AWS EC2 Container Service (ECS) is a managed container orchestration environment that while not as flexible as Kubernetes, it provides some great integration if you are already in an AWS environment, especially for hosting HTTP APIs. However, when just getting started on a project, setting up Application Load Balancers, CloudFront CDN, AutoScaling Groups etc can be a high entry point from a monthly cost and complexity standpoint. It also provides an alternative to 'serverless' solutions that avoid issues like cold starts as well as polluting any of your code with cloud provider specific implementation.
We've created a new npx add-in release-ecr-aws template to try and help solo developers and small teams that think they might use a more mature AWS ECS setup in the future, but don't have the budget or just want a cheap host for a prototype/demo. Once your product grows, integrating all the other AWS infrastructure is a smaller and clearer path than trying to do it from the very beginning, not knowing if you'll ever need it.
We're also going to leverage the powerful GitHub Actions platform so that the distance between your CI environment and code is as small as possible. The npx add-in release-ecr-aws template provides a starting point for your ServiceStack application to have a CI setup and deploy to a single server in ECS to keep costs down. This is good for prototyping an idea or any low request rate applications where you think you'll move into a more standard ECS infrastructure pattern as your application usage increases.
Hosting setup
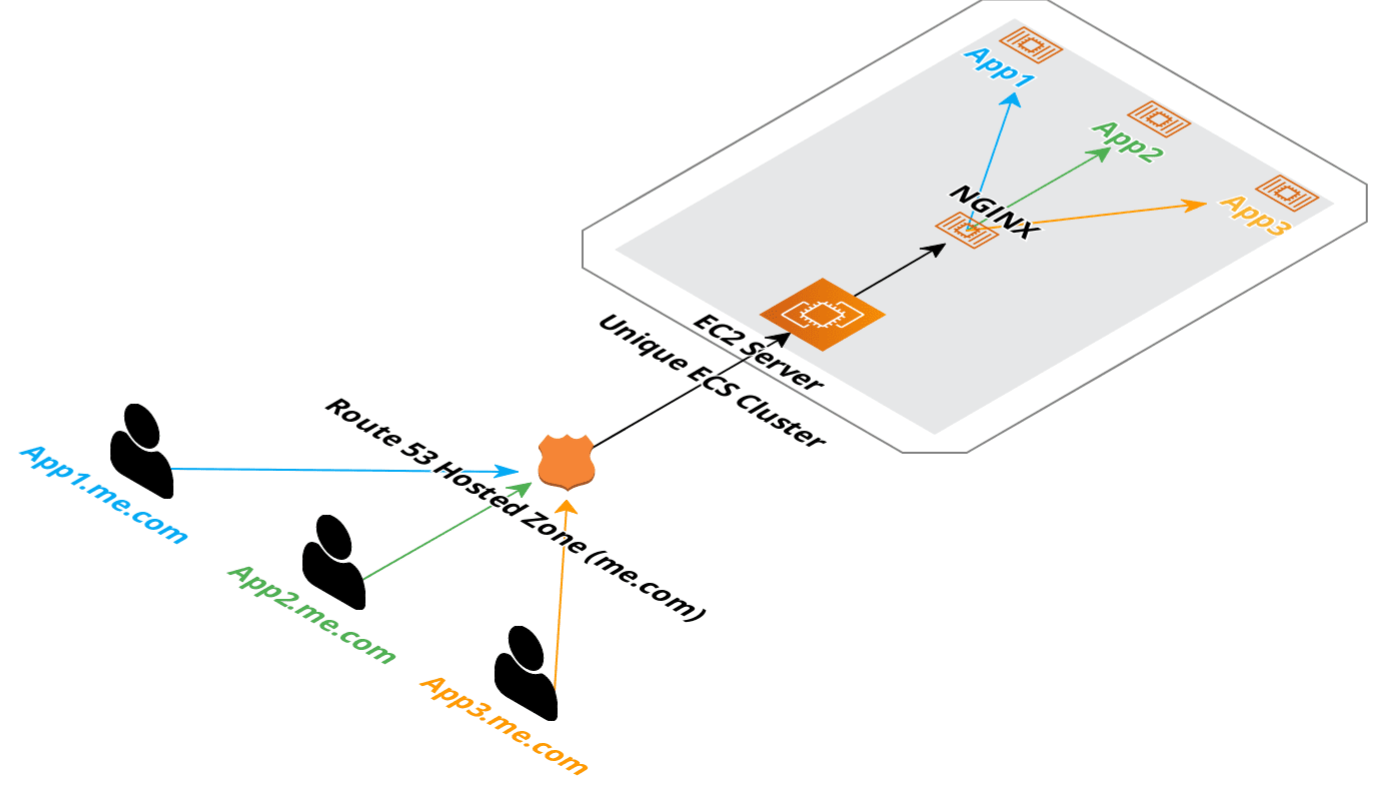
Since we are trying to keep costs at a minimal, just like our Digital Ocean hosting, we are using just 1 EC2 instance to (potentially) host multiple low traffic applications with minimal infrastructure. In this pattern we are using
- Route53 (DNS)
- 1 EC2 instance
- ECS (to manage our deployments)
- ECR (to stored our docker images)
The lion share of the costs will come from the single EC2 instance which you can match for size depending on how many applications you want to host on the 1 instance, a t3.micro is ~$8/month. ECR (docker repository) does cost money for storage at ~$0.10 per GB/month. $0.50 a month for a Route53 hosted zone. So while this is not quite as cheap as Digital Ocean setup we've shown, it is a stepping stone into using AWS ECS for a much larger horizontally scaling hosting setup without much change.
Keeping parts to our setup to a minimum, Route 53 points each subomain to the IP address of our EC2 instance, nginx-proxy routes traffic to each application running in docker.
Deployment setup
In the release-ecr-aws template we are using ecr for the storage of our Docker images and ECS for the deployment. Everything runes on GitHub Actions as provided by the template and your specific details are provided by GitHub Secrets (stored at the repository or organization level).
The GitHub Actions require an ECS cluster to be created with a single EC2 instance as member of that cluster. The rest of the AWS resources are created by the GitHub Action the first time it runs.
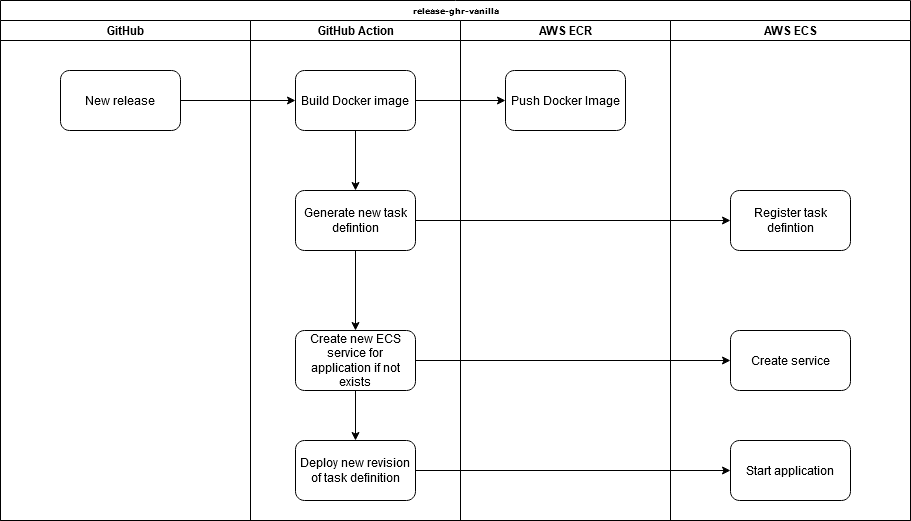
AWS ECS Agent that runs on the EC2 instance manages with ECS when to create/destroy containers. Since there is only 1 EC2 instance in the cluster, everything runs on the same instance.
Getting started
Now that we have the high level overview out of the way, lets get your apps running! For this tutorial, we'll start with a new ServiceStack application using x new and incorporate the GitHub Action templates to get our CI environment started.
First, create your new git repository on GitHub.
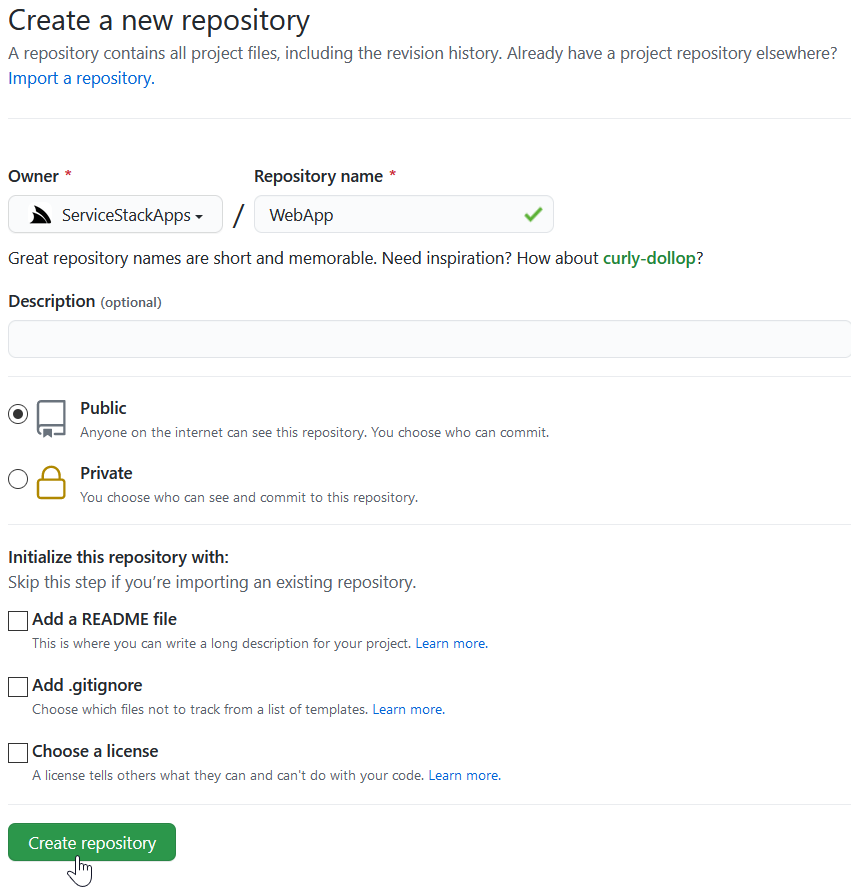
Once created, follow the GitHub wizard and clone it to your local machine.
Then you can use the following commands to get your new ServiceStack application setup in GitHub with GitHub Actions.
Choose the appropriate web template from
x newfor your needs as most templates are compatible GitHub Actionsx mixtemplates.npx create-net webwill create a project in an existing directory,npx create-net web WebAppwill create the project in a newWebAppfolder.
git clone <Git URL>
cd WebApp
npx create-net web
git add -A
git commit -m "Initial commit"
git branch -M main
git remote add origin <copy git URL from GitHub page>
git push -u origin main
npx add-in build release-ecr-aws
git add -A
git commit -m "Add GitHub Action files"
git push
AWS Setup
If you're use to setting up larger AWS infrastructure, you'll likely have experienced how costs can rise easily or seen complex infrastructure architected small for a web application doing 5 requests/sec with minimal users. These types of setups can be unnecessarily costly and complex and if you are a solo developer or small team (for which is pattern is more suited), is likely not suitable starting point. As your application infrastructure needs evolve, so can your cloud provider environment, this template provides a starting point with AWS ECS while keeping costs to a minimum.
As previously stated above, this template needs the following in AWS:
- A dedicated ECS cluster (not shared)
- Single EC2 server registered to that ECS cluster
- IAM User Credentials with
AmazonEC2ContainerRegistryFullAccessandAmazonECS_FullAccessfor use (exclusively) by GitHub Actions. - Route53 (or other DNS manager) with an A record pointing to the EC2 instance public IP
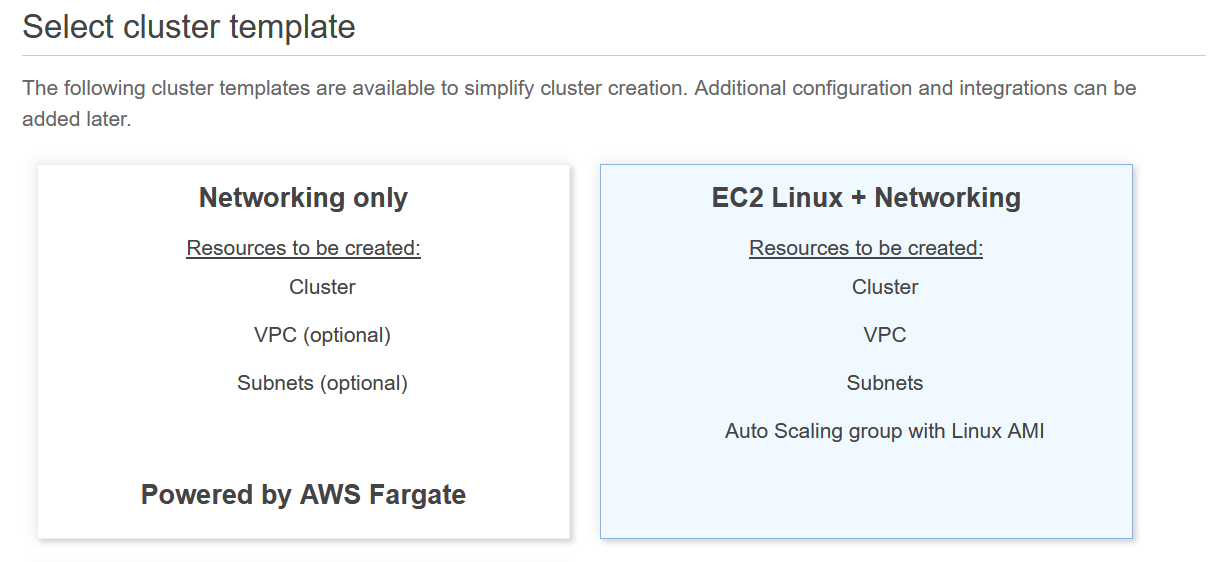
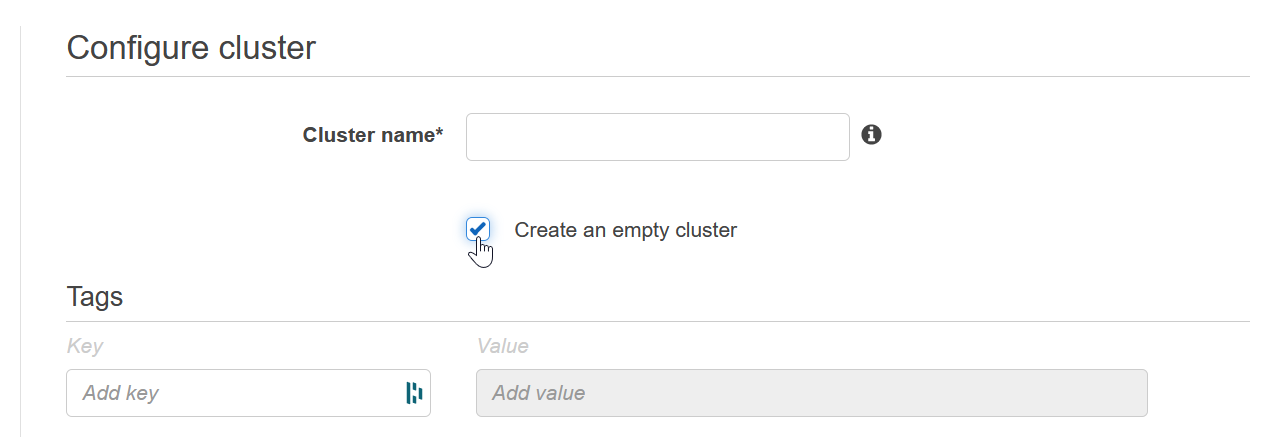
ECS Cluster
An empty ECS Cluster is needed as the GitHub Action process won't create this for you. You can choose to use the ECS Cluster wizard to create you an Auto-scaling Group, security groups, etc but the idea to start with is to just start with an empty ECS Cluster that an EC2 instance will join when we create it. This pattern doesn't scale horizontally with additional EC2 instances, but since it does use ECS, changing to use a load balancer and target groups can be introduced once they are needed.
If you know you need horizontal scaling, it would be suggested to jump straight to using Application Load Balancer with Target Groups to manage your cluster services routing with the additional costs that come with that. The base cost of an ALB is ~$20/month, costs also scales up with requests. See pricing details, the use of "LCU"s makes it highly dependent on your use case.
EC2 Instance Setup
Now we can create the EC2 instance, the goal being is that our EC2 instance will join our cluster and run docker + ECS agent to work with this setup.
Choose AMI
You need to use the AWS Optimized for ECS images, the easiest way to find the latest Amazon Linux 2 image for this is to go to the AWS documentation for ECS-optimized AMIs and look up your region here.
Using the AMI ID (starts with ami-) at the bottom, search in the 'Community AMIs' tab on the first step of the Launch EC2 Instance wizard.
Choose Instance Type
A t3.micro or larger will work fine, this pattern can be used to host multiple applications on the 1 server so if the number of applications gets larger, you might need a larger instance type.
INFO
this pattern is suitable for testing prototypes or low traffic applications as it is cost effective and makes it easy to bundle multiple apps onto 1 EC2 instance.
Configure Instance
Under IAM role, use the ecsInstanceRole, if this is not available, see AWS documentation for the process of checking if it exists and creating it if needed.
If you are not using your own generated Elastic IP, select Enabled for Auto-assign Public IP.
You will also want to add the following Userdata script (in the Configure step of the launch wizard) with your own ECS_CLUSTER value. This tells the ecs-agent running on the instance which ECS cluster the instance should join.
#!/bin/bash
cat <<EOS >/etc/ecs/ecs.config
ECS_CLUSTER=my-cluster
ECS_AVAILABLE_LOGGING_DRIVERS=["awslogs", "syslog"]
ECS_ENABLE_CONTAINER_METADATA=true
EOS
Note down your cluster name as it will need to be used to create the cluster in ECS before it is visible.
See ECS Container Agent Configuration for more information.
Add Storage
The default of 30gb is fine but take into account how large/how many applications you'll have running.
Configure Security Groups
You'll want to expose at least ports 80, 443 and 22 for remote SSH access. We'll need SSH access for the next step, once setup it can be closed off or restricted.
Setup Docker Compose and nginx-proxy
To route traffic to your ServiceStack applications and automate the generation and management of TLS certificates, an additional docker compose file is provided via the x mix template, nginx-proxy-compose.yml under the deploy directory of your repository. This docker-compose file is ready to run and can be copied to the deployment server.
INFO
This is done via docker compose rather than via ECS itself for simplicity as ECS is really not designed to make it easy to handle routing on the EC2 instance itself
First you'll need to install docker compose.
Run docker compose version to confirm.
INFO
Ensure you have v2+ of Docker Compose
A compatibility script can be used for docker-compose via the following script.
echo 'docker compose --compatibility "$@"' > /usr/local/bin/docker-compose
sudo chmod +x /bin/docker-compose
To copy you can use scp or create a new file via server text editor to copy the short YML file over. For this example, we are going to copy it straight to the ~/ (home) directory.
scp -i <path to private ssh key> ./nginx-proxy-compose.yml ec2-user@<server_floating_ip>:~/nginx-proxy.compose.yml
For example, once copied to remote ~/nginx-proxy-compose.yml, the following command can be run on the remote server.
docker compose -f ~/nginx-proxy-compose.yml up -d
This will run an nginx reverse proxy along with a companion container that will watch for additional containers in the same docker bridge network and attempt to initialize them with valid TLS certificates. This includes containers created and managed by the ECS agent.
INFO
If the container doesn't have the environment variable VIRTUAL_HOST set, it will be ignored. See the task-definition-template.json environment for more details
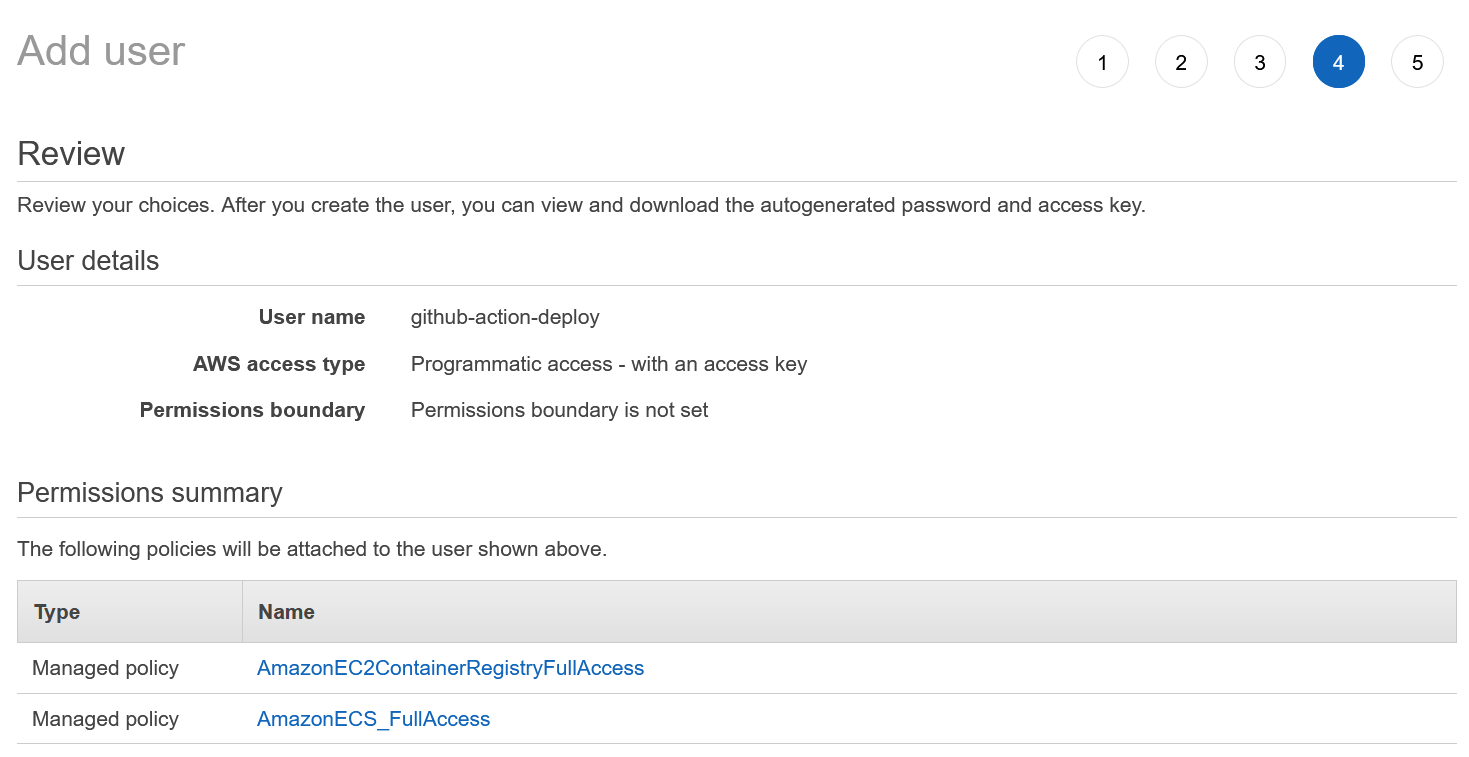
IAM Deploy User
For GitHub Actions to authenticate with AWS, you'll need a user with programmatic access and sufficient permissions to initialize the ECS + ECR resources. Once the initial deployment is complete, reduced access can be used for just uploading to ECR and promoting new releases to ECS. See the README in the Mix template for example of reduced access IAM policy for deployments.
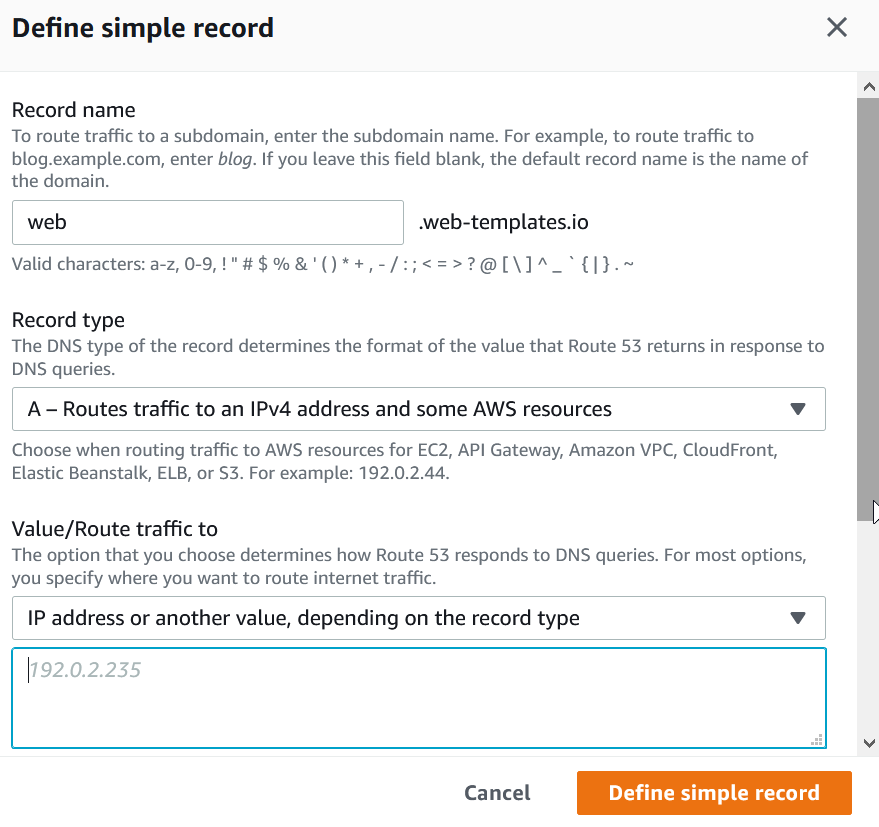
Route 53
To enough the nginx-proxy-lets-ecrypt-companion to work, a domain or subdomain DNS entry is needed to point to our EC2 host. You can use any DNS management tool, but in this example we will be using Route53.
Validate AWS Setup
Once completed the above steps, we can validate some of the setup by performing the following tests.
- Check our ECS cluster has 1 EC2 instance registered.
- Get a response from nginx for the application's subdomain.
If both these are showing up, our AWS environment should be ready to deploy the application.
Setup Repository Secrets
The GitHub Action templates added using npx add-in release-ecr-aws get their input from GitHub Secrets. These can be added to the repository or to your organization if there are common ones you are using in multiple repositories.
- AWS_ACCESS_KEY_ID - AWS access key for programmatic access to AWS APIs.
- AWS_SECRET_ACCESS_KEY - AWS access secrets for programmatic access to AWS APIs.
- AWS_REGION - default region for AWS API calls.
- AWS_ECS_CLUSTER - Cluster name in ECS, this should match the value in your Userdata.
- HOST_DOMAIN - Domain/sub-domain of your application, eg
my-app.example.com. - LETSENCRYPT_EMAIL - Email address, required for Let's Encrypt automated TLS certificates.
These secrets can use the GitHub CLI for ease of creation. Eg, using the GitHub CLI the following can be set.
gh secret set AWS_ACCESS_KEY_ID -b"<AWS_ACCESS_KEY_ID>"
gh secret set AWS_SECRET_ACCESS_KEY -b"<AWS_SECRET_ACCESS_KEY>"
gh secret set AWS_REGION -b"<AWS_REGION, eg us-east-1>"
gh secret set AWS_ECS_CLUSTER -b"<AWS_ECS_CLUSTER, eg my-apps>"
gh secret set HOST_DOMAIN -b"<HOST_DOMAIN, eg my-app.example.com>"
gh secret set LETSENCRYPT_EMAIL -b"<LETSENCRYPT_EMAIL, eg me@example.com>"
These secrets are used to populate variables within GitHub Actions and other configuration files.
For the AWS access, a separate user specifically for deploying via GitHub Actions should be used.
The GitHub Action template in .github/workflows/release.yml is there as a starting point and should be edited as required. The idea is that you can evolve and change these to your needs as your application grows.
Deploying your application
To start any new deployment, we use GitHub Releases.
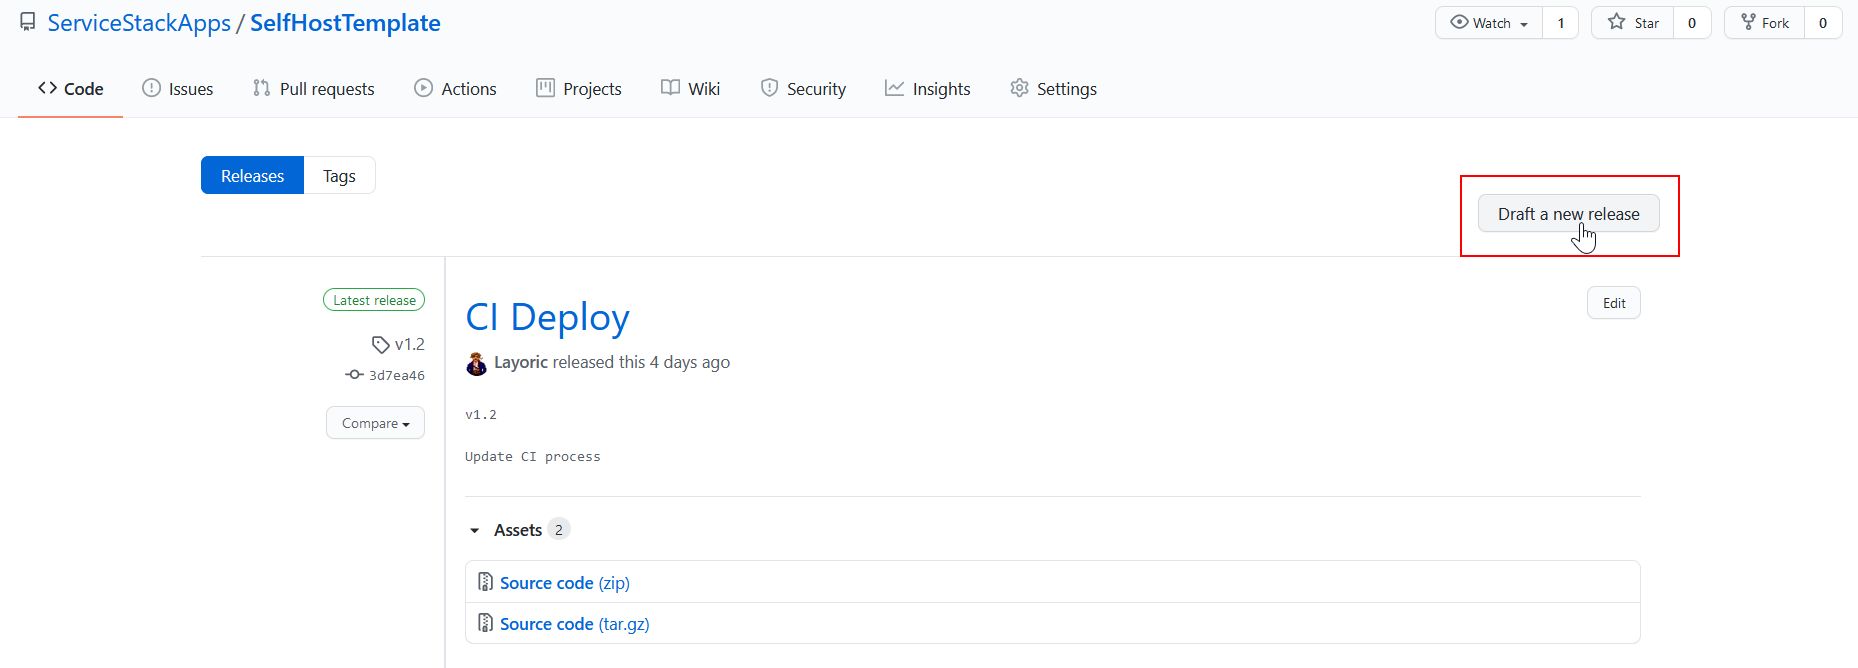
Provide a version number and name, the version will be used to tag the Docker image in ECR. If you are using the GitHub CLI, you can also do this via the command line. For example,
gh release create v1.0 -t "CI Deploy" --notes ""
Go to the Actions tab in your repository to see the progress of your deployment.

The initial deployment might take up to a minute for Lets-Encrypt to generate and use the certificate with your domain. Make sure your DNS is all setup before doing this, otherwise further delays related to DNS TTL will likely occur. If you are having problems with your app hosting, be sure to configure the logs in the nginx and your app docker containers for any startup issues. You can also run in attached mode to watch the output of these containers via docker compose -f ~/nginx-proxy-compose.yml up. Logs for your application are automatically setup to use CloudWatch under the name {your-ecs-cluster-name}-{your-app-name}.
Wrapping up
Like our other GitHub Action templates, making it easier to have an automated CI environment setup and running from the beginning pays off very quickly. If you're confident you are going to be using ECS in the future or already have AWS as your cloud provider, using this template will help you get started cheaply whilst enabling you to expand and adjust your automated CI strategies as your needs evolve.
Using ECS with a single EC2 instance is not a common pattern you'll see on AWS sales pitches or 'How to scale' guides. However, it does allow you to test your ideas, share your prototypes cheaply with friends and colleagues. Not everything has to be 'web scale' and starting from that point can be distracting and intimidating, not to mention expensive. Hopefully this pattern helps you build something small, test out your theories quickly while giving you a good base to build on as your application grows.
We intend to put together more of these templates and patterns for different use cases utilizing GitHub Actions, feel free to give us feedback and let us know what you'd like to see!