
The ServiceStackApps/AwsGettingStarted repository contains Visual Studio solutions for getting started with AWS and ServiceStack libraries, as well as step by step guides to get you started below.
Amazon RDS
Amazon ElastiCache
Getting Started with AWS RDS PostgreSQL and OrmLite

ServiceStack.OrmLite library has support for use with a PostgreSQL database via the ServiceStack.OrmLite.PostgreSQL NuGet package. This can be used in conjunction with Amazon's RDS service using PostgreSQL.
To get started, first you will need to create your PostgreSQL database via the AWS RDS service.
Creating a PostgreSQL RDS Instance
- Login to the AWS Web console.
- Select RDS from the Services from the top menu.
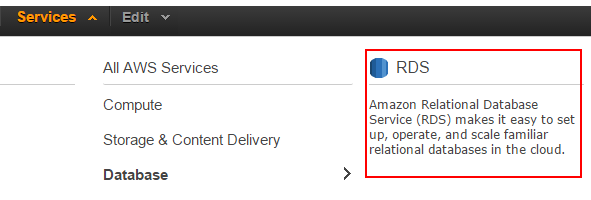
- Select Instances from the RDS Dashboard and click Launch DB Instance.

The above steps will start the RDS Wizard to launch a new DB instance. To setup a new PostgreSQL instance, follow the wizard selecting the appropriate options for your application. As an example, we can create a Customers database for a non-production environment.
- Select Engine - Select PostgreSQL
- Production? - Select
Nofor multi-instance/production setup - Specify DB Details
- Create a
db.t2.microinstance with default settings - Specify Multi-AZ Deployment as
No
- Create a
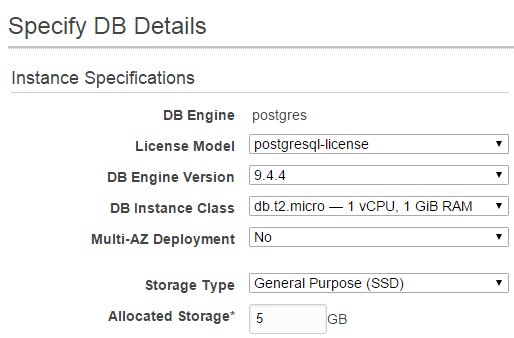
Specify DB Instance Identifier, eg
servicestack-example-customers.Specify Master Username, eg
postgres.Create and confirm master user password.
Configure Advanced Settings - Leave the suggested settings and specify a database name, eg
customers. This will be used in your connection string.
INFO
Problems can occur if your default VPC is not setup to DNS Resolution and/or DNS Hostname. Navigate to Services, VPC and enable these two options on your default VPC
Click Launch DB Instance at the bottom right to launch your new instance. If all is successful, you should see the following.

Connecting with ServiceStack.OrmLite
Now that you're PostgreSQL instance is running, connecting with OrmLite will require the ServiceStack.OrmLite.PostgreSQL NuGet package as well as connection string to your new PostgreSQL instance.
<appSettings>
    <add key="ConnectionString" value="User ID={User};Password={Password};Host={Host};Port={Port};" />
</appSettings>
<PackageReference Include="ServiceStack.OrmLite.PostgreSQL" Version="10.*" />
Once this dependency is installed, the OrmLiteConnectionFactory can be used with the PostgreSqlDialect.Provider can be configured in the AppHost Configure method. For example.
public class AppHost : AppSelfHostBase
{
    public AppHost() : base("AWS PostgreSQL Customers", typeof(AppHost).Assembly) {}

    public override void Configure(Container container)
    {
        container.Register<IDbConnectionFactory>(c => new OrmLiteConnectionFactory(
            AppSettings.GetString("ConnectionString"), PostgreSqlDialect.Provider));

        using (var db = container.Resolve<IDbConnectionFactory>().Open())
        {
            if (db.CreateTableIfNotExists<Customer>())
            {
                //Add seed data
            }
        }
    }
}
Using our connection from a ServiceStack Service, we can use the Db property to access our Customer table. Eg, Below is an example of a CRUD service using OrmLite.
public class CustomerService : Service
{
    public object Get(GetCustomers request)
    {
        return new GetCustomersResponse { Results = Db.Select<Customer>() };
    }

    public object Get(GetCustomer request)
    {
        return Db.SingleById<Customer>(request.Id);
    }

    public object Post(CreateCustomer request)
    {
        var customer = new Customer { Name = request.Name };
        Db.Save(customer);
        return customer;
    }

    public object Put(UpdateCustomer request)
    {
        var customer = Db.SingleById<Customer>(request.Id);
        if (customer == null)
            throw HttpError.NotFound("Customer '{0}' does not exist".Fmt(request.Id));

        customer.Name = request.Name;
        Db.Update(customer);

        return customer;
    }

    public void Delete(DeleteCustomer request)
    {
        Db.DeleteById<Customer>(request.Id);
    }
}
See the OrmLite GitHub page for more info on working with OrmLite API.
Getting Started with AWS RDS Aurora and OrmLite

ServiceStack.OrmLite library has support for use with an Aurora database via the ServiceStack.OrmLite.MySql NuGet package. This can be used in conjunction with Amazon's RDS service using Aurora.
To get started, first you will need to create your Aurora database via the AWS RDS service.
Creating an Aurora Instance
- Login to the AWS Web console.
- Select RDS from the Services from the top menu.
- Select Instances from the RDS Dashboard and click Launch DB Instance.
The above steps will start the RDS Wizard to launch a new DB instance. To setup a new Aurora instance, follow the wizard selecting the appropriate options for your application. As an example, we can create a Customers database for a non-production environment.
- Select Engine - Select Amazon Aurora
- Specify DB Details
- Create a
db.r3.largeinstance with default settings - Specify Multi-AZ Deployment as
No
- Create a
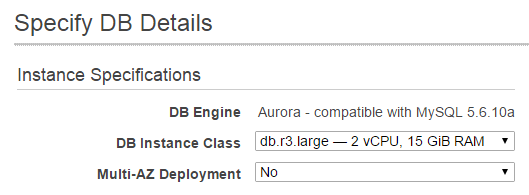
Specify DB Instance Identifier, eg
servicestack-example-customers.Specify Master Username, eg
admin.Create and confirm master user password.
Configure Advanced Settings - Leave the suggested settings and specify a Database Name, eg
customers. This will be used in your connection string.
INFO
Problems can occur if your default VPC is not setup to DNS Resolution and/or DNS Hostname. Navigate to Services, VPC and enable these two options on your default VPC. Default settings are to create a new VPC security group that will allow remote access to your DB instance based on your IP address. If your IP address changes, you will lose remote access and this security group will need to be updated
Click Launch DB Instance at the bottom right to launch your new instance. If all is successful, you should see the following.
Connecting with ServiceStack.OrmLite
Now that you're Aurora instance is running, connecting with OrmLite will require the ServiceStack.OrmLite.MySql NuGet package as well as connection string to your new Aurora instance.
<appSettings>
    <add key="ConnectionString" value="Uid={User};Password={Password};Server={EndpointUrl};Port={EndpointPort};Database=customers" />
</appSettings>
<PackageReference Include="ServiceStack.OrmLite.MySql" Version="10.*" />
Once this dependency is installed, the OrmLiteConnectionFactory can be used with the MySqlDialect.Provider can be configured in the AppHost Configure method. For example.
public class AppHost : AppSelfHostBase
{
    public AppHost() : base("AWS Aurora Customers", typeof(AppHost).Assembly) {}

    public override void Configure(Container container)
    {
        container.Register<IDbConnectionFactory>(c => new OrmLiteConnectionFactory(
            AppSettings.GetString("ConnectionString"), MySqlDialect.Provider));

        using (var db = container.Resolve<IDbConnectionFactory>().Open())
        {
            if (db.CreateTableIfNotExists<Customer>())
            {
                //Add seed data
            }
        }
    }
}
Using our connection from a ServiceStack Service, we can use the Db property to access our Customer table. Eg, Below is an example of a CRUD service using OrmLite.
public class CustomerService : Service
{
    public object Get(GetCustomers request)
    {
        return new GetCustomersResponse { Results = Db.Select<Customer>() };
    }

    public object Get(GetCustomer request)
    {
        return Db.SingleById<Customer>(request.Id);
    }

    public object Post(CreateCustomer request)
    {
        var customer = new Customer { Name = request.Name };
        Db.Save(customer);
        return customer;
    }

    public object Put(UpdateCustomer request)
    {
        var customer = Db.SingleById<Customer>(request.Id);
        if (customer == null)
            throw HttpError.NotFound("Customer '{0}' does not exist".Fmt(request.Id));

        customer.Name = request.Name;
        Db.Update(customer);

        return customer;
    }

    public void Delete(DeleteCustomer request)
    {
        Db.DeleteById<Customer>(request.Id);
    }
}
See the OrmLite GitHub page for more info on working with OrmLite API.
Getting Started with AWS RDS MySQL and OrmLite

ServiceStack.OrmLite library has support for use with a MySQL database via the ServiceStack.OrmLite.MySql NuGet package. This can be used in conjunction with Amazon's RDS service using MySQL.
To get started, first you will need to create your MySQL database via the AWS RDS service.
Creating a MySQL RDS Instance
- Login to the AWS Web console.
- Select RDS from the Services from the top menu.
- Select Instances from the RDS Dashboard and click Launch DB Instance.
The above steps will start the RDS Wizard to launch a new DB instance. To setup a new MySQL instance, follow the wizard selecting the appropriate options for your application. As an example, we can create a Customers database for a non-production environment.
- Select Engine - Select MySQL
- Production? - Select
Nofor multi-instance/production setup - Specify DB Details
- Create a
db.t2.microinstance with default settings - Specify Multi-AZ Deployment as
No
- Create a
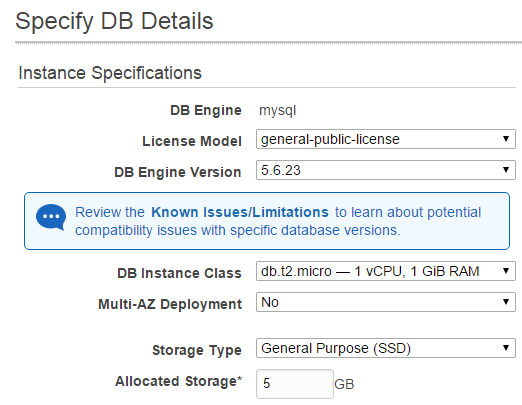
Specify DB Instance Identifier, eg
servicestack-example-customers.Specify Master Username, eg
admin.Create and confirm master user password.
Configure Advanced Settings - Leave the suggested settings and specify a database name, eg
customers. This will be used in your connection string.
INFO
Problems can occur if your default VPC is not setup to DNS Resolution and/or DNS Hostname. Navigate to Services, VPC and enable these two options on your default VPC
Click Launch DB Instance at the bottom right to launch your new instance. If all is successful, you should see the following.
Connecting with ServiceStack.OrmLite
Now that you're MySQL instance is running, connecting with OrmLite will require the ServiceStack.OrmLite.MySql NuGet package as well as connection string to your new MySQL instance.
<appSettings>
    <add key="ConnectionString" value="Uid={User};Password={Password};Server={EndpointUrl};Port={EndpointPort};Database=customers" />
</appSettings>
<PackageReference Include="ServiceStack.OrmLite.MySql" Version="10.*" />
Once this dependency is installed, the OrmLiteConnectionFactory can be used with the MySqlDialect.Provider can be configured in the AppHost Configure method. For example.
public class AppHost : AppSelfHostBase
{
    public AppHost() : base("AWS MySql Customers", typeof(AppHost).Assembly) {}

    public override void Configure(Container container)
    {
        container.Register<IDbConnectionFactory>(c => new OrmLiteConnectionFactory(
            AppSettings.GetString("ConnectionString"), MySqlDialect.Provider));

        using (var db = container.Resolve<IDbConnectionFactory>().Open())
        {
            if (db.CreateTableIfNotExists<Customer>())
            {
                //Add seed data
            }
        }
    }
}
Using our connection from a ServiceStack Service, we can use the Db property to access our Customer table. Eg, Below is an example of a CRUD service using OrmLite.
public class CustomerService : Service
{
    public object Get(GetCustomers request)
    {
        return new GetCustomersResponse { Results = Db.Select<Customer>() };
    }

    public object Get(GetCustomer request)
    {
        return Db.SingleById<Customer>(request.Id);
    }

    public object Post(CreateCustomer request)
    {
        var customer = new Customer { Name = request.Name };
        Db.Save(customer);
        return customer;
    }

    public object Put(UpdateCustomer request)
    {
        var customer = Db.SingleById<Customer>(request.Id);
        if (customer == null)
            throw HttpError.NotFound("Customer '{0}' does not exist".Fmt(request.Id));

        customer.Name = request.Name;
        Db.Update(customer);

        return customer;
    }

    public void Delete(DeleteCustomer request)
    {
        Db.DeleteById<Customer>(request.Id);
    }
}
See the OrmLite GitHub page for more info on working with OrmLite API.
Getting Started with AWS RDS MariaDB and OrmLite

ServiceStack.OrmLite library has support for use with a MariaDB database via the ServiceStack.OrmLite.MySql NuGet package. This can be used in conjunction with Amazon's RDS service using MariaDB.
INFO
MariaDB is a "binary drop in replacement for MySQL" which is why the ServiceStack.OrmLite.MySql NuGet package can be used. For more information, see the MariaDB documentation
To get started, first you will need to create your MariaDB database via the AWS RDS service.
Creating a MariaDB RDS Instance
- Login to the AWS Web console.
- Select RDS from the Services from the top menu.
- Select Instances from the RDS Dashboard and click Launch DB Instance.
The above steps will start the RDS Wizard to launch a new DB instance. To setup a new MariaDB instance, follow the wizard selecting the appropriate options for your application. As an example, we can create a Customers database for a non-production environment.
- Select Engine - Select MariaDB
- Production? - Select
Nofor multi-instance/production setup - Specify DB Details
- Create a
db.t2.microinstance with default settings - Specify Multi-AZ Deployment as
No
- Create a
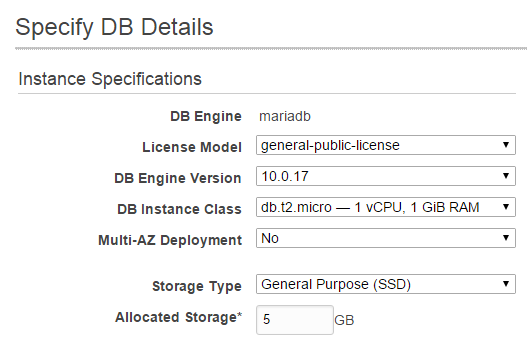
Specify DB Instance Identifier, eg
servicestack-example-customers.Specify Master Username, eg
admin.Create and confirm master user password.
Configure Advanced Settings - Leave the suggested settings and specify a database name, eg
customers. This will be used in your connection string.
INFO
Problems can occur if your default VPC is not setup to DNS Resolution and/or DNS Hostname. Navigate to Services, VPC and enable these two options on your default VPC
Click Launch DB Instance at the bottom right to launch your new instance. If all is successful, you should see the following.
Connecting with ServiceStack.OrmLite
Now that you're MariaDB instance is running, connecting with OrmLite will require the ServiceStack.OrmLite.MySql NuGet package as well as connection string to your new MariaDB instance.
<appSettings>
    <add key="ConnectionString" value="Uid={User};Password={Password};Server={EndpointUrl};Port={EndpointPort};Database=customers" />
</appSettings>
<PackageReference Include="ServiceStack.OrmLite.MySql" Version="10.*" />
Once this dependency is installed, the OrmLiteConnectionFactory can be used with the MySqlDialect.Provider can be configured in the AppHost Configure method. For example.
public class AppHost : AppSelfHostBase
{
    public AppHost() : base("AWS MariaDB Customers", typeof(AppHost).Assembly) {}

    public override void Configure(Container container)
    {
        container.Register<IDbConnectionFactory>(c => new OrmLiteConnectionFactory(
            AppSettings.GetString("ConnectionString"), MySqlDialect.Provider));

        using (var db = container.Resolve<IDbConnectionFactory>().Open())
        {
            if (db.CreateTableIfNotExists<Customer>())
            {
                //Add seed data
            }
        }
    }
}
Using our connection from a ServiceStack Service, we can use the Db property to access our Customer table. Eg, Below is an example of a CRUD service using OrmLite.
public class CustomerService : Service
{
    public object Get(GetCustomers request)
    {
        return new GetCustomersResponse { Results = Db.Select<Customer>() };
    }

    public object Get(GetCustomer request)
    {
        return Db.SingleById<Customer>(request.Id);
    }

    public object Post(CreateCustomer request)
    {
        var customer = new Customer { Name = request.Name };
        Db.Save(customer);
        return customer;
    }

    public object Put(UpdateCustomer request)
    {
        var customer = Db.SingleById<Customer>(request.Id);
        if (customer == null)
            throw HttpError.NotFound("Customer '{0}' does not exist".Fmt(request.Id));

        customer.Name = request.Name;
        Db.Update(customer);

        return customer;
    }

    public void Delete(DeleteCustomer request)
    {
        Db.DeleteById<Customer>(request.Id);
    }
}
See the OrmLite GitHub page for more info on working with OrmLite API.
Getting Started with AWS RDS SQL Server and OrmLite

ServiceStack.OrmLite library has support for use with a Microsoft SQL Server database via the ServiceStack.OrmLite.SqlServer NuGet package. This can be used in conjunction with Amazon's RDS service using SQL Server.
To get started, first you will need to create your SQL Server database via the AWS RDS service.
Creating a SQL Server RDS Instance
- Login to the AWS Web console.
- Select RDS from the Services from the top menu.
- Select Instances from the RDS Dashboard and click Launch DB Instance.
The above steps will start the RDS Wizard to launch a new DB instance. To setup a new SQL Server instance, follow the wizard selecting the appropriate options for your application. As an example, we can create a Customers database for a non-production environment.
- Select Engine
- Select SQL Server
- Select appropriate SQL Server version, for this example, SQL Server SE
- Specify DB Details
- Select License Model
license-included - Create a
db.m1.smallinstance with default settings by changing the DB Instance Class.
- Select License Model

Specify DB Instance Identifier, eg
customers.Specify Master Username, eg
admin.Create and confirm master user password.
Configure Advanced Settings - Leave the suggested settings which will create your RDS instance with network rule that restricts public access via your current public IP address.
INFO
Problems can occur if your default VPC is not setup to DNS Resolution and/or DNS Hostname. Navigate to Services, VPC and enable these two options on your default VPC
Click Launch DB Instance at the bottom right to launch your new instance. If all is successful, you should see the following.
Connecting with ServiceStack.OrmLite
Now that you're SQL Server instance is running, connecting with OrmLite will require the ServiceStack.OrmLite.SqlServer NuGet package as well as connection string to your new SQL Server instance.
INFO
If you are connecting to a new instance without a database, you'll need to create a new Database via SQL Management Studio first. For this example the customers database was created
<appSettings>
    <add key="ConnectionString" value="Data Source={Endpoint},{Port};Initial Catalog=customers;User ID={User};Password={Password}" />
</appSettings>
<PackageReference Include="ServiceStack.SqlServer" Version="10.*" />
Once this dependency is installed, the OrmLiteConnectionFactory can be used with the SqlServerDialect.Provider can be configured in the AppHost Configure method. For example.
public class AppHost : AppSelfHostBase
{
    public AppHost() : base("AWS SQL Server Customers", typeof(AppHost).Assembly) {}

    public override void Configure(Container container)
    {
        container.Register<IDbConnectionFactory>(c => new OrmLiteConnectionFactory(
            AppSettings.GetString("ConnectionString"), SqlServerDialect.Provider));

        using (var db = container.Resolve<IDbConnectionFactory>().Open())
        {
            if (db.CreateTableIfNotExists<Customer>())
            {
                //Add seed data
            }
        }
    }
}
Using our connection from a ServiceStack Service, we can use the Db property to access our Customer table. Eg, Below is an example of a CRUD service using OrmLite.
public class CustomerService : Service
{
    public object Get(GetCustomers request)
    {
        return new GetCustomersResponse { Results = Db.Select<Customer>() };
    }

    public object Get(GetCustomer request)
    {
        return Db.SingleById<Customer>(request.Id);
    }

    public object Post(CreateCustomer request)
    {
        var customer = new Customer { Name = request.Name };
        Db.Save(customer);
        return customer;
    }

    public object Put(UpdateCustomer request)
    {
        var customer = Db.SingleById<Customer>(request.Id);
        if (customer == null)
            throw HttpError.NotFound("Customer '{0}' does not exist".Fmt(request.Id));

        customer.Name = request.Name;
        Db.Update(customer);

        return customer;
    }

    public void Delete(DeleteCustomer request)
    {
        Db.DeleteById<Customer>(request.Id);
    }
}
See the OrmLite GitHub page for more info on working with OrmLite API.
Getting started with AWS ElastiCache Redis and ServiceStack

Amazon's 'ElastiCache' allows a simple way to create and manage cache instances that can be simply incorporated into your ServiceStack application stack using the ServiceStack Redis client, ServiceStack.Redis.
Creating an ElastiCache Cluster
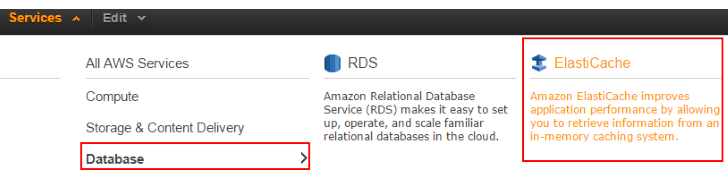
- Login to the AWS Web console.
- Select ElastiCache from the Services from the top menu.
- Select Get Started Now or ElasticCache Dashboard and Launch Cache Cluster
- Select Redis for the cluster engine.
You can run your cache as a single Redis node or add multiple nodes for additional redundency. In this example, we will be using 3 nodes. One as a primary (or master) node and 2 read only replicas (or slaves).

INFO
To use the smaller instances like the cache.t2.micro, Multi-AZ must be disabled
So you're EC2 instance can access your Redis nodes, ensure you select a VPC Security Group that exposes the default port 6379.

INFO
If you haven't already setup a security group exposing this port, you'll need to create one by managing your VPC security groups
To finish, reviewed your settings and click Launch Replication Group.
Enable Caching with ServiceStack.Redis
Now you're your Redis nodes are ready, your AppHost can be configured to use them when deployed. AWS does not allow external access to ElastiCache servers, so they can only be used when your ServiceStack application is deployed.
First, you'll need to install ServiceStack.Redis NuGet package if your application doesn't already use it.
<PackageReference Include="ServiceStack.Redis" Version="10.*" />
In this example, we are going to use a PooledRedisClientManager for our IRedisClientsManager. This will be responsible for creating ICacheClients that our Services will use to connect to the ElastiCache nodes. We will need to provide our PooledRedisClientManager with the nodes we have create. For example, as shown above, we created a cluster of 1 Primary (master) and 2 Read Replicas (slaves), these endpoint URLs can be accessed from the ElastiCache Dashboard.

Below is a simple example of a configured self hosting AppHost that uses ElastiCache for caching when deployed and an in memory caching when developing locally.
public class AppHost : AppSelfHostBase
{
    public AppHost() : base("AWS Redis ElastiCache Example", typeof(MyServices).Assembly) { }

    public override void Configure(Container container)
    {
		//Your DB initialization
		...

        // AWS ElastiCache servers are NOT accessible from outside AWS
        // Use MemoryCacheClient locally
        if (AppSettings.GetString("Environment") == "Production")
        {
            container.Register<IRedisClientsManager>(c =>
                new PooledRedisClientManager(
                    // Primary node from AWS (master)
                    AwsElastiCacheConfig.MasterNodes,
                    // Read replica nodes from AWS (slaves)
                    AwsElastiCacheConfig.SlaveNodes));

            container.Register<ICacheClient>(c =>
                container.Resolve<IRedisClientsManager>().GetCacheClient());
        }
        else
        {
            container.Register<ICacheClient>(new MemoryCacheClient());
        }
    }
}
With configuration provided in your application config.
<appSettings>
  <add key="Environment" value="Production"/>
  <add key="MasterNodes" value="{YourAWSPrimaryNodeAddress}"/>
  <add key="SlaveNodes" value="{Your1stAWSReadReplicaNodeAddress},{AWSReadReplicaNodeAddress}"/>
</appSettings>
Now that your caching is setup and connecting, you can cache your web servie responses easily by returning Request.ToOptimizedResultUsingCache from within a ServiceStack Service. For example, returning a full customers details might be an expensive database query. We can cache the result in the ElastiCache cluster for a faster response and invalidate the cache when the details are updated.
public class CustomerService : Service
{
    private static string CacheKey = "customer_details_{0}";

    public object Get(GetCustomer request)
    {
        return this.Request.ToOptimizedResultUsingCache(this.Cache,
            CacheKey.Fmt(request.Id), () => {
                Thread.Sleep(500); //Long request
                return new GetCustomerResponse
                {
                    Result = this.Db.LoadSingleById<Customer>(request.Id)
                };
            });
    }

    public object Put(UpdateCustomer request)
    {
        var customer = this.Db.LoadSingleById<Customer>(request.Id);
        customer = customer.PopulateWith(request.ConvertTo<Customer>());
        this.Db.Update(customer);
        //Invalidate customer details cache
        this.Cache.ClearCaches(CacheKey.Fmt(request.Id));
        return new UpdateCustomerResponse()
        {
            Result = customer
        };
    }
}
INFO
As this example uses the Cache property from the Service in a distributed cache environment, Cache.Get<T> values are coming from the read replica (slave) instances which will take time to replicate from a previous Cache.Set<T> call. To gaurantee a value is immediately available, reusing the same instance can be done by handling the creating from the IRedisClientsManager from within your Service method
using var cache = this.RedisClientManager.GetClient();
//Your Cache Client code
Getting started with AWS ElastiCache and ServiceStack
Memcached

Amazon's 'ElastiCache' allows a simple way to create and manage Memcached instances that can be simply incorporated into your ServiceStack application stack using the ServiceStack NuGet package, ServiceStack.Caching.Memcached.
Creating an ElastiCache Cluster
- Login to the AWS Web console.
- Select ElastiCache from the Services from the top menu.
- Select Get Started Now or ElasticCache Dashboard and Launch Cache Cluster
- Select Memcached for the cluster engine.
ElastiCache setup allows you to specify how many nodes you want in your cache cluster. In this example, we will be using 3.

So you're EC2 instance can access your Memcached cluster, ensure you select a VPC Security Group that exposes the default port 11211.

INFO
If you haven't already setup a security group exposing this port, you'll need to create one by managing your VPC security groups
To finish, reviewed your settings and click Launch Cache Cluster.
Enable Caching in your ServiceStack application
Now you're your Memcached cluster is ready, your AppHost can be configured to use it when deployed. AWS does not allow external access to ElastiCache servers, so they can only be used when your ServiceStack application is deployed.
First, you'll need to install ServiceStack.Caching.Memcached:
<PackageReference Include="ServiceStack.Caching.Memcached" Version="10.*" />
To access the Memcached nodes from your Services, you will need to register a MemcachedClientCache as a ICacheClient with the IoC container. This client has to initialized with each of the node endpoints provided by AWS. From the ElastiCache Dashboard, click on the nodes on your cluster to see the node endpoint URLs.

This will show all the nodes in the cluster. For example.

Below is a simple example of a configured self hosting AppHost that uses ElastiCache for caching when deployed and an in memory caching when developing locally.
public class AppHost : AppSelfHostBase
{
    public AppHost() : base("AWS Memcached ElastiCache Example", typeof(MyServices).Assembly) {}

    public override void Configure(Container container)
    {
        //Your DB initialization
		...

        // AWS ElastiCache servers are NOT accessible from outside AWS
        // Use MemoryCacheClient locally
        if (AppSettings.GetString("Environment") == "Production")
        {
            container.Register<ICacheClient>(c => new MemcachedClientCache(
                AwsElastiCacheConfig.MemcachedNodes));
        }
        else
        {
            container.Register<ICacheClient>(new MemoryCacheClient());
        }
    }
}
With configuration provided in your application config.
<appSettings>
  <add key="Environment" value="Production"/>
  <add key="MemcachedNodes" value="{MemcachedNodeAddress1},{MemcachedNodeAddress2}"/>
</appSettings>
Now that your caching is setup and connecting, you can cache your web service responses easily by returning Request.ToOptimizedResultUsingCache from within a ServiceStack Service. For example, returning a full customers details might be an expensive database query. We can cache the result in the ElastiCache cluster for a faster response and invalidate the cache when the details are updated.
public class CustomerService : Service
{
    private static string CacheKey = "customer_details_{0}";

    public object Get(GetCustomer request)
    {
        return this.Request.ToOptimizedResultUsingCache(this.Cache,
            CacheKey.Fmt(request.Id),
            () =>
            {
                Thread.Sleep(500); //Long request
                return new GetCustomerResponse
                {
                    Result = this.Db.LoadSingleById<Customer>(request.Id)
                };
            });
    }

    public object Put(UpdateCustomer request)
    {
        var customer = this.Db.LoadSingleById<Customer>(request.Id);
        customer = customer.PopulateWith(request.ConvertTo<Customer>());
        this.Db.Update(customer);
        //Invalidate customer details cache
        this.Cache.ClearCaches(CacheKey.Fmt(request.Id));
        return new UpdateCustomerResponse()
        {
            Result = customer
        };
    }
}