GitHub Actions are a great tool for automating builds, tests and deployments in a composable and flexible way. The ServiceStack x tool provides mix templates to incorporate into your existing applications and repositories that can speed up different types of workflows.
We've created a mix template for building and deploying your ServiceStack app with GitHub Actions, GitHub Container Repository and Docker Compose all via SSH for a minimalist server hosting setup.
Specifically, we'll be using npx add-in build release-ghr-vanilla which has GitHub actions configured ready to deploy your ServiceStack application when a new GitHub release is created. This can be run at the root of your local repository folder, for example if you wanted to create an empty web application you would run:
git clone git@github.com:<your user or org>/DropletApp.git
cd DropletApp
npx create-net web
npx add-in build release-ghr-vanilla
# 'y' to process with writing files from x mix.
git add -A
git commit -m "New ServiceStack project"
git push
Pushing your new application to GitHub, the build.yml will run a dotnet build and dotnet test within the CI environment. For deployments, we want to get a server setup for hosting the new application.
INFO
npx add-in release-* are designed to be used with ServiceStack applications that were created with most x new project templates that follow the ServiceStack recommended project structure. They are designed to be a starting point that you can edit once created to suit your needs.
Digital Ocean Droplets Host
In this tutorial, we'll be using a Digital Ocean Droplet as the target server and walk through the steps required to setup this automated deployment process for your ServiceStack application.
Droplet Setup
Since we are deploying a simple ServiceStack application, we are going to use the cheapest Basic Droplet at $5USD/month. This is plenty to host even multiple low traffic ServiceStack applications but your use case might have different hardware requirements.
Create your new droplet
The basic droplet we are going to create will have the following configuration.
- Distribution - Ubuntu 20.04 LTS
- Plan - Basic
- $5/month
- Datacenter region - Which ever suits your use case
- VPC - default
- Authentication - SSH keys, create a new one just for this server, follow the instructions on the right hand panel.
The rest of the options, leave as default.
Create your new SSH key
If you ended up using an existing SSH key, now would be the time to create one specifically for deploying applications to this server, and only that function.
The reason this is important because we will be using the private key within our GitHub Actions, which means the private key generated will be leaving your local computer and stored within GitHub Secrets. In the event that this key is compromised, we want to limit its use.
Digital Ocean has some excellent documentation for this process here.
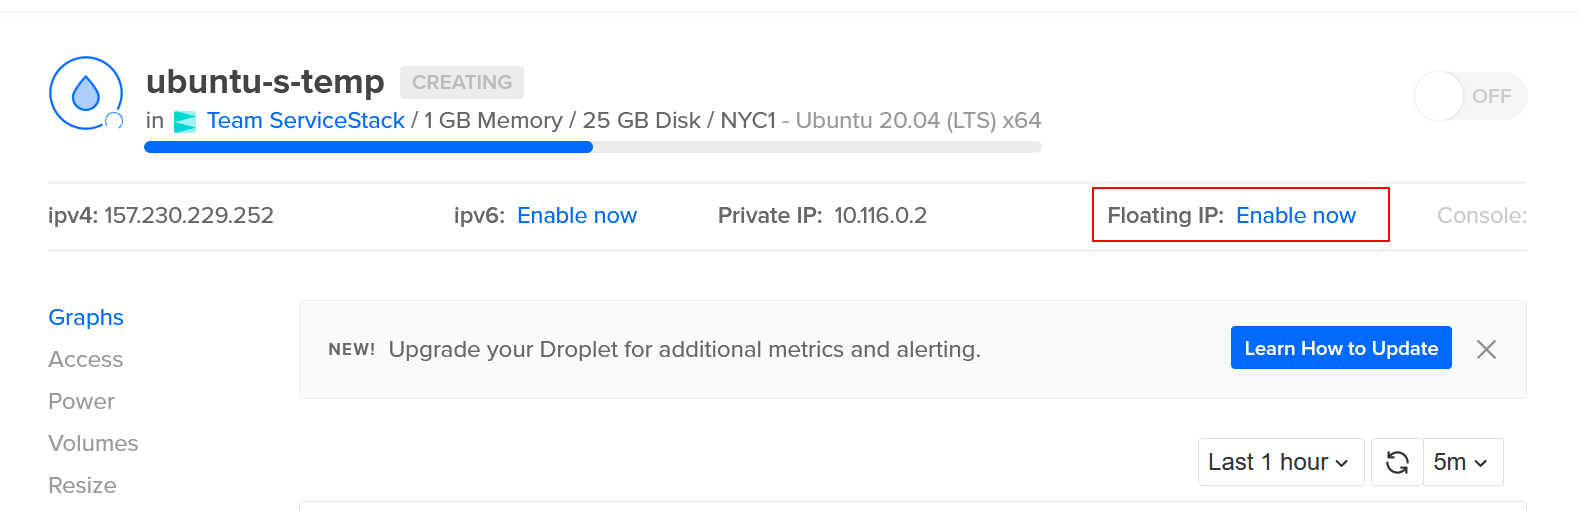
Enable floating IP
Once your Droplet has started, you'll want to Enable Floating IP so that we have a static public IP address to route to for a domain/subdomain.
This can be done via
ManageDropletsSelect your droplet- click
Enable Floating IPat the top right.
Docker setup
Now that our Droplet is running and has a public IP address, we'll want to install Docker and docker compose.
SSH into your Droplet using the appropriate SSH key and your preferred SSH client (straight ssh, Putty for Windows, etc).
Eg, with a Linux ssh client, the command would be ssh root@<your_IP_or_domain> as root is the default user setup when creating an Ubuntu droplet.
INFO
the user may change depending on how your server is setup. See man ssh for more details/options.
Install docker and docker compose
Installing Docker for Ubuntu 20.04 can be done via the repository with some setup or via Docker provided convenience scripts. For a more detailed walk through, DigitalOcean have a good write up here. Scripted included below for ease of use.
Docker via convenience script
curl -fsSL https://get.docker.com -o get-docker.sh
sudo sh get-docker.sh
INFO
These scripts required sudo privileges, see Docker notes regarding security. Full repository based script available here. Docker is installed remoting under root in this example for simplification. Information of Docker security can be found in the Docker docs
Docker compose install
Run docker compose version to confirm.
INFO
Ensure you have v2+ of Docker Compose
A compatibility script can be used for docker-compose via the following script.
echo 'docker compose --compatibility "$@"' > /usr/local/bin/docker-compose
sudo chmod +x /bin/docker-compose
Get nginx reverse proxy and letsencrypt companion running
Now we have Docker and Docker Compose installed on our new Droplet, we want to setup an nginx reverse proxy running in Docker. This will handle mapping requests to specific domain/subdomain requests to specific docker applications that have matching configuration as well as TLS registration via LetEncrypt. When a new docker container starts up and joins the bridge network, the nginx and letsencrypt companion detect the new application and look to see if routing and TLS certificate is needed.
In the npx add-in release-ghr-vanilla template, we include deploy/nginx-proxy-compose.yml file which can be copied to the droplet and run.
Here is the nginx Docker Compose file in full.
version: '2'

services:
  nginx-proxy:
    image: jwilder/nginx-proxy
    container_name: nginx-proxy
    restart: always
    ports:
      - "80:80"
      - "443:443"
    volumes:
      - conf:/etc/nginx/conf.d
      - vhost:/etc/nginx/vhost.d
      - html:/usr/share/nginx/html
      - dhparam:/etc/nginx/dhparam
      - certs:/etc/nginx/certs:ro
      - /var/run/docker.sock:/tmp/docker.sock:ro
    network_mode: bridge

  letsencrypt:
    image: jrcs/letsencrypt-nginx-proxy-companion:2.0
    container_name: nginx-proxy-le
    restart: always
    environment:
      - DEFAULT_EMAIL=you@example.com
    volumes_from:
      - nginx-proxy
    volumes:
      - certs:/etc/nginx/certs:rw
      - acme:/etc/acme.sh
      - /var/run/docker.sock:/var/run/docker.sock:ro
    network_mode: bridge

volumes:
  conf:
  vhost:
  html:
  dhparam:
  certs:
  acme:
You can use scp or shared clipboard to copy the short YML file over. For this example, we are going to copy it straight to the ~/ (home) directory.
scp -i <path to private ssh key> ./nginx-proxy-compose.yml root@<server_floating_ip>:~/nginx-proxy-compose.yml
Once copied, we can use docker compose to bring up the nginx reverse proxy.
docker compose -f ~/nginx-proxy-compose.yml up -d
To confirm these are running, you can run docker ps so have a look at what containers are running on your server.
Domain setup
Now our droplet server is all setup to host our docker applications, we want to make referring to our server easier by setting up a DNS record.
Specifically, we want to create an A record pointing to our Floating IP of our Droplet server.
INFO
You will need to use your DNS provider service to manage the DNS records of your domains.
GitHub Repository Setup
With the Droplet server all setup, first we'll need an application to deploy!
Create a new repository on GitHub. This setup will work with public or private repositories, select your options and clone it to your local machine.
git clone <GitHub URL>
cd <project name>
We are going to use npx create-net web as a command to create a blank ServiceStack application. Run this in your newly cloned repository folder, the project name will be derived from the repository directory name.
INFO
If you create the project in a new directory beforehand and want to name it, use npx create-net web <project name>.
The x new command gives us a working ServiceStack project from a template, x mix allows us to add additional templated files that work with templated ServiceStack projects.
Now our project is created, you can mix in our GitHub Action templates in the local repository folder by running:
npx add-in build release-ghr-vanilla
The build mix template provides a GitHub Action that builds and tests our dotnet project. The release-ghr-vanilla provides a GitHub Action that uses Docker to package the application, pushes the Docker image to GitHub Container Registry (ghcr.io) and deploys the application via SSH + docker compose to our new Droplet.
Just like other x mix templates ServiceStack provides, these are a starting point to help get things running quickly with known patterns. Unlike external dependencies, they just copy the templated code that is editable and not tied to any code generation service that will update these files.
Files provided by the release-ghr-vanilla are:
- .github/workflows/release.yml - Release GitHub Action Workflow
- deploy/docker-compose-template.yml - Templated docker compose file used by the application
- deploy/nginx-proxy-compose.yml - File provided to get nginx reserve proxy setup as used by steps above.
- Dockerfile - Self contained Docker that builds, publishes and hosts your application.
Make sure GitHub Enable improved container support is turned on
The account or organization of your repository at the time of writing needs to "Enable improved container support".
INFO
This step may no longer be required once Improved Container Support is generally available.
Goto:
AccountSettingsPackagesImproved container support- select
Enable improved container support - Save.
INFO
See GitHub Docs for details.
Once these steps are done, our GitHub Actions will be able to push Docker images to GitHub Container Registry.
Full Steps
Create new repository in GitHub first.
git clone git@github.com:<your user or org>/WebApp.git # Where "WebApp" is the name of your repository
cd WebApp
npx create-net web
npx add-in build release-ghr-vanilla
git add -A
git commit -m "Add new ServiceStack project with GitHub Action files"
git push
Steps overview
- Create a new GitHub repository
- Clone new repository locally
- Change directory to new repository
- Locally create ServiceStack project using
x new. - Mix in GitHub Actions using
x mix - Commit and push changes to GitHub
Create secrets
The x mix templates needs the following information to perform the deployment, this information is added to the GitHub repository as the following secrets.
- DEPLOY_HOST - hostname used to SSH to, this should be a domain or subdomain with A record pointing to the server's IP adddress.
- DEPLOY_USERNAME - the username being logged into via SSH. Eg,
ubuntu,ec2-user,rootetc. - DEPLOY_KEY - SSH private key used to remotely access deploy server/app host.
- LETSENCRYPT_EMAIL - Email address for your TLS certificate generation
These secrets can use the GitHub CLI for ease of creation. Eg, using the GitHub CLI the following can be set.
gh secret set DEPLOY_HOST -b"<DEPLOY_HOST, domain or subdomain for your application and server host.>"
gh secret set DEPLOY_USERNAME -b"<DEPLOY_USERNAME, the username being logged into via SSH. Eg, `ubuntu`, `ec2-user`, `root` etc.>"
gh secret set DEPLOY_KEY < [path to ssh key]
gh secret set LETSENCRYPT_EMAIL -b"<LETSENCRYPT_EMAIL, Email address for your TLS certificate generation, eg me@example.com>"
Repository secrets can be created under Settings->Actions->Secrets.
Tag release
To kick off any new deployment, we use GitHub Releases.
Provide a version number and name, the version will be used to tag the Docker image in GHCR.io. If you are using the GitHub CLI, you can also do this via the command line. For example,
gh release create v1 -t "v1" --notes ""
Go to the Actions tab in your repository to see the progress of your deployment.
INFO
The initial deployment might take upto a minute for LetsEncrypt to generate and use the certificate with your domain. Make sure your DNS is all setup before publishing the Release, otherwise further delays related to DNS TTL will likely occur.
If you are having problems with your app hosting, be sure to configure the logs in the nginx and your app docker containers for any startup issues. You can also run in attached mode to watch the output of these containers via docker compose -f ~/nginx-proxy-compose.yml up.
GitHub Container Registry Pricing
If you're already have a Pro or Team plan, you get free allowances to using the GitHub Container Registry. It has the same pricing as the GitHub Packages product which is summarized as the following for Pro or Team.
- 2GB storage free
- 10GB data transfer free
- Additional storage $0.25 per GB
- Additional transfer out $0.50 per GB (GitHub Actions are free)
With Docker images though, they can get large pretty quickly. While GitHub Container Registry is still in beta, it is free to use but additional storage and transfer costs are something to keep in mind. Hopefully use of retention policies and other features can help manage to keep these prices down.
Wrapping up
Having a CI process from the very start of a project/prototype is something that pays off quickly, even as a solo developer. The release-ghr-vanilla template is designed to help get that process started by providing a "no fuss" pattern for prototyping ideas and keeping costs down while giving a dockerized path forward as your hosting requirements change. GitHub Actions provide a great way to build and maintain your CI process right where your code lives, and even though GitHub Container Repository is in the early stage, we think it provides a simplified workflow that works well for the indie/solo developer as well as teams. We intend to put together more of these templates and patterns for different use cases, feel free to give us feedback and let us know what you'd like to see!