Blazor Tailwind
Combined with
![]()
As a way to provide a reliable and cost-effective option for building, deploying and hosting Blazor WASM applications with a backing API, we created the mix templates for our Blazor templates to be able to quickly take advantage of Litestream.io.
This can be used directly below to create a new Blazor Tailwind project directly with your Litestream replication target of your choice.
 S3 Simple Storage Service
 Azure Blob Storage
 sFTP
sFTP
Alternatively as the Docker compose configurations are delivered as mix configurations, they can also be applied to existing projects, e.g:
npx add-in blazor-litestream-aws
Since Litestream is tied to deployment, hosting environment & preferred configured storage, we've created a matrix of configurations to cover each of the supported templates and storage preferences.
| Project Template | AWS S3 | Azure Blob Storage | SFTP (generic) |
|---|---|---|---|
| web | litestream-aws | litestream-azure | litestream-sftp |
| blazor | blazor-litestream-aws | blazor-litestream-azure | blazor-litestream-sftp |
| blazor-vue | blazor-litestream-aws | blazor-litestream-azure | blazor-litestream-sftp |
| blazor-wasm | blazor-litestream-aws | blazor-litestream-azure | blazor-litestream-sftp |
| vue-static | jamstack-litestream-aws | jamstack-litestream-azure | jamstack-litestream-sftp |
| nextjs | jamstack-litestream-aws | jamstack-litestream-azure | jamstack-litestream-sftp |
GitHub Action Workflow
These GitHub Action configurations are a quicker way to create and deploy new Applications, which only need to be filled in with your environment's access credentials configured in your projects GitHub Action Secrets.
For a detailed overview for creating and setting up deployment for a new App from scratch checkout:
Setting up your Linux host
This project template is set up to deploy to any Linux with SSH access, and Docker with Docker Compose installed. This means you can choose any hosting provider or own server to make your application extremely portable.
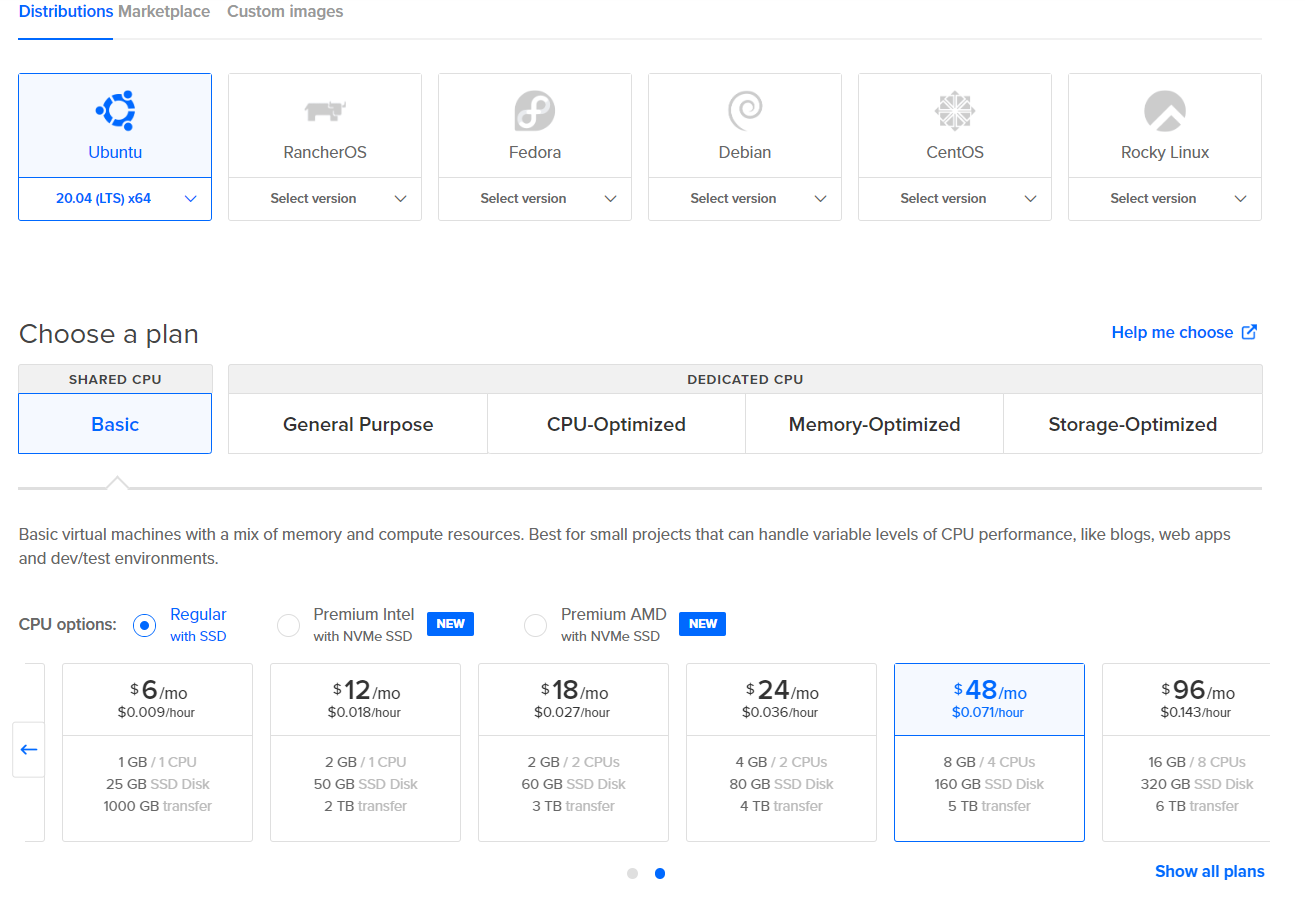
For example, we can use DigitalOcean droplets at $48 USD per month to host our application with good performance, especially for heavy read scenarios.
Using the DigitalOcean console, we can select Create droplet at the top and select the following options.
- Ubuntu 20.04 LTS x64 image
- Basic Plan type
- CPU options of Regular with SSD
- $48 per month droplet
- Your preferred region
- SSH keys for Authentication
Once our droplet is started, we will want to use a Reserved IP address and copy the value. This IP should be used with your DNS configuration for your domain as an A record. How this is done will depend on what service you use to manage your domains, eg AWS Route53, GoDaddy etc.
Docker and Docker Compose Installation
Below are two guides for installing Docker and Docker Compose for Ubuntu 20.04 LTS.
INFO
Ensure you have v2+ of Docker Compose
A compatibility script can be used for docker-compose via the following script.
echo 'docker compose --compatibility "$@"' > /usr/local/bin/docker-compose
sudo chmod +x /bin/docker-compose
nginx reverse proxy
Now that we have our host created with Docker and Docker Compose installed, we need to do some one-off configuration to make it easy to host and deploy our application to it using GitHub Actions and docker-compose.
As a part of the blazor project template, you will have a file called nginx-proxy-compose.yml in the .deploy directory. This contains a docker compose configuration to run an NGINX reverse proxy and a companion container to automatically manage TLS certificates via LetsEncrypt.
version: '2'

services:
  nginx-proxy:
    image: jwilder/nginx-proxy
    container_name: nginx-proxy
    restart: always
    ports:
      - "80:80"
      - "443:443"
    volumes:
      - conf:/etc/nginx/conf.d
      - vhost:/etc/nginx/vhost.d
      - html:/usr/share/nginx/html
      - dhparam:/etc/nginx/dhparam
      - certs:/etc/nginx/certs:ro
      - /var/run/docker.sock:/tmp/docker.sock:ro
    network_mode: bridge

  letsencrypt:
    image: jrcs/letsencrypt-nginx-proxy-companion:2.0
    container_name: nginx-proxy-le
    restart: always
    environment:
      - DEFAULT_EMAIL=you@example.com
    volumes_from:
      - nginx-proxy
    volumes:
      - certs:/etc/nginx/certs:rw
      - acme:/etc/acme.sh
      - /var/run/docker.sock:/var/run/docker.sock:ro
    network_mode: bridge

volumes:
  conf:
  vhost:
  html:
  dhparam:
  certs:
  acme:
Copy the file to your Linux host using scp or pasting in the above into a vi editor and save so we can update the file and run it remotely.
Update the DEFAULT_EMAIL environment variable to make sure you will get notified about problems with your TLS certificates and use the following command on your Linux host to run these containers.
docker compose -f nginx-proxy-compose.yml up -d
Once running, you should see a message similar to the following.
Creating nginx-proxy ... done
Creating nginx-proxy-le ... done
Your Linux host is now ready to deploy to using GitHub Actions.
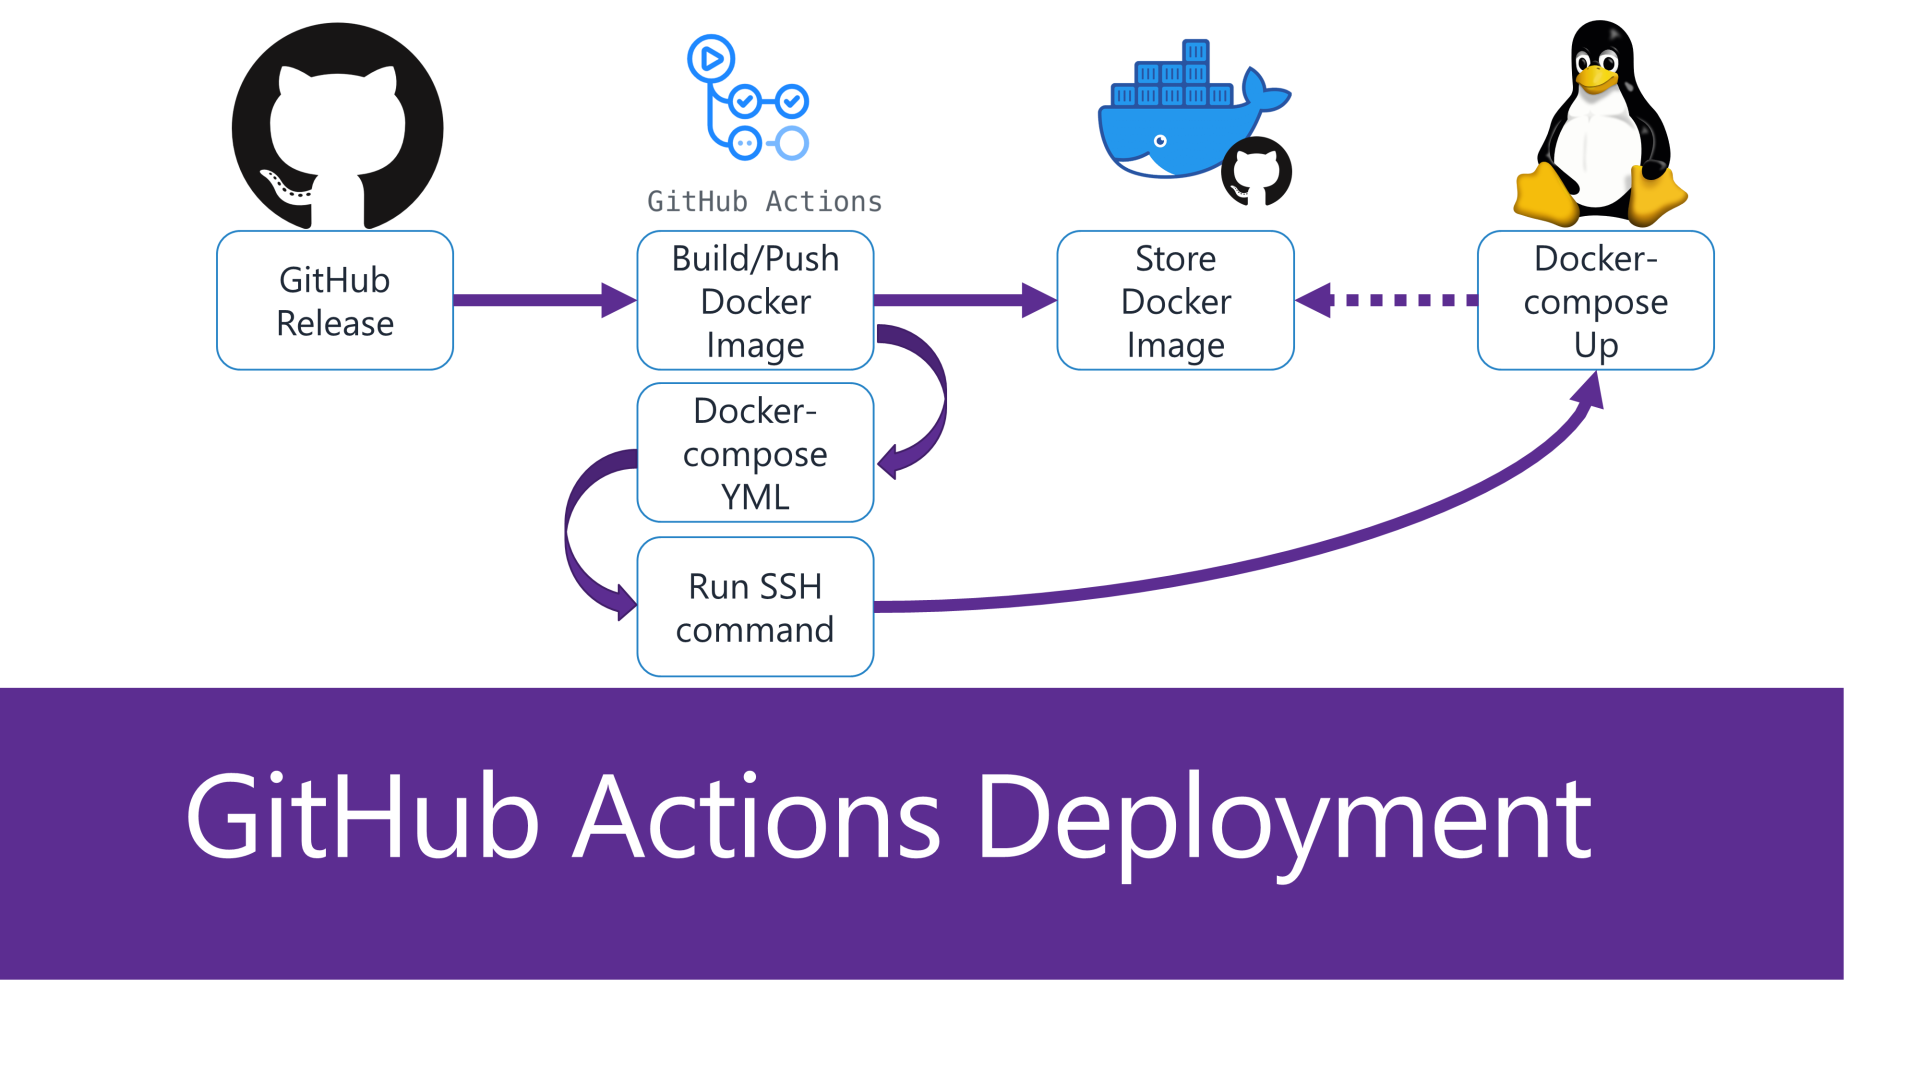
GitHub Actions
The Blazor project templates and Litestream mix templates have a release.yml GitHub Action workflow to deploying your application to a Linux host like the one we just set up.
This workflow uses SSH access to remotely copy files and execute docker compose commands on the remote host.
Docker images are stored on GitHub Container Repository packages, and pulled down on the remote host during deployment.
To get this working, repository secrets in your GitHub repository need to be populated
| Secret | Description | Example |
|---|---|---|
| DEPLOY_API | Resolvable DNS address to your Linux host | my-app.example.com |
| DEPLOY_USERNAME | The SSH login username | ubuntu |
| DEPLOY_KEY | The SSH private key associated with the SSH login | |
| LETSENCRYPT_EMAIL | Email address where you want notifications to go specifically related to this application domain | me@email.com |
| AWS_S3_BUCKET | An S3 bucket name where Litestream will be replicating data | my-s3-bucket-name |
| AWS_ACCESS_KEY_ID | The key ID for programmatic access to AWS with read/write access to the S3 bucket | |
| AWS_SECRET_ACCESS_KEY | The access key for programmatic access to AWS with read/write access to the S3 bucket |
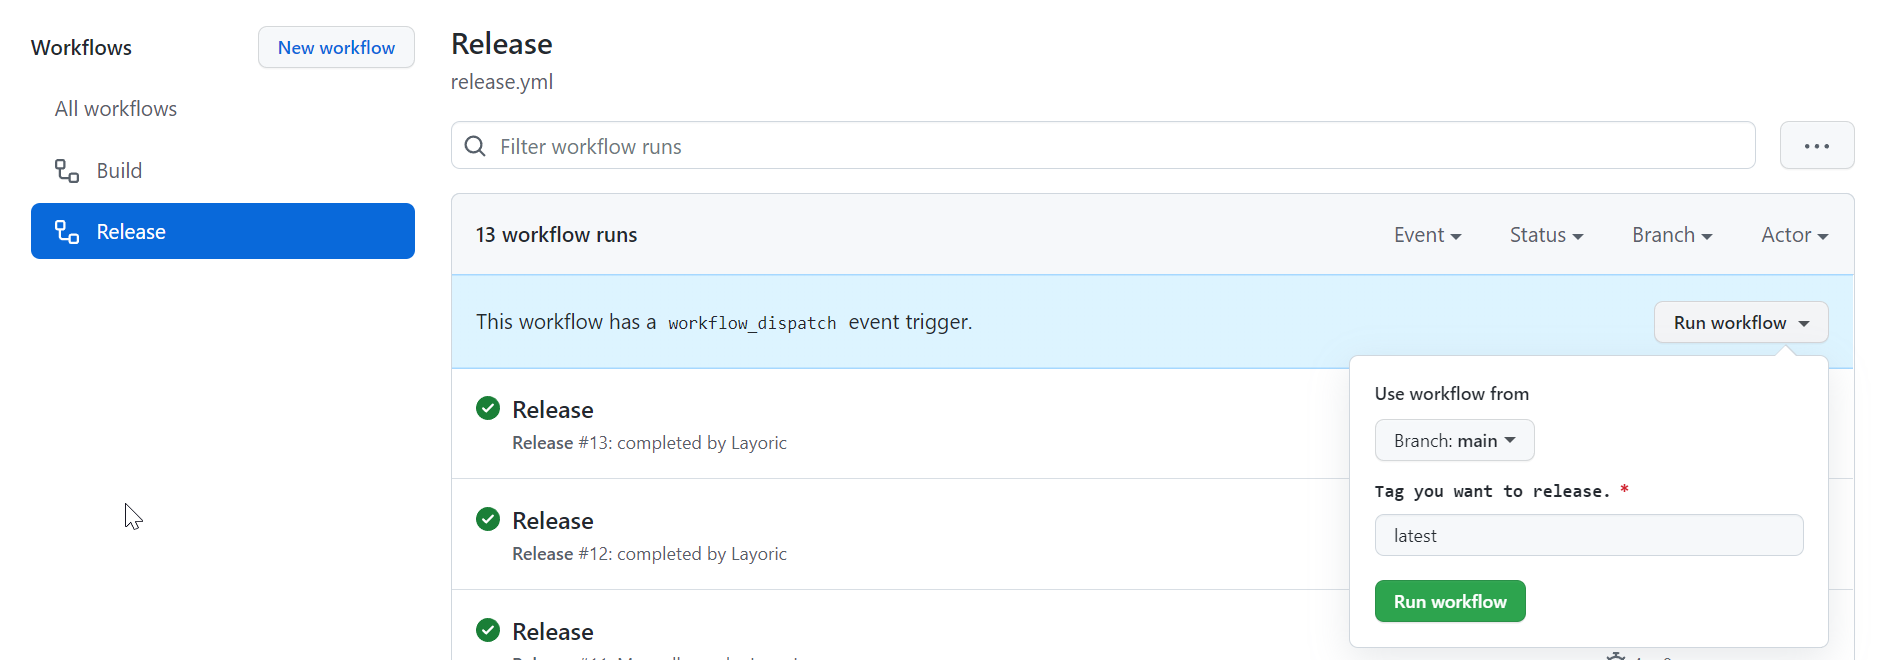
These repository secrets can be added by using the GitHub repository under Settings, Secrets, Actions.
Once values are assigned, you can use the Actions tab on your repository to create a new Release workflow using the Run workflow dropdown.
Once deployed, the Litestream docker sidecar container will monitor changes to your app.db SQLite database and back them up to your configured AWS S3 bucket.
Litestream automation
The docker-compose-template.yml file in the template is used to create the final running docker-compose configuration of your application and related Litestream sidecar.
The Litestream sidecar runs as a separate container with access to the same docker volume as your application to replicate data from your SQLite database file.
This monitoring starts before your application docker container runs so that data isn't missed. This is achieved using the docker compose functionality of depends_on and test, where your Blazor WASM application container will wait for the successful startup of the Litestream container before running.
my-app:
    image: ghcr.io/${IMAGE_REPO}:${RELEASE_VERSION}
    depends_on:
      my-app-litestream:
        condition: service_healthy
The healthcheck for your Blazor WASM container is that a Litestream restore process runs successfully on deployment. This is the functionality that provides automated disaster recovery if your SQLite database file is lost for whatever reason.
my-app-litestream:
    image: litestream/litestream
    entrypoint: ["/bin/sh", "-c"]
    # Timeout of health check will need to depend on size of db, and speed of network to host.
    healthcheck:
      test: /usr/local/bin/litestream restore -if-db-not-exists -if-replica-exists -o /data/app.db s3://${AWS_S3_BUCKET}/BlazorLitestream.sqlite
      timeout: 10m
      retries: 1
INFO
Timeout of health check will need to depend on size of db, and speed of network to host.
This restore will be skipped if either the database file already exists on the server or doesn't yet exist in AWS S3.
Testing restores
It is always a good idea to test your disaster recovery process, and the easiest way to test it with this Litestream setup is by doing the following steps.
- Take down your application using
docker compose downcommand pointing to the file on your remote server in the.deploydirect of your deploy user. - Removing the docker volume using
docker volume rm <volume_name>. You can find the volume name usingdocker volume ls, it will start withdeploy_and contain your app name. - Verifying your SQLite database file no longer exists by checking
/var/lib/docker/volumesfor the existence of your shared volume files.
Once confirmed the files are removed, you can then redeploy your application. This process will take longer than a normal deployment since Litestream will be combining the last snapshot with the WAL journal files.
Once completed, your application should be running with all the previous data it had before being taken down.