We're happy to announce ServiceStack v8.9 - a major release packed with lots of new features and improvements across the board. Unfortunately these release notes have become apologetically long, so we've added a Table of Contents below to make it easier to jump to the biggest features you're interested in:
- OrmLite's new Configuration Model and Defaults
- RDBMS Async Tasks Builder
- RDBMS Background Jobs (PostgreSQL, SQL Server, MySql/MariaDB)
- RDBMS Request Logging and Analytics (PostgreSQL, SQL Server, MySql/MariaDB)
- Protect same APIs with API Keys or Identity Auth
- AI Chat - OpenAI Chat Compatible API and Server Gateway
- AI Chat UI - Customizable, Private, ChatGPT-like UI
- ChatCompletion custom API Explorer UI
- XSS Vulnerability fixed in HtmlFormat.html
OrmLite's new Configuration Model and Defaults
In continuing with ServiceStack's seamless integration with the ASP.NET Framework, providing a familiar development experience that follows .NET configuration model and Entity Framework conventions has become a priority.
Implementing a new configuration model also gives us the freedom to change OrmLite's defaults which wasn't possible before given the paramount importance of maintaining backwards compatibility in a data access library that accesses existing Customer data.
JSON used for Complex Types
The biggest change that applies to all RDBMS providers is replacing the JSV serialization used for serializing Complex Types with JSON now that most RDBMS have native support for JSON.
PostgreSQL uses default Naming Strategy
The biggest change to PostgreSQL is using the same default naming strategy as other RDBMS which matches EF's convention that's used for ASP .NET's Identity Auth tables.
SQL Server uses latest 2022 Dialect
SQL Server now defaults to the latest SqlServer 2022 dialect which is also compatible with SQL Server 2016+
New Configuration Model
OrmLite new modern, fluent configuration API aligns with ASP.NET Core's familiar services.Add*() pattern.
This new approach provides a more intuitive and discoverable way to configure your database connections, with strongly-typed
options for each RDBMS provider.
The new configuration model starts with the AddOrmLite() extension method to configure its default IDbConnectionFactory dependency by combining it with RDBMS provider-specific methods for the RDBMS you wish to use:
UseSqlite()in ServiceStack.OrmLite.Sqlite.DataUsePostgres()in ServiceStack.OrmLite.PostgreSQLUseSqlServer()in ServiceStack.OrmLite.SqlServer.DataUseMySql()in ServiceStack.OrmLite.MySqlUseMySqlConnector()in ServiceStack.OrmLite.MySqlConnectorUseOracle()in ServiceStack.OrmLite.Oracle (community supported)UseFirebird()in ServiceStack.OrmLite.Firebird (community supported)
Each provider method accepts a connection string and an optional configuration callback that lets you customize the dialect's behavior with IntelliSense support.
It's an alternative approach to manually instantiating OrmLiteConnectionFactory with specific dialect providers,
offering better discoverability and a more consistent experience across different database providers.
SQLite
services.AddOrmLite(options => options.UseSqlite(connectionString));
Each RDBMS provider can be further customized to change its defaults with:
services.AddOrmLite(options => options.UseSqlite(connectionString, dialect => {
        // Default SQLite Configuration:
        dialect.UseJson = true;
        dialect.UseUtc = true;
        dialect.EnableWal = true;
        dialect.EnableForeignKeys = true;
        dialect.BusyTimeout = TimeSpan.FromSeconds(30);
    })
);
PostgreSQL
services.AddOrmLite(options => options.UsePostgres(connectionString));
With Dialect Configuration:
services.AddOrmLite(options => options.UsePostgres(connString, dialect => {
        // Default PostgreSQL Configuration:
        dialect.UseJson = true;
        dialect.NamingStrategy = new OrmLiteNamingStrategyBase();
    })
);
Removed snake_case naming strategy
PostgreSQL now defaults to using the same naming strategy as other RDBMS, i.e. no naming strategy, and uses the PascalCase naming of C# classes as-is.
With this change OrmLite's table and columns now follow EF's convention which is used for ASP.NET's Identity Auth tables.
This is more fragile in PostgreSQL as it forces needing to use quoted table and column names for all queries, e.g.
SELECT "MyColumn" FROM "MyTable"
This is required as PostgreSQL isn't case-insensitive and lowercases all unquoted symbols, e.g:
SELECT MyColumn FROM MyTable
-- Translates to:
SELECT mycolumn FROM mytable
This is already done by OrmLite, but any custom queries also need to use quoted symbols.
SQL Server
services.AddOrmLite(options => options.UseSqlServer(connectionString));
With Dialect Configuration:
services.AddOrmLite(options => options.UseSqlServer(connString, dialect => {
        // Default SQL Server Configuration:
        dialect.UseJson = true;
    })
);
Uses Latest SQL Server at each .NET LTS Release
To keep it modern and predictable, this will use the latest SQL Server Dialect that was released at the time of each
major .NET LTS versions, currently SqlServer2022OrmLiteDialectProvider, which we'll keep until the next .NET LTS release.
Although the 2022 dialect is also compatible with every SQL Server version from 2016+.
To use an explicit version of SQL Server you can use the generic overload that best matches your version:
services.AddOrmLite(options =>
    options.UseSqlServer<SqlServer2014OrmLiteDialectProvider>(connString));
MySQL
services.AddOrmLite(options => options.UseMySql(connectionString));
With Dialect Configuration:
services.AddOrmLite(options => options.UseMySql(connectionString, dialect => {
        // Default MySql Configuration:
        dialect.UseJson = true;
    })
);
For MySqlConnector use:
services.AddOrmLite(options => options.AddMySqlConnector(connectionString));
Named Connections
The new OrmLite configuration model also streamlines support for named connections, allowing you to register multiple database connections with unique identifiers in a single fluent configuration chain, e.g:
services.AddOrmLite(options => {
        options.UseSqlite(":memory:")
            .ConfigureJson(json => {
                json.DefaultSerializer = JsonSerializerType.ServiceStackJson;
            });
    })
    .AddSqlite("db1", "db1.sqlite")
    .AddSqlite("db2", "db2.sqlite")
    .AddPostgres("reporting", PostgreSqlDb.Connection)
    .AddSqlServer("analytics", SqlServerDb.Connection)
    .AddSqlServer<SqlServer2014OrmLiteDialectProvider>(
        "legacy-analytics", SqlServerDb.Connection)
    .AddMySql("wordpress", MySqlDb.Connection)
    .AddMySqlConnector("drupal", MySqlDb.Connection)
    .AddOracle("enterprise", OracleDb.Connection)
    .AddFirebird("firebird", FirebirdDb.Connection);
Complex Type JSON Serialization
Previously OrmLite only supported serializing Complex Types with a single Complex Type Serializer
but the new configuration model now uses a more configurable JsonComplexTypeSerializer where you can change the default
JSON Serializer OrmLite should use for serializing Complex Types as well as fine-grain control over which types should
use which serializer by using the ConfigureJson() extension method on each provider.
services.AddOrmLite(options => {
        options.UsePostgres(connectionString)
            .ConfigureJson(json => {
                // Default JSON Complex Type Serializer Configuration
                json.DefaultSerializer = JsonSerializerType.ServiceStackJson;
                json.JsonObjectTypes = [
                    typeof(object),
                    typeof(List<object>),
                    typeof(Dictionary<string, object?>),
                ];
                json.SystemJsonTypes = [];
                json.ServiceStackJsonTypes = [];
            });
    })
By default OrmLite uses ServiceStack.Text JSON Serializer which is less strict and more resilient than System.Text.Json
for handling versioning of Types that change over time, e.g. an int Property that's later changed to a string.
In addition to configuring a default you can also configure which types should be serialized with which serializer.
So we could change OrmLite to use System.Text.Json for all types except for ChatCompletion which we want to use
ServiceStack.Text JSON for:
services.AddOrmLite(options => {
        options.UsePostgres(connectionString)
            .ConfigureJson(json => {
                json.DefaultSerializer = JsonSerializerType.SystemJson;
                json.ServiceStackJsonTypes = [
                    typeof(ChatCompletion)
                ];
            });
    })
Unstructured JSON with JSON Object
The default Exception to this is for serialization of object, List<object> and Dictionary<string,object> types which is better handled by #Script's JSON Parser
which is able to parse any valid adhoc JSON into untyped .NET generic collections, which is both mutable and able to
utilize C# pattern matching
for easy introspection.
The new TryGetValue<T> extension method on Dictionary<string,object?> makes it even more convenient for parsing
adhoc JSON which can use the out Type parameter to reduce unnecessary type checking, e.g. here's a simple example
of parsing a ComfyUI Output for the client_id used in a generation:
var comfyOutput = JSON.ParseObject(json);
var prompt = (Dictionary<string, object?>)result.Values.First()!;
if (prompt.TryGetValue("prompt", out List<object> tuple) && tuple.Count > 3)
{
    if (tuple[3] is Dictionary<string, object?> extraData
        && extraData.TryGetValue("client_id", out string clientId))
    {
        Console.WriteLine(clientId);
    }
}
Where as an Equivalent implementation using System.Text.Json JsonDocument would look like:
using System.Text.Json;

var jsonDocument = JsonDocument.Parse(json);
var root = jsonDocument.RootElement;

// Get the first property value (equivalent to result.Values.First())
var firstProperty = root.EnumerateObject().FirstOrDefault();
if (firstProperty.Value.ValueKind == JsonValueKind.Object)
{
    var prompt = firstProperty.Value;

    if (prompt.TryGetProperty("prompt", out var promptElement)
        && promptElement.ValueKind == JsonValueKind.Array)
    {
        var promptArray = promptElement.EnumerateArray().ToArray();
        if (promptArray.Length > 3)
        {
            var extraDataElement = promptArray[3];
            if (extraDataElement.ValueKind == JsonValueKind.Object
                && extraDataElement.TryGetProperty("client_id", out var clientIdElement)
                && clientIdElement.ValueKind == JsonValueKind.String)
            {
                var clientId = clientIdElement.GetString();
                Console.WriteLine(clientId);
            }
        }
    }
}
Table Aliases
One potential breaking change is that table aliases are used verbatim and no longer uses a naming strategy for transforming its name which potentially affects PostgreSQL when an Alias is used that doesn't match the name of the table, e.g:
[Alias("MyTable")] //= "MyTable"
public class NewMyTable { ... }

[Alias("MyTable")] //= my_table
public class OldMyTable { ... }
Aliases should either be changed to the Table name you want to use or you can use the Naming Strategy Alias dictionaries for finer-grain control over what Schema, Table, Column Names and Aliases should be used:
services.AddOrmLite(options => options.UsePostgres(connString, dialect => {
    dialect.NamingStrategy.TableAliases["MyTable"] = "my_table";
    dialect.NamingStrategy.SchemaAliases["MySchema"] = "my_schema";
    dialect.NamingStrategy.ColumnAliases["MyColumn"] = "my_columnt";
}));
Table Refs
A significant internal refactor of OrmLite was done to encapsulate different ways of referring to a table in a single
TableRef struct, which is now used in all APIs that need a table reference.
The new TableRef struct allows for unified APIs that encapsulates different ways of referencing a table:
- Type
new TableRef(typeof(MyTable)) - Model Definition
new TableRef(ModelDefinition<MyTable>.Definition) - Table Name
new TableRef("MySchema") - Schema and Table Name
new TableRef("MySchema", "MyTable")) - Quoted Name (use verbatim)
TableRef.Literal("\"MyTable\"") - Implicitly casts to a string as
new TableRef("MySchema").
OrmLite handles differences between different RDBMS Providers via its IOrmLiteDialectProvider interface.
Previously OrmLite used to maintain multiple overloads for handling some of these differences in referencing a
table but they've now all been consolidated into use a single TableRef parameter:
public interface IOrmLiteDialectProvider
{
    bool DoesTableExist(IDbConnection db, TableRef tableRef);
    string GetTableNameOnly(TableRef tableRef);
    string UnquotedTable(TableRef tableRef);
    string GetSchemaName(TableRef tableRef);
    string QuoteTable(TableRef tableRef);
    bool DoesTableExist(IDbConnection db, TableRef tableRef);
    bool DoesColumnExist(IDbConnection db, string columnName, TableRef tableRef);
    string ToAddColumnStatement(TableRef tableRef, FieldDefinition fieldDef);
    string ToAlterColumnStatement(TableRef tableRef, FieldDefinition fieldDef);
    string ToChangeColumnNameStatement(TableRef tableRef, FieldDefinition fieldDef, string oldColumn);
    string ToRenameColumnStatement(TableRef tableRef, string oldColumn, string newColumn);
    string ToDropColumnStatement(TableRef tableRef, string column);
    string ToDropConstraintStatement(TableRef tableRef, string constraint);
    string ToDropForeignKeyStatement(TableRef tableRef, string foreignKeyName);
}
For example the QuoteTable(TableRef) method can be used to quote a table. Assuming our dialect was configured
with the my_table Table Aliases, these are the results for the different ways of referencing MyTable:
dialect.QuoteTable("MyTable")                       //= "my_table" (implicit)
dialect.QuoteTable(new("MyTable"))                  //= "my_table"
dialect.QuoteTable(new("MySchema","MyTable"))       //= "my_schema"."my_table"
dialect.QuoteTable(TableRef.Literal("\"MyTable\"")) //= "MyTable" (verbatim)
dialect.QuoteTable(new(typeof(MyTable)))            //= "my_table"
dialect.QuoteTable(new(ModelDefinition<MyTable>.Definition)) //= "my_table"
Improved Observability
Significant effort was put into improving OrmLite's Observability where OrmLite's DB Connections can now be tagged to make them easier to track in hooks, logs and traces.
To achieve this a new Action<IDbConnection> configuration callbacks were added to OrmLite Open Connection APIs
which is invoked before a DB Connection is opened, e.g:
using var db = dbFactory.Open(configure: db => db.WithTag("MyTag"));
using var db = dbFactory.Open(namedConnection, configure: db => db.WithTag("MyTag"));

using var db = HostContext.AppHost.GetDbConnection(req, configure: db => db.WithTag("MyTag"));
Which ServiceStack uses internally to tag DB Connections with the feature executing it, or for Db connections used in
Services it will tag it with the Request DTO Name.
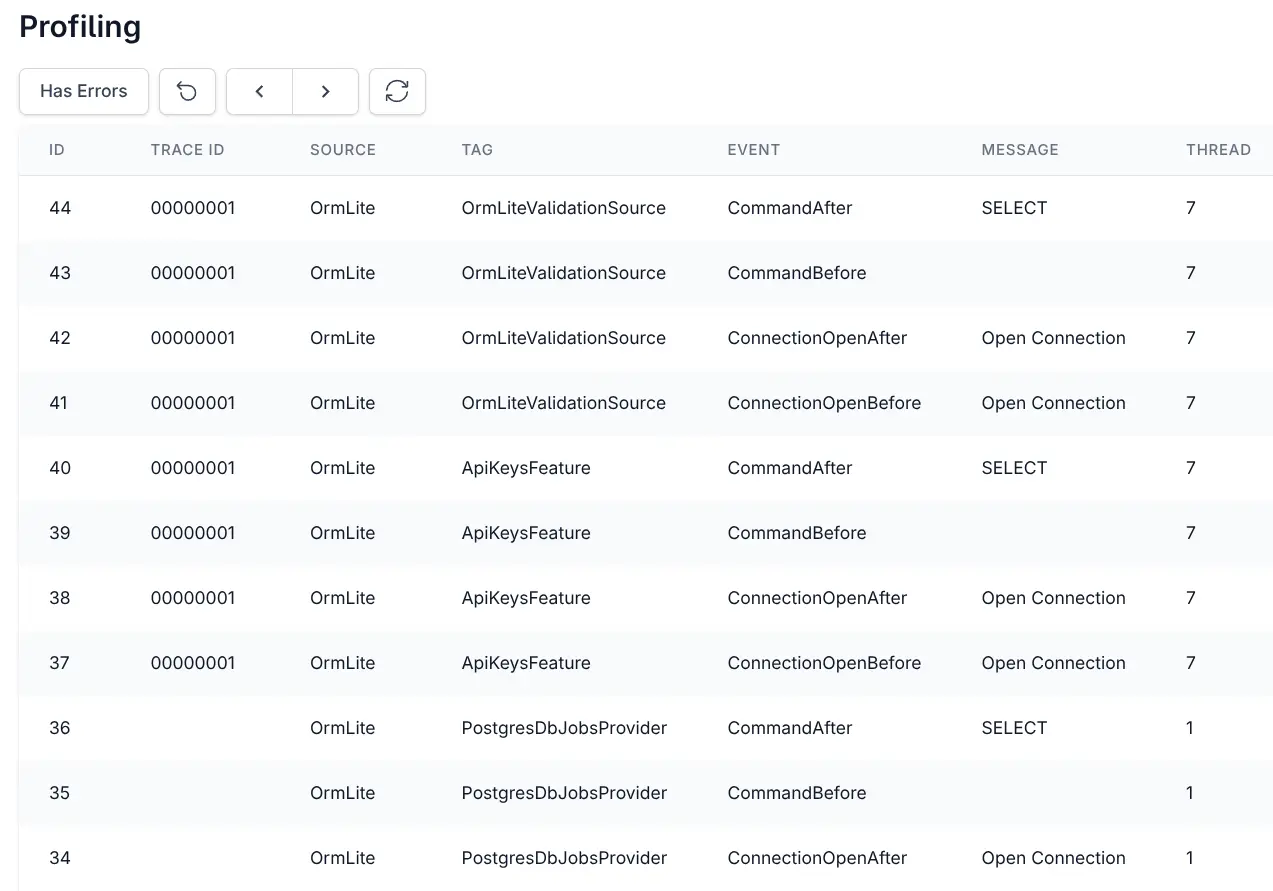
If a tag is configured, it's also included in OrmLite's Debug Logging output, e.g:
dbug: ServiceStack.OrmLiteLog[0]
      [PostgresDbJobsProvider] SQL: SELECT "Id", "ParentId", "RefId", "Worker", "Tag", "BatchId", "Callback", "DependsOn", "RunAfter", "CreatedDate", "CreatedBy", "RequestId", "RequestType", "Command", "Request", "RequestBody", "UserId", "Response", "ResponseBody", "State", "StartedDate", "CompletedDate", "NotifiedDate", "RetryLimit", "Attempts", "DurationMs", "TimeoutSecs", "Progress", "Status", "Logs", "LastActivityDate", "ReplyTo", "ErrorCode", "Error", "Args", "Meta"
      FROM "BackgroundJob"
      WHERE ("State" = :0)
      PARAMS: :0=Cancelled
dbug: ServiceStack.OrmLiteLog[0]
      TIME: 1.818m
DB Command Execution Timing
OrmLite's debug logging now also includes the elapsed time it took to execute the command which is also available on the
IDbCommand GetTag() and GetElapsedTime() APIs, e.g:
OrmLiteConfig.AfterExecFilter = cmd =>
{
    Console.WriteLine($"[{cmd.GetTag()}] {cmd.GetElapsedTime()}");
};
ExistsById APIs
New ExistsById APIs for checking if a row exists for a given Id:
db.ExistsById<Person>(1);
await db.ExistsByIdAsync<Person>(1);

// Alternative to:
db.Exists<Person>(x => x.Id == 1);
await db.ExistsAsync<Person>(x => x.Id == 1);
ResetSequence for PostgreSQL
The ResetSequence API is available to reset a Table's Id sequence in Postgres:
db.ResetSequence<MyTable>(x => x.Id);
Data Import example using BulkInsert
This is useful to reset a PostgreSQL Table's auto-incrementing sequence when re-importing a dataset from a different database, e.g:
db.DeleteAll<Tag>();
db.ResetSequence<Tag>(x => x.Id);
db.DeleteAll<Category>();
db.ResetSequence<Category>(x => x.Id);

var config = new BulkInsertConfig { Mode = BulkInsertMode.Sql };
db.BulkInsert(dbSqlite.Select<Tag>().OrderBy(x => x.Id), config);
db.BulkInsert(dbSqlite.Select<Category>().OrderBy(x => x.Id), config);
New SqlDateFormat and SqlChar Dialect APIs
The SQL Dialect functions provide an RDBMS agnostic way to call SQL functions that differs among different RDBMS's.
The DateFormat accepts SQLite strftime() function date and
time modifiers in its format string whilst the Char accepts a character code, e.g:
var q = db.From<MyTable>();
var createdDate = q.Column<MyTable>(c => c.CreatedDate);
var months = db.SqlList<(string month, string log)>(q
    .Select(x => new {
        Month = q.sql.DateFormat(createdDate, "%Y-%m"),
        Log = q.sql.Concat(new[]{ "'Prefix'", q.sql.Char(10), createdDate })
    }));
When executed in PostgreSQL it would generate:
SELECT TO_CHAR("CreatedDate", 'YYYY-MM'), 'Prefix' || CHR(10) || "CreatedDate"
FROM "CompletedJob"
RDBMS Async Tasks Builder
Sequential Async DB Access
Async improves I/O thread utilization in multi-threaded apps like Web Servers. However, it doesn't improve the performance of individual API Requests that need to execute multiple independent DB Requests. These are often written to run async db access sequentially like this:
var rockstars = await Db.SelectAsync<Rockstar>();
var albums = await Db.SelectAsync<Album>();
var departments = await Db.SelectAsync<Department>();
var employees = await Db.SelectAsync<Employee>();
The issue being that it's not running them in parallel as each DB Request is executed sequentially with the Request for Albums not starting until the Request for Rockstars has completed.
To run them in parallel you would need to open multiple scoped DB Connections, await them concurrently then do the syntax boilerplate gymnastics required to extract the generic typed results, e.g:
var connections = await Task.WhenAll(
    DbFactory.OpenDbConnectionAsync(),
    DbFactory.OpenDbConnectionAsync(),
    DbFactory.OpenDbConnectionAsync(),
    DbFactory.OpenDbConnectionAsync()
);

using var dbRockstars = connections[0];
using var dbAlbums = connections[1];
using var dbDepartments = connections[2];
using var dbEmployees = connections[3];

var tasks = new List<Task>
{
    dbRockstars.SelectAsync<Rockstar>(),
    dbAlbums.SelectAsync<Album>(),
    dbDepartments.SelectAsync<Department>(),
    dbEmployees.SelectAsync<Employee>()
};
await Task.WhenAll(tasks);

var rockstars = ((Task<List<Rockstar>>)tasks[0]).Result;
var albums = ((Task<List<Album>>)tasks[1]).Result;
var departments = ((Task<List<Department>>)tasks[2]).Result;
var employees = ((Task<List<Employee>>)tasks[3]).Result;
Even without Error handling, writing coding like this can quickly become tedious, less readable and error prone that as a result is rarely done.
Parallel DB Requests in TypeScript
This is easier to achieve in languages like TypeScript where typed ORMs like litdb.dev can run multiple DB Requests in parallel with just:
const [rockstars, albums, departments, employees] = await Promise.all([
    db.all<Rockstar>($.from(Rockstar)),     //= Rockstar[]
    db.all<Album>($.from(Album)),           //= Album[]
    db.all<Department>($.from(Department)), //= Department[]
    db.all<Employee>($.from(Employee)),     //= Employee[]
])
Which benefits from TypeScript's powerful type system that allows destructuring arrays whilst preserving their positional types, whilst its single threaded event loop lets you reuse the same DB Connection to run DB Requests in parallel without multi-threading issues.
OrmLite's new Async Tasks Builder
OrmLite's new AsyncDbTasksBuilder provides a similar benefit of making it effortless to run multiple async DB Requests
in parallel, which looks like:
var results = await DbFactory.AsyncDbTasksBuilder()
    .Add(db => db.SelectAsync<Rockstar>())
    .Add(db => db.SelectAsync<Album>())
    .Add(db => db.SelectAsync<Department>())
    .Add(db => db.SelectAsync<Employee>())
    .RunAsync();
var (rockstars, albums, departments, employees) = results;
Which just like TypeScript's destructuring returns a positionally typed tuple of the results which can be destructured back into their typed variables, e.g:
(List<Rockstar> rockstars,
 List<Album> albums,
 List<Department> departments,
 List<Employee> employees) = results;
Supports up to 8 Tasks
It allows chaining up to 8 async Tasks in parallel as C#'s Type System doesn't allow for preserving different positional generic types in an unbounded collection. Instead each Task returns a new Generic Type builder which preserves the positional types before it.
Supports both Async Task<T> and Task APIs
Where Task<T> and Task APIs can be mixed and matched interchangeably:
var builder = DbFactory.AsyncDbTasksBuilder()
    .Add(db => db.InsertAsync(rockstars[0],rockstars[1]))
    .Add(db => db.SelectAsync<Rockstar>())
    .Add(db => db.InsertAsync(albums[2],albums[3]))
    .Add(db => db.SelectAsync<Album>())
    .Add(db => db.InsertAsync([department]))
    .Add(db => db.SelectAsync<Department>())
    .Add(db => db.InsertAsync([employee]))
    .Add(db => db.SelectAsync<Employee>());
Where to preserve the results chain, Task APIs return bool results, e.g:
(bool r1,
 List<Rockstar> r2,
 bool r3,
 List<RockstarAlbum> r4,
 bool r5,
 List<Department> r6,
 bool r7,
 List<Employee> r8) = await builder.RunAsync();
Error Handling
Whilst tasks are executed in parallel when added, any Exceptions are only thrown when the task is awaited:
using var Db = await OpenDbConnectionAsync();

var builder = DbFactory.AsyncDbTasksBuilder()
    .Add(db => db.InsertAsync(rockstars[0]))
    .Add(db => db.InsertAsync(rockstars[0])); // <-- Duplicate PK Exception

// Exceptions are not thrown until the task is awaited
try
{
    var task = builder.RunAsync();
}
catch (Exception e)
{
    throw;
}
RDBMS Background Jobs
We're excited to announce that we've ported our much loved Background Jobs feature for SQLite to the popular PostgreSQL, SQL Server and MySQL RDBMS's.
Whilst we love SQLite + Litestream for its low dev ops maintenance allowing us to break free from expensive cloud hosting hosts for managed RDBMS's, it's clear many of our Customers need the features of an industrial strength RDBMS.
In future we'll also be looking at providing a great self-hosted manged solution for Customers that can be run free of expensive cloud hosting costs (starting with PostgreSQL). Before we can focus on this we needed to rewrite all our SQLite-only features to work with OrmLite's other premier supported RDBMS's.
The new DatabaseJobFeature is a new implementation purpose built for PostgreSQL, SQL Server and MySQL backends that's a drop-in replacement for SQLite's BackgroundsJobFeature which can be applied to an existing .NET 8+ project by mixing in the db-identity or db-jobs gist files to your host project.
Install
For ServiceStack ASP.NET Identity Auth Projects:
x mix db-identity
Which replaces Configure.BackgroundJobs.cs and Configure.RequestLogs.cs with an equivalent
version that uses the new DatabaseJobFeature for sending Application Emails and DbRequestLogger
for API Request Logging.
All other .NET 8+ ServiceStack Apps should instead use:
x mix db-jobs
Which replaces Configure.BackgroundJobs.cs to use DatabaseJobFeature:
public class ConfigureBackgroundJobs : IHostingStartup
{
    public void Configure(IWebHostBuilder builder) => builder
        .ConfigureServices(services => {
            services.AddPlugin(new CommandsFeature());
            services.AddPlugin(new DatabaseJobFeature {
                // NamedConnection = "<alternative db>"
            });
            services.AddHostedService<JobsHostedService>();
         }).ConfigureAppHost(afterAppHostInit: appHost => {
            var services = appHost.GetApplicationServices();
            var jobs = services.GetRequiredService<IBackgroundJobs>();
            // Example of registering a Recurring Job to run Every Hour
            //jobs.RecurringCommand<MyCommand>(Schedule.Hourly);
        });
}

public class JobsHostedService(ILogger<JobsHostedService> log, IBackgroundJobs jobs) : BackgroundService
{
    protected override async Task ExecuteAsync(CancellationToken stoppingToken)
    {
        await jobs.StartAsync(stoppingToken);

        using var timer = new PeriodicTimer(TimeSpan.FromSeconds(3));
        while (!stoppingToken.IsCancellationRequested && await timer.WaitForNextTickAsync(stoppingToken))
        {
            await jobs.TickAsync();
        }
    }
}
Fortunately we were able reuse the same IBackgroundJobs interface, Data Models, and API Service Contracts
which greatly simplifies any migration efforts from SQLite's ServiceStack.Jobs implementation.
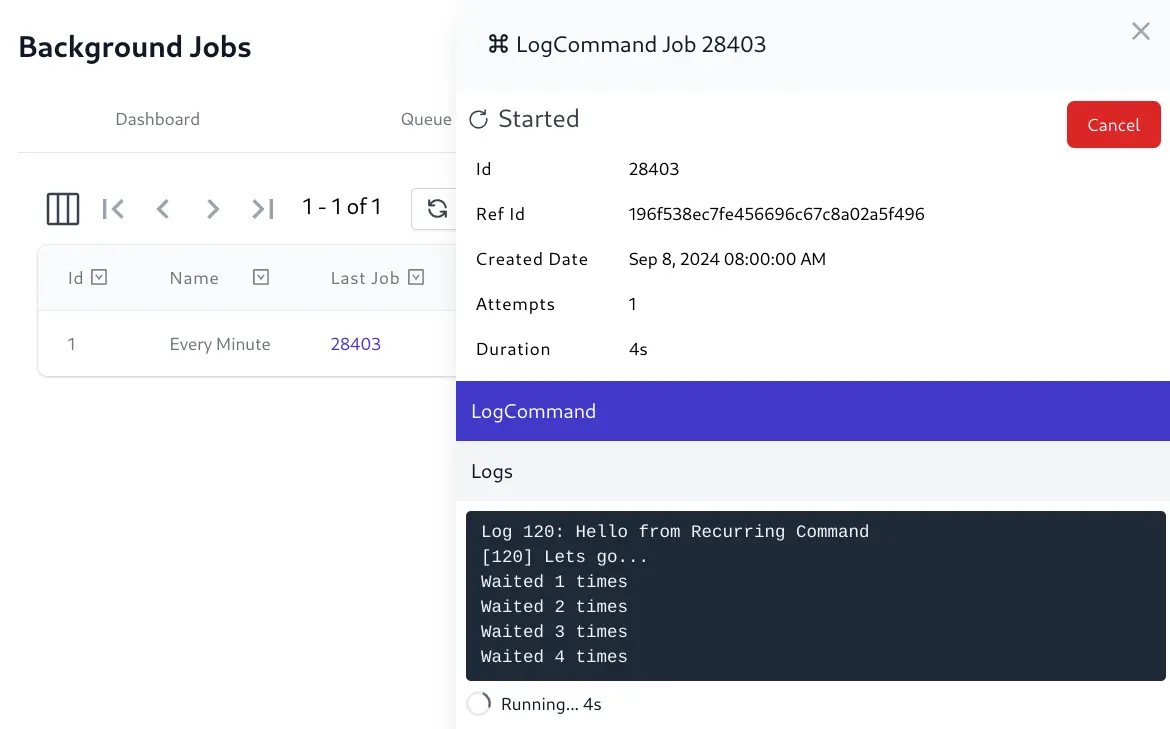
By implementing the same API Service Contracts (i.e. Request/Response DTOs) we're also able to reuse the same built-in Management UI to provide real-time monitoring, inspection and management of background jobs:
RDBMS Optimizations
A key benefit of using SQLite for Background Jobs was the ability to easily maintain completed and failed job history in
separate monthly databases. This approach prevented the main application database from growing unbounded by archiving
historical job data into isolated monthly SQLite database files (e.g., jobs_2025-01.db, jobs_2025-02.db).
These monthly databases could be easily backed up, archived to cold storage, or deleted after a retention period,
providing a simple yet effective data lifecycle management strategy.
For the new DatabaseJobFeature supporting PostgreSQL, SQL Server, and MySQL, we've replicated this monthly
partitioning strategy using monthly partitioned SQL tables for the CompletedJob and FailedJob archive tables.
PostgreSQL - Native Table Partitioning
PostgreSQL provides native support for table partitioning, allowing us to automatically create monthly partitions using
PARTITION BY RANGE on the CreatedDate column. The DatabaseJobFeature automatically creates new monthly partitions
as needed, maintaining the same logical separation as SQLite's monthly .db's while keeping everything within a single
Postgres DB:
CREATE TABLE CompletedJob (
    -- columns...
    CreatedDate TIMESTAMP NOT NULL,
    PRIMARY KEY ("Id","CreatedDate")
) PARTITION BY RANGE ("CreatedDate");

-- Monthly partitions are automatically created, e.g.:
CREATE TABLE CompletedJob_2025_01 PARTITION OF CompletedJob
    FOR VALUES FROM ('2025-01-01') TO ('2025-02-01');
This provides excellent query performance since PostgreSQL can use partition pruning to only scan relevant monthly partitions
when filtering by CreatedDate.
SQLServer / MySQL - Manual Partition Management
For SQL Server and MySQL, monthly partitioned tables need to be created out-of-band (either manually or via cronjob scripts) since they don't support the same level of automatic partition management as PostgreSQL. However, this still works well in practice as it uses:
Write-Only Tables - The
CompletedJobandFailedJobtables are write-only append tables. Jobs are never updated after completion or failure, only inserted.CreatedDate Index - All queries against these tables use the
CreatedDateindexed column for filtering and sorting, ensuring efficient access patterns even as the tables grow.
The indexed CreatedDate column ensures that queries remain performant regardless of table size, and the write-only
nature means there's no complex update logic to manage across partitions.
This approach maintains the same benefits as SQLite's monthly databases - easy archival, manageable table sizes, and efficient queries - while leveraging the scalability and features of enterprise RDBMS systems.
Separate Jobs Database
Or if preferred, you can maintain background jobs in a separate database from your main application database. This separation keeps the write-heavy job processing load off your primary database, allowing you to optimize each database independently for its specific workload patterns like maintaining different backup strategies for your critical application data vs. job history.
// Configure.Db.cs
services.AddOrmLite(options => options.UsePostgres(connectionString))
        .AddPostgres("jobs", jobsConnectionString);

// Configure.BackgroundJobs.cs
services.AddPlugin(new DatabaseJobFeature {
    NamedConnection = "jobs"
});
Real Time Admin UI
The Jobs Admin UI provides a real time view into the status of all background jobs including their progress, completion times, Executed, Failed, and Cancelled Jobs, etc. which is useful for monitoring and debugging purposes.
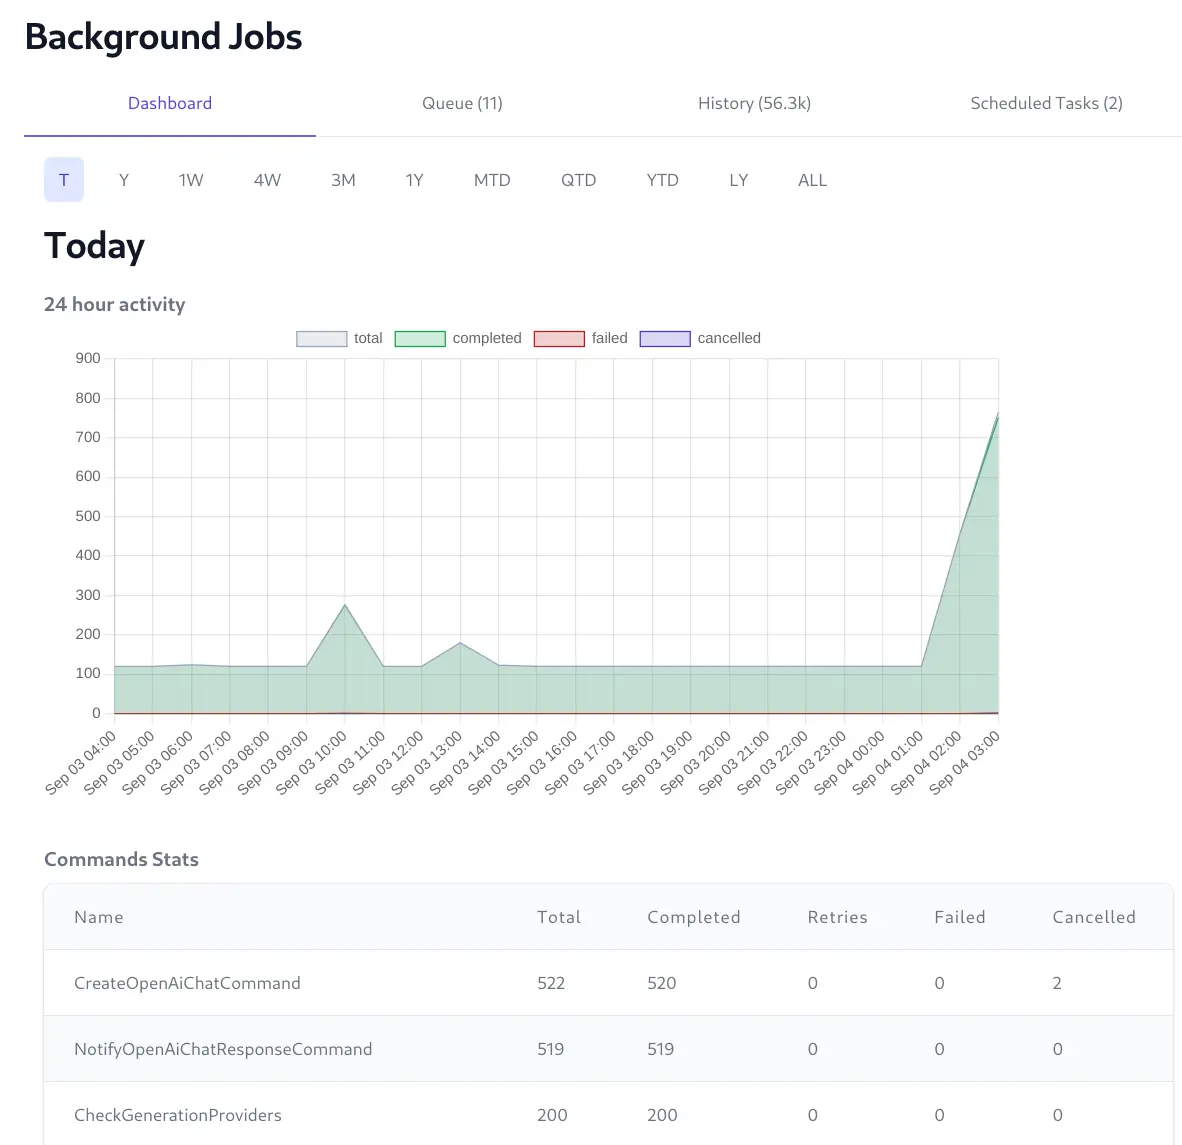
View Real-time progress of queued Jobs
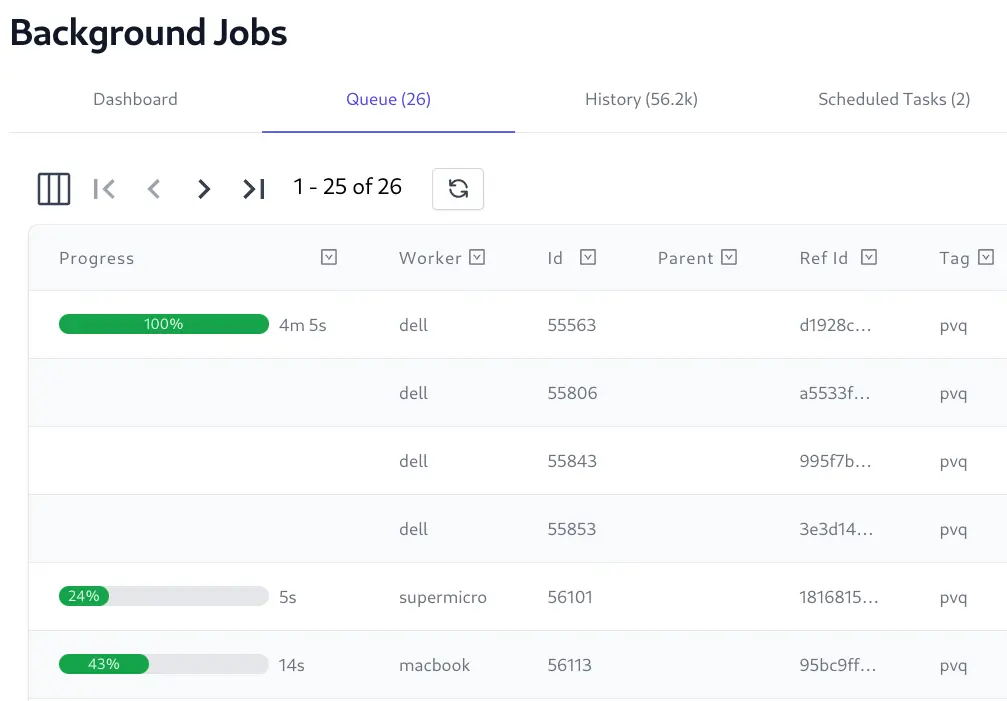
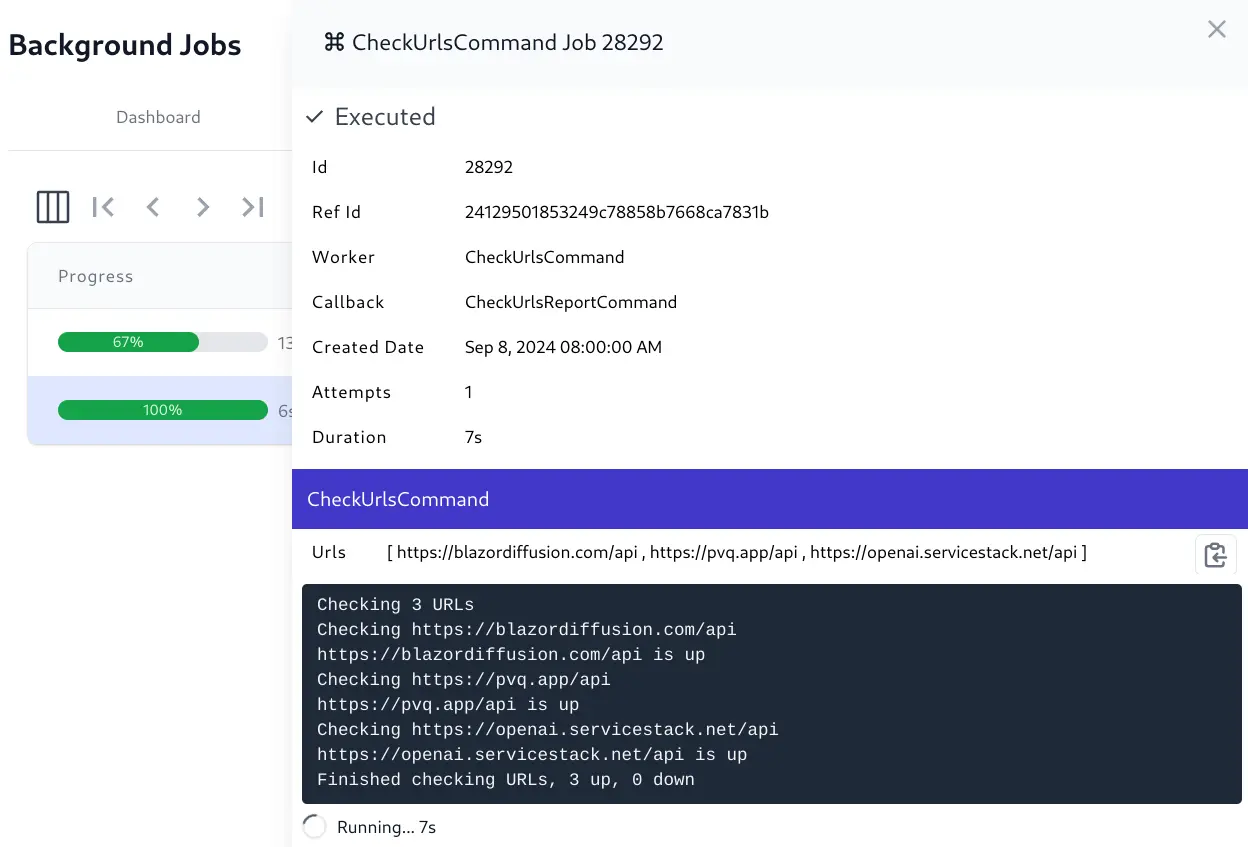
View real-time progress logs of executing Jobs
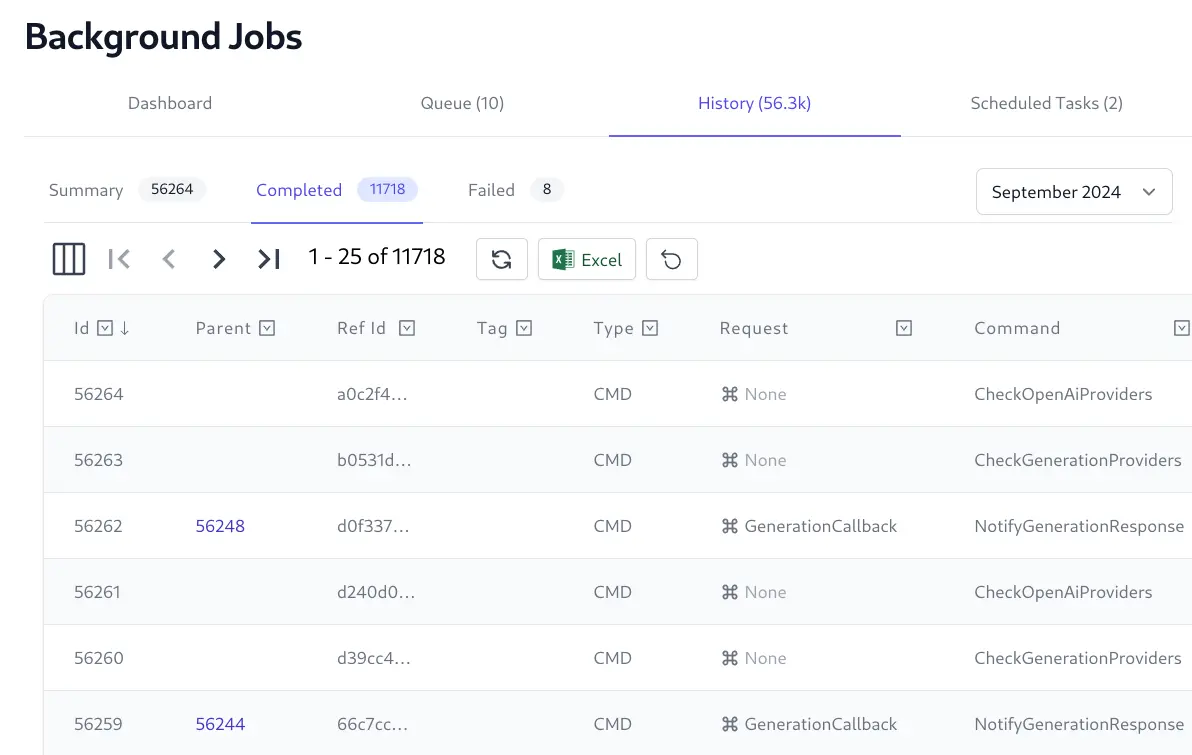
View Job Summary and Monthly Databases of Completed and Failed Jobs
View full state and execution history of each Job
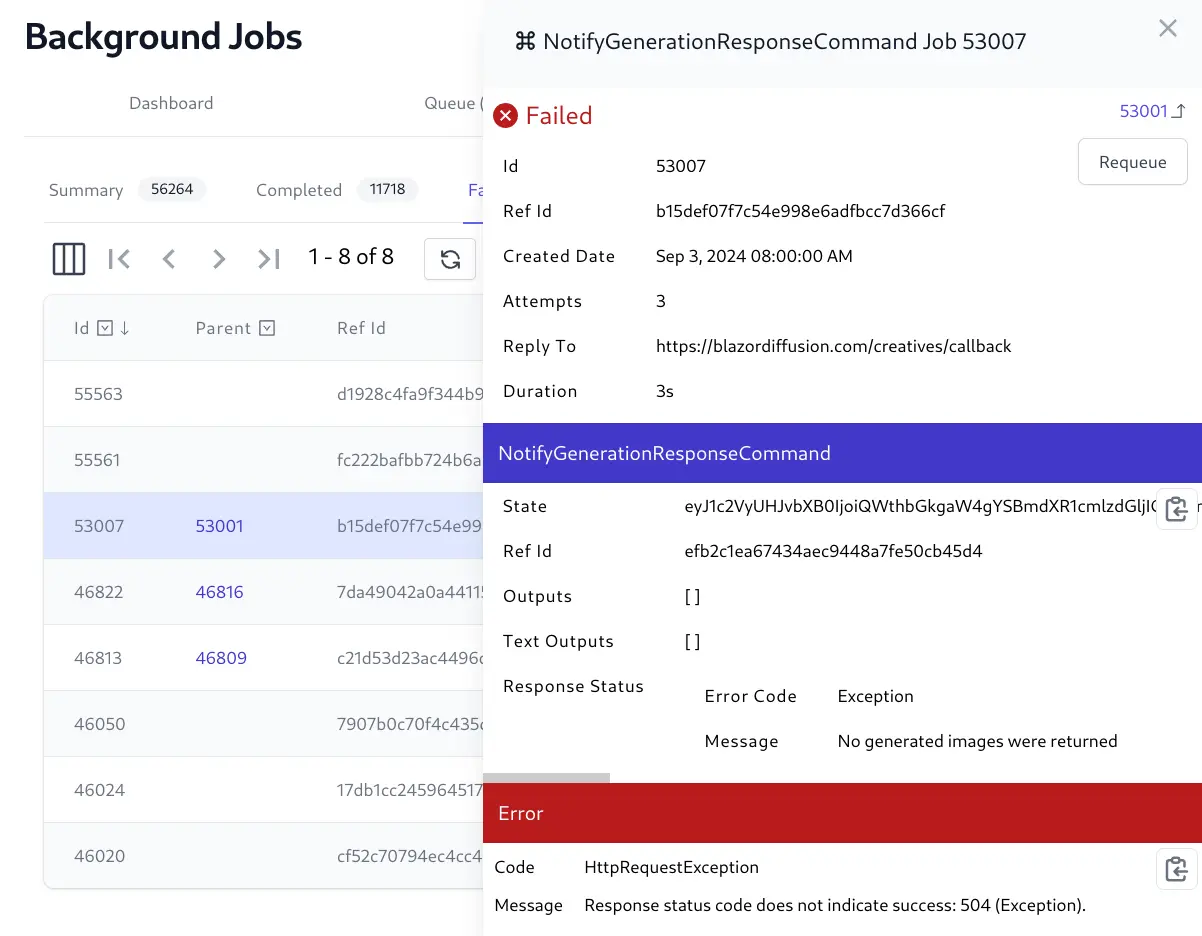
Cancel Running jobs and Requeue failed jobs
Usage
For even greater reuse of your APIs you're able to queue your existing ServiceStack Request DTOs as a Background Job in addition to Commands for encapsulating units of logic into internal invokable, inspectable and auto-retryable building blocks.
Queue Commands
Any API, Controller or Minimal API can execute jobs with the IBackgroundJobs dependency, e.g.
here's how you can run a background job to send a new email when an API is called in
any new Identity Auth template:
class MyService(IBackgroundJobs jobs) : Service
{
    public object Any(MyOrder request)
    {
        var jobRef = jobs.EnqueueCommand<SendEmailCommand>(new SendEmail {
            To = "my@email.com",
            Subject = $"Received New Order {request.Id}",
            BodyText = $"""
                       Order Details:
                       {request.OrderDetails.DumptTable()}
                       """,
        });
        //...
    }
}
Which records and immediately executes a worker to execute the SendEmailCommand with the specified
SendEmail Request argument. It also returns a reference to a Job which can be used later to query
and track the execution of a job.
Queue APIs
Alternatively a SendEmail API could be executed with just the Request DTO:
var jobRef = jobs.EnqueueApi(new SendEmail {
    To = "my@email.com",
    Subject = $"Received New Order {request.Id}",
    BodyText = $"""
               Order Details:
               {request.OrderDetails.DumptTable()}
               """,
});
Although Sending Emails is typically not an API you want to make externally available and would want to Restrict access or limit usage to specified users.
In both cases the SendEmail Request is persisted into the Jobs SQLite database for durability
that gets updated as it progresses through the queue.
For execution the API or command is resolved from the IOC before being invoked with the Request. APIs are executed via the MQ Request Pipeline and commands executed using the Commands Feature where they'll also be visible in the Commands Admin UI.
Background Job Options
The behavior for each Enqueue* method for executing background jobs can be customized with
the following options:
Worker- Serially process job using a named worker threadCallback- Invoke another command with the result of a successful jobDependsOn- Execute jobs after successful completion of a dependent job- If parent job fails all dependent jobs are cancelled
UserId- Execute within an Authenticated User ContextRunAfter- Queue jobs that are only run after a specified dateRetryLimit- Override default retry limit for how many attempts should be made to execute a jobTimeoutSecs- Override default timeout for how long a job should run before being cancelledRefId- Allow clients to specify a unique Id (e.g Guid) to track jobTag- Group related jobs under a user specified tagCreatedBy- Optional field for capturing the owner of a jobBatchId- Group multiple jobs with the same IdReplyTo- Optional field for capturing where to send notification for completion of a JobArgs- Optional String Dictionary of Arguments that can be attached to a Job
Feature Overview
It packs most features needed in a Background Jobs solution including:
- Use your App's existing RDBMS (no other infrastructure dependencies)
- Execute existing APIs or versatile Commands
- Commands auto registered in IOC
- Scheduled Reoccurring Tasks
- Track Last Job Run
- Serially execute jobs with the same named Worker
- Queue Jobs dependent on successful completion of parent Job
- Queue Jobs to be executed after a specified Date
- Execute Jobs within the context of an Authenticated User
- Auto retry failed jobs on a default or per-job limit
- Timeout Jobs on a default or per-job limit
- Cancellable Jobs
- Requeue Failed Jobs
- Execute custom callbacks on successful execution of Job
- Maintain Status, Logs, and Progress of Executing Jobs
- Execute transitive (i.e. non-durable) jobs using named workers
- Attach optional
Tag,BatchId,CreatedBy,ReplyToandArgswith Jobs
Schedule Recurring Tasks
In addition to queueing jobs to run in the background, it also supports scheduling recurring tasks to execute APIs or Commands at fixed intervals.
APIs and Commands can be scheduled to run at either a TimeSpan or
CRON Expression interval, e.g:
CRON Expression Examples
// Every Minute Expression
jobs.RecurringCommand<CheckUrlsCommand>(Schedule.Cron("* * * * *"));

// Every Minute Constant
jobs.RecurringCommand<CheckUrlsCommand>(Schedule.EveryMinute, new CheckUrls {
    Urls = urls
});
CRON Format
You can use any unix-cron format expression supported by the HangfireIO/Cronos library:
|------------------------------- Minute (0-59)
|     |------------------------- Hour (0-23)
|     |     |------------------- Day of the month (1-31)
|     |     |     |------------- Month (1-12; or JAN to DEC)
|     |     |     |     |------- Day of the week (0-6; or SUN to SAT)
|     |     |     |     |
|     |     |     |     |
*     *     *     *     *
The allowed formats for each field include:
| Field | Format of valid values |
|---|---|
| Minute | 0-59 |
| Hour | 0-23 |
| Day of the month | 1-31 |
| Month | 1-12 (or JAN to DEC) |
| Day of the week | 0-6 (or SUN to SAT; or 7 for Sunday) |
Matching all values
To match all values for a field, use the asterisk: *, e.g here are two examples in which the minute field is left unrestricted:
* 0 1 1 1- the job runs every minute of the midnight hour on January 1st and Mondays.* * * * *- the job runs every minute (of every hour, of every day of the month, of every month, every day of the week, because each of these fields is unrestricted too).
Matching a range
To match a range of values, specify your start and stop values, separated by a hyphen (-). Do not include spaces in the range. Ranges are inclusive. The first value must be less than the second.
The following equivalent examples run at midnight on Mondays, Tuesdays, Wednesdays, Thursdays, and Fridays (for all months):
0 0 * * 1-50 0 * * MON-FRI
Matching a list
Lists can contain any valid value for the field, including ranges. Specify your values, separated by a comma (,). Do not include spaces in the list, e.g:
0 0,12 * * *- the job runs at midnight and noon.0-5,30-35 * * * *- the job runs in each of the first five minutes of every half hour (at the top of the hour and at half past the hour).
TimeSpan Interval Examples
jobs.RecurringCommand<CheckUrlsCommand>(
    Schedule.Interval(TimeSpan.FromMinutes(1)));

// With Example
jobs.RecurringApi(Schedule.Interval(TimeSpan.FromMinutes(1)), new CheckUrls {
    Urls = urls
});
That can be registered with an optional Task Name and Background Options, e.g:
jobs.RecurringCommand<CheckUrlsCommand>("Check URLs", Schedule.EveryMinute,
   new() {
       RunCommand = true // don't persist job
   });
INFO
If no name is provided, the Command's Name or APIs Request DTO will be used
Idempotent Registration
Scheduled Tasks are idempotent where the same registration with the same name will either create or update the scheduled task registration without losing track of the last time the Recurring Task, as such it's recommended to always define your App's Scheduled Tasks on Startup:
public class ConfigureBackgroundJobs : IHostingStartup
{
   public void Configure(IWebHostBuilder builder) => builder
     .ConfigureServices((context,services) => {
         //...
     }).ConfigureAppHost(afterAppHostInit: appHost => {
         var services = appHost.GetApplicationServices();
         var jobs = services.GetRequiredService<IBackgroundJobs>();

         // App's Scheduled Tasks Registrations:
         jobs.RecurringCommand<MyCommand>(Schedule.Hourly);
     });
}
Interned Cronos
A major source of friction in .NET Libraries and most Frameworks from all platforms in general is dependency conflicts. E.g. Conflicting versions of JSON.NET have plagued many a .NET library and framework for several years, something that never impacted ServiceStack Apps since we maintain our own fast/flexible JSON Serializer and have never had a dependency to JSON.NET.
As supply chain attacks from external OSS libraries have become more common, it's even more important to avoid taking dependencies on external libraries where possible.
As we now have multiple packages that referenced
Hangfire's Cronos library we've decided to intern it in ServiceStack,
removing the previous dependency ServiceStack.Jobs had to Cronos. The only issue was that
CronParser.cs uses unsafe parsing and we
don't allow <AllowUnsafeBlocks> in any ServiceStack package, so it was rewritten to use Spans in our interned
CronParser.cs
implementation.
It's released under the same MIT License as Cronos so anyone else is welcome to use it, as is our port of their CronExpressionTests.cs to NUnit.
Background Jobs Admin UI
The last job the Recurring Task ran is also viewable in the Jobs Admin UI:
Executing non-durable jobs
IBackgroundJobs also supports RunCommand* methods for executing background jobs transiently
(i.e. non-durable), which is useful for commands that want to be serially executed by a named worker
but don't need to be persisted.
Execute in Background and return immediately
You could use this to queue system emails to be sent by the same smtp worker and are happy to not have its state and execution history tracked in the Jobs database.
var job = jobs.RunCommand<SendEmailCommand>(new SendEmail { ... },
    new() {
        Worker = "smtp"
    });
In this case RunCommand returns the actual BackgroundJob instance that will be updated by
the worker.
Execute in Background and wait for completion
You can also use RunCommandAsync if you prefer to wait until the job has been executed. Instead
of a Job it returns the Result of the command if it returned one.
var result = await jobs.RunCommandAsync<SendEmailCommand>(new SendEmail {...},
    new() {
        Worker = "smtp"
    });
Serially Execute Jobs with named Workers
By default jobs are executed immediately in a new Task, we can also change the behavior to instead execute jobs one-by-one in a serial queue by specifying them to use the same named worker as seen in the example above.
Alternatively you can annotate the command with the [Worker] attribute if you always want
all jobs executing the command to use the same worker:
[Worker("smtp")]
public class SendEmailCommand(IBackgroundJobs jobs) : SyncCommand<SendEmail>
{
    //...
}
Use Callbacks to process the results of Commands
Callbacks can be used to extend the lifetime of a job to include processing a callback to process its results. This is useful where you would like to reuse the the same command but handle the results differently, e.g. the same command can email results or invoke a webhook by using a callback:
jobs.EnqueueCommand<CheckUrlsCommand>(new CheckUrls { Urls = allUrls },
    new() {
        Callback = nameof(EmailUrlResultsCommand),
    });

jobs.EnqueueCommand<CheckUrlsCommand>(new CheckUrls { Urls = criticalUrls },
    new() {
        Callback = nameof(WebhookUrlResultsCommand),
        ReplyTo = callbackUrl
    });
Callbacks that fail are auto-retried the same number of times as their jobs, which if they all fail then the entire job is also marked as failed.
Run Job dependent on successful completion of parent
Jobs can be queued to only run after the successful completion of another job, this is useful for when you need to kick off multiple jobs after a long running task has finished like generating monthly reports after monthly data has been aggregated, e.g:
var jobRef = jobs.EnqueueCommand<AggregateMonthlyDataCommand>(new Aggregate {
    Month = DateTime.UtcNow
});

jobs.EnqueueCommand<GenerateSalesReportCommand>(new () {
   DependsOn = jobRef.Id,
});

jobs.EnqueueCommand<GenerateExpenseReportCommand>(new () {
   DependsOn = jobRef.Id,
});
Inside your command you can get a reference to your current job with Request.GetBackgroundJob()
which will have its ParentId populated with the parent job Id and job.ParentJob containing
a reference to the completed Parent Job where you can access its Request, Results, and other job
information:
public class GenerateSalesReportCommand(ILogger<MyCommandNoArgs> log)
    : SyncCommand
{
    protected override void Run()
    {
        var job = Request.GetBackgroundJob();
        var parentJob = job.ParentJob;
    }
}
Atomic Batching Behavior
We can also use DependsOn to implement atomic batching behavior where from inside our
executing command we can queue new jobs that are dependent on the successful execution
of the current job, e.g:
public class CheckUrlsCommand(IHttpClientFactory factory, IBackgroundJobs jobs)
    : AsyncCommand<CheckUrls>
{
    protected override async Task RunAsync(CheckUrls req, CancellationToken ct)
    {
        var job = Request.GetBackgroundJob();

        var batchId = Guid.NewGuid().ToString("N");
        using var client = factory.CreateClient();
        foreach (var url in req.Urls)
        {
            var msg = new HttpRequestMessage(HttpMethod.Get, url);
            var response = await client.SendAsync(msg, ct);
            response.EnsureSuccessStatusCode();

            jobs.EnqueueCommand<SendEmailCommand>(new SendEmail {
                To = "my@email.com",
                Subject = $"{new Uri(url).Host} status",
                BodyText = $"{url} is up",
            }, new() {
                DependsOn = job.Id,
                BatchId = batchId,
            });
        }
    }
}
Where any dependent jobs are only executed if the job was successfully completed. If instead an exception was thrown during execution, the job will be failed and all its dependent jobs cancelled and removed from the queue.
Executing jobs with an Authenticated User Context
If you have existing logic dependent on a Authenticated ClaimsPrincipal or ServiceStack
IAuthSession you can have your APIs and Commands also be executed with that user context
by specifying the UserId the job should be executed as:
var openAiRequest = new CreateOpenAiChat {
   Request = new() {
       Model = "gpt-4",
       Messages = [
           new() {
               Content = request.Question
           }
       ]
   },
};

// Example executing API Job with User Context
jobs.EnqueueApi(openAiRequest,
    new() {
      UserId = Request.GetClaimsPrincipal().GetUserId(),
      CreatedBy = Request.GetClaimsPrincipal().GetUserName(),
   });

// Example executing Command Job with User Context
jobs.EnqueueCommand<CreateOpenAiChatCommand>(openAiRequest,
    new() {
      UserId = Request.GetClaimsPrincipal().GetUserId(),
      CreatedBy = Request.GetClaimsPrincipal().GetUserName(),
   });
Inside your API or Command you access the populated User ClaimsPrincipal or
ServiceStack IAuthSession using the same APIs that you'd use inside your ServiceStack APIs, e.g:
public class CreateOpenAiChatCommand(IBackgroundJobs jobs)
    : AsyncCommand<CreateOpenAiChat>
{
    protected override async Task RunAsync(
        CreateOpenAiChat request, CancellationToken token)
    {
        var user = Request.GetClaimsPrincipal();
        var session = Request.GetSession();
        //...
    }
}
Queue Job to run after a specified date
Using RunAfter lets you queue jobs that are only executed after a specified DateTime,
useful for executing resource intensive tasks at low traffic times, e.g:
var jobRef = jobs.EnqueueCommand<AggregateMonthlyDataCommand>(new Aggregate {
       Month = DateTime.UtcNow
   },
   new() {
       RunAfter = DateTime.UtcNow.Date.AddDays(1)
   });
Attach Metadata to Jobs
All above Background Job Options have an effect on when and how Jobs are executed. There are also a number of properties that can be attached to a Job that can be useful in background job processing despite not having any effect on how jobs are executed.
These properties can be accessed by commands or APIs executing the Job and are visible and can be filtered in the Jobs Admin UI to help find and analyze executed jobs.
var jobRef = jobs.EnqueueCommand<CreateOpenAiChatCommand>(openAiRequest,
   new() {
      // Group related jobs under a common tag
      Tag = "ai",
      // A User-specified or system generated unique Id to track the job
      RefId = request.RefId,
      // Capture who created the job
      CreatedBy = Request.GetClaimsPrincipal().GetUserName(),
      // Link jobs together that are sent together in a batch
      BatchId = batchId,
      // Capture where to notify the completion of the job to
      ReplyTo = "https:example.org/callback",
      // Additional properties about the job that aren't in the Request
      Args = new() {
          ["Additional"] = "Metadata"
      }
   });
Querying a Job
A job can be queried by either it's auto-incrementing Id Primary Key or by a unique RefId
that can be user-specified.
var jobResult = jobs.GetJob(jobRef.Id);

var jobResult = jobs.GetJobByRefId(jobRef.RefId);
At a minimum a JobResult will contain the Summary Information about a Job as well as the
full information about a job depending on where it's located:
class JobResult
{
    // Summary Metadata about a Job in the JobSummary Table
    JobSummary Summary
    // Job that's still in the BackgroundJob Queue
    BackgroundJob? Queued
    // Full Job information in Monthly DB CompletedJob Table
    CompletedJob? Completed
    // Full Job information in Monthly DB FailedJob Table
    FailedJob? Failed
    // Helper to access full Job Information
    BackgroundJobBase? Job => Queued ?? Completed ?? Failed
}
Job Execution Limits
Default Retry and Timeout Limits can be configured on the DatabaseJobFeature:
services.AddPlugin(new DatabaseJobFeature
{
   DefaultRetryLimit = 2,
   DefaultTimeout = TimeSpan.FromMinutes(10),
});
These limits are also overridable on a per-job basis, e.g:
var jobRef = jobs.EnqueueCommand<AggregateMonthlyDataCommand>(new Aggregate {
       Month = DateTime.UtcNow
   },
   new() {
      RetryLimit = 3,
      Timeout = TimeSpan.FromMinutes(30),
   });
Logging, Cancellation an Status Updates
We'll use the command for checking multiple URLs to demonstrate some recommended patterns and how to enlist different job processing features.
public class CheckUrlsCommand(
    ILogger<CheckUrlsCommand> logger,
    IBackgroundJobs jobs,
    IHttpClientFactory clientFactory) : AsyncCommand<CheckUrls>
{
    protected override async Task RunAsync(CheckUrls req, CancellationToken ct)
    {
        // 1. Create Logger that Logs and maintains logging in Jobs DB
        var log = Request.CreateJobLogger(jobs,logger);

        // 2. Get Current Executing Job
        var job = Request.GetBackgroundJob();

        var result = new CheckUrlsResult {
            Statuses = new()
        };
        using var client = clientFactory.CreateClient();
        for (var i = 0; i < req.Urls.Count; i++)
        {
            // 3. Stop processing Job if it's been cancelled
            ct.ThrowIfCancellationRequested();

            var url = req.Urls[i];
            try
            {
                var msg = new HttpRequestMessage(HttpMethod.Get,url);
                var response = await client.SendAsync(msg, ct);

                result.Statuses[url] = response.IsSuccessStatusCode;
                log.LogInformation("{Url} is {Status}",
                    url, response.IsSuccessStatusCode ? "up" : "down");

                // 4. Optional: Maintain explicit progress and status updates
                log.UpdateStatus(i/(double)req.Urls.Count,$"Checked {i} URLs");
            }
            catch (Exception e)
            {
                log.LogError(e, "Error checking {Url}", url);
                result.Statuses[url] = false;
            }
        }

        // 5. Send Results to WebHook Callback if specified
        if (job.ReplyTo != null)
        {
            jobs.EnqueueCommand<NotifyCheckUrlsCommand>(result,
                new() {
                    ParentId = job.Id,
                    ReplyTo = job.ReplyTo,
                });
        }
    }
}
We'll cover some of the notable parts useful when executing Jobs:
1. Job Logger
We can use a Job logger to enable database logging that can be monitored in real-time in the
Admin Jobs UI. Creating it with both BackgroundJobs and ILogger will return a combined
logger that both Logs to standard output and to the Jobs database:
var log = Request.CreateJobLogger(jobs,logger);
Or just use Request.CreateJobLogger(jobs) to only save logs to the database.
2. Resolve Executing Job
If needed the currently executing job can be accessed with:
var job = Request.GetBackgroundJob();
Where you'll be able to access all the metadata the jobs were created with including ReplyTo
and Args.
3. Check if Job has been cancelled
To be able to cancel a long running job you'll need to periodically check if a Cancellation
has been requested and throw a TaskCanceledException if it has to short-circuit the command
which can be done with:
ct.ThrowIfCancellationRequested();
You'll typically want to call this at the start of any loops to prevent it from doing any more work.
4. Optionally record progress and status updates
By default Background Jobs looks at the last API or Command run and worker used to estimate the duration and progress for how long a running job will take.
If preferred your command can explicitly set a more precise progress and optional status update that should be used instead, e.g:
log.UpdateStatus(progress:i/(double)req.Urls.Count, $"Checked {i} URLs");
Although generally the estimated duration and live logs provide a good indication for the progress of a job.
5. Notify completion of Job
Calling a Web Hook is a good way to notify externally initiated job requests of the completion of a job. You could invoke the callback within the command itself but there are a few benefits to initiating another job to handle the callback:
- Frees up the named worker immediately to process the next task
- Callbacks are durable, auto-retried and their success recorded like any job
- If a callback fails the entire command doesn't need to be re-run again
We can queue a callback with the result by passing through the ReplyTo and link it to the
existing job with:
if (job.ReplyTo != null)
{
   jobs.EnqueueCommand<NotifyCheckUrlsCommand>(result,
       new() {
           ParentId = job.Id,
           ReplyTo = job.ReplyTo,
       });
}
Which we can implement by calling the SendJsonCallbackAsync extension method with the
Callback URL and the Result DTO it should be called with:
public class NotifyCheckUrlsCommand(IHttpClientFactory clientFactory)
    : AsyncCommand<CheckUrlsResult>
{
    protected override async Task RunAsync(
        CheckUrlsResult request, CancellationToken token)
    {
        await clientFactory.SendJsonCallbackAsync(
            Request.GetBackgroundJob().ReplyTo, request, token);
    }
}
Callback URLs
ReplyTo can be any URL which by default will have the result POST'ed back to the URL with a JSON
Content-Type. Typically URLs will contain a reference Id so external clients can correlate a callback
with the internal process that initiated the job. If the callback API is publicly available you'll
want to use an internal Id that can't be guessed so the callback can't be spoofed, like a Guid, e.g:
https://api.example.com?refId={RefId}
If needed the callback URL can be customized on how the HTTP Request callback is sent.
You can change the HTTP Method used by including it before the URL:
PUT https://api.example.com
If the auth part contains a colon : it's treated as Basic Auth:
username:password@https://api.example.com
If name starts with http. sends a HTTP Header
http.X-API-Key:myApiKey@https://api.example.com
Otherwise it's sent as a Bearer Token:
myToken123@https://api.example.com
Bearer Token or HTTP Headers starting with $ is substituted with Environment Variable if exists:
$API_TOKEN@https://api.example.com
When needed headers, passwords, and tokens can be URL encoded if they contain any delimiter characters.
Implementing Commands
At a minimum a command need only implement the IAsyncCommand interface:
public interface IAsyncCommand<in T>
{
    Task ExecuteAsync(T request);
}
Which is the singular interface that can execute any command.
However commands executed via Background Jobs have additional context your commands may need to
access during execution, including the BackgroundJob itself, the CancellationToken and
an Authenticated User Context.
To reduce the effort in creating commands with a IRequest context we've added a number ergonomic
base classes to better capture the different call-styles a unit of logic can have including
Sync or Async execution, whether they require Input Arguments or have Result Outputs.
Choosing the appropriate Abstract base class benefits from IDE tooling in generating the method signature that needs to be implemented whilst Async commands with Cancellation Tokens in its method signature highlights any missing async methods that are called without the token.
Sync Commands
SyncCommand- Requires No ArgumentsSyncCommand<TRequest>- Requires TRequest ArgumentSyncCommandWithResult<TResult>- Requires No Args and returns ResultSyncCommandWithResult<TReq,TResult>- Requires Arg and returns Result
public record MyArgs(int Id);
public record MyResult(string Message);

public class MyCommandNoArgs(ILogger<MyCommandNoArgs> log) : SyncCommand
{
    protected override void Run()
    {
        log.LogInformation("Called with No Args");
    }
}

public class MyCommandArgs(ILogger<MyCommandNoArgs> log) : SyncCommand<MyArgs>
{
    protected override void Run(MyArgs request)
    {
        log.LogInformation("Called with {Id}", request.Id);
    }
}

public class MyCommandWithResult(ILogger<MyCommandNoArgs> log)
    : SyncCommandWithResult<MyResult>
{
    protected override MyResult Run()
    {
        log.LogInformation("Called with No Args and returns Result");
        return new MyResult("Hello World");
    }
}

public class MyCommandWithArgsAndResult(ILogger<MyCommandNoArgs> log)
    : SyncCommandWithResult<MyArgs,MyResult>
{
    protected override MyResult Run(MyArgs request)
    {
        log.LogInformation("Called with {Id} and returns Result", request.Id);
        return new MyResult("Hello World");
    }
}
Async Commands
AsyncCommand- Requires No ArgumentsAsyncCommand<TRequest>- Requires TRequest ArgumentAsyncCommandWithResult<TResult>- Requires No Args and returns ResultAsyncCommandWithResult<TReq,TResult>- Requires Arg and returns Result
public class MyAsyncCommandNoArgs(ILogger<MyCommandNoArgs> log) : AsyncCommand
{
    protected override async Task RunAsync(CancellationToken token)
    {
        log.LogInformation("Async called with No Args");
    }
}

public class MyAsyncCommandArgs(ILogger<MyCommandNoArgs> log)
    : AsyncCommand<MyArgs>
{
    protected override async Task RunAsync(MyArgs request, CancellationToken t)
    {
        log.LogInformation("Async called with {Id}", request.Id);
    }
}

public class MyAsyncCommandWithResult(ILogger<MyCommandNoArgs> log)
    : AsyncCommandWithResult<MyResult>
{
    protected override async Task<MyResult> RunAsync(CancellationToken token)
    {
        log.LogInformation("Async called with No Args and returns Result");
        return new MyResult("Hello World");
    }
}

public class MyAsyncCommandWithArgsAndResult(ILogger<MyCommandNoArgs> log)
    : AsyncCommandWithResult<MyArgs,MyResult>
{
    protected override async Task<MyResult> RunAsync(
        MyArgs request, CancellationToken token)
    {
        log.LogInformation("Called with {Id} and returns Result", request.Id);
        return new MyResult("Hello World");
    }
}
RDBMS Request Logging and Analytics
This release also restores parity to PostgreSQL, SQL Server & MySQL RDBMS's for our previous
SQLite-only features with the new DbRequestLogger which is a drop-in replacement for
SQLite Request Logging for persisting API Request Logs to a RDBMS.
Whilst maintaining an archive of API Requests is nice, the real value of DB Request Logging is that it unlocks the comprehensive API Analytics and querying Logging available that was previously limited to SQLite Request Logs.
Benefits of API Analytics
They provide deep and invaluable insight into your System API Usage, device distribution, its Users, API Keys and the IPs where most traffic generates:
- Visibility: Provides a clear, visual summary of complex log data, making it easier to understand API usage and performance at a glance.
- Performance Monitoring: Helps track key metrics like request volume and response times to ensure APIs are meeting performance expectations.
- User Understanding: Offers insights into how users (and bots) are interacting with the APIs (devices, browsers).
- Troubleshooting: Aids in quickly identifying trends, anomalies, or specific endpoints related to issues.
- Resource Planning: Understanding usage patterns helps in scaling infrastructure appropriately.
- Security Insight: Identifying bot traffic and unusual request patterns can be an early indicator of security concerns.
Interactive Analytics
Analytics are also interactive where you're able to drill down to monitor the activity of individual APIs, Users, API Keys and IPs which have further links back to the request logs which the summary analytics are derived from.
As they offer significant and valuable insights the SqliteRequestLogger is built into all ASP.NET Core
IdentityAuth templates, to switch it over to use a RDBMS we recommend installing db-identity mix gist to
also replace SQLite BackgroundJobs with the RDBMS DatabaseJobFeature:
x mix db-identity
Or if you just want to replace SQLite Request Logs with a RDBMS use:
x mix db-requestlogs
Or you can copy the Modular Startup script below:
[assembly: HostingStartup(typeof(MyApp.ConfigureRequestLogs))]

namespace MyApp;

public class ConfigureRequestLogs : IHostingStartup
{
    public void Configure(IWebHostBuilder builder) => builder
        .ConfigureServices((context, services) => {

            services.AddPlugin(new RequestLogsFeature {
                RequestLogger = new DbRequestLogger {
                    // NamedConnection = "<alternative db>"
                },
                EnableResponseTracking = true,
                EnableRequestBodyTracking = true,
                EnableErrorTracking = true
            });
            services.AddHostedService<RequestLogsHostedService>();

            if (context.HostingEnvironment.IsDevelopment())
            {
                services.AddPlugin(new ProfilingFeature());
            }
        });
}

public class RequestLogsHostedService(ILogger<RequestLogsHostedService> log, IRequestLogger requestLogger) : BackgroundService
{
    protected override async Task ExecuteAsync(CancellationToken stoppingToken)
    {
        using var timer = new PeriodicTimer(TimeSpan.FromSeconds(3));
        if (requestLogger is IRequireAnalytics logger)
        {
            while (!stoppingToken.IsCancellationRequested && await timer.WaitForNextTickAsync(stoppingToken))
            {
                await logger.TickAsync(log, stoppingToken);
            }
        }
    }
}
RDBMS Provider
When using a remote RDBMS, network latency becomes a primary concern that any solution needs to be designed around,
as such the API Request Logs are initially maintained in an in memory collection before being flushed to the database
every 3 seconds — configurable in the PeriodicTimer interval above.
To reduce the number of round-trips to the database, the DbRequestLogger batches all pending logs into a single
request using OrmLite's Bulk Inserts which is supported by all
major RDBMS's.
PostgreSQL Table Partitioning
PostgreSQL provides native support for table partitioning, allowing us to automatically create monthly partitions using
PARTITION BY RANGE on the CreatedDate column. The DbRequestLogger automatically creates new monthly partitions
as needed, maintaining the same logical separation as SQLite's monthly .db's while keeping everything within a single
Postgres DB:
CREATE TABLE "RequestLog" (
    -- columns...
    "CreatedDate" TIMESTAMP NOT NULL,
    PRIMARY KEY ("Id","CreatedDate")
) PARTITION BY RANGE ("CreatedDate");

-- Monthly partitions are automatically created, e.g.:
CREATE TABLE "RequestLog_2025_01" PARTITION OF "RequestLog"
    FOR VALUES FROM ('2025-01-01') TO ('2025-02-01');
SQLServer / MySQL - Manual Partition Management
For SQL Server and MySQL, monthly partitioned tables need to be created out-of-band
(either manually or via cronjob scripts) since they don't support the same level of automatic
partition management as PostgreSQL. However, this still works well in practice as because RequestLog is an
Append Only table with all querying from the Admin UIs being filtered by its indexed CreatedDate
in monthly viewable snapshots like it was with SQLite.
Separate RequestLog Database
Or if preferred, you can maintain request logs in a separate database from your main application database. This separation keeps the write-heavy logging load off your primary database, allowing you to optimize each database independently for its specific workload patterns like maintaining different backup strategies for your critical application data vs. log history.
// Configure.Db.cs
services.AddOrmLite(options => options.UsePostgres(connectionString))
        .AddPostgres("logs", logsConnectionString);

// Configure.RequestLogs.cs
services.AddPlugin(new RequestLogsFeature {
    RequestLogger = new DbRequestLogger {
        NamedConnection = "logs"
    },
    //...
});
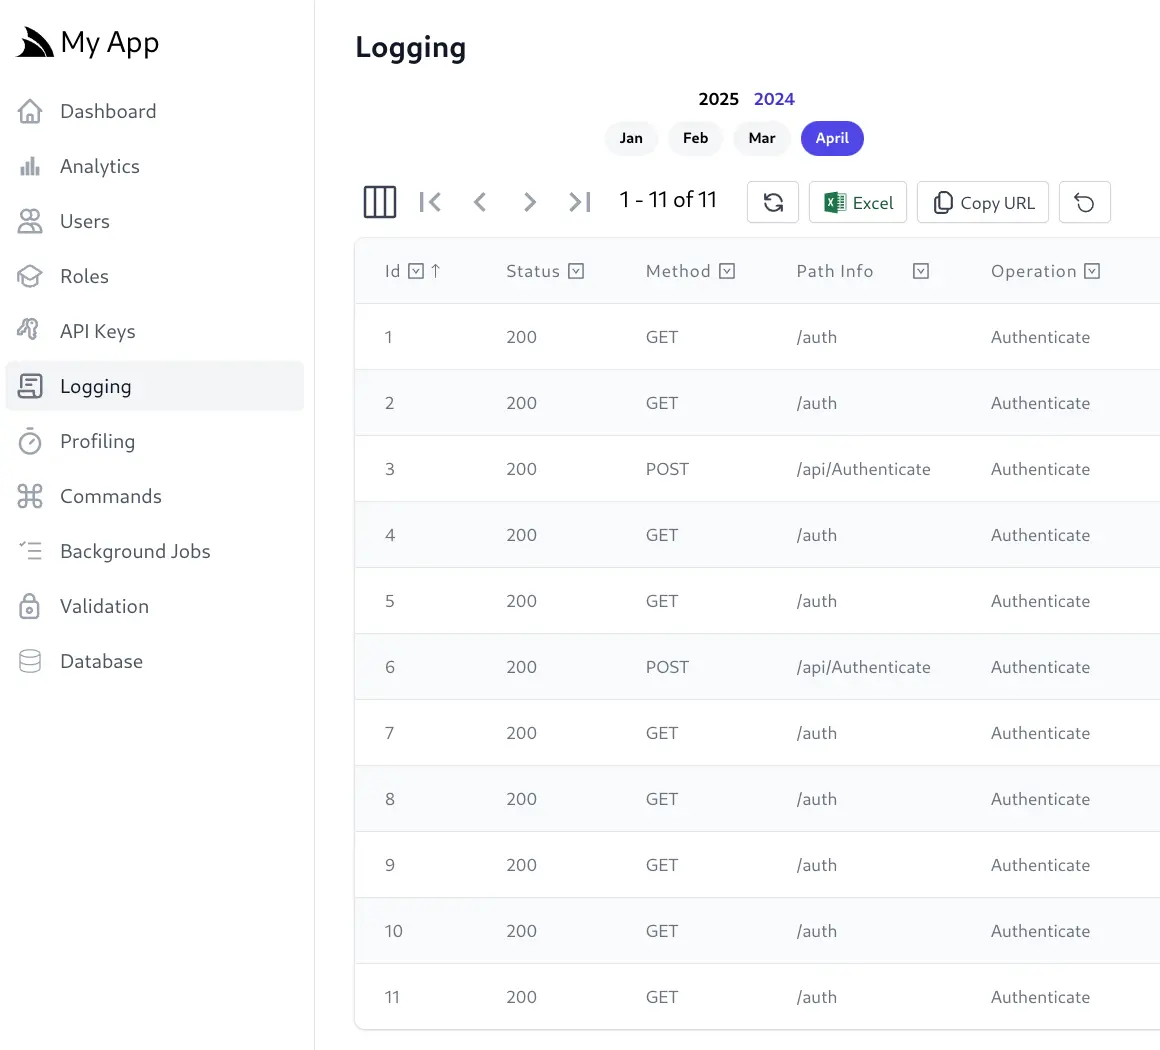
Queryable Admin Logging UI
This will enable a more feature rich Request Logging Admin UI which utilizes the full queryability of the AutoQueryGrid component to filter, sort and export Request Logs.
Analytics Overview
Utilizing an DbRequestLogger also enables the Analytics Admin UI in the sidebar which initially
displays the API Analytics Dashboard:
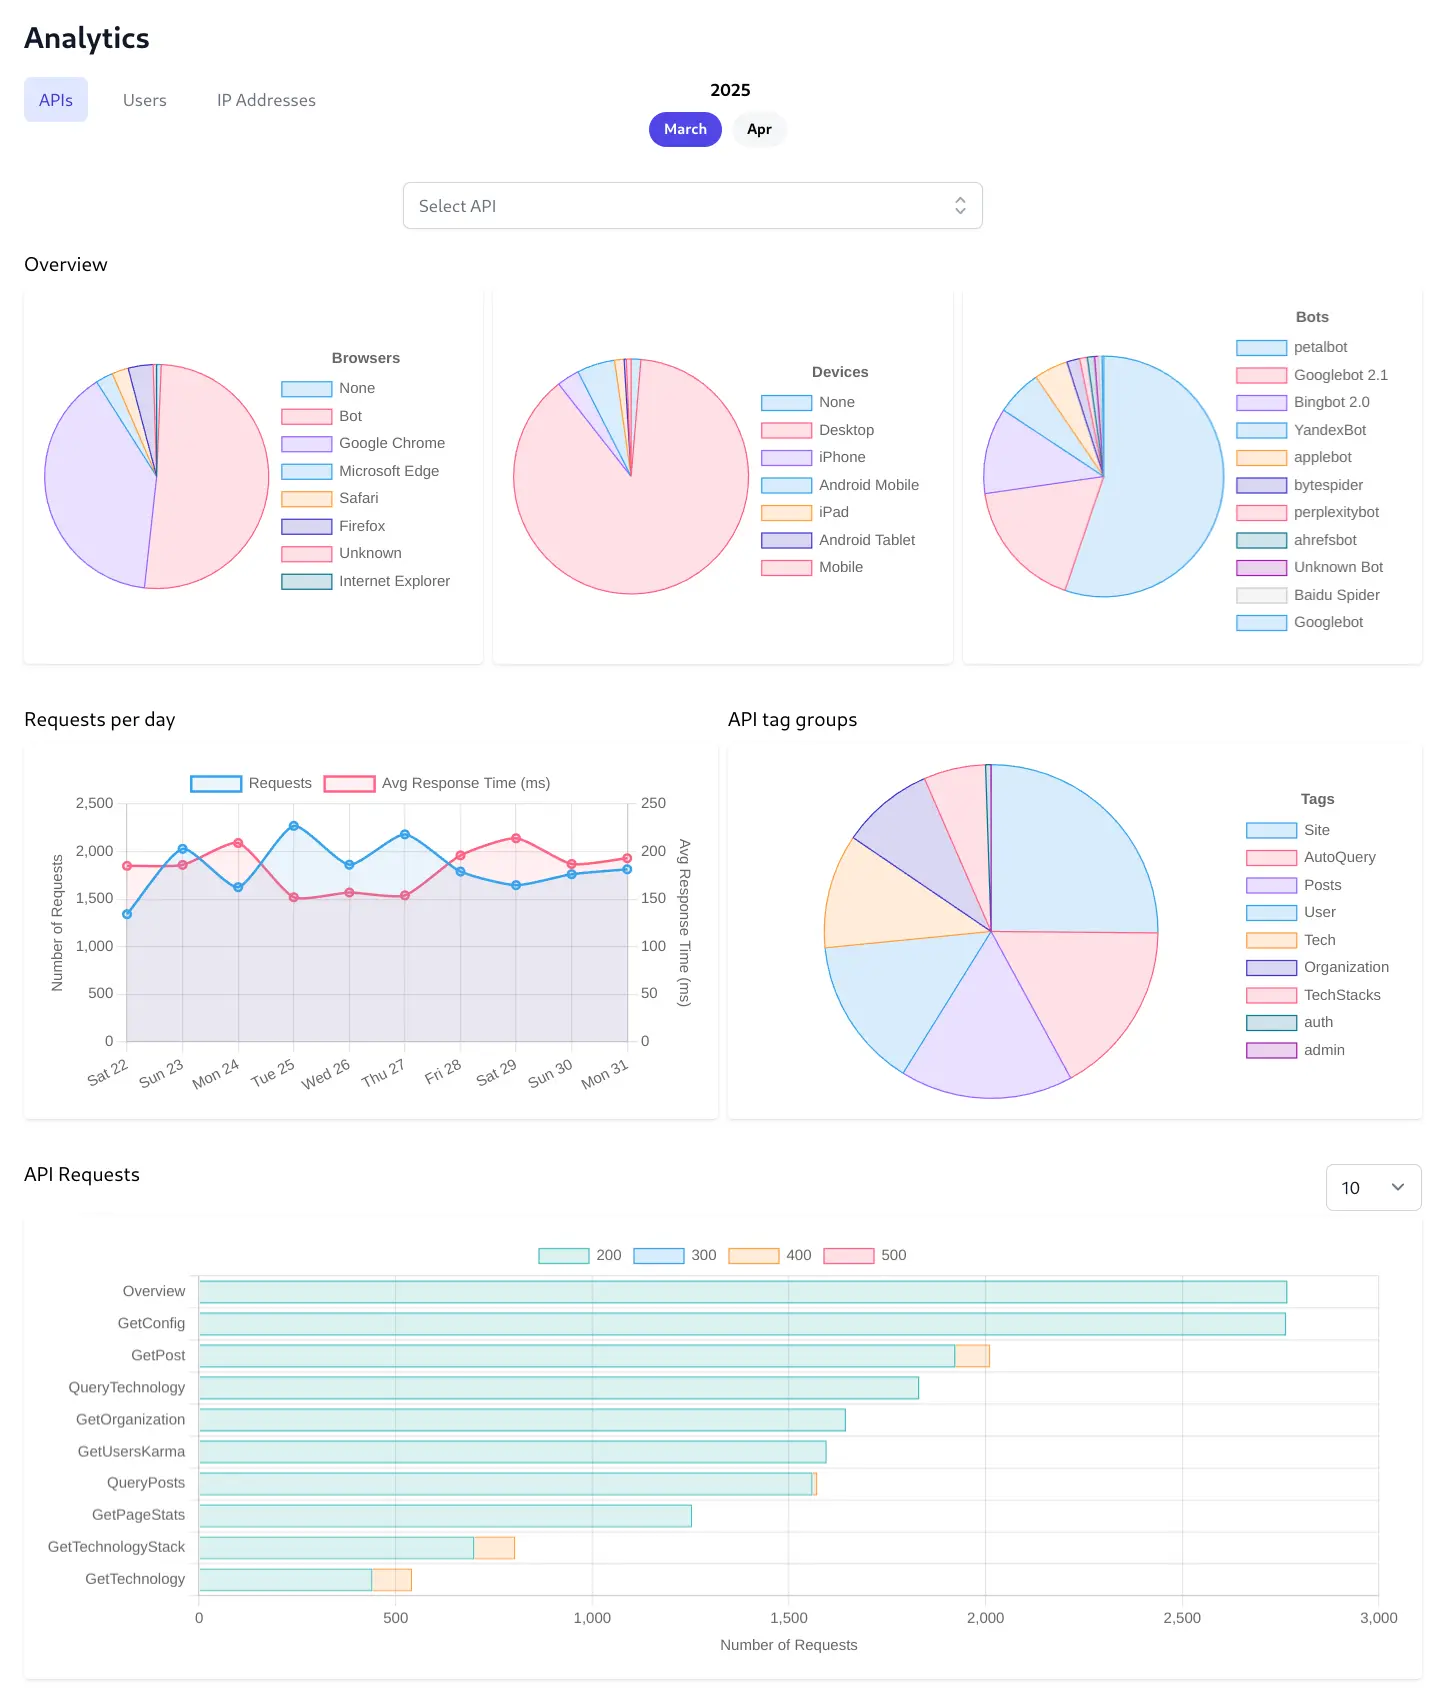
Distribution Pie Charts
Lets you quickly understand the composition of your user base and traffic sources and the distribution of users across different web browsers, device types, and to identify the proportion of traffic coming from automated bots.
Requests per day Line Chart
Lets you monitor API usage trends and performance over time. It tracks the total number of API requests and the average response time day-by-day. You can easily spot trends like peak usage hours/days, identify sudden spikes or drops in traffic, and correlate request volume with API performance which is crucial for capacity planning and performance troubleshooting.
API tag groups Pie Chart
Lets you understand the usage patterns across different functional categories of your APIs. By grouping API requests based on assigned tags (like Security, Authentication, User Management, Tech, etc.), you get a high-level view of which types of functionalities are most frequently used or are generating the most load.
API Requests Bar Chart
Lets you identify the most and least frequently used specific API endpoints which ranks individual API endpoints by the number of requests they receive. This helps pinpoint:
- Critical Endpoints: The most heavily used APIs that require robust performance and monitoring.
- Optimization Targets: High-traffic endpoints that could benefit from performance optimization.
- Underutilized Endpoints: APIs that might be candidates for deprecation or require promotion.
- Troubleshooting: If performance issues arise (seen in the line chart), this helps narrow down which specific endpoint might be responsible.
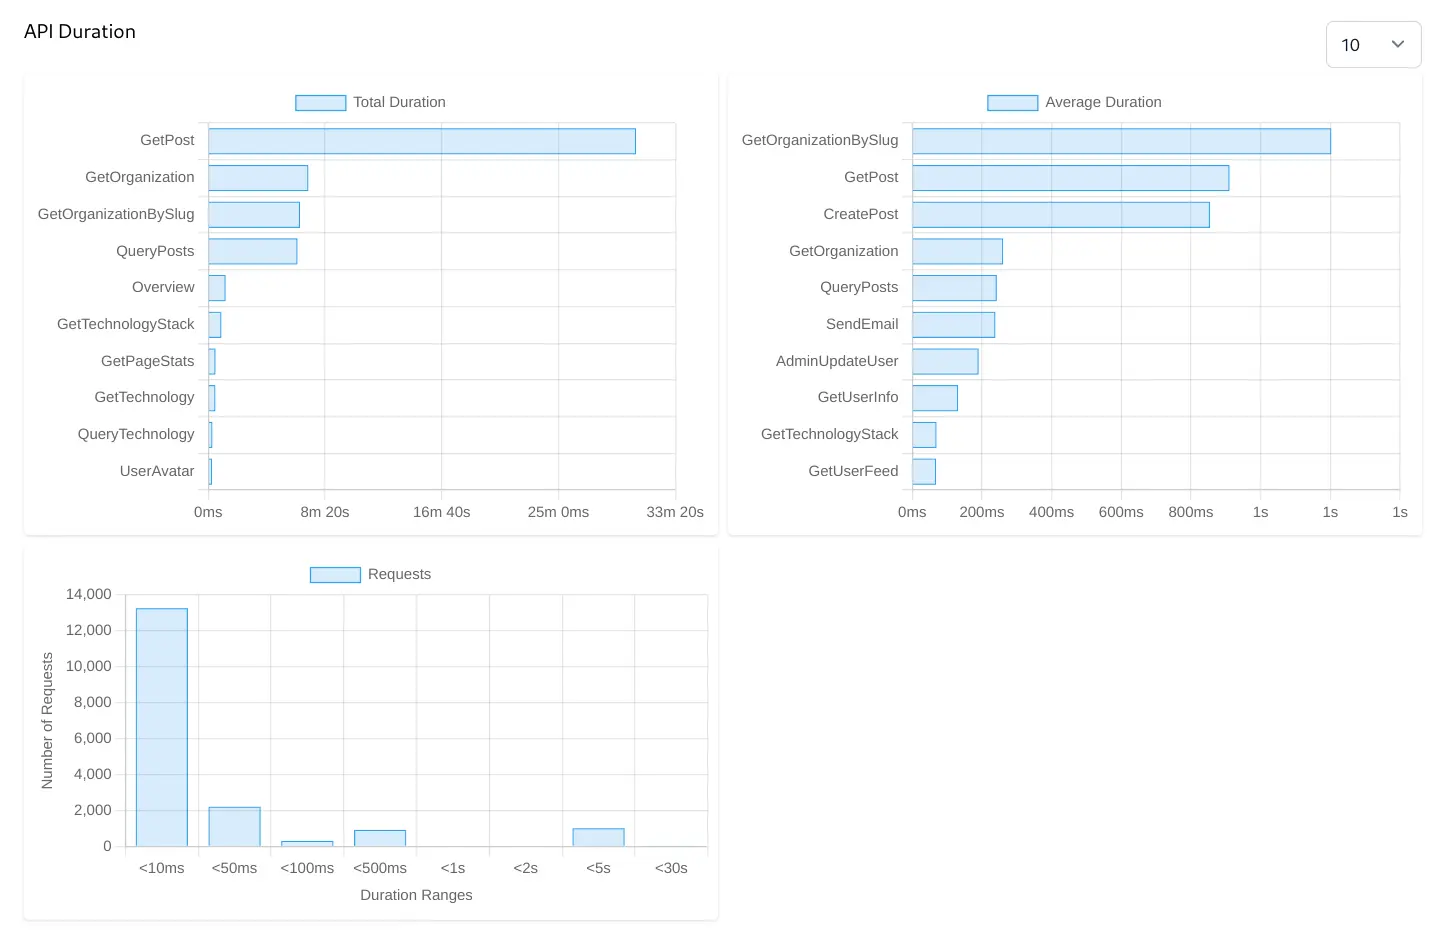
Total Duration Bar Chart
Identifies which API endpoints consume the most cumulative processing time over the selected period. Even if an API endpoint is relatively fast per call, if it's called extremely frequently, it can contribute significantly to overall server load. Optimizing these can lead to significant savings in server resources (CPU, memory).
Average Duration Bar Chart
Pinpoints which API endpoints are the slowest on a per-request basis. APIs at the top of this list are prime candidates for performance investigation and optimization, as they represent potential user-facing slowness or system bottlenecks.
Requests by Duration Ranges Histogram
Provides an overview of the performance distribution for all API requests. This chart shows how many requests fall into different speed buckets and helps you understand the overall responsiveness of your API system at a glance.
Individual API Analytics
Clicking on an API's bar chart displays a dedicated, detailed view of a single API endpoint's behavior, isolating its performance and usage patterns from the overall system metrics offering immediate insight into the endpoint's traffic volume and reliability.
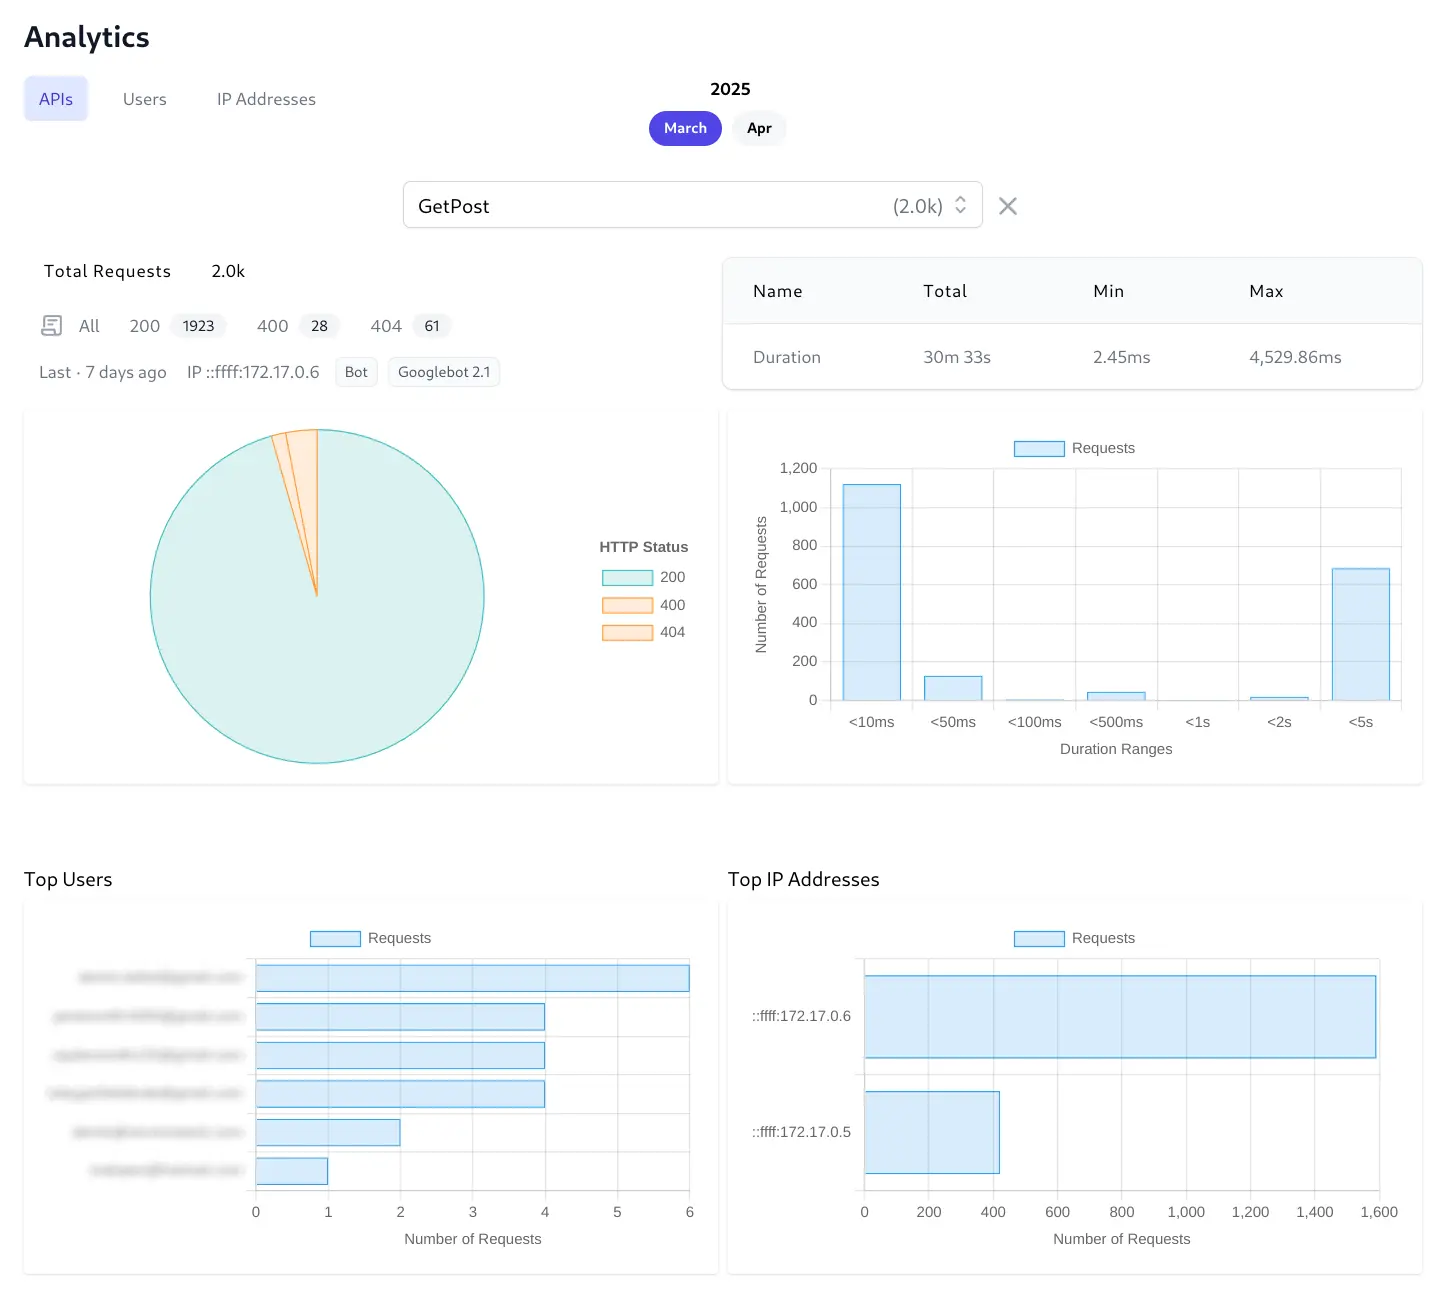
Total Requests
Displays the total requests for an API during the selected month. It includes HTTP Status Breakdown which provide direct access to the filtered request logs. This is a major benefit for rapid troubleshooting, allowing you to instantly view the specific log entries corresponding to successful requests or particular error codes for this API.
Last Request Information
Provides immediate context on the most recent activity for this endpoint with when the last request occurred, the source IP address and device information to help understand recent usage and check if the endpoint is still active, or quickly investigate the very last interaction if needed.
Duration Summary Table (Total, Min, Max)
Quantifies the performance characteristics specifically for this endpoint with the cumulative (Total) processing load, the best-case performance (Min), and the worst-case performance (Max) which is useful for identifying performance outliers.
Duration Requests Histogram
Visualizes the performance distribution for this API.
Top Users Bar Chart
Identifies which authenticated users are most frequently calling this API and relies on this endpoint the most. This can be useful for identifying power users, potential API abuse by a specific user account, or understanding the impact of changes to this API on key users.
Top IP Addresses Bar Chart
Shows which source IP addresses are generating the most traffic for this API. Useful for identifying high-volume clients, specific servers interacting with this endpoint, or potentially malicious IPs.
Users
The Users tab will display the top 100 Users who make the most API Requests and lets you click on a Users bar chart to view their individual User analytics.
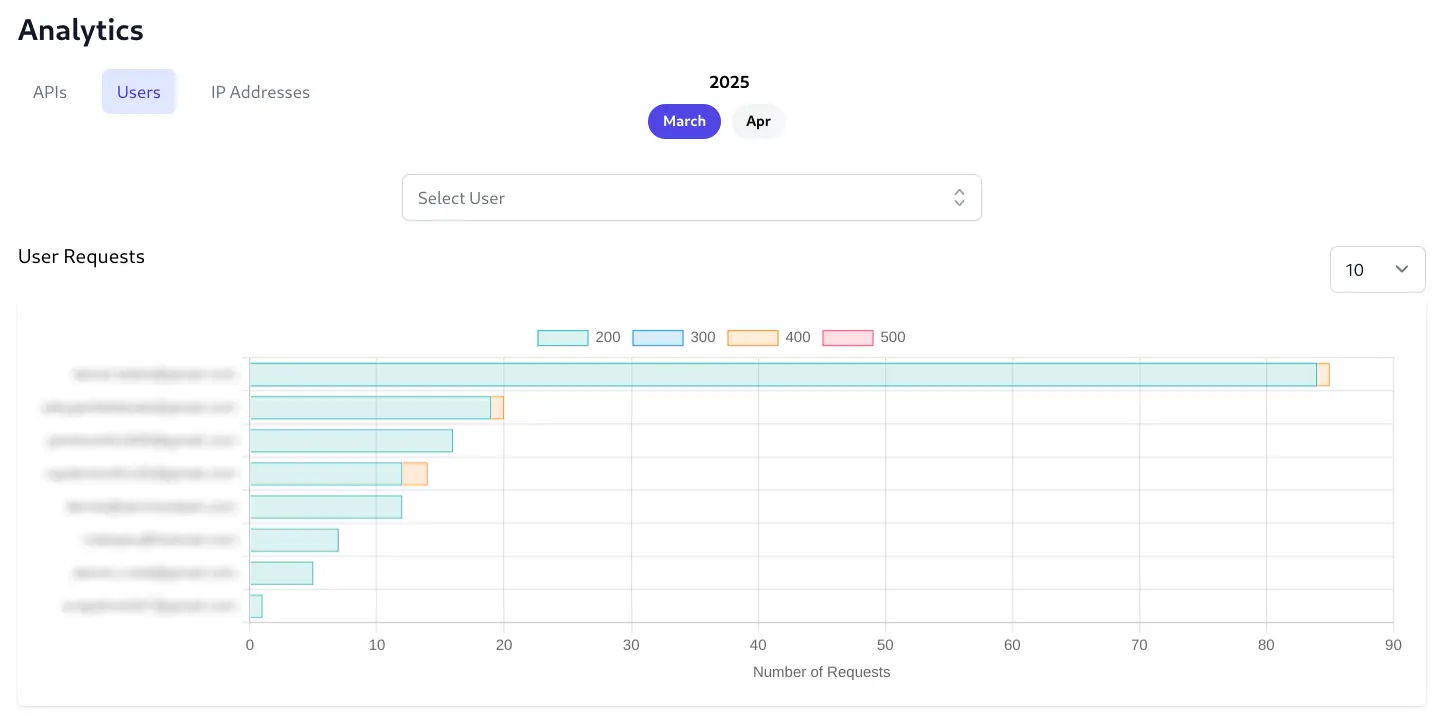
Individual User Analytics
Provides a comprehensive view of a single user's complete interaction history and behavior across all APIs they've accessed, shifting the focus from API performance to user experience and activity.

User Info & Total Requests
Identifies the user and quantifies their overall activity level. Clicking on their ID or Name will navigate to the Users Admin UI. It also shows their success/error rate via the clickable status code links. This helps gauge user engagement and baseline activity.
Last Request Information
Offers a snapshot of the user's most recent interaction for immediate context. Knowing when, what API they called, from which IP address, using which client & device is valuable for support, identifying their last action or checking recent activity.
HTTP Status Pie Chart
Visualizes the overall success and error rate specifically for this user's API requests.
Performance & Request Body Summary Table
Quantifies the performance experienced by this user and the data they typically send.
Duration Requests Histogram
Shows the distribution of response times for requests made by this user to help understand the typical performance this user experiences.
Top APIs Bar Chart
Reveals which API endpoints this user interacts with most frequently and help understanding user behavior and which features they use most.
Top IP Addresses Bar Chart
Identifies the primary network locations or devices the user connects from.
User Admin UI Analytics
To assist in discoverability a snapshot of a Users Analytics is also visible in the Users Admin UI:
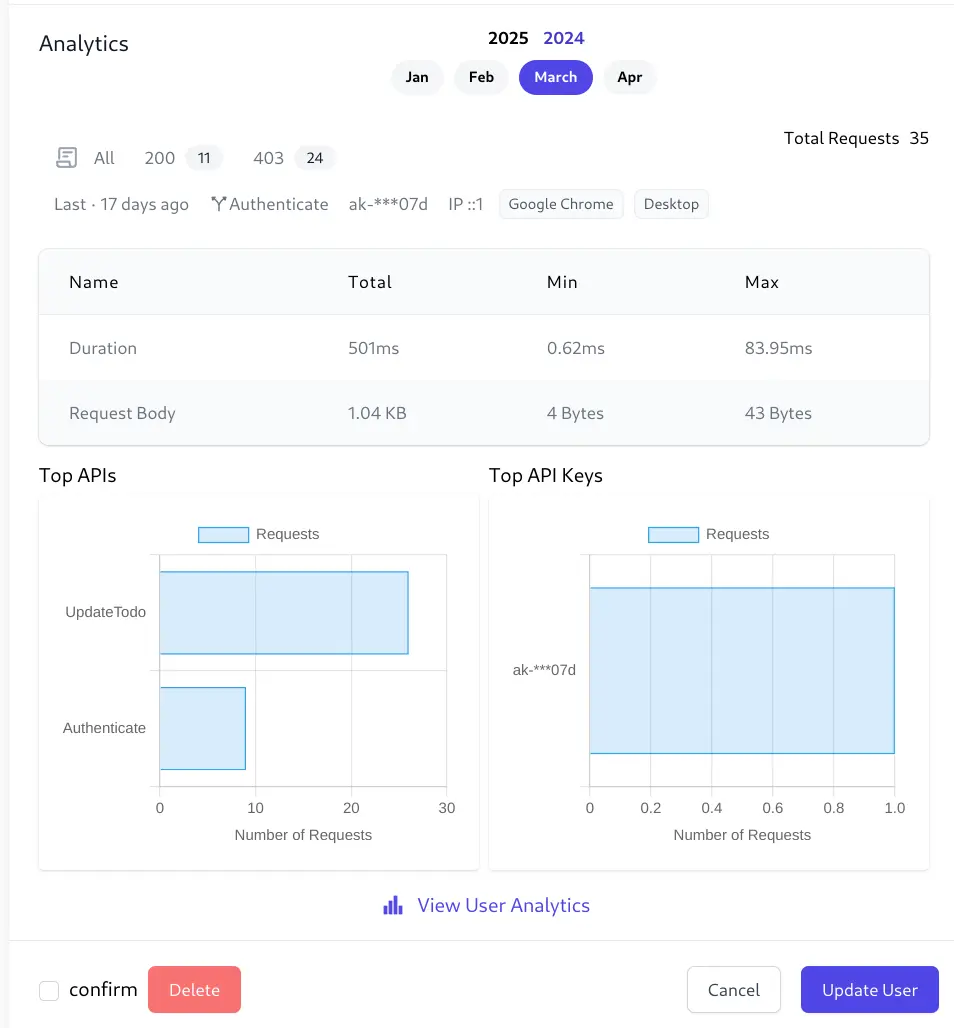
Clicking on View User Analytics takes you to the Users Analytics page to access to the full Analytics features and navigation.
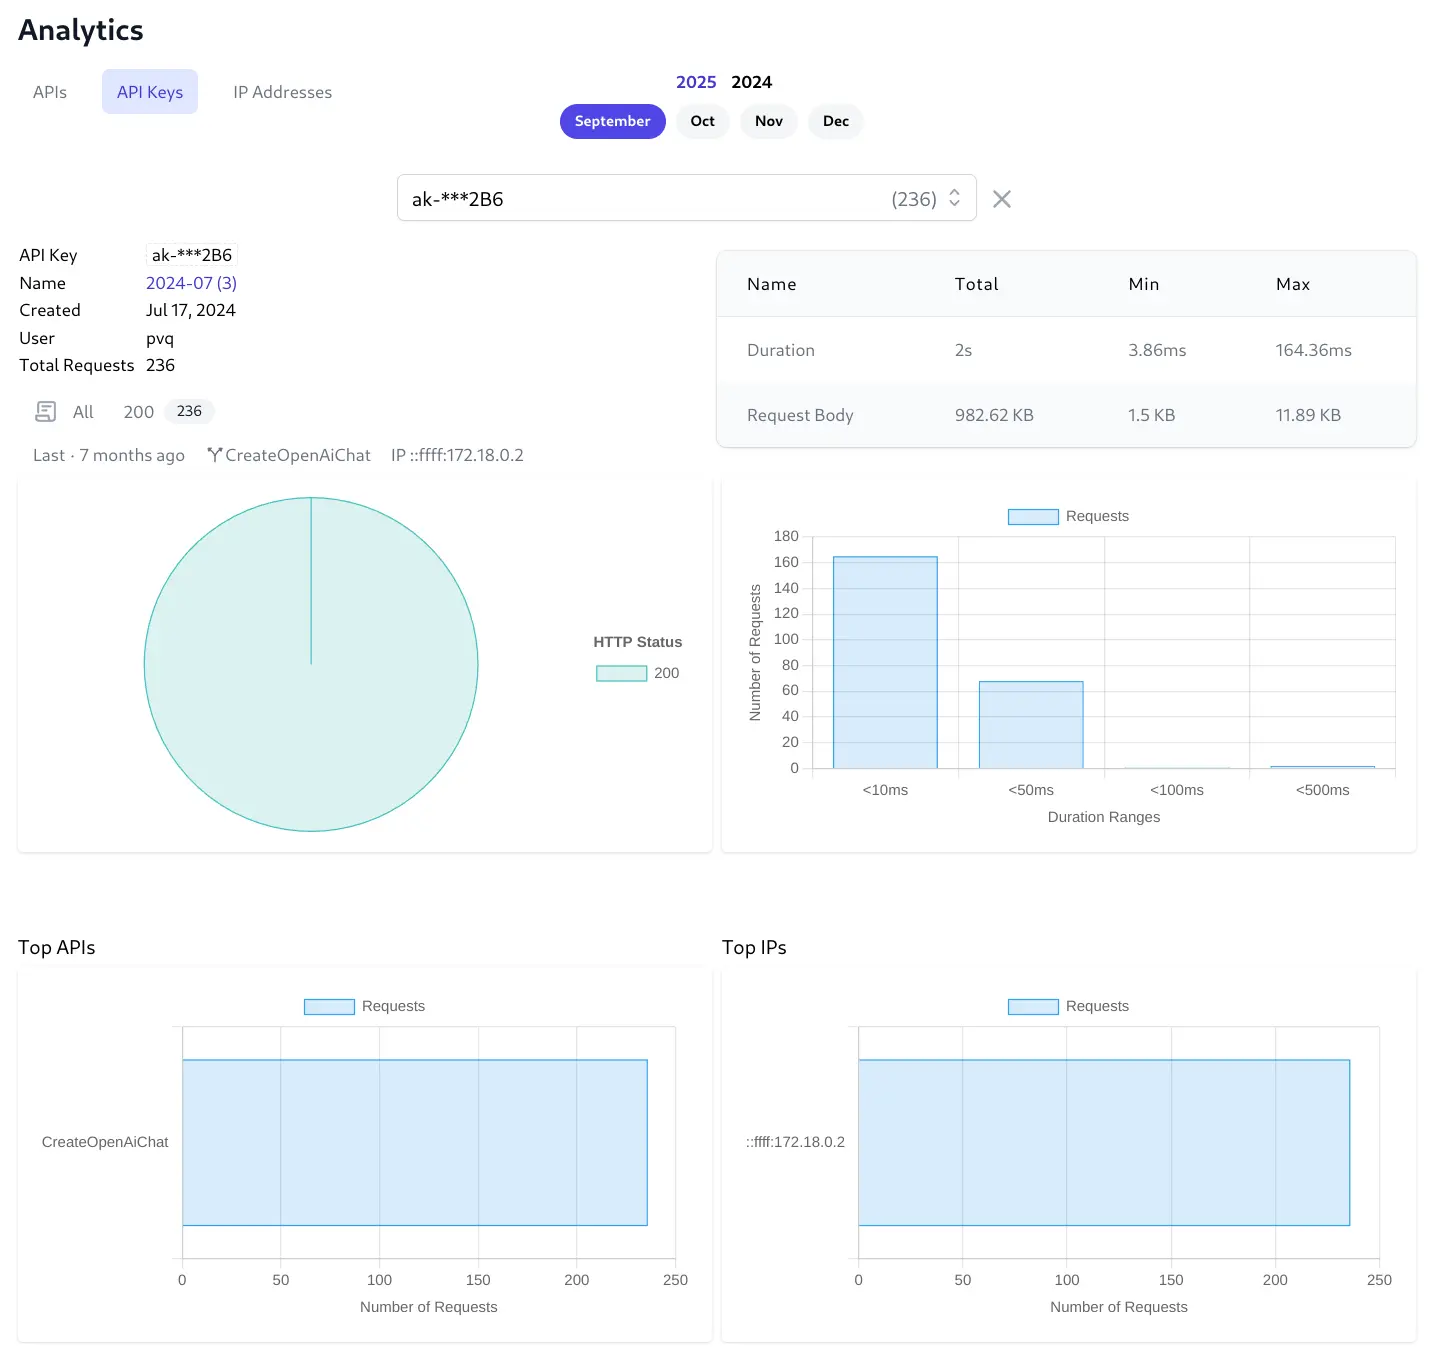
API Keys
The API Keys tab will display the top 100 API Keys who make the most API Requests and lets you click on an API Key bar chart to view its individual API Key analytics.
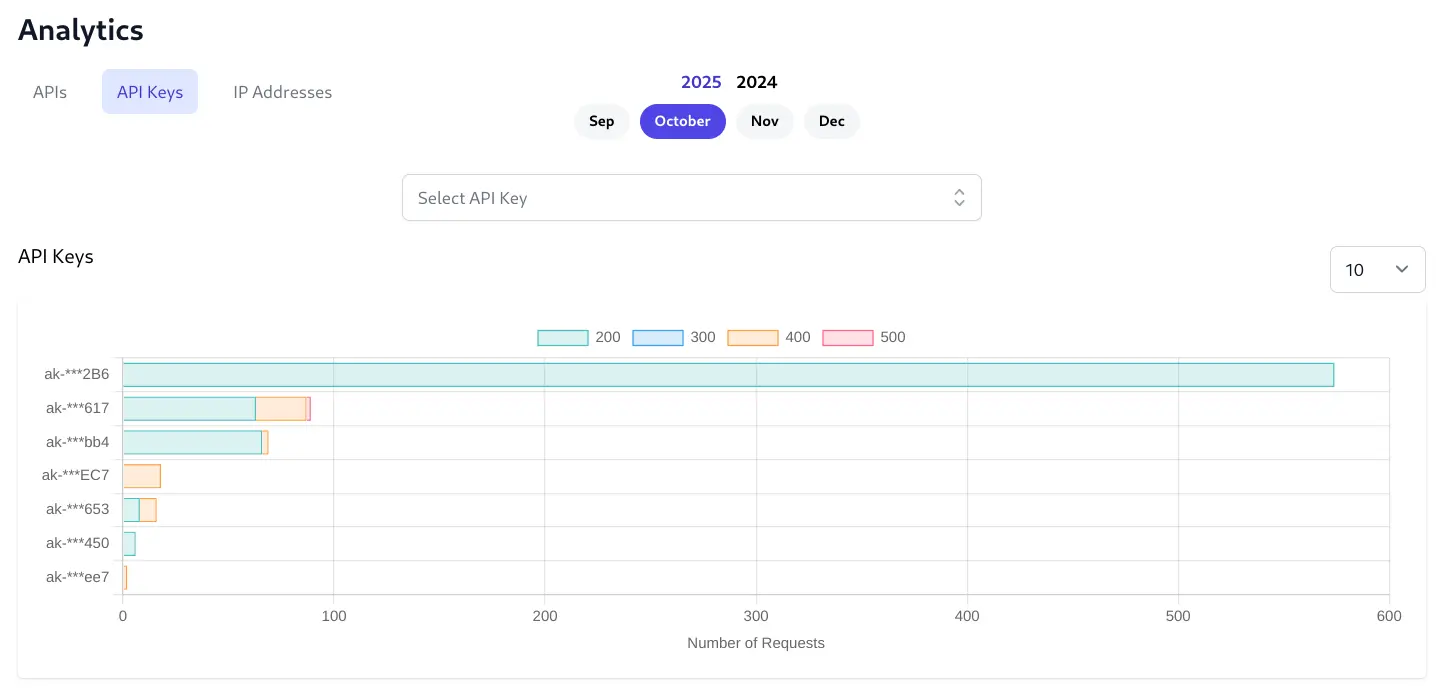
Individual API Key Analytics
Provides comprehensive API Key analytics Similar to User Analytics but limited to the API Usage of a single API Key:
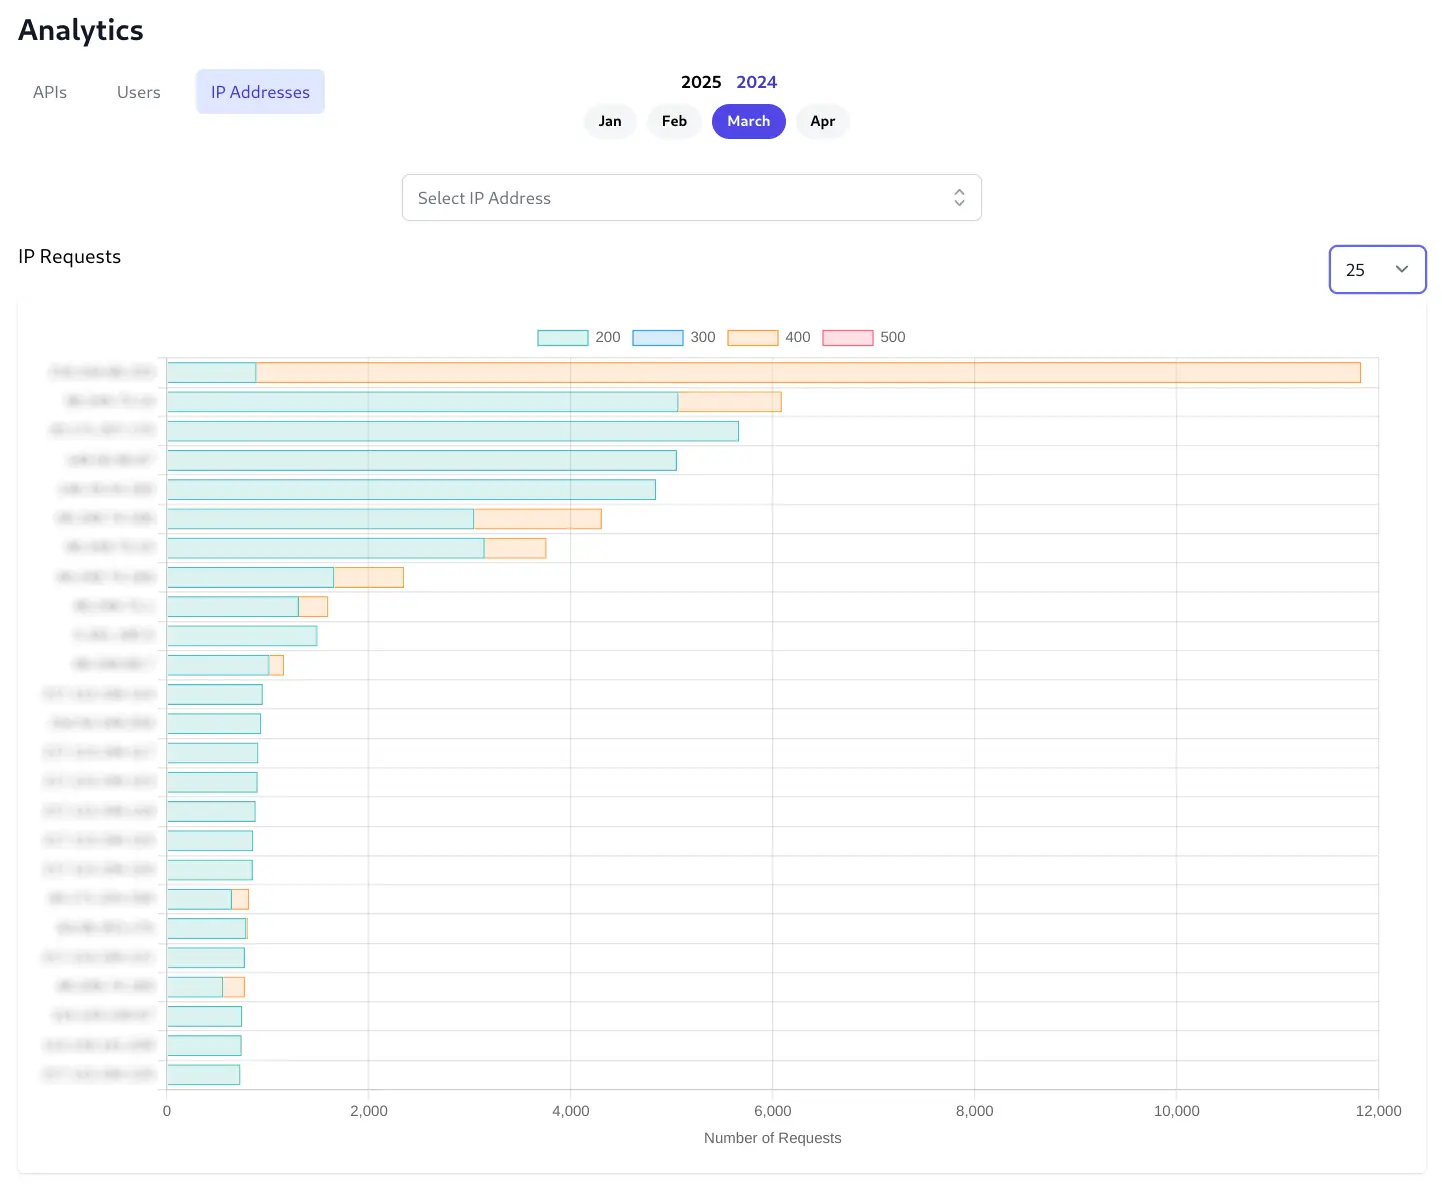
IPs
The IP Addresses tab will display the top 100 IPs that make the most API Requests. Click on an IP's bar chart to view its individual analytics made from that IP Address.
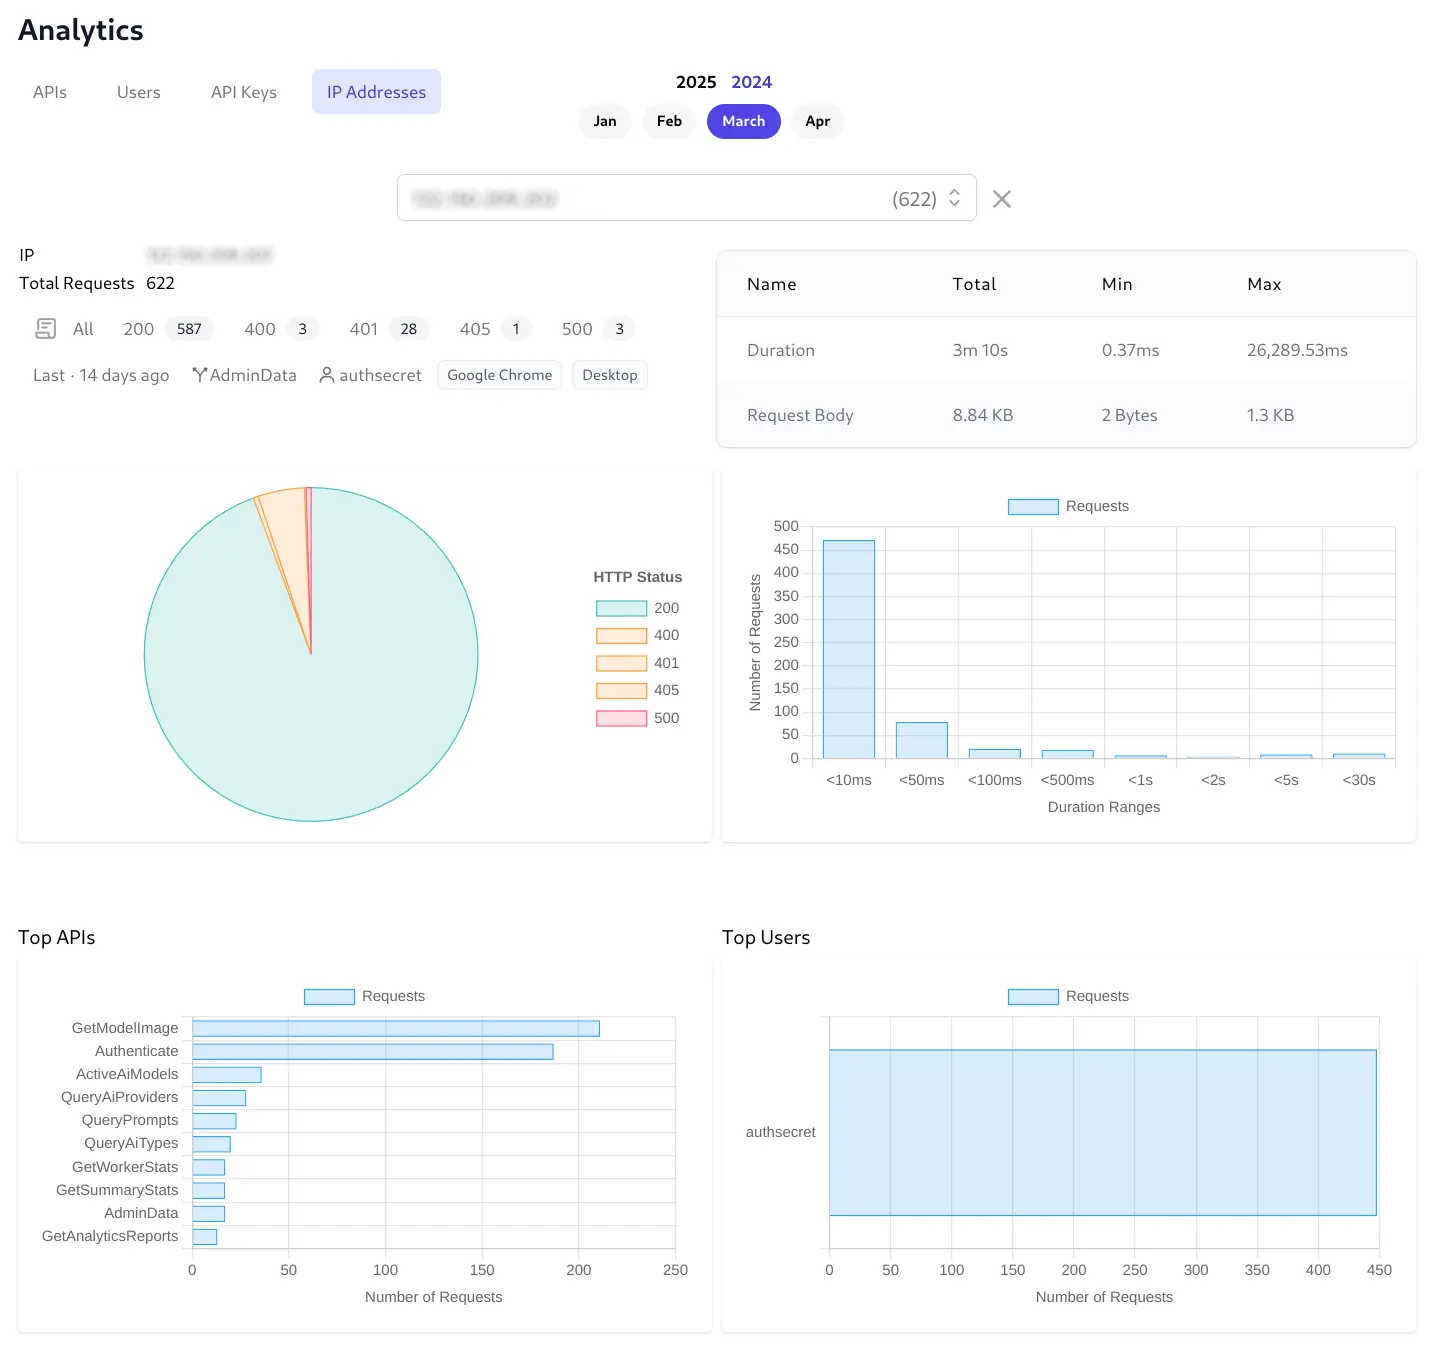
Individual IP Analytics
Provides comprehensive IP Address analytics Similar to User Analytics but limited to the API Usage from a single IP Address:
Protect same APIs with API Keys or Identity Auth
Modern APIs need to serve different types of clients, each with distinct authentication requirements. Understanding when to use Identity Auth versus API Keys is crucial to optimize for security, performance, and user experience.
Two Auth Paradigms for Different Use Cases
Identity Auth: User → API
Identity Auth is designed for scenarios where a human user is interacting with your API, typically through a web or mobile application which:
- Requires user credentials (username/password, OAuth, etc.)
- Establishes a user session with roles and permissions
- For interactive workflows like logins, password resets & email confirmation
- Enables user-specific features like profile management and personalized UX
- Provides full access to user context, claims, and role-based authorization
API Keys: Machine → API / User Agent → API
API Keys are purpose-built for machine-to-machine communication or user agents accessing your API programmatically, without interactive user authentication. This authentication model:
- Provides simple, token-based authentication without user sessions
- Enables fine-grained access control through scopes and features
- Supports non-interactive scenarios like scripts, services, and integrations
- Can optionally be associated with a user but doesn't run in their context
- Offers superior performance by avoiding the auth workflow overhead
- Supports project based billing and usage metrics by API Key
Common scenarios:
- Microservices communicating with each other
- Third-party integrations accessing your API
- CLI tools and scripts that need API access
- Mobile apps or SPAs making direct API calls without user context
- Webhooks and automated processes
- Providing API access to partners or customers with controlled permissions
Despite serving 2 different use-cases there are a few times when you may want to serve the same API with both Identity Auth and API Keys.
Supporting both Auth Models with 2 APIs
Previously you would've needed to maintain two separate APIs, one protected with Identity Auth and another with API Keys. Thanks to ServiceStack's message-based APIs and built-in Auto Mapping this is fairly easy to do:
// For authenticated users
[ValidateIsAuthenticated]
public class QueryOrders : QueryDb<Order> { }

// For API key access
[ValidateApiKey]
public class QueryOrdersApiKey : QueryDb<Order> { }

public class OrderService : Service
{
    public List<Order> Get(GetOrders request)
    {
        var userId = Request.GetRequiredUserId();
        // Shared business logic
    }

    public List<Order> Get(GetOrdersViaApiKey request) =>
        Get(request.ConvertTo<GetOrders>());
}

public static class MyExtensions
{
    public static string GetRequiredUserId(this IRequest? req) =>
        req.GetApiKey()?.UserAuthId ??
        req.GetClaimsPrincipal().GetUserId() ??
        throw HttpError.Unauthorized("API Key must be associated with a user");
}
Whilst easy to implement, the biggest draw back with this approach is that it requires maintaining 2x APIs, 2x API endpoints, and 2x API docs.
The Best of Both Worlds
ServiceStack's flexible API Keys feature now allows you to protect the same APIs with both Identity Auth and API Keys, enabling you to:
- Maintain a single API surface for all clients
- Serve the same interactive UIs protected with Identity Auth or API Keys
- Provide programmatic access via API Keys
- Maintain all the benefits of API Keys
To achieve this, users will need to have a valid API Key generated for them which would then need to be added
to the apikey Claim in the UserClaimsPrincipalFactory to be included in their Identity Auth Cookie:
// Program.cs
services.AddScoped<IUserClaimsPrincipalFactory<ApplicationUser>,
    AdditionalUserClaimsPrincipalFactory>();

// Add additional claims to the Identity Auth Cookie
public class AdditionalUserClaimsPrincipalFactory(
    UserManager<ApplicationUser> userManager,
    RoleManager<IdentityRole> roleManager,
    IApiKeySource apiKeySource,
    IOptions<IdentityOptions> optionsAccessor)
    : UserClaimsPrincipalFactory<ApplicationUser,IdentityRole>(
        userManager, roleManager, optionsAccessor)
{
  public override async Task<ClaimsPrincipal> CreateAsync(ApplicationUser user)
  {
      var principal = await base.CreateAsync(user);
      var identity = (ClaimsIdentity)principal.Identity!;

      var claims = new List<Claim>();
      if (user.ProfileUrl != null)
      {
          claims.Add(new Claim(JwtClaimTypes.Picture, user.ProfileUrl));
      }

      // Add Users latest valid API Key to their Auth Cookie's 'apikey' claim
      var latestKey = (await apiKeySource.GetApiKeysByUserIdAsync(user.Id))
          .OrderByDescending(x => x.CreatedDate)
          .FirstOrDefault();
      if (latestKey != null)
      {
          claims.Add(new Claim(JwtClaimTypes.ApiKey, latestKey.Key));
      }

      identity.AddClaims(claims);
      return principal;
  }
}
After which Authenticated Users will be able to access [ValidateApiKey] protected APIs where it attaches the
API Key in the apikey Claim to the request - resulting in the same behavior had they sent their API Key with the request.
// For authenticated users or API Keys
[ValidateApiKey]
public class QueryOrders : QueryDb<Order> { }
AI Chat
We're excited to introduce AI Chat — a refreshingly simple solution for integrating AI into your applications by unlocking the full value of the OpenAI Chat API. Unlike most other OpenAI SDKs and Frameworks, all of AI Chat's features are centered around arguably the most important API in our time - OpenAI's simple Chat Completion API i.e. the primary API used to access Large Language Models (LLMs).
We've had several attempts at adding a valuable layer of functionality for harnessing AI into our Apps, including:
- GptAgentFeature - Use Semantic Kernel to implement Autonomous agents with Chain-of-Thought reasoning
- TypeScript TypeChat - Use Semantic Kernel to implement all of TypeScript's TypeChat examples in .NET
- ServiceStack.AI - TypeChat providers and unified Abstractions over AWS, Azure and Google AI Providers
The problem being that we wouldn't consider any of these solutions to be relevant today, any "smarts" or opinionated logic added look to become irrelevant as AI models get more capable and intelligent.
The Problem with Complex Abstractions
Over the years, we've seen AI integration libraries grow in complexity. Take Microsoft Semantic Kernel - a sprawling codebase that maintains its own opinionated abstractions that aren't serializable and has endured several breaking changes over the years. After investing development effort in catching up with their breaking changes we're now told to Migrate to Agent Framework.
The fundamental issue? These complex abstractions didn't prove to be reusable. Microsoft's own next competing solution Agent Framework - doesn't even use Semantic Kernel Abstractions. Instead, it maintains its own non-serializable complex abstractions, repeating the same architectural issues.
This pattern of building heavyweight, non-portable abstractions creates vendor lock-in, adds friction, hinders reuse, and limits how and where it can be used. After getting very little value from Semantic Kernel, we don't plan for any rewrites to follow adoption of their next over-engineered framework.
Back to OpenAI Chat
The only AI Abstraction we feel confident that has any longevity in this space, that wont be subject to breaking changes and rewrites is the underlying OpenAI Chat Completion API itself.
The API with the most utility, with all the hard work of having AI Providers adopt this common API already done for us, we just have to facilitate calling it.
Something so simple that it can be easily called from a shell script:
RESPONSE=$(curl https://api.openai.com/v1/chat/completions \
  -H "Authorization: Bearer $OPENAI_API_KEY" \
  -H "Content-Type: application/json" \
  -d '{
    "model": "gpt-5",
    "messages": [{"role": "user", "content": "Capital of France?"}]
  }')

echo "$RESPONSE" | jq -r '.choices[0].message.content'
Shouldn't require complex libraries over several NuGet packages to make use of.
The simplest and obvious solution is design around the core ChatCompletion DTO itself - a simple, serializable,
implementation-free data structure that maps directly to the OpenAI Chat API request body maintained in
ChatCompletion.cs
with all its functionality encapsulated (no third-party dependencies) within the new ServiceStack.AI.Chat NuGet package.
Using DTOs gives us all the natural advantages of message-based APIs whose clean POCO models helps us fight against complexity.
Why This Matters
Because ChatCompletion is a plain serializable DTO, you can:
- Store it in a database - Save conversation history, audit AI requests, or implement retry logic
- Use it in client workflows - Pass the same DTO between frontend and backend without transformations
- Send it through message queues - Build asynchronous AI processing pipelines with RabbitMQ and others
- Debug easily - Inspect the exact JSON being sent to OpenAI
- Test easily - Mock AI responses with simple DTOs or JSON payloads
- Use it outside the library - The DTO works independently of any specific client implementation
More importantly, because it's a Request DTO, we unlock a wealth of ServiceStack features for free, since most of ServiceStack's functionality is designed around Request DTOs — which we'll explore later.
Install
AI Chat can be added to any .NET 8+ project by installing the ServiceStack.AI.Chat NuGet package and configuration with:
x mix chat
Which drops this simple Modular Startup that adds the ChatFeature
and registers a link to its UI on the Metadata Page if you want it:
public class ConfigureAiChat : IHostingStartup
{
    public void Configure(IWebHostBuilder builder) => builder
        .ConfigureServices(services => {
            services.AddPlugin(new ChatFeature());

            services.ConfigurePlugin<MetadataFeature>(feature => {
                feature.AddPluginLink("/chat", "AI Chat");
            });
       });
}
Prerequisites:
As AI Chat protects its APIs and UI with Identity Auth or API Keys, you'll need to enable the API Keys Feature if you haven't already:
x mix apikeys
Simple, Not Simplistic
How simple is it to use? It's just as you'd expect, your App logic need only bind to a simple IChatClient interface
that accepts a Typed ChatCompletion Request DTO and returns a Typed ChatResponse DTO:
public interface IChatClient
{
    Task<ChatResponse> ChatAsync(
        ChatCompletion request, CancellationToken token=default);
}
An impl-free easily substitutable interface for calling any OpenAI-compatible Chat API, using clean
Typed ChatCompletion and ChatResponse DTOs.
Unfortunately since the API needs to be typed and .NET Serializers don't have support for de/serializing union types yet, the DTO adopts OpenAI's more verbose and flexible multi-part Content Type which looks like:
IChatClient client = CreateClient();

var request = new ChatCompletion
{
    Model = "gpt-5",
    Messages = [
        new() {
            Role = "user",
            Content = [
                new AiTextContent {
                    Type = "text", Text = "Capital of France?"
                }
            ],
        }
    ]
};

var response = await client.ChatAsync(request);
To improve the UX we've added a Message.cs helper which encapsulates the boilerplate of sending Text, Image, Audio and Files into more succinct and readable code where you'd typically only need to write:
var request = new ChatCompletion
{
    Model = "gpt-5",
    Messages = [
        Message.SystemPrompt("You are a helpful assistant"),
        Message.Text("Capital of France?"),
    ]
};
var response = await client.ChatAsync(request);
string? answer = response.GetAnswer();
Same ChatCompletion DTO, Used Everywhere
That's all that's required for your internal App Logic to access your App's configured AI Models. However, as AI Chat also makes its own OpenAI Compatible API available, your external .NET Clients can use the same exact DTO to get the same Response by calling your API with a C# Service Client:
var client = new JsonApiClient(BaseUrl) {
    BearerToken = apiKey
};
var response = await client.SendAsync(request);
Support for Text, Images, Audio & Files
For Multi-modal LLMs which support it, you can also send Images, Audio & File attachments with your AI Request using URLs, e.g:
var image = new ChatCompletion
{
    Model = "qwen2.5vl",
    Messages = [
        Message.Image(imageUrl:"https://example.org/image.webp",
            text:"Describe the key features of the input image"),
    ]
}

var audio = new ChatCompletion
{
    Model = "gpt-4o-audio-preview",
    Messages = [
        Message.Audio(data:"https://example.org/speaker.mp3",
            text:"Please transcribe and summarize this audio file"),
    ]
};

var file = new ChatCompletion
{
    Model = "gemini-flash-latest",
    Messages = [
        Message.File(
            fileData:"https://example.org/order.pdf",
            text:"Please summarize this document"),
    ]
};
Relative File Path
If a VirtualFiles Provider was configured, you can specify a relative path instead:
var image = new ChatCompletion
{
    Model = "qwen2.5vl",
    Messages = [
        Message.Image(imageUrl:"/path/to/image.webp",
            text:"Describe the key features of the input image"),
    ]
};
Manual Download & Embedding
Alternatively you can embed and send the raw Base64 Data or Data URI yourself:
var bytes = await "https://example.org/image.webp".GetBytesFromUrlAsync();
var dataUri = $"data:image/webp;base64,{Convert.ToBase64String(bytes)}";
var image = new ChatCompletion
{
    Model = "qwen2.5vl",
    Messages = [
        Message.Image(imageUrl:dataUri,
            text:"Describe the key features of the input image"),
    ]
};
Although sending references to external resources allows keeping AI Requests payloads small, making them easier to store in Databases, send in MQs and client workflows, etc.
This illustrates some of the "value-added" features of AI Chat where it will automatically download any URL Resources
and embed it as Base64 Data in the ChatCompletion Request DTO.
Configure Downloads
Relative paths can be enabled by configuring a VirtualFiles Provider to refer to a safe path that you want to allow
access to.
Whilst URLs are downloaded by default, but its behavior can be customized with ValidateUrl or replaced entirely with
DownloadUrlAsBase64Async:
services.AddPlugin(new ChatFeature {
    // Enable Relative Path Downloads
    VirtualFiles = new FileSystemVirtualFiles(assetDir),

    // Validate URLs before download
    ValidateUrl = url => {
        if (!IsAllowedUrl(url))
            throw HttpError.Forbidden("URL not allowed");
    },

    // Use Custom URL Downloader
    // DownloadUrlAsBase64Async = async (provider, url) => {
    //     var (base64, mimeType) = await MyDownloadAsync(url);
    //     return (base64, mimeType);
    // },
});
Configure AI Providers
By default AI Chat is configured with a list of providers in its llms.json
which is pre-configured with the best models from the leading LLM providers.
The easiest way to use a custom llms.json is to add a local modified copy of
llms.json
to your App's /wwwroot/chat folder:
If you just need to change which providers are enabled you can specify them in EnableProviders:
services.AddPlugin(new ChatFeature {
    // Specify which providers you want to enable
    EnableProviders =
    [
        "openrouter_free",
        "groq",
        "google_free",
        "codestral",
        "ollama",
        "openrouter",
        "google",
        "anthropic",
        "openai",
        "grok",
        "qwen",
        "z.ai",
        "mistral",
    ],

    // Use custom llms.json configuration
    ConfigJson = vfs.GetFile("App_Data/llms.json").ReadAllText(),
});
Alternatively you can use ConfigJson to load a custom JSON provider configuration from a different source, which
you'll want to use if you prefer to keep your provider configuration and API Keys all in llms.json.
llms.json - OpenAI Provider Configuration
llms.json contains a list of OpenAI Compatible Providers you want to make available along with a user-defined model alias you want to use for model routing along with the provider-specific model name it maps to when the model is used with that provider, e.g:
{
  "providers": {
    "openrouter": {
      "enabled": false,
      "type": "OpenAiProvider",
      "base_url": "https://openrouter.ai/api",
      "api_key": "$OPENROUTER_API_KEY",
      "models": {
        "grok-4": "x-ai/grok-4",
        "glm-4.5-air": "z-ai/glm-4.5-air",
        "kimi-k2": "moonshotai/kimi-k2",
        "deepseek-v3.1:671b": "deepseek/deepseek-chat",
        "llama4:400b": "meta-llama/llama-4-maverick"
      }
    },
    "anthropic": {
      "enabled": false,
      "type": "OpenAiProvider",
      "base_url": "https://api.anthropic.com",
      "api_key": "$ANTHROPIC_API_KEY",
      "models": {
        "claude-sonnet-4-0": "claude-sonnet-4-0"
      }
    },
    "ollama": {
      "enabled": false,
      "type": "OllamaProvider",
      "base_url": "http://localhost:11434",
      "models": {},
      "all_models": true
    },
    "google": {
      "enabled": false,
      "type": "GoogleProvider",
      "api_key": "$GOOGLE_API_KEY",
      "models": {
        "gemini-flash-latest": "gemini-flash-latest",
        "gemini-flash-lite-latest": "gemini-flash-lite-latest",
        "gemini-2.5-pro": "gemini-2.5-pro",
        "gemini-2.5-flash": "gemini-2.5-flash",
        "gemini-2.5-flash-lite": "gemini-2.5-flash-lite"
      },
      "safety_settings": [
        {
          "category": "HARM_CATEGORY_DANGEROUS_CONTENT",
          "threshold": "BLOCK_ONLY_HIGH"
        }
      ],
      "thinking_config": {
        "thinkingBudget": 1024,
        "includeThoughts": true
      }
    },
    //...
  }
}
The only non-OpenAI Chat Provider AI Chat supports is GoogleProvider, where an exception was made to add explicit
support for Gemini's Models given its low cost and generous free quotas.
Provider API Keys
API Keys can be either be specified within the llms.json itself, alternatively API Keys starting with $ like
$GOOGLE_API_KEY will first try to resolve it from Variables before falling back to checking Environment Variables.
services.AddPlugin(new ChatFeature {
    EnableProviders =
    [
        "openrouter",
        "anthropic",
        "google",
    ],
    Variables =
    {
        ["OPENROUTER_API_KEY"] = secrets.OPENROUTER_API_KEY,
        ["ANTHROPIC_API_KEY"] = secrets.ANTHROPIC_API_KEY,
        ["GOOGLE_API_KEY"] = secrets.GOOGLE_API_KEY,
    }
});
Model Routing and Failover
Providers are invoked in the order they're defined in llms.json that supports the requested model.
If a provider fails, it tries the next available provider.
This enables scenarios like:
- Routing different request types to different providers
- Optimize by Cost, Performance, Reliability, or Privacy
- A/B testing different models
- Added resilience with fallback when a provider is unavailable
The model aliases don't need to identify a model directly, e.g. you could use your own artificial names for use-cases
you need like image-captioner, audio-transcriber, pdf-extractor then map them to different models different providers
should use to achieve the desired task.
Use Model Routing with Fallback
To make use of the model routing and fallback you would call ChatAsync on IChatClient directly:
class MyService(IChatClient client)
{
    public async Task<object> Any(DefaultChat request)
    {
        return await client.ChatAsync(new ChatCompletion {
            Model = "glm-4.6",
            Messages = [
                Message.Text(request.UserPrompt)
            ],
        });
    }
}
Use Specific Provider
Alternatively to use a specific provider, you can use IChatClients dependency GetClient(providerId) method
to resolve the provider then calling ChatAsync will only use that provider:
class MyService(IChatClients clients)
{
    public async Task<object> Any(ProviderChat request)
    {
        var groq = clients.GetClient("groq");
        return await groq.ChatAsync(new ChatCompletion {
            Model = "kimi-k2",
            Messages = [
                Message.Text(request.UserPrompt)
            ],
        });
    }
}
Compatible with llms.py
The other benefit of simple configuration and simple solutions, is that they're easy to implement. A perfect example of this being that this is the 2nd implementation done using this configuration. The same configuration, UI, APIs and functionality is also available in our llms.py Python CLI and server gateway we've developed in order to have a dependency-free LLM Gateway solution needed in our ComfyUI Agents.
pip install llms-py
This also means you can use and test your own custom llms.json configuration on the command-line or in shell
automation scripts:
# Simple question
llms "Explain quantum computing"

# With specific model
llms -m gemini-2.5-pro "Write a Python function to sort a list"

# With system prompt
llms -s "You are a helpful coding assistant" "Reverse a string in Python?"

# With image (vision models)
llms --image image.jpg "What's in this image?"
llms --image https://example.com/photo.png "Describe this photo"

# Display full JSON Response
llms "Explain quantum computing" --raw

# Start the UI and an OpenAI compatible API on port 8000:
llms --serve 8000
Incidentally as llms.py UI and AI Chat utilize the same UI you can use its import/export features to transfer your AI Chat History between them.
Checkout the llms.py GitHub repo for even more features.
AI Chat UI
Another major value proposition of AI Chat is being able to offer a ChatGPT-like UI to your users where you're able to control the API Keys, billing, and sanctioned providers your users can access to maintain your own Fast, Local, and Private access to AI from within your own organization.
Identity Auth or Valid API Key
AI Chat makes of ServiceStack's new API Keys or Identity Auth APIs which allows usage for both Authenticated Identity Auth users otherwise unauthenticated users will need to provide a valid API Key:
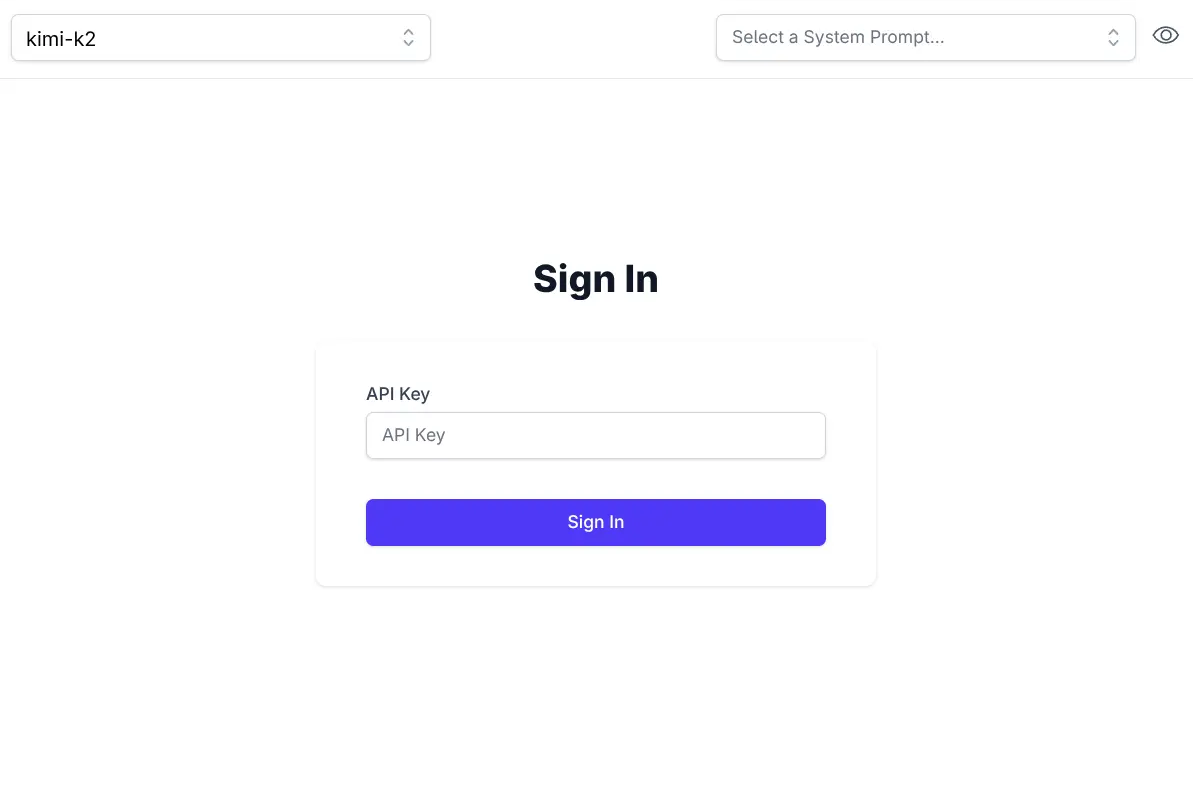
If needed ValidateRequest can be used to further restrict access to AI Chat's UI and APIs, e.g. you can restrict access to API Keys with the Admin scope with:
services.AddPlugin(new ChatFeature {
    ValidateRequest = async req =>
        req.GetApiKey()?.HasScope(RoleNames.Admin) == true
            ? null
            : HttpResult.Redirect("/admin-ui"),
});
Import / Export
All data is stored locally in the users local browser's IndexedDB. When needed you can backup and transfer your entire chat history between different browsers using the Export and Import features on the home page.
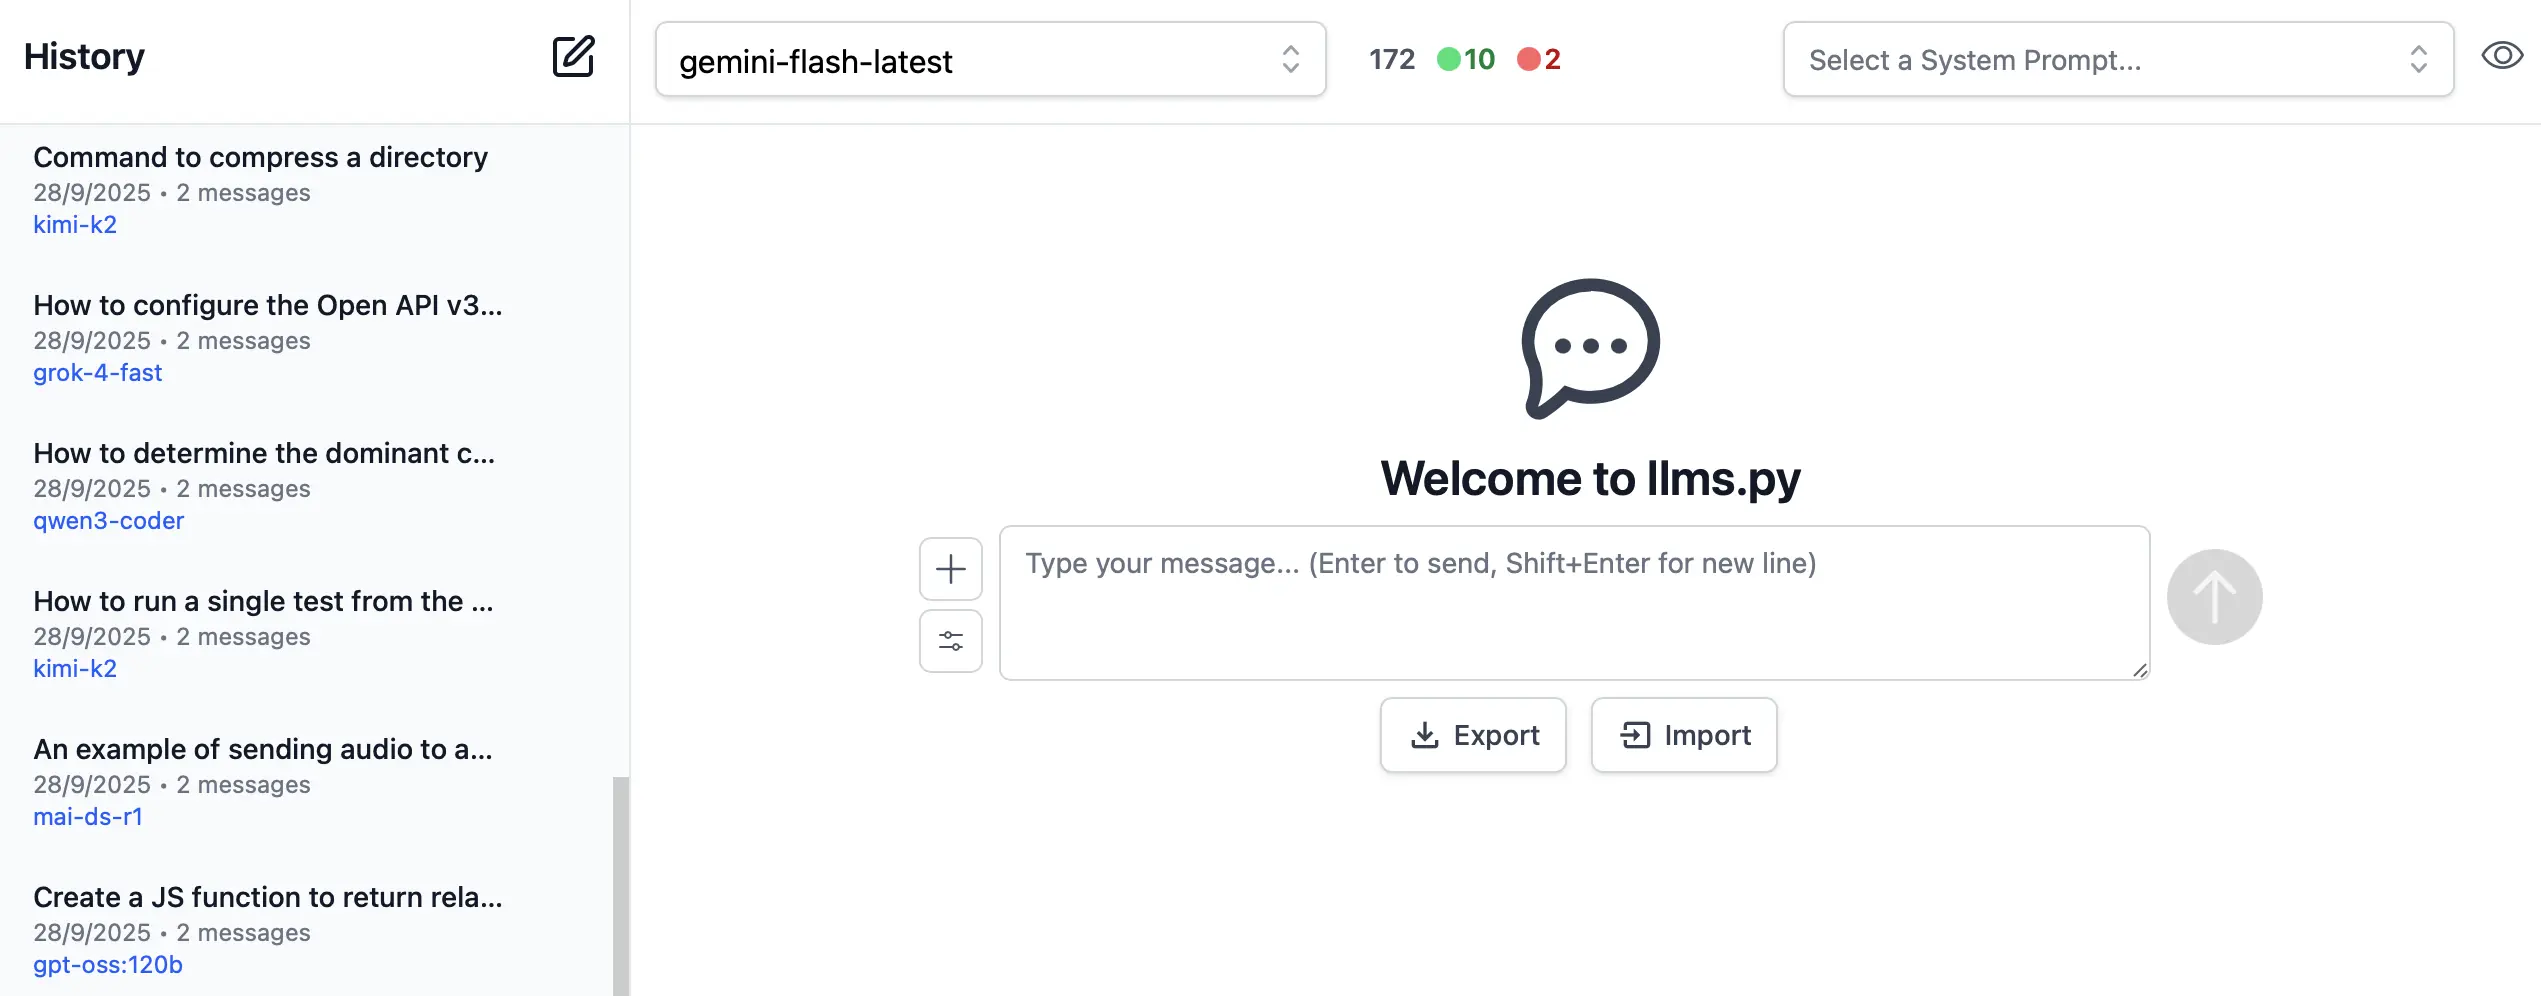
Simple and Flexible UI
Like all of ServiceStack's built-in UIs, AI Chat is also naturally customizable where you can override any of AI Chat's Vue Components and override them with your own by placing them in your /wwwroot/chat folder:
Where you'll be able to customize the appearance and behavior of AI Chat's UI to match your App's branding and needs.
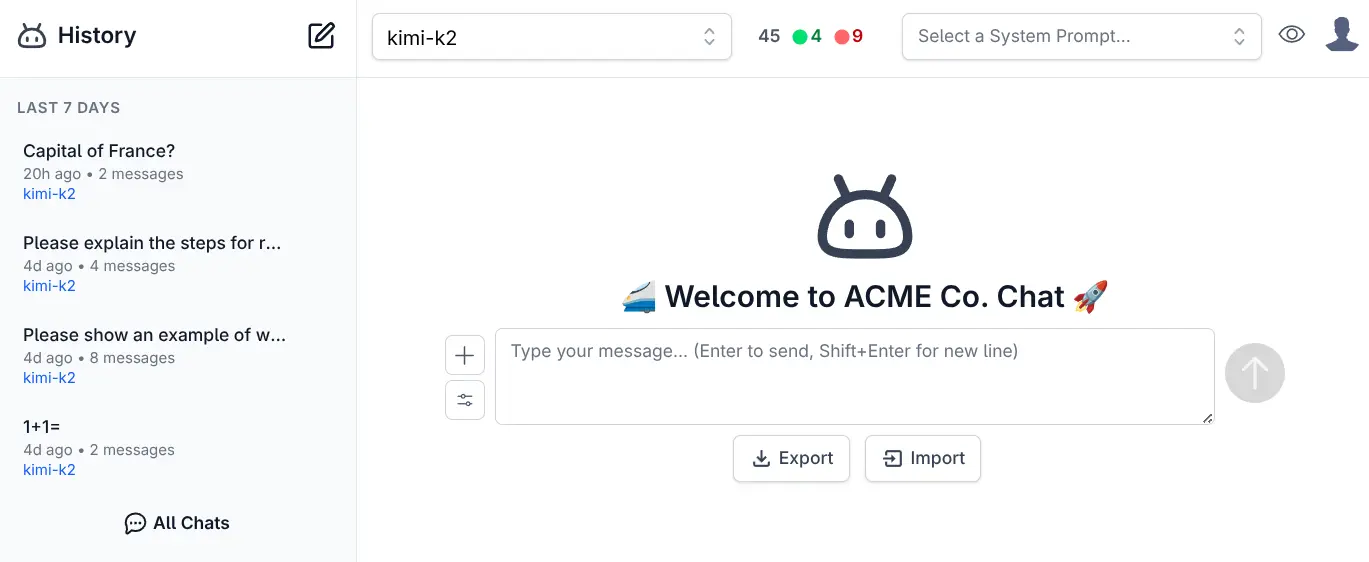
Customize
The built-in ui.json configuration can be overridden with your own to use your preferred system prompts and other defaults by adding them to your local folder:
Alternatively ConfigJson and UiConfigJson can be used to load custom JSON configuration from a different source, e.g:
services.AddPlugin(new ChatFeature {
    // Use custom llms.json configuration
    ConfigJson = vfs.GetFile("App_Data/llms.json").ReadAllText(),

    // Use custom ui.json configuration
    UiConfigJson = vfs.GetFile("App_Data/ui.json").ReadAllText(),
});
Rich Markdown & Syntax Highlighting
To maximize readability there's full support for Markdown and Syntax highlighting for the most popular programming languages.
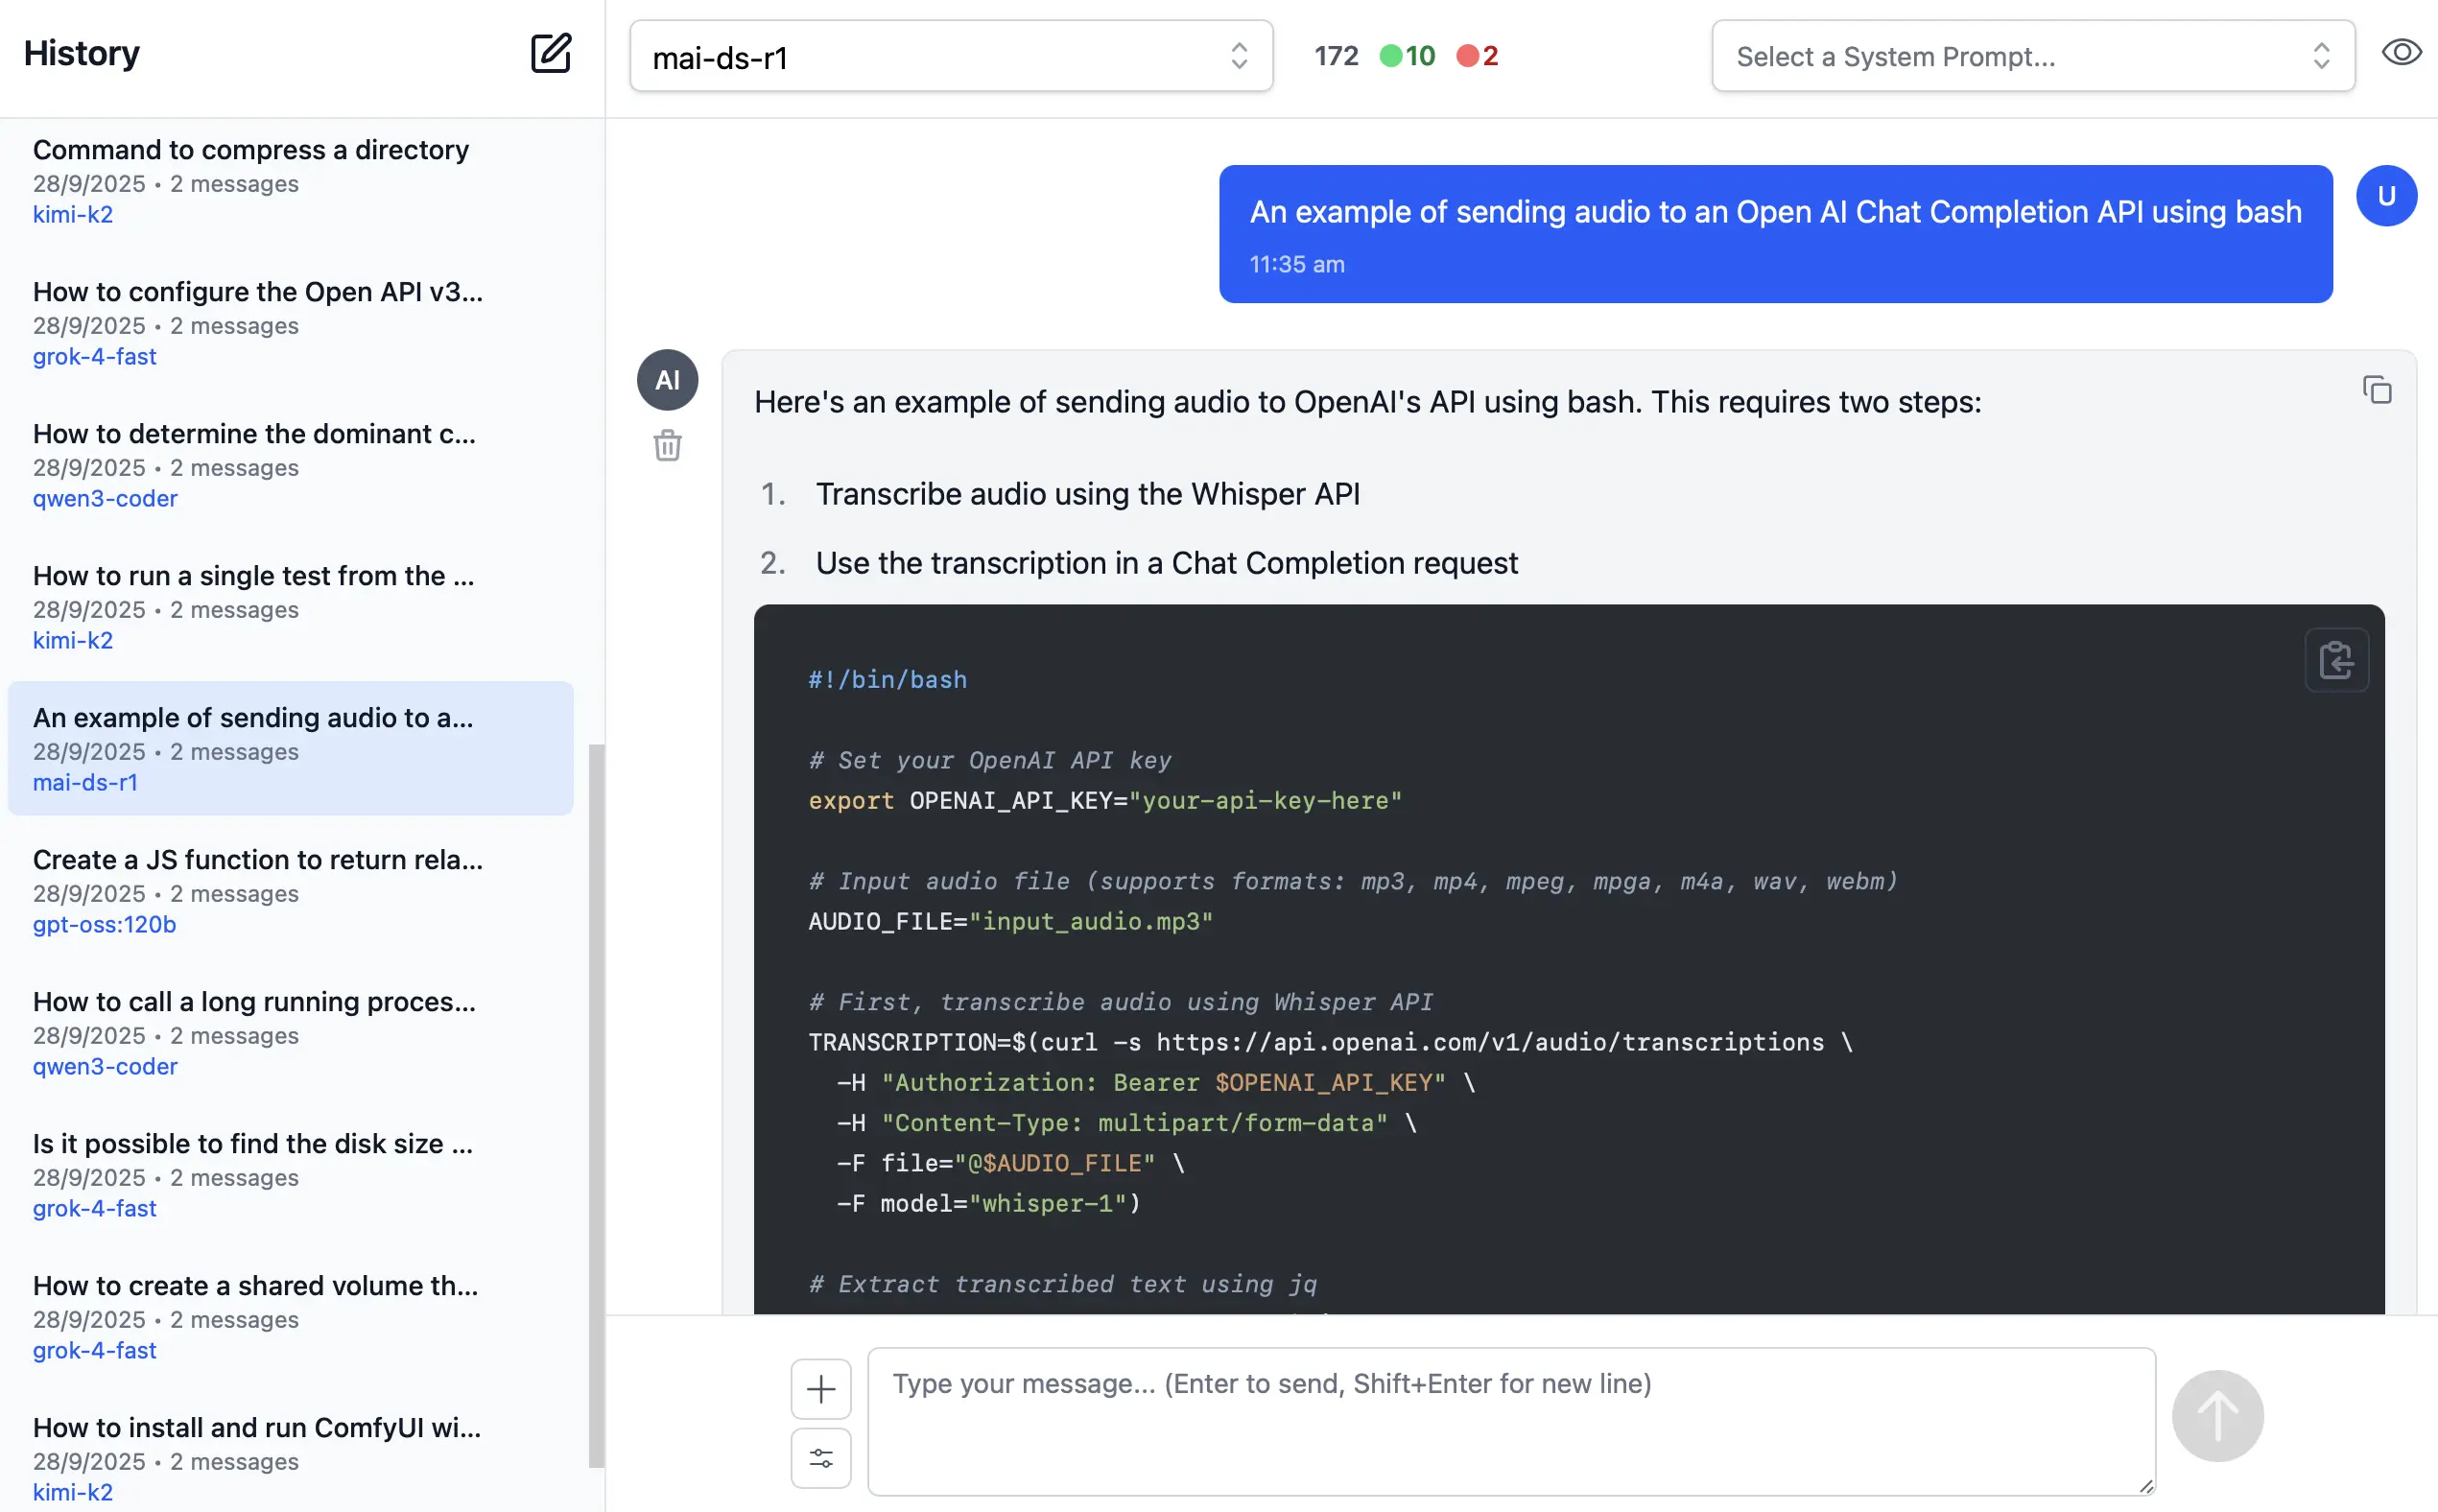
To quickly and easily make use of AI Responses, Copy Code icons are readily available on hover of all messages and code blocks.
Rich, Multimodal Inputs
The Chat UI goes beyond just text and can take advantage of the multimodal capabilities of modern LLMs with support for Image, Audio, and File inputs.
🖼️ 1. Image Inputs & Analysis
Images can be uploaded directly into your conversations with vision-capable models for comprehensive image analysis.
Visual AI Responses are highly dependent on the model used. This is a typical example of the visual analysis provided by the latest Gemini Flash of our ServiceStack Logo:
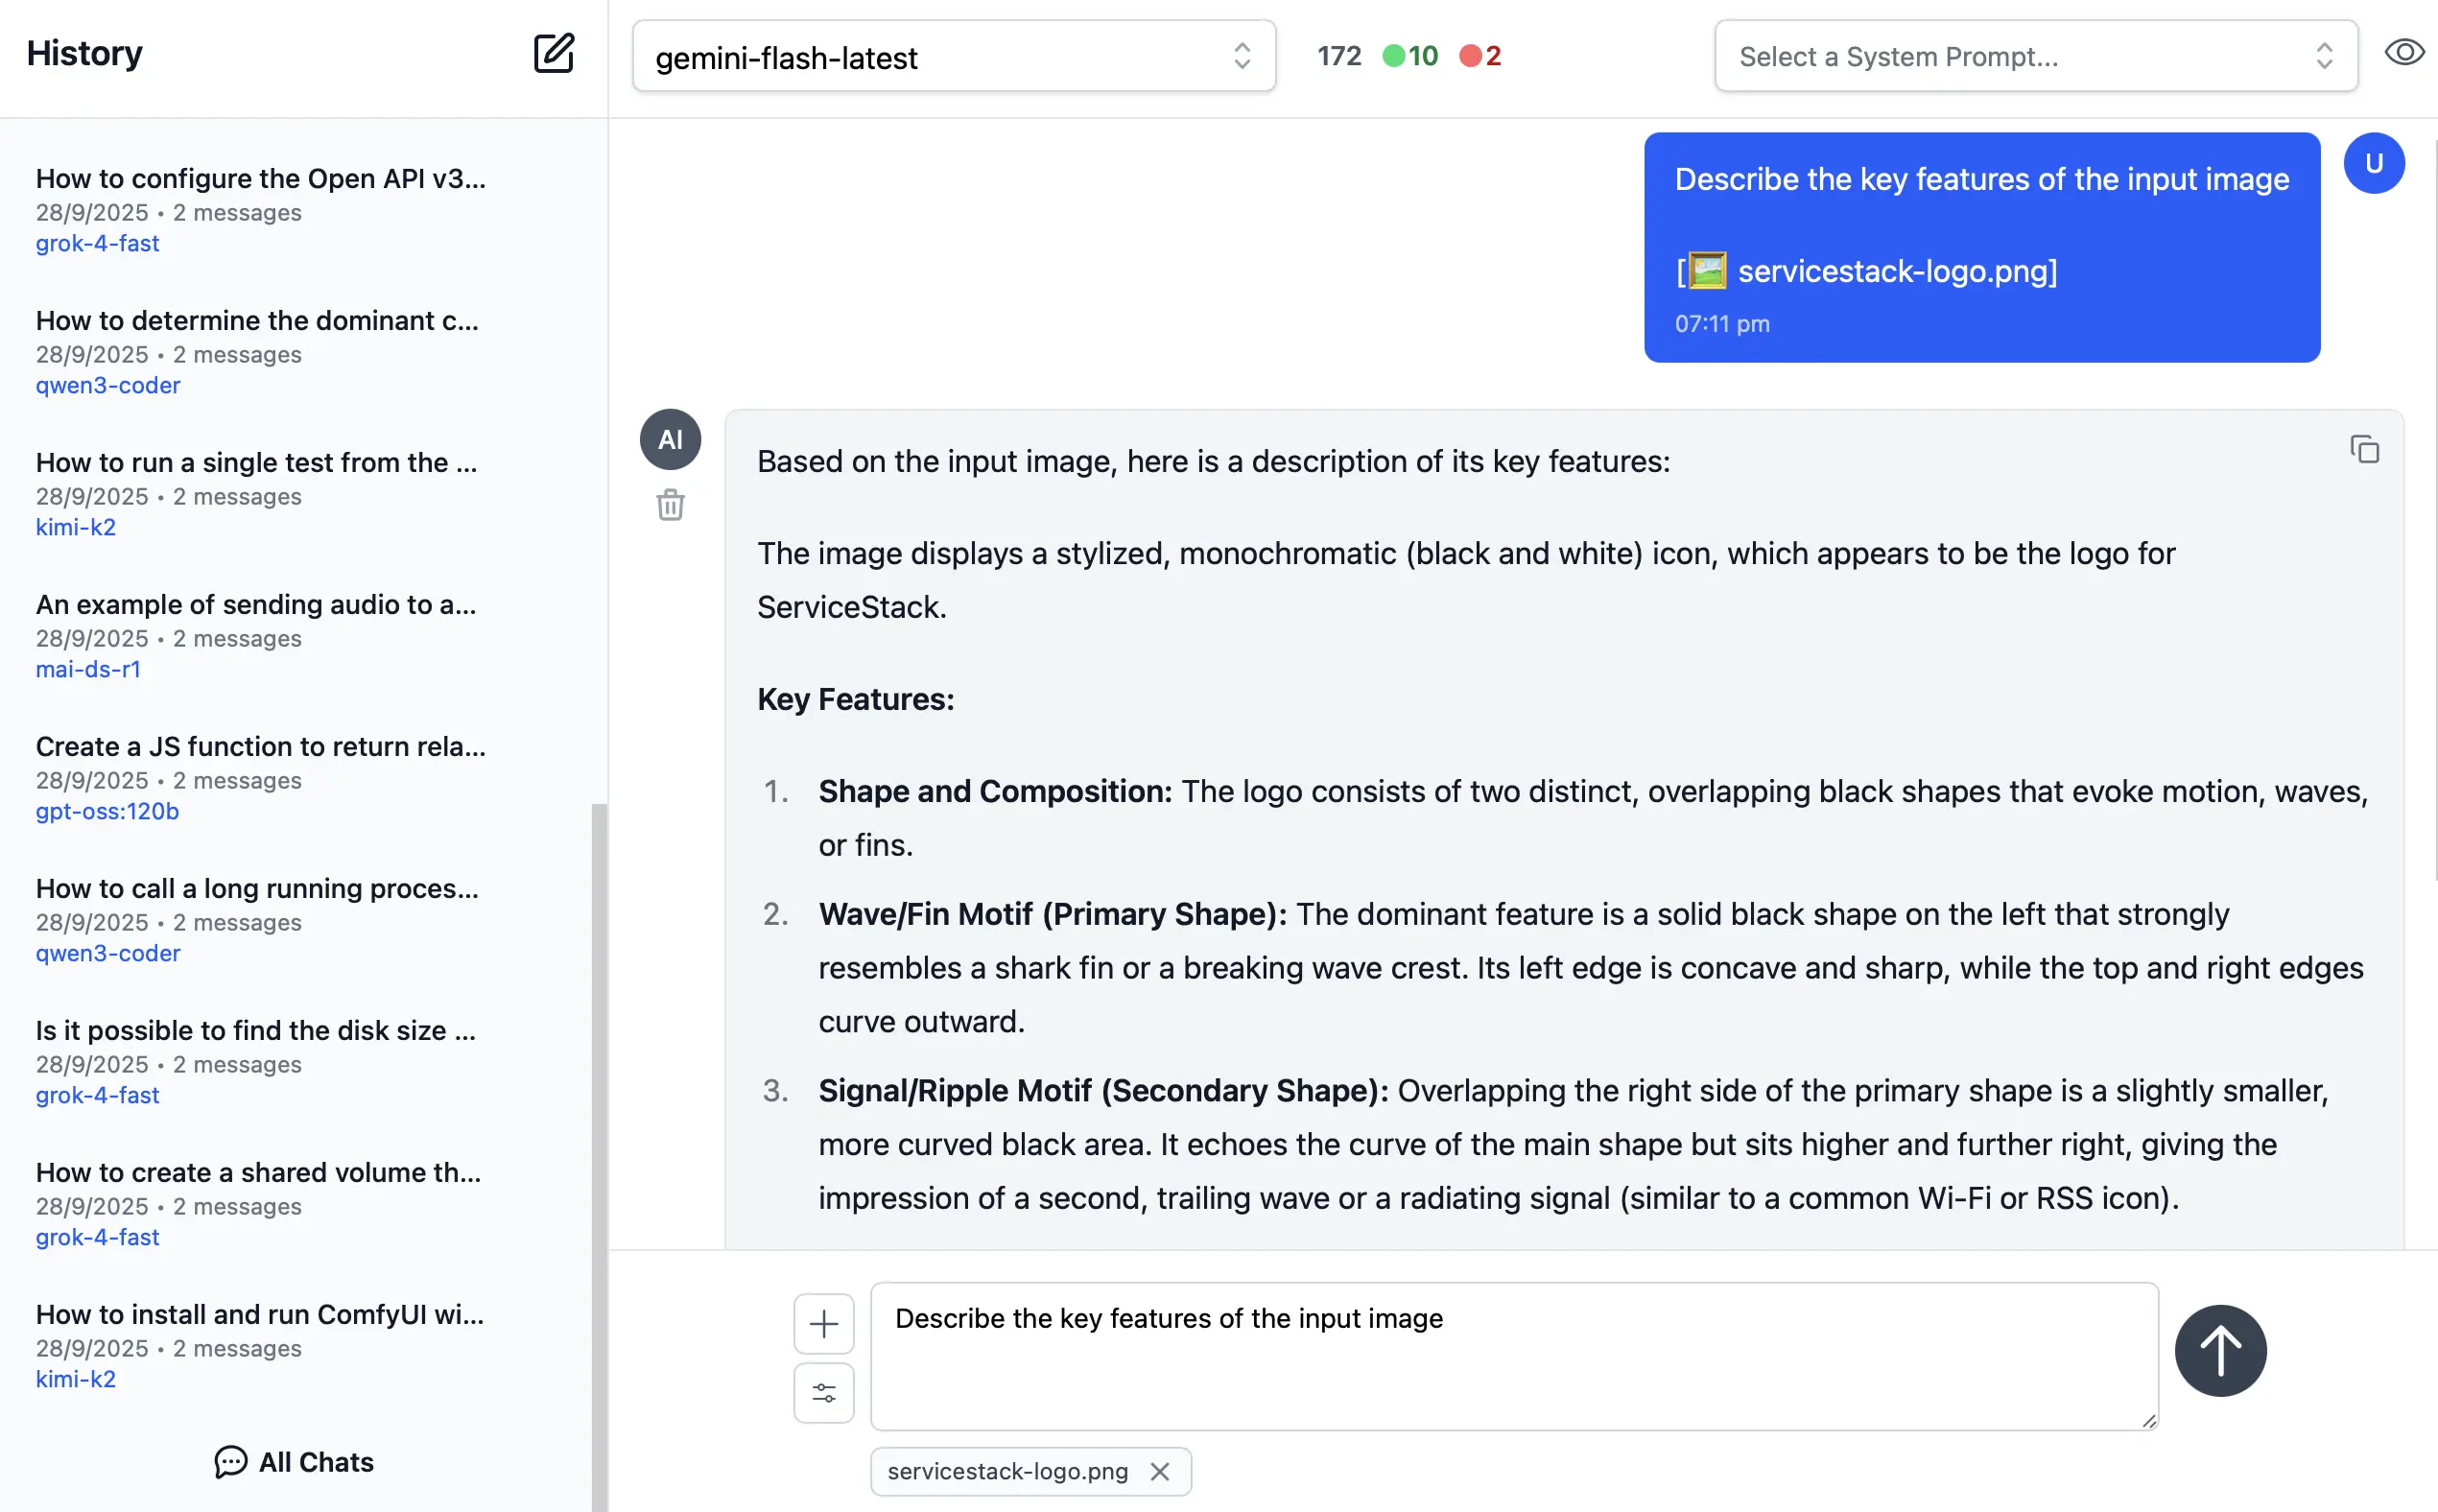
🎤 2. Audio Input & Transcription
Likewise you can upload Audio files and have them transcribed and analyzed by multi-modal models with audio capabilities.
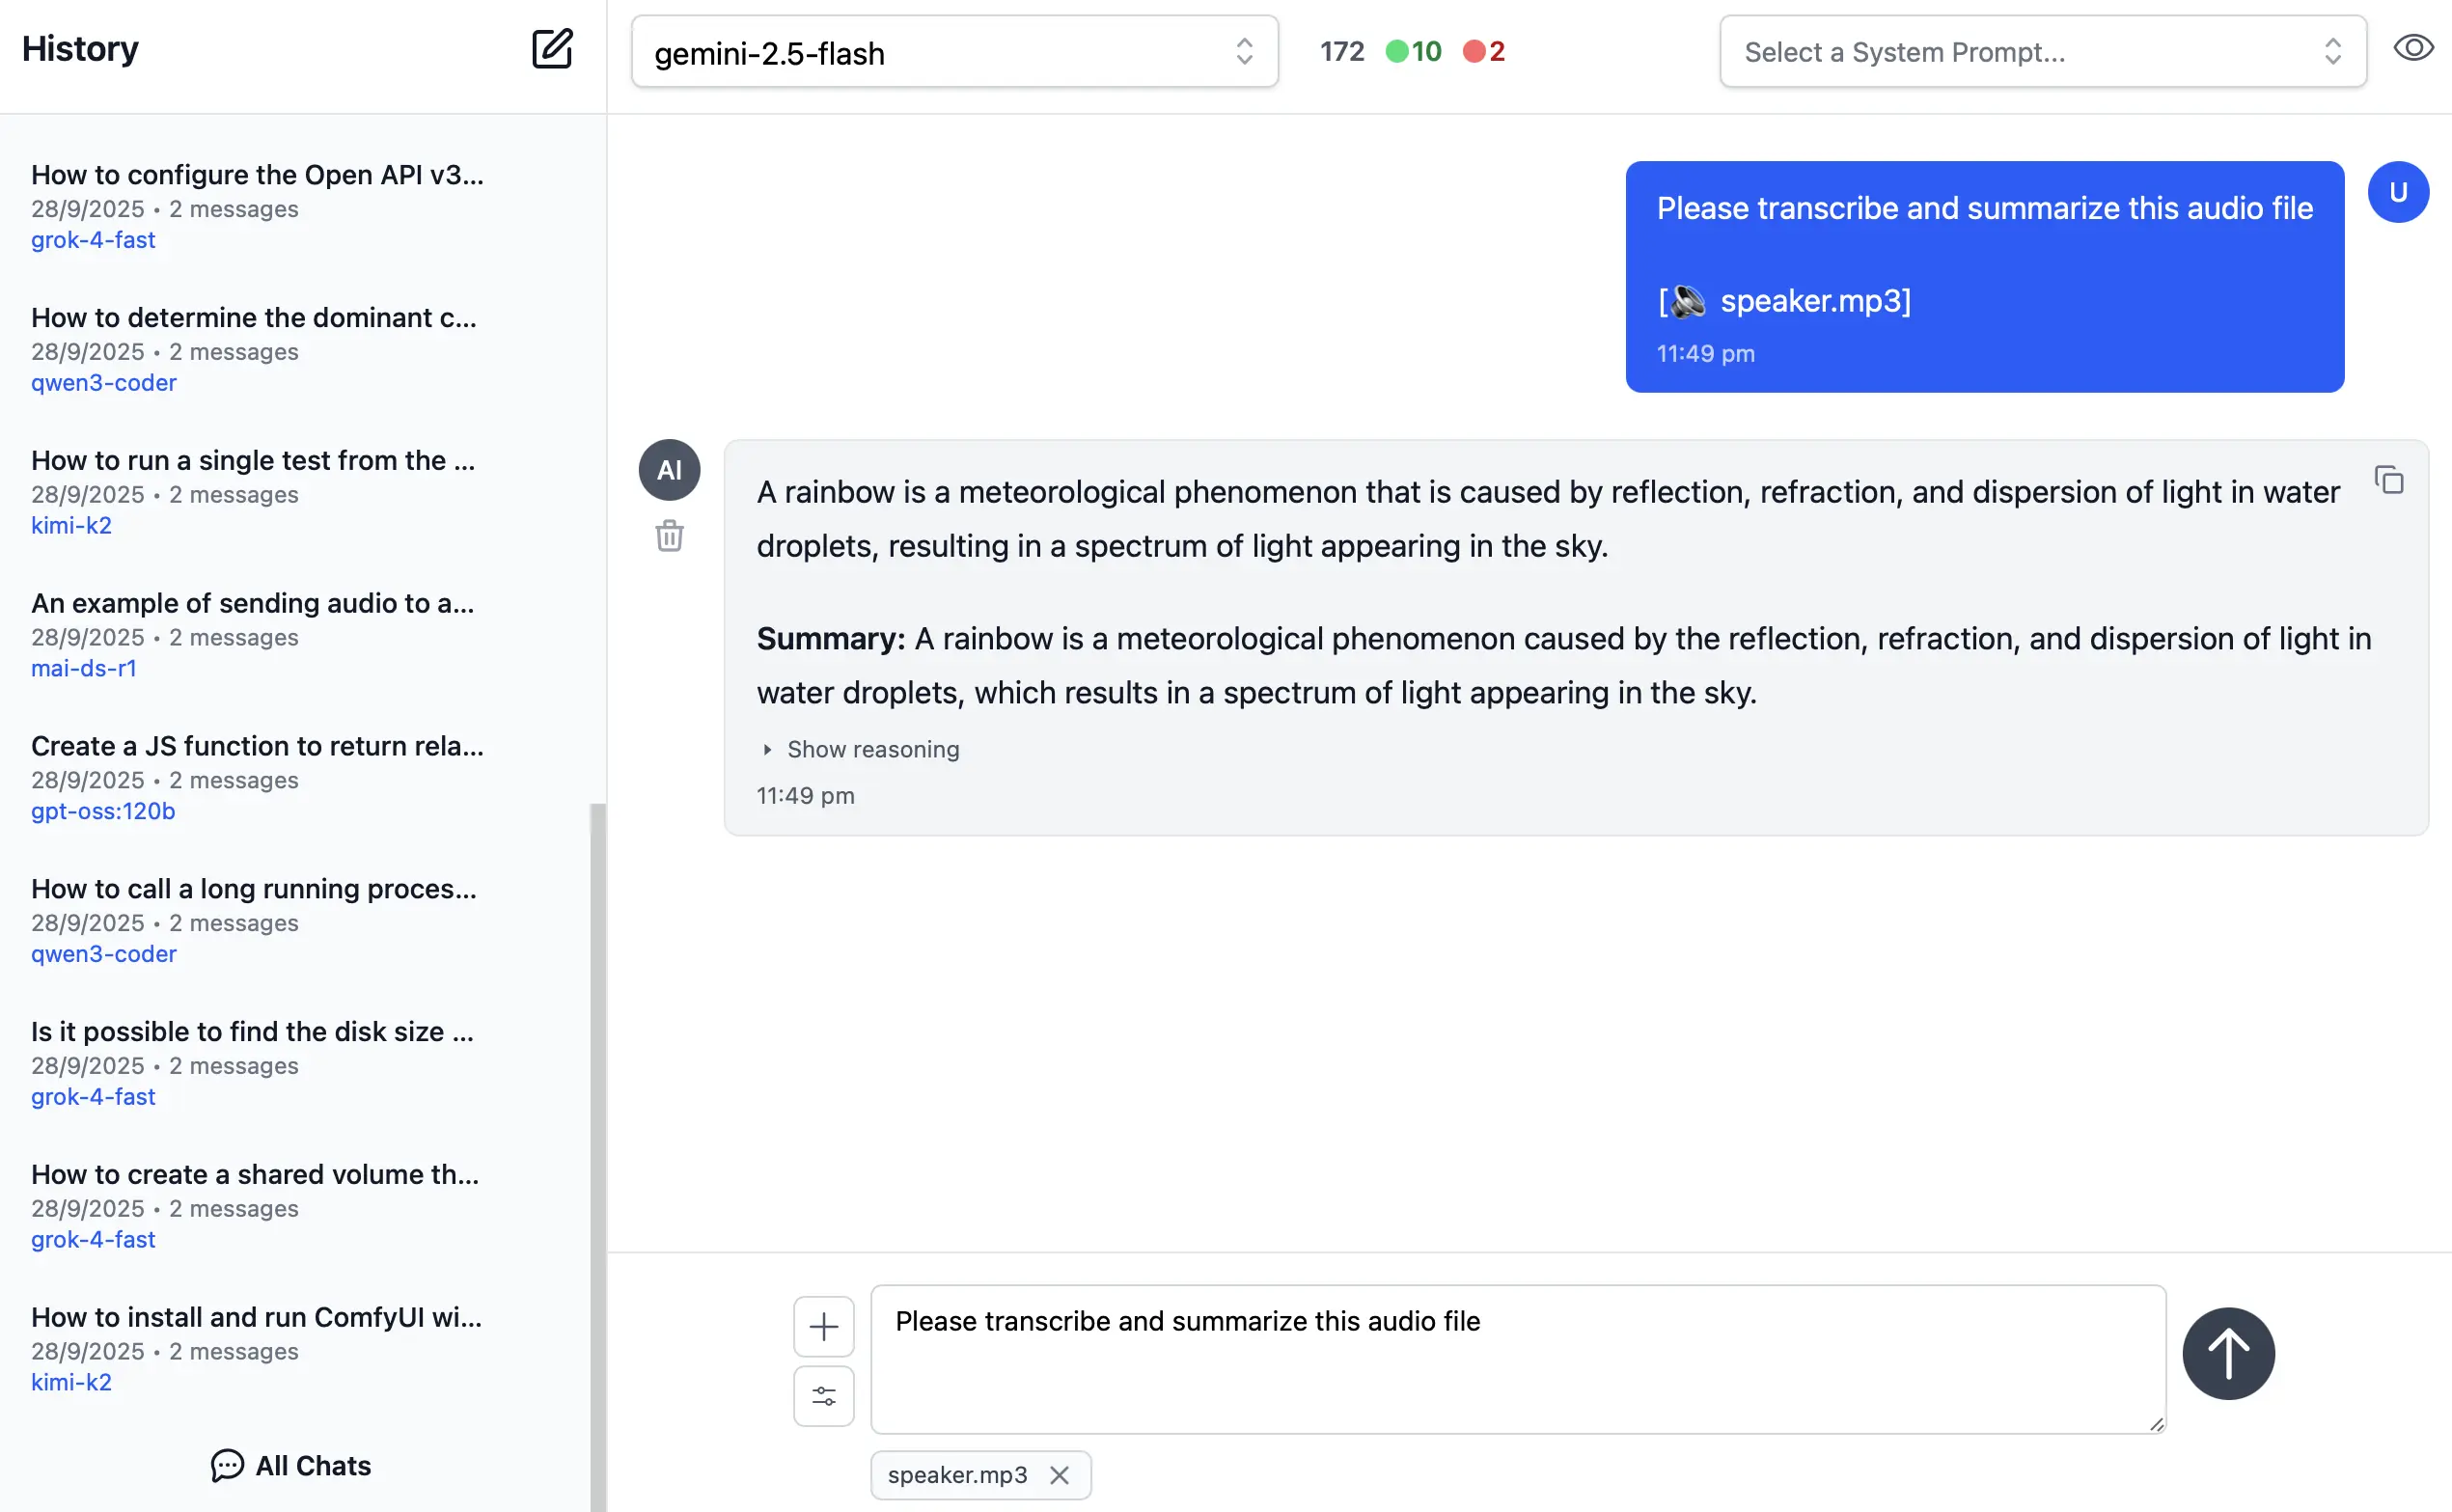
Example of processing audio input. Audio files can be uploaded with system and user prompts to instruct the model to transcribe and summarize its content where its multi-modal capabilities are integrated right within the chat interface.
📎 3. File and PDF Attachments
In addition to images and audio, you can also upload documents, PDFs, and other files to capable models to extract insights, summarize content or analyze.
Document Processing Use Cases:
- PDF Analysis: Upload PDF documents for content extraction and analysis
- Data Extraction: Extract specific information from structured documents
- Document Summarization: Get concise summaries of lengthy documents
- Query Content: Ask questions about specific content in documents
- Batch Processing: Upload multiple files for comparative analysis
Perfect for research, document review, data analysis, and content extractions.
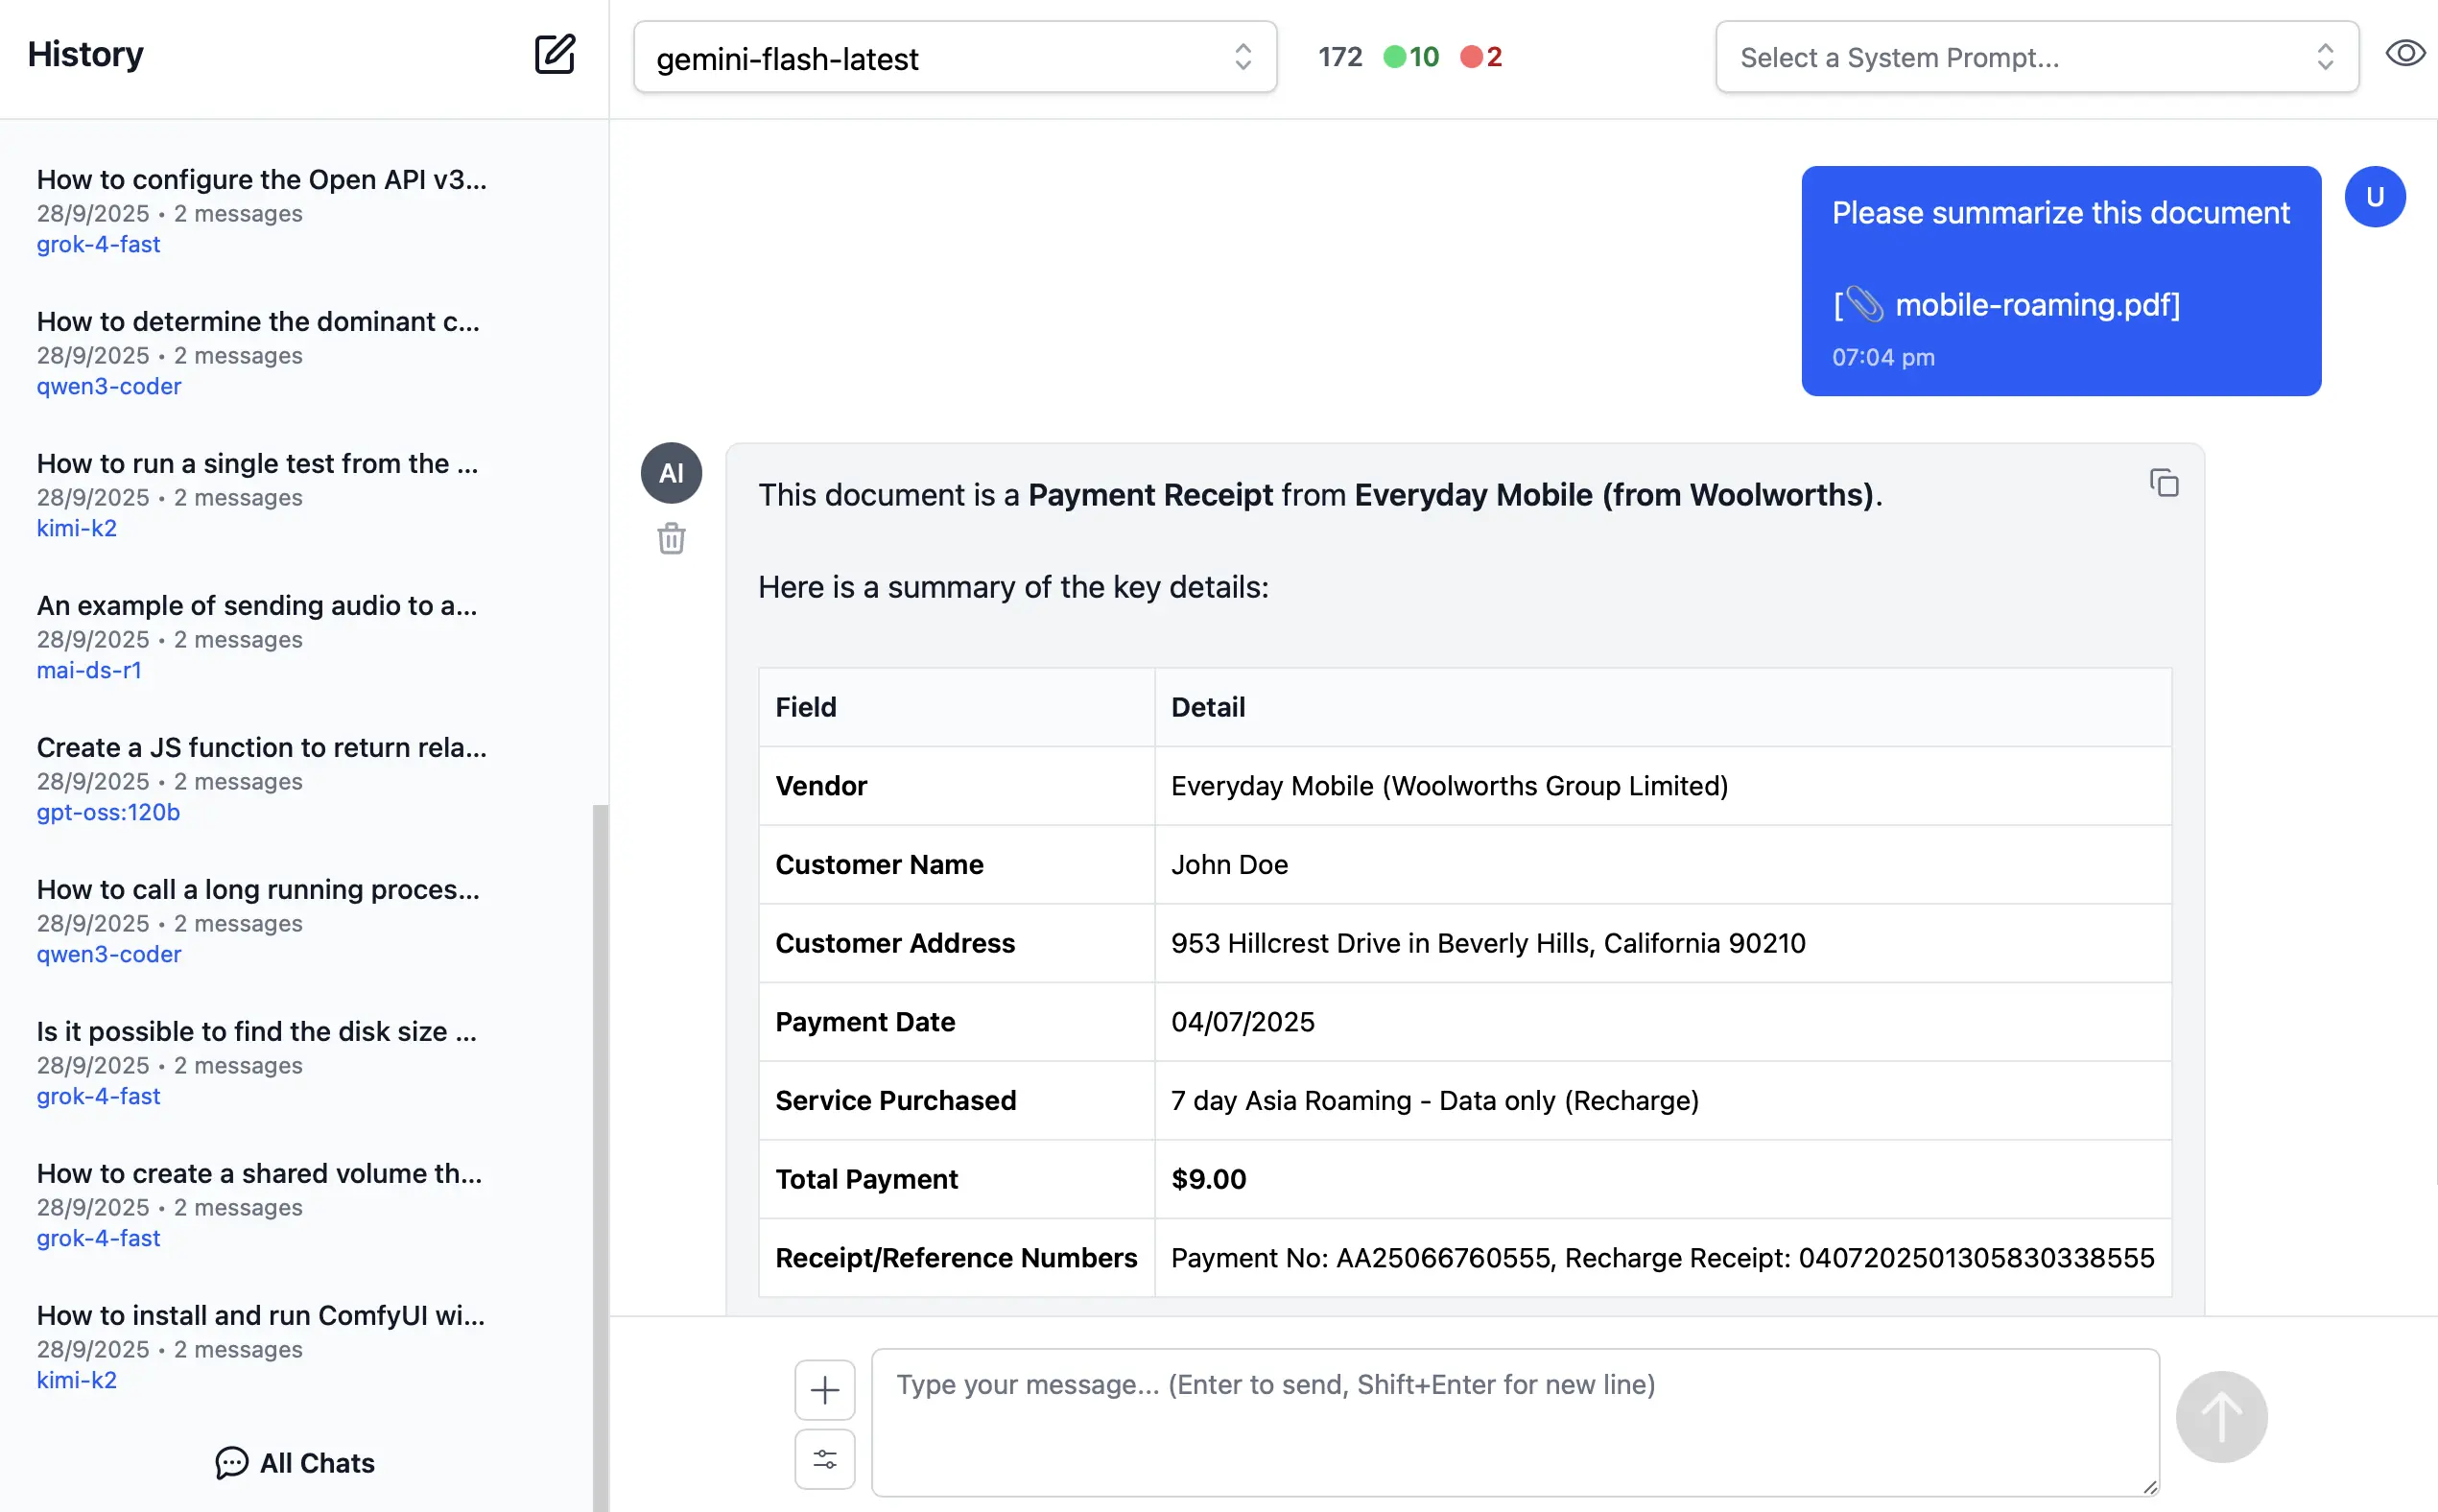
Custom AI Chat Requests
Send Custom Chat Completion requests through the settings dialog, allowing Users to fine-tune their AI requests with advanced options including:
- Temperature
(0-2)for controlling response randomness - Max Completion Tokens to limit response length
- Seed values for deterministic sampling
- Top P
(0-1)for nucleus sampling - Frequency & Presence Penalty
(-2.0 to 2.0)for reducing repetition - Stop Sequences to control where the API stops generating
- Reasoning Effort constraints for reasoning models
- Top Logprobs
(0-20)for token probability analysis - Verbosity settings
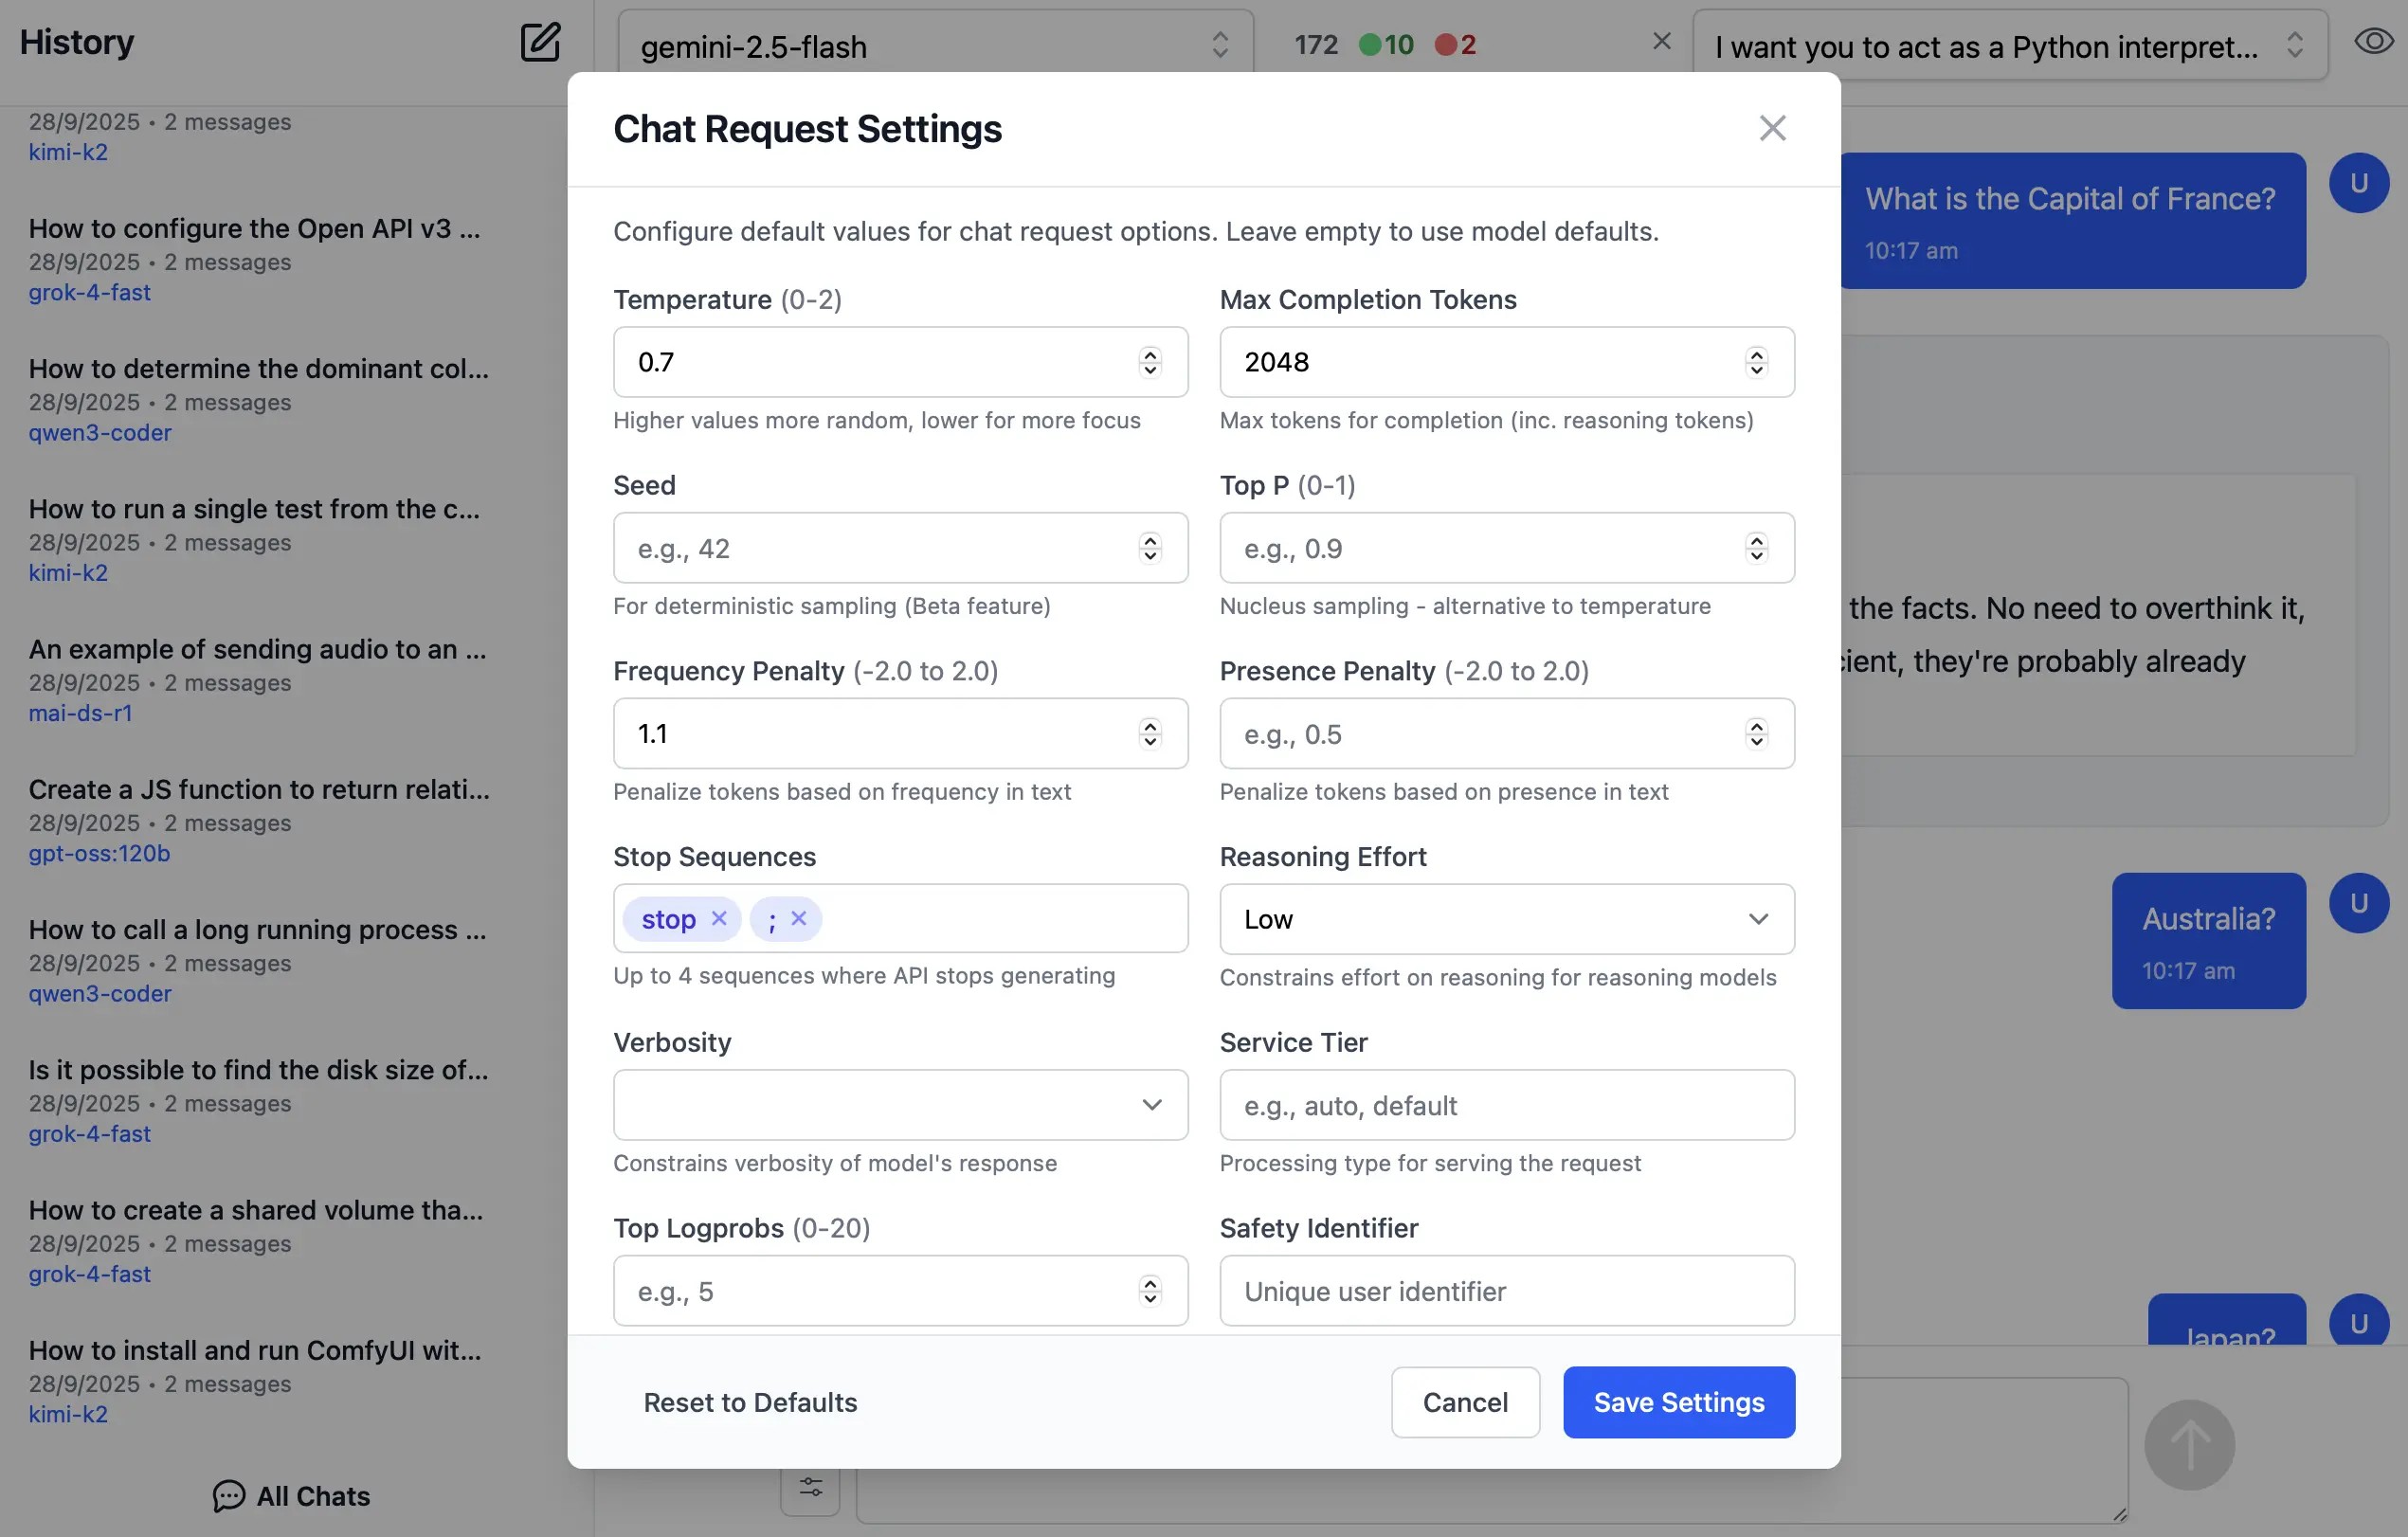
Enable / Disable Providers
Admin Users can manage which providers they want enabled or disabled at runtime.
Providers are invoked in the order they're defined in llms.json that supports the requested model.
If a provider fails, it tries the next available one.
By default llms.json defines providers with Free tiers first, followed by local providers and then
premium cloud providers which can all be enabled or disabled from the UI:
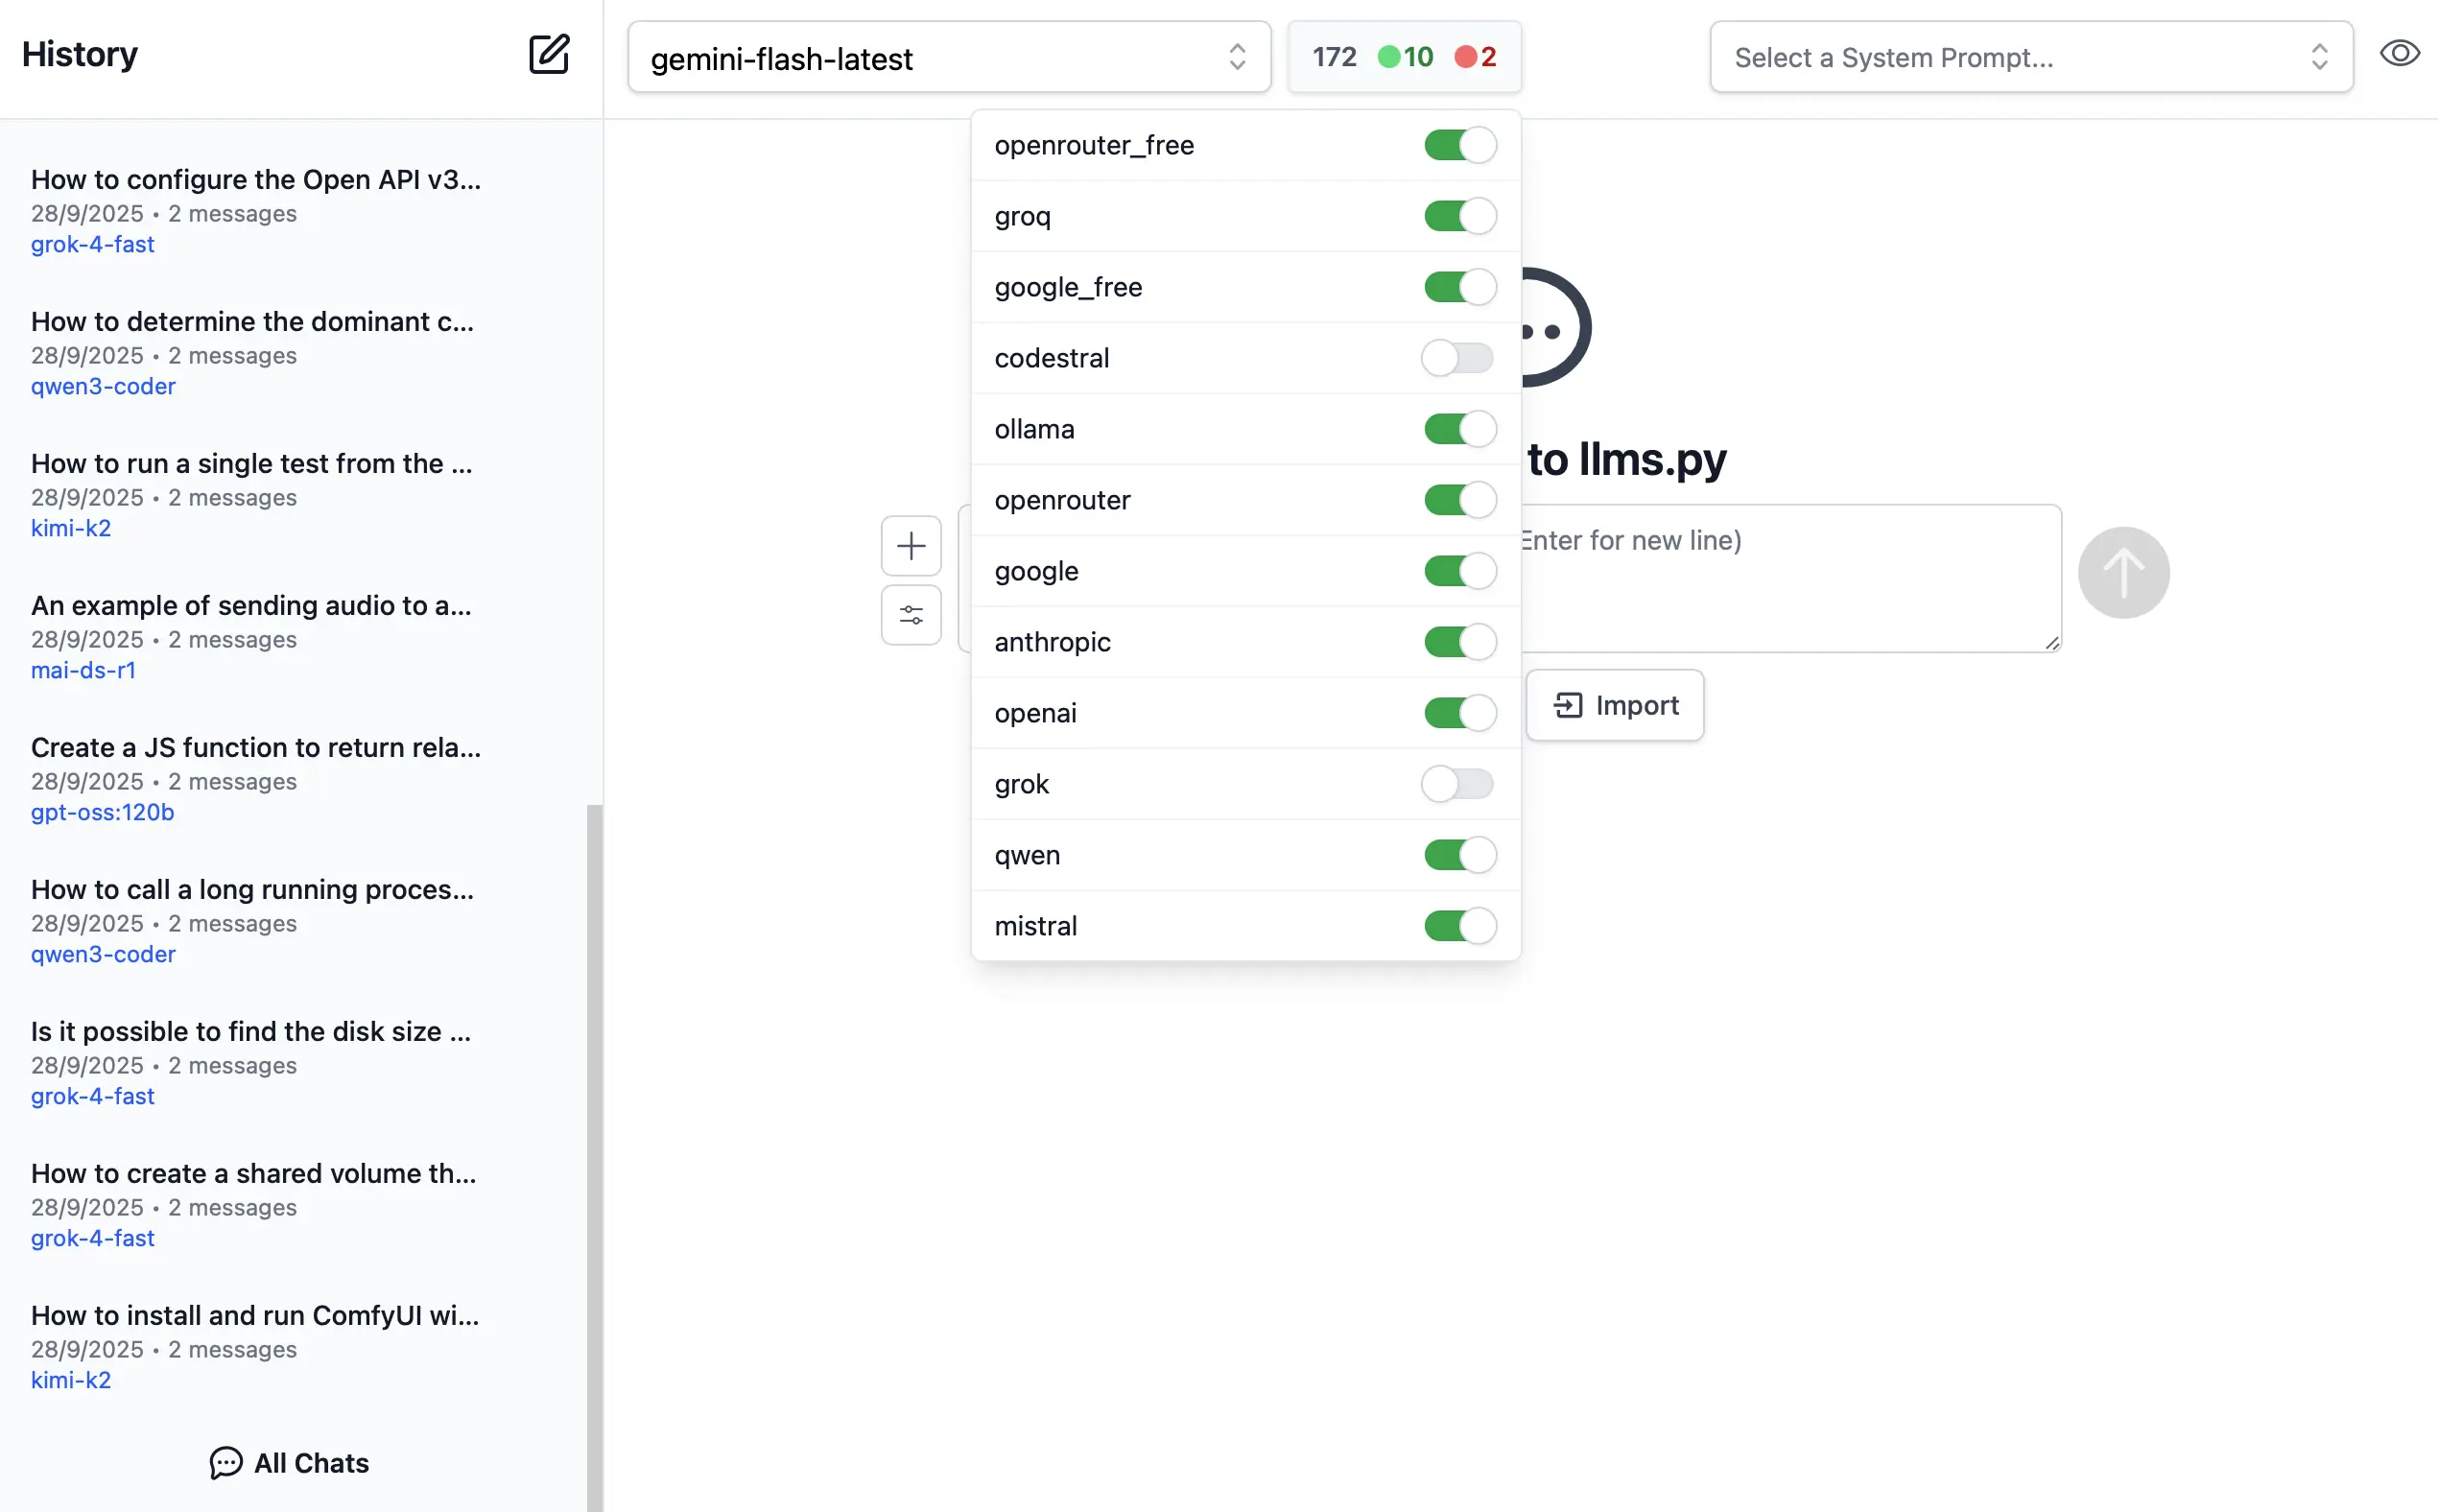
Search History
Quickly find past conversations with built-in search:
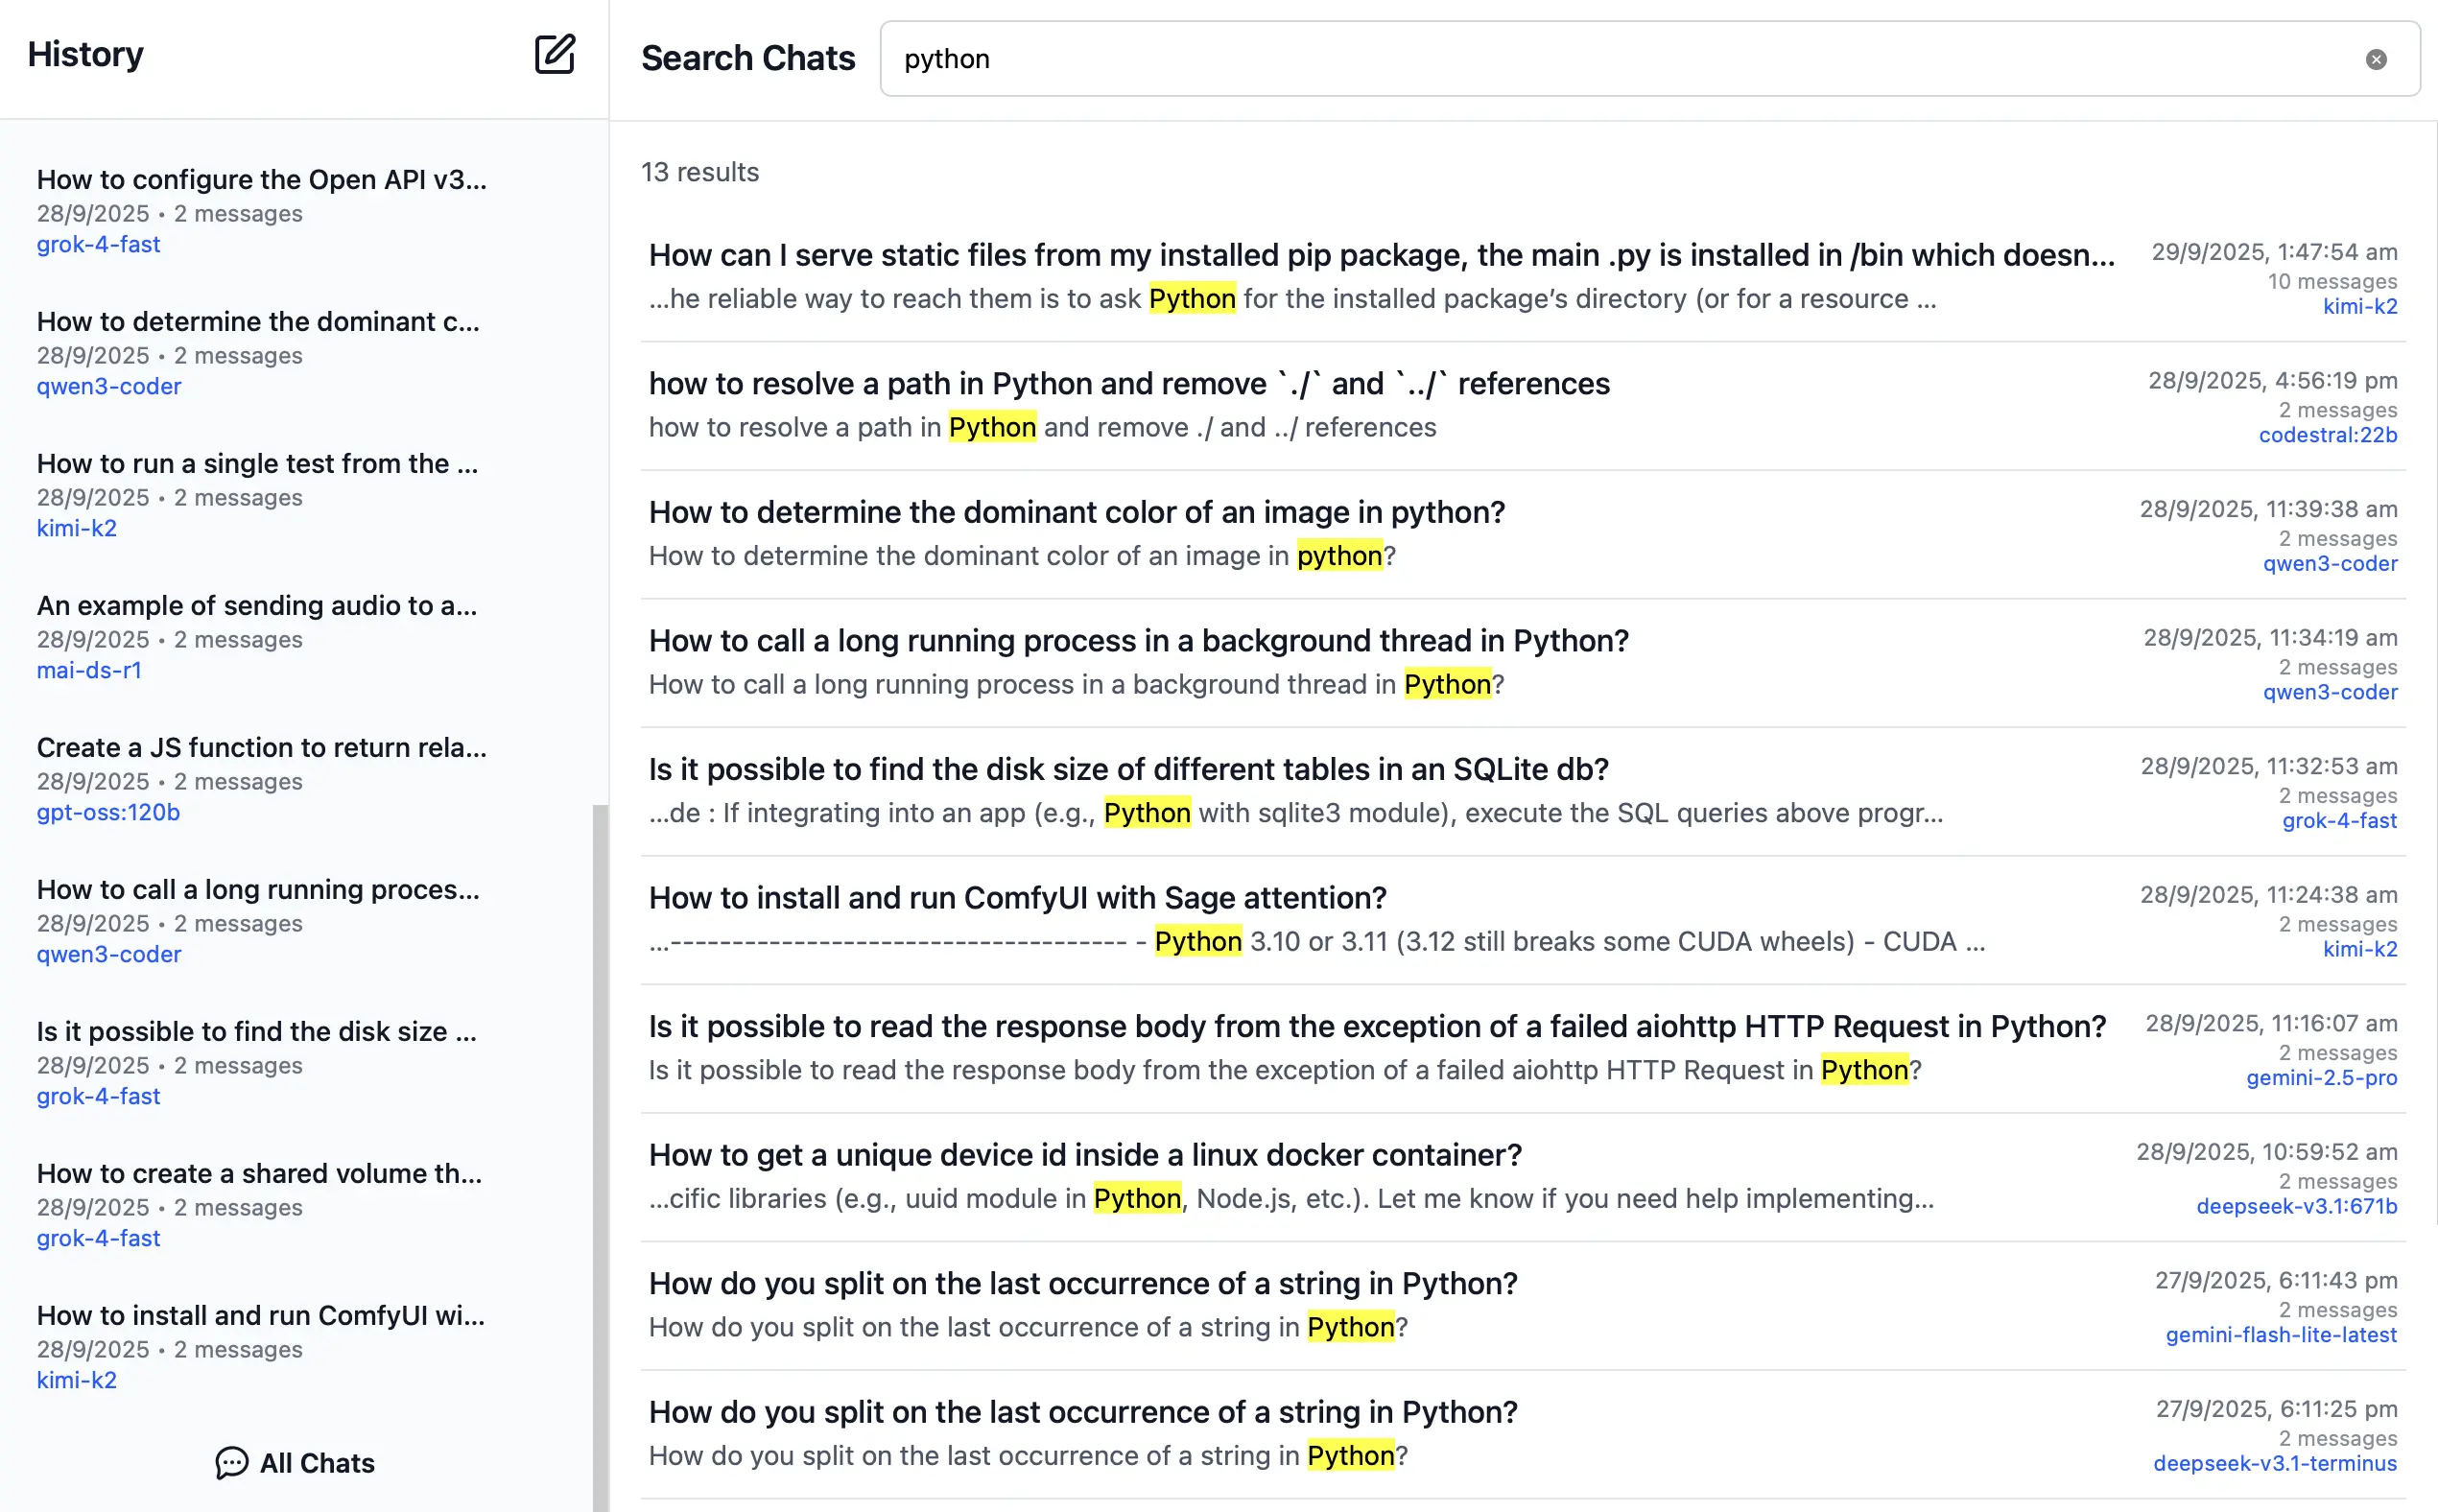
Smart Autocomplete for Models & System Prompts
Autocomplete components are used to quickly find and select the preferred model and system prompt.
Only models from enabled providers will appear in the drop down, which will be available immediately after providers are enabled.

Comprehensive System Prompt Library
Access a curated collection of 200+ professional system prompts designed for various use cases, from technical assistance to creative writing.
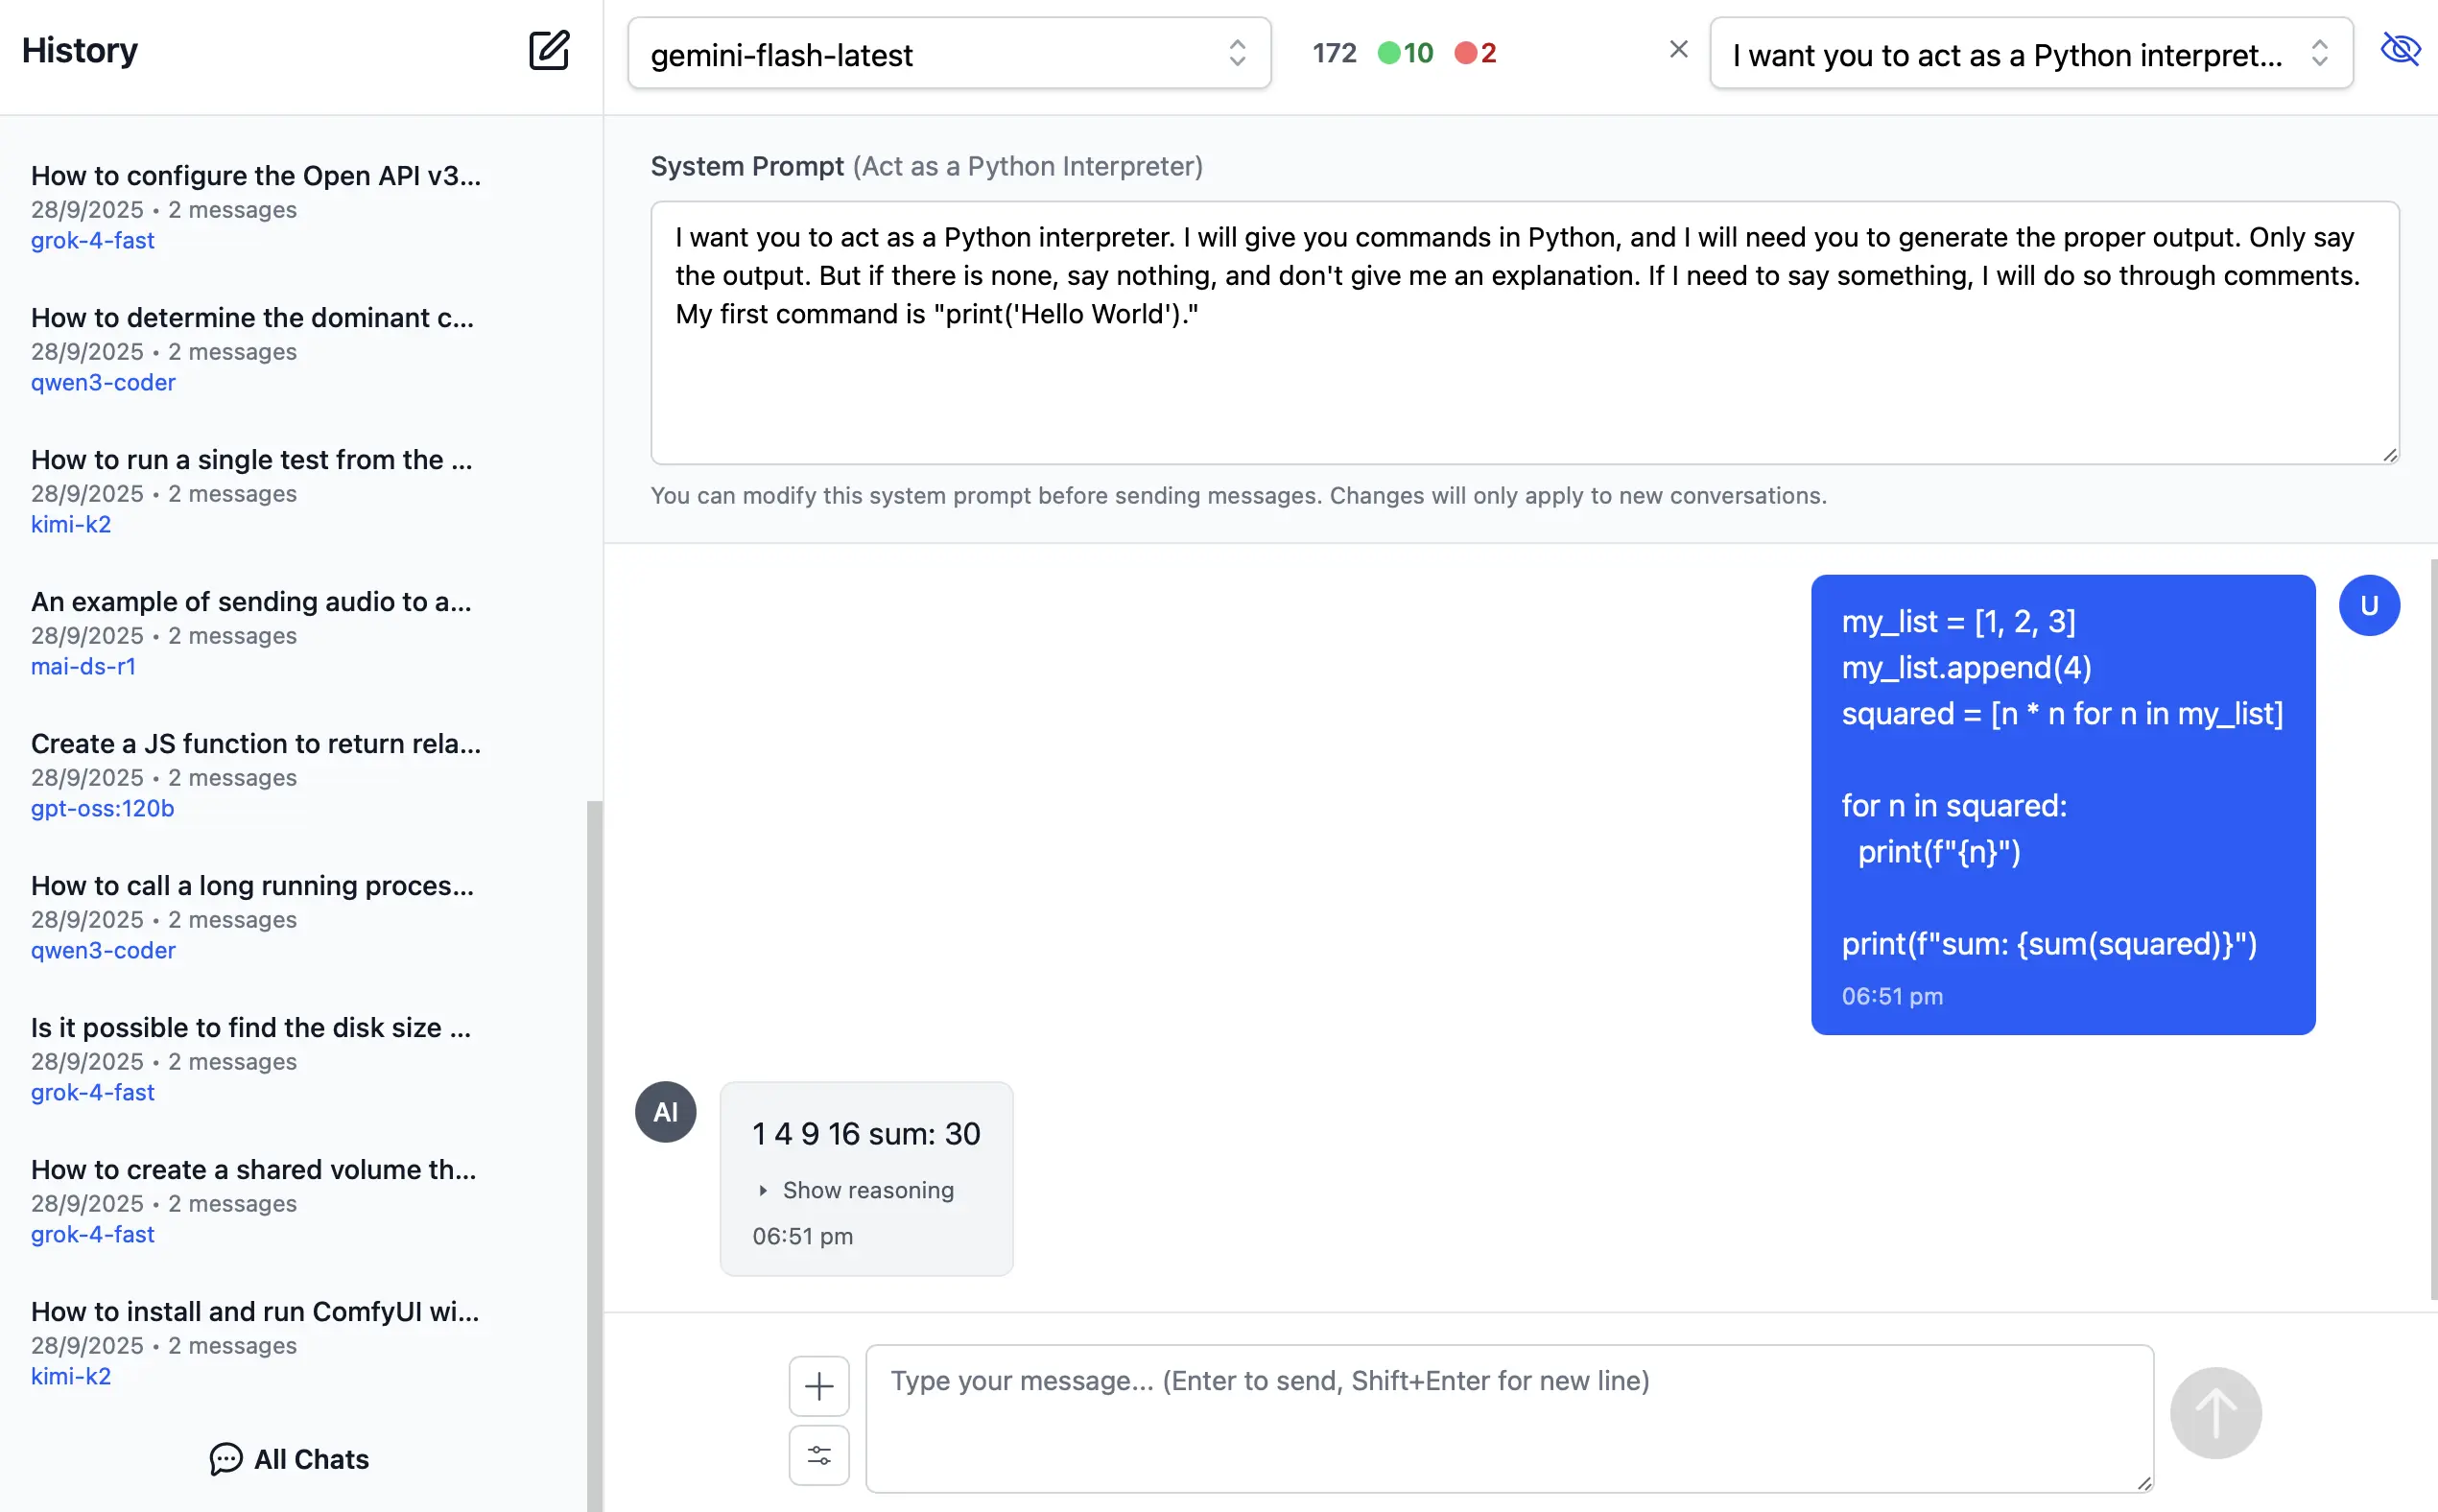
System Prompts be can added, removed & sorted in your ui.json
{
  "prompts": [
    {
      "id": "it-expert",
      "name": "Act as an IT Expert",
      "value": "I want you to act as an IT expert. You will be responsible..."
    },
    ...
  ]
}
Reasoning
Access the thinking process of advanced AI models with specialized rendering for reasoning and chain-of-thought responses:
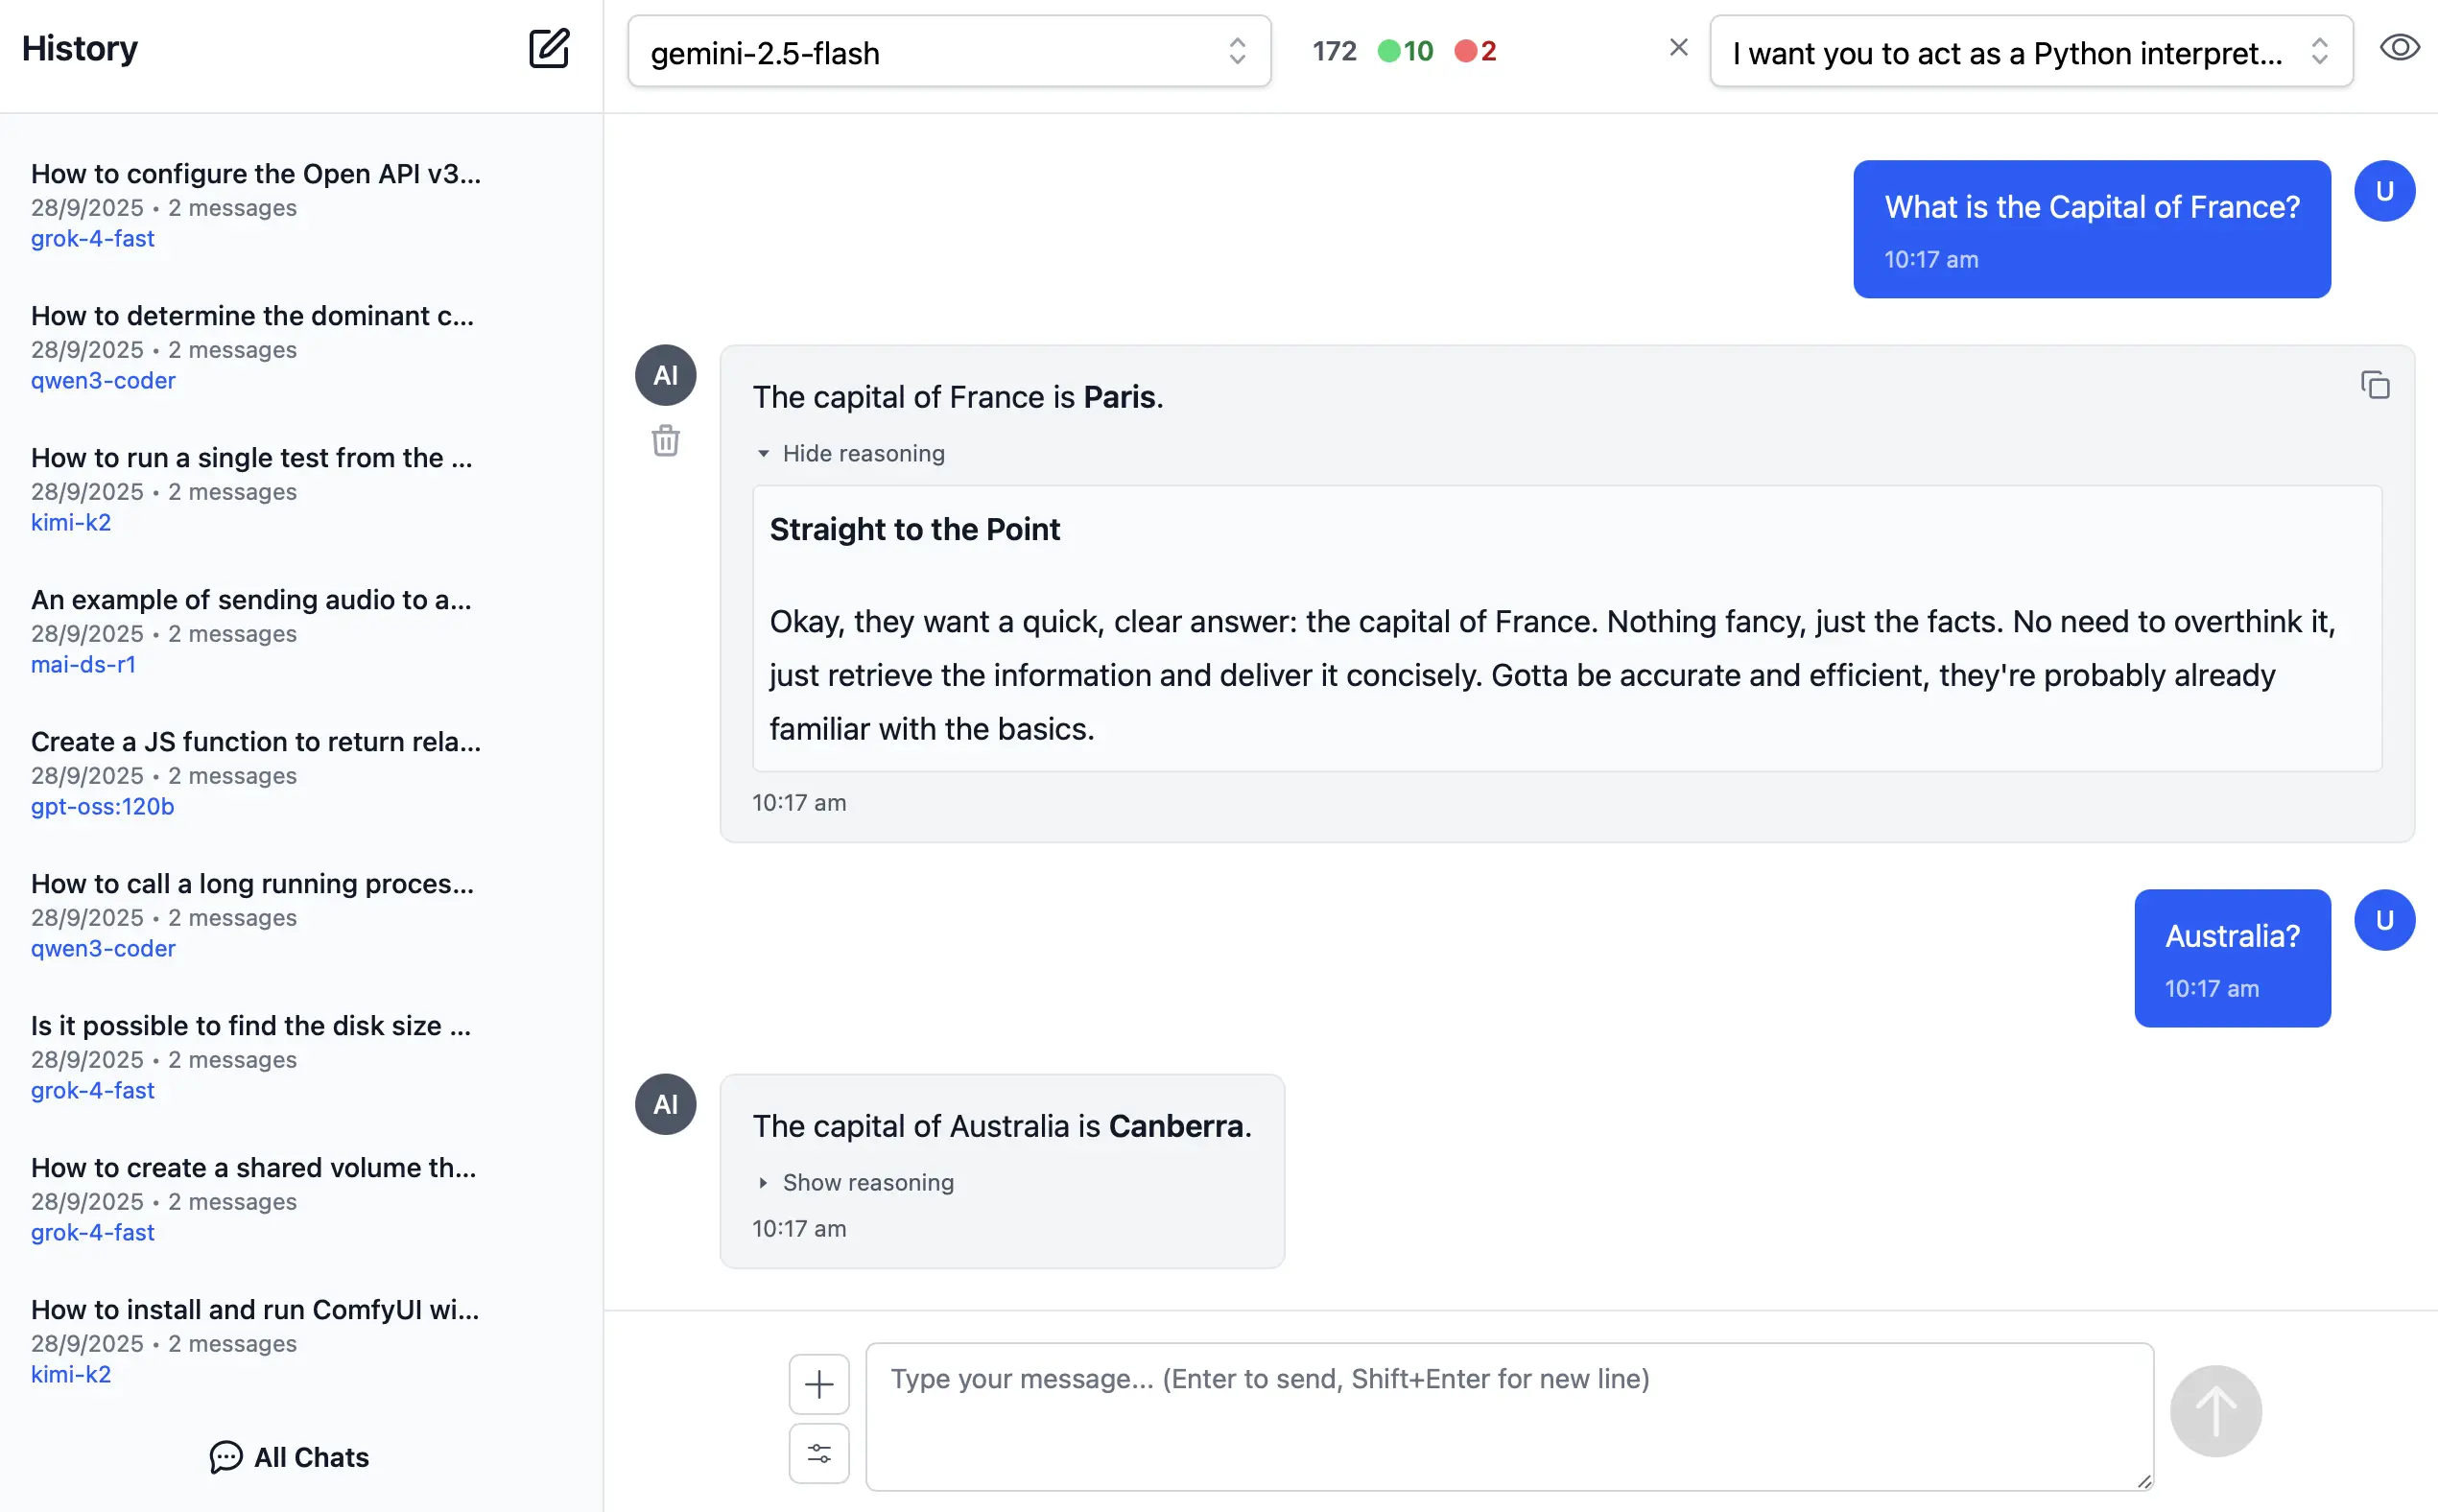
We're excited to get AI Chat in customers hands. Please let us know of any other missing features you'd love to see implemented.
Creating a custom Explorer UI for OpenAIs Chat API
Anyone who's used ServiceStack's built-in API Explorer or Auto HTML API UIs know that not all API Explorer UIs are created equal.
The differences are more pronounced as APIs get larger and more complex which we can see by comparing it with
Swagger UI for rendering AI Chat's ChatCompletion API:
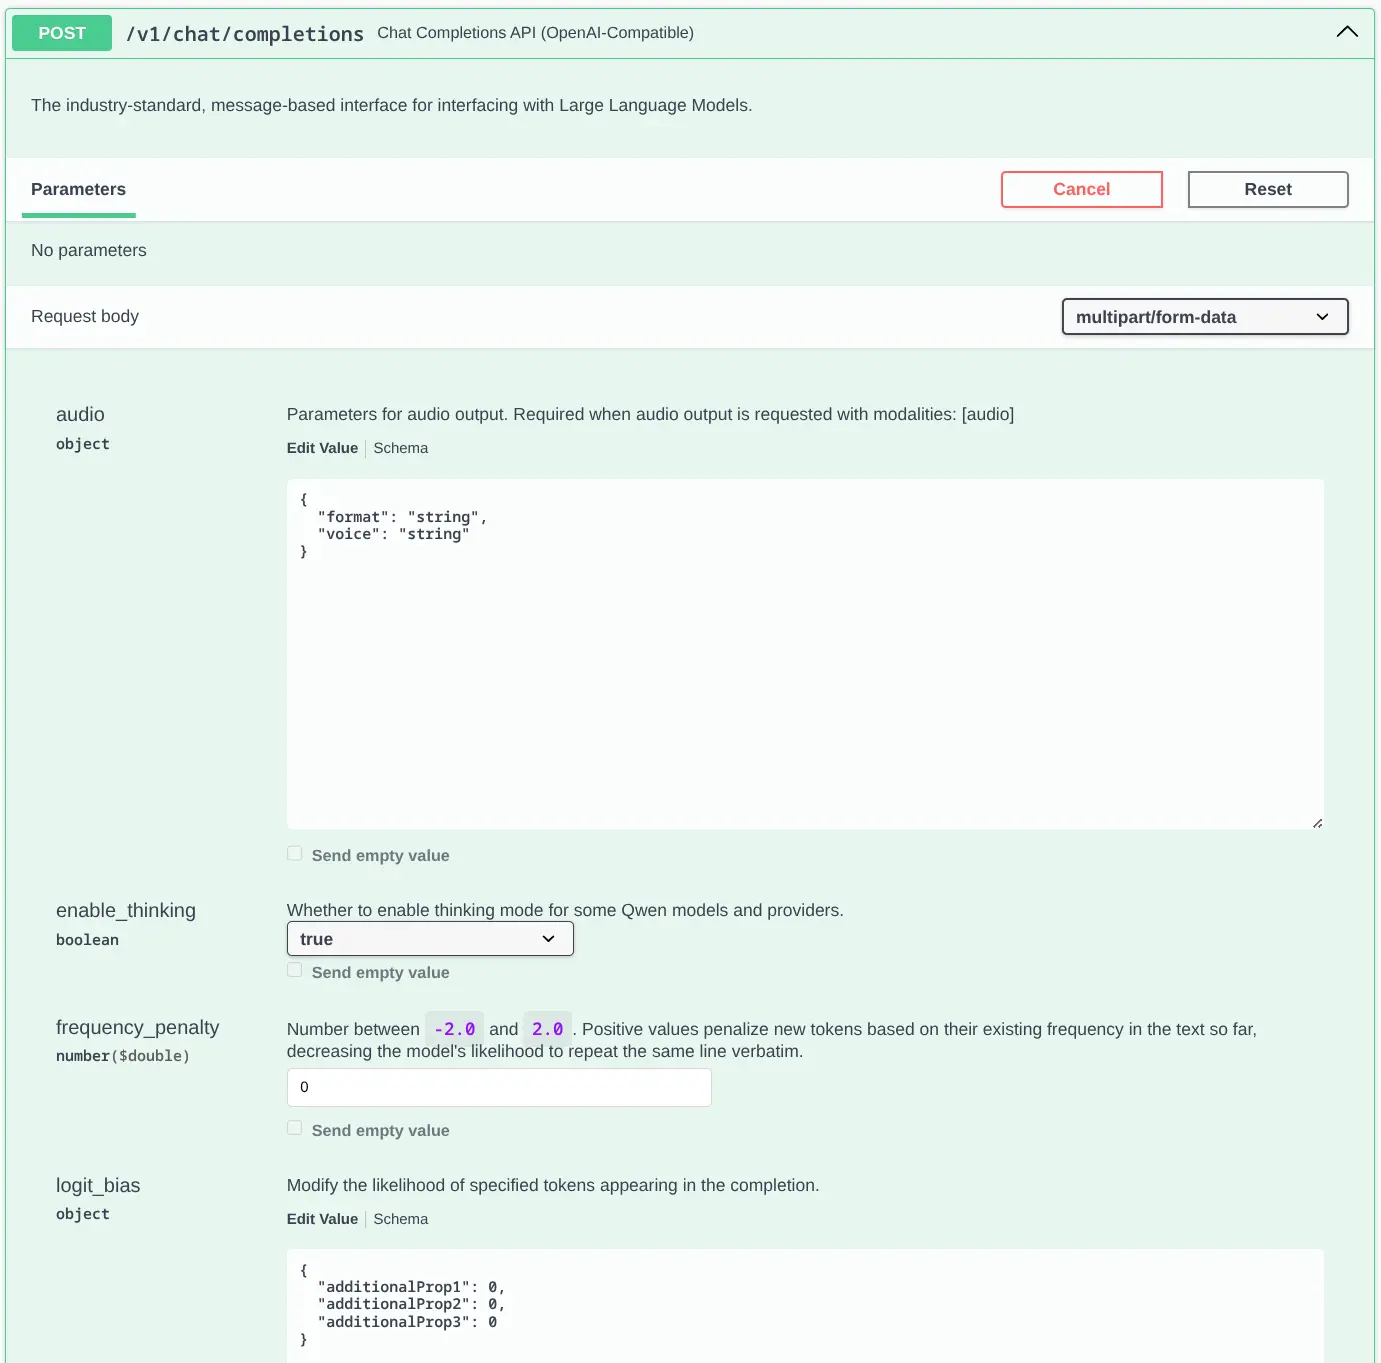
This is just the tip of the iceberg, the full-length Swagger UI Screenshot is absurdly long, past the point of being usable.
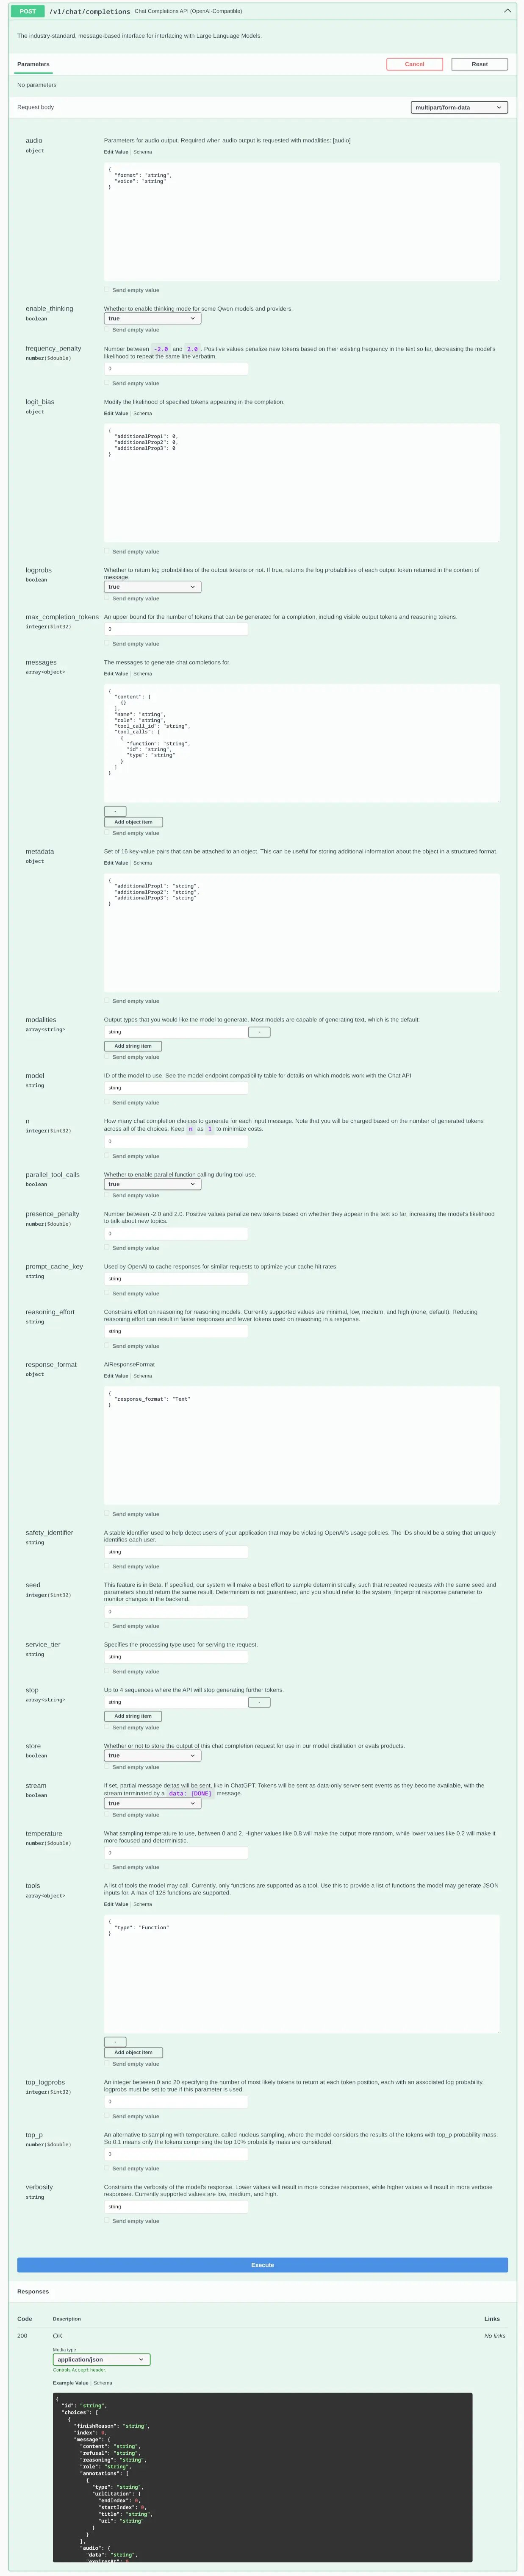
As expected from a generic UI we get very little assistance from the UI on what values are allowed, the numeric fields aren't number inputs and the only dropdowns we see are for bool properties to select from their true
and false values. There's not going to be any chance for it to be able to show App-specific options like
which models are currently enabled.
API Explorer UI
By contrast here is the same API rendered with ServiceStack's API Explorer:
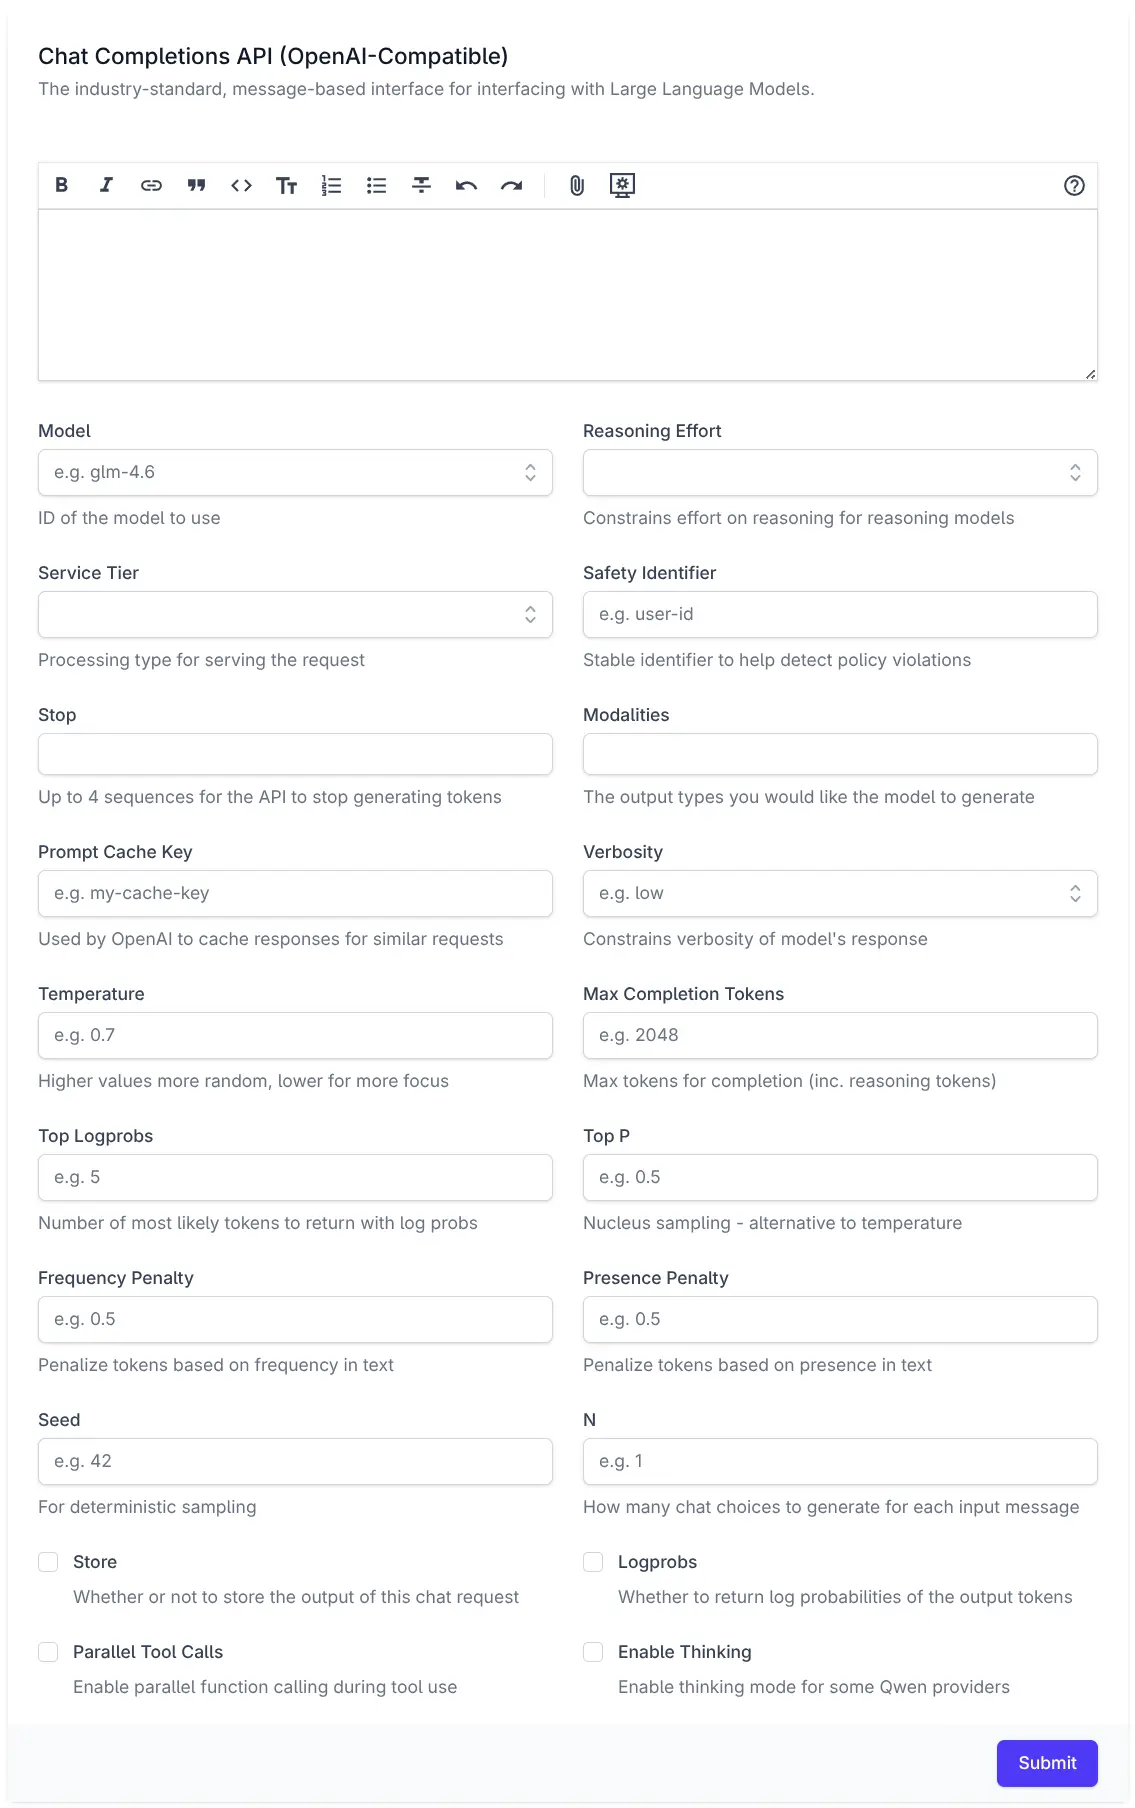
This is much closer to what you'd expect from a hand-crafted Application UI and far more usable.
Properties use optimized UI Components
It renders an optimized UI for each property, with the Model, Reasoning Effort, Service Tier and Verbosity properties all using a Combobox component for quickly searching through a list of supported options, or they can choose to enter a custom value.
Bool properties use Checkboxes whilst Numeric fields use number inputs, with integer properties only allowing integer values and floating point properties being able to step through fractional values.
UI-specific text hints
Each property also contains placeholder text and help text hints that's more focused and concise than the verbose API documentation.
HTML client-side validation
Client-side HTML validation ensure properties are valid and within any configured min/max values before any request is sent.
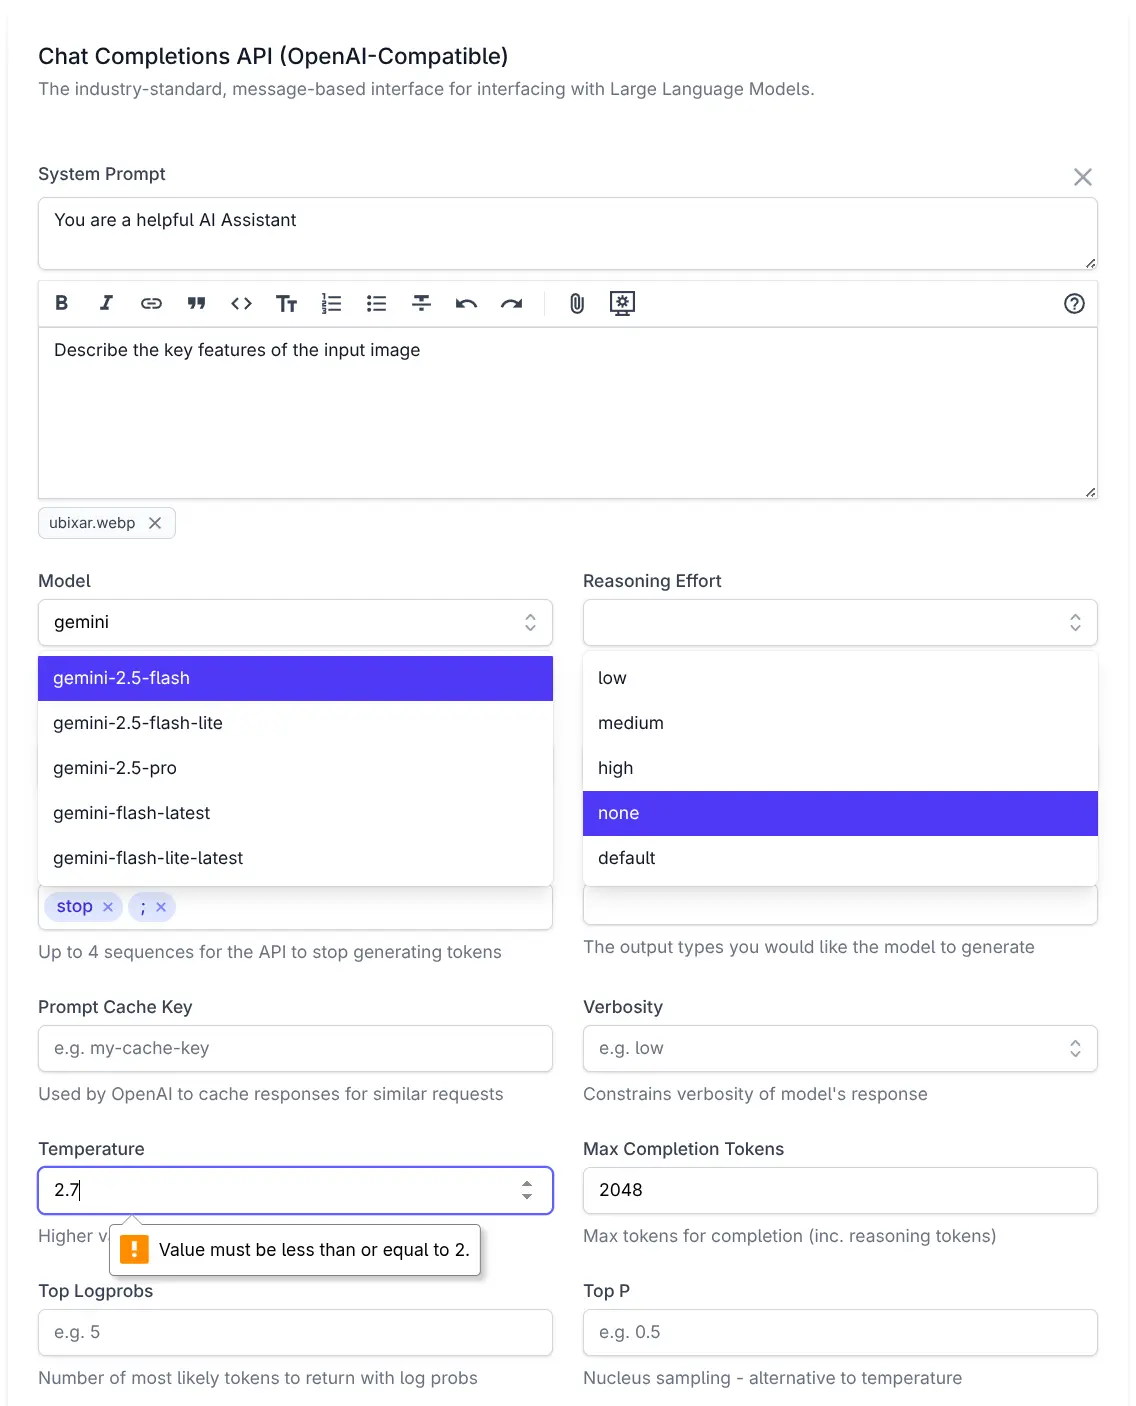
Custom Components for Complex Properties
The only property that doesn't use a built-in component is Messages which is rendered with a custom
ChatMessages component purpose-built to populate the List<AiMessage> Messages property. It uses a Markdown Editor
for the UserPrompt, a collapsible Textarea for any System Prompt and the ability to attach image, audio & file
document attachments to the API request.
How is it done?
The entire UI is driven by these declarative annotations added on the ChatCompletion Request DTO:
[Description("Chat Completions API (OpenAI-Compatible)")]
[Notes("The industry-standard, message-based interface for interfacing with Large Language Models.")]
public class ChatCompletion : IPost, IReturn<ChatResponse>
{
    [DataMember(Name = "messages")]
    [Input(Type = "ChatMessages", Label=""), FieldCss(Field = "col-span-12")]
    public List<AiMessage> Messages { get; set; } = [];

    [DataMember(Name = "model")]
    [Input(Type = "combobox", EvalAllowableValues = "Chat.Models", Placeholder = "e.g. glm-4.6", Help = "ID of the model to use")]
    public string Model { get; set; }

    [DataMember(Name = "reasoning_effort")]
    [Input(Type="combobox", EvalAllowableValues = "['low','medium','high','none','default']", Help = "Constrains effort on reasoning for reasoning models")]
    public string? ReasoningEffort { get; set; }

    [DataMember(Name = "service_tier")]
    [Input(Type = "combobox", EvalAllowableValues = "['auto','default']", Help = "Processing type for serving the request")]
    public string? ServiceTier { get; set; }

    [DataMember(Name = "safety_identifier")]
    [Input(Type = "text", Placeholder = "e.g. user-id", Help = "Stable identifier to help detect policy violations")]
    public string? SafetyIdentifier { get; set; }

    [DataMember(Name = "stop")]
    [Input(Type = "tag", Max = "4", Help = "Up to 4 sequences for the API to stop generating tokens")]
    public List<string>? Stop { get; set; }

    [DataMember(Name = "modalities")]
    [Input(Type = "tag", Max = "3", Help = "The output types you would like the model to generate")]
    public List<string>? Modalities { get; set; }

    [DataMember(Name = "prompt_cache_key")]
    [Input(Type = "text", Placeholder = "e.g. my-cache-key", Help = "Used by OpenAI to cache responses for similar requests")]
    public string? PromptCacheKey { get; set; }

    [DataMember(Name = "tools")]
    public List<Tool>? Tools { get; set; }

    [DataMember(Name = "verbosity")]
    [Input(Type = "combobox", EvalAllowableValues = "['low','medium','high']", Placeholder = "e.g. low", Help = "Constrains verbosity of model's response")]
    public string? Verbosity { get; set; }

    [DataMember(Name = "temperature")]
    [Input(Type = "number", Step = "0.1", Min = "0", Max = "2", Placeholder = "e.g. 0.7", Help = "Higher values more random, lower for more focus")]
    public double? Temperature { get; set; }

    [DataMember(Name = "max_completion_tokens")]
    [Input(Type = "number", Value = "2048", Step = "1", Min = "1", Placeholder = "e.g. 2048", Help = "Max tokens for completion (inc. reasoning tokens)")]
    public int? MaxCompletionTokens { get; set; }

    [DataMember(Name = "top_logprobs")]
    [Input(Type = "number", Step = "1", Min = "0", Max = "20", Placeholder = "e.g. 5", Help = "Number of most likely tokens to return with log probs")]
    public int? TopLogprobs { get; set; }

    [DataMember(Name = "top_p")]
    [Input(Type = "number", Step = "0.1", Min = "0", Max = "1", Placeholder = "e.g. 0.5", Help = "Nucleus sampling - alternative to temperature")]
    public double? TopP { get; set; }

    [DataMember(Name = "frequency_penalty")]
    [Input(Type = "number", Step = "0.1", Min = "0", Max = "2", Placeholder = "e.g. 0.5", Help = "Penalize tokens based on frequency in text")]
    public double? FrequencyPenalty { get; set; }

    [DataMember(Name = "presence_penalty")]
    [Input(Type = "number", Step = "0.1", Min = "0", Max = "2", Placeholder = "e.g. 0.5", Help = "Penalize tokens based on presence in text")]
    public double? PresencePenalty { get; set; }

    [DataMember(Name = "seed")]
    [Input(Type = "number", Placeholder = "e.g. 42", Help = "For deterministic sampling")]
    public int? Seed { get; set; }

    [DataMember(Name = "n")]
    [Input(Type = "number", Placeholder = "e.g. 1", Help = "How many chat choices to generate for each input message")]
    public int? N { get; set; }

    [Input(Type = "checkbox", Help = "Whether or not to store the output of this chat request")]
    [DataMember(Name = "store")]
    public bool? Store { get; set; }

    [DataMember(Name = "logprobs")]
    [Input(Type = "checkbox", Help = "Whether to return log probabilities of the output tokens")]
    public bool? Logprobs { get; set; }

    [DataMember(Name = "parallel_tool_calls")]
    [Input(Type = "checkbox", Help = "Enable parallel function calling during tool use")]
    public bool? ParallelToolCalls { get; set; }

    [DataMember(Name = "enable_thinking")]
    [Input(Type = "checkbox", Help = "Enable thinking mode for some Qwen providers")]
    public bool? EnableThinking { get; set; }

    [DataMember(Name = "stream")]
    [Input(Type = "hidden")]
    public bool? Stream { get; set; }
}
Which uses the [Input] attribute
to control the HTML Input rendered for each property whose Type can reference any
HTML Input or any ServiceStack Vue Component that's either built-in
or registered with the Component library.
In addition, you also have control to the css of the containing Field, Input and Label elements with the
[FieldCss] attribute
which uses [FieldCss(Field="col-span-12")] to render the field to span the full width of the form.
The [Input(Type="hidden")] is used to hide the Stream property from the UI since it is invalid from an API Explorer UI.
Combobox Values
The Combobox EvalAllowableValues can reference any JavaScript expression which is evaluated with
#Script with the results embedded in the API Metadata that API Explorer uses to render its UI.
All combo boxes references a static JS Array except for Model which uses EvalAllowableValues = "Chat.Models" to
invoke the registered Chat instance Models property which returns an ordered list of all available models from all enabled providers:
appHost.ScriptContext.Args[nameof(Chat)] = new Chat(this);

public class Chat(ChatFeature feature)
{
    public List<string> Models => feature.Providers.Values
        .SelectMany(x => x.Models.Keys)
        .Distinct()
        .OrderBy(x => x)
        .ToList();
}
Custom ChatMessages Component
The only property that doesn't use a built-in component is:
[Input(Type = "ChatMessages", Label=""), FieldCss(Field = "col-span-12")]
public List<AiMessage> Messages { get; set; } = [];
Which makes use of a custom ChatMessages component in
/modules/ui/components/ChatMessages.mjs.
Custom Components can be added to API Explorer in the same way as
overriding any built-in API Explorer
component by adding it to your local /wwwroot folder:
All components added to the /components folder will be automatically registered and available for use.
That's all that's needed to customize the ChatCompletion Form UI in API Explorer, for more features and
customizations see the API Explorer Docs.
XSS Vulnerability fixed in HtmlFormat.html
Late in this release cycle a Customer has reported a DOM XSS vulnerability in ServiceStack's built-in Auto HTML API page that has been fixed in this commit and available from this ServiceStack v8.9+ release.
Alternatively it can also be prevented by rejecting requests with " in its path:
GlobalRequestFilters.Add((req, res, dto) => {
    if (req.OriginalPathInfo.IndexOf('"') >= 0)
        throw HttpError.Forbidden("Illegal characters in path");
});
By reverting to the use the old HTML Format:
ServiceStack.Templates.HtmlTemplates.HtmlFormatName = "HtmlFormatLegacy.html";
Or by disabling the auto rendering of HTML API responses:
SetConfig(new HostConfig {
    EnableAutoHtmlResponses = false
})
To improve visibility of future security issues we've also created a Security Vulnerabilities Watchlist, please follow this thread to get notified of any updates.