
.NET 8
We're excited to welcome the next major release of ServiceStack v8, designed to take advantage of many advancements for in .NET's latest long-term release: .NET 8 - reflected in the new v8 major version which identifies that latest LTS release of .NET that's targeted.
All NuGet Packages include net8.0 builds
All of ServiceStack's active NuGet packages now include .net8.0 target framework builds along with their
dependencies on Microsoft's packages upgraded to use the latest 8.0.0 that were released with .NET 8.
All .NET Project Templates upgraded to .NET 8
In addition all of ServiceStack's .NET project templates have been upgraded to use ServiceStack v8 and .NET 8 target framework, in addition the built-in CI/CD deployment GitHub Actions have been upgraded to use the secure rootless Linux Docker containers that's now built into .NET 8 which allow you to effortlessly deploy your containerized .NET 8 Apps with Docker and GitHub Registry via SSH to any Linux Server.
.NET 8 Docker Containers
Learn about the latest streamlined containerization support built into .NET 8
.NET 8 Docker Containerization
.NET 8 simplifies Docker integration using functionality built into the .NET SDK tooling where it's able to use dotnet publish
to publish your .NET 8 App to a container image without a Dockerfile, adhering to the latest Least privilege and hardened security
best practices of running App's as non-root by default.
This publish to container feature also supports creating Docker images for different architectures like ARM64 which sees significant improvements in .NET 8 making deploying your .NET Apps to ARM64 an even better value proposition.
New .NET 8 Blazor Template
Perhaps the feature we're most excited about are the advancements made to Blazor in .NET 8 which we believe is a game changing release for .NET Web Development as it's now become suitable for building any kind of Web App in .NET.
The best way to find out what's new in .NET 8 Blazor is to watch the excellent Full stack web UI with Blazor in .NET 8 presentation by Daniel Roth and Steve Sanderson, which covers how Blazor has become a Full Stack UI Web Technology for developing any kind of .NET Web App.
ServiceStack's new Blazor project template takes advantage of .NET 8 Blazor's new features that redefines modern Web Development in C# which we explore in this video overview, covering how the template adopts Blazor's familiar ASP.NET Core Identity and Entity Framework for its authentication, utilizes the modern Tailwind CSS framework for beautiful responsive design and adopts .NET's best-practice Docker Containerization support for its built-in GitHub Action Deployments - enabling a simple ready-made CI solution for deployment to any Linux Host via SSH and Docker compose.
We’ll also discuss the project's structure, usage of ASP.NET Core Identity for Authorization and utilizing ServiceStack Blazor Components for data handling, all integrated to maximize developer efficiency in building Web Applications.
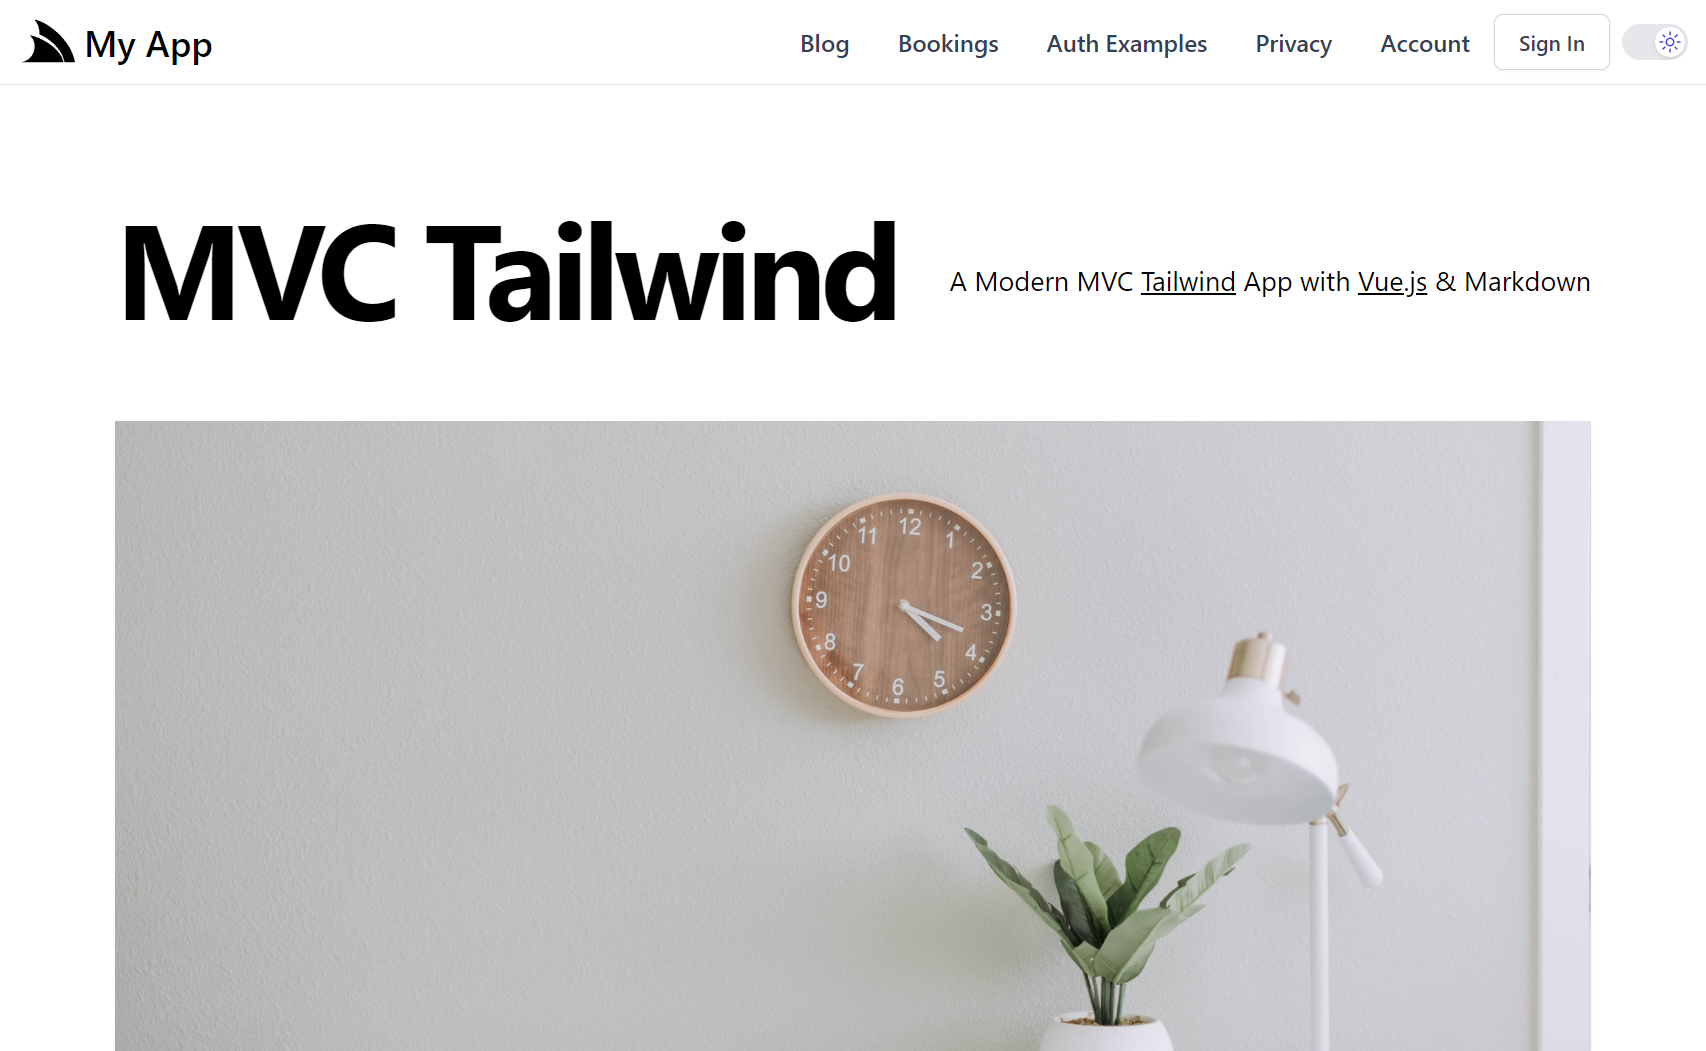
Blazor Tailwind Template
Create a new Blazor Tailwind App
Create a new Blazor Tailwind project with your preferred project name:
ASP.NET Core Identity Integration
In terms of security, the template integrates ASP.NET Core Identity, offering a structured approach to authentication, including support for email confirmation, two-factor authentication and GDPR compliance features.
Integrating ASP.NET Core Identity doesn't complicate securing ServiceStack services which can still be secured with
Declarative Validation Attributes
for role-based access control, e.g. using [ValidateHasRole("Employee")] directly on Request DTOs, bringing any
existing knowledge and experience with ServiceStack Authentication to securing UIs and APIs with Identity Auth.
The template includes a pre-baked solution for sending general and Identity Auth Emails with your configured SMTP Server in managed background workers with Background MQ and an enhanced version of the default ASP.NET Core Blazor Identity UI, with all pages upgraded to use a beautiful Tailwind CSS theme as well as integration with qrcode.js for providing a visual QR Code barcode which mobile phone users can easily scan to setup 2FA Authentication.
Responsive and Interactive UIs with Tailwind CSS
With responsive UI out-of-the-box, thanks to Tailwind CSS, Developers can style their Blazor Apps with the modern popular utility-first CSS framework for creating beautiful, maintainable Responsive UIs with DarkMode support
It also takes full advantage of Blazor’s static rendering for its Website layout for optimal performance and SEO, so only Pages and Components that require interactivity need to opt-in for Blazor Server Interactive rendering modes.
ServiceStack.Blazor Tailwind Components
The ServiceStack.Blazor Components, updated for .NET 8 enables you to rapidly develop beautiful Blazor Apps integrated with Rich high-productivity UI Tailwind Components like AutoQueryGrid and AutoForms which interface with AutoQuery services to provide a full CRUD data management UI with minimal effort.
Other Template Features
Other features that enhances the default ASP.NET Blazor App templates with several modern, high-productivity features, include:
- Entity Framework & OrmLite - Choose the best ORM for each App feature, with a unified solution that sees OrmLite's DB Migrations run both EF and OrmLite migrations, inc. Seed Data with a single command at Development or Deployment
- SQLite Database - Set up as the default database, it allows developers to start immediately without configuring a separate database server
- AutoQuery - Rapidly developing data-driven APIs, UIs and CRUD Apps
- Auto Admin Pages - Quickly develop your back-office CRUD Admin UIs to manage your App's Database tables at /admin
- Markdown - Maintain SEO-friendly documentation and content-rich pages like this one with just Markdown, beautifully styled with @tailwindcss/typography
- Built-in UIs - Use ServiceStack's Auto UIs to Explore your APIs at /ui or Query your App's Database Tables at /admin-ui/database
- Universal API Components - Effortlessly create reusable, maximally performant universal Blazor API Components that works in Blazor Server and Web Assembly Interactivity modes
- Organized Project Structure - Divided into AppHost, Service Interface, Service Model, and Tests projects to promote separation of concerns and maintainability.
Talent Blazor Demo Upgraded
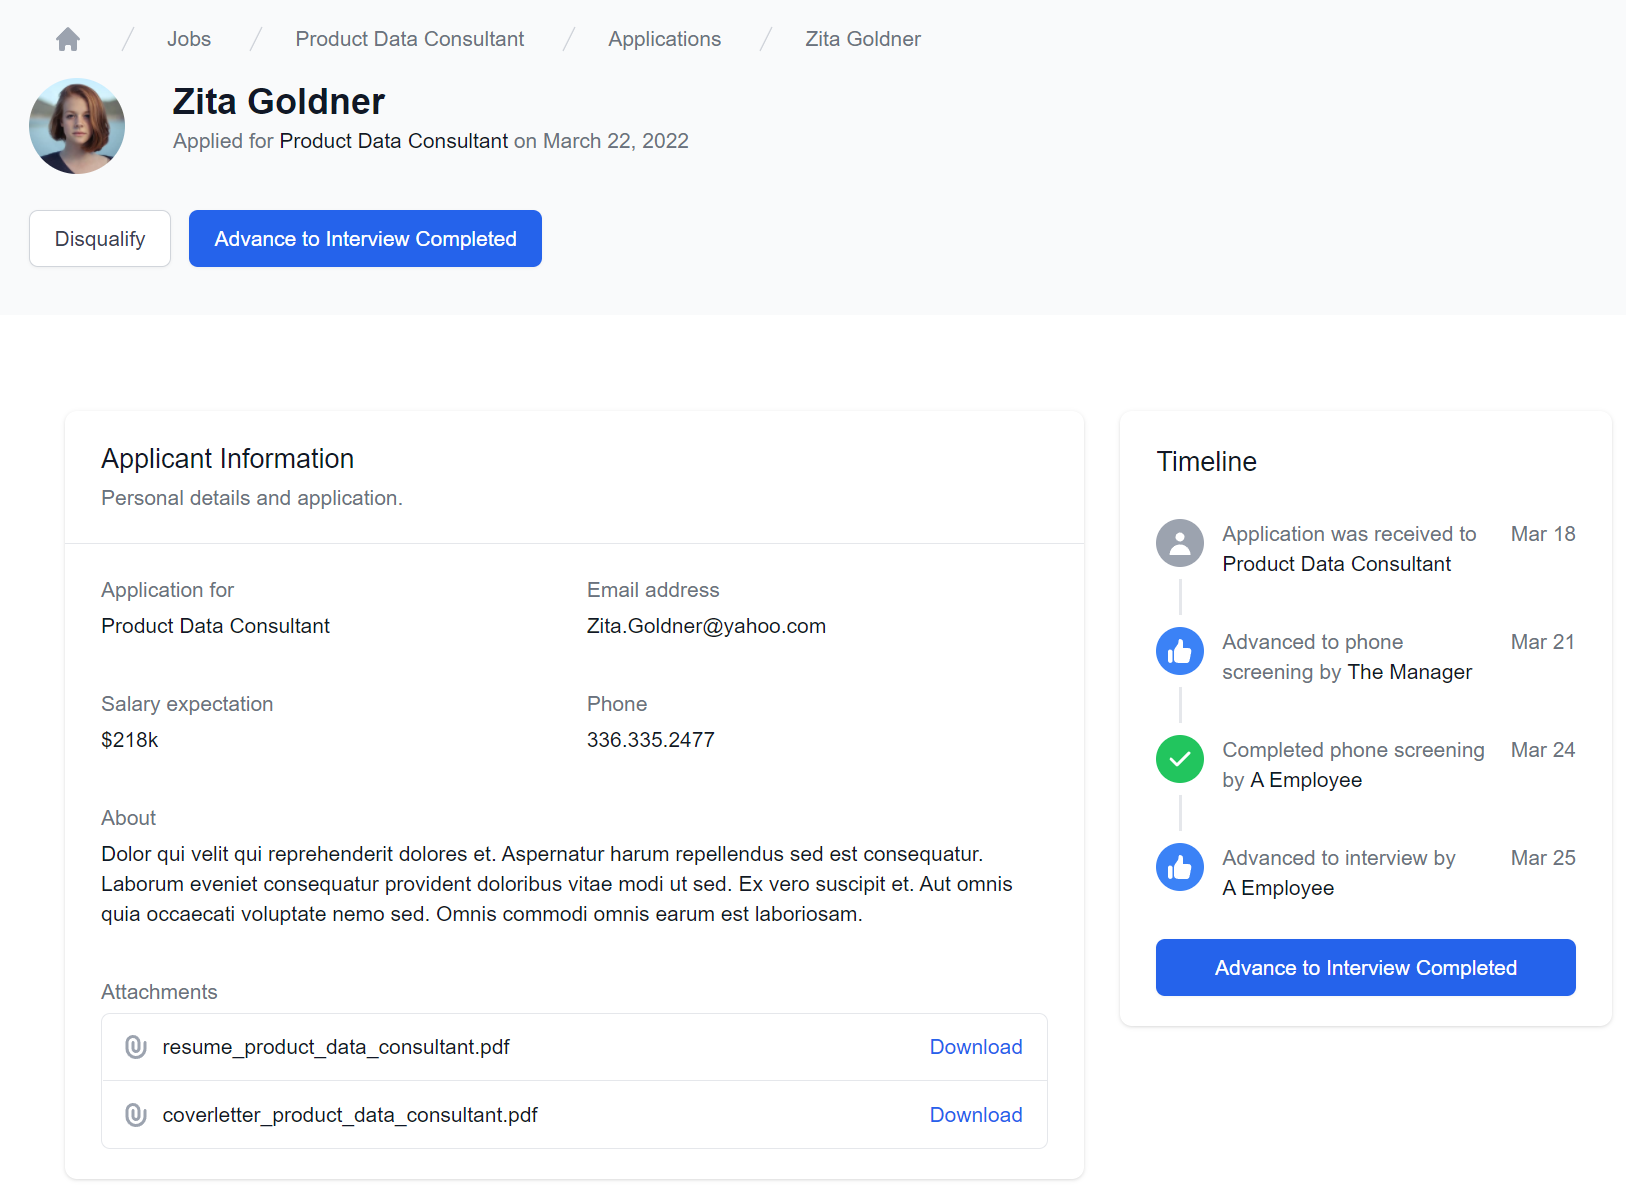
As a demonstration of the new .NET 8 Blazor Template in action, we've upgraded the Talent Blazor Demo which makes use of the above features:
Talent Blazor Locode
Talent Blazor is a Blazor .NET 8 App built around a HR's unique workflow for processing Job Applications
from initial Application, through to Phone Screening and Interviews by multiple employees, capturing
relevant feedback at each application event, with successful Applicants awarded the Job
It's co-developed & deployed with a customized Locode App that manages all other CRUD Database Access
Explore Features
Your first .NET 8 Blazor App
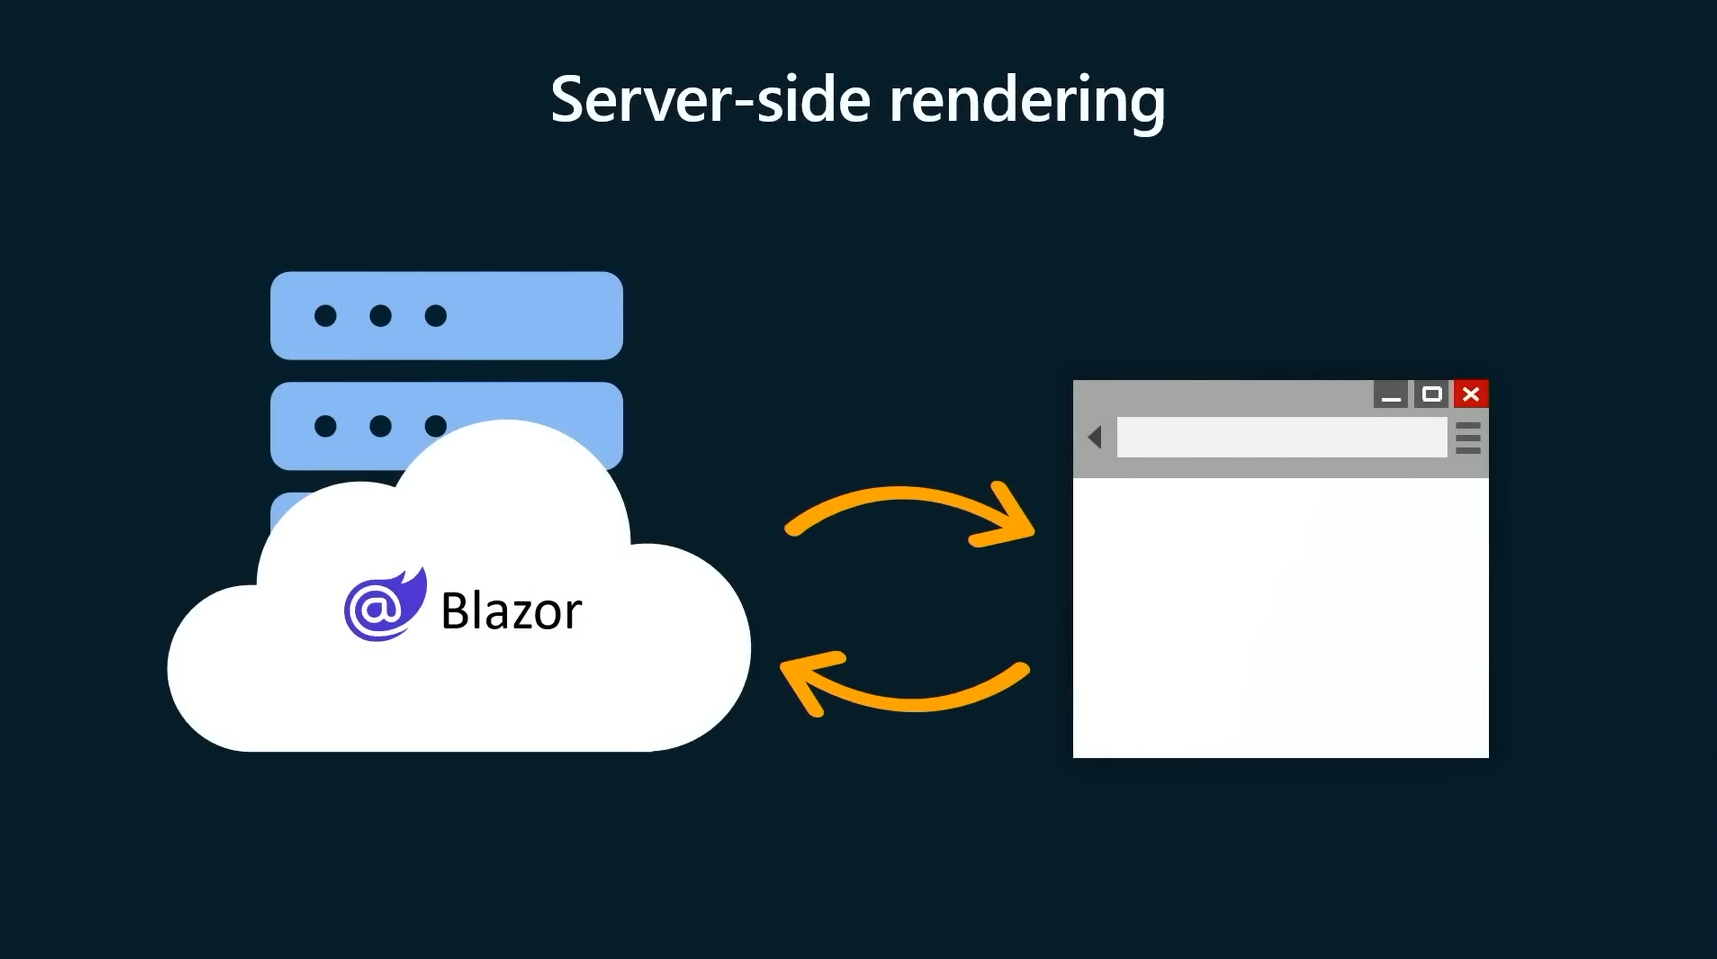
You won't get to appreciate the sum of Blazor's improvements until you create your first .NET 8 Blazor App where you'll be pleasantly surprised that Blazor Apps render fast, clean HTML without needing to load large Web Assembly assets needed for Blazor WebAssembly Apps or starting a stateful Web Socket connection required for Blazor Server Interactive Apps.
Static Rendering is now the default
This is because the default rendering mode for Blazor uses neither of these technologies, instead it returns to traditional Web App development where Blazor Pages now return clean, glorious HTML - courtesy of Blazor's Static render mode.
Choose your compromise
Previously we were forced to choose upfront whether we wanted to build a Blazor Web Assembly App or a Blazor Server App and the compromises that came with them, which for public Internet Web Apps wasn't even a choice as Blazor Server Apps perform poorly over high latency Internet connections.
This meant choosing Blazor Web Assembly which required downloading a large WASM runtime with users experiencing a long delay before the App was functional. To minimize this impact our Blazor WebAssembly Tailwind template included built-in prerendering where as part of deployment would generate static .html pages that were deployed with the Blazor Web Assembly front-end UI that can be hosted on CDN edge networks to further improve load times.
Whilst this meant the App's UI would be rendered immediately, it still wouldn't be functional until the Web Assembly runtime was downloaded and initialized, which would flicker as the static UI was replaced with Blazor's WASM rendered UI, then later Authenticated users would experience further delay and UI jank whilst the App signs in the Authenticated User. Whilst prerendering is an improvement over the default blank loading screen, it's still not ideal for Internet hosted Apps.
.NET 8 Blazor is a Game Changer
The situation has greatly improved in .NET 8 where your entire App no longer needs to be bound to a single Interactivity mode. Even better, Blazor's default static rendering mode results in the best UX where the Website Layout and important landing pages can be rendered instantly.
Interactive only when you need it
Only pages that need Blazor's interactivity features can opt-in to whichever Blazor interactive rendering mode makes
the most sense, either on a page-by-page or component basis, or by choosing RenderMode.InteractiveAuto which uses
InteractiveWebAssembly if the WASM runtime is loaded or InteractiveServer if it isn't.
Enhanced Navigation FTW
Ultimately we expect Blazor's new Enhanced Navigation will likely be the feature that delivers the best UX gains users will experience given it's enabled by default and gives traditional statically rendered Web Apps instant SPA-like navigation responsiveness where new pages are swapped in without needing to perform expensive full page reloads.
It's beauty lies in being able to do this as a mostly transparent detail without the traditional SPA complexity of needing to manage complex state or client-side routing. It's a smart implementation that's able to perform fine-grained DOM updates to only parts of pages that have changed, providing the ultimate UX of preserving page state, like populated form fields and scroll position, to deliver a fast and responsive UX that previously wasn't attainable from the simplicity of a Server Rendered App.
Full Stack Web UI
Blazor's static rendering with enhanced navigation and its opt-in flexibility makes .NET 8 Blazor a game changer, expanding it from a very niche set of use-cases that weren't too adversely affected by its Interactivity mode downsides, to becoming a viable solution for developing any kind of .NET Web App, especially as it can also be utilized within existing ASP.NET MVC and Razor Pages Apps.
Benefits over MVC and Razor Pages
In addition, Blazor's superior component model allows building better encapsulated, more reusable and easier-to-use UI components which has enabled Blazor's rich 3rd Party library ecosystem to flourish, that we ourselves utilize to develop the high productivity Tailwind Components in the ServiceStack.Blazor component library.
So far there's only upsides for .NET Web App development, the compromises only kick in when you need Blazor's interactivity features, luckily these can now be scoped to just the Pages and Components that need them. But how often do we need them?
When do you need Blazor's Interactivity features?
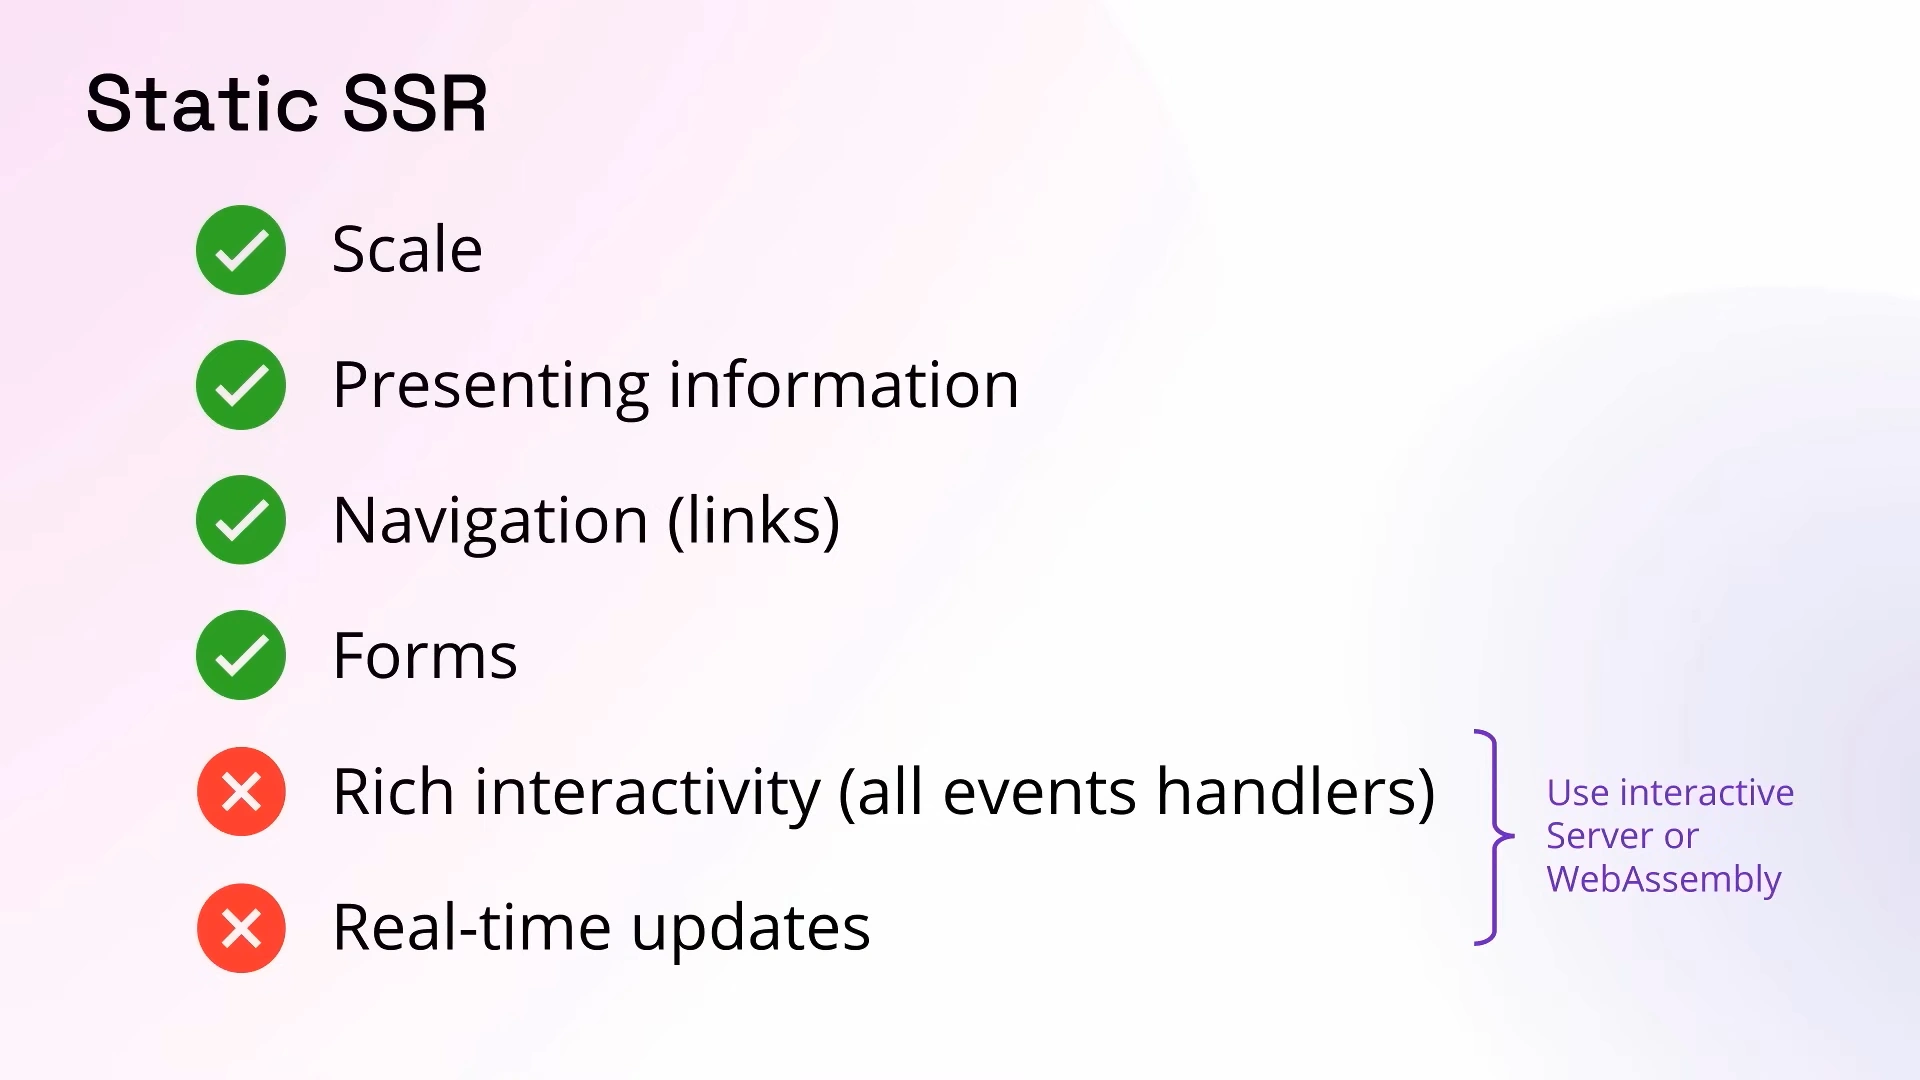
It ultimately depends on what App your building, but a lot of Websites can happily display dynamic content, navigate quickly with enhanced navigation, fill out and submit forms - all in Blazor's default static rendering mode.
Not even advanced features like Streaming Rendering used in Blazor Template's
Weather.razor
page require interactivity, as its progressive rendered UI updates are achieved in a single request without interactivity.
In fact the only time @rendermode InteractiveServer is needed in the default Blazor template is in the
Counter.razor
page whose C# Event Handling require it.
Ultimately some form of Interactivity will be required when adding behavior or client-side functionality that runs after pages have rendered, but you still have some options left before being forced to opt into an Interactive Blazor solution.
Interactive Feature Options
We can see some of these options utilized in the Blazor Template
NavMenu.razor
component which uses Blazor's @onclick directive to add client-side behavior to simulate mouse clicks to toggle UI elements:
<div class="nav-scrollable" onclick="document.querySelector('.navbar-toggler').click()">
and submitting forms to Logout users:
<LogoutForm id="logout-form" />
<NavLink class="nav-link" onclick="document.getElementById('logout-form').submit(); return false;">
    <span class="bi bi-arrow-bar-left" aria-hidden="true"></span> Logout
</NavLink>
Effectively using JavaScript to add interactivity to static rendered pages to avoid paying Blazor's Interactivity tax.
Avoid using Interactivity in Layouts
This is especially important for any features you want to add to the Websites Layout or Chrome UI which you'll always want to be statically rendered so landing pages can load fast and render SEO-friendly server rendered content.
This meant we couldn't use ServiceStack.Blazor's existing DarkModeToggle.razor component for toggling on/off DarkMode since its statically rendered inside the Websites Layout and requires Interactivity to work.
Vanilla JS Blazor Components
Fortunately utilizing simple element JavaScript callbacks was enough to be able to re-implement its functionality with Vanilla JS in the new DarkModeToggleLite.razor component which works in all Blazor rendering modes, in both full-page or enhanced navigation loads:
<button type="button" onclick="toggleDarkMode()" class=@ClassNames(DarkModeToggle.ButtonClasses, Class) role="switch" aria-checked="false" @attributes="AdditionalAttributes">
    <span class="@DarkModeToggle.InnerClasses" data-class-light="translate-x-5" data-class-dark="translate-x-0">
        <span class="@DarkModeToggle.IconClasses" data-class-light="opacity-0 ease-out duration-100" data-class-dark="opacity-100 ease-in duration-200" aria-hidden="true">
            <svg xmlns="http://www.w3.org/2000/svg" class="h-4 w-4 text-gray-400" preserveAspectRatio="xMidYMid meet" viewBox="0 0 32 32"><path fill="currentColor" d="M13.502 5.414a15.075 15.075 0 0 0 11.594 18.194a11.113 11.113 0 0 1-7.975 3.39c-.138 0-.278.005-.418 0a11.094 11.094 0 0 1-3.2-21.584M14.98 3a1.002 1.002 0 0 0-.175.016a13.096 13.096 0 0 0 1.825 25.981c.164.006.328 0 .49 0a13.072 13.072 0 0 0 10.703-5.555a1.01 1.01 0 0 0-.783-1.565A13.08 13.08 0 0 1 15.89 4.38A1.015 1.015 0 0 0 14.98 3Z" /></svg>
        </span>
        <span class="@DarkModeToggle.IconClasses" data-class-light="opacity-100 ease-in duration-200" data-class-dark="opacity-0 ease-out duration-100" aria-hidden="true">
            <svg xmlns="http://www.w3.org/2000/svg" class="h-4 w-4 text-indigo-600" preserveAspectRatio="xMidYMid meet" viewBox="0 0 32 32"><path fill="currentColor" d="M16 12.005a4 4 0 1 1-4 4a4.005 4.005 0 0 1 4-4m0-2a6 6 0 1 0 6 6a6 6 0 0 0-6-6ZM5.394 6.813L6.81 5.399l3.505 3.506L8.9 10.319zM2 15.005h5v2H2zm3.394 10.193L8.9 21.692l1.414 1.414l-3.505 3.506zM15 25.005h2v5h-2zm6.687-1.9l1.414-1.414l3.506 3.506l-1.414 1.414zm3.313-8.1h5v2h-5zm-3.313-6.101l3.506-3.506l1.414 1.414l-3.506 3.506zM15 2.005h2v5h-2z" /></svg>
        </span>
    </span>
</button>

<script>
window.toggleDarkMode = (function() {
    let isDark = localStorage.getItem('color-scheme') === 'dark'
    const html = document.documentElement
    function renderDarkMode() {
        html.style.setProperty('color-scheme', isDark ? 'dark' : null)
        html.classList.toggle('dark', isDark)
        document.querySelectorAll('[data-class-light]').forEach(el => {
            const removeClasses = isDark
                    ? el.dataset.classLight
                    : el.dataset.classDark
            const addClasses = isDark
                    ? el.dataset.classDark
                    : el.dataset.classLight

            removeClasses.split(' ').forEach(c => el.classList.remove(c))
            addClasses.split(' ').forEach(c => el.classList.add(c))
        })
    }
    renderDarkMode()

    document.addEventListener('DOMContentLoaded', () =>
            Blazor.addEventListener('enhancedload', () => {
                isDark = localStorage.getItem('color-scheme') === 'dark'
                html.classList.toggle('dark', isDark)
                renderDarkMode()
            }))

    return function() {
        isDark = !isDark
        localStorage.setItem('color-scheme', isDark ? 'dark' : 'light')
        renderDarkMode()
    }
})()
</script>
Scripts not re-executed in Enhanced Navigation
To support enhanced navigation you'll need to be aware that <script> tags are only executed once on initial page load.
You'll instead need to register a callback with Blazor's enhancedload event for any startup logic that needs re-executing,
which is fired after Blazor merges the new page's DOM with the existing DOM, and is where the <DarkModeToggleLite>
component re-renders itself with the correct state.
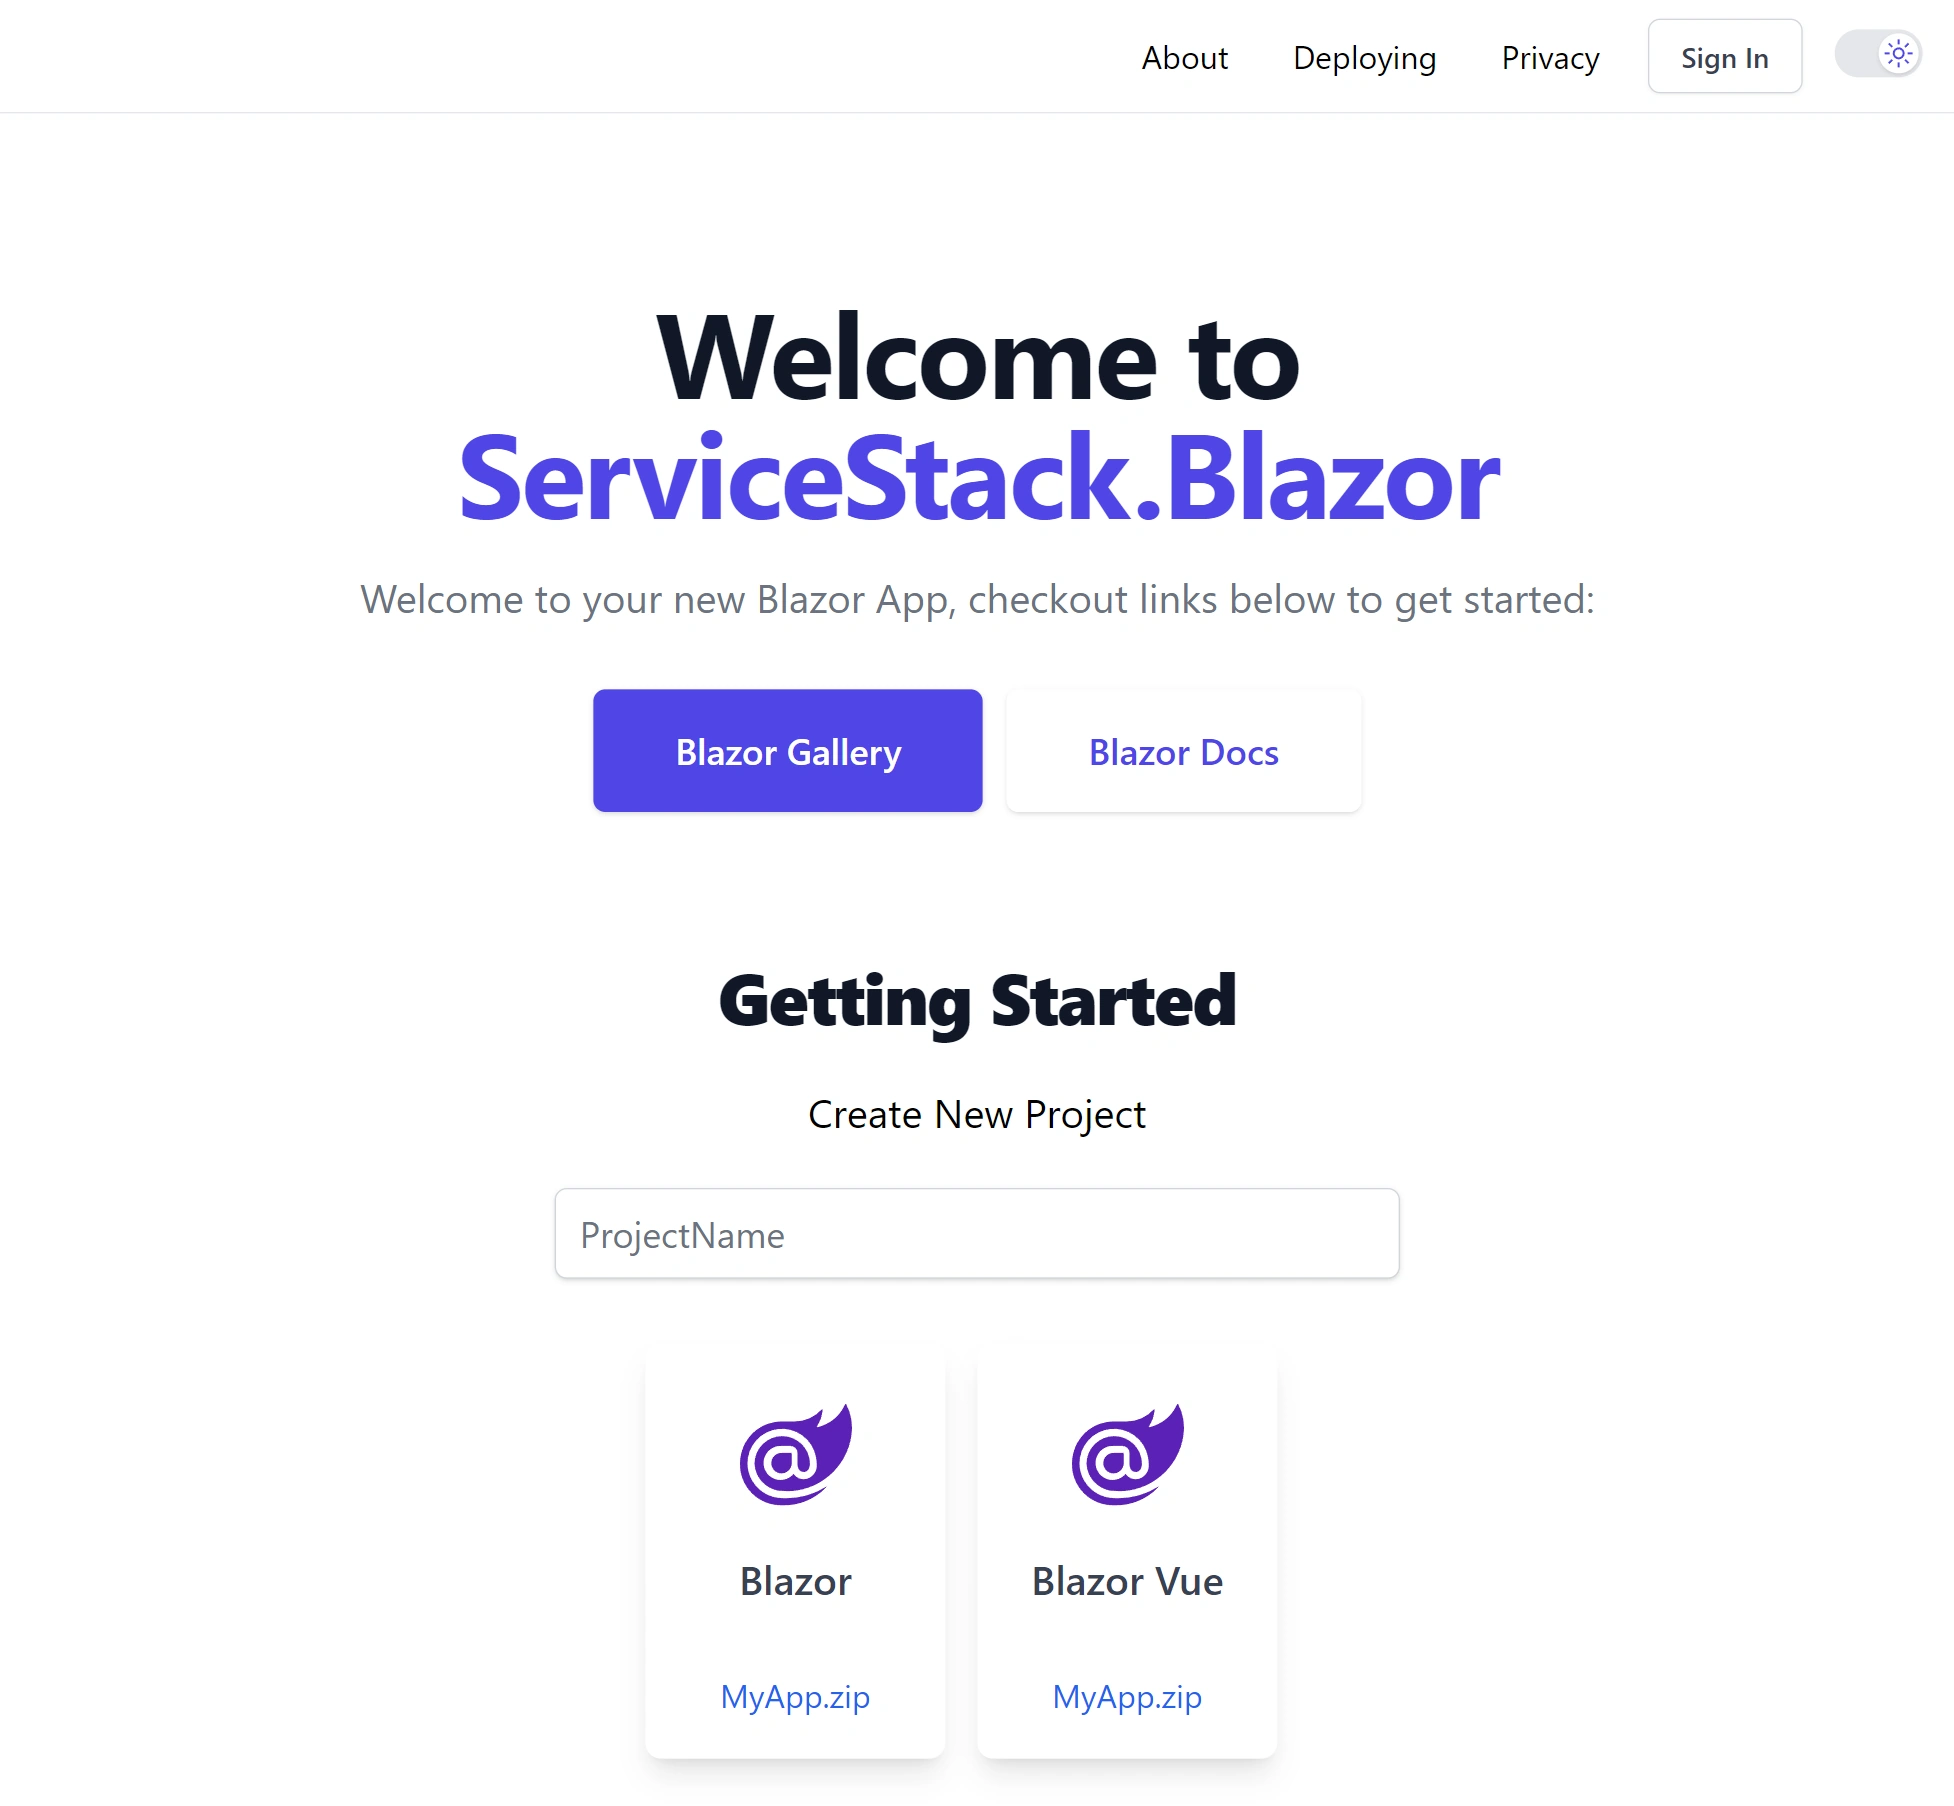
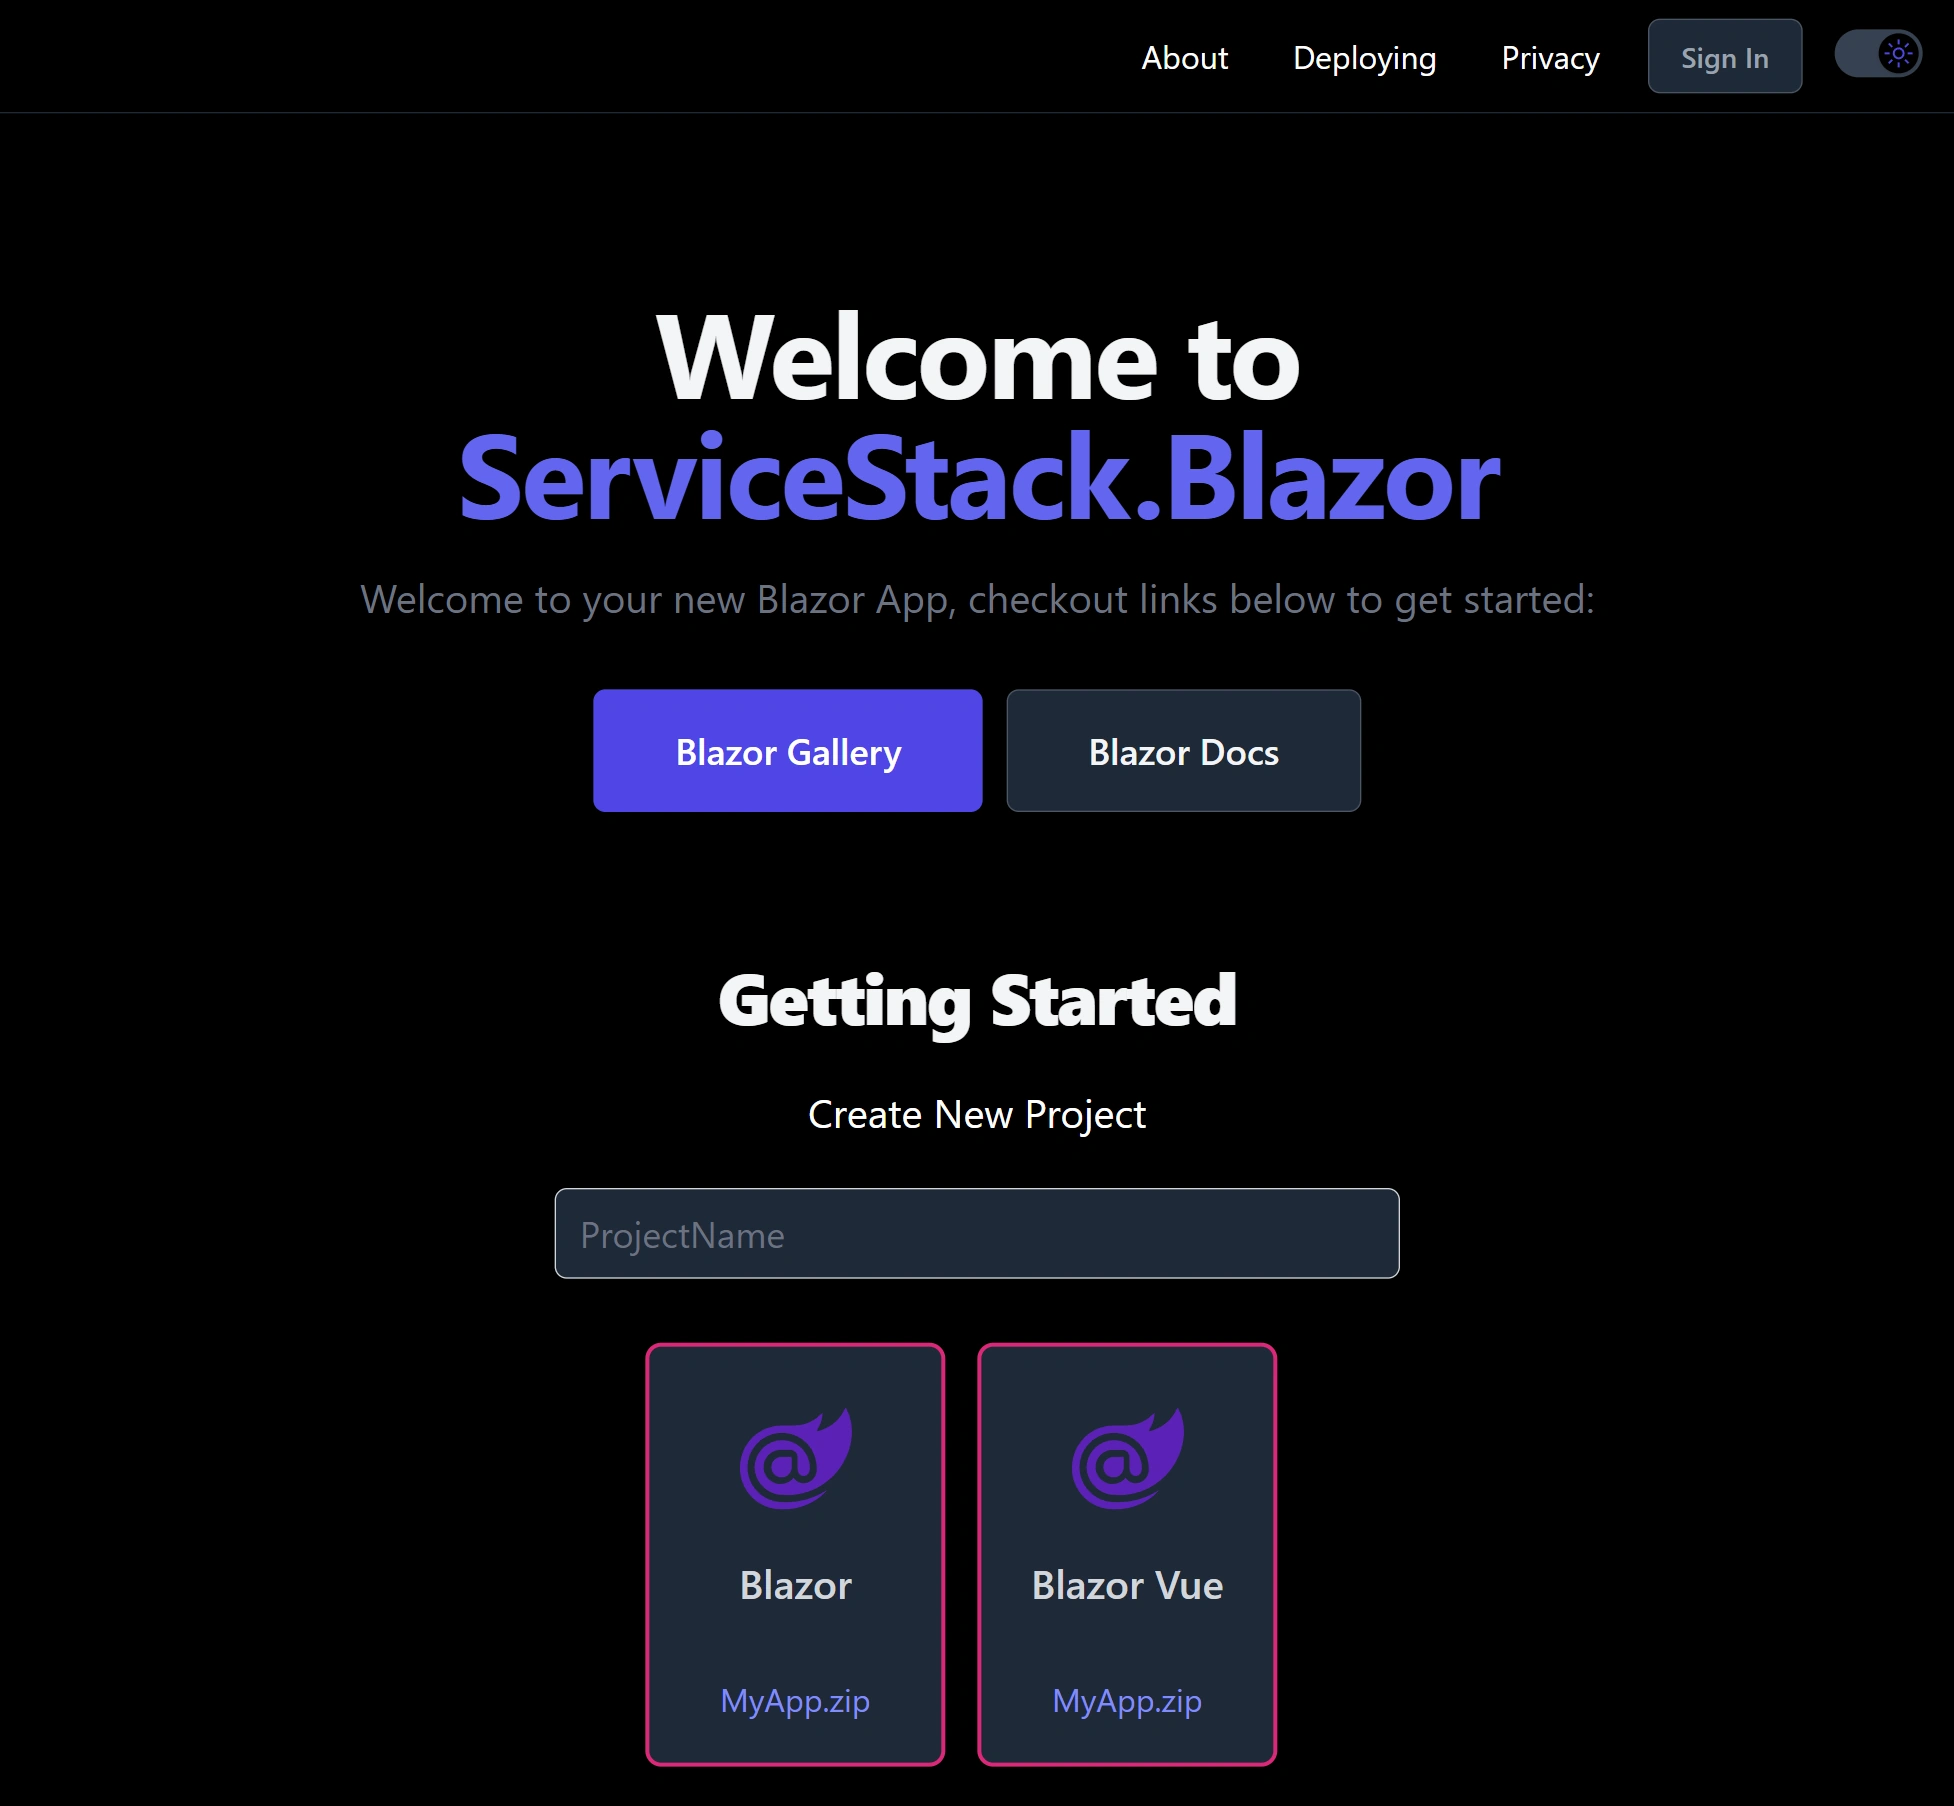
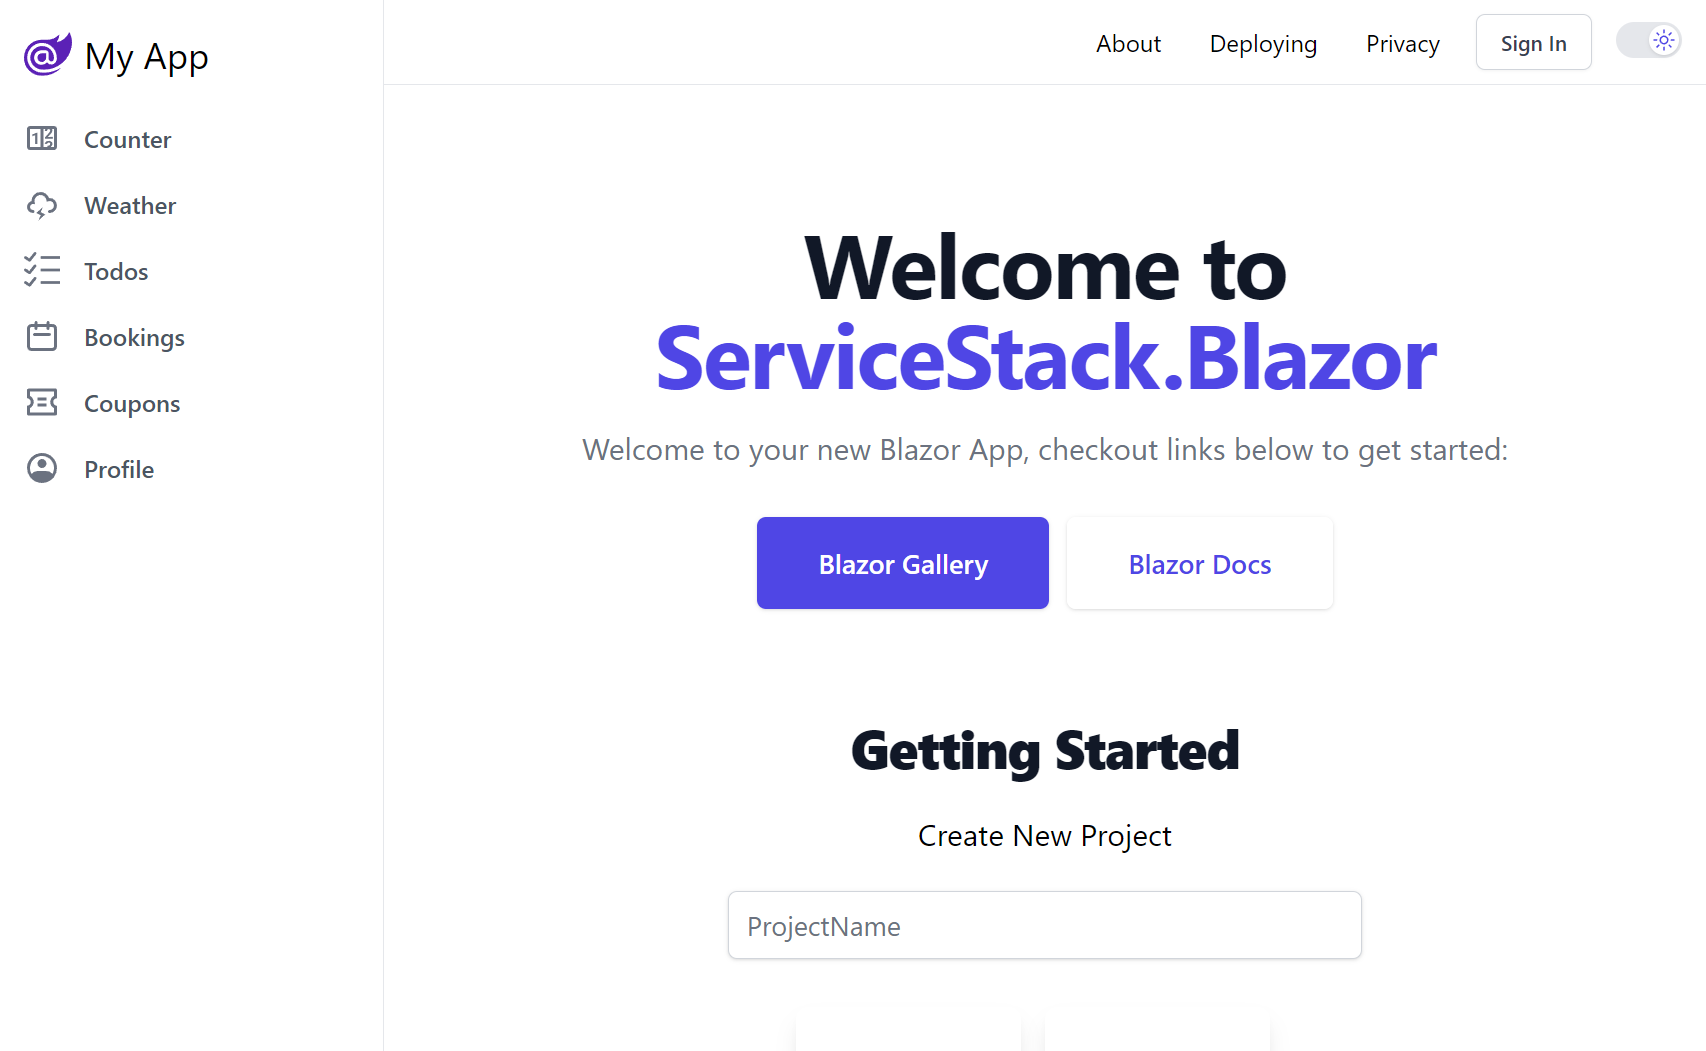
Try it out!
With that it's ready for action, try it out in a new blazor Project or from its Live Demo by toggling on/off Dark Mode Component in the top right corner:
Declarative JavaScript Modules
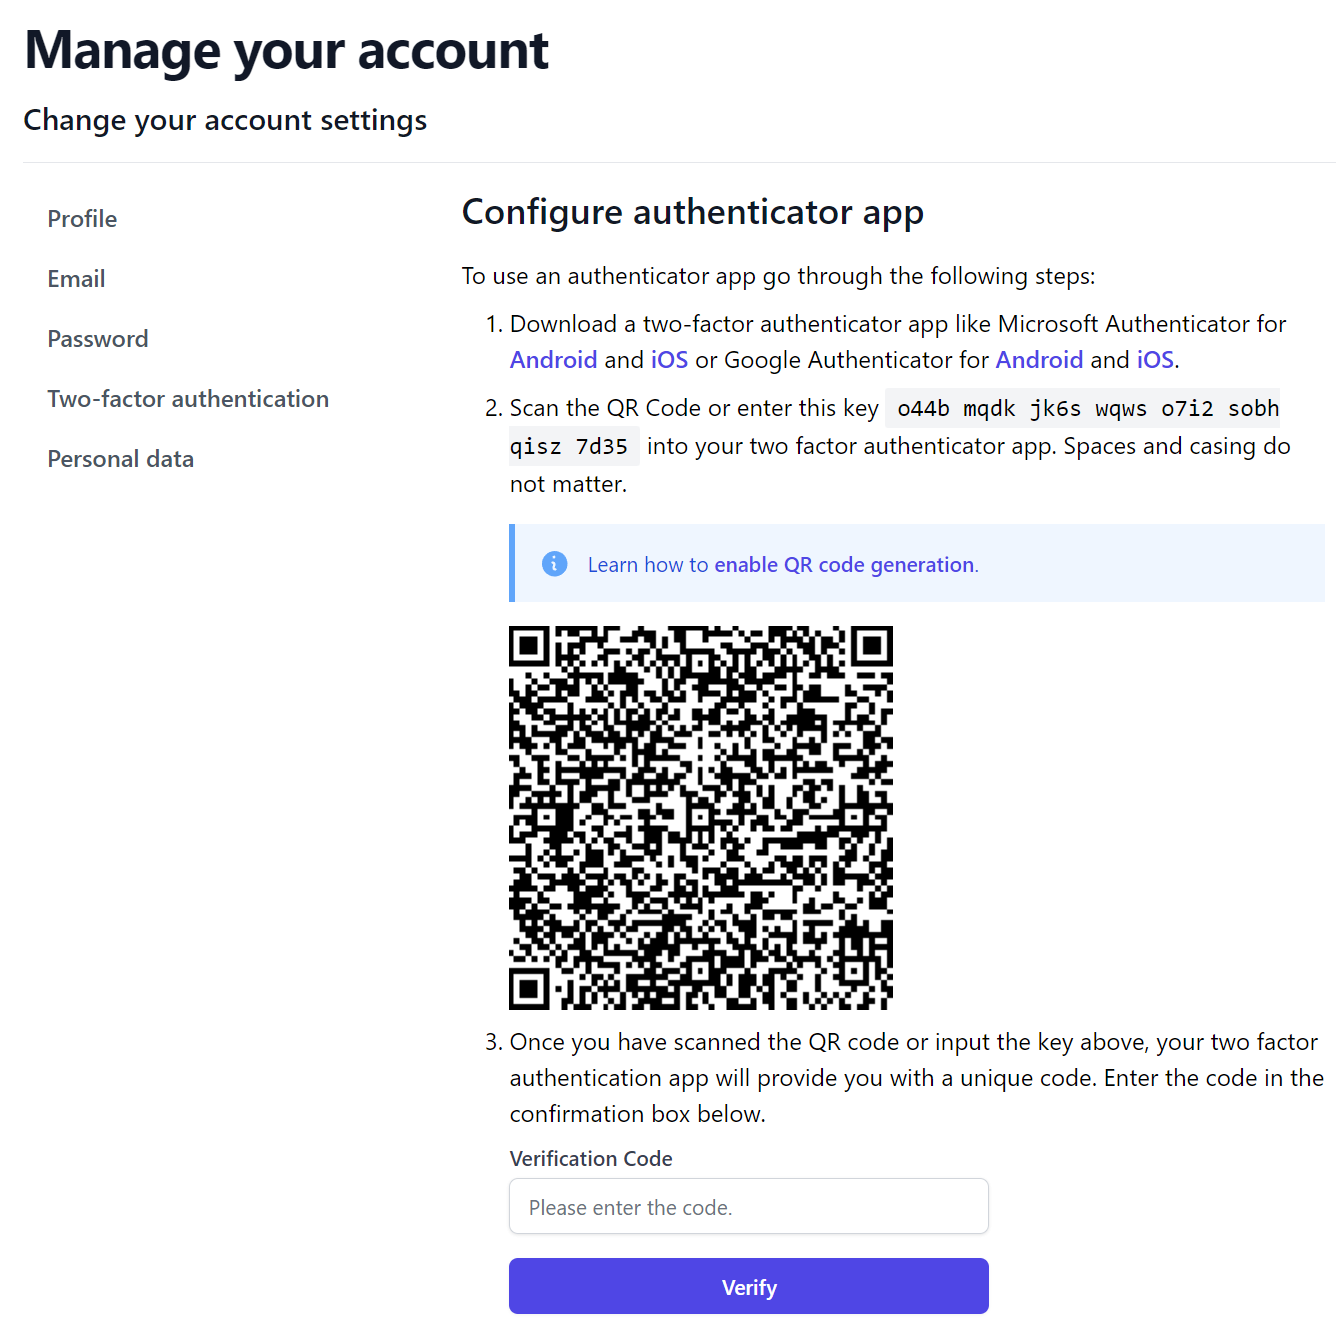
Unfortunately many other approaches won't work with Blazor's Enhanced Navigation, for example whilst the built-in ASP.NET Identity Pages all work without Blazor's Interactivity, the EnableAuthenticator.razor page doesn't actually include a solution for providing a visual QR Code barcode which mobile phones can easily scan to setup 2FA Authentication.
Whilst the placeholders are there, that implementation detail is left to us to workout, perhaps because they don't want to force an Interactivity rendering mode in the default template.
The natural way to implement it is to use the popular qrcodejs library by following its instructions and adding a simple inline script to the page:
Don't use in-line scripts for logic that needs to be re-executed
<div data-permanent id="qrCode"></div>
<div id="qrCodeData" data-url="@_authenticatorUri"></div>

<script src="lib/js/qrcode.min.js"></script>
<script>
new QRCode(document.getElementById('qrCode'),
    document.getElementById('qrCodeData').dataset.url)
</script>
Whilst this works as expected in full page reloads, it doesn't work in Blazor's Enhanced Navigation as the <script> tag
is only executed once on initial page load and not re-executed when the page is loaded with enhanced navigation.
Your options are to change all links to that page with data-enhance-nav="false" to turn off enhanced navigation
to that page, or the solution that worked best for us is to use declarative instructions to specify which JavaScript
modules should be loaded for any page, which we can do by adding a data-module attribute to any element, e.g:
<div data-module="pages/Account/Manage/EnableAuthenticator.mjs">
These instructions are handled by app.mjs
on each navigation which loads the JS module and load() function if it exists.
Which for EnableAuthenticator.razor page loads the
EnableAuthenticator.mjs
JavaScript Module which dynamically loads the qrcode.min.js library and initializes the QR Code on its exported load() function:
import { addScript, $1 } from "@servicestack/client"
const loadJs = addScript('lib/js/qrcode.min.js')

export default {
    async load() {
        await loadJs
        new QRCode($1("#qrCode"), $1('#qrCodeData').dataset.url)
    }
}
Which now works as expected in both full page reloads and Blazor's Enhanced Navigation:
Blazor without Blazor Interactivity
So right now we have a Blazor App that's predominantly statically rendered, with fast and SEO-friendly without any downsides of the Blazor's Interactivity options, but how much of our App can we implement without Blazor Interactivity?
Declarative Vue Components
Thankfully we can use the same approach we used for loading JavaScript modules to load Vue.js components, by using the
data-component attribute to specify which global Vue component to mount with any properties optionally
specified in thedata-props attribute, e.g:
<div data-component="GettingStarted" data-props="{template:'blazor'}"></div>
This does require ensuring all components loaded this way are registered as a global component, as done in:
import GettingStarted from "./components/GettingStarted.mjs"

/** Shared Global Components */
const Components = {
    GettingStarted,
}

export function mount(sel, component, props) {
    const app = createApp(component, props)
    Object.keys(Components).forEach(name => {
        app.component(name, Components[name])
    })
    app.mount(document.querySelector(sel))
}
However this does mean that all global components would need to be downloaded before any Vue Components can be rendered the first time a website is accessed.
Lazy Loading Vue Components
To avoid this we can instead use the data-component attribute to specify the path to the Vue component to load,
ensuring that only the Vue components required for the current page is loaded, e.g:
<div data-component="pages/Counter.mjs"></div>
Which is how we can implement Vue Components that work in statically rendered or enhanced navigation pages:
import { ref } from 'vue'
export default {
template: `
<p class="my-4">Current count: {{currentCount}}</p>
<PrimaryButton @click="incrementCount">Click me</PrimaryButton>
`,
setup() {
const currentCount = ref(0)
const incrementCount = () => currentCount.value++
return { currentCount, incrementCount }
}
}
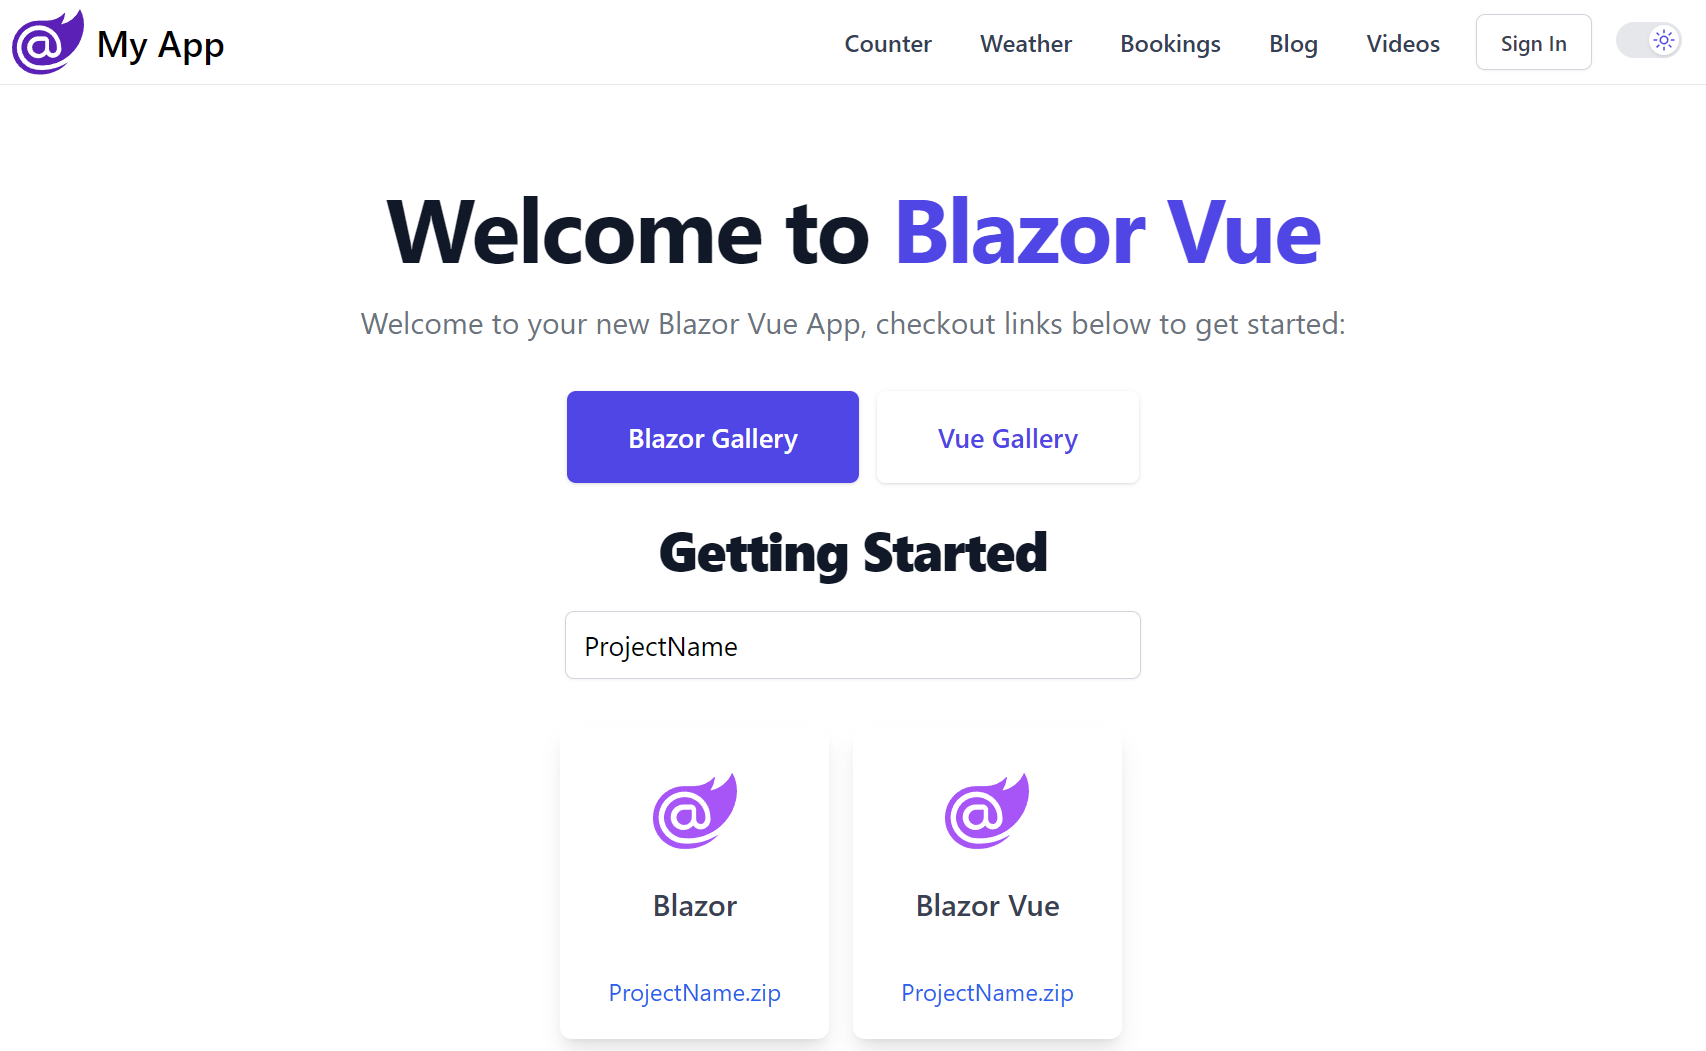
New .NET 8 Blazor Vue Template!
This ends up being how the Interactive features in the new blazor-vue template are implemented - ideal for building fast, SEO-friendly statically rendered Blazor Web Apps where all its dynamic functionally uses Vue.js to progressively enhance its static rendered content - eliminating Blazor's limitations of using static rendering to implement an entire App:
Blazor Vue Tailwind Template
The new blazor-vue template implements all the features of the blazor template but reimplements all its interactive features with Vue.js to and the Vue Components library.
Blazor Vue Template
Create a new Blazor Vue Tailwind App
Create a new Blazor Vue Tailwind project with your preferred project name:
Faster iterative development
Other benefits of using Vue for Interactivity is the fast iterative feedback loop during development that even applies to its Markdown-powered Blog which itself can embed rich interactive Vue Components and rich JavaScript UIs like Chart.js in its Markdown Blog Posts thanks to its unapologetic, complexity-free #NoBuild solution.
Statically Rendered Blazor Apps
Whilst Blazor Interactivity may remain the predominant solution amongst .NET developers we believe .NET 8 Blazor opens the doors for progressively enhanced statically-rendered Blazor Apps which has now become our preferred solution for developing most .NET Web Apps.
It overcomes our biggest gripe with Blazor Web Assembly, that we were unsuccessful in prerendering away its poor startup performance and UI jank in Internet Apps.
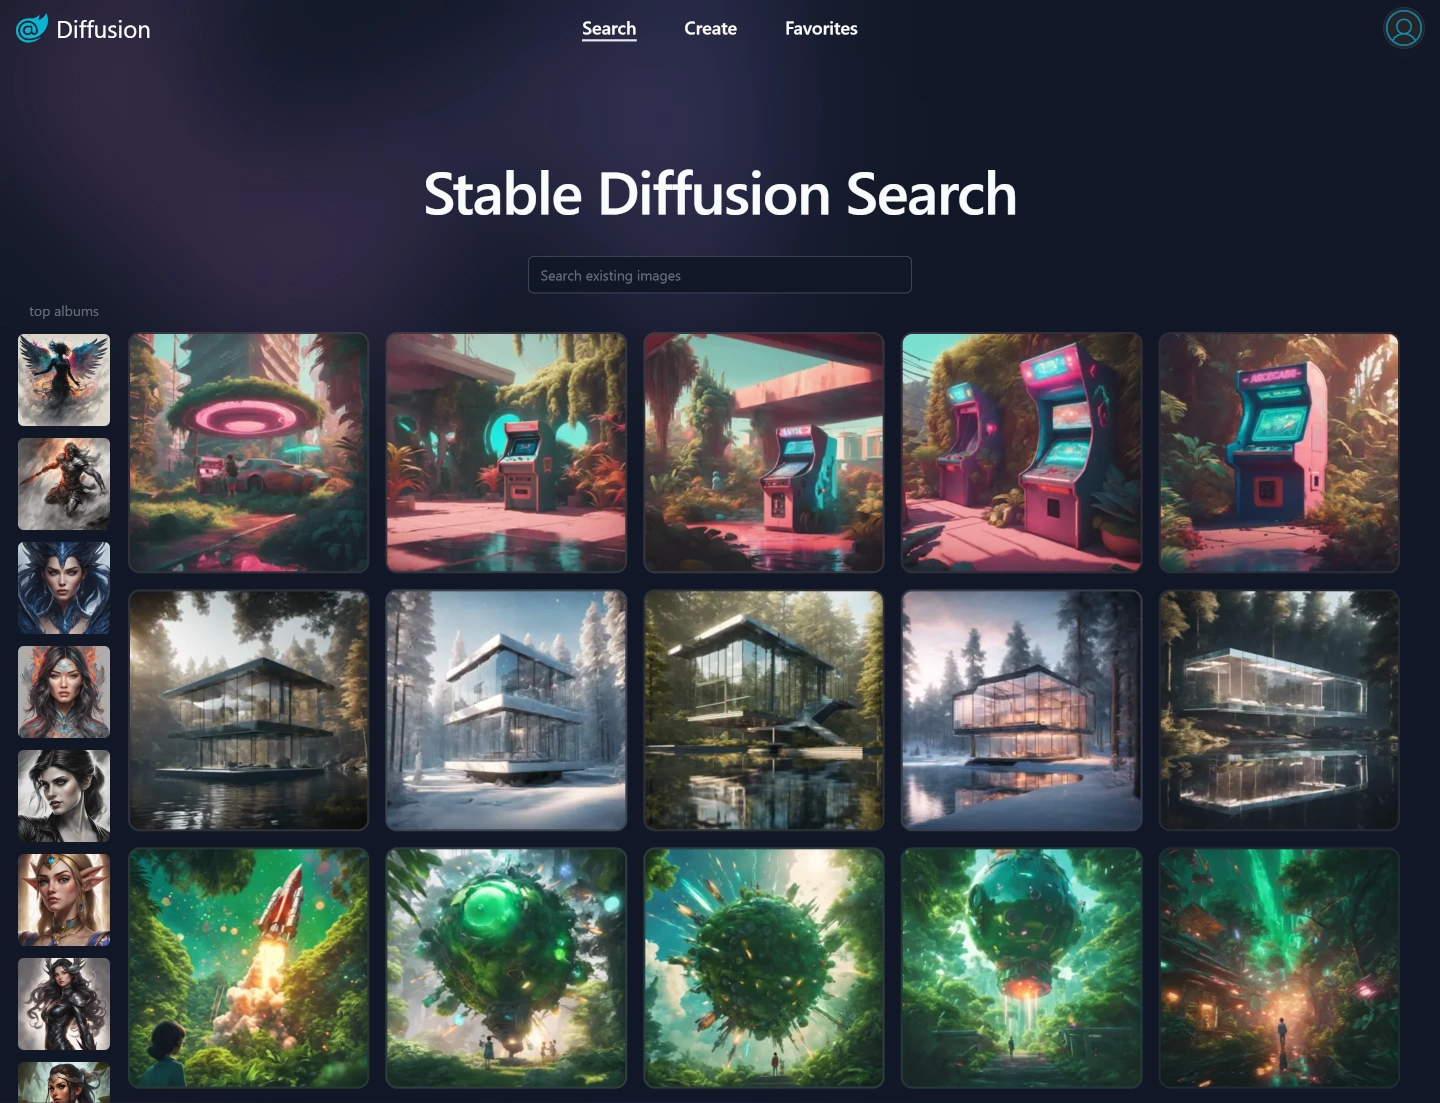
Blazor Vue Diffusion
So when we learned about .NET 8's static default rendering mode and enhanced navigation we jumped at the opportunity to create the Blazor Vue template which was used to re-implement Blazor Diffusion with Blazor SSR and Vue.js - a statically rendered Blazor App that uses Vue.js for all its functionality.
https://blazordiffusion.com
Blazor Diffusion is our Blazor Demo App we used to showcase how you could use Universal API Components to build Blazor Components and entire Blazor Apps whose source code runs in both Blazor Server and Blazor Web Assembly Interactive modes, which was first developed with Blazor Server then used a sync.bat script to export its source code into a Blazor Web Assembly project that was deployed instead.
The Blazor Vue version starts from a clean slate, utilizing statically rendered Blazor for faster page loads and generating SEO-friendly content:
We're very pleased with the results, much faster loading times, enhanced navigation, no UI jankiness, better SEO - essentially a better UX overall, despite not needing any prerendering solution - all whilst enjoying a faster iterative development experience where all Vue component changes were immediately visible after save.
You can compare the differences of each Blazor Solution from the Live Demos below:
| Live Demo | Source Code | |
|---|---|---|
| Blazor Vue | blazordiffusion.com | BlazorDiffusionVue |
| Blazor Web Assembly | auto.blazordiffusion.com | BlazorDiffusionAuto |
| Blazor Server | server.blazordiffusion.com | BlazorDiffusion |
Live Demos hosted on a shared Hetzner Cloud VM using SQLite that's replicated to Cloudflare R2 with Litestream
ASP.NET Core Identity Auth in .NET 8 Templates
A significant change we've added to our new .NET 8 Project Templates is the adoption of the same ASP.NET Core Identity Authentication that's configured in Microsoft's default Projects templates.
History of ServiceStack Authentication
Since the dawn of ServiceStack we've always maintained our own Authentication and Authorization provider model, primarily as it was the only way to provide an integrated and unified Authentication model that worked across all our supported hosting platforms, inc. .NET Framework, ASP.NET Core on .NET Framework, HttpListener and what's now .NET (fka .NET Core).
Whilst the Authentication story in ASP.NET has undergone several cycles of changes over the years, the ServiceStack Auth Model has remained relatively consistent and stable, with no schema changes required since release whilst still providing flexible options for extending UserAuth tables and typed User Sessions.
.NET Framework considered legacy
Although the multi-platform support of the unified Authentication model has been vital for Organizations migrating their systems to .NET (Core) where ServiceStack Customers have been able to enjoy Exceptional Code reuse, it's become clear that the .NET platform (e.g. .NET 8) is the only platform that should be considered for new projects and that .NET Framework should only be considered a stable legacy platform for running existing systems on.
Given Microsoft has committed to Authentication Improvements in .NET 8 it's become more important to easily integrate ServiceStack with new and existing .NET projects to access these new features than to continue recommending ServiceStack's unified Auth Providers as the default option for new projects.
ASP.NET Core Identity Auth now used in new Integrated Auth projects
Going forward all new ServiceStack .NET Project Templates will adopt ASP.NET Identity Auth, which closely follows the same approach as the Microsoft Project Template it integrates ServiceStack with, e.g. the new .NET 8 Blazor and Blazor Vue project templates adopts the exact same Auth configuration as Microsoft's default Blazor Project Template configured with Individual Identity Auth, likewise with the Bootstrap and Tailwind styled MVC and Razor Pages templates.
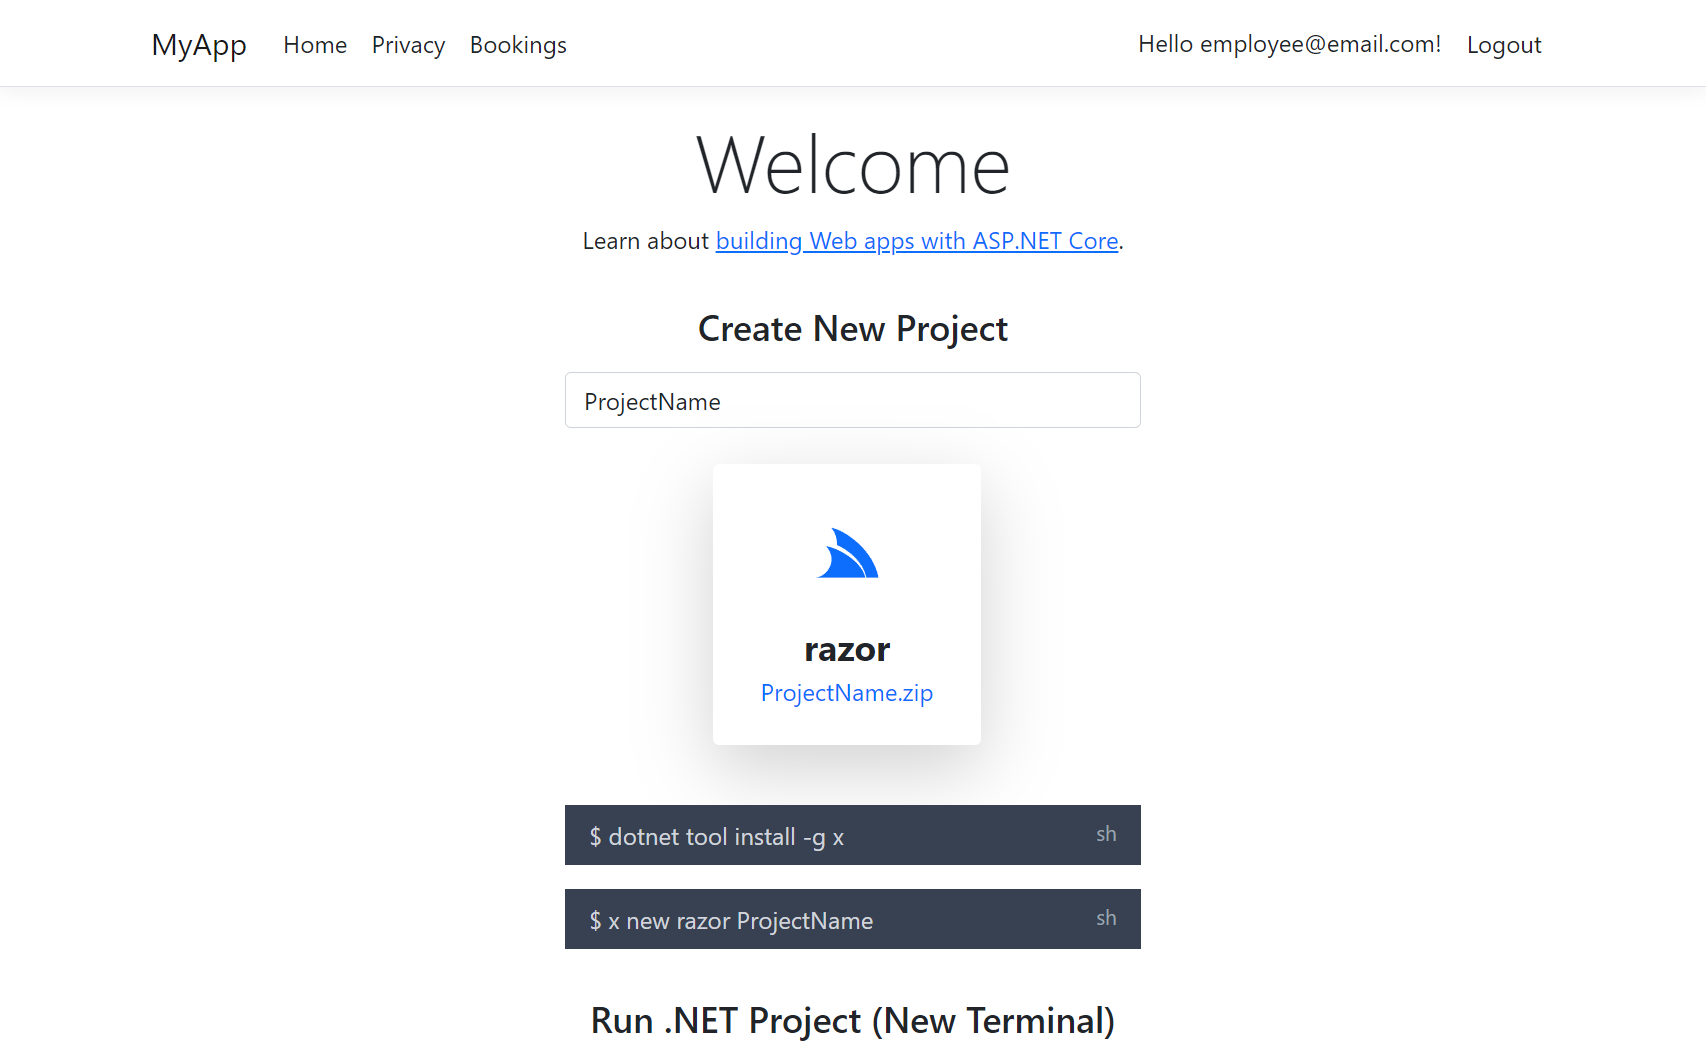
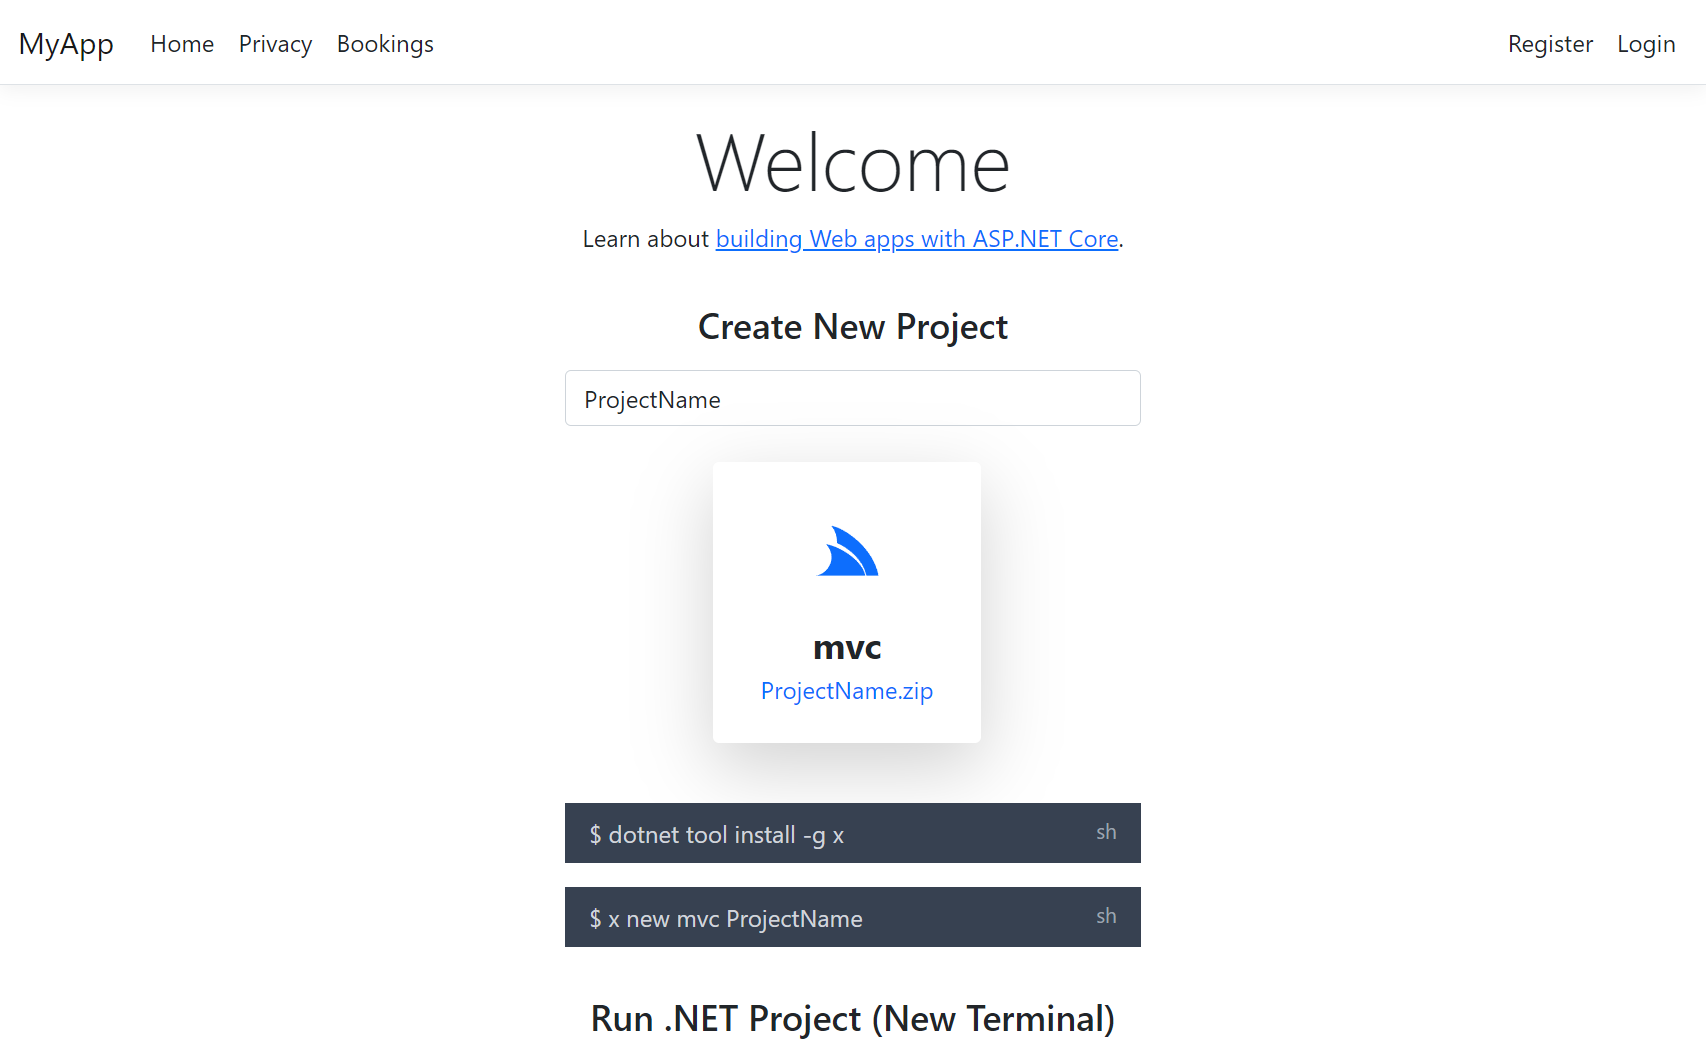
Where you can now create new ServiceStack Integrated Identity Auth Templates for each of ASP.NET Core's major Blazor, Razor Pages and MVC Templates:
Create a Project with ASP.NET Identity Auth
Identity Auth Template Live Demos
For a quick preview of what these look like, checkout out their Internet Hosted Live Demos:

The configuration and source code for the above projects are a good reference for how to configure ServiceStack with Identity Auth in your own projects.
The Bootstrap versions use same Individual Identity Auth Pages that Microsoft's Razor Pages and MVC templates use,
whilst the Tailwind versions have been enhanced to use Tailwind CSS instead of Bootstrap,
includes a visual QR Code implementation that was missing and includes an
IEmailSender SMTP solution that's easily enabled via Configuration to use your preferred SMTP Server.
Migrating to ASP.NET Core Identity Auth
Migrating from ServiceStack Auth to Identity Auth should be relatively straight-forward as ServiceStack uses a compatible Identity v2 password hashing format, which should let you migrate your users to Identity Auth without them noticing.
To help with any migrations we've published an Identity Auth Migration Guide we've used to convert existing ServiceStack Auth Apps to use Identity Auth.
ServiceStack's Identity Auth Integration
ServiceStack's Identity Auth integration is focused on high compatibility so existing ServiceStack Customers require minimal effort to migrate existing code bases to use the new Identity Auth integration, despite Identity Auth being an entirely different Auth Provider model and implementation.
It does this by retaining a lot of the existing user-facing Authentication and Session abstractions that ServiceStack APIs use for Authorization as well as existing endpoints and Request/Response DTOs that ServiceStack Clients use to Authenticate, but replace their internal implementation to use ASP.NET Identity Auth instead.
The new Identity Auth integration is contained in the .NET 8+ ServiceStack.Extensions NuGet package:
<PackageReference Include="ServiceStack.Extensions" Version="8.*" />
Which at a minimum lets you configure ServiceStack to use Identity Auth by simply registering the existing AuthFeature
plugin with the Application's custom EF ApplicationUser Data Model:
Plugins.Add(new AuthFeature(IdentityAuth.For<ApplicationUser>()));
It requires minimal configuration as all Authorization is configured using ASP.NET Core's standard APIs, any configuration in this plugin is then just used to customize Identity Auth's integration with ServiceStack.
There's also no new concepts to learn as all ASP .NET Core endpoints, pages and controllers continue to Authenticate against
the populated ClaimsPrincipal whilst all ServiceStack APIs continue to Authenticate against the populated typed
User Session.
The AuthFeature works by registering the following Identity Auth Providers:
Identity Auth Providers
- IdentityApplicationAuthProvider - Converts an Identity Auth
ClaimsPrincipalinto a ServiceStack Session - IdentityCredentialsAuthProvider - Implements ServiceStack's
AuthenticateAPI using Identity Auth - IdentityJwtAuthProvider - Converts an Identity Auth JWT into an Authenticated ServiceStack Session
Only the IdentityApplicationAuthProvider is registered by default which is required to convert Identity Auth's ClaimPrincipal
into an Authenticated ServiceStack Session. The other Auth Providers are required if you want to enable authentication with
ServiceStack's endpoints. E.g. ServiceStack's Built-in UIs would require the Credentials Auth
to be enabled to authenticate via the built-in Sign In dialogs.
Configuring Auth Providers
Which is what all the Blazor and MVC Identity Auth templates enable by default in Configure.Auth.cs:
public class ConfigureAuth : IHostingStartup
{
    public void Configure(IWebHostBuilder builder) => builder
        .ConfigureAppHost(appHost =>
        {
            appHost.Plugins.Add(new AuthFeature(IdentityAuth.For<ApplicationUser>(
                // Configure ServiceStack's Integration with Identity Auth
                options => {
                    // options.SessionFactory = () => new CustomUserSession(); //optional
                    options.CredentialsAuth();
                })
            ));
        });
}
If you're using a CustomUserSession you'll also need to register it with the SessionFactory for it to be used.
Each of the Identity Auth Providers can also be customized individually:
Plugins.Add(new AuthFeature(IdentityAuth.For<ApplicationUser>(options => {
        // Configure IdentityApplicationAuthProvider
        options.ApplicationAuth(options => {});

        // Configure IdentityCredentialsAuthProvider
        options.CredentialsAuth(options => {});

        // Configure IdentityJwtAuthProvider
        options.JwtAuth(options => {});
    })
));
Typically you'll want to use the included Identity UI Pages and dependencies to register new users and assign roles, but if you have any existing client integrations that use ServiceStack APIs they can also be enabled with:
Plugins.Add(new AuthFeature(IdentityAuth.For<ApplicationUser>(options => {
    // Include ServiceStack's Register API
    options.IncludeRegisterService = true;

    // Include ServiceStack's AssignRoles and UnAssignRoles APIs
    options.IncludeAssignRoleServices = true;
));
Extending Identity Auth Cookies and User Sessions
By default all well known Claim Names
are used to populate the User Session, but you can also include additional claims in the Identity Auth Cookie
and use them to populate the User Session by overriding PopulateFromClaims() in your
CustomUserSession.cs, e.g:
public class CustomUserSession : AuthUserSession
{
    public override void PopulateFromClaims(IRequest httpReq, ClaimsPrincipal principal)
    {
        // Populate Session with data from Identity Auth Claims
        ProfileUrl = principal.FindFirstValue(JwtClaimTypes.Picture);
    }
}

// Add additional claims to the Identity Auth Cookie
public class AdditionalUserClaimsPrincipalFactory(UserManager<ApplicationUser> userManager, RoleManager<IdentityRole> roleManager, IOptions<IdentityOptions> optionsAccessor)
    : UserClaimsPrincipalFactory<ApplicationUser,IdentityRole>(userManager, roleManager, optionsAccessor)
{
    public override async Task<ClaimsPrincipal> CreateAsync(ApplicationUser user)
    {
        var principal = await base.CreateAsync(user);
        var identity = (ClaimsIdentity)principal.Identity!;

        var claims = new List<Claim>();
        // Add additional claims here
        if (user.ProfileUrl != null)
        {
            claims.Add(new Claim(JwtClaimTypes.Picture, user.ProfileUrl));
        }

        identity.AddClaims(claims);
        return principal;
    }
}
Custom Application User Primary Key
The default IdentityUser uses a string as the primary key populated with a Guid, but you could also change it to use an
int by having your EF IdentityUser Data Model inherit from IdentityUser<int> instead:
public class AppUser : IdentityUser<int>
{
    //...
}
You'll also need to specify the Key Type when registering the AuthFeature plugin:
public class ConfigureAuth : IHostingStartup
{
    public void Configure(IWebHostBuilder builder) => builder
        .ConfigureAppHost(appHost => {
            appHost.Plugins.Add(new AuthFeature(IdentityAuth.For<AppUser,int>(
                options => {
                    // options.SessionFactory = () => new CustomUserSession(); //optional
                    options.CredentialsAuth();
                })
            ));
        });
}
Which the new .NET 8 BlazorDiffusion App does in Configure.Auth.cs
to be compatible with its existing ServiceStack UserAuth tables which used an int primary key.
Using Identity Auth in ServiceStack Apps
One of the primary benefits of adopting Identity Auth is the wealth of documentation and resources available for it, which also applies to how you would use Identity Auth to secure your own Apps.
If you're new to Identity Auth we recommend starting with the official introduction from Microsoft:
To learn about securing Blazor Apps, go to:
Declarative Validation Attributes
The recommended way to protect your ServiceStack APIs is to continue to use the Declarative Validation attributes which are decoupled from any implementation so be safely annotated on Request DTOs without adding any implementation dependencies, where they're also accessible to Clients and UIs using the Request DTOs to invoke your APIs.
The available Typed Authorization Attributes include:
| Attribute | Description |
|---|---|
[ValidateIsAuthenticated] |
Restrict access toAuthenticated Users only |
[ValidateIsAdmin] |
Restrict access to Admin Users only |
[ValidateHasRole] |
Restrict access to only Users assigned with this Role |
[ValidateHasClaim] |
Restrict access to only Users assigned with this Claim |
[ValidateHasScope] |
Restrict access to only Users assigned with this Scope |
That can be annotated on Request DTOs to protect APIs:
[ValidateIsAuthenticated]
[ValidateIsAdmin]
[ValidateHasRole(role)]
[ValidateHasClaim(type,value)]
[ValidateHasScope(scope)]
public class Secured {}
Using Identity Auth in ServiceStack Clients
As ServiceStack Identity Auth integration registers replacements Auth Providers for ServiceStack's built-in Auth Providers, existing ServiceStack Client integrations will continue to work without any changes, e.g:
const client = new JsonApiClient(baseUrl);

var response = await client.ApiAsync(new Authenticate {
    provider = "credentials",
    UserName = userName,
    Password = password,
});
The difference being that instead of returning an Authenticated ServiceStack Session Cookie, it instead returns an
ASP.NET's Identity .AspNetCore.Identity.Application Cookie which it will be used to perform Authenticated API requests.
This transparent re-implementation of ServiceStack Auth Providers and endpoints is also how ServiceStack's Built-in UIs was able to continue to work without any code changes.
SMTP IEmailSender
The .NET 8 Templates also include a nice solution for sending Identity Auth emails through the IEmailSender interface
which drops the Email Request in the registered Background MQ in
Configure.Mq.cs
which uses it to invoke the SendEmail API in
EmailServices in a
managed background worker:
public class EmailSender(IMessageService messageService) : IEmailSender
{
    public Task SendEmailAsync(string email, string subject, string htmlMessage)
    {
        using var mqClient = messageService.CreateMessageProducer();
        mqClient.Publish(new SendEmail
        {
            To = email,
            Subject = subject,
            BodyHtml = htmlMessage,
        });

        return Task.CompletedTask;
    }
}
To enable it you'll need to register your preferred SMTP Server in your App's appsettings.json:
{
  "SmtpConfig": {
    "Username": "username",
    "Password": "password",
    "Host": "smtp.mailtrap.io",
    "Port": 587,
    "FromEmail": "mail@example.org"
  }
}
Then uncomment the EmailSender registration in your Program.cs
services.AddSingleton<IEmailSender, EmailSender>();
Send any App Email
The nice part about this solution is that it's not limited to just sending Identity Auth emails, you can also use it to send
any App Email, either by publishing a message to the registered MQ with PublishMessage or by using the
Service Gateway to invoke the API directly, e.g:
public class MyServices : Service
{
    public object Any(MyRequest request)
    {
        // Send Email in managed Background MQ Worker
        PublishMessage(new SendEmail {
            To = email,
            Subject = subject,
            BodyHtml = body,
        });

        // Block until Email is sent to SMTP Serve
        Gateway.Send(new SendEmail {
            To = email,
            Subject = subject,
            BodyHtml = body,
        });
    }
}
End-to-end Typed API support for PHP!
We're happy to announce the next Add ServiceStack Reference language to enjoy end-to-end typed support is - PHP!
End-to-end typed PHP APIs
Learn about the rich JsonServiceClient & end-to-end typed API support for PHP
ServiceStack's Add ServiceStack Reference feature allows clients to generate Native Types from directly within PhpStorm using ServiceStack IntelliJ Plugin - providing a simple way to give clients typed access to your ServiceStack Services.
First class development experience
PHP is one of the worlds most popular programming languages thanks to its ease of use, platform independence, large standard library, flexibility and fast development experience which sees it excels as a popular language for web development and for development of popular CMS products like WordPress, Drupal and Joomla thanks to its flexibility, embeddability and ease of customization.
To maximize the experience for calling ServiceStack APIs within these environments ServiceStack now supports PHP as a 1st class Add ServiceStack Reference supported language which gives PHP developers an end-to-end typed API for consuming ServiceStack APIs, complete with IDE integration in PhpStorm as well as built-in support in x dotnet tool to generate Typed and annotated PHP DTOs for a remote ServiceStack instance from a single command-line.
Ideal idiomatic Typed Message-based API
To maximize the utility of PHP DTOs and enable richer tooling support and greater development experience, PHP DTOs are generated as Typed JsonSerializable classes with promoted constructors and annotated with PHPDoc Types - that's invaluable when scaling large PHP code-bases and greatly improves discoverability of a remote API. DTOs are also enriched with interface markers and Annotations which enables its optimal end-to-end typed API:
The PHP DTOs and JsonServiceClient library follow
PHP naming conventions
so they'll naturally fit into existing PHP code bases. Here's a sample of techstacks.io
generated PHP DTOs containing string and int Enums, an example AutoQuery and a standard Request & Response DTO showcasing
the rich typing annotations and naming conventions used:
enum TechnologyTier : string
{
    case ProgrammingLanguage = 'ProgrammingLanguage';
    case Client = 'Client';
    case Http = 'Http';
    case Server = 'Server';
    case Data = 'Data';
    case SoftwareInfrastructure = 'SoftwareInfrastructure';
    case OperatingSystem = 'OperatingSystem';
    case HardwareInfrastructure = 'HardwareInfrastructure';
    case ThirdPartyServices = 'ThirdPartyServices';
}

enum Frequency : int
{
    case Daily = 1;
    case Weekly = 7;
    case Monthly = 30;
    case Quarterly = 90;
}

// @Route("/technology/search")
#[Returns('QueryResponse')]
/**
 * @template QueryDb of Technology
 * @template QueryDb1 of TechnologyView
 */
class FindTechnologies extends QueryDb implements IReturn, IGet, JsonSerializable
{
    public function __construct(
        /** @var array<int>|null */
        public ?array $ids=null,
        /** @var string|null */
        public ?string $name=null,
        /** @var string|null */
        public ?string $vendorName=null,
        /** @var string|null */
        public ?string $nameContains=null,
        /** @var string|null */
        public ?string $vendorNameContains=null,
        /** @var string|null */
        public ?string $descriptionContains=null
    ) {
    }

    /** @throws Exception */
    public function fromMap($o): void {
        parent::fromMap($o);
        if (isset($o['ids'])) $this->ids = JsonConverters::fromArray('int', $o['ids']);
        if (isset($o['name'])) $this->name = $o['name'];
        if (isset($o['vendorName'])) $this->vendorName = $o['vendorName'];
        if (isset($o['nameContains'])) $this->nameContains = $o['nameContains'];
        if (isset($o['vendorNameContains'])) $this->vendorNameContains = $o['vendorNameContains'];
        if (isset($o['descriptionContains'])) $this->descriptionContains = $o['descriptionContains'];
    }

    /** @throws Exception */
    public function jsonSerialize(): mixed
    {
        $o = parent::jsonSerialize();
        if (isset($this->ids)) $o['ids'] = JsonConverters::toArray('int', $this->ids);
        if (isset($this->name)) $o['name'] = $this->name;
        if (isset($this->vendorName)) $o['vendorName'] = $this->vendorName;
        if (isset($this->nameContains)) $o['nameContains'] = $this->nameContains;
        if (isset($this->vendorNameContains)) $o['vendorNameContains'] = $this->vendorNameContains;
        if (isset($this->descriptionContains)) $o['descriptionContains'] = $this->descriptionContains;
        return empty($o) ? new class(){} : $o;
    }
    public function getTypeName(): string { return 'FindTechnologies'; }
    public function getMethod(): string { return 'GET'; }
    public function createResponse(): mixed { return QueryResponse::create(genericArgs:['TechnologyView']); }
}

// @Route("/orgs/{Id}", "DELETE")
class DeleteOrganization implements IReturnVoid, IDelete, JsonSerializable
{
    public function __construct(
        /** @var int */
        public int $id=0
    ) {
    }

    /** @throws Exception */
    public function fromMap($o): void {
        if (isset($o['id'])) $this->id = $o['id'];
    }

    /** @throws Exception */
    public function jsonSerialize(): mixed
    {
        $o = [];
        if (isset($this->id)) $o['id'] = $this->id;
        return empty($o) ? new class(){} : $o;
    }
    public function getTypeName(): string { return 'DeleteOrganization'; }
    public function getMethod(): string { return 'DELETE'; }
    public function createResponse(): void {}
}
The smart PHP JsonServiceClient available in the servicestack/client
packagist package enables the same productive, typed API development experience available in our other 1st-class supported
client platforms.
Using promoted constructors enables DTOs to be populated using a single constructor expression utilizing named parameters
which together with the generic JsonServiceClient enables end-to-end typed API Requests in a single LOC:
use Servicestack\JsonServiceClient;
use dtos\Hello;

$client = new JsonServiceClient("https://test.servicestack.net");

/** @var HelloResponse $response */
$response = client->get(new Hello(name:"World"));
The
HelloResponseoptional type hint doesn't change runtime behavior but enables static analysis tools and IDEs like PyCharm to provide rich intelli-sense and development time feedback.
Installation
Ensure you have PHP and Composer installed.
The only requirements for PHP apps to perform typed API Requests are the generated PHP DTOs and the generic JsonServiceClient
which can be installed in Composer projects with:
$ composer require servicestack/client
Or by adding the package to your composer.json then installing the dependencies:
{
  "require": {
    "servicestack/client": "^1.0"
  }
}
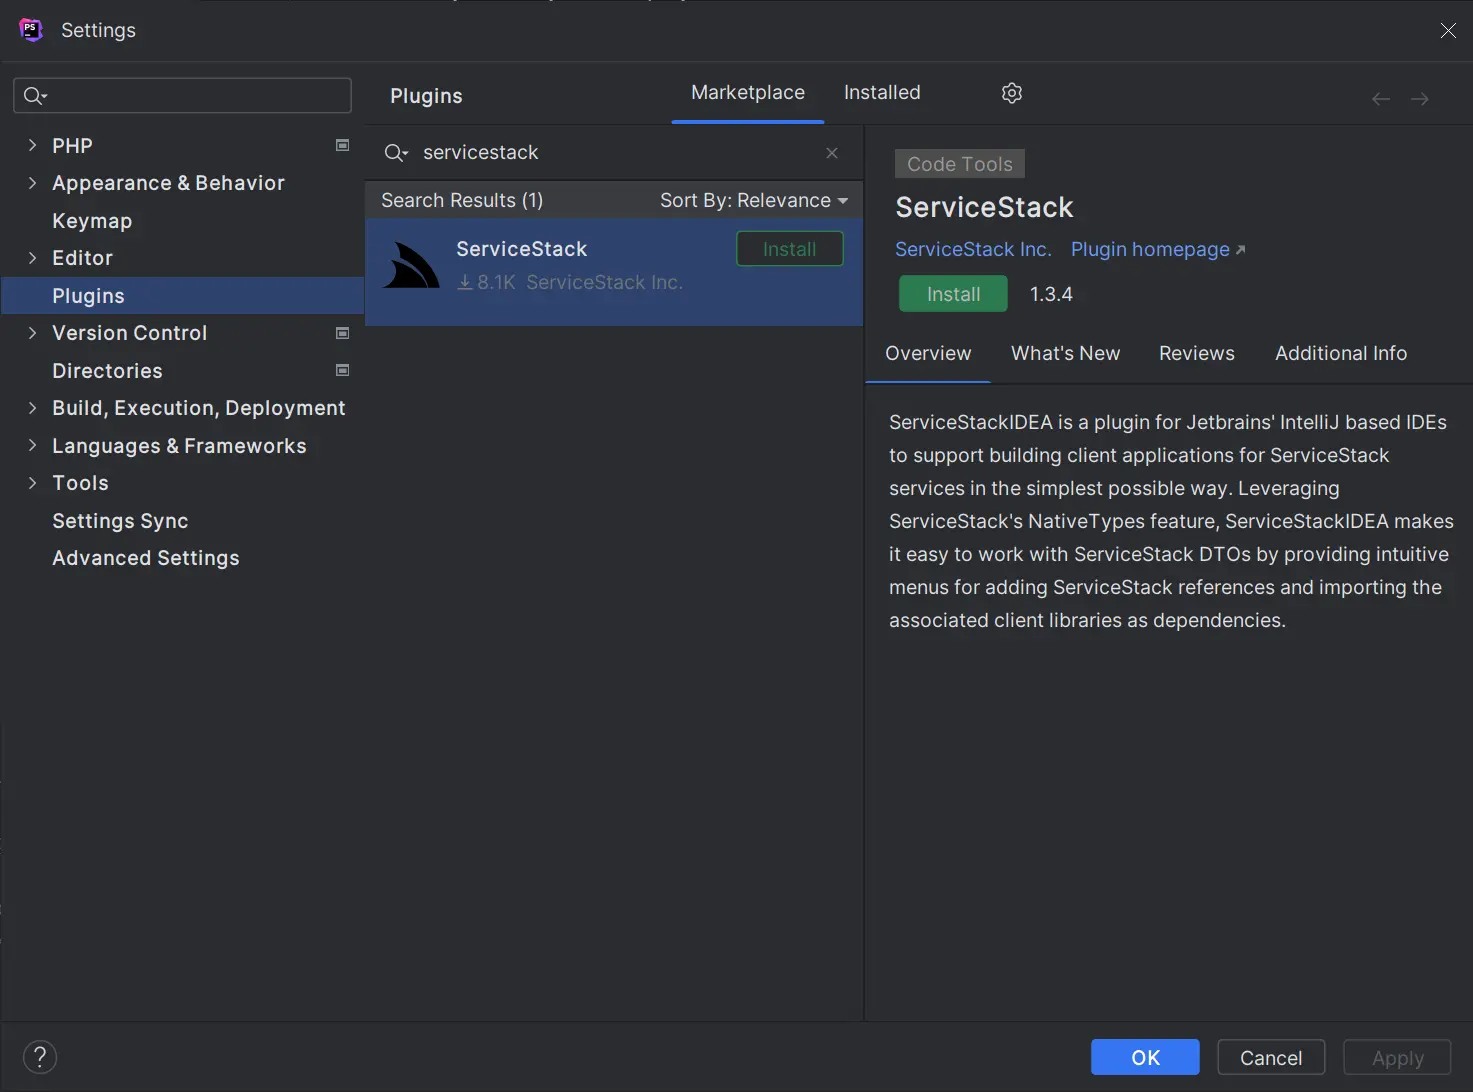
PhpStorm ServiceStack Plugin
PHP developers of PhpStorm can get a simplified development experience for consuming ServiceStack Services by installing the ServiceStack Plugin from the JetBrains Marketplace:
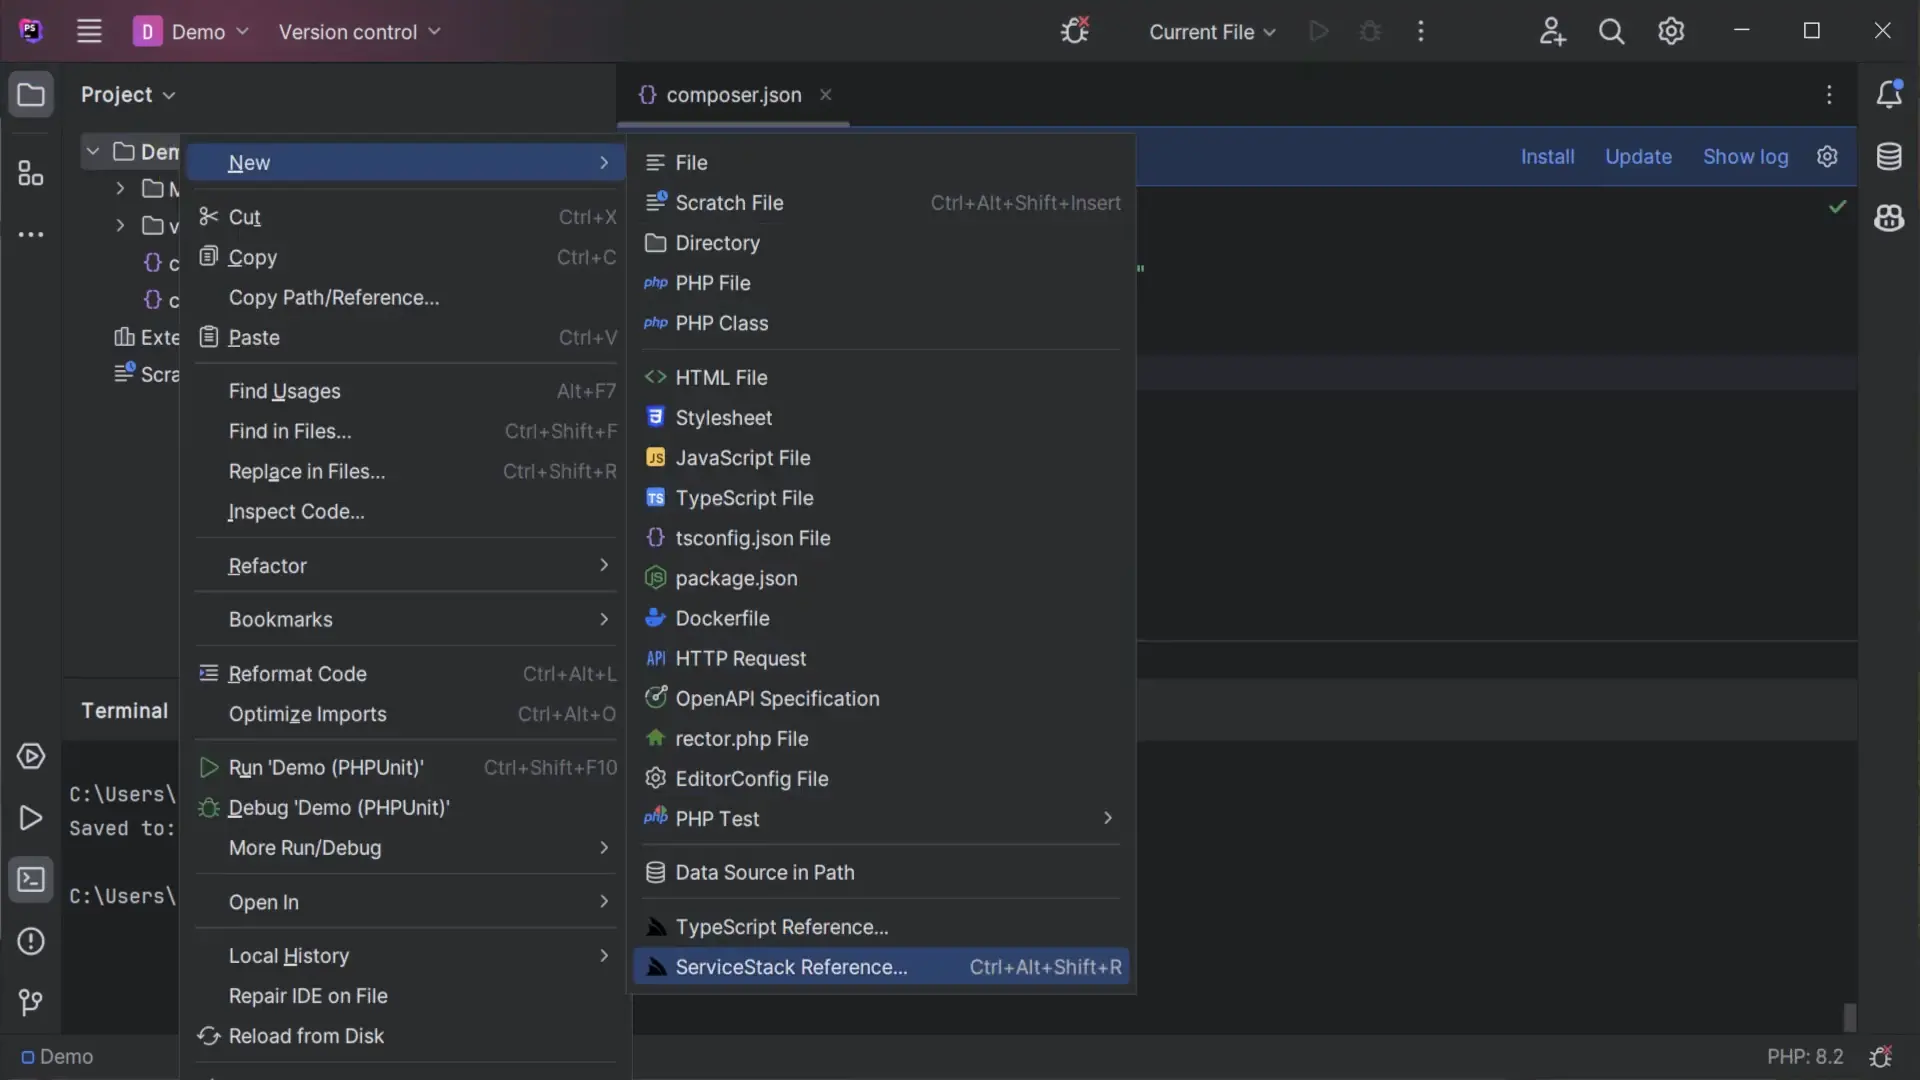
Where you'll be able to right-click on a directory and click on ServiceStack Reference on the context menu:
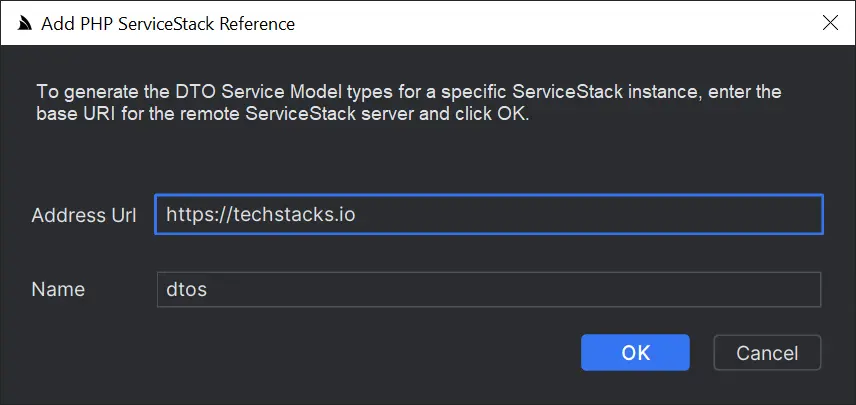
To launch the Add PHP ServiceStack Reference dialog where you can enter the remote URL of the ServiceStack endpoint you wish to call to generate the Typed PHP DTOs for all APIs which by default will saved to dtos.php:
Then just import the DTOs and JsonServiceClient to be able to consume any of the remote ServiceStack APIs:
<?php

require_once __DIR__ . '/vendor/autoload.php'; // Autoload files using Composer autoload
require_once 'dtos.php';

use dtos\FindTechnologies;
use Servicestack\JsonServiceClient;

$client = JsonServiceClient::create("https://techstacks.io");

$response = $client->send(new FindTechnologies(
    ids: [1,2,4,6],
    vendorName: "Google"));

print_r($response);
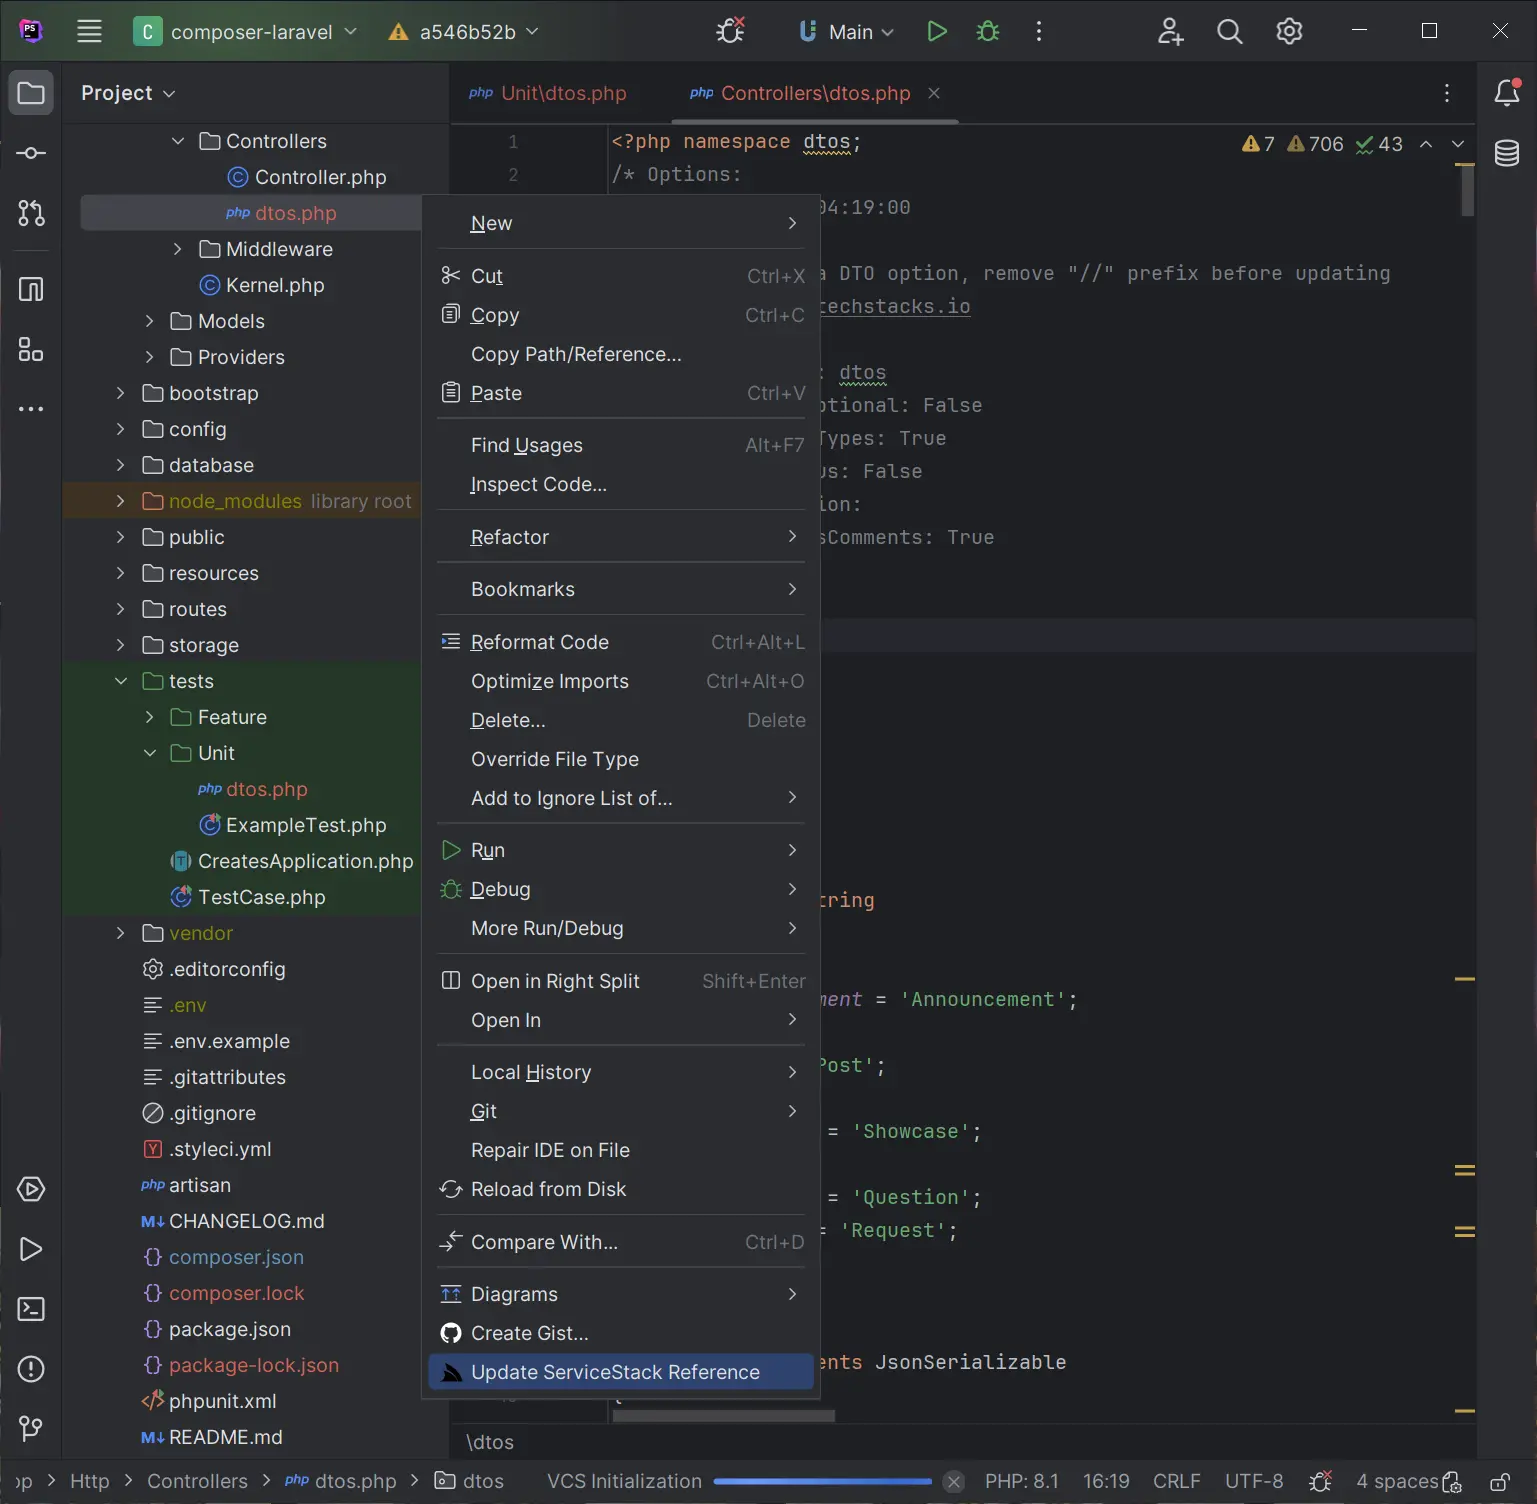
If any of the the remote APIs change their DTOs can be updated by right-clicking on dtos.php and clicking Update ServiceStack Reference:
For more usage examples and information about ServiceStack's PHP support checkout the PHP Add ServiceStack Reference docs.