
100M package downloads 🎉
Shortly after adding 1st-class net6.0 support, we're starting off 2022 eclipsing an impressive milestone having crossed 100M+ NuGet package downloads which we're celebrating with our first licensing model change since our 2014 launch where ServiceStack is now...
FREE for Individual & OSS projects!
This is the same perpetual, royalty-free License to use ServiceStack unrestricted as our Indie Licenses (less commercial support).
OSS Projects have always been able to use the ServiceStack source code for free, however collaborative OSS Projects publicly hosted on GitHub or GitLab can now generate an OSS License Key for their Project to enable unrestricted usage of ServiceStack's official NuGet packages with a License Key that can be included & shared in their project source code to enable unrestricted usage for its users.
servicestack.net/free
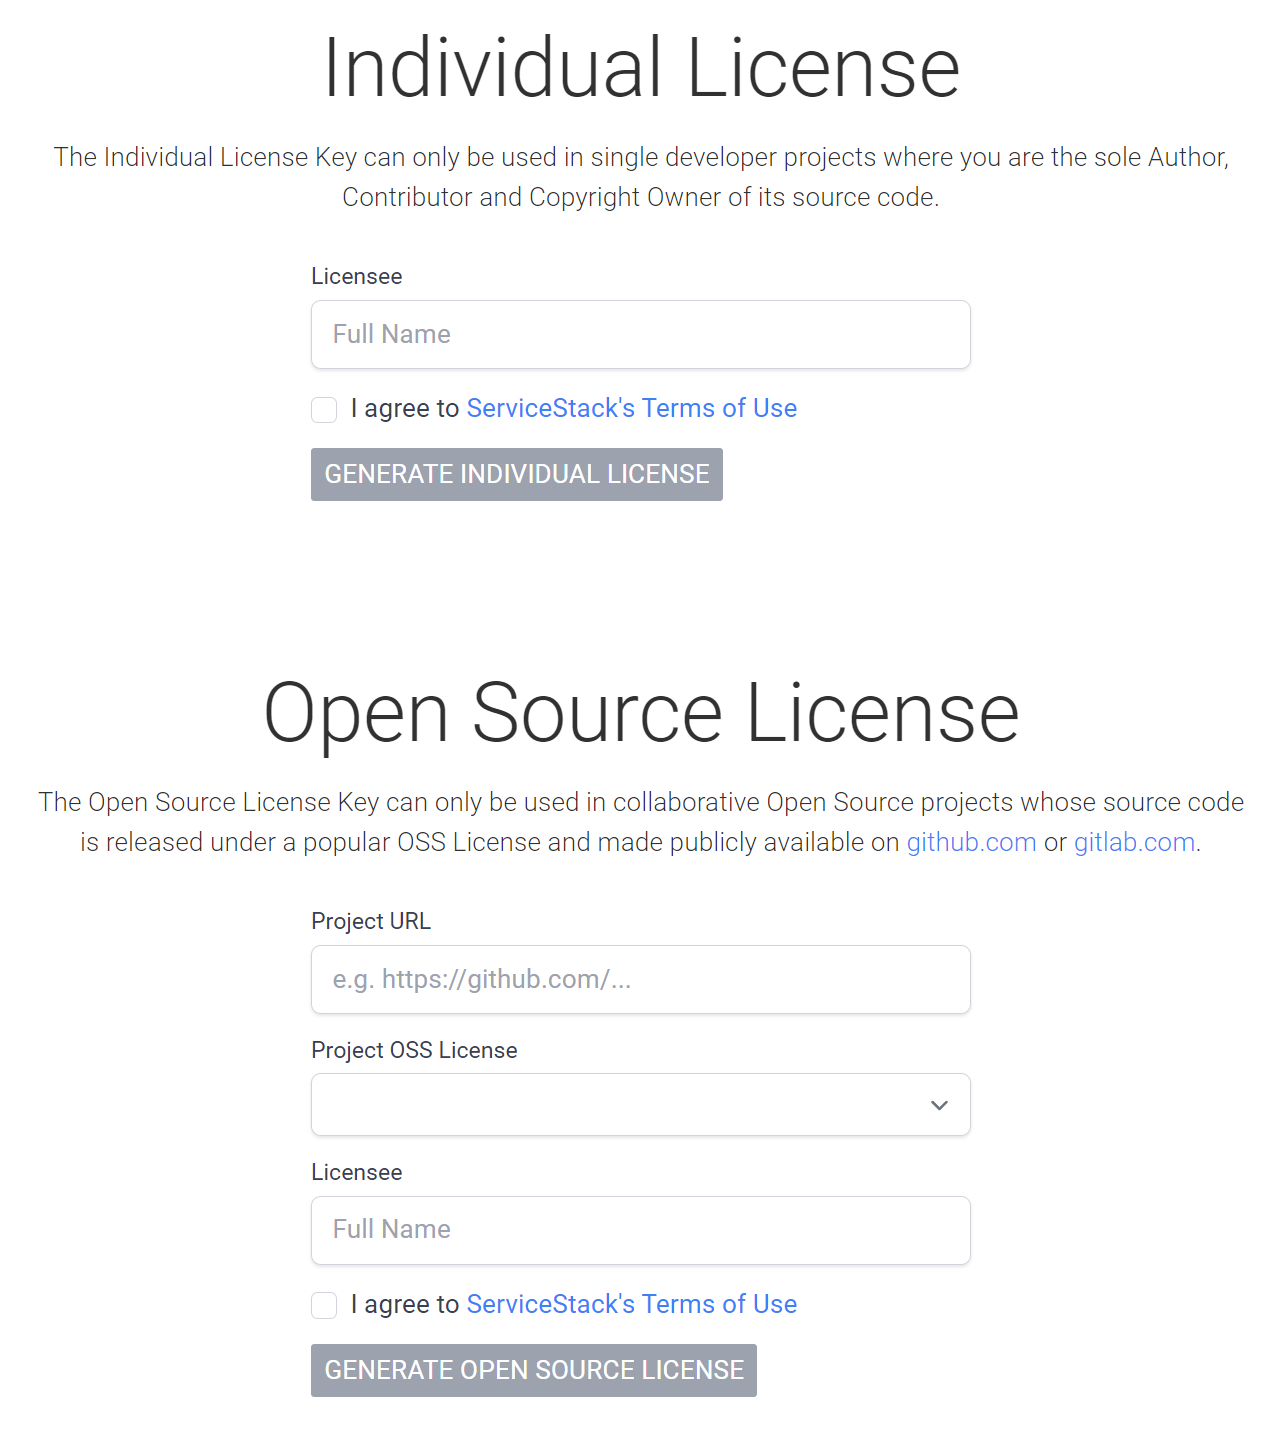
Both options generates a license key enabling perpetual, unrestricted royalty-free usage of any ServiceStack version released in that year (e.g. 2022). ServiceStack libraries never call home, so license verification is completely stand-alone ensuring License Keys will forever enable unrestricted perpetual usage of any version of ServiceStack released within the same year the license key was generated.
These licenses are gratis, i.e. no account or email is required. ServiceStack v6 is our best release ever that we'd love to see broad adoption of, so we're removing the cost barrier to entry for Individuals & OSS projects which we hope you'll make use of to create amazing experiences with, e.g. that our new premier jamstacks.net project templates can deliver.
Hang out with us on Discord 💬
If you are creating something you're excited about, we'd love to hear about it, drop us a line in the new #ServiceStack Discord channel:
We're keen of creating a welcoming space for a dev community of like-minded App creators, which we consider ourselves a part of.
Community Support
We're happy to continue extending free licenses to individuals & OSS projects indefinitely provided that it doesn't negatively impact our development resources currently dedicated on developing ServiceStack, i.e. additional free users shouldn't impose additional burden on the full-time dev resources currently working on improving ServiceStack.
At the same time we're happy to help in anyway we can to make it easy for the community to help each other so we've created a new ServiceStack/Discuss GitHub Discussion space where you can request help from the community in its Q&A category:
Hopefully it's also something we can also contribute to in our downtime, but our highest priority is going to remain committed to supporting commercial customers whose licenses are funding the full-time dev resources supporting and improving ServiceStack.
Free license users who want to report an Issue are welcome to send PR's with either a reproducible failing test of the issue or the fix itself.
Motivation
Our primary goal with ServiceStack is to make the best & most productive App Services Framework available as broadly as possible, which is only achievable with full-time dev resources committed to improving it. With the lack of any cloud or Infrastructure businesses funding development teams behind free quality frameworks, sales of commercial licenses have historically been the only way for this to be sustainable. As a 100% bootstrapped company not beholden to anyone, we've been fortunate to be immediately profitable since our 2014 launch, and every month since where we can now comfortably sacrifice a majority of the Indie Licenses that's contributed to 23% of our overall revenue in exchange for a larger user base that we ultimately believe will benefit the entire ServiceStack community.
If this initiative is successful in significantly increasing adoption without impacting business licenses currently funding development we'll look at further expanding it to cover all Indie License users or adopt something akin to Duende's Fair Trade Software License in future.
Either way we welcome new ServiceStack developers previously prohibited by cost and hope you create something awesome with it! 🎉
v6.0.2 Release
This release is essentially a more refined v6 release with a week of fixes of reported issues and another breaking change we thought important to introduce immediately to align with the recommendations for .NET 6+ future releases.
API Explorer now supports PascalCase
Previously you needed to use ASP.NET Core's default camelCase to use API Explorer & Admin UI, we've now also added support for .NET Framework PascalCase default bringing ServiceStack's exciting new mainstay to more supported platforms.
HTTP Utils rewritten to use HttpClient in .NET 6+
Our HTTP Utils provides user-friendly extension methods for intuitively making HTTP requests from URL strings, e.g:
List<GithubRepo> repos = $"https://api.github.com/users/{user}/repos"
    .GetJsonFromUrl()
    .FromJson<List<GithubRepo>>();
As .NET's existing HttpWebRequest has been officially deprecated, these UX-friendly HTTP APIs were rewritten to use the recommended HttpClient implementation in .NET 6+ builds so they can continue to used without concern of relying on deprecated implementations.
All new HttpClient implementations remain in the core ServiceStack.Text.dll which continues to remain a dependency-free library courtesy of HttpClient being available in default .NET 6 installations.
New Source Compatible API
Given they're completely different implementations it wasn't possible to enable 100% compatibility with existing code that use custom Request & Response filters
however as we need to use both implementations in the same code-base we've added a source compatible .With() APIs you can use instead to customize a HTTP Request, e.g:
var response = url.GetJsonFromUrl(requestFilter:req => req.With(c => c.UserAgent = UserAgent));
var response = await url.GetJsonFromUrlAsync(requestFilter:req => req.With(c => c.UserAgent = UserAgent));
Which lets you configure a HttpRequestConfig that is equally applied to their HttpClient and HttpWebRequest implementations.
It also includes Set* methods to simplify common tasks like creating Authenticated Requests, e.g:
var json = await url.GetJsonFromUrlAsync(requestFilter: req =>
    req.With(c => {
        c.UserAgent = UserAgent;
        c.SetAuthBasic(ClientId, ClientSecret);
    }), token: token).ConfigAwait();
The full HttpRequestConfig API available in this release include:
public class HttpRequestConfig
{
    public string? Accept { get; set; }
    public string? UserAgent { get; set; }
    public string? ContentType { get; set; }
    public string? Referer { get; set; }
    public string? Expect { get; set; }
    public string[]? TransferEncoding { get; set; }
    public bool? TransferEncodingChunked { get; set; }
    public NameValue? Authorization { get; set; }
    public LongRange? Range { get; set; }
    public List<NameValue> Headers { get; set; } = new();

    public void SetAuthBearer(string value) => Authorization = new("Bearer", value);
    public void SetAuthBasic(string name, string value) =>
        Authorization = new("Basic", Convert.ToBase64String(Encoding.UTF8.GetBytes(name + ":" + value)));
    public void SetRange(long from, long? to = null) => Range = new(from, to);

    public void AddHeader(string name, string value) => Headers.Add(new(name, value));
}
Inspecting Responses
For source compatible APIs to inspect HTTP Responses you can use GetHeader() to retrieve HTTP Response Headers, GetContentLength() to retrieve the Content-Length if exists and MatchesContentType() to compare against existing MimeTypes which ignores whitespace, casing and charset suffixes, e.g:
var response = baseUrl.AppendPath("dir","sub").AddQueryParam("id", 1)
    .SendStringToUrl(method: "HEAD",
        responseFilter: res => {
            Assert.That(res.GetHeader("X-Method"), Is.EqualTo("HEAD"));
            Assert.That(res.GetHeader("X-Id"), Is.EqualTo("1"));
            Assert.That(res.MatchesContentType("video/mp4"));
            Assert.That(res.GetContentLength(), Is.EqualTo(100));
        });
Connect to HttpFactory
The HttpClient HttpUtils use a lazy singleton for efficiency however if you're using it in a host that has an ASP.NET IOC you can configure it to make use of a HttpClient factory by using the IServiceCollection.AddHttpUtilsClient() extension method, e.g:
public class AppHost : AppHostBase, IHostingStartup
{
    public void Configure(IWebHostBuilder builder) => builder
        .ConfigureServices(services => services.AddHttpUtilsClient())
        .Configure(app => {
            if (!HasInit)
                app.UseServiceStack(new AppHost());
        });
}
Custom HttpClient
Alternatively you can configure it to use your own client factory with:
HttpUtils.CreateClient = () => UseMyHttpClient()
The following Core APIs also have extension methods on HttpClient which existing HttpClient instances can make use of:
SendStringToUrl()SendStringToUrlAsync()SendBytesToUrl()SendBytesToUrlAsync()SendStreamToUrl()SendStreamToUrlAsync()
ServiceStack now using HttpClient in .NET 6
A consequence of replacing the existing HTTP Utils HttpWebRequest implementations is that internally ServiceStack is now using HttpClient throughout its libraries including the C# Server Events Client, ServiceStack.Stripe, GitHubGateway, AuthHttpGateway, etc.
ZLibStream used for deflate compression in .NET 6
Thanks to Eaton from the ServiceStack Community for reporting issues with DeflateStream which has been superseded by ZLibStream for deflate compression in .NET 6+.
/types/js now cached in production
Given the primary usecase for the new JavaScript Language support is to enable instant access to Typed APIs using a <script> reference in HTML Pages, it's now cached by default in non DebugMode configurations for improved runtime performance.
Should it be needed, uncached JS DTOs can be accessed with /types/js?cache=false.
v5.14 Release
In conjunction with this v6 release we've also shipped v5.14 which is our last release supporting .NET Framework v4.5. From v6+ all ServiceStack packages have been upgraded to use .NET Framework v4.7.2+ across the board.
Fast Browsing Mode
We regret the unnaturally long length of these release notes, and invite you to scan Sidebar links to fast jump to interested features ⚡️
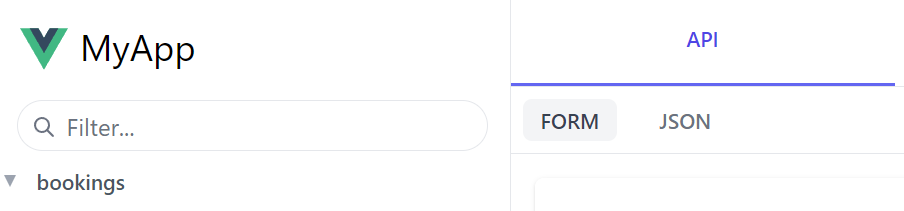
New built-in features
We'll explore each in more detail, but 2 very useful new routes to remember now built into every ServiceStack App are:
/api/{Request}
Pre-defined JSON route to call any API
/ui/{Request}
API Explorer Auto UI to call any API
Where Request DTO names can be used to call APIs using API Explorer's Auto UI or at the new /api route with any HTTP JSON client.
API Explorer
We ultimately expect API Explorer to be the flagship v6 feature providing the greatest value to all ServiceStack customers since it's a built-in feature yielding immediate utility with a instant UI to call any API without any integration or configuration required, i.e. after upgrading to the latest release you can immediately go to /ui to browse and call your App's APIs.
A better Postman and Swagger UI for ServiceStack APIs
Quite simply, even at its v1 release we believe it a better Postman to call your ServiceStack APIs and a better Swagger UI to document them to API consumers, with unparalleled customizability and envious performance.
For a glimpse of what's in v1, we've prepared a quick tour of its features:
ServiceStack Exclusive
With greater knowledge about your APIs ServiceStack's able to provide a smarter, richer and more optimized UX than what would be possible had every feature had to be routed through a lowest common denominator specification like Open API, e.g. trying to construct source code in different languages from basic common types ends up inferior to asking ServiceStack directly to translate DTOs in the preferred language, granularity & language features we want, which it creates directly from your DTOs richer C# blue-print, i.e. instead of more primitive lossier basic types. As a result API Explorer can include features Swagger UI and Postman can't like Source code navigation in all 11 languages supported by Add ServiceStack Reference.
Let's go feature exploring via screenshots 📷
The entire API Explorer UI is driven by the rich metadata around your APIs and AppHost's registered plugins, e.g. if you have the ServiceStack AuthFeature plugin registered, the home page will display a Sign In dialog based on the its configured Auth Providers.
This is what you'll see in a new Blazor WASM project which has Credentials Auth, JWT as well as Facebook, Google and Microsoft OAuth providers registered in Configure.Auth.cs
Custom Auth Providers can provide their own Form Layout by overriding the FormLayout, e.g. the above Credentials UI is creatable with:
public class CustomCredentialsAuthProvider : CredentialsAuthProvider
{
    public CustomCredentialsAuthProvider()
    {
        FormLayout = new() {
            Input.For<Authenticate>(x => x.UserName, c =>
            {
                c.Label = "Email address";
                c.Required = true;
            }),
            Input.For<Authenticate>(x => x.Password, c =>
            {
                c.Type = "Password";
                c.Required = true;
            }),
            Input.For<Authenticate>(x => x.RememberMe),
        };
    }
    //...
}
Where the Input utility can be used to configure most HTML Form Input control properties that automatically configures to use the desired Input control for each property Type.
You can Sign In with any of the users in the Vue Vite Sign In page configured in Configure.AuthRepository.cs, i.e:
| Username | Password | Role |
|---|---|---|
| admin@email.com | p@55wOrd | Admin |
| manager@email.com | p@55wOrd | Manager |
| employee@email.com | p@55wOrd | Employee |
If signed in with the Admin User and the Admin Users plugin is configured:
Plugins.Add(new AdminUsersFeature());
It also displays Admin UI links that only Admin Users have access to.
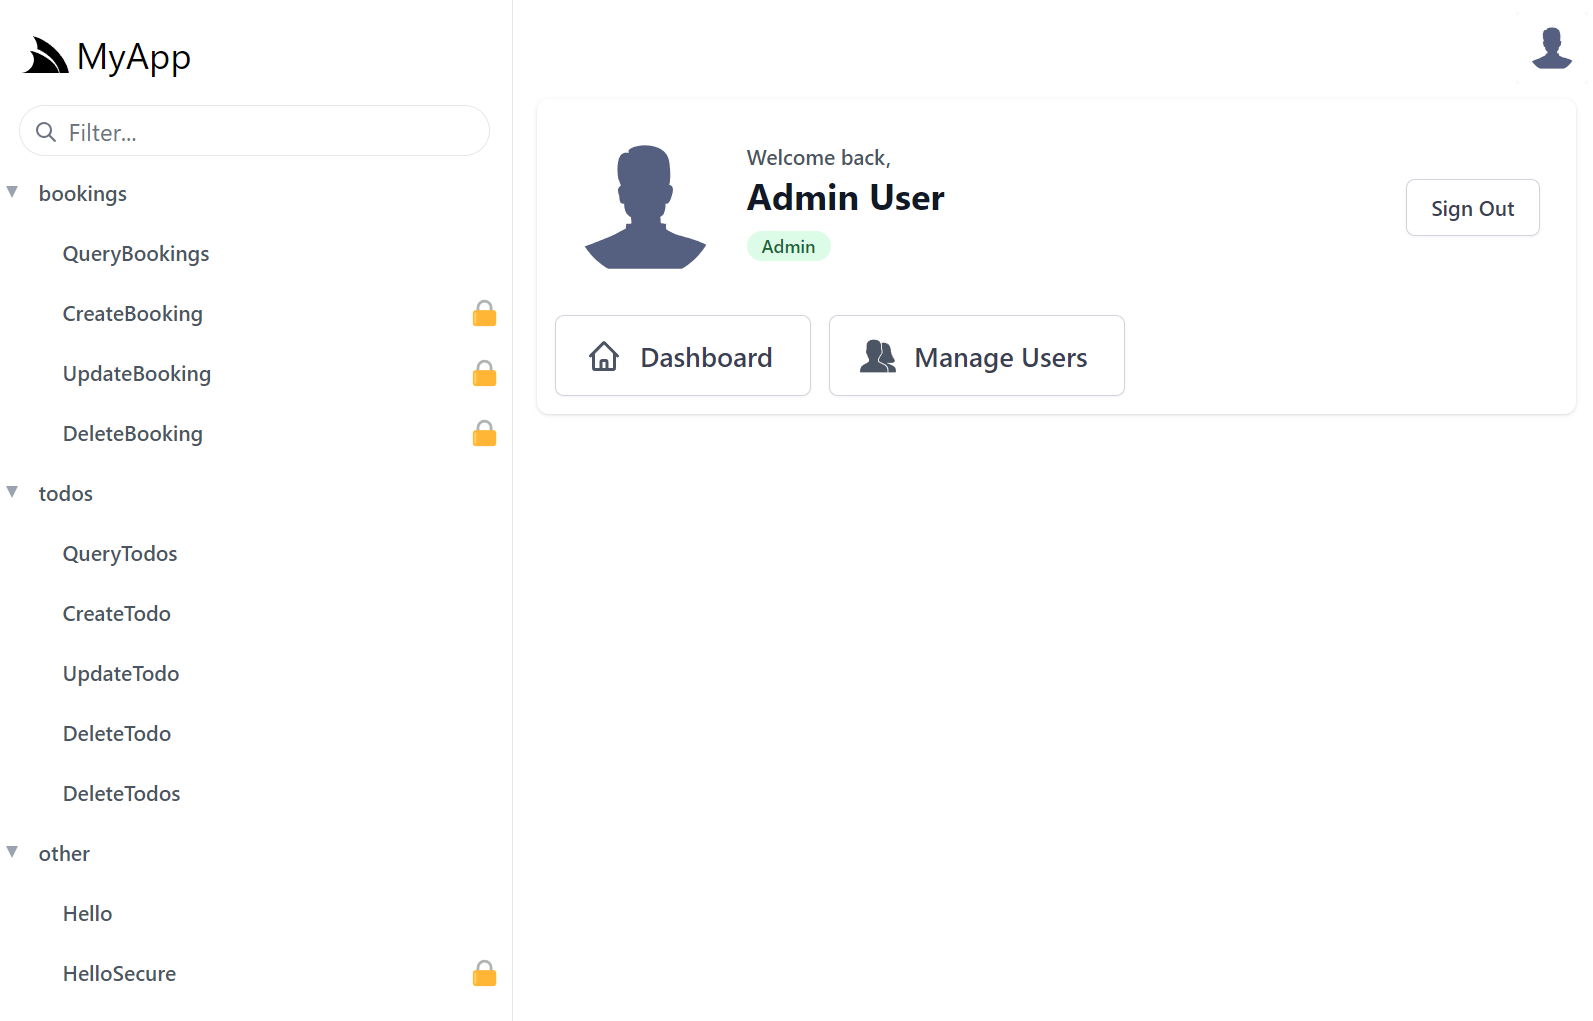
INFO
Admin UI is a new App but built using the same HTML Modules technology & shares common components with API Explorer
If you'd like to, you can add personalized links for users in different roles, e.g. this is what's used to populate the above UI for Admins:
appHost.AddToAppMetadata(meta =>
{
    meta.Plugins.Auth.RoleLinks[RoleNames.Admin] = new List<LinkInfo>
    {
        new() { Href = "../admin-ui", Label = "Dashboard", Icon = Svg.ImageSvg(Svg.Create(Svg.Body.Home)) },
        new() { Href = "../admin-ui/users", Label = "Manage Users", Icon = Svg.ImageSvg(Svg.GetImage(Svg.Icons.Users, "currentColor")) },
    };
});
Once signed in, API Explorer expands to include all the protected APIs the signed in user has access to, identifiable with the padlock icon.
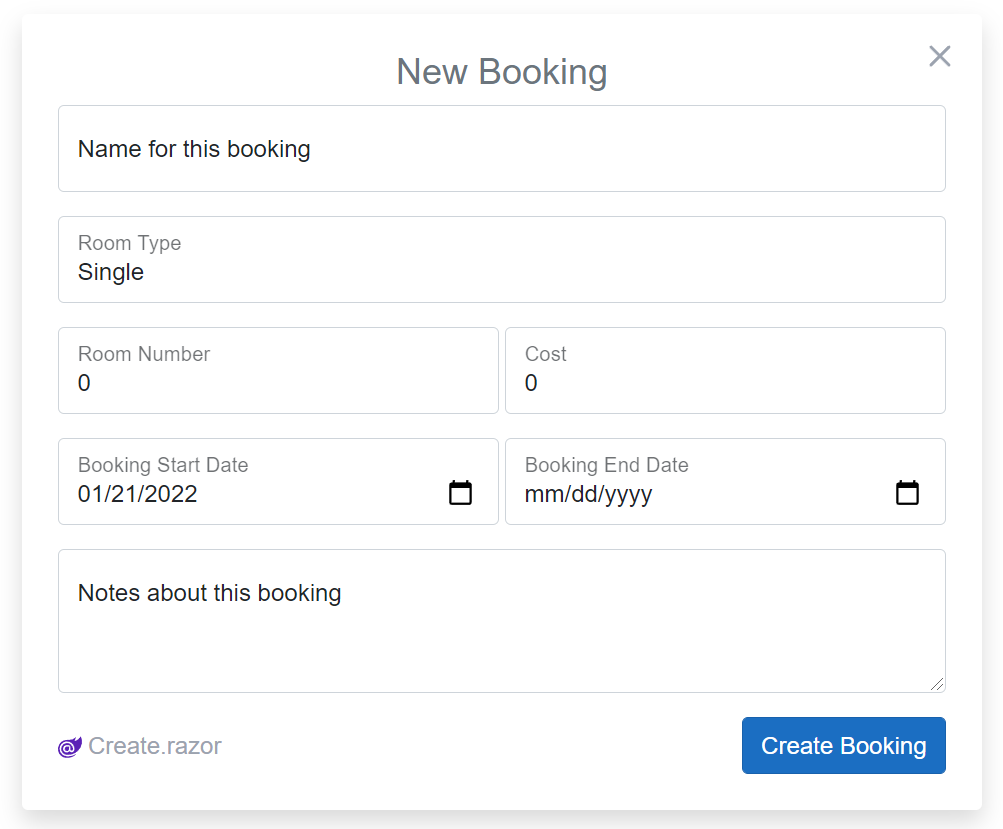
API Form
The major tabs takes you to different API feature areas, with the first API tab being where to call APIs through an Auto UI generated based on the Request DTO schema. Submitting the form returns API results in a similar layout to Postman with body displaying a syntax highlighted JSON response, Raw showing raw JSON output in a textarea and the Preview tab displaying results in a human-friendly view:

The Auto UI by default uses the appropriate HTML Input UI Control based on each property type:
| UI Input | Data Types |
|---|---|
<select> |
Enum, Custom Values |
<input type=number> |
Numeric Types |
<input type=date> |
DateTime, DateTimeOffset, DateOnly |
<input type=time> |
TimeSpan, TimeOnly |
<input type=checkbox> |
Boolean |
<input type=text> |
default |
Where the CreateBooking Request DTO defined in Bookings.cs:
[Tag("bookings"), Description("Create a new Booking")]
[Route("/bookings", "POST")]
[ValidateHasRole("Employee")]
[AutoApply(Behavior.AuditCreate)]
public class CreateBooking : ICreateDb<Booking>, IReturn<IdResponse>
{
    [Description("Name this Booking is for"), ValidateNotEmpty]
    public string Name { get; set; }
    public RoomType RoomType { get; set; }
    [ValidateGreaterThan(0)]
    public int RoomNumber { get; set; }
    [ValidateGreaterThan(0)]
    public decimal Cost { get; set; }
    public DateTime BookingStartDate { get; set; }
    public DateTime? BookingEndDate { get; set; }
    [Input(Type = "textarea")]
    public string? Notes { get; set; }
}
Generates the following UI:
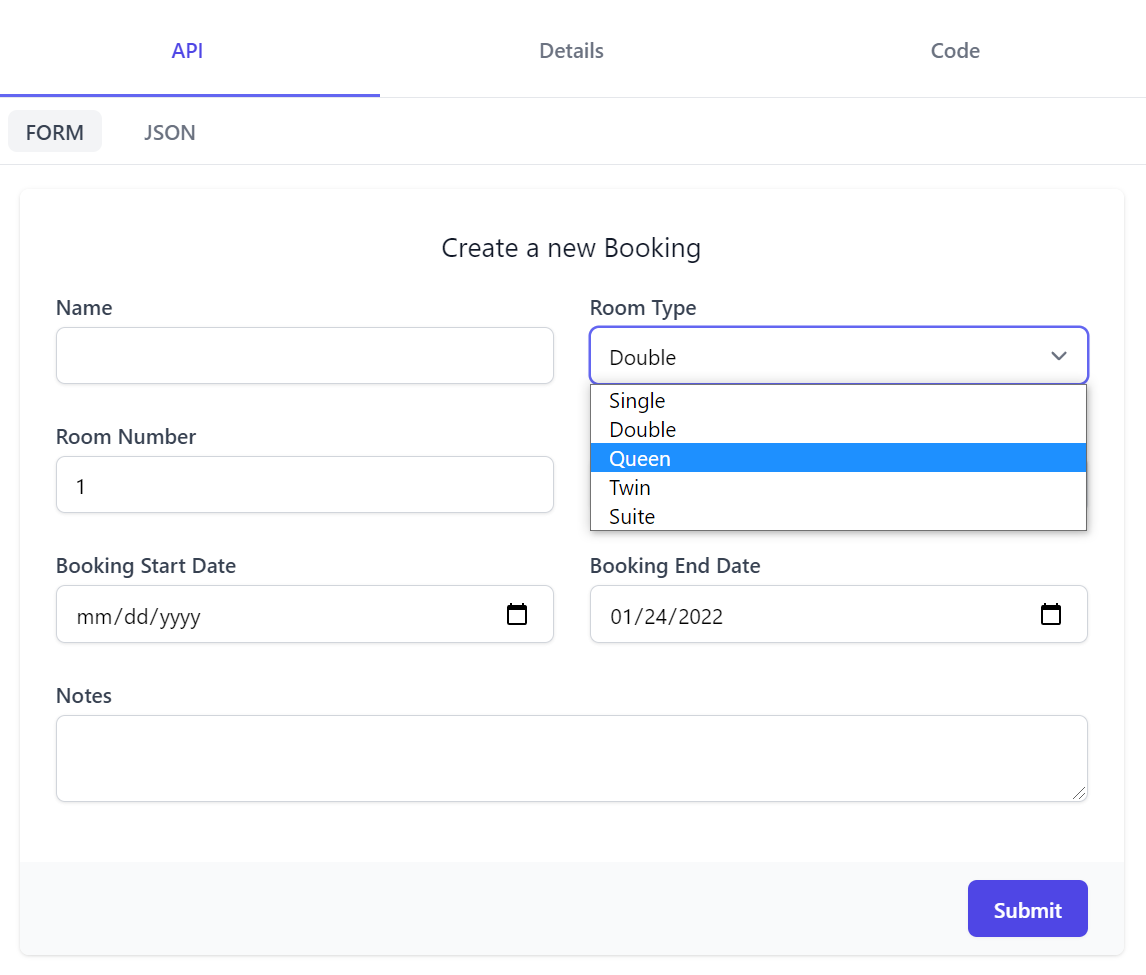
This also shows how we can use the [Input] attribute
to further customize the Input UI control for each property as a declarative alternative to using Input.For<T>() above that the Notes property utilizes to change to use a textarea control instead.
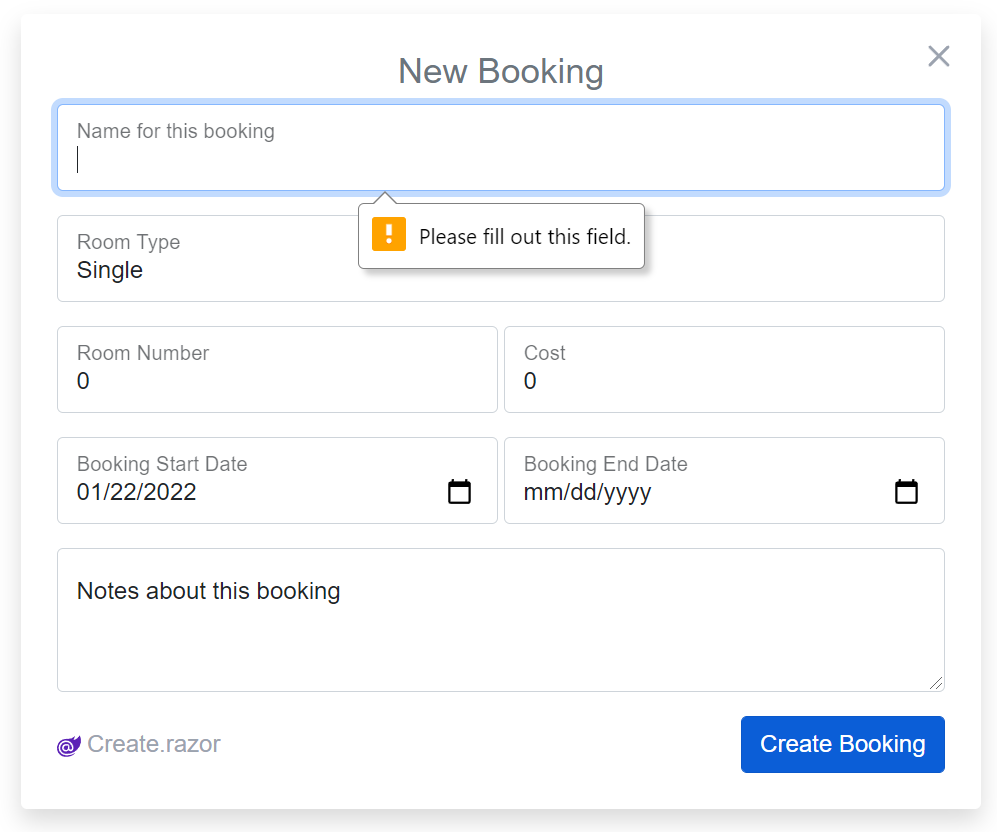
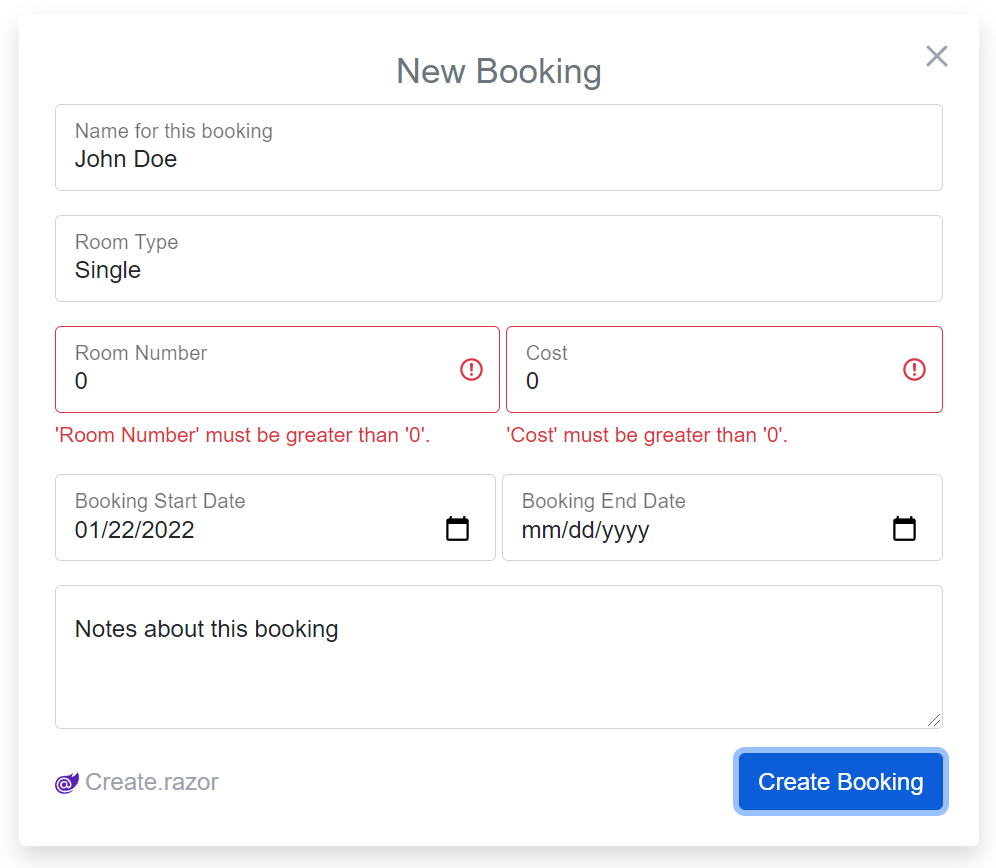
API Form also supports auto binding Argument Exceptions or Fluent & Declarative Validation rules where any validation errors will be contextually displayed next to the invalid property. Here's both the resulting invalid UI & the Error Response DTO that generated it:
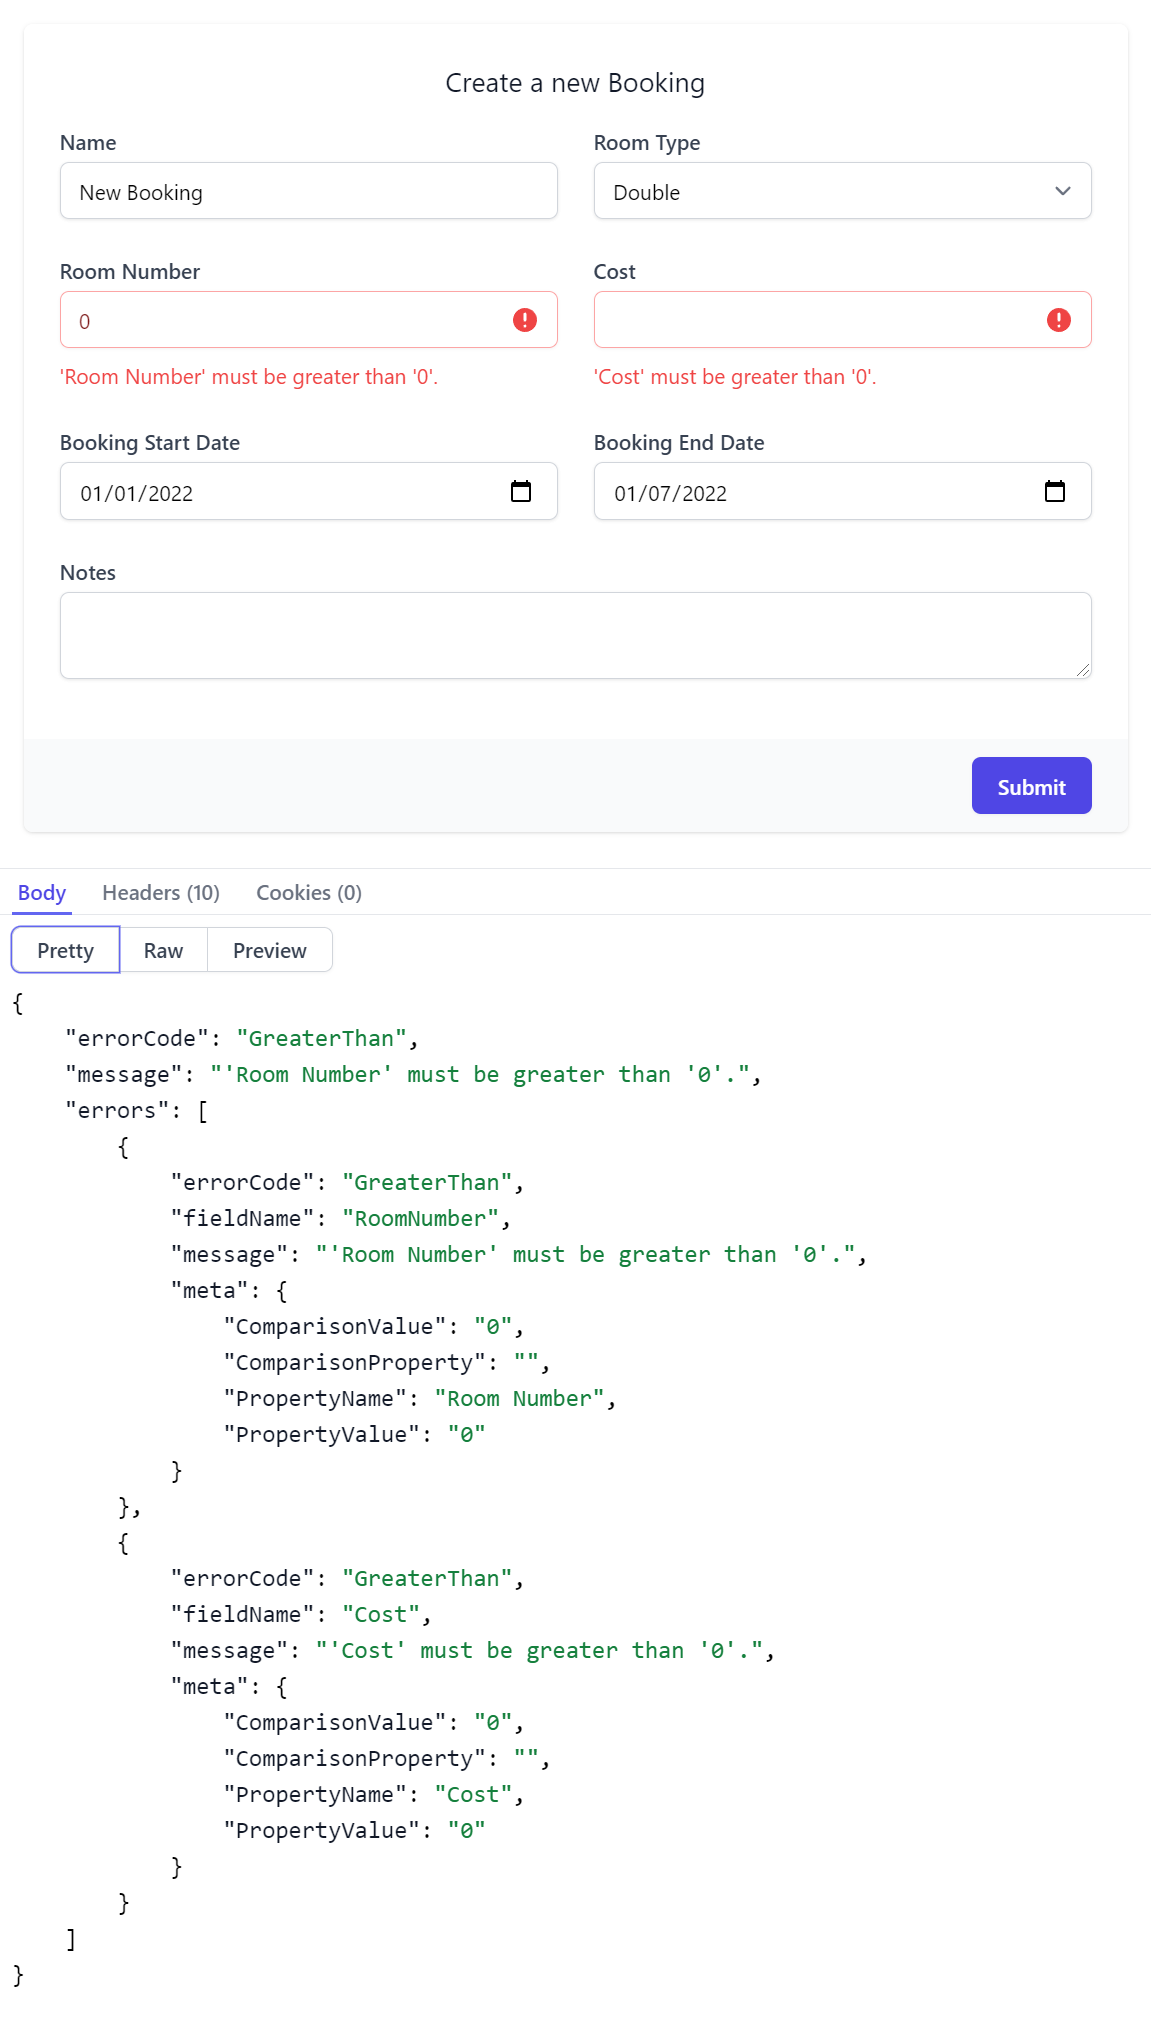
Contextual validation errors is used where possible, otherwise an Error Summary notification is displayed along with the API Response body containing the full API error information.
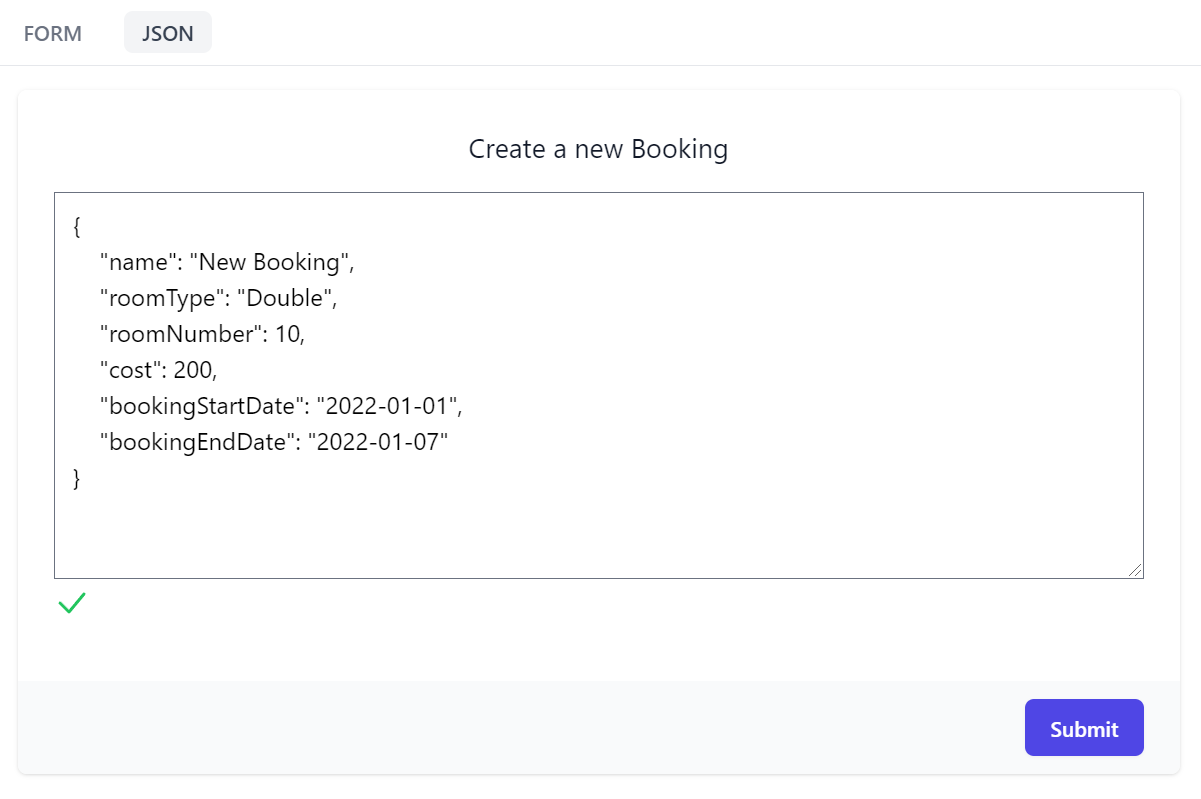
Another useful API form feature is being able to call APIs with a JSON request payload which maintains a 2-way sync with the Form's UI allowing you to quickly cycle between input modes to quickly construct your API request.
Real-time JSON validation is also displayed for added assistance, warning you whenever the JSON is malformed.
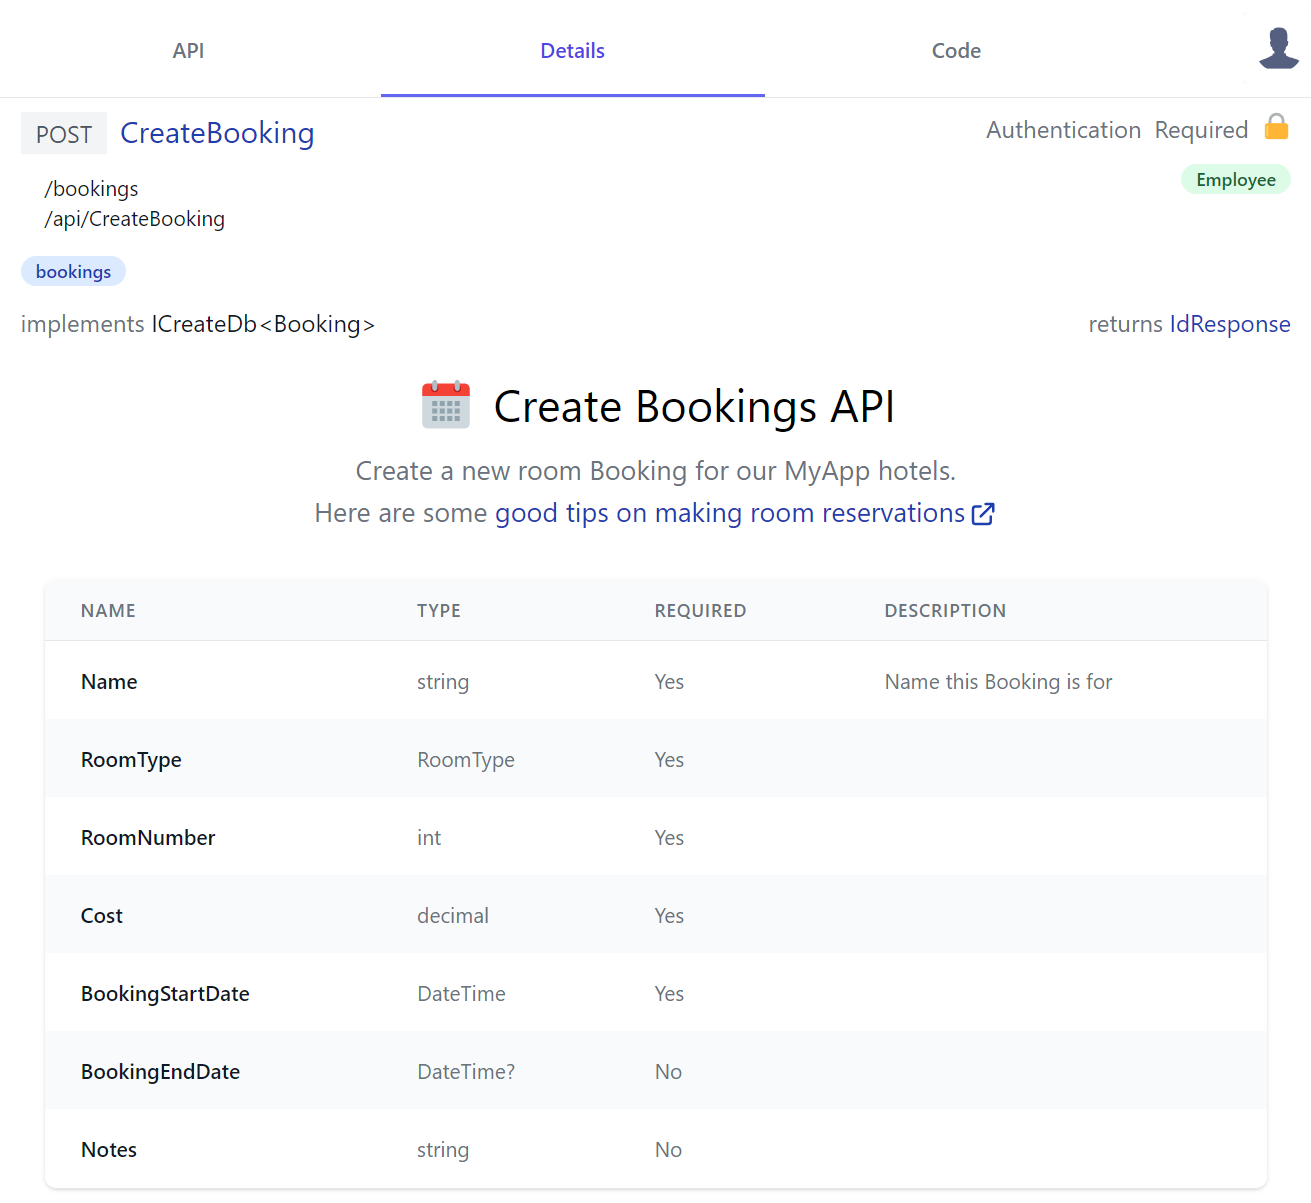
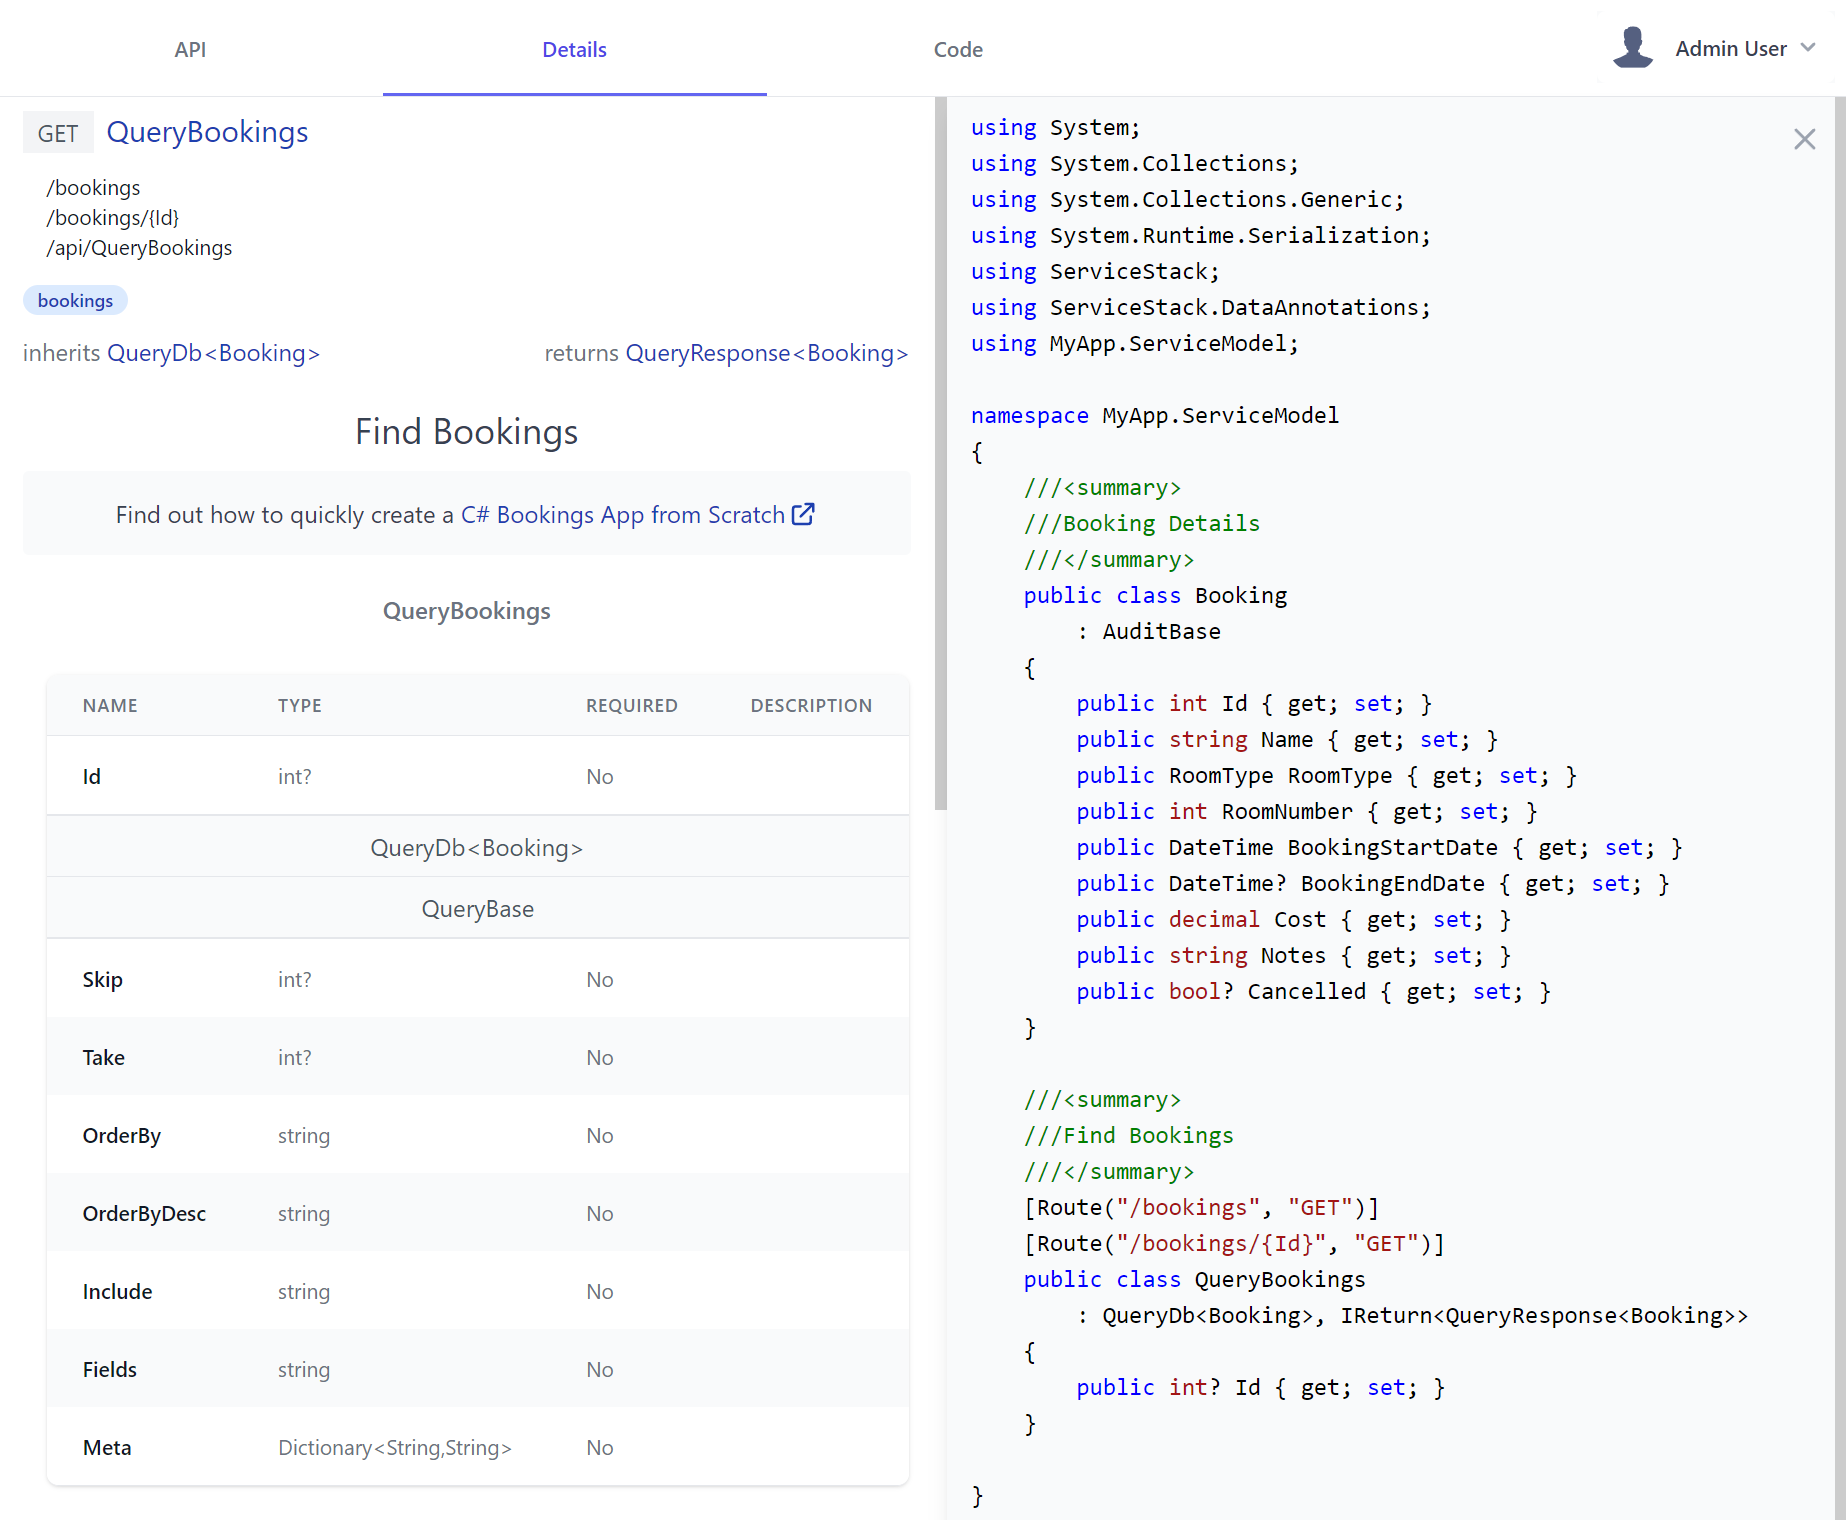
API Details
Moving to Details tab is the place where API consumers would go to learn about each API where it displays all relevant information about the API at a glance. For CreateBooking it shows that:
- POST is the APIs preferred HTTP Method
- List its user-defined and pre-defined routes
- It's a protected API limited to Authenticated Users with the Employee role
- It's categorized in the bookings tag group
- It's an AutoQuery CRUD API implementing
ICreateDb<Booking>indicating it creates entries in the Booking RDBMS Table - It returns an
IdResponsewhich we can intuitively infer returns the new Booking Id for successfully created Bookings
We'll include the CreateBooking DTO again to compare it against the Required column used to document the APIs required properties where we can see the only optional properties are the nullable Value and Reference Types as this Project has #nullable enabled.
public class CreateBooking : ICreateDb<Booking>, IReturn<IdResponse>
{
    [Description("Name this Booking is for"), ValidateNotEmpty]
    public string Name { get; set; }
    public RoomType RoomType { get; set; }
    [ValidateGreaterThan(0)]
    public int RoomNumber { get; set; }
    [ValidateGreaterThan(0)]
    public decimal Cost { get; set; }
    public DateTime BookingStartDate { get; set; }
    public DateTime? BookingEndDate { get; set; }
    [Input(Type = "textarea")]
    public string? Notes { get; set; }
}
INFO
Importantly Required annotations are only documentative, your API still has to validate required reference types like string using your preferred validation method, e.g. Using the [ValidateNotEmpty] declarative attribute, Fluent Validation or manual verification in your Service C# implementation and throwing ArgumentException for invalid properties
Maximum Customizability
Something you don't expect to see in auto generated API docs is the rich custom API Docs that's in the API description which is another example of the high customizability available to enhance API Explorer with custom rich API documentation.
To become the preferred solution to document APIs, API Explorer was designed from scratch to support multiple customization levels that we've already seen glimpses of in the C# defined Form Layouts, enabling both programmatic and declarative customized Input controls.
API Docs Components
We can also further enhance API Explorer with our own custom HTML Components by adding them to your Host projects local /modules folder which the Blazor WASM project template utilizes to showcase some customization examples:
-
/modules
- /ui
- /shared
Where you can enhance any of your APIs or DTOs with rich API docs by adding HTML Components to /modules/ui/docs/*.html which gets included together with API Explorers own components in its single file download. API Explorer is built using petite-vue which is a 6kb subset of Vue optimized for progressive enhancement your components can also take advantage of to enhance it with rich dynamic UIs.
The *.html file names aren't important, to create an API doc component it just needs to be named {Type}Docs. Here's the simple component example
CreateBookingsDocs.html uses to generate its custom UI that just references the id of its <template> UI:
<script>App.components({ CreateBookingDocs: '#create-booking-docs' })</script>
<template id="create-booking-docs">
<div class="text-center my-3">
<div class="flex justify-center">
<svg>...</svg>
<h2 class="text-3xl ml-3 mb-3">Create Bookings API</h2>
</div>
<div class="text-gray-500 text-lg">
<p>
Create a new room Booking for our {{serviceName}} hotels.
</p>
<p>
Here are some
<a class="svg-external text-blue-800" target="_blank"
href="https://edition.cnn.com/travel/article/scoring-best-hotel-rooms/index.html">
good tips on making room reservations
</a>
</p>
</div>
</div>
</template>
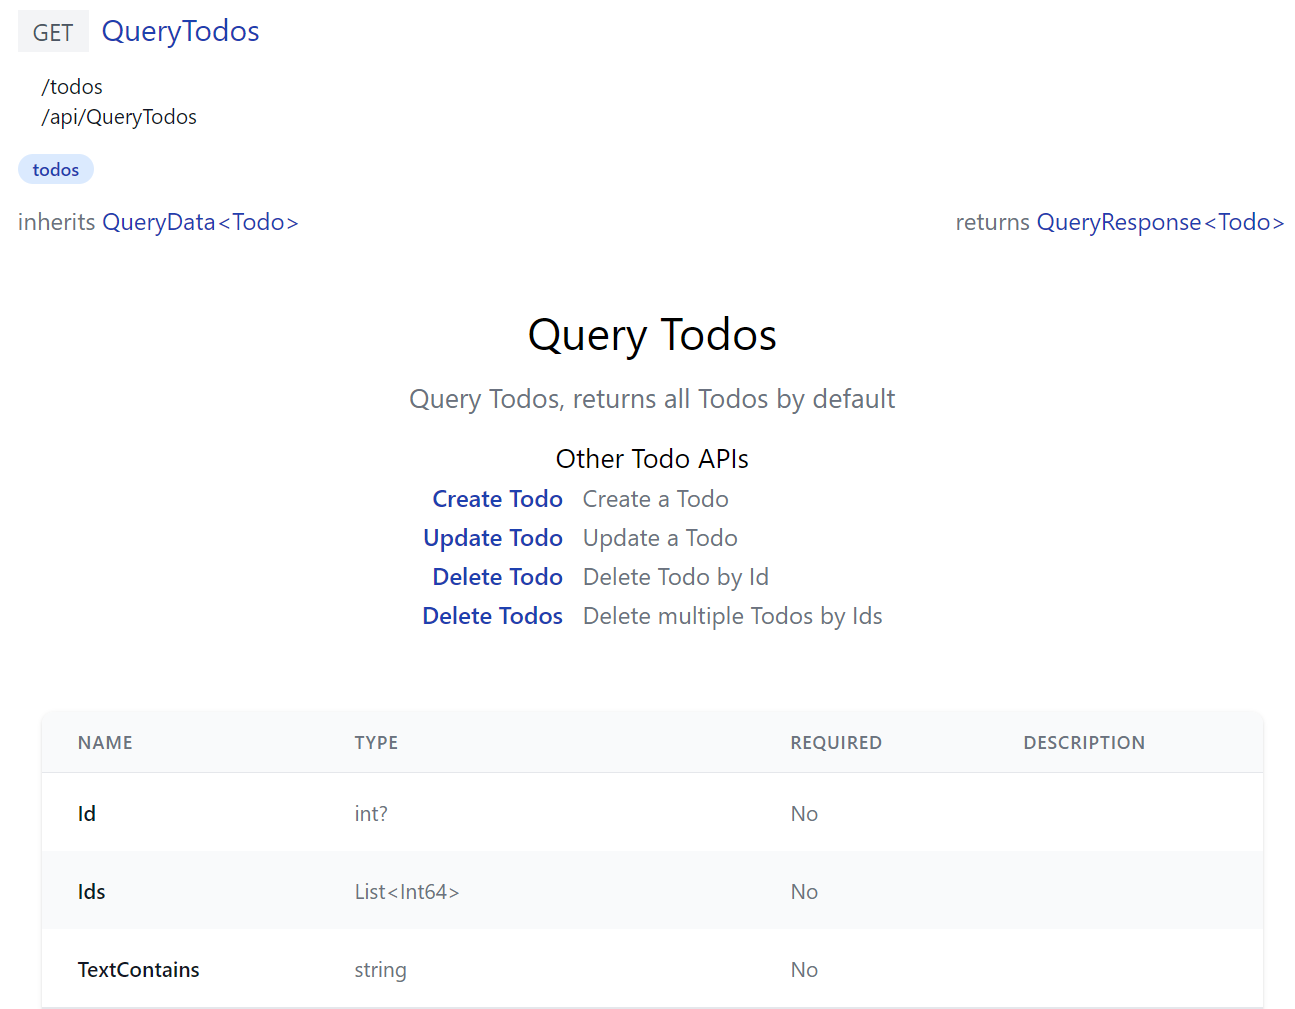
QueryTodos is a more advanced example that generates a dynamic UI shared by all TODO APIs:
<script>
(function (){
let apis = {
QueryTodos: 'Query Todos, returns all Todos by default',
CreateTodo: 'Create a Todo',
UpdateTodo: 'Update a Todo',
DeleteTodo: 'Delete Todo by Id',
DeleteTodos: 'Delete multiple Todos by Ids',
}
let apiNames = Object.keys(apis)
function TodosDocs({ op, store, routes, breakpoints }) {
return {
$template: '#Todos-docs',
get op() { return resolve(op) },
routes,
apis,
get otherApis() { return apiNames.filter(x => x !== this.op.request.name)
.reduce((acc,x) => { acc[x] = apis[x]; return acc }, {}) },
}
}
App.components(apiNames.reduce((acc, x) => { acc[x + 'Docs'] = TodosDocs; return acc }, {}))
})()
</script>
<template id="Todos-docs">
<div class="mx-auto max-w-screen-md text-center py-8">
<h2 class="text-center text-3xl">{{humanize(op.request.name)}}</h2>
<p class="text-gray-500 text-lg my-3">{{apis[op.request.name]}}</p>
<div class="flex justify-center text-left">
<table>
<caption class="mt-3 text-lg font-normal">Other Todo APIs</caption>
<tr v-for="(info,name) in otherApis">
<th class="text-right font-medium pr-3">
<a v-href="{ op:name }" class="text-blue-800">{{humanize(name)}}</a>
</th>
<td class="text-gray-500">{{info}}</td>
</tr>
</table>
</div>
</div>
</template>
To generate its reactive Mini Navigation UI users can use to cycle through all TODO API docs with a v-href="{ op }" custom directive:
API Doc HTML components are injected with the following properties:
op- Operation metadata about your API- store - API Explorer's Reactive object model
- routes - App
usePageRoutesplugin Reactive store to manage its SPA routing - breakpoints - App
useBreakpointsplugin Reactive store used that maintains responsive layout breakpoint properties
Components also have access to the entire functionality in the @servicestack/client library:
- index.d.ts - TypeScript library declaration
- index.ts - Source code implementation
You're also not limited with what's in API Explorer, with full access to HTML you can also import & use any <script> library features.
As we explore differing API Docs requirements we'll document useful functionality available to API doc components, in the meantime you can browse API Explorer's source code or use JavaScript's reflective capabilities to discover what's available, e.g:
[store,routes,breakpoints].map(Object.keys) // available methods & getters on reactive stores
Object.keys(exports)                        // all imported functionality e.g. @servicestack/client + DTOs
Built-in API Docs
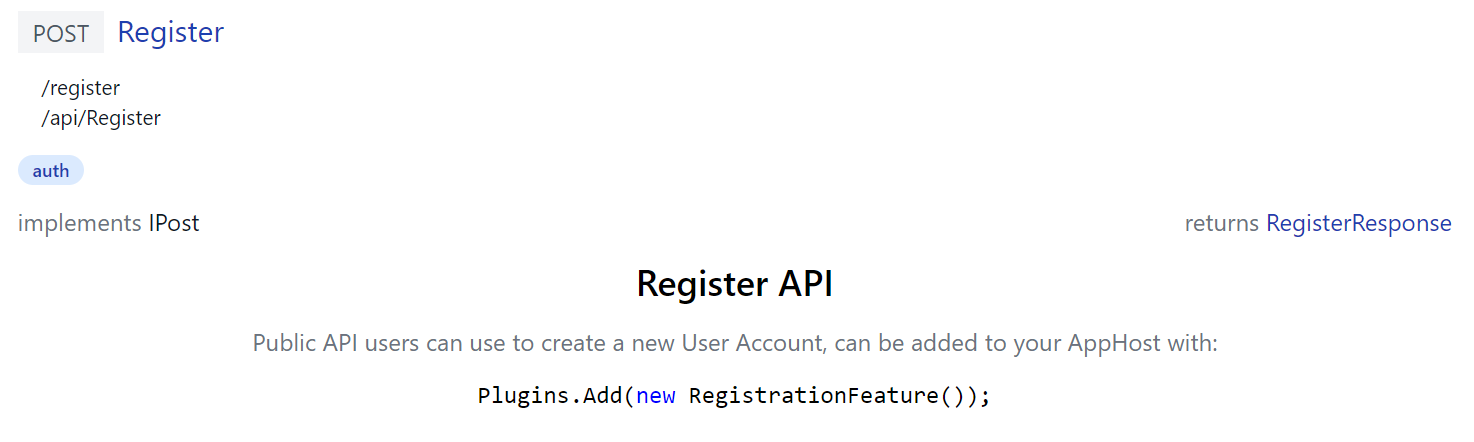
ServiceStack's own built-in APIs uses custom API Doc components itself to document its APIs, e.g. /ui/docs/RegisterDocs.html
<script>App.components({ RegisterDocs:'#register-docs-template' })</script>
<template id="register-docs-template">
<div class="max-w-screen-md mx-auto text-center">
    <h2 class="text-2xl font-medium mb-3">Register API</h2>
    <p class="text-gray-500">
        Public API users can use to create a new User Account, can be added to your AppHost with:
    </p>
    <pre class="my-3"><code v-html="highlight(`Plugins.Add(new RegistrationFeature());`)"></code></pre>
</div>
</template>
Generates docs for the built-in Register API that includes C# Syntax highlighting:
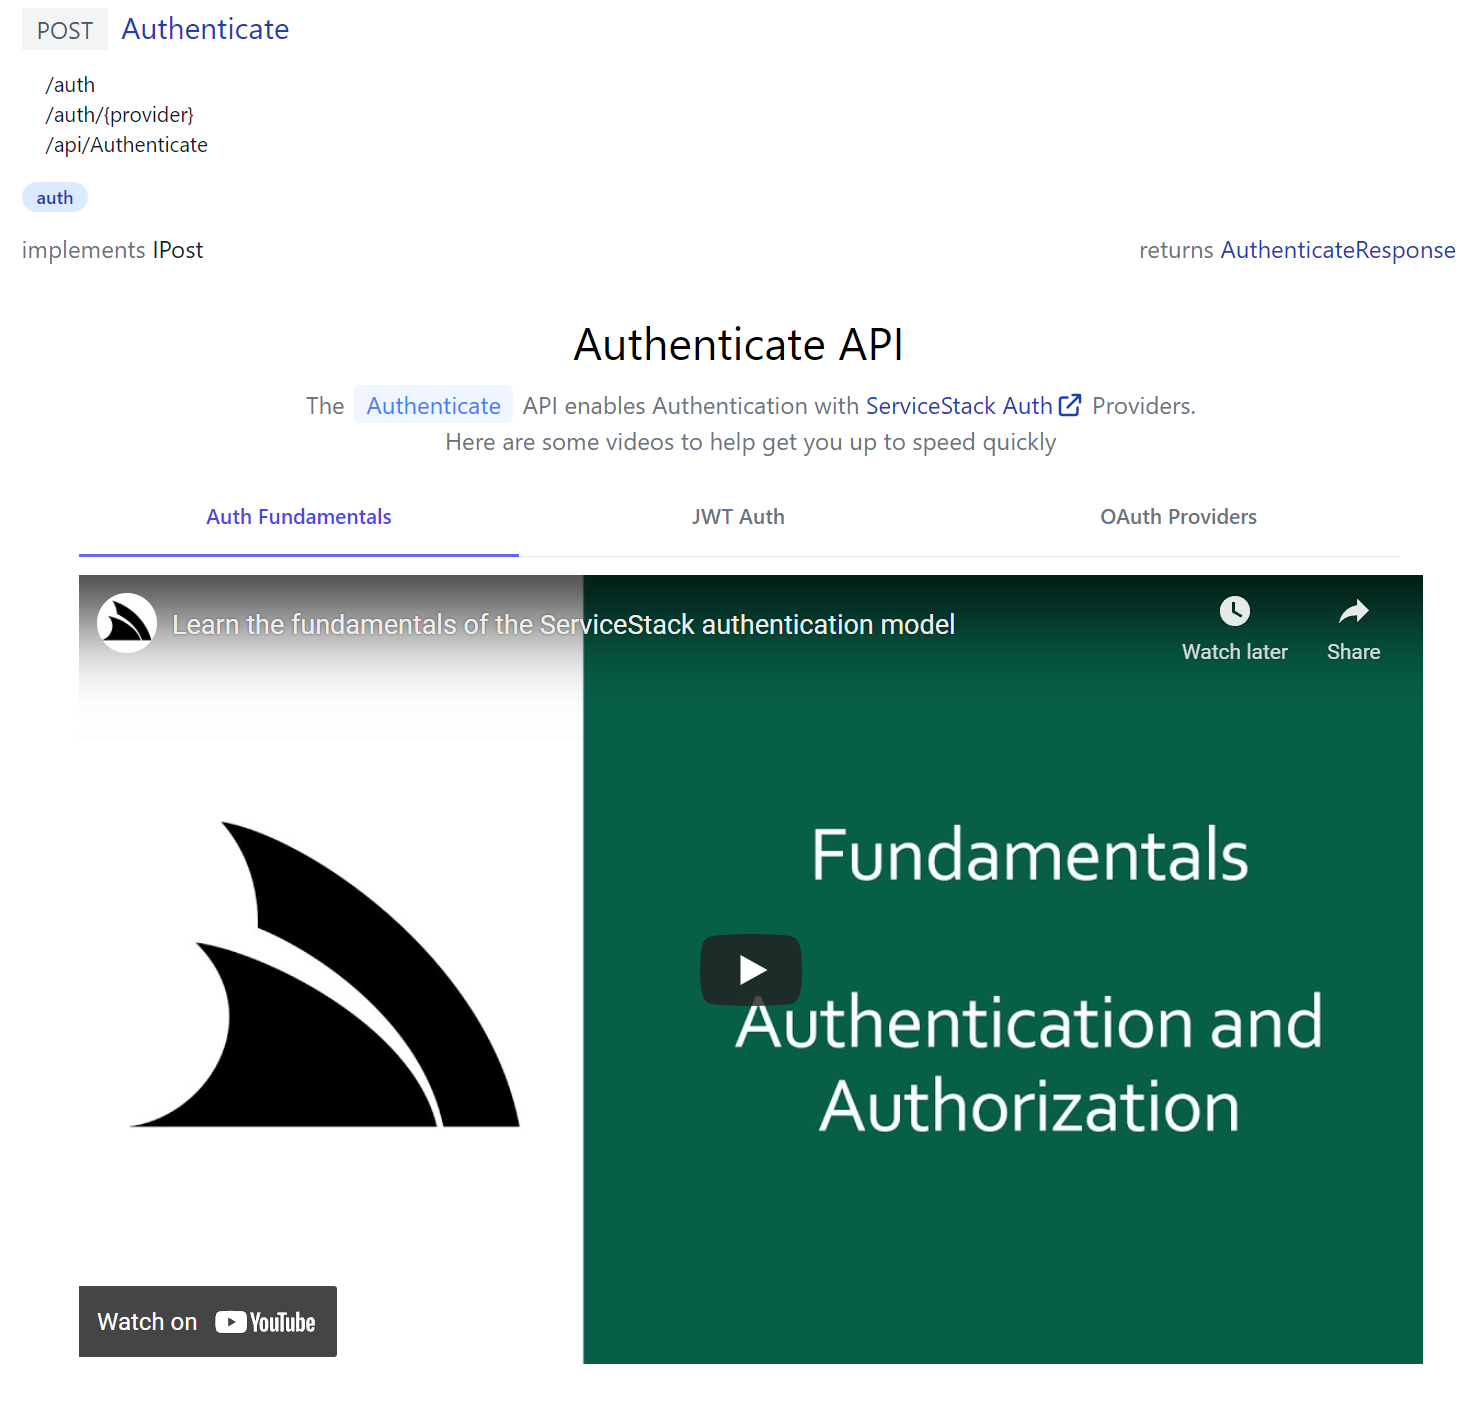
Whilst /ui/docs/AuthenticateDocs.html demonstrates a more advanced example in generating a responsive dynamic tab layout containing multiple relevant ServiceStack Auth YouTube videos:
Fantastic Developer Productivity
You'll also be happy to discover the excellent productivity when contributing API Docs when your App is run with dotnet watch which takes advantage ASP .NET Core's built-in file watcher to enable an instant live reload developer UX.
Counter intuitively making it more productive than API docs added with C# attributes as changes are immediately visible without a restart.
Flexible, Productive & Fast
It's worth noting this flexibility doesn't compromise on runtime performance as all HTML components are returned in a single HTTP Cached (ETag) response, returning a pre-computed Brotli compressed .html file. Another contributing factor to API Explorer's great performance is
petite-vue - its 6kb Vue subset optimized for progressive enhancement promotes optimal HTML practices of defining components in inert <templates> that lazily delays consuming any rendering resources until they're used.
Overriding built-in components
Customization doesn't end there, you're also able to completely replace any of API Explorers built-in components by adding a local file with the same path used in /ServiceStack/modules as Blazor WASM does with its local /modules/shared/Brand.html which overrides the top-right branding navigation for all API Explorer and Admin UIs:
Although a less invasive option if you just want to use your own logo is to configure the UiFeature plugin to override the default BrandIcon as the other Jamstack templates do in their Configure.AppHost.cs:
ConfigurePlugin<UiFeature>(feature => {
    feature.Info.BrandIcon.Uri = "/assets/img/logo.svg";
    feature.Info.BrandIcon.Cls = "inline-block w-8 h-8 mr-2";
});
Custom API Form Layouts
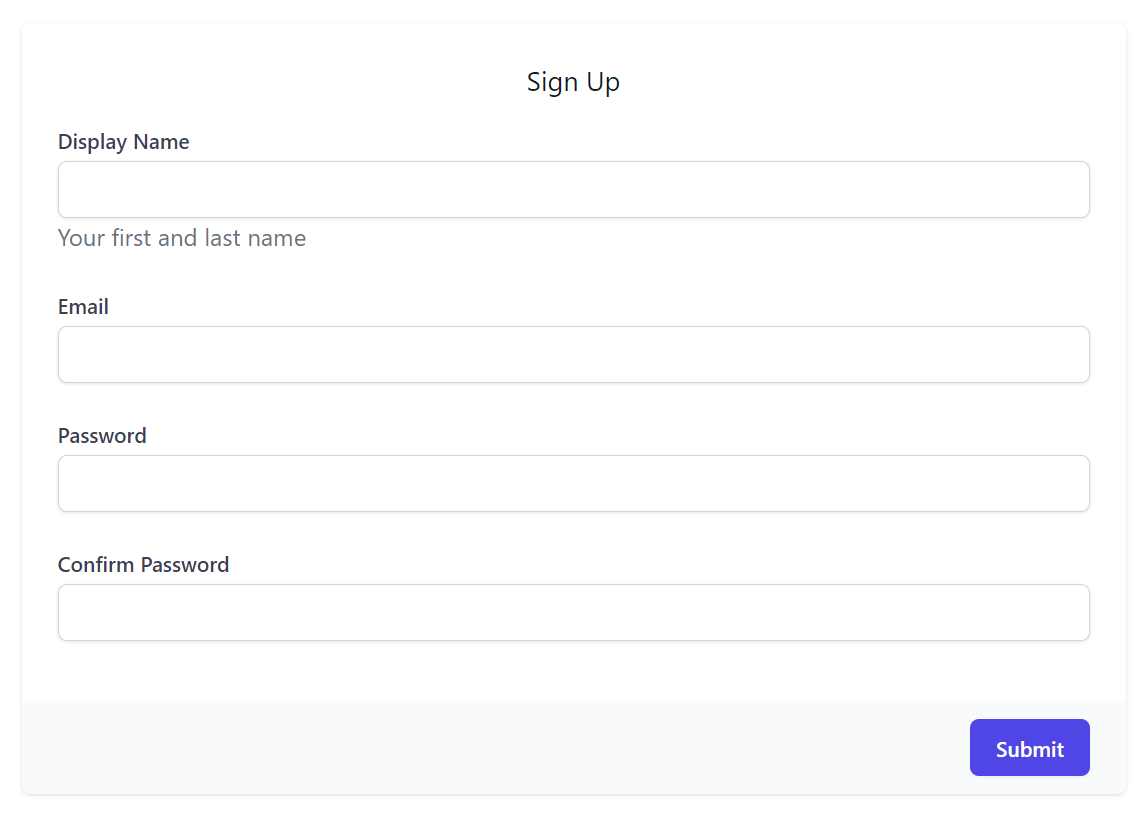
In addition to customizing the Input control used for each property, you're also able to redesign the API form itself by specifying your own FormLayout to use in IAppHost.ConfigureOperation<T>(), e.g. the RegistrationFeature does this to mask its password fields:
appHost.ConfigureOperation<Register>(op => op.FormLayout = new()
{
    new(){ Input.For<Register>(x => x.DisplayName, x => x.Help = "Your first and last name") },
    new(){ Input.For<Register>(x => x.Email, x => x.Type = Input.Types.Email) },
    new(){ Input.For<Register>(x => x.Password, x => x.Type = Input.Types.Password) },
    new(){ Input.For<Register>(x => x.ConfirmPassword, x => x.Type = Input.Types.Password) },
});
Which overrides the default Auto UI Form to use this custom layout:
API Annotations
Whilst the capability of adding rich API Docs is essential when needed, we expect plain C# attributes will often be used to document APIs where [Description] can be used to provide a short summary on a Type and its Properties whilst richer HTML markup can be added to any Type using [Notes]
as done in Bookings.cs:
[Tag("bookings"), Description("Find Bookings")]
[Notes("Find out how to quickly create a <a class='svg-external' target='_blank' href='https://youtu.be/rSFiikDjGos'>C# Bookings App from Scratch</a>")]
[Route("/bookings", "GET")]
[Route("/bookings/{Id}", "GET")]
[AutoApply(Behavior.AuditQuery)]
public class QueryBookings : QueryDb<Booking>
{
    public int? Id { get; set; }
}

[Description("Booking Details")]
[Notes("Captures a Persons Name & Room Booking information")]
public class Booking : AuditBase
{
    [AutoIncrement]
    public int Id { get; set; }
    //...
}
Where it still generates very reasonable API documentation displayed in a human-friendly table layout containing properties of its Request DTO Type and inherited base class properties, starting with the APIs Request DTO followed by all its referenced dependent types - resulting in the details page containing a complete snapshot of all types used in the API:

C# Source Code View
In addition to the human-friendly view, C# devs who prefer it can also click on the Request DTO link, its base class or Response Type to read the API Service contract in its more familiar C# form, where any [Description] annotation also filters down into comments:
API Code
The Code feature was added in our quest of creating an API Explorer all programmers of different language flavors will love which lets developers choose to browse each API contract in their preferred programming language - currently supporting 11 different languages.
We've also made it easy to call your APIs from client Apps, all done the same way for each language, distilled into 3 simple steps:
- Copy your API DTOs
- Copy and install the package containing ServiceStack's generic JSON Service Client
- Copy the initial source code pre-configured to call the API they want
At which point, without any code-gen or build tools, they'll end up with an end-to-end Typed API configured to your APIs endpoint. E.g. this is what it looks like to Python developers utilizing our most recently supported language:
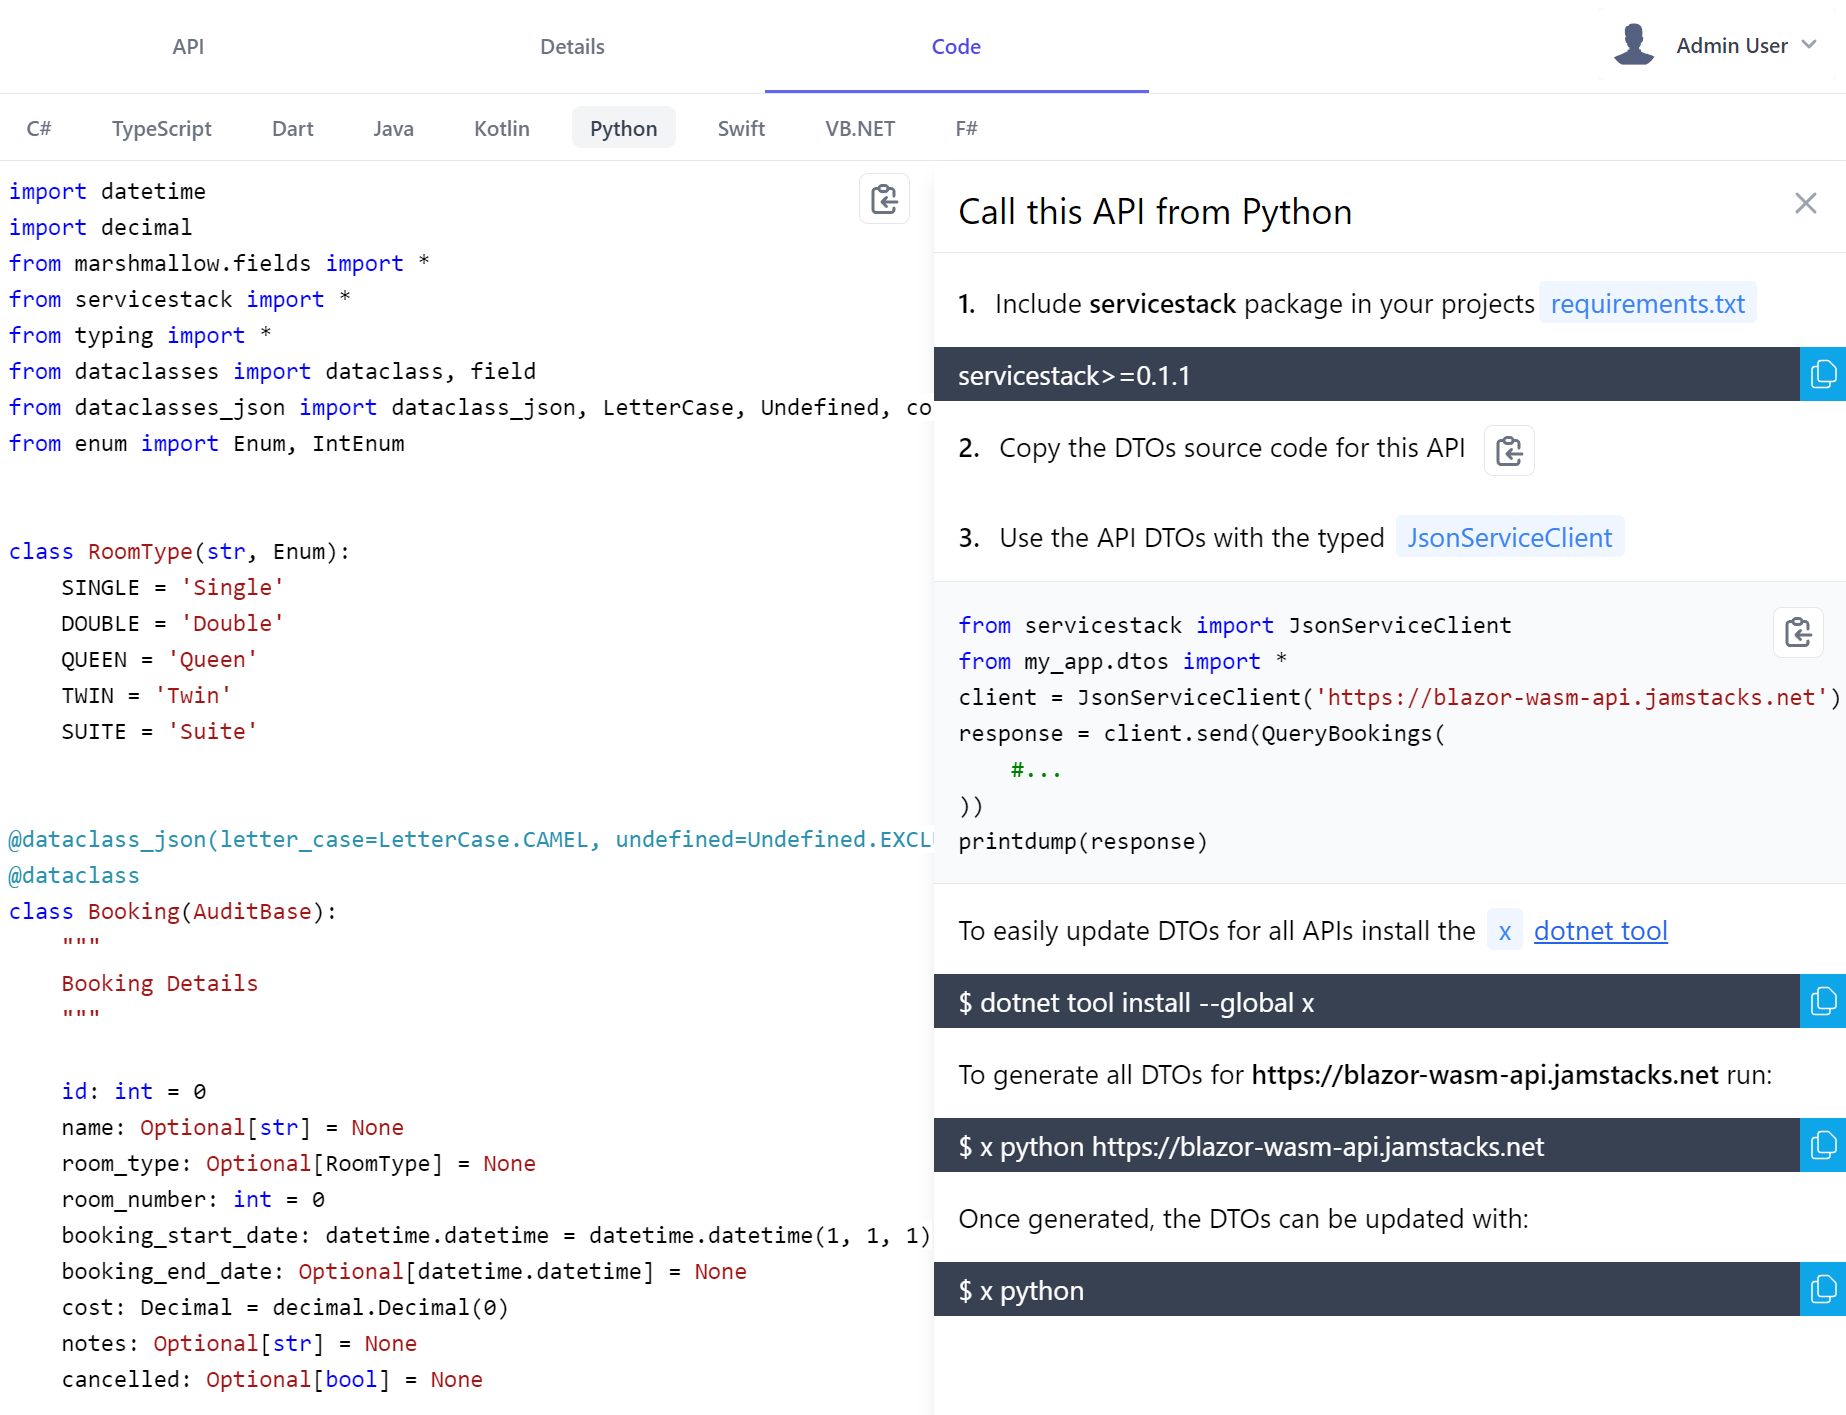
That they can follow to quickly incorporate your API into their existing Apps, in addition Python, C# or F# developers could also copy this source code to their Jupyter Notebooks for an instant typed visual REPL to explore your APIs in their preferred programming language.
Responsive Design
You'll be pleased to learn API Explorer also works great in Smart Phones and Tablets letting you comfortably browse and call APIs on the go, it also means new APIs you check-in late Friday afternoon can be instantly usable by relevant stakeholders on the weekend 🚀

Admin UI
We didn't have any intention of doing it in this release, but as the new Html Modules technology we created to build API Explorer accidentally became the most productive & enjoyable development workflow we've experienced, we were excited to start re-implementing ServiceStack Studio features over in it.
Firstly in order to be able to access Admin functionality we need to enable the relevant protected APIs on our server, currently Admin UI only contains the UI for the Admin Users Feature that can be enabled with:
Plugins.Add(new AdminUsersFeature());
Now after a restart you'll get an instant UI Admin users can use to perform Admin tasks and access protected information at:
/admin-ui
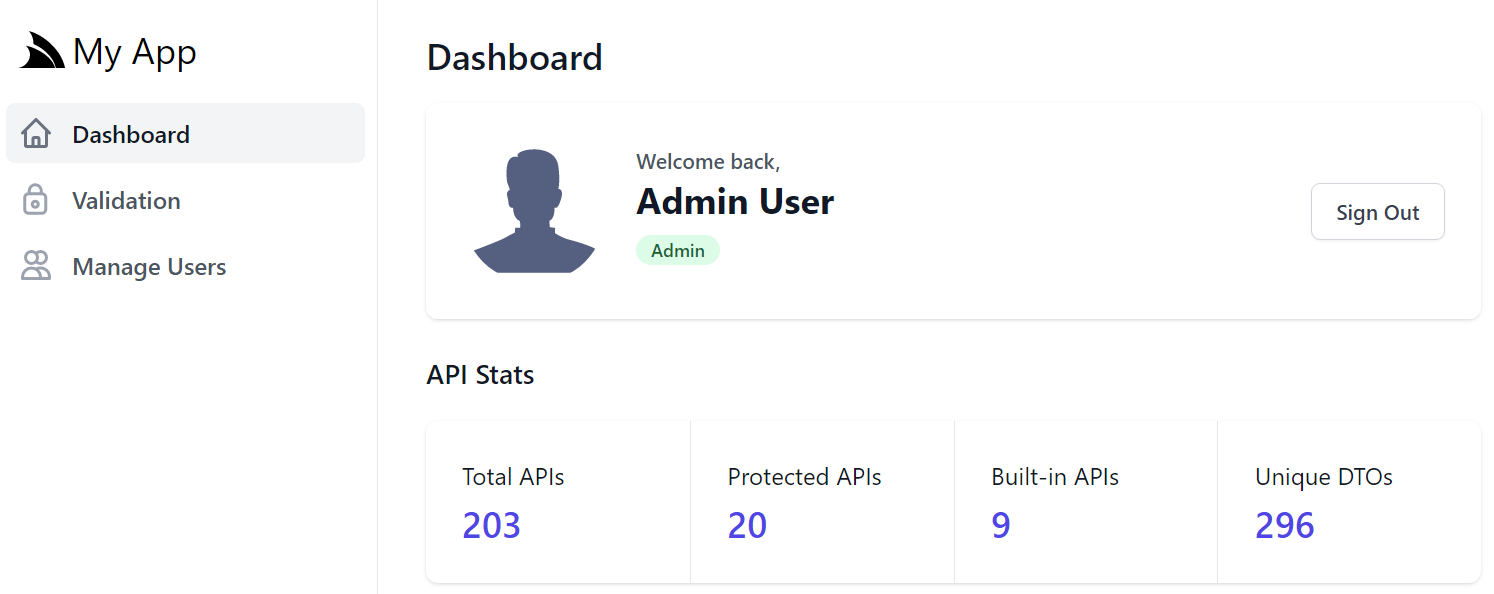
For this v1 release, Dashboard only shows overall stats about your APIs that Admin users can click to navigate between /ui and /admin-ui
Please let us know what relevant stats of your running App and its APIs you would like to see added first 💡
When the plugin is registered, a link to Manage Users will appear in the Sidebar Navigation, Admin UI Home page and role links for the Admin users role in API Explorer.
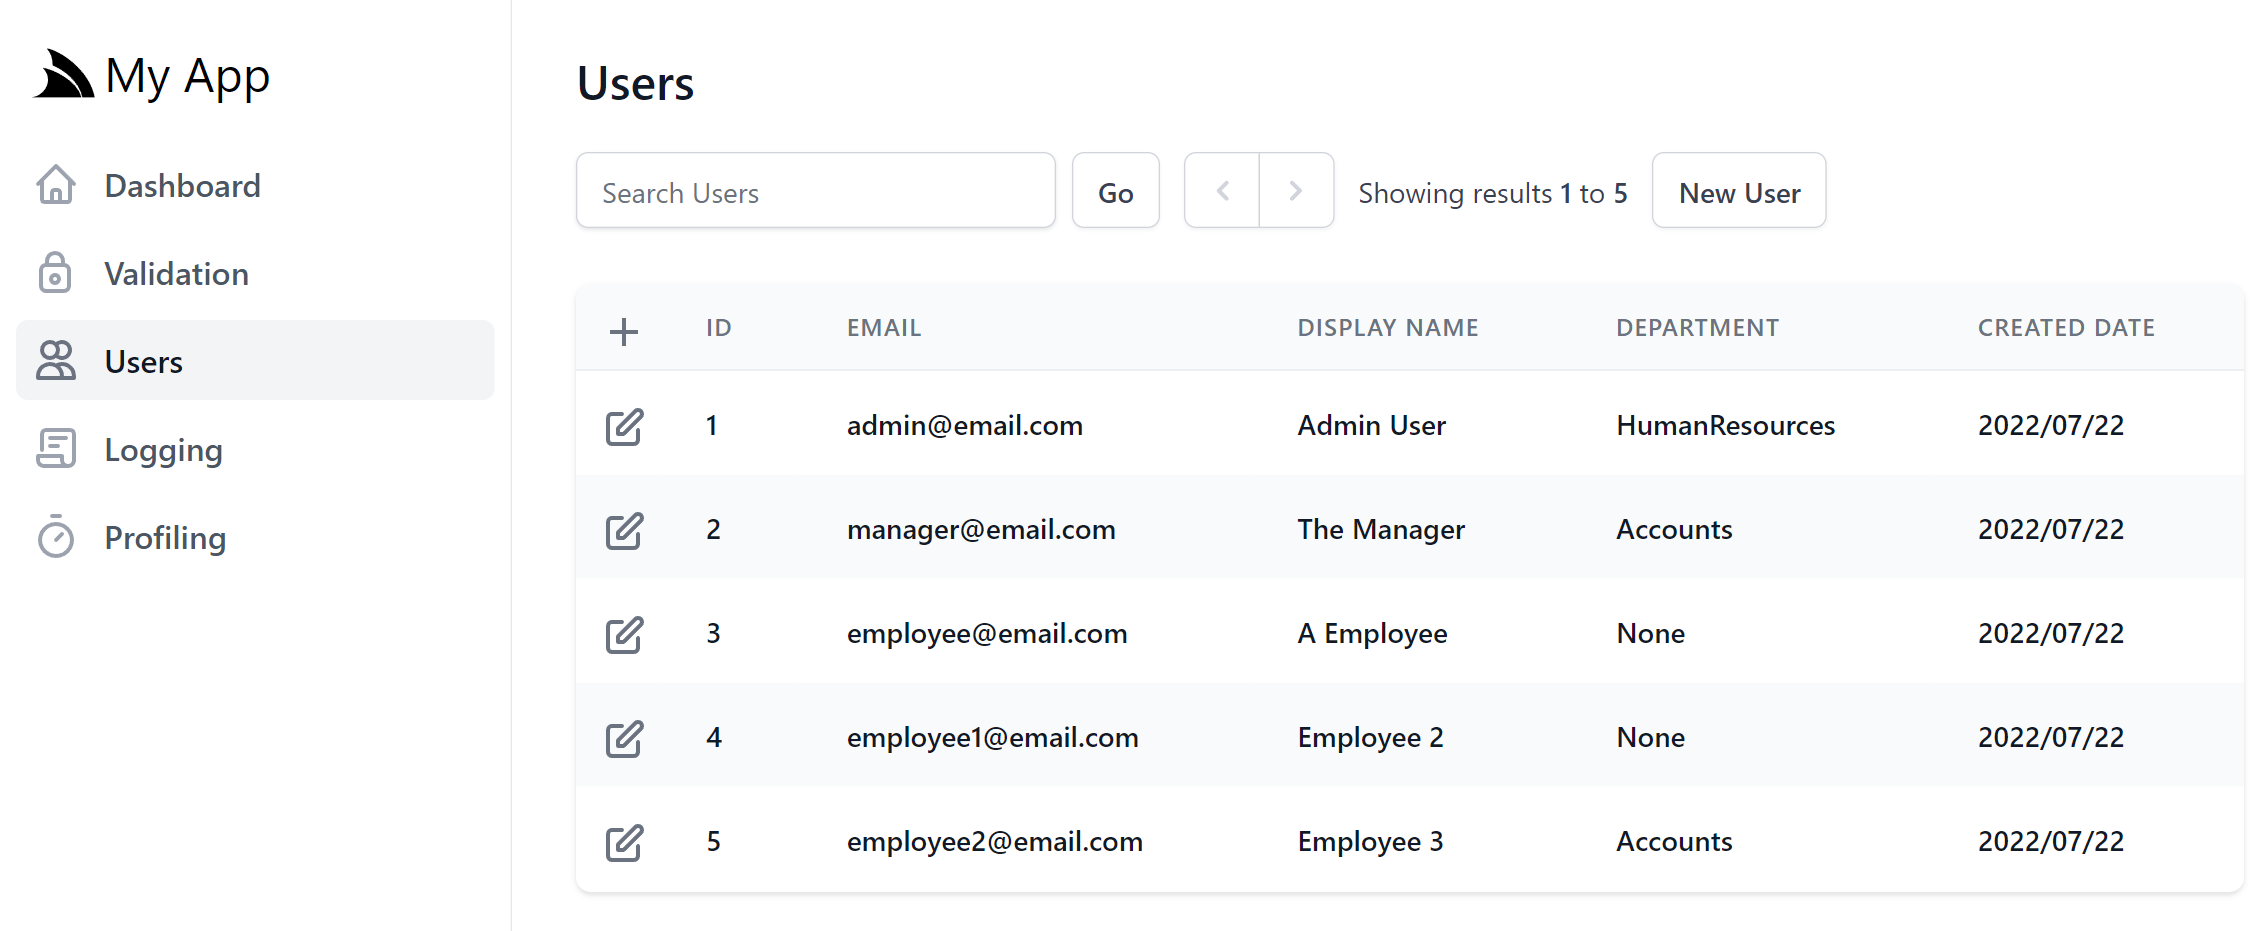
As it shares the same backend configuration and AdminUsersFeature functionality, it's ultimately just an alternative UI implementation of the User Admin feature in ServiceStack Studio and Blazor WASM Admin Users, re-implemented in petite-vue and tailwindcss instead of Blazor WASM and Bootstrap.
The new implementation does gain a few new tricks courtesy of the UI customizability features in this release. By default the Add and Edit Users forms contains the default layout of common properties in UserAuth.cs
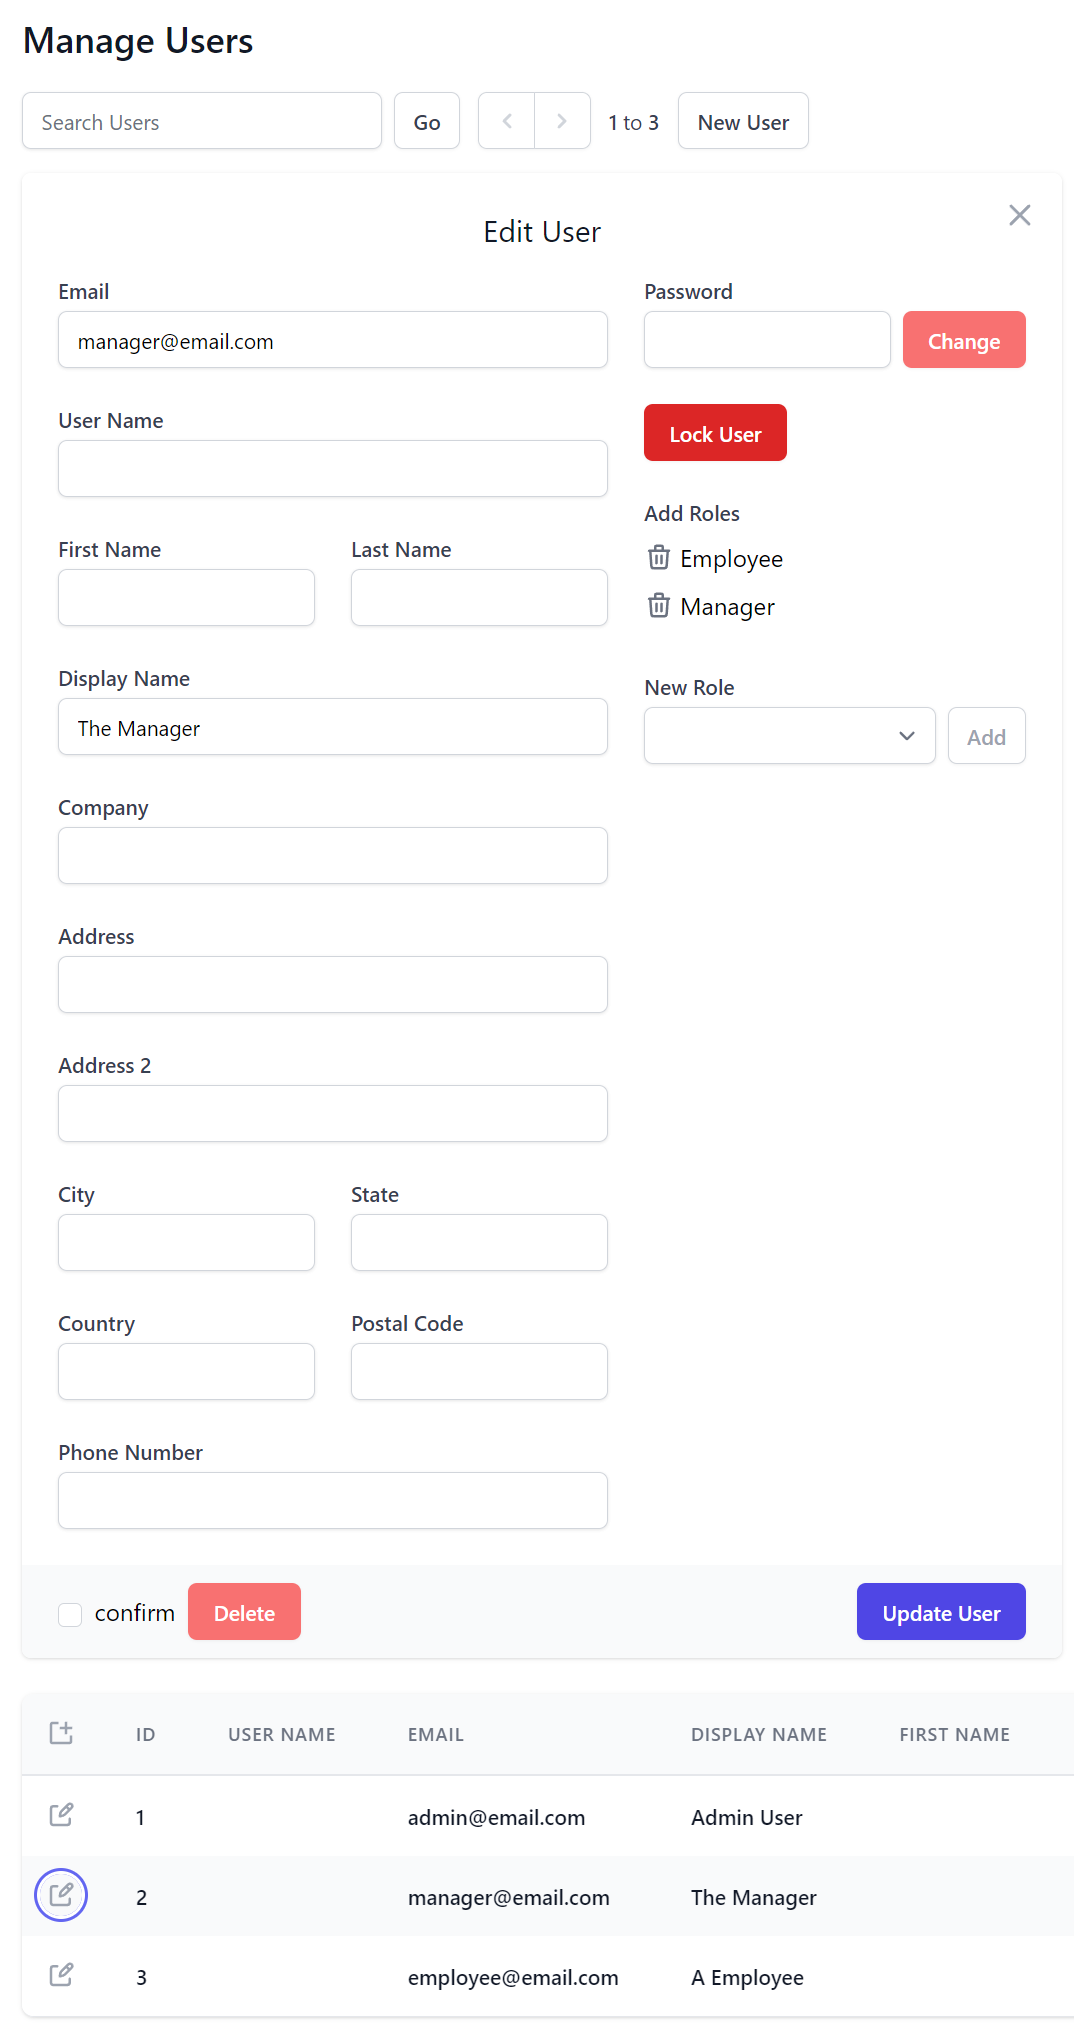
But most Apps will likely prefer their to manage their own alternative custom AppUser data model properties. This can be customized when registering the AdminUsersFeature plugin, e.g. Blazor WASM uses this custom configuration to show alternative form layout and properties in its custom AppUser model:
Plugins.Add(new AdminUsersFeature {

    // Show custom fields in Search Results
    QueryUserAuthProperties = new() {
        nameof(AppUser.Id),
        nameof(AppUser.Email),
        nameof(AppUser.DisplayName),
        nameof(AppUser.Department),
        nameof(AppUser.CreatedDate),
        nameof(AppUser.LastLoginDate),
    },

    // Specify which fields should be displayed and different responsive breakpoints
    QueryMediaRules = new()
    {
        MediaRules.ExtraSmall.Show<AppUser>(x => new { x.Id, x.Email, x.DisplayName }),
        MediaRules.Small.Show<AppUser>(x => x.Department),
    },

    // Add Custom Fields to Create/Edit User Forms
    UserFormLayout = new() {
        new()
        {
            Input.For<AppUser>(x => x.Email),
        },
        new()
        {
            Input.For<AppUser>(x => x.DisplayName),
        },
        new()
        {
            Input.For<AppUser>(x => x.Company),
            Input.For<AppUser>(x => x.Department),
        },
        new() {
            Input.For<AppUser>(x => x.PhoneNumber, c => c.Type = Input.Types.Tel)
        },
        new() {
            Input.For<AppUser>(x => x.Nickname, c => {
                c.Help = "Public alias (3-12 lower alpha numeric chars)";
                c.Pattern = "^[a-z][a-z0-9_.-]{3,12}$";
                c.Required = true;
            })
        },
        new() {
            Input.For<AppUser>(x => x.ProfileUrl, c => c.Type = Input.Types.Url)
        },
        new() {
            Input.For<AppUser>(x => x.IsArchived), Input.For<AppUser>(x => x.ArchivedDate),
        },
    }
});
Where it will display our custom Form Layout in both New User and Edit User UI Forms:
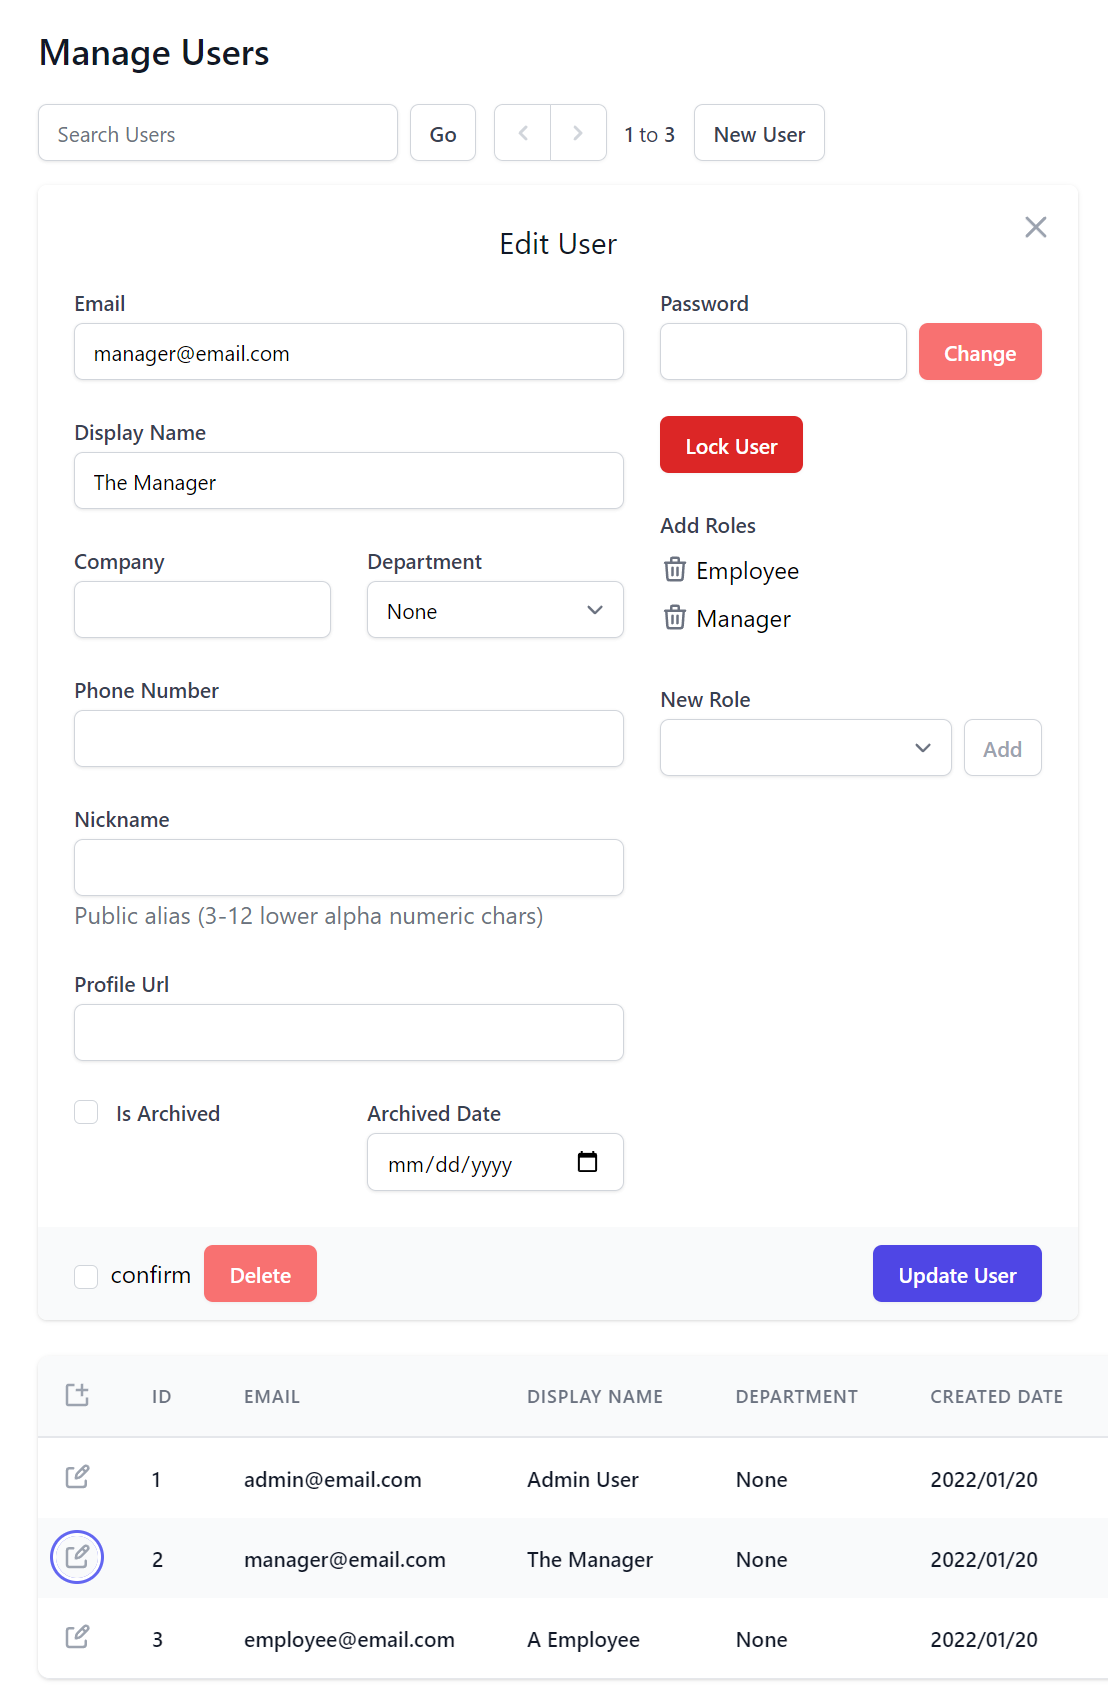
You can also use QueryUserAuthProperties to specify which columns to display in the results view, whilst QueryMediaRules can be used to control which columns start appearing at different responsive UI breakpoints for an optimized layout in smaller devices.
Roadmap
Our immediate goals after this release is to port the remaining ServiceStack Studio features so that /admin-ui becomes the one-stop shop for all Admin UI functionality shipped in ServiceStack. At which point we'll be retiring the ServiceStack Studio Desktop App since having them in Admin UI results greater utility, a faster UI and a much more productive dev model.
HTML Modules
HTML Modules is our accidental super productive UI framework powering API Explorer and Admin UI. Whilst technically at a robust v1 implementation, it requires a significant documentation effort for it to be more widely useful that we're unable to fit in this release.
We'll provide a brief overview of it should it also be of interest and share some learnings on the elements that help make it so productive.
For a good quick overview, you can browse ServiceStack/modules containing the source code of API Explorer and Admin UI.
Back to basics
The overall goal of HTML Modules is effectively to enhance vanilla web development by removing any build steps or obstructions slowing down development.
Unfortunately the biggest productivity killer we've found when developing UIs was rebuilding and restarting .NET projects. Web UI development greatly benefits from fast, iterative instant UI updates that's unfortunately unproductive in C#, so during normal development HTML Modules doesn't make use of any .NET features requiring a restart, leaving dotnet watch rebuilds limited to back-end C# API changes.
HTML Modules optimizes for the 3 different modes in the typical web development lifecycle:
Authoring
It allows developer to maintain source code in an optimal form where they're able to modularize features down into multiple isolated HTML Components and take advantage of rich static analysis and intelli-sense in IDEs by allowing for native JS imports to npm packages, typescript declarations or symbols defined in other .js files, e.g:
import { leftPart } from "@servicestack/client"
import { APP, Authenticate } from "../../lib/types"
import { setBodyClass } from "../../shared/js/core"
This does mean we need some instructions to turn our optimal developer source code into source code our browser can run natively which is done through custom processing instructions. A mistake we made in #Script Pages was using a custom Handlebars template syntax which resulted in a detracted UX from poor syntax highlighting as it wasn't understood natively by IDEs.
For HTML Components, all processing instructions are in HTML, JS or CSS comments, e.g. here's API Explorer instructions importing its HTML components:
<!--shared:Alert,AuthNav,Brand,CloseButton,CopyIcon,CopyLine,Image,Input,Loading,PreviewObject,SignIn,ErrorSummary-->
<!--files:components/*.html-->
<!--files:docs/*.html-->
Where it hand-picks the Shared components to include, then includes all its local HTML & API Docs components, the wildcard import is why API Docs are instantly visible as they're added, as they're automatically included in the pages next reload.
Debug
No opinionated functionality is baked into HTML Modules itself, it's essentially a library for defining your own processing instructions. It does have pre-defined defaults for its built-in features - that are easily be replaced or removed.
E.g. to process the above instructions, it uses the FilesHandler.cs and SharedFolder.cs handlers:
public List<IHtmlModulesHandler> Handlers { get; set; } = new()
{
    new SharedFolder("shared", "/modules/shared", ".html"),
    new FilesHandler("files"),
};
To be able to run in most browsers, we also need to remove all import and export declarations.
Whilst we're at it, lets also support removing debug source code (ala [Conditional]) HTML, JS & CSS comments and any empty new lines:
public static List<HtmlModuleLine> HtmlLineTransformers { get; } = new()
{
    // Enable static typing during dev, strip from browser to run
    new RemoveLineStartingWith(new[]{ "import ", "declare " }, ignoreWhiteSpace:false, Run.Always),
    new RemovePrefixesFromLine("export ", ignoreWhiteSpace:false, Run.Always),
    // Strip debug source code from production
    new RemoveLineEndingWith(new[]{ "/*debug*/", "<!--debug-->" }, ignoreWhiteSpace:true, Run.IgnoreInDebug),
    // Hide dev comments from browser
    new RemoveLineStartingWith("<!---:", ignoreWhiteSpace:true, Run.Always),
    new RemoveLineStartingWith("/**:", ignoreWhiteSpace:true, behaviour:Run.Always),
    // Remove inert empty lines
    new RemoveLineWithOnlyWhitespace(Run.Always),
};
To improve performance, all line processing instructions are performed in a single pass and utilize Span Types for minimal allocations.
Runtime
Each declarative instruction also specifies when it's run, so only the appropriate instructions are run in debug and production outputs.
As efficient outputs are important for end-user UX, there's also pre-registered Minification blocks:
["html"] = new FileTransformerOptions
{
    BlockTransformers = {
        new RawBlock("<!--raw-->", "<!--/raw-->", Run.Always),
        new MinifyBlock("<!--minify-->", "<!--/minify-->", Minifiers.HtmlAdvanced, Run.IgnoreInDebug),
        new MinifyBlock("<script minify>", "</script>", Minifiers.JavaScript, Run.IgnoreInDebug) {
            LineTransformers = FilesTransformer.JsLineTransformers.ToList(),
            Convert = js => "<script>" + js + "</script>",
        },
        new MinifyBlock("<style minify>", "</style>", Minifiers.Css, Run.IgnoreInDebug) {
            Convert = css => "<style>" + css + "</style>"
        }
    }
}
Which you can sprinkle in your .html to minify source code and reduce file size to eek out a bit more performance:
<!--raw-->
    Ignore all other processing instructions and emit as-is
<!--/raw-->
<script minify>
    /* Minify .js in non debug requests */
</script>
<style minify>
    /* Minify .css in non debug requests */
</style>
By default, it uses lightweight JSMin and CSSMin built into ServiceStack.dll, for more advanced minification you can also mix in NUglify.
These instructions are only run once in production builds. By default, it returns a pre-computed compressed response (typically Brotli) for most browsers as well as making use of ETag HTTP Caching to eliminate unnecessary requests & responses.
HtmlModules Overview
There's more features & functionality, but this is a good overview of its goals and how HtmlModules works. You can experience its dev UX now by adding API Doc components to your local ServiceStack project or by modifying the existing API Doc Components in a new blazor.web-templates.io Project template.
Developer productivity tips
Some other generic features and tools we've found to help improve productivity of any project include:
Tailwind
We wanted to give a special shoutout to tailwindcss whose thoughtful constraints, intuitive classes, excellent docs, premium components & utility classes dev model resulted in the most productive css framework we've had the pleasure of using.
We want to highlight, Tailwind isn't just limited to npm projects as all projects can make use of its global tailwindcss CLI tool to set up a watched .css builds for their project as detailed in their Installation Guide.
JSONP
Whilst an old technique, JSONP allows you to perform synchronous I/O operations to force exactly when client App state needs to be available. API Explorer uses this technique to load the API Metadata required to initialize its PetiteVue App and Reactive stores. JSONP also makes it possible to eagerly determine the current authenticated user info.
This prevents UI Yank when displaying multiple Auth states which would've otherwise created jarring UI updates had it waited until the page is loaded before performing the async API Ajax request to fetch the authenticated user information.
<script>
function loadApp(app) { window.APP = app }
function loadAuth(auth) { window.AUTH = auth.responseStatus ? null : auth }
</script>
<script src="/metadata/app?callback=loadApp"></script>
<script src="/auth?callback=loadAuth"></script>
JSONP is supported by default in all ServiceStack APIs by specifying the callback function in the ?callback parameter. A change in v6 making JSONP more useful is that callbacks are also invoked for Error Responses with the APIs Error Response DTO that your callback can check to see if its ResponseStatus property is populated to determine if a user is authenticated or not.
Instant Typed JavaScript DTOs 🚀
Ultimately the key to maximizing productivity is avoiding things that interrupt your dev workflow. Since we use JsonServiceClient for all API requests one area we were still interrupted by was regenerating TypeScript dtos.ts after adding new APIs, as it was the only way to generate typed DTOs for use in the generic JsonServiceClient in both Vanilla JS and TypeScript Apps.
For Vanilla JS Apps typically this means running the x dotnet tool to update dtos.ts, then using TypeScript to compile it to JavaScript:
$ x ts && tsc dtos.ts
While not a great hindrance, it would frequently interrupt our workflow when developing new APIs.
We're happy to announce this is now optional with the new native JavaScript Language support where you can now reference Typed JavaScript DTOs directly from /types/js
Since importing JavaScript doesn't require any tooling or build steps, it greatly simplifies calling ServiceStack APIs from Vanilla JS Apps which all our .NET 6 Empty Project Templates now take advantage of for its now optimal friction-less dev model.
To make typed API Requests from web pages, you need only include /js/require.js containing a simple require() to load CommonJS libraries, /js/servicestack-client.js (production build of @servicestack/client) and /types/js containing your APIs typed JS DTOs - all built-in ServiceStack.
After which you'll have access to full feature-set of the generic JsonServiceClient with your APIs Typed Request DTOs, e.g:
<script src="/js/require.js"></script>
<script src="/js/servicestack-client.js"></script>
<script src="/types/js"></script>

<script>
var { JsonServiceClient, Hello } = exports

var client = new JsonServiceClient()
client.api(new Hello({ name }))
    .then(api => console.log(api.response))
</script>
Using /types/js has the same behavior as using dtos.js generated from $ tsc dtos.ts whose outputs are identical, i.e. both containing your API DTOs generated in CommonJS format. It's feasible to simulate the TypeScript compiler's output in this instance as ServiceStack only needs to generate DTO Types and Enums to enable its end-to-end API, and not any other of TypeScript's vast featureset.
Enhanced Dev Time productivity with TypeScript
Even when no longer using TypeScript DTOs in your Apps, it's still useful to have TypeScript's dtos.ts included in your project (inc. Vanilla JS projects) to serve as optional type annotations enabling rich intelli-sense and static analysis in IDEs that support it, but as it's no longer used at runtime you're free to generate it at optimal times that don't interrupt your dev workflow.
Jamstack
The other flagship feature we're excited to announce in this release are ServiceStack's new Jamstack templates encapsulating the latest technologies at the forefront of modern web development to deliver both a great developer experience and performant end-user UX.
Jamstack (JavaScript, APIs, and Markup) is a modern architecture pattern to build fast, secure and easy to scale web applications where pre-rendering content, enhancing with JavaScript and leveraging CDN static hosting results in a highly productive, flexible and performant system that takes advantage of CDN edge caches to deliver greater performance & efficiency at lower cost.
Jamstack Benefits
It's quickly becoming the preferred architecture for modern web apps with benefits extending beyond performance to improved:
- Security from a reduced attack surface from hosting read-only static resources and requiring fewer App Servers
- Scale with non-essential load removed from App Servers to CDN's architecture capable of incredible scale & load capacity
- Maintainability resulting from reduced hosting complexity and the clean decoupling of UI and server logic
- Portability with your static UI assets being easily capable from being deployed and generically hosted from any CDN or web server
- Developer Experience with major JavaScript Frameworks embracing Jamstack in their dev model, libraries & tooling
Ultimately, it's hosting your App's pre-rendered static UI assets on Content Delivery Network (CDN) edge caches close to users locations that's primarily responsible for its lightning performance.

$0.40 /month
Other by-products of generating pre-computed CDN hostable assets, is interchangeable cost-effective hosting and great SEO - characteristics our Jamstack Demos take advantage of with free UI hosting on GitHub Pages CDN leaving their only cost to host its .NET 6 API back-ends, deployed with SSH in Docker compose containers to a vanilla Digital Ocean droplet costing only $0.40 /month each.
Recommended Templates
These new templates represent the best-in class experiences for their respective React, Vue & Blazor WASM ecosystems each, packed with features & examples common in many websites including Integrated Auth, rich Markdown content as well as TODOs MVC and CRUD examples with built-in contextual validation binding. As such they're now recommended over our existing SPA and C# MVC Templates.
We've put together a quick check list to help decide which templates we'd recommend:
| Project | Recommendation |
|---|---|
| Next.js | If you prefer React |
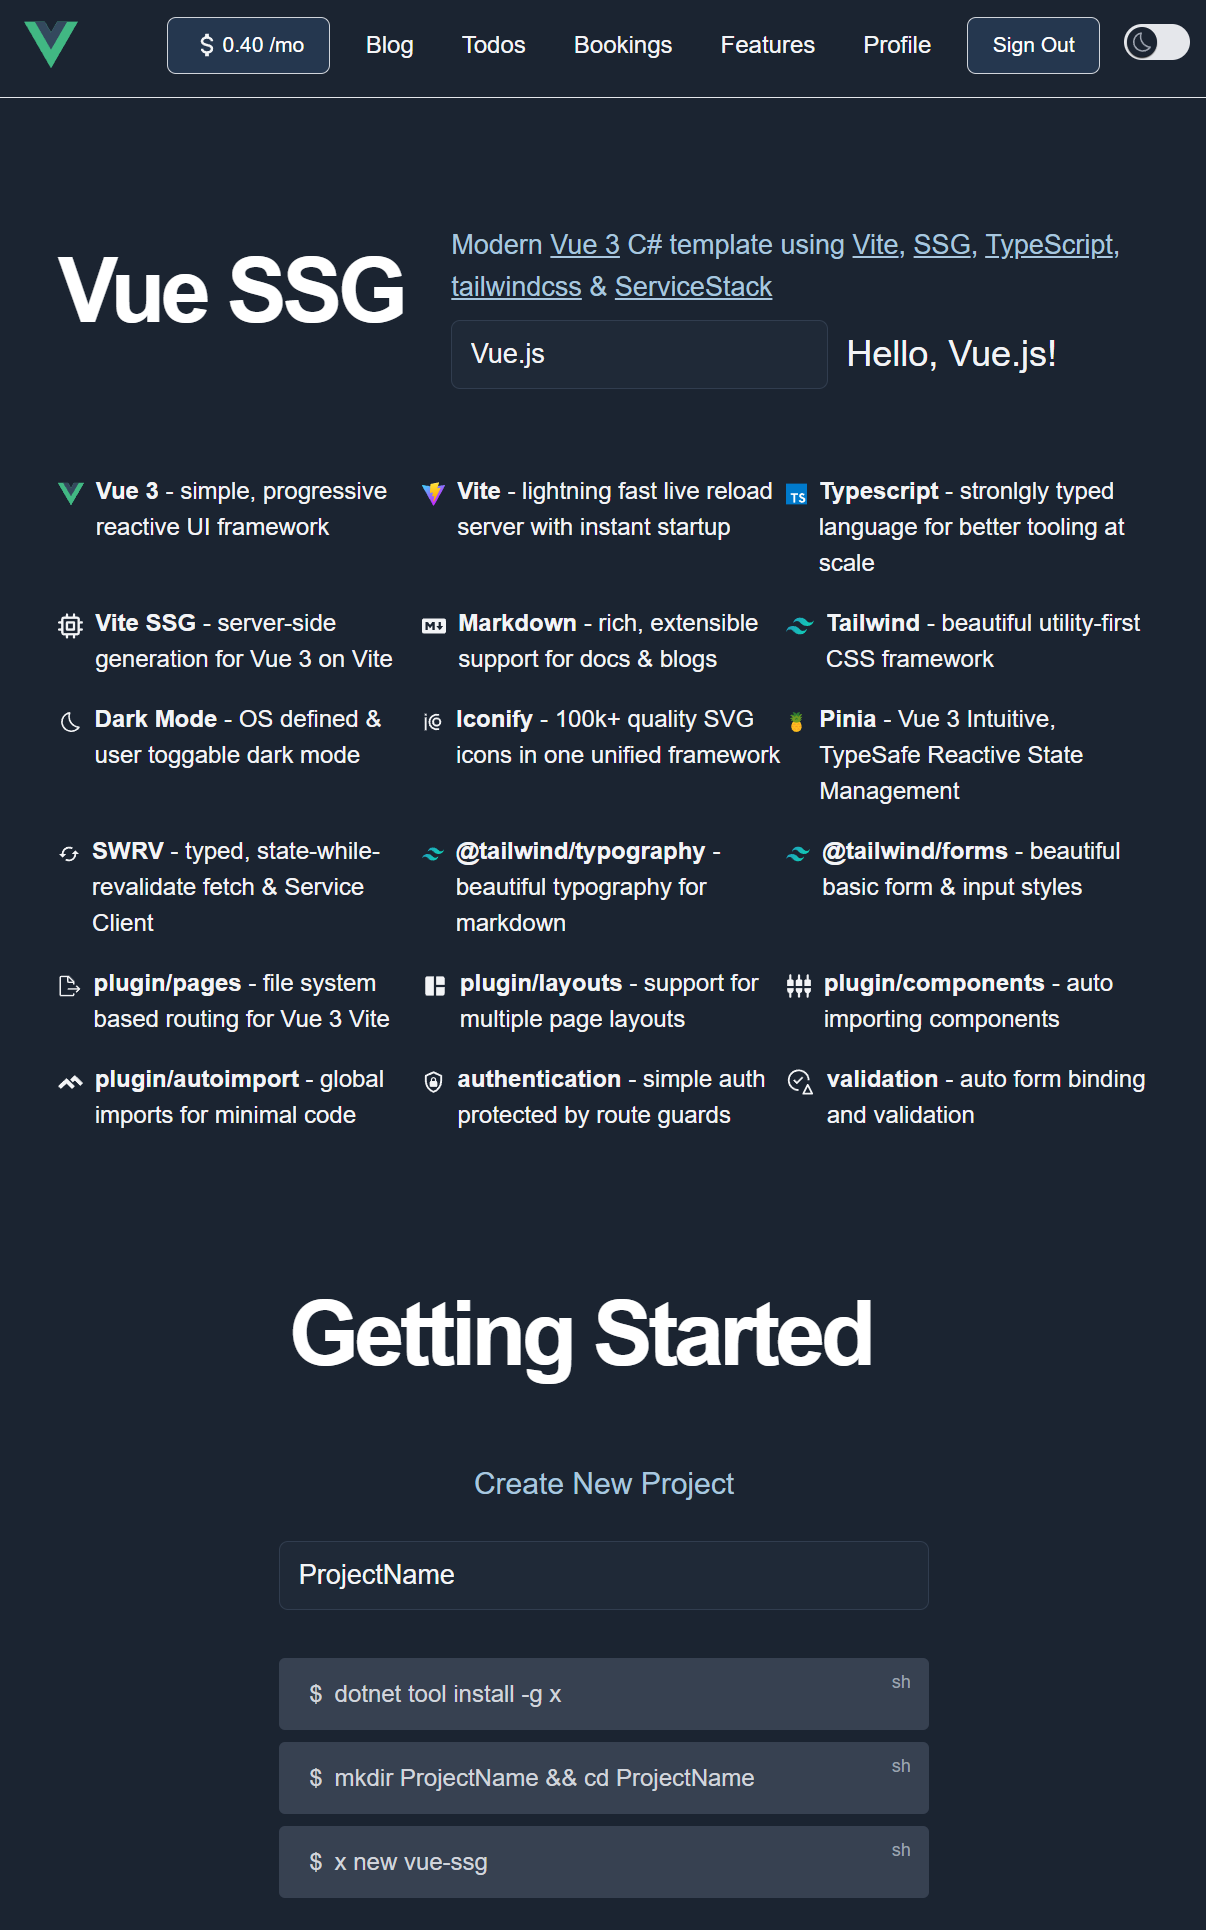
| Vue SSG | If you prefer Vue and SEO is important |
| Vue SPA | If you prefer Vue and happy to trade SEO benefits of SSG for a simpler template |
| Blazor WASM | If you prefer a full C# Stack or are developing Line of Business (LOB) Apps |
Still not sure? familiarize yourself with their respective dev models by comparing their functionality equivalent TODOs MVC Examples:
TODOs MVC
All projects utilize the same back-end ServiceStack Services with TODOs MVC implemented in TodosServices.cs.
As Bookings CRUD is an AutoQuery CRUD API, it defines all its functionality in its declarative Bookings.cs DTOs and serves as a good example for the minimal dev model effort required to implement a typical Authenticated CRUD UI in each framework:
Bookings CRUD
Once you know the framework you wish to use, create a new App using your preferred Project Name below:
Download new C# Jamstack Project Template
INFO
An updated list of available Jamstack project templates is also at https://jamstacks.net (built with Razor SSG)
Pre-configured Jamstack App Deployments
All project templates supports CDN hostable UI assets and include the necessary GitHub Actions that takes care of building and SSH deploying a Docker compose production build of your App to any Linux Host with just a few GitHub Action Secrets in your GitHub repo.
The optional DEPLOY_CDN secret lets you control whether to deploy your App's static /wwwroot assets to your GitHub Pages CDN by specifying the custom domain to use and is what all JamStack Live demos used to deploy a copy of their UIs to GitHub Pages CDN:
| Project Source | GitHub Pages CDN | Digital Ocean Docker .NET API |
|---|---|---|
| nextjs | nextjs.jamstacks.net | nextjs-api.jamstacks.net |
| vue-ssg | vue-ssg.jamstacks.net | vue-ssg-api.jamstacks.net |
| vue-spa | vue-spa.jamstacks.net | vue-spa-api.jamstacks.net |
Blazor WebAssembly
Our new Blazor WebAssembly (WASM) template offers a pure end-to-end integrated C# solution to building a high performance web application with Blazor and ServiceStack. In fact we were so impressed by the integrated dev model we've been able to achieve in Blazor that it's become our preferred technology to use to develop Line of Business Apps since it's the only C# Razor solution adopting our preferred API First Development model with Web UIs reusing the same well-defined APIs as Mobile and Desktop Apps.
Great Perceived Performance and SEO
Typically the large download sizes & slow initial load times of Blazor WASM Apps would make it a poor choice for Internet hosted sites. However, our Blazor WASM template has largely mitigated this with easily maintainable built-in pre-rendering techniques to make every page appear to load quickly, including instant loading of its Markdown Pages courtesy of the GitHub Actions publish task generating & deploying pre-rendered content pages.
ServiceStack.Blazor
The new ServiceStack.Blazor library contains integrated functionality for Blazor including an optimal JSON API HttpClient Factory, API-enabled base components, HTML Utils and Bootstrap & Tailwind UI Input components heavily utilized throughout the template.
Built-in Blazor and Tailwind UI Components
The Built-in UI Components enable a clean & productive dev model and share the same base classes making them functionally equivalent and can easily be swapped when switching CSS frameworks by updating its namespace in your projects _Imports.razor
The Blazor Components in ServiceStack.Blazor v1 include:
| Component | Description |
|---|---|
<TextInput> |
Text Input control for string properties |
<DateTimeInput> |
Date Input control for Date properties |
<CheckboxInput> |
Checkbox Input control for Boolean properties |
<SelectInput> |
Select Dropdown for properties with finite list of values like Enums |
<TextAreaInput> |
Text Input control for large strings |
<DynamicInput> |
Dynamic component utilizing the appropriate above Input controls in Auto Forms |
<AlertSuccess> |
Displaying successful notification feedback |
<ErrorSummary> |
Displaying error summary message when no contextual field validation is available |
INFO
All Input controls support contextual validation of ServiceStack's existing structured Error responses
Themable
Should it be needed, all components are themable by running the included README.ss executable documentation that copies its Razor UI markup locally into your project enabling complete customization of their Entire UI.
Developer Productivity Preview
We're particularly excited about the level of integration & clean productive dev model we've been able to achieve. With ServiceStack's clean separation of ServiceStack's ServiceModel, combined with Blazor enabling C# on the client, we get complete reuse of your APIs shared DTOs as-is to enable an end-to-end Typed API automatically without any tooling or code-gen.
Building on this, the new C# Service Client Api* methods make calling remote ServiceStack APIs even easier than calling a C# method as its returned ApiResult<Response> encapsulates both a typed Error & API Response to eliminate Exception handling as all components can bind directly to its api.Error.
The reusability extends to your APIs typed Request DTOs which components can directly 2-way data bind to, together this allows us to achieve the ultimate dev model most LOB UIs can use to implement the same declarative pattern using only an APIs existing Typed DTOs.
For a preview of what this looks like in action, here's the BookingsCrud/Create.razor used to Create Bookings:
@attribute [Authorize(Roles="Employee")]
@inherits AppAuthComponentBase

<form @onsubmit="_ => OnSubmit()" @onsubmit:preventDefault
     class=@CssUtils.ClassNames("relative shadow rounded p-4",@class)>
<CascadingValue Value=@api.Error>
    <button type="button" class="close" @onclick="close"><i></i></button>

    <h1 class="fs-4 text-secondary text-center">
        New Booking
    </h1>

    <ErrorSummary Except=@VisibleFields />

    <div class="mb-3 form-floating">
        <TextInput @bind-Value="request.Name" required placeholder="Name for this booking" />
    </div>

    <div class="mb-3 form-floating">
        <SelectInput @bind-Value="request.RoomType" Options=@(Enum.GetValues<RoomType>()) />
    </div>

    <div class="d-flex">
        <div class="mb-3 flex-fill form-floating me-1">
            <TextInput type="number" @bind-Value="request.RoomNumber" min="0" required />
        </div>

        <div class="mb-3 flex-fill form-floating">
            <TextInput type="number" @bind-Value="request.Cost" min="0" required />
        </div>
    </div>

    <div class="d-flex">
        <div class="mb-3 flex-fill form-floating me-1">
            <DateTimeInput @bind-Value="request.BookingStartDate" required />
        </div>

        <div class="mb-3 flex-fill form-floating">
            <DateTimeInput @bind-Value="request.BookingEndDate" />
        </div>
    </div>

    <div class="mb-3 form-floating">
        <TextAreaInput @bind-Value="request.Notes" placeholder="Notes about this booking" style="height:6rem" />
    </div>

    <div class="d-flex justify-content-between align-items-center">
        <div>
            <button type="submit" class="btn btn-primary">Create Booking</button>
        </div>
    </div>
</CascadingValue>
</form>

@code {
    [Parameter] public EventCallback<IdResponse> done { get; set; }
    [Parameter] public string? @class { get; set; }

    CreateBooking request = new()
    {
        BookingStartDate = DateTime.UtcNow,
    };

    string[] VisibleFields => new[]{
        nameof(request.Name), nameof(request.RoomType), nameof(request.RoomNumber), nameof(request.BookingStartDate),
        nameof(request.BookingEndDate), nameof(request.Cost), nameof(request.Notes),
    };

    ApiResult<IdResponse> api = new();

    async Task OnSubmit()
    {
        api = await ApiAsync(request);

        if (api.Succeeded)
        {
            await done.InvokeAsync(api.Response!);
            request = new();
        }
    }

    async Task close() => await done.InvokeAsync(null);
}
Which binds directly to the CreateBooking Request DTO:
[Tag("bookings"), Description("Create a new Booking")]
[Route("/bookings", "POST")]
[ValidateHasRole("Employee")]
[AutoApply(Behavior.AuditCreate)]
public class CreateBooking : ICreateDb<Booking>, IReturn<IdResponse>
{
    [Description("Name this Booking is for"), ValidateNotEmpty]
    public string Name { get; set; }
    public RoomType RoomType { get; set; }
    [ValidateGreaterThan(0)]
    public int RoomNumber { get; set; }
    [ValidateGreaterThan(0)]
    public decimal Cost { get; set; }
    public DateTime BookingStartDate { get; set; }
    public DateTime? BookingEndDate { get; set; }
    [Input(Type = "textarea")]
    public string? Notes { get; set; }
}
To initially render this form:
Whose [ValidateNotEmpty] declarative validator even filters down to the client Input UI to prevent unnecessary invalid API requests:
And what contextual validation of server error responses looks like:
Clean Dev Model
Some other things to note is that it just uses the standard <form> element given its clean dev model doesn't require any magic behavior, as api.Error responses can be passed directly to each control or in this case uses Blazor's built-in <CascadingValue Value=@api.Error> to cascade it to child components controls that can make use of it.
Integrated Auth
It uses the templates included AppComponentBase which integrates with Blazor's Auth model allowing it to use its standard [Authorize(Roles="Employee")] attributes and provides easy access to the Authenticated User's info populated from Secure; HttpOnly JWT Cookies for secure stateless client Authentication that works across App deployments and without any server infrastructure.
Public pages can inherit AppComponentBase to access ServiceStack.Blazor's BlazorComponentBase and get access to JsonApiClient dependency and related functionality.
AutoQuery CRUD Example
Incidentally, whilst not affecting the above dev model, as CreateBooking is an AutoQuery CRUD Request DTO, it works without a server implementation as it uses the default (and overridable) implementation generated by AutoQuery.
Learn more
To find out more about our exciting new Blazor support watch its YouTube overview & explore locally with a new Blazor App.
Next.js
For those preferring working with React, there's a clear choice in Nextjs.org - currently the flagship & most popular Jamstack framework backed by the folks over at Vercel, where it enjoys deep engineering talent committed to maintaining and continually improving it, so you can be confident in the longevity of the technology and the React framework maintained by Meta (Facebook).

Designed as an SSG framework from the start, its pre-defined patterns include static generation and UX focused functionality built-in.
Stale While Revalidate
Its SWR Data Fetching React Hooks library is one innovative example utilizing the popular stale-while-revalidate UX pattern to help developers balance between immediacy — loading cached content right away — and freshness — ensuring updates to the cached content are used in the future.
To take advantage of this, the nextjs template includes a swrClient that provides a typed wrapper for making typed SWR API Requests with ServiceStack's generic JsonServiceClient:
import { swrClient } from "../lib/gateway"
import { Hello } from "../lib/dtos"

const HelloApi = ({ name }) => {
  const {data, error} = swrClient.get(() =>
    new Hello({ name }))
  if (error) return <div>{error.message}</div>
  return <div>{data?data.result:'loading...'}</div>
}
This reactively sets up the UI to handle multiple states:
loading- displays loading... message whilst API request is in transitdata- when completed, populated with aHelloResponseand displayederror- when failed, populated withResponseStatusand displayed
The primary UX benefits are realized when re-making an existing request in which a locally-cached stale version is immediately returned and displayed whilst a new API Request is made behind the scenes, updating the UI if the fresh response was modified.
Vite
Despite Vercel's full-time resources, Next.js is still reliant on the Webpack ecosystem, who although have done a formidable job managing complex tooling requirements for npm projects over a number of years, has since lost the Developer Experience (DX) crown to vitejs.dev
Vite is being built for speed in the modern era and takes advantage of modern browser features like native ES modules support to remove bundling entirely during development and adopts performance leading technologies like esbuild to pre-bundle dependencies and transpile TypeScript which is able to do 20-30x faster than TypeScript's own tsc compiler.
Ultimately its architectural choices allows Vite to deliver Lightning Fast Hot Module Reload (HMR) to remain at the developer-experience forefront of modern web development serving a growing ecosystem of frameworks with a rich typed suite of Universal Plugins.
Vue SSG or SPA
Both Vue & Vite being led by Evan You, which ensures both have stellar integration and delivers a well-supported & productive development experience making it the clear choice for any new Vue project.
Both vue-ssg.jamstacks.net and vue-static.web-templates.io utilizing the same high-end Vue3, TypeScript and Tailwind components means their included pages like TODOs MVC, Bookings and Sign In contain identical source code, the choice on which to use effectively becomes if you need advanced features like Static Site Generation (SSG) and Dark Mode or would otherwise prefer to start with a simpler template.
Features list comparison
- vue-ssg.jamstacks.net/features
- vue-static.web-templates.io/features
Stale-while-revalidate in Vue3
Just like Next.js's Stale While Revalidate, both Vue templates includes a swrClient providing a typed wrapper around SWVR Vue3 composition library around making typed SWR API Requests using ServiceStack’s typed JsonServiceClient, e.g:
<template>
<div v-if="error">{{ error.message }}</div>
<div v-else>{{data ? data.result :'loading...'}}</div>
</template>
<script setup lang="ts">
import { Hello } from "@/dtos"
import { swrClient } from "@/api"
const props = defineProps<{ name: string }>()
const { data, error } = swrClient.get(() =>
new Hello({ name: props.name }))
</script>
Where it yields the same optimal UX with cached API responses rendered instantly before later updating itself if modified.
Vue SSG
React & Next.js are primarily corporate-led efforts whilst the Vue ecosystem is largely community led, with one of Vue's lieutenants Anthony Fu being the primary developer behind many of the developer-experience focused features adopted in his vite-ssg project. Most of these features are designed to reduce developer effort by auto registering routes and components by convention which effectively gives it Nuxt like productivity by utilizing hand-picked quality dependencies without needing to be reliant on the slow development pace of a heavy framework like Nuxt.
Anthony's own opinionated Vite Starter Template - Vitesse serves as a great resource for an experienced insight into a curated list of Vue & Vite packages offering the nicest developer experience, although Vue SSG will be more conservative and adopt more well-known technologies like tailwindcss in favor of Windi CSS.
Otherwise, it's still jam-packed full of features for modern Web Apps, including built-in Dark Mode support:
Vue Vite
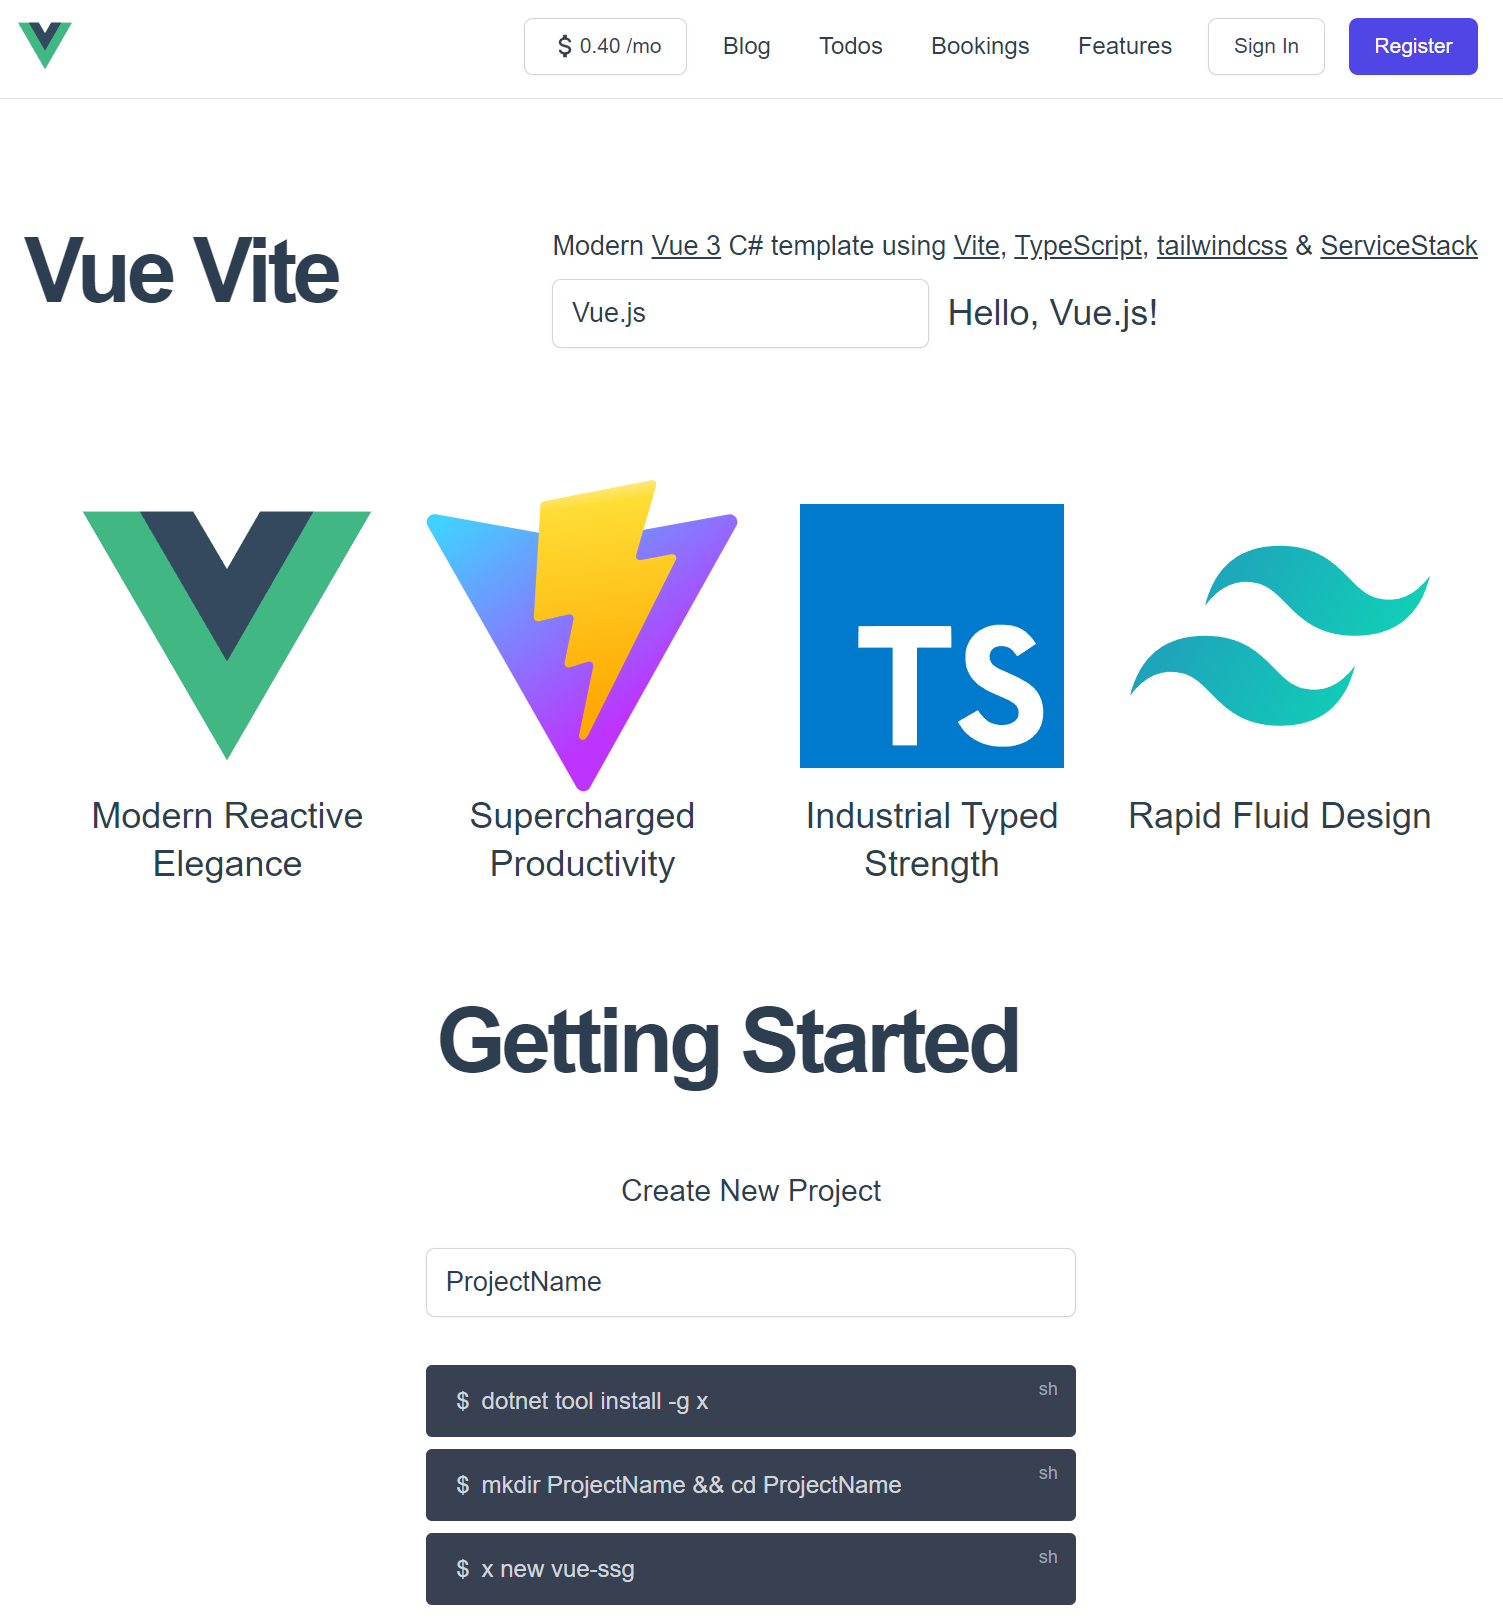
Don't need SSG or Dark mode? Try the simpler SPA template instead:
New /api route
As ServiceStack is an equal Content-Type Services Framework capable of hosting your APIs in a myriad of different Data Formats and Endpoints, its pre-defined routes were designed to cater for multiple formats and calling conventions. However, over the last decade JSON has stood out and become more popular than all others combined, where it's the lingua franca for calling APIs in Web Apps and what our Add ServiceStack Reference ecosystem of languages relies on.
With JSON's increasing popularity in Mobile, Web & Desktop Apps and the advent of our flagship Jamstack templates we've decided to elevate its status and give it a pre-defined route of its very own at:
/api/{Request}
This simple and popular convention makes it easy to remember the route new APIs are immediately available on & also pairs nicely with:
/ui/{Request}
i.e. An easy to remember route for API Explorer's Auto Form UI, together we expect both to yield greater utility out-of-the-box in ServiceStack Apps.
Benefits in Jamstack Apps
The new /api route is particularly useful in Jamstack Apps as the 2 ways to call back-end APIs from decoupled UIs hosted on CDNs is to make CORS requests which doesn't send pre-flight CORS requests for Simple Browser requests. As such, we can improve the latency of GET and POST API Requests by configuring our JsonServiceClient to use /api and to not send the Content-Type: application/json HTTP Header which isn't necessary for /api who always expects and returns JSON:
Configuring in TypeScript
export const client = new JsonServiceClient(API_URL).apply(c => {
    c.basePath = "/api"
    c.headers = new Headers() //avoid pre-flight CORS requests
})
It also benefits the alternative method to CORS in only needing to define a single reverse proxy rule on the CDN host to proxy all API requests to downstream back-end servers.
Configuring in .NET
No configuration is necessary for the new .NET 6+ JsonApiClient that's pre-configured to use /api fallback by default:
var client = new JsonApiClient(baseUri);
All .NET Clients use any matching user-defined routes defined on the Request DTO with the existing Service Clients falling back to /json/[reply|oneway] if none exist who can be configured to use the /api fallback with:
var client = new JsonServiceClient(baseUri) {
    UseBasePath = "/api"
};
var client = new JsonHttpClient(baseUri) {
    UseBasePath = "/api"
};
ApiHandlers
Using the new ApiHandlers, the code to enable the new /api pre-defined route is just:
RawHttpHandlers.Add(ApiHandlers.Json("/api/{Request}"));
ApiHandlers is a simpler wrapper that registers a Raw HttpHandler delegating all matching requests to a GenericHandler configured with that Mime Type and includes typed overloads for each built-in data format.
So you could also define a new pre-defined route at /excel/* with:
RawHttpHandlers.Add(ApiHandlers.Csv("/excel/{Request}"));
Where it can now be used to download any APIs response in a *.csv file.
To avoid potential conflicts /api isn't registered if your AppHost configures its own Custom BasePath, or can be explicitly disabled with:
ConfigurePlugin<PredefinedRoutesFeature>(feature => feature.JsonApiRoute = null);
Configuring Plugins, Operations and AppHost
The new Modular Startup added in the last release allows us to make use of ASP .NET Core's HostingStartup to configure our App in layered modular building blocks. Most plugins are self-contained however but also often enhances another plugins functionality which can be difficult using layered blocks without manually specifying ordering to control the order plugins are loaded.
ConfigurePlugin
The new ConfigurePlugin API now lets us avoid this time-coupling and lets us configure plugins before they've been added by registering a lazy callback invoked just before a plugin is registered.
As it's resilient against ordering, it's now the recommended way to configure any plugin it doesn't register, here's some usage examples:
// App's can use to change logo API Explorer uses
appHost.ConfigurePlugin<UiFeature>(feature => {
    feature.Info.BrandIcon.Uri = "https://example.org/logo.svg";
});

// OpenApiFeature uses to add the /swagger-ui link to /metadata page
appHost.ConfigurePlugin<MetadataFeature>(
    feature => feature.AddPluginLink(swaggerUrl, "Swagger UI"));

// GrpcFeature uses to add a link to gRPC .proto APIs on /metadata page
appHost.ConfigurePlugin<MetadataFeature>(
    feature => feature.AddPluginLink("types/proto", "gRPC .proto APIs"));
ConfigurePlugin is invoked just before a plugin is registered, there's also PostConfigurePlugin to configure a plugin just after it's registered and AfterPluginLoaded invoked after any of its IPostInitPlugin callbacks have completed.
ConfigureOperation
The new ConfigureOperation method has the same benefits for configuring an APIs metadata which is especially useful for AutoQuery AutoGen services since its operation metadata only exists after its default implementation is generated by AutoGen:
appHost.ConfigureOperation<Register>(op => op.FormLayout = new()
{
    new(){ Input.For<Register>(x => x.DisplayName, x => x.Help = "Your first and last name") },
    new(){ Input.For<Register>(x => x.Email, x => x.Type = Input.Types.Email) },
    new(){ Input.For<Register>(x => x.Password, x => x.Type = Input.Types.Password) },
    new(){ Input.For<Register>(x => x.ConfirmPassword, x => x.Type = Input.Types.Password) },
});
ConfigureAppHost
The same functionality used to configure your AppHost before it exists in HostingStartup configurations, now exists in the stand-alone HostContext.ConfigureAppHost() API which also lets you lazily configure your ServiceStack AppHost at any point before it's initialized:
HostContext.ConfigureAppHost(
    beforeConfigure: appHost => ...,
    afterConfigure: appHost => ...,
    afterPluginsLoaded: appHost => ...,
    afterAppHostInit: appHost => ...);
JsonApiClient
Thanks to ServiceStack's new net6.0 target framework builds we're able to easily add functionality that takes advantage of .NET 6 features which we'll increasingly continue to do in future making it the best and recommended runtime to run ServiceStack.
Previously .NET had 2 Service Clients they could use to make its typed API Requests:
- JsonServiceClient - Utilizing .NET's older
HttpWebRequest - JsonHttpClient - Utilizing .NET's newer
HttpClientrequiring ServiceStack.HttpClient NuGet package
In .NET Core, .NET's HttpWebRequest is implemented as a less optimized wrapper around HttpClient as such it was recommended to use JsonHttpClient directly which previously required an additional dependency to be added to ServiceStack.HttpClient NuGet package.
New for .NET 6+
Courtesy of being built-into net6.0 the new JsonApiClient in this release is now available in ServiceStack.Client that's an enhanced version of JsonHttpClient which:
- Is pre-configured with the new
/apifallback route - Disables
EnableAutoRefreshTokenfor fetching new JWT BearerTokens (implemented server-side from v6) - Has been updated to use #nullable annotations for better static analysis around correct usage
- Supports Brotli Request Body Compression
Synchronous Requests are Back!
Until adding net6.0 TFM builds there was no officially supported way to perform synchronous requests with HttpClient, to implement the complete IServiceClient interface, JsonHttpClient had to adopt the least problematic sync-over-async solution.
JsonApiClient improves its synchronous support by rewriting all Sync methods to use HttpClient's new blocking Send() method. Whilst Blocking I/O continues to impact scalability, it's nice to finally have an officially supported method free from deadlock concerns.
Recommended ServiceClient for .NET 6+
Going forward we'll continue improving JsonApiClient with new .NET runtime features and optimizations as they're available and now that .NET's HttpWebRequest has been officially deprecated in .NET 6+ we recommend switching to JsonApiClient in .NET 6+ runtimes.
HttpClient Factory Registration
.NET's HttpClient is a weirdly designed class which despite implementing IDisposable shouldn't be used transitively, it also shouldn't be used as a singleton making it difficult to work with directly. The recommendation is to instead use a HttpClient Factory which can be done to register the JsonApiClient dependency in your App with:
builder.Services.AddJsonApiClient(builder.Configuration["BaseUrl"]);
Blazor WASM should instead use the tailored AddBlazorApiClient() which also configures a CORS-enabled typed JsonApiClient:
builder.Services.AddBlazorApiClient(builder.Configuration["ApiBaseUrl"] ?? builder.HostEnvironment.BaseAddress);
New ergonomic Api and ApiAsync methods
.NET was originally conceived to use Exceptions for error control flow however there's been a tendency in modern languages & libraries to shun Exceptions and return errors as normal values, an approach we believe is a more flexible & ergonomic way to handle API responses.
The ApiResult way
The new APIs simply returns a typed ApiResult<Response> Value Result that encapsulates either a Typed Response or a structured API Error populated in ResponseStatus allowing you to handle API responses programmatically without try/catch handling:
const api = client.api(new Hello({ name }))
if (api.failed) {
    console.log(`Greeting failed! ${api.error.errorMessage}`)
    return
}

console.log(`API Says: ${api.response.result}`) //api.succeeded
C# Example
We've already seen a preview of what this looks like in Blazor WASMs Dev Model Preview example code to create a new Booking:
CreateBooking request = new();

ApiResult<IdResponse> api = new();

async Task OnSubmit()
{
    api = await Client.ApiAsync(request);

    if (api.Succeeded)
    {
        await done.InvokeAsync(api.Response!);
        request = new();
    }
}
Which despite its terseness handles both success and error API responses, if successful it invokes the done() callback notifying its parent of the new Booking API Response before resetting the Form's data model with a new Request DTO.
Upon failure the error response is populated in api.Error which binds to the UI via Blazor's <CascadingValue Value=@api.Error> to propagate it to all its child components in order to show contextual validation errors next to their respective Input controls.
Simplified API Handling
Being able to treat errors as values greatly increases the ability to programmatically handle and genericize api handling, while it also greatly simplifies functionality needing to handle both successful and error responses like binding to UI components.
An example of this is below where we're able to concurrently fire off multiple unrelated async requests in parallel, wait for them all to complete, print out the ones that have succeeded or failed then access their strong typed responses:
import { JsonServiceClient } from "@servicestack/client"

let requests:ApiRequest[] = [
    new AppOverview(),            // GET => AppOverviewResponse
    new DeleteTechnology(),       // DELETE => IReturnVoid (requires auth)
    new GetAllTechnologies(),     // GET => GetAllTechnologiesResponse
    new GetAllTechnologyStacks(), // GET => GetAllTechnologyStacksResponse
]

let results = await Promise.all(requests.map(async (request) =>
    ({ request, api:await client.api(request) as ApiResponse}) ))

let failed = results.filter(x => x.api.failed)
console.log(`${failed.length} failed:`)
failed.forEach(x =>
    console.log(`    ${x.request.getTypeName()} Request Failed: ${failed.map(x => x.api.errorMessage)}`))

let succeeded = results.filter(x => x.api.succeeded)
console.log(`\n${succeeded.length} succeeded: ${succeeded.map(x => x.request.getTypeName()).join(', ')}`)

let r = succeeded.find(x => x.request.getTypeName() == 'AppOverview')?.api.response as AppOverviewResponse
if (r) console.log(`Top 5 Technologies: ${r.topTechnologies.slice(0,4).map(tech => tech.name).join(', ')}`)
Output:
1 failed:
    DeleteTechnology Request Failed: Unauthorized

3 succeeded: AppOverview, GetAllTechnologies, GetAllTechnologyStacks
Top 5 Technologies: Redis, MySQL, Amazon EC2, Nginx
Here treating Errors as values dramatically reduces the effort required to accomplish the same feat when handling errors with try/catch.
Available in all .NET and TypeScript Clients
We'll eventually deliver the benefits of these new APIs to all Add ServiceStack Reference languages, as of this writing the new Api and ApiAsync methods is available in all .NET Service Clients, including Service Gateway's as well as the @servicestack/client library servicing TypeScript and Vanilla JS projects. (inc. /js/servicestack-client.js).
All APIs have a preferred default method
Like the Send* APIs before them, both API Explorer and the new Api* methods send API requests using an APIs preferred HTTP Method which can be defined either:
- Explicitly annotating Request DTOs with
IGet,IPost, etc. IVerb interface markers - Using the verb specified in its user-defined
[Route]attribute (if single verb specified) - Implicitly when using AutoQuery/CRUD Request DTOs
- Using the Services Verb() implementation method if not using Any()
If the HTTP Method can't be inferred, it defaults to using HTTP POST. But as good API documentation practice, we recommend specifying the HTTP Method each API should use, preferably using the IVerb interface marker, so it's embedded into the APIs Services Contract shared with clients (not required for AutoQuery APIs).
Brotli Compression
Another new .NET 6 feature we're happy to finally have access to is .NET Core's BrotliStream which now fully supported throughout ServiceStack, e.g. in Cached & Compressed Responses as well as sending compressed Request payloads in Service Clients.
The inclusion of Brotli triggered us to overhaul our compression abstractions whose implementations are now contained within:
- BrotliCompressor - Brotli (br)
- DeflateCompressor - Deflate (deflate)
- GZipCompressor - GZIP (gzip)
Which now all implement the same substitutable interface:
public interface IStreamCompressor
{
    string Encoding { get; }

    byte[] Compress(string text, Encoding? encoding = null);
    byte[] Compress(byte[] bytes);
    Stream Compress(Stream outputStream, bool leaveOpen=false);

    string Decompress(byte[] zipBuffer, Encoding? encoding = null);

    Stream Decompress(Stream zipBuffer, bool leaveOpen=false);

    byte[] DecompressBytes(byte[] zipBuffer);
}
That are managed with StreamCompressors in the ServiceStack.Client package:
public static class StreamCompressors
{
    // Is there a compressor registered with this encoding?
    public static bool SupportsEncoding(string? encoding);

    // return the registered IStreamCompressor implementation for for this
    public static IStreamCompressor? Get(string? encoding);

    // Assert there exists a IStreamCompressor for this encoding
    public static IStreamCompressor GetRequired(string encoding);

    // Register a new compressor for a specific encoding (defaults: gzip, deflate, br*) .NET6+
    public static void Set(string encoding, IStreamCompressor compressor);

    // Remove compression support for this encoding
    public static bool Remove(string encoding);
}
Containing pre-registered implementations of all popular Brotli, Deflate & gzip HTTP Compression algorithms so there's typically no need to add any yourself.
The preferred compression implementation for a request can be retrieved with IRequest.GetCompressor() which determines the implementation to use based on the overridable GetCompressionType(IRequest request) method in your AppHost.
Brotli disabled for Firefox
Brotli is currently not returned for Firefox browsers (by UserAgent detection in AppHost.GetCompressionType()) which for a yet to be determined reason is the only modern browser that doesn't support .NET's BrotliStream output. We'll continue to investigate and remove the restriction when resolved.
JWT Changes
From this major release, we're changing the default configuration of the JWT Auth Provider to use HTTP Token Cookies by default which is both recommended for Web Apps, but is also better able to support effortless JWT Token management features.
Although this is technically a breaking change in clients that were manually handling BearerTokens returned in AuthenticateResponse, it's the more interoperable solution as the normal client logic for authenticating using normal Server Session Cookies, e.g:
let api = client.api(new Authenticate({ provider:'credentials', userName, password, rememberMe }))
Also works transparently after a configuring to use JWT on the server to switch to using stateless JWT Tokens, as in both cases the HTTP Clients utilize Cookies to enable authenticated requests.
Transparent Server Auto Refresh of JWT Tokens
JWTs enable stateless authentication of clients without servers needing to maintain any Auth state in server infrastructure or perform any I/O to validate a token. As such, JWTs are a popular choice for Microservices as they only need to configured with confidential keys to validate access.
But to be able to terminate a users access, they need to revalidate their eligibility to verify they're still allowed access (e.g. deny Locked out users). This JWT revalidation pattern is implemented using Refresh Tokens which are used to request revalidation of their access with a new JWT Access Token which they'll be able to use to make authenticated requests until it expires.
Previously the management of auto refreshing expired JWT Access Tokens was done with logic built into each of our smart generic Service Clients. But switching to use Token Cookies allows us to implement the revalidation logic on the server where it's now able to do this transparently for all HTTP Clients, i.e. it's no longer just limited to our typed Service Clients.
Revert to Bearer Token Responses
If you're not ready to move to HTTP Token Cookies yet, you can revert to the previous behavior of returning JWT Tokens in AuthenticateResponse API responses with:
new JwtAuthProvider(AppSettings) {
    UseTokenCookie = false
}
Large Profile Image handling in JWT Cookies
This is one feature we wished we never had to build, unfortunately due to trade-offs of competing solutions, we've had to surface different solutions, so you can choose the one that best suits your needs.
Microsoft Graph Auth
Large Image profiles is an issue limited to Microsoft Graph Auth, since in its wisdom it has chosen not to return a public CDN URL of a Users Profile Image (like every other OAuth Provider). Instead, it pushes the burden of profile image management down to every authenticating App server, which to maintain their statelessness, means converting into a Data URL, except as it typically returns the high-res image JPEG which far exceeds the maximum 4kb limit of cookies, it requires resizing in order to make fit (otherwise the JWT Cookie is ignored and Authentication will fail). Microsoft Graph does provide APIs to resize photos, unfortunately even its lowest 48x48 resolution is still too large for storage in Cookies.
State of Imaging on Linux
This forces us to use .NET's built-in System.Drawing APIs to resize it, this works fine on Windows up until you need to deploy on Linux where you're met with the state of Imaging on Linux which can best be described as undesirable - at least as it exists in ASP .NET's official .NET 6 Docker Images. Resizing with System.Drawing immediately fails, so will SkiaSharp even with its NativeAssets.Linux package references, we finally got it to successfully resize using ImageSharp except that doing it in a HTTP/2 request would reliably kill the connection, that even buffering couldn't avoid. Suffice to say this experience taught us to not rely on Imaging functionality in .NET runtimes on Linux. We've had previous success using SkiaSharp in a Custom Linux Docker Image before & will likely work again with the appropriate OS packages, however it needs to reliably work in all popular hosting options to be acceptable for ServiceStack to adopt.
Large Profile Image Handling workarounds
Given Image resizing within the same OAuth request is off-limits, we needed to explore some other solutions. Since resizing did actually work in ImageSharp we could offload the task to a Background MQ and push the resized Data URI down to the user (e.g. with Server Events) but that would result in a UI yank of the profile image and force developers to manage the complexity of additional client & server configuration which isn't a burden we want to impose due to their choice of OAuth providers.
The best working solution we could come up with that's able to display a users high-res photo whilst still keeping our App server stateless was to create a new ImagesHandler that the JWT AuthProvider calls RewriteImageUri() on to replace any large profile URLs with a link to its /auth-profiles/{MD5}.jpg - a URL it also handles serving the original high-res image back to.
This is the solution AuthFeature uses by default, pre-configured with:
new AuthFeature {
    ProfileImages = new ImagesHandler("/auth-profiles", fallback: Svg.GetStaticContent(Svg.Icons.DefaultProfile))
}
Where if using a custom SavePhotoSize will be resized using Microsoft Graph APIs, if the resized image size still exceeds the max allowable size in JWT Cookies it's swapped out for a URL reference to the image which ImageHandler stores in memory. The trade-off of this default is when your Docker App is re-deployed, whilst their stateless authentication keeps them authenticated, the original high-res photo saved in ImageHandler's memory will be lost, which will be replaced with the fallback Svg.Icons.DefaultProfile image.
Using an MD5 hash does allow us to maintain URLs that's both predictable in that it will result in the same hash after every sign in, while also preventing information leakage that using a predictable User Id would do. A client-only solution that could retain their avatar across deployments is saving it to localStorage however that pushes the burden down to every client App using your APIs, which could be manageable if you control all of them.
Persistent Large Profile Image Handling
For a persistent solution that retains profile images across deployments you can use PersistentImagesHandler with the VFS Provider and path for profile images to be written to, e.g:
new AuthFeature {
    ProfileImages = new PersistentImagesHandler("/auth-profiles", Svg.GetStaticContent(Svg.Icons.DefaultProfile),
        appHost.VirtualFiles, "/App_Data/auth-profiles")
}
When using the default FileSystemVirtualFiles VFS provider this would require configuring your Docker App with a persistent /App_Data Volume, otherwise using one of the other Virtual Files Providers like S3VirtualFiles or AzureBlobVirtualFiles may be the more preferable solution to keep your Docker Apps stateless.
AuthSecret HttpHeader
AdminAuthSecret is a quick way to configure your App with a Super User Account for accessing the Admin only services like Admin UI:
SetConfig(new HostConfig {
    AdminAuthSecret = authsecret,
})
In addition to authsecret QueryString, FormData or Cookie, it can also be sent with any request with the authsecret HTTP Header, e.g:
let client = new JsonServiceClient(BaseUrl).apply(c => {
    c.basePath = '/api'
    c.headers.set('authsecret', authsecret)
})
RegisterResponse as a substitutable Authentication source
Typically, to verify a user is authenticated you would call Authenticate without any params, e.g:
let api = client.api(new Authenticate())
let isAuthenticated = api.succeeded
Or via JSONP:
<script>
function loadAuth(auth) { window.AUTH = auth.responseStatus ? null : auth }
</script>
<script src="/auth?callback=loadAuth"></script>
To save the additional call, new users signing up through the Register API with AutoLogin=true returns the same information as AuthenticateResponse, i.e. it's been extended to return:
- Roles
- Permissions
- JWT Cookie or Bearer/Refresh Tokens
Allowing its response to be persisted in clients to indicate an Authenticated User Session.
New Queryable PocoDataSource
PocoDataSource is useful for quickly creating an In Memory Queryable Data Source as done in the TODOs MVC Jamstack Examples:
public class TodosServices : Service
{
    public IAutoQueryData AutoQuery { get; set; }

    static readonly PocoDataSource<Todo> Todos = PocoDataSource.Create(new Todo[]
    {
        new () { Id = 1, Text = "Learn" },
        new () { Id = 2, Text = "Blazor", IsFinished = true },
        new () { Id = 3, Text = "WASM!" },
    }, nextId: x => x.Select(e => e.Id).Max());

    public object Get(QueryTodos query)
    {
        var db = Todos.ToDataSource(query, Request);
        return AutoQuery.Execute(query, AutoQuery.CreateQuery(query, Request, db), db);
    }

    public Todo Post(CreateTodo request)
    {
        var newTodo = new Todo { Id = Todos.NextId(), Text = request.Text };
        Todos.Add(newTodo);
        return newTodo;
    }

    public Todo Put(UpdateTodo request)
    {
        var todo = request.ConvertTo<Todo>();
        Todos.TryUpdateById(todo, todo.Id);
        return todo;
    }

    // Handles Deleting the Todo item
    public void Delete(DeleteTodo request) => Todos.TryDeleteById(request.Id);

    public void Delete(DeleteTodos request) => Todos.TryDeleteByIds(request.Ids);
}
Where it provides ThreadSafe CRUD operations to manage a collection of In Memory POCOs.
In Memory AutoQuery
The QueryTodos implementation utilizes an AutoQuery Memory Source with the full capabilities of AutoQuery's Implicit Conventions:
Where it can be used to iteratively prototype new data models under a productive dotnet watch workflow until it satisfies all your requirements where it could be easily converted to AutoQuery CRUD APIs and integrated with your Systems configured RDBMS - which would require even less code.
AutoGen specific options in AutoGen DTOs
When using AutoGen to generate Typed AutoQuery DTOs for your RDBMS Tables:
$ x csharp https://localhost:5001 -path /crud/all/csharp
The generated dtos.cs now include AutoGen-specific options that can be used to maintain multiple custom RDBMS Tables and AutoQuery APIs, e.g. you could maintain one for each of your different RDBMS schemas:
/* Options:
//...
//IncludeCrudOperations:
Schema: custom
//NamedConnection:
//IncludeTables:
//ExcludeTables:
*/
Force Include Types in Native Types DTOs
ServiceStack's Add ServiceStack Reference feature carefully limits which DTOs it generates based on just the DTOs needed by different clients packages to call APIs. There's many reasons why Types aren't generated, e.g. they already exist in service client library, the APIs have Visibility or Access restrictions, their built-in APIs purposefully hidden by ServiceStack to reduce bloat, etc.
We can override these rules for specific Types by including them in Metadata.ForceInclude, e.g:
public override void Configure(Container container)
{
    Metadata.ForceInclude = new() {
        typeof(MetadataApp),
        typeof(AppMetadata),
        typeof(AdminQueryUsers),
        typeof(AdminGetUser),
        typeof(AdminCreateUser),
        typeof(AdminUpdateUser),
        typeof(AdminDeleteUser),
    };
}
Add ServiceStack Reference still only generates dependent Types that your API references but the previous restrictions that prevented them from being generated will be lifted.
Metadata pages
Whilst API Explorer received most of the attention in this release (and will continue to do so in future), we've also added the ability to browse an API Contract in the viewers preferred language in the existing API /metadata pages, e.g:
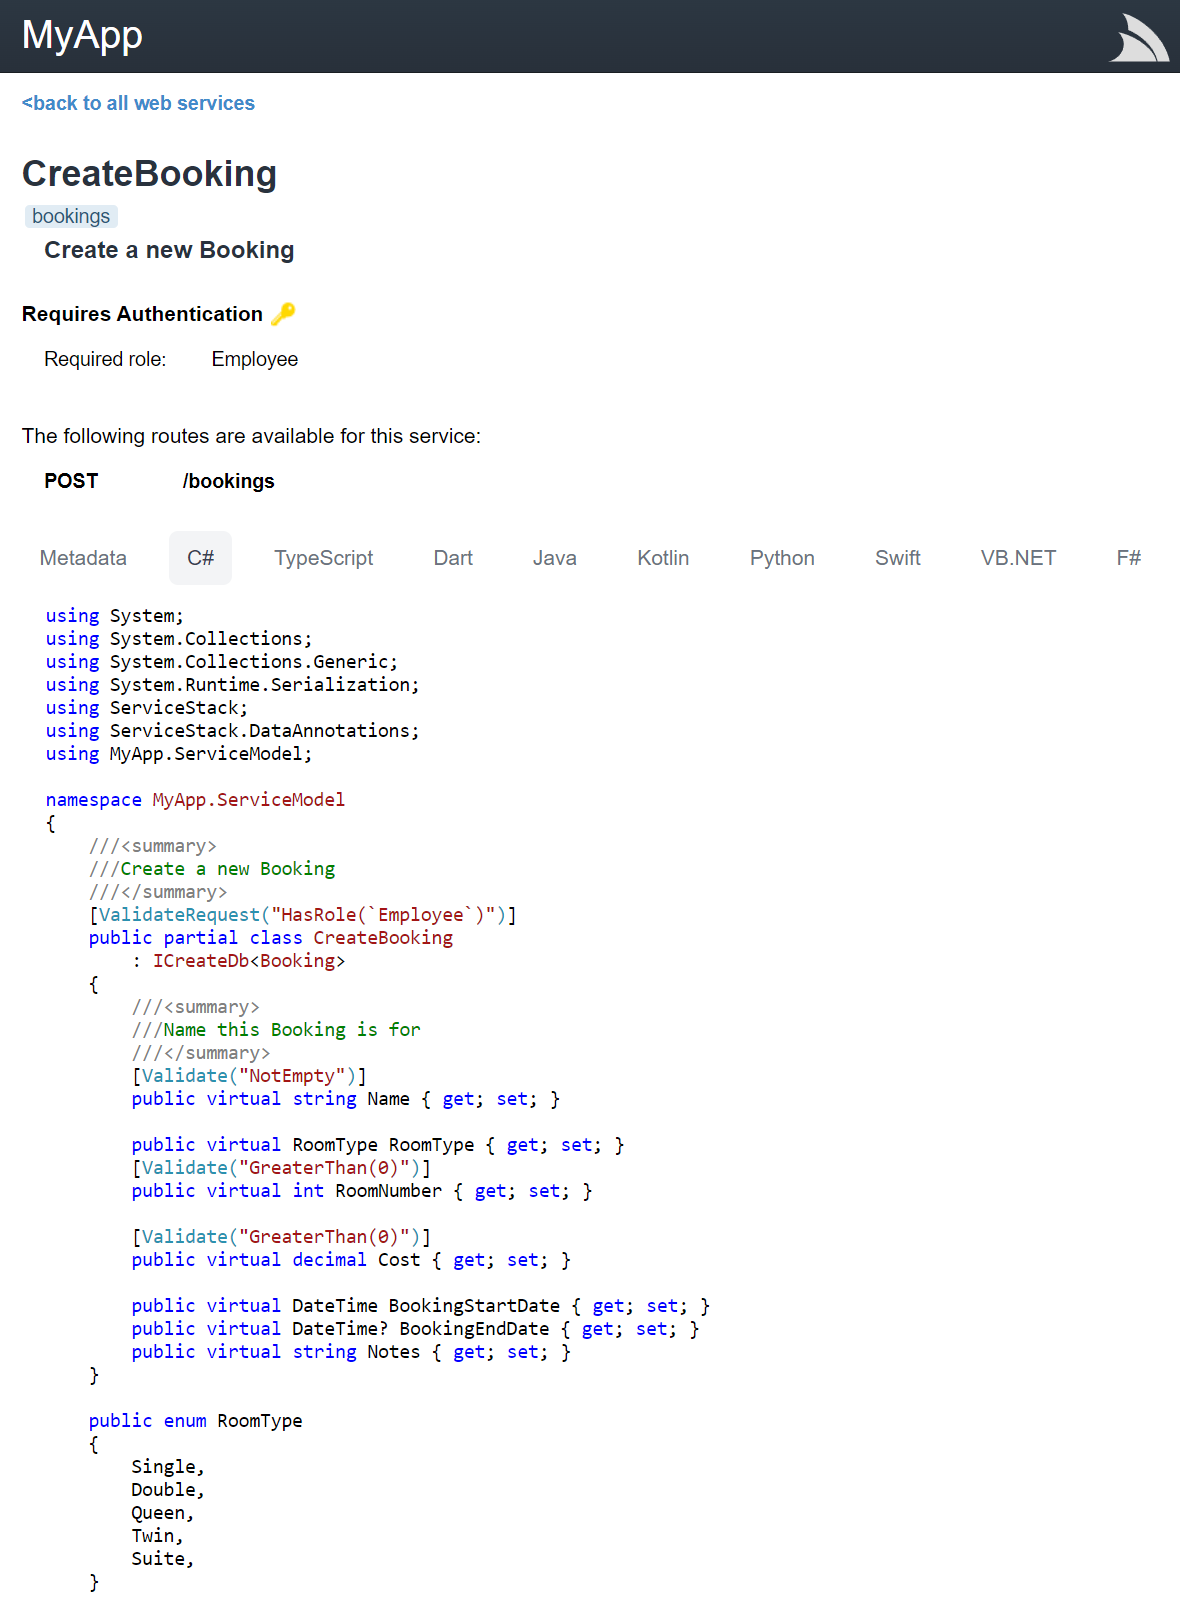
The difference between them is that API Explorer is an entirely client rendered SPA that only supports modern browsers, whilst the /metadata pages are server rendered and should be visible in all browsers.
Process Utils
Our ProcessUtils.cs contains useful utils for managing & running external processes cross-platform, a new feature we've added is being able to easily run a shell command asynchronously, and emit its output in real-time, e.g:
await ProcessUtils.RunShellAsync("npm run ui:build",
    onOut:   Console.WriteLine,
    onError: Console.Error.WriteLine);
ServiceStack.Text
The new overloads on ServiceStack.Text's convenience serialization methods .ToJson(), .ToJsv(), .ToCsv() now accept a lambda for configuring a custom configuration scope to simplify its usage, e.g:
var json = dto.ToJson(config => config.TextCase = TextCase.SnakeCase);

// Equivalent To:
using var scope = JsConfig.With(new Config { TextCase = TextCase.Default });
var json = response.ToJson();
Breaking Changes
Despite being a major release there should be only a few breaking changes, most notable was dropping support for .NET Framework versions whose support will end during this release cycle.
v5.14 and v6 Breaking Changes
- Changed JWT to use Token Cookies by default
- Removed legacy Swift4 support
- Removed redundant deprecated legacy classes, e.g. #Script, S3VirtualPathProvider
v6 only Breaking Changes
- Upgraded minimum .NET Framework version to v4.7.2
- Removed out of support netcoreapp2.1 targets
- Removed Legacy Projects:
INFO
If you still need to use the functionality from any of the removed projects the easiest way to continue using them is to copy the linked projects *.cs source code from the fx45 branch locally into your project
v5.14 Releases and .NET 4.5 branches
Should you need to make changes to support a Legacy .NET v4.5 Framework, the v5.14 Release in All Repos will let you download the source code and view the state before support for v4.5 Framework builds were removed.
Each v5.14 release is tagged at first commit of the new fx45 branches in each Repository, both included below for quick reference: