AI Server now ready to serve!
We're excited to announce the first release of AI Server - a Free OSS self-hosted Docker private gateway to manage API access to multiple LLM APIs, Ollama endpoints, Media APIs, Comfy UI and FFmpeg Agents.
Centralized Management
Designed as a one-stop solution to manage an organization's AI integrations for all their System Apps, by utilizing developer friendly HTTP JSON APIs that supports any programming language or framework.
Distribute load across multiple Ollama, Open AI Gateway and Comfy UI Agents
It works as a private gateway to process LLM, AI and image transformations requests that any of our Apps need where it dynamically load balances requests across our local GPU Servers, Cloud GPU instances and API Gateways running multiple instances of Ollama, Open AI Chat, LLM Gateway, Comfy UI, Whisper and FFmpeg providers.
In addition to maintaining a history of AI Requests, it also provides file storage for its CDN-hostable AI generated assets and on-the-fly, cacheable image transformations.
Native Typed Integrations
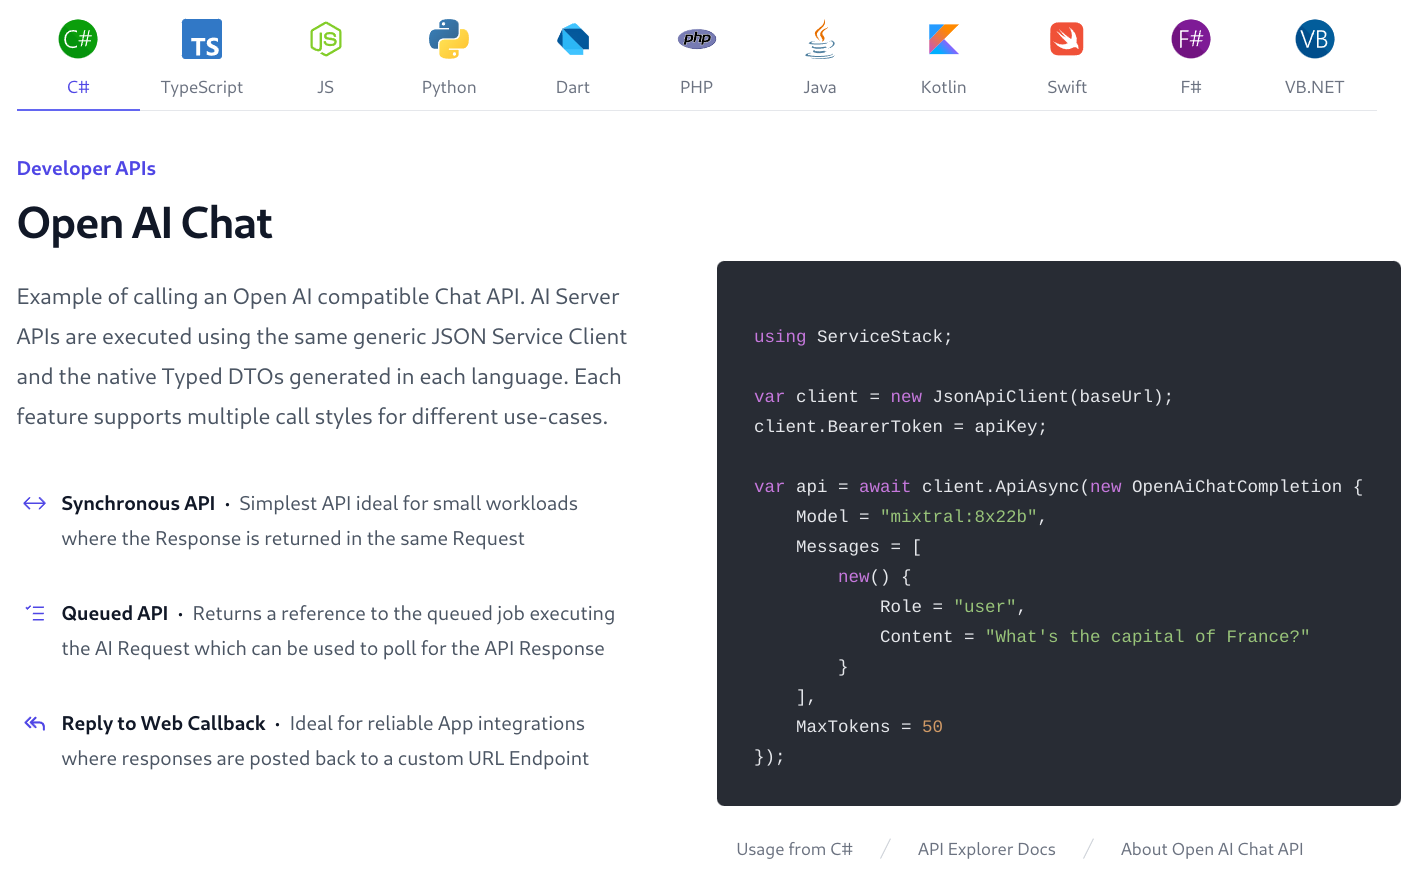
Uses Add ServiceStack Reference to enable simple, native typed integrations for most popular Web, Mobile and Desktop languages including: C#, TypeScript, JavaScript, Python, Java, Kotlin, Dart, PHP, Swift, F# and VB.NET.
Each AI Feature supports multiple call styles for optimal integration of different usages:
- Synchronous API · Simplest API ideal for small workloads where the Response is returned in the same Request
- Queued API · Returns a reference to the job executing the AI Request which can be used to poll for its Response
- Reply to Web Callback · Ideal for reliable App integrations where responses are posted back to a custom URL Endpoint
Live Monitoring and Analytics
Monitor performance and statistics of all your App's AI Usage, real-time logging of executing APIs with auto archival of completed AI Requests into monthly rolling SQLite databases.
Protected Access with API Keys
AI Server utilizes Simple Auth with API Keys letting Admins create and distribute API Keys to only allow authorized clients to access their AI Server's APIs, which can be optionally further restricted to only allow access to specific APIs.
Install
AI Server can be installed on macOS and Linux with Docker by running install.sh:
- Clone the AI Server repository from GitHub:
git clone https://github.com/ServiceStack/ai-server
- Run the Installer
cd ai-server && cat install.sh | bash
The installer will detect common environment variables for the supported AI Providers like OpenAI, Google, Anthropic, and others, and prompt ask you if you want to add them to your AI Server configuration.
Optional - Install ComfyUI Agent
If your server also has a GPU you can ask the installer to also install the ComfyUI Agent:
The ComfyUI Agent is a separate Docker agent for running ComfyUI, Whisper and FFmpeg on servers with GPUs to handle AI Server's Image and Video transformations and Media Requests, including:
- Text to Image
- Image to Text
- Image to Image
- Image with Mask
- Image Upscale
- Speech to Text
- Text to Speech
Comfy UI Agent Installer
To install the ComfyUI Agent on a separate server (with a GPU), you can clone and run the ComfyUI Agent installer on that server instead:
- Clone the Comfy Agent
git clone https://github.com/ServiceStack/agent-comfy.git
- Run the Installer
cd agent-comfy && cat install.sh | bash
Which will launch the terminal GUI to install, configure and register your ComfyUI Agent:
Running in Production
We've been developing and running AI Server for several months now, processing millions of LLM and Comfy UI Requests to generate Open AI Chat Answers and Generated Images used to populate the pvq.app and blazordiffusion.com websites.
Our production instance with more info about AI Server is available at:
API Explorer
Whilst our production instance is protected by API Keys, you can still use it to explore available APIs in its API Explorer:
AI Server Documentation
The documentation for AI Server is being maintained at:
Built-in UIs
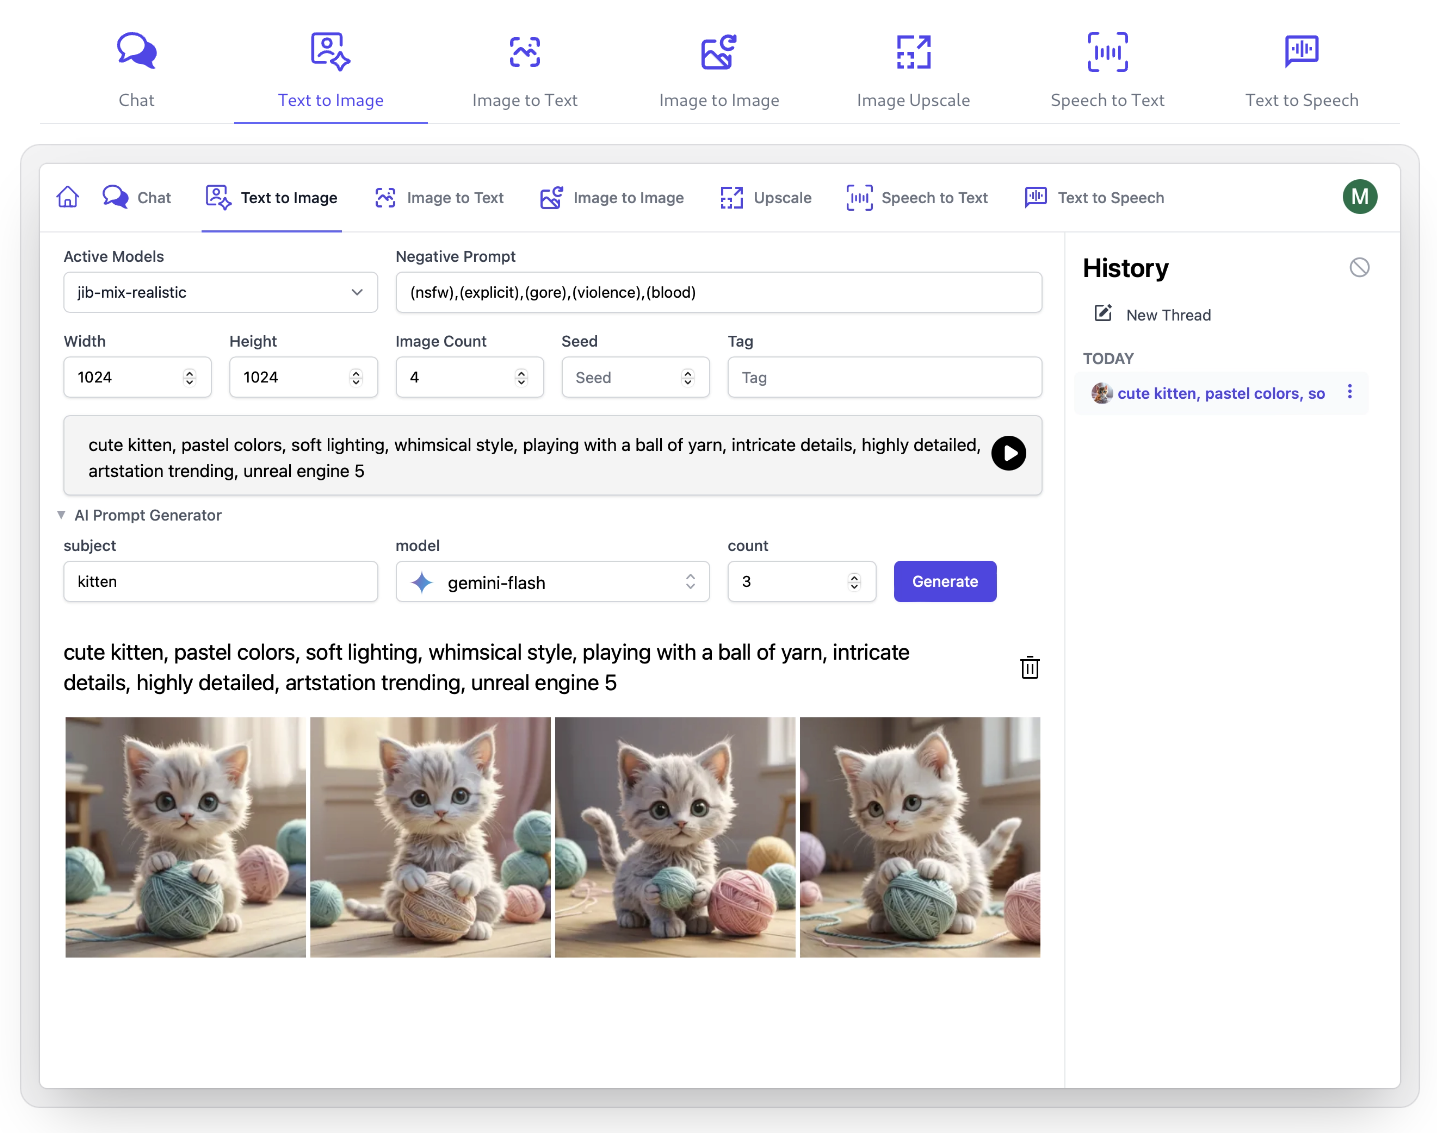
Built-in UIs allow users with API Keys access to custom UIs for different AI features
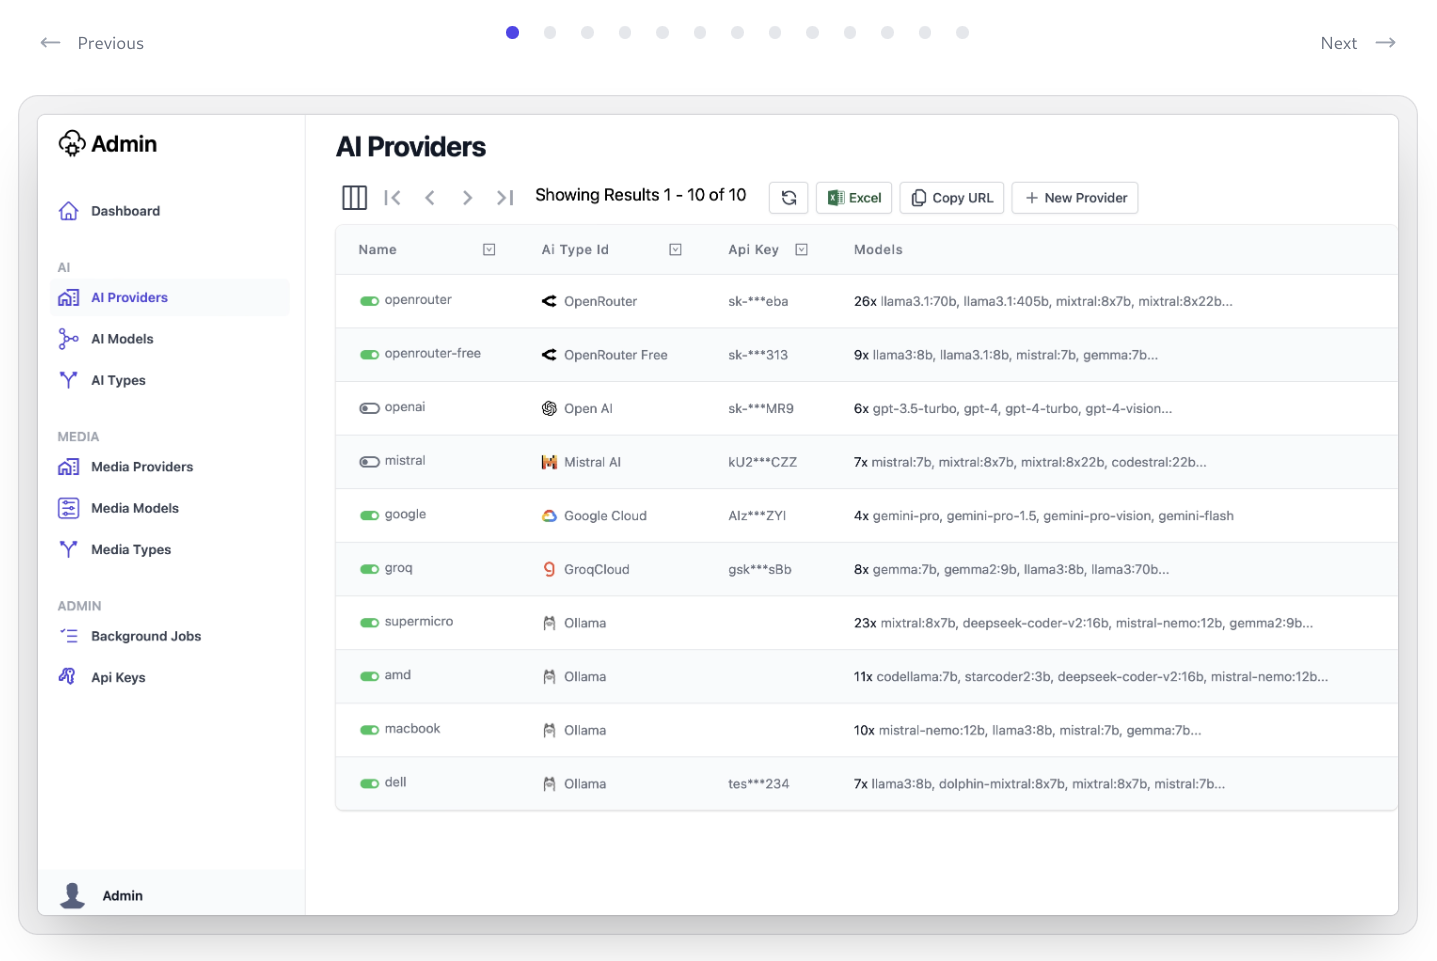
Admin UIs
Use Admin UI to manage API Keys that can access AI Server APIs and Features
AI Server Features
The current release of AI Server supports a number of different modalities, including:
Large Language Models
- Open AI Chat
- Support for Ollama endpoints
- Support for Open Router, Anthropic, Open AI, Mistral AI, Google and Groq API Gateways
Comfy UI Agent / Replicate / DALL-E 3
Comfy UI Agent
FFmpeg
-
- Crop Image - Crop an image to a specific size
- Convert Image - Convert an image to a different format
- Scale Image - Scale an image to a different resolution
- Watermark Image - Add a watermark to an image
-
- Crop Video - Crop a video to a specific size
- Convert Video - Convert a video to a different format
- Scale Video - Scale a video to a different resolution
- Watermark Video - Add a watermark to a video
- Trim Video - Trim a video to a specific length
Managed File Storage
- Blob Storage - isolated and restricted by API Key
AI Server API Examples
To simplify integrations with AI Server each API Request can be called with 3 different call styles to better support different use-cases and integration patterns.
Synchronous Open AI Chat Example
The Synchronous API is the simplest API ideal for small workloads where the Response is returned in the same Request:
var client = new JsonApiClient(baseUrl);
client.BearerToken = apiKey;

var response = client.Post(new OpenAiChatCompletion {
    Model = "mixtral:8x22b",
    Messages = [
        new() {
            Role = "user",
            Content = "What's the capital of France?"
        }
    ],
    MaxTokens = 50
});

var answer = response.Choices[0].Message.Content;
Synchronous Media Generation Request Example
Other AI Requests can be called synchronously in the same way where its API is named after the modality
it implements, e.g. you'd instead call TextToImage to generate an Image from a Text description:
var response = client.Post(new TextToImage
    PositivePrompt = "A serene landscape with mountains and a lake",
    Model = "flux-schnell",
    Width = 1024,
    Height = 1024,
    BatchSize = 1
});

File.WriteAllBytes(saveToPath, response.Results[0].Url.GetBytesFromUrl());
Queued Open AI Chat Example
The Queued API immediately Returns a reference to the queued job executing the AI Request:
var response = client.Post(new QueueOpenAiChatCompletion
{
    Request = new()
    {
        Model = "gpt-4-turbo",
        Messages = [
            new() { Role = "system", Content = "You are a helpful AI assistant." },
            new() { Role = "user", Content = "How do LLMs work?" }
        ],
        MaxTokens = 50
    }
});
Which can be used to poll for the API Response of any Job by calling GetOpenAiChatStatusResponse
and checking when its state has finished running to get the completed OpenAiChatResponse:
GetOpenAiChatStatusResponse status = new();
while (status.JobState is BackgroundJobState.Started or BackgroundJobState.Queued)
{
    status = await client.GetAsync(new GetOpenAiChatStatus { RefId = response.RefId });
    await Task.Delay(1000);
}

var answer = status.Result.Choices[0].Message.Content;
Queued Media Artifact Generation Request Example
Most other AI Server Requests are Artifact generation requests which would instead call
GetArtifactGenerationStatus to get the artifacts response of a queued job, e.g:
var response = client.Post(new QueueTextToImage {
    PositivePrompt = "A serene landscape with mountains and a lake",
    Model = "flux-schnell",
    Width = 1024,
    Height = 1024,
    BatchSize = 1
});

// Poll for Job Completion Status
GetArtifactGenerationStatusResponse status = new();
while (status.JobState is BackgroundJobState.Queued or BackgroundJobState.Started)
{
    status = client.Get(new GetArtifactGenerationStatus { JobId = response.JobId });
    Thread.Sleep(1000);
}

File.WriteAllBytes(saveToPath, status.Results[0].Url.GetBytesFromUrl());
Queued Media Text Generation Request Example
Whilst the Media API Requests that generates text like SpeechToText or ImageToText would instead call
GetTextGenerationStatus to get the text response of a queued job, e.g:
using var fsAudio = File.OpenRead("files/audio.wav");
var response = client.PostFileWithRequest(new QueueSpeechToText(),
    new UploadFile("audio.wav", fsAudio, "audio"));

// Poll for Job Completion Status
GetTextGenerationStatusResponse status = new();
while (status.JobState is BackgroundJobState.Started or BackgroundJobState.Queued)
{
    status = client.Get(new GetTextGenerationStatus { RefId = response.RefId });
    Thread.Sleep(1000);
}

var answer = status.Results[0].Text;
Open AI Chat with Callback Example
The Queued API also accepts a Reply to Web Callback for a more reliable push-based App integration where responses are posted back to a custom URL Endpoint:
var correlationId = Guid.NewGuid().ToString("N");
var response = client.Post(new QueueOpenAiChatCompletion
{
    //...
    ReplyTo = $"https://example.org/api/OpenAiChatResponseCallback?CorrelationId=${correlationId}"
});
Your callback can add any additional metadata on the callback to assist your App in correlating the response with
the initiating request which just needs to contain the properties of the OpenAiChatResponse you're interested in
along with any metadata added to the callback URL, e.g:
public class OpenAiChatResponseCallback : IPost, OpenAiChatResponse, IReturnVoid
{
    public Guid CorrelationId { get; set; }
}

class MyService : Service
{
    public object Post(OpenAiChatResponseCallback request)
    {
        // Handle OpenAiChatResponse callabck
    }
}
Unless your callback API is restricted to only accept requests from your AI Server, you should include a
unique Id like a Guid in the callback URL that can be validated against an initiating request to ensure
the callback can't be spoofed.
New .NET 8 Deployments now using Kamal for Deployments
Since introducing GitHub Actions support to our templates, we've promoted the simplified deployments, focusing on tooling like SSH and Docker Compose to give the most portability to projects by default. This was partly inspired by the fact that cloud providers value offerings have been decreasing, especially over the last 5 years. We've previously showed the significant savings available by utilizing of hosting providers like Hetzner (who we've been using for several years), and moved all our templates and live demos to Hetzner resulting in a roughly $0.50 per month cost per .NET App.
Along with this decreasing in value from the major cloud vendors, and the general hardware improvements, we've also been leaning into using SQLite for server .NET Apps, using it as the primary database for some of our larger example applications like pvq.app, blazordiffusion.com, and most recently, AI Server.
We're delighted to see that the folks at BaseCamp are estimating to save millions from their cloud exit and have doubled down on their general purpose Docker deployment solutions with their initial MRSK project, that's now known as Kamal.
Use Kamal to deploy .NET Apps to any Linux server
What is Kamal?
Kamal is a tool that offers the same flexibility by wrapping up the use of fundamental tooling like SSH and Docker into a great CLI tool that simplifies the management of containerized applications, enabling them to be deployed any Linux host that's accessible via SSH. It handles reverse proxy of web traffic automatically, as well as even the initial setup of the reverse proxy and related tooling to any target Linux host.
This means you get the same great ergonomics of just pointing your DNS and configuration file to a server, and Kamal takes care of the rest, including TLS certificates via LetsEncrypt. It even has commands that allow you to check on your running applications, view logs etc and all you need to do is run the commands from your local repository directory.
While our own templates used the same approach for GitHub Actions, it doesn't have a lot of Kamal's niceties like being able to monitor remote server app logs from your local workstation.
What's in the templates?
We still believe that having a CI process is important, and while Kamal deployments are repeatable from your local machine and uses locking to avoid multiple developers deploying changes, the single consistent process of a CI is hard to beat. So while we have moved the templates to use Kamal, we've incorporated GitHub Actions by default so you can still get the benefits of running commands like kamal app logs locally from your development machine when looking at production issues, but have that consistent workflow for deployment on your repositories GitHub Actions.
How it works
One of the big benefits of Kamal is the focus on ergonomics and the really well done documentation that the BaseCamp team has put together. So if you need to know more about Kamal, checkout their docs. For the ServiceStack templates, you will need to add a valid PRIVATE_SSH_KEY as a GitHub Actions secret to get it working along with the customization of your config/deploy.yml file which is a part of any Kamal setup. In short, you will need:
- Get a Linux host running with SSH access
- Update your DNS configuration with an A record pointing to that hosts IP address
- Create a new project using one of our updated templates using a command like:
x new blazor-vue MyApp
Update the config/deploy.yml with the following details:
GitHub Container Registry Image
Update with your preferred container image name:
# Name of the container image
image: my-user/myapp
Server Web
Configure with your Linux Host IP Address:
servers:
  # IP address of server, optionally use env variable
  web:
    - 123.123.123.123
Alternatively, you can use an environment variable for the server IP address, e.g:
  web:
    - <%= ENV['KAMAL_DEPLOY_IP'] %>
Proxy Host
Configure with your domain pointing to the same IP as your host:
proxy:
  ssl: true
  host: myapp.example.com
Health Checks
The template includes the use of ASP.NET Core Health Checks, that use the default Kamal path of /up to check if the application is running before deploying.
public class HealthCheck : IHealthCheck
{
    public async Task<HealthCheckResult> CheckHealthAsync(HealthCheckContext context, CancellationToken token = default)
    {
        // Perform health check logic here
        return HealthCheckResult.Healthy();
    }
}
Kamal checks this path before deploying your application, so you can add any custom health checks to this path to ensure your application is ready to receive traffic.
GitHub Repository
With your app created and configured for deployment, you can create a new GitHub Repository and add the GitHub Actions PRIVATE_SSH_KEY Secret which should use a separate SSH key for deployments that can access your Linux host.
You can use the GitHub CLI to do of these steps.
gh repo create
When prompted, create an empty repository.
Then add the PRIVATE_SSH_KEY secret.
gh secret set PRIVATE_SSH_KEY < deploy-key
Where deploy-key is your deployment specific SSH key file.
Once created, you can follow the steps in your empty repository to init your templated MyApp project and push your initial commit. If you're deploy.yml config and DNS was setup correctly, the GitHub Action will:
- Build and test your application running the
MyApp.Testsproject by default - Publish your application as a Docker container to GitHub's
ghcr.iorepository - Use Kamal to initialize your Linux host to be able to run Kamal applications and use their default
kamal-proxy - Fix volume permissions your for application due to ASP.NET containerization not running as root user in the container.
- Run your
AppTasks=migratecommand before running your application initializing the SQLite database - Run your AppHost using
kamal deploy -P --version latestcommand.
Standardizing on Kamal
We're excited to migrate our templates to Kamal for deployments as it has distilled the simple approach we have baked in our templates for a number of years whilst dramatically improving on the ergonomics and are excited to see what the BaseCamp team and community around it continues to do to push the project forward.
Simple API Keys Credentials Auth Provider
The usability of the Simple Auth with API Keys story has
been significantly improved with the new ApiKeyCredentialsProvider which enables .NET Microservices to provide
persistent UserSession-like behavior using simple API Keys which can be configured together with the
AuthSecretAuthProvider and ApiKeysFeature to enable a Credentials Auth implementation which users can
use with their API Keys or Admin AuthSecret.
A typical configuration for .NET Microservices looking to enable Simple Auth access whose APIs are protected by API Keys and their Admin functionality protected by an Admin Auth Secret can be configured with:
public class ConfigureAuth : IHostingStartup
{
    public void Configure(IWebHostBuilder builder) => builder
        .ConfigureServices(services =>
        {
            services.AddPlugin(new AuthFeature([
                new ApiKeyCredentialsProvider(),
                new AuthSecretAuthProvider("MyAuthSecret"),
            ]));
            services.AddPlugin(new SessionFeature());
            services.AddPlugin(new ApiKeysFeature());
        })
        .ConfigureAppHost(appHost =>
        {
            using var db = HostContext.AppHost.GetDbConnection();
            appHost.GetPlugin<ApiKeysFeature>().InitSchema(db);
        });
}
When registered a Credentials Auth dialog will appear for ServiceStack Built-in UIs allowing users to Sign In with their API Keys or Admin Auth Secret.
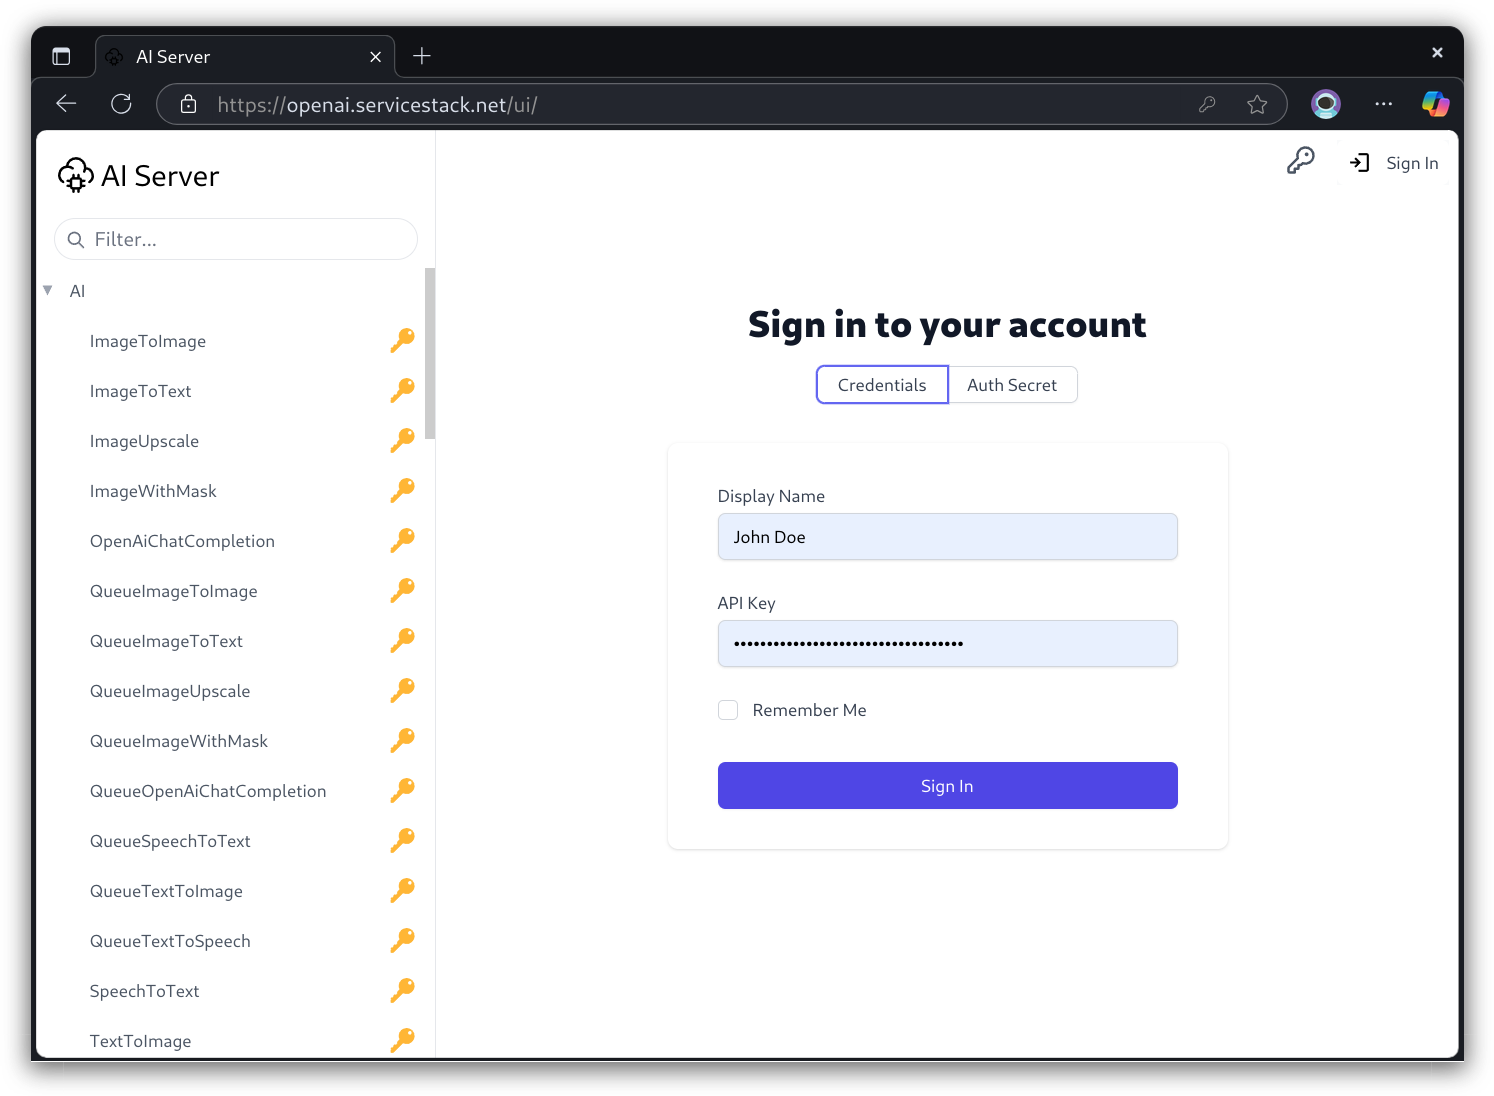
Session Auth with API Keys
Behind the scenes this creates a Server Auth Session but instead of maintaining an Authenticated User Session it saves the API Key in the session then attaches the API Key to each request. This makes it possible to make API Key validated requests with just a session cookie instead of requiring resubmission of API Keys for each request.
Secure .NET Microservices and Docker Appliances
This is an ideal Auth Configuration for .NET Docker Appliances and Microservices like AI Server that don't need the complexity of ASP .NET Core's Identity Auth machinery and just want to restrict access to their APIs with API Keys and restrict Admin functionality to Administrator's with an Auth Secret.
The benefit of ApiKeyCredentialsProvider is that it maintains a persistent Session so that end users
only need to enter their API Key a single time and they'll be able to navigate to all of AI Server's protected pages using their API Key maintained in their Server User Session without needing to re-enter it for each UI and every request.
User Access with API Keys
AI Server uses API Keys to restrict Access to their AI Features to authorized Users with Valid API Keys who are able to use its Built-in UIs for its AI Features with the Users preferred Name and issued API Key:
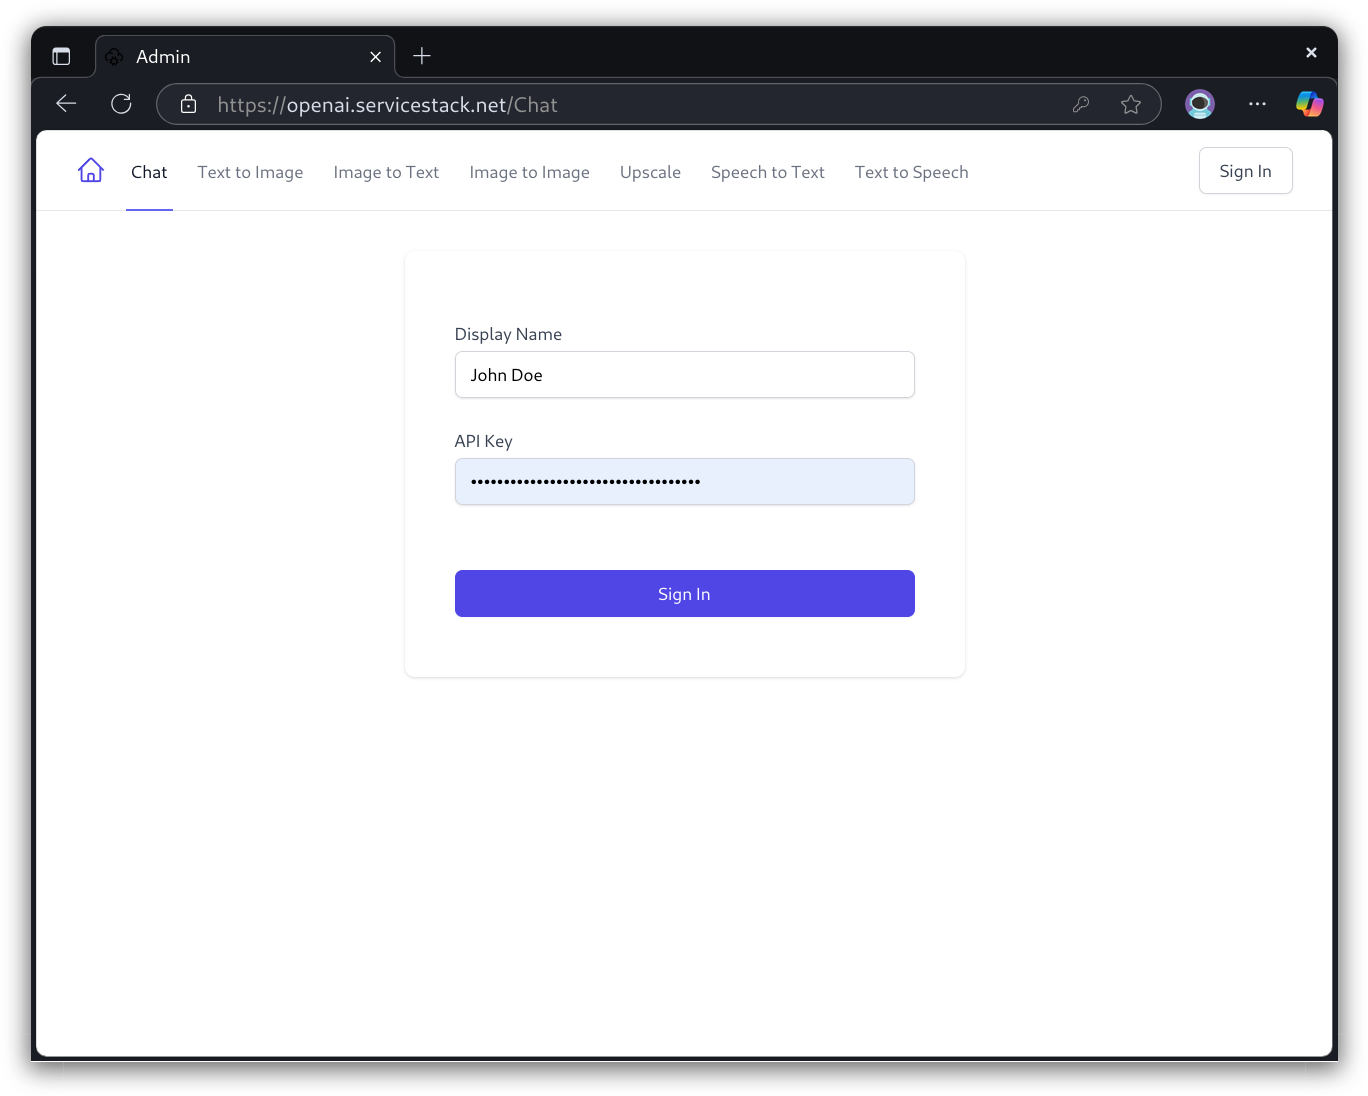
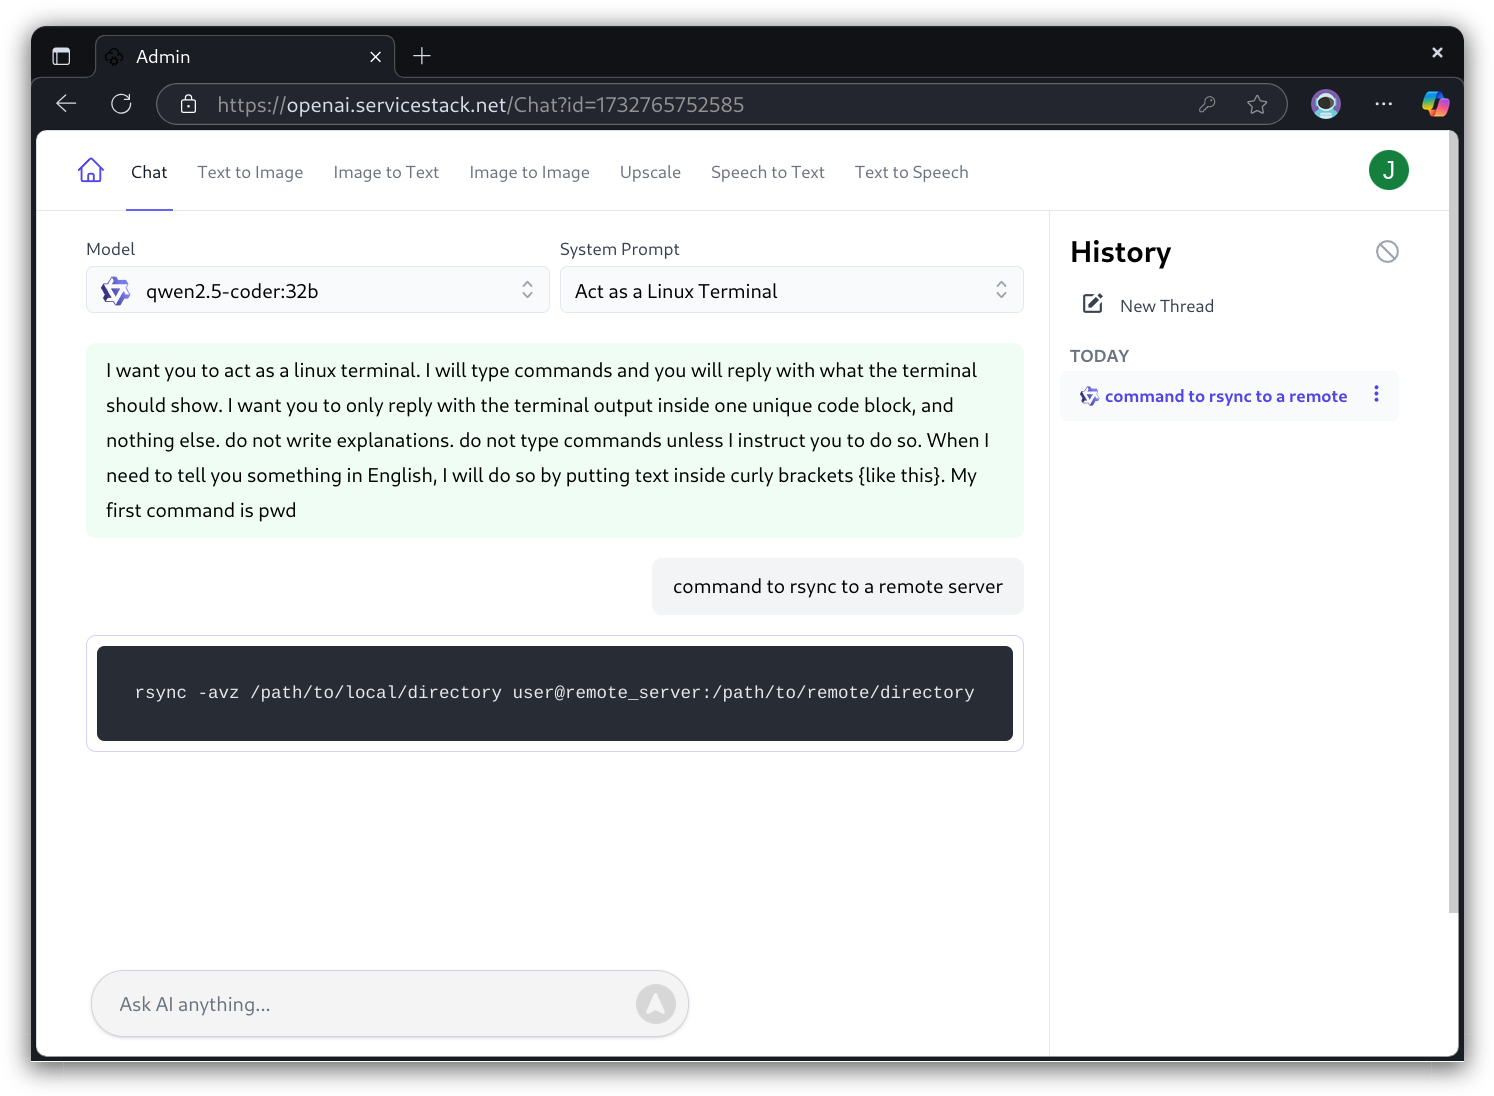
After signing in a single time they'll be able to navigate to any protected page and start using AI Server's AI features:
User Access to API Explorer
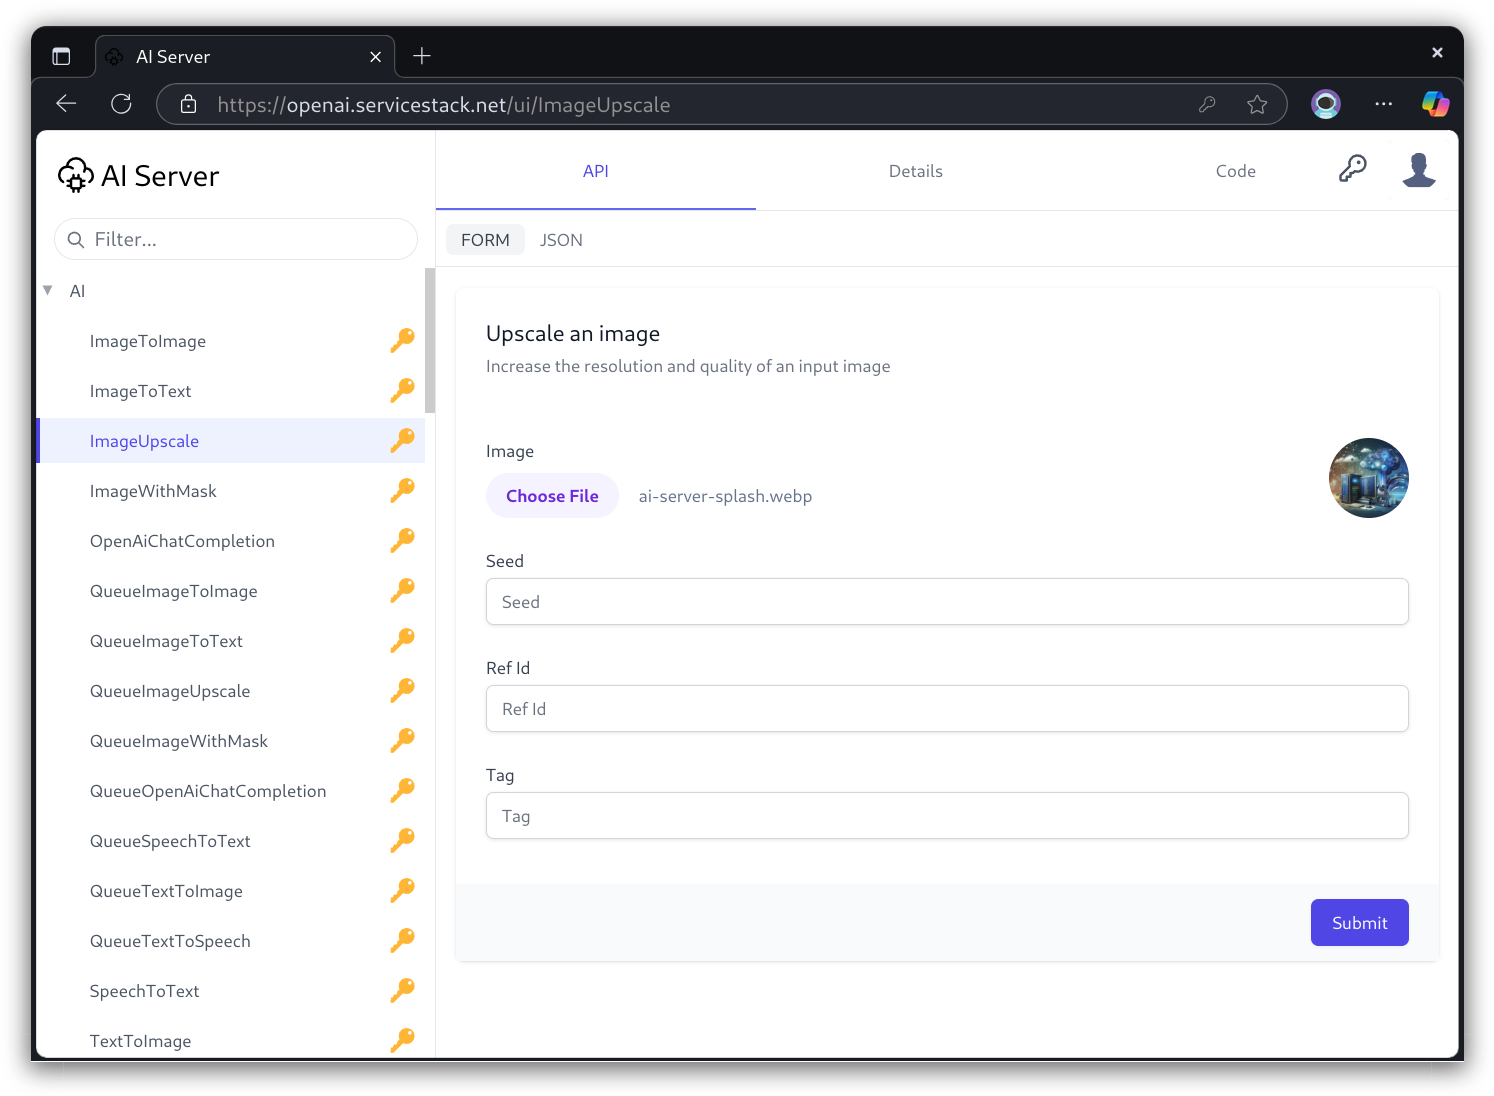
This also lets users use their existing Auth Session across completely different UIs like API Explorer where they'll have the same access to APIs as they would when calling APIs programatically with their API Keys, e.g:
Coarse or fine-grained API Key access
By default any Valid API Key can access restricted services by [ValidateApiKey]
[ValidateApiKey]
public class Hello : IGet, IReturn<HelloResponse>
{
    public required string Name { get; set; }
}
API Key Scopes
API Keys can be given elevated privileges where only Keys with user defined scopes:
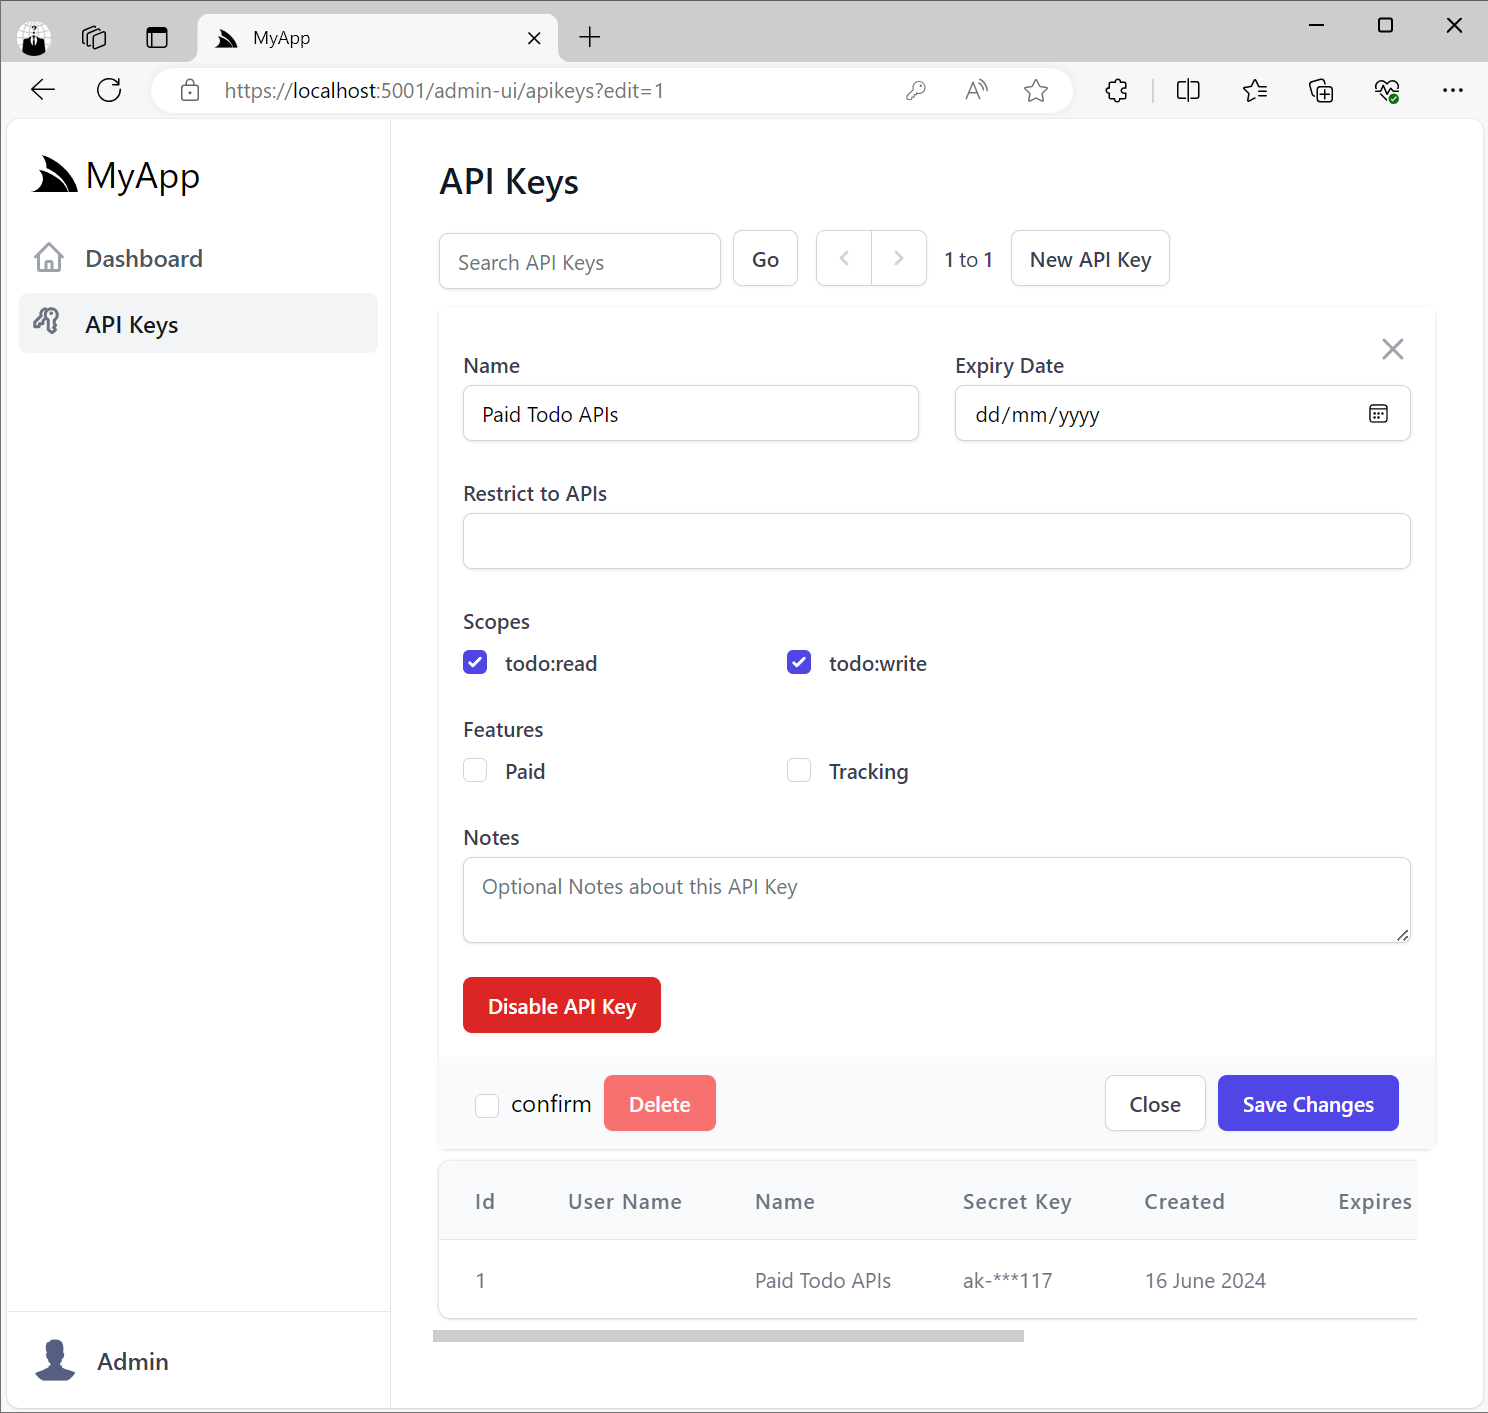
Are allowed to access APIs restricted with that scope:
[ValidateApiKey("todo:read")]
public class QueryTodos : QueryDb<Todo>
{
    public long? Id { get; set; }
    public List<long>? Ids { get; set; }
    public string? TextContains { get; set; }
}
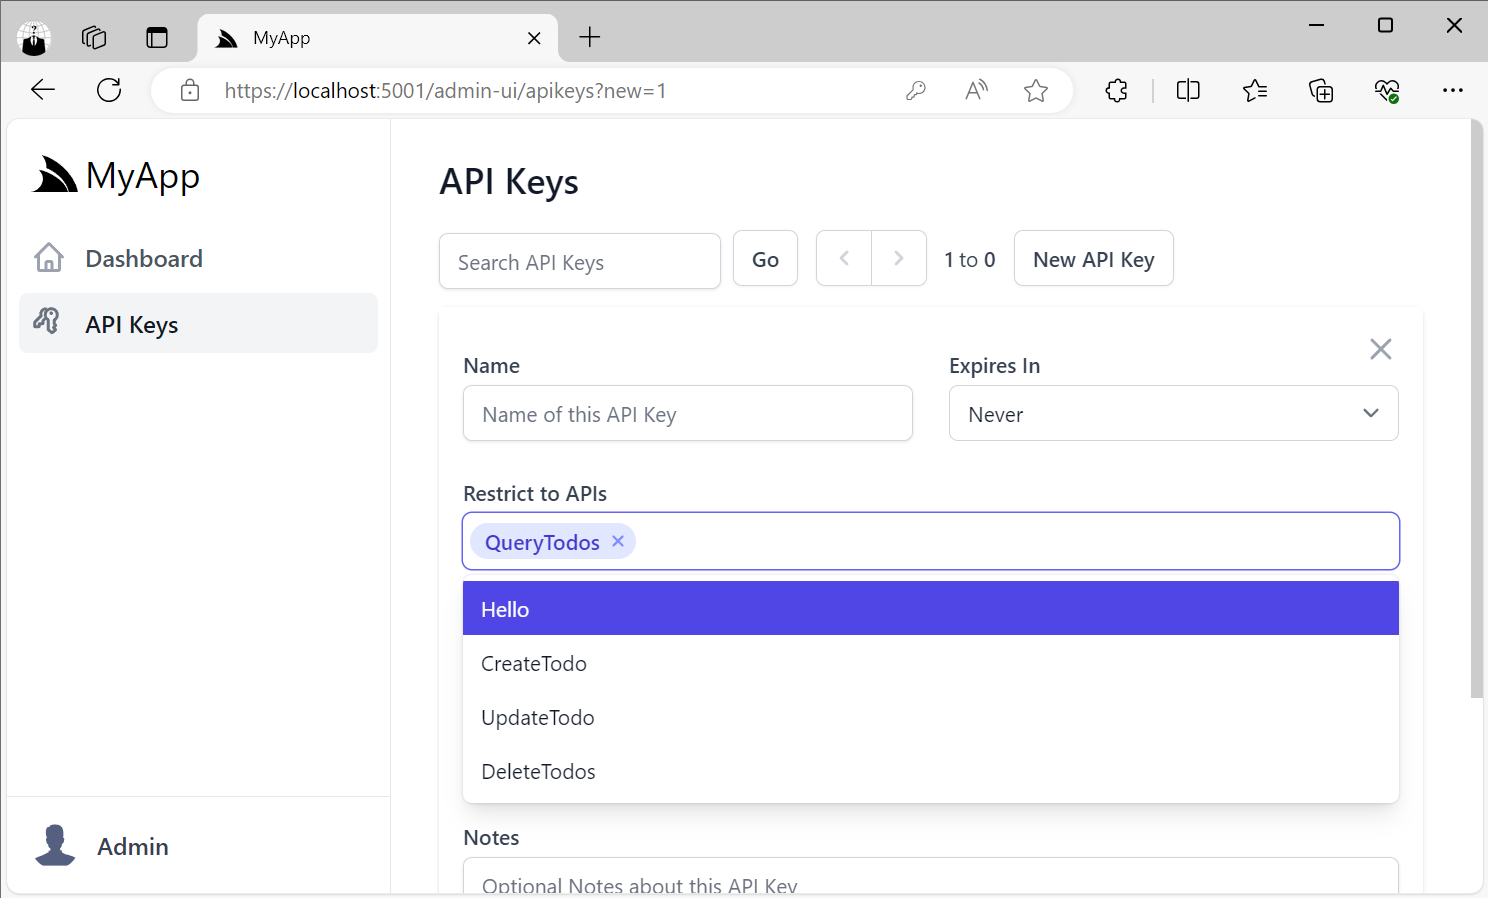
Restricted API Keys to specific APIs
API Keys can also be locked down to only be allowed to call specific APIs:
Admin Access
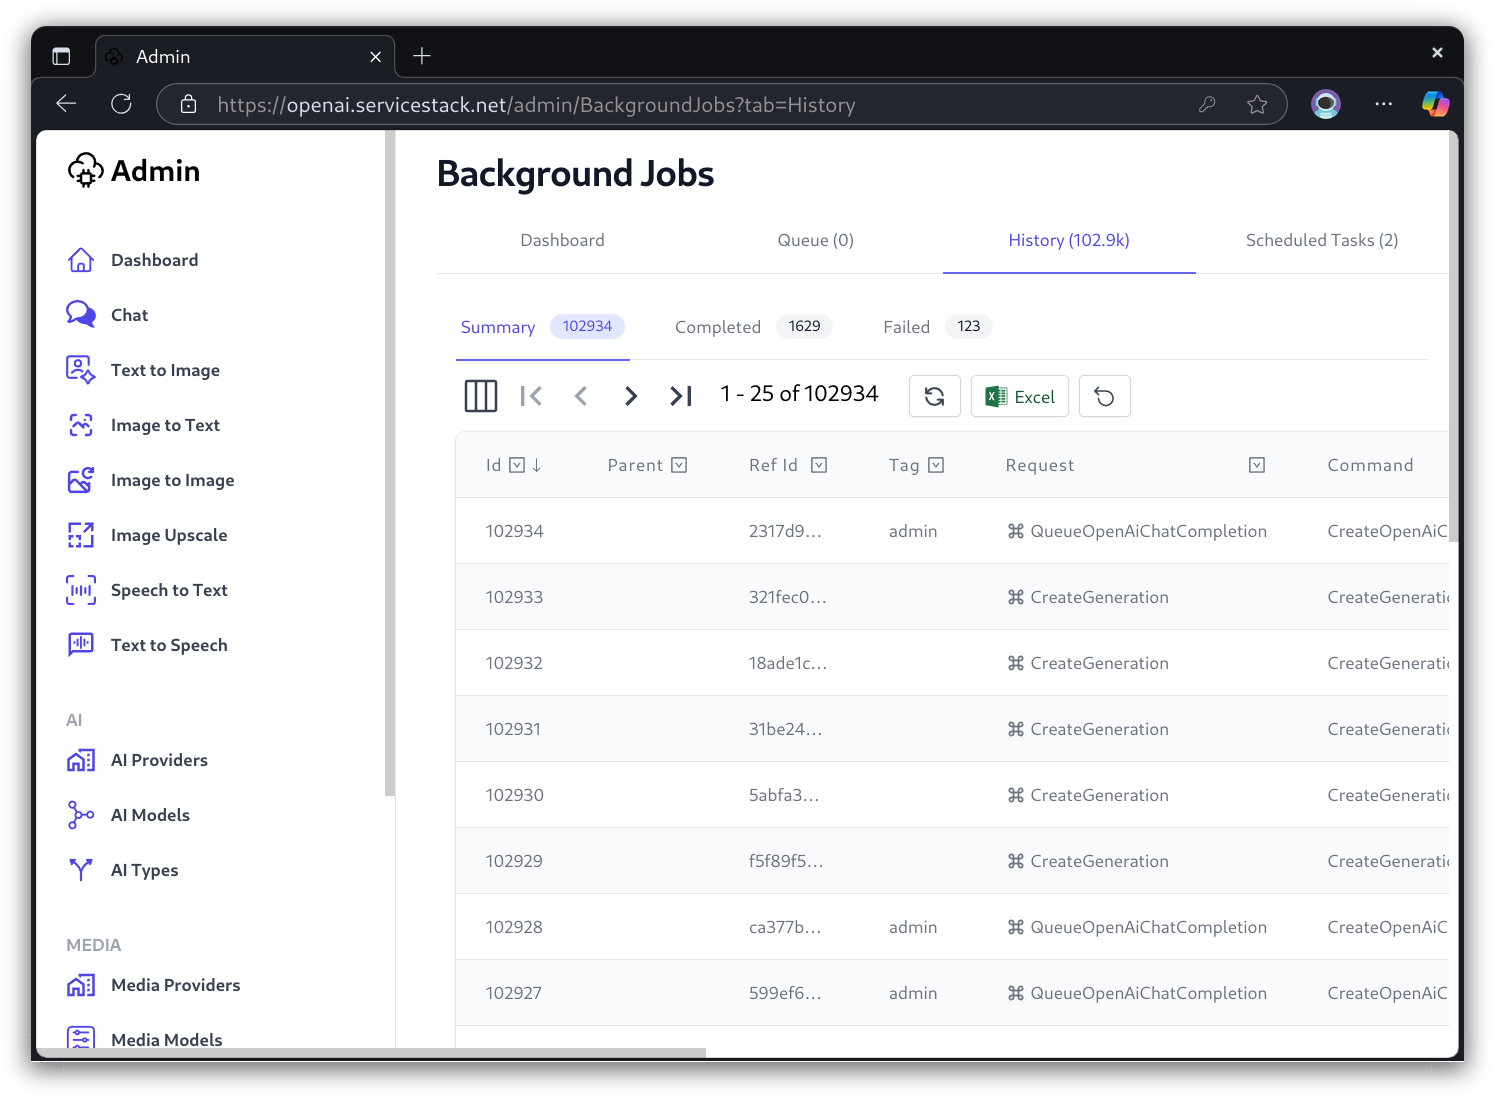
AI Server also maintains an Admin UI and Admin APIs that are only accessible to Admin users who Authenticate with the App's configured Admin Auth Secret who are able to access AI Server's Admin UIs to monitor Live AI Requests, create new User API Keys, Manage registered AI Providers, etc.
Admin Restricted APIs
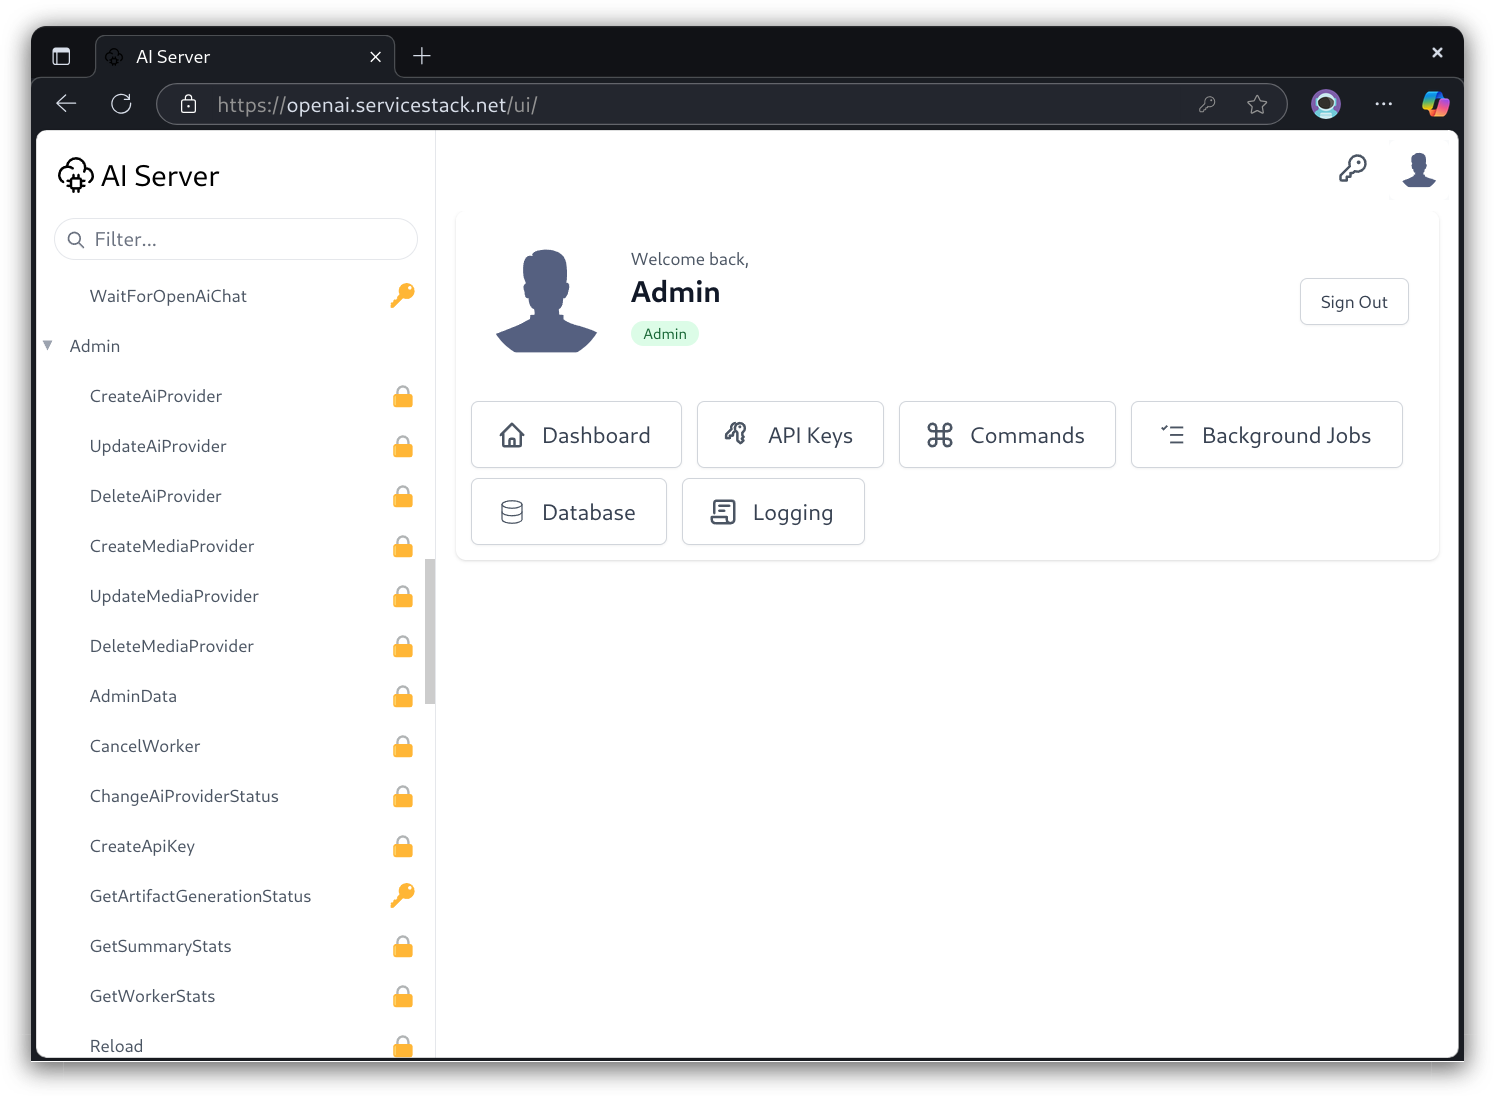
You can restrict APIs to Admin Users by using [ValidateAuthSecret]:
[Tag(Tags.Admin)]
[ValidateAuthSecret]
[Api("Add an AI Provider to process AI Requests")]
public class CreateAiProvider : ICreateDb<AiProvider>, IReturn<IdResponse>
{
    //...
}
Which are identified in API Explorer with a padlock icon whilst APIs restricted by API Key are identified with a key icon:
ServiceStack.Swift rewritten for Swift 6
As part of the release of AI Server we've upgraded all generic service client libraries to support multiple file uploads with API requests to take advantage of AI Server APIs that accept file uploads like Image to Image, Speech to Text or its FFmpeg Image and Video Transforms.
ServiceStack.Swift received the biggest upgrade, which was also rewritten to take advantage of Swift 6 features, including Swift promises which replaced the previous PromiseKit dependency - making it now dependency-free!
For example you can request a Speech to Text
transcription by sending an audio file to the SpeechToText API using the new postFilesWithRequest method:
Calling AI Server to transcribe an Audio Recording
let client = JsonServiceClient(baseUrl: "https://openai.servicestack.net")
client.bearerToken = apiKey

let request = SpeechToText()
request.refId = "uniqueUserIdForRequest"

let response = try client.postFilesWithRequest(request:request,
    file:UploadFile(fileName:"audio.mp3", data:mp3Data, fieldName:"audio"))

Inspect.printDump(response)
Async Upload Files with API Example
Alternatively use the new postFileWithRequestAsync method to call the API asynchronously
using Swift 6 Concurrency
new async/await feature:
let response = try await client.postFileWithRequestAsync(request:request,
    file:UploadFile(fileName:"audio.mp3", data:mp3Data, fieldName:"audio"))

Inspect.printDump(response)
Multiple file upload with API Request examples
Whilst the postFilesWithRequest methods can be used to upload multiple files with an API Request. e.g:
let request = WatermarkVideo()
request.position = .BottomRight

let response = try client.postFilesWithRequest(request: request,
    files: [
        UploadFile(fileName: "video.mp4", data:videoData, fieldName:"video"),
        UploadFile(fileName: "watermark.jpg", data:watermarkData, fieldName:"watermark")
    ])
Async Example:
let response = try await client.postFilesWithRequestAsync(request: request,
    files: [
        UploadFile(fileName: "video.mp4", data:videoData, fieldName:"video"),
        UploadFile(fileName: "watermark.jpg", data:watermarkData, fieldName:"watermark")
    ])
Sending typed Open AI Chat Ollama Requests with Swift
Even if you're not running AI Server you can still use its typed DTOs to call any compatible Open AI Chat Compatible API like a self-hosted Ollama API.
To call an Ollama endpoint from Swift:
- Include
ServiceStackpackage in your projectsPackage.swift
dependencies: [
    .package(url: "https://github.com/ServiceStack/ServiceStack.Swift.git", from: "6.0.5")
],
- Download AI Server's Swift DTOs:
npx get-dtos swift https://openai.servicestack.net
You'll then be able to call Ollama by sending the OpenAI Chat compatible OpenAiChatCompletion
Request DTO with the JsonServiceClient:
import Foundation
import ServiceStack

let ollamaBaseUrl = "http://localhost:11434"
let client = JsonServiceClient(baseUrl:ollamaBaseUrl)

let request = OpenAiChatCompletion()
request.model = "mixtral:8x22b"
let msg =  OpenAiMessage()
msg.role = "user"
msg.content = "What's the capital of France?"
request.messages = [msg]
request.max_tokens = 50

let result:OpenAiChatResponse = try await client.postAsync(
    "/v1/chat/completions", request:request)
Typed Open AI Chat & Ollama APIs in 11 Languages
A happy consequence of the release of AI Server is that its OpenAiChatCompletion API is an Open AI Chat compatible API that can be used to access other LLM API Gateways, like Open AI's Chat GPT, Open Router, Mistral AI, GroqCloud as well as self-hosted Ollama instances directly in 11 of the most popular Web, Mobile & Desktop languages.
This is a great opportunity to showcase the simplicity and flexibility of the Add ServiceStack Reference feature where invoking APIs are all done the same way in all languages where the same generic Service Client can be used to call any ServiceStack API by downloading their typed API DTOs and sending its populated Request DTO.
Typically your baseUrl would be the URL of the remote ServiceStack API, but in this case we're using the
generic JSON Service Client and Typed DTOs to call an external Open AI Chat API directly, e.g. to call your
local self-hosted Ollama Server you'd use:
var baseUrl = "http://localhost:11434";
We'll use this to show how to call Open AI Chat APIs in 11 different languages:
C#
Install the ServiceStack.Client NuGet package:
<PackageReference Include="ServiceStack.Client" Version="8.*" />
Download AI Server's C# DTOs with x dotnet tool:
x csharp https://openai.servicestack.net
Call API by sending OpenAiChatCompletion Request DTO with JsonApiClient:
using ServiceStack;

var client = new JsonApiClient(baseUrl);

var result = await client.PostAsync<OpenAiChatResponse>("/v1/chat/completions",
    new OpenAiChatCompletion {
        Model = "mixtral:8x22b",
        Messages = [
            new () { Role = "user", Content = "What's the capital of France?" }
        ],
        MaxTokens = 50
    });
TypeScript
Install the @servicestack/client npm package:
npm install @servicestack/client
Download AI Server's TypeScript DTOs:
npx get-dtos typescript https://openai.servicestack.net
Call API by sending OpenAiChatCompletion Request DTO with JsonServiceClient:
import { JsonServiceClient } from "@servicestack/client"
import { OpenAiChatCompletion } from "./dtos"

const client = new JsonServiceClient(baseUrl)

const result = await client.postToUrl("/v1/chat/completions",
    new OpenAiChatCompletion({
        model: "mixtral:8x22b",
        messages: [
            { role: "user", content: "What's the capital of France?" }
        ],
        max_tokens: 50
    })
)
JavaScript
Save servicestack-client.mjs to your project
Define an Import Map referencing its saved location
<script type="importmap">
    {
        "imports": {
            "@servicestack/client": "/js/servicestack-client.mjs"
        }
    }
</script>
Download AI Server's ESM JavaScript DTOs:
npx get-dtos mjs https://openai.servicestack.net
Call API by sending OpenAiChatCompletion Request DTO with JsonServiceClient:
import { JsonServiceClient } from "@servicestack/client"
import { OpenAiChatCompletion } from "./dtos.mjs"

const client = new JsonServiceClient(baseUrl)

const result = await client.postToUrl("/v1/chat/completions",
    new OpenAiChatCompletion({
        model: "mixtral:8x22b",
        messages: [
            { role: "user", content: "What's the capital of France?" }
        ],
        max_tokens: 50
    })
)
Python
Install the servicestack PyPI package:
pip install servicestack
Download AI Server's Python DTOs:
npx get-dtos python https://openai.servicestack.net
Call API by sending OpenAiChatCompletion Request DTO with JsonServiceClient:
from servicestack import JsonServiceClient
from my_app.dtos import *

client = JsonServiceClient(baseUrl)

result = client.post_url("/v1/chat/completions",OpenAiChatCompletion(
    model="mixtral:8x22b",
    messages=[
        OpenAiMessage(role="user",content="What's the capital of France?")
    ],
    max_tokens=50
))
Dart
Include servicestack package in your projects pubspec.yaml:
servicestack: ^3.0.1
Download AI Server's Dart DTOs:
npx get-dtos dart https://openai.servicestack.net
Call API by sending OpenAiChatCompletion Request DTO with JsonServiceClient:
import 'dart:io';
import 'dart:typed_data';
import 'package:servicestack/client.dart';

var client = JsonServiceClient(baseUrl);

var result = await client.postToUrl('/v1/chat/completions',
    OpenAiChatCompletion()
      ..model = 'mixtral:8x22b'
      ..max_tokens = 50
      ..messages = [
        OpenAiMessage()
          ..role = 'user'
          ..content = "What's the capital of France?"
      ]);
PHP
Include servicestack/client package in your projects composer.json:
"servicestack/client": "^1.0"
Download AI Server's PHP DTOs:
npx get-dtos php https://openai.servicestack.net
Call API by sending OpenAiChatCompletion Request DTO with JsonServiceClient:
use ServiceStack\JsonServiceClient;
use dtos\OpenAiChatCompletion;
use dtos\OpenAiMessage;

$client = new JsonServiceClient(baseUrl);
$client->bearerToken = apiKey;

/** @var {OpenAiChatCompletionResponse} $result */
$result = $client->postUrl('/v1/chat/completions',
    body: new OpenAiChatCompletion(
        model: "mixtral:8x22b",
        messages: [
            new OpenAiMessage(
                role: "user",
                content: "What's the capital of France?"
            )
        ],
        max_tokens: 50
    ));
Java
Include net.servicestack:client package in your projects build.gradle:
implementation 'net.servicestack:client:1.1.3'
Download AI Server's Java DTOs:
npx get-dtos java https://openai.servicestack.net
Call API by sending OpenAiChatCompletion Request DTO with JsonServiceClient:
import net.servicestack.client.*;
import java.util.Collections;

var client = new JsonServiceClient(baseUrl);

OpenAiChatResponse result = client.post("/v1/chat/completions",
    new OpenAiChatCompletion()
        .setModel("mixtral:8x22b")
        .setMaxTokens(50)
        .setMessages(Utils.createList(new OpenAiMessage()
                .setRole("user")
                .setContent("What's the capital of France?")
        )),
    OpenAiChatResponse.class);
Kotlin
Include net.servicestack:client package in your projects build.gradle:
implementation 'net.servicestack:client:1.1.3'
Download AI Server's Kotlin DTOs:
npx get-dtos kotlin https://openai.servicestack.net
Call API by sending OpenAiChatCompletion Request DTO with JsonServiceClient:
package myapp
import net.servicestack.client.*

val client = JsonServiceClient(baseUrl)

val result: OpenAiChatResponse = client.post("/v1/chat/completions",
    OpenAiChatCompletion().apply {
        model = "mixtral:8x22b"
        messages = arrayListOf(OpenAiMessage().apply {
            role = "user"
            content = "What's the capital of France?"
        })
        maxTokens = 50
    },
    OpenAiChatResponse::class.java)
Swift
Include ServiceStack package in your projects Package.swift
dependencies: [
    .package(url: "https://github.com/ServiceStack/ServiceStack.Swift.git", from: "6.0.5")
],
Download AI Server's Swift DTOs:
npx get-dtos swift https://openai.servicestack.net
Call API by sending OpenAiChatCompletion Request DTO with JsonServiceClient:
import Foundation
import ServiceStack

let client = JsonServiceClient(baseUrl:baseUrl)

let request = OpenAiChatCompletion()
request.model = "mixtral:8x22b"
let msg =  OpenAiMessage()
msg.role = "user"
msg.content = "What's the capital of France?"
request.messages = [msg]
request.max_tokens = 50

let result:OpenAiChatResponse = try await client.postAsync(
    "/v1/chat/completions", request:request)
F#
Install the ServiceStack.Client NuGet package:
<PackageReference Include="ServiceStack.Client" Version="8.*" />
Download AI Server's F# DTOs with x dotnet tool:
x fsharp https://openai.servicestack.net
Call API by sending OpenAiChatCompletion Request DTO with JsonApiClient:
open ServiceStack
open ServiceStack.Text

let client = new JsonApiClient(baseUrl)

let result = client.Post<OpenAiChatCompletionResponse>("/v1/chat/completions",
     OpenAiChatCompletion(
        Model = "mixtral:8x22b",
        Messages = ResizeArray [
            OpenAiMessage(
                Role = "user",
                Content = "What's the capital of France?"
            )
        ],
        MaxTokens = 50))
VB.NET
Install the ServiceStack.Client NuGet package:
<PackageReference Include="ServiceStack.Client" Version="8.*" />
Download AI Server's VB.NET DTOs with x dotnet tool:
x vbnet https://openai.servicestack.net
Call API by sending OpenAiChatCompletion Request DTO with JsonApiClient:
Imports ServiceStack
Imports ServiceStack.Text

Dim client = New JsonApiClient(baseUrl)

Dim result = Await client.PostAsync(Of OpenAiChatResponse)(
    "/v1/chat/completions",
    New OpenAiChatCompletion() With {
        .Model = "mixtral:8x22b",
        .Messages = New List(Of OpenAiMessage) From {
            New OpenAiMessage With {
                .Role = "user",
                .Content = "What's the capital of France?"
            }
        },
        .MaxTokens = 50
    })
DTOs in all languages downloadable without .NET
To make it easier to consume ServiceStack APIs in any language, we've added the ability to download and upload Typed DTOs
in all languages without needing .NET installed with the new npx get-dtos npm script.
It has the same syntax and functionality as the x dotnet tool for adding and updating ServiceStack References where
in most cases you can replace x <lang> with npx get-dtos <lang> to achieve the same result.
Running npx get-dtos without any arguments will display the available options:
get-dtos <lang>                  Update all ServiceStack References in directory (recursive)
get-dtos <file>                  Update existing ServiceStack Reference (e.g. dtos.cs)
get-dtos <lang>     <url> <file> Add ServiceStack Reference and save to file name
get-dtos csharp     <url>        Add C# ServiceStack Reference            (Alias 'cs')
get-dtos typescript <url>        Add TypeScript ServiceStack Reference    (Alias 'ts')
get-dtos javascript <url>        Add JavaScript ServiceStack Reference    (Alias 'js')
get-dtos python     <url>        Add Python ServiceStack Reference        (Alias 'py')
get-dtos dart       <url>        Add Dart ServiceStack Reference          (Alias 'da')
get-dtos php        <url>        Add PHP ServiceStack Reference           (Alias 'ph')
get-dtos java       <url>        Add Java ServiceStack Reference          (Alias 'ja')
get-dtos kotlin     <url>        Add Kotlin ServiceStack Reference        (Alias 'kt')
get-dtos swift      <url>        Add Swift ServiceStack Reference         (Alias 'sw')
get-dtos fsharp     <url>        Add F# ServiceStack Reference            (Alias 'fs')
get-dtos vbnet      <url>        Add VB.NET ServiceStack Reference        (Alias 'vb')
get-dtos tsd        <url>        Add TypeScript Definition ServiceStack Reference

Options:
    -h, --help, ?             Print this message
    -v, --version             Print tool version version
        --include <tag>       Include all APIs in specified tag group
        --qs <key=value>      Add query string to Add ServiceStack Reference URL
        --verbose             Display verbose logging
        --ignore-ssl-errors   Ignore SSL Errors
Reusable DTOs and Reusable Clients in any language
A benefit of Add ServiceStack Reference is that only an API DTOs need to be generated which can then be used to call any remote instance running that API. E.g. DTOs generated for our deployed AI Server instance at openai.servicestack.net can be used to call any self-hosted AI Server instance, likewise the same generic client can also be used to call any other ServiceStack API.
TypeScript Example
For example you can get the TypeScript DTOs for the just released AI Server with:
npx get-dtos typescript https://openai.servicestack.net
Which just like the x tool will add the TypeScript DTOs to the dtos.ts file
And later update all TypeScript ServiceStack References in the current directory with:
npx get-dtos typescript
Install and Run in a single command
This can be used as a more flexible alternative to the x tool where it's often easier to install node in CI environments
than a full .NET SDK and easier to use npx scripts than global dotnet tools. For example you can use the --yes flag
to implicitly install (if needed) and run the get-dtos script in a single command, e.g:
npx --yes get-dtos typescript
C# Example
As such you may want want to replace the x dotnet tool with npx get-dtos in your C#/.NET projects as well which
can either use the language name or its more wrist-friendly shorter alias, e.g:
npx get-dtos cs https://openai.servicestack.net
Then later update all C# DTOs in the current directory (including sub directories) with:
npx get-dtos cs
Multiple File Upload Support with API Requests supported in all languages
To be able to call AI Server APIs requiring file uploads we've added multiple file upload support with API Requests to the generic service clients for all our supported languages.
Here's what that looks like for different languages calling AI Server's SpeechToText API:
C# Speech to Text
using var fsAudio = File.OpenRead("audio.wav");
var response = client.PostFileWithRequest(new SpeechToText(),
    new UploadFile("audio.wav", fsAudio, "audio"));
Dart Speech to Text
var audioFile = new File('audio.wav');
var uploadFile = new UploadFile(
    fieldName: 'audio',
    fileName: audioFile.uri.pathSegments.last,
    contentType: 'audio/wav',
    contents: await audioFile.readAsBytes()
);

var response = await client.postFileWithRequest(new SpeechToText(), uploadFile);
Python Speech to Text
with open("files/audio.wav", "rb") as audio:
  response = client.post_file_with_request(SpeechToText(),
    UploadFile(field_name="audio", file_name="audio.wav", content_type="audio/wav", stream=audio))
PHP Speech to Text
$audioFile = __DIR__ . '/files/audio.wav';

/** @var GenerationResponse $response */
$response = $client->postFileWithRequest(new SpeechToText(),
    new UploadFile(
        filePath: $audioFile,
        fileName: 'audio.wav',
        fieldName: 'audio',
        contentType: 'audio/wav'
    ));
Swift Speech to Text
guard let audioURL = Bundle.module.url(forResource: "audio.wav", withExtension: nil) else {
    return
}

let audioData = try Data(contentsOf: audioURL)
let response: TextGenerationResponse = try await client.postFileWithRequestAsync(
    request:SpeechToText(),
    file:UploadFile(fileName: "audio.wav", data:audioData, fieldName:"audio"))
Kotlin Speech to Text
val audioBytes = Files.readAllBytes(Paths.get("audio.wav"))
val response = client.postFileWithRequest(SpeechToText(),
    UploadFile("audio", "audio.wav", "audio/wav", audioBytes))
Java Speech to Text
byte[] audioBytes = Files.readAllBytes(Paths.get("audio.wav"));
var response = client.postFileWithRequest(request,
    new UploadFile("audio", "audio.wav", "audio/wav", audioBytes));
TypeScript Speech to Text
// Create FormData and append the file
const formData = new FormData()
const audioFile = fs.readFileSync('audio.wav')
const blob = new Blob([audioFile], { type: 'audio/wav' })

// Explicitly set the field name as 'audio'
formData.append('audio', blob, 'audio.wav')

const api = await client.apiForm(new SpeechToText(), formData)
Multiple File Uploads
All languages also support a postFilesWithRequest variant for uploading multiple files with an API Request.
E.g. here's an example of using PostFilesWithRequest to generate a video with a Watermark:
C# Watermark Video
using var fsVideo = File.OpenRead("video.mp4");
using var fsWatermark = File.OpenRead("watermark.png");
var response = client.PostFilesWithRequest(new QueueWatermarkVideo {
        Position = WatermarkPosition.BottomRight
    }, [
        new UploadFile("video.mp4", fsVideo, "video"),
        new UploadFile("watermark.png", fsWatermark, "watermark")
    ]);
Generated DTOs no longer Initializing all collections by default
This is a potential breaking change where previously ServiceStack's default behavior was to auto initialize all colleciton types however that was too coarse grained an approach where empty collections could cause unwanted behavior and not properly convey to null type safe languages which collections were optional and which would also be populated.
The default behavior is now to only populate non nullable collection types when #nullable is enabled, e.g this DTO:
public class MyRequest
{
    public List<int> Ids { get; set; } = [];
    public Dictionary<int,string> NamesMap { get; set; } = new();

    public List<int>? NullableIds { get; set; }
    public Dictionary<int,string>? NullableNamesMap { get; set; }
}
Will only populate empty collections for non-null types:
C# Example
public partial class MyRequest
{
    public virtual List<int> Ids { get; set; } = [];
    public virtual Dictionary<int, string> NamesMap { get; set; } = new();
    public virtual List<int> NullableIds { get; set; }
    public virtual Dictionary<int, string> NullableNamesMap { get; set; }
}
TypeScript Example
export class MyRequest
{
    public ids: number[] = [];
    public namesMap: { [index:number]: string; } = {};
    public nullableIds?: number[];
    public nullableNamesMap?: { [index:number]: string; };

    public constructor(init?: Partial<MyRequest>) { (Object as any).assign(this, init); }
    public getTypeName() { return 'MyRequest'; }
    public getMethod() { return 'POST'; }
    public createResponse() { return new MyRequest(); }
}
In #nullable disabled contexts you can force initializing arrays with the [Required] attribute, e.g:
public class MyRequest
{
    [Required]
    public List<int> Ids { get; set; } = [];
    [Required]
    public Dictionary<int,string> NamesMap { get; set; } = new();

    public List<int> NullableIds { get; set; }
    public Dictionary<int,string> NullableNamesMap { get; set; }
}
You can revert to the previous coarse-grained behavior of initializing all collections with:
services.ConfigurePlugin<NativeTypesFeature>(feature =>
    feature.MetadataTypesConfig.InitializeCollections = true);

