Many features in this release are focused on providing a more enjoyable, integrated and refined development experience for creating ServiceStack Apps.
Starting with Modular Startup to enable a "no-touch", layerable composition of ASP.NET Core Apps, the
mix dotnet tools for being able to add hand-picked features with a single command from its
extensible library of composable features.
Unified Navigation allows features to provide even deeper integration into your Apps and its
native navigation renderers makes it effortless to maintain your Apps dynamic navigation menus across ServiceStack's
most popular App types.
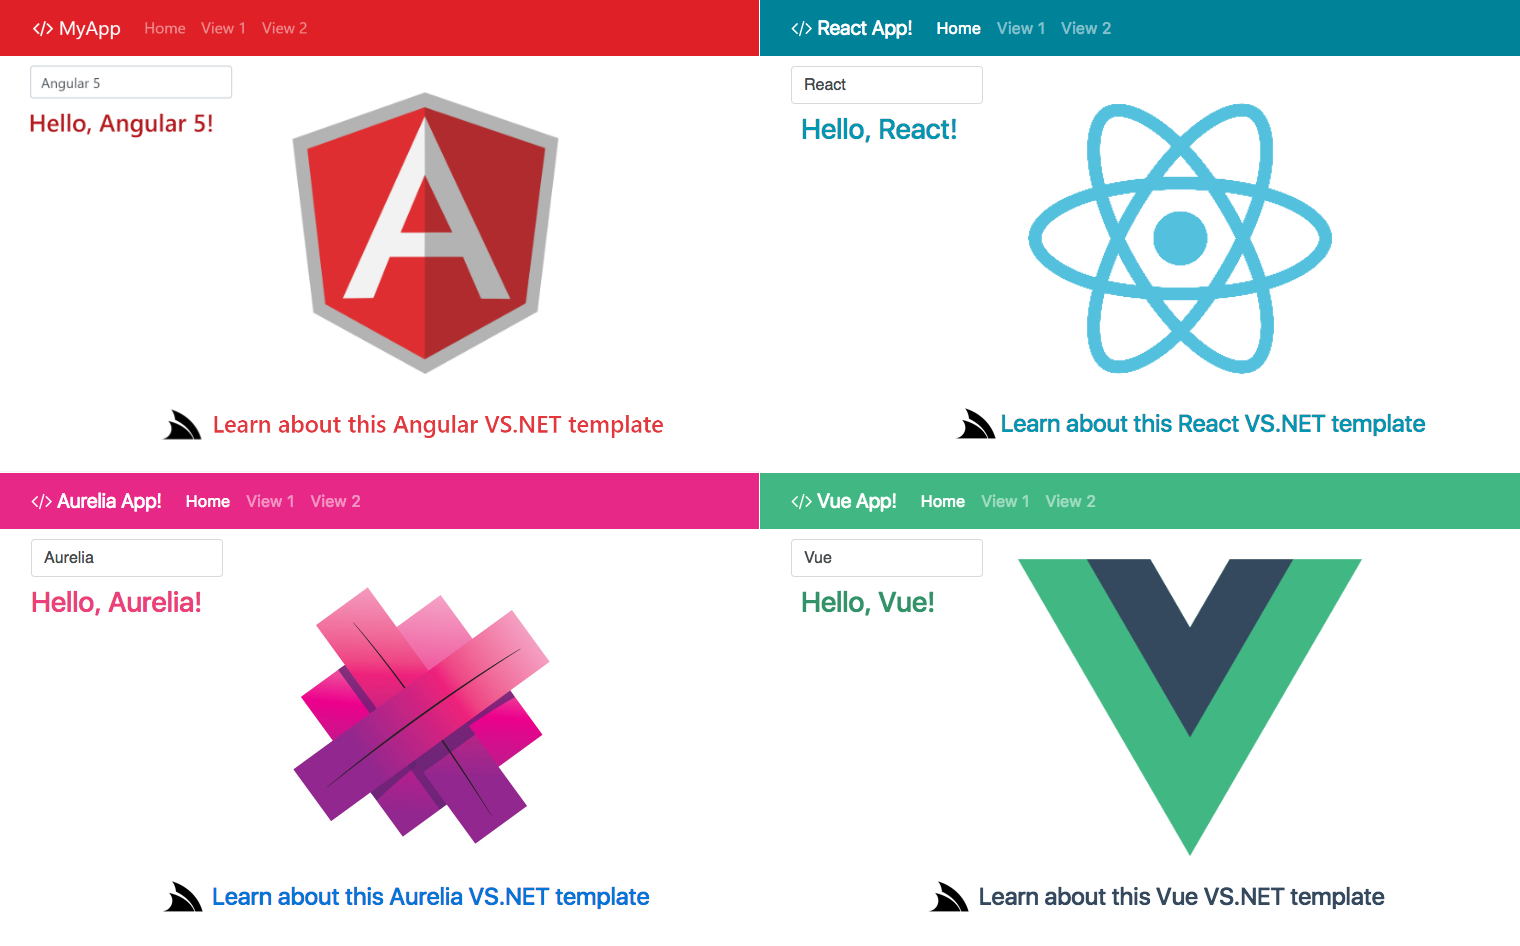
High-level UI Controls available to Sharp and Razor Pages Web Apps as well as rich client Component Libraries for Vue, React and Angular Apps provide an integrated experience for User Input Validation and App Routing and Navigation.
The new SVG support takes care of maintaining libraries of SVG image-sets to produce optimal .css bundles and a variety of different ways to easily make usage of SVG images into your App without any reliance on external or build tooling.
The easiest way to take advantage of these features is to create a new ASP.NET Core Project Template which have them pre-configured along with integrated Auth including auth-redirect flow of protected Service APIs and Pages.
#Script has gained a number of exciting features, graduating it to where it's now our preferred way to create cross-platform
shell scripts that's now an enjoyable productive experience with the real-time feedback of watched scripts.
However its most exciting new capability is being able to Run Desktop Apps from Gists! Resolving many of the
disadvantages of Desktop Apps along the way, which are
Always Up-to-date, requires no install, can be run from URL of a Gist, GitHub Repo or Release Archive
or when needed, offline, using the last run version.
The same Sharp App can also be run cross-platform on Windows, macOS and Linux and hosted on a Server that can be
deployed and updated in the easiest process imaginable thanks to its built-in support for
publishing and installation.
We hope you love these new features and can't wait to see what new creations you build using them :)
Table of Contents
- ASP.NET Core App Composition
- Modular Startup
- Mix n' Match .NET Core Apps
- mix-enabled dotnet tools
- mix Usage
- Mix in Features into ASP.NET Core Apps
- Mix in DB Support
- Composable Features
- Undo mix
- Encapsulated Features
- Mix in Auth Repository
- Mix in MQ Server
- Mix in Prebuilt Recipes and Working Examples
- Modular Startup prioritization
- AppHost Startup classes
- Register ASP.NET Core dependencies in AppHost
- Unified Navigation
- SPA Component Libraries
- SVG
- Embedded Bootstrap CSS
- Refined Project Templates
- #Script Features
- Gist VFS Provider
- GitHubGateway
- Gist Desktop Apps
- ServiceStack Updates
- OrmLite
- ServiceStack.Redis
- ServiceStack.Text
ASP.NET Core App Composition
An area of ASP.NET Core that's less than ideal is app composability which involves using opaque RPC "mystery meat" extension methods to enable features by slotting them in different sections of your Startup class.
There's a lack of consistency with how each feature is enabled, some require both Services and App registration, some use a configuration lambda to configure the feature, other use a builder pattern, some require multiple app registrations, and in some cases like MVC Tag Helpers, also need configuration in external files.
App construction via opaque RPC mutations makes it hard to introspect and discover what features are enabled, how they were configured, how different features can interact with each other, to be able to attach additional custom logic and registration or to replace or disable any pre-existing conflicting features.
They also require more moving parts to build a feature which typically requires separate classes for exposing an Extension method, configuration object and any classes for its implementation, and another set of classes again if the feature requires registering any dependencies in the IOC.
ServiceStack's Plugins
By contrast you could implement the same feature in a single cohesive Plugin class like CorsFeature, encapsulating both configuration and implementation and exposes an ideal natural declarative typed API that takes advantage of C#'s class and property initialization syntax sugar for simplified typed configuration. They also naturally benefit from all the introspection, discoverability and modularity of being maintained within a generic List collection that's accessible from everywhere.
Most ServiceStack features are encapsulated within Plugins which are all registered the same way - by
adding a declarative class instance to the Plugins collection. Plugins encapsulate the entire feature, taking care of all IOC
registrations and how to configure itself with ServiceStack.
So if you wanted to enable #Script Pages (alternative to MVC) and give all pages access to OrmLite's DB functionality - it can all be configured with a single declarative expression:
Plugins.Add(new SharpPagesFeature {
    ScriptMethods = {
        new DbScriptsAsync()
    }
});
Other features independent of your AppHost are able to easily extend other plugins before they're registered, e.g. the new AuthRepo UI Feature ensures #Script Pages is registered and extends it with its own functionality with:
public void Configure(IAppHost appHost)
{
    appHost.AssertPlugin<SharpPagesFeature>().ScriptMethods.Add(new UserAuthScripts());
}
Modular plugins makes it easy to toggle on/off features with feature flags:
SetConfig(new HostConfig {
    EnableFeatures = Feature.All.Remove(Feature.Csv | Feature.Html)
})
Or just by removing them from the Plugins collection:
Plugins.RemoveAll(x => x is CsvFormat || x is HtmlFormat);
Other functionality that's not possible with ASP.NET Core's app mutation model is a implementing a dynamic plugin system as done in
Sharp Apps Plugins where it's possible to both register and configure plugins
without compilation, dynamically, using a simple app.settings text file, e.g:
features CustomPlugin, OpenApiFeature, PostmanFeature, CorsFeature, ValidationFeature
CustomPlugin { ShowProcessLinks: true }
ValidationFeature { ScanAppHostAssemblies: true }
Where it specifies which Plugins the App should register and the order they should be registered with, where any additional configuration can be configured using a JS Object Literal, together the above configuration is equivalent to:
Plugins.Add(new CustomPlugin { ShowProcessLinks = true });
Plugins.Add(new OpenApiFeature());
Plugins.Add(new PostmanFeature());
Plugins.Add(new CorsFeature());
Plugins.Add(new ValidationFeature { ScanAppHostAssemblies = true });
The features app.setting also supports adding plugins/* to the end of the features list which
enables no-touch extensibility where Apps can automatically
register all IPlugin it can find in any .dll dropped into the App's /plugin folder.
The consequence of ASP.NET's app mutation configuration model is that adding features are less intuitive, less discoverable and require more documentation and knowledge then they otherwise should. Having all features slotted into different parts of the same Startup class also makes copying and maintaining individual features across a suite of .NET Core Apps unnecessarily cumbersome.
Modular Startup
We want to dramatically simplify and improve the experience for configuring ASP.NET Core Apps and make them truly composable, where we can drop-in files that auto configures itself with both ASP.NET Core and ServiceStack's AppHost so they can encapsulate an entire feature and provide instant utility without needing to wade through different steps of how they should be manually configured at different places in your Startup configuration class.
This functionality is enabled via the ModularStartup base class which can be leveraged in any ASP.NET Core App
(i.e. not just ServiceStack Apps) by modifying the standard Startup class with injected IConfiguration:
public class Startup
{
    IConfiguration Configuration { get; }
    public Startup(IConfiguration configuration) => Configuration = configuration;

    public void ConfigureServices(IServiceCollection services)
    {
        //...
    }

    public void Configure(IApplicationBuilder app, IHostingEnvironment env)
    {
        //...
    }
}
and change it to inherit from ModularStartup instead:
public class Startup : ModularStartup
{
    public Startup(IConfiguration configuration) : base(configuration){}

    public new void ConfigureServices(IServiceCollection services)
    {
        //...
    }

    public void Configure(IApplicationBuilder app, IHostingEnvironment env)
    {
        //...
    }
}
The
newmodifier isn't strictly necessary but does resolve a compiler warning
This change now makes it possible to maintain configuration in independent "no-touch" cohesive configuration files by implementing any of the below interfaces to register dependencies in ASP.NET Core's IOC or App handlers:
public interface IConfigureServices
{
    void Configure(IServiceCollection services);
}

public interface IConfigureApp
{
    void Configure(IApplicationBuilder app);
}
Scan Multiple Assemblies
By default the ModularStartup class only scans for types in the Host project (i.e. containing the Startup class),
the base constructor can also specify a list of assemblies it should scan to find and register other "no-touch" configuration files, e.g:
public class Startup : ModularStartup
{
    public Startup(IConfiguration configuration)
      : base(configuration, typeof(Startup).Assembly, typeof(AltAssemblyType).Assembly){}
}
Skip Assembly Scanning
Assembly scanning can also be avoided entirely by specifying the list of Types implementing Startup interfaces you want registered, e.g:
public class Startup : ModularStartup
{
    public Startup(IConfiguration configuration)
      : base(configuration, typeof(ConfigureRedis), typeof(ConfigureDb)){}
}
Although in this case it ceases to be "no-touch" as it would require manual registration of each Startup class
Using AspNetCore's IStartup instead
If preferred your features configuration classes can avoid any dependency to ServiceStack by having them implement ASP.NET Core's
Microsoft.AspNetCore.Hosting IStartup class instead:
public interface IStartup
{
    // Note: return value is ignored
    IServiceProvider ConfigureServices(IServiceCollection services);

    void Configure(IApplicationBuilder app);
}
Which ModularStartup also auto-registers.
Ignore Startup Classes
The IgnoreTypes collection or LoadType predicate can be used to specify which Startup classes that ModularStartup should ignore,
so you could skip configuring Redis in your App with:
public class Startup : ModularStartup
{
    public Startup(IConfiguration configuration) : base(configuration)
    {
        IgnoreTypes.Add(typeof(ConfigureRedis));
    }
}
no-touch Startup Configuration Examples
The benefit of ModularStartup is that we can now start composing App features like lego building blocks,
so we could configure Redis with our ASP.NET Core App by dropping in a Configure.Redis.cs like:
public class ConfigureRedis : IConfigureServices
{
    public void Configure(IServiceCollection services) =>
        services.AddSingleton<IRedisClientsManager>(new RedisManagerPool());
}
Which will be auto-registered by ModularStartup and add the IRedisClientsManager dependency to .NET Core's IOC where
it's available to all of ASP.NET Core (including ServiceStack).
If a feature requires access to IConfiguration it can either use constructor injection or property injection
by implementing IRequireConfiguration, e.g:
public class ConfigureRedis : IConfigureServices
{
    IConfiguration Configuration { get; }
    public ConfigureRedis(IConfiguration configuration) => Configuration = configuration;

    public void Configure(IServiceCollection services) => services.AddSingleton<IRedisClientsManager>(
        new RedisManagerPool(Configuration.GetConnectionString("redis")));
}
We can then start adding other features depending on Redis independently without disrupting and mutating existing
configuration source files, so we can register to use a Redis Auth Repository by dropping in a Configure.AuthRepository.cs:
public class ConfigureAuthRepository : IConfigureServices
{
    public void Configure(IServiceCollection services) => services.AddSingleton<IAuthRepository>(
        c => new RedisAuthRepository(c.Resolve<IRedisClientsManager>()));
}
Or utilize Redis MQ by dropping in a Configure.Mq.cs:
public class ConfigureMq : IConfigureServices, IAfterInitAppHost
{
    public void Configure(IServiceCollection services) => services.AddSingleton<IMessageService>(
        c => new RedisMqServer(c.Resolve<IRedisClientsManager>()));

    public void AfterInit(IAppHost appHost) => appHost.Resolve<IMessageService>().Start();
}
Which other isolated features can further extend by registering which of its ServiceStack Services they want to make available via MQ:
public class MyFeature : IConfigureAppHost
{
    public void Configure(IAppHost appHost) =>
        appHost.Resolve<IMessageService>().RegisterHandler<MyRequest>(appHost.ExecuteMessage);
}
Here we can see how we can easily compose our App's functionality like lego by dropping in cohesive features that can
replace features in isolation without disrupting other parts of the App. For example we could use a different Auth Repository by
overwriting Configure.AuthRepository.cs and replace Configure.Mq.cs to use a different MQ Server all without disrupting
any of the App's other features, including feature extensions like MyFeature which registers its Service the overwritten MQ Server -
unaware that it had been replaced.
We can then easily replicate the same consistent technology choices you want to standardize on across all Apps, by copying feature in piecemeal units at the file-level, without fear of breaking existing Apps as any no other App-specific configuration is disrupted - a process which could now be automated with shell scripts.
Ultimately the driving force behind enabling modular App composition is to reduce the knowledge and effort required to add, remove and replace features. So instead of having to wade through a set of documentation around learning how to add and configure each feature we can reduce the steps down to just choosing the features we want and have them include the minimum configuration needed to register it with our App.
Mix n' Match .NET Core Apps
To complete the picture of making it easy as possible to compose ASP.NET Core Apps we've created the mix dotnet tool to easily
install features which can be installed with:
$ dotnet tool install --global mix
The same functionality is also built into the cross-platform x and Windows app
dotnet tools which can be updated to the latest version with:
$ dotnet tool update -g web
$ dotnet tool update -g app
mix-enabled dotnet tools
mix works exactly the same in all dotnet tools, which just needs the tool name prefixed before the mix command:
$ mix ...
$ web mix ...
$ app mix ...
mix Usage
The mix tool is designed around applying ASP.NET Core features captured in GitHub gists to your local .NET Core projects.
Type mix ? for a quick Usage Summary:
View all published gists:
   mix

Simple Usage:
   mix <name> <name> ...

Mix using numbered list index instead:
   mix 1 3 5 ...

Delete previously mixed gists:
   mix -delete <name> <name> ...

Use custom project name instead of current folder name (replaces MyApp):
   mix -name ProjectName <name> <name> ...

Replace additional tokens before mixing:
   mix -replace term=with <name> <name> ...

Multi replace with escaped string example:
   mix -replace term=with -replace "This Phrase"="With This" <name> <name> ...

Only display available gists with a specific tag:
  mix [tag]
  mix [tag1,tag2]
Although most of the time you're only going to run 2 commands, viewing available features with:
$ mix
Where it displays different features that can be added to your App, where they're added to and the author of the Gist:
 1. init                 Empty .NET Core 2.2 ServiceStack App         to: .      by @ServiceStack  [project]
 2. init-lts             Empty .NET Core 2.1 LTS ServiceStack App     to: .      by @ServiceStack  [project]
 3. init-corefx          Empty ASP.NET Core 2.1 LTS on .NET Framework to: .      by @ServiceStack  [project]
 4. init-sharp-app       Empty ServiceStack Sharp App                 to: .      by @ServiceStack  [project]
 5. bootstrap-sharp      Bootstrap + #Script Pages Starter Template   to: $HOST  by @ServiceStack  [ui,sharp]
 6. redis                Use ServiceStack.Redis                       to: $HOST  by @ServiceStack  [db]
 7. sqlserver            Use OrmLite with SQL Server                  to: $HOST  by @ServiceStack  [db]
 8. sqlite               Use OrmLite with SQLite                      to: $HOST  by @ServiceStack  [db]
 9. postgres             Use OrmLite with PostgreSQL                  to: $HOST  by @ServiceStack  [db]
10. mysql                Use OrmLite with MySql                       to: $HOST  by @ServiceStack  [db]
11. oracle               Use OrmLite with Oracle                      to: $HOST  by @ServiceStack  [db]
12. firebird             Use OrmLite with Firebird                    to: $HOST  by @ServiceStack  [db]
13. dynamodb             Use AWS DynamoDB and PocoDynamo              to: $HOST  by @ServiceStack  [db]
14. mongodb              Use MongoDB                                  to: $HOST  by @ServiceStack  [db]
15. ravendb              Use RavenDB                                  to: $HOST  by @ServiceStack  [db]
16. marten               Use Marten NoSQL with PostgreSQL             to: $HOST  by @ServiceStack  [db]
17. auth                 Configure AuthFeature                        to: $HOST  by @ServiceStack  [auth]
18. auth-db              Use OrmLite Auth Repository (requires auth)  to: $HOST  by @ServiceStack  [auth]
19. auth-redis           Use Redis Auth Repository (requires auth)    to: $HOST  by @ServiceStack  [auth]
20. auth-memory          Use Memory Auth Repository (requires auth)   to: $HOST  by @ServiceStack  [auth]
21. auth-dynamodb        Use DynamoDB Auth Repository (requires auth) to: $HOST  by @ServiceStack  [auth]
22. auth-mongodb         Use MongoDB Auth Repository (requires auth)  to: $HOST  by @ServiceStack  [auth]
23. auth-ravendb         Use RavenDB Auth Repository (requires auth)  to: $HOST  by @ServiceStack  [auth]
24. auth-marten          Use Marten Auth Repository (requires auth)   to: $HOST  by @ServiceStack  [auth]
25. backgroundmq         Use Memory Background MQ                     to: $HOST  by @ServiceStack  [mq]
26. rabbitmq             Use RabbitMQ                                 to: $HOST  by @ServiceStack  [mq]
27. sqs                  Use AWS SQS MQ                               to: $HOST  by @ServiceStack  [mq]
28. servicebus           Use Azure Service Bus MQ                     to: $HOST  by @ServiceStack  [mq]
29. redismq              Use Redis MQ                                 to: $HOST  by @ServiceStack  [mq]
30. vue-lite-lib         Update vue-lite projects libraries           to: $HOST  by @ServiceStack  [lib,vue]
31. react-lite-lib       Update react-lite projects libraries         to: $HOST  by @ServiceStack  [lib,react]
32. validation-contacts  Contacts Validation Example                  to: $HOST  by @ServiceStack  [example]
33. feature-mq           Simple MQ Feature to test sending Messages   to: $HOST  by @ServiceStack  [feature,mq]
34. feature-authrepo     List and Search Users registered in AuthRepo to: $HOST  by @ServiceStack  [feature]
37. docker               Dockerfile example for .NET Core Sharp Apps  to: .      by @ServiceStack  [config]
38. svg-action           Material Design Action Icons                 to: svg/   by @ServiceStack  [svg]
39. svg-alert            Material Design Alert Icons                  to: svg/   by @ServiceStack  [svg]
40. svg-av               Material Design Audio Visual Icons           to: svg/   by @ServiceStack  [svg]
41. svg-communication    Material Design Communication Icons          to: svg/   by @ServiceStack  [svg]
42. svg-content          Material Design Content Icons                to: svg/   by @ServiceStack  [svg]
43. svg-device           Material Design Device Icons                 to: svg/   by @ServiceStack  [svg]
44. svg-editor           Material Design Editor Icons                 to: svg/   by @ServiceStack  [svg]
45. svg-file             Material Design File Icons                   to: svg/   by @ServiceStack  [svg]
46. svg-hardware         Material Design Hardware Icons               to: svg/   by @ServiceStack  [svg]
47. svg-image            Material Design Image Icons                  to: svg/   by @ServiceStack  [svg]
48. svg-maps             Material Design Maps Icons                   to: svg/   by @ServiceStack  [svg]
49. svg-navigation       Material Design Navigation Icons             to: svg/   by @ServiceStack  [svg]
50. svg-places           Material Design Places Icons                 to: svg/   by @ServiceStack  [svg]
51. svg-social           Material Design Social Icons                 to: svg/   by @ServiceStack  [svg]
52. svg-toggle           Material Design Toggle Icons                 to: svg/   by @ServiceStack  [svg]


   Usage:  mix <name> <name> ...

  Search:  mix [tag] Available tags: auth, config, db, feature, lib, mq, project, react, sharp, svg, ui, vue

Advanced:  mix ?
Then choosing which features you want to add to your project with mix <name>, e.g:
$ mix redis
The entire list of available features is maintained in the self-documenting human and machine readable mix.md feature index.
To publish your feature here and make it available to all
mixusers, please link to it in the comments.
Mix in Features into ASP.NET Core Apps
It should be noted that ModularStartup and mix dotnet tool aren't limited to ServiceStack Apps, they're a generic solution
that can easily add features to any .NET Core App. E.g. some of ServiceStack features relies on external dependencies which utilizes
the same dependency registration used in all ASP.NET Core Apps, e.g running:
$ mix mongodb
Applies the mongodb feature to your HOST project as instructed by the to: $HOST modifier above that it finds by
using the first folder containing either appsettings.json, Program.cs or Startup.cs
and writing the following mongodb Gist file:
namespace MyApp
{
    public class ConfigureMongoDb : IConfigureServices
    {
        IConfiguration Configuration { get; }
        public ConfigureMongoDb(IConfiguration configuration) => Configuration = configuration;

        public void Configure(IServiceCollection services)
        {
            var mongoClient = new MongoClient();
            IMongoDatabase mongoDatabase = mongoClient.GetDatabase("MyApp");
            container.AddSingleton(mongoDatabase);
        }
    }
}
With all MyApp tokens replaced with the Project Name using the same replacement rules as new projects, i.e:
MyAppwill be replaced withProjectNamemy-appwill be replaced withproject-nameMy Appwill be replaced withProject Name
By default it assumes the folder name is the project name, that's overridable using the -name flag:
$ mix -name ProjectName mongodb
This feature also installs the MongoDB.Driver NuGet package as instructed by the _init command in the
mongodb feature.
So after just a single mix command and App restart, it's now configured and running with MongoDB!
Registering MongoDB Auth Repository
As a design goal mix features are designed to be layerable where you can existing features that builds upon existing registrations,
for example you can later configure your App to enable auth and configure it to use a MongoDbAuthRepository with:
$ mix auth auth-mongodb
This release also includes .NET Core Support for
MongoDbAuthRepositoryand has been upgraded to use the latest MongoDB.Driver v2.8.1
Mix in DB Support
All DB servers are just as easily configurable, which we can quickly find using a [db] tag search:
$ mix [db]
Which will list all available [db] providers:
Results matching tag [db]:

   1. redis      Use ServiceStack.Redis            to: $HOST  by @ServiceStack  [db]
   2. sqlserver  Use OrmLite with SQL Server       to: $HOST  by @ServiceStack  [db]
   3. sqlite     Use OrmLite with SQLite           to: $HOST  by @ServiceStack  [db]
   4. postgres   Use OrmLite with PostgreSQL       to: $HOST  by @ServiceStack  [db]
   5. mysql      Use OrmLite with MySql            to: $HOST  by @ServiceStack  [db]
   6. oracle     Use OrmLite with Oracle           to: $HOST  by @ServiceStack  [db]
   7. firebird   Use OrmLite with Firebird         to: $HOST  by @ServiceStack  [db]
   8. dynamodb   Use AWS DynamoDB and PocoDynamo   to: $HOST  by @ServiceStack  [db]
   9. mongodb    Use MongoDB                       to: $HOST  by @ServiceStack  [db]
  10. ravendb    Use RavenDB                       to: $HOST  by @ServiceStack  [db]
  11. marten     Use Marten NoSQL with PostgreSQL  to: $HOST  by @ServiceStack  [db]

   Usage:  mix <name> <name> ...

  Search:  mix [tag] Available tags: auth, config, db, feature, lib, mq, project, react, sharp, svg, ui, vue

Advanced:  mix ?
So we can install Redis with:
$ mix redis
Where it will apply the Redis Gist below:
namespace MyApp
{
    public class ConfigureRedis : IConfigureServices, IConfigureAppHost
    {
        IConfiguration Configuration { get; }
        public ConfigureRedis(IConfiguration configuration) => Configuration = configuration;

        public void Configure(IServiceCollection services)
        {
            services.AddSingleton<IRedisClientsManager>(
                new RedisManagerPool(Configuration.GetConnectionString("Redis") ?? "localhost:6379"));
        }

        public void Configure(IAppHost appHost)
        {
            appHost.GetPlugin<SharpPagesFeature>()?.ScriptMethods.Add(new RedisScripts());
        }
    }
}
The configuration is declarative where it only runs Configure(IAppHost appHost) in ServiceStack Apps and only adds the RedisScripts
if it's configured with #Script Pages, otherwise any additional configuration is inert and isn't run.
Typically DB's will require you to specify your App DB's connection string to your external DB (with a default fallback) - where typically the
most effort required to enable a feature is adding a Connection String in your appsettings.json.
Composable Features
A nice characteristic about "no-touch" layerable features are that they're composable, where mix will let you hand-pick all features you
want in a single command. For example you can enable Authentication, register an RDBMS Auth Repository using SQL Server with:
$ mix auth auth-db sqlserver
Which will apply the Configure.Auth.cs, Configure.AuthRepository.cs and Configure.Db.cs gists.
If you later wanted to switch to PostgreSQL, you can mix it in with:
$ mix postgres
Where it will override Configure.Db.cs to use the postgres version,
leaving any custom logic in Configure.Auth.cs or Configure.AuthRepository.cs untouched.
Or if you later want to change the Auth Repository to use Redis instead, you can run:
$ mix auth-redis
Where it will override the existing Configure.AuthRepository.cs added by auth-db.
Undo mix
In addition to being easy to add, mix makes it easy to undo where you can specify the -delete flag to remove all the Gist files added
by all features, e.g:
$ mix -delete auth auth-db sqlserver
Which will let you review all the files in each Gist that will deleted, then hit Enter to confirm:
Delete 1 file from 'auth' https://gist.github.com/gistlyn/1ec54e10d44f87e0f20daaf7e2248fea:

C:\Projects\app\Configure.Auth.cs

Delete 1 file from 'auth-db' https://gist.github.com/gistlyn/16fddde0763b3eee516d670ab9fab194:

C:\Projects\app\Configure.AuthRepository.cs

Delete 1 file from 'sqlserver' https://gist.github.com/gistlyn/7075e53e1fe69d3da12996677b5f3a5a:

C:\Projects\app\Configure.Db.cs

Proceed? (n/Y):
Encapsulated Features
A nice benefit of decoupling features into modular classes is that you're able to a richer and more customizable out-of-the-box experience.
Instead of overloading users with daunting amounts of configuration required in common medium-sized Apps, most templates will start with an empty slate and leave it for users to read about each feature then decide how to hand-pick different configuration to slot it into their own App's configuration.
On the flip-side if you provide too much configuration Developers wont be confident to know what configuration belongs to which feature and which feature are interconnected or can be safely removed without breaking their App.
With modular features we can encapsulate configuration in a single .cs file that's primed with the popular well-known configuration
for the feature. E.g. The Auth Repositories include an example of maintaining a custom UserAuth model, registering the
Auth Event to populate their additional fields on Authentication and sample code necessary for ensuring
a specific Admin User is created on Startup:
namespace MyApp
{
    // Custom User Table with extended Metadata properties
    public class AppUser : UserAuth
    {
        public string ProfileUrl { get; set; }
        public string LastLoginIp { get; set; }
        public DateTime? LastLoginDate { get; set; }
    }

    public class AppUserAuthEvents : AuthEvents
    {
        public override void OnAuthenticated(IRequest req, IAuthSession session, IServiceBase authService,
            IAuthTokens tokens, Dictionary<string, string> authInfo)
        {
            var authRepo = HostContext.AppHost.GetAuthRepository(req);
            using (authRepo as IDisposable)
            {
                var userAuth = (AppUser)authRepo.GetUserAuth(session.UserAuthId);
                userAuth.ProfileUrl = session.GetProfileUrl();
                userAuth.LastLoginIp = req.UserHostAddress;
                userAuth.LastLoginDate = DateTime.UtcNow;
                authRepo.SaveUserAuth(userAuth);
            }
        }
    }

    public class ConfigureAuthRepository : IConfigureAppHost, IConfigureServices, IPreInitPlugin
    {
        public void Configure(IServiceCollection services)
        {
            services.AddSingleton<IAuthRepository>(c =>
                new OrmLiteAuthRepository<AppUser, UserAuthDetails>(c.Resolve<IDbConnectionFactory>()) {
                    UseDistinctRoleTables = true
                });
        }

        public void Configure(IAppHost appHost)
        {
            var authRepo = appHost.Resolve<IAuthRepository>();
            authRepo.InitSchema();

            CreateUser(authRepo, "admin@email.com", "Admin User", "p@55wOrd", roles:new[]{ RoleNames.Admin });
        }

        public void BeforePluginsLoaded(IAppHost appHost)
        {
            appHost.AssertPlugin<AuthFeature>().AuthEvents.Add(new AppUserAuthEvents());
        }

        // Add initial Users to the configured Auth Repository
        public void CreateUser(IAuthRepository authRepo,
            string email, string name, string password, string[] roles)
        {
            if (authRepo.GetUserAuthByUserName(email) == null)
            {
                var newAdmin = new AppUser { Email = email, DisplayName = name };
                var user = authRepo.CreateUserAuth(newAdmin, password);
                authRepo.AssignRoles(user, roles);
            }
        }
    }
}
All captured within a working configuration. You can start appreciating the instant utility of mix once you imagine what it was like before
with how much time an effort it would've taken to scan through docs, learn about each feature independently to be able to piece together
equivalent functionality.
Mix in Auth Repository
As it can take a while to piece together how to configure your preferred Auth Repository, use a Custom User Model
and utilize Auth Events to populate it, we now recommend using mix to configure
your preferred Auth Repository, which you can query with:
$ mix [auth]
To display the current list of available Auth Repositories:
Results matching tag [auth]:

   1. auth              Configure AuthFeature                        to: $HOST  by @ServiceStack [auth]
   2. auth-db           Use OrmLite Auth Repository (requires auth)  to: $HOST  by @ServiceStack [auth]
   3. auth-redis        Use Redis Auth Repository (requires auth)    to: $HOST  by @ServiceStack [auth]
   4. auth-memory       Use Memory Auth Repository (requires auth)   to: $HOST  by @ServiceStack [auth]
   5. auth-dynamodb     Use DynamoDB Auth Repository (requires auth) to: $HOST  by @ServiceStack [auth]
   6. auth-mongodb      Use MongoDB Auth Repository (requires auth)  to: $HOST  by @ServiceStack [auth]
   7. auth-ravendb      Use RavenDB Auth Repository (requires auth)  to: $HOST  by @ServiceStack [auth]
   8. auth-marten       Use Marten Auth Repository (requires auth)   to: $HOST  by @ServiceStack [auth]
   9. feature-authrepo  List and Search Users in an Auth Repo        to: $HOST  by @ServiceStack [feature,auth]
Mix in MQ Server
Likewise we now recommend using mix to configure your preferred MQ Service, other than being quicker to add,
it proposes adopting a naming convention in app settings and file names that other mix features can also make use of:
$ mix [mq]
Currently available list of MQ Services:
Results matching tag [mq]:

   1. backgroundmq  Use Memory Background MQ                    to: $HOST  by @ServiceStack  [mq]
   2. rabbitmq      Use RabbitMQ                                to: $HOST  by @ServiceStack  [mq]
   3. sqs           Use AWS SQS MQ                              to: $HOST  by @ServiceStack  [mq]
   4. servicebus    Use Azure Service Bus MQ                    to: $HOST  by @ServiceStack  [mq]
   5. redismq       Use Redis MQ                                to: $HOST  by @ServiceStack  [mq]
   6. feature-mq    Simple MQ Feature to test sending Messages  to: $HOST  by @ServiceStack  [feature,mq,sharp]
Mix in Prebuilt Recipes and Working Examples
ModularStartup and mix can scale up to complete working examples which can provide instant utility and integration of a feature into
your existing App. By contrast most working examples are typically made available off to the side in stale projects which need to
be downloaded and run in isolation. If it still works you'd then have to compare the project files with your project and carefully copy over the
differences you'd think your App needs to replicate its functionality. This can be very time consuming to the point where a lot of users will
skip trying to download & run the example and instead try to manually configure it in their App.
All mix features add their files to your App's Physical Project Structure where configuration is added to
your Host Project, Service Contracts are added to your ServiceModel/ folder and Service Implementations added to your ServiceInterface/ folder
and any Web assets added to your App's wwwroot/.
They can also be added to both multi and single project solutions in which case they'll be added to ServiceInterface and ServiceModel folders
in your App's project folder using the same namespace as used in multi-project solutions, making it easy to upgrade to a multi-project solution later.
example-validation
The example-validation mix is a complete working validation example that's typical of a real-world validation example complete with
Authentication integration allowing each authenticated user to manage their own private Contacts list.
YouTube: youtu.be/udrLtICylj8
To follow video's example, start with a new Acme project from sharp .NET Core Template:
$ x new script Acme
Add the example-validation mix:
$ cd Acme
$ web mix example-validation
Which will prompt you with a link to the gist and the files that will be added to your project:
Write files from 'example-validation' https://gist.github.com/gistlyn/33873ed2857b2c5a9623629c6210d665 to:

  C:\projects\Acme\Acme\Configure.Contacts.cs
  C:\projects\Acme\Acme.ServiceInterface\ContactServices.cs
  C:\projects\Acme\Acme.ServiceModel\Contacts.cs
  C:\projects\Acme\Acme\wwwroot\contacts\_id\edit.html
  C:\projects\Acme\Acme\wwwroot\contacts\_requires-auth-partial.html
  C:\projects\Acme\Acme\wwwroot\contacts\index.html

Proceed? (n/Y):
Now after restarting your App you'll be able to add contacts by clicking on the new Contacts link in your App's main menu:
$ cd Acme
$ dotnet run
After you're done reviewing the example you can either refactor it to handle your App's requirements or completely remove it from your App with:
$ mix -delete example-validation
feature-mq
The feature-mq adds MQ support to your App, complete with UI and includes 2 different ways of calling MQ Services in ServiceStack, just like
example-validation above, feature-mq is another complete working example with both UI and Service implementation in the following files:
- Configure.Mq.cs?
- Feature.Mq.cs
- ServiceInterface\MqServices.cs
- ServiceModel\Mq.cs
- wwwroot\messaging.html
As Configure.Mq.cs? is optional it will only add it if doesn't already exist, so it will either use your existing MQ configuration
or configure your App to use the In Memory BackgroundMqService implementation.
Add feature-mq to your project with:
$ mix feature-mq
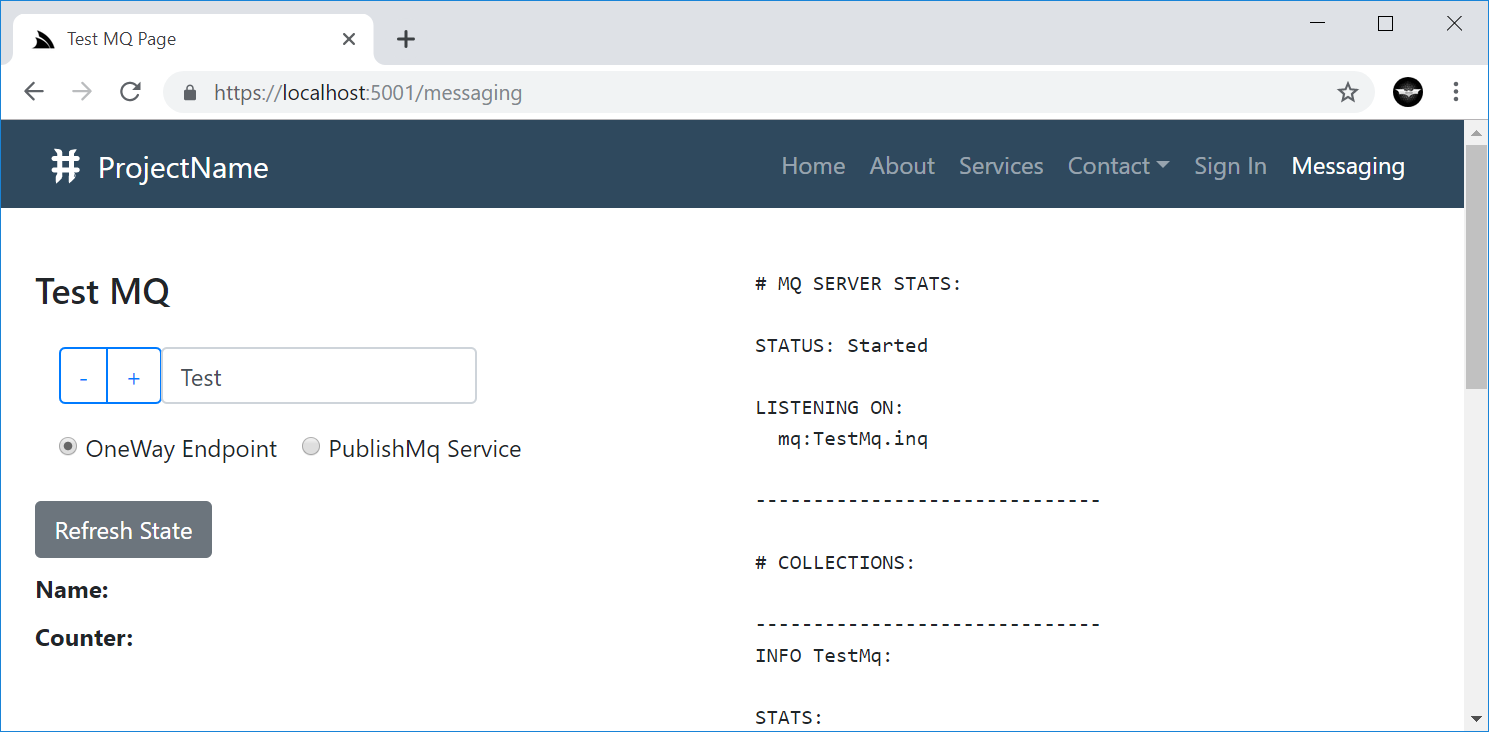
This will add the TestMq Service and make it available to your MQ endpoint. TestMq is a regular service that updates values in the
App's registered ICacheClient and returns the Cache's current values as well as the internal Stats of the MQ:
public class MqServices : Service
{
    public IMessageService MqService { get; set; }

    public void Any(PublishMq request)
    {
        PublishMessage(request.ConvertTo<TestMq>());
    }

    public object Any(TestMq request)
    {
        if (!string.IsNullOrEmpty(request.Name))
            Cache.Set("mq.name", request.Name);

        if (request.Add > 0)
            Cache.Increment("mq.counter", (uint)request.Add);
        else if (request.Add < 0)
            Cache.Decrement("mq.counter", (uint)(request.Add * -1));

        return new TestMqResponse {
            Name = Cache.Get<string>("mq.name"),
            Counter = Cache.Get<long>("mq.counter"),
            StatsDescription = MqService.GetStatsDescription(),
        };
    }
}
The 2 ways to call a MQ Service is directly using the publish or sendOneWay APIs (available in all ServiceStack Service Clients) where
it send the request to the Service's /oneway endpoint which will automatically publish it to the registered MQ.
Alternatively you can publish the Request DTO yourself from a different Service Implementation as done in PublishMq, as-is typical for
Services that queues sending emails without blocking Service Execution.
The feature's UI allows you to publish TestMq messages using either approach:
client = new JsonServiceClient('/');

var oneway = document.querySelector('input[name=mq-publish]:checked').value === "OneWay";
if (oneway) {
    client.publish(new TestMq({ name: $txtName.value, add: parseInt(add) }))
} else {
    client.post(new PublishMq({ name: $txtName.value, add: parseInt(add) }))
}
Both approaches end with the same result with the TestMq Request DTO published and executed by the registered MQ Service as shown in the
UI which is periodically updated with the current state in the Cache and the internal stats of the MQ Service showing how many messages it processed.
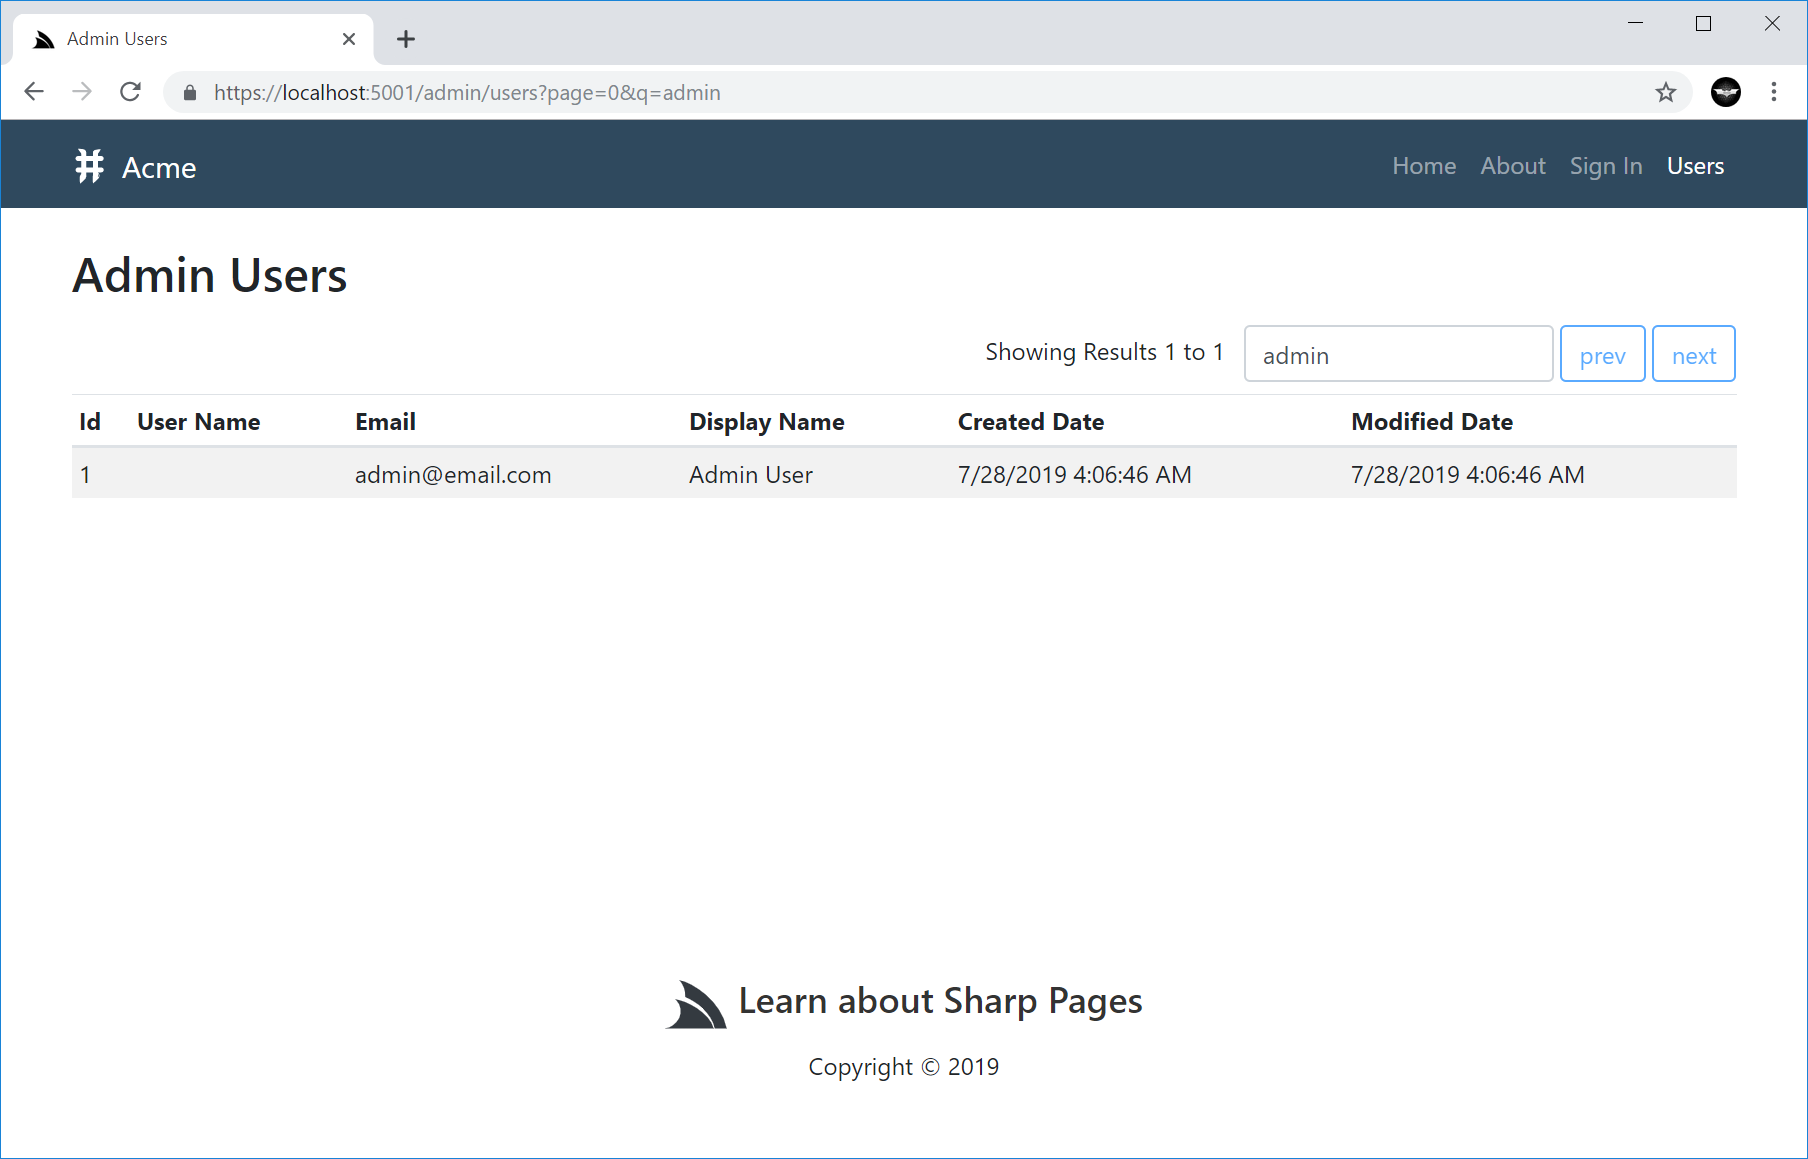
feature-authrepo
Another UI feature mix available in this release is a UI to browse and search for registered users in an Auth Repository.
This wasn't generically possible before as IAuthRepository didn't previously provide any API's to be able to query all Users,
which is now available in the new IQueryUserAuth API:
public interface IQueryUserAuth
{
    List<IUserAuth> GetUserAuths(string orderBy = null, int? skip = null, int? take = null);
    List<IUserAuth> SearchUserAuths(string query, string orderBy = null, int? skip = null, int? take = null);
}
This is now implemented in all ServiceStack Auth Repositories although there are limitations depending on the queryability of the underlying data provider.
Searching in these Auth Repositories are efficient and searches in UserName, Email, DisplayName and Company fields:
OrmLiteAuthRepositoryInMemoryAuthRepositoryMongoDbAuthRepository
For RavenDB it reuses the existing Username/Email indexes so only searches UserName, Email fields and only performs a StartsWith/EndsWith search as allowed by RavenDB:
RavenDbUserAuthRepository
Searches and Order By's are very inefficient in Redis as it needs to deserialize all users to perform the querying/sorting on the client. Just paging through users with skip/take is efficient as it only needs to deserialize the partial resultset.
RedisAuthRepository
All queries performs a table scan in DynamoDB but searches all fields:
DynamoDbAuthRepository
API Usage
These API's are accessible from an IAuthRepository dependency, if you're using a custom Auth Repository it will need to implement
IQueryUserAuth otherwise calling these APIs (and feature) will throw a NotSupportedException:
AuthRepository.GetUserAuths(orderBy:fieldName, skip:skip, take:take)
AuthRepository.SearchUserAuths(query:q, orderBy:fieldName, skip:skip, take:take)
The orderBy is the field name you want to order the results by, e.g. UserName and can suffixed with the DESC modifier to order
results in descending order, e.g. UserName DESC.
In #Script these API's are available in camelCase off authRepo using a JS Object literal as seen in users.html page usage of this feature:
{{ authRepo.searchUserAuths({ query:qs.q, take: pageSize, skip: pageSize*page }) | to => users }}
Users UI
Clicking the Users menu item will show you a list of searchable and pageable registered Users in a summary view:
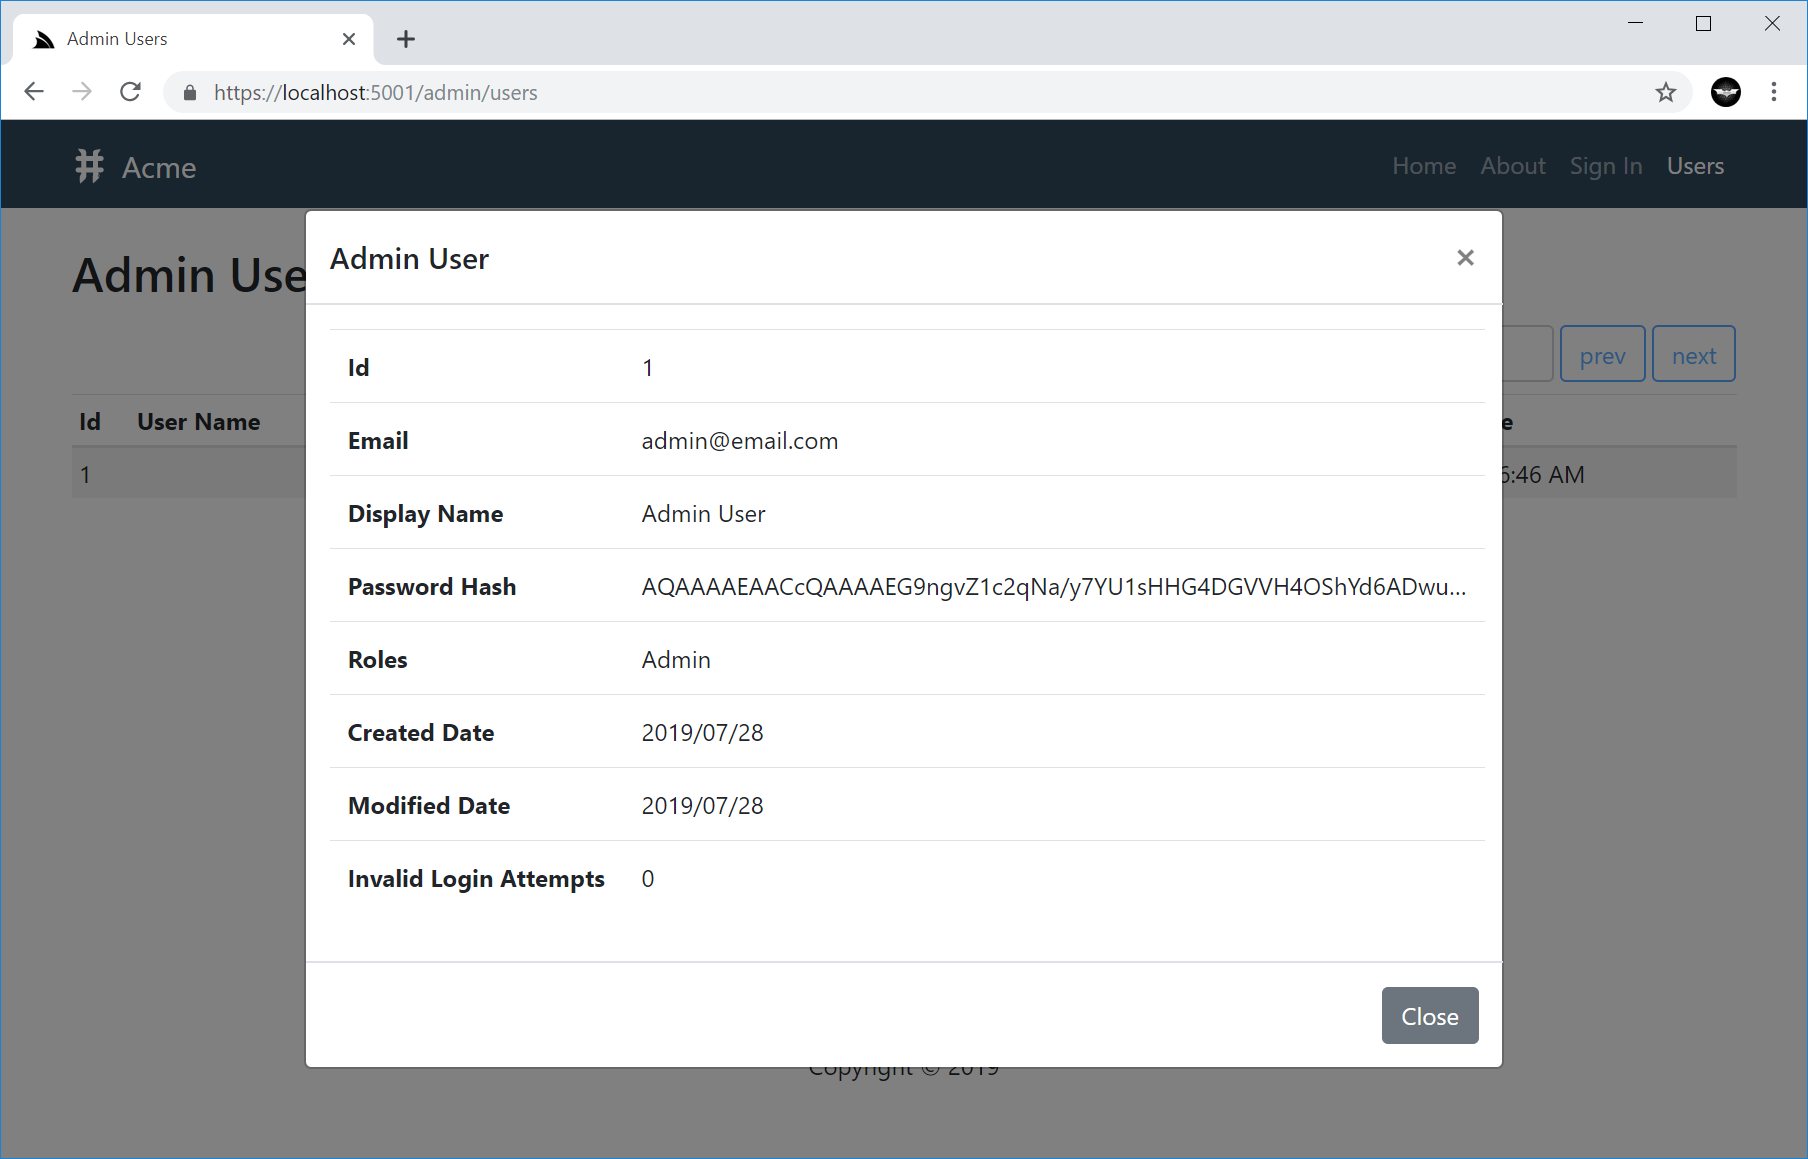
Clicking on a user will show you a complete list of fields stored for that user, including any custom fields, if you're using a Custom
UserAuth table:
Modular Startup Prioritization
Ideally features would not be order dependent, but if need to, you can use the [Priority] attribute to control the prioritization of different
features implementing the .NET Core Startup interfaces:
IConfigureServices- Register IOC dependenciesIConfigureApp- Register ASP.NET Core ModulesIStartup- Configure both IOC and App Modules
Startup classes with Priority < 0 are executed before your App's Startup otherwise they're executed after your AppHost, in ascending order.
The example configuration below shows the order in which each Startup class is executed:
[Priority(-1)]
public class MyPreConfigureServices : IConfigureServices
{
    public void Configure(IServiceCollection services) => "#1".Print();
}

public class MyConfigureServices : IConfigureServices
{
    public void Configure(IServiceCollection services) => "#4".Print();
}

[Priority(1)]
public class MyPostConfigureServices : IConfigureServices
{
    public void Configure(IServiceCollection services) => "#5".Print();
}

[Priority(-1)]
public class MyStartup : IStartup
{
    public IServiceProvider ConfigureServices(IServiceCollection services)
    {
        "#2".Print();
        return null;
    }

    public void Configure(IApplicationBuilder app) => "#6".Print();
}

public class Startup : ModularStartup
{
    public Startup(IConfiguration configuration) : base(configuration){}

    public new void ConfigureServices(IServiceCollection services) => "#3".Print();

    public void Configure(IApplicationBuilder app, IHostingEnvironment env) => "#8".Print();
}

[Priority(-1)]
public class MyPreConfigureApp : IConfigureApp
{
    public void Configure(IApplicationBuilder app)=> "#7".Print();
}

public class MyConfigureApp : IConfigureApp
{
    public void Configure(IApplicationBuilder app)=> "#9".Print();
}
AppHost Startup classes
The [Priority] attribute can also be used in ServiceStack AppHost's Startup classes:
IPreConfigureAppHost- CustomizeAppHostbeforeConfigure()is run (e.g. to add ServiceAssemblies)IConfigureAppHost- Run external "no-touch"AppHostconfigurationIAfterInitAppHost- Run custom logic afterAppHosthas initialized (e.g. to start MQ Server)
In addition to the above Interfaces, IPlugin can also implement the plugin interfaces below:
IPreInitPlugin- Run custom logic just before Plugins are registeredIPostInitPlugin- Run custom logic just after Plugins are registered
Register ASP.NET Core dependencies in AppHost
A limitation of ASP.NET Core is that all dependencies need to be registered in ConfigureServices() before any App Modules
which is the reason why dependencies registered in ServiceStack's AppHost Configure() are only accessible from ServiceStack and
not the rest of ASP.NET Core.
But as ASP.NET Core's AppHostBase now implements IConfigureServices, you're now able to register IOC dependencies in your
AppHost class by registering them in Configure(IServiceCollection) where they'll now be accessible to both ServiceStack and the
rest of your ASP.NET Core App, e.g:
public class AppHost : AppHostBase
{
    public override void Configure(IServiceCollection services)
    {
        services.AddSingleton<IRedisClientsManager>(
            new RedisManagerPool(Configuration.GetConnectionString("redis")));
    }

    public override void Configure(Container container)
    {
        var redisManager = container.Resolve<IRedisClientsManager>();
        //...
    }
}
We can take this even further and have your ServiceStack AppHost implement IConfigureApp where it can also contain the logic to register itself
as an alternative to registering ServiceStack in your Startup class, e.g:
public class AppHost : AppHostBase, IConfigureApp
{
    public void Configure(IApplicationBuilder app)
    {
        app.UseServiceStack(new AppHost
        {
            AppSettings = new NetCoreAppSettings(Configuration)
        });
    }

    public override void Configure(Container container) { /***/ }
}
This will let you drop-in your custom AppHost into a ModularStartup enabled ASP.NET Core App to enable the same "no-touch" auto-registration.
IPreInitPlugin Breaking Change
In order for Startup classes to be able to implement multiple Startup interfaces and avoiding naming collisions, the IPreInitPlugin
interface was changed from:
public interface IPreInitPlugin
{
    void Configure(IAppHost appHost);
}
to:
public interface IPreInitPlugin
{
    void BeforePluginsLoaded(IAppHost appHost);
}
Any of your plugins implementing IPreInitPlugin will need to be rename its Configure() method to BeforePluginsLoaded().
Unified Navigation
With the new App composition model in ModularStartup we want to enable features to be able to have deep integration with your App
for instant utility and to reduce the effort required to integrate it with your App.
A problem with being able to add an integrated feature that combines both UI and functionality is the large variety of different kind of Apps that can be created with ServiceStack. To give you some idea, the World Validation contains 10 different client/server rendered Web App development strategies - which doesn't even cover all the major SPA that ServiceStack has first-class support for, not including any native Desktop or Mobile Apps.
To be able to provide higher-level functionality with instant utility we need a standard navigation API that all Apps can use to register functionality that all ServiceStack Apps can make use of.
To support this, we use the new NavItem below to capture hierarchical Navigation information about a single Navigation Item:
/// <summary>
/// NavItem in View.NavItems and View.NavItemsMap
/// </summary>
public class NavItem : IMeta
{
    /// Link Label
    public string Label { get; set; }

    /// Link href
    public string Href { get; set; }

    /// Whether NavItem should only be considered active when paths
    /// are an exact match otherwise checks if ActivePath starts with Path
    public bool? Exact { get; set; }

    /// Emit id="{Id}"
    public string Id { get; set; }

    /// Override class="{Class}"
    public string ClassName { get; set; }

    /// Icon class (if any)
    public string IconClass { get; set; }

    /// Only show if NavOptions.Attributes.Contains(Show)
    public string Show { get; set; }

    /// Do not show if NavOptions.Attributes.Contains(Hide)
    public string Hide { get; set; }

    /// Sub Menu Child NavItems
    public List<NavItem> Children { get; set; }

    /// Additional custom Metadata to attach to this Nav Item
    public Dictionary<string, string> Meta { get; set; }
}
There's also 2 built-in collections you can add Navigation Items to:
public static class View
{
    // The App's main navigation
    public static List<NavItem> NavItems

    // Maintain any other number of custom Navigation lists
    public static Dictionary<string, List<NavItem>> NavItemsMap
}
Simply View.NavItems can be used to maintain your App's primary navigation whilst NavItemsMap lets you maintain any number of additional
navigation item groups.
For example ServiceStack uses NavItemsMap to maintain Navigation items for each OAuth provider in the auth NavItem collection
which is now able to generate an auto dynamic list of Auth Sign In Options from the existing list of Auth Providers registered
in your App's AuthFeature, e.g:
Plugins.Add(new AuthFeature(() => new AuthUserSession(),
    new IAuthProvider[] {
        new CredentialsAuthProvider(AppSettings),
        new FacebookAuthProvider(AppSettings),
        new GoogleAuthProvider(AppSettings),
        new MicrosoftGraphAuthProvider(AppSettings),
        new TwitterAuthProvider(AppSettings),
        new GithubAuthProvider(AppSettings),
    }));
Will render the following list of OAuth Sign In buttons in new ServiceStack Project Templates:

This is enabled by each OAuth Provider defining their own Navigation Item which is used to populate the auth NavItems collection,
here's an example from FacebookAuthProvider:
NavItem = new NavItem {
    Href = "/auth/" + Name,
    Label = "Sign in with Facebook",
    Id = "btn-" + Name,
    ClassName = "btn-social btn-facebook",
    IconClass = "fab svg-facebook",
};
Load from Configuration
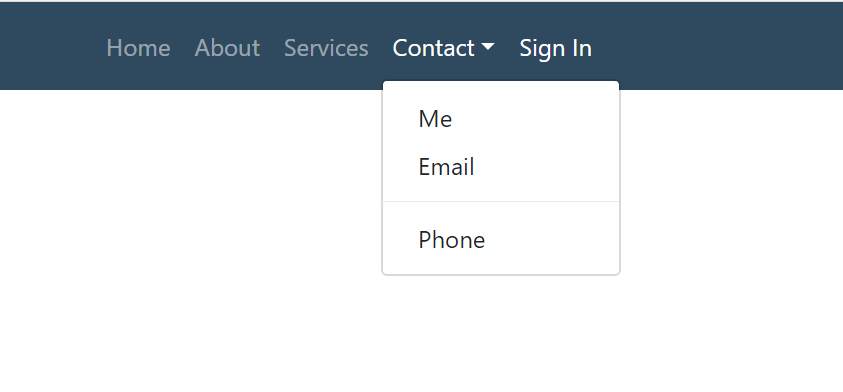
To start with, the NavItems collections can be initialized from appsettings.json by populating the NavItems and NavItemsMap collections, e.g:
{
  "NavItems": [
    { "href":"/",                   "label":"Home", "exact":true },
    { "href":"/about",              "label":"About" },
    { "href":"/services",           "label":"Services" },
    { "href":"/contact",            "label":"Contact",
      "children": [
        { "href": "/contact/me",    "label":"Me" },
        { "href": "/contact/email", "label":"Email" },
        { "label":"-" },
        { "href": "/contact/phone", "label":"Phone" }
      ]
    },
    { "href":"/login",      "label":"Sign In", "hide":"auth" },
    { "href":"/profile",    "label":"Profile", "show":"auth" },
    { "href":"/admin",      "label":"Admin",   "show":"role:Admin" }
  ],
  "NavItemsMap": {
    "aside": [
      { "href":"/faq",     "label":"FAQ" }
    ],
    "footer": [
      { "href":"/terms",   "label":"Terms" },
      { "href":"/privacy", "label":"Privacy" }
    ]
  }
}
Populate from Code
Or if preferred you can create the navigation in code:
View.NavItems.AddRange(new List<NavItem>
{
    new NavItem { Href = "/",         Label = "Home",    Exact = true },
    new NavItem { Href = "/about",    Label = "About" },
    new NavItem { Href = "/services", Label = "services" },
    new NavItem
    {
        Href = "/contact", Label = "Contact",
        Children = new List<NavItem>
        {
            new NavItem { Href = "/contact/me", Label = "Me" },
            new NavItem { Href = "/contact/email", Label = "Email" },
            new NavItem { Label = "-" },
            new NavItem { Href = "/contact/phone", Label = "Phone" },
        }
    },
    new NavItem { Href = "/login",    Label = "Sign In", Hide = "auth" },
    new NavItem { Href = "/profile",  Label = "Profile", Show = "auth" },
    new NavItem { Href = "/admin",    Label = "Admin",   Show = "role:Admin" },
});
Which when used to render your main menu navigation in a Bootstrap Web App, looks something like:
UI Feature Integration
The NavItems generic collections can be further extended programmatically which allows UI plugins to register their functionality with the App's UI.
Here are some examples that the new
feature-authrepo and
feature-mq mix features
use to register their pages with the running Web App:
Feature.UserAuth.cs
public void AfterPluginsLoaded(IAppHost appHost)
{
    View.NavItems.Add(new NavItem {
        Label = "Users",
        Href = "/admin/users",
        // Show = "role:Admin" // Uncomment to only show menu item to Admin Users
    });
}
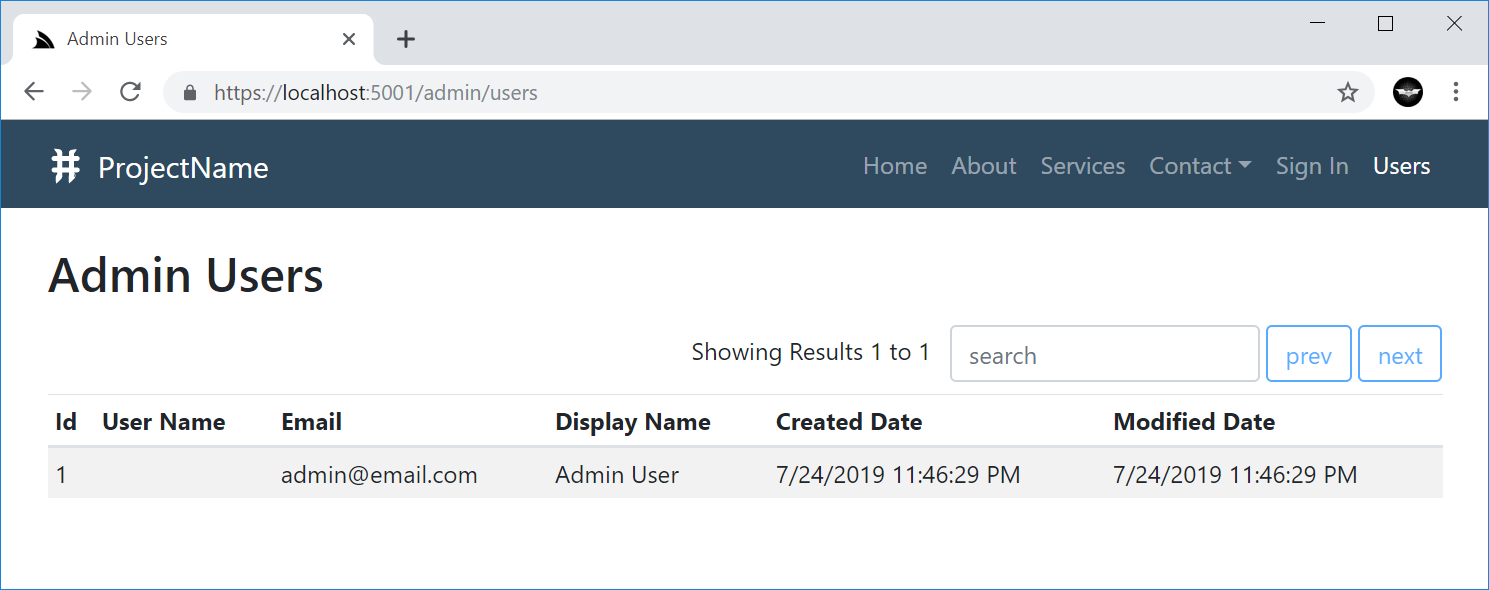
Which adds the Users Menu Item linking to the /admin/users.html page:
Feature.Mq.cs
public void AfterPluginsLoaded(IAppHost appHost)
{
    View.NavItems.Add(new NavItem {
        Label = "Messaging",
        Href = "/messaging",
    });
}
Which adds the Messaging Menu Item linking to its messaging.html page:
Navigation Renderers
The NavItem classes capture the Navigation information which is used together with the NavOptions class below:
public class NavOptions
{
    /// User Attributes for conditional rendering, e.g:
    ///  - auth - User is Authenticated
    ///  - role:name - User Role
    ///  - perm:name - User Permission
    public HashSet<string> Attributes { get; set; }

    /// Path Info that should set as active
    public string ActivePath { get; set; }

    /// Prefix to include before NavItem.Path (if any)
    public string BaseHref { get; set; }

    // Custom classes applied to different navigation elements (defaults to Bootstrap classes)
    public string NavClass { get; set; }
    public string NavItemClass { get; set; }
    public string NavLinkClass { get; set; }

    public string ChildNavItemClass { get; set; }
    public string ChildNavLinkClass { get; set; }
    public string ChildNavMenuClass { get; set; }
    public string ChildNavMenuItemClass { get; set; }
}
To customize how navigation items are rendered using the new navigation controls available for each of ServiceStack's most popular Project Types.
All components are customizable in the same way and render the same markup, apart from Angular due to how it renders components where it includes additional "wrapper" HTML tags around each component.
#Script Pages
In #Script Pages you can use render the navbar and navButtonGroup methods to render NavItems:
Navbar
You can render the main menu navigation using the navbar script method:
{{ navbar }}
Which by default renders the View.NavItems main navigation, using the default NavOptions and User Attributes (if authenticated):
You can also render a different Navigation List with:
{{ navbar(navItems('submenu')) }}
Which can be customized using the different NavOptions properties above, in camelCase:
{{ navbar(navItems('submenu'), { navClass: 'navbar-nav navbar-light bg-light' }) }}
Rewritten using #Script Extension methods
Thanks to #Script new ability to be able to call any script methods as extension methods, this can also be rewritten as:
{{ 'submenu'.navItems().navbar({ navClass: 'navbar-nav navbar-light bg-light' }) }}
Button group
The navButtonGroup script can render NavItems in a button group, e.g. the
OAuth buttons
are rendered with:
{{ 'auth'.navItems().navButtonGroup({ navClass: '', navItemClass: 'btn btn-block btn-lg' }) }}
Which renders a vertical, spaced list of buttons which look like:
Razor Pages
The same server controls are available in ServiceStack.Razor Apps as HTML Helper extension methods:
Navbar
@Html.Navbar()

@Html.Navbar(Html.GetNavItems("submenu"))

@Html.Navbar(Html.GetNavItems("submenu"), new NavOptions {
    NavClass = "navbar-nav navbar-light bg-light"
})
NavButtonGroup
@Html.NavButtonGroup(Html.GetNavItems("auth"), new NavOptions {
    NavClass = "",
    NavItemClass = "btn btn-block btn-lg",
})
SPA Component Libraries
To lay the foundation for richer and more tightly integrated UI controls, we've created UI and common component libraries for the 3 most popular JS frameworks:
@servicestack/vue
@servicestack/react
@servicestack/angular
All new Single Page App Project Templates have been pre-configured to use these libraries which will make it a lot easier to deliver new UI components and updates to existing SPA Apps with just an npm upgrade.
UI Component List
On this first release the component libraries include common Bootstrap UI Form Controls, Navigation Components and a generic Forbidden page
to handle when users don't have access to a protected route.
Side-by-side comparison displaying the names for the different Component Type in each JS Framework:
| Control | vue | react | angular |
|---|---|---|---|
| Forbidden | Forbidden | Forbidden | ForbiddenComponent |
| ErrorSummary | error-summary | ErrorSummary | error-summary |
| Input | v-input | Input | ng-input |
| Select | v-select | Select | |
| CheckBox | v-checkbox | CheckBox | ng-checkbox |
| Button | v-button | Button | ng-button |
| SvgImage | v-svg | SvgImage | |
| Link | v-link | ALink | ng-link |
| LinkButton | link-button | LinkButton | link-button |
| Nav | v-nav | Nav | |
| Navbar | navbar | Navbar | navbar |
| NavLink | nav-link | NavLink | nav-link |
| NavButtonGroup | nav-button-group | NavButtonGroup | nav-button-group |
| NavLinkButton | nav-link-button | NavLinkButton | nav-link-button |
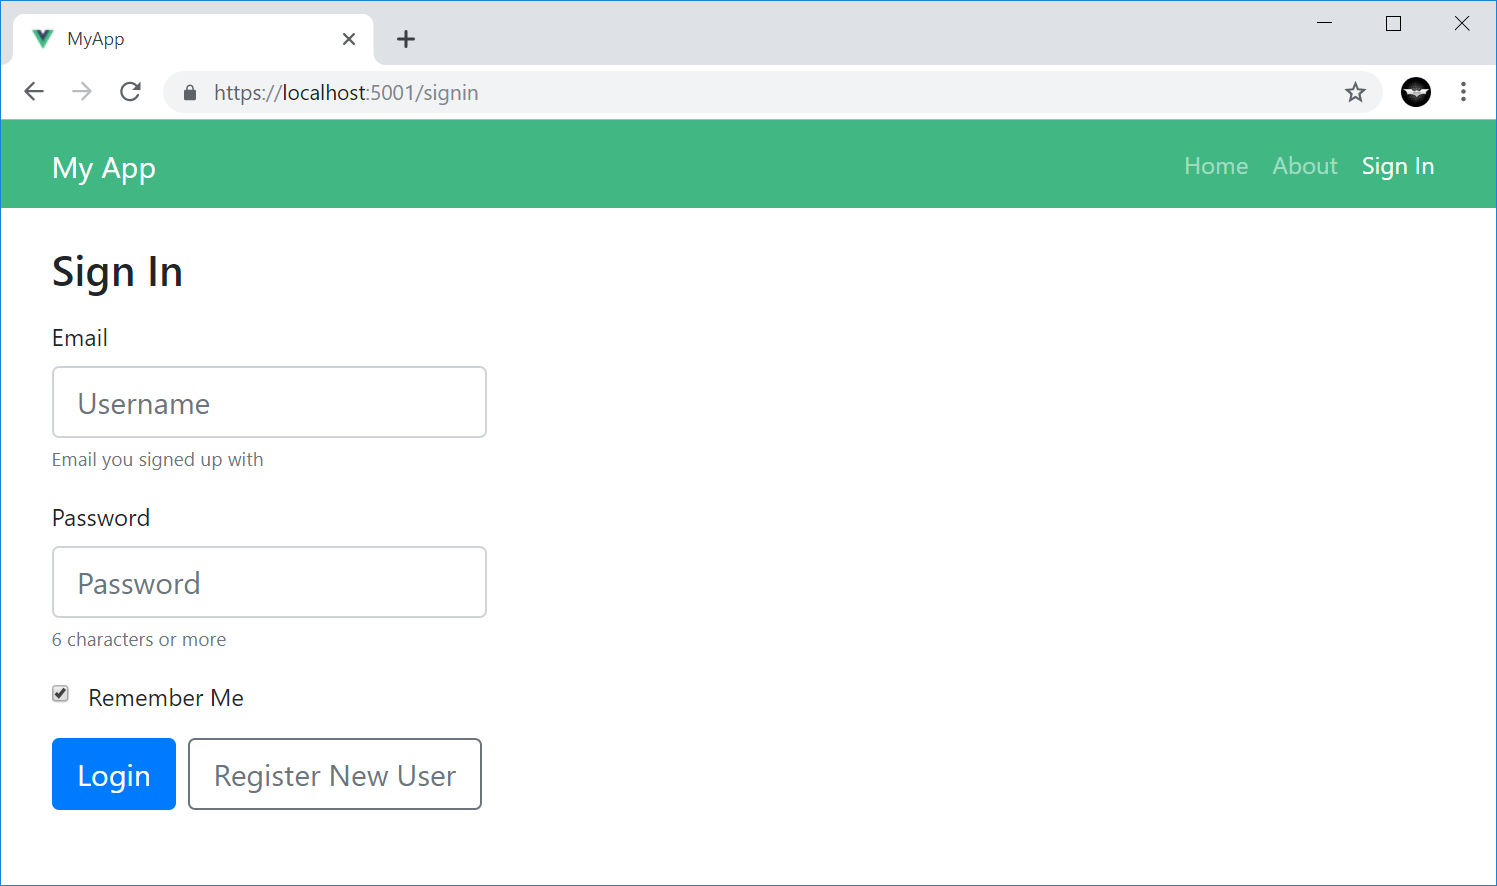
Bootstrap UI Form Controls
The Bootstrap UI form controls include built-in support for validation where they can render validation errors from ServiceStack's
ResponseStatus object, e.g the SignIn.vue
page used in all Vue project templates:
<form @submit.prevent="submit" :class="{ error:responseStatus, loading }" >
    <div class="form-group">
        <error-summary except="userName,password" :responseStatus="responseStatus" />
    </div>
    <div class="form-group">
        <v-input id="userName" v-model="userName" placeholder="Username" :responseStatus="responseStatus"
                 label="Email" help="Email you signed up with" />
    </div>
    <div class="form-group">
        <v-input type="password"  id="password" v-model="password" placeholder="Password"
                :responseStatus="responseStatus" label="Password" help="6 characters or more" />
    </div>
    <div class="form-group">
        <v-checkbox id="rememberMe" v-model="rememberMe" :responseStatus="responseStatus">
            Remember Me
        </v-checkbox>
    </div>
    <div class="form-group">
        <button type="submit" class="btn btn-lg btn-primary">Login</button>
        <link-button href="/signup" lg outline-secondary class="ml-2">Register New User</link-button>
    </div>
</form>
Initially renders the following UI:
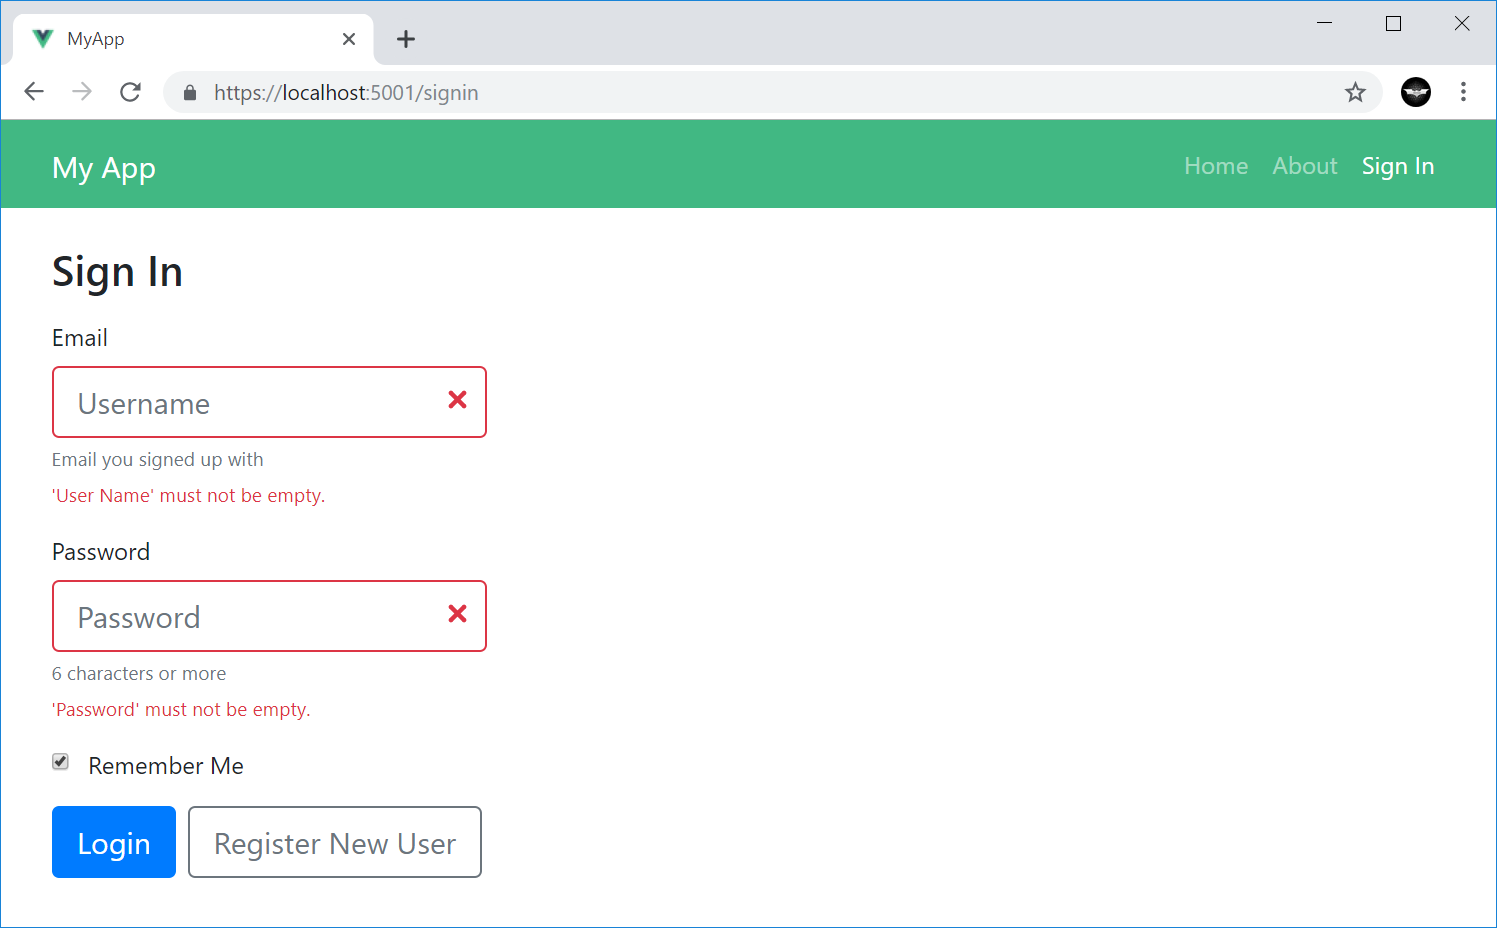
All form validation is typically performed the same way, by sending a populated ServiceStack Request DTO and capturing any
Service Client exceptions in the components responseStatus property, e.g:
protected async submit() {
    try {
        this.loading = true;
        this.responseStatus = null;
        const response = await client.post(new Authenticate({
            provider: 'credentials',
            userName: this.userName,
            password: this.password,
            rememberMe: this.rememberMe,
        }));
        bus.$emit('signin', response);
        redirect(this.$route.query.redirect as string || Routes.Home);
    } catch (e) {
        this.responseStatus = e.responseStatus || e;
    } finally {
        this.loading = false;
    }
}
Where it automatically applies the field validation error next to their respective control:
Conversely you can unset the responseStatus to reset all form validation errors:
this.responseStatus = null;
Navigation Components
All navigation components are populated the same way for all JavaScript FX's where it embeds the navigation data structure in the page by
serializing the response of the GetNavItems Service to JSON that's embedded in the layout page where it's only loaded once
upon the initial page request (immediately, without an Ajax network request):
{{#script}}
NAV_ITEMS = {{ 'GetNavItems' |> execService |> json }};
AUTH = {{ 'Authenticate' |> execService({ ifErrorReturn: "null" }) |> json }};
{{/script}}
The navigation items data structure is used with new Navigation Components for each JavaScript FX to render the menu navigation which is initially captured in a state object containing the NavItems data structure, the Users Session and the list of User Attributes generated from the Authenticated Users Session (if any), e.g:
Vue
In Vue the Nav and User Information is maintained in a global store object which uses UserAttributes.fromSession() from the
@servicestack/client library to generate the list of User Attributes:
export const store: State = {
  nav: global.NAV_ITEMS as GetNavItemsResponse,
  userSession: global.AUTH as AuthenticateResponse,
  userAttributes: UserAttributes.fromSession(global.AUTH),
};
The built-in list of User Attributes include:
auth- Authenticated Userrole:TheRole- Authenticated User withTheRolerole.perm:ThePermission- Authenticated User withThePermissionpermission.
This list can be further extended to include your own custom User Attributes, these are used to control whether to display the navigation item
based on if the attribute is an exact match for the Show and Hide properties of the NavItem. E.g. Navigation Items populated with:
  "NavItems": [
    { "href":"/login",      "label":"Sign In", "hide":"auth" },
    { "href":"/profile",    "label":"Profile", "show":"auth" },
    { "href":"/admin",      "label":"Admin",   "show":"role:Admin" }
  ],
Will hide the Sign In and show the Profile nav items to Authenticated Users and only show the Admin nav item to Admin Users.
The navbar component uses these data structures to render the main menu:
<navbar :items="store.nav.results" :attributes="store.userAttributes" />
The rendering of the component can be further customized using any of the NavOptions properties, in camelCase.
Which also applies to the list of registered OAuth provider buttons
rendered with <nav-button-group>:
<nav-button-group :items="store.nav.navItemsMap.auth" :attributes="store.userAttributes"
                  :baseHref="store.nav.baseUrl" block lg />
In addition to NavOptions properties, new Bootstrap UI Controls (in each JavaScript FX) can also use these common bootstrap attributes
to stylize their components:
export declare class BootstrapBase extends Vue {
    primary?: boolean;
    outlinePrimary?: boolean;
    secondary?: boolean;
    outlineSecondary?: boolean;
    success?: boolean;
    outlineSuccess?: boolean;
    info?: boolean;
    outlineInfo?: boolean;
    warning?: boolean;
    outlineWarning?: boolean;
    danger?: boolean;
    outlineDanger?: boolean;
    light?: boolean;
    outlineLight?: boolean;
    dark?: boolean;
    outlineDark?: boolean;
    lg?: boolean;
    md?: boolean;
    sm?: boolean;
    xs?: boolean;
    block?: boolean;
    vertical?: boolean;
    horizontal?: boolean;
}
camelCase properties like
outlinePrimaryare exposed as kebab-case in components, e.g.outline-primary
React
These same components are
available in React
from the new @servicestack/react library, except the JSX Components use PascalCase, e.g:
<Navbar items={state.nav.results} attributes={state.userAttributes} />
Likewise for NavButtonGroup:
<NavButtonGroup items={state.nav.navItemsMap.auth} attributes={state.userAttributes}
                baseHref={state.nav.baseUrl} block lg />
Angular
Likewise for Angular from the new @servicestack/angular package where the main menu is rendered using the
navbar component:
<navbar [items]="nav.results" [attributes]="userAttributes"></navbar>
And the OAuth Button list is rendered using the nav-button-group component in kebab-case:
 <nav-button-group [items]="nav.navItemsMap.auth" [attributes]="userAttributes"
                   [baseHref]="nav.baseUrl" block lg></nav-button-group>
Mobile and Desktop Apps
Whilst there are no native components developed for different Mobile and Desktop UI's, the same navigation information can be accessed
by calling the GetNavItems Service, e.g:
var response = await client.GetAsync(new GetNavItems());
SVG
A common performance drain in Web Apps is serving images whose large binary blobs can have a significant impact on your App's Request throughput, and why they're often hosted behind CDN's which can complicate the deployment process and introduce subtle caching issues.
A popular image format that's seen its popularity rise on the Web is SVG - a text vector image format that scales beautifully to support
different resolutions. SVG's are typically small in size and have great support in browsers where they can be optimally cached in .css
style sheets to reduce the number of required image requests.
Unless you're using an npm based build system there hasn't been great support for managing SVG images in .NET beyond treating them
as individual images, that is until now with the new SvgFeature plugin (pre-registered by default) and the Svg class - providing programmatic
access to registering SVG image collections and accessing them in a variety of different formats and colors.
In Memory Bundled CSS files
SvgFeature works by creating an in memory bundled .css file for each "image set" that's registered at the path /css/{image-set}.css,
e.g. it's pre-configured with the svg-auth and svg-icons svg groups:
- /css/svg-auth.css - Vendor Icons for each of the popular 3rd Party OAuth Providers
- /css/svg-icons.css - Generic User Avatars (used as the default profile image)
SVG files are simply stored as strings in regular collections maintained in Svg.CssFiles and Svg.Images dictionaries which can be modified/extended as normal.
Viewing SVG Icons
One thing that sets SVG apart from normal images is the multitude of ways they can be referenced. SVG's are commonly bundled in
.css files and referenced by classes, but they can also be embedded in a native <img> tag and <svg> block element where they
can be displayed in different colors.
To make it as easy as possible to reference SVG images in different contexts we've created the dynamic /metadata/svg page
(also available under the SVG Images link in your /metadata page Debug Links) where you can view
all your App's registered SVG images complete with different usage examples, code fragments and links to access SVG Image .css
collections or individual SVG images:

The entire page is clickable where you can first click on the SVG image you want to use then click on any text fragment to copy it, ready for pasting it in your web page.
Loading SVG from FileSystem
The most user-friendly way to load custom SVG images is to load them from a custom directory, e.g:
/svg
    /svg-icons
        vue.svg
        spirals.html
    /my-icons
        myicon.svg
Then in your AppHost you can register all SVG images using Svg.Load():
public override void Configure(Container container)
{
    Svg.Load(RootDirectory.GetDirectory("/svg"));
}
VirtualFilesis configured to your projects ContentRoot, useVirtualFileSourcesto use your WebRoot,RootDirectoryuses the FileSystem VFS inVirtualFileSourceswhereasContentRootDirectorylooks inVirtualFiles
This will load all the SVG images in the /svg directory with the sub directory used for the cssfile (aka image-set)
you want to add them to and the file name (without extension) used as the SVG identifier.
It will also evaluate any .html files in the directory with #Script and add the rendered SVG output,
e.g. we can load the generated SVG from the Spirals Sharp App:
/svg/svg-icons/spirals.html
<svg height="640" width="240">
{{#each range(180) }}
{{ 120 + 100 * cos((5) * it * 0.02827) | to => x }}
{{ 320 + 300 * sin((1) * it * 0.02827) | to => y }}
<circle cx="{{x}}" cy="{{y}}" r="{{it*0.1}}" fill="#556080" stroke="black" stroke-width="1"></circle>
{{/each}}
</svg>
and the SVG rendered output will be registered as a normal static SVG Image.
Register Custom SVG Images via API
You can also register your own SVG images programmatically with:
Svg.AddImage("<svg width='100' height='100' viewBox='0 0 100 100'>...</svg>", "myicon", "my-icons");
Where it will register the SVG under the myicon name and include it in the /css/my-icons.css css file.
The same icon can also be included in multiple stylesheets by adding its name to the Svg.CssFiles collection, e.g:
Svg.CssFiles["svg-icons"].Add("myicon");
SVG APIs
Once added you can access your SVG images from the available Svg APIs:
var svg = Svg.GetImage("myicon");
var dataUri = Svg.GetDataUri("myicon");
All SVG images are also available from the Svg.Images collection if you need to access them programmatically:
foreach (var entry in Svg.Images) {
    var name = entry.Key;
    var svg = entry.Value;
    $"{name}: {svg}".Print();
}
Recommended SVG conventions
All built-in SVG's are 100x100 in size, it's not necessary but for consistency it's good for your SVG icons also retain the same size,
but as they're vector images they can be easily resized when referencing them in your App.
If your icons use the fill colors registered in:
Svg.FillColors = new[] { "#ffffff", "#556080" };
You will be able replace the fill colors with:
var svg = Svg.GetImage("myicon", "#e33");
var dataUri = Svg.GetDataUri("myicon", "#e33");
Using SVG images in CSS
On Startup ServiceStack generates .css files for all SVG icons in Svg.CssFiles so you can import all icons with a single
stylesheet reference with all icons in each CSS file available from /css/{name}.css, e.g:
<link rel="stylesheet" href="/css/svg-icons.css">
Each CSS file includes 2 CSS classes for each SVG image that are both configured with the SVG as a background image:
.svg-myicon, .fa-myicon { background-image: url(...) }
Use the svg-myicon class when you want to set an HTML Element to use your SVG as its background:
<div class="icon svg-myicon"></div>
A good way to set the size of all related icons is to use a shared class, e.g:
.icon {
  width: 50px;
  height: 50px;
  background-size: 50px 50px;
  background-repeat: no-repeat;
  background-position: 2px 2px;
}
The fa-myicon class follows Font Awesome convention which you can use to render SVG icons inside buttons, e.g:
<button class="btn btn-block btn-social btn-light">
  <i class="fab fa-myicon"></i> Label
</button>
You can either use Bootstrap Button colors to select the button color
you want or use a custom btn-myicon class to choose different backgrounds for each SVG, e.g:
.btn-myicon {
  color: #212529;
  background-color: #dae0e5;
  border-color: #d3d9df;
}
The buttons requires the Social Buttons for Bootstrap which is also embedded in ServiceStack.dll
that can be referenced from /css/buttons.css, e.g:
<link rel="stylesheet" href="/css/buttons.css">
<link rel="stylesheet" href="/css/svg-icons.css">
Inline CSS
An alternative to using external stylesheet references above, is to embed them as inline styles in your page which can benefit in reduced network requests as well as provide better isolation than including all CSS your App's use in each page.
You can use cssIncludes to embed the contents of multiple css files in #Script pages with:
{{ 'buttons,svg-icons' | cssIncludes }}
Or in Razor with:
@Html.CssIncludes("buttons","svg-icons")
Using SVG images in #Script
In #Script Pages you can embed SVG xml with the svgImage and svgDataUri scripts:
{{ 'myicon' | svgImage }}
{{ 'myicon'.svgImage('#e33') }}
Inside an HTML IMG element using its data URI:
<img src="{{ 'myicon'.svgDataUri() }}">
<img src="{{ 'myicon'.svgDataUri('#e33') }}">
Or as a background image in a custom CSS class:
.myicon {
width: 150px;
height: 150px;
background-size: 142px;
background-position: 4px;
background-repeat: no-repeat;
{{ 'myicon'.svgBackgroundImageCss() }}
}
Where you can use the class name to apply the above CSS to an element:
<div class="myicon"></div>
Using SVG images in Razor
Likewise there are HTML Helpers with the same name available in Razor Pages, where you can embed SVG images directly with:
@Html.SvgImage("myicon")
@Html.SvgImage("myicon", "#e33")
Inside an HTML IMG element using its data URI:
<img src='@Html.SvgDataUri("myicon")'>
<img src='@Html.SvgDataUri("myicon", "#e33")'>
Or inside a CSS class:
.myicon {
  width: 150px;
  height: 150px;
  background-size: 150px;
  background-repeat: no-repeat;
  @Html.SvgBackgroundImageCss("myicon")
}
Server Controls
Use these #Script methods to reference and modify individual SVG images in #Script Pages:
svgImage(string name) => Svg.GetImage(name)
svgImage(string name, string fillColor) => Svg.GetImage(name, fillColor)
svgDataUri(string name) => Svg.GetDataUri(name)
svgDataUri(string name, string fillColor) => Svg.GetDataUri(name, fillColor)
svgFill(string svg, string color) => Svg.Fill(svg, color)

svgBackgroundImageCss(string name) => Svg.GetBackgroundImageCss(name)
svgBackgroundImageCss(string name, string fillColor) => Svg.GetBackgroundImageCss(name, fillColor)
svgInBackgroundImageCss(string svg) => Svg.InBackgroundImageCss(svg)

svgBaseUrl(ScriptScopeContext scope) =>
    req(scope).ResolveAbsoluteUrl(HostContext.AssertPlugin<SvgFeature>().RoutePath);

Dictionary<string, string> svgImages() => Svg.Images;
Dictionary<string, string> svgDataUris() => Svg.DataUris;
Dictionary<string, List<string>> svgCssFiles() => Svg.CssFiles;
The same API's are also available in ServiceStack.Razor pages using the @Html helpers below:
Html.SvgImage(name)
Html.SvgImage(name, fillColor)
Html.SvgDataUri(name)
Html.SvgDataUri(name, fillColor)
Html.SvgFill(svg, color);

Html.SvgBackgroundImageCss(name)
Html.SvgBackgroundImageCss(name, fillColor)
Html.SvgInBackgroundImageCss(svg)

Html.SvgBaseUrl()
Mix in SVG Images
A nice consequence of the SVG support is being able to easily create a customized bundles of hand-picked SVG image assets as opposed to being forced to choose from a limited library in a fixed bundle.
As creating svg bundles just involves dropping SVG images inside your /svg/{group}/ folder, we're also able take advantage of mix
to import SVG image-sets into your App with a single command. You can view the current list of all SVG image-sets on mix with:
$ mix [svg]
Currently all Material Design Icons are available separately by their logical group names:
Results matching tag [svg]:

   1. svg-action         Material Design Action Icons         to: svg/  by @ServiceStack  [svg]
   2. svg-alert          Material Design Alert Icons          to: svg/  by @ServiceStack  [svg]
   3. svg-av             Material Design Audio Visual Icons   to: svg/  by @ServiceStack  [svg]
   4. svg-communication  Material Design Communication Icons  to: svg/  by @ServiceStack  [svg]
   5. svg-content        Material Design Content Icons        to: svg/  by @ServiceStack  [svg]
   6. svg-device         Material Design Device Icons         to: svg/  by @ServiceStack  [svg]
   7. svg-editor         Material Design Editor Icons         to: svg/  by @ServiceStack  [svg]
   8. svg-file           Material Design File Icons           to: svg/  by @ServiceStack  [svg]
   9. svg-hardware       Material Design Hardware Icons       to: svg/  by @ServiceStack  [svg]
  10. svg-image          Material Design Image Icons          to: svg/  by @ServiceStack  [svg]
  11. svg-maps           Material Design Maps Icons           to: svg/  by @ServiceStack  [svg]
  12. svg-navigation     Material Design Navigation Icons     to: svg/  by @ServiceStack  [svg]
  13. svg-places         Material Design Places Icons         to: svg/  by @ServiceStack  [svg]
  14. svg-social         Material Design Social Icons         to: svg/  by @ServiceStack  [svg]
  15. svg-toggle         Material Design Toggle Icons         to: svg/  by @ServiceStack  [svg]
Once imported, you have the flexibility to further customize them individually to create your App's custom designer bundle.
You also have access to #Script to generate parts of your SVG image dynamically if needed, as seen above in spirals.html.
Embedded Bootstrap CSS
This release also embeds the latest v4.3.1 of Bootstrap which enables built-in UI features like the above dynamic SVG page and 3rd Party OAuth Provider buttons without needing any external references:
- /css/bootstrap.css - v4.3.1 of bootstrap.min.css
- /css/buttons.css - Alternative to using Social Buttons for Bootstrap and fontawesome.io
Note: We intend to keep the embedded resources uptodate with the latest stable Bootstrap version at each ServiceStack release
Refined Project Templates
The ASP.NET Core Project Templates have been upgraded to use the latest external dependencies and have all been rewritten to take advantage of the ServiceStack Features added in this release, namely:
- ModularStartup - ASP.NET Core Apps can take advantage of the modularity benefits and extensibility of
mixfeatures - Navigation Items - Simplified maintenance and dynamic navigation items rendering using Navigation controls
- Auth Enabled - Integrated Auth including dynamic menu, protected pages, auth redirect flow inc. Forbidden pages
- SVG - Pre-configured to use
svg/folder, ready to drop in your App's assets and go - Optimal Library Bundles - CSS/JS bundles are split into optimal hashed library and frequently changing App bundles
- SSL - As it's recommended for Web Apps to use SSL, all templates now use
https://localhost:5001and configured to use Same Site Cookies by default
Auth Enabled Project Templates
Most Project Templates are now integrated with Credentials Auth and Facebook, Google and Facebook 3rd Party OAuth providers, complete with protected Pages and Services and auth redirect flow to Sign In and Forbidden pages.
angular-spa
Angular 8 CLI Bootstrap App
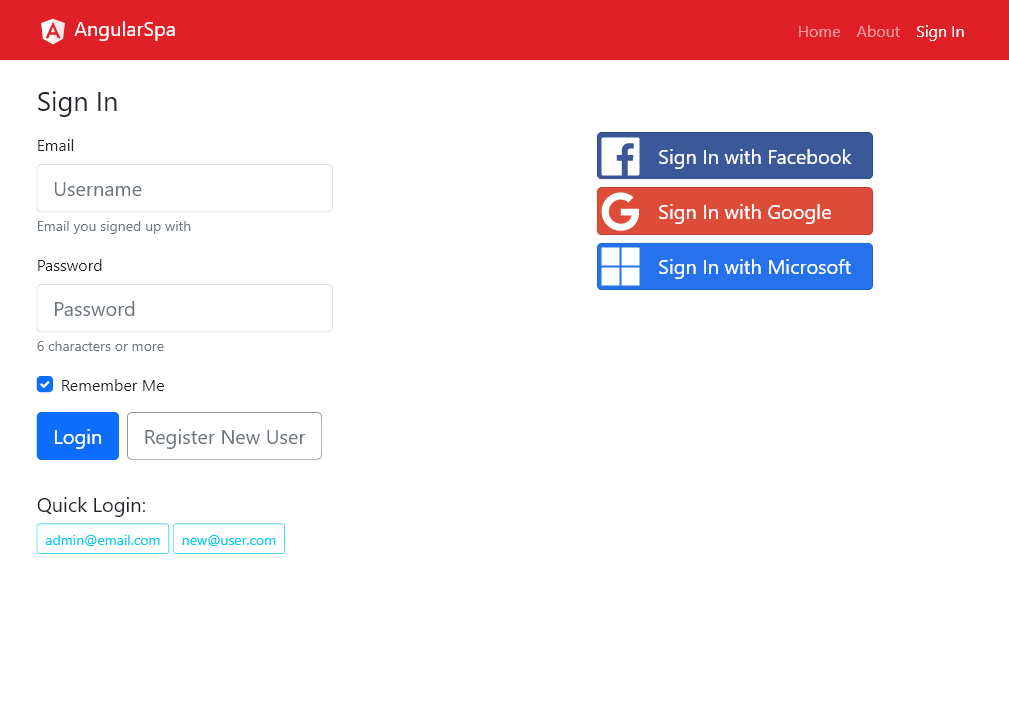
$ x new angular-spa ProjectName            # .NET Core
$ x new angular-spa-netfx ProjectName      # Classic ASP.NET on .NET Framework
mvcauth
.NET Core 2.2 MVC Website integrated with ServiceStack Auth
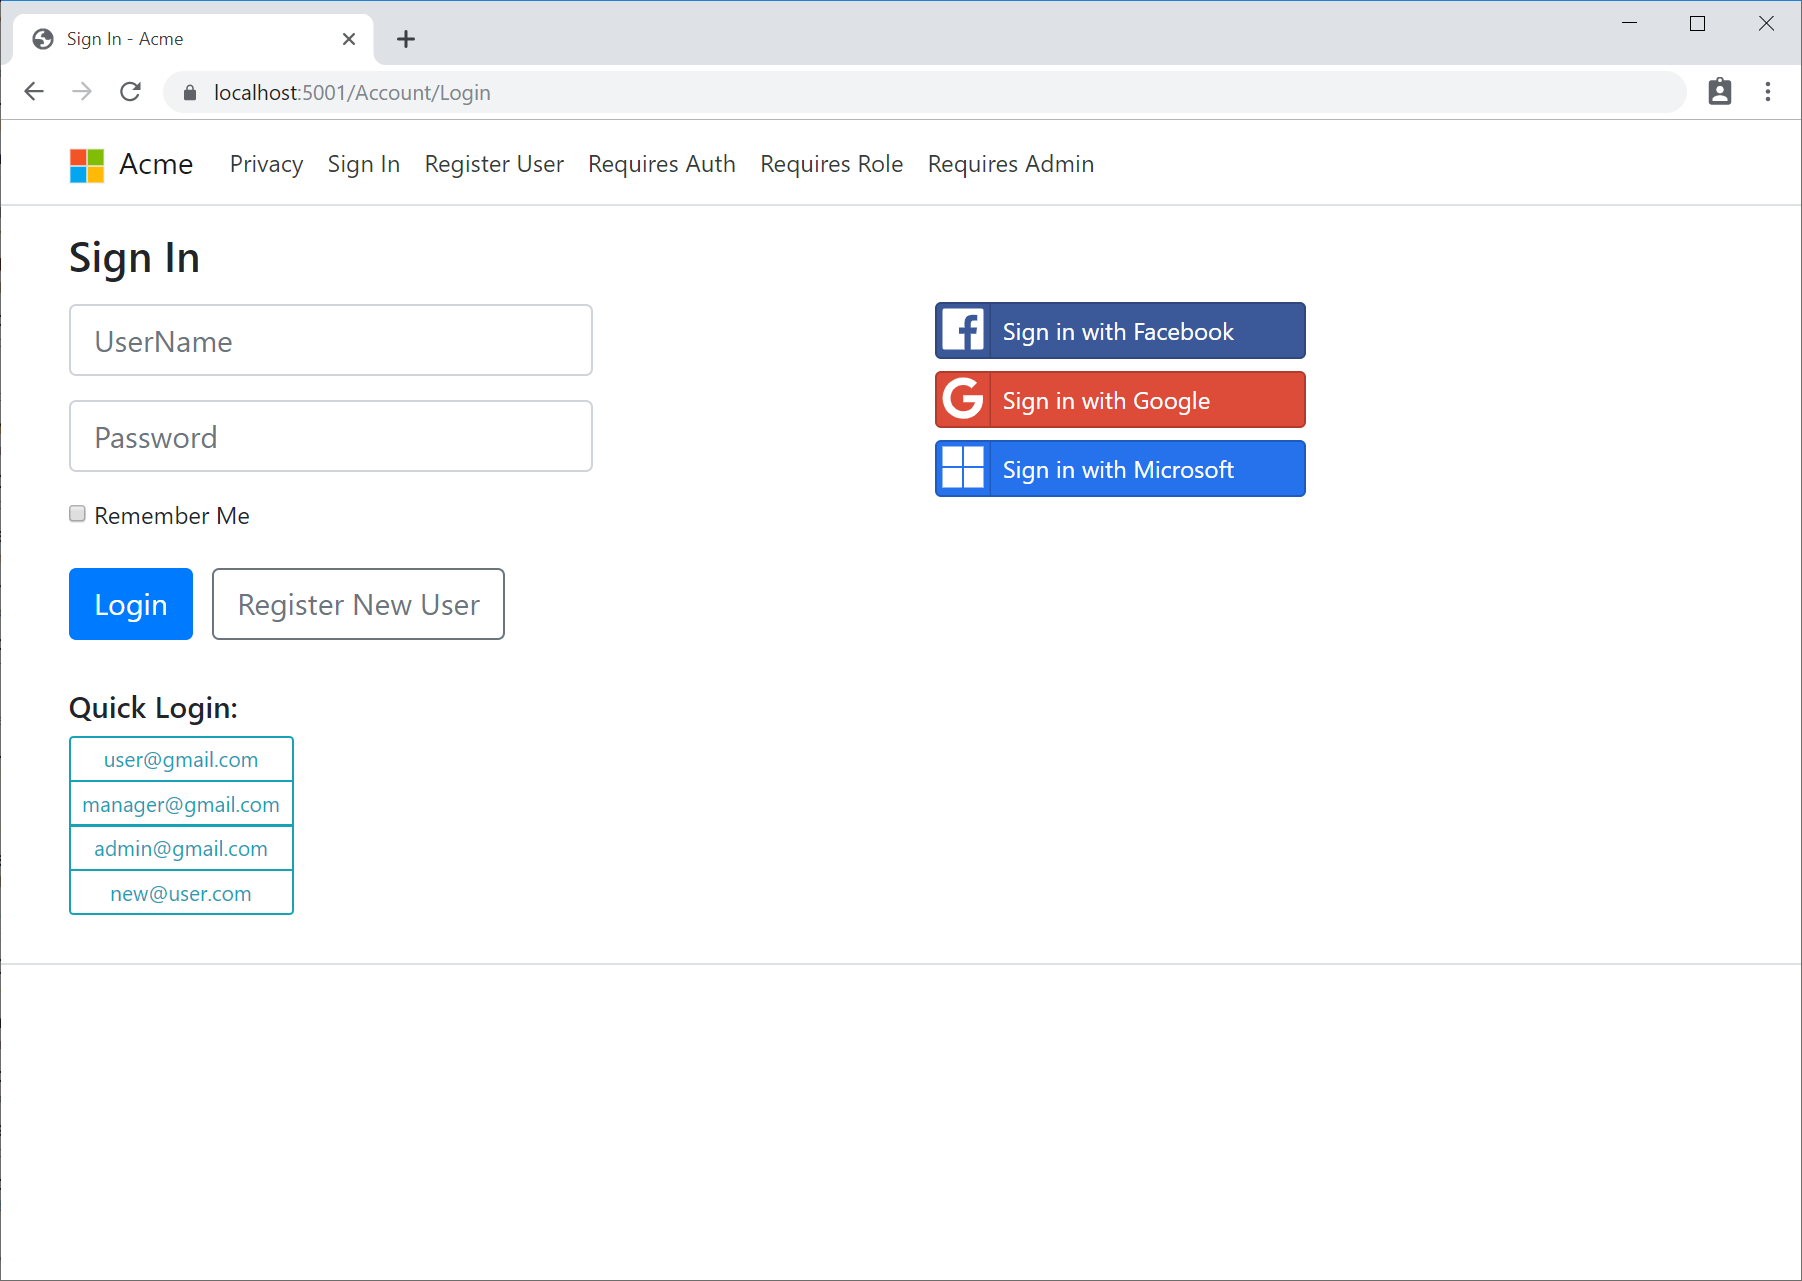
$ x new mvcauth ProjectName # .NET Core
mvcidentity
.NET Core 2.2 MVC Website integrated with ServiceStack using MVC Identity Auth
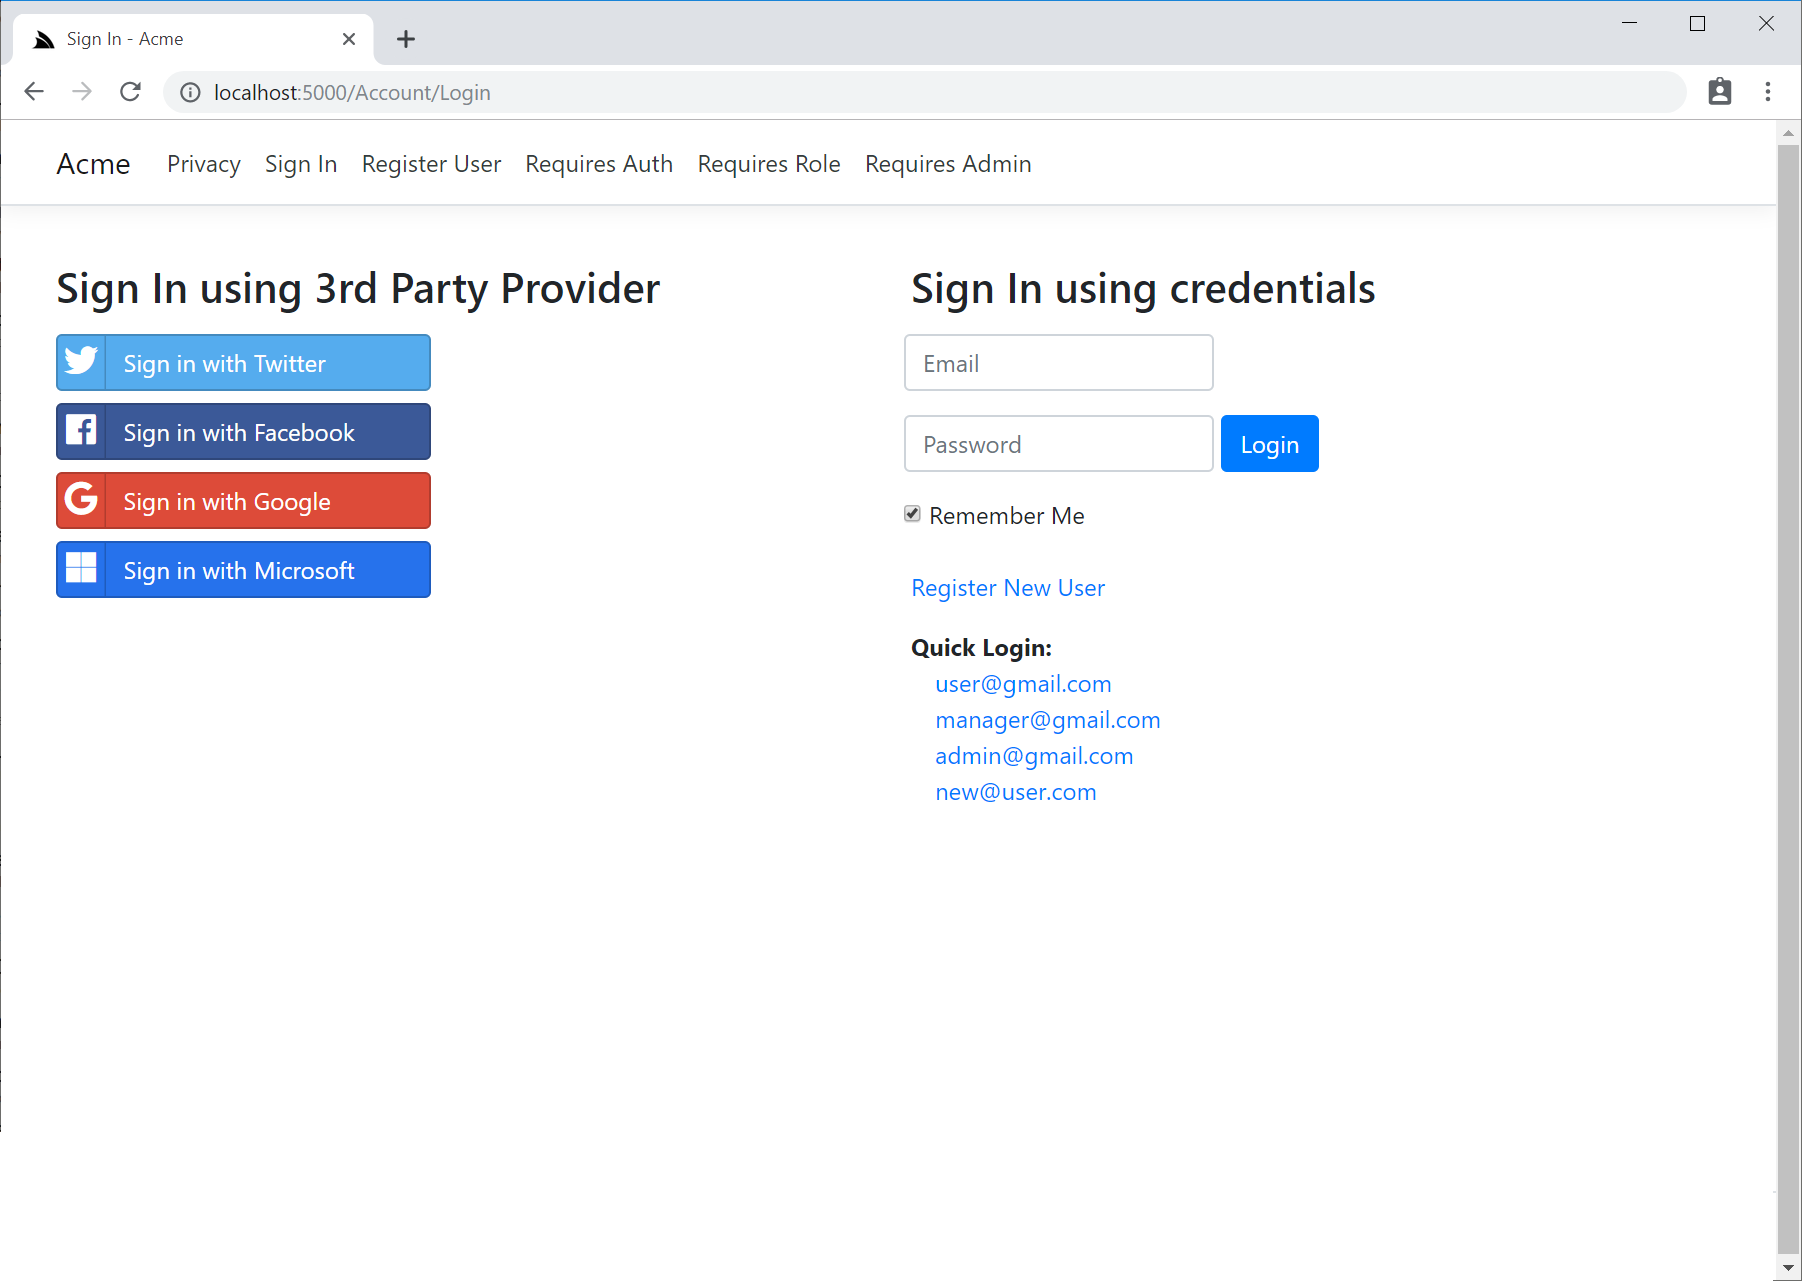
$ x new mvcidentity ProjectName # .NET Core
mvcidentityserver
.NET Core 2.1 MVC Website integrated with ServiceStack using IdentityServer4 Auth
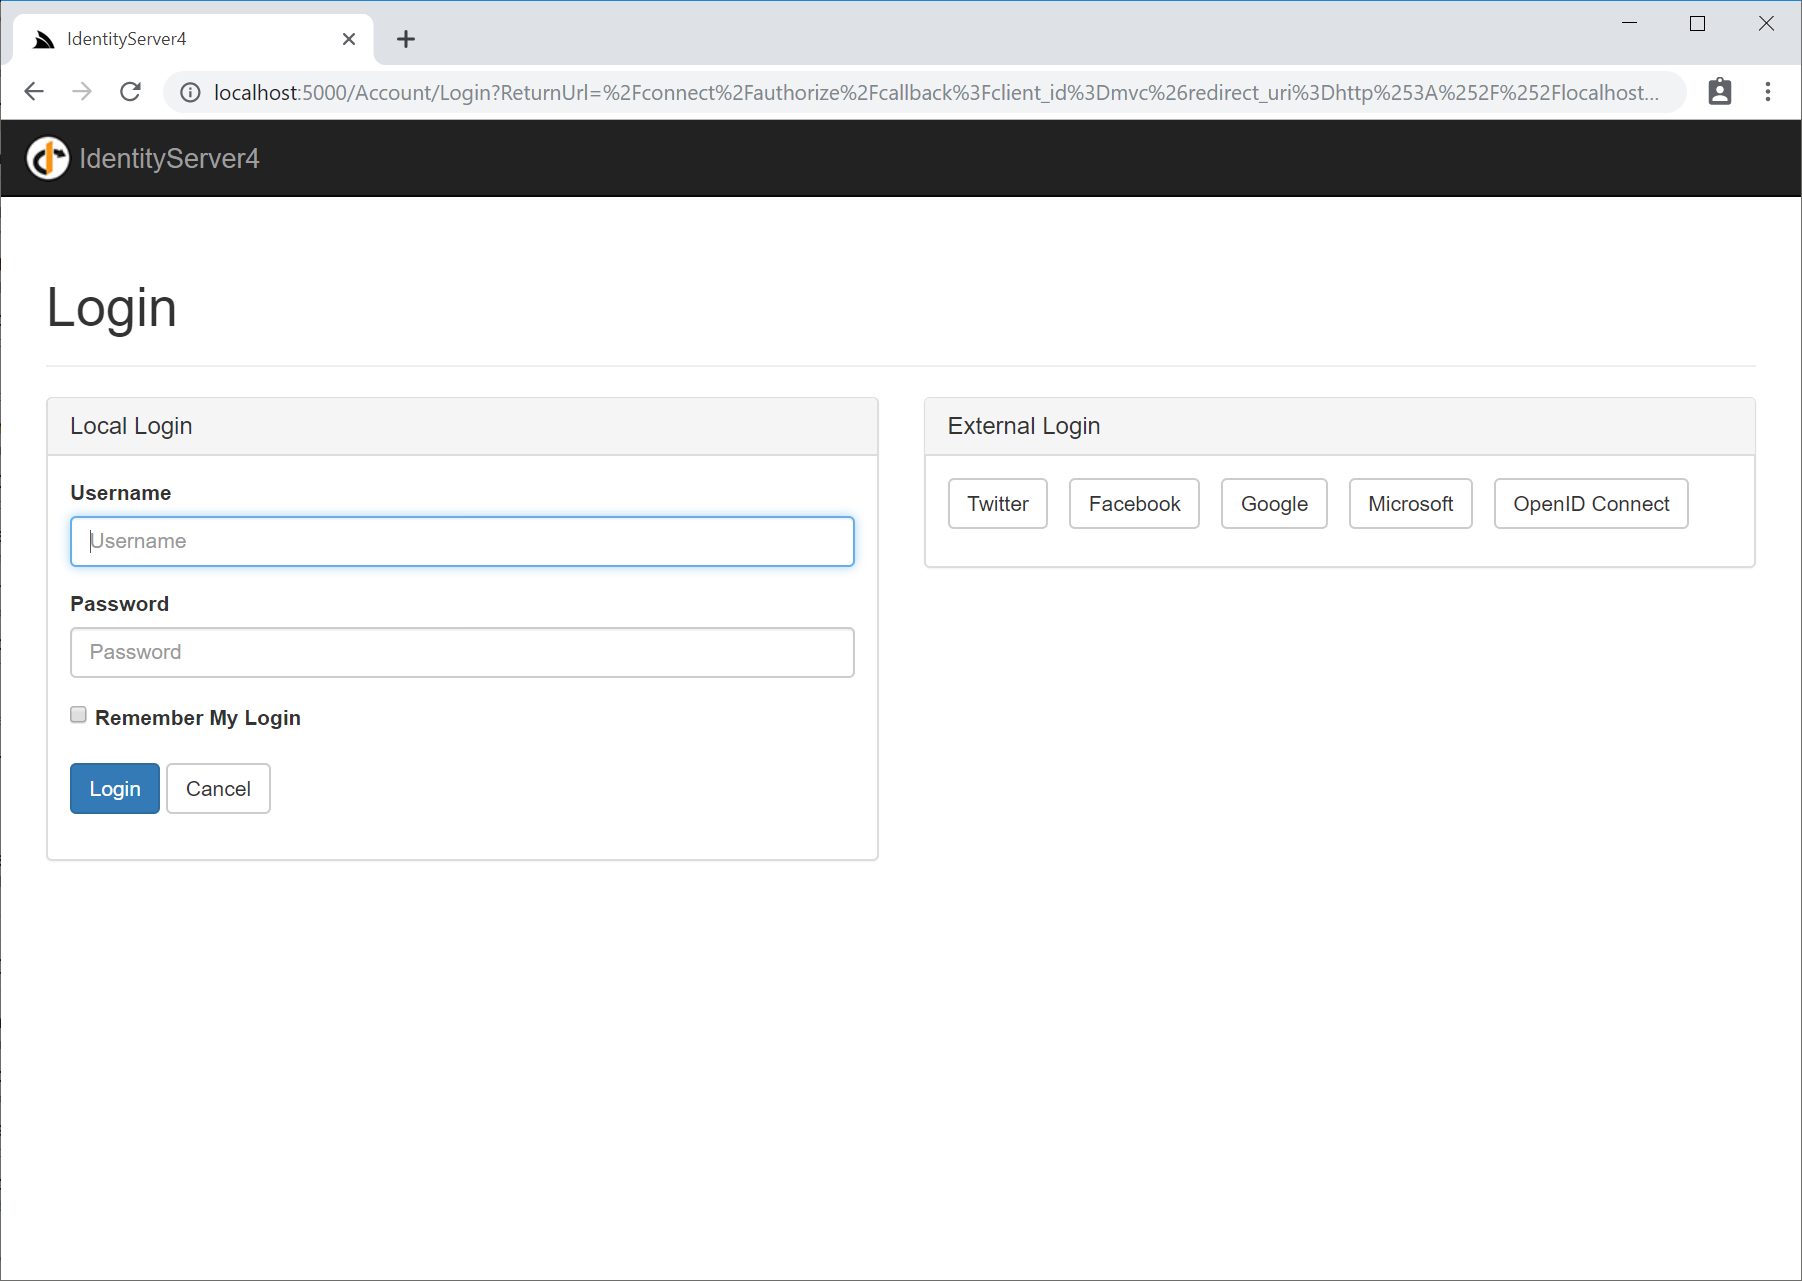
$ x new mvcidentityserver ProjectName # .NET Core
razor
ServiceStack.Razor Bootstrap Website
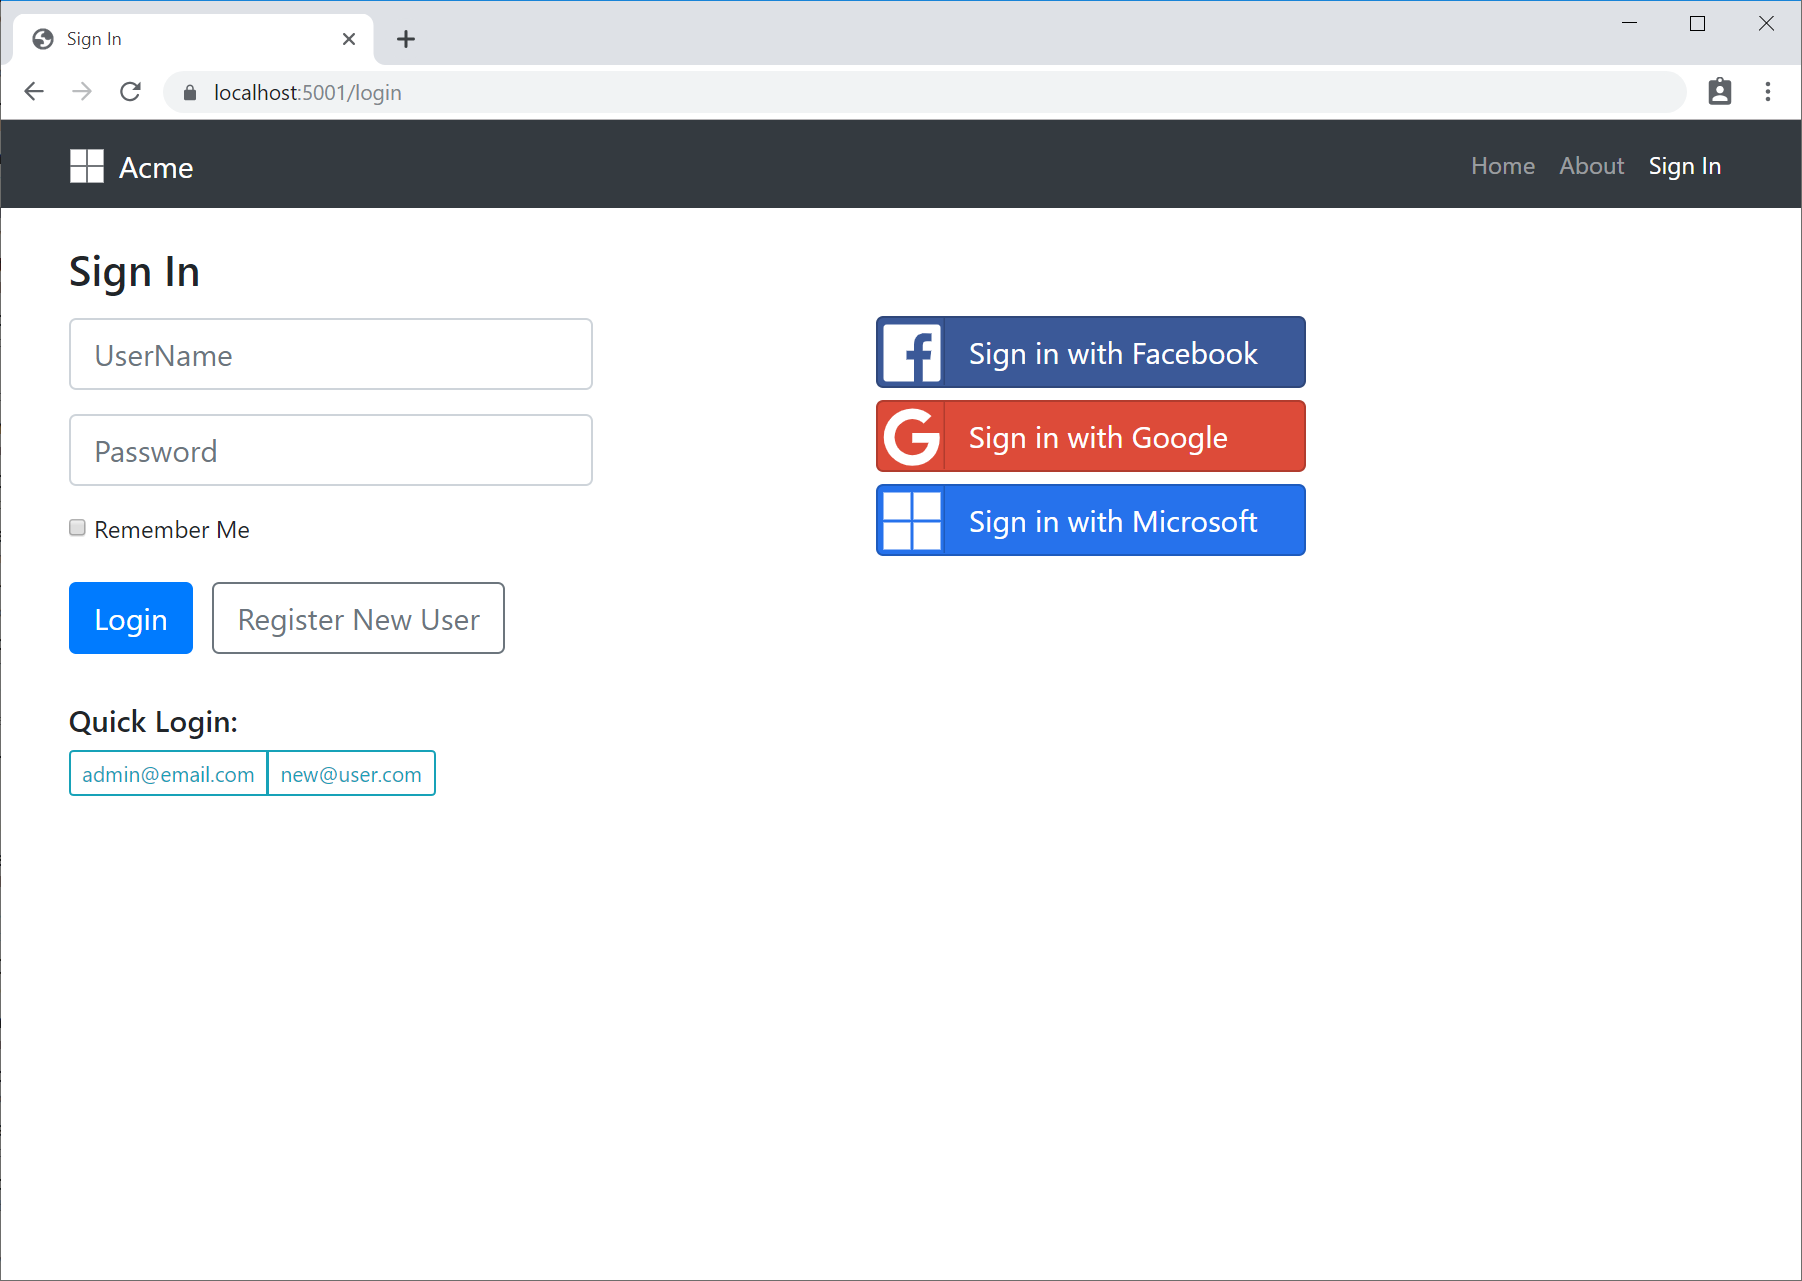
$ x new razor ProjectName                  # .NET Core
$ x new razor-corefx ProjectName           # ASP.NET Core on .NET Framework
$ x new razor-netfx ProjectName            # Classic ASP.NET on .NET Framework
react-spa
React Create App CLI Bootstrap App
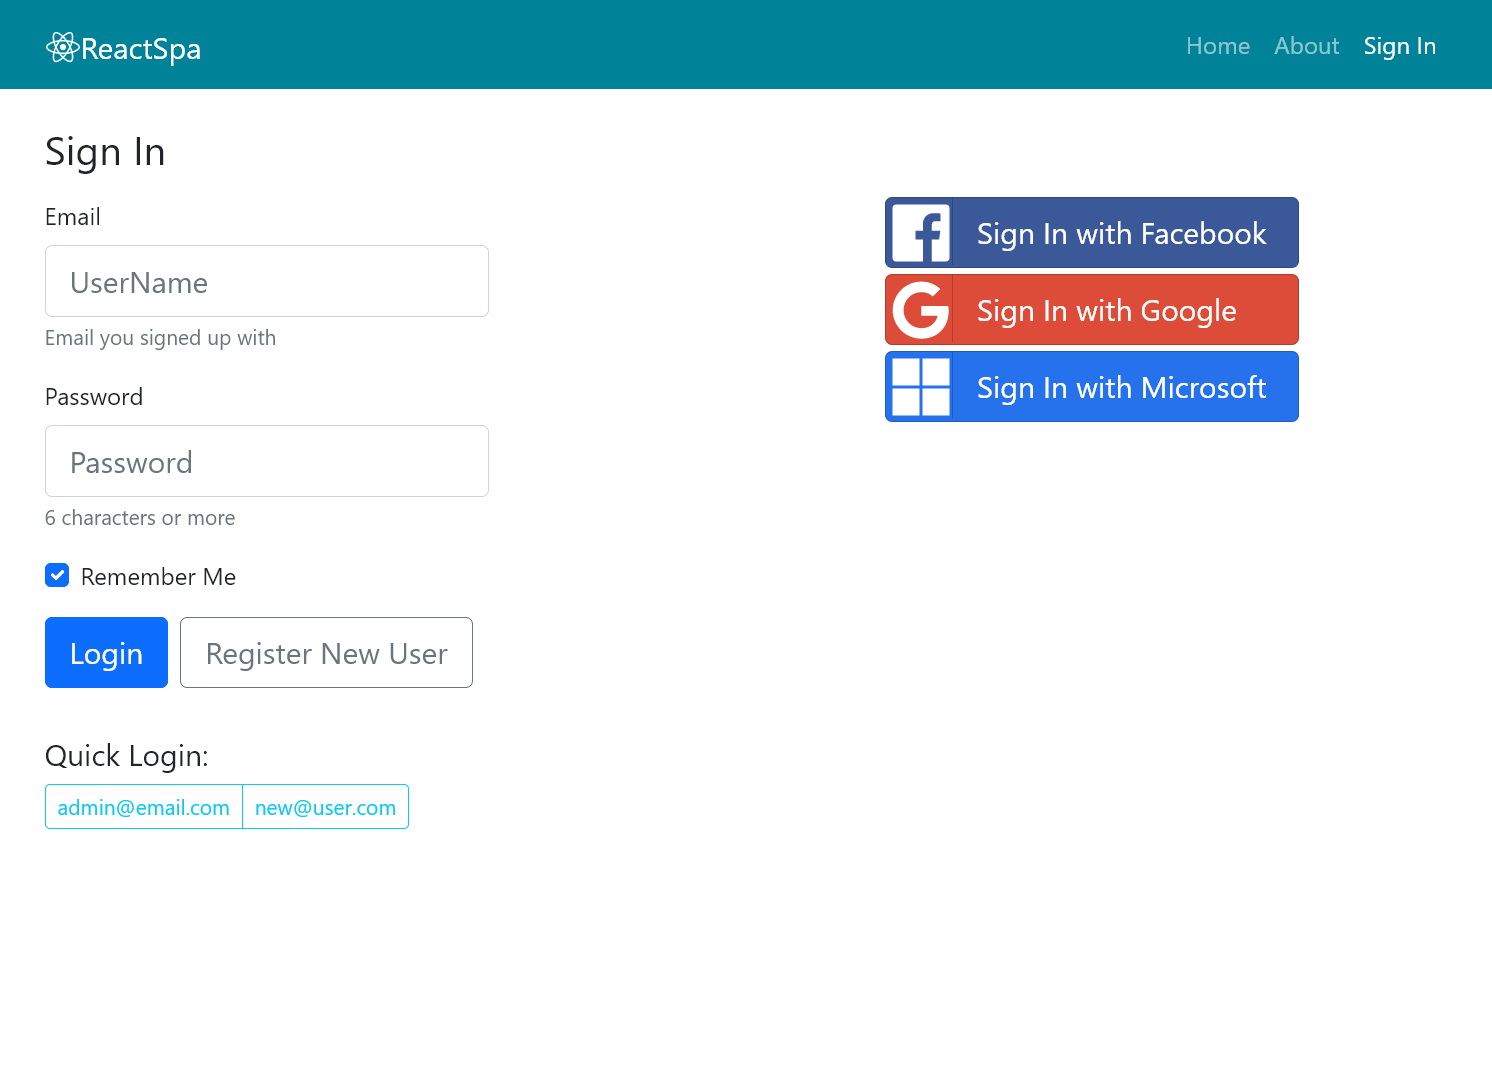
$ x new react-spa ProjectName              # .NET Core
$ x new react-spa-netfx ProjectName        # Classic ASP.NET on .NET Framework
react-lite
ASP.NET Core Simple + lite (npm-free) React SPA using TypeScript
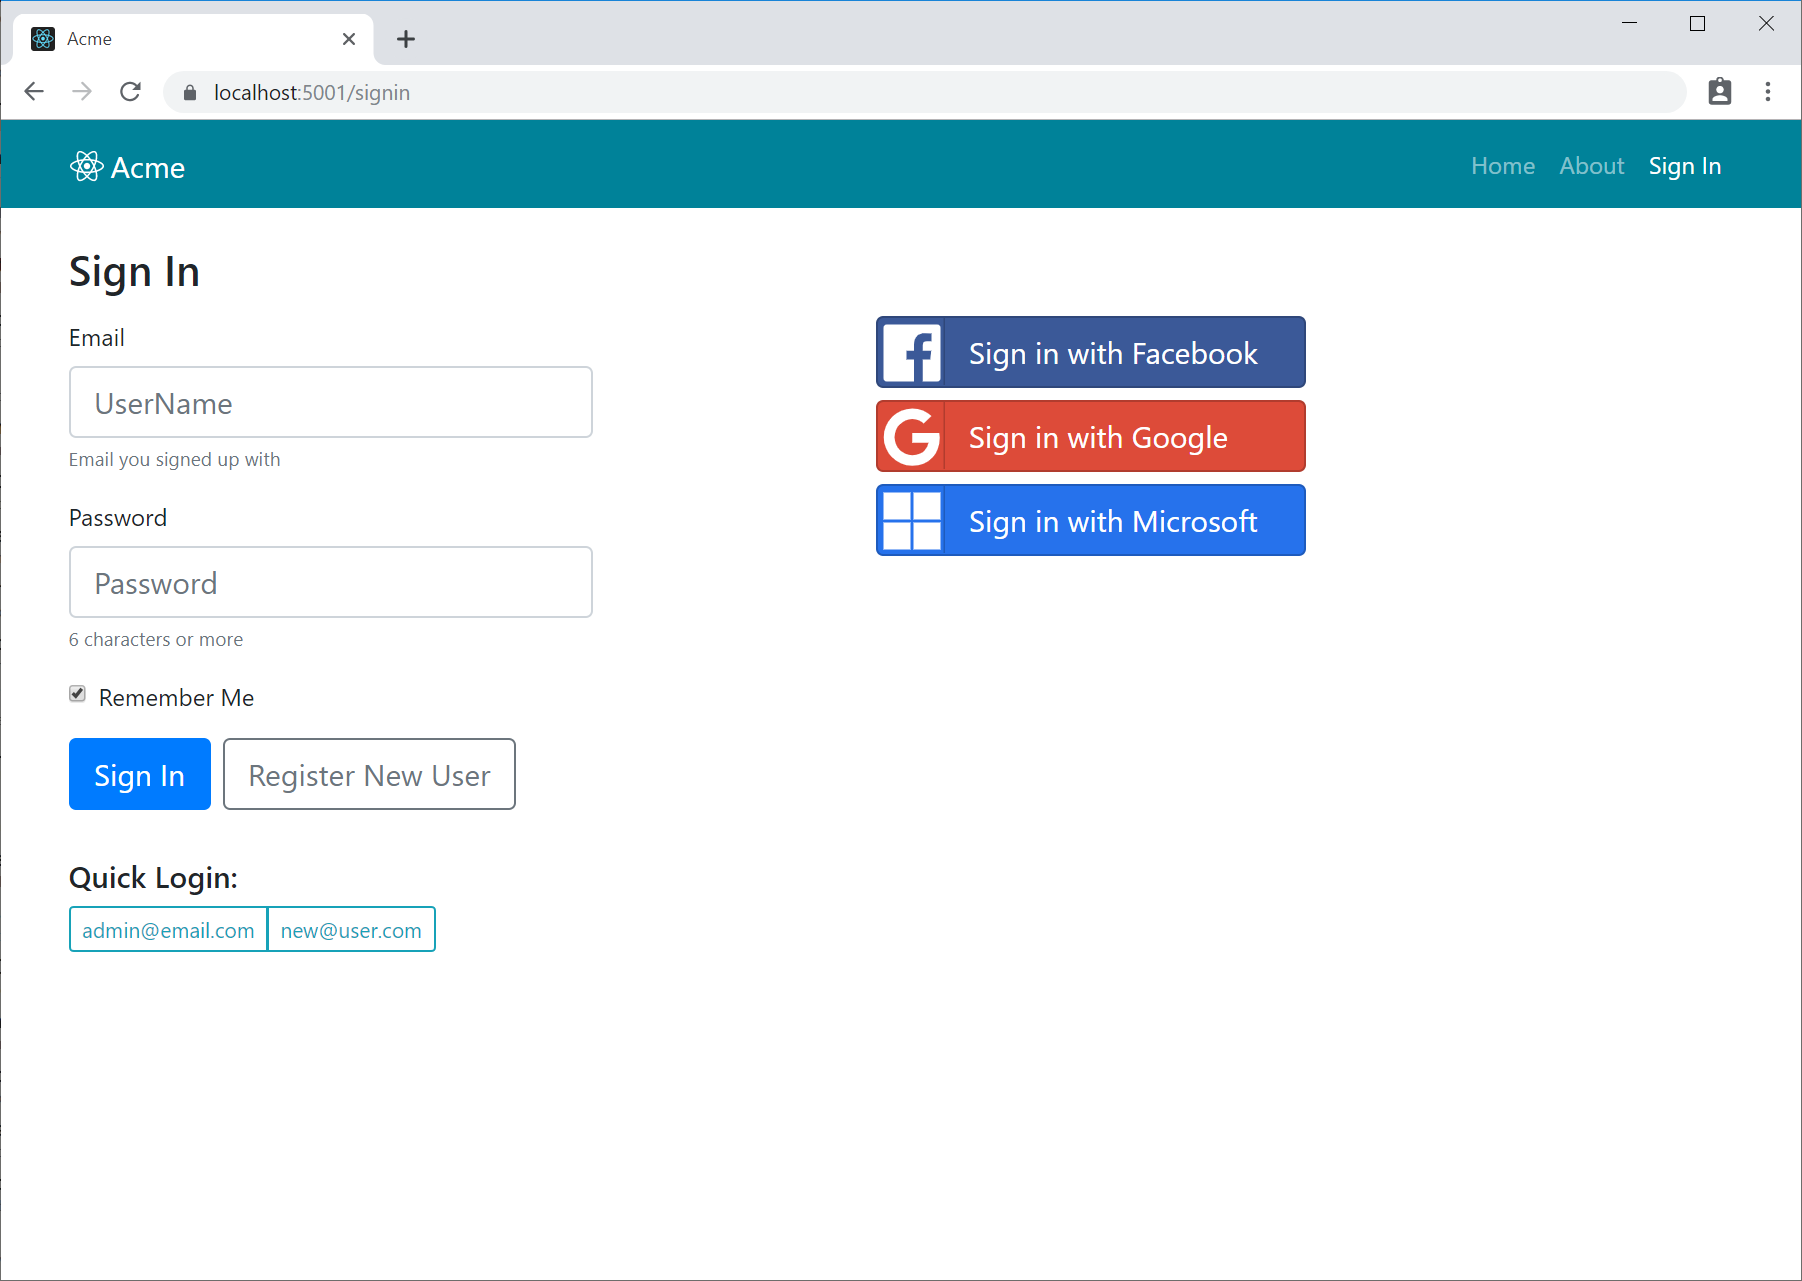
$ x new react-lite ProjectName             # .NET Core
$ x new react-lite-corefx ProjectName      # ASP.NET Core on .NET Framework
script
#Script Pages Bootstrap Website
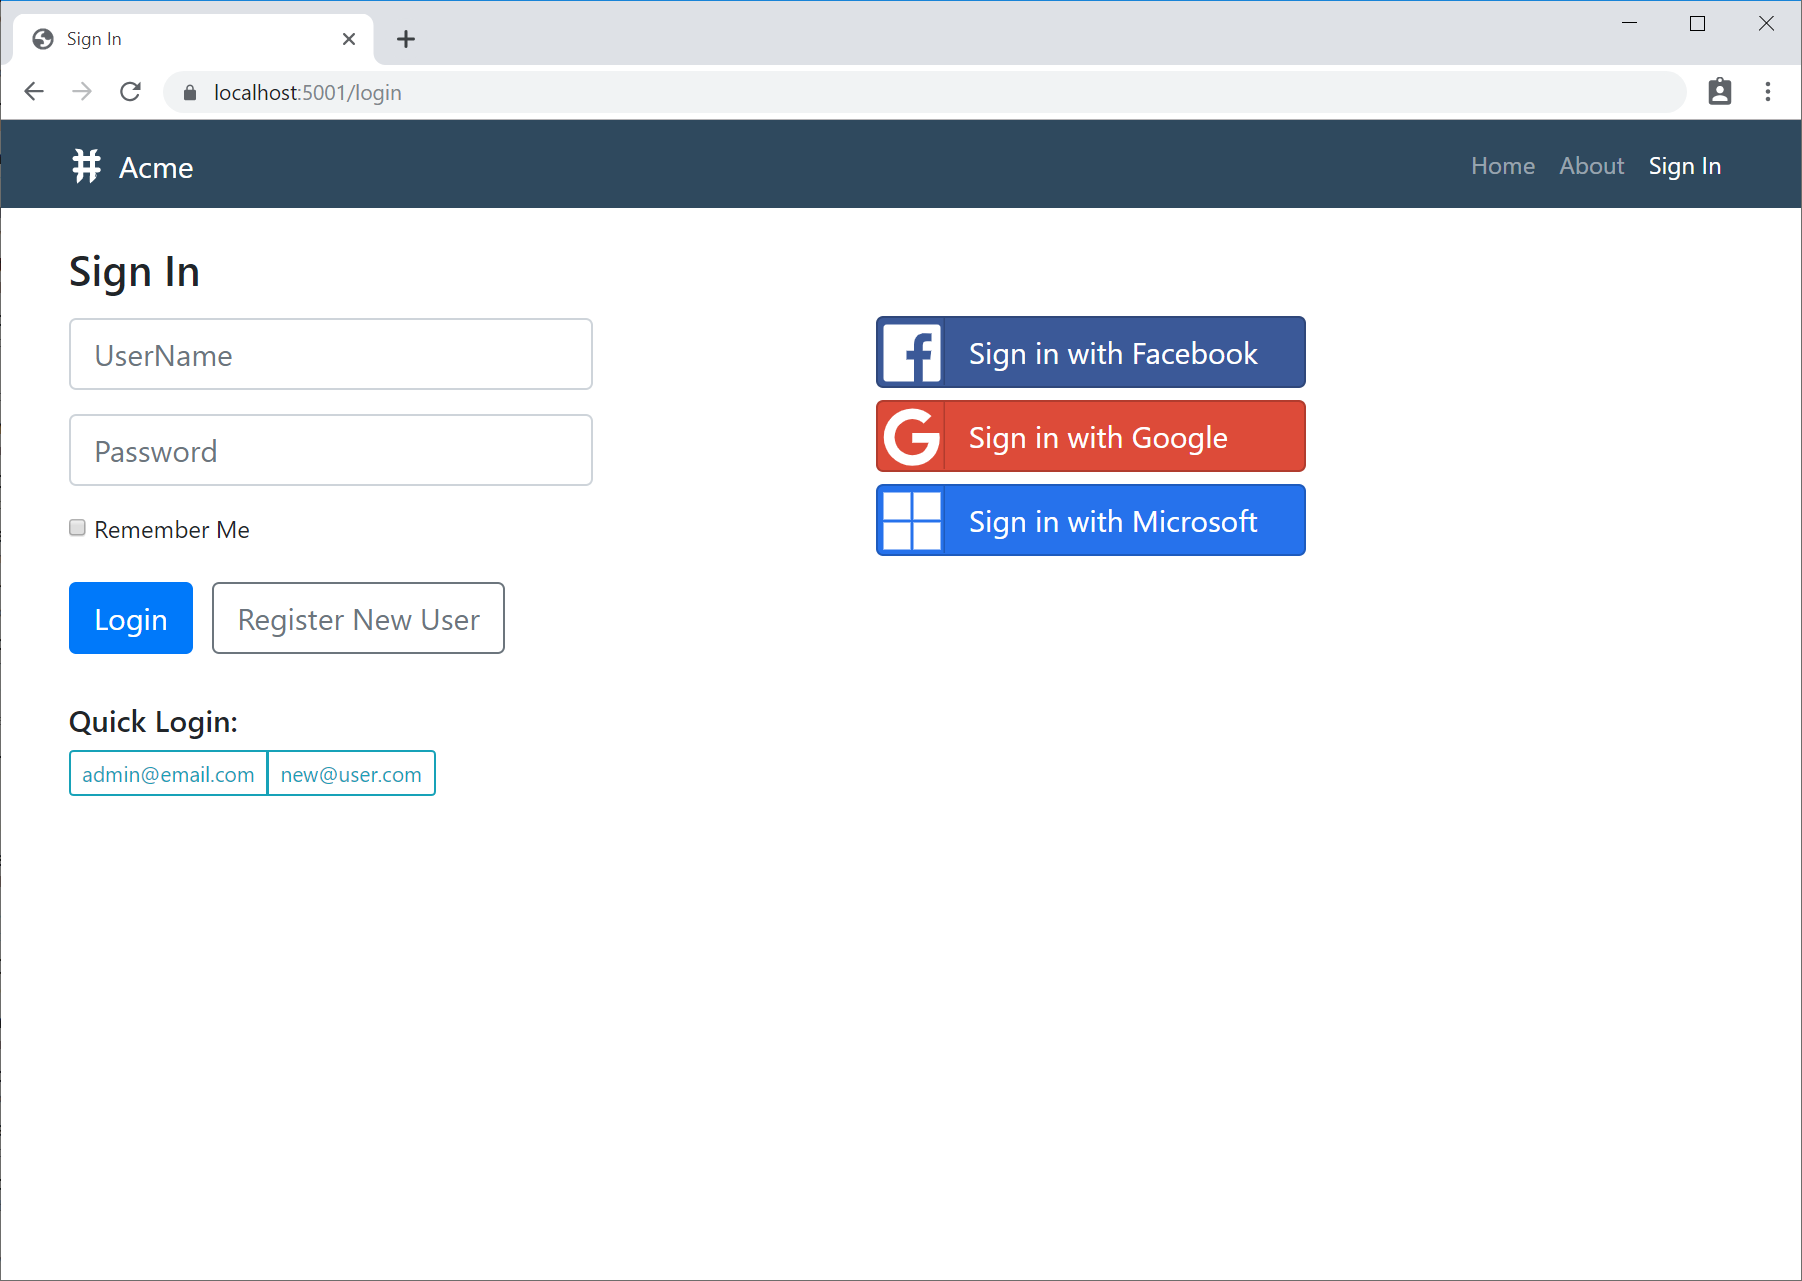
$ x new script ProjectName                 # .NET Core
$ x new script-corefx ProjectName          # ASP.NET Core on .NET Framework
$ x new script-netfx ProjectName           # Classic ASP.NET on .NET Framework
vue-spa
Vue CLI Bootstrap App
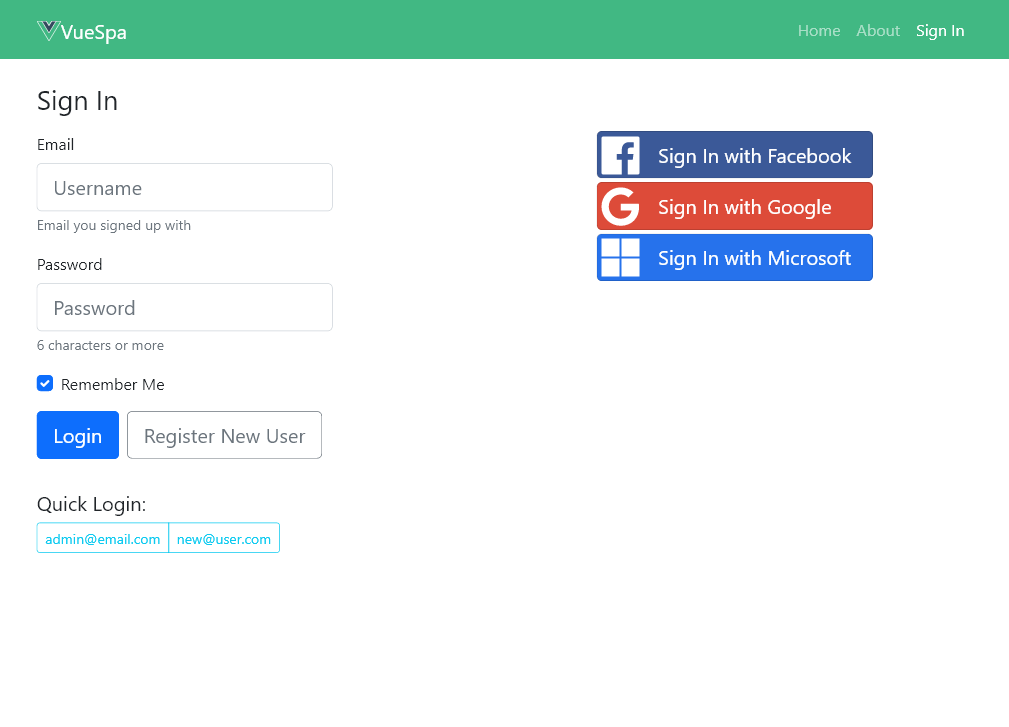
$ x new vue-spa ProjectName                # .NET Core
$ x new vue-spa-netfx ProjectName          # Classic ASP.NET on .NET Framework
vue-lite
ASP.NET Core Simple + lite (npm-free) Vue SPA using TypeScript
$ x new vue-lite ProjectName               # .NET Core
$ x new vue-lite-corefx ProjectName        # ASP.NET Core on .NET Framework
vue-nuxt
Nuxt.js SPA App with Bootstrap
$ x new vue-nuxt ProjectName               # .NET Core
$ x new vue-nuxt-netfx ProjectName         # Classic ASP.NET on .NET Framework
Optimal Library Bundles
To facilitate splitting JS and CSS assets into multiple bundles without needing to create artificial directories for each bundle
you can use the ! prefix to exclude files from bundles.
Example from sharp _layout.html:
{{ (debug ? '' : '[hash].min') | to => min }}
{{ [ '!/assets/css/default.css', '/assets/css/', '/css/buttons.css', '/css/svg-auth.css',
'/css/svg-icons.css', '/css/app.css' ]
| bundleCss({ disk:!debug, out:`/css/lib.bundle${min}.css` }) }}
{{ [ '/assets/css/default.css']
| bundleCss({ minify:!debug, cache:!debug, disk:!debug, out:`/css/bundle${min}.css` }) }}
Here the App specific default.css is excluded when bundling all other .css files in the /assets/css/ directory as
it's included on its own in a separate app bundle.css below.
{{ [ '!/assets/js/dtos.js', '!/assets/js/default.js', '/assets/js/jquery.min.js', '/assets/js/' ]
| bundleJs({ disk:!debug, out:`/js/lib.bundle${min}.js` }) }}
{{ [ '/assets/js/dtos.js', '/assets/js/default.js' ]
| bundleJs({ minify:!debug, cache:!debug, disk:!debug, out:`/js/bundle${min}.js` }) }}
Likewise the App specific dtos.js and default.js files are excluded from the library bundle and included in its own app bundle.js.
The equivalent bundle API's are also available in ServiceStack.Razor projects as seen in the razor template's
_Layout.cshtml:
@{
  var debug = DebugMode;
  var min = debug ? "" : "[hash].min";
}

@Html.BundleCss(new BundleOptions {
    Sources = {
        "!/assets/css/default.css",
        "/assets/css/",
        "/css/buttons.css",
        "/css/svg-auth.css",
        "/css/svg-icons.css",
        "/css/app.css",
    },
    SaveToDisk = !debug,
    OutputTo = $"/css/lib.bundle{min}.css"
})

@Html.BundleCss(new BundleOptions {
    Sources = {
        "/assets/css/default.css",
    },
    Minify = !debug,
    Cache = !debug,
    SaveToDisk = !debug,
    OutputTo = $"/css/bundle{min}.css"
})

//...

@Html.BundleJs(new BundleOptions {
    Sources = {
        "!/assets/js/dtos.js",
        "!/assets/js/default.js",
        "/assets/js/jquery.min.js",
        "/assets/js/",
    },
    SaveToDisk = !debug,
    OutputTo = $"/js/lib.bundle{min}.js"
})

@Html.BundleJs(new BundleOptions {
    Sources = {
        "/assets/js/dtos.js",
        "/assets/js/default.js",
    },
    Minify = !debug,
    Cache = !debug,
    SaveToDisk = !debug,
    OutputTo = $"/js/bundle{min}.js"
})
Single Page App Templates also makes use of cssIncludes to embed multiple *.css files inline in the initial page request,
avoiding external resource requests as seen in the vue-lite template
_layout.html:
{{ 'buttons,svg-auth,app,/assets/css/default.css' | cssIncludes }}
{{ 'svg-icons' | cssIncludes | svgFill('#41B883') }}
By default cssIncludes references files in the format /css/{name}.css which can be overridden by specifying
the Virtual Path to the file. It can be useful to use in conjunction with svgFill to change the fill color
of all SVG images in the SVG CSS bundle as seen above.
New Auth #Script methods
- Use
hasRoleandhasPermissionmethods to validate Authenticated Users - Use
assertRoleandassertPermissionto validate that Users have role/permission otherwise returns 403 Forbidden response- If configured, browsers will return Fallback Error Page response
Example Usage a the top of sharp template's Admin only
/admin/index.html page:
{{ 'requires-auth' | partial({ role: 'Admin' }) }}
_requires-auth-partial.html validates
User is authenticated (otherwise redirects to /login page) and contains any specified roles and permissions
(otherwise returns /forbidden page):
{{ redirectIfNotAuthenticated }}
{{#if role}}
{{ assertRole(role) }}
{{/if}}
{{#if permission}}
{{ assertPermission(permission) }}
{{/if}}
Razor base methods
The same API's are also available in Razor Pages:
AssertRoleAsync()AssertPermissionAsync()AssertRole()andAssertPermission()RedirectTo()andRedirectToAsync()
Example usage in razor template's /admin/default.cshtml
page:
@await Html.PartialAsync("RequiresRole", "Admin")
Which is defined in /Views/Shared/RequiresRole.cshtml as:
@model string
@{
    RedirectIfNotAuthenticated();
    await AssertRoleAsync(Model);
}
#Script Features
We're happy to be able to share some exciting features added to #Script that greatly improves the usability of the language.
All Script Methods can be used as Extension Methods!
A core feature of #Script is that it runs in a sandbox and only has access to functionality that's configured in its ScriptContext
that it runs in, so by design #Script is prohibited from calling instance methods so they only have a read-only view of your objects
unless you explicitly register ScriptMethods that allows them to change them.
This frees up the instance.method() syntax to be put to other use which can now be used to call every script method as an extension method.
This can greatly improve the readability and execution flow of code, e,g. we can rewrite our previous
JS Utils Eval example:
itemsOf(3, padRight(reverse(arg), 8, '_'))
into the more readable form using the same methods as extension methods off the first argument, e.g:
3.itemsOf(arg.reverse().padRight(8, '_'))
It's been a joy being able to rewrite existing #Script code to use extension methods where it improves readability as
done when rewriting LINQ examples.
As an example, C#'s 101 LINQ examples most complicated LINQ expression can now be rewritten from its original source:
{{ customers
| map => {
CompanyName: it.CompanyName,
YearGroups: map (
groupBy(it.Orders, it => it.OrderDate.Year),
yg => {
Year: yg.Key,
MonthGroups: map (
groupBy(yg, o => o.OrderDate.Month),
mg => { Month: mg.Key, Orders: mg }
)
}
)
}
| htmlDump }}
to use extension methods which greatly improves its readability as its execution flow is now able to read from left-to-right:
{{ customers | map => {
CompanyName: it.CompanyName,
YearGroups: it.Orders.groupBy(it => it.OrderDate.Year).map(yg =>
{
Year: yg.Key,
MonthGroups: yg.groupBy(o => o.OrderDate.Month).map(mg =>
{ Month: mg.Key, Orders: mg }
)
}
)
}
| htmlDump }}
Which we believe now makes it even more readable than the original C# LINQ Expression:
List customers = GetCustomerList();

var customerOrderGroups =
    from c in customers
    select
        new
        {
            c.CompanyName,
            YearGroups =
                from o in c.Orders
                group o by o.OrderDate.Year into yg
                select
                    new
                    {
                        Year = yg.Key,
                        MonthGroups =
                            from o in yg
                            group o by o.OrderDate.Month into mg
                            select new { Month = mg.Key, Orders = mg }
                    }
        };
JavaScript Array Support
With the new extension method support allowing us to add instance methods on any object, we took the opportunity to add JS Array
methods support to further improve #Script source compatibility with JavaScript.
This also provides a good opportunity to showcase #Script other exciting feature, it's new support for code blocks.
Here are Mozilla's Array examples in #Script:
```code
`Create an Array`
['Apple', 'Banana'] | to => fruits
fruits.Count

`\nAccess (index into) an Array Item`
fruits[0] | to => first
first

`\nLoop over an Array`
#each item in fruits
    `${item}, ${index}`
/each

[] | to => sb
fruits.forEach((item,index,array) => sb.push(`${item}, ${index}`))
sb.join(`\n`)

`\nAdd to the end of an Array`

fruits.push('Orange') | to => newLength
newLength

`\nRemove from the end of an Array`
fruits.pop() | to => last
last

`\nRemove from the front of an Array`
fruits.shift() | to => first
first

`\nAdd to the front of an Array`
fruits.unshift('Strawberry') | to => newLength
newLength

`\nFind the index of an item in the Array`
fruits.push('Mango') | end

fruits.indexOf('Banana') | to => pos
pos

`\nRemove an item by index position`
fruits.splice(pos, 1) | to => removedItem
removedItem | join
fruits | join

`\nRemove items from an index position`
['Cabbage', 'Turnip', 'Radish', 'Carrot'] | to => vegetables
vegetables | join

1 | to => pos
2 | to => n

vegetables.splice(pos, n) | to => removedItems
vegetables | join
removedItems | join

`\nCopy an Array`
fruits.slice() | join
```
Which can be run with web run <script>.ss to view its expected output:
Create an Array
2

Access (index into) an Array Item
Apple

Loop over an Array
Apple, 0
Banana, 1

Apple, 0
Banana, 1

Add to the end of an Array
3

Remove from the end of an Array
Orange

Remove from the front of an Array
Apple

Add to the front of an Array
2

Find the index of an item in the Array
1

Remove an item by index position
Banana
Strawberry,Mango

Remove items from an index position
Cabbage,Turnip,Radish,Carrot
Cabbage,Carrot
Turnip,Radish

Copy an Array
Strawberry,Mango
Most JS Array methods are supported, including the latest additions from ES2019:
concateveryfilterfindfindIndexflatflatMapforEachincludesindexOfjoinkeyslastIndexOfmappoppushreducereverseshiftslicesomesortsplicetoStringunshiftvalues
VFS Script Methods Object API
This now makes it possible to provide a more natural OOP API over object instances using just script methods, e.g.
all Protected Scripts Virtual File System APIs
are executed against the ScriptContext.VirtualFiles which in #Script Pages is configured to the WebRoot FileSystem by default:
allFiles()
With the new extension method support we're able to include an overloaded method that includes IVirtualPathProvider as
its first argument:
public IEnumerable<IVirtualFile> allFiles() => allFiles(VirtualFiles);
public IEnumerable<IVirtualFile> allFiles(IVirtualPathProvider vfs) => vfs.GetAllFiles();
This allows being able to use the same script method name against any VFS provider by calling it like an instance method, e.g:
vfsFileSystem(dirPath) | to => fs

fs.allFiles()
Which is now supported on all VFS APIs on the left with its C# implementation where vfs is an instance of IVirtualPathProvider:
| Protected VFS Script Method | C# Implementation |
|---|---|
| allFiles() | vfs.GetAllFiles() |
| allRootFiles() | vfs.GetRootFiles() |
| allRootDirectories() | vfs.GetRootDirectories() |
| dir(virtualPath) | vfs.GetDirectory(virtualPath) |
| dirExists(virtualPath) | vfs.DirectoryExists(virtualPath) |
| dirFile(dirPath, fileName) | vfs.GetDirectory(dirPath)?.GetFile(fileName) |
| dirFiles(virtualPath) | vfs.GetDirectory(dirPath)?.GetFiles() |
| dirDirectory(dirPath, dirName) | vfs.GetDirectory(dirPath)?.GetDirectory(dirName) |
| dirDirectories(dirPath) | vfs.GetDirectory(dirPath)?.GetDirectories() |
| findFilesInDirectory(dirPath, globPattern) | vfs.GetDirectory(dirPath)?.GetAllMatchingFiles(globPattern) |
| findFiles(globPattern) | vfs.GetAllMatchingFiles(globPattern) |
| fileExists(virtualPath) | vfs.FileExists(virtualPath) |
| file(virtualPath) | vfs.GetFile(virtualPath) |
| writeFile(virtualPath, contents) | vfs.WriteFile(virtualPath, contents) |
| writeFiles(files) | vfs.WriteFiles(files) |
| writeTextFiles(textFiles) | vfs.WriteFiles(textFiles) |
| appendToFile(virtualPath, contents) | vfs.AppendFile(virtualPath, contents) |
| deleteFile(virtualPath) | vfs.DeleteFile(virtualPath) |
| deleteDirectory(virtualPath) | vfs.DeleteFolder(virtualPath) |
| fileTextContents(virtualPath) | vfs.GetFile(virtualPath)?.ReadAllText() |
| fileBytesContent(virtualPath) | vfs.GetFile(virtualPath)?.ReadAllBytes() |
| fileHash(virtualPath) | vfs.GetFileHash(virtualPath) |
All above VFS APIs work against the built-in VFS providers below:
vfsMemory()                  | to => memFs
vfsFileSystem(dirPath)       | to => fs
vfsGist(gistId, accessToken) | to => gistFs
vfsGist(gistId)              | to => gistReadOnlyFs
They can also be used against AWS S3 and Azure Blob storage providers if you configure your ScriptContext with AwsScripts
from ServiceStack.Aws package or AzureScripts from ServiceStack.Azure:
vfsS3(accessKey, secretAccessKey, region, bucketName) | to => s3Fs
vfsAzureBlob(connectionString, containerName)         | to => azureBlobFs
Code Blocks
We've caught a glimpse of #Script new code blocks feature in the JavaScript Array Example above which dramatically reduces
the boilerplate that would've otherwise been needed where each statement would've needed to be wrapped in an expression block.
They're akin to Razor's statement blocks which inverts Razor's mode of emitting text to treating text inside statement blocks as code, e.g:
@{
    var a = 1;
    var b = 2;
}
Basic Calc
a + b = @(a + b)
The equivalent in #Script using code blocks:
```code
1 | to => a
2 | to => b
```
Basic Calc
a + b = <code v-pre>{{a + b}}</code>
The entire code feature is implemented within a
simple TransformCodeBlocks PreProcessor
that's pre-configured by default and so can be removed by clearing the Preprocessors List:
var context = new ScriptContext();
context.Preprocessors.Clear();
Preprocessor Code Transformations
It performs a basic transformation that assumes every statement is an expression and wraps them in an {{...}}
expression block, the exception are expressions which are already within an expression block which are ignored and you still
need to use to wrap multi-line expressions in code blocks.
The other transformation code blocks perform is collapsing new lines and trimming each line, this is so scripts which are primarily
structured and indented for readability aren't reflected in its text output.
We can see an example of how code blocks work from the example below:
<!--
title: The title
-->
# {{title}}
{{ 1 + 1 }}
```code
* Odd numbers < 5 *
#each i in range(1,5)
#if i.isOdd()
`${i} is odd`
else
`${i} is even`
/if
/each
```
```code
1 + 2 * 3
```
```code
{{ 1 + 1 }}
{{#if debug}}
{{ range(1,5)
| where => it.isOdd()
| map => it * it
| join(',')
}}
{{/if}}
```
Before this script is run it's processed by the
TransformCodeBlocks PreProcessor
which transforms it to the normal #Script code:
<!--
title: The title
-->
# {{title}}
{{ 1 + 1 }}
{{* Odd numbers < 5 *}}
{{#each i in range(1,5)}}
{{#if i.isOdd()}}
{{`${i} is odd`}}
{{else}}
{{`${i} is even`}}
{{/if}}
{{/each}}
{{1 + 2 * 3}}
{{ 1 + 1 }}
{{#if debug}}
{{ range(1,5)
| where => it.isOdd()
| map => it * it
| join(',')
}}
{{/if}}
The resulting output when executed is:
# The title

2

1 is odd
2 is even
3 is odd
4 is even
5 is odd

7

2
1,9,25
Shell Scripts
Unlike most languages, #Script has 2 outputs, the side-effect of the script itself and its textual output which makes it ideal for
literate programming where executable snippets can be embedded inside an executable document.
code blocks are a convenient markup for embedding executable scripts within a document without the distracting boilerplate of wrapping
each statement in expression blocks. Together with web watch, #Script allows for an iterative, exploratory style of programming
in a live programming environment that benefits many domains whose instant progressive feedback unleashes an unprecedented amount of
productivity, one of those areas it benefits is shell scripting where the iterative feedback is invaluable in working towards a solution
for automating the desired task.
Other protected script methods added in this release to improve Usage in shell scripts, include:
string proc(string exeFileName, {arguments:string, dir:string})- arguments: command line args
- dir: working directory
sh(cmdArgs, {dir:string})- Executes shell commands. Uses
cmd.exe /C {cmdArgs}in Windows, otherwise/bin/bash -c {cmdArgs}on macOS/Linux
- Executes shell commands. Uses
string exePath(string exeName)- Returns the full path to an executable located in the users $PATH
string osPaths(string path)- Rewrite paths to use
\for Windows, otherwise uses/
- Rewrite paths to use
From this list, you're likely to use sh the most to execute arbitrary commands with:
cmd | sh
As with any
#Scriptmethod, it can also be executed using the less natural forms ofcmd.sh()orsh(cmd)
Which will emit the StandardOutput of the command if successful, otherwise it throws an Exception if anything was written to the StandardError. Checkout the Error Handling docs for how to handle exceptions.
With the features in this release, #Script has now became our preferred way to create x-plat shell scripts which can be run
with the Windows app or x-plat x dotnet tool which runs everywhere .NET Core does.
As such, all scripts in ServiceStack/mix provides a good collection of .ss scripts to check out
which are used to maintain the Gist content that powers the new mix feature.
Live Shell Scripting Preview
To provide a glimpse of the productivity of this real-time exploratory programming-style, here's an example
of a task we needed to automate to import and rename 48px SVG images from Material Design Icons Project folders into the form needed in the mix Gists:
![]()
YouTube: youtu.be/joXSHtfb_7g
Here we can see how we're able to progressively arrive at our solution without leaving the source code, with the watched script
automatically updated at each Ctrl+S save point where we're able to easily infer its behavior from its descriptive textual output.
Explore HTTP APIs in real-time
The real-time scriptability of #Script makes it ideal for a whole host of explanatory programming tasks that would otherwise be painful
in the slow code/build/debug cycles of a compiled language like C#, like being able to cut, sort & slice HTTP APIs with ease:
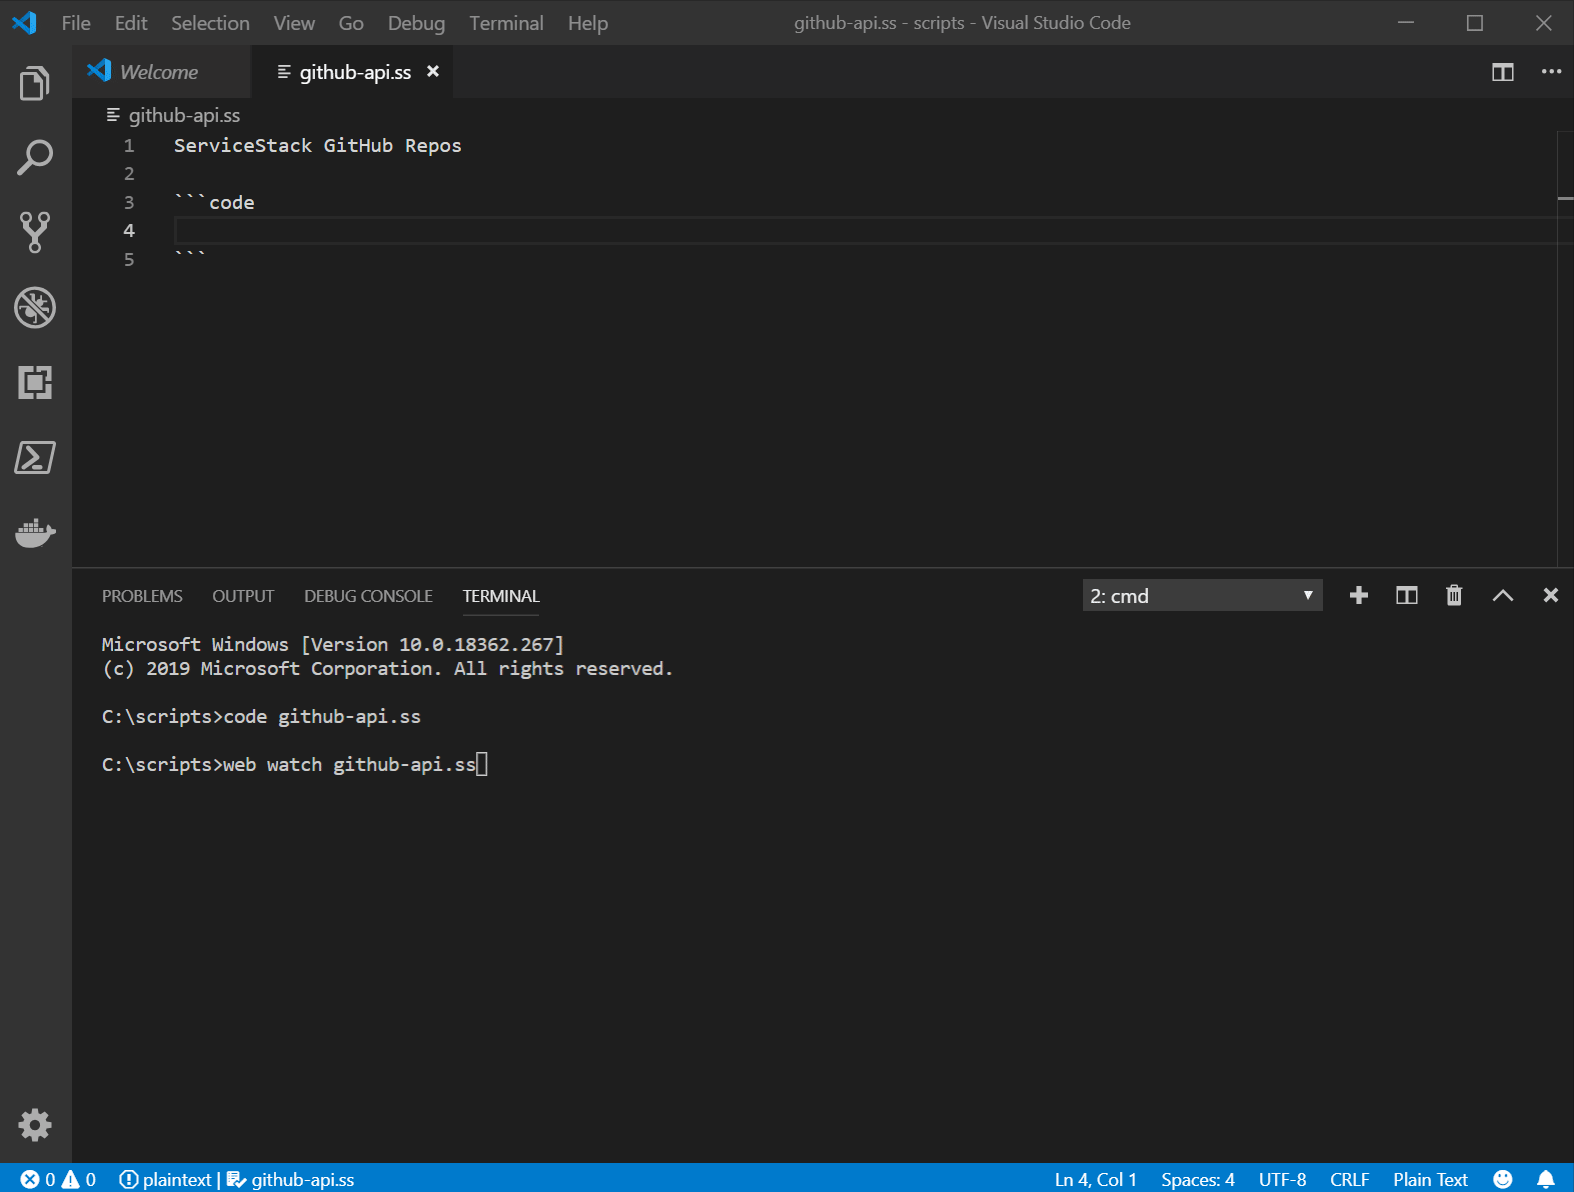
YouTube: youtu.be/Yjx_9Tp91bQ
Live Querying of Databases
It also serves a great tool for data exploration, akin to a programmable SQL Studio environment with instant feedback:
YouTube: youtu.be/HCjxVJ8RyPc
That benefits from being able to maintain reusable queries in simple, executable text files that can be organized along with other shell scripts and treated like source code where it can be checked into a versionable repo, that anyone will be able to checkout and run from the command-line in Windows, macOS or Linux OS's.
Utilize high-level ServiceStack Features
Here's another example showing the expressive power of #Script and its comprehensive high-level library
which is used to update all library dependencies of the Vue and React "lite" Project Templates:
```code
* Update /libraries gists *
* Usage: web run libraries.ss <id>? *
{{
{
'react-lite-lib': 'ad42adc11337c243ee203f9e9f84622c',
'vue-lite-lib': '717258cd4c26ba612e5eed0615d8d61c',
}
| to => gistMap
}}
(ARGV.Length > 0 ? ARGV : gistMap.Keys) | to => keys
#each id in keys
gistMap[id] | to => gistId
{} | to => files
vfsFileSystem(`libraries/${id}`) | to => fs
#each file in fs.allFiles()
files.putItem(file.VirtualPath.replace('/','\\'), file.fileContents()) | end
/each
`Writing to ${files.count()} files to ${id} '${gistId}' ...` | raw
vfsGist(gistId, 'GITHUB_GIST_TOKEN'.envVariable()) | to => gist
gist.writeFiles(files)
/each
```
Running without any arguments:
$ web run libraries.ss
will update both React and Vue dependencies:
Writing to 26 files to react-lite-lib 'ad42adc11337c243ee203f9e9f84622c' ...
Writing to 41 files to vue-lite-lib '717258cd4c26ba612e5eed0615d8d61c' ...
Alternatively it can be limited to updating a single Framework dependencies with:
$ web run libraries.ss vue-lite-lib
Other #Script Features
Two other noteworthy additions to #Script that you'll see more of in the latest project Templates include:
ifErrorReturn
You can use ifErrorReturn in all Script Methods that throw Managed Exceptions
to specify a return value to use instead of throwing the Exception.
This is used in SPA project templates to catch the Unauthorized Exception thrown when the Authenticate Service is called from an unauthenticated Request, e.g:
{{#script}}
AUTH = {{ 'Authenticate' |> execService({ ifErrorReturn: "null" }) |> json }};
{{/script}}
The new execService method is a readable alternative to calling a service via
sendToGateway
without arguments, e.g:
AUTH = {{ {} |> sendToGateway('Authenticate', { ifErrorReturn: "null" }) |> json }};
to
Generally we prefer to use descriptive symbol names in #Script for their improved readability, but for frequently used
methods brevity is often preferred to reduce noise so we've added to method as an alias for assignTo which can be used interchangeably, e.g:
{{ 1 | to => a }}
{{ a | assignTo: a }}
We also like using to in combination with the => arrow expression syntax as it's a more visual descriptive behavior of the assignment method.
GitHubPlugin
ServiceStack's GitHub integration available in this release can be used in your #Script by adding GitHubPlugin to your
ScriptContext or SharpPagesFeature:
new ScriptContext {
    Plugins = { new GitHubPlugin() },
}.Init();
This is enabled by default in the web and app dotnet tools so they can be used in #Script .ss scripts.
Checkout GitHubScripts.cs
for the full API available. Here's GitHub's Gist API example of creating gists in #Script:
githubGateway('GITHUB_GIST_TOKEN'.envVariable()) | to => gateway
{{ gateway.githubCreateGist('Hello World Examples', {
'hello_world_ruby.txt': 'Run `ruby hello_world.rb` to print Hello World',
'hello_world_python.txt': 'Run `python hello_world.py` to print Hello World',
})
| to => newGist }}
{ ...newGist, Files: null, Owner: null } | textDump({ caption: 'new gist' })
View Gist files and metadata example:
gateway.githubGist(gistId) | to => gist

{ ...gist, Files: null, Owner: null } | textDump({ caption: 'gist' })

`#### Gist Files`
#each file in gist.Files.Keys
    gist.Files[file] | textDump({ caption: file })
/each
Which renders the following GitHub Flavored Markdown output:
| gist | |
|---|---|
| Node Id | MDQ6R2lzdDRjNWQ5NWVjNGIyNTk0YjRjZGQyMzg5ODdmZTdhMTVh |
| Git Pull Url | https://gist.github.com/4c5d95ec4b2594b4cdd238987fe7a15a.git |
| Git Push Url | https://gist.github.com/4c5d95ec4b2594b4cdd238987fe7a15a.git |
| Forks Url | https://api.github.com/gists/4c5d95ec4b2594b4cdd238987fe7a15a/forks |
| Commits Url | https://api.github.com/gists/4c5d95ec4b2594b4cdd238987fe7a15a/commits |
| Comments | 0 |
| Comments Url | https://api.github.com/gists/4c5d95ec4b2594b4cdd238987fe7a15a/comments |
| Truncated | False |
| Owner | |
| Id | 4c5d95ec4b2594b4cdd238987fe7a15a |
| Url | https://api.github.com/gists/4c5d95ec4b2594b4cdd238987fe7a15a |
| Html Url | https://gist.github.com/4c5d95ec4b2594b4cdd238987fe7a15a |
| Files | |
| Public | True |
| Created at | 2019-06-15 |
| Updated At | 2019-06-15 |
| Description | Hello World Examples |
| User Id |
Gist Files
| hello_world_python.txt | |
|---|---|
| Filename | hello_world_python.txt |
| Type | text/plain |
| Language | Text |
| Raw Url | https://gist.githubusercontent.com/gistlyn/.../hello_world_python.txt |
| Size | 48 |
| Truncated | False |
| Content | Run python hello_world.py to print Hello World |
| hello_world_ruby.txt | |
|---|---|
| Filename | hello_world_ruby.txt |
| Type | text/plain |
| Language | Text |
| Raw Url | https://gist.githubusercontent.com/gistlyn/.../hello_world_ruby.txt |
| Size | 46 |
| Truncated | False |
| Content | Run ruby hello_world.rb to print Hello World |
Gist VFS Provider
The new GistVirtualFiles is a particular exciting addition to the collection of available Virtual File System providers.
Gist's are the perfect way to capture and share a publicly versionable snapshot of files that's validated against a
authenticated user account - adding an important layer of trust and verification over an anonymous archive download.
GitHub also provide public HTTP API's to access Gist's and their metadata, that scales nicely to support small fileset snapshots where all
content is returned in the public API resource request, as well as supporting larger fileset snapshots where the contents of the gist are
truncated and its contents are instead downloaded from its raw_url in an alternative HTTP Request.
GistVirtualFiles provides a transparent VFS abstraction over GitHub's Gist APIs so they can be used interchangeably with all other VFS providers.
Heirachal and Binary file Support
On its surface Gists appear to only support a flat list of text files, but GistVirtualFiles is able to overcome these limitations by transparently
encoding Binary files to Base 64 behind the scenes and utilizing \ back-slashes in file names to maintain a heirachal file structure
where it's able to implement the full VFS Provider abstraction.
ServiceStack includes good heuristics for determining which files are binary on its extension and Content Type, if your Binary file isn't
recognized you can register its extension with a known binary content type or override the IsBinaryFilter predicate:
MimeTypes.ExtensionMimeTypes[ext] = contentType; // e.g. MimeTypes.Binary
//MimeTypes.IsBinaryFilter = contentType => ...;
Read/Write and ReadOnly Gists
It supports both public read-only and read/write gists with a GitHub accessToken being needed in order to perform any writes:
var gistFs = new GistVirtualFiles(gistId, accessToken);
var gistFsReadOnly = new GistVirtualFiles(gistId);
Gist Refresh
Behaviourally they differ from other VFS providers in that they're used more as a snapshot instead of a actively modified file system and their updates and are noticeably slower to both read and write then the other VFS providers.
To maximize performance the files are stored in memory after the first access and its internal cache only updated when a Write operation is performed.
If you're instead using a Gist that changes frequently you can specify how long before refreshing the cache:
var gistFs = new GistVirtualFiles(...) {
    RefreshAfter = TimeSpan.FromHours(1)
};
GitHub truncates large Gists which GistVirtualFiles transparently fetches behind-the-scenes on-demand, you can also eagerly
fetch all truncated content with:
await gistFs.LoadAllTruncatedFilesAsync();
New Virtual File System APIs
As Gist HTTP API's are relatively slow, we've added batched APIs to all VFS providers so multiple files can be updated in a single HTTP Request.
The new object Content APIs allow VFS Providers to implement more efficient file access which by default returns ReadOnlyMemory<char>
for text files and ReadOnlyMemory<byte> for binary files:
public interface IVirtualFile
{
    object GetContents();
}
The single and multi-write File APIs support object content values of either string, ReadOnlyMemory<char>, byte[],
ReadOnlyMemory<byte>, Stream and IVirtualFile Types:
public interface IVirtualFiles
{
    void WriteFile(string filePath, object contents);
    void AppendFile(string filePath, object contents);
    void WriteFiles(Dictionary<string, string> textFiles); //text files only
    void WriteFiles(Dictionary<string, object> files); //binary or text files
}
Additional allocation-efficient ReadOnlyMemory<T> APIs are also available as extension methods:
void WriteFile(string path, ReadOnlyMemory<char> text);
void WriteFile(string path, ReadOnlyMemory<byte> bytes);
void AppendFile(string path, ReadOnlyMemory<char> text);
void AppendFile(string path, ReadOnlyMemory<byte> bytes);
The new APIs let you use the same source code to read/write both text and binary files which VFS providers can implement more efficiently:
var content = vfs.GetFile(fromVirtualPath).GetContent();
vfs.WriteFile(toVirtualPath, content);
In #Script you can access a files text or binary contents with either:
vfs.fileContents(filePath) | to => fileContents
vfs.writeFile(path, fileContents)

vfs.fileTextContents(filePath) | to => textContents
vfs.writeFile(path, textContents)

vfs.fileBytesContent(filePath) | to => binaryContents
vfs.writeFile(path, binaryContents)
GitHubGateway
The new GitHubGateway provides a number of typed APIs for querying GitHub Repos and managing gists.
The IGistGateway and IGitHubGateway interfaces contains the public API and functionality available:
public interface IGistGateway
{
    Gist CreateGist(string description, bool isPublic, Dictionary<string, object> files);
    Gist CreateGist(string description, bool isPublic, Dictionary<string, string> textFiles);
    Gist GetGist(string gistId);
    Task<Gist> GetGistAsync(string gistId);
    void WriteGistFiles(string gistId, Dictionary<string, object> files);
    void WriteGistFiles(string gistId, Dictionary<string, string> textFiles);
    void CreateGistFile(string gistId, string filePath, string contents);
    void WriteGistFile(string gistId, string filePath, string contents);
    void DeleteGistFiles(string gistId, params string[] filePaths);
}

public interface IGitHubGateway : IGistGateway
{
    Tuple<string,string> FindRepo(string[] orgs, string name, bool useFork=false);
    string GetSourceZipUrl(string user, string repo);
    Task<string> GetSourceZipUrlAsync(string user, string repo);
    Task<List<GithubRepo>> GetSourceReposAsync(string orgName);
    Task<List<GithubRepo>> GetUserAndOrgReposAsync(string githubOrgOrUser);
    GithubRepo GetRepo(string userOrOrg, string repo);
    Task<GithubRepo> GetRepoAsync(string userOrOrg, string repo);
    List<GithubRepo> GetUserRepos(string githubUser);
    Task<List<GithubRepo>> GetUserReposAsync(string githubUser);
    List<GithubRepo> GetOrgRepos(string githubOrg);
    Task<List<GithubRepo>> GetOrgReposAsync(string githubOrg);
    void DownloadFile(string downloadUrl, string fileName);

    string GetJson(string route);
    T GetJson<T>(string route);
    Task<string> GetJsonAsync(string route);
    Task<T> GetJsonAsync<T>(string route);
    IEnumerable<T> StreamJsonCollection<T>(string route);
    Task<List<T>> GetJsonCollectionAsync<T>(string route);
}
The GetJson and *JsonCollection APIs can be used to query other GitHub HTTP APIs not included
where they'll utilize the same configured HTTP Client and is able to stream GitHub's linked multi-paged HTTP Results.
Gist Desktop Apps
We're extremely excited to bring ServiceStack's enhancements in this release to Sharp Apps giving it additional liveness capabilities unseen in .NET Core Apps where they can now be run on-the-fly without installation!
To recap Sharp Apps enable a dramatically simplified and productive workflow where entire Apps can be developed in a real-time dev workflow without compilation using a JavaScript inspired syntax with access to a comprehensive default library that includes built-in support for the most popular RDBMS's, Redis, AWS and Azure support.
Although they're not only limited to the built-in functionality as they can be further extended with
plugins where any functionality it finds in its plugins/*.dll are automatically
made available to the Sharp App
Windows .NET Core Desktop Apps
Major disadvantages to developing Desktop Apps today include limitations in available UI frameworks not being as flexible and feature-rich as modern browser rendering engines, slow development/iteration times, large downloads, forced upfront installations, stale versions and cumbersome upgrades - resulting in both increased cost to develop Desktop Apps and reduced accessibility and potential popularity with the additional barrier to entry of forced installations.
Electron resolves some of these issues which has seen a surge of popularity vs Native Apps with its more productive web development model and partial support for auto updating, but it still requires a large download and upfront installation.
By contrast the majority of the download size of Sharp Apps is in the local .NET Core installation and app
dotnet tool which are shared by all Sharp Apps, only the app-specific web assets and #Script source files need to be downloaded, making
them a lot smaller and quicker to download (and run instantly).
They can even be further reduced by utilizing the resources embedded into ServiceStack.dll like the built-in SVG icons and stylesheet
and /css/bootstrap.css, which many Sharp Apps take advantage of to reduce their footprint.
Now everyone can launch a Windows Desktop Sharp App by specifying the name of the App they want to open with:
$ app open redis
OSX or Linux users can run Sharp Apps with the cross-platform web dotnet tool instead
redis
Instant Run without Installation
This searches the app.md global App directory for the link to the App, and in this case launches the Redis Sharp App within a Chromium Desktop shell as seen above.
The list of available apps is also visible from the command-line with:
$ app open
1. redis       Simple, lightweight, versatile Redis Admin UI                            by @ServiceStack
2. spirals     Explore and generate different Spirals with SVG                          by @ServiceStack
3. blog        Minimal, multi-user Twitter Auth blogging app                            by @ServiceStack
4. rockwind    Example combining Rockstars website + data-driven Northwind Browser      by @ServiceStack
5. redis-html  Redis Admin Viewer developed as server-generated HTML Website            by @sharp-apps
6. plugins     Extend Apps with Plugins, ServiceStack Services and other C# extensions  by @sharp-apps
7. chat        Extensible App with custom AppHost using OAuth + SSE for real-time Chat  by @sharp-apps
Making Sharp Apps both easy to discover as well as launch.
Cross Platform
If you're using macOS or Linux you can run all Sharp Apps using the cross-platform x dotnet tool where it will launch in your preferred Web Browser instead:
$ web open redis
Always Up-to-date
Thanks to their minimal footprint, another unique characteristic of Sharp Apps launched with open is that they
always run the latest version of the App, thereby avoiding the need to implement an Update feature or maintain patch release versions.
Run Apps Offline
When App's are launched with open it creates a folder in the Users .sharp-apps directory, e.g:
$HOME\.sharp-apps\redis
This is the current directory that the App is run from and where any files created by App's will be saved to and preserved across App runs.
For Gist Apps this is an empty folder as the Gist files are loaded into memory, however to support being able to run Apps offline it also serializes all Gist files (after fetching all truncated files) to JSON at:
$HOME\.sharp-apps\redis.gist
This is so after App's are launched once with open, they can then be run locally with:
$ app run redis
Which will load the Gist files from the serialized redis.gist JSON blob instead of downloading them from the gist on GitHub
which is useful for times you don't have an Internet connection or GitHub is down. However as small App's like redis start instantly
it's preferred to run them with app open redis so you're always running the latest version.
Uninstall Apps
As Gist App's are downloaded on-the-fly and loaded into memory there's not much to uninstall just an empty folder and a <app-name.gist>
JSON blob which you can either manually delete or get the dotnet tool to do it for you.
To view all App's you've opened, run:
$ app uninstall
This displays a list of Sharp App's you've run at least once:
Usage: app uninstall <app>

Installed Apps:
  blog
  chat
  plugins
  redis
  rockwind
  spirals
To delete all traces of redis from your system, run:
$ app uninstall redis
Which removes the empty $HOME\.sharp-apps\redis folder and $HOME\.sharp-apps\redis.gist.
Gist Sharp Apps
If we peek into the markdown of app.md we can see the different ways Sharp Apps can be hosted, for redis we see that the entire App is published in a Gist:
- [redis](https://gist.github.com/gistlyn/6de7993333b457445793f51f6f520ea8)
Thanks to the new GistVirtualFiles support in this release, Gist Apps were trivial to support which only required launching
the ServiceStack App with a configured GistVirtualFiles that references the redis Gist, i.e:
appHost.InsertVirtualFileSources.Add(new GistVirtualFiles("6de7993333b457445793f51f6f520ea8"));
Hosting Apps in Gists provides numerous benefits: predominantly they're effectively a free, public, distributed app host which are tied to Authenticated GitHub Accounts and have a public version history of every commit so each change is visible.
GitHub also provide both a Web UI and HTTP UI to manage gists making them easy to modify, both manually and programmatically where you can use their Web UI to make a quick fix which is instantly available the next time the app is launched.
We've already had quick look of the redis Gist App that provides a nice UI for querying and editing a Redis instance (an example of an App that can't be implemented as a website), lets have a look at some other Gist Apps that are well suited for development as Sharp Apps:
spirals
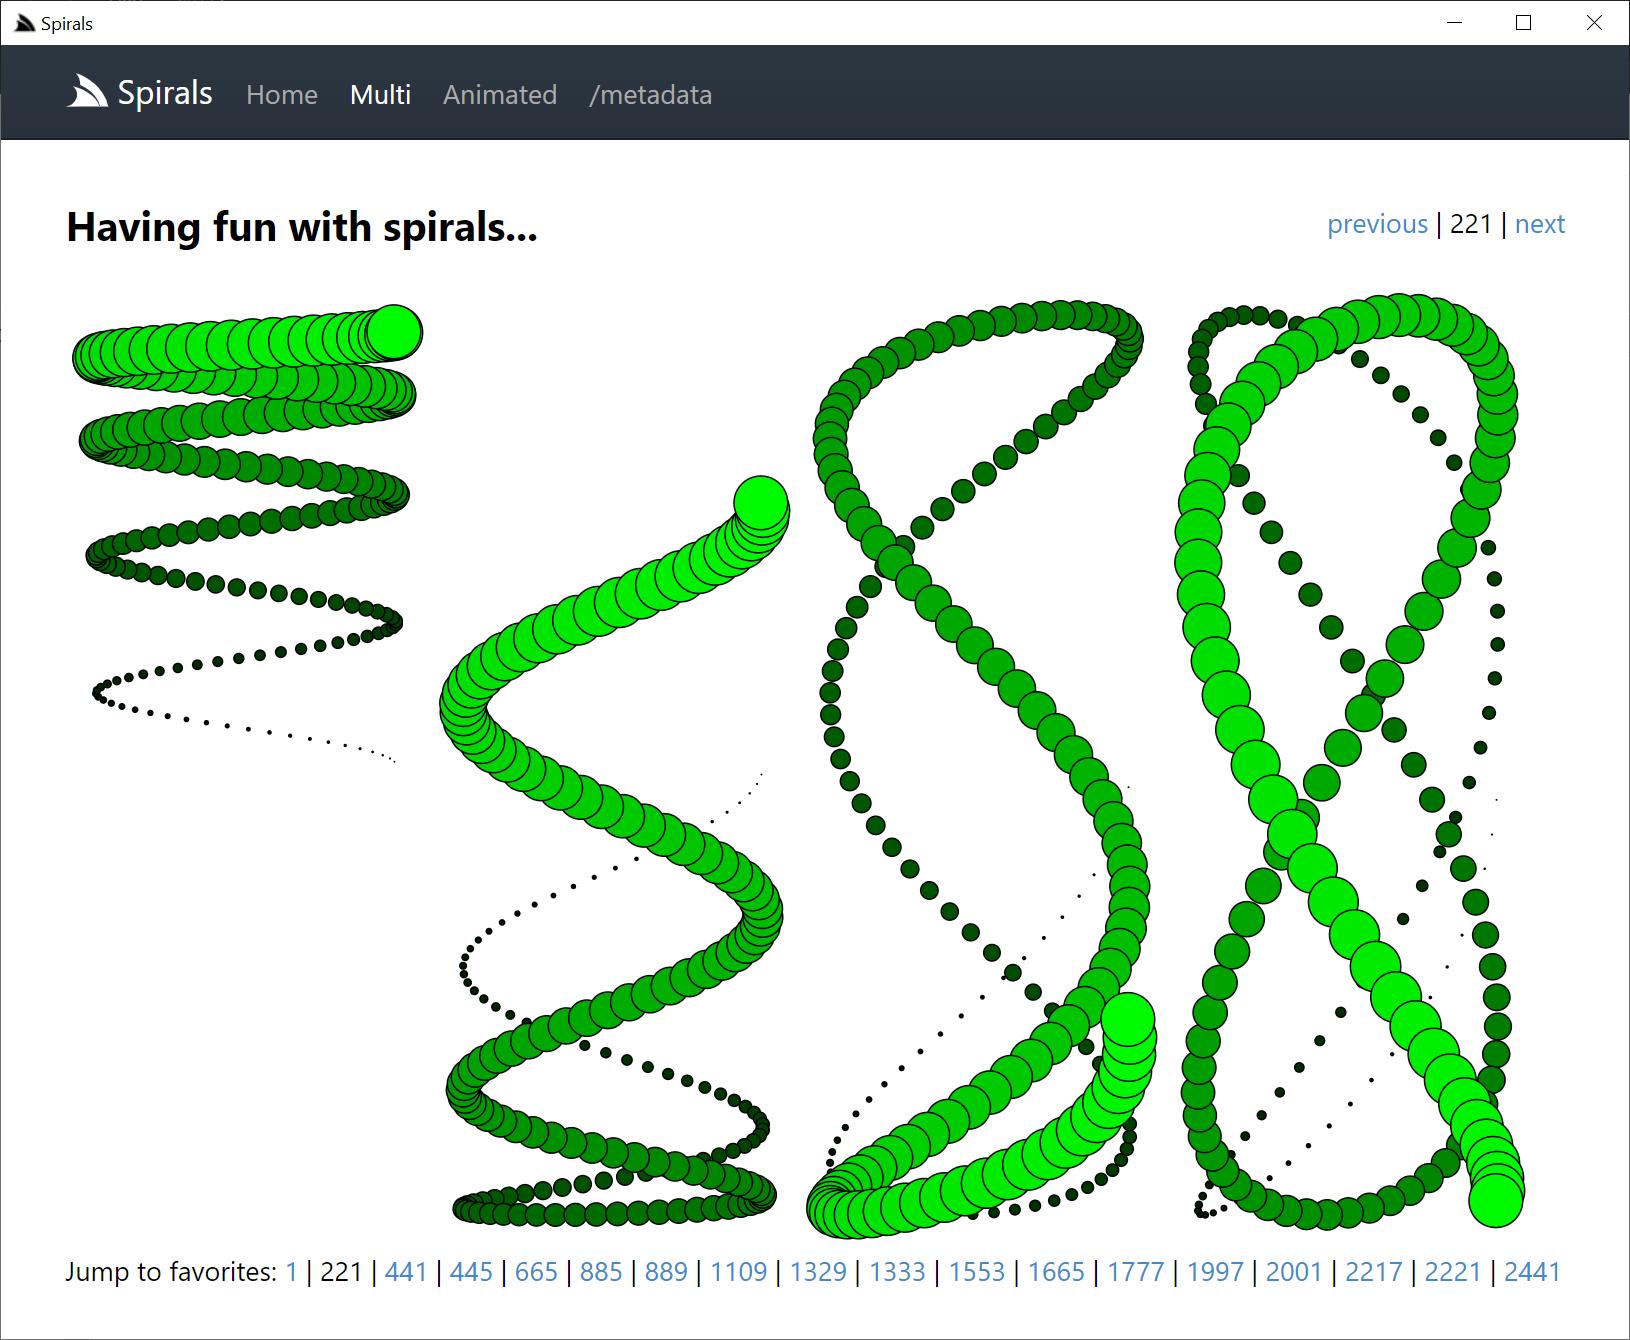
Open with:
$ app open spirals
Spirals in an example of a minimally useful App to explore and generate different Spirals with SVG that showcases the productivity and
live Development experience of Sharp Apps where you can create an App from scratch with just a text editor and the web tool, without
a single re-compile or app restart:
Publishing Gist Apps
Now that we've created an App it's time to publish it to a Gist, to do this we need to Creating a personal access token with the gist permission so it's able to create gists.
You can provide your access token via either the -token command-line argument:
$ app publish -token {GITHUB_TOKEN}
But our recommendation is instead to set it in the GITHUB_GIST_TOKEN Environment Variable to avoid needing to provide it each time.
Before publishing our App, our app.settings looks something like:
debug true
name Spirals
CefConfig { width:1100, height:900 }
Then in your App's home directory (containing the app.settings), run:
$ app publish
This creates a new Gist with your App as confirmed by its successful response:
App published to: https://api.github.com/gists/4e06df1f1b9099526a7c97721aa7f69c

Publish App to the public registry by re-publishing with app.settings:

appName     <app alias>    # required: alpha-numeric snake-case characters only, 30 chars max
description <app summary>  # optional: 20-150 chars
tags        <app tags>     # optional: space delimited, alpha-numeric snake-case, 3 tags max
It also modifies your app.settings to include the gist that your App was published to:
debug true
name Spirals
CefConfig { width:1100, height:900 }
publish https://gist.github.com/gistlyn/4e06df1f1b9099526a7c97721aa7f69c
Containing the location your App will be published to in future.
At this point anyone will now be able to run your App locally with the link its published to:
$ app open https://gist.github.com/gistlyn/4e06df1f1b9099526a7c97721aa7f69c
Or if preferred, using just the gist id:
$ app open 4e06df1f1b9099526a7c97721aa7f69c
Or you can give it a friendlier name and make it more discoverable by publishing it to the global App Directory by updating your app.settings to include appName, description and tags settings, e.g:
debug true
name Spirals
CefConfig { width:1100, height:900 }
publish https://gist.github.com/gistlyn/4e06df1f1b9099526a7c97721aa7f69c
appName spirals
description Explore and generate different Spirals with SVG
tags svg
Now when you re-publish your App:
$ app publish
It will update your App's gist, register spirals with the App directory and output the command everyone will be able to run your App with:
App updated at: https://gist.github.com/gistlyn/4e06df1f1b9099526a7c97721aa7f69c

Run published App:

    app open spirals
Users that are not on Windows can use the web tool instead to launch your App in their preferred browser:
$ web open spirals
With its built-in publishing support, it means you can create an App from scratch, publish it to a gist, register it in the App directory - where your creations are ready for the world to use in minutes! We're not aware of any other Desktop App solution that comes close to this level of turn around time.
blog
Spirals are cool, but lets explore some more useful real-world Apps:
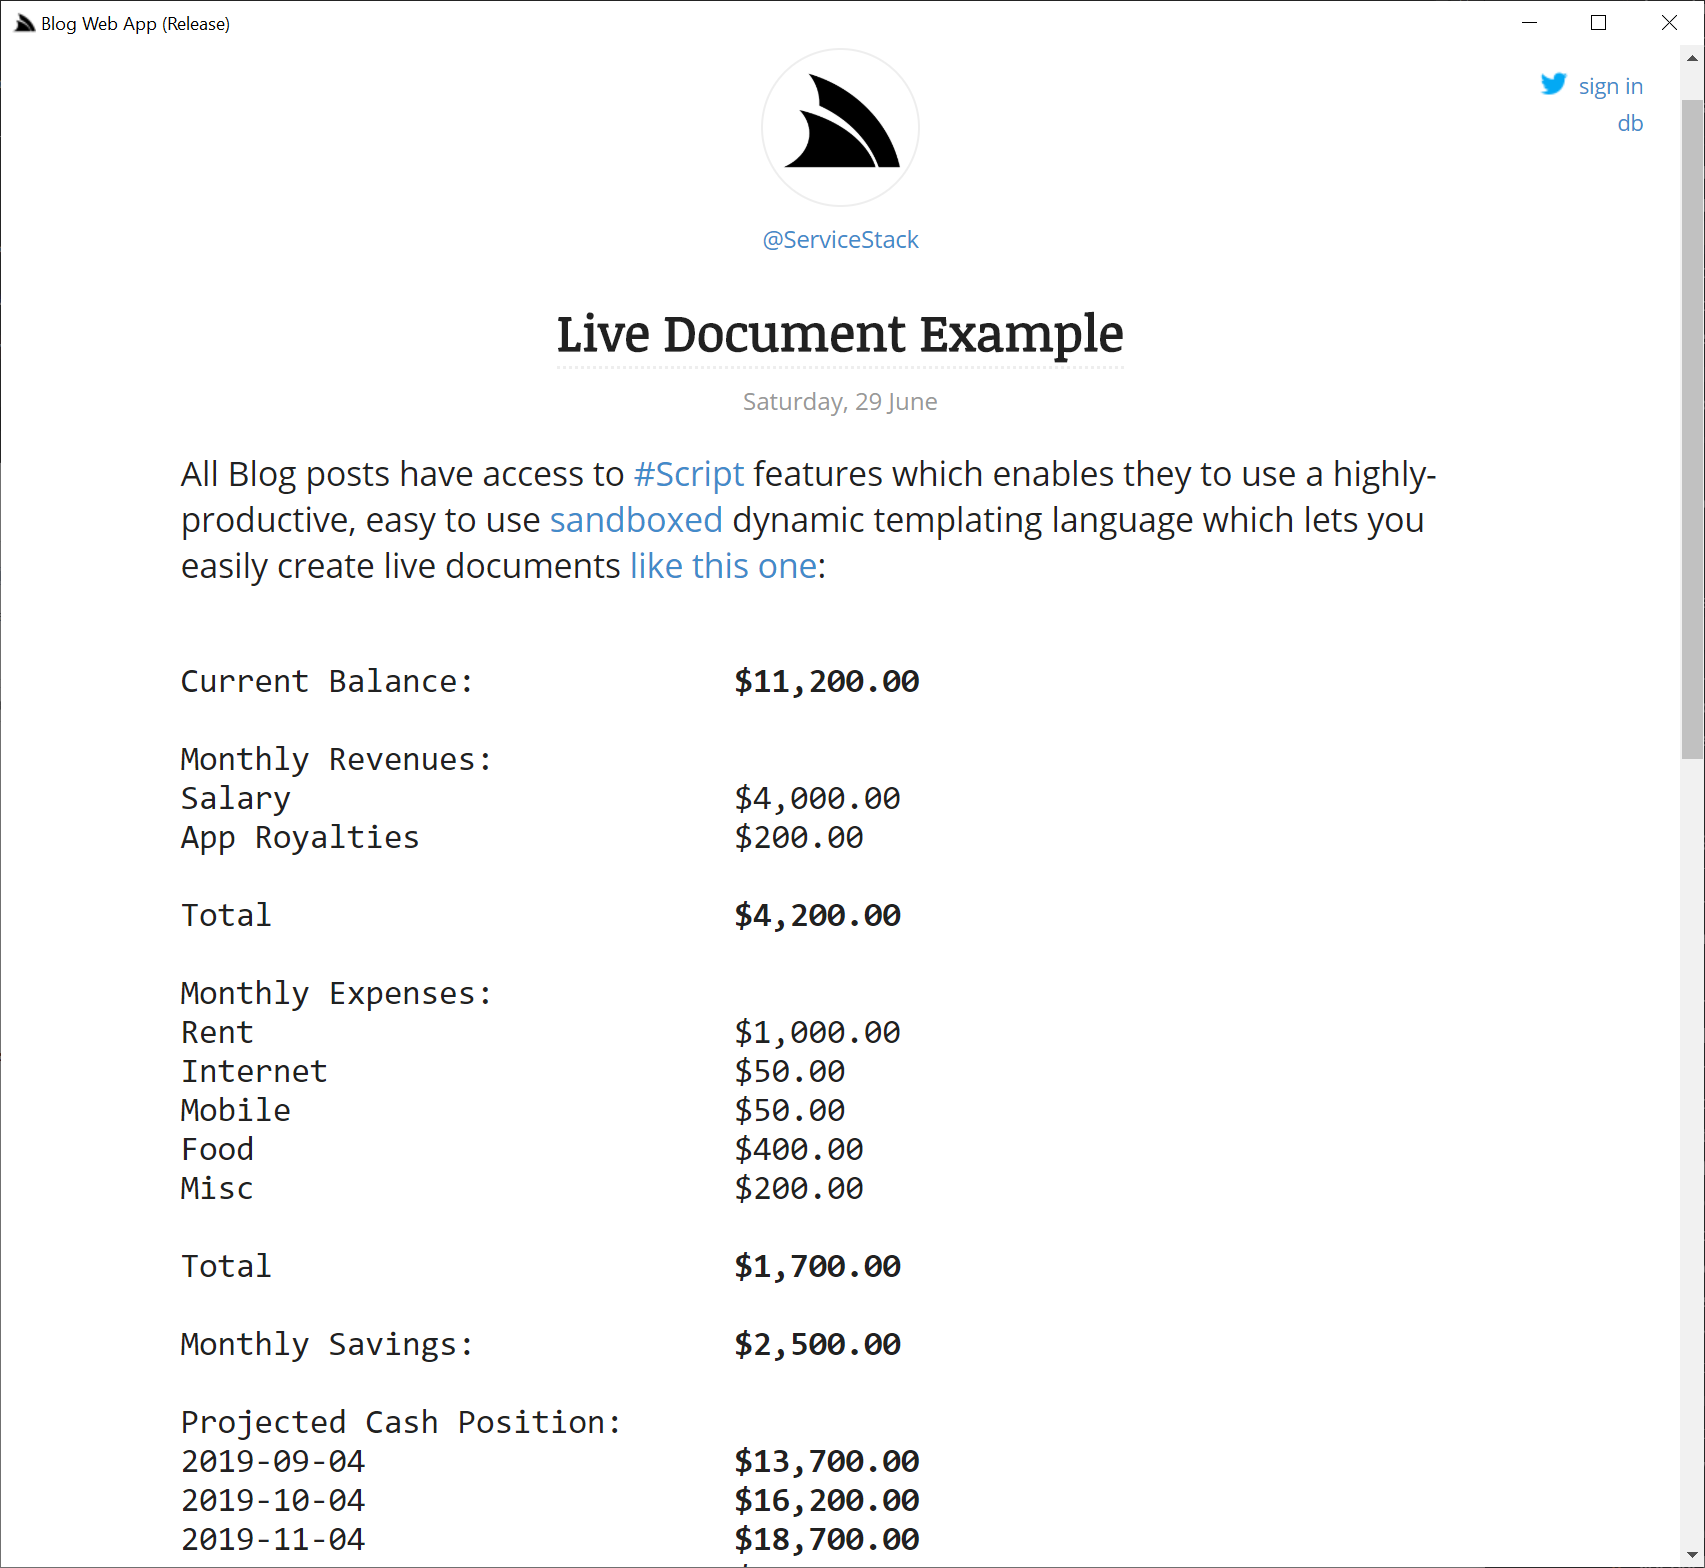
Open with:
$ app open blog
blog is an sqlite-powered multi-user blogging system, that in addition to supporting Markdown, also lets you use #Script in your
posts so you're able to post "live executable literate documents" that can mix both content and executable scripts.
As we envisage sqlite to a popular storage option we'll go through a couple of ways to make use of it in Gist Apps as your App's Gist files are read-only and loaded in memory where as SQLite needs to access it on disk.
Firstly to configure your App to use SQLite, add db sqlite and db.connection dbname.sqlite to:
app.settings
debug false
name Blog Web App
db sqlite
db.connection blog.sqlite
This will create an empty file at $HOME\.sharp-apps\blog\blog.sqlite when your App is first launched.
You can then create your DB Schema and populate your database using the Database Scripts
in a file called _init.html which is executed just before your App is launched.
The blog App uses this approach for creating its database and populating it with initial seed data if the database is empty, e.g:
_init.html
{{ `CREATE TABLE IF NOT EXISTS "Post"
(
"Id" INTEGER PRIMARY KEY AUTOINCREMENT,
"Slug" VARCHAR(8000) NULL,
"Title" VARCHAR(8000) NULL,
"Content" VARCHAR(8000) NULL,
"Created" VARCHAR(8000) NOT NULL,
"CreatedBy" VARCHAR(8000) NOT NULL,
"Modified" VARCHAR(8000) NOT NULL,
"ModifiedBy" VARCHAR(8000) NOT NULL
);
CREATE TABLE IF NOT EXISTS "UserInfo"
(
"UserName" VARCHAR(8000) PRIMARY KEY,
"DisplayName" VARCHAR(8000) NULL,
"AvatarUrl" VARCHAR(8000) NULL,
"AvatarUrlLarge" VARCHAR(8000) NULL,
"Created" VARCHAR(8000) NOT NULL,
"Modified" VARCHAR(8000) NOT NULL
);`
| dbExec
}}
{{ dbScalar(`SELECT COUNT(*) FROM Post`) | to => postsCount }}
{{#if postsCount == 0 }}
{{ `datetime(CURRENT_TIMESTAMP,'localtime')` | to => sqlNow }}
{{ `ServiceStack` | to => user }}
========================
Create ServiceStack User - Contains same info as if was @ServiceStack authenticated via Twitter
========================
{{ `INSERT INTO UserInfo (UserName, DisplayName, AvatarUrl, AvatarUrlLarge, Created, Modified)
VALUES (@user, @user, @avatarUrl, @avatarUrlLarge, ${sqlNow}, ${sqlNow})`
| dbExec({
user: 'ServiceStack',
avatarUrl: 'https://pbs.twimg.com/profile_images/876249730078056448/JuTVEkWX_normal.jpg',
avatarUrlLarge: 'https://pbs.twimg.com/profile_images/876249730078056448/JuTVEkWX.jpg'
})
}}
...
{{/if}}
The next time the blog App is run it uses the existing $HOME\.sharp-apps\blog\blog.sqlite and skips populating the database above.
rockwind

Open with:
$ app open rockwind
Rockwind is an example of a larger (60+ files) multi-versatile App of a hybrid Content, Data driven App with a UI and Web API over northwind tables that also combines multiple different Layouts in a single App.
Its data-driven Web UI and Web API requires the northwind database which is included in the gist as northwind.readonly.sqlite
then in the init script it saves a copy to northwind.sqlite if it doesn't already exist:
_init.html
vfsFileSystem('.') | to => fs

#if !fs.fileExists('northwind.sqlite') || fs.file('northwind.sqlite').Length == 0
    fs.writeFile('northwind.sqlite', file('northwind.readonly.sqlite'))
/if
rockwind contains a number of other hidden useful gems like how easy it is to create multi-linked query reports:
northwind\order-report_id.html
As well as a dynamic SQL Studio UI that re-queries as-you-type:
northwind\sql\index.html
GitHub Sharp Apps
Up to this point we've only seen running Sharp Apps from Gists, but they can also be run from traditional GitHub repos as we can see from the chat App which links to its repo:
- [chat](https://github.com/sharp-apps/chat)
The difference between Gist an GitHub Repo Apps is that GitHub repo's need to be installed before they're run.
When you run a GitHub Repo App with open, e.g:
$ app open chat
It downloads the repo archive (either the last released version or current master archive), extracts its contents to the App's
$HOME\.sharp-apps\chat folder then runs it as a traditional Web App where its files are maintained on disk.
As this process takes a little longer to start than Gist Apps you may prefer to use run for subsequent App runs:
$ app run chat
Where it will run it from disk, whereas open will nuke the existing install, re-downloads the archive and extracts it again before launching.
For GitHub Repo apps, open is equivalent to re-running install and run each time:
$ app install chat
$ app run chat
GitHub Sharp App Commands
Whilst they work differently, open, install, run and uninstall have the same behavior for both Gist and GitHub Repo Apps, i.e:
open- Always run the latest version of the Appinstall- Download the App only so it can be run offlinerun- Run the locally downloaded Appuninstall- Remove all traces of previously installed or opened Apps
chat
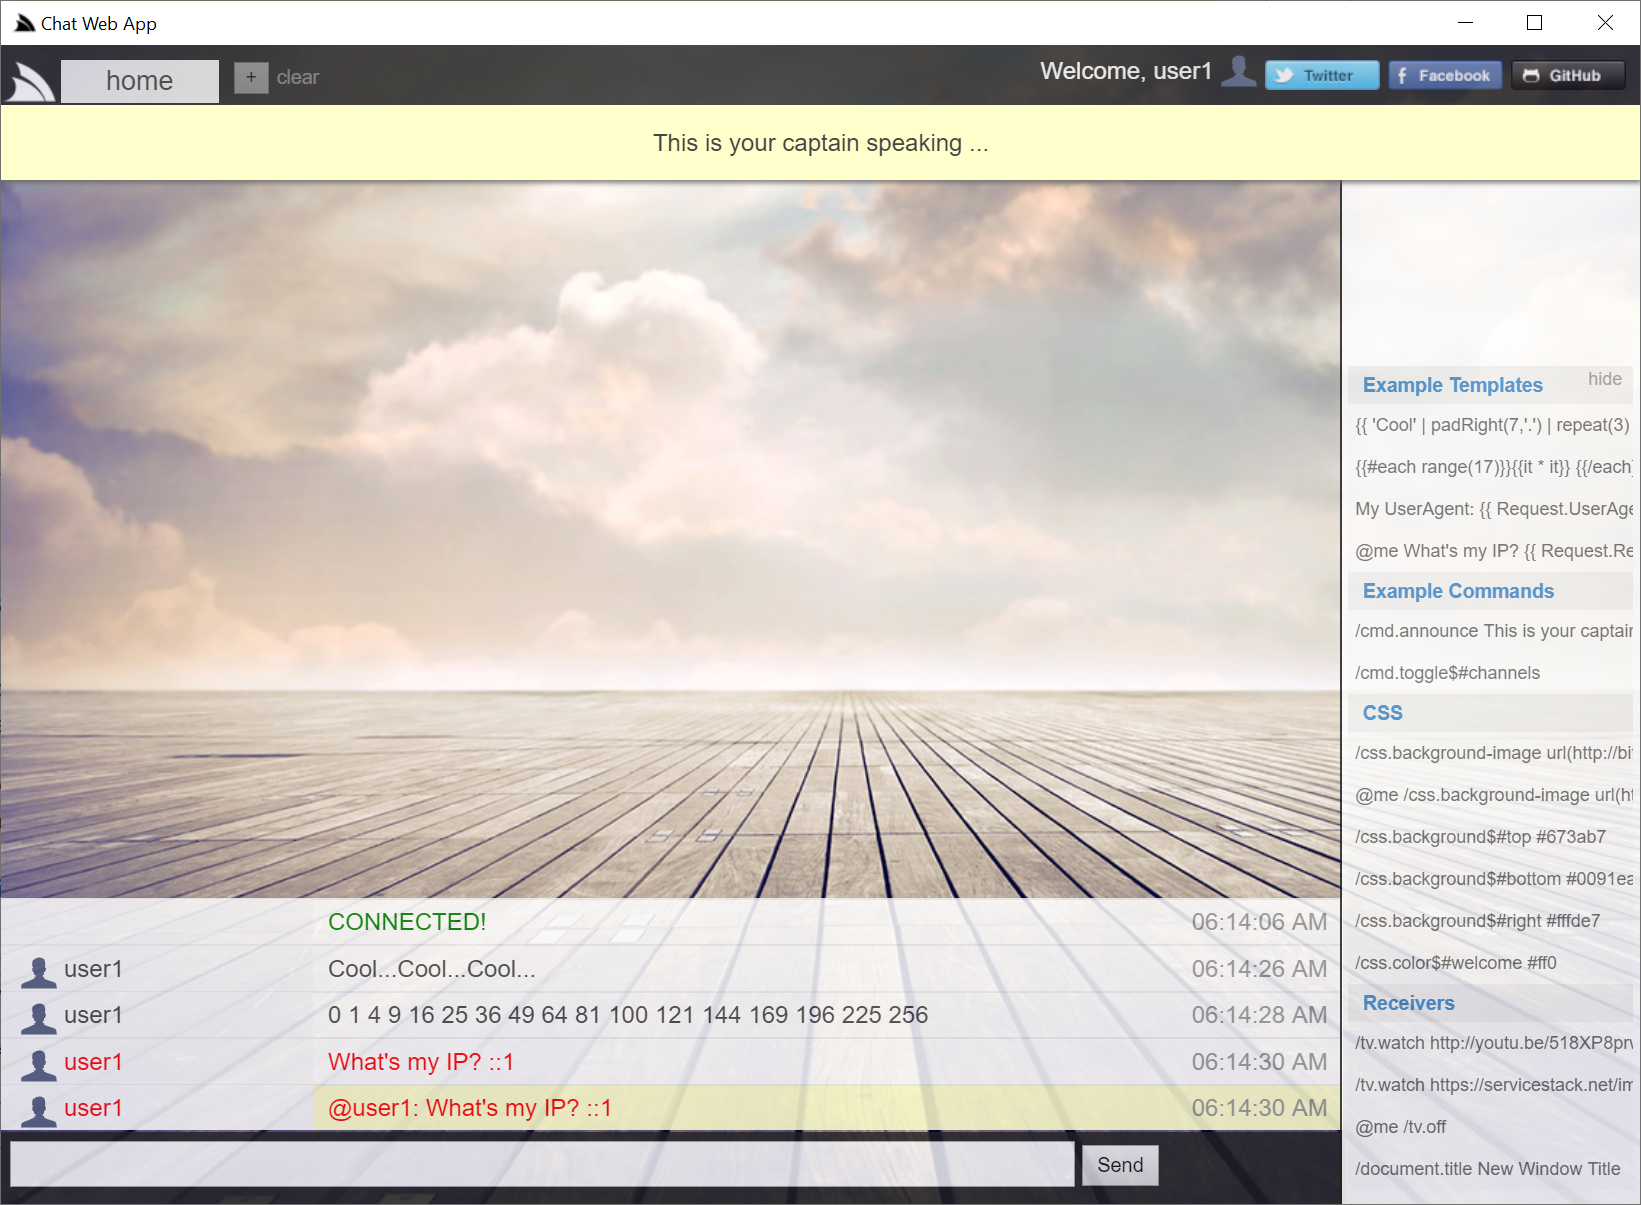
Open with:
$ app open chat
chat is an example of the ultimate form of extensibility where instead of just being able to add Services, Filters and Plugins, etc. You can add your entire AppHost which Sharp Apps will use instead of its own. This vastly expands the use-cases that can be built with Sharp Apps as it gives you complete fine-grained control over exactly how your App is configured.
plugins
The last packaging option supported for running Sharp Apps is being able to link to a specific GitHub Release version of your App, e.g:
- [plugins](https://github.com/sharp-apps/plugins/archive/v5.zip)
Which will ensure you're always running the same version of the App which is useful in being able to easily run and compare different App versions or be able to support beta releases of your App that you don't want everyone to use yet.

Open with:
$ app open plugins
plugins showcases the easy extensibility of Sharp Apps which allow "no touch" sharing of ServiceStack Plugins, Services, Script Methods, Sharp Code Pages and Validators contained within .dll's or .exe's dropped in a Sharp App's /plugins folder which are auto-registered on startup. The source code for all plugins used in this App were built from the .NET Core 2.1 projects in the example-plugins folder.
Run Apps from URLs
Publishing your App to the global app.md registry makes it more accessible via a friendly name and discoverable, but if you don't want your App shared publicly or want to test it before publishing, it can also be run directly from a Gist URL, Gist Id, GitHub Repo or Release .zip Archive, e.g:
$ app open https://gist.github.com/gistlyn/6de7993333b457445793f51f6f520ea8
$ app open 189cd72bfaf480526e4b34814c80f2c0
$ app open https://github.com/sharp-apps/redis
$ app open https://github.com/sharp-apps/plugins/archive/v5.zip
Every
appcommand is substitutable withwebto run it within your preferred browser in Windows, macOS or Linux
Gist or GitHub App Server Deployments
As Sharp Apps are just .NET Core Web Apps, the same App can be run within a Chromium Desktop App with app, cross-platform on Windows, macOS or Linux with x in the preferred browser or hosted on a server where it's accessible to everyone with an internet connection.
Not only does not needing to compile Sharp Apps dramatically simplify App development but it also dramatically simplifies App deployment where you can completely skip all CI and build steps as there's nothing to build or deploy with the built-in support for Gist publishing.
All that's required is to run the App on your server with:
$ web open redis
Configure Nginx
Which runs on port 5000 by default, which you can make available under your preferred domain by adding an nginx virtual host by changing to:
$ cd /etc/nginx/sites-available/
Then creating a Virtual Host configuration for your App, which you can start from using the mix nginx config template:
$ web mix nginx
Then renaming the my-app.web-app.io file to the domain you want it hosted on instead, e.g:
$ mv my-app.web-app.io redis.your-domain.com
You'll also need to rename the virtual host in the config file, which in vi you can do with:
:%s/my-app.web-app.io/redis.your-domain.com/g
Now to enable the site in nginx, link it with:
$ ln -s /etc/nginx/sites-available/redis.your-domain.com /etc/nginx/sites-enabled/redis.your-domain.com
Then reload nginx to pick up changes:
$ /etc/init.d/nginx reload
And voila! your Gist Sharp App is now being served at redis.your-domain.com
Configure Supervisor
We can further harden the .NET Core App process by having it run under a managed supervisord process.
To do this create a deploy User Account and give it
permission to run the supervisorctl and web programs, then change directory to:
$ cd /etc/supervisor/conf.d
Then generate a supervisor configuration template with:
$ web mix supervisor
Rename it to your Web App's folder name:
$ mv app.my-app.conf app.redis.conf
Then change all references of my-app to redis, which in vi you can do with:
:%s/my-app/spirals/g
Which will change it to:
[program:app-redis]
command=/home/deploy/.dotnet/tools/web run redis --release
directory=/home/deploy/.sharp-apps/redis
autostart=true
autorestart=true
stderr_logfile=/var/log/app-redis.err.log
stdout_logfile=/var/log/app-redis.out.log
environment=ASPNETCORE_ENVIRONMENT=Production,ASPNETCORE_URLS="http://*:5000/"
user=deploy
stopsignal=INT
The --release flag overrides debug in app.settings so it's always run in release mode.
After reviewing the changes, tell supervisor to register and start the supervisor process with:
$ supervisorctl update
Where your website will now be up and running under a managed process at: redis.your-domain.com
Deploy Updates
Now that's everything's configured, deploying app updates are easily done by installing the app again (which downloads the latest version), then restarting the supervisor managed process, in these 2 commands:
$ web install redis
$ supervisorctl restart app-redis
Customized App Settings
If you need to customize the App's settings, like we've needed to do with blog.web-app.io app.settings to replace its OAuth keys, you can add a modified copy in its App folder which will take precedence over the read-only gist version:
$HOME/.sharp-apps/blog/app.settings
Hosted Gist Apps
All our Gist Apps are now hosted this way, by running a locally downloaded Gist App that's hosted at the following URLs:
ServiceStack Updates
This covers all major feature items in this release, there were a number of other minor features an enhancements including:
Fluent Validation Upgraded
The internalized version of ServiceStack.FluentValidation was upgraded to Fluent Validation v8.2.3.
Enums displayed in Metadata pages
Enum's are now included in metadata pages definition of Service Contract Types, e.g:
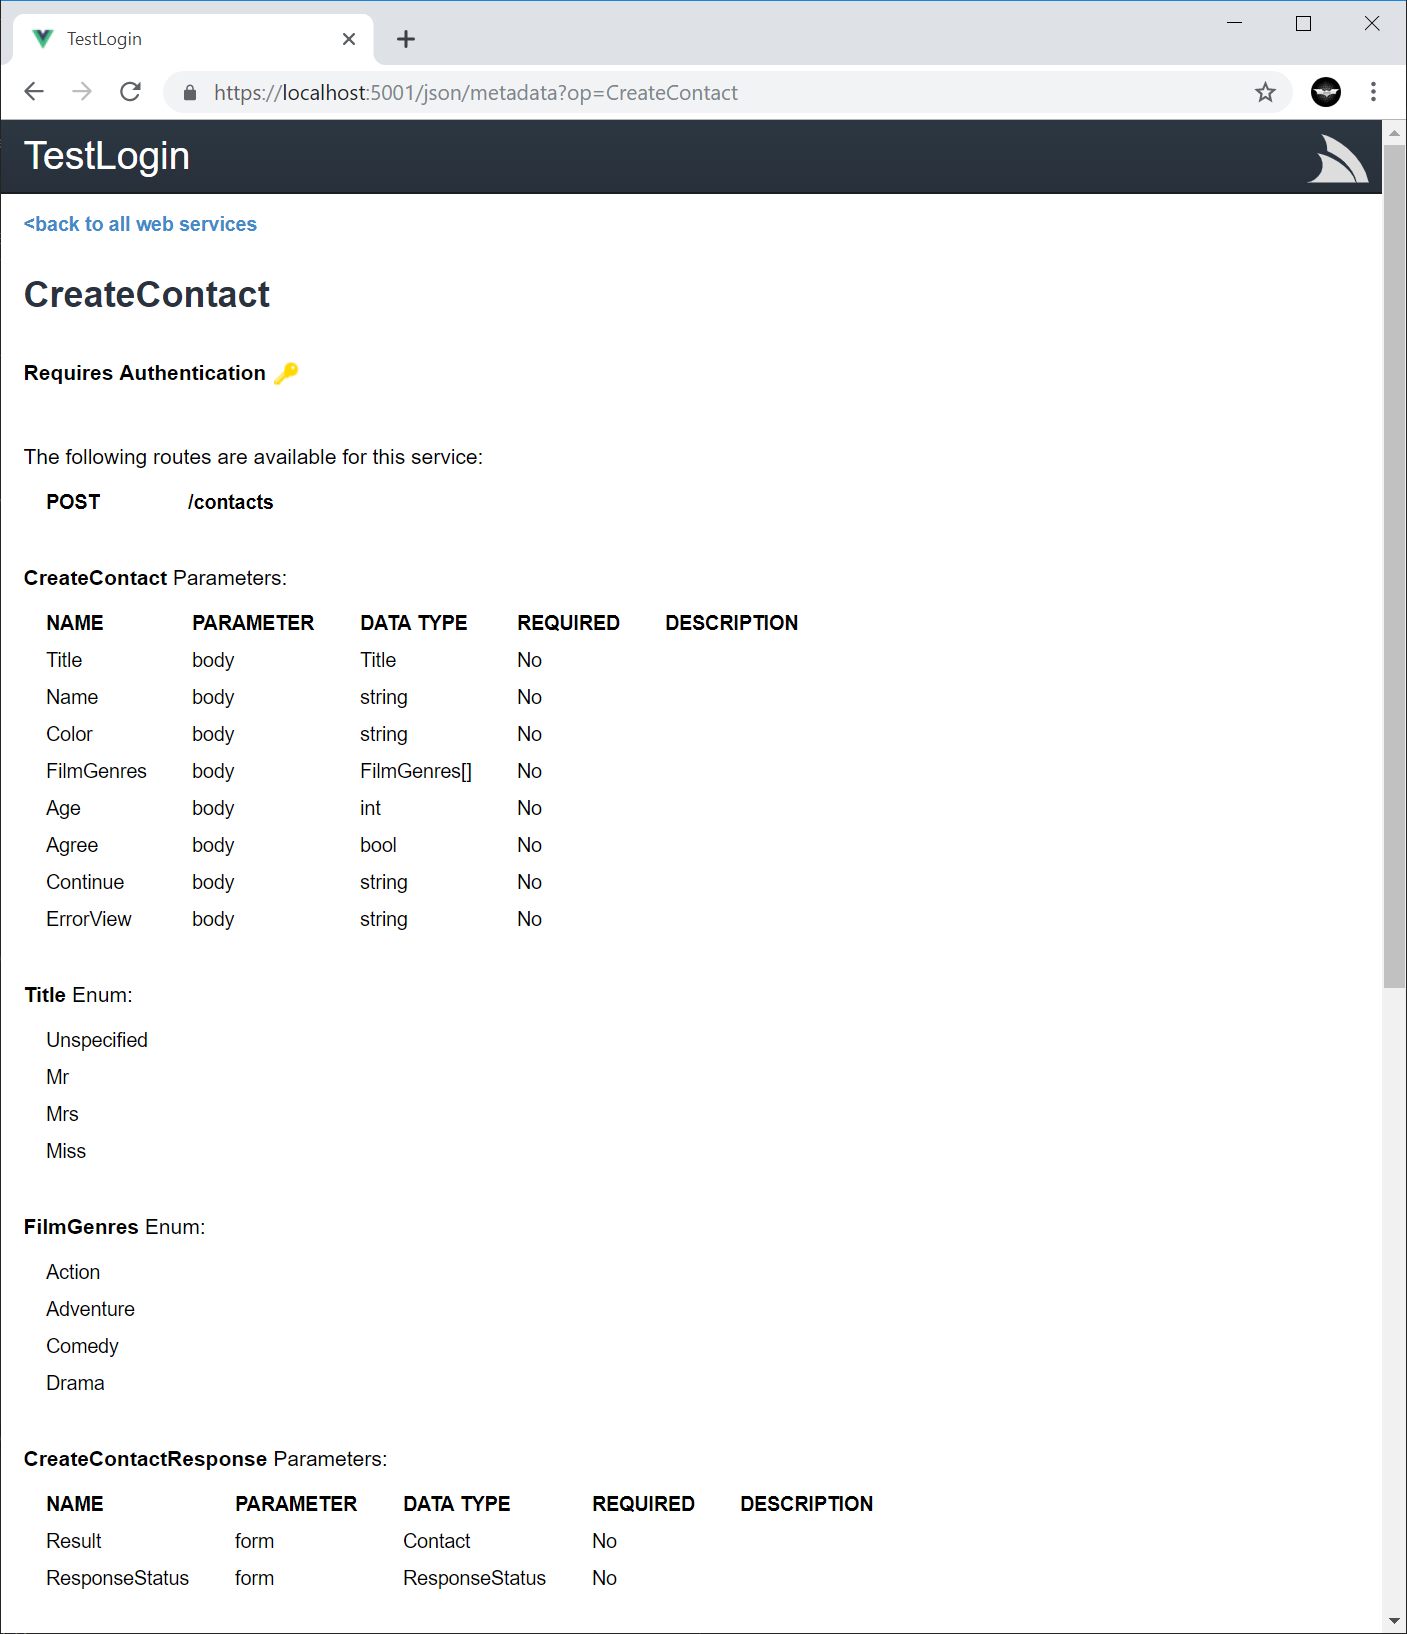
Auth Enhancements
- The
FacebookAuthProviderwas upgraded to use v3.2 of Facebook API AuthenticateResponsenow returns Roles/Permissions for authenticated users- can be disabled with
AuthFeature.IncludeRolesInAuthenticateResponse
- can be disabled with
- The JWT Auth Provider added support for
FallbackPrivateKeyswhen using JWE Tokens- The new
GetVerifiedJwePayload()andVerifyJwePayload()API's lets you verify JWE Tokens - The existing
GetVerifiedJwtPayload()continues to validate both JWT and JWE Tokens
- The new
Auth Repository Features
- Custom UserAuth Tables support added to
InMemoryAuthRepository - New
GetUserAuths()andSearchUserAuths()API's onIAuthRepositorylets you search and page through registered users - New
IManageRoles.GetRolesAndPermissions()API allows for more efficient API to fetch both roles & permissions in single API call inIManageRolesAuth Repositories that are configured withUseDistinctRoleTables MongoDbAuthRepositoryupgraded to latest v2.8.1 and now includes supports for .NET CoreRavenDbUserAuthRepositoryupgraded to use v4.2 and now includes supports for .NET Core
RavenDB Breaking Change
In v4.2 RavenDB fails when using an int Primary Key so RavenDbUserAuthRepository has been changed to use use new
RavenUserAuth and RavenUserAuthDetails tables by default which have a string Key identifier field. If you're using
RavenDB you'll need to migrate your UserAuth and UserAuthDetails tables to move to use a Key string identifier field,
alternatively you can use your own custom UserAuth table and use the [Index] attribute to specify which string field should be
for the identifier, e.g:
[Index(Name = nameof(Key))]
public class RavenUserAuth : UserAuth
{
    public string Key { get; set; }
}
ServerEventsClient AllRequestFilters
The .NET ServerEventsClient makes a number of different request types during the life-cycle of a Server Events Connection which all have
different RequestFilters on ServerEventsClient if you want to customize each request differently, or you can use the new AllRequestFilters
to register a request filter to be used in all connections.
With this we can easily use an SSL Client Certificate in all Server Event Connections:
void AddClientCertificate(WebRequest req) =>
    ((HttpWebRequest)req).ClientCertificates.Add(...);

var sseClient = new ServerEventsClient(baseUrl) {
    AllRequestFilters = AddClientCertificate,
};
Return Refresh Tokens in Token Cookies
The new UseTokenCookie added to C# and TypeScript Service Clients configures the Service Client to request
Refresh Tokens be returned in a JWT Token Cookie:
var client = new JsonServiceClient(BaseUrl);
client.UseTokenCookie = true;
Service Clients Async WebProxy
IWebProxy Proxy was added to AsyncServiceClient which is now also used in all async C# ServiceClient requests.
Extensible Client DTOs
All built-in Client Request and Response DTOs
implement the extensible IMeta string dictionaries allowing clients to attach additional metadata in all Requests to built-in Services.
Native Types
All Native Types have a TypeFilter which can be used to override the return custom Type returned name based on .NET Type name and generic args, e.g:
TypeScriptGenerator.TypeFilter = (type, args) => {
    if (type == "ResponseBase`1" && args[0] == "Dictionary<String,List`1>")
        return "ResponseBase<Map<string,Array<any>>>";
    return null;
};
Further customizations are available with the InsertCodeFilter and AddCodeFilter to be able to add custom code to the top and bottom of
each languages generated DTOs:
InsertCodeFilter- add custom code to top of generated dtosAddCodeFilter- add custom code to bottom of generated dtos
ServiceStack Dart
Dart Add ServiceStack Reference received major compatibility improvements to its generic types support and support for the latest version of Dart which now supports for Enum's inside generic collections among other things.
RabbitMQ
The new MqQueueClientFilter and MqProducerFilter Filters lets you customize the RabbitMqProducer and RabbitMqQueueClient clients
used to publish and receive MQ messages.
Logging
JetBrains.Annotations were added to ServiceStack.Interfaces and used to annotate the ILog APIs having the effect of lighting up string.Format() methods in JetBrains static analyzers.
AutoQuery
The new GlobalQueryFilter on AutoQueryFeature and AutoQueryDataFeature can be used to intercept every AutoQuery Request.
OrmLite
Enum Char Values
By default OrmLite will store the string value of enums, if you wanted to instead store the Enum's integer value you can
annotate it with [Flags] or [EnumAsInt] attribute:
[Flags] //or [EnumAsInt]
public enum IntEnumExample
{
    None = 0,
    Value1 = 1 << 0,
    Value2 = 1 << 1,
    Value3 = 1 << 2,
    Value4 = 1 << 3,
}
Similarly you can use the [EnumAsChar] attribute to store the char value of the Enum instead, e.g:
[EnumAsChar]
public enum CharEnumExample
{
    Value1 = 'A',
    Value2 = 'B',
    Value3 = 'C',
    Value4 = 'D'
}
If you instead wanted to use different Enum Values in serialization and Service responses than what OrmLite persists in your
Database you can use [EnumMember] to change the value that's serialized, e.g:
//Different serialized value than DB value
[DataContract]
public enum SomeEnum
{
    [EnumMember(Value = "VALUE 1")]
    Value1,
    [EnumMember(Value = "VALUE 2")]
    Value2,
    [EnumMember(Value = "VALUE 3")]
    Value3,
    [EnumMember(Value = "VALUE 4")]
    Value4,
}
Multi Table Typed OrderBy Expressions
Support for Multi Table Typed Expressions were added to OrderBy, OrderByDescending, ThenBy and ThenByDescending supporting
ORDER BY expressions of up to 5 tables, e.g:
var q = db.From<MainTable>()
    .Join<SubTable>()
    .OrderBy<MainTable, SubTable>((m, s) => m.Weight > s.Weight ? m.Score : s.Score);

var results = db.Select(q);
Consistent String Param Lengths
To assist RDBMS's in being able to re-use query plans, all string DB Parameters are configured to use the registered StringConverter
Default String Length when it's larger than the string param value otherwise uses the param value length.
PopulatedObjectFilter
The new PopulatedObjectFilter can be used to apply custom logic after OrmLite populates an object instance which you can use
to modify the instance before it's returned by OrmLite's APIs, e.g:
OrmLiteConfig.PopulatedObjectFilter = obj => {
    if (obj is MyType myType)
    {
        myType.UpdateCalculatedFields();
    }
}
Firebird 4 Support
Support for Firebird 4 was added by Luis Madaleno contained within the new Firebird4OrmLiteDialectProvider
class that you can utilize with:
var dbFactory = new OrmLiteConnectionFactory(
    connectionString,
    Firebird4Dialect.Provider);
ServiceStack.Redis
Send Binary Pub/Sub Messages
You can now send/receive binary messages over a RedisPubServer and RedisSubscription Redis Pub/Sub connection with the new
OnMessageBytes filter, e.g:
var redisPubSub = new RedisPubSubServer(clientsManager, chan1, chan2) {
        OnMessageBytes = (channel, msgBytes) => ....
    }.Start();
Change SslProtocols
Support for changing the SslProtocols
used for encrypted SSL connections was added by @amohtashami12307 which can be set on the
connection string using the sslprotocols modifier, e.g:
var connString = $"redis://{Host}?ssl=true&sslprotocols=Tls12&password={Password.UrlEncode()}";
var redisManager = new RedisManagerPool(connString);
using (var client = redisManager.GetClient())
{
    //...
}
ServiceStack.Text
Intercept AutoMapping Conversions
The new RegisterPopulator AutoMapping API can be used to run custom logic after an Auto Mapping Conversion, e.g. after a
T.ConvertTo<T>() or T.PopulateWith(obj) is performed.
This is useful when you need to intercept Auto Mapping conversions in external libraries, e.g. you can use this to populate
the UserSession's UserAuthId with a different field from your Custom UserAuth:
AutoMapping.RegisterPopulator((IAuthSession session, IUserAuth userAuth) =>
{
    if (userAuth is RavenUserAuth ravenUserAuth)
    {
        session.UserAuthId = ravenUserAuth.Key;
    }
});