ServiceStack turns 10!
Before we get into unpacking this release we're happy to announce that we've now eclipsed 10 years since our first commit!
When you've been working on the same piece of code or art work for a long enough time you can look through it as a time lens back to that first commit, the developer you were, the visions, inspiration and motivations you had. Enough years pass that it eclipses a generation, remembering the person you were then and comparing with who you are now, how we grew as developers, as people, with different skills, careers, motivations, perspectives and life priorities.
As I take this moment to reflect back, it's reassuring to see that whilst the environments and ecosystems around us have all changed, ServiceStack's code always stayed true to its time-tested original vision. Whose core focus, Services, still provides the most value and software reuse, whose interface is still your systems most important and regardless of the technology used to implement them, its goals continue to be to make them simple to implement and simple to consume from wherever they're being called from - realizing their benefits.
It might be clear now but it wasn't in the era ServiceStack was created in, where most software was being given the "Enterprise" label and focused on surrounding itself with "Enterprise features". In Java, Enterprise Java Beans were being marketed as the pinnacle of Enterprise Software development whilst in .NET we were told we needed to use SOAP to in order to develop Web Services - which after experiencing the friction they inflicted in large code-bases first-hand, became the catalyst for starting ServiceStack - a clean, friction-free Services Framework for developing evolving message-based APIs, that even then already shipped with multiple JSON/XML serialization formats and REST/HTTP and SOAP endpoints out-of-the-box, including generic SOAP clients to ease transitions from legacy code bases.
DTO-first Services on the outside
From the outset ServiceStack embraced and built upon the importance of the Data Transfer Object (DTO) and Remote Facade patterns for the development of its robust coarse-grained, message-based Services, the importance of using Model-first logic-less DTOs for developing well-defined, evolvable, serialization-agnostic Services ensuring they can be consumed in any format, in any language and client - where they utilized the Gateway pattern, a large part to why ServiceStack Services are so easily consumed from all its reusable generic Typed Service Clients in different languages, all in the same way, where only DTOs are needed to enable its end-to-end Typed APIs.
Even today, most generated client proxy solutions still generate their clients RPC proxy stubs coupled with their types, creating additional friction whilst limiting its flexibility and reuse.
Clean architecture on the inside
Instead of WCF's dependence on complicated configuration and tooling ServiceStack opted for a convention-based configuration-free approach that in addition to adopting a simpler, cleaner more robust approach to develop Services on the outside, also encouraged a cleaner development model on the inside where DTOs only dependency were to ServiceStack.Interfaces - a dependency and implementation-free Assembly containing abstractions of all ServiceStack providers. This allowed the decoupling of your Host project containing all your App's configuration and concrete dependencies with your Services logic which would only bind to substitutable and testable interfaces so your AppHost could freely switch to use different concrete Caching, Configuration or Logging providers without impacting your Services implementation which is decoupled from your ServiceModel DTOs, which itself has no concrete dependencies.
This same time-tested blue-print giving ServiceStack Projects a structured base to build on continues to be our recommended Physical Project Structure that's adopted from most of our project templates.
So what started out as a System.Web ASP.NET 3/3.5 code-base 10 years ago has now evolved where its single modular code-base can support running your ServiceStack Services on any of .NET Framework v4.5+ and .NET Core's most popular Hosts where they're available in a myriad of serialization formats, accessible from a number of popular MQ Servers and SOAP Endpoints (should you still need to support legacy integrations) whilst the first-class end-to-typed support for all popular Mobile and Desktop platforms enables maximum utility and productivity for everyone consuming your Services.
Thank You!
I'd like to take this milestone to thank our thousands of Customers we've had the pleasure to serve and see our Software used which has amassed more than 27,000,000+ total downloads on NuGet and to see the uptick in adoption of some of our unique features like Add ServiceStack Reference which has been used more than 88,000 times to generate native Typed DTOs amongst its 8 supported languages.
It's rewarding to see value being created with our software and the small part we've played in its success, we're especially grateful to continue serving our long term Customers who've supported us since ServiceStack became a permanent full-time effort in 2013 and I look forward to continue working on enhancing the value and provide more first-class integrations around your ServiceStack Services including access to the latest modern development technologies in the simplest and most productive way we can make it, including continuing to develop our own innovations where it can reduce friction or be able to deliver a simpler and more enjoyable experience - many of which we're happy to introduce to you today.
And with that we have another jam-packed release with exciting features across the board, if you haven't got enough time to go through it all today, feel free to jump directly to the features you're interested in:
Table of Contents
- ASP.NET Core on .NET Framework
- New Vue and React "lite" ASP.NET Core Templates
- Introducing new "lite" npm-free project templates
- Light on Complexity, Big on Features
- vue-lite
- react-lite
- Development workflow
- Update TypeScript DTOs
- Integrated Bundling
- Pre-compiled minified production bundles
- Minified bundles with cache breakers
- Available in Razor Helpers
- vue-lite Project Template features
- react-lite Project Template features
- React Global State Management
- "lite" Project Structure
- Updating "lite" project dependencies
- #Script!
- World Validation
- "No touch" Host Configuration
- Auto Mapping
- Page Based Routing in Razor!
webtoolweb new- .NET's missing project template systemweb +- customize mix/match projects from gists!- SourceLink Enabled Packages
- Authentication
- Using ServiceStack Auth in MVC
- Using ASP.NET Identity Auth in ServiceStack
- Using IdentityServer4 Auth in ServiceStack
- ServiceStack
- New Auth Providers
- Microsoft Graph Auth Provider
- New Claim APIs
- IServiceProvider Request Extensions
- Enable Same Site Cookies
- Cookie Filters
- Secure Cookies enabled by default
- Override Authorization HTTP Header
- GET Authenticate Requests are disabled by default
- UserSession validation
- Intercept Service Requests
- Fluent Validation
- Auto Batching
- Hot Reload
- Image Utils
- Enum Utils
- Open API Feature
- Disable Auto HTML Pages
- TypeScript
- Messaging
- OrmLite
- INSERT INTO SELECT
- PostgreSQL Rich Data Types
- Hstore support
- JSON data types
- New KeyValuePair<K,V> top-level APIs
- SELECT Constant Expressions
- SELECT DISTINCT in SelectMulti
- New TableAlias replaces JoinAlias
- GetTableNames and GetTableNamesWithRowCounts APIs
- Dapper updated
- DB Scripts can open different connections
- Redis
- ServiceStack.Text
- ServiceStack.Azure
ASP.NET Core on .NET Framework
Another important announcement that occurred since our last release was Microsoft's announcement that it would stop supporting new versions of ASP.NET Core on the .NET Framework. Whilst we strongly disagreed against this decision which would've put out a large class of the existing ecosystems from participating in the new ASP.NET Core development model and many from staged migrations to .NET Core from commencing, we're happy to see ASP.NET Core 2.1 LTS will enjoy the same indefinite level of support as the rest of the .NET Framework - which should come as great news to the 1/3 of our Customers who are still creating new ASP.NET Core on FX Project Templates.
Whilst this announcement sends a clear message that new development on .NET Framework has effectively been put on product life support, ASP.NET Core 2.1 LTS is still a great rock-solid platform to build on if you're unable to jump directly to .NET Core immediately or if you want to get off .NET Core's major version release train and build upon a stable LTS platform.
ASP.NET Core - still our top recommendation for .NET Framework
If you need to stay on the .NET Framework, we'd still recommend using the newer ASP.NET Core 2.1 over classic ASP.NET System.Web projects as it's cleaner, lighter, more flexible and future proof. Unlike Microsoft web frameworks, ServiceStack is a single code-base which supports running on multiple platforms so your ServiceStack Services can enjoy near perfect source-code compatibility when and if you choose to move to .NET Core in future.
So whilst Microsoft is stopping new development of ASP.NET Core on .NET Framework, we're not, our supported packages have standardized to multi-target both .NET v4.5+ and .NET Standard 2.0 which is supported natively on ASP.NET Core 2.1.
ServiceStack's multi-targeted Packages
We've opted early on to shun classic ASP.NET providers and use our own clean Session, Caching, Configuration, Logging providers all of which automatically support .NET Standard 2.0 given they're clean library implementations without .NET Framework-only dependencies.
The only features which we can't offer .NET Standard 2.0 builds for are when they referenced external packages which don't offer .NET Standard 2.0 builds, the major examples being:
- ServiceStack.Authentication.OAuth2 which depends on DotNetOpenAuth, of which we've rewritten the last remaining popular OAuth providers in this release to not have any dependencies and
- ServiceStack.Razor which depends on the .NET Framework Microsoft.AspNet.Razor which we've rewritten on top of ASP.NET Core MVC that in this release gained features that eclipses the .NET Framework implementation with the exciting new Page-based routing feature.
Future proofed and continually developed
But otherwise all our own home-grown innovations like #Script (fka ServiceStack Templates) naturally support .NET Framework and .NET Core and runs everywhere ServiceStack does including within classic ASP.NET MVC Controllers which wasn't a design goal but was a natural consequence of developing clean libraries without external dependencies or reliance on external tooling.
This is to say that ASP.NET Core 2.1 LTS is still a fantastic rock-solid platform to run your .NET Framework workloads when you need to which will continue to receive enhancements and new features with each ServiceStack release courtesy of being derived from the same shared code-base which will enable seamless migrations to .NET Core should you wish to in future.
Subpar experiences
It's not always a friction-free experience as there have been frequent reports of runtime Assembly binding issues which are not always correctly handled by NuGet package installs and may require manual binding redirects, in general upgrading to the latest .NET Framework will mitigate these issues.
Also you'll miss out on some niceties like the Microsoft.AspNetCore.App meta-package reference, as a result we recommend starting from one of our ASP.NET Core Framework project Templates which contains all the individual package references needed to get started which we've expanded in this release to include a couple of exciting new project templates...
New Vue and React "lite" ASP.NET Core Templates
Developing Single Page Apps can often feel like a compromise, on the one hand premier JS frameworks like Vue and React have offered unprecedented simplicity and elegance in developing rich and reactive Single Page Apps on the Web, on the other hand you have to start from:
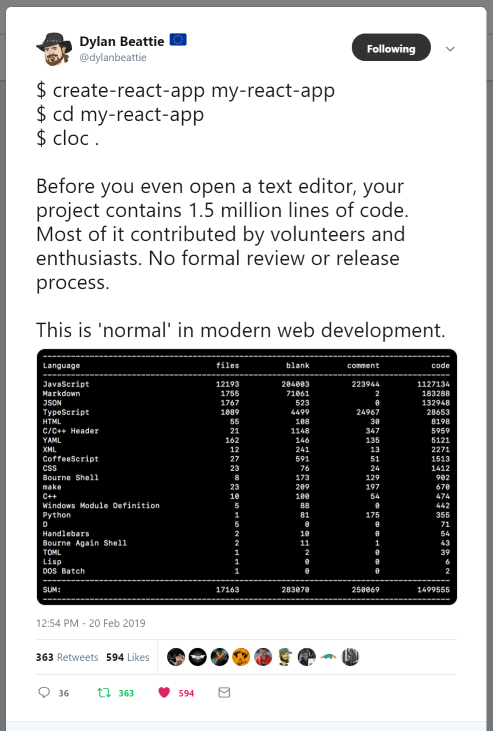
This is the result of npm's culture for hyper modularization into micro modules where often these dependencies only contain a single function, in some cases something as simple as checking if a number is positive is an npm package all by itself with a single function requiring 3 additional dependencies.
Regardless of the reasons touted for micro modules, they have many negative side-effects where each of these dependencies opens a possible vector making your project susceptible to breaking changes, potential vulnerabilities or potentially malicious code if any of the packages in your dependency tree becomes compromised by a bad actor. The resulting matrix of dependencies often requires you to use complicated tools like Webpack to manage them, which itself can grow to accumulate bespoke complex configuration to manage your projects builds which can quickly become obsolete with each new major Webpack version.
There are also packages that have shunned this trend like typescript - a wonderfully capable Typed superset of JavaScript that assists in maintaining new class of large-scale code-bases - a clear counter that you can maintain large, high quality code bases and build highly functional and capable libraries without micro modules.
Introducing new "lite" npm-free project templates
The question we keep asking ourselves is how can ServiceStack make modern Web Development simpler, the natural choice was to provide pre-configured Webpack-powered SPA Project Templates - bringing the recommended SPA development model for all popular SPA frameworks to .NET, which we've been doing successfully and seamlessly integrated with ServiceStack for years.
However the next leap in simplicity wont be coming from adding additional tooling to manage the complexity, it will be from removing the underlying complexity entirely. Fortunately one of the targets all premier SPA frameworks offer are encapsulated UMD packages so they can be referenced as a single include in online IDE's like codepen.io but also for simple Web Apps that want to gradually adopt these frameworks but want to avoid the complexity of maintaining an npm build system.
These UMD packages lets us return back to the simple era of web development where we can go back to referencing libraries using simple script includes - which is the strategy embraced in ServiceStack's new "lite" project templates.
Light on Complexity, Big on Features
Surprisingly whilst we're able to rid ourselves of the complexity of maintaining an npm-based build system, we're still able to enjoy many of the features that make SPA development with Webpack a joy:
- Integrated hot-reloading
- Advanced JavaScript language features
- Continue developing with same componentized development model as done when using Webpack
- Future proofed to use optimal ES6 source code
- TypeScript with runtime type-checking verification and auto-complete
- Incremental compilation
- TypeScript declarations are included for all default packages
- Smart, effortless bundling and minification
- Optimal unminified during development and minified for production
- No reliance on external tooling necessary, but can use same bundling configuration in website
_layout.htmlif pre-compilation is preferred
Essentially the "lite" templates goal are to provide the richest suite of functionality possible with the least amount of complexity. TypeScript was adopted because it runs as a non-invasive global tool with no dependencies that enables us to take advantage of the latest JavaScript language features to be able to develop in modern JavaScript without compromises, in the same source code as a fully-fledged npm webpack build system, should you wish to upgrade to one in future.
Install
All ServiceStack Project Templates can now be created with our web (or app) .NET Core tool:
$ dotnet tool install -g web
If you previously had an existing web tool installed, update it to the latest version with:
$ dotnet tool update -g web
vue-lite

Browse source code, view vue-lite.web-templates.io live demo and install for .NET Core with:
$ web new vue-lite ProjectName
Alternatively you can create an ASP.NET Core 2.1 LTS project on .NET Framework with:
$ web new vue-lite-corefx ProjectName
react-lite

Browse source code, view react-lite.web-templates.io live demo and install for .NET Core with:
$ web new react-lite ProjectName
Alternatively you can create an ASP.NET Core 2.1 LTS project on .NET Framework with:
$ web new react-lite-corefx ProjectName
Development workflow
All that's needed for client development is to run TypeScript in "watch" mode:
$ tsc -w
Which monitors any changes to any .ts files and incrementally compiles their .js files on save. ServiceStack's built-in
static files hot-reloading detects
changes to any .js files and automatically reloads the page.
For Server C# development, start your .NET Web App in a new Terminal window with:
$ dotnet watch run
Using
watch runwill monitor changes toC#source files and automatically re-builds and restarts the Server.
Update TypeScript DTOs
After changing your ServiceStack Services, you can re-generate their Typed TypeScript DTOs with:
$ web ts
Which will recursively update and re-generate all *dto.ts in the current and sub directories.
Integrated Bundling
The way to eliminate needing a build and module system comes down to including dependencies in dependent order which is where ServiceStack's new bundling APIs help with. We'll walk through the vue-lite to see how this is easily done.
All the bundling logic for all .css and .js resources are contained within the _layout.html page below:
/wwwroot/_layout.html
<!DOCTYPE html>
<html lang="en">
<head>
<meta charset="UTF-8">
<meta name="viewport" content="width=device-width, initial-scale=1.0">
<meta http-equiv="X-UA-Compatible" content="ie=edge">
<title>{{ title ?? 'MyApp' }}</title>
{{ (debug ? '' : '.min') | assignTo: min }}
{{ ['/assets/css/'] | bundleCss({minify:!debug, cache:!debug, disk:!debug, out:`/css/bundle${min}.css`}) }}
</head>
<body>
<i hidden>{{ '/js/hot-fileloader.js' | ifDebugIncludeScript }}</i>
{{page}}
{{ [
`/lib/vue/dist/vue${min}.js`,
`/lib/vue-router/dist/vue-router${min}.js`,
'/lib/vue-class-component/vue-class-component.js',
'/lib/vue-property-decorator/vue-property-decorator.umd.js',
'/lib/@servicestack/client/servicestack-client.umd.js',
] | bundleJs({ minify:!debug, cache:!debug, disk:!debug, out:`/js/lib.bundle${min}.js` }) }}
<script>
var ALIASES = {
'vue': { default: Vue },
'vue-router': { default: VueRouter },
'vue-class-component': VueClassComponent
};
window.exports = {};
window.require = function(name) {
return ALIASES[name] || exports[name] || window[name] || exports;
};
</script>
{{ [
'content:/src/components/',
'content:/src/shared/',
'content:/src/',
] | bundleJs({ minify:!debug, cache:!debug, disk:!debug, out:`/js/bundle${min}.js` }) }}
{{ scripts | raw }}
</body>
</html>
Bundling happens on-the-fly at runtime when the index.html page is requested which is embedded in its nearest _layout.html (above).
CSS Bundling
The first bundle created is the .css bundle that's appropriately located in the <head/> section of the HTML page.
How and where the bundle is written depends on whether the page is loaded in Development (debug) or Release mode:
{{ var min = debug ? '' : '.min' }}
{{ ['/assets/css/'] |> bundleCss({ minify:!debug, cache:!debug, disk:!debug, out:`/css/bundle${min}.css` }) }}
Bundling Options
The bundler will include all target resources specified on the left of bundleCss using the behavior as specified in the argument options on the right:
minify- whether to minify the.cssfiles before bundlingcache- whether to use the previous cached version if existsdisk- whether to save the output bundle to disk or in the In Memory FileSystembundle- whether to bundle all.cssin a single file or emit include individual<link />importsout- virtual file path where to save the bundle (defaults to/css/bundle{.min}.css)
During development (in DebugMode) this will create an unminified bundle, ignoring any previous caches that's saved to the In Memory Virtual File at /css/bundle.css.
Whereas in Release mode it will create a minified bundle, with all subsequent requests using the pre-bundled asset written at /css/bundle.min.css.
No tooling or pre-compilation is required prior to deployment as the bundler will automatically create one if it doesn't already exist.
All virtual paths are from the wwwroot/ WebRoot. Paths ending with a / indicate to include all .css files in that directory, which
is included in DirectoryInfo (alphabetical) order.
If for example you wanted to include your App's default.css before bootstrap.css you can specify it first, where it will be included first
and ignored in subsequent references, e.g:
{{ [
'/assets/css/default.css',
'/assets/css/'
] |> bundleCss }}
Hot Reloading of Static Resources
The script below enables hot-reloading during development:
<i hidden>{{ '/js/hot-fileloader.js' |> ifDebugIncludeScript }}</i>
Where it will automatically reload the page if it detects any modifications to any .html, .js or .css files,
Configured with:
if (Config.DebugMode)
{
    Plugins.Add(new HotReloadFeature {
        DefaultPattern = "*.html;*.js;*.css",
        VirtualFiles = VirtualFiles // Monitor ContentRoot to detect changes in /src
    });
}
The page placeholder is where the page will be rendered inside the Layout template:
{{page}}
JavaScript Library Bundling
The layout creates 2 JavaScript bundles, the first containing all 3rd Party libraries used in the App which is written to /js/lib.bundle{.min}.js
using the same bundling options as the bundleCss above:
{{ [
`/lib/vue/dist/vue${min}.js`,
`/lib/vue-router/dist/vue-router${min}.js`,
'/lib/vue-class-component/vue-class-component.js',
'/lib/vue-property-decorator/vue-property-decorator.umd.js',
'/lib/@servicestack/client/servicestack-client.umd.js',
] |> bundleJs({ minify:!debug, cache:!debug, disk:!debug, out:`/js/lib.bundle${min}.js` }) }}
Register UMD Module Mappings
After importing the libraries we need to make the globals registered by the UMD dependencies available under the module name they are imported from.
When they don't match they need to be explicitly registered in the ALIASES object:
<script>
    var ALIASES = {
        'vue': { default: Vue },
        'vue-router': { default: VueRouter },
        'vue-class-component': VueClassComponent
    };
    window.exports = {};
    window.require = function(name) {
        return ALIASES[name] || exports[name] || window[name] || exports;
    };
</script>
Since Vue is imported as a default import:
import Vue from 'vue';
It's expected for require("vue").default to return the module assigned to the Vue global:
(global = global || self, global.Vue = factory());
Dependencies like vue-property-decorator.umd.js and servicestack-client.umd.js that already register themselves under their expected "vue-property-decorator" and "@servicestack/client" module names don't need any manual mappings.
App Source Code Bundling
The last js bundle created is your App's source code which also needs to be imported in dependent order, both vue-lite and react-lite project templates share the same structure so their bundle configuration is identical where /src/components contains each page defined as a separate component, the /src/shared contains any shared functionality used by the different components whilst the base /src folder contains your App's entry point:
{{ [
'content:/src/components/',
'content:/src/shared/',
'content:/src/',
] |> bundleJs({ minify:!debug, cache:!debug, disk:!debug, out:`/js/bundle${min}.js` }) }}
Bundling Path Options
The content: prefix specifies that the virtual path is from the ContentRoot directory, in this case so your App source code is maintained outside of the wwwroot/ WebRoot.
Possible values include:
web:- Web Root folder (default)content:- Content Root folderfilesystem:- TheFileSystemVFS provider in the Web Root's cascading Virtual File Sourcesmemory:- TheMemoryVFS provider in the Web Root's cascading Virtual File Sources
Finally the scripts argument is written (unencoded) after the library and App Source code bundles where it contains any additional scripts that
individual pages wants to include at the bottom of the page:
{{ scripts | raw }}
Pre-compiled minified production bundles
Whilst not required you can copy the exact same bundling configuration in your _layout.html above into a separate
/wwwroot/_bundle.ss script:
{{* run in host project directory with `web run wwwroot/_bundle.ss` *}}
{{ var debug = false }}
{{ var min = debug ? '' : '.min' }}
{{ [`/css/bundle${min}.css`,`/js/lib.bundle${min}.js`,`/js/bundle${min}.js`] |> map => fileDelete(it) |> end }}
{{* Copy same bundle definitions from _layout.html as-is *}}
{{ ['/assets/css/'] |> bundleCss({ minify:!debug, cache:!debug, disk:!debug, out:`/css/bundle${min}.css` }) }}
{{ [
`/lib/vue/dist/vue${min}.js`,
`/lib/vue-router/dist/vue-router${min}.js`,
'/lib/vue-class-component/vue-class-component.js',
'/lib/vue-property-decorator/vue-property-decorator.umd.js',
'/lib/@servicestack/client/servicestack-client.umd.js',
] |> bundleJs({ minify:!debug, cache:!debug, disk:!debug, out:`/js/lib.bundle${min}.js` }) }}
{{ [
'content:/src/components/',
'content:/src/shared/',
'content:/src/',
] |> bundleJs({ minify:!debug, cache:!debug, disk:!debug, out:`/js/bundle${min}.js` }) }}
Then run it with:
$ web run wwwroot/_bundle.ss
Which will create the production bundles, minify all already non-minified bundles and write them to disk with the paths written visible in the
#Script _bundle.ss output:
<link rel="stylesheet" href="/css/bundle.min.css">

<script src="/js/lib.bundle.min.js"></script>

<script src="/js/bundle.min.js"></script>
The bundles created by running _bundle.ss generates more advanced compression courtesy of the web tool's use of NUglify's
smarter and more advanced JS, CSS and HTML minifers.
If you encounter any issues you can revert back to using ServiceStack's built-in JSMin and CssMinifier implementations by adding these
script arguments at the top of your _bundle.css script:
<!--
jsMinifier  ServiceStack
cssMinifier ServiceStack
-->
Minified bundles with cache breakers
Cache Breaker support is available by with the [hash] placeholder, which we only want to include in minified bundles.
In this case we need to perform a file pattern search to find and delete any existing generated bundles:
{{* run in host project directory with `web run wwwroot/_bundle.ss` *}}
{{ false | assignTo: debug }}
{{ (debug ? '' : '[hash].min') | assignTo: min }}
{{ [`/css/bundle${min}.css`,`/js/lib.bundle${min}.js`,`/js/bundle${min}.js`]
| map => filesFind(replace(it,'[hash]','.*'))
| flatten
| map => fileDelete(it.VirtualPath) | end }}
{{* Copy same bundle definitions from _layout.html as-is *}}
{{ ['/assets/css/'] | bundleCss({ minify:!debug, cache:!debug, disk:!debug, out:`/css/bundle${min}.css` }) }}
{{ [
`/lib/vue/dist/vue${min}.js`,
`/lib/vue-router/dist/vue-router${min}.js`,
'/lib/vue-class-component/vue-class-component.js',
'/lib/vue-property-decorator/vue-property-decorator.umd.js',
'/lib/@servicestack/client/servicestack-client.umd.js',
] | bundleJs({ minify:!debug, cache:!debug, disk:!debug, out:`/js/lib.bundle${min}.js` }) }}
{{ [
'content:/src/components/',
'content:/src/shared/',
'content:/src/',
] | bundleJs({ minify:!debug, cache:!debug, disk:!debug, out:`/js/bundle${min}.js` }) }}
Running the _bundle.css script again will then output minified bundles with cache breakers:
<link rel="stylesheet" href="/css/bundle.1549858174979.min.css">

<script src="/js/lib.bundle.155190192923.min.js"></script>

<script src="/js/bundle.1551907971028.min.js"></script>
When using [hash] cache breakers the bundle APIs will use any existing generated bundles it finds, so you'll need to
ensure that any older minified assets are removed (as done in the above script).
Available in Razor Helpers
The same Html.BundleJs(), Html.BundleCss() and Html.BundleHtml() bundling implementations as above have also been available in
ServiceStack Razor where it can be used like:
@Html.BundleJs(new BundleOptions {
    Sources = {
        "content:/src/components/",
        "content:/src/shared/",
        "content:/src/",
    },
    Minify = !DebugMode,
    Cache = !DebugMode,
    SaveToDisk = !DebugMode,
    OutputTo = $"/js/bundle{min}.js",
})
vue-lite Project Template features
vue-lite comes pre-configured with a lot of the functionality needed in most Single Page Apps including client-side routing in /shared/router.ts and Sign In and Registration pages, both of which are integrated with ServiceStack's declarative form validation and auto-binding.
Form Validation Example
The Sign Up Page shows a typical example of auto-form validation with ServiceStack which can be developed using clean declarative markup:
@Component({ template:
    `<div>
        <h3>Register New User</h3>
        <form ref="form" @submit.prevent="submit" :class="{ error:responseStatus, loading }" >
            <div class="form-group">
                <ErrorSummary except="displayName,email,password,confirmPassword" :responseStatus="responseStatus" />
            </div>
            <div class="form-group">
                <Input name="displayName" v-model="displayName" placeholder="Display Name" :responseStatus="responseStatus" />
            </div>
            <div class="form-group">
                <Input name="email" v-model="email" placeholder="Email" :responseStatus="responseStatus" />
            </div>
            <div class="form-group">
                <Input type="password" name="password" v-model="password" placeholder="Password" :responseStatus="responseStatus" />
            </div>
            <div class="form-group">
                <Input type="password" name="confirmPassword" v-model="confirmPassword" placeholder="Password" :responseStatus="responseStatus" />
            </div>
            <div class="form-group">
                <CheckBox name="autoLogin" v-model="autoLogin" :responseStatus="responseStatus">
                    Auto Login
                </CheckBox>
            </div>
            <div class="form-group">
                <button class="btn btn-lg btn-primary" type="submit">Register</button>
            </div>
            <div class="pt-3">
                <b>Quick Populate:</b>
                <p class="pt-1">
                    <a class="btn btn-outline-info btn-sm" href="javascript:void(0)" @click.prevent="newUser('new@user.com')">new@user.com</a>
                </p>
            </div>
        </form>
    </div>`
})
Which renders into the following Bootstrap Form UI:

All custom controls used are defined in /shared/controls.ts which encapsulate the label and input controls and their validation error bindings within reusable Vue components.
Validation Error Binding
All validation errors are sourced from the Component's this.responseStatus reactive property, populated by any Exception's thrown when using the
ServiceStack's TypeScript JsonServiceClient which in this case is used to
Register the user by sending the Register Request DTO generated in /shared/dtos.ts:
export class SignUp extends Vue {
    displayName = ''
    email = ''
    password = ''
    confirmPassword = ''
    autoLogin = true
    loading = false
    responseStatus = null

    async submit() {
        try {
            this.loading = true;
            this.responseStatus = null;

            const response = await client.post(new Register({
                displayName: this.displayName,
                email: this.email,
                password: this.password,
                confirmPassword: this.confirmPassword,
                autoLogin: this.autoLogin,
            }));

            await checkAuth();
            redirect('/');

        } catch (e) {
            this.responseStatus = e.responseStatus || e;
        } finally {
            this.loading = false;
        }
    }

    newUser(email:string) {
        const names = email.split('@');
        this.displayName = toPascalCase(names[0]) + " " + toPascalCase(splitOnFirst(names[1],'.')[0]);
        this.email = email;
        this.password = this.confirmPassword = 'p@55wOrd';
    }
}
This is all it takes to render any server validation errors against their respective fields which we can test by submitting an empty form:

Vue Global State Management
Instead of immediately reaching for Vuex, we've kept the templates "lite" by leveraging existing
functionality built into the core libraries. So for global state management we're using a global Vue instance as a pub/sub EventBus that
our decoupled components use to update global state and listen for events.
This is used by checkAuth to post an empty Authenticate DTO to ServiceStack to check if the user is still authenticated on the server,
which depending if they're Authenticated will either returns basic session info or fails with a 401 error response, which the pub/sub event listeners
use to update global its state:
export const store:Store = {
    isAuthenticated: false,
    userSession: null,
};

class EventBus extends Vue {
    store = store
}
export var bus = new EventBus({ data: store });

bus.$on('signin', (userSession:AuthenticateResponse) => {
    bus.$set(store, 'isAuthenticated', true);
    bus.$set(store, 'userSession', userSession);
})

export const checkAuth = async () => {
    try {
        bus.$emit('signin', await client.post(new Authenticate()));
    } catch (e) {
        bus.$emit('signout');
    }
}
react-lite Project Template features
The react-lite template is functionality equivalent to vue-lite but created using the latest React features. For client-side routing we use React Router's declarative markup defined in main.tsx.
All components are written as Functional Components and makes use of React's new Hooks functionality which enable functional components to retain local state. Just like vue-lite all high-level controls are encapsulated into reusable functional components defined in /shared/controls.tsx which ends up retaining similar markup as vue-lite despite their completely different implementations:
export const SignUpImpl: React.SFC<any> = ({ history }) => {
const {state, dispatch} = useContext(StateContext);
const [loading, setLoading] = useState(false);
const [responseStatus, setResponseStatus] = useState(null);
const [displayName, setDisplayName] = useState('');
const [email, setEmail] = useState('');
const [password, setPassword] = useState('');
const [confirmPassword, setConfirmPassword] = useState('');
const [autoLogin, setAutoLogin] = useState(true);
const newUser = (email:string) => {
const names = email.split('@');
setDisplayName(toPascalCase(names[0]) + " " + toPascalCase(splitOnFirst(names[1],'.')[0]));
setEmail(email);
setPassword('p@55wOrd');
setConfirmPassword('p@55wOrd');
}
const submit = async () => {
try {
setLoading(true);
setResponseStatus(null);
const response = await client.post(new Register({
displayName,
email,
password,
confirmPassword,
autoLogin,
}));
await checkAuth(dispatch);
setLoading(false);
(history as History).push('/');
} catch (e) {
setResponseStatus(e.responseStatus || e);
setLoading(false);
}
};
return (<div>
<h3>Register New User</h3>
<form className={classNames({error:responseStatus, loading})}
onSubmit={async e => { e.preventDefault(); await submit(); }}>
<div className="form-group">
<ErrorSummary responseStatus={responseStatus} except={'displayName,email,password,confirmPassword'} />
</div>
<div className="form-group">
<Input type="text" name="displayName" value={displayName} onChange={setDisplayName} responseStatus={responseStatus} placeholder="Display Name" />
</div>
<div className="form-group">
<Input type="text" name="email" value={email} onChange={setEmail} responseStatus={responseStatus} placeholder="Email" />
</div>
<div className="form-group">
<Input type="password" name="password" value={password} onChange={setPassword} responseStatus={responseStatus} placeholder="Password" />
</div>
<div className="form-group">
<Input type="password" name="confirmPassword" value={confirmPassword} onChange={setConfirmPassword} responseStatus={responseStatus} placeholder="Confirm" />
</div>
<div className="form-group">
<CheckBox name="autoLogin" checked={autoLogin} onChange={setAutoLogin} responseStatus={responseStatus}>
Auto Login
</CheckBox>
</div>
<div className="form-group">
<button className="btn btn-lg btn-primary" type="submit">Register</button>
</div>
<div className="pt-3">
<b>Quick Populate:</b>
<p className="pt-1">
<a className="btn btn-outline-info btn-sm" href="javascript:void(0)" onClick={() => newUser('new@user.com')}>new@user.com</a>
</p>
</div>
</form>
</div>);
}
export const SignUp = withRouter(SignUpImpl);
Which renders the same Bootstrap form UI:

Despite React and Vue's stylistic differences the ServiceStack integration remains the same where the populated Register Request DTO
in /shared/dtos.ts is used to register the User with any failures used to
populate the responseStatus local state where it's reactively referenced in all Input components to render field validation errors against their targeted control:

React Global State Management
Likewise with global state management we've leveraged existing functionality instead of depending on an external state library like Redux or MobX.
Instead react-lite use React's new useReducer hook within a global StateContext which is made available to all components using
React's Context where they're used to dispatch actions that mutate global state:
const initialState: State = {
  isAuthenticated: false,
  userSession: null
};

const reducer = (state:State, action:Action) => {
    switch (action.type) {
        case 'signin':
            return { ...state, isAuthenticated:true, userSession:action.data };
        case 'signout':
            return { ...state, isAuthenticated:false, userSession:null };
        default:
            throw new Error();
    }
}

export const StateContext = createContext({} as Context);

export const StateProvider = (props:any) => {
    const [state, dispatch] = useReducer(reducer, initialState);
    return (<StateContext.Provider value={ { state, dispatch } }>{props.children}</StateContext.Provider>);
}

type Dispatch = React.Dispatch<Action>;

export const checkAuth = async (dispatch:Dispatch) => {
    try {
        dispatch({ type: 'signin', data: await client.post(new Authenticate()) });
    } catch (e) {
        dispatch({ type: 'signout' });
    }
};
"lite" Project Structure
Unlike most other project templates which follow our Recommended Physical Project Structure, the "lite" project templates are all within a single project as it's more suitable for smaller projects and can be developed using lightweight IDE's like VS Code which doesn't work well with multi-project solutions.
So what would've been separate projects are being maintained separate folders:
Where they still retain the same source code and namespaces and can be easily be moved out into a different project when wanting to upgrade to a multi-project solution.
Updating "lite" project dependencies
We've also enabled a novel approach for updating your "lite" project 3rd Party dependencies where instead of everyone maintaining their own bespoke configuration and a tool like libman for updating their local dependencies, vue-lite projects can just run:
$ web +vue-lite-lib
To update their vue-lite projects with the latest JS libraries and TypeScript definitions used in the default project template.
For react-lite projects, run:
$ web +react-lite-lib
We'll cover how this works in more detail when we announce our web tool's new capabilities below.
Empty MemoryVirtualFiles now registered in VirtualFileSources
To enable shadowing of the WebRoot cascading Virtual File Sources, an empty MemoryVirtualFiles has been added to
InsertVirtualFileSources by default where it gets inserted at the start of VirtualFileSources, i.e:
new AppHost {
    InsertVirtualFileSources = { new MemoryVirtualFiles() }
}
If needed, the individual Memory and FileSystem VFS providers in the WebRoot VFS Sources can be accessed with:
var memFs = appHost.VirtualFileSources.GetMemoryVirtualFiles();
var diskFs = appHost.VirtualFileSources.GetFileSystemVirtualFiles();
Which are also available from the HostContext singleton:
HostContext.MemoryVirtualFiles- WebRoot MemoryVirtualFilesHostContext.FileSystemVirtualFiles- WebRoot FileSystem
The WebRoot Directory and ContentRoot Directories are also available from:
HostContext.RootDirectory- WebRootwwwroot/HostContext.ContentRootDirectory- ContentRoot/
Sharp Script
![]()
sharpscript.net
#Script (fka ServiceStack Templates)
As we continue enhancing ServiceStack's scripting support with exciting new features, it no longer made sense to call our dynamic scripting language
"Templates" which is just one of the many use-cases #Script enables.
#Script is typical of a popular dynamic template language you'd find in other platforms, using the ubiquitously familiar mix of
JavaScript Expressions which for increased wrist-friendly readability can be easily composed
together using the Unix | operator as embraced by Vue.js filters and
Angular's Template Expressions
whist the Script Statement Blocks adopt the universally adopted Handlebars-like syntax that's ideal for
rendering dynamic pages.
#Script is contained within the pure ServiceStack.Common library that as it doesn't require any compilation or reliance on any
external build tools is embeddable within any .NET v4.5 or .NET Standard 2.0 App, even within Environments that don't allow
Reflection.Emit thanks to the cascading implementations of Reflection Utils.
#Script is also completely customizable where all the script methods and blocks can easily be removed or shadowed and replaced to create your
own DSL language. Alternatively you can use its AST parsing APIs directly to create, parse and evaluate ASTs
from free-form JavaScript expressions.
Optimal for generating HTML and Live Scripting Environments
We're staunch proponents for using typed languages like C# for developing compiler-checked server software but we prefer using dynamic languages for creating UIs which are typically constantly changing, single purpose "end-user scripts" where we believe it's more valuable to have a flexible and highly iterative and productive workflow than be confronted with the friction and delays imposed by a static type system - that's especially cumbersome in text generation tasks like dynamic HTML pages. We see this as the main reason why innovative Reactive UI frameworks like React and Vue don't work well translated in C# where the friction and boilerplate imposed by conforming to static and generic typed structures inhibits the productivity and fast iteration that dynamic languages enjoy.
Unrestricted flexibility
The flexibility, extensibility, expendability of #Script ensures we can use it anywhere, e.g. the same UI logic and controls we use to render
dynamic HTML pages can also be re-used inside Services to render Emails and run in stand-alone scripts. It also becomes trivial to unit test
any partial fragments and functionality in isolation where the ScriptContext can easily be re-created and any functionality simulated.
As #Script is not shackled to external tooling or constrained by MVC Razor conventions it's unrestricted with which features and capabilities
we can add to #Script - where it's already being used to power a number of exciting scenarios.
Sharp Apps
In our last release we can see how we can use #Script to build Sharp Apps in real-time:
Sharp APIs
#Script is also the fastest way to create APIs in .NET, which can also be created in real-time without compilation where you can use page based
routing to define your API at /hello/_name/index.html (or /hello/_name.html)
that just returns a JS object literal:
{{ { result: `Hello, ${name}!` } | return }}
Which returns the same JSON wire-format as the equivalent ServiceStack Service:
[Route("/hello/{Name}")]
public class Hello : IReturn<HelloResponse>
{
    public string Name { get; set; }
}
public class HelloResponse
{
    public string Result { get; set; }
}

public class HelloService : Service
{
    public object Any(Hello request) => new HelloResponse { Result = $"Hello, {request.Name}!" };
}
Which also supports standard HTTP Content Negotiation available in all registered Content Types:
- /hello/World?format=html
- /hello/World?format=json
- /hello/World?format=xml
- /hello/World?format=csv
- /hello/World?format=jsv
Note: as Sharp APIs are untyped they don't benefit from ServiceStack's metadata features around its Typed Services
Sharp Scripts
In addition to being a versatile utility tool belt, our web (and app) .NET Core tools also serve as a #Script runner. We've seen a
glimpse of this with _bundle.ss script above which is run with web run {script}:
$ web run wwwroot/_bundle.ss
Sharp Scripts are run in the same context and have access to the same functionality and features as a Sharp App including extensibility va custom plugins. They can run stand-alone independent of an app.settings config file, instead the app settings configuration can be added in its page arguments to enable or configure any features.
Lets go through a couple of different possibilities we can do with scripts:
Adhoc reports
Scripts can use the built-in Database Scripts to be able to run queries against any sqlite, sqlserver, mysql and postgres database and quickly view data snapshots using the built-in
HTML Scripts, e.g:
<!--
db sqlite
db.connection ~/../apps/northwind.sqlite
-->
<link rel="stylesheet" href="https://stackpath.bootstrapcdn.com/bootstrap/4.3.1/css/bootstrap.min.css">
<style>body {padding:1em} caption{caption-side:top;}</style>
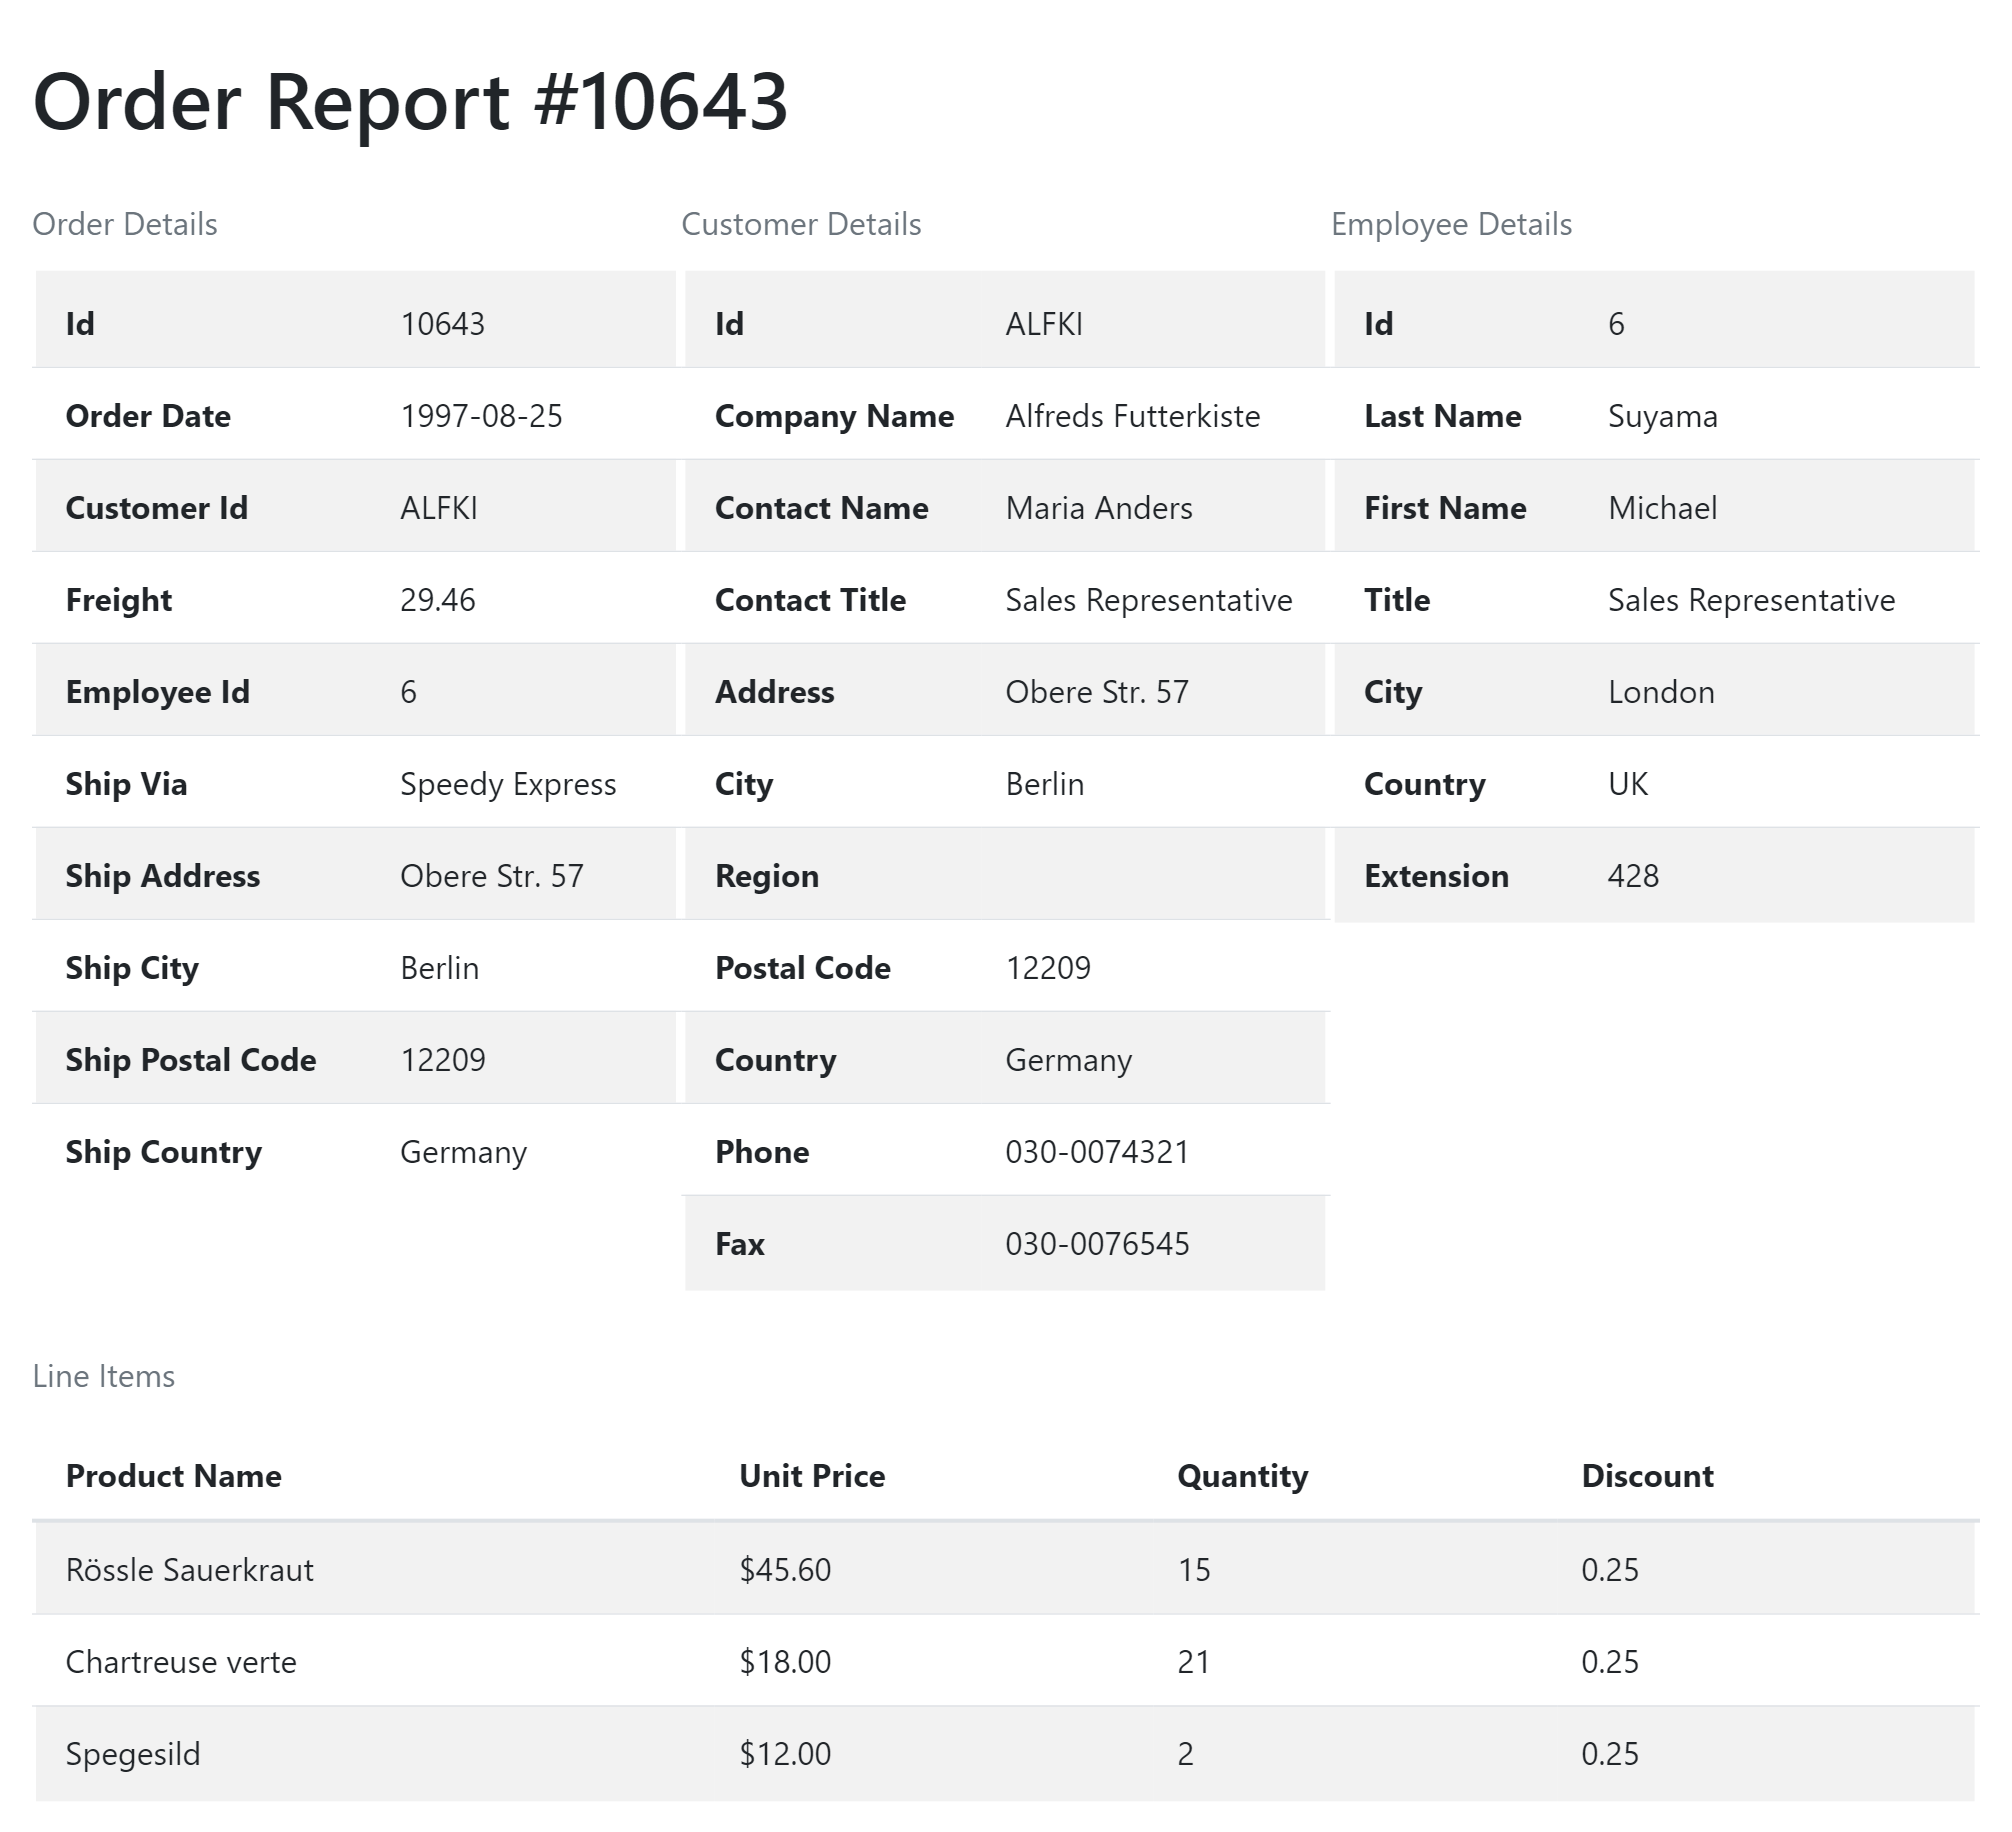
<h1 class="py-2">Order Report #{{id}}</h1>
{{ `SELECT o.Id, OrderDate, CustomerId, Freight, e.Id as EmployeeId, s.CompanyName as ShipVia,
ShipAddress, ShipCity, ShipPostalCode, ShipCountry
FROM "Order" o
INNER JOIN
Employee e ON o.EmployeeId = e.Id
INNER JOIN
Shipper s ON o.ShipVia = s.Id
WHERE o.Id = @id`
| dbSingle({ id }) | assignTo: order }}
{{#with order}}
{{ "table table-striped" | assignTo: className }}
<style>table {border: 5px solid transparent} th {white-space: nowrap}</style>
<div style="display:flex">
{{ order | htmlDump({ caption: 'Order Details', className }) }}
{{ `SELECT * FROM Customer WHERE Id = @CustomerId`
| dbSingle({ CustomerId }) | htmlDump({ caption: `Customer Details`, className }) }}
{{ `SELECT Id, LastName, FirstName, Title, City, Country, Extension FROM Employee WHERE Id=@EmployeeId`
| dbSingle({ EmployeeId }) | htmlDump({ caption: `Employee Details`, className }) }}
</div>
{{ `SELECT p.ProductName, ${sqlCurrency("od.UnitPrice")} UnitPrice, Quantity, Discount
FROM OrderDetail od
INNER JOIN
Product p ON od.ProductId = p.Id
WHERE OrderId = @id`
| dbSelect({ id })
| htmlDump({ caption: "Line Items", className }) }}
{{else}}
{{ `There is no Order with id: ${id}` }}
{{/with}}
Specifying Script Arguments
The above script generates a static HTML page can be invoked with any number of named arguments after the script name, in this case it
generates a report for Northwind Order #10643, saves it to 10643.html and opens it in the OS's default browser:
$ web run script.html -id 10643 > 10643.html && start 10643.html
Which looks like:
textDump
Generating static .html pages can quickly produce reports that looks good enough to share with others,
but if you just want to see a snapshot info at a glance or be able to share in text-based mediums like email or chat
channels you can replace htmlDump with textDump where it will instead output GitHub flavored Markdown tables, e.g:
<!--
db sqlite
db.connection ~/../apps/northwind.sqlite
-->
{{ `SELECT o.Id, OrderDate, CustomerId, Freight, e.Id as EmployeeId, s.CompanyName as ShipVia,
ShipAddress, ShipCity, ShipPostalCode, ShipCountry
FROM "Order" o
INNER JOIN
Employee e ON o.EmployeeId = e.Id
INNER JOIN
Shipper s ON o.ShipVia = s.Id
WHERE o.Id = @id`
| dbSingle({ id }) | assignTo: order }}
{{#with order}}
{{ order | textDump({ caption: 'Order Details' }) }}
{{ `SELECT p.ProductName, ${sqlCurrency("od.UnitPrice")} UnitPrice, Quantity, Discount
FROM OrderDetail od
INNER JOIN
Product p ON od.ProductId = p.Id
WHERE OrderId = @id`
| dbSelect({ id })
| textDump({ caption: "Line Items" })
}}
{{ `SELECT ${sqlCurrency("(od.UnitPrice * Quantity)")} AS OrderTotals
FROM OrderDetail od
INNER JOIN
Product p ON od.ProductId = p.Id
WHERE OrderId = @id
ORDER BY 1 DESC`
| dbSelect({ id })
| textDump({ rowNumbers: false }) }}
{{else}}
{{ `There is no Order with id: ${id}` }}
{{/with}}
As the output is human-readable we can view directly it without a browser:
$ web run script.ss -id 10643
Which will output:
| Order Details                    ||
|------------------|----------------|
| Id               | 10643          |
| Order Date       | 1997-08-25     |
| Customer Id      | ALFKI          |
| Freight          | 29.46          |
| Employee Id      | 6              |
| Ship Via         | Speedy Express |
| Ship Address     | Obere Str. 57  |
| Ship City        | Berlin         |
| Ship Postal Code | 12209          |
| Ship Country     | Germany        |


Line Items

| # | Product Name      | Unit Price | Quantity | Discount |
|---|-------------------|------------|----------|----------|
| 1 | Rössle Sauerkraut | $45.60     | 15       | 0.25     |
| 2 | Chartreuse verte  | $18.00     | 21       | 0.25     |
| 3 | Spegesild         | $12.00     | 2        | 0.25     |


| Order Totals |
|--------------|
| $684.00      |
| $378.00      |
| $24.00       |
And because they're GitHub Flavored Markdown Tables they can be embedded directly in Markdown docs (like this) where it's renders as:
AWS Dashboards
The comprehensive built-in scripts coupled with ServiceStack's agnostic providers like the Virtual File System makes it easy to quickly query infrastructure resources like all Tables and Row counts in managed AWS RDS Instances or Search for static Asset resources in S3 Buckets.
<!--
db postgres
db.connection $AWS_RDS_POSTGRES
files s3
files.config {AccessKey:$AWS_S3_ACCESS_KEY,SecretKey:$AWS_S3_SECRET_KEY,Region:us-east-1,Bucket:rockwind}
-->
{{ dbTableNamesWithRowCounts | textDump({ caption: 'Tables' }) }}
{{ `SELECT "Id", "CustomerId", "EmployeeId", "OrderDate" from "Order" ORDER BY "Id" DESC ${sqlLimit(5)}`
| dbSelect | textDump({ caption: 'Last 5 Orders', headerStyle:'None' }) }}
{{ contentAllRootDirectories | map => `${it.Name}/`
| union(map(contentAllRootFiles, x => x.Name))
| textDump({ caption: 'Root Files and Folders' }) }}
{{ find ?? '*.html' | assignTo: find }}
{{ find | contentFilesFind | map => it.VirtualPath | take(15)
| textDump({ caption: `Files matching: ${find}` }) }}
You can use $NAME to move confidential information out of public scripts where it will be replaced with Environment
Variables. Then run the script as normal and optionally override the find pattern for files you want to search for:
$ web run script-aws.ss -find *.png
Where it displays a dashboard of activity from your AWS resources: containing all Tables with their Row Counts,
adhoc queries like your last 5 Orders, The Root files and Folders available in your S3 Bucket and any matching resources
from your find search pattern:
| Tables                   ||
|--------------------|------|
| Order Detail       | 2155 |
| Order              | 830  |
| Customer           | 91   |
| Product            | 77   |
| Territory          | 53   |
| Region             | 0    |
| Shipper            | 0    |
| Supplier           | 0    |
| Category           | 0    |
| Employee           | 0    |
| Employee Territory | 0    |


Last 5 Orders

| # | Id    | CustomerId | EmployeeId | OrderDate  |
|---|-------|------------|------------|------------|
| 1 | 11077 | RATTC      | 1          | 1998-05-06 |
| 2 | 11076 | BONAP      | 4          | 1998-05-06 |
| 3 | 11075 | RICSU      | 8          | 1998-05-06 |
| 4 | 11074 | SIMOB      | 7          | 1998-05-06 |
| 5 | 11073 | PERIC      | 2          | 1998-05-05 |


| Root Files and Folders |
|------------------------|
| api/                   |
| northwind/             |
| rockstars/             |
| index.html             |
| web.aws.settings       |
| web.postgres.settings  |
| web.sqlite.settings    |
| web.sqlserver.settings |


| Files matching: *.png                   |
|-----------------------------------------|
| assets/img/logo-32.png                  |
| rockstars/img/green_dust_scratch.png    |
| rockstars/img/rip_jobs.png              |
| rockstars/img/tileable_wood_texture.png |
Azure Dashboards
The nice thing about #Script late-binding and cloud agnostic providers is that with just different configuration we
can use the exact same script to query an Azure managed SQL Server Database and Azure Blob File Storage:
<!--
db sqlserver
db.connection $AZURE_SQL_CONNECTION_STRING
files azure
files.config {ConnectionString:$AZURE_BLOB_CONNECTION_STRING,ContainerName:rockwind}
-->
{{ dbTableNamesWithRowCounts |> textDump({ caption: 'Tables' }) }}
{{ `SELECT "Id", "CustomerId", "EmployeeId", "OrderDate" from "Order" ORDER BY "Id" DESC ${sqlLimit(5)}`
|> dbSelect |> textDump({ caption: 'Last 5 Orders', headerStyle:'None' }) }}
{{ contentAllRootDirectories | map => `${it.Name}/`
|> union(map(contentAllRootFiles, x => x.Name))
|> textDump({ caption: 'Root Files and Folders' }) }}
{{ find ?? '*.html' |> to => find }}
{{ find |> contentFilesFind |> map => it.VirtualPath | take(5)
|> textDump({ caption: `Files matching: ${find}` }) }}
Live #Script with web watch
What's even nicer than the fast feedback of running adhoc scripts? Is the instant feedback you get from being able to "watch" the same script!
To watch a script just replace run with watch:
$ web watch script-aws.ss -find *.png
The ability to run stand-alone adhoc scripts in an extensible dynamic scripting language feels like you're using a "developer enhanced" SQL Studio, where you can combine queries from multiple data sources, manipulate them with LINQ and quickly pipe results to dump utils to combine them in the same output for instant visualization.
#Script scripts can also be easily shared, maintained in gists and run on all different Win/OSX/Linux OS's that .NET Core runs on.
Live Transformations
Another area where "watched" scripts can shine is as a "companion scratch pad" assistant during development that you can quickly switch to
and instantly test out live code fragments, calculations and transformations, e.g. This ends up being a great way to test out markdown syntax
and Nuglify's advanced compression using our new minifyjs and minifycss Script Blocks:
<!--
debug false
-->
Markdown:
{{#markdown}}
## Title
> quote
Paragraph with [a link](https://example.org).
{{/markdown}}
JS:
{{#minifyjs}}
function add(left, right) {
return left + right;
}
add(1, 2);
{{/minifyjs}}
CSS:
{{#minifycss}}
body {
background-color: #ffffff;
}
{{/minifycss}}
Then run with:
$ web watch livepad.ss
Which starts a live watched session that re-renders itself on save, initially with:
Markdown:
<h2 id="title">Title</h2>
<blockquote>
<p>quote</p>
</blockquote>
<p>Paragraph with <a href="https://example.org">a link</a>.</p>

JS:
function add(n,t){return n+t}add(1,2)

CSS:
body{background-color:#fff}
Live Session

Usage in .NET
To evaluate #Script in .NET you'll first create the ScriptContext containing all functionality and features your Scripts have access to:
var context = new ScriptContext {
    Args = { ... },               // Global Arguments available to all Scripts, Pages, Partials, etc
    Plugins = { ... },            // Encapsulated Features, e.g. Markdown, Protected or ServiceStack Features
    ScriptMethods = { ... },      // Additional Methods
    ScriptBlocks = { ... },       // Additional Script Blocks
    FilterTransformers = { ... }, // Additional Stream Transformers
    ScanTypes = { ... },          // Auto register Methods, Blocks and Code Page Types
    ScanAssemblies = { ... },     // Auto register all Methods, Blocks and Code Page Types in Assembly
    PageFormats = { ... },        // Additional Text Document Formats
}.Init();
Then call EvaluateScript() to evaluate the script and capture it's rendered output in a string:
string output = context.EvaluateScript("The time is now: {{ now | dateFormat('HH:mm:ss') }}");
Evaluating Scripts with return values
#Script can render text as above or they can return values using the return method where it can be accessed using Evaluate():
var result = context.Evaluate("1 + 1 = {{ 1 + 1 | return }}."); //= 2
The generic version utilizes ServiceStack's powerful built-in conversion utils to convert the return value into your preferred type, e.g:
double result = context.Evaluate<double>("1 + 1 = {{ return(1 + 1) }}."); //= 2.0
string result = context.Evaluate<string>("1 + 1 = {{ return(1 + 1) }}."); //= "2"
But can also be used for more powerful conversions like converting an Object Dictionary into your preferred POCO:
var result = context.Evaluate<Customer>("{{`select * from customer where id=@id` | dbSingle({id}) | return }}",
new ObjectDictionary {
["id"] = 1
});
Optimized for .NET
To enable JS-like dynamism when binding to .NET methods, #Script automatically converts arguments for Types that don't match.
One of the effects of this is that you can define a single method with double params:
class MyMethods : ScriptMethods
{
    public double add(double a, double b) => a + b;
}
And be able to call it with any .NET numeric type, e.g:
var context = new ScriptContext { ScriptMethods = { new MyMethods() } }.Init();
context.EvaluateScript("{{ add(1,1) }}");
Where it will convert all int arguments into double before executing your method.
For improved performance the Default scripts arithmetic and Math methods avoid any numeric conversions themselves by using
DynamicNumberwhich delegates it to use the optimal concrete arithmetic methods.
Auto Async I/O and Stream Transformations
#Script makes it easy to write composable, intent-based self-documenting code, e.g it's clear that the expression below makes a database call
to fetch a URL from the qotd table, downloads the URL Contents, transforms its markdown contents and assigns the results to the quote argument:
{{ 'select url from qotd where id = @id'
| dbScalar({ id }) | urlContents | markdown | assignTo: quote }}
How it does it becomes an implementation detail, e.g. with this naive implementation below it will make a Sync DB call then
download the entire URL contents before passing it to the markdown() method to convert it to HTML:
class MyMethods : ScriptMethods
{
    public string urlContents(string url) => url.GetStringFromUrl();
    public string markdown(string markdown) => MarkdownConfig.Transform(markdown);
}

var context = new ScriptContext {
    InsertScriptMethods = {
        new MyMethods(),
        new DbScripts(),
    }
}.Init();
But without changing any of the script code we can use the more optimal built-in implementation:
var context = new ScriptContext {
    Plugins = { new MarkdownScriptPlugin() },
    ScriptMethods = { new DbScriptsAsync() },
}.Init();
Where dbScalar is now an async API that returns a Task<object> which is automatically awaited before the async urlContents method
is called which makes an Async I/O HTTP Call to asynchronously write the response to the OutputStream before it's passed to the markdown
Filter Transformer which reads markdown from an async Input Stream
and returns a Stream of HTML, the rendered text output is then captured and stored in the quote string argument.
So whilst both implementations end up with the same result, they achieve it differently where no additional boilerplate is required to enlist the more performant async streaming implementation below.
Breaking Changes
There were 2 major changes which can cause breaking changes in #Script:
ServiceStack.Script rebrand
Despite the re-branding to #Script we were able to retain most source-code compatibility where the previous "Old APIs" under ServiceStack.Templates
are now deprecated stubs
that inherit the new APIs under ServiceStack.Script. All deprecation messages contain the newer classes that you should move to.
Some classes couldn't be duplicated, like if you were using PageResult in your Services. They now require adding:
using ServiceStack.Script;
Which is effectively the only changes that ServiceStack Templates needed to run on the latest version.
ServiceStack Templates still uses and documents the old ServiceStack.Template APIs whilst the
new sharpscript.net is the new website for #Script which has been converted to use and document the new ServiceStack.Script APIs.
To verify minimal disruption to existing APIs, most were converted into unit tests in BAK_CompatTemplateTests.cs.
Migration to new Script APIs
Migrating to the new APIs is fairly straight forward:
- Change
using ServiceStack.Templates;tousing ServiceStack.Script; - Any classes with
TemplatePage*has been renamed toSharpPage* - Any other class with a
Template*prefix has been renamed toScript*
This change doesn't affect any of your existing #Script source code whose existing syntax and available filters/methods remains unchanged.
New Terminology
The primary rationale for the rebranding was so we're better able to label, describe and document all of #Script different features easier,
so when referring to Templates View Engine we're now calling #Script Pages which is a better corollary to "Razor Pages"
which it provides an alternative to.
Other re-branded features:
- API Pages are now called Sharp APIs
- Web Apps are now called Sharp Apps
- Template Filters are now called Script Methods
- Template Blocks are now called Script Blocks
The collection of methods you inject in your scripts like TemplateRedisFilters and TemplateDbFilters are now referred to as "Scripts"
where they've been renamed to RedisScripts and DbScripts.
Request Params are no longer imported by default
A major change that will require changing existing scripts is that Request Parameters are no longer imported by default and will need to explicitly accessed or imported.
Previously you could access the ?id=1 queryString param in your page with:
{{ id }}
This now needs to be explicitly accessed using the new query or shorter qs alias:
{{ qs.id }}
For HTTP Form Data Params use:
{{ form.id }}
importRequestParams
The least disruption to existing Pages would be to specify a white-list of arguments you want to import at the top of your page:
{{ 'id,name,age' | importRequestParams }}
Or if preferred, you can specify a collection of param names instead:
{{ ['id','name','age'] | importRequestParams }}
Allow all Request Params in a page
There's a local nuclear option that you can use to temporarily restore previous behavior in adhoc pages by calling importRequestParams
without any arguments:
{{ importRequestParams }}
Which you can add at the top of adhoc pages to import all QueryString and FormData params as page arguments.
Allow all Request Params Globally
There's also the unrecommended global nuclear option of reverting to the previous behaving and always importing all Request Params in all pages:
Plugins.Add(new SharpPagesFeature {
    ImportRequestParams = true
});
No impact on page based routing
This doesn't impact page based routing as the path info arguments are explicitly declared in the file or directory name, e.g:
/posts/_slug.htmlcalled from/posts/Astill populatesslugwith A/posts/_slug/edit.htmlcalled from/posts/A/editstill populatesslugwith A
Request Param Methods
To make it accessing the Request Params as easy as possible we've added a number of new methods to access it in a variety of different ways:
| Query Methods | Description | |
|---|---|---|
| formQuery(name) | -> string | FormData[name] ?? QueryString[name] |
| formQueryValues(name) | -> string[] | FormData[name] |
| httpParam(name) | -> string | Headers[X-name] ?? QueryString[name] ?? FormData[name] ?? Item[name] |
| queryString | -> string | $"?{QueryString.ToString()}" |
| queryDictionary | -> Dictionary | QueryString.ToObjectDictionary() |
| formDictionary | -> Dictionary | FormData.ToObjectDictionary() |
| formValue(name) | -> string | if (hasError) FormData[name] ?? QueryString[name] |
| formValues(name) | -> string[] | if (hasError) FormData[name] ?? QueryString[name] |
| formCheckValue(name) | -> bool | formValue(name) in [ "true", "t", "on", "1" ] |
Here's a flavor of how of using the different APIs above:
{{ `?${qs}` | addQueryString({ qs3:3}) }}
{{ queryString | addQueryString({ qs3:3}) }}
{{ qs | toObjectDictionary | addItem({ qs3:3 }) | toQueryString }}
{{ queryDictionary | addItem({ qs3:3 }) | toQueryString }}
{{ queryDictionary | addItem(pair('qs3',3)) | toQueryString }}
Which all return the same result:
    ?qs1=1&qs2=2&qs3=3
    ?qs1=1&qs2=2&qs3=3
    ?qs1=1&qs2=2&qs3=3
    ?qs1=1&qs2=2&qs3=3
    ?qs1=1&qs2=2&qs3=3
As they all return a string they can be further manipulated with the various URL handling methods:
{{ queryDictionary | addItem({ qs3:3 }) | toQueryString | addQueryString({ qs4:4 }) }}
{{ queryDictionary | addItem({ qs3:3 }) | toQueryString | setQueryString({ qs1:5 }) }}
{{ queryDictionary | addItem({ qs3:3 }) | toQueryString | addHashParams({ qs4:4 }) }}
{{ queryDictionary | toQueryString | addHashParams({qs4:4}) | setHashParams({qs4:5}) }}
Which returns:
    ?qs1=1&qs2=2&qs3=3&qs4=4
    ?qs1=5&qs2=2&qs3=3
    ?qs1=1&qs2=2&qs3=3#qs4=4
    ?qs1=1&qs2=2#qs4=5
World Validation
One message we continually try to re-iterate is the importance of Services (aka APIs) having a well-defined coarse-grained Services Contract which serves as the interface into your system by which all external consumers bind to - making it the most important contract in your system.
Benefits of Services
This is the development model ServiceStack has always promoted and what most of its features are centered around, where your Services Contract is defined by decoupled impl-free DTOs. If your Services retain this property then they'll be able to encapsulate any of its capabilities of infinite complexity and make it available remotely to all consumers with never any more complexity than the cost of a Service call:
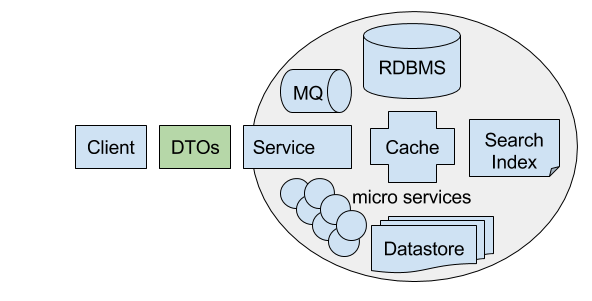
This is where the true value of Services are derived, they're the ultimate form of encapsulating complexity and offers the highest level of software reuse. ServiceStack amplifies your Services capabilities by making them available in multiple Hosting Options, serialization formats, MQ and SOAP endpoints to enable more seamless integrations in a variety of different scenarios including native end-to-end Typed APIs for the most popular Web, Mobile and Desktop Apps that reduce the effort and complexity required to call your Services in all consumers - multiplicatively increasing the value provided.
API First Development Model
The practice .NET has always dictated was that you need to maintain separate controllers and logic for your HTML UIs and a different controller for your HTTP APIs. Apart from forcing code duplication, doing this breaks your systems well-defined Service Contracts where any custom logic in your MVC Controllers and Razor pages becomes another entry point into your system where no longer are all your system capabilities available to all clients, some are only available when using a browser to navigate MVC pages.
Whereas in ServiceStack there are only Services, which are written with pure logic that's unopinionated as to what clients are calling it, with clean Request DTOs received as Inputs that typically return clean Response DTOs as outputs. HTML is then just another serialization format, providing a View of your Services or serving as a bundled UI that works on top of your existing Services, in all cases calling the same well tested and defined Services that all other clients use.
Validation from all the things
To better demonstrate the benefits of this approach and to show there's no loss of flexibility, we've created the new Validation .NET Core App which uses the same pure unopinionated ServiceStack Services to support 8 different HTML UI strategies including server HTML Rendered and Ajax Client forms, multiple View Engines, multiple layouts - all utilizing the same Services and declarative Fluent Validation.
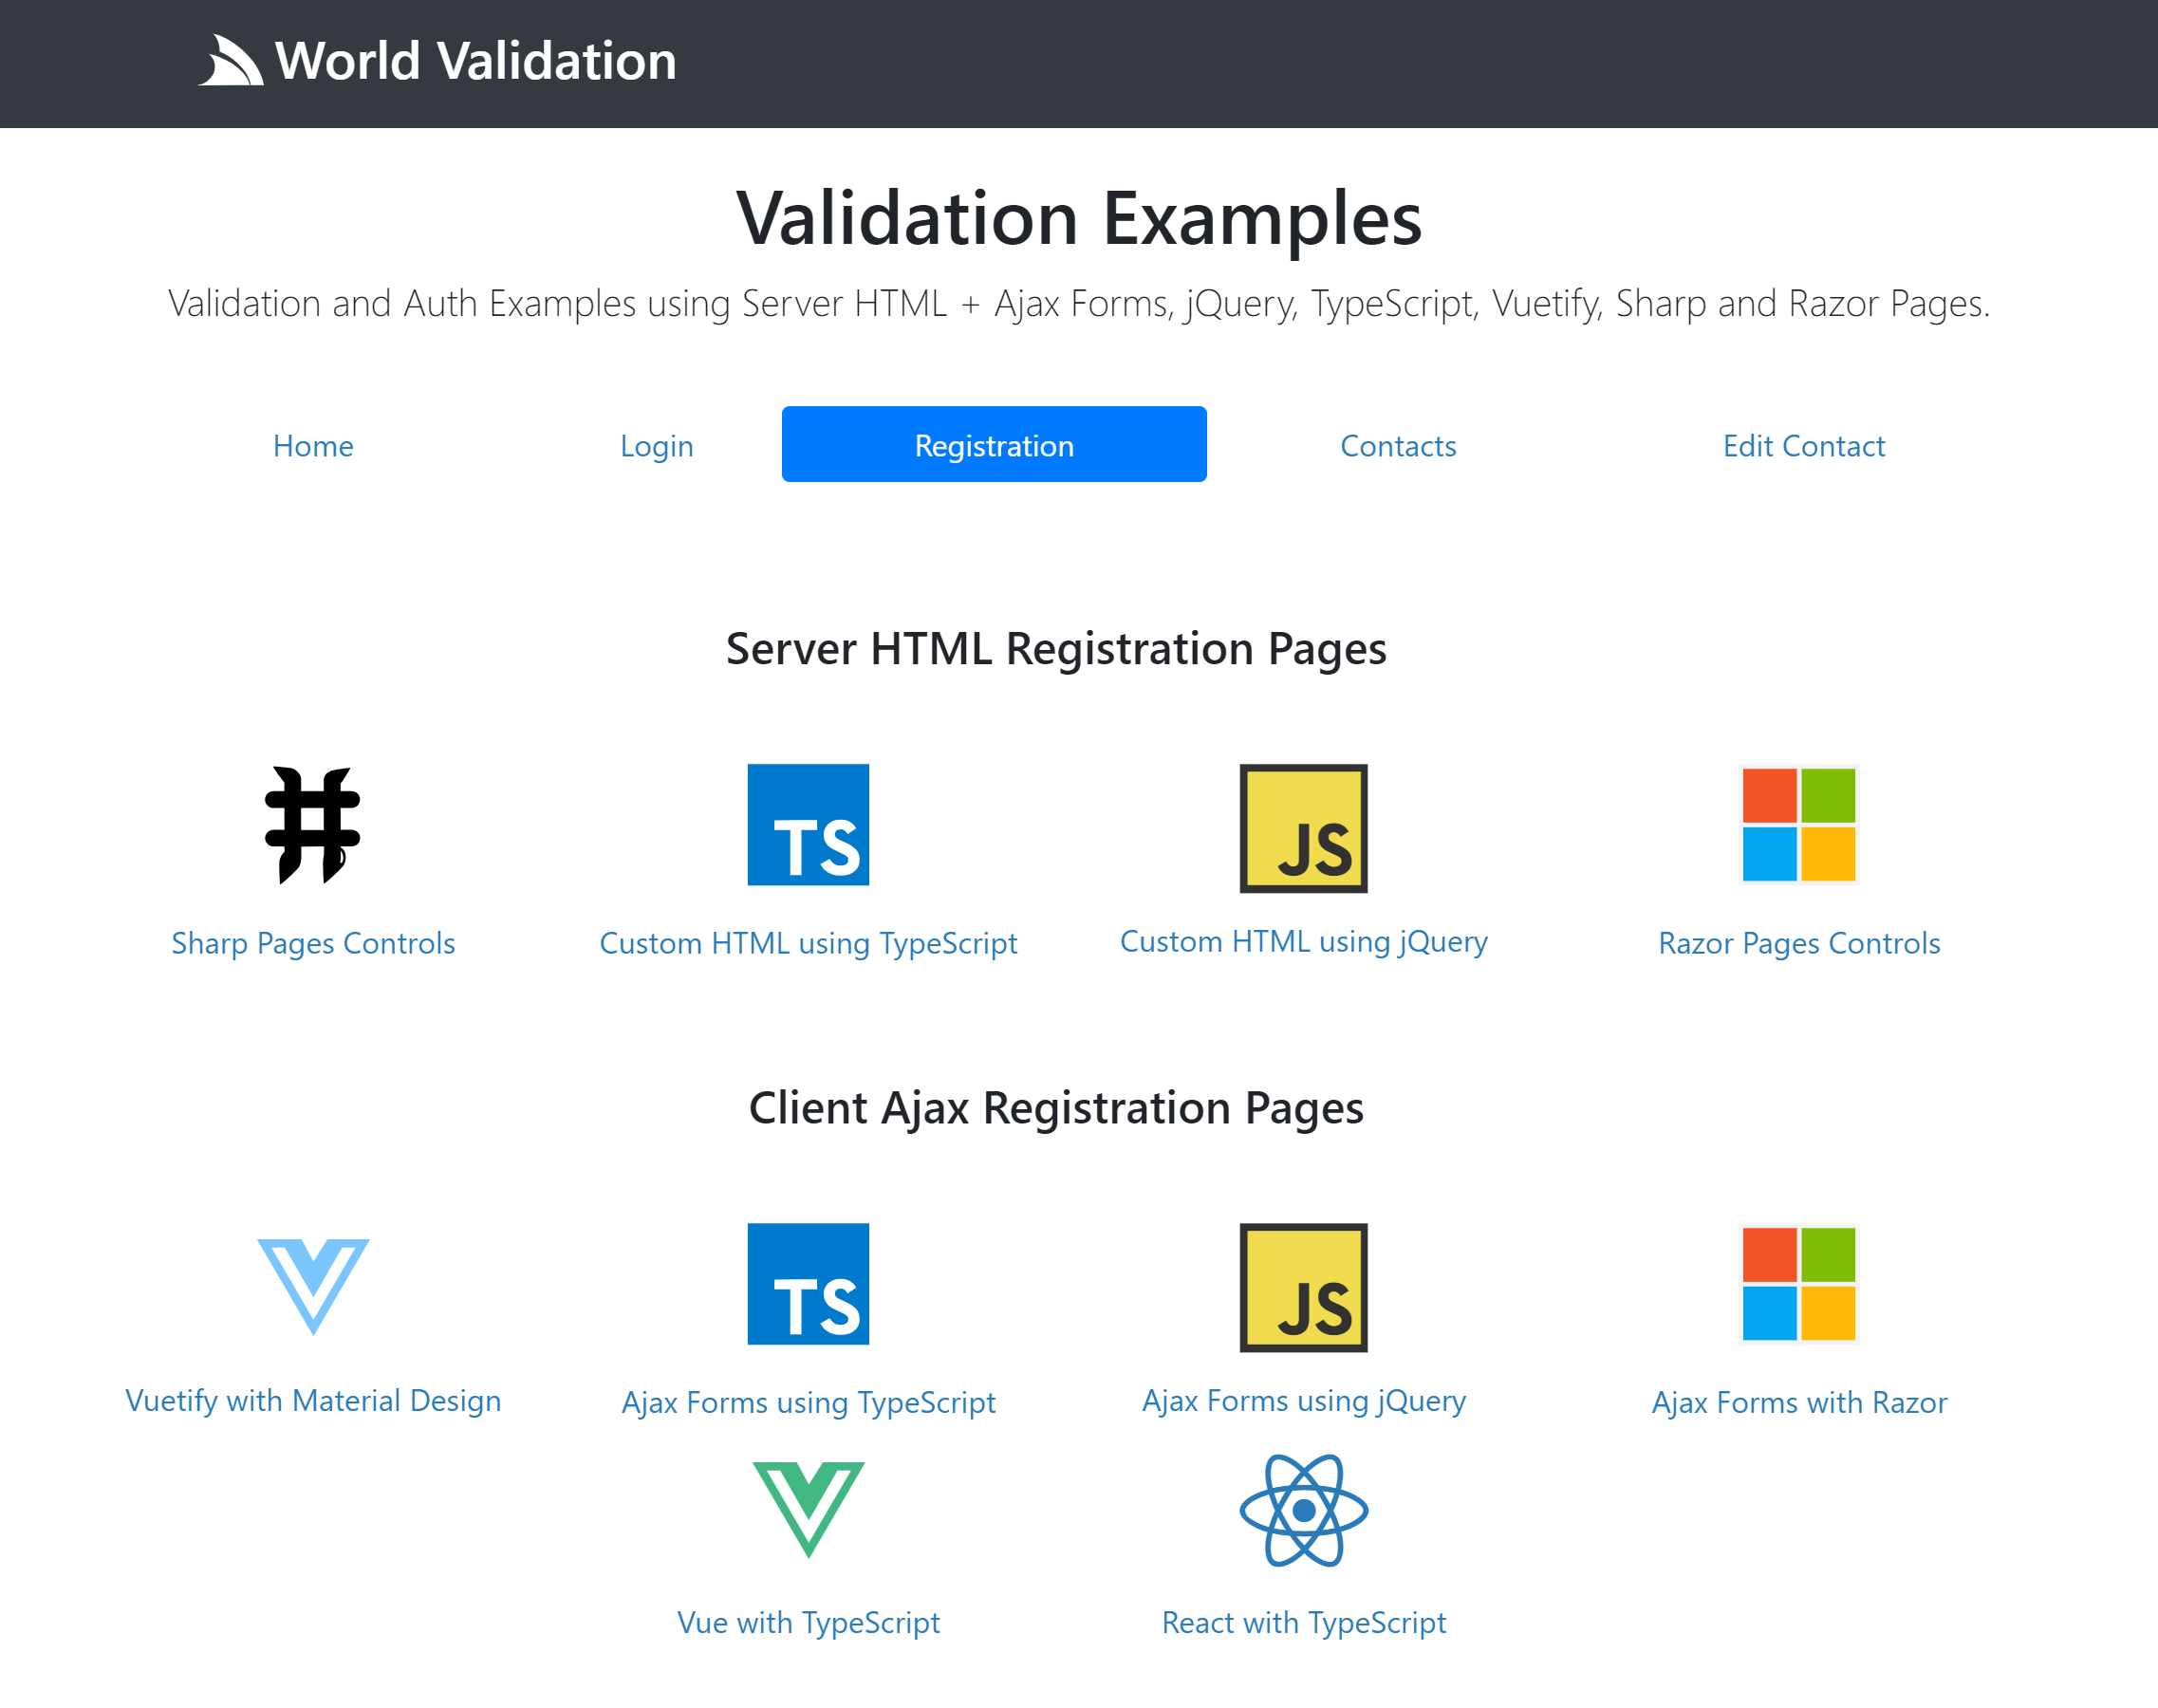
View Source on GitHub NetCoreApps/Validation
It should be noted that these are just examples of different HTML UIs, with no additional effort, all ServiceStack Services automatically provide native integrations into all popular Mobile and Desktop Apps with Add ServiceStack Reference.
About
The Validation App covers a typical App example you'd find in most Apps, including Login and Registration Forms to Sign In and Register new Users who are then able to access the same protected Services to maintain their own private contact lists. It's a compact example that tries to cover a lot of use-cases typical in a real-world App, including maintaining a separate Data and DTO Model and using C# idioms like Enum's for defining a finite list of options which are re-used to populate its HTML UI.
The UI for the same App is re-implemented in 8 popular Web Development approaches, each integrated with ServiceStack's validation.
As of this writing there 4 different server HTML generated strategies that use HTML Form Posts to call back-end Services:
Server Rendered HTML UIs
- /server - #Script Pages using Server Controls
- /server-ts - Server HTML enhanced with TypeScript
- /server-jquery - Server HTML enhanced with jQuery
- /server-razor - ServiceStack.Razor using Razor Helpers
Client HTML UIs
The Client Examples use Ajax Forms and the TypeScript JsonServiceClient to send TypeScript dtos.ts generated with TypeScript Add ServiceStack Reference:
- /vuetify - Vue App using Vuetify's Material Design Controls using ServiceClient Requests
- /client-ts - TypeScript UI using Ajax Forms and ServiceClient Requests
- /client-jquery - JavaScript UI using jQuery Ajax Requests
- /client-razor - Client jQuery Ajax Requests rendered by Razor pages
The source code for all different strategies are encapsulated within their folders above except for the Razor examples which need to maintain their shared resources in the /Views folder (representative of friction and restrictions when working with Razor).
Server Implementation
This is the shared backend Server implementation that all UIs are using:
All Auth Configuration is encapsulated within a "no-touch" IConfigureAppHost plugin that's run once on Startup:
// Run before AppHost.Configure()
public class ConfigureAuth : IConfigureAppHost
{
    public void Configure(IAppHost appHost)
    {
        var AppSettings = appHost.AppSettings;
        appHost.Plugins.Add(new AuthFeature(() => new CustomUserSession(),
            new IAuthProvider[] {
                new CredentialsAuthProvider(), //Enable UserName/Password Credentials Auth
            }));

        appHost.Plugins.Add(new RegistrationFeature()); //Enable /register Service

        //override the default registration validation with your own custom implementation
        appHost.RegisterAs<CustomRegistrationValidator, IValidator<Register>>();

        container.Register<ICacheClient>(new MemoryCacheClient()); //Store User Sessions in Memory

        appHost.Register<IAuthRepository>(new InMemoryAuthRepository()); //Store Authenticated Users in Memory

        CreateUser(appHost, "admin@email.com", "Admin User", "p@55wOrd", roles:new[]{ RoleNames.Admin });
    }

    // Add initial Users to the configured Auth Repository
    public void CreateUser(IAppHost appHost, string email, string name, string password, string[] roles)
    {
        var authRepo = appHost.TryResolve<IAuthRepository>();
        var newAdmin = new UserAuth { Email = email, DisplayName = name };
        var user = authRepo.CreateUserAuth(newAdmin, password);
        authRepo.AssignRoles(user, roles);
    }
}

// Type class to store additional metadata in Users Session
public class CustomUserSession : AuthUserSession {}

// Custom Validator to add custom validators to built-in /register Service requiring DisplayName and ConfirmPassword
public class CustomRegistrationValidator : RegistrationValidator
{
    public CustomRegistrationValidator()
    {
        RuleSet(ApplyTo.Post, () =>
        {
            RuleFor(x => x.DisplayName).NotEmpty();
            RuleFor(x => x.ConfirmPassword).NotEmpty();
        });
    }
}
All Services and Validators used in this App. Extension methods are used to DRY reusable code and a Custom
Auto Mapping handles conversion between the Contact Data Model and Contact`` DTO:
public class CreateContactValidator : AbstractValidator<CreateContact>
{
    public CreateContactValidator()
    {
        RuleFor(r => r.Title).NotEqual(Title.Unspecified).WithMessage("Please choose a title");
        RuleFor(r => r.Name).NotEmpty();
        RuleFor(r => r.Color).Must(x => x.IsValidColor()).WithMessage("Must be a valid color");
        RuleFor(r => r.FilmGenres).NotEmpty().WithMessage("Please select at least 1 genre");
        RuleFor(r => r.Age).GreaterThan(13).WithMessage("Contacts must be older than 13");
        RuleFor(x => x.Agree).Equal(true).WithMessage("You must agree before submitting");
    }
}

[Authenticate] // Limit to Authenticated Users
[ErrorView(nameof(CreateContact.ErrorView))] // Display ErrorView for HTML requests resulting in an Exception
[DefaultView("/server/contacts")] // Render custom HTML View for HTML Requests
public class ContactServices : Service
{
    private static int Counter = 0;
    internal static readonly ConcurrentDictionary<int, Data.Contact> Contacts = new ConcurrentDictionary<int, Data.Contact>();

    public object Any(GetContacts request)
    {
        var userId = this.GetUserId();
        return new GetContactsResponse
        {
            Results = Contacts.Values
                .Where(x => x.UserAuthId == userId)
                .OrderByDescending(x => x.Id)
                .Map(x => x.ConvertTo<Contact>())
        };
    }

    public object Any(GetContact request) =>
        Contacts.TryGetValue(request.Id, out var contact) && contact.UserAuthId == this.GetUserId()
            ? (object)new GetContactResponse { Result = contact.ConvertTo<Contact>() }
            : HttpError.NotFound($"Contact was not found");

    public object Any(CreateContact request)
    {
        var newContact = request.ConvertTo<Data.Contact>();
        newContact.Id = Interlocked.Increment(ref Counter);
        newContact.UserAuthId = this.GetUserId();
        newContact.CreatedDate = newContact.ModifiedDate = DateTime.UtcNow;

        var contacts = Contacts.Values.ToList();
        var alreadyExists = contacts.Any(x => x.UserAuthId == newContact.UserAuthId && x.Name == request.Name);
        if (alreadyExists)
            throw new ArgumentException($"You already have a contact named '{request.Name}'", nameof(request.Name));

        Contacts[newContact.Id] = newContact;
        return new CreateContactResponse { Result = newContact.ConvertTo<Contact>() };
    }

    public object AnyHtml(CreateContact request) // Called for CreateContact API HTML Requests on any HTTP Method
    {
        Any(request);
        return HttpResult.Redirect(request.Continue ?? Request.GetView());
    }

    public void Any(DeleteContact request)
    {
        if (Contacts.TryGetValue(request.Id, out var contact) && contact.UserAuthId == this.GetUserId())
            Contacts.TryRemove(request.Id, out _);
    }

    public object PostHtml(DeleteContact request) // Only called by DeleteContact HTML POST requests
    {
        Any(request);
        return HttpResult.Redirect(request.Continue ?? Request.GetView()); //added by [DefaultView]
    }
}

public class UpdateContactValidator : AbstractValidator<UpdateContact>
{
    public UpdateContactValidator()
    {
        RuleFor(r => r.Id).GreaterThan(0);
        RuleFor(r => r.Title).NotEqual(Title.Unspecified).WithMessage("Please choose a title");
        RuleFor(r => r.Name).NotEmpty();
        RuleFor(r => r.Color).Must(x => x.IsValidColor()).WithMessage("Must be a valid color");
        RuleFor(r => r.FilmGenres).NotEmpty().WithMessage("Please select at least 1 genre");
        RuleFor(r => r.Age).GreaterThan(13).WithMessage("Contacts must be older than 13");
    }
}

[ErrorView(nameof(UpdateContact.ErrorView))] // Display ErrorView for HTML requests resulting in an Exception
public class UpdateContactServices : Service
{
    public object Any(UpdateContact request)
    {
        if (!ContactServices.Contacts.TryGetValue(request.Id, out var contact) || contact.UserAuthId != this.GetUserId())
            throw HttpError.NotFound("Contact was not found");

        contact.PopulateWith(request);
        contact.ModifiedDate = DateTime.UtcNow;

        return request.Continue != null
            ? (object) HttpResult.Redirect(request.Continue)
            : new UpdateContactResponse();
    }
}

public static class ContactServiceExtensions // DRY reusable logic used in Services and Validators
{
    public static int GetUserId(this Service service) => int.Parse(service.GetSession().UserAuthId);

    public static bool IsValidColor(this string color) => !string.IsNullOrEmpty(color) &&
        (color.FirstCharEquals('#')
            ? int.TryParse(color.Substring(1), NumberStyles.HexNumber, CultureInfo.InvariantCulture, out _)
            : Color.FromName(color).IsKnownColor);
}

// Register Custom Auto Mapping for converting Contact Data Model to Contact DTO
public class ContactsHostConfig : IConfigureAppHost
{
    public void Configure(IAppHost appHost) =>
        AutoMapping.RegisterConverter((Data.Contact from) => from.ConvertTo<Contact>(skipConverters:true));
}
The dynamic App data used within ServiceStack Sharp Pages and Razor pages are maintained within Custom ContactScripts and RazorHelpers:
// Custom filters for App data sources and re-usable UI snippets in ServiceStack Sharp Pages

using Microsoft.AspNetCore.Mvc.Rendering;
using ServiceModel.Types;
using ServiceStack.Script;

public class ContactScripts : ScriptMethods
{
    internal readonly List<KeyValuePair<string, string>> MenuItems = new()
    {
        KeyValuePair.Create("/", "Home"),
        KeyValuePair.Create("/login-links", "Login Links"),
        KeyValuePair.Create("/register-links", "Register Links"),
        KeyValuePair.Create("/contact-links", "Contacts Links"),
        KeyValuePair.Create("/contact-edit-links", "Edit Contact Links"),
    };

    public List<KeyValuePair<string, string>> menuItems() => MenuItems;

    static Dictionary<string, string> Colors = new()
    {
        {"#ffa4a2", "Red"},
        {"#b2fab4", "Green"},
        {"#9be7ff", "Blue"}
    };

    public Dictionary<string, string> contactColors() => Colors;

    private static List<KeyValuePair<string, string>> Titles => EnumUtils.GetValues<Title>()
        .Where(x => x != Title.Unspecified)
        .ToKeyValuePairs();

    public List<KeyValuePair<string, string>> contactTitles() => Titles;

    private static List<string> FilmGenres => EnumUtils.GetValues<FilmGenres>().Map(x => x.ToDescription());
    public List<string> contactGenres() => FilmGenres;
}

// Razor Helpers for App data sources and re-usable UI snippets in Razor pages
public static class RazorHelpers
{
    internal static readonly ContactScripts Instance = new ContactScripts();

    public static Dictionary<string, string> ContactColors(this IHtmlHelper html) => Instance.contactColors();
    public static List<KeyValuePair<string, string>> ContactTitles(this IHtmlHelper html) => Instance.contactTitles();
    public static List<string> ContactGenres(this IHtmlHelper html) => Instance.contactGenres();
    public static List<KeyValuePair<string, string>> MenuItems(this IHtmlHelper html) => Instance.MenuItems;
}
Typed Request/Response Service Contracts including Data and DTO models that utilizes Enum's:
namespace Data // DB Models
{
    using ServiceModel.Types;

    public class Contact // Data Model
    {
        public int Id { get; set; }
        public int UserAuthId { get; set; }
        public Title Title { get; set; }
        public string Name { get; set; }
        public string Color { get; set; }
        public FilmGenres[] FilmGenres { get; set; }
        public int Age { get; set; }
        public DateTime CreatedDate { get; set; }
        public DateTime ModifiedDate { get; set; }
    }
}

namespace ServiceModel // Request/Response DTOs
{
    using Types;

    [Route("/contacts", "GET")]
    public class GetContacts : IReturn<GetContactsResponse> {}
    public class GetContactsResponse
    {
        public List<Contact> Results { get; set; }
        public ResponseStatus ResponseStatus { get; set; }
    }

    [Route("/contacts/{Id}", "GET")]
    public class GetContact : IReturn<GetContactResponse >
    {
        public int Id { get; set; }
    }
    public class GetContactResponse
    {
        public Contact Result { get; set; }
        public ResponseStatus ResponseStatus { get; set; }
    }

    [Route("/contacts", "POST")]
    public class CreateContact : IReturn<CreateContactResponse>
    {
        public Title Title { get; set; }
        public string Name { get; set; }
        public string Color { get; set; }
        public FilmGenres[] FilmGenres { get; set; }
        public int Age { get; set; }
        public bool Agree { get; set; }

        public string Continue { get; set; }
        public string ErrorView { get; set; }
    }
    public class CreateContactResponse
    {
        public Contact Result { get; set; }
        public ResponseStatus ResponseStatus { get; set; }
    }

    [Route("/contacts/{Id}", "POST PUT")]
    public class UpdateContact : IReturn<UpdateContactResponse>
    {
        public int Id { get; set; }
        public Title Title { get; set; }
        public string Name { get; set; }
        public string Color { get; set; }
        public FilmGenres[] FilmGenres { get; set; }
        public int Age { get; set; }

        public string Continue { get; set; }
        public string ErrorView { get; set; }
    }
    public class UpdateContactResponse
    {
        public ResponseStatus ResponseStatus { get; set; }
    }

    [Route("/contacts/{Id}", "DELETE")]
    [Route("/contacts/{Id}/delete", "POST")] // more accessible from HTML
    public class DeleteContact : IReturnVoid
    {
        public int Id { get; set; }
        public string Continue { get; set; }
    }

    namespace Types // DTO Types
    {
        public class Contact
        {
            public int Id { get; set; }
            public int UserAuthId { get; set; }
            public Title Title { get; set; }
            public string Name { get; set; }
            public string Color { get; set; }
            public FilmGenres[] FilmGenres { get; set; }
            public int Age { get; set; }
        }

        public enum Title
        {
            Unspecified=0,
            [Description("Mr.")] Mr,
            [Description("Mrs.")] Mrs,
            [Description("Miss.")] Miss
        }

        public enum FilmGenres
        {
            Action,
            Adventure,
            Comedy,
            Drama,
        }
    }
}
Each UI implements 4 different screens which are linked from:
- Login Page - Sign In to ServiceStack's built-in Username/Password Credentials Auth Provider
- Registration Page - Calling ServiceStack's built-in
/registerService to register a new User - Contacts Page - Contacts Form to Add a new Contact and view list of existing contacts
- Edit Contact Page - Edit Contact Form
Shared Error Handling Concepts
Despite their respective differences they share the same concepts where all validation errors are populated from the Service's ResponseStatus
Error Response. The UI implementations takes care of binding all matching field errors next to their respective controls whilst the
validationSummary or errorResponseExcept methods takes a list of field names that they should not display as they'll already be
displayed next to their targeted control.
We'll cover just the Login and Contacts Pages since they're sufficiently different, to see what this looks like in practice:
Login Page
The Login Page contains a standard Bootstrap Username/Password form with labels, placeholders and help text, which initially looks like:

What it looks like after submitting an empty form with Server Exception Errors rendered against their respective fields:

Server UIs
All Server Examples submits a HTML Form Post and renders full page responses:
About Server Implementations
Unfortunately Validation in Bootstrap doesn't lend itself to easy server rendering as it requires co-ordination with label, input and error feedback
elements so #Script Pages wraps this in a formInput control from BootstrapScripts to render both Label and Input elements together.
For those preferring Razor, these same controls are available as @Html Helpers as seen in Server Razor which ends up having identical
behavior and markup, albeit rendered using a different View Engine.
Server TypeScript shows a more fine-grained version where we show how to bind validation errors to your own custom HTML markup.
This would normally end up being a lot more tedious to do so we've extended it with our own declarative data-invalid attribute to hold the
fields error message which drastically reduces the manual binding effort required. Calling the bootstrap() method will scan the form for populated
data-invalid attributes where it's used to render the appropriate error message adjacent to the control and toggle the appropriate error classes.
All TypeScript examples only depends on the dependency-free @servicestack/client which is available as both an npm package and as a stand-alone servicestack-client.umd.js script include.
The Server jQuery version uses the exact same markup as Server TypeScript but requires a dependency on jQuery and uses the
$(document).bootstrap() jQuery plugin from ServiceStack's built-in ss-utils.js.
Continue and ErrorView
In order to enable full-page reloads in ServiceStack's built-in Services like its /auth and /register Services we need to submit 2 additional
hidden input fields: errorView to tell it which page it should render on failed requests and continue to tell it where to redirect to after
successful requests.
Client UIs
In contrast to full page reloads all Client UIs submit Ajax forms and bind their JSON Error Response to the UI for a more fluid and flicker-free UX:
About Client Implementations
Vuetify is a Vue App which uses the popular Vuetify Material Design UI which is in contrast to all other UIs which use Bootstrap.
It also uses the JsonServiceClient to send a JSON Authenticate Request whereas all other UIs sends HTML Form x-www-form-urlencoded Key/Value Pairs.
Client TypeScript only needs to render the initial Bootstrap Form Markup as bootstrapForm() takes care of submitting the Ajax Request and binding
any validation errors to the form. The data-validation-summary placeholder is used to render any other error summary messages except for the userName
or password fields.
Client jQuery uses the exact same markup but uses $('form').bootstrapForm() jQuery plugin to handle the form Ajax request and any error binding.
Client Razor adopts the same jQuery implementation but is rendered using MVC Razor instead of #Script Pages.
Contacts Page
The Contacts Page is representative of a more complex page that utilizes a variety of different form controls where the same page is also responsible for rendering the list of existing contacts:
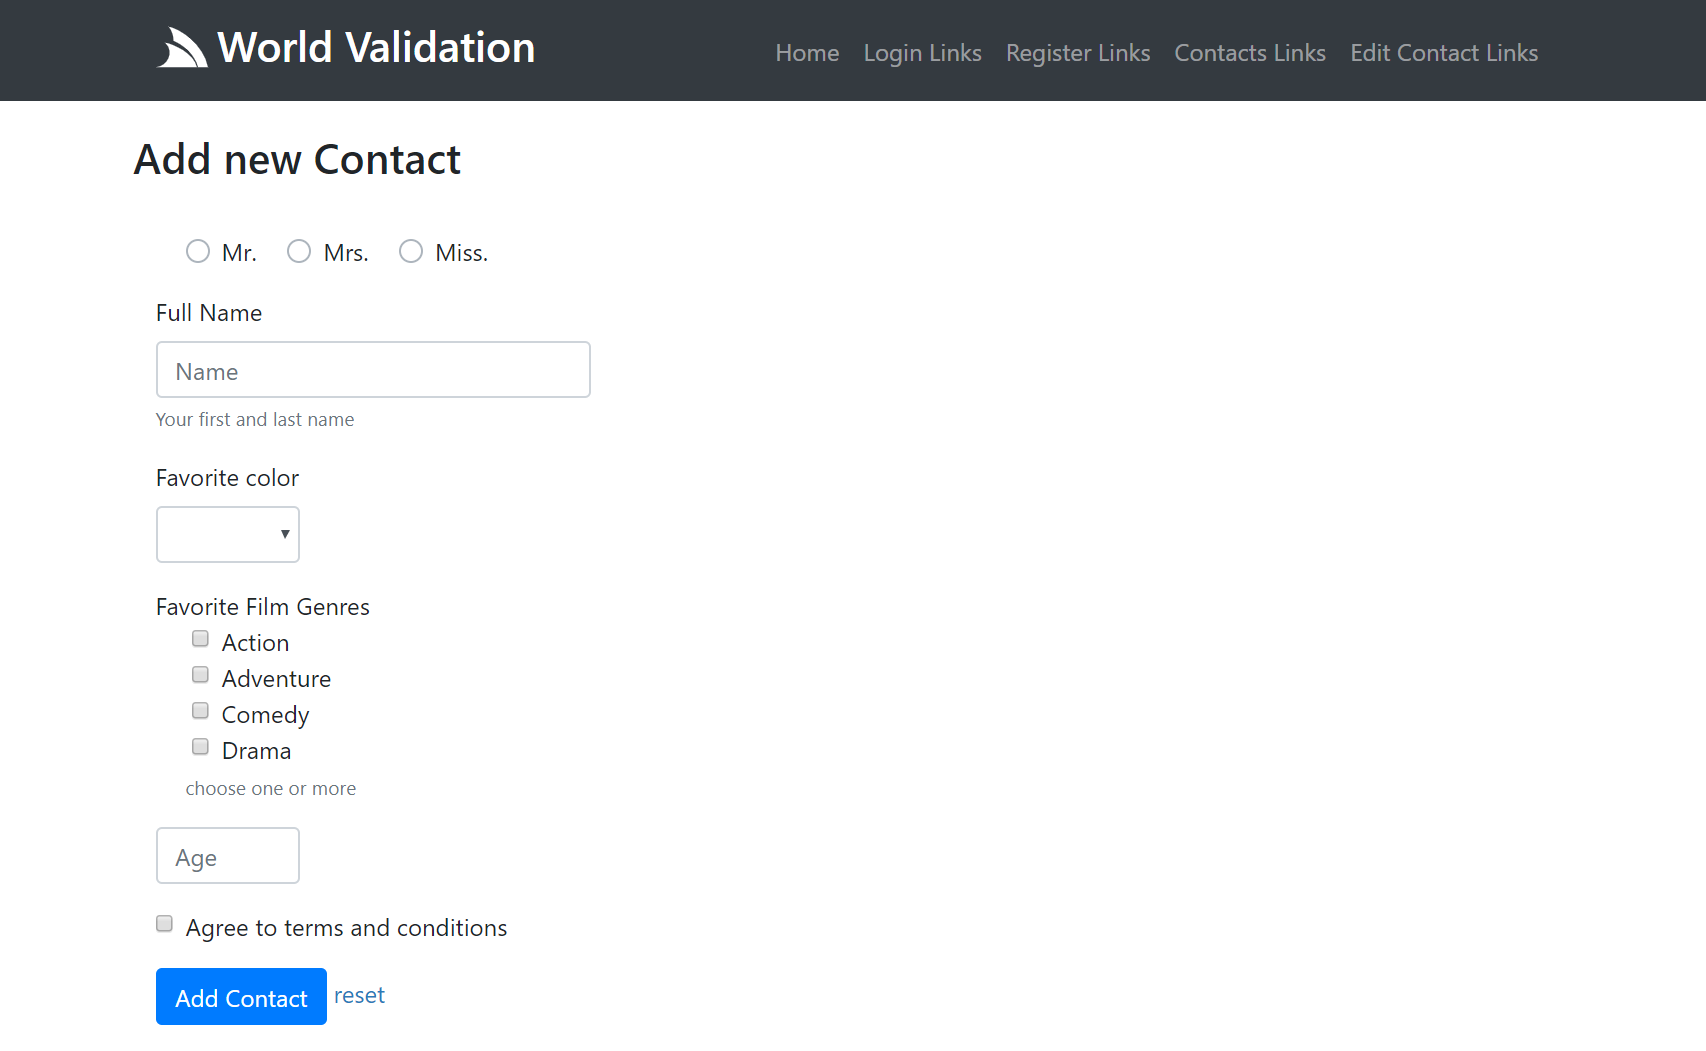
Here's an example of what a partially submitted invalid form looks like:
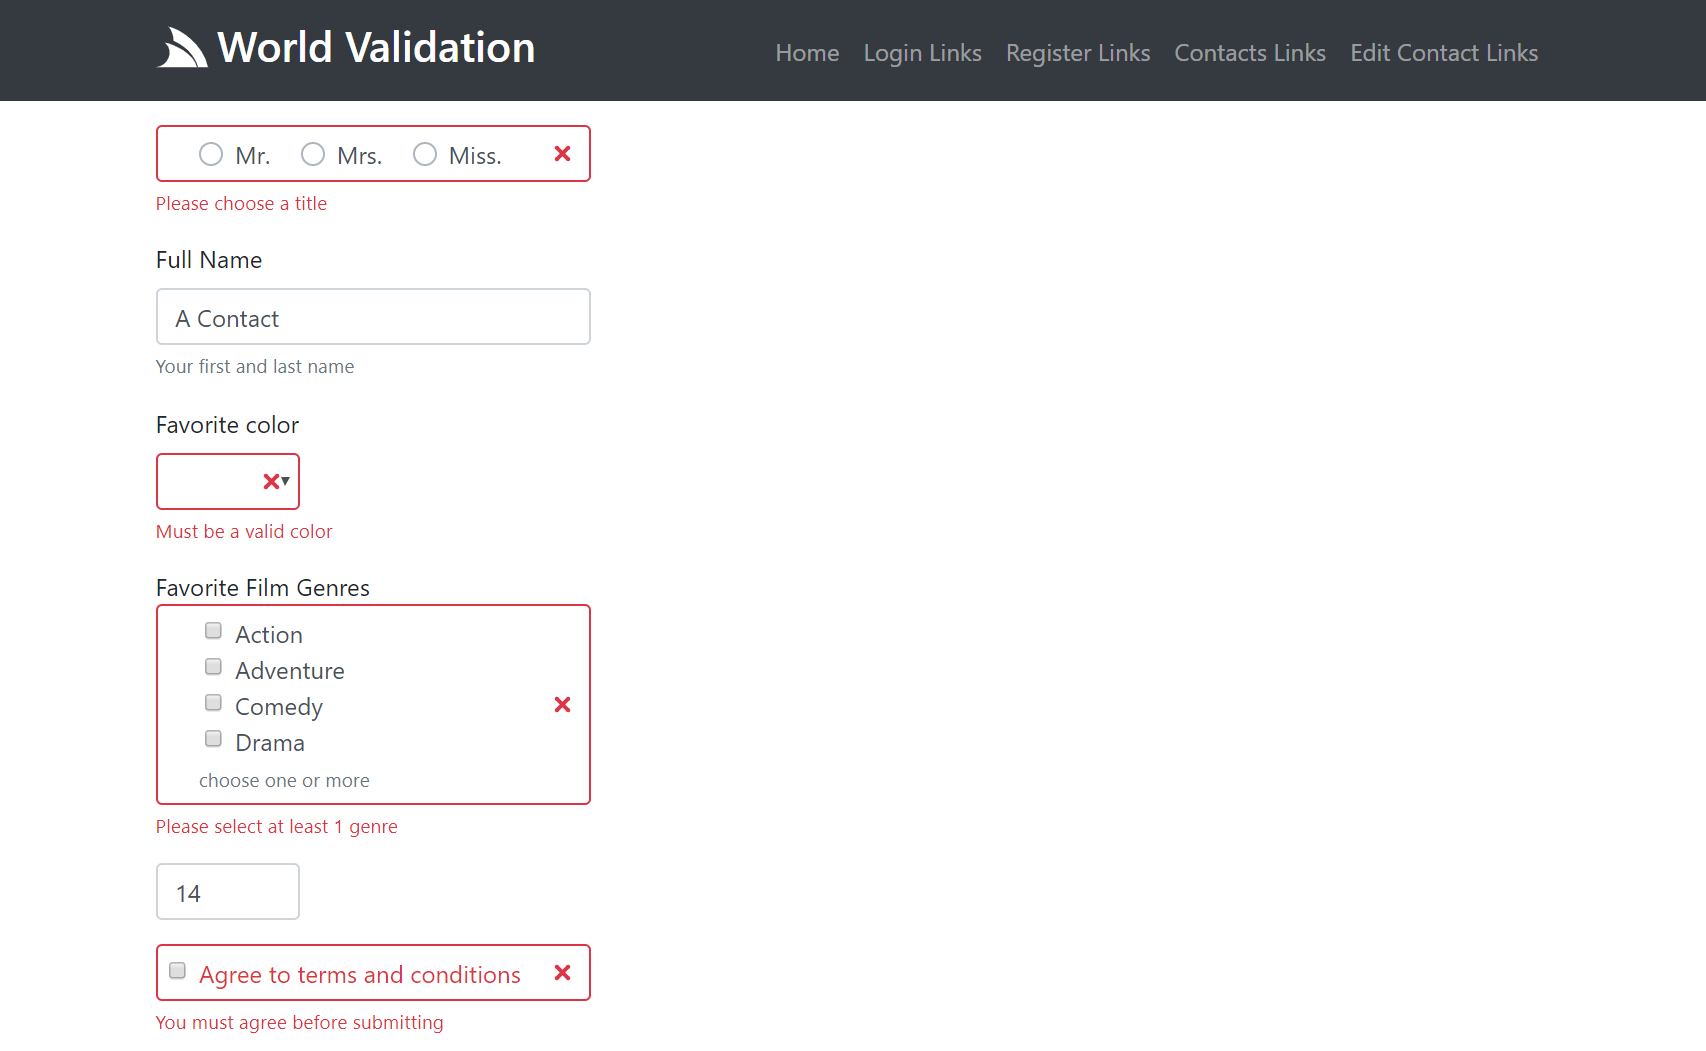
Server UIs
About Server Implementations
Both the Contacts UIs and Contacts Services are protected resources which uses a partial to protect its pages.
Normally redirectIfNotAuthenticated wouldn't require a URL, but one is needed here so it knows the right login page it should redirect to.
Script Pages
In #Script Pages our wrist-friendly server controls are back as we start to see more of its features. The arguments of the left of the formInput
are for HTML attributes you want rendered on the input control whilst the arguments on the right (or 2nd argument) are to enlist the controls
other "high-level features" like values which is used to populate a list of radio and checkboxes or formSelect options. The inline
argument tells the control to render multiple controls in-line whilst you can use help to render some help text as an aside.
We also see the introduction of the sendToGateway method used to send the GetContacts Request DTO to call its Service using the
Service Gateway, the Response of which is used to render the list of contacts on the Server.
Another difference is that there are multiple <form> elements on this page to handle deleting a contact by submitting an empty form post to
/contacts/{{Id}}/delete.
#Script Pages doesn't need to specify its own ErrorView or Continue Request params as its the default view used for ContactServices:
[DefaultView("/server/contacts")] // Render custom HTML View for HTML Requests
public class ContactServices : Service { ... }
This is typically all that's needed, as most real-world Apps would rarely have more than 1 HTML View per Service.
Server TypeScript
With Server TypeScript you're starting to see the additional effort required when you need to use your own custom markup to render form controls.
It differs with #Script Pages in that instead of rendering the list of contacts on the server, it renders the GetContacts Response DTO
as JSON which is interpreted in the browser as a native JS Object literal which the render() method uses to render the list of contacts in the browser.
Deleting a contact is also handled differently where it uses the JsonServiceClient to send the DeleteContact Request DTO from the generated dtos.ts.
After the request completes it uses GetContacts to fetch an updated list of Contacts which it re-renders.
Server jQuery
Server jQuery adopts the same approach as Server TypeScript but renders it using jQuery and uses custom routes constructed on the client
with jQuery's Ajax APIs to call the ContactServices.
Server Razor
Server Razor is very similar to #Script Pages but implemented using Razor. In many cases the built-in script methods in #Script Pages have
Razor equivalents, either in the base ViewPage<T> class like RedirectIfNotAuthenticated() or as a @Html helper.
Client UIs
About Client Implementations
Vuetify ends up being larger than other implementations as it also handles Edit Contacts functionality which is a separate page in other UIs.
It also includes additional functionality like client-side validation enabled in each control using its :rules attribute. One thing
that remains consistent is the way to call ServiceStack Services and handle errors by assigning it to this.responseStatus which the reactive
errorResponse method uses to bind to each control.
The remaining client implementations show that whilst the server controls require the least code, if you need custom markup it's much easier
to render the initial markup once, then use bootstrapForm() to bind any validation errors and handle the ajax form submissions. It's especially
valuable when you need to update a form where the same markup can be populated by just assigning the model property as done in the
Edit Contact Pages:
const form = document.querySelector("form")!;
bootstrapForm(form,{
    model: CONTACT,
    success: function () {
        location.href = '/client-ts/contacts/';
    }
});
The amount of code can be even further reduced when using an SPA framework that allows easy componentization as seen in the Vue Form Validation and React Form Validation examples.
"No touch" Host Configuration
There's also a couple of new ServiceStack features that World Validation introduces, the first is that all Auth Configuration logic is encapsulated in a single Configure.Auth.cs:
public class ConfigureAuth : IConfigureAppHost
{
    public void Configure(IAppHost appHost)
    {
        // Auth configuration logic
    }
}
You can use this to refactor out different cohesive parts your Host configuration over multiple files and decouple them from your concrete AppHost which
ServiceStack automatically runs all IPreConfigureAppHost, IConfigureAppHost and IPostConfigureAppHost interfaces on Startup it
can find in either your AppHost Assembly or Service Assemblies specified in your AppHost constructor.
This opens up a number of re-use benefits where you'll be able to use the same AppHost configuration if your Services are being hosted
in different Hosting Options, it makes it easy to maintain a standardized configuration
across many of your ServiceStack projects, e.g. you can easily replace Configure.Auth.cs in all your projects to ensure they're running
the same Auth Configuration without impacting any of the projects other bespoke host configuration.
It also allows you to maintain any necessary Startup configuration that your Services implementation needs alongside the Services themselves.
E.g. This is used to register the Data.Contact to DTO Contact Auto Mapping:
// Register Custom Auto Mapping for converting Contact Data Model to Contact DTO
public class ContactsHostConfig : IConfigureAppHost
{
    public void Configure(IAppHost appHost) =>
        AutoMapping.RegisterConverter((Data.Contact from) => from.ConvertTo<Contact>(skipConverters:true));
}
There are 3 different Startup interfaces you can use depending on when you want your configuration to run.
Use IPreConfigureAppHost for Startup logic you want to run before the AppHost starts initialization, this is
run before AppHost.Config is initialized or Services are registered so has limited configurability but is useful
if you want to register additional Service Assemblies with ServiceStack, e.g:
public class ConfigureContactsServices : IPreConfigureAppHost
{
    public void Configure(IAppHost host) => host.ServiceAssemblies.AddIfNotExists(typeof(MyServices).Assembly);
}
Use IConfigureAppHost for Startup logic you want to run immediately before AppHost.Configure():
public interface IConfigureAppHost
{
    void Configure(IAppHost appHost);
}
Use IPostConfigureAppHost for Startup logic you want to run immediately after AppHost.Configure():
public interface IPostConfigureAppHost
{
    void Configure(IAppHost appHost);
}
Auto Mapping
We've added the number 1 feature request that prevented many Customers from using ServiceStack's built-in Auto Mapping instead of the more feature-complete AutoMapper.
Our stance was that you should use a C# Extension Method for any additional Custom Conversions that didn't follow the intuitive mapping convention, e.g:
public static class ConvertExtensions
{
    public static MyDto ToDto(this MyViewModel from)
    {
        var to = from.ConvertTo<MyDto>();
        to.Items = from.Items.ConvertAll(x => x.ToDto());
        to.CalculatedProperty = Calculate(from.Seed);
        return to;
    }
}
Which would be explicitly called when you want to convert between a Data Model and View Model:
var dto = viewModel.ToDto();
Using C# methods ensures conversion is explicit, discoverable, debuggable, fast and flexible with access to the full C# language at your disposal whose conversion logic can be further DRY'ed behind reusable extension methods.
The problem with his is having to call this extension method manually everywhere you want this conversion to occur.
Register Converters
No More! You can now register a custom Converter mapping using the new AutoMapping.RegisterConverter() APIs, e.g:
// Data.User -> DTO User
AutoMapping.RegisterConverter((Data.User from) => {
    var to = from.ConvertTo<User>(skipConverters:true); // avoid infinite recursion
    to.FirstName = from.GivenName;
    to.LastName = from.Surname;
    return to;
});

// Car -> String
AutoMapping.RegisterConverter((Car from) => $"{from.Model} ({from.Year})");

// WrappedDate -> DateTime
AutoMapping.RegisterConverter((WrappedDate from) => from.ToDateTime());
// DateTime    -> WrappedDate
AutoMapping.RegisterConverter((DateTime from) => new WrappedDate(from));
Where it will be called whenever a conversion between Data.User -> User or Car -> String is needed, inc. nested types and collections.
Converters can also be used when you want to "take over" and override the default conversion behavior.
Ignore Mapping
Use the new AutoMapping.IgnoreMapping() API to specify mappings you want to skip entirely, e.g:
// Ignore Data.User -> User
AutoMapping.IgnoreMapping<Data.User, User>();
// Ignore List<Data.User> -> List<User>
AutoMapping.IgnoreMapping<List<Data.User>, List<User>>();
Support for Implicit / Explicit Type Casts
This release also extends the built-in Auto Mapping to use any implicit or explicit Value Type Casts when they exists, e.g:
struct A
{
    public int Id { get; }
    public A(int id) => Id = id;
    public static implicit operator B(A from) => new B(from.Id);
}

struct B
{
    public int Id { get; }
    public B(int id) => Id = id;
    public static implicit operator A(B from) => new A(from.Id);
}

var b = new A(1).ConvertTo<B>();
Powerful and Capable
Due to its heavy reliance in #Script and other parts in ServiceStack, the built-in Auto Mapping is a sophisticated implementation
that covers a large number of use-cases and corner cases when they can be intuitively mapped.
To see a glimpse of its available capabilities check out some of the examples in the docs where it's able to call any method or construct any type dynamically using different Types.
Or how it's able to convert any Reference Type into and out of an Object Dictionary, providing a simple approach to dynamically manipulating Types.
Page Based Routing in Razor!
Another feature introduced in the Validation App is the new support for Page Based Routing in ASP.NET Core Razor
which lets you use a _ prefix to declare a variable placeholder for dynamic routes defined solely by directory and file names.
With this feature we can use a _id directory name to declare an id variable place holder:
This will let you navigate to the edit.cshtml page directly to edit a contact using the ideal "pretty url" we want:
Placeholders can be on both directory or file names, e.g:
/contacts/edit/_id.cshtml-> /contacts/edit/1
Inside your Razor page you can fetch any populated placeholders from the ViewBag:
var id = int.Parse(ViewBag.id);
var contact = Html.Exec(() => Gateway.Send(new GetContact { Id = id }).Result, out var error);
Which /_id/edit.cshtml
uses to call the GetContact Service using the Service Gateway.
Html.Exec()is a UX-friendly alternative to usingtry/catchboilerplate in Razor
Limitation
One drawback of page based routing is that MVC is unable to resolve Page Based Routes when pre-compiled and will need to disabled with:
<MvcRazorCompileOnPublish>false</MvcRazorCompileOnPublish>
Consider "pretty-urls" for public pages
A constant eyesore that hurts my aesthetic eye when surfing the web is how you can immediately tell that a Website is written in ASP.NET
by its /{Controller}/{Action} routing convention or .aspx suffix. This forces URL abnormalities where instead of choosing
the ideal identifier for your public resource, the path tends to adopt internal method and class names that typically makes more sense
to its developers than to external users. These dictated conventions also results in the ?queryString becoming a data bag of params
that should otherwise be hidden or included as part of its public URI identifier.
Permalinks important for SEO, usability and refactorability
In general it's not a good idea to let a technology to dictate what your public routes end up being. Ideally your external routes should be regarded as permalinks and decoupled from their internal implementations as you don't want internal refactors to cause link rot, break existing inbound navigation or lose any SEO weight they've accumulated.
If you adopt the ideal URL from the start, you'll never have a reason to change it and the decoupling frees you from being able to refactor it's mapped implementation or even replacing the underlying technology completely as the ideal routes are already at what they should be that's free from any technology bias.
Pretty URLs or Clean URLs also provide important usability and accessibility benefits to non technical users where their prominent location in browsers is a valuable opportunity to add meaningful context on where they are in your Website.
Pre-defined Routes are optimal for machines
In ServiceStack all Services are automatically available using the pre-defined routes which is optimal for automated tooling and machinery as they can be predicted without requiring any server meta information.
Optimize Custom Routes for humans
Use Custom Routes to also make your Services available at the optimal Clean URLs for humans. For Content Pages you can take advantage of Page Based Routing in both #Script Pages and now in Razor to specify the ideal route for your page which in addition to requiring less effort to define (as they're implicitly defined) they're also less effort to implement as no Controller or Service are needed. They also benefit from being immediately inferrible by looking at the intuitively mapped directory and file names alone which works equally well in reverse where the page for a route will be exactly where you think it will be.
Designing Clean URLs
Some great references on designing RESTful Pretty URLs are the Clean URL examples in Wikipedia:
Get Inspired by GitHub
For some real-world inspiration look to github.com who are masters at it. You can tell a lot of thought went into meticulously choosing the ideal routes they want for all of their sites functionality. This has added tremendous value to GitHub's usability whose intuitive routes have made deep navigation possible where you can jump directly to the page you want without always having to navigate from their home page as needed in most websites with framework-generated routes who are more susceptible to negatively impacting user engagement in home page redesigns that move around existing links and navigation. GitHub's logically grouped routes also gets a natural assist from Autocomplete in browsers who are better able to complete previously visited GitHub URLs.
web tool
Our web (and app) .NET Core tools have graduated to become a versatile invaluable companion for all ServiceStack developers.
It builds on our last v5.4 release where it served as a Sharp App
delivery platform where they can be run as a .NET Core Windows Desktop App with app or as a cross-platform Web App launcher
using web and we've already how it's now a #Script runner with web run and into a
Live #Script playground with web watch.
They've now also gained all existing features from our @servicestack/cli npm tools so you'll no longer need npm to create ServiceStack projects or Add/Update ServiceStack References.
To access available features, install with:
$ dotnet tool install --global web
Or if you had a previous version installed, update with:
$ dotnet tool update -g web
Then run web without any arguments to view Usage:
$ web
Usage:

  web new                     List available Project Templates
  web new <template> <name>   Create New Project From Template

  web <lang>                  Update all ServiceStack References in directory (recursive)
  web <file>                  Update existing ServiceStack Reference (e.g. dtos.cs)
  web <lang>     <url> <file> Add ServiceStack Reference and save to file name
  web csharp     <url>        Add C# ServiceStack Reference         (Alias 'cs')
  web typescript <url>        Add TypeScript ServiceStack Reference (Alias 'ts')
  web swift      <url>        Add Swift ServiceStack Reference      (Alias 'sw')
  web java       <url>        Add Java ServiceStack Reference       (Alias 'ja')
  web kotlin     <url>        Add Kotlin ServiceStack Reference     (Alias 'kt')
  web dart       <url>        Add Dart ServiceStack Reference       (Alias 'da')
  web fsharp     <url>        Add F# ServiceStack Reference         (Alias 'fs')
  web vbnet      <url>        Add VB.NET ServiceStack Reference     (Alias 'vb')
  web tsd        <url>        Add TypeScript Definition ServiceStack Reference

  web +                       Show available gists
  web +<name>                 Write gist files locally, e.g:
  web +init                   Create empty .NET Core 2.2 ServiceStack App
  web + #<tag>                Search available gists
  web gist <gist-id>          Write all Gist text files to current directory

  web run <name>.ss           Run #Script within context of AppHost   (or <name>.html)
  web watch <name>.ss         Watch #Script within context of AppHost (or <name>.html)

  web run                     Run Sharp App in App folder using local app.settings
  web run path/app.settings   Run Sharp App at folder containing specified app.settings

  web list                    List available Sharp Apps            (Alias 'l')
  web gallery                 Open Sharp App Gallery in a Browser  (Alias 'g')
  web install <name>          Install Sharp App                    (Alias 'i')

  web publish                 Package Sharp App to /publish ready for deployment (.NET Core Required)
  web publish-exe             Package self-contained .exe Sharp App to /publish  (.NET Core Embedded)

  web shortcut                Create Shortcut for Sharp App
  web shortcut <name>.dll     Create Shortcut for .NET Core App

  dotnet tool update -g web   Update to latest version

Options:
    -h, --help, ?             Print this message
    -v, --version             Print this version
    -d, --debug               Run in Debug mode for Development
    -r, --release             Run in Release mode for Production
    -s, --source              Change GitHub Source for App Directory
    -f, --force               Quiet mode, always approve, never prompt
        --clean               Delete downloaded caches
        --verbose             Display verbose logging
Add/Update ServiceStack References
This shows us we can Add a ServiceStack Reference with web <lang> <baseurl> which will let us create a TypeScript Reference
to the new World Validation App using its ts file extension alias:
$ web ts http://validation.web-app.io

Saved to: dtos.ts
Or create a C# ServiceStack Reference with:
$ web cs http://validation.web-app.io

Saved to: dtos.cs
To update run web <lang> which will recursively update all existing ServiceStack References:
$ web ts

Updated: dtos.ts
web new - .NET's missing project template system
It's not often that a tool causes enough friction that it ends up requiring less effort to develop a replacement than it is to continue using the tool. But this has been our experience with maintaining our VS.NET Templates in the ServiceStackVS VS.NET Extension which has been the biggest time sink of all our 3rd Party Integrations where the iteration time to check in a change, wait for CI build, uninstall/re-install the VS.NET extension and create and test new projects is measured in hours not minutes. To top off the poor development experience we've now appeared to have reached the limits of the number of Project Templates we can bundle in our 5MB ServiceStackVS.vsix VS.NET Extension as a number of Customers have reported seeing VS.NET warning messages that ServiceStackVS is taking too long to load.
Given all the scenarios ServiceStack can be used in, we needed a quicker way to create, update and test our growing 47 starting project templates. In the age of simple command-line dev tools like git and .NET Core's light weight text/human friendly projects, maintaining and creating new .NET project templates still feels archaic & legacy requiring packaging projects as binary blobs in NuGet packages which become stale the moment they're created.
GitHub powered Project Templates
Especially for SPA projects which need to be frequently updated, the existing .NET Project Templates system is a stale solution that doesn't offer
much benefit over maintaining individual GitHub projects, which is exactly what the dotnet-new npm tool and now web new .NET Core are designed around.
Inside dotnet-new and web new is an easier way to create and share any kind of project templates which are easier for developers
to create, test, maintain and install. So if you're looking for a simpler way to be able to create and maintain your own value-added project templates
with additional bespoke customizations, functionality, dependencies and configuration, using web new is a great way to maintain and share them.
Using GitHub for maintaining project templates yields us a lot of natural benefits:
- Uses the same familiar development workflow to create and update Project Templates
- Git commit history provides a public audit trail of changes
- Publish new versions of project templates by creating a new GitHub release
- Compare changes between Project Templates using GitHub's compare changes viewer
- Browse and Restore Previous Project Releases
- End users can raise issues with individual project templates and send PR contributions
Always up to date
Importantly end users will always be able to view the latest list of project templates and create projects using the latest available version,
even if using older versions of the tools as they query GitHub's public APIs to list all currently available projects that for installation
will use the latest published release (or master if there are no published releases), which if available, downloads, caches and
creates new projects from the latest published .zip release.
Just regular Projects
Best of all creating and testing projects are now much easier since project templates are just working projects following a simple naming convention that when a new project is created with:
$ web new <template> ProjectName
Replaces all occurrences in all text files, file and directory names, where:
MyAppis replaced withProjectNamemy-appis replaced withproject-nameMy Appis replaced withProject Name
The tool installer then inspects the project contents and depending on what it finds will:
- Restore the .NET
.slnif it exists - Install npm packages if
package.jsonexists - Install libman packages if
libman.jsonexists
That after installation is complete, results in newly created projects being all setup and ready to run.
Available project templates
One missing detail is how it finds which GitHub repo should be installed from the <template> name.
This can be configured with the APP_SOURCE_TEMPLATES Environment variable to configure the web tool to use your own GitHub organizations instead, e.g:
APP_SOURCE_TEMPLATES=NetCoreTemplates;NetFrameworkTemplates;NetFrameworkCoreTemplates
Optionally you can display a friendly name next to each Organization name, e.g:
APP_SOURCE_TEMPLATES=NetCoreTemplates .NET Core C# Templates;
web new will then use the first GitHub Repo that matches the <template> name from all your GitHub Sources, so this
does require that all repos have unique names across all your configured GitHub Sources.
These are the only sources web new looks at to create ServiceStack projects, which by default is configured to use
NetCoreTemplates, NetFrameworkTemplates and
NetFrameworkCoreTemplates GitHub Organizations, whose repos will be listed when running:
$ x new
.NET Core C# Templates:

   1. angular-spa        .NET 8 Angular 15 App with Bootstrap
   2. blazor             .NET 8 Blazor Tailwind App Template
   3. blazor-vue         .NET 8 Blazor Static Rendered Vue interactivity App with Tailwind
   4. blazor-wasm        .NET 8 Blazor Server & WebAssembly Interactive Auto App with Tailwind
   5. empty              .NET 8 Empty Single Project App
   6. grpc               .NET 8 gRPC Services
   7. mvc                .NET 8 MVC Identity Auth App with Tailwind
   8. mvc-bootstrap      .NET 8 MVC Identity Auth App with Bootstrap
   9. mvcauth            .NET 8 MVC App with ServiceStack Auth and Bootstrap
  10. mvcidentityserver  .NET 8 MVC App with ServiceStack and IdentityServer4 Auth
  11. nextjs             .NET 8 Jamstack Next.js SSG React App with Tailwind
  12. razor              .NET 8 Razor Pages App with Tailwind
  13. razor-bootstrap    .NET 8 Razor Pages Identity Auth App with Bootstrap
  14. razor-pages        .NET 8 Razor Pages App with ServiceStack Auth and Bootstrap
  15. razor-press        .NET 8 Statically Generated, CDN hostable Razor Pages Documentation
  16. razor-ssg          .NET 8 Statically Generated, CDN hostable Razor Pages Website
  17. react-spa          .NET 8 React Create App with Bootstrap
  18. script             .NET 8 #Script Pages App with Bootstrap
  19. selfhost           .NET 8 self-hosting Console App
  20. svelte-spa         .NET 8 Svelte v3 Rollup App with Bootstrap
  21. vue-desktop        .NET 8 Chromium Vue Desktop App
  22. vue-mjs            .NET 8 Simple, Modern Vue ServiceStack Auth App with Tailwind
  23. vue-nuxt           .NET 8 Nuxt.js SPA App with Bootstrap
  24. vue-spa            .NET 8 Vue App with Bootstrap
  25. vue-ssg            .NET 8 Jamstack Vue SSG App with Tailwind
  26. vue-vite           .NET 8 Jamstack Vue Vite App with Tailwind
  27. web                .NET 8 Empty App
  28. web-tailwind       .NET 8 Empty App with Tailwind
  29. worker-rabbitmq    .NET 8 Rabbit MQ Worker Service
  30. worker-redismq     .NET 8 Redis MQ Worker Service
  31. worker-servicebus  .NET 8 Azure Service Bus MQ Worker Service
  32. worker-sqs         .NET 8 AWS SQS MQ Worker Service

.NET Framework C# Templates:

   1. angular-spa-netfx         .NET Framework Angular 7 Bootstrap cli.angular.io App
   2. aurelia-spa-netfx         .NET Framework Aurelia Bootstrap Webpack App
   3. mvc-netfx                 .NET Framework MVC Website
   4. razor-netfx               .NET Framework Website with ServiceStack.Razor
   5. react-desktop-apps-netfx  .NET Framework React Desktop Apps
   6. react-spa-netfx           .NET Framework React Bootstrap Webpack App
   7. script-netfx              .NET Framework #Script Pages Bootstrap WebApp
   8. selfhost-netfx            .NET Framework self-hosting HttpListener Console App
   9. vue-nuxt-netfx            .NET Framework Vue Nuxt.js SPA Web App
  10. vue-spa-netfx             .NET Framework Vue Bootstrap Webpack App
  11. vuetify-nuxt-netfx        .NET Framework Vuetify Material Nuxt.js SPA Web App
  12. vuetify-spa-netfx         .NET Framework Vuetify Material Webpack App
  13. web-netfx                 .NET Framework Empty Website
  14. winservice-netfx          .NET Framework Windows Service

ASP.NET Core Framework Templates:

   1. empty-corefx       .NET Framework ASP.NET Core Empty Web Single Project Template
   2. mvc-corefx         .NET Framework ASP.NET Core MVC Website
   3. razor-corefx       .NET Framework ASP.NET Core Website with ServiceStack.Razor
   4. react-lite-corefx  .NET Framework ASP.NET Core lite (npm-free) React SPA using TypeScript
   5. script-corefx      .NET Framework ASP.NET Core #Script Pages Bootstrap Website
   6. selfhost-corefx    .NET Framework ASP.NET Core self-hosting Console App
   7. vue-lite-corefx    .NET Framework ASP.NET Core lite (npm-free) Vue SPA using TypeScript
   8. web-corefx         .NET Framework ASP.NET Core Website
web + - customize mix/match projects from gists!
Whilst we believe web new is a super simple way to create and maintain project templates, we've also created an even
simpler and lighter way to create projects - from gists!
We can use web + (read as "apply gist") to create light-weight customized projects by applying multiple gists on top of each other.
One of the major benefits of this approach is that it's not only limited at project creation time as it's also a great way to easily add
"layered functionality" to existing projects and was the catalyst for the new "no touch" IConfigureAppHost interfaces which allows
for easy extension and replacement of isolated AppHost configuration.
We saw an example of this earlier with how we can use this to easily update dependencies in "lite" projects which is just applying the vue-lite-lib and react-lite-lib to your existing "lite" projects:
$ web +vue-lite-lib
Usage
Similar to web other features, we get the full user experience where we can list, search and apply gists from the commands below:
Usage:
  web +                       Show available gists
  web +<name>                 Write gist files locally, e.g:
  web + #<tag>                Search available gists
  web gist <gist-id>          Write all Gist text files to current directory
Where we can view all available gists that we can apply to our projects with:
$ web +
Which as of this writing lists:
   1. init                 Empty .NET Core 2.2 ServiceStack App                                   to: .                            by @ServiceStack  [project]
   2. init-lts             Empty .NET Core 2.1 LTS ServiceStack App                               to: .                            by @ServiceStack  [project]
   3. init-corefx          Empty ASP.NET Core 2.1 LTS on .NET Framework                           to: .                            by @ServiceStack  [project]
   4. init-sharp-app       Empty ServiceStack Sharp App                                           to: .                            by @ServiceStack  [project]
   5. bootstrap-sharp      Bootstrap + #Script Pages Starter Template                             to: $HOST                        by @ServiceStack  [ui,sharp]
   6. sqlserver            Use OrmLite with SQL Server                                            to: $HOST                        by @ServiceStack  [db]
   7. sqlite               Use OrmLite with SQLite                                                to: $HOST                        by @ServiceStack  [db]
   8. postgres             Use OrmLite with PostgreSQL                                            to: $HOST                        by @ServiceStack  [db]
   9. mysql                Use OrmLite with MySql                                                 to: $HOST                        by @ServiceStack  [db]
  10. auth-db              AuthFeature with OrmLite AuthRepository, CacheClient (requires ui,db)  to: $HOST                        by @ServiceStack  [auth]
  11. auth-memory          AuthFeature with Memory AuthRepository, CacheClient (requires ui)      to: $HOST                        by @ServiceStack  [auth]
  12. validation-contacts  Contacts Validation Example                                            to: $HOST                        by @ServiceStack  [example,sharp]
  13. vue-lite-lib         Update vue-lite projects libraries                                     to: $HOST                        by @ServiceStack  [lib,vue]
  14. react-lite-lib       Update react-lite projects libraries                                   to: $HOST                        by @ServiceStack  [lib,react]
  15. nginx                Nginx reverse proxy config for .NET Core Apps                          to: /etc/nginx/sites-available/  by @ServiceStack  [config]
  16. supervisor           Supervisor config for managed execution of .NET Core Apps              to: /etc/supervisor/conf.d/      by @ServiceStack  [config]
  17. docker               Dockerfile example for .NET Core Web Apps                              to: .                            by @ServiceStack  [config]

 Usage:  web +<name>
         web +<name> <UseName>

Search:  web + #<tag>      Available tags: auth, config, db, example, lib, project, react, sharp, ui, vue
The way we populate this list is by extending the multi-purpose functionality of Markdown and using it as an "Executable Document" where the human-friendly apply.md document below is also reused as the datasource to populate the above list:
Apply Gists
Usage:
  web +                       Show available gists
  web +<name>                 Write gist files locally, e.g:
  web + #<tag>                Search available gists
  web gist <gist-id>          Write all Gist text files to current directory
Available Modifers
The modifiers next to each gist specify where the gist files should be written to:
{to:'.'}- Write to current directory (default){to:'$HOST'}- Write to host project (1st folder containing eitherappsettings.json,Web.config,App.config,Startup.cs){to:'wwwroot/'}- Write to first sub directories namedwwwroot{to:'package.json'}- Write to first directory containingpackage.json{to:'/etc/nginx/sites-available/'}- Write to absolute folder{to:'$HOME/.my-app/'}- Write to$HOMEin unix or%USERPROFILE%on windows{to:'${EnumName}/.my-app/'}- Write toEnvironment.SpecialFolder.{EnumName}, e.g:{to:'$UserProfile/.my-app/'}- Write toEnvironment.SpecialFolder.UserProfile
File Name features
Use \ to in gist file names to write files to sub directories, e.g:
wwwroot\js\script.js- Writes gist file towwwroot/js/script.js
Use ? at end of filename to indicate optional file that should not be overridden, e.g:
wwwroot\login.html?- Only writes towwwroot\login.htmlif it doesn't already exist.
Replacement rules
Any gist file name or contents with different "MyApp" text styles will be replaced with the Project Name in that style, e.g:
MyAppwill be replaced withProjectNamemy-appwill be replaced withproject-nameMy Appwill be replaced withProject Name
Adding packages
To include nuget package dependencies, create a file in your gist called _init with the list of dotnet or nuget commands:
dotnet add package ServiceStack.OrmLite.Sqlite
This self-documenting list lets you browse all available gists and their contents the same way as the web tool does.
That just like web new can be configured to use your own apply.md Gist document with:
APP_SOURCE_GISTS=<gist id>
Available Gists
As we expect to see this list of available gists expand greatly in future we've also included support for grouping related gists by <tag>,
e.g. you can view available starting projects with:
$ web + #project
Results matching tag [project]:

   1. init            Empty .NET Core 2.2 ServiceStack App          to: .  by @ServiceStack  [project]
   2. init-lts        Empty .NET Core 2.1 LTS ServiceStack App      to: .  by @ServiceStack  [project]
   3. init-corefx     Empty ASP.NET Core 2.1 LTS on .NET Framework  to: .  by @ServiceStack  [project]
   4. init-sharp-app  Empty ServiceStack Sharp App                  to: .  by @ServiceStack  [project]

 Usage:  web +<name>
         web +<name> <UseName>

Search:  web + #<tag> Available tags: auth, config, db, example, lib, project, react, sharp, ui, vue
Which can be chained together to search for all project and sharp gists we can use for #Script Pages projects:
$ web + #project,sharp
Results matching tags [project,sharp]:

   1. init                 Empty .NET Core 2.2 ServiceStack App          to: .      by @ServiceStack  [project]
   2. init-lts             Empty .NET Core 2.1 LTS ServiceStack App      to: .      by @ServiceStack  [project]
   3. init-corefx          Empty ASP.NET Core 2.1 LTS on .NET Framework  to: .      by @ServiceStack  [project]
   4. init-sharp-app       Empty ServiceStack Sharp App                  to: .      by @ServiceStack  [project]
   5. bootstrap-sharp      Bootstrap + #Script Pages Starter Template      to: $HOST  by @ServiceStack  [ui,sharp]
   6. validation-contacts  Contacts Validation Example                   to: $HOST  by @ServiceStack  [example,sharp]

 Usage:  web +<name>
         web +<name> <UseName>

Search:  web + #<tag>      Available tags: auth, config, db, example, lib, project, react, sharp, ui, vue
Creating customized projects
From this list we can see that we can create an Empty .NET Core 2.2 ServiceStack App by starting in a new App Folder:
$ mkdir ProjectName && cd ProjectName
Then applying the init labelled gist which will be saved to the '.' current directory:
$ web +init
Write files from 'init' https://gist.github.com/gistlyn/58030e271595520d87873c5df5e4c2eb to:
  C:\projects\Example\ProjectName.csproj
  C:\projects\Example\Program.cs
  C:\projects\Example\Properties\launchSettings.json
  C:\projects\Example\ServiceInterface\MyServices.cs
  C:\projects\Example\ServiceModel\Hello.cs
  C:\projects\Example\Startup.cs
  C:\projects\Example\appsettings.Development.json
  C:\projects\Example\appsettings.json

Proceed? (n/Y):
Where its output will let you inspect and verify the gist it's writing and all the files that it will write to before accepting, by typing y or Enter.
To instead start with the latest .NET Core LTS release, run:
$ web +init-lts
After we've created our empty .NET Core project we can configure it to use PostgreSQL with:
$ web +postgres
Or we can give it a Bootstrap #Script Pages UI with:
$ web +bootstrap-sharp
What's even better is that gists can be chained, so we can create a .NET Core 2.2 Bootstrap #Script Pages App using PostgreSQL with:
$ web +init+bootstrap-sharp+postgres
A Bootstrap #Script Pages App that includes a complete Contacts Validation example with:
$ web +init+bootstrap-sharp+validation-contacts
The same as above, but its Auth replaced to persist in a PostgreSQL backend:
$ web +init+bootstrap-sharp+validation-contacts+postgres+auth-db
If we decided later we wanted to switch to use SQL Server instead we can just layer it over the top of our existing App:
$ web +sqlserver
This isn't just limited to gist projects, you can also apply gists when creating new projects:
$ web new sharp+postgres+auth-db
Which will create a script project configured to use PostgreSQL Auth.
This works despite the sharp project being a multi-project solution
thanks to the to: $HOST modifier which says to apply the gists files to the HOST project.
Apply Gist Modifiers
To enable a versatile and fine-grained solution you can use the modifiers below to control how gists are applied:
The modifiers next to each gist specify where the gist files should be written to:
{to:'.'}- Write to current directory (default){to:'$HOST'}- Write to host project (1st folder containing eitherappsettings.json,Web.config,App.config,Startup.cs){to:'wwwroot/'}- Write to first sub directories namedwwwroot{to:'package.json'}- Write to first directory containingpackage.json{to:'/etc/nginx/sites-available/'}- Write to absolute folder{to:'$HOME/.my-app/'}- Write to$HOMEin unix or%USERPROFILE%on windows{to:'${EnumName}/.my-app/'}- Write toEnvironment.SpecialFolder.{EnumName}, e.g:{to:'$UserProfile/.my-app/'}- Write toEnvironment.SpecialFolder.UserProfile
File Name features
Use \ in gist file names to write files to sub directories, e.g:
wwwroot\js\script.js- Writes gist file towwwroot/js/script.js
Use ? at end of filename to indicate optional file that should not be overridden, e.g:
wwwroot\login.html?- Only writes towwwroot\login.htmlif it doesn't already exist.
Replacement rules
Just like web new any gist file name or contents with different "MyApp" text styles will be replaced with the Project Name in that style, e.g:
MyAppwill be replaced withProjectNamemy-appwill be replaced withproject-nameMy Appwill be replaced withProject Name
Adding packages
To include nuget package dependencies, create a file in your gist called _init with the list of dotnet or nuget commands:
dotnet add package ServiceStack.OrmLite.Sqlite
Open for Gists!
Whilst we intend to use this feature extensively to be able to deliver "pre-set layered functionality" to ServiceStack Users, we're
happy to maintain a curated list of gists that can help any .NET Core project as we've done with the config gists:
$ web + #config
Results matching tag [config]:

   1. nginx       by @ServiceStack  Nginx reverse proxy config for .NET Core Apps              to: /etc/nginx/sites-available/  [config]
   2. supervisor  by @ServiceStack  Supervisor config for managed execution of .NET Core Apps  to: /etc/supervisor/conf.d/      [config]
   3. docker      by @ServiceStack  Dockerfile example for .NET Core Web Apps                  to: .                            [config]
Where being able to apply pre-configured configuration files like this reduces the required steps and effort to Configure .NET Core Apps to run on Linux.
How to include your gist
To add your gist to the public list add a comment to apply.md with a link to your gist and the modifiers you want it to use.
Apply adhoc Gists
Alternatively you can share and apply any gists by gist id or URL, e.g:
$ web gist 58030e271595520d87873c5df5e4c2eb
$ web gist https://gist.github.com/58030e271595520d87873c5df5e4c2eb
SourceLink Enabled Packages
To maximize the debuggability of ServiceStack packages all ServiceStack projects have been overhauled and converted to utilize MSBuild generated NuGet packages where all packages are now embedding pdb symbols and have configured support for SourceLink to improve the debugging experience of ServiceStack Apps as source files can be downloaded on-the-fly from GitHub as you debug.
Scott Hanselman has written a nice post on Source Link and how it can be enabled inside VS.NET by turning on Enable source link support:
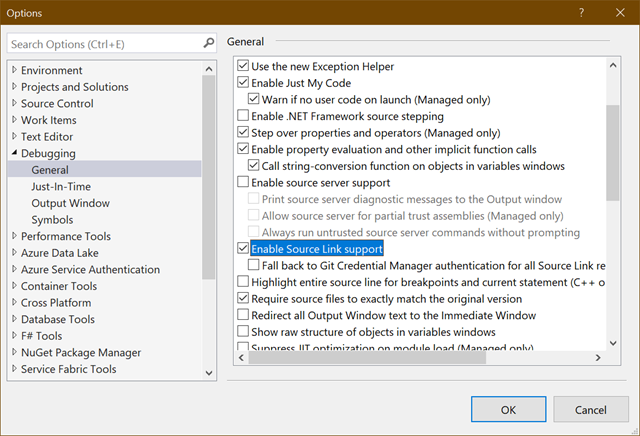
When enabled it should let you debug into the ServiceStack framework implementation, downloading the correct source files version from GitHub as and when needed.
All ServiceStack GitHub projects now use CI NuGet feed
In addition to switching to MSBuild generated packages all projects have also switched to using CI NuGet package feeds for external dependencies instead
of copying .dll's in /lib folders. As a consequence you'll no longer have to build external ServiceStack GitHub projects or use GitHub published releases,
as now the master repo of all GitHub projects can be built from a clean checkout at anytime.
The pre-release packages are still published using the same version number so if you get a build error from having a cached stale package you'll need to clear your local packages cache to download the latest build packages from the CI NuGet packages feed.
Authentication
For many Customers the improved Authentication support will be the most important part of this release which saw a major focus going into enhancing Authentication integration with ASP.NET Core's Claims based Authentication.
Community Auth Providers
Before we begin, I'd like to give a shoutout to our amazing community who have been filling in the gaps with the Community Auth Providers when a built-in solution doesn't exist like the ServiceStack.Authentication.IdentityServer by @wwwlicious to integrate with a remote Identity Server.
To best way to describe the differences between existing Identity/IdentityServer Auth Providers is that they function on
converting token inputs into ServiceStack Authenticated Sessions whereas the new NetCoreIdentityAuthProvider creates Authenticated
Sessions from the Claims based Authentication outputs and so still requires Identity/IdentityServer configured as normal
to handle the token Authentication. Depending on your use-case or preferences you may want to continue using and contributing to the existing
Community Auth Providers instead.
ASP.NET Core Identity Auth Provider
The central piece that enables integration with ASP.NET Core's Claims Based Authentication is the new NetCoreIdentityAuthProvider which
is a bi-directional adapter that for non-ServiceStack requests converts ServiceStack's Authenticated UserSession into an ASP.NET Core Identity
ClaimsPrincipal and lets you use ServiceStack's Auth Model in ASP.NET Core MVC. It also does the inverse where it lets you use
ASP.NET Core's Identity Auth to protect ServiceStack Services in which case it does the reverse and converts an Authenticated ClaimsPrincipal
into a ServiceStack Authenticated User Session.
This enables 3 new popular integration strategies which lets you have a single Auth Model to protect your hybrid ServiceStack + MVC Apps:
- Using ServiceStack Auth in MVC
- Using ASP.NET Core Identity in ServiceStack
- Using Identity Server in ServiceStack
Note: Despite the new integration possibilities we're continuing to invest and enhance in ServiceStack Auth where we're able to provide a simpler integrated experience and more optimal implementation as we have full control over the implementation and is still the better choice if you prefer Roles/Permissions based Authentication (like we do).
In general if your hybrid App only has a small ServiceStack component and a large MVC component than it may make more sense to start with the ASP.NET Core Identity templates (unless of course, you find ServiceStack Auth to be simpler to use).
Use existing Attributes
Irrespective of what Auth Provider is used, you'd continue to use the same Auth Attributes to protect ServiceStack Services:
[Authenticate]
public object Any(RequiresAuth request) => new RequiresAuthResponse { Result = $"Hello, {request.Name}!" };

[RequiredRole("Manager")]
public object Any(RequiresRole request) => new RequiresRoleResponse { Result = $"Hello, {request.Name}!" };

[RequiredRole(nameof(RoleNames.Admin))]
public object Any(RequiresAdmin request) => new RequiresAdminResponse { Result = $"Hello, {request.Name}!" };
and MVC's [Authorize] attribute to protect ASP.NET Core MVC Controllers:
[Authorize]
public IActionResult RequiresAuth() => View();

[Authorize(Roles = "Manager")]
public IActionResult RequiresRole() => View();

[Authorize(Roles = "Admin")]
public IActionResult RequiresAdmin() =>View();
To quickly get started, we've created new pre-configured .NET Core project templates for all 3 scenarios:
Using ServiceStack Auth in MVC
mvcauth is a .NET Core 2.2 MVC Website integrated with ServiceStack Auth:
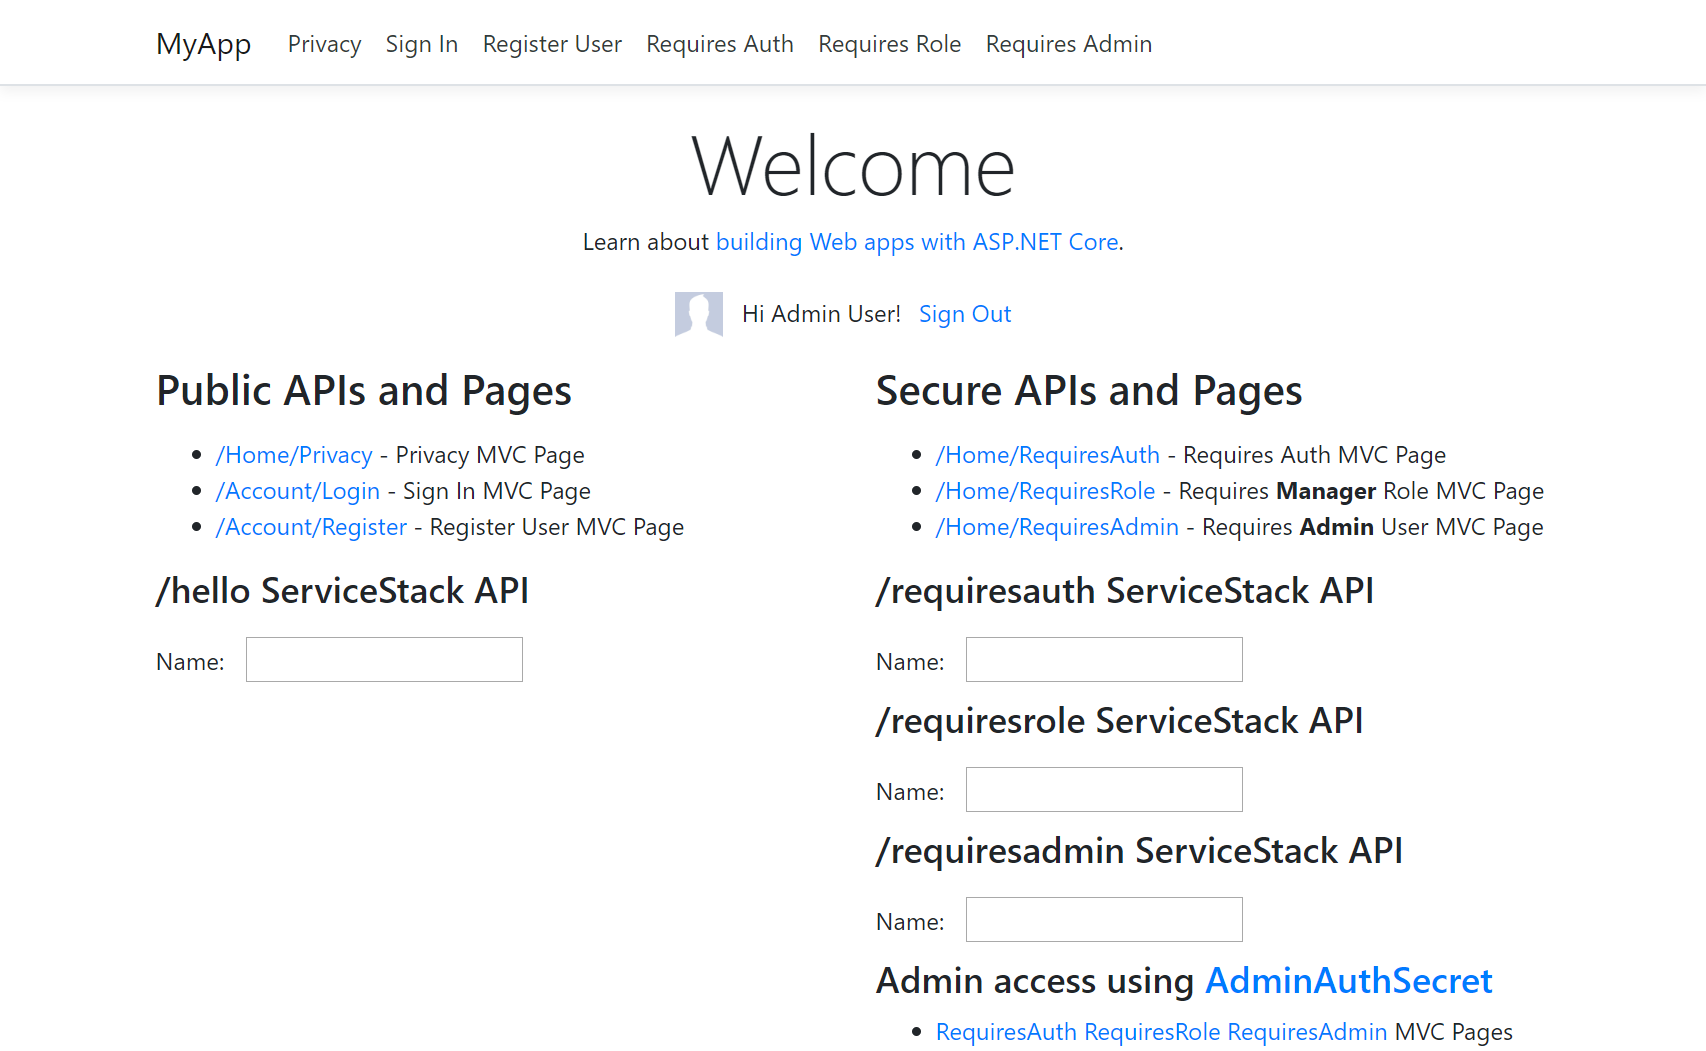
Create new mvcauth project with:
$ web new mvcauth ProjectName
The ServiceStack Auth is pre-configured to persist users in an OrmLite Auth Repository (default SQLite) and enables both local Username/Password Credentials Auth as well as external Sign In's via Facebook, Twitter, Google and the new Microsoft Graph OAuth providers:
container.Register<IDbConnectionFactory>(c =>
    new OrmLiteConnectionFactory(":memory:", SqliteDialect.Provider));

container.Register<IAuthRepository>(c =>
    new OrmLiteAuthRepository(c.Resolve<IDbConnectionFactory>()) {
        UseDistinctRoleTables = true,
    });
container.Resolve<IAuthRepository>().InitSchema();

// TODO: Replace OAuth App settings in: appsettings.Development.json
Plugins.Add(new AuthFeature(() => new CustomUserSession(),
    new IAuthProvider[] {
        new NetCoreIdentityAuthProvider(AppSettings) { // Adapter to enable ServiceStack Auth in MVC
            AdminRoles = { "Manager" }, // Automatically Assign additional roles to Admin Users
        },
        new CredentialsAuthProvider(AppSettings), // Sign In with Username / Password credentials
        new FacebookAuthProvider(AppSettings),    // Create App at: https://developers.facebook.com/apps
        new TwitterAuthProvider(AppSettings),     // Create App at: https://dev.twitter.com/apps
        new GoogleAuthProvider(AppSettings),      // https://console.developers.google.com/apis/credentials
        new MicrosoftGraphAuthProvider(AppSettings), // Create App https://apps.dev.microsoft.com
    }) {
    IncludeRegistrationService = true,
    IncludeAssignRoleServices = false,
});
In ServiceStack users with the Admin roles are "super users" with unrestricted access to all protected resources whereas in MVC we need to specify
all the Roles Admin Users should have access to with AdminRoles above.
We also see the built-in Register and AssignRoles Services are enabled to allow new User Registration and assignment of roles/permissions to existing users.
On Startup, 3 users are created to test out the different access levels:
- A basic Authenticated User
- A Manager with the
Managerrole - A Super User with the
Adminrole
if (authRepo.GetUserAuthByUserName("user@gmail.com") == null)
{
    var testUser = authRepo.CreateUserAuth(new UserAuth
    {
        DisplayName = "Test User",
        Email = "user@gmail.com",
        FirstName = "Test",
        LastName = "User",
    }, "p@55wOrd");
}

if (authRepo.GetUserAuthByUserName("manager@gmail.com") == null)
{
    var roleUser = authRepo.CreateUserAuth(new UserAuth
    {
        DisplayName = "Test Manager",
        Email = "manager@gmail.com",
        FirstName = "Test",
        LastName = "Manager",
    }, "p@55wOrd");
    authRepo.AssignRoles(roleUser, roles:new[]{ "Manager" });
}

if (authRepo.GetUserAuthByUserName("admin@gmail.com") == null)
{
    var roleUser = authRepo.CreateUserAuth(new UserAuth
    {
        DisplayName = "Admin User",
        Email = "admin@gmail.com",
        FirstName = "Admin",
        LastName = "User",
    }, "p@55wOrd");
    authRepo.AssignRoles(roleUser, roles:new[]{ "Admin" });
}
You can sign in with any of these users and go to the the home page to test the behavior of the different granular protection levels which contains links to both MVC and ServiceStack Public and Protected Pages and Services.
mvcauth also comes complete with User Registration where users can Sign up with either Password or using any of the registered OAuth providers:
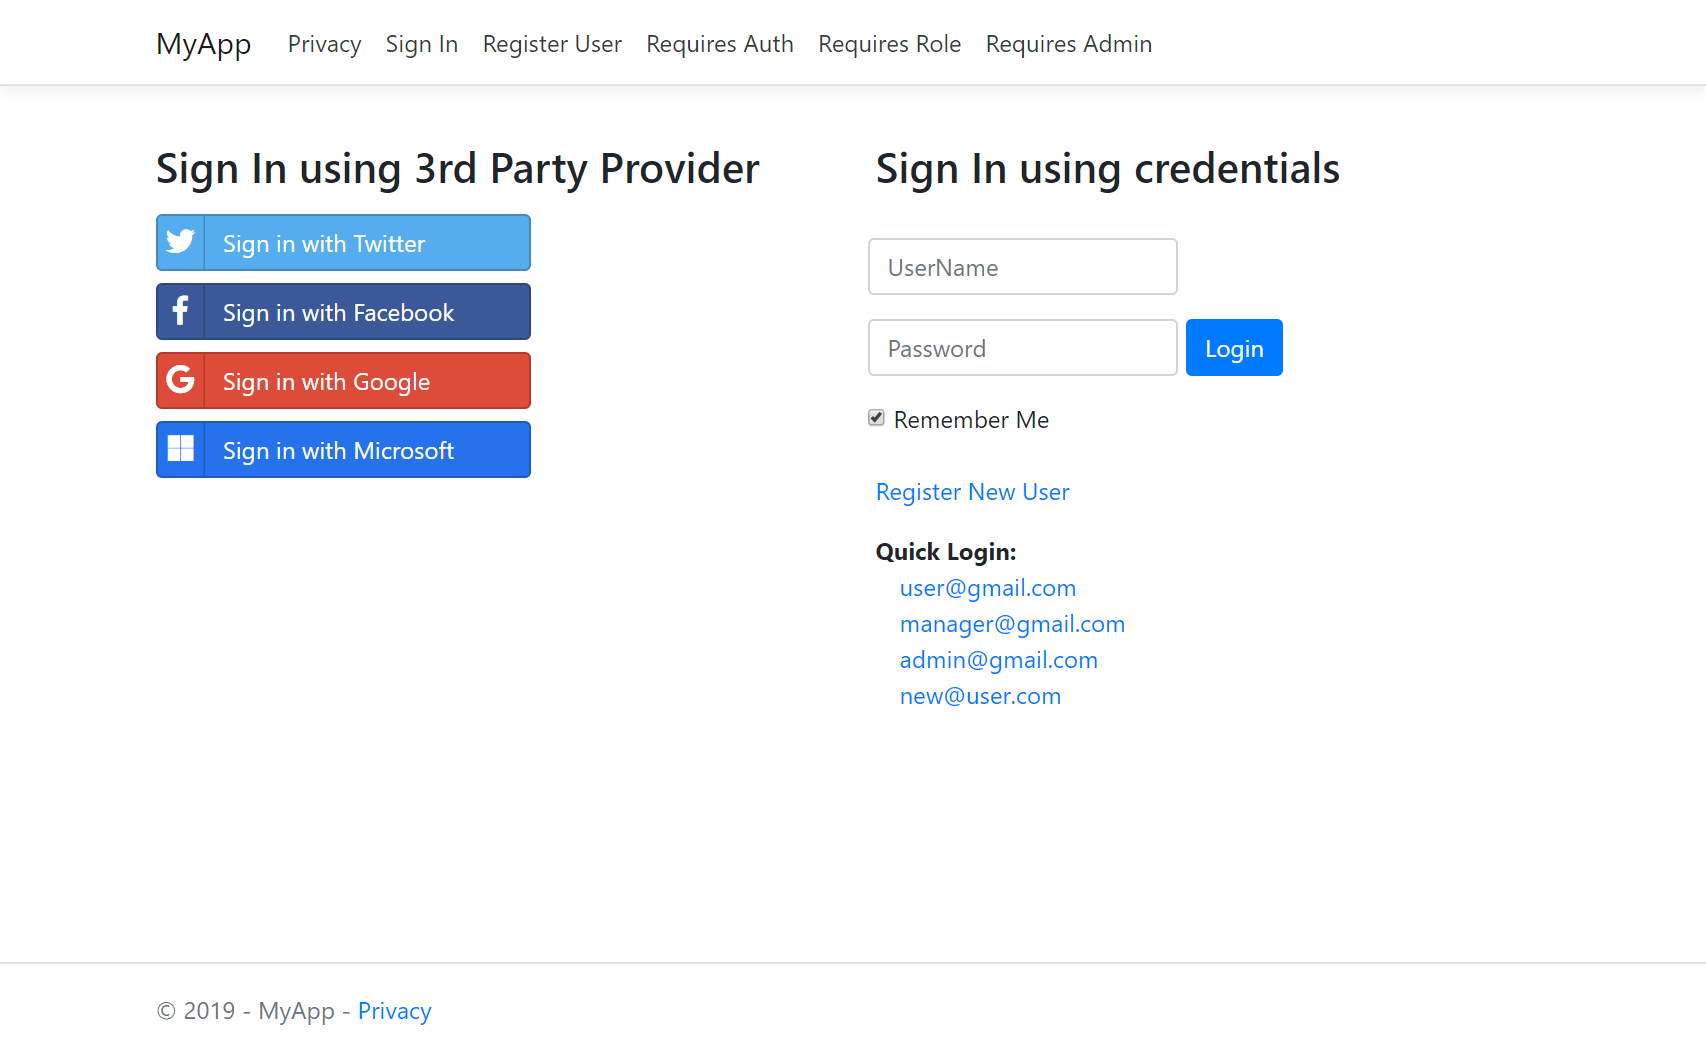
Defaults to MVC Auth Redirect Conventions
When using NetCoreIdentityAuthProvider we assume you're going to use MVC for your UI so it overrides the HTML Redirects
that Users will be redirected to when trying to access Pages they don't have access to:
authFeature.HtmlRedirect = "~/Account/Login";
authFeature.HtmlRedirectAccessDenied = "~/Account/AccessDenied";
authFeature.HtmlRedirectReturnParam = "ReturnUrl";
authFeature.HtmlRedirectReturnPathOnly = true;
Where non-Authenticated Users will be redirected to MVC's convention of /Account/Login?ReturnUrl= instead of ServiceStack's /login?redirect=.
Alternatively you can retain ServiceStack's HTML redirect defaults with:
new NetCoreIdentityAuthProvider(AppSettings) {
    OverrideHtmlRedirect = false
}
Using ASP.NET Identity Auth in ServiceStack
mvcidentity is a .NET Core 2.2 MVC Website integrated with ServiceStack using ASP.NET Identity Auth:
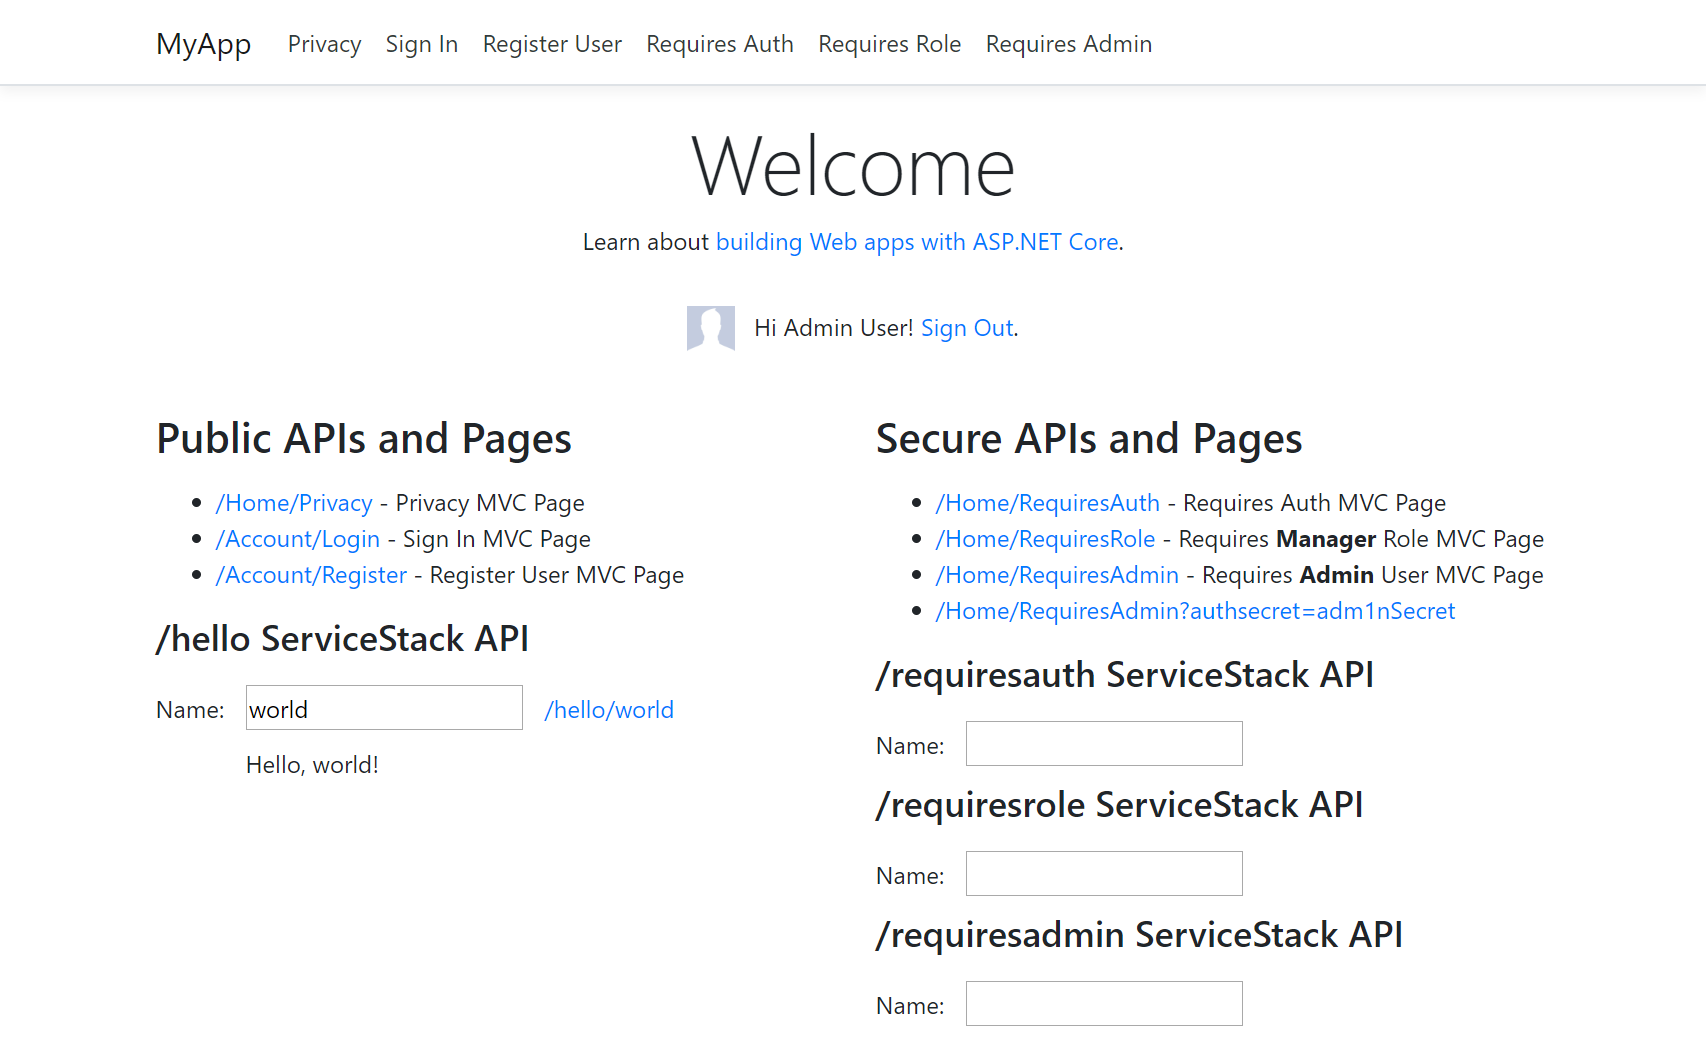
Create new mvcidentity project with:
$ web new mvcidentity ProjectName
mvcidentity is essentially the same App with the same functionality as mvcauth but rewritten to use ASP.NET Identity Auth instead of ServiceStack Auth, including the registration options which are handled implemented using MVC Controllers instead of ServiceStack's built-in Services:

mvcidentity defaults to using EF and SQL Server which we expect to be the most popular configuration:
services.AddDbContext<ApplicationDbContext>(options =>
    options.UseSqlServer(Configuration.GetConnectionString("DefaultConnection")));

services.AddIdentity<ApplicationUser, IdentityRole>(options => {
        options.User.AllowedUserNameCharacters = null;
    })
    .AddEntityFrameworkStores<ApplicationDbContext>()
    .AddDefaultTokenProviders();
The rest of Startup.cs contains the standard setup for configuring ASP.NET Identity Auth with the same Twitter, Facebook, Google and Microsoft OAuth Providers.
A custom ApplicationUser
EF DataModel is used to better prepare for real world usage to show how to propagate custom User metadata
down into Authenticated UserSessions. mvcidentity starts with an extended ApplicationUser that captures basic info about
the user and capture external references to any 3rd Party OAuth providers that Users have signed in with:
public class ApplicationUser : IdentityUser
{
    public string FirstName { get; set; }
    public string LastName { get; set; }
    public string DisplayName { get; set; }

    public string TwitterUserId { get; set; }
    public string TwitterScreenName { get; set; }

    public string FacebookUserId { get; set; }

    public string GoogleUserId { get; set; }

    public string GoogleProfilePageUrl { get; set; }

    public string MicrosoftUserId { get; set; }

    public string ProfileUrl { get; set; }
}
Mapping Customizations
By default the NetCoreIdentityAuthProvider.cs
uses the MapClaimsToSession dictionary to map well known ClaimTypes Properties to their natural AuthUserSession property:
public Dictionary<string, string> MapClaimsToSession { get; set; } = new Dictionary<string, string> {
    [ClaimTypes.Email] = nameof(AuthUserSession.Email),
    [ClaimTypes.Name] = nameof(AuthUserSession.UserAuthName),
    [ClaimTypes.GivenName] = nameof(AuthUserSession.FirstName),
    [ClaimTypes.Surname] = nameof(AuthUserSession.LastName),
    [ClaimTypes.StreetAddress] = nameof(AuthUserSession.Address),
    [ClaimTypes.Locality] = nameof(AuthUserSession.City),
    [ClaimTypes.StateOrProvince] = nameof(AuthUserSession.State),
    [ClaimTypes.PostalCode] = nameof(AuthUserSession.PostalCode),
    [ClaimTypes.Country] = nameof(AuthUserSession.Country),
    [ClaimTypes.OtherPhone] = nameof(AuthUserSession.PhoneNumber),
    [ClaimTypes.DateOfBirth] = nameof(AuthUserSession.BirthDateRaw),
    [ClaimTypes.Gender] = nameof(AuthUserSession.Gender),
    [ClaimTypes.Dns] = nameof(AuthUserSession.Dns),
    [ClaimTypes.Rsa] = nameof(AuthUserSession.Rsa),
    [ClaimTypes.Sid] = nameof(AuthUserSession.Sid),
    [ClaimTypes.Hash] = nameof(AuthUserSession.Hash),
    [ClaimTypes.HomePhone] = nameof(AuthUserSession.HomePhone),
    [ClaimTypes.MobilePhone] = nameof(AuthUserSession.MobilePhone),
    [ClaimTypes.Webpage] = nameof(AuthUserSession.Webpage),
};
Which you can also extend or modify to handle any additional straightforward 1:1 mappings.
Custom Mappings
Alternatively you can use PopulateSessionFilter to apply additional logic when creating a UserSession from a ClaimsPrincipal
which is what's needed to copy over EF Identity Roles when using EF Identity Auth with ServiceStack.
As mvcidentity doesn't have a dependency on OrmLite you could choose to populate roles using EF's APIs directly:
new NetCoreIdentityAuthProvider(AppSettings)
{
    PopulateSessionFilter = (session, principal, req) =>
    {
        var userManager = req.TryResolve<UserManager<ApplicationUser>>();
        var user = userManager.FindByIdAsync(session.Id).Result;
        var roles = userManager.GetRolesAsync(user).Result;
    }
},
Whilst this works it uses "sync over async" which is discouraged and problematic in many use-cases, less efficient than just sync and UserManager's limited API available forces multiple DB calls and more data over the wire than just the role names needed.
Built-in Identity DB APIs
Instead we recommend instead using the more optimal IDbConnection.GetIdentityUserRolesById() API which returns just the role names in
a single indexed DB query.
If you're not using OrmLite you can utilize EF's configured DB Connection by adding this extension method to your host project:
public static class AppExtensions
{
    public static T DbExec<T>(this IServiceProvider services, Func<IDbConnection, T> fn) => services
        .DbContextExec<ApplicationDbContext,T>(x => { x.Database.OpenConnection(); return x.Database.GetDbConnection(); }, fn);
}
Where you'll able to use it to perform adhoc DB queries, in this case calling GetIdentityUserRolesById() to populate the Users roles:
new NetCoreIdentityAuthProvider(AppSettings)
{
    PopulateSessionFilter = (session, principal, req) =>
    {
        session.Roles = ApplicationServices.DbExec(db => db.GetIdentityUserRolesById(session.Id));
    }
}
This gets called whenever ServiceStack receives an Authenticated Request which you can intercept and customize how ClaimsPrincipal
are mapped to ServiceStack User Sessions.
To improve performance and save the DB hit, we recommend caching the User Roles into an In Memory Cache:
new NetCoreIdentityAuthProvider(AppSettings)
{
    PopulateSessionFilter = (session, principal, req) =>
    {
        session.Roles = req.GetMemoryCacheClient().GetOrCreate(
            IdUtils.CreateUrn(nameof(session.Roles), session.Id),
            TimeSpan.FromMinutes(5),
            () => ApplicationServices.DbExec(db => db.GetIdentityUserRolesById(session.Id)));
    }
},
Alternatively use
req.GetCacheClient()if you want to use your registeredICacheClientprovider instead.
Propagating Extended User Info
In addition to populating the Users Roles we also want to populate our custom User metadata on our ApplicationUser EF model,
for this we can use the new GetIdentityUserById<T> API which we'll also want to cache.
This brings us to the end result in mvcidentity project template:
Plugins.Add(new AuthFeature(() => new CustomUserSession(),
    new IAuthProvider[] {
        new NetCoreIdentityAuthProvider(AppSettings) // Adapter to enable ASP.NET Identity Auth in ServiceStack
        {
            AdminRoles = { "Manager" }, // Automatically Assign additional roles to Admin Users
            PopulateSessionFilter = (session, principal, req) =>
            {
                //Example of populating ServiceStack Session Roles + Custom Info from EF Identity DB
                var user = req.GetMemoryCacheClient().GetOrCreate(
                    IdUtils.CreateUrn(nameof(ApplicationUser), session.Id),
                    TimeSpan.FromMinutes(5), // return cached results before refreshing cache from db every 5mins
                    () => ApplicationServices.DbExec(db => db.GetIdentityUserById<ApplicationUser>(session.Id)));

                session.Email = session.Email ?? user.Email;
                session.FirstName = session.FirstName ?? user.FirstName;
                session.LastName = session.LastName ?? user.LastName;
                session.DisplayName = session.DisplayName ?? user.DisplayName;
                session.ProfileUrl = user.ProfileUrl ?? AuthMetadataProvider.DefaultNoProfileImgUrl;

                session.Roles = req.GetMemoryCacheClient().GetOrCreate(
                    IdUtils.CreateUrn(nameof(session.Roles), session.Id),
                    TimeSpan.FromMinutes(5), // return cached results before refreshing cache from db every 5mins
                    () => ApplicationServices.DbExec(db => db.GetIdentityUserRolesById(session.Id)));
            }
        },
    }));
Using IdentityServer4 Auth in ServiceStack
mvcidentityserver .NET Core 2.1 MVC Website integrated with IdentityServer4 Auth and ServiceStack:
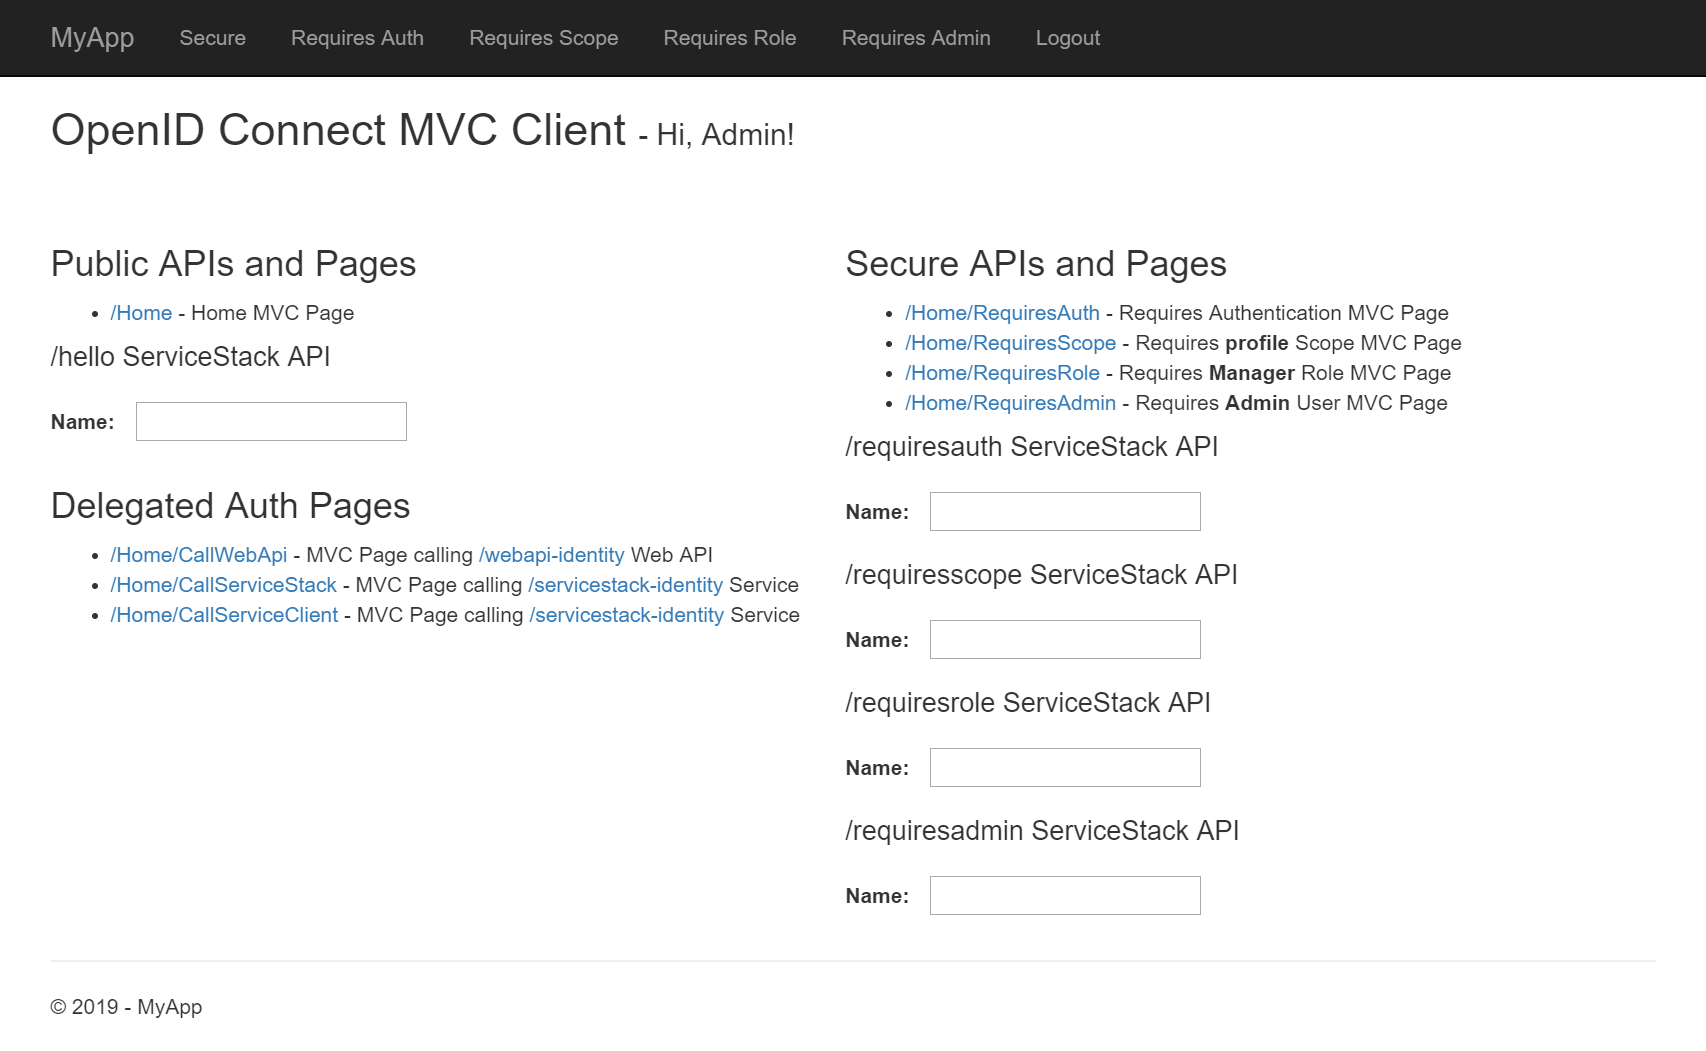
The mvcidentityserver builds upon Identity Server's OpenID Connect Hybrid Flow Authentication and API Access Tokens Quickstart project to include integration with ServiceStack and additional OAuth providers.
The home page has also been customized to contain the same functionality as the other 2 templates with some additional features to validate against custom OAuth App scopes and Delegation Auth Pages showing how to make Authenticated API requests to our remote microservices from within MVC Controllers.
In contrast to integrating Authentication into our App directly, mvcidentityserver configures a central remote IdentityServer instance with the Auth Features and OAuth providers we want available to our Apps.
Then when non Authenticated users go to a protected resource they're redirected to the Sign In page on IdentityServer:
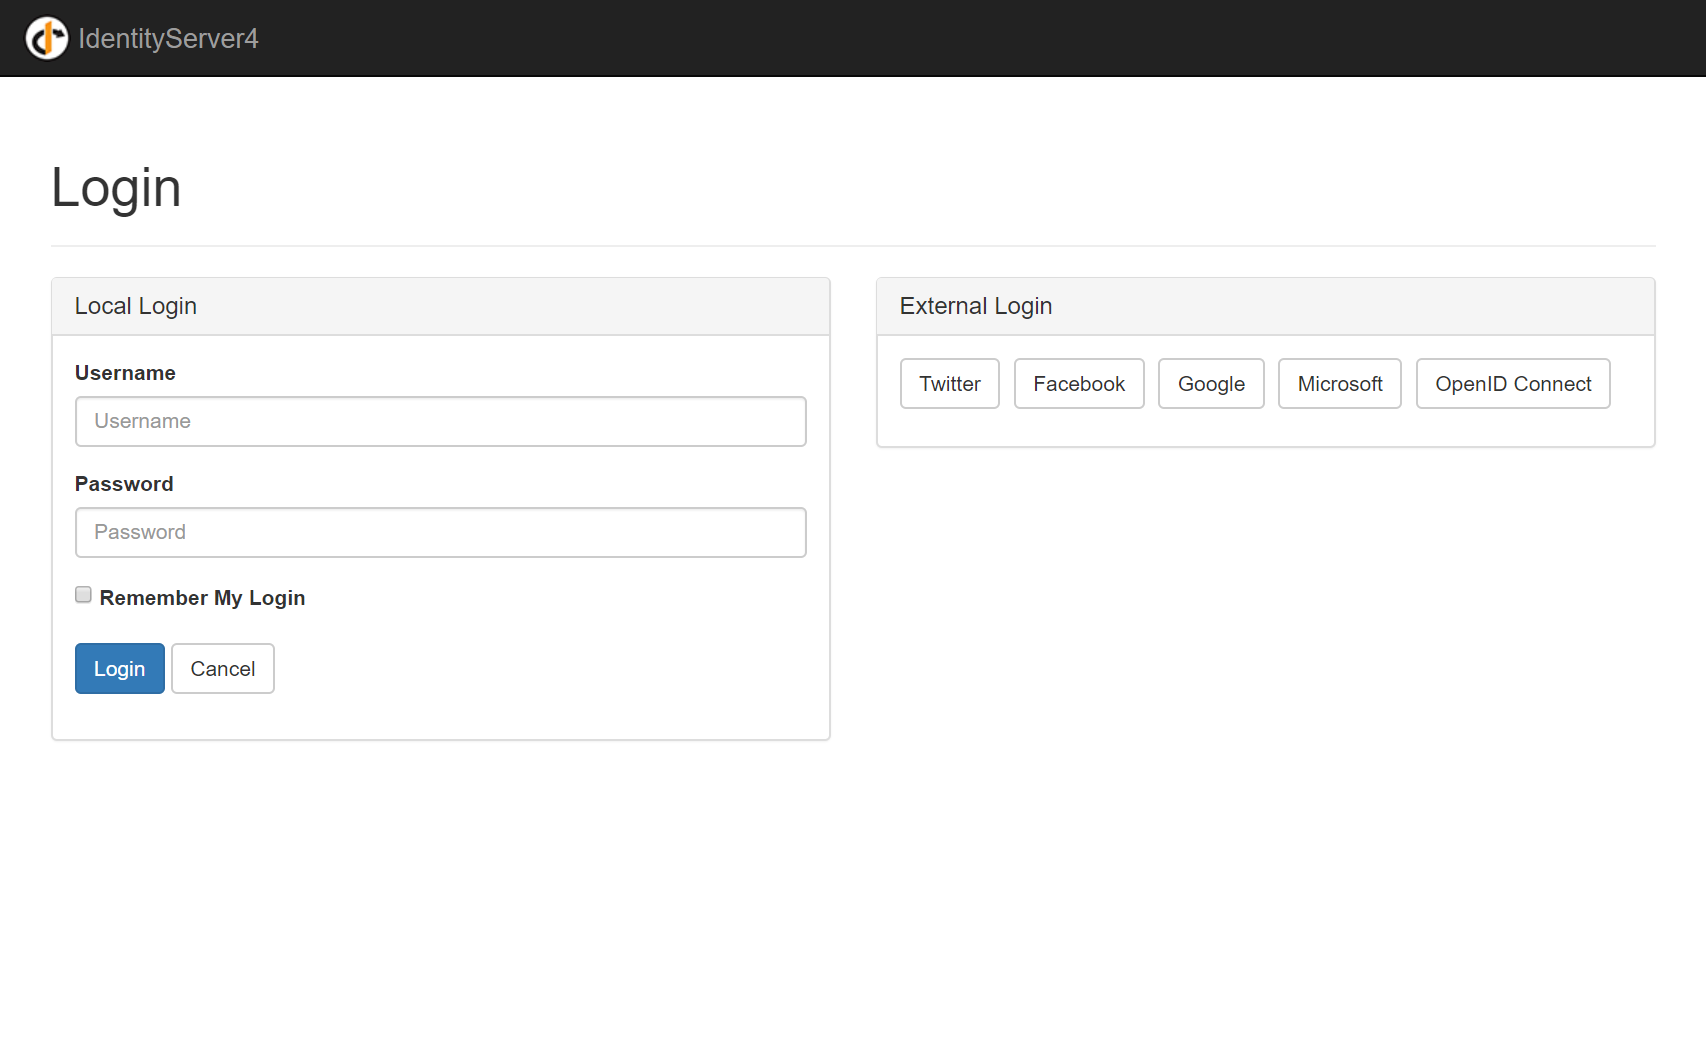
Users can sign in using the same Credentials or external OAuth Providers but are presented with an additional consent screen to grant the App permission to access their User profile information and access to custom features the App needs:

Once granted the Auth information is captured in a stateless IdentityServer Token, stored in a cookie and redirected back to the App.
Physical Project Structure
mvcidentityserver is pre-configured with 3 Host projects:
- /IdentityServer - The Central IdentityServer Auth Server (port 5000)
- /ProjectName - Our Hybrid MVC + ServiceStack App (port 5002)
- /ProjectName.Api - Example Microservice API used by Hybrid App (port 5001)
IdentityServer
The IdentityServer instance is configured in Startup.cs which contains all external OAuth providers we want to allow Sign Ins from, the OpenId Connect Endpoint which allows Sign Ins from another external IdentityServer on demo.identityserver.io and all its pre-configured Users, Identity Resources, API Resources and Clients defined in Config.cs.
App
The App's Startup.cs consists of configuring the OpenId Connect Endpoint
to our Central IdentityServer containing additional customizations to control what Claims the Authenticated ClaimsPrincipal will have:
services.AddAuthentication(options =>
    {
        options.DefaultScheme = "Cookies";
        options.DefaultChallengeScheme = "oidc";
    })
    .AddCookie("Cookies")
    .AddOpenIdConnect("oidc", options =>
    {
        options.SignInScheme = "Cookies";

        options.Authority = "http://localhost:5000";
        options.RequireHttpsMetadata = false;

        options.ClientId = "mvc";
        options.ClientSecret = "secret";
        options.ResponseType = "code id_token";

        options.SaveTokens = true;
        options.GetClaimsFromUserInfoEndpoint = true;

        options.Scope.Add("api1");
        options.Scope.Add("offline_access");

        options.ClaimActions.MapJsonKey("website", "website");
        options.ClaimActions.MapJsonKey("role", "role");
        options.ClaimActions.Add(new AdminRolesClaimAction("Manager", "Employee"));

        options.TokenValidationParameters = new TokenValidationParameters
        {
            NameClaimType = "name",
            RoleClaimType = "role"
        };

        options.Events = new OpenIdConnectEvents {
            OnRemoteFailure = CustomHandlers.HandleCancelAction,
            OnTokenResponseReceived = CustomHandlers.CopyAllowedScopesToUserClaims,
        };
    });
The only customization needed in ServiceStack is to specify the different custom name being used for RoleClaimType:
Plugins.Add(new AuthFeature(() => new CustomUserSession(),
    new IAuthProvider[] {
        // Adapter to enable ASP.NET Core Identity Auth in ServiceStack
        new NetCoreIdentityAuthProvider(AppSettings) {
            RoleClaimType = "role"
        },
    }));
The MapJsonKey contains a whitelist of properties in Identity Server's Token we want propagated to Claims.
The AdminRolesClaimAction is a custom ClaimAction we can use to add additional AdminRoles to users with the RoleNames.Admin role:
/// <summary>
/// Use this class to assign additional roles to Admin Users
/// </summary>
public class AdminRolesClaimAction : ClaimAction
{
    string[] AdminRoles { get; }
    public AdminRolesClaimAction(params string[] adminRoles) : base("role", null) => AdminRoles = adminRoles;

    public override void Run(JObject userData, ClaimsIdentity identity, string issuer)
    {
        if (!HasAdminRole(userData)) return;
        foreach (var role in AdminRoles)
        {
            identity.AddClaim(new Claim("role", role));
        }
    }

    private bool HasAdminRole(JObject userData)
    {
        var jtoken = userData?[this.ClaimType];
        if (jtoken is JValue)
        {
            if (jtoken?.ToString() == RoleNames.Admin)
                return true;
        }
        else if (jtoken is JArray)
        {
            foreach (var obj in jtoken)
                if (obj?.ToString() == RoleNames.Admin)
                    return true;
        }
        return false;
    }
}
The OpenIdConnectEvents lets us intercept the original IdentityServer token so we can extract the custom OAuth scopes the User
has granted the App and add them to scope Claims:
public static class CustomHandlers
{
    /// <summary>
    /// Use this handler to copy requested Scopes to User Claims so they can be validated using a Policy
    /// </summary>
    public static Task CopyAllowedScopesToUserClaims(TokenResponseReceivedContext context)
    {
        var scopes = context.ProtocolMessage.Scope?.Split(' ');
        if (scopes != null && context.Principal.Identity is ClaimsIdentity identity)
        {
            foreach (var scope in scopes)
            {
                identity.AddClaim(new Claim("scope", scope));
            }
        }
        return Task.CompletedTask;
    }

    public static Task HandleCancelAction(RemoteFailureContext context)
    {
        context.Response.Redirect("/");
        context.HandleResponse();
        return Task.CompletedTask;
    }
}
Now that our populated claims contains the granted OAuth scopes we can validate against it in ServiceStack Services using the new [RequiredClaim] attribute:
[RequiredClaim("scope", "profile")]
public object Any(RequiresScope request)
{
    return new RequiresScopeResponse { Result = $"Hello, {request.Name}!" };
}
In MVC we need create a custom Auth Policy:
services.AddAuthorization(options => {
    options.AddPolicy("ProfileScope", policy =>
        policy.RequireClaim("scope", "profile"));
});
That can then be used in our MVC Controllers using the [Authorize] attribute, referencing our custom policy:
[Authorize(Policy = "ProfileScope")]
public async Task<IActionResult> RequiresScope()
{
    var accessToken = await HttpContext.GetTokenAsync("access_token");

    return View();
}
Delegated Auth Pages
mvcidentityserver also contains examples showing how to make
Authenticated API Requests to a remote Web API Service using HttpClient:
public async Task<IActionResult> CallWebApi()
{
    var accessToken = await HttpContext.GetTokenAsync("access_token");

    var client = new HttpClient();
    client.DefaultRequestHeaders.Authorization = new AuthenticationHeaderValue("Bearer", accessToken);
    var content = await client.GetStringAsync("http://localhost:5001/webapi-identity");

    ViewBag.Json = JArray.Parse(content).ToString();
    return View("json");
}
The same HttpClient request to call an Authenticated ServiceStack Service:
public async Task<IActionResult> CallServiceStack()
{
    var accessToken = await HttpContext.GetTokenAsync("access_token");

    var client = new HttpClient();
    client.DefaultRequestHeaders.Authorization = new AuthenticationHeaderValue("Bearer", accessToken);
    client.DefaultRequestHeaders.Accept.Add(new MediaTypeWithQualityHeaderValue(MimeTypes.Json));
    var json = await client.GetStringAsync("http://localhost:5001/servicestack-identity");

    ViewBag.Json = json.IndentJson();
    return View("json");
}
We need the additional Accept JSON HTTP header to tell ServiceStack which of the registered Content Types
we want to receive the response in.
Alternatively we can make Authenticated Requests using the more typed and terse C#/.NET Service Client:
public async Task<IActionResult> CallServiceClient()
{
    var accessToken = await HttpContext.GetTokenAsync("access_token");

    var client = new JsonServiceClient("http://localhost:5001/") {
        BearerToken = accessToken
    };
    var response = await client.GetAsync(new GetIdentity());

    ViewBag.Json = response.ToJson().IndentJson();
    return View("json");
}
API
The API's Startup.cs is configured to accept Bearer Tokens issued by our central IdentityServer:
services.AddAuthentication("Bearer")
    .AddJwtBearer("Bearer", options => {
        options.Authority = "http://localhost:5000";
        options.RequireHttpsMetadata = false;

        options.Audience = "api1";
    });
Nothing special is needed for ServiceStack here other than registering the Identity Auth Provider adapter:
Plugins.Add(new AuthFeature(() => new AuthUserSession(),
    new IAuthProvider[] {
        new NetCoreIdentityAuthProvider(AppSettings),
    }));
The GetIdentity ServiceStack Service then returns the populated AuthUserSession and all claims contained in the Bearer Token:
[Route("/servicestack-identity")]
public class GetIdentity : IReturn<GetIdentityResponse> { }

public class GetIdentityResponse
{
    public List<Property> Claims { get; set; }
    public AuthUserSession Session { get; set; }
}

[Authenticate]
public class IdentityService : Service
{
    public object Any(GetIdentity request)
    {
        return new GetIdentityResponse {
            Claims = Request.GetClaims().Map(x => new Property { Name = x.Type, Value = x.Value }),
            Session = SessionAs<AuthUserSession>(),
        };
    }
}
ServiceStack
AppSettings .NET Core Configuration conventions
To improve integration with .NET Core's Configuration API, using the : in your AppSettings Key can be used to navigate nested configuration, e.g:
{
    "A": {
        "B": {
            "C": "value"
        }
    }
}
You can retrieve the nested configuration above with:
var value = AppSettings.GetString("A:B:C");
See NetCoreAppSettingsTests.cs for more examples.
Update servicestack:license configuration
This is a breaking change if you were relying on Auto License Key registration in appsettings.json with:
{
    "servicestack:license": "{LICENSE_KEY}"
}
Which now needs to be changed to:
{
    "servicestack" : {
        "license": "{LICENSE_KEY}"
    }
}
Alternatively you can use your own key without : and register your license key manually:
{
    "servicestack_license": "{LICENSE_KEY}"
}
Then you can register the key as a normal string app setting, e.g:
Licensing.RegisterLicense(AppSettings.GetString("servicestack_license"));
New Auth Providers
In coordination with winding down our support for ServiceStack.Authentication.OAuth2 and ServiceStack.Authentication.OpenId packages that depends on the abandoned DotNetOpenAuth, we've rewritten the remaining popular Auth Providers to not have any dependencies where they're now included in ServiceStack.Auth and can be used in all .NET Framework and .NET Core hosts:
LinkedInAuthProviderGoogleAuthProvider
Microsoft Graph Auth Provider
We've also added a new Microsoft Auth Provider to authenticate using Microsoft's Graph API:
MicrosoftGraphAuthProvider
To get started quickly with the Microsoft and Google Auth providers, create a new mvcauth project with:
$ web new mvcauth ProjectName
OAuth Setup
You'll need to Replace the oauth.* App settings with your own in appsettings.Development.json for local development and appsettings.json for production deployments.
Follow the links below to create OAuth Apps for the different external providers:
- Twitter - Create Twitter App with
{BaseUrl}/auth/twitterreferrer - Facebook - Create Facebook App with
{BaseUrl}/auth/facebookreferrer - Google - Create Google App with
{BaseUrl}/auth/googlereferrer - Microsoft - Create Microsoft App with
{BaseUrl}/auth/microsoftreferrer
Microsoft Graph SavePhoto
The additional SavePhoto and SavePhotoSize options are specific to Microsoft's Graph provider to workaround it not providing a publicly servable image
for the Users avatar so we can provide the same experience and have IAuthSession.GetProfileUrl() return the Users avatar.
Enabling SavePhoto downloads the users avatar on Authentication, resizes it to the dimensions in SavePhotoSize then convert into a URL embedded with the PNG image data of the avatar.
{
  "oauth.microsoftgraph.SavePhoto": "true",
  "oauth.microsoftgraph.SavePhotoSize": "32x32"
}
New Claim APIs
A few new APIs were added to make accessing and working claims easier in ServiceStack, e.g:
var claims = base.Request.GetClaims();
claims.HasRole(roleName);
claims.HasScope(scopeName);
claims.HasClaim(claimType, claimValue);
Use the new [RequiredClaim] attribute to check for specific claims when using ServiceStack with Claims Based Auth:
[RequiredClaim("scope", "profile")]
public object Any(RequiresScope request) => ...;
IServiceProvider Request Extensions
You can access scoped ASP.NET Core dependencies and create Custom IOC Scopes using the new IRequest extension methods:
IRequest.TryResolveScoped<T>()IRequest.TryResolveScoped()IRequest.ResolveScoped<T>()IRequest.ResolveScoped()IRequest.CreateScope()IRequest.GetServices()IRequest.GetServices<T>()
Enable Same Site Cookies
Same Site Cookies are a good default to use in your Apps which restricts cookies from being sent cross-site in order to prevent against cross-site request forgery (CSRF) attacks.
Configure it with:
SetConfig(new HostConfig
{
    UseSameSiteCookies = true
});
This restriction will prevent features reliant on cross-site cookies from working so you'll need to verify it's safe to enable in your Apps.
This restriction works with most Auth Providers except for TwitterAuthProvider who doesn't yet support the OAuth state callback that
could be used instead of Session cookies.
Cookie Filters
Further customization of Cookies can be enabled by overriding the host-specific methods in your AppHost:
//ASP.NET Core
public override void CookieOptionsFilter(Cookie cookie, Microsoft.AspNetCore.Http.CookieOptions cookieOptions) {}

//Classic ASP.NET
public override void HttpCookieFilter(HttpCookie cookie) {}
Secure Cookies enabled by default
Secure Cookies ensure that Cookies added over HTTPS are only resent in subsequent secure connections.
They're now enabled by default for Cookies added over SSL, they can be disabled with:
Plugins.Add(new HostConfig {
    UseSecureCookies = false
});
Override Authorization HTTP Header
Request Filters can override the Authorization HTTP Header used in Auth Providers with:
httpReq.Items[Keywords.Authorization] = $"Bearer {token}";
GET Authenticate Requests are disabled by default
We're disabling GET /auth/{provider} requests by default to discourage sending confidential information in the URL.
The current exceptions which still allow GET requests include:
/auth- Used to check if a User is Authenticated/auth/logout- Logging Out- All OAuth Providers who starts their OAuth flow by navigating to
/auth/{provider}
This is a potential breaking change if you're currently using GET requests to Authenticate and can be reverted with:
new AuthFeature {
    AllowGetAuthenticateRequests = req => true
}
Although it's recommended to instead update or existing code to use POST instead of GET requests.
Otherwise you can use the IRequest req parameter to check against a white list of known requests types.
UserSession validation
Custom User Sessions can override AuthUserSession.Validate() to add additional logic for validating whether to allow a User to Authenticate, e.g:
public class CustomUserSession : AuthUserSession
{
    public override IHttpResult Validate(IServiceBase authService, IAuthSession session,
        IAuthTokens tokens, Dictionary<string, string> authInfo)
    {
        if (!ValidateEmail(session.Email))
            return HttpError.BadRequest($"{nameof(session.Email)} is invalid") as IHttpResult;

        return null;
    }
}
Returning any IHttpResult will cause Authentication to fail with the returned IHttpResult written to the response.
Intercept Service Requests
As an alternative to creating a Custom Service Runner to intercept
different events when processing ServiceStack Requests, you can instead override the OnBeforeExecute(), OnAfterExecute() and OnExceptionAsync()
callbacks in your Service class (or base class) to intercept and modify Request DTOs, Responses or Error Responses, e.g:
class MyServices : Service
{
    // Log all Request DTOs that implement IHasSessionId
    public override void OnBeforeExecute(object requestDto)
    {
        if (requestDto is IHasSessionId dtoSession)
        {
            Log.Debug($"{nameof(OnBeforeExecute)}: {dtoSession.SessionId}");
        }
    }

    //Return Response DTO Name in HTTP Header with Response
    public override object OnAfterExecute(object response)
    {
        return new HttpResult(response) {
            Headers = {
                ["X-Response"] = response.GetType().Name
            }
        };
    }

    //Return custom error with additional metadata
    public override Task<object> OnExceptionAsync(object requestDto, Exception ex)
    {
        var error = DtoUtils.CreateErrorResponse(requestDto, ex);
        if (error is IHttpError httpError)
        {
            var errorStatus = httpError.Response.GetResponseStatus();
            errorStatus.Meta = new Dictionary<string,string> {
                ["InnerType"] = ex.InnerException?.GetType().Name
            };
        }
        return Task.FromResult(error);
    }
}
If you're implementing IService instead of inheriting the concrete Service class, you can implement the interfaces directly:
// Handle all callbacks
public class MyServices : IService, IServiceFilters
{
    //..
}

// Or individually, just the callbacks you want
public class MyServices : IService, IServiceBeforeFilter, IServiceAfterFilter, IServiceErrorFilter
{
    //..
}
Fluent Validation
You can change ServiceStack's built-in FluentValidation to throw Exceptions on Warnings with:
Plugins.Add(new ValidationFeature {
    TreatInfoAndWarningsAsErrors = true
});
Thanks to @DeonHeyns for this feature.
Auto Batching
The current index of the Auto Batched Request being processed is now being maintained in IRequest.Items[Keywords.AutoBatchIndex].
In Error Responses the index of the request that failed is now being populated in your Response DTO's ResponseStatus.Meta["AutoBatchIndex"].
To also maintain the active AutoBatchIndex in Custom Batched Requests Implementations
you can use the IRequest.EachRequest() extension method, e.g:
public object Any(GetCustomAutoBatchIndex[] requests)
{
    var responses = new List<GetAutoBatchIndexResponse>();

    Request.EachRequest<GetCustomAutoBatchIndex>(dto =>
    {
        responses.Add(Any(dto));
    });

    return responses;
}
Thanks to @georgehemmings for this feature.
Hot Reload
ServiceStack includes 2 Hot Reloading solutions to automatically detect file changes and reload your page on save.
Hot Reload #Script Pages
The Hot Reloading support in #Script Pages enables the HotReloadFilesService
when registering the SharpPagesFeature, e.g:
Plugins.Add(new SharpPagesFeature {
    EnableHotReload = Config.DebugMode //default
});
This is enabled in your pages with this snippet which renders the hot reload client script during development:
<i hidden>{{ '/js/hot-loader.js' | ifDebugIncludeScript }}</i>
Which starts a long poll that calls the smart HotReloadFilesService which recursively inspects the current tokenized
#Script Pages to find if it or any dependent layouts, partials or file includes have changed.
Sharp Page's Hot Reload feature now also monitors Paged Based Routing Pages and View Pages.
Hot Reload Static Files
If you're not developing your Website with #Script or are developing a Single Page App where it's mostly contained in static files
you can use the HotReloadFeature instead which has added support for monitoring multiple File Search Patterns and can now be configured
to monitor a different VFS provider (defaults to WebRoot).
The new "lite" projects utilize both these features for its hot reloading support:
if (Config.DebugMode)
{
    Plugins.Add(new HotReloadFeature {
        DefaultPattern = "*.html;*.js;*.css",
        VirtualFiles = VirtualFiles // Monitor ContentRoot to detect changes in /src
    });
}
Which is enabled during development in _layout.html by including /js/hot-fileloader.js:
<i hidden>{{ '/js/hot-fileloader.js' | ifDebugIncludeScript }}</i>
Image Utils
New Image.ResizeToPng() and Image.CropToPng() extension methods
can be used to resize and crop System.Drawing Images, e.g:
[AddHeader(ContentType = "image/png")]
public Stream Get(Resize request)
{
    var imageFile = VirtualFiles.GetFile(request.Path);
    if (imageFile == null)
        throw HttpError.NotFound(request.Path + " was not found");

    using (var stream = imageFile.OpenRead())
    using (var img = Image.FromStream(stream))
    {
        return img.ResizeToPng(request.Width, request.Height);
    }
}

[AddHeader(ContentType = "image/png")]
public Stream Get(Crop request)
{
    var imageFile = VirtualFiles.GetFile(request.Path);
    if (imageFile == null)
        throw HttpError.NotFound(request.Path + " was not found");

    using (var stream = imageFile.OpenRead())
    using (var img = Image.FromStream(stream))
    {
        return img.CropToPng(request.Width, request.Height, request.StartX, request.StartY);
    }
}
Enum Utils
The new EnumUtils.GetValues(), IEnumerable<Enum>.ToKeyValuePairs() and Enum.ToDescription() extension methods
makes it easy to create data sources from Enums that can be annotated with [ApiMember] and [Description] attributes:
List<KeyValuePair<string, string>> Titles => EnumUtils.GetValues<Title>()
    .Where(x => x != Title.Unspecified)
    .ToKeyValuePairs();

List<string> FilmGenres => EnumUtils.GetValues<FilmGenres>()
    .Map(x => x.ToDescription());
Open API Feature
Customizable Security Definitions
The OpenApiFeature now allows customizable SecurityDefinitions and includes a couple of pre-set configurations, e.g.
to configure swagger-ui to allow authentication via HTTP Bearer Token (via JWT or API Key Auth) use:
Plugins.Add(new OpenApiFeature
{
    UseBearerSecurity = true
});
This will customize the Open API metadata Response to specify your authenticated Services would like to use Swagger's API Key authentication, e.g:

As the value field is for the entire Authorization HTTP Header you'd need to add your JWT Token or API Key prefixed with Bearer :
Bearer {JWT or API Key}
Alternatively you can force using HTTP Basic Auth instead with:
Plugins.Add(new OpenApiFeature
{
    UseBasicSecurity = true
});
By default if you've registered a BasicAuthProvider it will use UseBasicSecurity otherwise it default to using UseBearerSecurity.
Customize SwaggerUI
Open API lets you override embedded resources to customize the embedded /swagger-ui
where you can add a /swagger-ui/patch.js to add additional JavaScript at the end of the page, you can now also add /swagger-ui/patch-preload.js
to modify the window.swaggerUi configuration object before it's loaded with window.swaggerUi.load():
<script type='text/javascript'>
//...

// contents of /swagger-ui/patch-preload.js

window.swaggerUi.load();
</script>
Disable Auto HTML Pages
ServiceStack's fallback Auto HTML Report Pages can now be disabled with:
SetConfig(new HostConfig {
    EnableAutoHtmlResponses = false
})
When disabled it will render Response DTOs from Browser requests (i.e. Accept:text/html) in the next Config.PreferredContentTypes - (JSON by default).
TypeScript
Partial Constructors
All TypeScript Reference DTOs now includes support for Partial Constructors making them much nicer to populate using object initializer syntax we're used to in C#, so instead of:
const request = new Authenticate();
request.provider = 'credentials'
request.userName = this.userName;
request.password = this.password;
request.rememberMe = this.rememberMe;
const response = await client.post(request);
You can now populate DTOs with object literal syntax without any loss of TypeScript's Type Safety benefits:
const response = await client.post(new Authenticate({
    provider: 'credentials',
    userName: this.userName,
    password: this.password,
    rememberMe: this.rememberMe,
}));
DefaultImports
There's new Symbol:module short-hand syntax for specifying additional imports in your generated TypeScript DTOs, e.g:
/* Options:
...
DefaultImports: Symbol:module,Zip:./ZipValidator
*/
Which will generate the popular import form of:
import { Symbol } from "module";
import { Zip } from "./ZipValidator";
Messaging
All MQ Servers now support the ability to specify a whitelist of Requests you only want to publish .outq for:
PublishToOutqWhitelist = new[]{ nameof(MyRequest) }
Alternatively all .outq messages can be disabled with:
DisablePublishingToOutq = true
Background MQ Stats
Additional stats are available for Background MQ to gain more insight into the processing of background operations, e.g. you can get info on the Queue Collection for a specific DTO Type with:
var bgService = (BackgroundMqService)HostContext.Resolve<IMessageService>();
var mqCollection = bgService.GetCollection(typeof(Poco));
Dictionary<string, long> statsMap = mqCollection.GetDescriptionMap();
Which returns the text info that mqCollection.GetDescription() returns, but in a structured Dictionary using the keys:
ThreadCountTotalMessagesAddedTotalMessagesTakenTotalOutQMessagesAddedTotalDlQMessagesAdded
The dictionary also includes each the snapshot counts of each queue in the MQ Collection, e.g:
mq:Poco.inqmq:Poco.priorityqmq:Poco.outqmq:Poco.dlq
You can also get the Stats of each MQ Worker, or if you have multiple workers for a Request Type you can access them with:
IMqWorker[] workers = bgService.GetWorkers(QueueNames<Type>.In);
List<IMessageHandlerStats> stats = workers.Map(x => x.GetStats());
Then combine them to get their cumulative result:
IMessageHandlerStats combinedStats = stats.CombineStats();
Aws SQS Server
Intercepting Filters
A number of new filters have been added to SqsMqServer and SqsMqClient which will let you intercept and apply custom logic before SQS messages are
sent and received:
Action<SendMessageRequest,IMessage> SendMessageRequestFilter
Action<ReceiveMessageRequest> ReceiveMessageRequestFilter
Action<Amazon.SQS.Model.Message, IMessage> ReceiveMessageResponseFilter
Action<DeleteMessageRequest> DeleteMessageRequestFilter
Action<ChangeMessageVisibilityRequest> ChangeMessageVisibilityRequestFilter
Polling Duration
The polling duration used to poll SQS queues can be configured with:
new SqsMqServer {
    PollingDuration = TimeSpan.FromMilliseconds(1000) //default
}
OrmLite
OrmLite continues to receive a number of enhancements in response to Customer Feature Requests:
INSERT INTO SELECT
You can use OrmLite's Typed SqlExpression to create a subselect expression that you can use to create and execute a
typed INSERT INTO SELECT SqlExpression with:
var q = db.From<User>()
    .Where(x => x.UserName == "UserName")
    .Select(x => new {
        x.UserName,
        x.Email,
        GivenName = x.FirstName,
        Surname = x.LastName,
        FullName = x.FirstName + " " + x.LastName
    });

var id = db.InsertIntoSelect<CustomUser>(q)
PostgreSQL Rich Data Types
By default all arrays of .NET's built-in numeric, string and DateTime types will be stored in PostgreSQL array types:
public class Table
{
    public Guid Id { get; set; }

    public int[] Ints { get; set; }
    public long[] Longs { get; set; }
    public float[] Floats { get; set; }
    public double[] Doubles { get; set; }
    public decimal[] Decimals { get; set; }
    public string[] Strings { get; set; }
    public DateTime[] DateTimes { get; set; }
    public DateTimeOffset[] DateTimeOffsets { get; set; }
}
You can opt-in to annotate other collections like List<T> to also be stored in array types by annotating them with [Pgsql*] attributes, e.g:
public class Table
{
    public Guid Id { get; set; }

    [PgSqlIntArray]
    public List<int> ListInts { get; set; }
    [PgSqlBigIntArray]
    public List<long> ListLongs { get; set; }
    [PgSqlFloatArray]
    public List<float> ListFloats { get; set; }
    [PgSqlDoubleArray]
    public List<double> ListDoubles { get; set; }
    [PgSqlDecimalArray]
    public List<decimal> ListDecimals { get; set; }
    [PgSqlTextArray]
    public List<string> ListStrings { get; set; }
    [PgSqlTimestamp]
    public List<DateTime> ListDateTimes { get; set; }
    [PgSqlTimestampTz]
    public List<DateTimeOffset> ListDateTimeOffsets { get; set; }
}
Alternatively if you always want List<T> stored in Array types, you can register them in the PostgreSqlDialect.Provider:
PostgreSqlDialect.Provider.RegisterConverter<List<string>>(new PostgreSqlStringArrayConverter());
PostgreSqlDialect.Provider.RegisterConverter<List<int>>(new PostgreSqlIntArrayConverter());
PostgreSqlDialect.Provider.RegisterConverter<List<long>>(new PostgreSqlLongArrayConverter());
PostgreSqlDialect.Provider.RegisterConverter<List<float>>(new PostgreSqlFloatArrayConverter());
PostgreSqlDialect.Provider.RegisterConverter<List<double>>(new PostgreSqlDoubleArrayConverter());
PostgreSqlDialect.Provider.RegisterConverter<List<decimal>>(new PostgreSqlDecimalArrayConverter());
PostgreSqlDialect.Provider.RegisterConverter<List<DateTime>>(new PostgreSqlDateTimeTimeStampArrayConverter());
PostgreSqlDialect.Provider.RegisterConverter<List<DateTimeOffset>>(new PostgreSqlDateTimeOffsetTimeStampTzArrayConverter());
Hstore support
To use hstore, its extension needs to be enabled in your PostgreSQL RDBMS by running:
CREATE EXTENSION hstore;
Which can then be enabled in OrmLite with:
PostgreSqlDialect.Instance.UseHstore = true;
Where it will now store string Dictionaries in Hstore columns:
public class TableHstore
{
    public int Id { get; set; }

    public Dictionary<string,string> Dictionary { get; set; }
    public IDictionary<string,string> IDictionary { get; set; }
}

db.DropAndCreateTable<TableHstore>();

db.Insert(new TableHstore
{
    Id = 1,
    Dictionary = new Dictionary<string, string> { {"A", "1"} },
    IDictionary = new Dictionary<string, string> { {"B", "2"} },
});
Where they can than be queried in postgres using Hstore SQL Syntax:
db.Single(db.From<PostgreSqlTypes>().Where("dictionary -> 'A' = '1'")).Id //= 1
Thanks to @cthames for this feature.
JSON data types
If you instead wanted to store arbitrary complex types in PostgreSQL's rich column types to enable deep querying in postgres,
you'd instead annotate them with [PgSqlJson] or [PgSqlJsonB], e.g:
public class TableJson
{
    public int Id { get; set; }

    [PgSqlJson]
    public ComplexType ComplexTypeJson { get; set; }

    [PgSqlJsonB]
    public ComplexType ComplexTypeJsonb { get; set; }
}

db.Insert(new TableJson
{
    Id = 1,
    ComplexTypeJson = new ComplexType {
        Id = 2, SubType = new SubType { Name = "JSON" }
    },
    ComplexTypeJsonb = new ComplexType {
        Id = 3, SubType = new SubType { Name = "JSONB" }
    },
});
Where they can then be queried on the server with JSON SQL Syntax and functions:
var result = db.Single<TableJson>("table_json->'SubType'->>'Name' = 'JSON'");
New KeyValuePair<K,V> top-level APIs
The new db.KeyValuePair<K,V> API is similar to db.Dictionary<K,V> where it uses the first 2 columns for its Key/Value Pairs to
create a Dictionary but is more appropriate when the results can contain duplicate Keys or when ordering needs to be preserved:
var q = db.From<StatsLog>()
    .GroupBy(x => x.Name)
    .Select(x => new { x.Name, Count = Sql.Count("*") })
    .OrderByDescending("Count");

var results = db.KeyValuePairs<string, int>(q);
*Asyncvariants also available
SELECT Constant Expressions
You can now mix+match Constant C# Expressions with RDBMS Expressions in the same query:
var q = db.From<Table>()
    .Select(x => new
    {
        x.Field,
        param = 1,
        str = "hi",
        date = DateTime.Now
    });
SELECT DISTINCT in SelectMulti
SelectMulti APIs for populating multiple tables now supports SELECT DISTINCT with:
var tuples = db.SelectMulti<Customer, CustomerAddress>(q.SelectDistinct());
New TableAlias replaces JoinAlias
The new TableAlias APIs is a new expression visitor replacement that replaces the existing JoinAlias APIs which you can use in Queries
with multiple self-reference joins, e.g:
var q = db.From<Page>(db.TableAlias("p1"))
    .Join<Page>((p1, p2) =>
        p1.PageId == p2.PageId &&
        p2.ActivityId == activityId, db.TableAlias("p2"))
    .Join<Page,Category>((p2,c) => Sql.TableAlias(p2.Category) == c.Id)
    .Join<Page,Page>((p1,p2) => Sql.TableAlias(p1.Rank,"p1") < Sql.TableAlias(p2.Rank,"p2"))
    .Select<Page>(p => new {
        ActivityId = Sql.TableAlias(p.ActivityId, "p2")
    });

var rows = db.Select(q);
GetTableNames and GetTableNamesWithRowCounts APIs
As the queries for retrieving table names can vary amongst different RDBMS's, we've abstracted their implementations behind uniform APIs where you can now get a list of table names and their row counts for all supported RDBMS's with:
List<string> tableNames = db.GetTableNames();

List<KeyValuePair<string,long>> tableNamesWithRowCounts = db.GetTableNamesWithRowCounts();
*Asyncvariants also available
Both APIs can be called with an optional schema if you only want the tables for a specific schema.
It defaults to using the more efficient RDBMS APIs, which if offered typically returns an approximate estimate of rowcounts in each table.
If you need exact table row counts, you can specify live:true:
var tablesWithRowCounts = db.GetTableNamesWithRowCounts(live:true);
Dapper updated
The internal ServiceStack.OrmLite.Dapper was updated to the latest v1.60.1 release thanks to @wwwlicious.
DB Scripts can open different connections
By default the DbScripts will use the registered IDbConnectionFactory in the IOC or when Multi tenancy is configured
it will use the connection configured for that request.
You can also specify to use a different DB connection using the namedConnection and connectionString arguments:
{{ sql | dbSelect({ namedConnection }) }}
{{ sql | dbSelect({ connectionString:sqlServerConnString, provider:"mssql" }) }}
Both Named Connections and Dialect providers can be registered in your IDbConnectionFactory, e.g:
dbFactory.RegisterConnection(namedConnection, connString, SqlServer2012Dialect.Provider);
dbFactory.RegisterProvider("mssql", SqlServer2017Dialect.Provider);
Redis
All Redis Clients are initialized with a unique ClientId which is now prefixed in Debug/Error logging #{ClientId} to make it easier to trace the
history for specific clients.
Improved auto-reconnection / auto retry operations on failed requests.
ServiceStack.Text
In addition to significant Auto Mapping improvements covered above, there's a couple of UX Friendly Generic collections to reduce the boilerplate if you're repeatedly using these collections:
var objDict = new ObjectDictionary { //inherits Dictionary<string,object>
    ["one"] = 1,
    ["foo"] = "bar"
}

var strDict = new StringDictionary { //inherits Dictionary<string,string>
    ["one"] = "1",
    ["foo"] = "bar"
}

var kvps = new KeyValuePairs {
    KeyValuePairs.Create("one",1),
    KeyValuePairs.Create("foo","bar"),
};

//instead of
var kvps = new List<KeyValuePair<string,object>> {
    new KeyValuePair<string,object>("one",1),
    new KeyValuePair<string,object>("foo","bar"),
}
ServiceStack.Azure
Large blobs >100MB are now streamed in chunks thanks to @DeonHeyns.