
This release is primarily focused on adding 1st class support for our next most feature requested language - Python!
Python has been going from strength to strength in recent years which has solidified itself as the leading programming language in a number of industries from Education where it's often the first language taught to students learning programming, to becoming a powerhouse in Data Science and Machine Learning thanks to its best-in-class libraries as well as being at the forefront of Interactive Computing with its native support in Jupyter Notebooks - a popular realization of Donald Knuth's Literate Programming paradigm where executable code is interlaced in a live document with natural language documentation, rich markup and embedded media. It's become an invaluable medium for data science, scientists and researchers where it's often used as an advanced REPL environment for data and computation exploration whose resulting knowledge and insights are easily captured and shared.
We're excited to be able to join the beautiful interactive world of Jupyter Notebooks with both simple UI and command-line tools for effortlessly generating customized Notebooks around typed ServiceStack APIs for Jupyter's flagship Python language in addition to C# and F# Notebooks by leveraging dotnet/interactive Jupyter kernel's.
We're also excited to introduce Post Command functionality added to the latest x and app dotnet tools where API consumers can inspect a remote ServiceStack endpoint from the command-line and be able to invoke any API with just the API name and a JS object literal allowing effortless API exploration and superior scriptability and automation.
AutoQuery CRUD operations gains additional functionality with new service implementations generated for every CRUD operation to execute Auto Batched Requests within the same DB transaction.
Lets jump right in to this release with ServiceStack's typed ecosystem expanding with the introduction of its 9th Add ServiceStack Reference language - Python:
Python ServiceStack Reference

ServiceStack's Add ServiceStack Reference feature allows clients to generate Native Types from directly within PyCharm using ServiceStack IntelliJ Plugin - providing a simple way to give clients typed access to your ServiceStack Services.
First class development experience
Python is one of the worlds most popular programming languages which excels in a number of industries thanks to its ease of use and comprehensive libraries. To maximize the experience for calling ServiceStack APIs within these environments ServiceStack now supports Python as a 1st class Add ServiceStack Reference supported language which gives Python developers an end-to-end typed API for consuming ServiceStack APIs, complete with IDE integration in PyCharm as well as built-in support in x dotnet tool to generate Python DTOs for a remote ServiceStack instance from a single command-line.
Ideal idiomatic Typed Message-based API
To maximize the utility of Python DTOs and enable richer tooling support, Python DTOs are generated as dataclasses with support for JSON serialization and annotated with Python 3 type hints - that's invaluable when scaling large Python code-bases and greatly improves discoverability of a remote API. DTOs are also enriched with interface markers through Python's multiple inheritance support which enables its optimal end-to-end typed API:
The Python DTOs and JsonServiceClient library follow Python's PEP 8's naming conventions so they'll naturally fit into existing Python code bases. Here's a sample of techstacks.io generated Python DTOs containing string and int Enums, an example AutoQuery and a standard Request & Response DTO showcasing the rich typing annotations and naming conventions used:
class TechnologyTier(str, Enum):
    PROGRAMMING_LANGUAGE = 'ProgrammingLanguage'
    CLIENT = 'Client'
    HTTP = 'Http'
    SERVER = 'Server'
    DATA = 'Data'
    SOFTWARE_INFRASTRUCTURE = 'SoftwareInfrastructure'
    OPERATING_SYSTEM = 'OperatingSystem'
    HARDWARE_INFRASTRUCTURE = 'HardwareInfrastructure'
    THIRD_PARTY_SERVICES = 'ThirdPartyServices'

class Frequency(IntEnum):
    DAILY = 1
    WEEKLY = 7
    MONTHLY = 30
    QUARTERLY = 90

# @Route("/technology/search")
@dataclass_json(letter_case=LetterCase.CAMEL, undefined=Undefined.EXCLUDE)
@dataclass
class FindTechnologies(QueryDb2[Technology, TechnologyView], IReturn[QueryResponse[TechnologyView]], IGet):
    ids: Optional[List[int]] = None
    name: Optional[str] = None
    vendor_name: Optional[str] = None
    name_contains: Optional[str] = None
    vendor_name_contains: Optional[str] = None
    description_contains: Optional[str] = None

# @Route("/orgs/{Id}", "PUT")
@dataclass_json(letter_case=LetterCase.CAMEL, undefined=Undefined.EXCLUDE)
@dataclass
class UpdateOrganization(IReturn[UpdateOrganizationResponse], IPut):
    id: int = 0
    slug: Optional[str] = None
    name: Optional[str] = None
    description: Optional[str] = None
    color: Optional[str] = None
    text_color: Optional[str] = None
    link_color: Optional[str] = None
    background_color: Optional[str] = None
    background_url: Optional[str] = None
    logo_url: Optional[str] = None
    hero_url: Optional[str] = None
    lang: Optional[str] = None
    delete_posts_with_report_count: int = 0
    disable_invites: Optional[bool] = None
    default_post_type: Optional[str] = None
    default_subscription_post_types: Optional[List[str]] = None
    post_types: Optional[List[str]] = None
    moderator_post_types: Optional[List[str]] = None
    technology_ids: Optional[List[int]] = None

@dataclass_json(letter_case=LetterCase.CAMEL, undefined=Undefined.EXCLUDE)
@dataclass
class UpdateOrganizationResponse:
    response_status: Optional[ResponseStatus] = None
The smart Python JsonServiceClient available in the servicestack pip and conda packages enabling the same
productive, typed API development experience available in our other 1st-class supported client platforms.
Using dataclasses enables DTOs to be populated using a single constructor expression utilizing named parameters which together with the generic JsonServiceClient enables end-to-end typed API Requests in a single LOC:
from .dtos import *
from servicestack import JsonServiceClient

client = JsonServiceClient("https://test.servicestack.net")

response: HelloResponse = client.get(Hello(name="World"))
The
HelloResponseoptional type hint doesn't change runtime behavior but enables static analysis tools and IDEs like PyCharm to provide rich intelli-sense and development time feedback.
Installation
The only requirements for Python apps to perform typed API Requests are the generated Python DTOs and the generic JsonServiceClient which can be installed globally or in a virtual Python environment using Python's pip:
$ pip install servicestack
Or if preferred can be installed with conda:
$ conda install servicestack
PyCharm ServiceStack Plugin
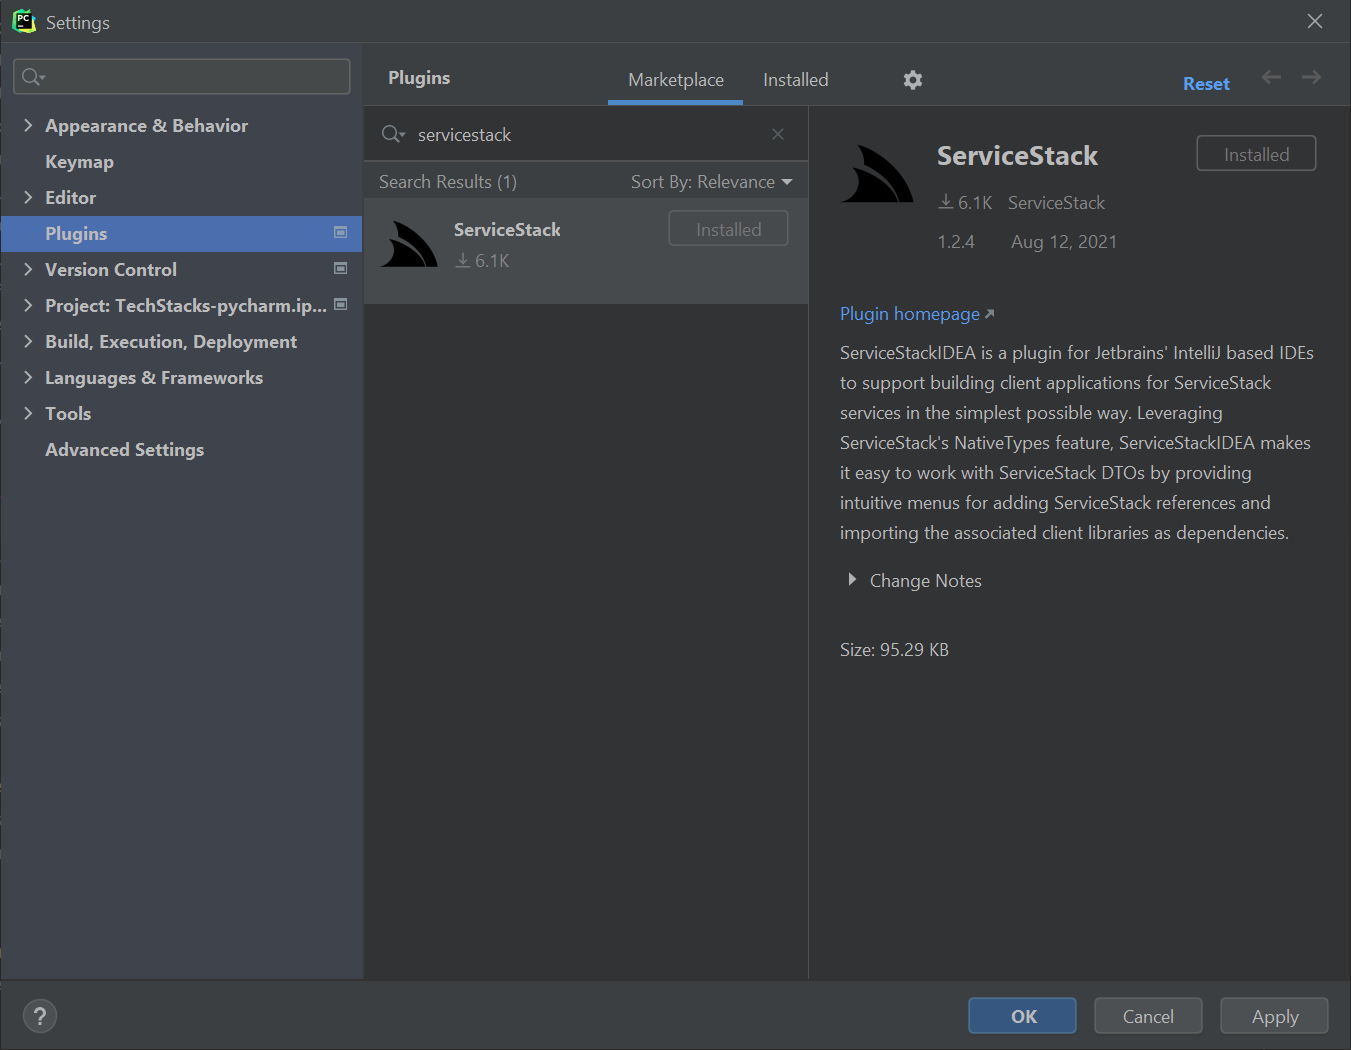
Python developers of PyCharm Professional and FREE Community Edition can get a simplified dev UX for consuming ServiceStack Services by installing the ServiceStack Plugin from the JetBrains Marketplace:
Where you'll be able to right-click on a directory and click on ServiceStack Reference on the context menu:

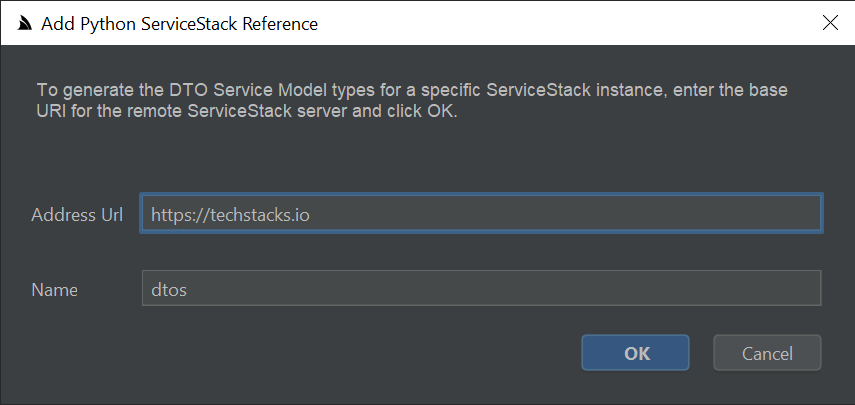
To launch the Add Python ServiceStack Reference dialog where you can enter the remote URL of the ServiceStack endpoint you wish to call to generate the Typed Python DTOs for all APIs which by default will saved to dtos.py:
Then just import the DTOs and JsonServiceClient to be able to consume any of the remote ServiceStack APIs, e.g:
from .dtos import *
from servicestack import JsonServiceClient

client = JsonServiceClient("https://techstacks.io")

response = client.send(FindTechnologies(
    ids=[1, 2, 4, 6],
    vendor_name="Google",
    take=10))
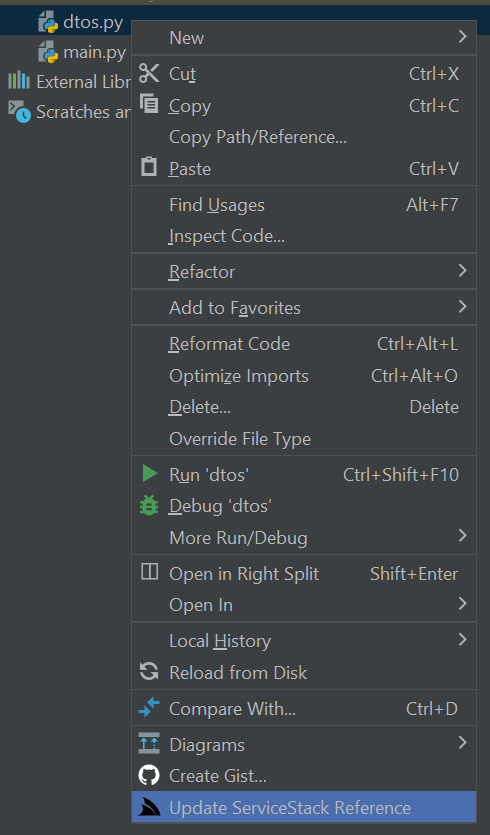
If any of the the remote APIs change their DTOs can be updated by right-clicking on dtos.py and clicking Update ServiceStack Reference:
Simple command-line utility for Python
Developers using other Python IDEs and Text Editors like VS Code can utilize the cross-platform x command line utility for generating Python DTOs from the command-line.
To install, first install the latest .NET SDK for your OS then install the x dotnet tool with:
$ dotnet tool install --global x
Adding a ServiceStack Reference
To Add a Python ServiceStack Reference just call x python with the URL of a remote ServiceStack instance:
$ x python https://techstacks.io
Result:
Saved to: dtos.py
Calling x python with just a URL will save the DTOs using the Host name, you can override this by specifying a FileName as the 2nd argument:
$ x python https://techstacks.io Tech
Result:
Saved to: Tech.dtos.py
Updating a ServiceStack Reference
To Update an existing ServiceStack Reference, call x python with the Filename:
$ x python dtos.py
Result:
Updated: dtos.py
Which will update the File with the latest Python Server DTOs from techstacks.io. You can also customize how DTOs are generated by uncommenting the Python DTO Customization Options and updating them again.
Updating all Python DTOs
Calling x python without any arguments will update all Python DTOs in the current directory:
$ x python
Result:
Updated: Tech.dtos.py
Updated: dtos.py
Smart Generic JsonServiceClient
The generic JsonServiceClient is a 1st class client with the same rich featureset of the smart ServiceClients in other 1st class supported languages sporting a terse, typed flexible API with support for additional untyped params, custom URLs and HTTP Methods, dynamic response types including consuming API responses in raw text and binary data formats. Clients can be decorated to support generic functionality using instance and static Request, Response and Exception Filters.
It includes built-in support for a number of ServiceStack Auth options including HTTP Basic Auth and stateless Bearer Token Auth Providers like API Key and JWT Auth as well as stateful Sessions used by the popular credentials Auth Provider and an on_authentication_required callback for enabling custom authentication methods. The built-in auth options include auto-retry support for transparently authenticating and retrying authentication required requests as well as Refresh Token Cookie support where it will transparently fetch new JWT Bearer Tokens automatically behind-the-scenes for friction-less stateless JWT support.
A snapshot of these above features is captured in the high-level public API below:
class JsonServiceClient:
    base_url: str
    reply_base_url: str
    oneway_base_url: str
    headers: Optional[Dict[str, str]]
    bearer_token: Optional[str]
    refresh_token: Optional[str]
    refresh_token_uri: Optional[str]
    username: Optional[str]
    password: Optional[str]

    on_authentication_required: Callable[[], None]

    global_request_filter: Callable[[SendContext], None]  # static
    request_filter: Callable[[SendContext], None]

    global_response_filter: Callable[[Response], None]  # static
    response_filter: Callable[[Response], None]

    exception_filter: Callable[[Response, Exception], None]
    global_exception_filter: Callable[[Response, Exception], None]

    def __init__(self, base_url)

    def set_credentials(self, username, password)
    @property def token_cookie(self)
    @property def refresh_token_cookie(self)

    def get(self, request: IReturn[T], args: Dict[str, Any] = None) -> T
    def post(self, request: IReturn[T], body: Any = None, args: Dict[str, Any] = None) -> T
    def put(self, request: IReturn[T], body: Any = None, args: Dict[str, Any] = None) -> T
    def patch(self, request: IReturn[T], body: Any = None, args: Dict[str, Any] = None) -> T
    def delete(self, request: IReturn[T], args: Dict[str, Any] = None) -> T
    def options(self, request: IReturn[T], args: Dict[str, Any] = None) -> T
    def head(self, request: IReturn[T], args: Dict[str, Any] = None) -> T
    def send(self, request, method: Any = None, body: Any = None, args: Dict[str, Any] = None)

    def get_url(self, path: str, response_as: Type, args: Dict[str, Any] = None)
    def delete_url(self, path: str, response_as: Type, args: Dict[str, Any] = None)
    def options_url(self, path: str, response_as: Type, args: Dict[str, Any] = None)
    def head_url(self, path: str, response_as: Type, args: Dict[str, Any] = None)
    def post_url(self, path: str, body: Any = None, response_as: Type = None, args: Dict[str, Any] = None)
    def put_url(self, path: str, body: Any = None, response_as: Type = None, args: Dict[str, Any] = None)
    def patch_url(self, path: str, body: Any = None, response_as: Type = None, args: Dict[str, Any] = None)
    def send_url(self, path: str, method: str = None, response_as: Type = None, body: Any = None,
                 args: Dict[str, Any] = None)

    def send_all(self, request_dtos: List[IReturn[T]])  # Auto Batch Reply Requests
    def send_all_oneway(self, request_dtos: list)       # Auto Batch Oneway Requests
Change Default Server Configuration
The above defaults are also overridable on the ServiceStack Server by modifying the default config on the NativeTypesFeature Plugin, e.g:
var nativeTypes = this.GetPlugin<NativeTypesFeature>();
nativeTypes.MetadataTypesConfig.AddResponseStatus = true;
...
Python specific functionality can be added by PythonGenerator
PythonGenerator.DefaultImports.Add("requests");
Customize DTO Type generation
Additional Python specific customization can be statically configured like PreTypeFilter, InnerTypeFilter & PostTypeFilter (available in all languages) can be used to inject custom code in the generated DTOs output.
Use the PreTypeFilter to generate source code before and after a Type definition, e.g. this will append the Decorator class decorator on non enum & interface types:
PythonGenerator.PreTypeFilter = (sb, type) => {
    if (!type.IsEnum.GetValueOrDefault() && !type.IsInterface.GetValueOrDefault())
    {
        sb.AppendLine("@Decorator");
    }
};
The InnerTypeFilter gets invoked just after the Type Definition which can be used to generate common members for all Types and interfaces, e.g:
PythonGenerator.InnerTypeFilter = (sb, type) => {
    sb.AppendLine("id:str = str(random.random())[2:]");
};
There's also PrePropertyFilter & PostPropertyFilter for generating source before and after properties, e.g:
PythonGenerator.PrePropertyFilter = (sb , prop, type) => {
    if (prop.Name == "Id")
    {
        sb.AppendLine("@IsInt");
    }
};
Emit custom code
To enable greater flexibility when generating complex Typed DTOs, you can use [Emit{Language}] attributes to generate code before each type or property.
These attributes can be used to generate different attributes or annotations to enable client validation for different validation libraries in different languages, e.g:
[EmitCode(Lang.Python, "# App User")]
[EmitPython("@Validate")]
public class User : IReturn<User>
{
    [EmitPython("@IsNotEmpty", "@IsEmail")]
    [EmitCode(Lang.Swift | Lang.Dart, new[]{ "@isNotEmpty()", "@isEmail()" })]
    public string Email { get; set; }
}
Which will generate [EmitPython] code in Python DTOs:
# App User
@Validate
@dataclass_json(letter_case=LetterCase.CAMEL, undefined=Undefined.EXCLUDE)
@dataclass
class User:
    @IsNotEmpty
    @IsEmail
    email: Optional[str] = None
Whilst the generic [EmitCode] attribute lets you emit the same code in multiple languages with the same syntax.
Python Reference Example
Lets walk through a simple example to see how we can use ServiceStack's Python DTO annotations in our Python JsonServiceClient. Firstly we'll need to add a Python Reference to the remote ServiceStack Service by right-clicking on a project folder and clicking on ServiceStack Reference... (as seen in the above screenshot).
This will import the remote Services dtos into your local project which looks similar to:
""" Options:
Date: 2021-08-14 15:33:39
Version: 5.111
Tip: To override a DTO option, remove "//" prefix before updating
BaseUrl: https://techstacks.io

#GlobalNamespace:
#MakePropertiesOptional: False
#AddServiceStackTypes: True
#AddResponseStatus: False
#AddImplicitVersion:
#AddDescriptionAsComments: True
#IncludeTypes:
#ExcludeTypes:
#DefaultImports: datetime,decimal,marshmallow.fields:*,servicestack:*,typing:*,dataclasses:dataclass/field,dataclasses_json:dataclass_json/LetterCase/Undefined/config,enum:Enum/IntEnum
#DataClass:
#DataClassJson:
"""

@dataclass_json(letter_case=LetterCase.CAMEL, undefined=Undefined.EXCLUDE)
@dataclass
class GetTechnologyResponse:
    created: datetime.datetime = datetime.datetime(1, 1, 1)
    technology: Optional[Technology] = None
    technology_stacks: Optional[List[TechnologyStack]] = None
    response_status: Optional[ResponseStatus] = None

# @Route("/technology/{Slug}")
@dataclass_json(letter_case=LetterCase.CAMEL, undefined=Undefined.EXCLUDE)
@dataclass
class GetTechnology(IReturn[GetTechnologyResponse], IRegisterStats, IGet):
    slug: Optional[str] = None
In keeping with idiomatic style of local .py sources, generated types are not wrapped within a module by default. This lets you reference the types you want directly using normal import destructuring syntax:
from .dtos import GetTechnology, GetTechnologyResponse
Or import all Types into your preferred variable namespace with:
from .dtos import *

request = GetTechnology()
Making Typed API Requests
Making API Requests in Python is the same as all other ServiceStack's Service Clients by sending a populated Request DTO using a JsonServiceClient which returns typed Response DTO.
So the only things we need to make any API Request is the JsonServiceClient from the servicestack package and any DTO's we're using from generated Python ServiceStack Reference, e.g:
from .dtos import GetTechnology, GetTechnologyResponse
from servicestack import JsonServiceClient

client = JsonServiceClient("https://techstacks.io")

request = GetTechnology()
request.slug = "ServiceStack"

r: GetTechnologyResponse = client.get(request)  # typed to GetTechnologyResponse
tech = r.technology                             # typed to Technology

print(f"{tech.name} by {tech.vendor_name} ({tech.product_url})")
print(f"`{tech.name} TechStacks: {r.technology_stacks}")
Constructors Initializer
All Python Reference dataclass DTOs also implements init making them much nicer to populate using a constructor expression with named params syntax we're used to in C#, so instead of:
request = Authenticate()
request.provider = "credentials"
request.user_name = user_name
request.password = password
request.remember_me = remember_me
response = client.post(request)
You can populate DTOs with a single constructor expression without any loss of Python's Typing benefits:
response = client.post(Authenticate(
    provider='credentials',
    user_name=user_name,
    password=password,
    remember_me=remember_me))
Sending additional arguments with Typed API Requests
Many AutoQuery Services utilize implicit conventions to query fields that aren't explicitly defined on AutoQuery Request DTOs, these can be queried by specifying additional arguments with the typed Request DTO, e.g:
request = FindTechStacks()

r:QueryResponse[TechnologyStackView] = client.get(request, args={"vendorName": "ServiceStack"})
Making API Requests with URLs
In addition to making Typed API Requests you can also call Services using relative or absolute urls, e.g:
client.get("/technology/ServiceStack", response_as=GetTechnologyResponse)

client.get("https://techstacks.io/technology/ServiceStack", response_as=GetTechnologyResponse)

# https://techstacks.io/technology?Slug=ServiceStack
args = {"slug":"ServiceStack"}
client.get("/technology", args=args, response_as=GetTechnologyResponse)
as well as POST Request DTOs to custom urls:
client.post_url("/custom-path", request, args={"slug":"ServiceStack"})

client.post_url("http://example.org/custom-path", request)
Raw Data Responses
The JsonServiceClient also supports Raw Data responses like string and byte[] which also get a Typed API once declared on Request DTOs using the IReturn<T> marker:
public class ReturnString : IReturn<string> {}
public class ReturnBytes : IReturn<byte[]> {}
Which can then be accessed as normal, with their Response typed to a JavaScript str or bytes for raw byte[] responses:
str:str = client.get(ReturnString())

data:bytes = client.get(ReturnBytes())
Authenticating using Basic Auth
Basic Auth support is implemented in JsonServiceClient and follows the same API made available in the C# Service Clients where the userName/password properties can be set individually, e.g:
client = JsonServiceClient(baseUrl)
client.username = user
client.password = pass

response = client.get(SecureRequest())
Or use client.set_credentials() to have them set both together.
Authenticating using Credentials
Alternatively you can authenticate using userName/password credentials by
adding a Python Reference
to your remote ServiceStack Instance and sending a populated Authenticate Request DTO, e.g:
request = Authenticate()
request.provider = "credentials"
request.user_name = user_name
request.password = password
request.remember_me = true

response:AuthenticateResponse = client.post(request)
This will populate the JsonServiceClient with Session Cookies
which will transparently be sent on subsequent requests to make authenticated requests.
Authenticating using JWT
Use the bearer_token property to Authenticate with a ServiceStack JWT Provider using a JWT Token:
client.bearer_token = jwt
Alternatively you can use just a Refresh Token instead:
client.refresh_token = refresh_token
Where the client will automatically fetch a new JWT Bearer Token using the Refresh Token for authenticated requests.
Authenticating using an API Key
Use the bearer_token property to Authenticate with an API Key:
client.bearer_token = api_key
Transparently handle 401 Unauthorized Responses
If the server returns a 401 Unauthorized Response either because the client was Unauthenticated or the
configured Bearer Token or API Key used had expired or was invalidated, you can use onAuthenticationRequired
callback to re-configure the client before automatically retrying the original request, e.g:
auth_client = JsonServiceClient(AUTH_URL)

client.on_authentication_required = lambda c=client, a=auth_client: [
    a.set_credentials(username, password),
    client.set_bearer_token(cast(AuthenticateResponse, a.get(Authenticate())).bearer_token)
]

# Automatically retries requests returning 401 Responses with new bearerToken
response = client.get(Secured())
Automatically refresh Access Tokens
With the Refresh Token support in JWT
you can use the refresh_token property to instruct the Service Client to automatically fetch new JWT Tokens behind the scenes before automatically retrying failed requests due to invalid or expired JWTs, e.g:
# Authenticate to get new Refresh Token
auth_client = JsonServiceClient(AUTH_URL)
auth_client.username = username
auth_client.password = password
auth_response = auth_client.get(Authenticate())

# Configure client with RefreshToken
client.refresh_token = auth_response.refresh_token

# Call authenticated Services and clients will automatically retrieve new JWT Tokens as needed
response = client.get(Secured())
Use the refresh_token_uri property when refresh tokens need to be sent to a different ServiceStack Server, e.g:
client.refresh_token = refresh_token
client.refresh_token_uri = AUTH_URL + "/access-token"
DTO Customization Options
In most cases you'll just use the generated Python DTO's as-is, however you can further customize how the DTO's are generated by overriding the default options.
The header in the generated DTO's show the different options Python native types support with their defaults. Default values are shown with the comment prefix of //. To override a value, remove the # and specify the value to the right of the :. Any uncommented value will be sent to the server to override any server defaults.
The DTO comments allows for customizations for how DTOs are generated. The default options that were used to generate the DTO's are repeated in the header comments of the generated DTOs, options that are preceded by a Python comment # are defaults from the server, any uncommented value will be sent to the server
to override any server defaults.
""" Options:
Date: 2021-08-15 08:26:46
Version: 5.111
Tip: To override a DTO option, remove "#" prefix before updating
BaseUrl: https://techstacks.io

#GlobalNamespace:
#MakePropertiesOptional: False
#AddServiceStackTypes: True
#AddResponseStatus: False
#AddImplicitVersion:
#AddDescriptionAsComments: True
#IncludeTypes:
#ExcludeTypes:
#DefaultImports: datetime,decimal,marshmallow.fields:*,servicestack:*,typing:*,dataclasses:dataclass/field,dataclasses_json:dataclass_json/LetterCase/Undefined/config,enum:Enum/IntEnum
#DataClass:
#DataClassJson:
"""
We'll go through and cover each of the above options to see how they affect the generated DTO's:
Change Default Server Configuration
The above defaults are also overridable on the ServiceStack Server by modifying the default config on the NativeTypesFeature Plugin, e.g:
//Server example in C#
var nativeTypes = this.GetPlugin<NativeTypesFeature>();
nativeTypes.MetadataTypesConfig.AddResponseStatus = true;
...
We'll go through and cover each of the above options to see how they affect the generated DTO's:
GlobalNamespace
As Python lacks the concept of namespaces this just emits a comment with the namespace name:
# module dtos
AddResponseStatus
Automatically add a response_status property on all Response DTO's, regardless if it wasn't already defined:
class GetTechnologyResponse:
    ...
    response_status: Optional[ResponseStatus] = None
AddImplicitVersion
Lets you specify the Version number to be automatically populated in all Request DTO's sent from the client:
class GetTechnology(IReturn[GetTechnologyResponse], IRegisterStats, IGet):
    version: int = 1
    ...
This lets you know what Version of the Service Contract that existing clients are using making it easy to implement ServiceStack's recommended versioning strategy.
IncludeTypes
Is used as a Whitelist to specify only the types you would like to have code-generated:
""" Options:
IncludeTypes: GetTechnology,GetTechnologyResponse
Will only generate GetTechnology and GetTechnologyResponse DTO's:
class GetTechnologyResponse:
    ...
class GetTechnology:
    ...
Include Generic Types
Use .NET's Type Name to include Generic Types, i.e. the Type name separated by the backtick followed by the number of generic arguments, e.g:
IncludeTypes: IReturn`1,MyPair`2
Include Request DTO and its dependent types
You can include a Request DTO and all its dependent types with a .* suffix on the Request DTO, e.g:
""" Options:
IncludeTypes: GetTechnology.*
Which will include the GetTechnology Request DTO, the GetTechnologyResponse Response DTO and all Types that they both reference.
Include All Types within a C# namespace
If your DTOs are grouped into different namespaces they can be all included using the /* suffix, e.g:
""" Options:
IncludeTypes: MyApp.ServiceModel.Admin/*
This will include all DTOs within the MyApp.ServiceModel.Admin C# namespace.
Include All Services in a Tag Group
Services grouped by Tag can be used in the IncludeTypes where tags can be specified using braces in the format {tag} or {tag1,tag2,tag3}, e.g:
""" Options:
IncludeTypes: {web,mobile}
Or individually:
""" Options:
IncludeTypes: {web},{mobile}
ExcludeTypes
Is used as a Blacklist to specify which types you would like excluded from being generated:
""" Options:
ExcludeTypes: GetTechnology,GetTechnologyResponse
Will exclude GetTechnology and GetTechnologyResponse DTOs from being generated.
DefaultImports
The module:Symbols short-hand syntax can be used for specifying additional imports in your generated Python DTO. There are 3 different syntaxes for specifying different Python imports:
""" Options:
...
DefaultImports: datetime,typing:*,enum:Enum/IntEnum
"""
Which will generate the popular import form of:
import datetime
from typing import *
from enum import Enum, IntEnum
DataClass
Change what dataclass decorator is used, e.g:
""" Options:
...
DataClass: init=False
"""
Will decorate every DTO with:
@dataclass(init=False)
class GetTechnology(IReturn[GetTechnologyResponse], IRegisterStats, IGet):
    slug: Optional[str] = None
DataClassJson
Change what dataclass_json decorator is used, e.g:
""" Options:
...
DataClassJson: letter_case=LetterCase.PASCAL
"""
Will decorate every DTO with:
@dataclass_json(letter_case=LetterCase.PASCAL)
class GetTechnology(IReturn[GetTechnologyResponse], IRegisterStats, IGet):
    slug: Optional[str] = None
Which will result in each type being serialized with PascalCase.
Customize Serialization
The servicestack client lib allows for flexible serialization customization where you can change how different .NET Types are serialized and deserialized into native Python types.
To illustrate this we'll walk through how serialization of properties containing binary data to Base64 is implemented.
First we specify the Python DTO generator to emit bytes type hint for the popular .NET binary data types:
PythonGenerator.TypeAliases[typeof(byte[]).Name] = "bytes";
PythonGenerator.TypeAliases[typeof(Stream).Name] = "bytes";
In the Python app we can then specify the serializers and deserializers to use for deserializing properties with the bytes data type which converts binary data to/from Base64:
from servicestack import TypeConverters

def to_bytearray(value: Optional[bytes]):
    if value is None:
        return None
    return base64.b64encode(value).decode('ascii')

def from_bytearray(base64str: Optional[str]):
    return base64.b64decode(base64str)

TypeConverters.serializers[bytes] = to_bytearray
TypeConverters.deserializers[bytes] = from_bytearray
Inspect Utils
To help clients with inspecting API Responses the servicestack library also includes a number of helpful utils to quickly visualizing API outputs.
For a basic indented object graph you can use dump to capture and printdump to print the output of any API Response, e.g:
from dataclasses import dataclass
from dataclasses_json import dataclass_json, Undefined
from typing import Optional
from servicestack import printdump, printtable

@dataclass_json(undefined=Undefined.EXCLUDE)
@dataclass
class GithubRepo:
    name: str
    description: Optional[str] = None
    homepage: Optional[str] = None
    lang: Optional[str] = field(metadata=config(field_name="language"),default=None)
    watchers: Optional[int] = 0
    forks: Optional[int] = 0

response = requests.get(f'https://api.github.com/orgs/python/repos')
orgRepos = GithubRepo.schema().loads(response.text, many=True)
orgRepos.sort(key=operator.attrgetter('watchers'), reverse=True)

print(f'Top 3 {orgName} Repos:')
printdump(orgRepos[0:3])
Output:
Top 3 python Repos:
[
    {
        name: mypy,
        description: Optional static typing for Python 3 and 2 (PEP 484),
        homepage: http://www.mypy-lang.org/,
        lang: Python,
        watchers: 9638,
        forks: 1564
    },
    {
        name: peps,
        description: Python Enhancement Proposals,
        homepage: https://www.python.org/dev/peps/,
        lang: Python,
        watchers: 2459,
        forks: 921
    },
    {
        name: typeshed,
        description: Collection of library stubs for Python, with static types,
        homepage: ,
        lang: Python,
        watchers: 1942,
        forks: 972
    }
]
For tabular resultsets you can use table to capture and printtable to print API resultsets in a human-friendly markdown table with an optional headers parameter to specify the order and columns to display, e.g:
print(f'\nTop 10 {orgName} Repos:')
printtable(orgRepos[0:10],headers=['name','lang','watchers','forks'])
Output:
Top 10 python Repos:
+--------------+-----------+------------+---------+
| name         | lang      |   watchers |   forks |
|--------------+-----------+------------+---------|
| mypy         | Python    |       9638 |    1564 |
| peps         | Python    |       2459 |     921 |
| typeshed     | Python    |       1942 |     972 |
| pythondotorg | Python    |       1038 |     432 |
| asyncio      |           |        945 |     178 |
| typing       | Python    |        840 |     130 |
| raspberryio  | Python    |        217 |      38 |
| typed_ast    | C         |        171 |      43 |
| planet       | Python    |        100 |     145 |
| psf-salt     | SaltStack |         87 |      50 |
+--------------+-----------+------------+---------+
Alternatively you can use htmldump to generate API responses in a HTML UI which is especially useful in Python Jupyter Notebooks to easily visualize API responses, e.g:
Interactive Jupyter Notebooks
Initially forged from the Interactive Python project, Jupyter is an exciting initiative to support an open standards, language agnostic interactive computing platform where it provides the ideal integrated exploratory programming environment for data science and scientific computing as represented by its 3 core languages for these domains in Julia, Python and R (Ju-Py-R).
However its popularity, thriving ecosystem and rich tooling has seen it grow to encompass a wide range of interactive computing use-cases including data cleaning and transformation, numerical simulation, statistical modeling, data visualization, machine learning, and much more which now sees it support over 40 programming languages.
At the core of Jupyter is the "Notebook" (Nb) - an open JSON document format that contains a complete record of user's sessions including code, narrative text, equations, visualizations and rich output. The culmination of which facilitates the creation and sharing of Live Executable Documents encapsulating an Interactive computing session that provides an ideal visual REPL environment for exploratory programming whose results and findings can be further annotated with Markdown documentation and exported in a number of formats to facilitate knowledge sharing including: HTML, PDF, Markdown, Latex, ReStructured Text, Asciidoc, Reveal.js.
Create Python, C# and F# Jupyter Notebooks for any ServiceStack API
By leveraging Add ServiceStack Reference's rich, typed ecosystem we're able to tap into the exciting interactive world of Jupyter Notebooks where ServiceStack API consumers are now able to generate custom-tailored notebooks for ServiceStack API using a Simple UI or if preferred, generated from a single command-line.
Generating Python Notebooks with Python ServiceStack Reference will let you get the most out of Jupyter Notebooks ecosystem, tooling and free hosting cloud services.
Alternatively .NET Teams can use .NET Interactive Kernels and Notebooks VSCode extension to generate and execute C# and F# Notebooks:
Notebook Apps
The core UX for experiencing Jupyter Notebooks is through a Notebook App which thanks to Jupyter's momentum and vibrant ecosystem there are now many options to choose from, optimizing for different developers use-cases and integrated development workflows.
Delivered and maintained as part of the Jupyter project are 2 self-hosted front-end Web Application UIs for authoring and running Notebooks:
JupyterLab
JupyterLab is Jupyter's next-gen web-based development environment designed around maintaining an entire Workspace of Notebooks in a multi-tabbed splittable UI whereby many of them can be running at the same time:

An easy way to install JupyterLab is to use the pip package manager installed with Python:
$ pip install jupyterlab
Once installed you can launch JupyterLab's UI from a directory containing your Notebooks where they'll be accessible from its built-in File Explorer UI:
$ jupyter-lab
Jupyter Notebook
The original Jupyter Notebook Web Application offering a simplified single document UI:

Install with Python's pip package manager:
$ pip install notebook
Then launch from any directory containing Notebooks to open them from the Jupyter Notebook App:
$ jupyter notebook
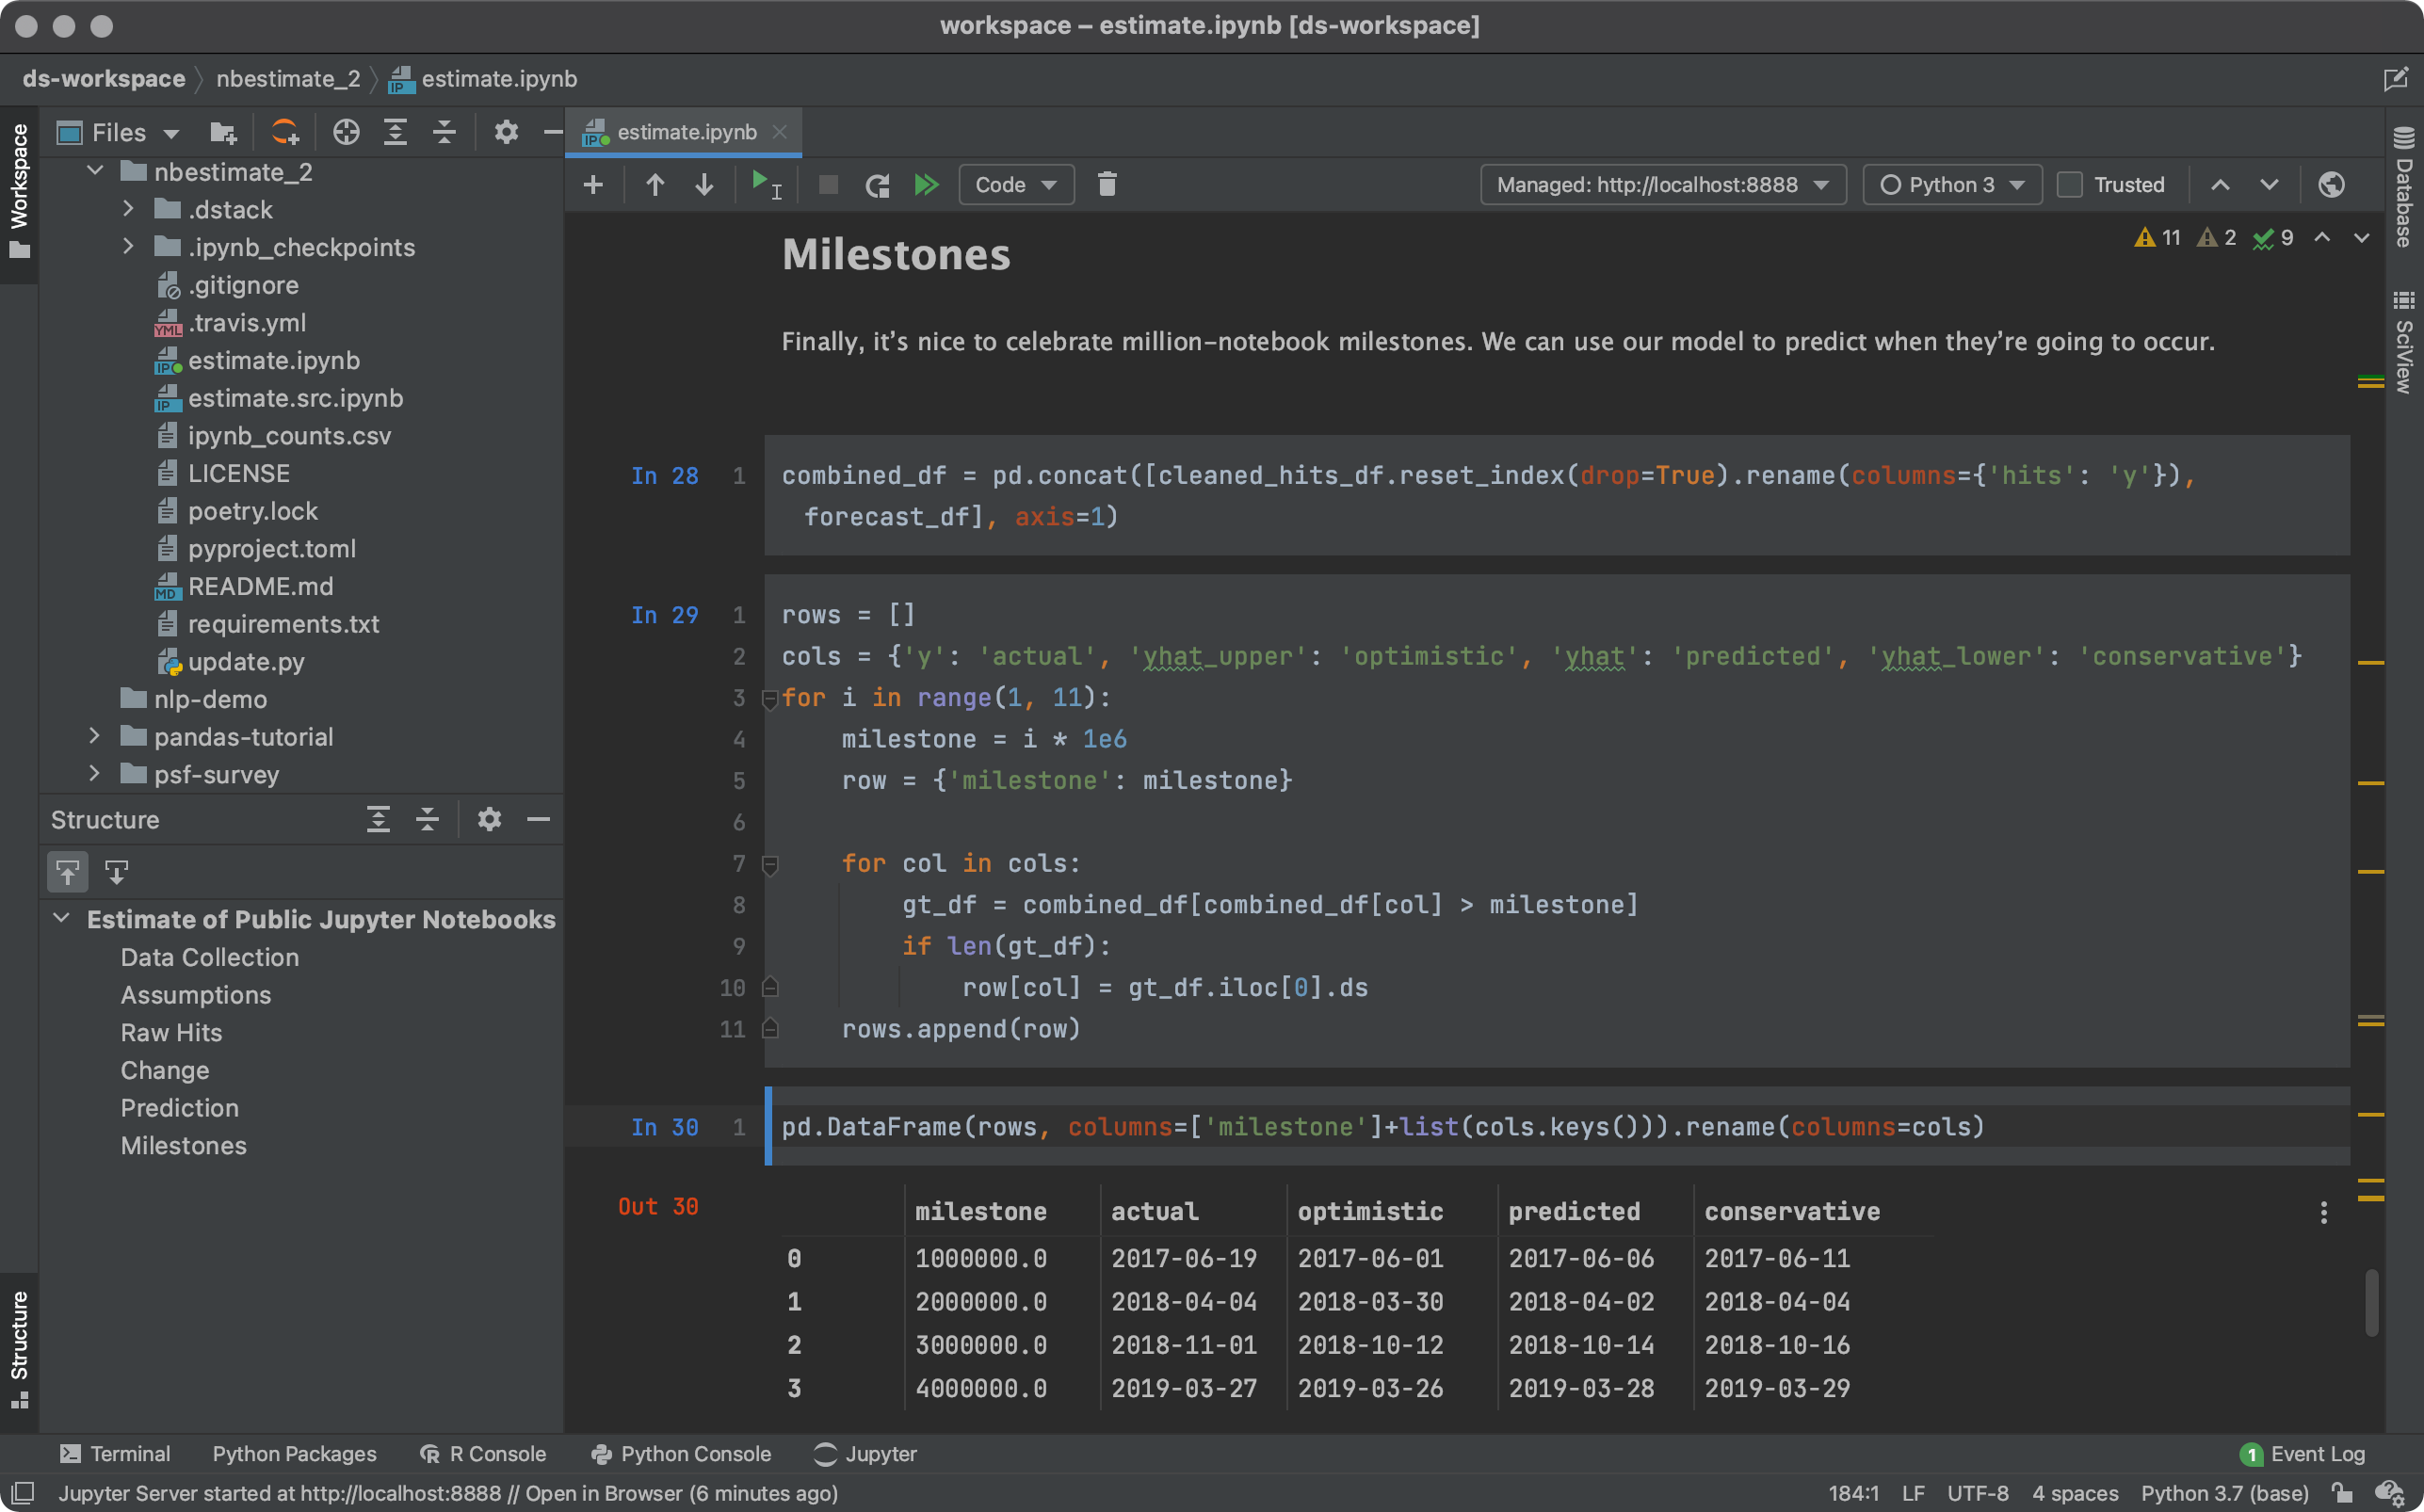
PyCharm
JetBrains likely offers the most functional and capable IDEs for authoring and viewing Notebooks whose Notebook support is built-in to their leading Python IDE - PyCharm.
In addition to all the source code assistance and analysis you can expect from JetBrains smart IDEs to assist in writing Python, it also supports debugging as well as multiple edit and preview modes.
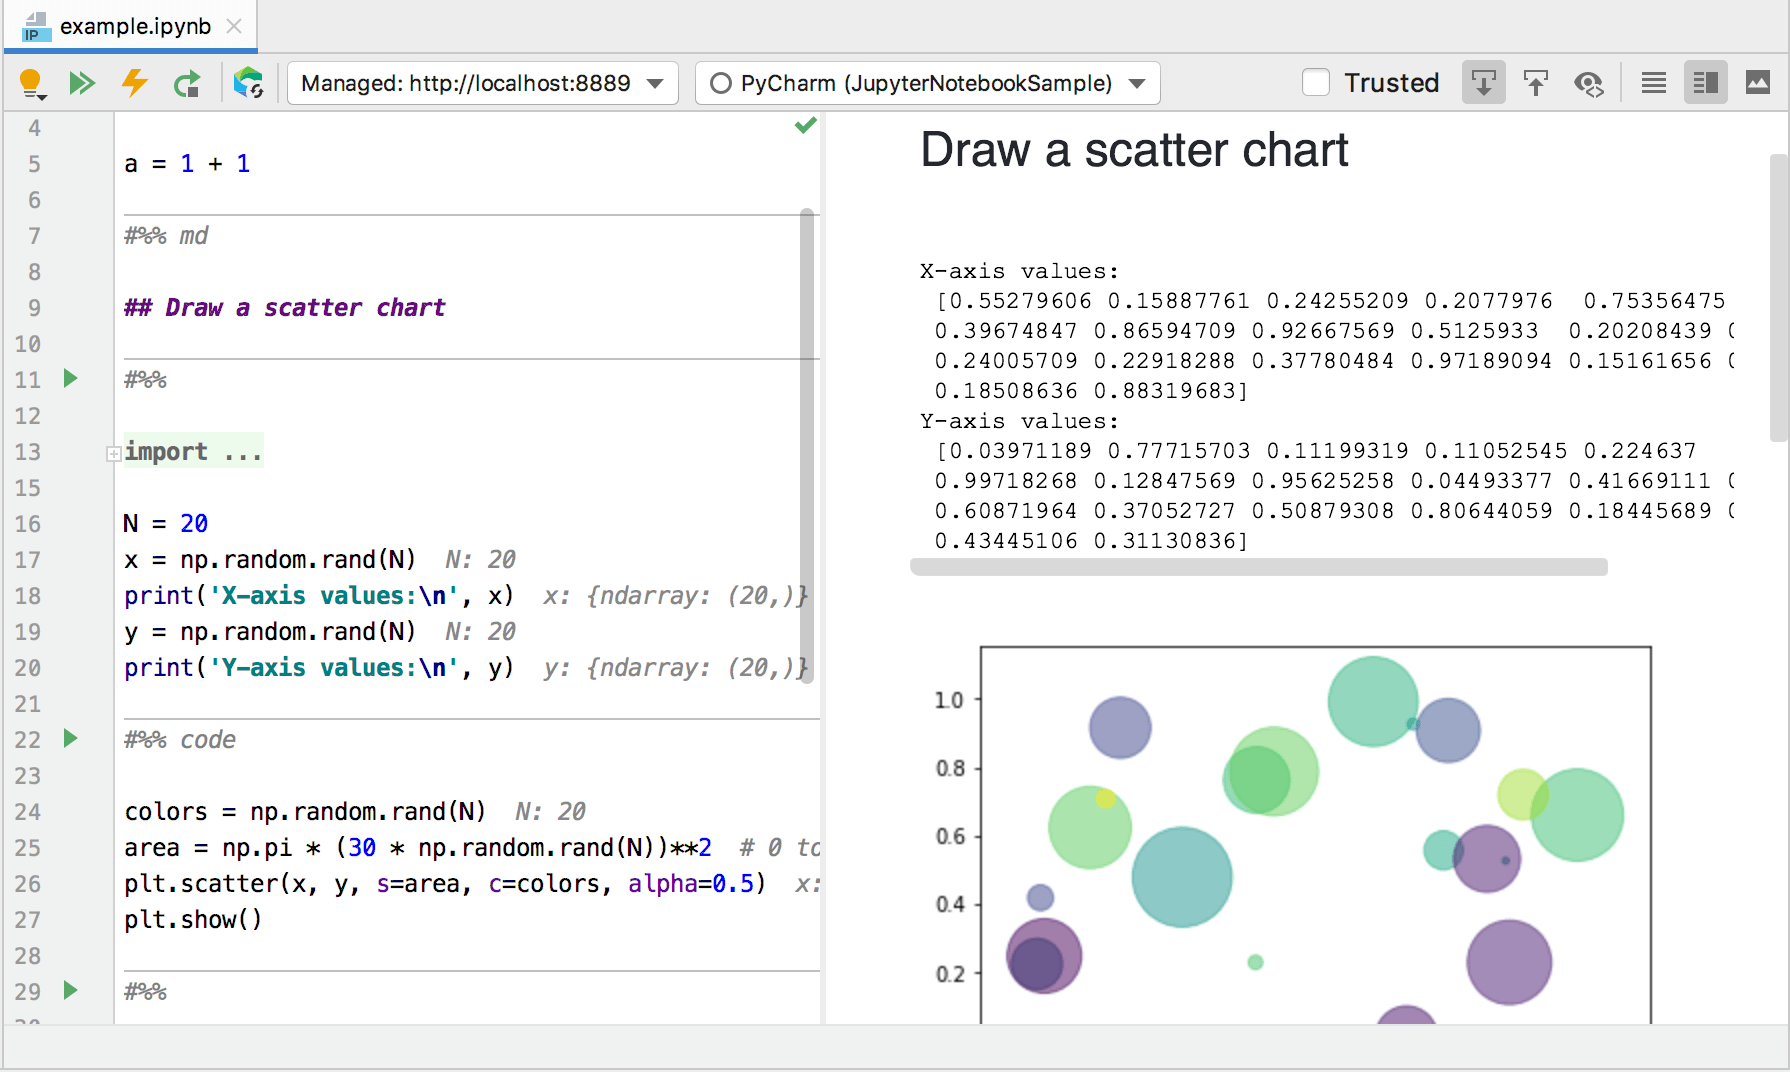
PyCharm is ideal for Python programmers and maintaining Notebooks as part of a Python project where it takes care of creating a Python virtual environment for the project, installing required local dependencies and executing Notebooks within the projects venv context.
JetBrains DataSpell
Jupyter's popularity with Data Scientists has prompted JetBrains to develop a stand-alone DataSpell IDE optimized for working with Data with a more refined lightweight UX for working with Notebooks:
VS Code
Visual Studio Code is another IDE popular with Python Developers that has their own built-in UX for Jupyter Notebooks:
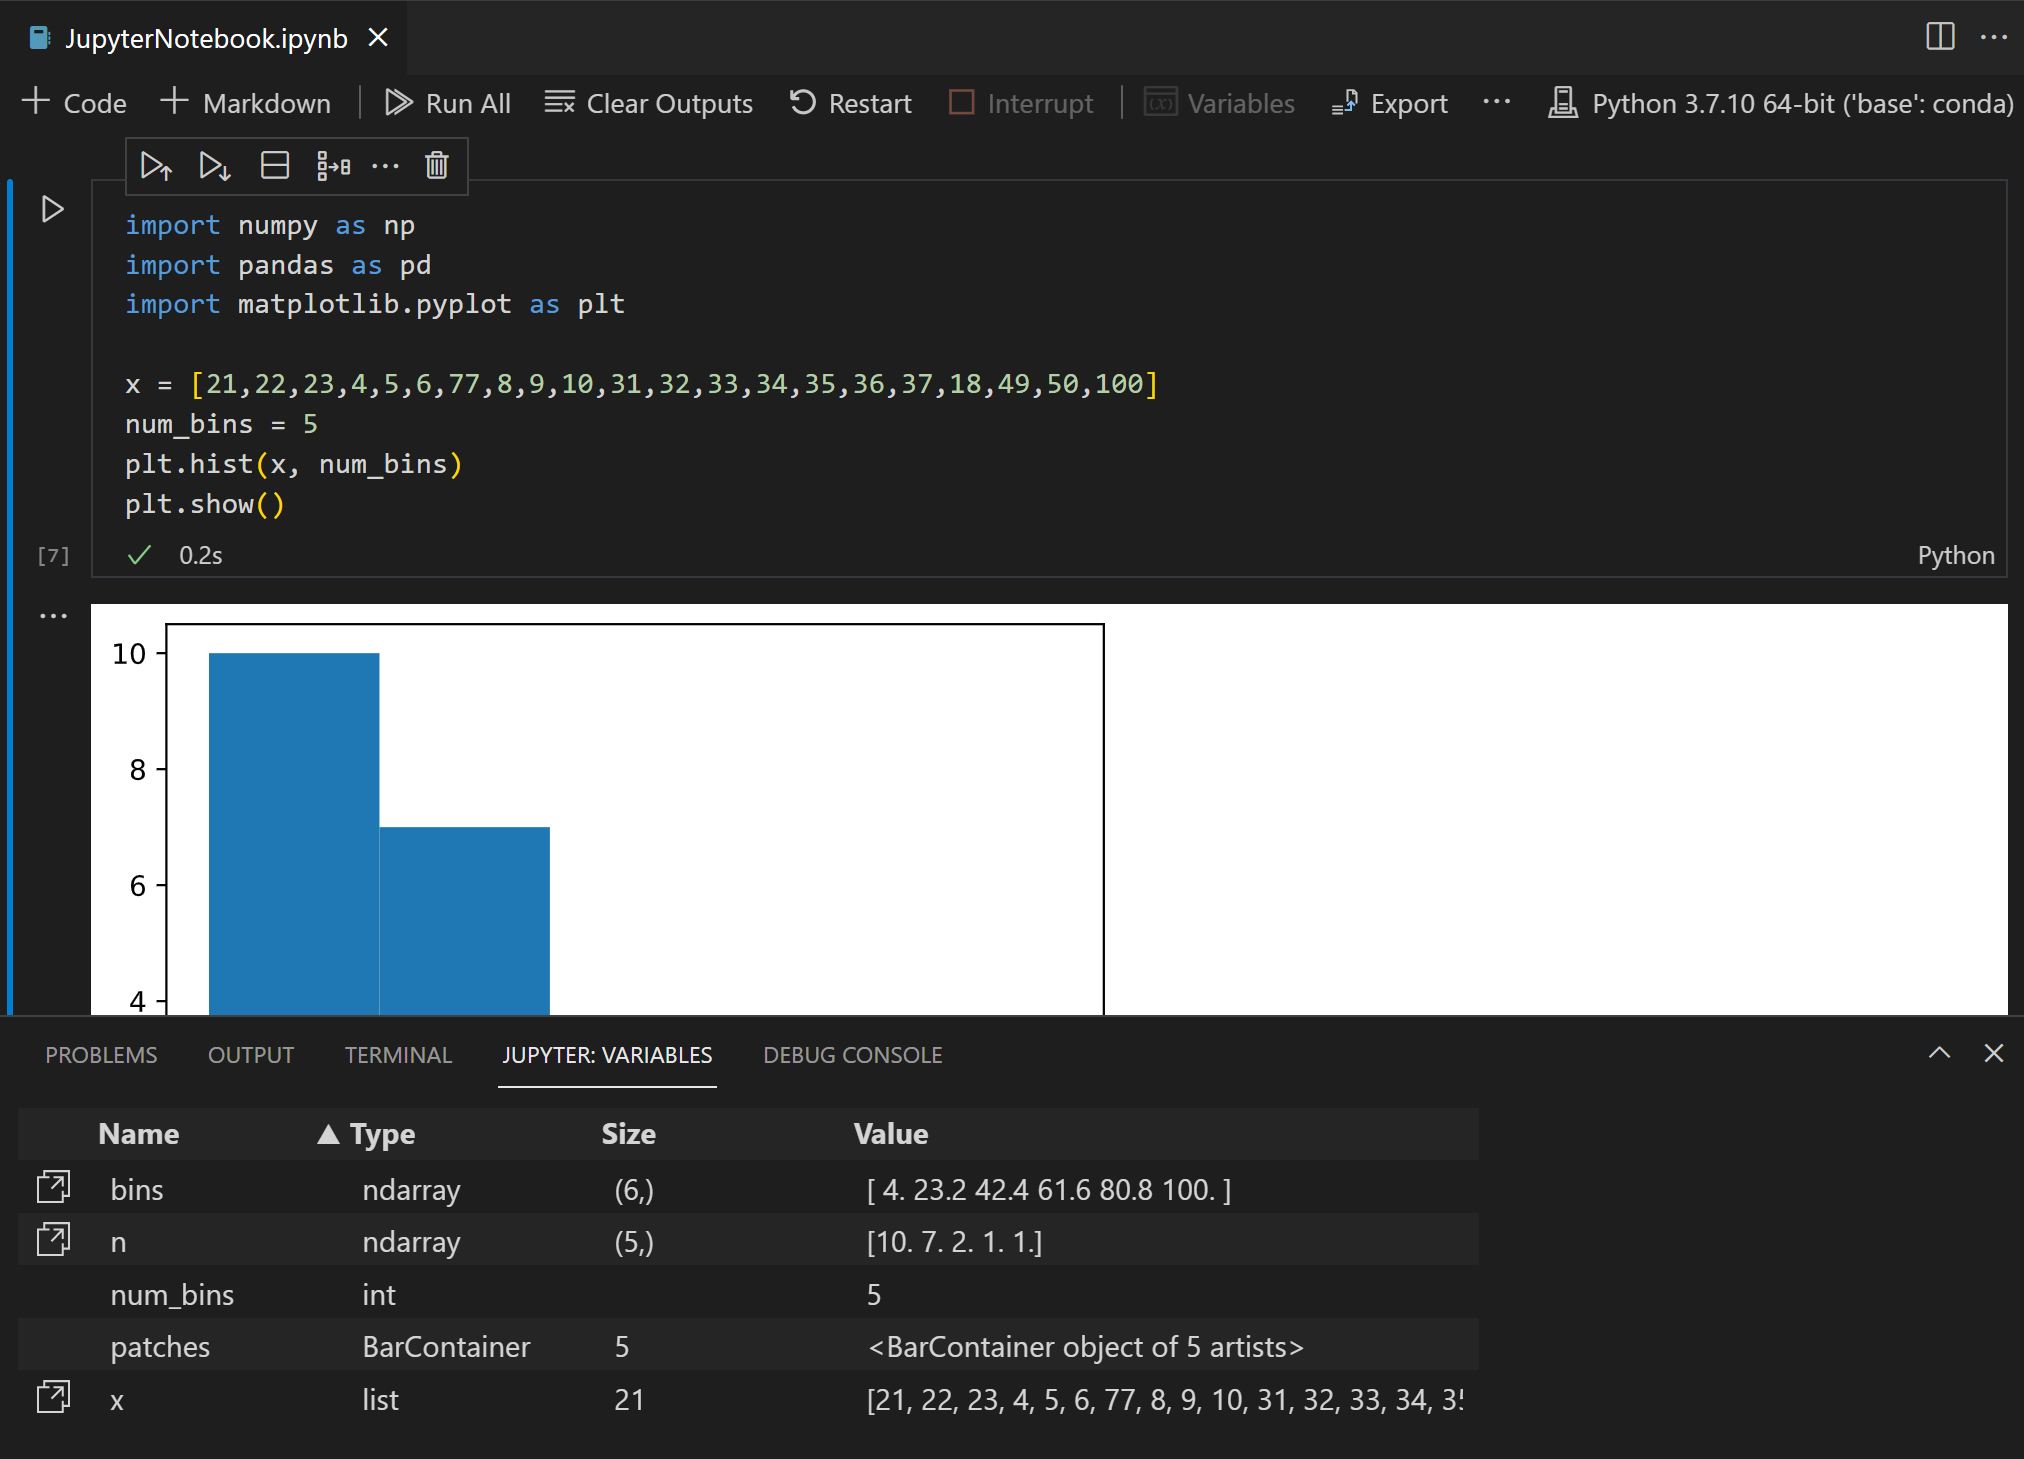
It provides a nicer UX over the traditional Notebook UX with niceties like intelli-sense and variable explorer and is better at opening stand-alone Notebooks outside the context of a Python project where its able to make use of pip's global OS packages.
Whilst its Python notebook support is still the most complete, it's the optimal UI for working with C# and F# Notebooks with its .NET Interactive Notebooks extension, currently in Preview that's maintained as part of the github.com/dotnet/interactive project.
Cloud Notebook Services
The proliferation of Notebooks as an interactive computing platform, popular in machine learning, data analysis and education has spawned a number of cloud services to facilitate the management, authoring and sharing of Notebooks where as they're run and hosted in the cloud can be easily shared with anyone without requiring a local install or development environment.
Binder
The JupyterHub team maintain their public Jupyter notebooks service at mybinder.org for anyone who wants to share their interactive GitHub repositories publicly. Behind the scenes Notebooks are executed on a collection of BinderHub Federated services using resources donated by Google Cloud, OVH, GESIS Notebooks and the Turing Institute.
To run your Notebooks on Binder head over to https://mybinder.org and paste the URL of your public GitHub repo containing your Jupyter Notebooks to retrieve the generated URL for your repo.
E.g. our ServiceStack/jupyter-notebooks GitHub repo is available from:
https://mybinder.org/v2/gh/ServiceStack/jupyter-notebooks/HEAD
Where behind-the-scenes Binder will build and host a Docker image of your repo and launch a dedicated notebook Web App instance to view an execute your repo's Notebooks:
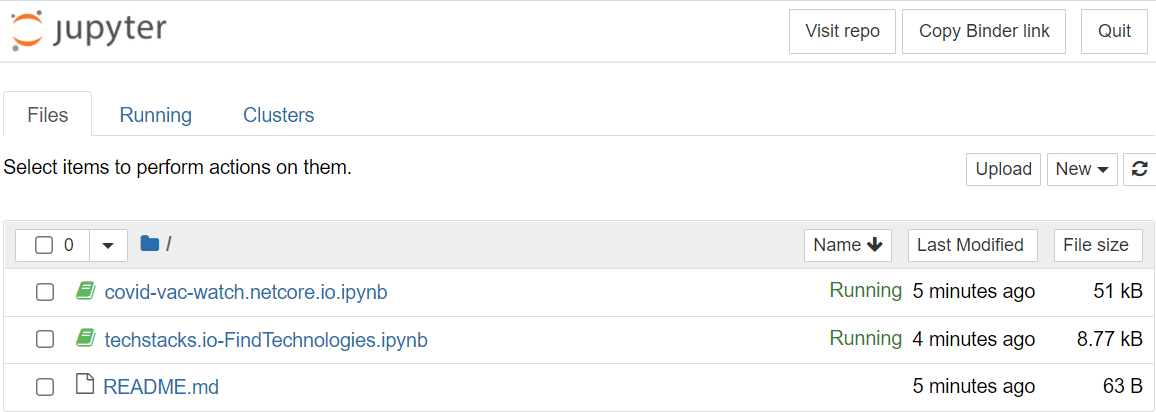
The ServiceStack/jupyter-notebooks repo contains a couple of API examples generated using our Instant Client Apps site to craft a QueryVaccinationRates API call that can be downloaded in a Python Notebook:
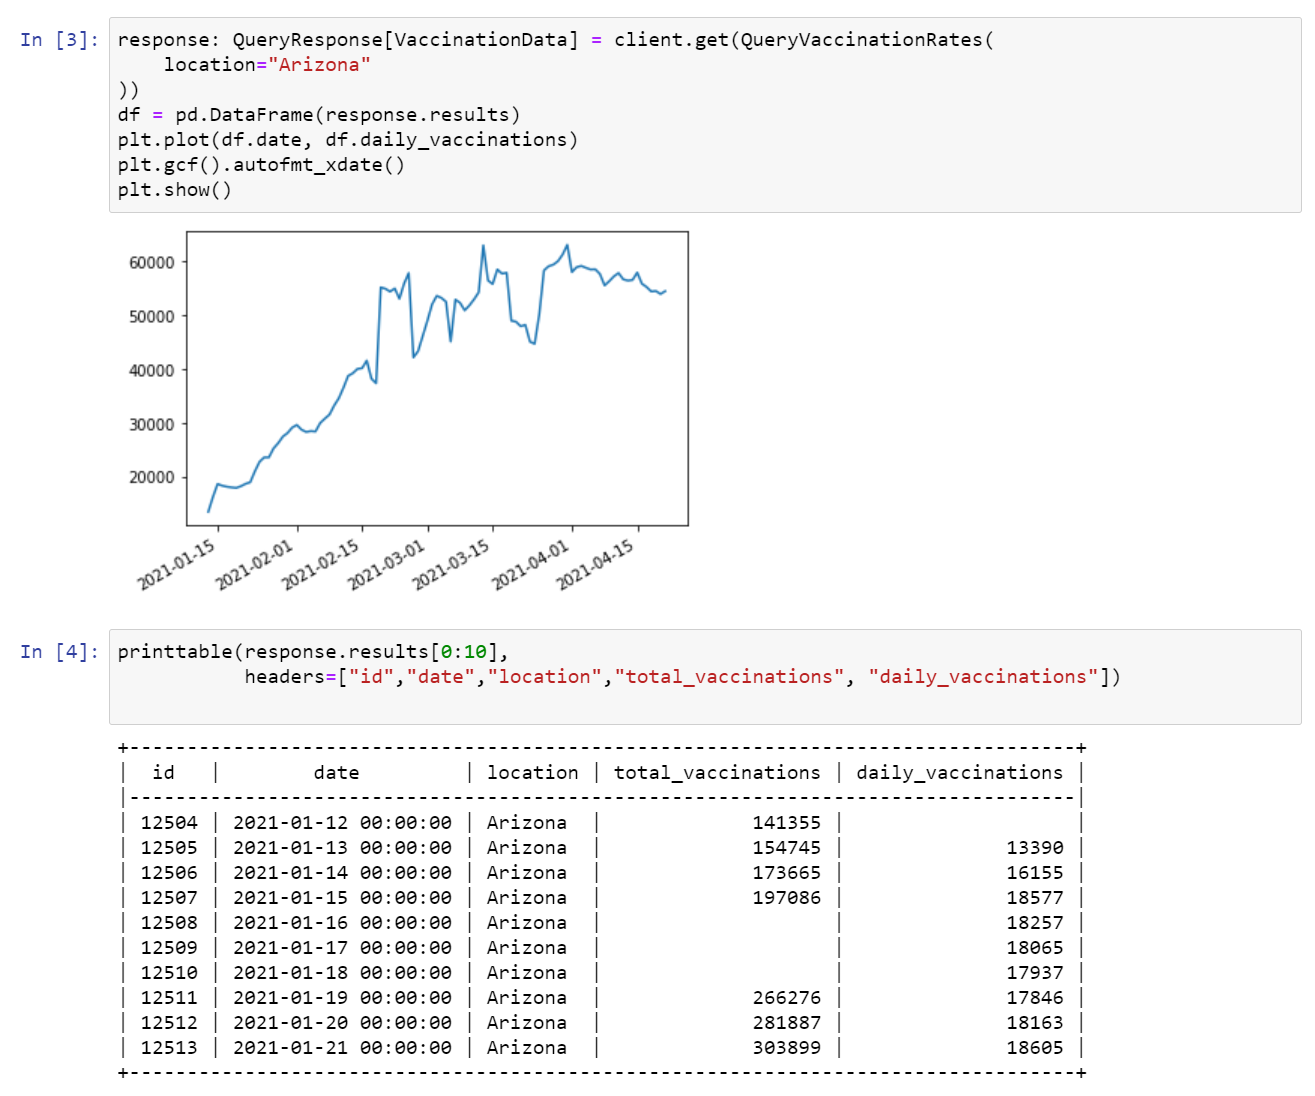
Covid Vaccinations
In addition to previewing the raw data response in human-friendly markdown and HTML tables, you can also leverage Python's powerful pandas and matplotlib libraries to plot a quick visualization of the typed QueryVaccinationRates AutoQuery response:
TechStacks
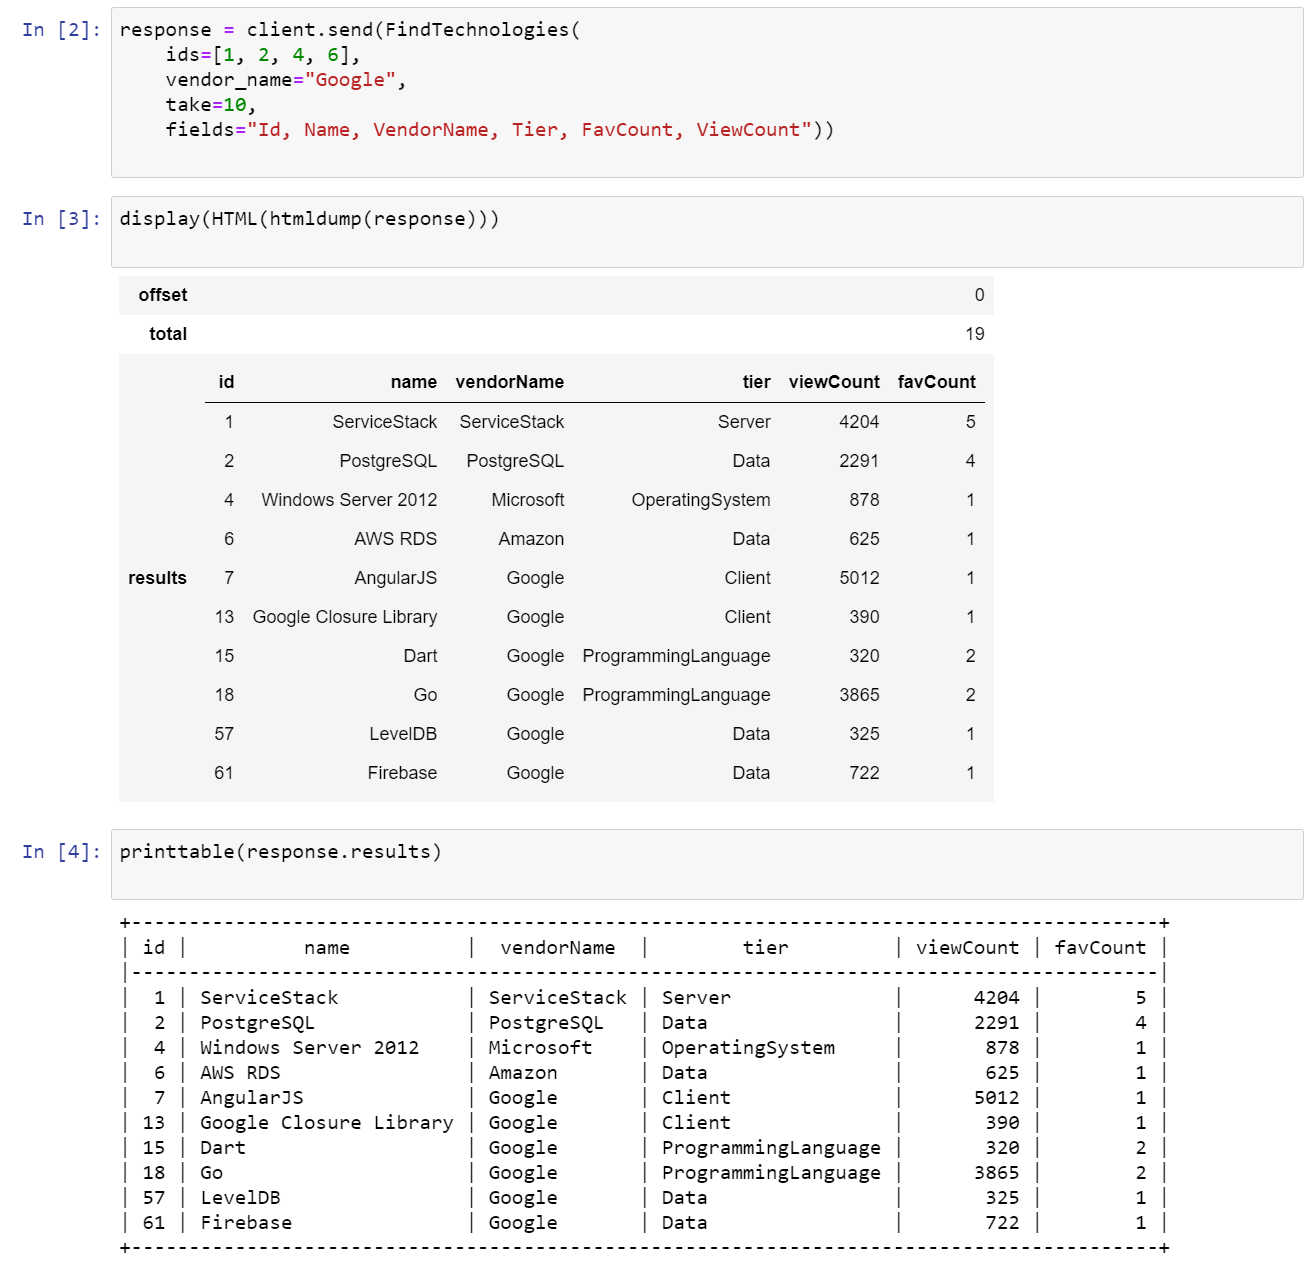
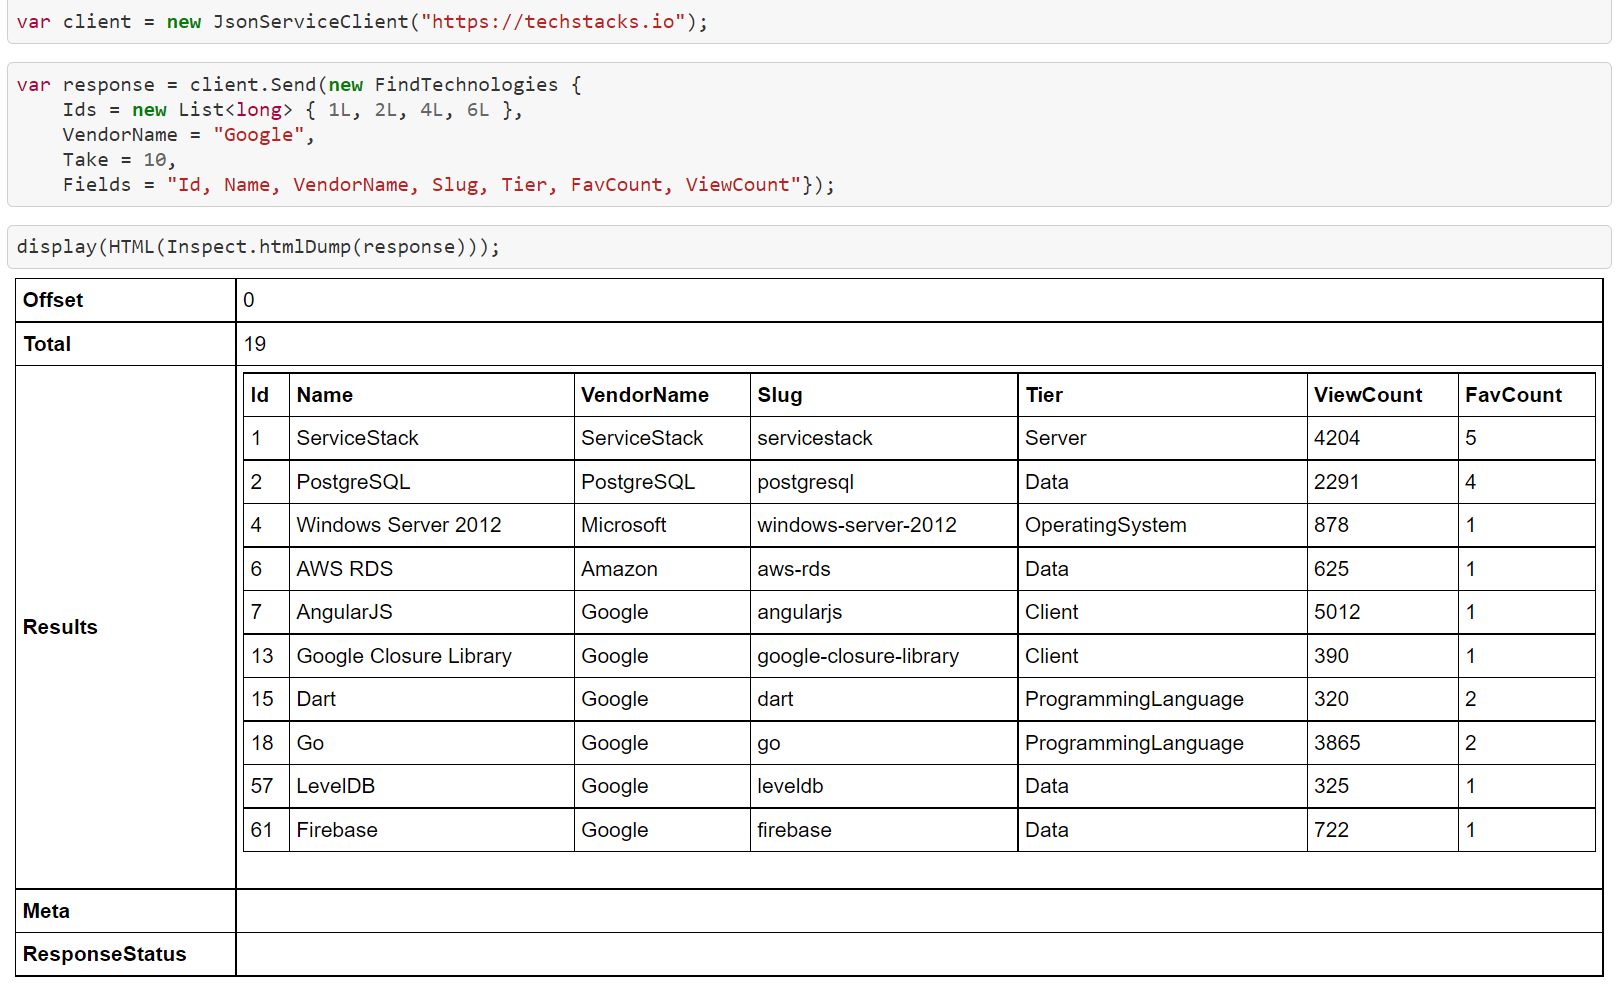
The techstacks.io-FindTechnologies.ipynb is an example of a Notebook generated by apps.servicestack.net which displays results in a HTML table and a human-friendly markdown table for API Responses containing a Results resultset, e.g:
When executed in either a Binder or self-hosted notebook web app it will render API responses that looks like:
GitHub Auto Preview
Thanks to executed Notebooks retaining their executed outputs and GitHub's built-in support of rendering Jupyter Notebooks, we can also view pre-rendered Notebooks directly in GitHub, e.g. you can view the pre-rendered output of the above Python Notebook directly on GitHub at: techstacks.io-FindTechnologies.ipynb.
The beauty of Notebook's retaining their executed outputs within the same document is that it makes it possible to share rendered Notebooks on GitHub written in different languages.
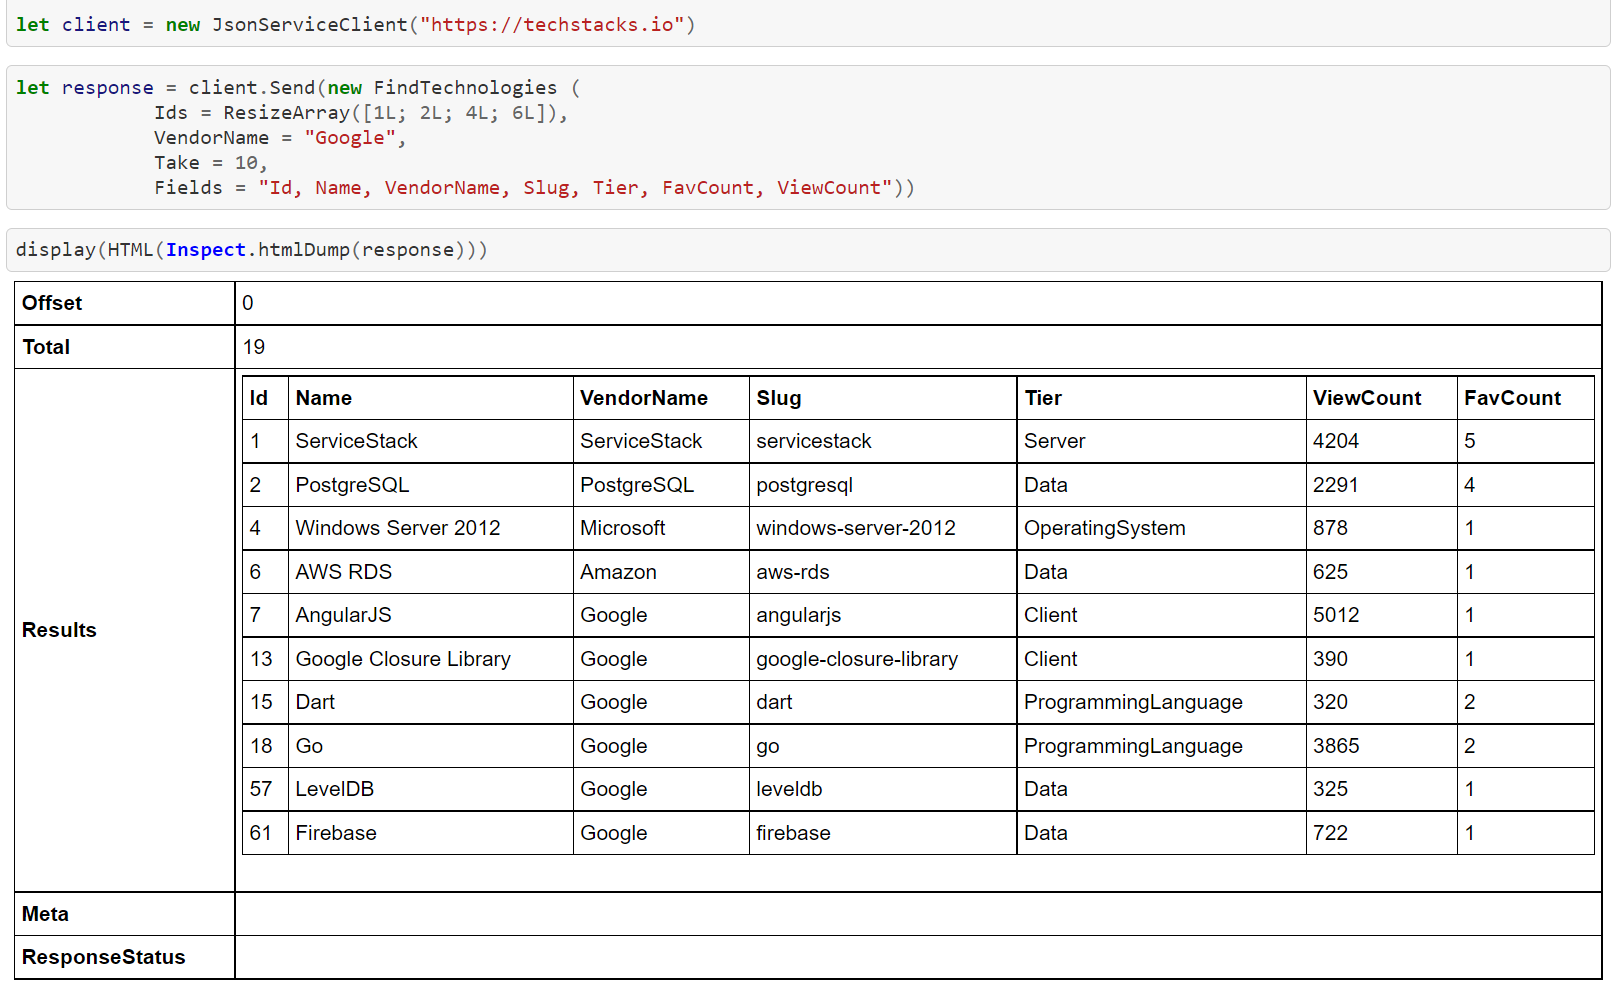
Which we can demonstrate using apps.servicestack.net which lets you download Notebooks for any publicly accessible ServiceStack API in C#, Python and F#:

Then use the languages tab to download the same API in a C# and F# Jupyter Notebook instead:
C# TechStacks FindTechnologies Notebook
/csharp/techstacks.io-FindTechnologies.ipynb
F# TechStacks FindTechnologies Notebook
/fsharp/techstacks.io-FindTechnologies.ipynb
Google Colab
Google Colab is another FREE hosted Jupyter notebook service that can open Notebooks stored in Google Drive or loaded from GitHub and can be shared just as you would with Google Docs or Sheets, which requires no install to use, while providing free access to computing resources including GPUs where it's executed in a virtual machine private to your account.
Built into GDrive, you can open any .ipynb Jupyter Notebooks with Google's Colab service making it a great way to share private Notebooks between users using Google Drive.
Whilst you can upload your Python Jupyter Notebooks manually, the quickest way to open your ServiceStack API in Colab is to Save it directly in GDrive with the Save button:

Then click on the saved .ipynb Notebook to open it in Colab where like other Notebook services will let you see the last pre-executed rendered output. Running a cell with the Play icon or CTRL+Enter will execute the Notebook in a private virtual machine to update the captured outputs with live results:

JetBrains Datalore
Datalore is JetBrains premium cloud hosted service for hosting and running Jupyter Notebooks within a shared team environment. It's online Notebook App features PyCharm's code insights and autocompletion, real-time collaborative editing and also includes built-in Terminal support for running remote commands and .py scripts:
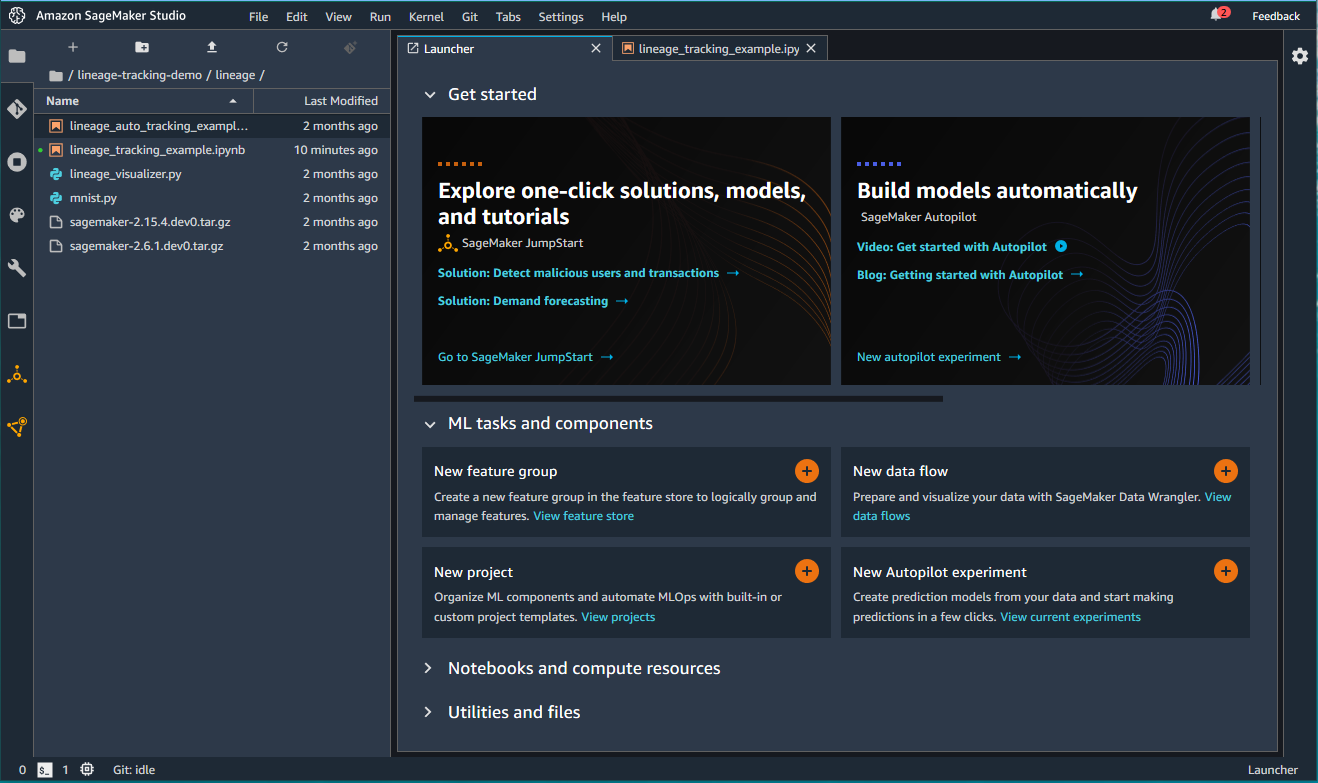
Amazon SageMaker
Amazon SageMaker is Amazon's comprehensive ML service that helps data scientists and developers to prepare, build, train, and deploy high-quality machine learning (ML) models.
Included as part of their offering is Amazon SageMaker Notebook Instances which is a machine learning (ML) compute instance running the Jupyter Notebook App. SageMaker manages creating the instance and related resources. Use Jupyter notebooks in your notebook instance to prepare and process data, write code to train models, deploy models to SageMaker hosting, and test or validate your models.
Python Jupyter Notebooks

Whilst the Jupyter project has designed its Notebooks to be language agnostic with current support for over 40+ programming languages, the best experience and broadest ecosystem and community support is still centered around Python Jupyter Notebooks.
Thanks to Python Add ServiceStack Reference support for generating typed Python data classes for your ServiceStack Service DTOs, your API consumers are able to tap into the beautiful interactive world of Jupyter Notebooks who can leverage end-to-end typed APIs with your Services Python DTOs and the generic servicestack Python package containing both the generic JsonServiceClient for making typed API requests as well as useful utilities for easily previewing API Responses in human-readable HTML or markdown table formats.
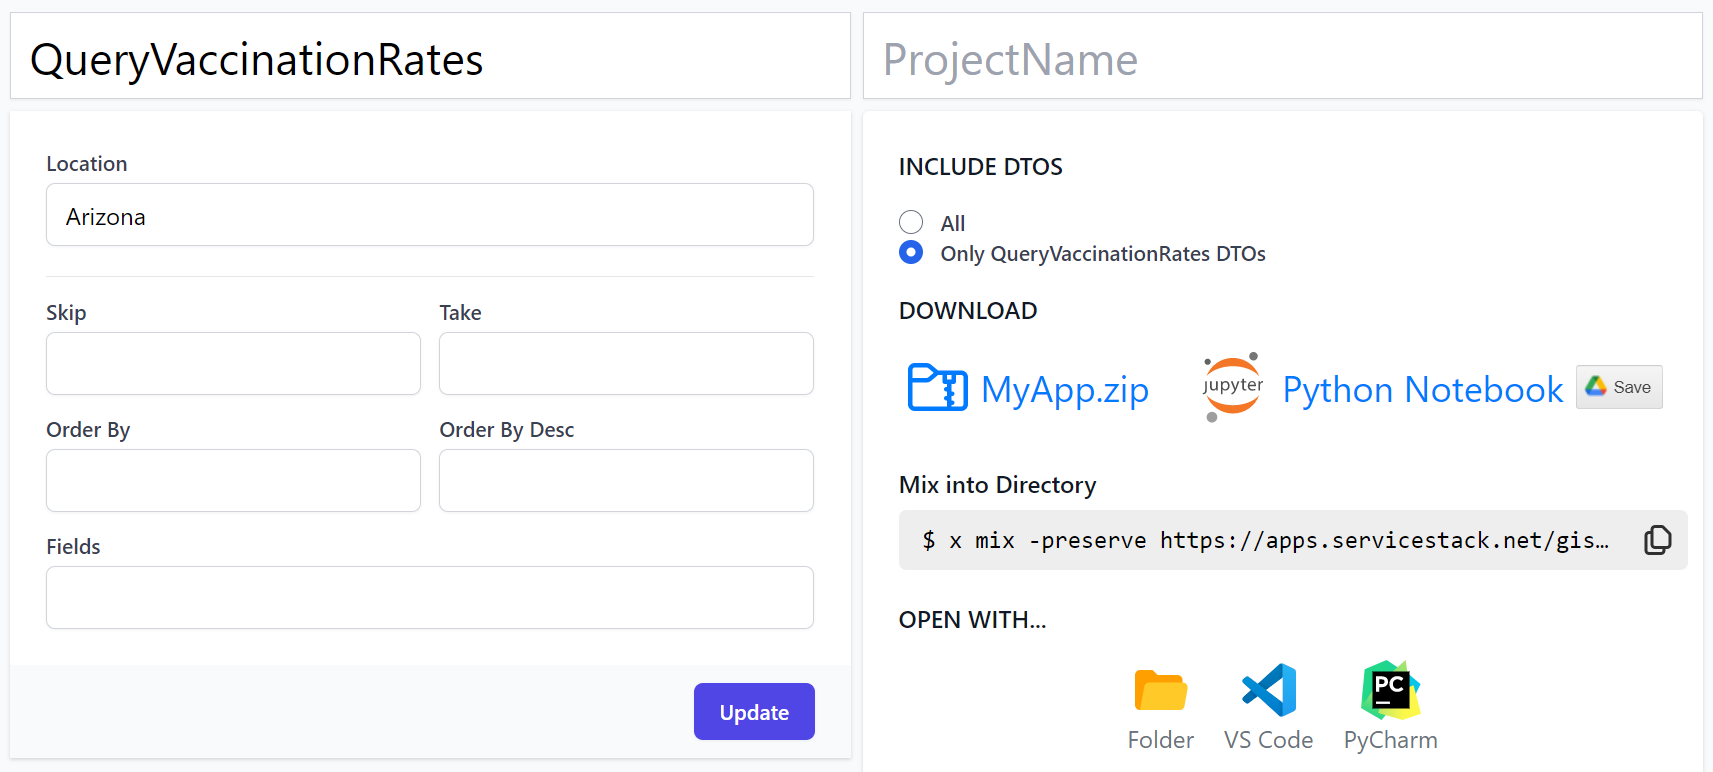
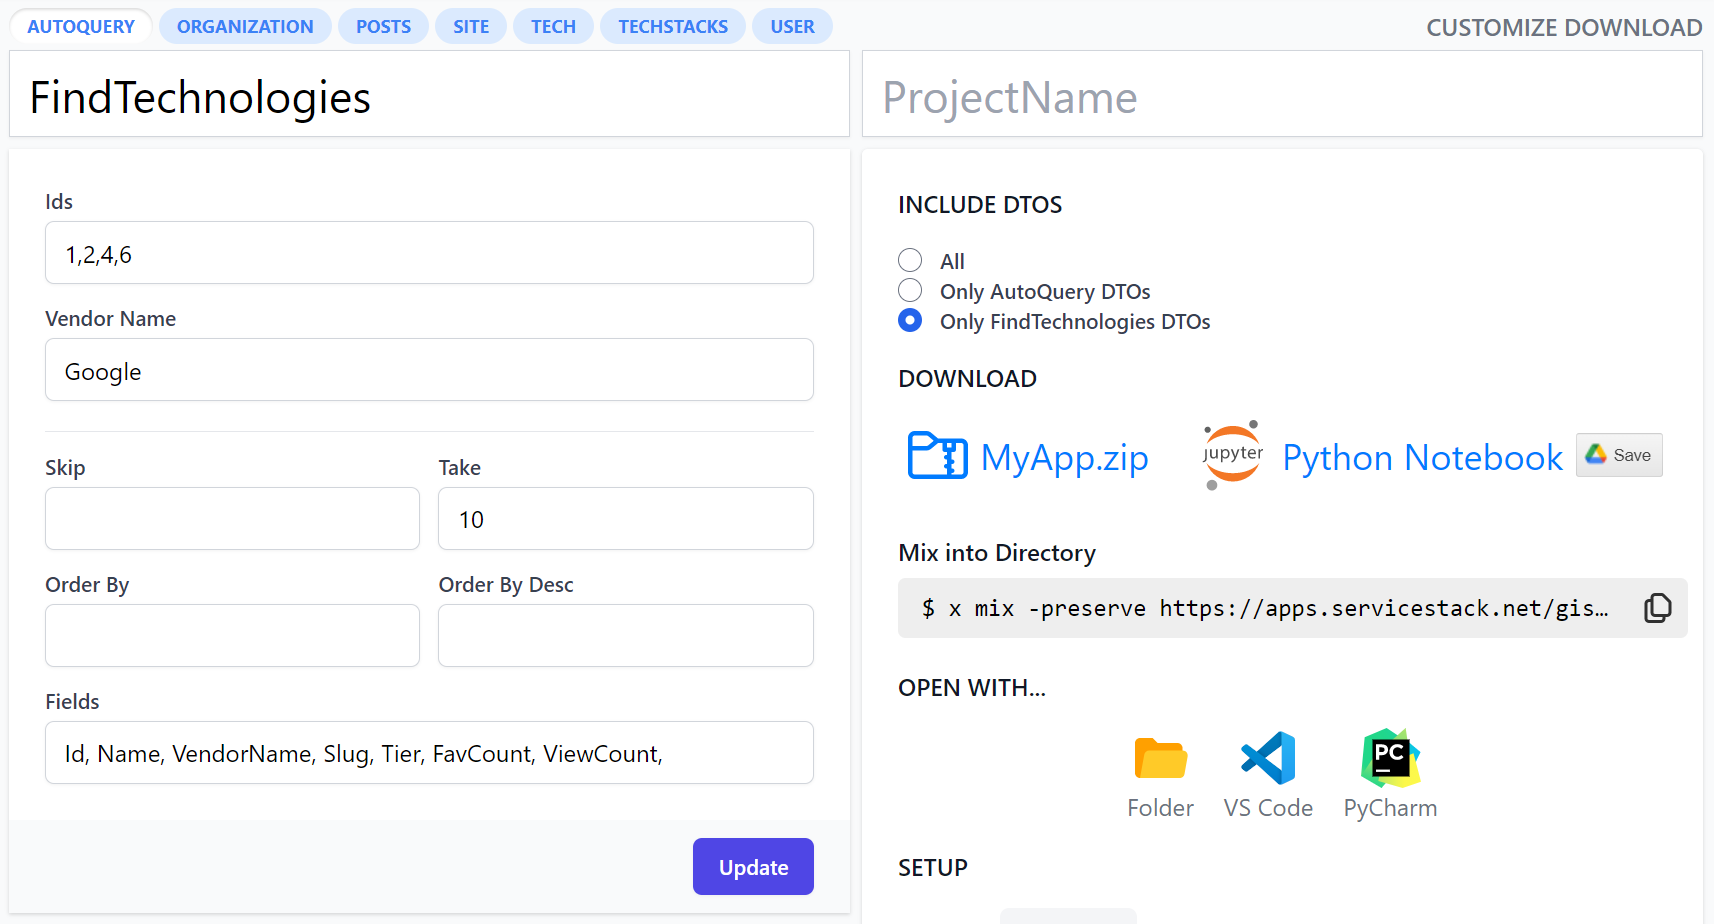
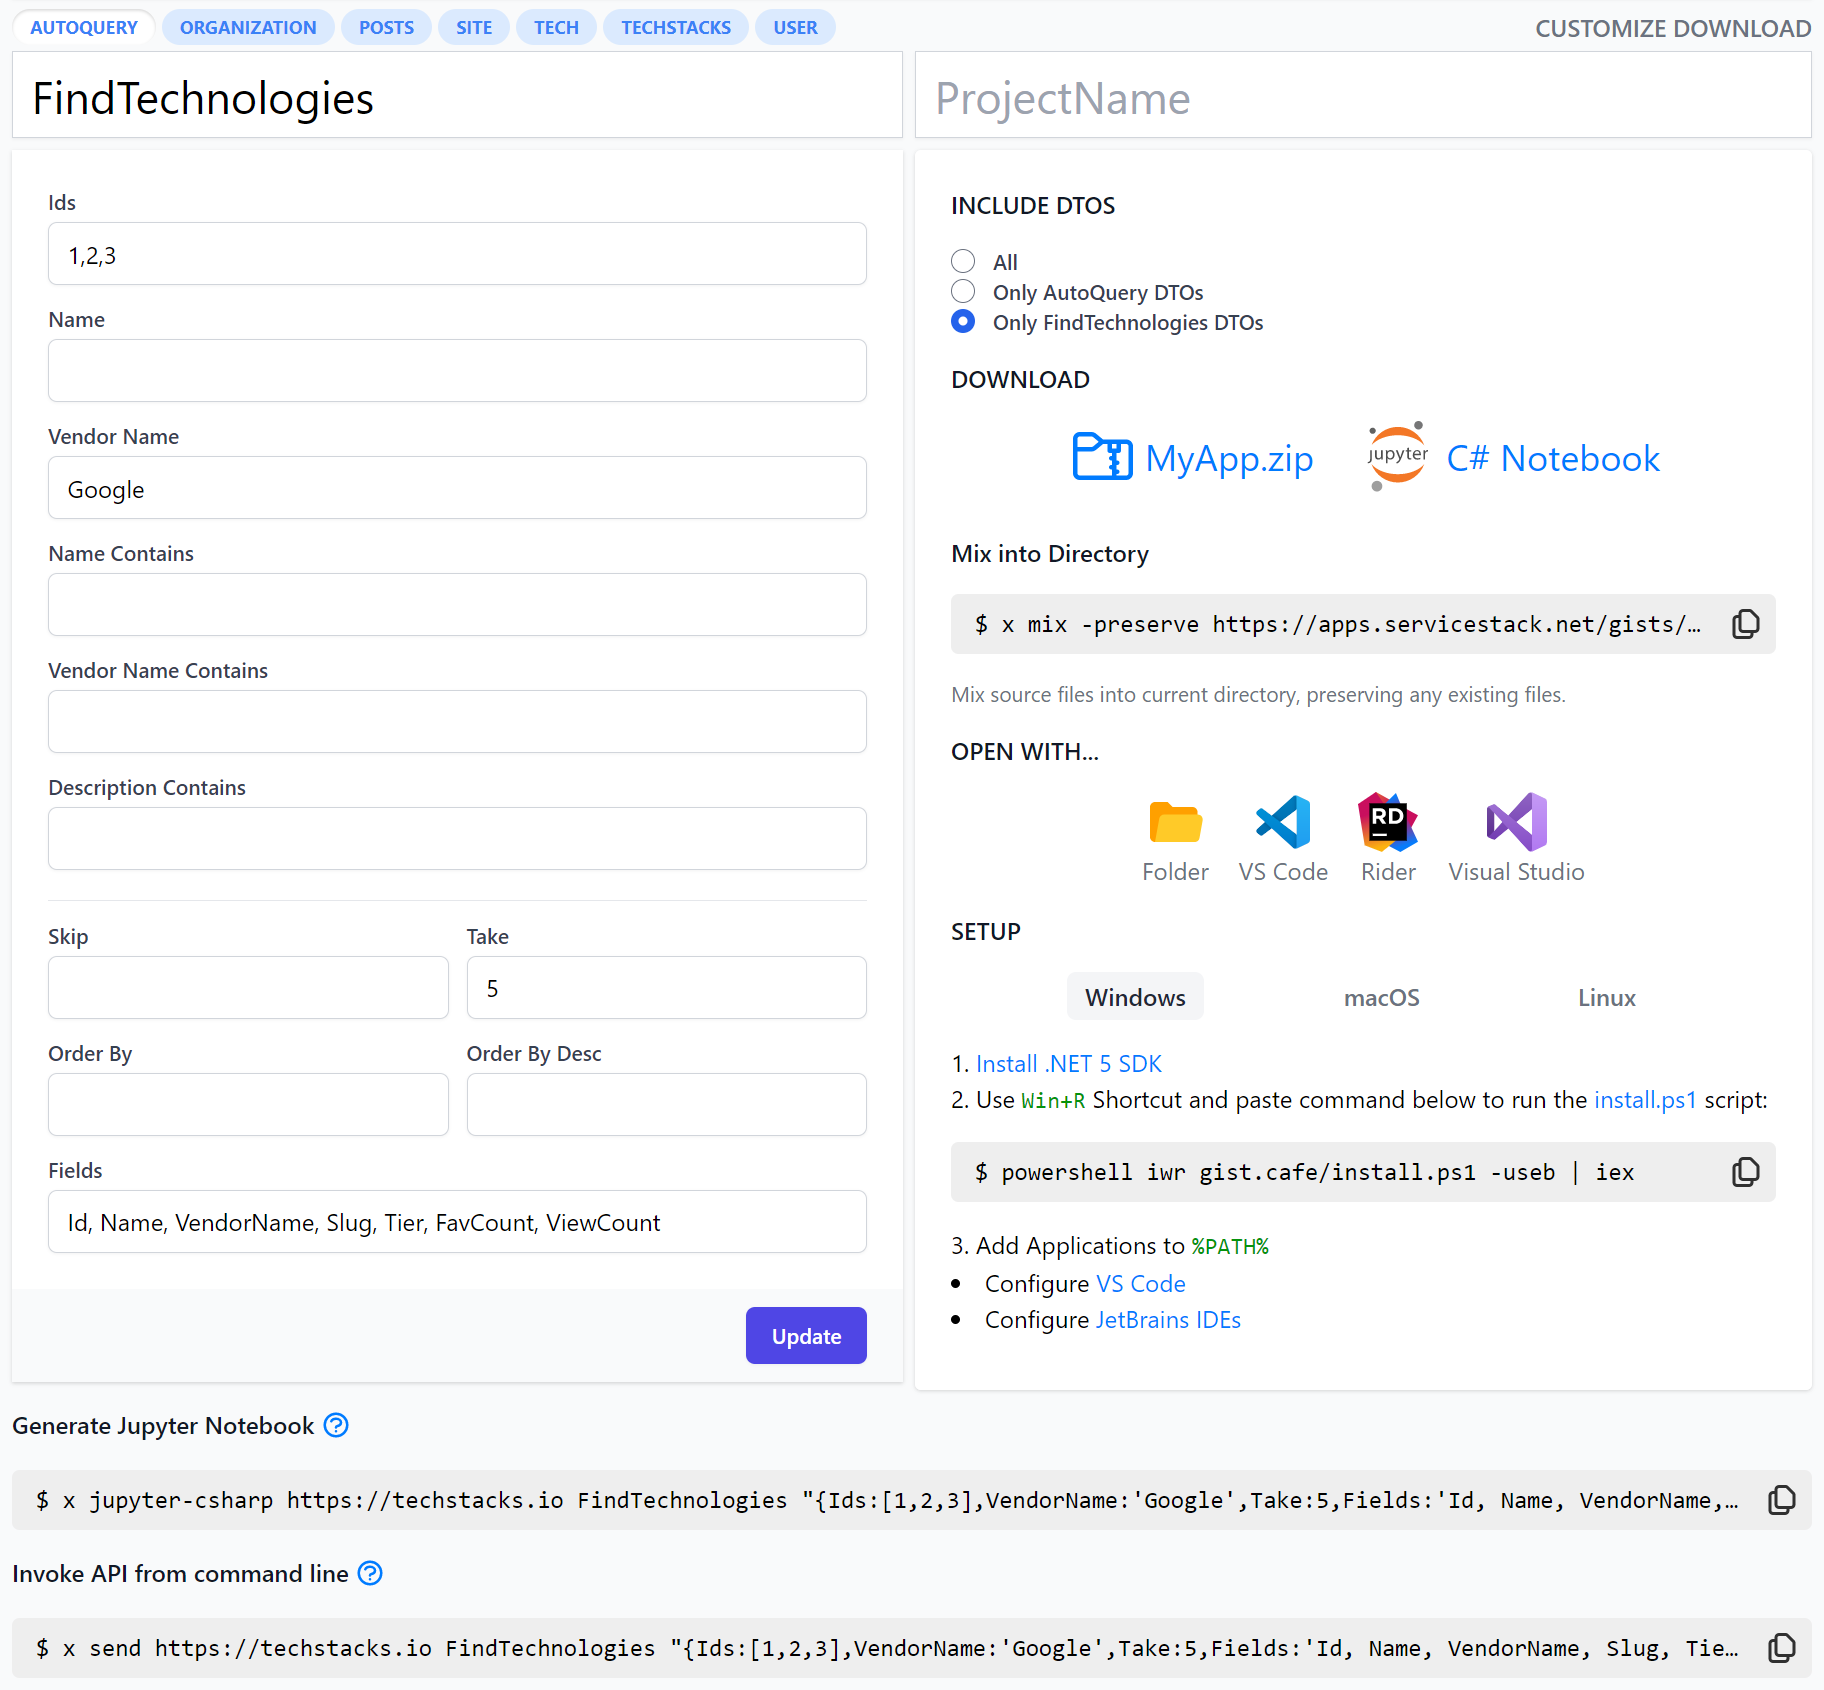
Instant Client Apps
Easiest way to generate a Python Notebook for a publicly available ServiceStack instance is to use Instant Client Apps UI at:
apps.servicestack.net
Where API Consumers will be able to select an API for a remote ServiceStack Instance and generate a native UI to generate an API Request that can be downloaded in a stand-alone client App in any of the 9 supported programming languages:
Within seconds after being guided by Instant Client Apps UI, users will be able to select their preferred API and use the Auto form to pre-populate their API Request, e.g:
Which can be run online to display results in a HTML table and a human-friendly markdown table for AutoQuery Requests or API Responses containing a Results resultset. Clicking on Python Notebook will download a custom techstacks.io-FindTechnologies.ipynb Jupyter Notebook that when executed in either a Binder or self-hosted notebook web app will render API responses that looks like:
All populated API Requests are also deep-linkable so they can be easily documented, shared and customized with other team members:
Google Colab
Google Colab is a FREE hosted Jupyter notebook service from Google that can open Notebooks stored in Google Drive that can be shared just as you would with Google Docs or Sheets, which requires no install to use, while providing free access to computing resources including GPUs where it's executed in a virtual machine private to your account.
Whilst you can upload your Python Jupyter Notebooks manually, the quickest way to open your ServiceStack API in Colab is to Save it directly in GDrive with the Save button:
Then click on the saved .ipynb Notebook to open it in Colab where like other Notebook services will let you see the last pre-executed rendered output. Running a cell with the Play icon or CTRL+Enter will execute the Notebook in a private virtual machine to update the captured outputs with live results:
GitHub Auto Preview
Thanks to executed Notebooks retaining their executed outputs and GitHub's built-in support of rendering Jupyter Notebooks, we can also view pre-rendered Notebooks directly in GitHub, e.g. you can view the pre-rendered output of the above Python Notebook directly on GitHub at: techstacks.io-FindTechnologies.ipynb.

Instant Client Apps command-line generator
For increased flexibility and scriptability Instant Client Apps will also generate a command-line argument of your pre-populated API Request you can use to generate a Python Jupyter Notebook locally, e.g:

Generate Notebook using command-line
Jupyter Commands lets you generate Python Jupyter Notebooks for calling ServiceStack APIs in a single command.
All command line utils used are available in the latest dotnet tool which can be installed from:
$ dotnet tool install --global x
Or if you had a previous version installed, update with:
$ dotnet tool update -g x
Generate Python Jupyter Notebooks
Use x jupyter-python to display different usage examples for generating Python Jupyter Notebooks:
Usage: x jupyter-python <base-url>
       x jupyter-python <base-url> <request>
       x jupyter-python <base-url> <request> {js-object}
       x jupyter-python <base-url> <request> < body.json

Options:
 -out <file>            Save notebook to file
 -include <pattern>     Include Types DTOs pattern
The same syntax for invoking APIs with the Post Command HTTP Utils can also be used to generate Python Jupyter Notebooks, e.g:
$ x jupyter-python https://techstacks.io FindTechStacks "{Ids:[1,2,3],VendorName:'Google',Take:5}"
Output:
Saved to: techstacks.io-FindTechStacks.ipynb
Generate C# Jupyter Notebooks

Use x jupyter-csharp to display different usage examples for generating C# Jupyter Notebooks:
Usage: x jupyter-csharp <base-url>
       x jupyter-csharp <base-url> <request>
       x jupyter-csharp <base-url> <request> {js-object}
       x jupyter-csharp <base-url> <request> < body.json

Options:
 -out <file>            Save notebook to file
 -include <pattern>     Include Types DTOs pattern
Generate F# Jupyter Notebooks

Use x jupyter-fsharp to display different usage examples for generating F# Jupyter Notebooks:
Usage: x jupyter-fsharp <base-url>
       x jupyter-fsharp <base-url> <request>
       x jupyter-fsharp <base-url> <request> {js-object}
       x jupyter-fsharp <base-url> <request> < body.json

Options:
 -out <file>            Save notebook to file
 -include <pattern>     Include Types DTOs pattern
The same syntax for invoking APIs with the Post Command HTTP Utils can also be used to generate C# Jupyter Notebooks, e.g:
$ x jupyter-csharp https://techstacks.io FindTechStacks "{Ids:[1,2,3],VendorName:'Google',Take:5}"
Output:
Saved to: techstacks.io-FindTechStacks.ipynb
Jupyter Notebooks can also be created with the API Explorer UI at apps.servicestack.net.
Setup Jupyter for C# and F# locally
To get working with JupyterLabs to run locally with a C# kernel, there are a few things you'll need to have installed.
- Latest dotnet 5.0+ SDK
- Python 3.7+ with pip
With both dotnet SDK and Python installed, you can then install JupyterLab, Dotnet Interactive and register the dotnet kernels with the following commands.
# Install jupyterlab to default Python interpreter
pip install jupyterlab
# Install Dotnet Interactive dotnet tool
dotnet tool install -g Microsoft.dotnet-interactive
# Get Dotnet Interactive to register kernels with Jupyter
dotnet interactive jupyter install
To verify these have been installed successfully, you can list the currently registered kernels using the command.
jupyter kernelspec list
This should list .net-csharp and .net-fsharp as kernels which is what the C# and F# notebooks will use.
Running JupyterLab
With everything setup, navigate to a local directory with your notebooks and run:
jupyter-lab
The context of where this command is run from matter as JupyterLab will mount list files in the same directory is was run, so make sure your running the jupyter-lab command from where your notebooks are located or where you new notebooks to be saved.
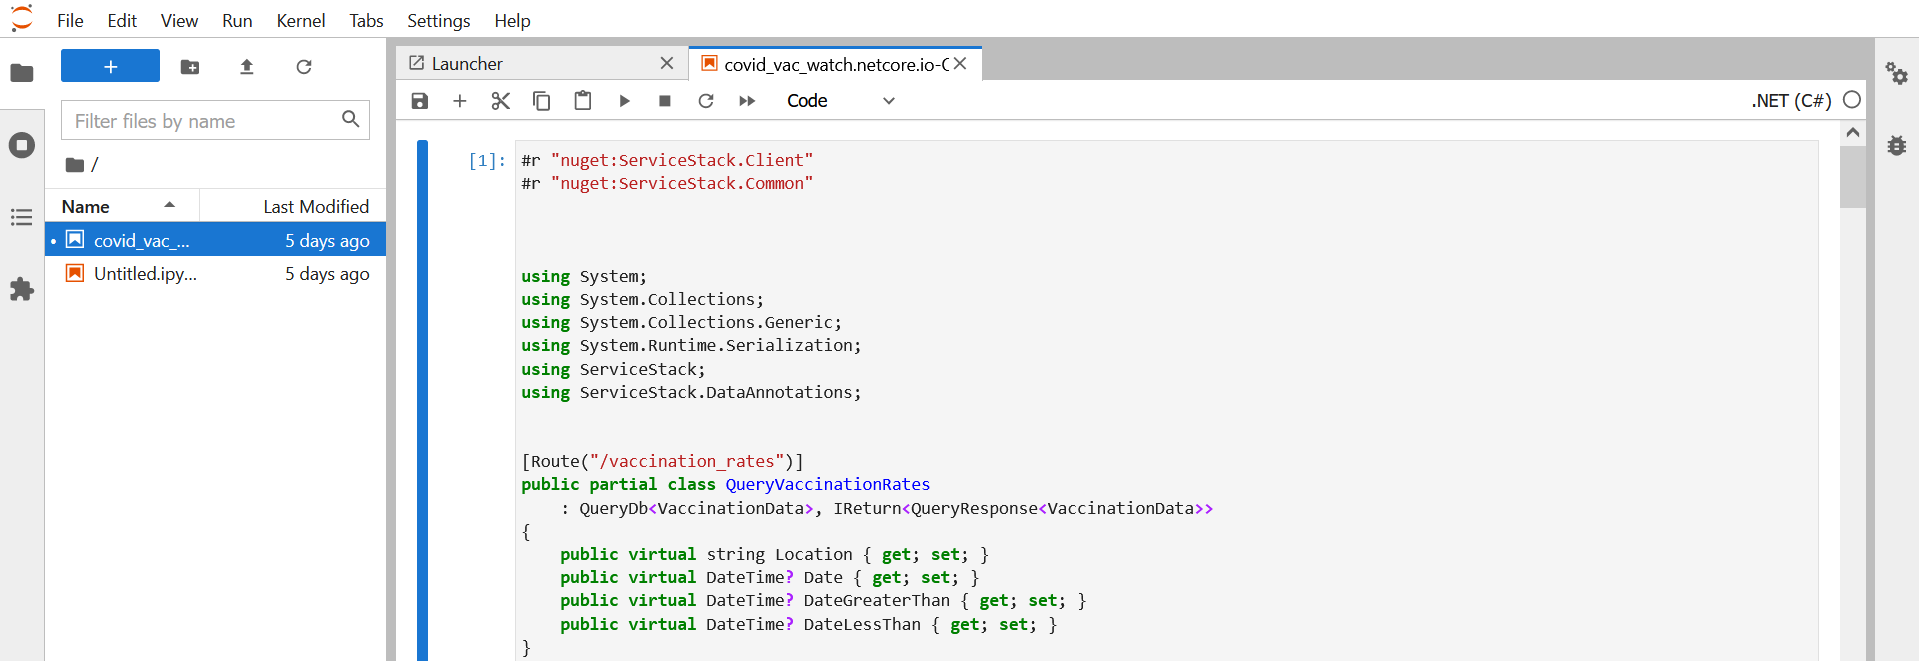
Example generated notebook
From your notebook directory that JupyterLab is using, open a new command prompt/terminal and run:
$ x jupyter-csharp https://covid-vac-watch.netcore.io QueryVaccinationRates
$ x jupyter-fsharp https://covid-vac-watch.netcore.io QueryVaccinationRates
This will generate the file covid_vac_watch.netcore.io-QueryVaccinationRates.ipynb in that directory. This file has everything that is needed to call the QueryVaccinationRates service and display data in the response.
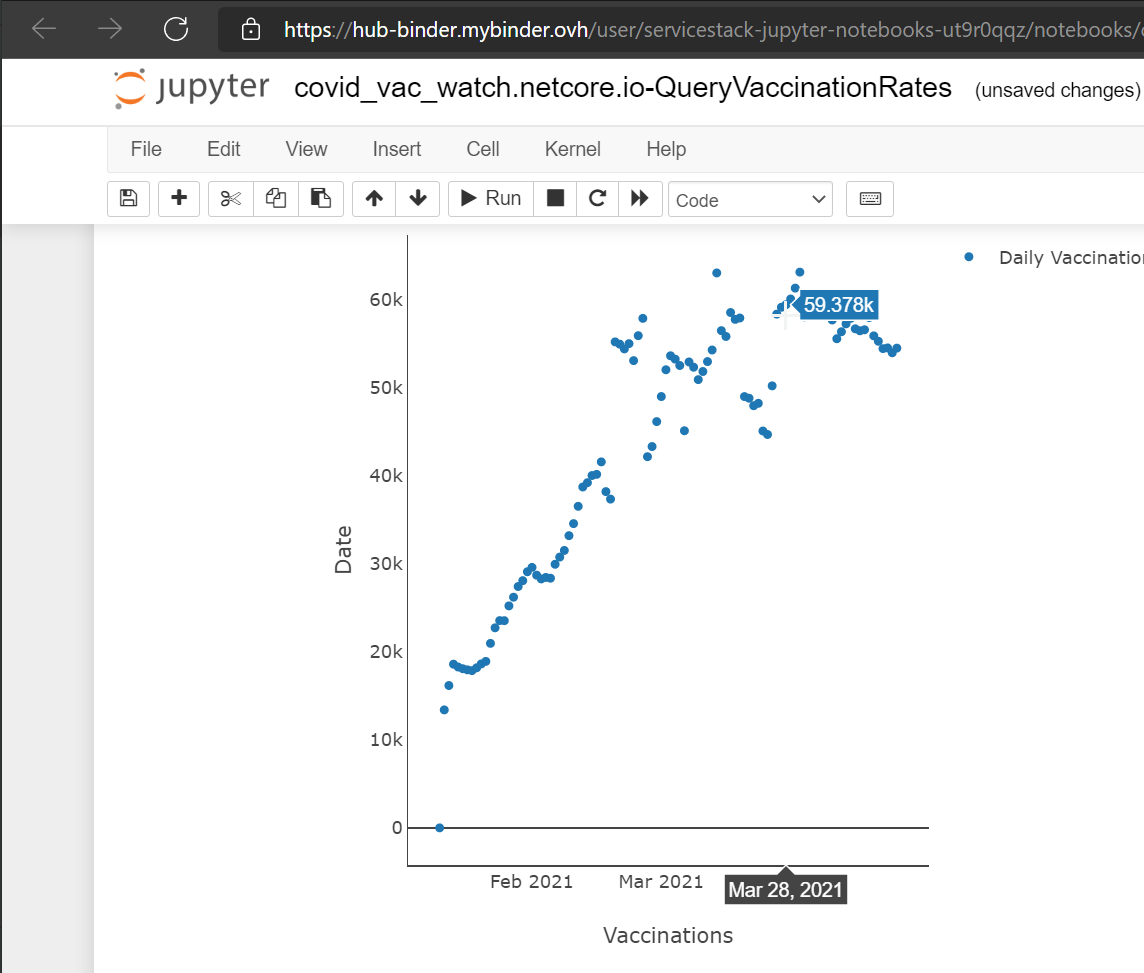
Visualize the data
These generated notebooks are designed to be a starting point with all the data plumbing setup done for you. Taking this example further, we can visualize the data using Plotly.NET, a NuGet library that generates plotly.js visuals using .NET. Run at least the first two cells and then add a new cell at the bottom of the generated notebook with the following code.
#r "nuget: Plotly.NET, 2.0.0-preview.6"
#r "nuget: Plotly.NET.Interactive, 2.0.0-preview.6"

using Plotly.NET;

var xData = response.Results.Select(x => x.Date).ToList();
var yData = response.Results.Select(x => x.DailyVaccinations == null ? 0 : (decimal)(x.DailyVaccinations)).ToList();

GenericChart.GenericChart chart = Chart.Point<DateTime,decimal, string>(x: xData, y: yData, Name: "");
chart
    .WithTraceName("Daily Vaccinations", true)
    .WithX_AxisStyle(title: "Vaccinations", Showgrid: false, Showline: true)
    .WithY_AxisStyle(title: "Date", Showgrid: false, Showline: true);
display(chart);
Same functionality for F# Notebooks:
#r "nuget: Plotly.NET, 2.0.0-preview.6"
#r "nuget: Plotly.NET.Interactive, 2.0.0-preview.6"

open Plotly.NET

let xData = response.Results.Map(fun (x:VaccinationData) -> x.Date)
let yData = response.Results.Map(fun (x:VaccinationData) -> x.DailyVaccinations.GetValueOrDefault())

let chart =
    Chart.Point(xData,yData)
        |> Chart.withTitle "Daily Vaccinations"
        |> Chart.withX_AxisStyle ("Date", Showgrid=false)
        |> Chart.withY_AxisStyle ("Vaccinations", Showgrid=false)
display(chart)
The code above does several things.
- Import the 2 required Plotly.NET NuGet dependencies.
- Declares
usingstatement. - Transforms response data into 2 equal list of primitive data.
- Generates a plot with
Dateon the X axis andDailyVaccinationson the Y axis.

Try it out yourself using MyBinder with generated notebooks
Another way to work with Jupyter, C# and ServiceStack generated notebooks is to do with via MyBinder. MyBinder is a free hosted service that gives you an isolated docker container to run your notebooks if you are just trying something out.
![]()
- Click on the
Launch Binderbadge above and wait for it to launch into a Jupyter web UI (it can take a min or two sometimes) - Goto
Newand selectTerminal. - In the terminal use the ServiceStack
xtool to generate a new C# or F# notebook like beforex jupyter-csharp https://covid-vac-watch.netcore.io QueryVaccinationRatesx jupyter-fsharp https://covid-vac-watch.netcore.io QueryVaccinationRates
- Navigate back to Jupyter file explorer and see your generated notebook.
- Open the new notebook and run the generated cells.
- Add a new cell with the same code for Plotly.NET as above and run
Post Command
Post Command is a collection of command line utils that lets you easily discover, inspect and invoke ServiceStack endpoints from a single command.
All command line utils are available in the latest dotnet tool which can be installed from:
$ dotnet tool install --global x
Or if you had a previous version installed, update with:
$ dotnet tool update -g x
inspect command
The inspect command lets you inspect features and APIs available on a remote ServiceStack endpoint including the version of ServiceStack
running, the App's registered Content Types, Plugins and Auth Providers as well as its public APIs, their routes and Response Types.
Use x inspect to display usage examples and available options:
Usage: x inspect <base-url>
       x inspect <base-url> <request>
       x inspect <base-url> <request> -lang <csharp|python|typescript|dart|java|kotlin|swift|fsharp|vbnet>
       x inspect <base-url> <request> -lang <cs|py|ts|da|ja|kt|sw|fs|vb>
inspect ServiceStack App
This this command to display high-level information about the endpoint in a human-friendly format, e.g:
$ x inspect https://techstacks.io
Output:
Base URL: https://techstacks.io
Name: TechStacks!
Version: 5.111
Content Types: application/json, application/xml, application/jsv, text/html, text/jsonreport, text/csv
Plugins: html, csv, autoroutes, metadata, ssref, httpcache, svg, sharp, auth, sitemap, cors, validation, autoquerymeta, autoquery, openapi, session
Auth Providers: twitter (oauth), github (oauth), jwt (Bearer), servicestack (credentials)
| # | Api | Routes | Response |
|-----|------------------------------------|-----------------------------------------------------------|--------------------------------------------|
| 1 | Ping | /ping | |
| 2 | GetOrganization | GET:/orgs/{Id} | GetOrganizationResponse |
| 3 | GetOrganizationBySlug | GET:/organizations/{Slug} | GetOrganizationResponse |
| 4 | GetOrganizationMembers | GET:/orgs/{Id}/members | GetOrganizationMembersResponse |
| 5 | GetOrganizationAdmin | GET:/orgs/{Id}/admin | GetOrganizationAdminResponse |
| 6 | CreateOrganizationForTechnology | POST:/orgs/posts/new | CreateOrganizationForTechnologyResponse |
| 7 | CreateOrganization | POST:/orgs | CreateOrganizationResponse |
| 8 | UpdateOrganization | PUT:/orgs/{Id} | UpdateOrganizationResponse |
| 9 | DeleteOrganization | DELETE:/orgs/{Id} | |
| 10 | LockOrganization | PUT:/orgs/{Id}/lock | |
| 11 | AddOrganizationLabel | POST:/orgs/{OrganizationId}/labels | OrganizationLabelResponse |
| 12 | UpdateOrganizationLabel | PUT:/orgs/{OrganizationId}/members/{Slug} | OrganizationLabelResponse |
| 13 | RemoveOrganizationLabel | DELETE:/orgs/{OrganizationId}/labels/{Slug} | |
| 14 | AddOrganizationCategory | POST:/orgs/{OrganizationId}/categories | AddOrganizationCategoryResponse |
| 15 | UpdateOrganizationCategory | PUT:/orgs/{OrganizationId}/categories/{Id} | UpdateOrganizationCategoryResponse |
| 16 | DeleteOrganizationCategory | DELETE:/orgs/{OrganizationId}/categories/{Id} | |
| 17 | AddOrganizationMember | POST:/orgs/{OrganizationId}/members | AddOrganizationMemberResponse |
| 18 | UpdateOrganizationMember | PUT:/orgs/{OrganizationId}/members/{Id} | UpdateOrganizationMemberResponse |
| 19 | RemoveOrganizationMember | DELETE:/orgs/{OrganizationId}/members/{UserId} | |
| 20 | SetOrganizationMembers | POST:/orgs/{OrganizationId}/members/set | SetOrganizationMembersResponse |
| 21 | GetOrganizationMemberInvites | GET:/orgs/{OrganizationId}/invites | GetOrganizationMemberInvitesResponse |
| 22 | RequestOrganizationMemberInvite | POST:/orgs/{OrganizationId}/invites | RequestOrganizationMemberInviteResponse |
| 23 | UpdateOrganizationMemberInvite | PUT:/orgs/{OrganizationId}/invites/{UserId} | UpdateOrganizationMemberInviteResponse |
| 24 | QueryPosts | GET:/posts | QueryResponse<Post> |
| 25 | GetPost | GET:/posts/{Id} | GetPostResponse |
| 26 | CreatePost | POST:/posts | CreatePostResponse |
| 27 | UpdatePost | PUT:/posts/{Id} | UpdatePostResponse |
| 28 | DeletePost | DELETE:/posts/{Id} | DeletePostResponse |
| 29 | LockPost | PUT:/posts/{Id}/lock | |
| 30 | HidePost | PUT:/posts/{Id}/hide | |
| 31 | ChangeStatusPost | PUT:/posts/{Id}/status/{Status} | |
| 32 | ActionPostReport | POST:/posts/{PostId}/report/{Id} | |
| 33 | CreatePostComment | POST:/posts/{PostId}/comments | CreatePostCommentResponse |
| 34 | UpdatePostComment | PUT:/posts/{PostId}/comments/{Id} | UpdatePostCommentResponse |
| 35 | DeletePostComment | DELETE:/posts/{PostId}/comments/{Id} | DeletePostCommentResponse |
| 36 | ActionPostCommentReport | POST:/posts/{PostId}/comments/{PostCommentId}/report/{Id} | |
| 37 | GetUserPostCommentVotes | /user/comments/votes | GetUserPostCommentVotesResponse |
| 38 | PinPostComment | PUT:/posts/{PostId}/comments/{Id}/pin | PinPostCommentResponse |
| 39 | GetUsersByEmails | /users/by-email | GetUsersByEmailsResponse |
| 40 | GetUserPostActivity | /user/posts/activity | GetUserPostActivityResponse |
| 41 | GetUserOrganizations | /user/organizations | GetUserOrganizationsResponse |
| 42 | UserPostVote | PUT:/posts/{Id}/vote | UserPostVoteResponse |
| 43 | UserPostFavorite | PUT:/posts/{Id}/favorite | UserPostFavoriteResponse |
| 44 | UserPostReport | PUT:/posts/{Id}/report | UserPostReportResponse |
| 45 | UserPostCommentVote | GET:/posts/{PostId}/comments/{Id} | UserPostCommentVoteResponse |
| 46 | UserPostCommentReport | PUT:/posts/{PostId}/comments/{Id}/report | UserPostCommentReportResponse |
| 47 | StorePreRender | PUT:/prerender/{Path*} | |
| 48 | GetPreRender | GET:/prerender/{Path*} | string |
| 49 | SessionInfo | /my-session | SessionInfoResponse |
| 50 | SubscribeToOrganization | PUT:/orgs/{OrganizationId}/subscribe | |
| 51 | SubscribeToPost | PUT:/posts/{PostId}/subscribe | |
| 52 | DeleteOrganizationSubscription | DELETE:/orgs/{OrganizationId}/subscribe | |
| 53 | DeletePostSubscription | DELETE:/posts/{PostId}/subscribe | |
| 54 | GetTechnologyPreviousVersions | GET:/technology/{Slug}/previous-versions | GetTechnologyPreviousVersionsResponse |
| 55 | GetAllTechnologies | GET:/technology | GetAllTechnologiesResponse |
| 56 | FindTechnologies | /technology/search | QueryResponse<TechnologyView> |
| 57 | QueryTechnology | /technology/query | QueryResponse<TechnologyView> |
| 58 | GetTechnology | /technology/{Slug} | GetTechnologyResponse |
| 59 | GetTechnologyFavoriteDetails | /technology/{Slug}/favorites | GetTechnologyFavoriteDetailsResponse |
| 60 | CreateTechnology | POST:/technology | CreateTechnologyResponse |
| 61 | UpdateTechnology | PUT:/technology/{Id} | UpdateTechnologyResponse |
| 62 | DeleteTechnology | DELETE:/technology/{Id} | DeleteTechnologyResponse |
| 63 | GetTechnologyStackPreviousVersions | GET:/techstacks/{Slug}/previous-versions | GetTechnologyStackPreviousVersionsResponse |
| 64 | GetPageStats | /pagestats/{Type}/{Slug} | GetPageStatsResponse |
| 65 | ClearCache | /cache/clear | string |
| 66 | HourlyTask | /tasks/hourly | HourlyTaskResponse |
| 67 | FindTechStacks | /techstacks/search | QueryResponse<TechnologyStackView> |
| 68 | QueryTechStacks | /techstacks/query | QueryResponse<TechnologyStackView> |
| 69 | Overview | /overview | OverviewResponse |
| 70 | AppOverview | /app-overview | AppOverviewResponse |
| 71 | GetAllTechnologyStacks | GET:/techstacks | GetAllTechnologyStacksResponse |
| 72 | GetTechnologyStack | GET:/techstacks/{Slug} | GetTechnologyStackResponse |
| 73 | GetTechnologyStackFavoriteDetails | /techstacks/{Slug}/favorites | GetTechnologyStackFavoriteDetailsResponse |
| 74 | GetConfig | /config | GetConfigResponse |
| 75 | CreateTechnologyStack | POST:/techstacks | CreateTechnologyStackResponse |
| 76 | UpdateTechnologyStack | PUT:/techstacks/{Id} | UpdateTechnologyStackResponse |
| 77 | DeleteTechnologyStack | DELETE:/techstacks/{Id} | DeleteTechnologyStackResponse |
| 78 | GetFavoriteTechStack | GET:/favorites/techtacks | GetFavoriteTechStackResponse |
| 79 | AddFavoriteTechStack | PUT:/favorites/techtacks/{TechnologyStackId} | FavoriteTechStackResponse |
| 80 | RemoveFavoriteTechStack | DELETE:/favorites/techtacks/{TechnologyStackId} | FavoriteTechStackResponse |
| 81 | GetFavoriteTechnologies | GET:/favorites/technology | GetFavoriteTechnologiesResponse |
| 82 | AddFavoriteTechnology | PUT:/favorites/technology/{TechnologyId} | FavoriteTechnologyResponse |
| 83 | RemoveFavoriteTechnology | DELETE:/favorites/technology/{TechnologyId} | FavoriteTechnologyResponse |
| 84 | GetUserFeed | /my-feed | GetUserFeedResponse |
| 85 | GetUsersKarma | GET:/users/karma | GetUsersKarmaResponse |
| 86 | GetUserInfo | /userinfo/{UserName} | GetUserInfoResponse |
| 87 | UserAvatar | GET:/users/{UserName}/avatar | Task<TResult> |
| 88 | MqStart | /mq/start | string |
| 89 | MqStop | /mq/stop | string |
| 90 | MqStats | /mq/stats | string |
| 91 | MqStatus | /mq/status | string |
| 92 | SyncDiscourseSite | /sync/discourse/{Site} | SyncDiscourseSiteResponse |
| 93 | LogoUrlApproval | /admin/technology/{TechnologyId}/logo | LogoUrlApprovalResponse |
| 94 | LockTechStack | /admin/techstacks/{TechnologyStackId}/lock | LockStackResponse |
| 95 | LockTech | /admin/technology/{TechnologyId}/lock | LockStackResponse |
| 96 | DummyTypes | /json/oneway/DummyTypes | |
| 97 | EmailTest | /email/post/{PostId} | EmailTestRespoonse |
| 98 | ImportUser | /json/reply/ImportUser | ImportUserResponse |
| 99 | ImportUserVoiceSuggestion | /import/uservoice/suggestion | ImportUserVoiceSuggestionResponse |
| 100 | Authenticate | /auth /auth/{provider} | AuthenticateResponse |
| 101 | AssignRoles | /assignroles | AssignRolesResponse |
| 102 | UnAssignRoles | /unassignroles | UnAssignRolesResponse |
| 103 | ConvertSessionToToken | /session-to-token | ConvertSessionToTokenResponse |
| 104 | GetAccessToken | /access-token | GetAccessTokenResponse |
| 105 | QueryPostComments | GET:/posts/comment | QueryResponse<PostComment> |
Routes with an associated HTTP Verb, e.g. GET:/technology only allows access with that specific verb, if unspecified any verb can be used.
inspect API
Adding an API Name to the command will let you describe a specific API Endpoint to learn more about its features, restrictions & capabilities, e.g:
$ x inspect https://techstacks.io LockTechStack
Which will output the APIs description, any tags it was annotated with, its defined routes as well as any Auth Requirements along with all the available Auth Providers registered, e.g:
# LockTechStack
Limit updates to TechStack to Owner or Admin users

Tags:               [TechStacks]
Routes:             /admin/techstacks/{TechnologyStackId}/lock

# Requires Auth
Auth Providers:     twitter (oauth), github (oauth), jwt (Bearer), servicestack (credentials)
Roles:              Admin


# C# DTOs:


using System;
using System.Collections;
using System.Collections.Generic;
using System.Runtime.Serialization;
using ServiceStack;
using ServiceStack.DataAnnotations;


public partial class LockStackResponse
{
}

///<summary>
///Limit updates to TechStack to Owner or Admin users
///</summary>
[Route("/admin/techstacks/{TechnologyStackId}/lock")]
public partial class LockTechStack
    : IReturn<LockStackResponse>, IPut
{
    [Validate("GreaterThan(0)")]
    public virtual long TechnologyStackId { get; set; }

    public virtual bool IsLocked { get; set; }
}
Whilst the C# code defines the API Service Contract including any user-defined routes, its Response Type, what HTTP Verb it should be called with as well as any declarative validation rules when defined. The properties on the Request DTO define the Typed Inputs that the API Accepts whilst the Response DTO describes what a successful Response will return.
View all Referenced DTOs
Only the Request and Response DTOs representing the APIs Inputs and Outputs are displayed by default, to include all referenced types you can use the IncludeTypes syntax, e.g:
$ x inspect https://techstacks.io GetTechnology.*
Which will include all referenced types used in this API:
# GetTechnology
Tags:               [Tech]
Routes:             /technology/{Slug}

# C# DTOs:


using System;
using System.Collections;
using System.Collections.Generic;
using System.Runtime.Serialization;
using ServiceStack;
using ServiceStack.DataAnnotations;


[Route("/technology/{Slug}")]
public partial class GetTechnology
    : IReturn<GetTechnologyResponse>, IRegisterStats, IGet
{
    public virtual string Slug { get; set; }
}

public partial class GetTechnologyResponse
{
    public GetTechnologyResponse()
    {
        TechnologyStacks = new List<TechnologyStack>{};
    }

    public virtual DateTime Created { get; set; }
    public virtual Technology Technology { get; set; }
    public virtual List<TechnologyStack> TechnologyStacks { get; set; }
    public virtual ResponseStatus ResponseStatus { get; set; }
}

public partial interface IRegisterStats
{
}

public partial class Technology
    : TechnologyBase
{
}

public partial class TechnologyBase
{
    public virtual long Id { get; set; }
    public virtual string Name { get; set; }
    public virtual string VendorName { get; set; }
    public virtual string VendorUrl { get; set; }
    public virtual string ProductUrl { get; set; }
    public virtual string LogoUrl { get; set; }
    public virtual string Description { get; set; }
    public virtual DateTime Created { get; set; }
    public virtual string CreatedBy { get; set; }
    public virtual DateTime LastModified { get; set; }
    public virtual string LastModifiedBy { get; set; }
    public virtual string OwnerId { get; set; }
    public virtual string Slug { get; set; }
    public virtual bool LogoApproved { get; set; }
    public virtual bool IsLocked { get; set; }
    public virtual TechnologyTier Tier { get; set; }
    public virtual DateTime? LastStatusUpdate { get; set; }
    public virtual int? OrganizationId { get; set; }
    public virtual long? CommentsPostId { get; set; }
    public virtual int ViewCount { get; set; }
    public virtual int FavCount { get; set; }
}

public partial class TechnologyStack
    : TechnologyStackBase
{
}

public partial class TechnologyStackBase
{
    public virtual long Id { get; set; }
    public virtual string Name { get; set; }
    public virtual string VendorName { get; set; }
    public virtual string Description { get; set; }
    public virtual string AppUrl { get; set; }
    public virtual string ScreenshotUrl { get; set; }
    public virtual DateTime Created { get; set; }
    public virtual string CreatedBy { get; set; }
    public virtual DateTime LastModified { get; set; }
    public virtual string LastModifiedBy { get; set; }
    public virtual bool IsLocked { get; set; }
    public virtual string OwnerId { get; set; }
    public virtual string Slug { get; set; }
    [StringLength(int.MaxValue)]
    public virtual string Details { get; set; }

    [StringLength(int.MaxValue)]
    public virtual string DetailsHtml { get; set; }

    public virtual DateTime? LastStatusUpdate { get; set; }
    public virtual int? OrganizationId { get; set; }
    public virtual long? CommentsPostId { get; set; }
    public virtual int ViewCount { get; set; }
    public virtual int FavCount { get; set; }
}

public enum TechnologyTier
{
    ProgrammingLanguage,
    Client,
    Http,
    Server,
    Data,
    SoftwareInfrastructure,
    OperatingSystem,
    HardwareInfrastructure,
    ThirdPartyServices,
}
Thanks to ServiceStack's unique message-based design the code contract used to define the Service is also all that's needed to invoke the API along with the generic ServiceStack Client library which for .NET is available in the ServiceStack.Client NuGet package:
$ dotnet add package ServiceStack.Client
Which together with the above C# DTOs enables its optimal end-to-end typed API:
var client = new JsonServiceClient("https://techstacks.io");

client.Send(new LockTechStack { TechnologyStackId = id, IsLocked = true });
Request DTOs annotated with an IVerb interface marker (e.g. IPut) can instead use Send() to invoke the API with that HTTP Verb.
This same simplified usage scenario is also available in each of Add ServiceStack Reference supported Languages:
Where the -lang option can be used to change what language to return the DTO Types in:
Usage: x inspect <base-url> <request> -lang <csharp|python|typescript|dart|java|kotlin|swift|fsharp|vbnet>
       x inspect <base-url> <request> -lang <cs|py|ts|da|ja|kt|sw|fs|vb>
For example to view the DTOs in Swift run:
$ x inspect https://techstacks.io LockTechStack -lang swift
Output:
# LockTechStack
Limit updates to TechStack to Owner or Admin users

Tags:               [TechStacks]
Routes:             /admin/techstacks/{TechnologyStackId}/lock

# Requires Auth
Auth Providers:     twitter (oauth), github (oauth), jwt (Bearer), servicestack (credentials)
Roles:              Admin


# Swift DTOs:


import Foundation
import ServiceStack

/**
* Limit updates to TechStack to Owner or Admin users
*/
// @Route("/admin/techstacks/{TechnologyStackId}/lock")
public class LockTechStack : IReturn, IPut, Codable
{
    public typealias Return = LockStackResponse

    // @Validate(Validator="GreaterThan(0)")
    public var technologyStackId:Int?

    public var isLocked:Bool?

    required public init(){}
}

public class LockStackResponse : Codable
{
    required public init(){}
}
send - Invoking APIs
In addition to being able to invoke ServiceStack APIs natively in each supported language, they can also be invoked with just a single command-line.
Running x send will display different example usage of this versatile tool which supports most of
ServiceStack's Authentication options:
Usage: x <send|GET|POST|PUT|DELETE|PATCH> <base-url> <request>
       x <send|GET|POST|PUT|DELETE|PATCH> <base-url> <request> {js-object}
       x <send|GET|POST|PUT|DELETE|PATCH> <base-url> <request> < body.json

Options:
 -raw                   Show raw HTTP Headers and Body
 -token <token>         Use JWT or API Key Bearer Token
 -basic <user:pass>     Use HTTP Basic Auth
 -authsecret <secret>   Use Admin Auth Secret
 -ss-id <session-id>    Use ss-id Session Id Cookie
 -cookies <file>        Store and Load Cookies from file
HTTP APIs can be invoked with a specific HTTP Verb or send which will use the APIs preferred HTTP Method when it can be inferred e.g. Request DTO is annotated with IVerb interface marker or its implementation uses a HTTP Verb method name instead of Any().
UI for generating post commands
Whilst the syntax for invoking APIs from the command line should be fairly intuitive, you may benefit from using the UI in apps.servicestack.net to craft the initial API call that can be copied by clicking the copy icon from Invoke API from command line command:
This is quick way for using a UI to bootstrap the initial post command that you can continue iterating on and invoking locally.
Note: apps.servicestack.net requires your remote ServiceStack App is accessible from the Internet
Invoking APIs without arguments
APIs that don't require arguments can be invoked with just their names, e.g. we can invoke the GetLocations Covid 19 Vaccine Watch API with either:
$ x send https://covid-vac-watch.netcore.io GetLocations
$ x GET https://covid-vac-watch.netcore.io GetLocations
Output:
locations:
  Alabama
  Alaska
  American Samoa
  Arizona
  Arkansas
  Bureau of Prisons
  California
  Colorado
  Connecticut
  Delaware
  Dept of Defense
  District of Columbia
  Federated States of Micronesia
  Florida
  Georgia
  ...
By default APIs return a human friendly text output optimal for reading at a glance.
If preferred you can instead view the full HTTP Response including HTTP Headers by adding the -raw flag, e.g:
$ x send https://covid-vac-watch.netcore.io GetLocations -raw
Output:
GET /json/reply/GetLocations HTTP/1.1
Host: covid-vac-watch.netcore.io
Accept: application/json

HTTP/1.1 200 OK
Server: nginx/1.19.3
Date: Wed, 28 Jul 2021 07:39:34 GMT
Transfer-Encoding: chunked
Connection: keep-alive
Vary: Accept
X-Powered-By: ServiceStack/5.111 NetCore/Linux
Strict-Transport-Security: max-age=31536000
Content-Type: application/json; charset=utf-8

{"locations":["Alabama","Alaska","American Samoa","Arizona","Arkansas","Bureau of Prisons","California","Colorado","Connecticut","Delaware","Dept of Defense","District of Columbia","Federated States of Micronesia","Florida","Georgia","Guam","Hawaii","Idaho","Illinois","Indian Health Svc","Indiana","Iowa","Kansas","Kentucky","Long Term Care","Louisiana","Maine","Marshall Islands","Maryland","Massachusetts","Michigan","Minnesota","Mississippi","Missouri","Montana","Nebraska","Nevada","New Hampshire","New Jersey","New Mexico","New York State","North Carolina","North Dakota","Northern Mariana Islands","Ohio","Oklahoma","Oregon","Pennsylvania","Puerto Rico","Republic of Palau","Rhode Island","South Carolina","South Dakota","Tennessee","Texas","United States","Utah","Vermont","Veterans Health","Virgin Islands","Virginia","Washington","West Virginia","Wisconsin","Wyoming"]}
Invoking APIs with Arguments
To invoke an API with arguments we can use a JavaScript Object Literal which allows a wrist-friendly syntax for invoking any API including rich AutoQuery APIs which thanks to its human friendly output allows quickly inferring Query result-sets from a glance, e.g:
Quote Arguments in Unix Shells
Since JavaScript operators have special meaning in Unix shells you'd need to wrap the object literal in double quotes to have the shell pass it verbatim to the command tool without evaluating it, e.g:
Windows / Linux / macOS:
$ x send https://techstacks.io FindTechnologies "{Ids:[1,2,6],VendorName:'Google',Take:1}"
Windows Only:
$ x send https://techstacks.io FindTechnologies {Ids:[1,2,6],VendorName:'Google',Take:1}
So requests that doesn't use any special batch characters can be sent with or without quotes. An alternative way to by pass the shell is to redirect a JSON Request body instead, e.g:
$ x send https://techstacks.io FindTechnologies < FindTechnologies.json
Last 5 Recorded Dates of Vaccinated people in Alaska
$ x send https://covid-vac-watch.netcore.io QueryVaccinationRates {Location:'Alaska',orderBy:'-date',take:5,Fields:'id,date,peopleVaccinated',include:'total'}
Output:
offset:   0
total:    195

results:
| # | id    | date                        | peopleVaccinated |
|---|-------|-----------------------------|------------------|
| 1 | 12308 | 2021-07-25T00:00:00.0000000 |           372940 |
| 2 | 12307 | 2021-07-24T00:00:00.0000000 |           372902 |
| 3 | 12306 | 2021-07-23T00:00:00.0000000 |           372132 |
| 4 | 12305 | 2021-07-22T00:00:00.0000000 |           371514 |
| 5 | 12304 | 2021-07-21T00:00:00.0000000 |           371062 |
Multi conditional TechStacks query
$ x send https://techstacks.io FindTechnologies {Ids:[1,2,6],VendorName:'Google',Take:10,Fields:'Id,Name,VendorName,Tier,FavCount,ViewCount'}
Output:
offset:   0
total:    18

results:
| #  | id | name                   | vendorName   | tier                   | viewCount | favCount |
|----|----|------------------------|--------------|------------------------|-----------|----------|
| 1  |  1 | ServiceStack           | ServiceStack | Server                 |      4204 |        5 |
| 2  |  2 | PostgreSQL             | PostgreSQL   | Data                   |      2291 |        4 |
| 3  |  6 | AWS RDS                | Amazon       | Data                   |       625 |        1 |
| 4  |  7 | AngularJS              | Google       | Client                 |      5012 |        1 |
| 5  | 13 | Google Closure Library | Google       | Client                 |       390 |        1 |
| 6  | 15 | Dart                   | Google       | ProgrammingLanguage    |       320 |        2 |
| 7  | 18 | Go                     | Google       | ProgrammingLanguage    |      3865 |        2 |
| 8  | 57 | LevelDB                | Google       | Data                   |       325 |        1 |
| 9  | 61 | Firebase               | Google       | Data                   |       722 |        1 |
| 10 | 72 | Google Cloud Platform  | Google       | HardwareInfrastructure |       269 |        1 |
Invoking Complex APIs
As ServiceStack APIs supports nested complex types in query strings the JS Object Request body will be able to scale to execute even deeply complicated API requests in both HTTP Methods without Request Bodies, e.g:
Example GET Request
$ x GET https://test.servicestack.net StoreLogs {Loggers:[{Id:786,Devices:[{Id:5955,Type:'Panel',TimeStamp:1,Channels:[{Name:'Temperature',Value:'58'},{Name:'Status',Value:'On'}]}]}]} -raw
Where they're sent on the query string:
GET /json/reply/StoreLogs?Loggers=%5b%7bId%3a786,Devices%3a%5b%7bId%3a5955,Type%3aPanel,TimeStamp%3a1,Channels%3a%5b%7bName%3aTemperature,Value%3a58%7d,%7bName%3aStatus,Value%3aOn%7d%5d%7d%5d%7d%5d HTTP/1.1
Host: test.servicestack.net
Accept: application/json

HTTP/1.1 200 OK
Server: nginx/1.18.0, (Ubuntu)
Date: Wed, 28 Jul 2021 07:40:26 GMT
Transfer-Encoding: chunked
Connection: keep-alive
Set-Cookie: ss-id=nt6W8DDHatjwf0kToEUa; path=/; samesite=strict; httponly, ss-pid=GsP8tmccacQn0fH8vOAD; expires=Sun, 28 Jul 2041 07:40:26 GMT; path=/; samesite=strict; httponly
Vary: Accept
Access-Control-Allow-Credentials: true
Access-Control-Allow-Headers: Content-Type, Allow, Authorization, X-Args
Access-Control-Allow-Methods: GET, POST, PUT, DELETE, PATCH, OPTIONS, HEAD
X-Powered-By: ServiceStack/5.111 NetCore/Linux
Content-Type: application/json; charset=utf-8

{"existingLogs":[{"id":786,"devices":[{"id":5955,"type":"Panel","timeStamp":1,"channels":[{"name":"Temperature","value":"58"},{"name":"Status","value":"On"}]}]}]}
Example POST Request
As well as HTTP Requests with Request bodies where only the method used needs to change whilst the Request JS Object literal stays exactly the same, e.g:
$ x POST https://test.servicestack.net StoreLogs {Loggers:[{Id:786,Devices:[{Id:5955,Type:'Panel',TimeStamp:1,Channels:[{Name:'Temperature',Value:'58'},{Name:'Status',Value:'On'}]}]}]} -raw
Where instead of being sent on the query string it's posted inside a JSON Request body, irrespective of how its sent a ServiceStack API supporting any HTTP Method by being implemented with the Any() method name will result in an identical response:
POST /json/reply/StoreLogs HTTP/1.1
Host: test.servicestack.net
Accept: application/json
Content-Type: application/json
Content-Length: 157

{"Loggers":[{"Id":786,"Devices":[{"Id":5955,"Type":"Panel","TimeStamp":1,"Channels":[{"Name":"Temperature","Value":"58"},{"Name":"Status","Value":"On"}]}]}]}

HTTP/1.1 200 OK
Server: nginx/1.18.0, (Ubuntu)
Date: Wed, 28 Jul 2021 07:40:54 GMT
Transfer-Encoding: chunked
Connection: keep-alive
Set-Cookie: ss-id=X1BmXXrr9vr5DIpAoxFM; path=/; samesite=strict; httponly, ss-pid=J8kDBiJ37WEOnywRdGMS; expires=Sun, 28 Jul 2041 07:40:54 GMT; path=/; samesite=strict; httponly
Vary: Accept
Access-Control-Allow-Credentials: true
Access-Control-Allow-Headers: Content-Type, Allow, Authorization, X-Args
Access-Control-Allow-Methods: GET, POST, PUT, DELETE, PATCH, OPTIONS, HEAD
X-Powered-By: ServiceStack/5.111 NetCore/Linux
Content-Type: application/json; charset=utf-8

{"existingLogs":[{"id":786,"devices":[{"id":5955,"type":"Panel","timeStamp":1,"channels":[{"name":"Temperature","value":"58"},{"name":"Status","value":"On"}]}]}]}
Redirected Input Example
For requests that get significantly large it may be more convenient to maintain the request body in a separate file that you can pipe into the command instead, e.g:
$ x send https://test.servicestack.net StoreLogs -raw < StoreLogs.json
Output:
POST /json/reply/StoreLogs HTTP/1.1
Host: test.servicestack.net
Accept: application/json
Content-Type: application/json
Content-Length: 157

{"Loggers":[{"Id":786,"Devices":[{"Id":5955,"Type":"Panel","TimeStamp":1,"Channels":[{"Name":"Temperature","Value":"58"},{"Name":"Status","Value":"On"}]}]}]}

HTTP/1.1 200 OK
Server: nginx/1.18.0, (Ubuntu)
Date: Wed, 28 Jul 2021 07:41:38 GMT
Transfer-Encoding: chunked
Connection: keep-alive
Set-Cookie: ss-id=kScY3mYF06e3iuPaCnaD; path=/; samesite=strict; httponly, ss-pid=hpbimtl9dIWA1IbJPMXN; expires=Sun, 28 Jul 2041 07:41:38 GMT; path=/; samesite=strict; httponly
Vary: Accept
Access-Control-Allow-Credentials: true
Access-Control-Allow-Headers: Content-Type, Allow, Authorization, X-Args
Access-Control-Allow-Methods: GET, POST, PUT, DELETE, PATCH, OPTIONS, HEAD
X-Powered-By: ServiceStack/5.111 NetCore/Linux
Content-Type: application/json; charset=utf-8

{"existingLogs":[{"id":786,"devices":[{"id":5955,"type":"Panel","timeStamp":1,"channels":[{"name":"Temperature","value":"58"},{"name":"Status","value":"On"}]}]}]}
Remove the -raw option to display the response in a more human-friendly readable format:
$ x send https://test.servicestack.net StoreLogs < StoreLogs.json
Output:
[existingLogs]
id:       786

[devices]
id:         5955
type:       Panel
timeStamp:  1

channels:
| # | name        | value |
|---|-------------|-------|
| 1 | Temperature | 58    |
| 2 | Status      | On    |
Authentication
To support making Authenticated Requests most of ServiceStack's built-in Authentication Options are supported from the options below:
Options:
 -token <token>         Use JWT or API Key Bearer Token
 -basic <user:pass>     Use HTTP Basic Auth
 -authsecret <secret>   Use Admin Auth Secret
 -ss-id <session-id>    Use ss-id Session Id Cookie
 -cookies <file>        Store and Load Cookies from file
Since Username/Password Credentials Auth is a normal ServiceStack API we can invoke it like normal, e.g:
$ x send https://test.servicestack.net Authenticate {provider:'credentials',username:'admin',password:'test'}
However to hide your credentials from command history logs you'll likely want to maintain your credentials in a separate file, e.g:
$ x send https://test.servicestack.net Authenticate < auth.json
Which if successful will return a populated human-friendly AuthenticateResponse:
userId:          2
sessionId:       QfJLhmd8XQxeuAIqvoCY
userName:        admin
displayName:     admin DisplayName
bearerToken:     eyJ0eXAiOiJKV1QiLCJhbGciOiJIUzI1NiIsImtpZCI6IjNuLyJ9.eyJzdWIiOjIsImlhdCI6MTYyNzM4MjY5NiwiZXhwIjoxNjI4NTkyMjk2LCJlbWFpbCI6ImFkbWluQGdtYWlsLmNvbSIsImdpdmVuX25hbWUiOiJGaXJzdCBhZG1pbiIsImZhbWlseV9uYW1lIjoiTGFzdCBhZG1pbiIsIm5hbWUiOiJhZG1pbiBEaXNwbGF5TmFtZSIsInByZWZlcnJlZF91c2VybmFtZSI6ImFkbWluIiwicm9sZXMiOlsiQWRtaW4iXSwianRpIjozfQ.j80f1KYsNRDhygO817NSaqYg7DIR1ptLZQUB1mZd_R8
refreshToken:    eyJ0eXAiOiJKV1RSIiwiYWxnIjoiSFMyNTYiLCJraWQiOiIzbi8ifQ.eyJzdWIiOjIsImlhdCI6MTYyNzM4MjY5NiwiZXhwIjoxNjU4OTE4Njk2LCJqdGkiOi0zfQ.nkwDYvmB5_QHm6hmVv8Thfl2Iz8W_LUDf6bspb-Nu2c
profileUrl:      data:image/svg+xml,%3Csvg width='100' height='100' viewBox='0 0 100 100' xmlns='http://www.w3.org/2000/svg'%3E %3Cstyle%3E .path%7B%7D %3C/style%3E %3Cg id='male-svg'%3E%3Cpath fill='%23556080' d='M1 92.84V84.14C1 84.14 2.38 78.81 8.81 77.16C8.81 77.16 19.16 73.37 27.26 69.85C31.46 68.02 32.36 66.93 36.59 65.06C36.59 65.06 37.03 62.9 36.87 61.6H40.18C40.18 61.6 40.93 62.05 40.18 56.94C40.18 56.94 35.63 55.78 35.45 47.66C35.45 47.66 32.41 48.68 32.22 43.76C32.1 40.42 29.52 37.52 33.23 35.12L31.35 30.02C31.35 30.02 28.08 9.51 38.95 12.54C34.36 7.06 64.93 1.59 66.91 18.96C66.91 18.96 68.33 28.35 66.91 34.77C66.91 34.77 71.38 34.25 68.39 42.84C68.39 42.84 66.75 49.01 64.23 47.62C64.23 47.62 64.65 55.43 60.68 56.76C60.68 56.76 60.96 60.92 60.96 61.2L64.74 61.76C64.74 61.76 64.17 65.16 64.84 65.54C64.84 65.54 69.32 68.61 74.66 69.98C84.96 72.62 97.96 77.16 97.96 81.13C97.96 81.13 99 86.42 99 92.85L1 92.84Z'/%3E%3C/g%3E%3C/svg%3E

[roles]
Admin
Authentication -cookies
Likely the easiest and most versatile authentication option would be to use a separate cookies file where it will load and save cookies after each request allowing each request to be made within the context of the same authenticated session as done in browsers, e.g:
$ x send -cookies cookies.xml https://test.servicestack.net Authenticate < auth.json
We can test that it's working by first trying to call an Authentication protected Service without any Authentication options, e.g:
$ x send https://test.servicestack.net HelloSecure {name:'World'}
Output:
The remote server returned an error: (401) Not Authenticated.
Then re-trying the request, providing the cookies.xml that was populated after the success Authentication:
$ x send -cookies cookies.xml https://test.servicestack.net HelloSecure {name:'World'}
Output:
result: Hello, World!
The -cookies Authentication option is the most versatile as it supports standard Server Sessions as well as stateless Authentication options like JWT Auth configured with Token Cookies where the JWT Bearer Token is maintained in a cookie.
Authentication -token
The -token Authentication option should be used when authenticating with Bearer Tokens like JWT or API Key Auth Providers.
When the JwtAuthProvider is configured a successful Authentication Response will return a populated bearerToken which we can use to authenticate with instead. As Bearer Tokens can become quite verbose you may want to choose to save in a shell environment variable instead, e.g:
Windows:
$ set TOKEN=...
$ x send -token %TOKEN% https://test.servicestack.net HelloSecure {name:'World'}
Linux / macOS:
$ TOKEN=...
$ x send -token $TOKEN https://test.servicestack.net HelloSecure "{name:'World'}"
Output:
result: Hello, World!
Inspect JWTs
When working with JWTs it can be useful to quickly inspect its contents which we can do with inspect-jwt:
Usage: x inspect-jwt <jwt>
       x inspect-jwt < file.txt
Which we can use with the populated bearerToken above to inspect the contents of the JWT in a human-friendly format, e.g:
$ x inspect-jwt eyJ0eXAiOiJKV1QiLCJhbGciOiJIUzI1NiIsImtpZCI6IjNuLyJ9.eyJzdWIiOjIsImlhdCI6MTYyNjg0OTEzMCwiZXhwIjoxNjI4MDU4NzMwLCJlbWFpbCI6ImFkbWluQGdtYWlsLmNvbSIsImdpdmVuX25hbWUiOiJGaXJzdCBhZG1pbiIsImZhbWlseV9uYW1lIjoiTGFzdCBhZG1pbiIsIm5hbWUiOiJhZG1pbiBEaXNwbGF5TmFtZSIsInByZWZlcnJlZF91c2VybmFtZSI6ImFkbWluIiwicm9sZXMiOlsiQWRtaW4iXSwianRpIjo5fQ.uLp_QkmBo6J6TlXiUPl0Iq6TkTbF0xzncbUI1HmDro4
Output:
[JWT Header]
typ:  JWT
alg:  HS256
kid:  3n/


[JWT Payload]
sub:                 2
iat:                 1626849130 (Wed, 21 Jul 2021 06:32:10 GMT)
exp:                 1628058730 (Wed, 04 Aug 2021 06:32:10 GMT)
email:               admin@gmail.com
given_name:          First admin
family_name:         Last admin
name:                admin DisplayName
preferred_username:  admin

[roles]
Admin

jti:                 9
Authentication -basic
When the BasicAuthProvider is configured we can authenticate with HTTP Basic Auth using the -basic command line option which supports both clear text:
$ x send -basic admin:test https://test.servicestack.net HelloSecure {name:'World'}
Output:
$ x send -basic admin:test https://test.servicestack.net HelloSecure {name:'World'}
As well as Base64 encoded credentials which we can convert using the x base64 tool, e.g:
$ x base64 admin:test
Output:
YWRtaW46dGVzdA==
$ x send -basic YWRtaW46dGVzdA== https://test.servicestack.net HelloSecure {name:'World'}
Output:
result: Hello, World!
Although a Base64 encoded password does not offer much protection for your password (e.g. it can be decoded with x unbase64 YWRtaW46dGVzdA==), to avoid your password from being captured in shell command history we can instead read it from a plain text file, e.g:
$ set /P basic=<credentials.txt
$ x send -basic %basic% https://test.servicestack.net HelloSecure {name:'World'}
Output:
result: Hello, World!
Authentication -authsecret
If the remote ServiceStack App is configured with an Admin Auth Secret, i.e:
SetConfig(new HostConfig { AdminAuthSecret = "secretz" });
It can be used to authenticated with using the -authsecret option:
$ x send -authsecret secretz https://test.servicestack.net HelloSecure {name:'World'}
Output:
result: Hello, World!
Authentication -ss-id
When the remote ServiceStack App is configured to use Server Sessions you can impersonate a pre-authenticated Users Session using the -ss-id Authentication option which is useful for impersonating an existing Users Session by copying their ss-id or ss-pid Cookie which you can find in Web Inspector's Application page:

If Users were authenticated with Remember Me checked their Session will be stored against the ss-pid Cookie otherwise it will use the ss-id Session Cookie.
Making a GET request to the Authenticate API is another way you can test which user you're authenticated as, e.g:
$ x GET -ss-id FoCHJK9Apl9mrcaq3ceE https://blazor-vue.web-templates.io Authenticate
Output:
userId:          1
sessionId:       FoCHJK9Apl9mrcaq3ceE
userName:        admin@email.com
displayName:     Admin User
profileUrl:      data:image/svg+xml,%3Csvg width='100' height='100' viewBox='0 0 100 100' xmlns='http://www.w3.org/2000/svg'%3E %3Cstyle%3E .path%7B%7D %3C/style%3E %3Cg id='male-svg'%3E%3Cpath fill='%23556080' d='M1 92.84V84.14C1 84.14 2.38 78.81 8.81 77.16C8.81 77.16 19.16 73.37 27.26 69.85C31.46 68.02 32.36 66.93 36.59 65.06C36.59 65.06 37.03 62.9 36.87 61.6H40.18C40.18 61.6 40.93 62.05 40.18 56.94C40.18 56.94 35.63 55.78 35.45 47.66C35.45 47.66 32.41 48.68 32.22 43.76C32.1 40.42 29.52 37.52 33.23 35.12L31.35 30.02C31.35 30.02 28.08 9.51 38.95 12.54C34.36 7.06 64.93 1.59 66.91 18.96C66.91 18.96 68.33 28.35 66.91 34.77C66.91 34.77 71.38 34.25 68.39 42.84C68.39 42.84 66.75 49.01 64.23 47.62C64.23 47.62 64.65 55.43 60.68 56.76C60.68 56.76 60.96 60.92 60.96 61.2L64.74 61.76C64.74 61.76 64.17 65.16 64.84 65.54C64.84 65.54 69.32 68.61 74.66 69.98C84.96 72.62 97.96 77.16 97.96 81.13C97.96 81.13 99 86.42 99 92.85L1 92.84Z'/%3E%3C/g%3E%3C/svg%3E

[roles]
Admin
Capture HTTP Headers in .NET Service Clients
A common issue when trying to diagnose service integration issues is wanting to inspect the full HTTP traffic to help identify issues. Inside .NET Applications this would typically require using an external packet sniffer like Fiddler but just like Post Command raw HTTP captured output above you can now capture the raw HTTP traffic of all .NET *ServiceClient with the new CaptureHttp() API.
To print HTTP requests to the Console use:
var client = new JsonServiceClient(BaseUrl);
client.CaptureHttp(print:true);

var authResponse = client.Send(new Authenticate { provider = "credentials", UserName = "admin", Password = "test" });
Which will print out the raw HTTP Request & Response Headers and body to the Console, e.g:
POST /json/reply/Authenticate HTTP/1.1
Host: test.servicestack.net
Accept: application/json
User-Agent: ServiceStack .NET Client 5.121
Accept-Encoding: gzip,deflate
Content-Type: application/json
{"provider":"credentials","UserName":"admin","Password":"test"}
HTTP/1.1 200 OK
Server: nginx/1.18.0, (Ubuntu)
Date: Sat, 21 Aug 2021 09:51:34 GMT
Transfer-Encoding: chunked
Connection: keep-alive
Set-Cookie: ss-id=o7VAdXm7JKLy92XiQcQQ; path=/; samesite=strict; httponly, ss-pid=I2MdbrzWZILqNCOqGlyR; expires=Wed, 21 Aug 2041 09:51:34 GMT; path=/; samesite=strict; httponly, ss-opt=temp; expires=Wed, 21 Aug 2041 09:51:34 GMT; path=/; samesite=strict; httponly, X-UAId=2; expires=Wed, 21 Aug 2041 09:51:34 GMT; path=/; samesite=strict; httponly, ss-tok=eyJ0eXAiOiJKV1QiLCJhbGciOiJIUzI1NiIsImtpZCI6IjNuLyJ9.eyJzdWIiOjIsImlhdCI6MTYyOTUzOTQ5NCwiZXhwIjoxNjMwNzQ5MDk0LCJlbWFpbCI6ImFkbWluQGdtYWlsLmNvbSIsImdpdmVuX25hbWUiOiJGaXJzdCBhZG1pbiIsImZhbWlseV9uYW1lIjoiTGFzdCBhZG1pbiIsIm5hbWUiOiJhZG1pbiBEaXNwbGF5TmFtZSIsInByZWZlcnJlZF91c2VybmFtZSI6ImFkbWluIiwicm9sZXMiOlsiQWRtaW4iXSwianRpIjoxMTR9.rHk-OdCwd8wR4AsT7exLRUr59-mzFs0FvKZUeZhvKMI; expires=Sat, 04 Sep 2021 09:51:34 GMT; path=/; samesite=strict; httponly, ss-reftok=eyJ0eXAiOiJKV1RSIiwiYWxnIjoiSFMyNTYiLCJraWQiOiIzbi8ifQ.eyJzdWIiOjIsImlhdCI6MTYyOTUzOTQ5NCwiZXhwIjoxNjYxMDc1NDk0LCJqdGkiOi02OX0.35MpYdz-QIkbVf98y_wNTA9PIYDy_EEQc3zfkpFvuQc; expires=Sun, 21 Aug 2022 09:51:34 GMT; path=/; samesite=strict; httponly
Vary: Accept
Access-Control-Allow-Credentials: true
Access-Control-Allow-Headers: Content-Type, Allow, Authorization, X-Args
Access-Control-Allow-Methods: GET, POST, PUT, DELETE, PATCH, OPTIONS, HEAD
X-Powered-By: ServiceStack/5.111 NetCore/Linux
X-Cookies: ss-tok,ss-reftok
Content-Type: application/json; charset=utf-8
{"userId":"2","sessionId":"o7VAdXm7JKLy92XiQcQQ","userName":"admin","displayName":"admin DisplayName","bearerToken":"eyJ0eXAiOiJKV1QiLCJhbGciOiJIUzI1NiIsImtpZCI6IjNuLyJ9.eyJzdWIiOjIsImlhdCI6MTYyOTUzOTQ5NCwiZXhwIjoxNjMwNzQ5MDk0LCJlbWFpbCI6ImFkbWluQGdtYWlsLmNvbSIsImdpdmVuX25hbWUiOiJGaXJzdCBhZG1pbiIsImZhbWlseV9uYW1lIjoiTGFzdCBhZG1pbiIsIm5hbWUiOiJhZG1pbiBEaXNwbGF5TmFtZSIsInByZWZlcnJlZF91c2VybmFtZSI6ImFkbWluIiwicm9sZXMiOlsiQWRtaW4iXSwianRpIjoxMTR9.rHk-OdCwd8wR4AsT7exLRUr59-mzFs0FvKZUeZhvKMI","refreshToken":"eyJ0eXAiOiJKV1RSIiwiYWxnIjoiSFMyNTYiLCJraWQiOiIzbi8ifQ.eyJzdWIiOjIsImlhdCI6MTYyOTUzOTQ5NCwiZXhwIjoxNjYxMDc1NDk0LCJqdGkiOi02OX0.35MpYdz-QIkbVf98y_wNTA9PIYDy_EEQc3zfkpFvuQc","profileUrl":"data:image/svg+xml,...","roles":["Admin"],"permissions":[],"responseStatus":{}}
Alternatively you can log it to the debug logger with:
var client = new JsonServiceClient(BaseUrl);
client.CaptureHttp(log:true);
Or if preferred you can capture it in a StringBuilder to inspect later by disabling clearing it after each request:
var client = new JsonServiceClient(BaseUrl);
client.CaptureHttp(clear:false);
Which will begin capturing all HTTP requests made by that client in a StringBuilder you can access with:
client.HttpLog
AutoQuery CRUD Batch Requests
All AutoQuery CRUD operations now support auto batch implementations which will by default execute all AutoQuery CRUD Requests within a DB transaction.
By default it will generate AutoBatch implementations for all CRUD operations and can be changed to only generate implementations for specific CRUD operations by changing:
Plugins.Add(new AutoQueryFeature {
    GenerateAutoBatchImplementationsFor = new() { AutoCrudOperation.Create }
});
It also wont generate implementations for custom AutoBatch implementations, e.g. you can add a custom implementation that does what the generated implementation would've done and execute using the same DB Connection and Transaction with:
public class CustomAutoQueryServices(IAutoQueryDb autoQuery) : Service
{
    public object Any(CreateItem[] requests)
    {
        using var db = autoQuery.GetDb<Item>(Request);
        using var dbTrans = db.OpenTransaction();

        var results = new List<object>();
        foreach (var request in requests)
        {
            var response = await autoQuery.CreateAsync(request, Request, db);
            results.Add(response);
        }

        dbTrans.Commit();
        return results;
    }
}
As AutoQuery Services are normal ServiceStack Services you can re-use the existing Service Client support for Auto Batched Requests, e.g:
var client = new JsonServiceClient(BaseUrl);
var response = client.SendAll(new CreateItem[] { ... });