We're excited to share the next release of ServiceStack which sees the introduction of our simple Database Migration solution with Code-First DB Migrations, it also sees the completion of our initial Admin UI objectives, with new Admin UIs to manage your App's configured Redis server and a UX-friendly personalizable UI to browse your App's registered databases.
Code-First DB Migrations
OrmLite DB Migrations advances OrmLite's light-weight code-first development approach with a simple change based migration solution that facilitates the code-first development workflow of OrmLite.
As DB Migrations promotes a better development workflow solution than creating non-existing tables from scratch, it's now integrated into the Quick install RDBMS Modular Startup scripts. For the best experience you'll need to update your x and app tools:
dotnet tool update -g x
Alternatively you can create new projects from ServiceStack's /start page.
Introduction
In contrast to state-based migration solutions which relies on tooling to generate state changes from a snapshot of a DB at a point-in-time with schema changes made out-of-band, OrmLite's DB migrations are instead designed to capture and execute the schema changes developers want to make, so when the Migrations are checked-in with the feature that needs them, the same exact changes are run by CI integration servers and other developers syncing their code-base with the new feature.
Instead of relying on generation by an opaque tool, this code-first approach treats DB Migrations like any other maintainable & logically structured code written by developers where it maintains a connected audit history in source control together with the feature that needs the schema changes.
Getting Started
We'll start by looking at the minimum amount of code required for a Migration:
class Migration1000 : MigrationBase
{
    public override void Up() {}
}
Which doesn't do anything but shows that the migration class name should adopt a numerical naming convention given class names are what determines the order in which migrations run. It also shows that a compensatory Down() implementation isn't required if you intend to adopt a "Roll-Forward" approach where any issues are resolved in subsequent migrations instead of reverting to a previous state so existing migrations can be refactored and re-run.
Class names used to determine order of Migrations
We've decided upon using class names for determining the order migrations are run as it's important for their sequence to be clearly visible and easily navigable, a trait made possible with files being listed in alphabetical order making it easy to determine the order migrations were run and what the name of the next migration should be, it also gains assistance by the compiler in enforcing duplicates are not possible and source control ensures conflicting migration files are identified before they're checked in and run by CI.
Basic Example
The [Description] or [Notes] attributes can instead be used to provide human-friendly descriptions of each migration where they'll be included in logs and included in the Migration table that's used to capture the execution of each migration.
With the basics covered lets look at using DB Migrations to create our first table:
[Description("Create initial database tables")]
class Migration1000 : MigrationBase
{
    class MyTable
    {
        [AutoIncrement]
        public int Id { get; set; }
        public string Name { get; set; }
        public double ToDelete { get; set; }
    }

    public override void Up() => Db.CreateTable<MyTable>();
    public override void Down() => Db.DropTable<MyTable>();
}
First thing to notice is that the migrations do not reference our App's Data Models because migrations only contains the initial state and the deltas performed in each Migration, the result of which should match our App's Data Models which represent the current Data Models for the latest DB Schema.
TIP
Initially these will match so you can just copy over all your Data Models as inner classes for your App's 1st Migration
Declarative Code-First Migrations
To improve the typical development workflow your implementations can take advantage of declarative migration support which allows you to copy over new properties in your Data Models you want to Add, Remove or Rename as an alternative for writing procedural statements to perform the same changes with the Modify Schema APIs.
We'll use this feature in our 2nd migration for its Data Model changes where we want to:
- Add a new
CodeVARCHAR column with Index - Rename the existing
Namecolumn toFullName - Delete the existing
ToDeletecolumn
For these common use-cases we can use Migrate<Table> to apply schema changes from a declarative class definition or use Revert<Table> to revert them, e.g:
[Description("Update MyTable")]
class Migration1001 : MigrationBase
{
    class MyTable
    {
        [Index]
        public string Code { get; set; }

        [RenameColumn("Name")]
        public string? FullName { get; set; }

        [RemoveColumn]
        public double ToDelete { get; set; }
    }

    public override void Up() => Db.Migrate<MyTable>();
    public override void Down() => Db.Revert<MyTable>();
}
In addition to being more productive and readable, it also benefits from being able to infer both schema migration and revert changes from the same declarative definition which is an alternative to using the Modify Schema APIs to perform the same operations:
[Description("Update MyTable")]
class Migration1001 : MigrationBase
{
    class MyTable
    {
        [Index]
        public string Code { get; set; }
        public double ToDelete { get; set; }
    }

    public override void Up()
    {
        Db.AddColumn<MyTable>(x => x.Code);
        Db.RenameColumn<MyTable>("Name", "FullName");
        Db.DropColumn<MyTable>("ToDelete");
    }

    public override void Down()
    {
        Db.DropColumn<MyTable>(x => x.Code);
        Db.RenameColumn<MyTable>("FullName", "Name");
        Db.AddColumn<MyTable>(x => x.ToDelete);
    }
}
Or for a more dynamic and Type-free approach it can also be rewritten as:
[Description("Update MyTable")]
class Migration1001 : MigrationBase
{
    public override void Up()
    {
        Db.AddColumn(table:"MyTable", new FieldDefinition {
            Name = "Code",
            FieldType = typeof(string),
            IsIndexed = true
        });
        Db.RenameColumn(table:"MyTable", oldColumn:"Name", newColumn:"FullName");
        Db.DropColumn(table:"MyTable", column:"ToDelete");
    }

    public override void Down()
    {
        Db.DropColumn(table:"MyTable", column:"Code");
        Db.RenameColumn(table:"MyTable", oldColumn:"FullName", newColumn:"Name");
        Db.AddColumn(table:"MyTable", new FieldDefinition { Name = "ToDelete", FieldType = typeof(string) });
    }
}
But our preference is to adopt the declarative approach when possible since it's a better match for code-first development where new or modified columns can be copied over from your App's Data Models to maintain and perform the schema changes. But ultimately you could use anything to implement your migration, from Custom SQL or as Db is just an ADO .NET Connection you could also use other Micro ORM's like Dapper that's also built-into OrmLite.
Code-First approach
To get the most out of DB migrations it's recommended that all schema changes are done through migrations to ensure they end up capturing all schema changes and saves duplicated efforts from having to create Migrations from out-of-band schema changes. It's a more explicit approach than relying on a tool to generate migrations from state diffs, but you'll have more control over how changes are applied and organized together with any populated data required by new features which are tracked together in source control. They're also easier to debug, re-run and refactor during the development cycle of new features.
Complex Example
For a more complex example we'll look at creating an isolated feature that utilizes many of OrmLite's declarative attributes to define a wide class of RDBMS features, that combines both schema creation and seed data within the same migration:
[Description("Add Player Feature")]
public class Migration1002 : MigrationBase
{
    public class Player : AuditBase
    {
        public int Id { get; set; }                     // 'Id' is PrimaryKey by convention

        [Required]
        public string FirstName { get; set; }           // Creates NOT NULL Column

        [Alias("Surname")]                              // Maps to [Surname] RDBMS column
        public string LastName { get; set; }

        [Index(Unique = true)]                          // Creates Unique Index
        public string Email { get; set; }

        public List<Phone> PhoneNumbers { get; set; }   // Complex Types blobbed by default

        [Reference]
        public List<GameItem> GameItems { get; set; }   // 1:M Reference Type saved separately

        [Reference]
        public Profile Profile { get; set; }            // 1:1 Reference Type saved separately
        public int ProfileId { get; set; }              // 1:1 Self Ref Id on Parent Table

        [ForeignKey(typeof(Level), OnDelete="CASCADE")] // Creates ON DELETE CASCADE Constraint
        public Guid SavedLevelId { get; set; }          // Creates Foreign Key Reference

        public ulong RowVersion { get; set; }           // Optimistic Concurrency Updates
    }

    public class Phone                                  // Blobbed Type only
    {
        public PhoneKind Kind { get; set; }
        public string Number { get; set; }
        public string Ext { get; set; }
    }

    public enum PhoneKind { Home, Mobile, Work }

    [Alias("PlayerProfile")]                            // Maps to [PlayerProfile] RDBMS Table
    [CompositeIndex(nameof(Username), nameof(Region))]  // Creates Composite Index
    public class Profile : AuditBase
    {
        [AutoIncrement]                                 // Auto Insert Id assigned by RDBMS
        public int Id { get; set; }

        public PlayerRole Role { get; set; }            // Native support for Enums
        public Region Region { get; set; }
        public string Username { get; set; }
        public long HighScore { get; set; }

        [Default(1)]                                    // Created in RDBMS with DEFAULT (1)
        public long GamesPlayed { get; set; }

        [CheckConstraint("Energy BETWEEN 0 AND 100")]   // Creates RDBMS Check Constraint
        public short Energy { get; set; }

        public string ProfileUrl { get; set; }
        public Dictionary<string, string> Meta { get; set; }
    }

                                                        // Enums saved as strings by default
    public enum PlayerRole { Leader, Player, NonPlayer }

    [EnumAsInt]                                         // Enum Saved as int
    public enum Region { Africa = 1, Americas = 2, Asia = 3, Australasia = 4, Europe = 5 }

    public class GameItem
    {
        [PrimaryKey]                                    // Specify field to use as Primary Key
        [StringLength(50)]                              // Creates VARCHAR COLUMN
        public string Name { get; set; }

        public int PlayerId { get; set; }               // Foreign Table Reference Id

        [StringLength(StringLengthAttribute.MaxText)]   // Creates "TEXT" RDBMS Column
        public string Description { get; set; }

        [Default(OrmLiteVariables.SystemUtc)]           // Populated with UTC Date by RDBMS
        public DateTime DateAdded { get; set; }
    }

    public class Level
    {
        public Guid Id { get; set; }                    // Unique Identifier/GUID Primary Key
        public byte[] Data { get; set; }                // Saved as BLOB/Binary where possible
    }
    private string by = "admin@email.com";

    public override void Up()
    {
        //CREATE ForeignKey Tables in dependent order
        Db.CreateTable<Level>();
        Db.CreateTable<Player>();

        //CREATE tables without Foreign Keys in any order
        Db.CreateTable<Profile>();
        Db.CreateTable<GameItem>();

        var savedLevel = new Level {
            Id = Guid.NewGuid(),
            Data = new byte[]{ 1, 2, 3, 4, 5 },
        };
        Db.Insert(savedLevel);

        var player = new Player
        {
            Id = 1,
            FirstName = "North",
            LastName = "West",
            Email = "north@west.com",
            PhoneNumbers = new List<Phone> {
                new() { Kind = PhoneKind.Mobile, Number = "123-555-5555" },
                new() { Kind = PhoneKind.Home,   Number = "555-555-5555", Ext = "123" },
            },
            GameItems = new List<GameItem> {
                new() { Name = "WAND", Description = "Golden Wand of Odyssey"},
                new() { Name = "STAFF", Description = "Staff of the Magi"},
            },
            Profile = new Profile {
                Username = "north",
                Role = PlayerRole.Leader,
                Region = Region.Australasia,
                HighScore = 100,
                GamesPlayed = 10,
                ProfileUrl = "https://images.unsplash.com/photo-1463453091185-61582044d556?w=1024&h=1024",
                Meta = new() {
                    { "Quote", "I am gamer" }
                },
            }.WithAudit(by),
            SavedLevelId = savedLevel.Id,
        }.WithAudit(by);
        Db.Save(player, references: true);
    }

    public override void Down()
    {
        // Clear FK Data
        Db.DeleteAll<Level>();

        // DROP ForeignKey Tables in dependent order
        Db.DropTable<Level>();
        Db.DropTable<Player>();

        // DROP tables without Foreign Keys in any order
        Db.DropTable<Profile>();
        Db.DropTable<GameItem>();
    }
}
Essentially showing the App Data Models for the initial version of a feature can be copied into a Migration class to perform the required database changes.
Reverting Migrations
Implementing Down() is optional but required if you ever intend to revert, refactor then reapply migrations. Alternatively this can be avoided by adopting a "roll-forward" approach where any issues with a migration would be resolved in the next one. Whilst this can save some dev effort it would prevent you from reverting, refactoring then reapplying migrations during development and before checking-in a finalized feature.
Migrations are executed within a transaction that's rolled back if it fails, however you should be aware of the limitations of your RDBMS, e.g. newer MySQL versions has caveats on DDL Statements which can be rolled back, but otherwise it's fairly well supported on PostgreSQL, SQL Server & SQLite.
In most cases you'll be able to revert & rerun migrations however you should be mindful that some operations aren't completely reversible, e.g. if you remove a column then revert to add it again, the data in the column will be lost.
Running Migrations
To support multiple use-cases, Migrations can easily be run from the command-line or from code which you can use to run or debug migrations from Unit tests.
Running migrations from command-line
To be able to run from migrations from the command line, DB Migrations needs access to your App's DB configuration. The best way to do this is to run your App normally then access the configured IDbConnectionFactory from the IOC, perform the migrations then exit with either a success or failure error code.
To do this we've added support for AppTasks which let you define tasks in your App that you can run from the command-line. This will let you perform migrations in a separate stage to check migrations were successful before running your App.
Configuring existing Projects
You can add DB Migration support to existing projects by applying the migrations gist to your project with:
x mix migrations
This will register the Migration AppTasks with your App via a Modular Startup configuration:
public class ConfigureDbMigrations : IHostingStartup
{
    public void Configure(IWebHostBuilder builder) => builder
        .ConfigureAppHost(afterAppHostInit:appHost => {
            var migrator = new Migrator(appHost.Resolve<IDbConnectionFactory>(), typeof(Migration1000).Assembly);
            AppTasks.Register("migrate", _ => migrator.Run());
            AppTasks.Register("migrate.revert", args => migrator.Revert(args[0]));
            AppTasks.Run();
        });
}
Here we can see we need to configure our Migrator with the IDbConnectionFactory we want to run against and the assemblies where all our Migration classes are maintained. It also registers an AppTasks to migrate our App by comparing the Migration table with the Migrations in the specified Assembly to workout which Migrations are left to run (in order) and the revert AppTask to do the opposite and revert to the specified migration.
This will now let us run your app in "Task Mode" where it will execute the specified task before promptly exiting with a 0 success exit code if successful or the index of the task that failed, e.g. 1 if the first Task failed.
We can then execute our App Task by running our App with the AppTasks command-line argument of the Task we want to run, so we can run all pending migrations with:
dotnet run --AppTasks=migrate
The format to revert a migration is:
dotnet run --AppTasks=migrate.revert:
Where name is either the class name of the Migration you want to revert to (inclusive) or you can use last to revert the last migration:
dotnet run --AppTasks=migrate.revert:last
or all to revert all migrations:
dotnet run --AppTasks=migrate.revert:all
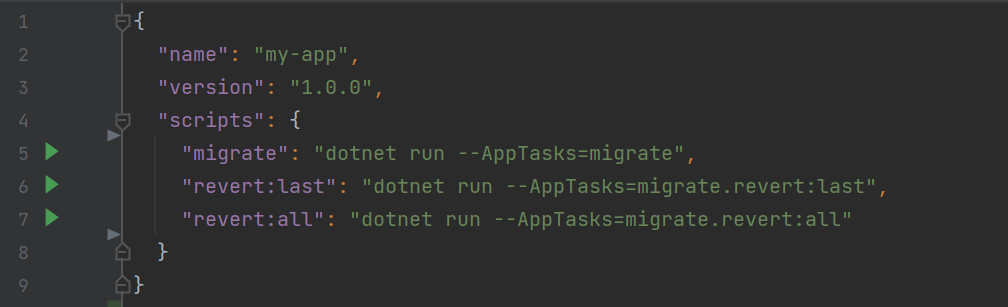
To make this easier to remember and use, these tasks are also added as npm scripts:
{
  "scripts": {
    "migrate": "dotnet run --AppTasks=migrate",
    "revert:last": "dotnet run --AppTasks=migrate.revert:last",
    "revert:all": "dotnet run --AppTasks=migrate.revert:all"
  }
}
Which can be run with:
$ npm run migrate
$ npm run revert:last
$ npm run revert:all
Which Rider provides a nice UX for running directly from the IDE where it will print all executed SQL output in a dedicated Console:
ASP .NET Core Projects
Other (non-ServiceStack) ASP .NET Core Apps can instead configure AppTasks before app.Run() in their Program.cs:
var migrator = new Migrator(app.Services.Resolve<IDbConnectionFactory>(), typeof(Migrations.Migration1000).Assembly);
AppTasks.Register("migrate", _ => migrator.Run());
AppTasks.Register("migrate.revert", args => migrator.Revert(args[0]));
AppTasks.Run();

app.Run();
New RDBMS Projects configured with DB Migrations by default
Now that OrmLite has a formal solution for implementing and executing schema changes, the Quick instal RDBMS mix scripts are now configured to include migrations by default.
Failed migration behavior
Executing migrations from the command-line is also how they are run in CI. The strategy we've employed in our GitHub Action Deployment Templates is to run the container to execute the migrate AppTask on the host machine first to validate migration was successful before completing deployment of the new App, so that a failed migration will cause deployment to fail and the previous App version to continue to run.
Running migrations from GitHub Actions
Where applicable, GitHub Action deployments have been updated to automatically run on deployment before the new version of your application starts up. This is done in the Run remote db migrations step.
Output can be found in your GitHub Action run output. The task that is run is controlled in the .deploy/docker-compose-template.yml file as a separate service which is only run if specified directly or with the --profiles migration option.
This migration approach enables an easy way to test your migration with a custom local docker compose file. Such as the following for a SQLite setup.
version: "3.9"
services:
  myapp-migration:
    build: .
    restart: "no"
    command: --AppTasks=migrate
    volumes:
      - myapp-mydb:/app/App_Data

volumes:
  myapp-mydb:
Running migrations from unit tests
The migration printed in the console output and captured in the Migration table should typically be enough to identify any issues, but should it be needed you can also debug Migrations in a unit test with:
var migrator = new Migrator(DbFactory, typeof(Migration1000).Assembly);
var result = migrator.Run();

result.Succeeded // true if successful
result.TasksRun  // instances of MigrationBase run, can inspect `Error` for failed Exceptions and `Log` for executed SQL
result.TypesCompleted // Migration Types successfully completed
Likewise uou can revert using the Revert() method which accepts the same options as the command-line, e.g. Migration Type name, "all" or "last":
var result = migrator.Revert(Migrator.All);
Running Migrations individually
Should you ever need to, you can also run individual Migrations with the static Up() and Down() methods, e.g:
Migrator.Up(DbFactory,   new[]{ typeof(Migration1000), typeof(Migration1001) });
Migrator.Down(DbFactory, new[]{ typeof(Migration1001), typeof(Migration1000) });
These lets you execute migration logic out-of-band where they'll have no impact on the Migration table which can be useful in developing & iterating migration implementations by removing/re-adding a feature's schema changes without impacting migration state.
Clearing Migration State
To clear your migration table at the start of tests, run:
var db = DbFactory.Open();
Migrator.Clear(db);
Running Migrations on Named Connections
By default the Migration's base.Db connection is configured to use the primary database's connection string, e.g:
var dbFactory = new OrmLiteConnectionFactory(
    Configuration.GetConnectionString("DefaultConnection"), PostgreSqlDialect.Provider);
services.AddSingleton<IDbConnectionFactory>(dbFactory);
But if your App has Multiple database connections that you need to run migrations on, e.g:
dbFactory.RegisterConnection("Sales", Configuration.GetConnectionString("Sales"), SqlServer2012Dialect.Provider);
dbFactory.RegisterConnection("Reporting", "reporting.sqlite", SqliteDialect.Provider);
You can configure the Migration base.Db connection to be configured to use a named connection with the [NamedConnection] attribute, e.g:
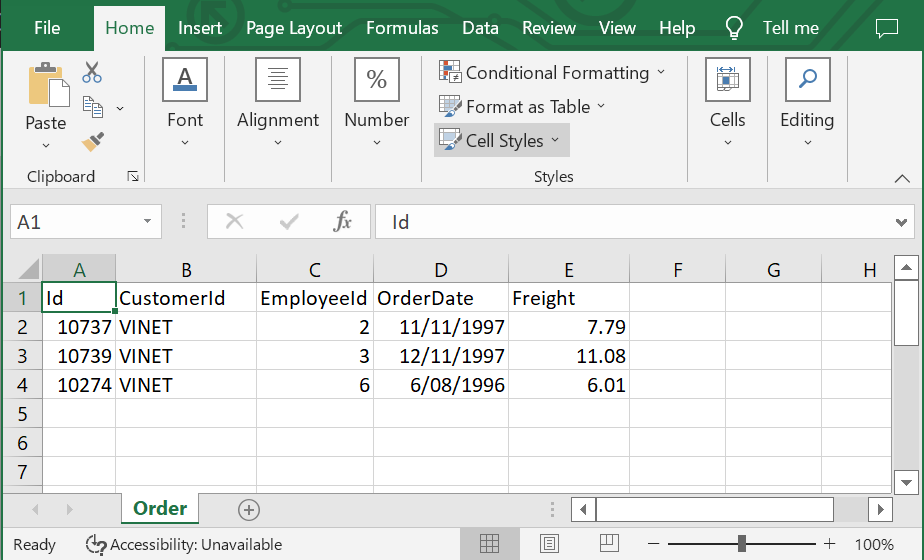
[NamedConnection("Sales")]
class Migration1000 : MigrationBase
{
    class Order
    {
        public decimal Freight { get; set; }
    }

    public override void Up() => Db.Migrate<Order>();
    public override void Down() => Db.Revert<Order>();
}
Where you would maintain schema changes to different Databases in different Migrations, alternatively you could use base.DbFactory to create connections to named connections within the same Migration, e.g:
class Migration1000 : MigrationBase
{
    class Order
    {
        public decimal Freight { get; set; }
    }

    class Subscription
    {
        public string Referral { get; set; }
    }

    public override void Up()
    {
        using var dbSales = DbFactory.Open("Sales");
        dbSales.Migrate<Order>();

        using var dbReporting = DbFactory.Open("Reporting");
        dbReporting.Migrate<Subscription>();
    }

    public override void Down()
    {
        using var dbSales = DbFactory.Open("Sales");
        dbSales.Revert<Order>();

        using var dbReporting = DbFactory.Open("Reporting");
        dbReporting.Revert<Subscription>();
    }
}
INFO
Whilst schema changes are run on different RDBMS's, all migration state is maintained in the primary database's Migration table
Reviewing Migrations
The output of each Migration is logged to the Console (or configured Logger), logging useful information on Migrations found and run as well as the executed SQL run in each migration. This information is also captured in the Migration table on the database they were run on, where they can be easily viewed in your App's Database Admin UI, e.g:
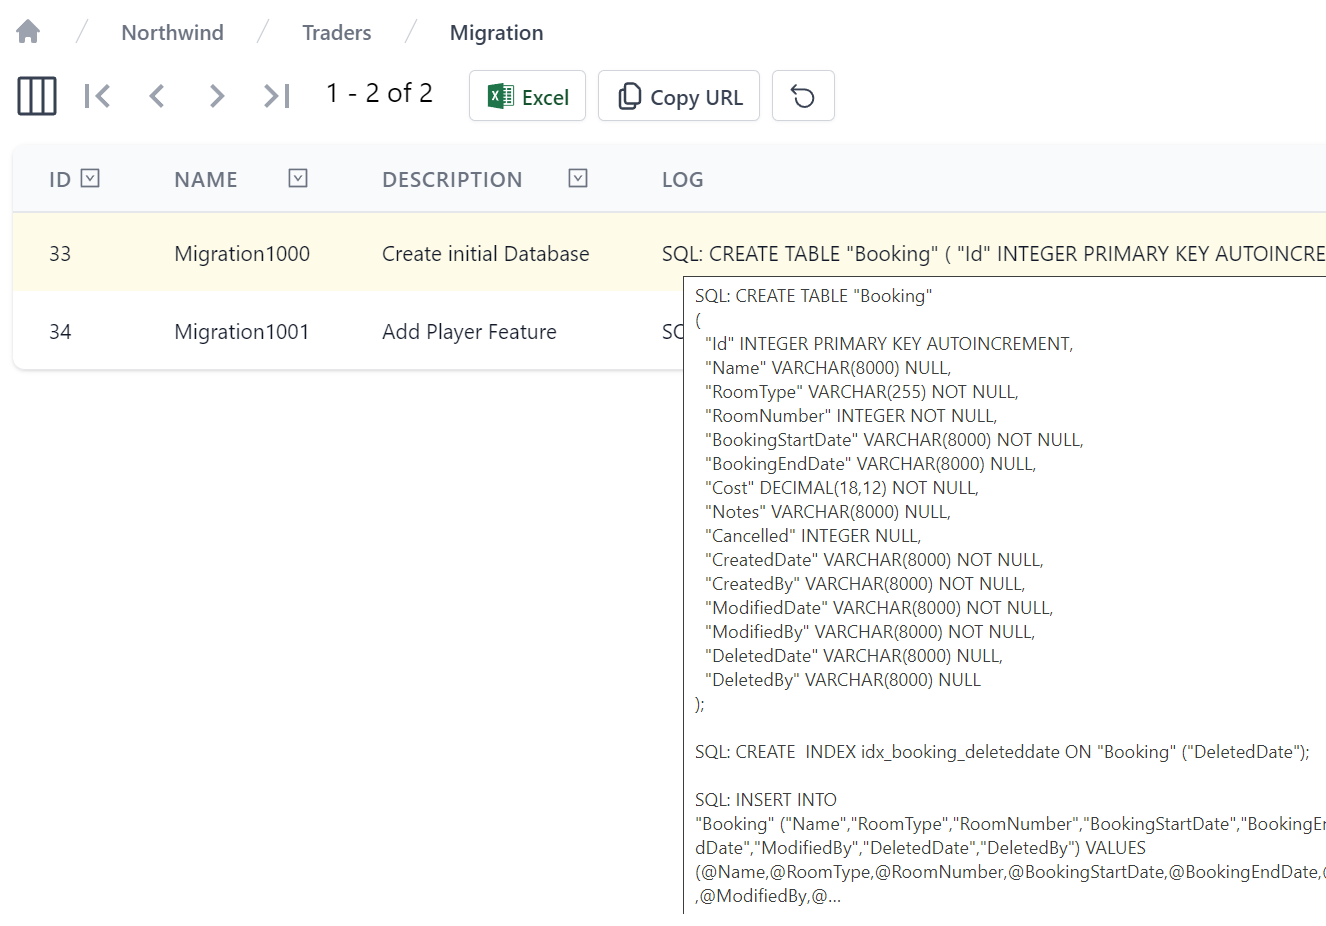
TIP
In addition to capturing executed SQL in the Log column, failed Migrations capture error information in the ErrorCode, ErrorMessage and ErrorStackTrace columns
Redis Admin UI
The Redis Admin UI lets you manage your App's configured Redis Server with a user-friendly UX for managing core Redis data types, simple search functionality to quickly find Redis values, quick navigation between related values, first class support for JSON values and a flexible command interface and command history to inspect all previously run redis commands that's easily editable & rerun.
It can be enabled by registering the AdminRedisFeature plugin:
Plugins.Add(new AdminRedisFeature());
Redis Stats on Dashboard
The Admin Dashboard contains valuable insight into monitoring the health of your App's redis usage with both client & server counters:
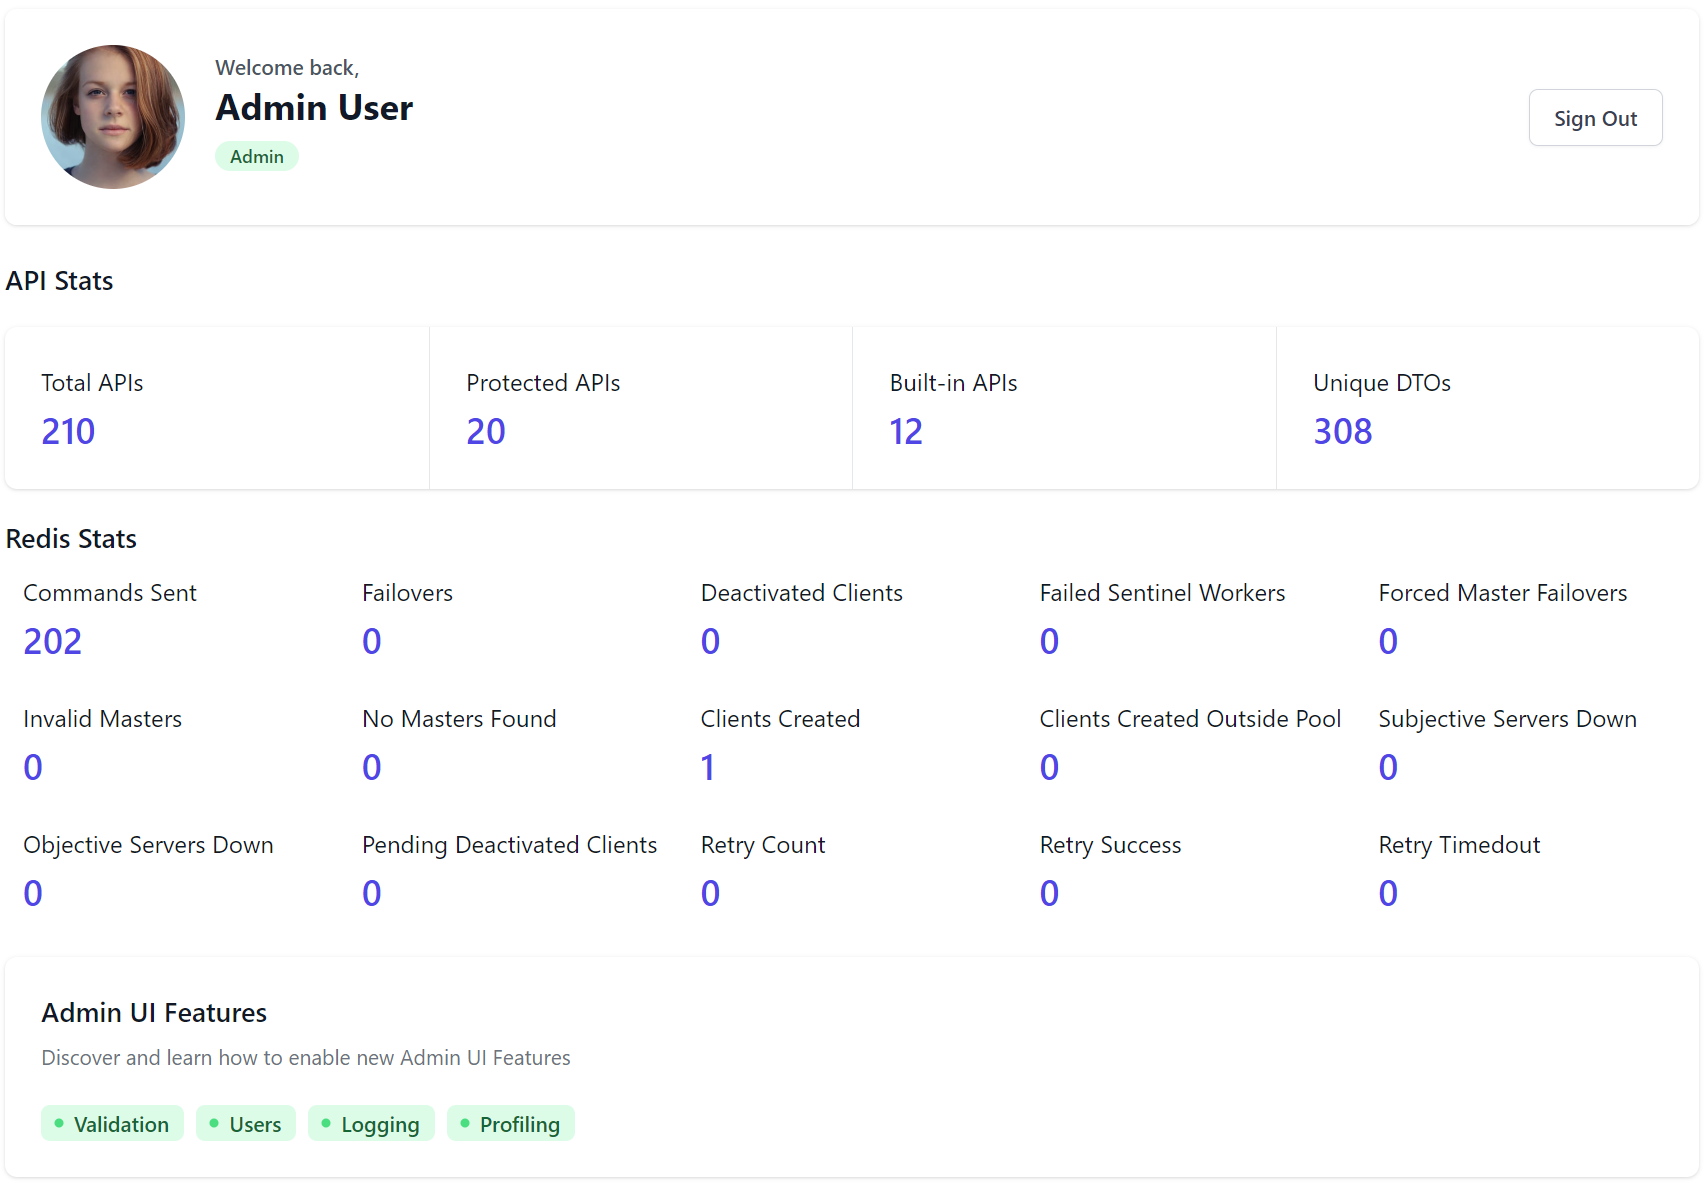
TIP
A description of each of these stats is available in the Redis Stats docs
Info
The Redis Admin home page shows the output of the Redis INFO command containing detailed information on the remote redis server:
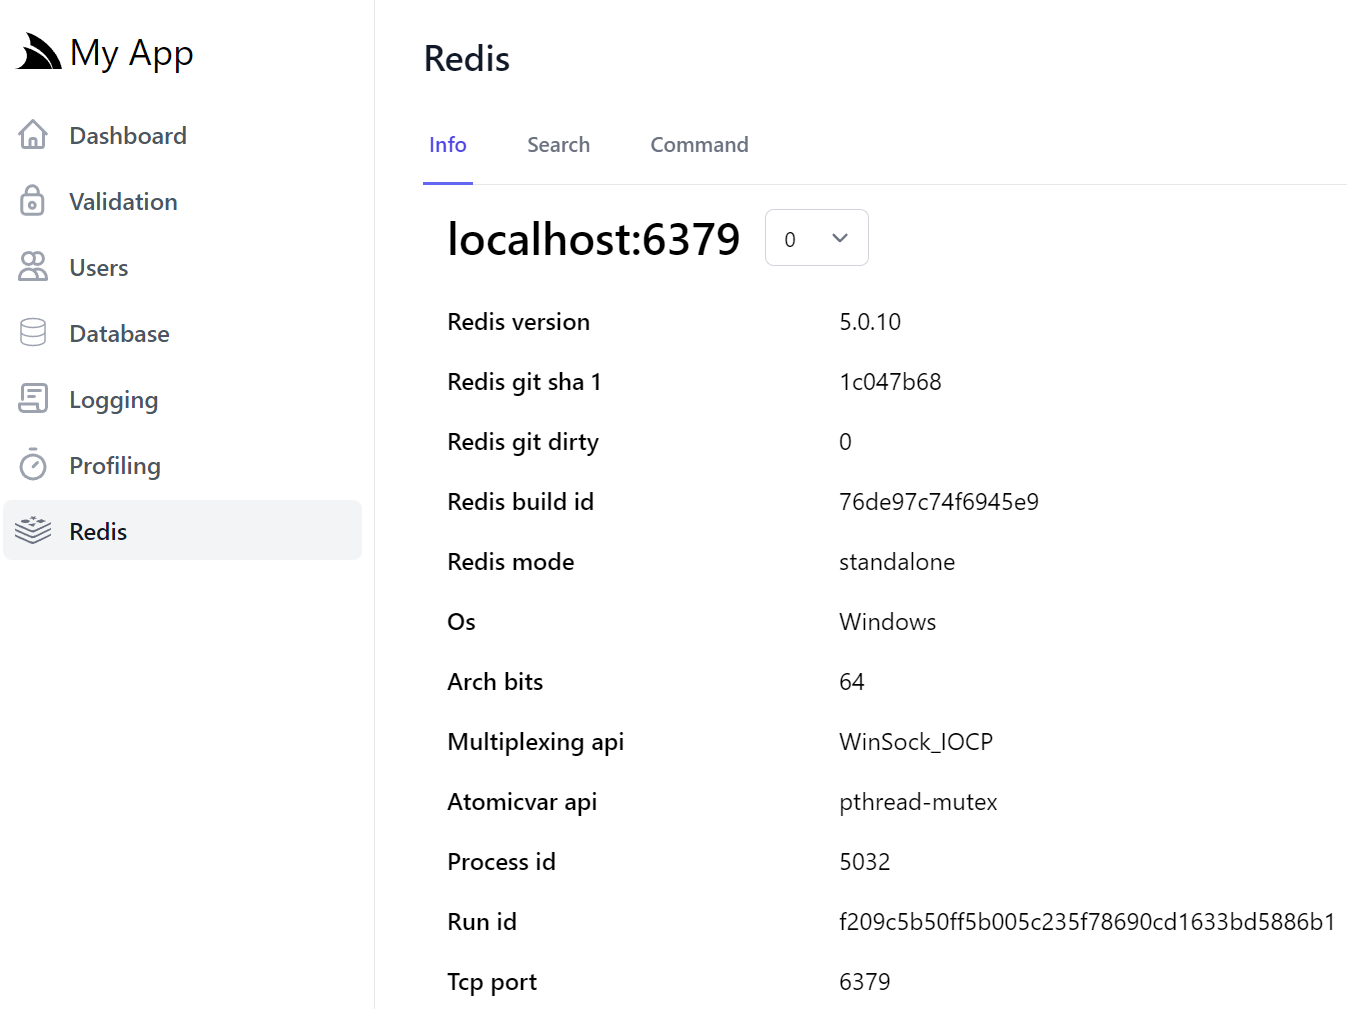
By default it uses the App's configured database but can easily switch between Redis databases with the numbered Database dropdown.
Modify Redis Connection
Changing your App's Redis Configuration at runtime can be enabled with:
Plugins.Add(new AdminRedisFeature {
    ModifiableConnection = true
});
Which will linkify the Redis Connection string to open the Change Connection Dialog:
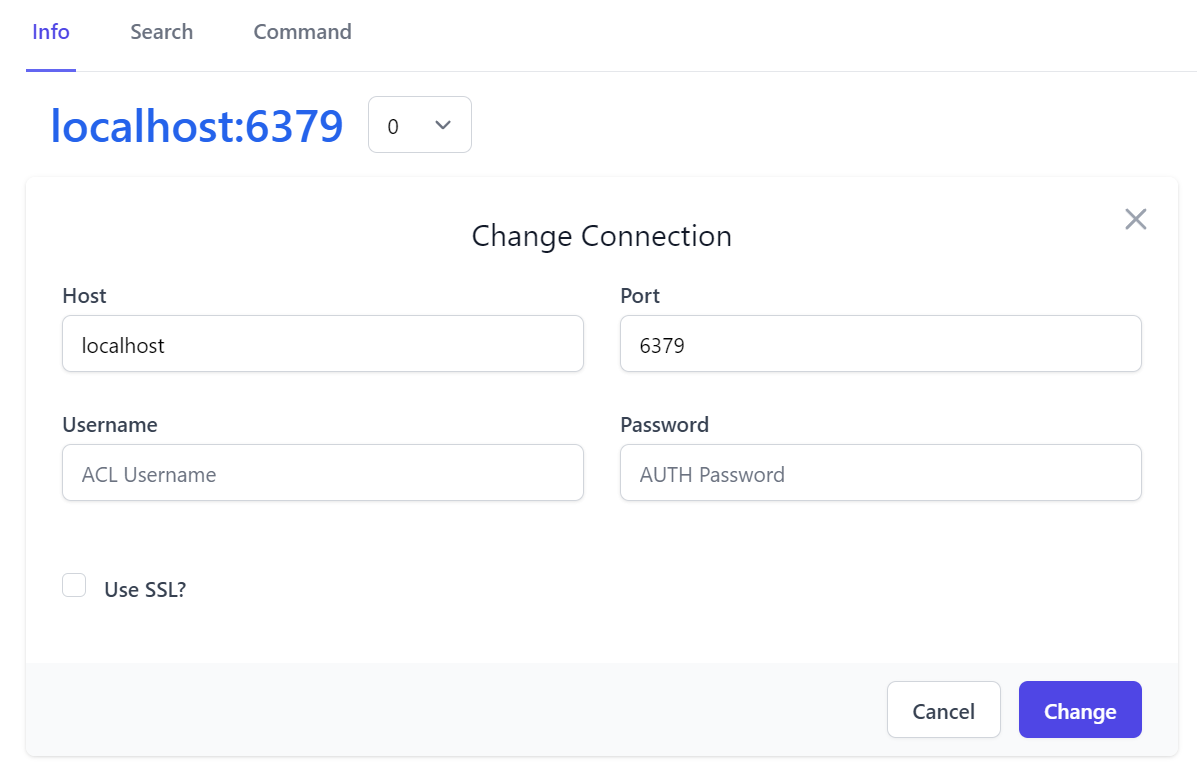
Be aware this will change your App's Redis Connection at runtime to different redis server than what it was configured with, which can be useful if you have a warm stand-by Redis server you want to switch to without redeploying your App.
Search
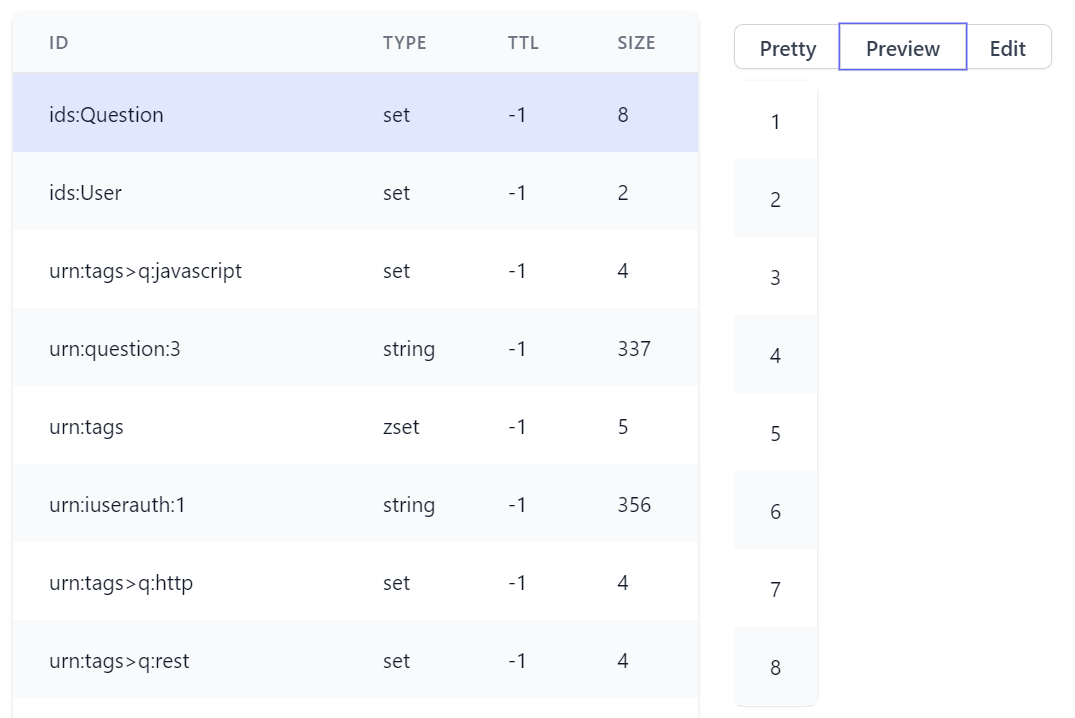
The Search tab is where you'll find the primary functionality for being able to quickly search through the Redis keyspace to find where you can create or edit new Redis Strings, Lists, Sets, Sorted Sets and Hashes:
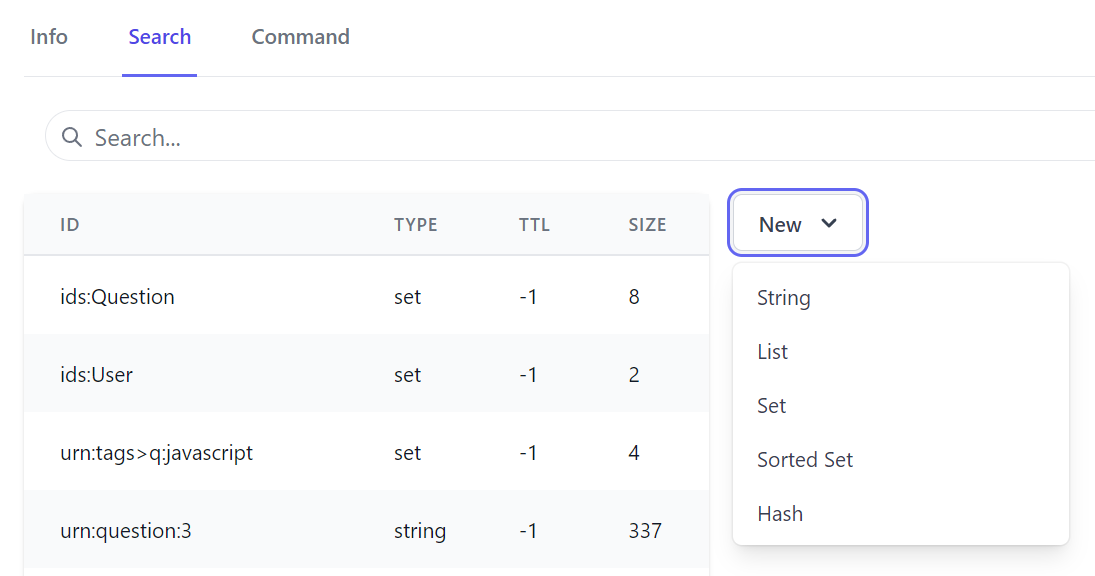
Set
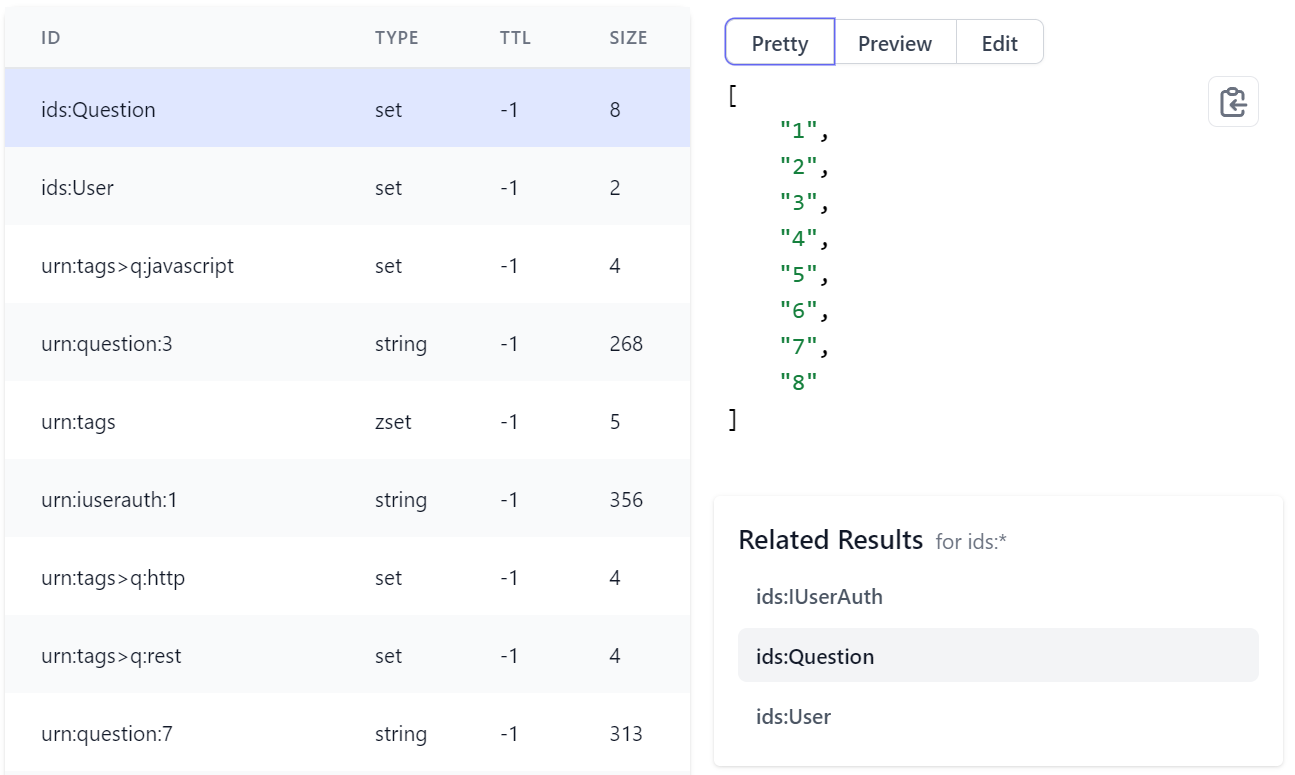
Selecting a Redis Data Type displays an optimized form you can use to create a new Value of that type:

Which you can view in a Pretty view where collections like sets are displayed in a formatted JS Array letting you can copy all its values:
A Preview mode displaying the results in a human-friendly table view:
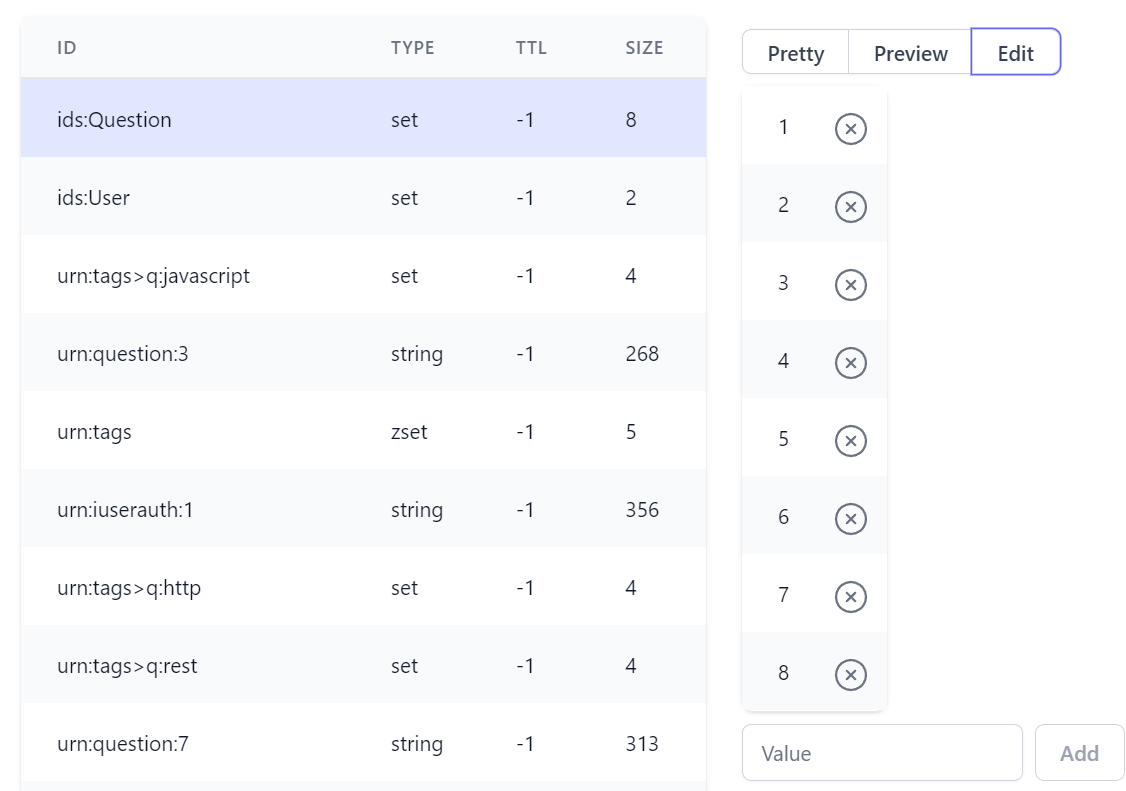
And an Edit mode where you can add and delete members:
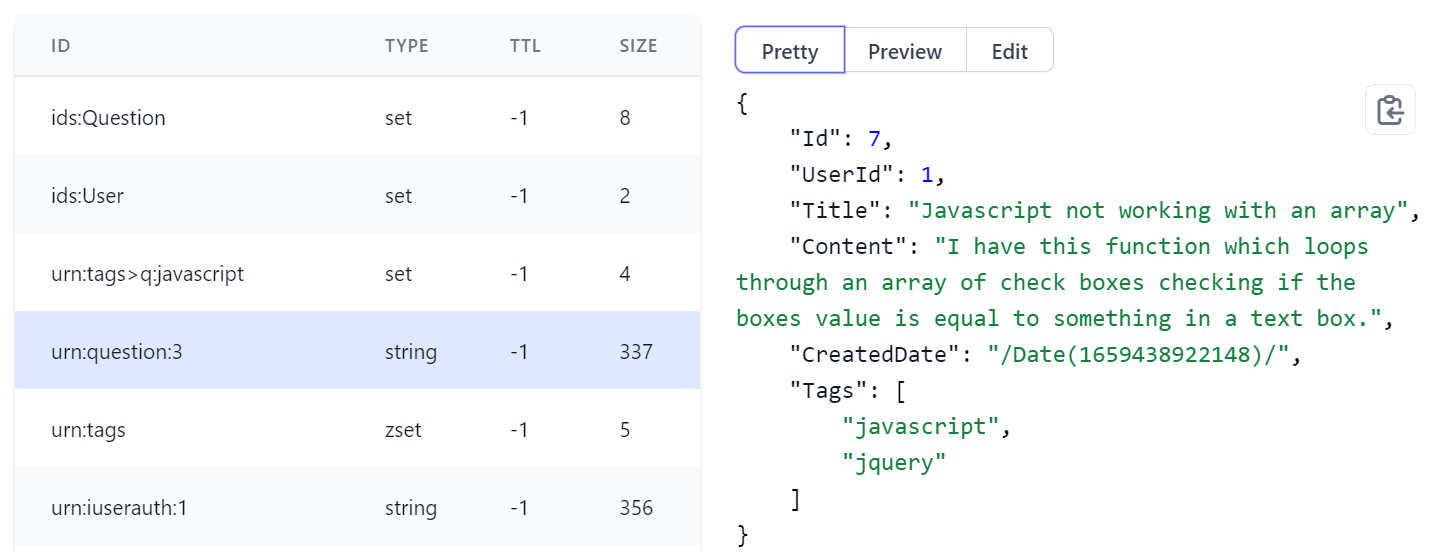
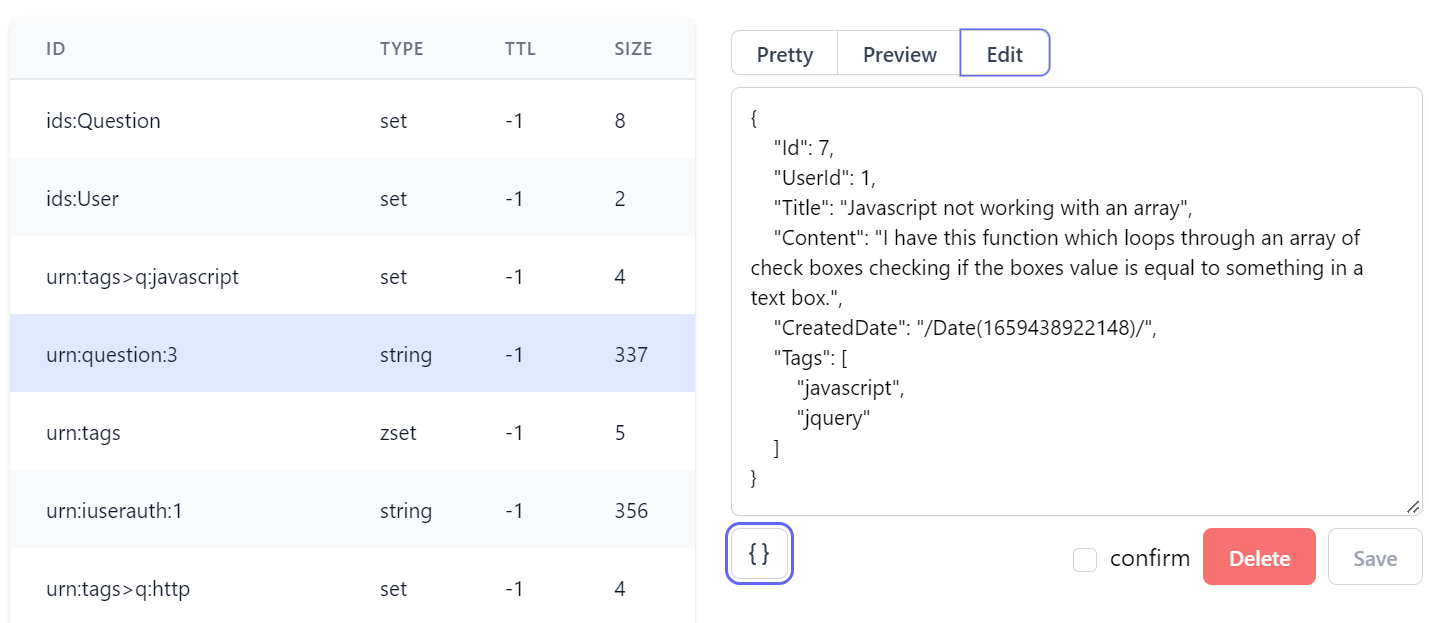
String
The same functionality is available for all Data Types, whilst Strings contain first-class support for JSON strings in the Pretty tab:
Preview
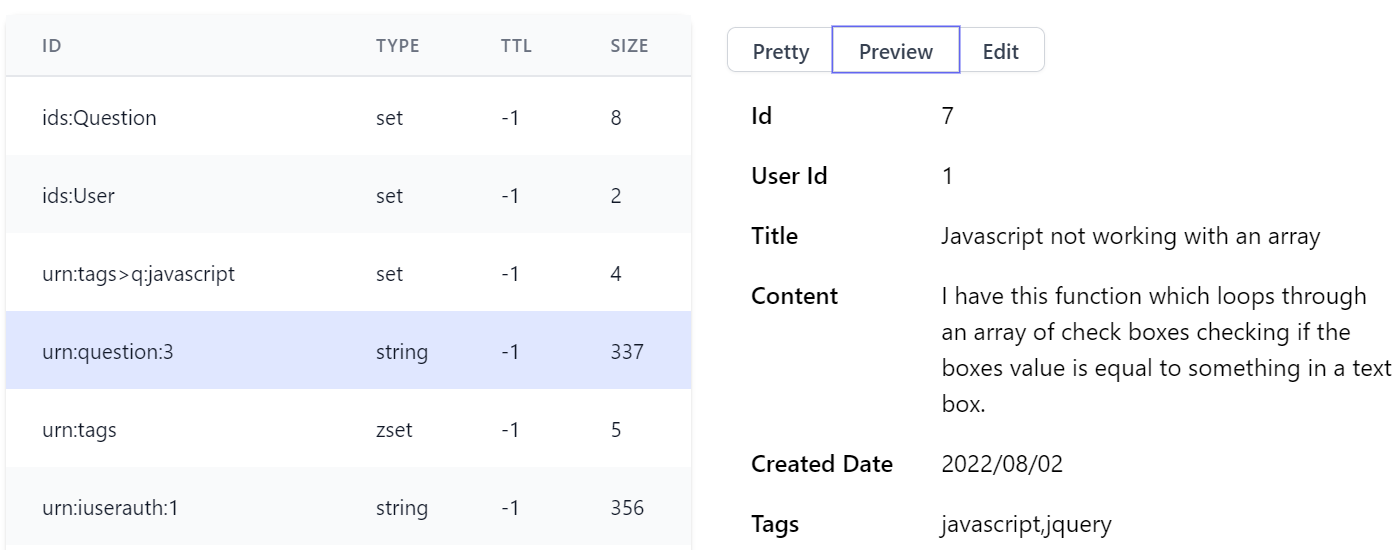
and Edit views where you can indent JSON when creating or editing JSON Strings:
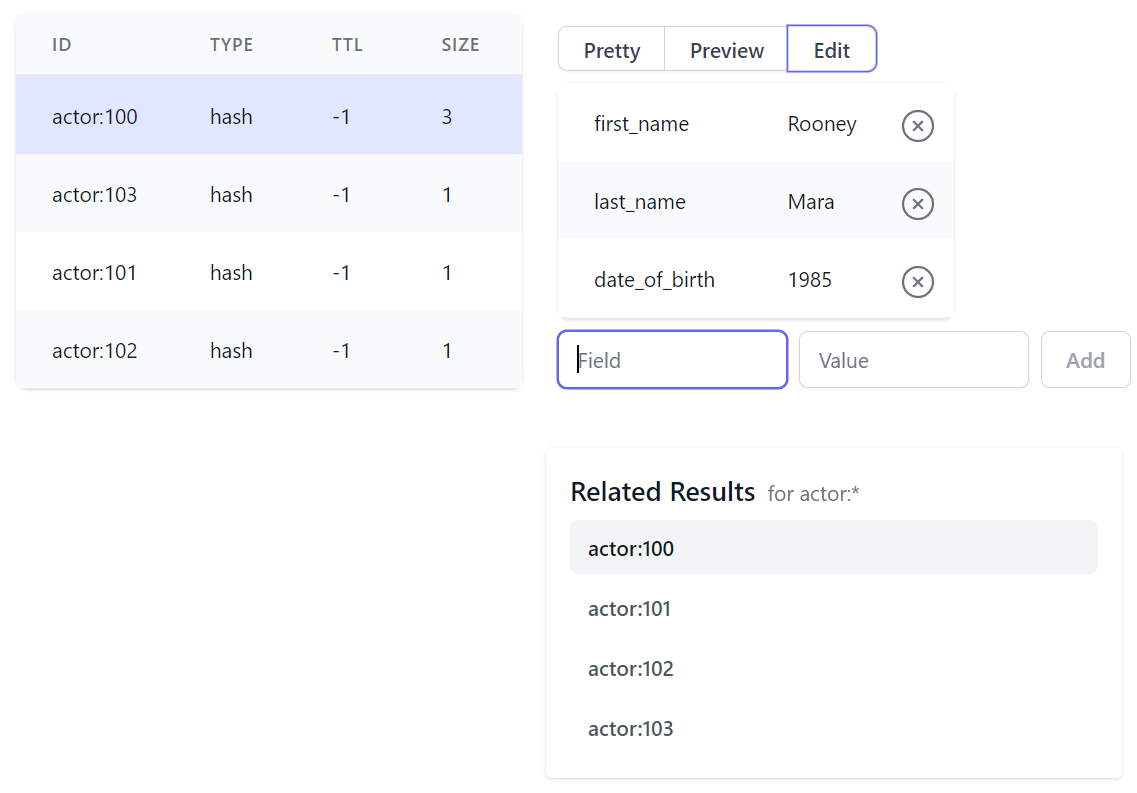
Hash
Hashes have the same functionality as SET with an additional field to capture the hash entries value:
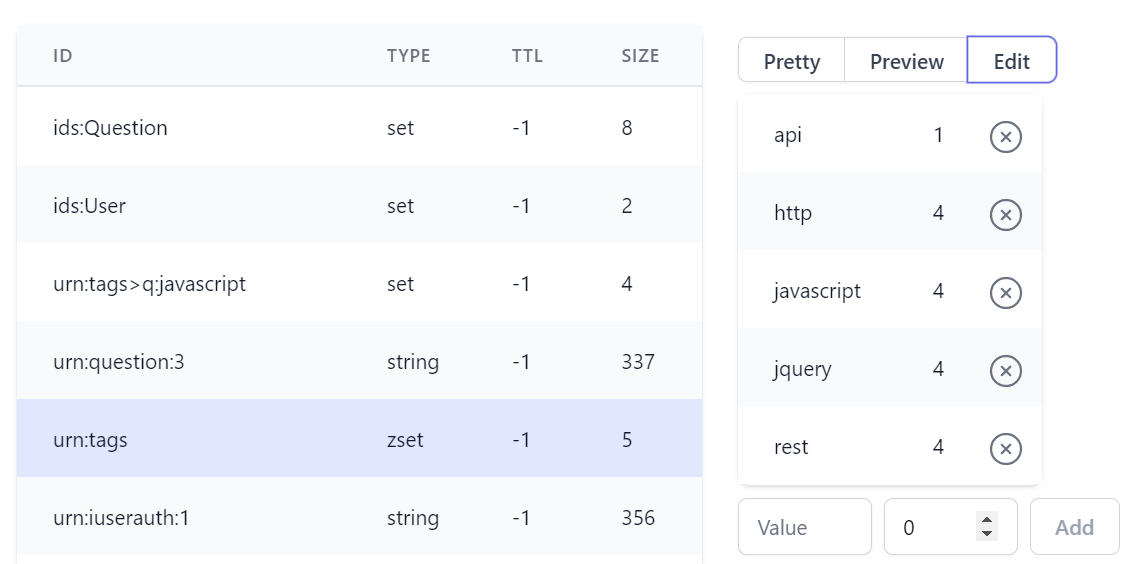
Sorted Set
Whilst Sorted Sets maintains an extra numerical field to capture Sorted Set scores:
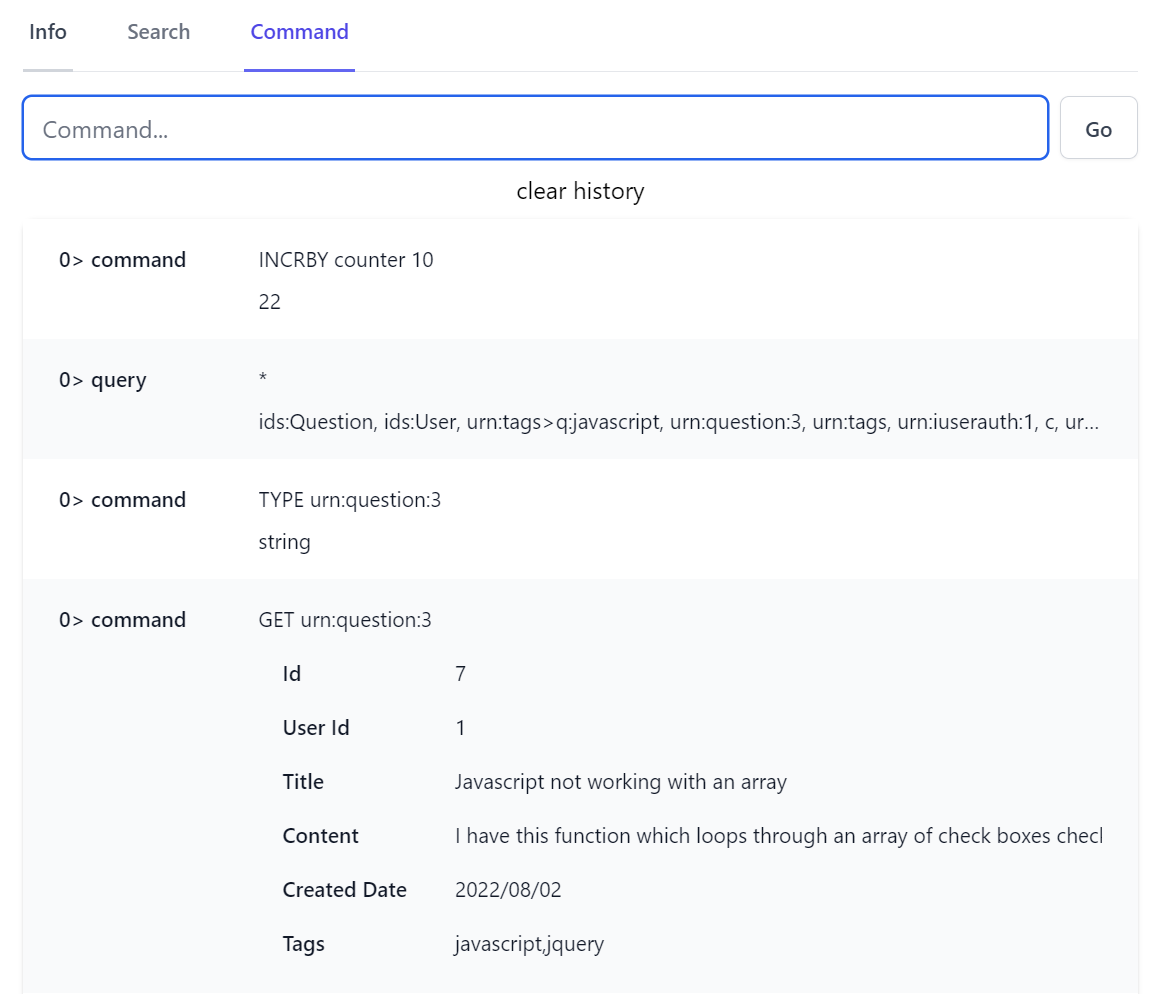
Command
The Command tab gives you a flexible Command bar letting you run custom Redis commands against the selected database, including a Command History capturing all previously run commands that can be reselected to quickly edit & rerun commands:
By default Redis Admin blocks running dangerous and unsuitable commands from a Web interface which can be modified when registering the AdminRedisFeature, that by default prevents the commands below:
Plugins.Add(new AdminRedisFeature {
    IllegalCommands = {
        "BLMOVE",
        "BLMPOP",
        "BLPOP",
        "BRPOP",
        "BRPOPLPUSH",
        "FLUSHDB",
        "FLUSHALL",
        "MONITOR",
    }
})
Profile App Redis Usage
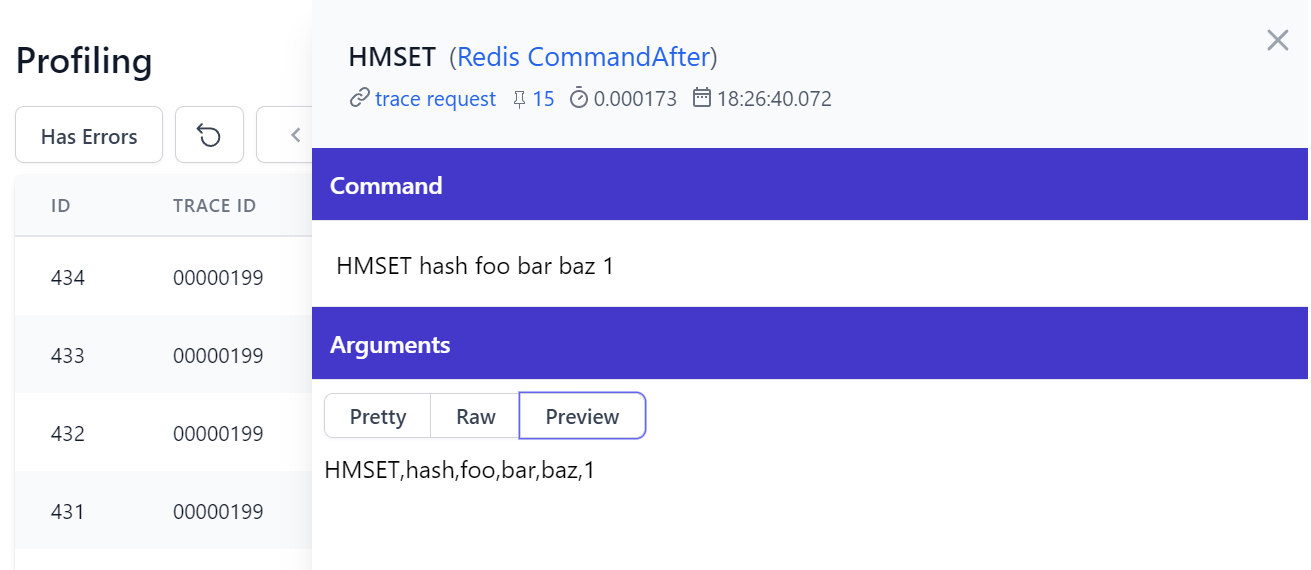
The command history maintains a log for all commands executed in the Redis Admin UI, you can also inspect the redis commands executed by your Services with the Redis Profiling built into the Admin Profiling UI:
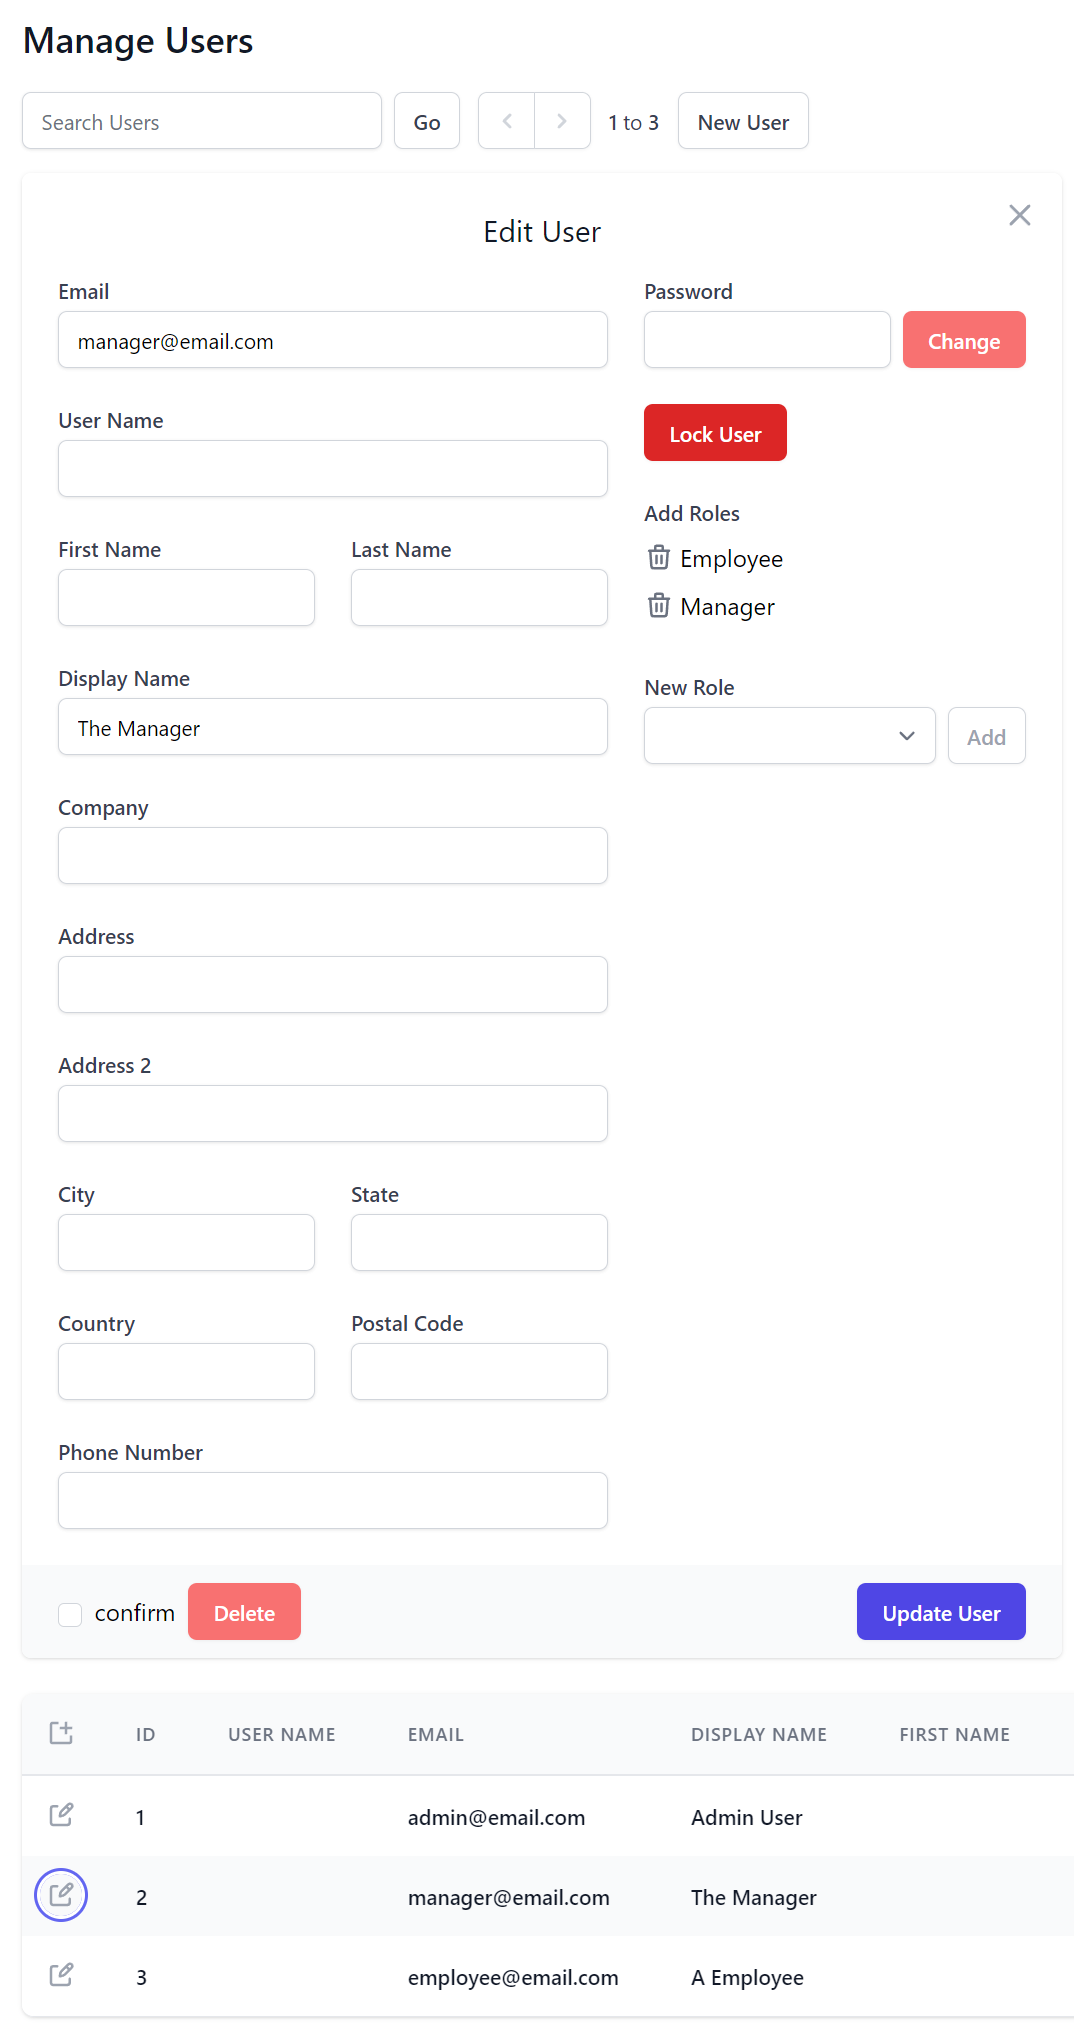
Database Admin UI
The new Database Admin UI lets you quickly browse and navigate your App's configured RDBMS schemas and tables:
It can be enabled by registering the AdminDatabaseFeature plugin from ServiceStack.Server:
Plugins.Add(new AdminDatabaseFeature());
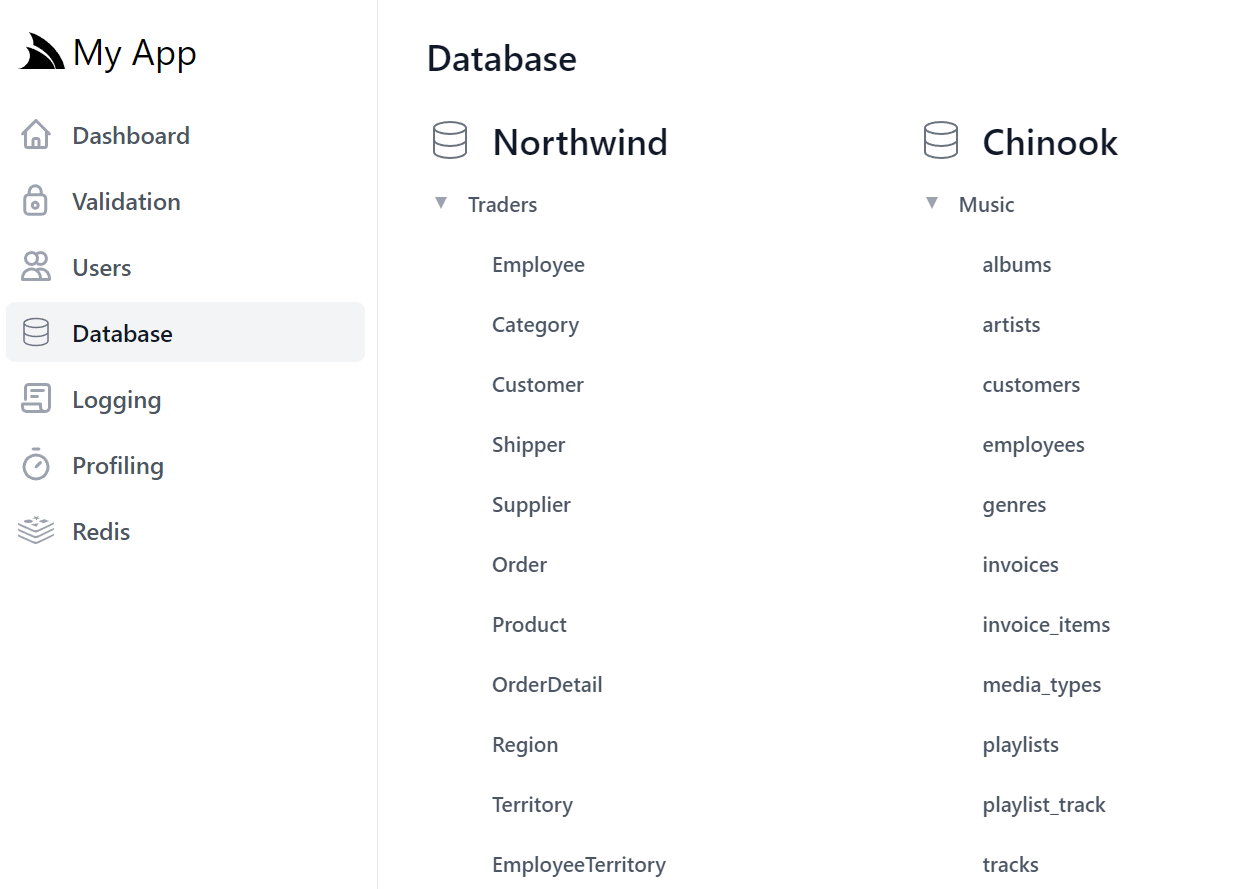
Which without any additional configuration your App's configured databases will be listed on the home page, including their schemas, tables and any registered named connections:
Selecting a table takes us to a familiar tabular search results grid, similar in appearance and functionality to Locode's Auto UI:
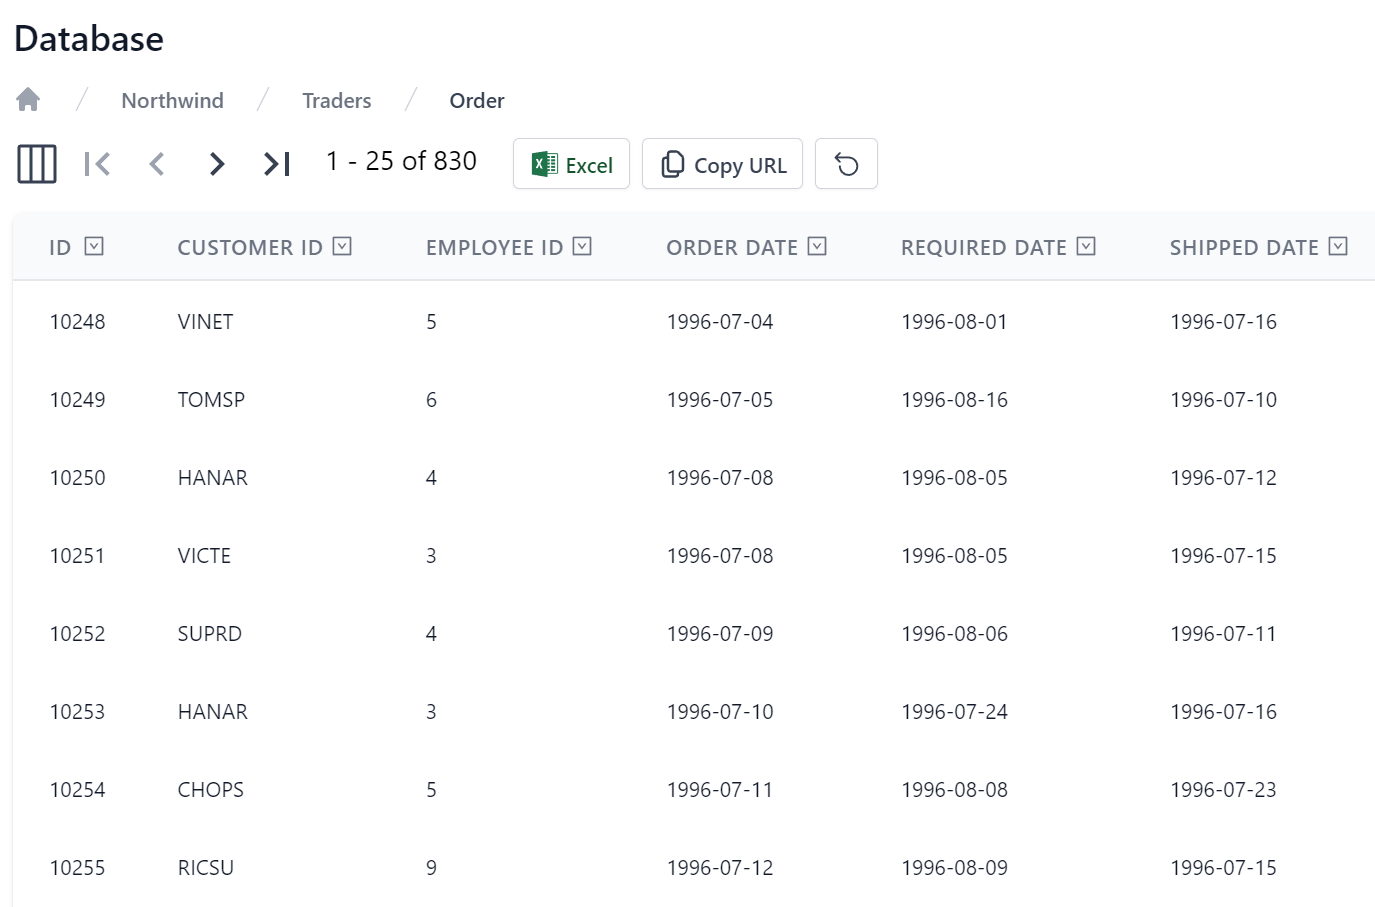
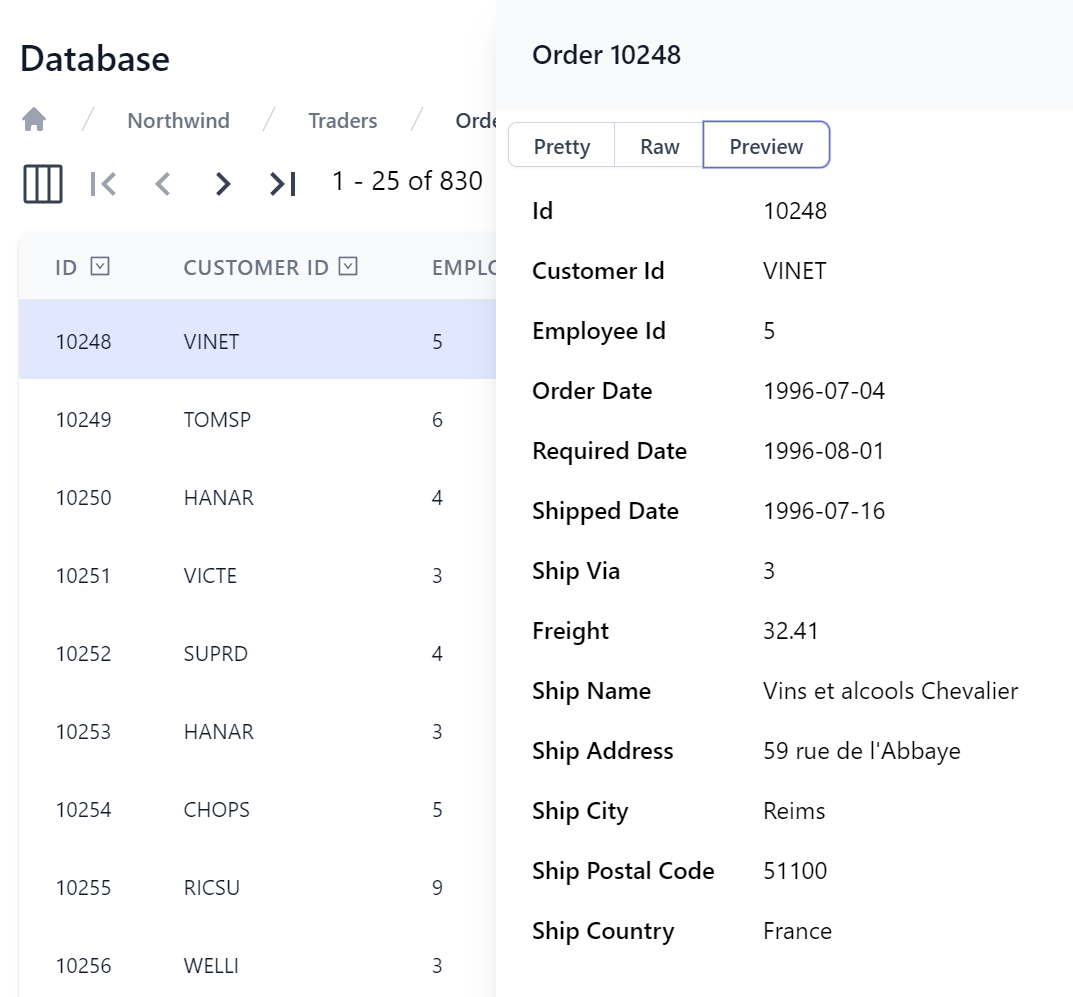
Whilst Locode gives you an entire Auto Management UI with all modifications performed through managed AutoQuery APIs, Database Admin instead focuses on providing a great readonly UX for querying & inspecting your App's data, starting with multiple views or quickly previewing every row in either Pretty JSON format:
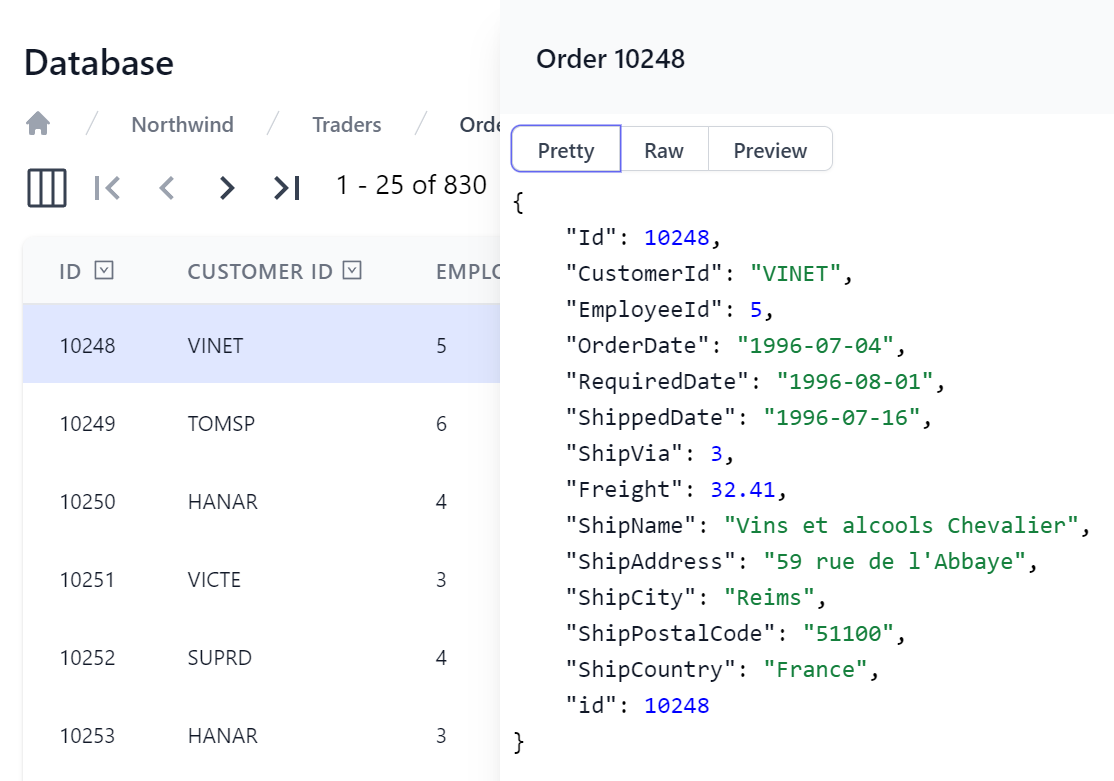
Where it will also let you copy every row in JSON format, whilst the Preview tab shows a friendlier view of the row's fields:
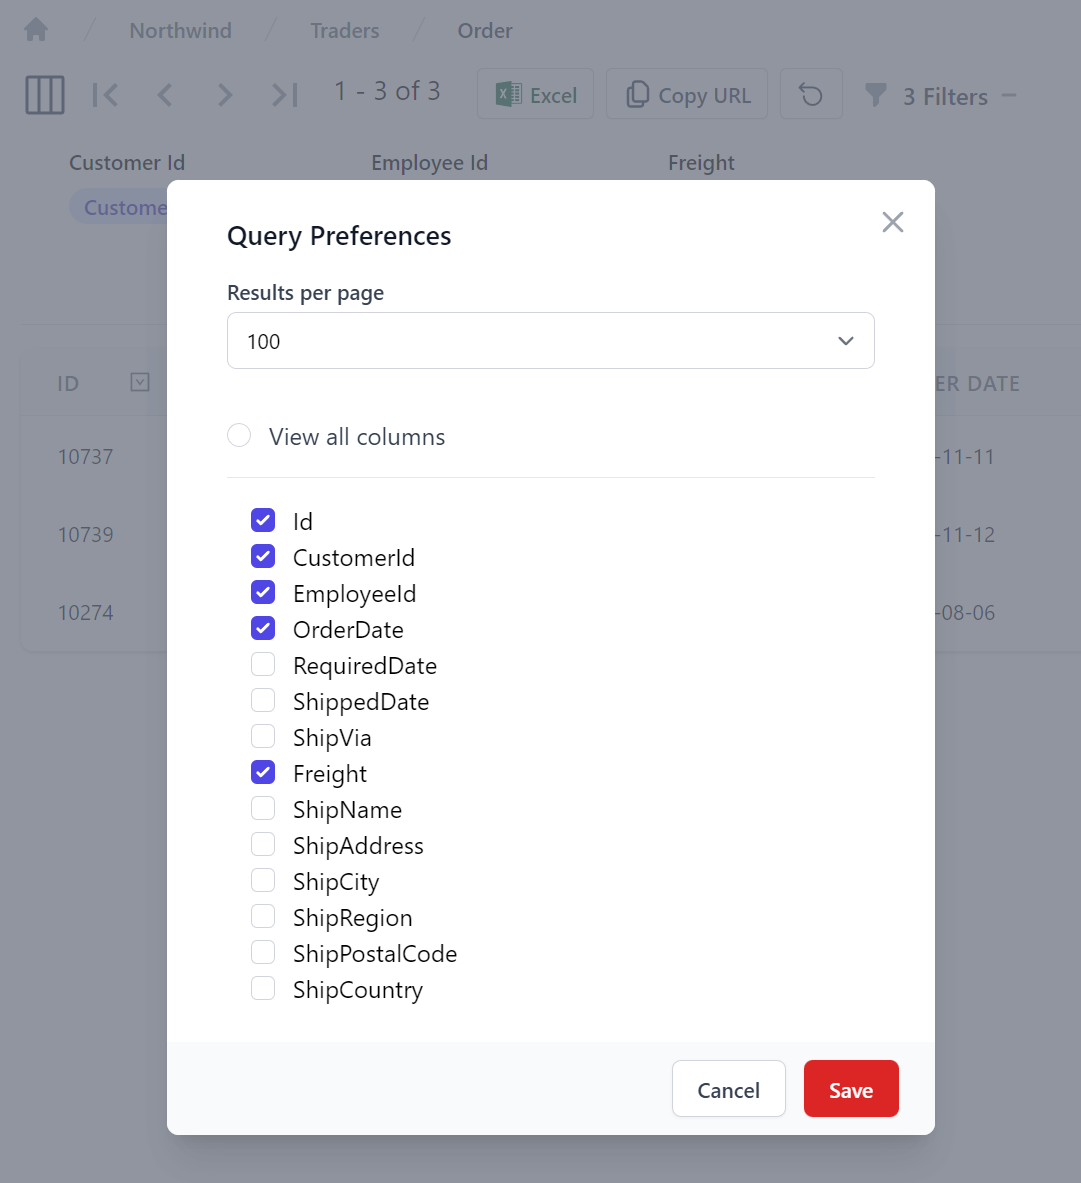
The tabular grid is highly personalizable where it lets change the query preferences and display fields for each table, where they're persisted in localStorage and preserved across browser restarts:
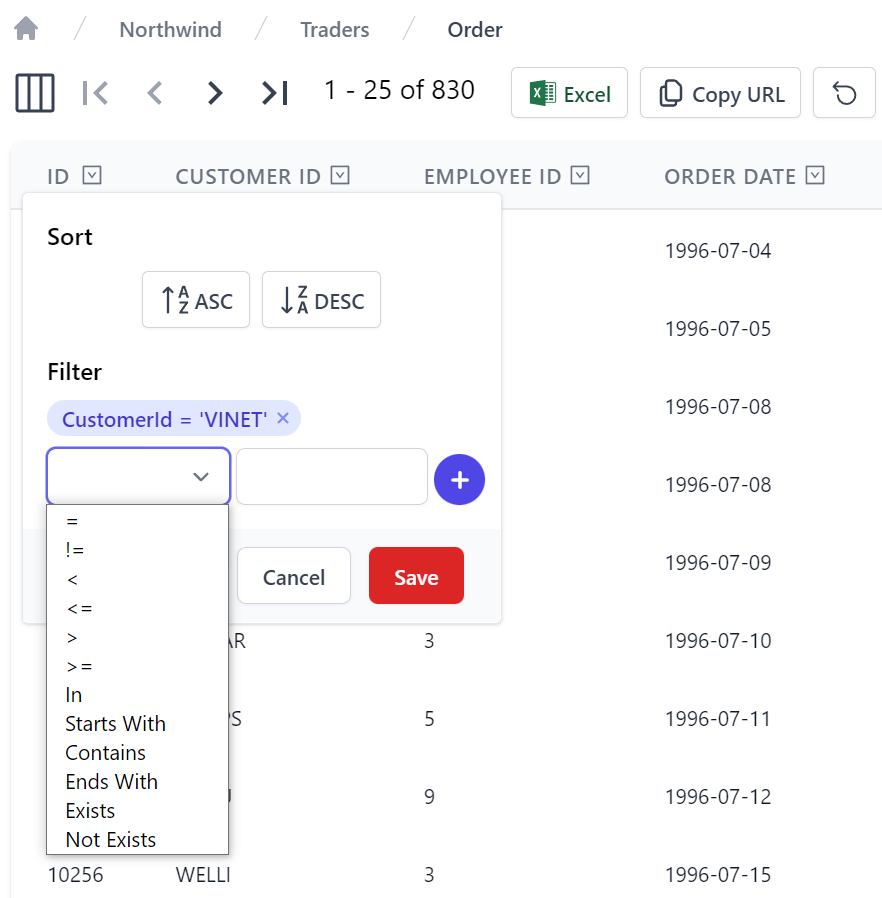
Likewise so are the flexible filtering options allowing any number of filters per column:
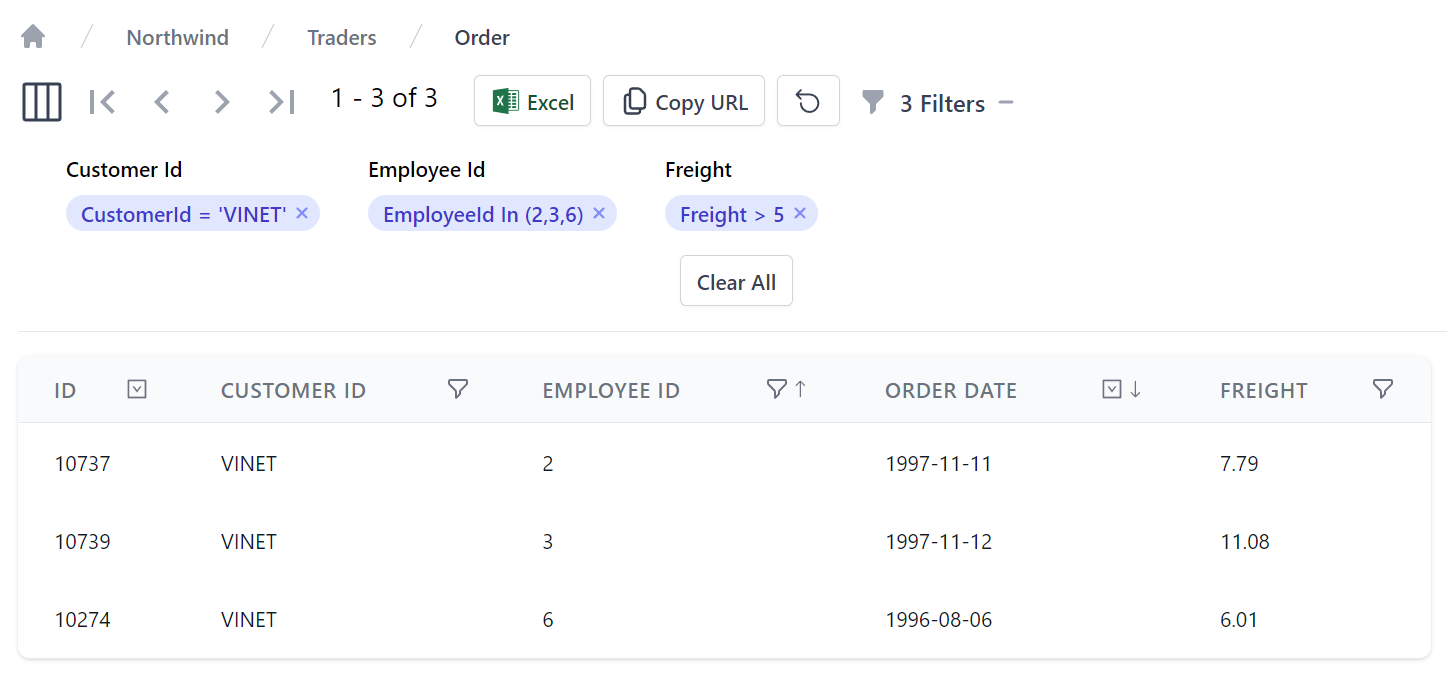
The number and type of filters are readily available from the Filters dropdown showing all filters grouped under their column name where they're easily cleared per filter, column or using Clear All to clear all filters:
After you've finished customizing your table search view, you can export the data with the Excel button to download the results in CSV Format where it can be opened in your favorite spreadsheet, e.g:
Alternatively the Copy URL button can be used to generate the API data URL to return results in JSON:
Database Admin Customizations
Some customizations is available on the AdminDatabaseFeature plugin where you can control the maximum size of resultsets returned and you can use the DatabaseFilter to control which databases and schemas are displayed as well as changing the labels shown by setting their Alias properties, e.g:
Plugins.Add(new AdminDatabaseFeature {
    QueryLimit = 100,
    DatabasesFilter = dbs => {
        foreach (var db in dbs)
        {
            if (db.Name == "main")
            {
                db.Alias = "Northwind";
                db.Schemas[0].Alias = "Traders";
            }
            else if (db.Name == "chinook")
            {
                db.Alias = "Chinook";
                db.Schemas[0].Alias = "Music";
            }
        }
    },
});
New Videos!
Blazor WASM Litestream Apps
To capitalize on the great reception of last release's new Blazor Tailwind template and our first-class Litestream support, we've created a new video combining these ultimate developer experience & value combo solutions that walks through how to deploy a new Blazor Tailwind SQLite + Litestream App to any Linux server with SSH access, Docker and Docker Compose:
Useful Blazor Litestream Video Links
Build a Bookings API from scratch in minutes
With the introduction of our Rapid Application Development solution Locode, the continuous advancements of the built-in Admin UI and rich discoverability of API Explorer, it's never been as productive to create rich Apps and APIs with ServiceStack AutoQuery
In this video we walk through the steps to create a new Bookings App from scratch that is easy to use for non-developers by using ServiceStack Locode and the Admin UI. This enables user management, data editing, and dynamic validation so developers can focus on implementing core business functionality. REST APIs with Create, Read, Update & Delete (CRUD) functionality are expected, and the ServiceStack framework provides the easiest way to built them while still getting the best developer experience when integrating with external systems or customers.
Run As Admin
As ServiceStack's built-in Admin UI, Locode and API Explorer has been gaining sufficient functionality over time you may want to deploy ServiceStack Apps just to make use of them, to streamline such use-cases we've added a RunAsAdminFeature where you can configure your App to always be signed with the super Admin User where they'll have access to all functionality without needing to Sign in.
For example you could launch an empty ServiceStack App just to get access to the Redis Admin functionality, in which case you can register the RunAsAdminFeature to launch Redis Admin by default where it's immediately ready to manage the App's configured Redis server with:
Plugins.Add(new RunAsAdminFeature {
    RedirectTo = "/admin-ui/redis"
});
App Tasks
There may be times when you want to run one-off tasks with the full context of your App but without the overhead of maintaining a separate .exe with duplicated App configuration, instead you can just run your ASP .NET Core App, run the specified Tasks then exit before launching its HTTP Server.
This can now be done using AppTasks where you can register user-defined tasks with:
var runner = new TaskRunner(app.Services);
AppTasks.Register("task1", args => runner.Task1(args));
AppTasks.Register("task2", args => runner.Task2(args));
AppTasks.Run();

app.Run();
Which can be run from the command-line with:
dotnet run --AppTasks=task1:arg1,arg2;task2:arg1,arg2
Which will run the tasks in the specified order, before immediately exiting. If any of the tasks fail the command will return the 1-based index of the task that failed, otherwise it will return a 0 success result.
Microsoft Graph Roles
Some OAuth Providers like Microsoft Graph have their own global roles for users managed separately. We've added the ability to combine both Microsoft Graph's Azure AD Roles with App-defined roles when using the OrmLiteAuthRepository configured to persist roles in distinct role tables (required to capture the source of each role):
services.AddSingleton<IAuthRepository>(c =>
    new OrmLiteAuthRepository<AppUser, UserAuthDetails>(c.Resolve<IDbConnectionFactory>()) {
        UseDistinctRoleTables = true
    });
Once configured you'll be able to manage your App's local User roles via ServiceStack's Auth Repository, Assign Roles APIs or built-in Admin Users UI without interfering with Azure AD managed roles: