React Desktop Apps!
We're super excited to announce React Desktop Apps which lets you re-use your Web Development skills to develop multi-platform Desktop Apps with React, ServiceStack and .NET.
React Desktop Apps take advantage of the adaptability, navigation and deep-linking benefits of a Web-based UI, the productivity and responsiveness of the React framework, the performance, rich features and functionality contained in ServiceStack and the .NET Framework combined with the native experience and OS Integration possible from a Native Desktop App - all within a single VS .NET template!
The new React Desktop Apps template in ServiceStackVS provides everything you need to package your ServiceStack ASP.NET Web App into a native Windows Winforms App, an OSX Cocoa App or cross-platform Windows/OSX/Linux Console App which instead of being embedded inside a Native UI, runs "headless" and launches the User's prefered Web Browser for its Web UI.
This Hybrid model of developing Desktop Apps with modern WebKit technologies offers a more productive and reusable alternative with greater development effort ROI than existing bespoke WPF Apps in XAML or Cocoa OSX Apps with Xcode. It enables full code reuse of your Web App whilst still allowing for platform specific .js, .css and C# specialization when needed. These advantages are also why GitHub also adopted a similar approach for their new cross-platform UI in their flagship Windows and OSX Desktop Apps.
Single Installer-less Executable
Each application is compiled into a single xcopy-able executable that's runnable directly without a Software install. The only pre-requisite is the .NET 4.5 Framework on Windows (pre-installed on recent versions) or Mono for Linux. The OSX Cocoa Xamarin.Mac App has the option to bundle the Mono runtime alleviating the need for users to have an existing install of Mono.
The default template includes ServiceStack.Server NuGet packages which includes all of ServiceStack as well as Redis, OrmLite and other high-level functionality depending on OrmLite and Redis including AutoQuery, Redis Server Events, Redis MQ, etc. Despite its features, ServiceStack is super lean where the working Empty Template Console App project which includes jQuery, Bootstrap, React and its CSS, JS and Font resources compiles down into a single .NET .exe that only weighs 1.5 MB zipped or 4.7 MB uncompressed.
Modern Web Application Development
The React Desktop Template is structured for optimal developer productivity, fast iterations, maximum re-use, easy customizability and optimal runtime performance that's driven by a pre-configured automated workflow. It also maximizes skill re-use where most development time will be spent developing a normal ASP.NET React Web Application without any consideration for the different platforms the tooling creates.
The template follows the same Modern React Apps with .NET as ServiceStack's other Single Page App templates which uses node's rich npm ecosystem to enable access to its premier Web technologies including bower for client dependencies and pre-configured Grunt and Gulp tasks to take care of website bundling, optimization, application packaging and ASP.NET Website deployemnts.
The entire React application is hosted within a single static default.html which is itself only used to structure the websites resources into logical groups where 3rd Party JavaScript libraries and CSS are kept isolated from your own Application's source code. The groups are defined by HTML comments which instruct Gulps userref plugin on how to minify and optimize your Apps resources.
React Desktop App VS.NET Template
The React Desktop Apps template is pre-configured with the necessary tools to package your Web Application into multiple platforms using the provided Grunt build tasks. The Desktop Apps are also debuggable allowing for a simplified and iterative dev workflow by running any of the Host Projects:
- Web - ASP.NET Web Application
- Windows - Native Windows application embedded in a CefSharp Chromium browser
- OSX - Native OS X Cocoa App embedded in a WebView control (requires Xamarin.Mac)
- Console - Single portable, cross platform executable that launches the user's prefered browser
Project Structure
The resulting project structure is the same as the React App VS.NET Template, but with 3 additional projects for hosting the new Desktop and Console Apps and a Common Resources project shared by Host projects containing all the ASP.NET resources (e.g. .css, .js, images, etc) as embedded resources.
It's kept in-sync with the primary DefaultApp project with the 01-bundle-all (or default) Grunt task.
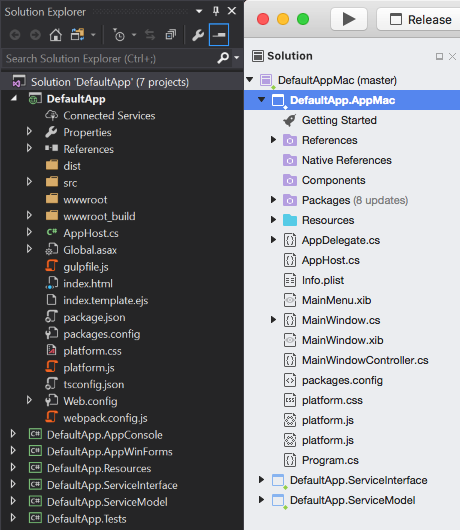
DefaultApp.sln
- DefaultApp - Complete Web application, inc. all Web App's .js, .css, images, etc.
- DefaultApp.AppConsole - Console Host Project
- DefaultApp.AppWinForms - WinForms Host Project
- DefaultApp.Resources - Shared Embedded resources sourced from DefaultApp
- DefaultApp.ServiceInterface - ServiceStack Service Implementations
- DefaultApp.ServiceModel - Request and Response DTO's
- DefaultApp.Tests - NUnit tests
DefaultAppMac.sln
- DefaultApp.AppMac - OSX Cocoa Host project
This is a Xamarin Studio project which can be built with Xamarin.Mac and uses the compiled embedded resources
lib\DefaultApp.Resources.dll created by the 01-bundle-all Grunt task.
DefaultApp Project
The primary DefaultApp project contains the complete React Web App hosted in an ASP.NET Project.
It includes gruntfile.js which provides the necessary Grunt tasks to bundle and optimize the Wep Application
ready for deployment as well as Grunt tasks to minify the Web Applications assets and publishes them
embedded resources into the shared DefaultApp.Resources project. This project is how the React WebApp
is made available to the alternative Desktop and Console Apps.
The primary Grunt Tasks you'll use to package and deploy your App are contained in Alias Tasks group which is easily runnable from VS .NET's Task Runner Explorer which is built into VS 2015:

- default - Runs
01-bundle-alland creates packages for02-package-consoleand03-package-winforms - 01-bundle-all - optimizes and packages Web App the into
wwwrootandResourcesproject - 02-package-console - Packages the Console App in
wwwroot_build\apps - 03-package-winforms - Packages the Winforms App in
wwwroot_build\apps - 04-deploy-app - deploys the Web App in
wwwrootwith MS WebDeploy to any IIS Server using configwwwroot_build\publish\config.json
The template also includes the ILMerge tool to merge all .NET .dlls (inc. Resources.dll) into a single, cross-platform Console Application .exe that's runnable as-is on any Windows, OSX or Linux server with .NET or Mono pre-installed.
Incredible Reuse and Highly Customizable
Customizations for each platform is available by modifying the individual platform.css and project.js files at the
base of each Host folder for adding unique platform-specific JavaScript or CSS.
In addition, an easy way to limit which HTML elements are displayed is to use the platform class to initially
hide the element, then specify which platforms it should be displayed in by listing the specific platforms, e.g:
<ul className="nav navbar-nav pull-right">
    <li><a onClick={this.handleAbout}>About</a></li>
    <li className="platform winforms">
        <a onClick={this.handleToggleWindow}>Toggle Window</a>
    </li>
    <li className="platform winforms mac">
        <a onClick={this.handleQuit}>Close</a>
    </li>
</ul>
In this example the About link is shown on every platform, Toggle Window is specific to Windows and Close is available in both Winforms or OSX Cocoa Desktop Applications.
Since each host is just a normal C# project you also have complete freedom in enhancing each platform with specific functionality native to that platform. E.g. you can add 3rd party dependencies or create Services that are only available to that platform.
Downloads for the DefaultApp VS.NET Template
Windows Winforms App:
DefaultApp-winforms.exe (23.7 MB)
OSX Cocoa App:
DefaultApp.AppMac.app.zip (4.1 MB)
Console App (Windows/OSX/Linux):
DefaultApp-console.exe (4.8 MB) or DefaultApp-console.zip (1.5 MB)
React Chat Desktop App
To illustrate the potential of React Desktop Apps we've developed a couple of Basic Examples to show how quick and easy it is to create highly-interactive Desktop Applications for every major Operating System.

React Chat shows the features and interactivity possible when you have all of ServiceStack available in a Desktop App. React Chat uses Server Events for its real-time notifications allowing ServiceStack Services to notify the client of events instantly. In React Chat each command is sent by Ajax to a normal ServiceStack Service which effectively just relays it back to the client via a Server Event.
After the Server Event reaches the client it calls the registered JavaScript handler, which in the case of /cmd.toggleFormBorder calls
nativeHost.toggleFormBorder().
In Winforms, nativeHost is registered a C# object courtesy of CefSharp's JavaScript Interop feature where JavaScript can call C# directly, which for ToggleFormBorder() just toggles the Window's Chrome on/off:
ChromiumBrowser.RegisterJsObject("nativeHost", new NativeHost(this));

public class NativeHost
{
    //...
    public void ToggleFormBorder()
    {
        formMain.InvokeOnUiThreadIfRequired(() => {
            formMain.FormBorderStyle = formMain.FormBorderStyle == FormBorderStyle.None
                ? FormBorderStyle.Sizable
                : FormBorderStyle.None;
        });
    }
}
This is also an example of a Windows only feature that only appears when the React Web App hosted in Winforms.
Controlling multiple Windows with Server Events
A nice benefit for using Server Events for real-time communication with JavaScript is that you're able
to control multiple window clients naturally just by having each Windows Application subscribe to the same
remote /event-stream url. You can do in React Chat just by opening multiple windows as all subesquent
Windows Apps opened listen to the self-hosting listener of the first one that was opened.
The /windows.dance chat message provides a nice demonstration of this in action :)
YouTube Live Demo

In addition to the Default template, ReactChat also has Razor enabled to also generate dynamic server pages
You can play around with React Chat with the download for your Operating System below:
Downloads for the React Chat
Windows Winforms App:
ReactChat-winforms.exe (23.6 MB)
OSX Cocoa App:
ReactChat.AppMac.mono.app.zip (16.9 MB) or without Mono ReactChat.AppMac.app.zip (4.51 MB)
Console App (Windows/OSX/Linux):
ReactChat-console.exe (5.33 MB) or DefaultApp-console.zip (1.93MB)
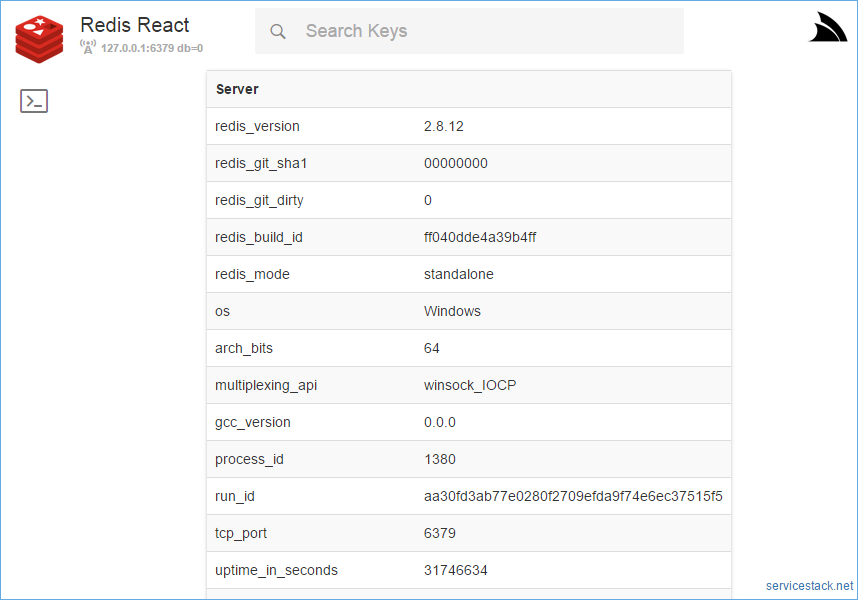
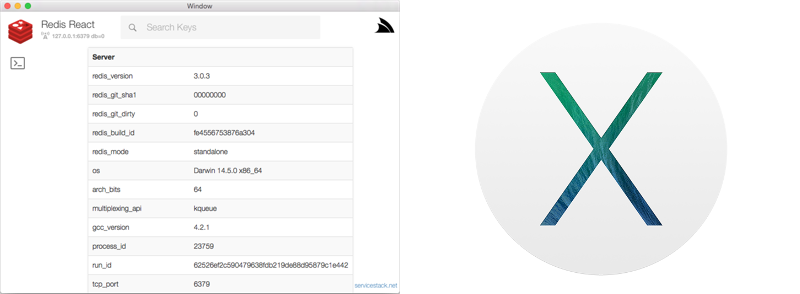
Introducing Redis React!
We're also excited to announce Redis React, which we believe is a good example showing an ideal use-case for React Desktop Apps:
Redis React is a simple user-friendly UI for browsing data in Redis servers that leverages the navigation and deep-linking benefits of a Web-based UI, the productivity and responsiveness of the React framework and the deep Integration possible from a Native App.
Live Demo
The Redis React App has been packaged for multiple platforms inc. the ASP.NET Live Demo redisreact.servicestack.net deployed on AWS which you can use to preview Redis React browsing a redis server populated with the Northwind Dataset persisted as JSON following the Complex Type Conventions built into the C# ServiceStack.Redis Client.
Download
Use Redis React to browse your internal Redis Server by downloading the appropriate download for your platform:
Windows
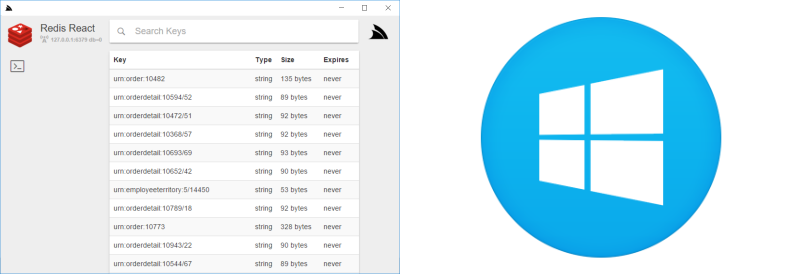
To run on Windows, download the self-extracting Winforms App:
RedisReact-winforms.exe (23.9MB)
Windows requires .NET 4.5 installed which is pre-installed on recent version of Windows
OSX
To run on OSX, download the Cocoa OSX App:
RedisReact.AppMac.mono.app.zip (16.5 MB) or without mono RedisReact.AppMac.app.zip (4.1 MB)
The Cocoa OSX App was built with Xamarin.Mac and includes an embedded version of Mono which doesn't require an existing install of Mono
Linux
To run on Linux, download the cross-platform Console App:

RedisReact-console.exe (5.4MB) or RedisReact-console.exe.zip (1.7MB)
RedisReact-console.exe is a headless Console Application that can run on Windows, OSX and Linux platforms with .NET or Mono installed.
See the instructions for Installing Mono on Linux. If installing via apt-get, it needs the mono-complete package to run.
Rich support for JSON
Redis React is especially useful for browsing JSON values which includes a human friendly view of JSON data and the ability to view multiple related keys together in a tabular data grid enabling fast inspection of redis data.
At anytime you can click on the JSON preview to reveal the raw JSON string, or use the Global t
shortcut key to toggle between preview mode and raw mode of JSON data.
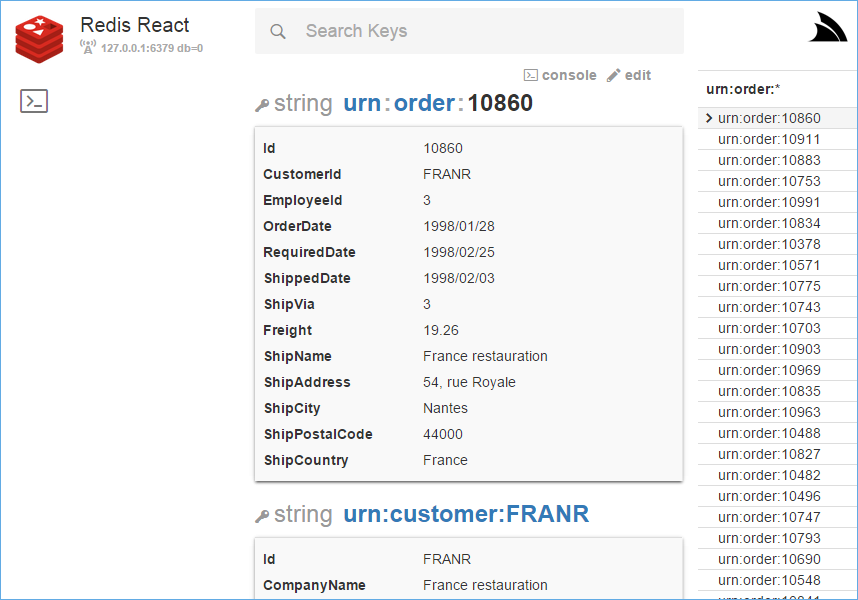
It also takes advantages of the POCO conventions built into the C# ServiceStack.Redis Client where it will automatically display any related entities for the current value, as seen with the related Customer the Order was for and the Employee who created it.
It works by scanning the JSON fields for names ending with Id then taking the prefix and using it to predict the referenced key, e.g:
CustomerId:FRANR => urn:customer:FRANR
It then fetches all the values with the calculated key and displays them below the selected Order. Clicking the Customer or Employee Key will navigate to that record, providing nice navigation for quickly viewing a record and its related entities.
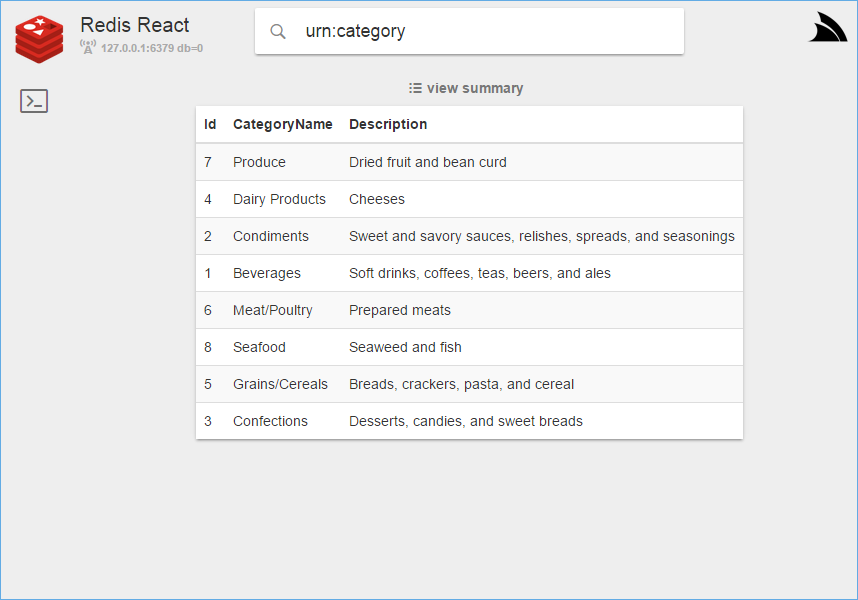
View as Grid
When keys share the same schema, clicking on the view as grid link lets you see multiple search results displayed in a tabular data grid, e.g:
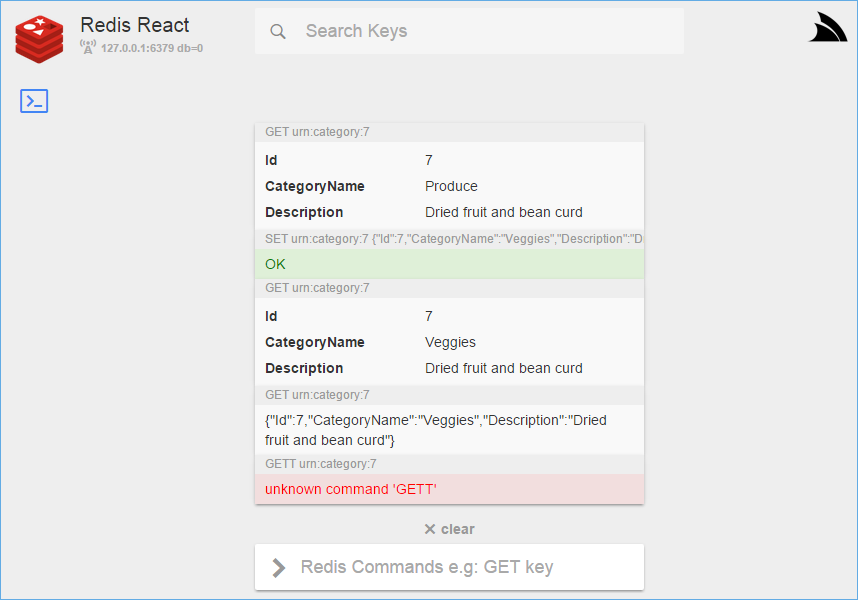
Web Console
The built-in Console takes advantage of a Web Based UI to provide some nice enhancements. E.g. each command is displayed on top of the result it returns, where clicking the command populates the text box making it easy to execute or modify existing commands. Any OK Success responses are in green, whilst any error responses are in red. Also just like JSON values above, it shows a human-friendly view for JSON data which can be clicked to toggle on/off individually:
Redis React is packed with a number of other features, checkout the project home page for an Overview and try it out today!
Swift 2.0 Support!
We're also happy to announce support for the new and much improved Swift 2.0 that's now shipping in Xcode 7 which is now available as a free download for everyone to enjoy.
![]()
We're happy to report that Swift has improved substantially and has also had a positive impact on our Swift Client library,
e.g. Error Handling is more familiar thanks to
Swift 2.0 new Error Handling
utilizing a do/try/catch block where you can now access ServiceStack Service Exceptions inside a catch block, e.g:
let client = JsonServiceClient(baseUrl: "https://test.servicestack.net")

let request = ThrowValidation()
request.email = "invalidemail"

do {
    let response = try client.post(request)
} catch let responseError as NSError {

    let status:ResponseStatus = responseError.convertUserInfo()!
    status.errors.count //= 3

    status.errors[0].errorCode! //= InclusiveBetween
    status.errors[0].fieldName! //= Age
    status.errors[0].message!   //= 'Age' must be between 1 and 120. You entered 0.
}
The addition of the new catch keyword means the the previous Async promise error handling has now been renamed to error
which now looks like:
let request = ThrowValidation()
request.email = "invalidemail"

client.postAsync(request)
    .error { responseError in
        let status:ResponseStatus = responseError.convertUserInfo()!
        status.errors.count //= 3
        //...
    }
There's improved type inference where before you had to include the full type signature in the closure continuation:
client.getAsync(AppOverview())
    .then(body:{(r:AppOverviewResponse) -> Void in
        r.topTechnologies.count //= 100
        ...
    })
In Swift 2.0 this has now been reduced to the absolute minimum code required:
client.getAsync(AppOverview())
    .then {
        $0.topTechnologies.count //= 100
        //...
    }
If preferred you can continue marking it up with as much additional Type information or optional syntax as you'd like, e.g:
client.getAsync(AppOverview())
    .then({ r in
        r.topTechnologies.count //= 100
        //...
    })
Download ServiceStack Xcode 7 Plugin

Once opened, the ServiceStack XCode Plugin can be installed by dragging it to the XCode Plugins directory:

Swift 2.0 Changes
Swift 2.0 is a major upgrade that introduced a number of breaking changes which required updating both Server generated DTO's as
well as JsonServiceClient client library. Whilst the POCO DTO definition remained exactly the same, i.e:
public class AllCollectionTypes
{
    required public init(){}
    public var intArray:[Int] = []
    public var intList:[Int] = []
    public var stringArray:[String] = []
    public var stringList:[String] = []
    public var pocoArray:[Poco] = []
    public var pocoList:[Poco] = []
    public var pocoLookup:[String:[Poco]] = [:]
    public var pocoLookupMap:[String:[String:Poco]] = [:]
}
Old Type Extensions
In Swift 1.x the amount of boilerplate required for transparent JSON serialization without being able to use Swift's incomplete reflection support required this amount of boilerplate repeated for every type:
extension AllCollectionTypes : JsonSerializable
{
    public class var typeName:String { return "AllCollectionTypes" }
    public class func reflect() -> Type<AllCollectionTypes> {
        return TypeConfig.config() ?? TypeConfig.configure(Type<AllCollectionTypes>(
            properties: [
                Type<AllCollectionTypes>.arrayProperty("intArray", get: { $0.intArray }, set: { $0.intArray = $1 }),
                Type<AllCollectionTypes>.arrayProperty("intList", get: { $0.intList }, set: { $0.intList = $1 }),
                Type<AllCollectionTypes>.arrayProperty("stringArray", get: { $0.stringArray }, set: { $0.stringArray = $1 }),
                Type<AllCollectionTypes>.arrayProperty("stringList", get: { $0.stringList }, set: { $0.stringList = $1 }),
                Type<AllCollectionTypes>.arrayProperty("pocoArray", get: { $0.pocoArray }, set: { $0.pocoArray = $1 }),
                Type<AllCollectionTypes>.arrayProperty("pocoList", get: { $0.pocoList }, set: { $0.pocoList = $1 }),
                Type<AllCollectionTypes>.objectProperty("pocoLookup", get: { $0.pocoLookup }, set: { $0.pocoLookup = $1 }),
                Type<AllCollectionTypes>.objectProperty("pocoLookupMap", get: { $0.pocoLookupMap }, set: { $0.pocoLookupMap = $1 }),
            ]))
    }
    public func toJson() -> String {
        return AllCollectionTypes.reflect().toJson(self)
    }
    public class func fromJson(json:String) -> AllCollectionTypes? {
        return AllCollectionTypes.reflect().fromJson(AllCollectionTypes(), json: json)
    }
    public class func fromObject(any:AnyObject) -> AllCollectionTypes? {
        return AllCollectionTypes.reflect().fromObject(AllCollectionTypes(), any:any)
    }
    public func toString() -> String {
        return AllCollectionTypes.reflect().toString(self)
    }
    public class func fromString(string:String) -> AllCollectionTypes? {
        return AllCollectionTypes.reflect().fromString(AllCollectionTypes(), string: string)
    }
}
New Type Extensions
This has now been greatly reduced in Swift 2.0 thanks to Protocol Extensions (aka traits) where it's down to just:
extension AllCollectionTypes : JsonSerializable
{
    public static var typeName:String { return "AllCollectionTypes" }
    public static var metadata = Metadata.create([
            Type<AllCollectionTypes>.arrayProperty("intArray", get: { $0.intArray }, set: { $0.intArray = $1 }),
            Type<AllCollectionTypes>.arrayProperty("intList", get: { $0.intList }, set: { $0.intList = $1 }),
            Type<AllCollectionTypes>.arrayProperty("stringArray", get: { $0.stringArray }, set: { $0.stringArray = $1 }),
            Type<AllCollectionTypes>.arrayProperty("stringList", get: { $0.stringList }, set: { $0.stringList = $1 }),
            Type<AllCollectionTypes>.arrayProperty("pocoArray", get: { $0.pocoArray }, set: { $0.pocoArray = $1 }),
            Type<AllCollectionTypes>.arrayProperty("pocoList", get: { $0.pocoList }, set: { $0.pocoList = $1 }),
            Type<AllCollectionTypes>.objectProperty("pocoLookup", get: { $0.pocoLookup }, set: { $0.pocoLookup = $1 }),
            Type<AllCollectionTypes>.objectProperty("pocoLookupMap", get: { $0.pocoLookupMap }, set: { $0.pocoLookupMap = $1 }),
        ])
}
This still doesn't make use any reflection so JSON serialization should continue to perform exceptionally well.
New Service Client Features
During the upgrade we've also added a number of new features to the JsonServiceClient where it's public ServiceClient
protocol has been expanded to:
public protocol ServiceClient
{
    func get(request:T) throws -> T.Return
    func get(request:T) throws -> Void
    func get(request:T, query:[String:String]) throws -> T.Return
    func get(relativeUrl:String) throws -> T
    func getAsync(request:T) -> Promise<T.Return>
    func getAsync(request:T) -> Promise<Void>
    func getAsync(request:T, query:[String:String]) -> Promise<T.Return>
    func getAsync(relativeUrl:String) -> Promise<T>

    func post(request:T) throws -> T.Return
    func post(request:T) throws -> Void
    func post(relativeUrl:String, request:Request?) throws -> Response
    func postAsync(request:T) -> Promise<T.Return>
    func postAsync(request:T) -> Promise<Void>
    func postAsync(relativeUrl:String, request:Request?) -> Promise<Response>

    func put(request:T) throws -> T.Return
    func put(request:T) throws -> Void
    func put(relativeUrl:String, request:Request?) throws -> Response
    func putAsync(request:T) -> Promise<T.Return>
    func putAsync(request:T) -> Promise<Void>
    func putAsync(relativeUrl:String, request:Request?) -> Promise<Response>

    func delete(request:T) throws -> T.Return
    func delete(request:T) throws -> Void
    func delete(request:T, query:[String:String]) throws -> T.Return
    func delete(relativeUrl:String) throws -> T
    func deleteAsync(request:T) -> Promise<T.Return>
    func deleteAsync(request:T) -> Promise<Void>
    func deleteAsync(request:T, query:[String:String]) -> Promise<T.Return>
    func deleteAsync(relativeUrl:String) -> Promise<T>

    func patch(request:T) throws -> T.Return
    func patch(request:T) throws -> Void
    func patch(relativeUrl:String, request:Request?) throws -> Response
    func patchAsync(request:T) -> Promise<T.Return>
    func patchAsync(request:T) -> Promise<Void>
    func patchAsync(relativeUrl:String, request:Request?) -> Promise<Response>

    func send(request:T) throws -> T.Return
    func send(request:T) throws -> Void
    func send(intoResponse:T, request:NSMutableURLRequest) throws -> T
    func sendAsync(intoResponse:T, request:NSMutableURLRequest) -> Promise<T>

    func getData(url:String) throws -> NSData
    func getDataAsync(url:String) -> Promise<NSData>
}
Where new support has been added for IReturnVoid and PATCH Requests.
Swift HTTP Marker Interfaces
The new send* API's take advantage of the HTTP Verb Interface Markers described below to send the Request DTO using the
annotated HTTP Method, e.g:
public class HelloByGet : IReturn, IGet
{
    public typealias Return = HelloResponse
    public var name:String?
}
public class HelloByPut : IReturn, IPut
{
    public typealias Return = HelloResponse
    public var name:String?
}

let response = try client.send(HelloByGet())  //GET

client.sendAsync(HelloByPut())                //PUT
    .then { }
ServiceStack's Error Response Status DTO's are now included in the JsonServiceClient.swift source instead of being repeated within each ServiceStack Reference added to your project, mitigating any duplicate DTO conflicts.
Java ServiceStack Reference

The Java Android Studio and Eclipse Plugins have also been improved in this release, the new versions which can be downloaded below:
Download ServiceStack IDEA Android Studio Plugin
Download ServiceStack Eclipse Plugin
Send Raw String or byte[] Requests
You can easily get the raw string Response from Request DTO's that return are annotated with IReturn<string>, e.g:
public static class HelloString implements IReturn<String> { ... }

String response = client.get(new HelloString().setName("World"));
You can also specify that you want the raw UTF-8 byte[] or String response instead of a the deserialized Response DTO by specifying
the Response class you want returned, e.g:
byte[] response = client.get("/hello?Name=World", byte[].class);
Java HTTP Marker Interfaces
Like the .NET and Swift Service Clients, the HTTP Interface markers are also annotated on Java DTO's and let you use the same
send API to send Requests via different HTTP Verbs, e.g:
public static class HelloByGet implements IReturn<HelloResponse>, IGet { ... }
public static class HelloByPut implements IReturn<HelloResponse>, IPut { ... }

HelloResponse response = client.send(new HelloByGet().setName("World")); //GET

client.sendAsync(new HelloByPut().setName("World"),                         //PUT
    new AsyncResult<HelloResponse>() {
        @Override
        public void success(HelloResponse response) { }
    });
IReturnVoid Support
New Sync/Async overloads have been added for IReturnVoid Request DTO's:
client.delete(new DeleteCustomer().setId(1));
Java Annotations
The built-in Java Annotations now have their metadata available at runtime as they're now annotated with:
@Retention(RetentionPolicy.RUNTIME)
public @interface Api { ... }
Add ServiceStack Reference
Export Types
By default ServiceStack's Native Type Feature doesn't emit any System types built into the .NET Framework, these can now be
emitted for non-.NET Languages with the new ExportTypes list, e.g. if your DTO's exposes the DayOfWeek System Enum it can
be exported by adding it to the pre-registered NativeTypesFeature's Plugin with:
 var nativeTypes = this.GetPlugin<NativeTypesFeature>();
nativeTypes.MetadataTypesConfig.ExportTypes.Add(typeof(DayOfWeek));
Now if any of your DTO's has a DayOfWeek property it will emitted in the generated DTO's, Java example:
public static enum DayOfWeek
{
    Sunday,
    Monday,
    Tuesday,
    Wednesday,
    Thursday,
    Friday,
    Saturday;
}
Service Clients
HTTP Verb Interface Markers
You can decorate your Request DTO's using the IGet, IPost, IPut, IDelete and IPatch interface markers and the Send and
SendAsync API's will use it to automatically send the Request using the selected HTTP Method. E.g:
public class HelloByGet : IReturn<HelloResponse>, IGet
{
    public string Name { get; set; }
}
public class HelloByPut : IReturn<HelloResponse>, IPut
{
    public string Name { get; set; }
}

var response = client.Send(new HelloByGet { Name = "World" }); //GET

await client.SendAsync(new HelloByPut { Name = "World" }); //PUT
This was feature was previously only implemented in StripeGateway, but is now available in all .NET Service Clients as well as the latest Java JsonServiceClient and Swift JsonServiceClient.
Whilst a simple feature, it enables treating your remote services as a message-based API yielding its many inherent advantages where your Application API's need only pass Request DTO models around to be able to invoke remote Services, decoupling the Service Request from its implementation which can be now easily managed by a high-level adapter that takes care of proxying the Request to the underlying Service Client. The adapter could also add high-level functionality of it's own including auto retrying of failed requests, generic error handling, logging/telemetrics, event notification, throttling, offline queuing/syncing, etc.
Async StripeGatway
Perhaps a clearer indication of the simplicity and generic functionality possible from a message-based API's is how it's possible to add Async support to all Stripe Gateway API's in <1 hour from initial feature request to implementation and published to our pre-release NuGet packages where it's available for immediate use:
var charge = await gateway.PostAsync(new ChargeStripeCustomer {
    Customer = customer.Id,
    Amount = 100,
    Currency = "usd",
    Description = "Test Charge Customer",
});
The Stripe Gateway provides a typed .NET message-based API to
Stripe's REST Services which as it's inspired by Ruby conventions, uses a snake_case naming
convention so it's a good example of viewing the benefits of a message-based API's in isolation, i.e. independent from the features
ServiceStack adds around it's own .NET Services.
Unlike other Stripe Client implementations the StripeGateway.cs is
- Small - Fits in a single class where the majority of the code-base contains Stripe's Typed DTO's and Currency Info
- Simple - Its tiny code-base has great re-use, requiring less effort to create, maintain, extend and test
- Highly Testable - Its small surface area implements the typed, mockable IRestGateway
- Open Ended - Users can use their own Request DTO's to call new Stripe Services that StripeGateway has no knowledge about
Declarative Message-based APIs
The only custom code required to implement the ChargeStripeCustomer above is this single, clean, declarative Request DTO:
[Route("/charges")]
public class ChargeStripeCustomer : IPost, IReturn<StripeCharge>
{
    public int Amount { get; set; }
    public string Currency { get; set; }
    public string Customer { get; set; }
    public string Card { get; set; }
    public string Description { get; set; }
    public bool? Capture { get; set; }
    public int? ApplicationFee { get; set; }
}
Which contains all the information needed to call the Stripe Service including the /charges relative url, using the POST
HTTP method and the typed StripeCharge DTO it returns. To charge a Customer the Request DTO can either use the explicit
Post/PostAsync or universal Send/SendAsync StripeGateway methods.
We hope this example makes it clearer why we continue to encourage others to adopt a message-based API for accessing any remote Services and how we're able to continue to deliver rich generic functionality and value to all ServiceStack Services with minimal code, effort, friction and complexity as a result.
Debuggable Razor Views
Razor Views are now debuggable for Debug builds by default, it can also be explicitly specified on:
Plugins.Add(new RazorFormat {
    IncludeDebugInformation = true,
    CompileFilter = compileParams => ...
})
The new
CompileFilteris an advanced option that lets modify theCompilerParametersused by the C# CodeDom provider to compile the Razor Views if needed.
ss-utils.js
$.fn.ajaxSubmit
ajaxSubmit has been decoupled from ServiceStack's
auto bindForm ajax and validation helper
so it can be used independently to submit a form on demand. This is used in the
connections.jsx
React Component of Redis React's Connections Page
to auto submit the form via ajax to the specified /connection url with the populated Form INPUT values. It also disables the
#btnConnect submit button and adds a .loading class to the form whilst it's in transit which is used to temporarily show the
loading sprite:
var Connections = React.createClass({
    //...
    onSubmit: function (e) {
        e.preventDefault();

        var $this = this;
        $(e.target).ajaxSubmit({
            onSubmitDisable: $("#btnConnect"),
            success: function () {
                $this.setState({ successMessage: "Connection was changed" });
                Actions.loadConnection();
            }
        });
    },
    render: function () {
        var conn = this.state.connection;
        return (
          <div id="connections-page">
            <div className="content">
                <form id="formConnection" className="form-inline" onSubmit={this.onSubmit} action="/connection">
                    <h2>Redis Connection</h2>
                    <div className="form-group">
                        <input name="host" type="text" />
                        <input name="port" type="text" className="form-control" />
                        <input name="db" type="text" className="form-control" />
                    </div>
                    <p className="actions">
                        <img className="loader" src="/img/ajax-loader.gif" />
                        <button id="btnConnect" className="btn btn-default btn-primary">Change Connection</button>
                    </p>
                    <p className="bg-success">{this.state.successMessage}</p>
                    <p className="bg-danger error-summary"></p>
                </form>
            </div>
          </div>
        );
    }
};
$.ss.parseResponseStatus
Lets you easily parse the raw text of a Ajax Error Response into a responseStatus JavaScript object, example used in Redis React's Console Component:
.fail(function (jq, jqStatus, statusDesc) {
    var status = $.ss.parseResponseStatus(jq.responseText, statusDesc);
    Actions.logEntry({
        cmd: cmd,
        result: status.message,
        stackTrace: status.stackTrace,
        type: 'err',
    });
});
$.ss.bindAll
The new bindAll API is a simple helper for creating lightweight JavaScript objects by binding this for all functions of an
object literal to the object instance, e.g:
var Greeting = $.ss.bindAll({
    name: "World",
    sayHello: function() {
        alert("Hello, " + this.name);
    }
});

var fn = Greeting.sayHello;
fn(); // Hello, World
Redis
Improved LUA support
The new ExecLua API lets you execute LUA Script on a Redis server and returns any result in a generic RedisText Type which can
be easily be inspected to access the LUA Script's complex type response. A good example of when to use a server-side LUA script
is to reduce the network latency of chatty multi-request API's.
A prime example of this is when using Redis's SCAN API which provides a streaming, non-blocking API to search through the entire Redis KeySet. The number of API calls that's required is bounded to the size of the Redis KeySet which could quickly result in a large number of Redis Operations yielding an unacceptable delay due to the latency of multiple dependent remote network calls.
An easy solution is to instead have the multiple SCAN calls performed in-process on the Redis Server, eliminating the network latency of multiple SCAN calls, e.g:
const string FastScanScript = @"
local limit = tonumber(ARGV[2])
local pattern = ARGV[1]
local cursor = 0
local len = 0
local results = {}
repeat
    local r = redis.call('scan', cursor, 'MATCH', pattern, 'COUNT', limit)
    cursor = tonumber(r[1])
    for k,v in ipairs(r[2]) do
        table.insert(results, v)
        len = len + 1
        if len == limit then break end
    end
until cursor == 0 or len == limit
return results";

RedisText r = redis.ExecLua(FastScanScript, "key:*", "10");
r.Children.Count.Print() //= 10
The ExecLua API returns this complex LUA table response in the Children collection of the RedisText Response.
This above API is equivalent to C# API below which returns the first 10 results matching the key:* pattern:
var keys = Redis.ScanAllKeys(pattern: "key:*", pageSize: 10)
    .Take(10).ToList();
However the C# Streaming API above would require an unknown number of Redis Operations to complete the request whereas only 1 call to Redis is required for the LUA Script. The number of SCAN calls can be reduced by choosing a higher pageSize to tell Redis to scan more keys.
ExecCachedLua
ExecCachedLua is a convenient high-level API that eliminates the bookkeeping required for executing high-performance server LUA Scripts which suffers from many of the problems that RDBMS stored procedures have which depends on pre-existing state in the RDBMS that needs to be updated with the latest version of the Stored Procedure.
With Redis LUA you either have the option to send, parse, load then execute the entire LUA script each time it's called or
alternatively you could pre-load the LUA Script into Redis once on StartUp and then execute it using the Script's SHA1 hash.
The issue with this is that if the Redis server is accidentally flushed you're left with a broken application relying on a
pre-existing script that's no longer there. The new ExecCachedLua API provides the best of both worlds where it will always
execute the compiled SHA1 script, saving bandwidth and CPU but will also re-create the LUA Script if it no longer exists.
You can now execute the compiled LUA script above by its SHA1 identifier, which continues to work regardless if it never existed or was removed at runtime, e.g:
// #1: Loads LUA script and caches SHA1 hash in Redis Client
r = redis.ExecCachedLua(FastScanScript, sha1 =>
    redis.ExecLuaSha(sha1, "key:*", "10"));

// #2: Executes using cached SHA1 hash
r = redis.ExecCachedLua(FastScanScript, sha1 =>
    redis.ExecLuaSha(sha1, "key:*", "10"));

// Deletes all existing compiled LUA scripts
redis.ScriptFlush();

// #3: Executes using cached SHA1 hash, gets NOSCRIPT Error, re-creates and re-executes with SHA1 hash
r = redis.ExecCachedLua(FastScanScript, sha1 =>
    redis.ExecLuaSha(sha1, "key:*", "10"));
New Redis Client APIs
All new APIs added in this release:
IRedisClient
- Type - returns key Type as string that can be used in pipelines
- GetStringCount - returns STRLEN in a consistent API to fetch size of value, i.e
Get{DataType}Count() - SetValues - Set multiple String values, alias for SetAll
- ExecLua - Execute Lua Script that returns a generic
RedisTextresult - ExecLuaSha - Execute Lua Script by SHA1 which returns a generic
RedisTextresult - ExecCachedLua - Execute Lua Script by SHA1, re-creating it if it no longer exists
IRedisNativeClient
- Type - returns key Type as string that can be used in pipelines
- EvalCommand - Execute Lua Script that returns a generic
RedisDatabyte[] result - EvalShaCommand - Execute Lua Script by SHA1 which returns a generic
RedisDatabyte[] result
Caching
The ICacheClientExtended API is used to to provide additional non-core functionality to our most popular Caching providers:
- Redis
- OrmLite RDBMS
- In Memory
- AWS
The new API's are added as Extension methods on ICacheClient so they're easily accessible without casting, the new API's available include:
- GetKeysByPattern(pattern) - return keys matching a wildcard pattern
- GetAllKeys() - return all keys in the caching provider
- GetKeysStartingWith() - Streaming API to return all keys Starting with a prefix
With these new API's you can now easily get all active User Sessions using any of the supported Caching providers above with:
var sessionPattern = IdUtils.CreateUrn<IAuthSession>(""); //= urn:iauthsession:
var sessionKeys = Cache.GetKeysStartingWith(sessionPattern).ToList();

var allSessions = Cache.GetAll<IAuthSession>(sessionKeys);
Minor Features
- All 3rd Party NuGet dependencies updated to latest stable version
- C#
FormatExceptionreturn 400 by default - New
AuthServerFilterandAuthClientFilteravailable to all DotNetOpenAuth OAuth2 Providers - Patch added on JavaScript JsonServiceClient by @DeonHeyns
- Added
UnsafeOrderBy()to OrmLite SqlExpression to allow unchecked ordering by results by Custom SQL