Blazor Tailwind
We've had great feedback from our existing Boostrap Blazor WASM template, its highly productive dev model and pre-rendering solution for achieving instant Startup performance which has seen it become more popular than all our other jamstacks.net templates combined.
As a result we've continued to invest in our Blazor support and have created a new blazor-tailwind project template to take advantage of Tailwind's modern utility-first CSS design system to create beautiful, instant-loading Blazor WASM Apps.

Tailwind Components
Tailwind has quickly become the best modern CSS framework we've used to create scalable, mobile-first responsive websites built upon a beautiful expert-crafted constraint-based Design System that enabled effortless reuse of a growing suite of Free Community and professionally-designed Tailwind UI Component Libraries which has proven invaluable in quickly creating beautiful websites & docs that have benefited all our new modern jamstacks.net templates.

Creating Beautiful Blazor Apps with Tailwind
Preview the highly productive development model of the new Blazor Tailwind template showing how easy it is to utilize beautifully designed components
Getting Started
Create a new Blazor WASM Tailwind App
Customize and Download a new Tailwind Blazor WASM project with your preferred project name:
Alternatively you can create & download a new Blazor Project with the x dotnet tool:
x new LegacyTemplates/blazor-tailwind ProjectName
Blazor Components
Rich, themeable UI Component Library with declarative contextual Validation
To maximize productivity the template utilizes the ServiceStack.Blazor library containing integrated functionality for Blazor including an optimal JSON API HttpClient Factory, API-enabled base components and a rich library of Tailwind & Bootstrap UI Input components with integrated contextual validation support of ServiceStack's structured Error responses heavily utilized throughout each project template.
Blazor Tailwind UI Components
The Built-in UI Components enable a clean & productive dev model, which as of this release include:
| Component | Description |
|---|---|
<TextInput> |
Text Input control for string properties |
<DateTimeInput> |
Date Input control for Date properties |
<CheckboxInput> |
Checkbox Input control for Boolean properties |
<SelectInput> |
Select Dropdown for properties with finite list of values like Enums |
<TextAreaInput> |
Text Input control for large strings |
<DynamicInput> |
Dynamic component utilizing the appropriate above Input controls in Auto Forms |
<AlertSuccess> |
Displaying successful notification feedback |
<ErrorSummary> |
Displaying error summary message when no contextual field validation is available |
<FileUpload> |
Used with FilesUploadFeature and UploadTo attribute to upload files |
The Tailwind & Bootstrap components share the same functionally equivalent base classes that can be easily swapped when switching CSS frameworks by updating its namespace in your App's _Imports.razor.
@using ServiceStack.Blazor.Components.Tailwind
//@using ServiceStack.Blazor.Components.Bootstrap
Themable
Should it be needed, their decoupled design also allows easy customization by running the included README.ss executable documentation to copy each controls Razor UI markup locally into your project, enabling easy customization of all UI input controls.
Bookings CRUD Example
To demonstrate ServiceStack's clean & highly productive Blazor dev model, we'll walk through implementing the AutoQuery Bookings CRUD example in Blazor.
Since we're using AutoQuery CRUD we only need to define the Request DTO with the input fields we want the user to populate in our Booking RDBMS table in Bookings.cs:
[Tag("bookings"), Description("Create a new Booking")]
[Route("/bookings", "POST")]
[ValidateHasRole("Employee")]
[AutoApply(Behavior.AuditCreate)]
public class CreateBooking : ICreateDb<Booking>, IReturn<IdResponse>
{
    [Description("Name this Booking is for"), ValidateNotEmpty]
    public string Name { get; set; }
    public RoomType RoomType { get; set; }
    [ValidateGreaterThan(0)]
    public int RoomNumber { get; set; }
    [ValidateGreaterThan(0)]
    public decimal Cost { get; set; }
    public DateTime BookingStartDate { get; set; }
    public DateTime? BookingEndDate { get; set; }
    [Input(Type = "textarea")]
    public string? Notes { get; set; }
}
Where we make use of Declarative Validation attributes to define the custom validation rules for this API.
TIP
The [Tag], [Description] and [Input] attributes are optional to markup how this API appears in ServiceStack's built-in API Explorer and Locode UIs
Blazor WASM App
Thanks to ServiceStack's Recommended Project Structure no any additional classes are needed as we're able to bind UI Controls directly to our typed server CreateBooking Request DTO used to define the API in
BookingsCrud/Create.razor:
<form @onsubmit="_ => OnSubmit()" @onsubmit:preventDefault>
<CascadingValue Value=@api.Error>
<div class=@CssUtils.ClassNames("shadow overflow-hidden sm:rounded-md bg-white", @class)>
    <div class="relative px-4 py-5 bg-white sm:p-6">
        <CloseButton OnClose="close" />
        <fieldset>
            <legend class="text-base font-medium text-gray-900 text-center mb-4">New Booking</legend>

            <ErrorSummary Except=@VisibleFields />

            <div class="grid grid-cols-6 gap-6">
                <div class="col-span-6 sm:col-span-3">
                    <TextInput @bind-Value="request.Name" required placeholder="Name for this booking" />
                </div>

                <div class="col-span-6 sm:col-span-3">
                    <SelectInput @bind-Value="request.RoomType" Options=@(Enum.GetValues<RoomType>()) />
                </div>

                <div class="col-span-6 sm:col-span-3">
                    <TextInput type="number" @bind-Value="request.RoomNumber" min="0" required />
                </div>

                <div class="col-span-6 sm:col-span-3">
                    <TextInput type="number" @bind-Value="request.Cost" min="0" required />
                </div>

                <div class="col-span-6 sm:col-span-3">
                    <DateTimeInput @bind-Value="request.BookingStartDate" required />
                </div>
                <div class="col-span-6 sm:col-span-3">
                    <DateTimeInput @bind-Value="request.BookingEndDate" />
                </div>

                <div class="col-span-6">
                    <TextAreaInput @bind-Value="request.Notes" placeholder="Notes about this booking" />
                </div>
            </div>
        </fieldset>
    </div>
</div>
</CascadingValue>
</form>

@code {
    [Parameter] public EventCallback<IdResponse> done { get; set; }
    [Parameter] public string? @class { get; set; }

    CreateBooking request = new() {
        BookingStartDate = DateTime.UtcNow,
    };

    // Hide Error Summary Messages for Visible Fields which displays contextual validation errors
    string[] VisibleFields => new[] {
        nameof(request.Name),
        nameof(request.RoomType),
        nameof(request.RoomNumber),
        nameof(request.BookingStartDate),
        nameof(request.BookingEndDate),
        nameof(request.Cost),
        nameof(request.Notes),
    };

    ApiResult<IdResponse> api = new();

    async Task OnSubmit()
    {
        api = await ApiAsync(request);

        if (api.Succeeded)
        {
            await done.InvokeAsync(api.Response!);
            request = new();
        }
    }

    async Task close() => await done.InvokeAsync(null);
}
Calling ServiceStack APIs requires no additional code-gen or boilerplate where the populated Request DTO can be sent as-is using the
JsonApiClient Api methods which returns an encapsulated successful API or structured error response
in its typed ApiResult<T>.
The UI validation binding uses Blazor's <CascadingValue> to propagate any api.error responses down to the child Input components.
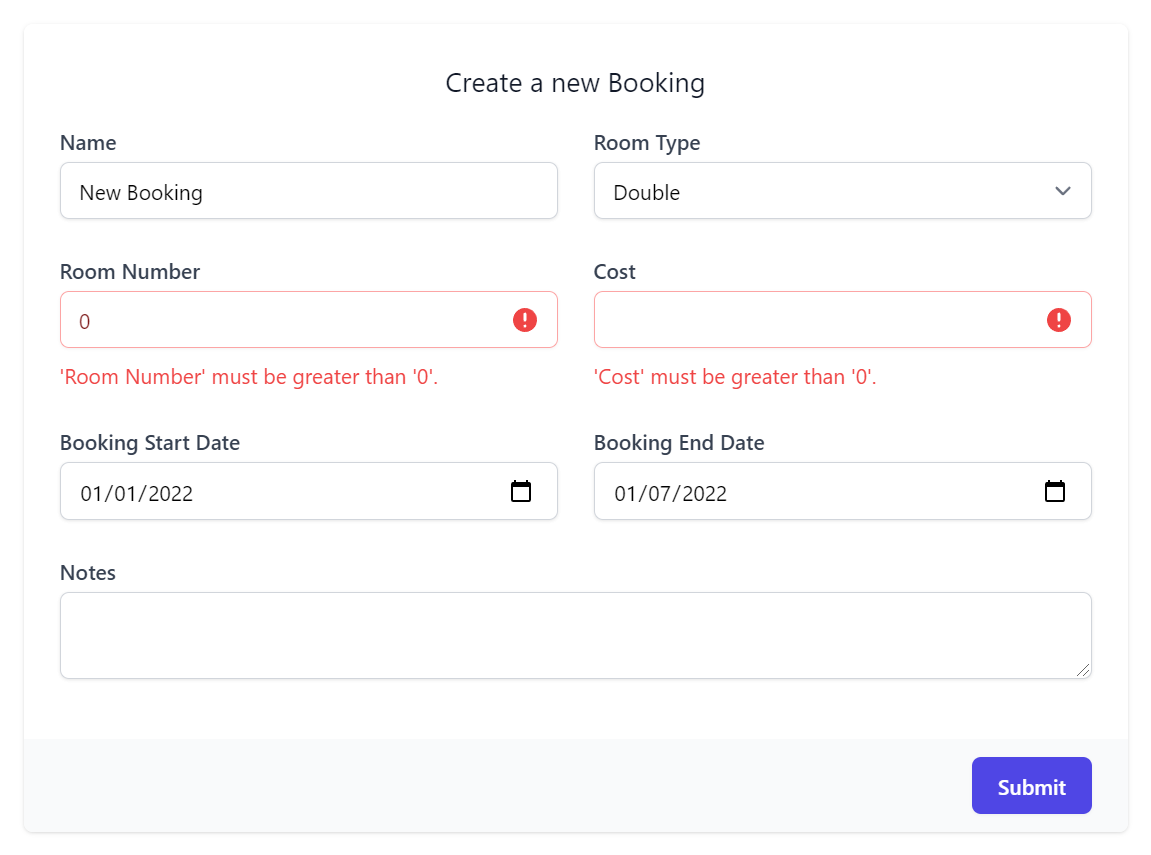
That's all there's to it, we use Tailwind's CSS Grid classes to define our UI layout which shows each control in its own row for mobile UIs or 2 fields per row in resolutions larger than the Tailwind's sm: responsive breakpoint to render our beautiful Bookings Form:
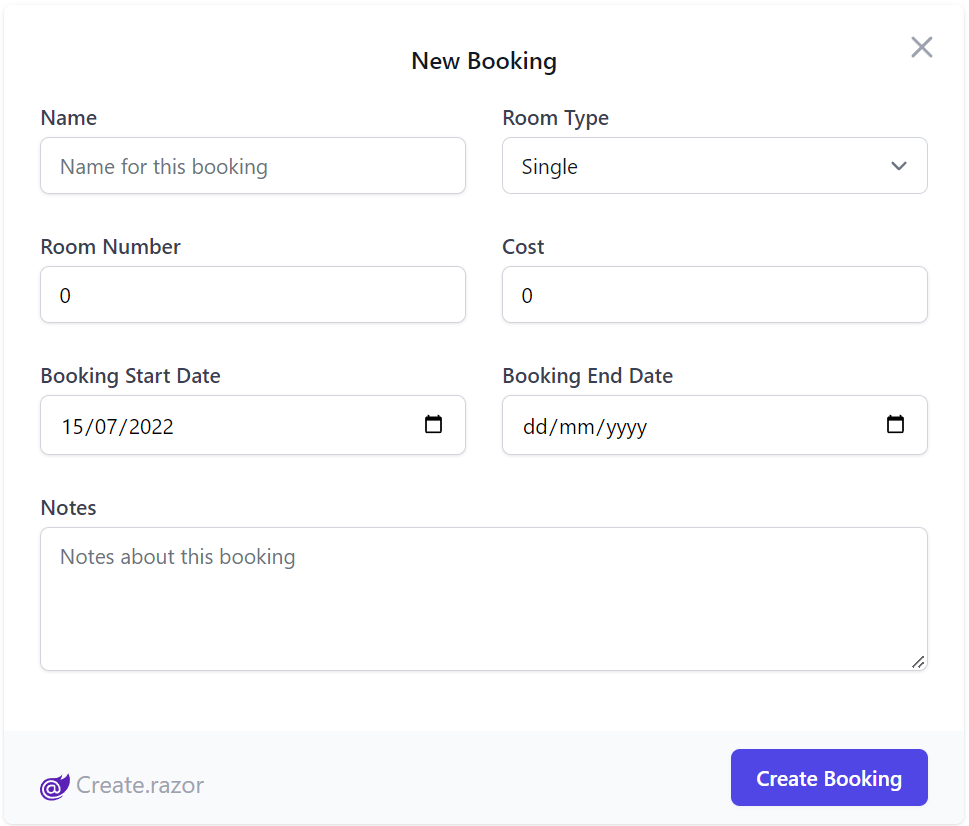
Which utilizes both client and server validation upon form submission, displaying UX friendly contextual errors under each field when they violate any server declarative validation or Client UI required rules:

New FileUpload Control
We've also extracted the File Upload UI component used in our File Blazor Demo into a reusable Blazor component you can utilize in your own apps:

It's a simple control that takes advantage of ServiceStack's declarative Managed File Uploads support to effortlessly enable multiple file uploads that can be declaratively added to any Request DTO, which only requires setting 2 properties:
| Property | Description |
|---|---|
| Request | Request DTO object instance populated with into to be sent to your endpoint |
| FilePropertyName | The name of the property that is used to reference your file, used with the [UploadTo] attribute |
Example usage
Below is an AutoQuery CRUD API example that references an upload location defined when configuring the FileUploadFeature Plugin:
public class CreateMyDtoWithFileUpload : ICreateDb<MyDtoWithFileUpload>, IReturn<IdResponse>
{
    [Input(Type="file"), UploadTo("fs")]
    public string FilePath { get; set; }

    public string OtherData { get; set; }
}

public class QueryFileUpload : QueryDb<MyDtoWithFileUpload> {}

public class MyDtoWithFileUpload
{
    [AutoIncrement]
    public int Id { get; set; }

    public string FilePath { get; set; }

    public string OtherData { get; set; }
}
When calling this API, the Managed File Uploads feature will upload the HTTP File Upload included in the API request to the configured fs upload location and populate the uploaded path to the FilePath Request DTO property.
The Blazor FileUpload Control handles the C# File Upload API Request by providing the Request DTO instance to send and the DTO property the File Upload should populate:
@page "/file-upload"
<h3>FileUploadPage</h3>

<FileUpload Request="request" FilePropertyName="@nameof(CreateMyDtoWithFileUpload.FilePath)" />

@code {

    // Any additional values should be populated
    // on the request object before the upload starts.
    CreateMyDtoWithFileUpload request = new() {
        OtherData = "Test"
    };
}

The FilePropertyName matches the property name that is annotated by the UploadTo attribute. The Request is the instance of the Request DTO.
One of our primary goals with ServiceStack is to deliver great value and performance, attributes which are exemplified in our modern jamstacks.net templates which are maximally designed to deliver the best performance possible in a .NET App by adopting a Jamstack architecture, enabling redundant hosting of their decoupled UI's on inexpensive CDN edge caches - the most optimal place to deliver the best performance.
This also happens to be the cheapest to place to host their static files, taking load away from expensive .NET App Servers and move them to free Cloudflare or GitHub CDNs, which our Jamstack Live Demos take advantage of to enable their $0.40 /mo TCO for hosting their .NET Docker Apps which are only needed to serve the JSON APIs used to power their Jamstack UIs.
Expensive Managed Databases
Having achieved the best architecture for delivering max value and performance, the last expensive vital component used in most Web Apps is hosting of their expensive managed databases. Despite most RDBMS's being OSS and free of licensing costs, major cloud companies continue to charge artificially high hosting costs to provide redundant hosting of App data. The effect of which adds an artificial barrier to entry discouraging new Indie developers from building & hosting their dream Apps that could form self sustaining business models that should ideally be accessible to anyone with access to a Computer with the Internet.
If we solve this, Individual developers can take advantage of our Free Licenses for experimenting and iterating on building their dream Apps for a few $'s a month, instead of their prohibitive recommended setup costing $100's /month.
Introducing Litestream
Our Jamstack live demos have been able to avoid these expensive costs by being configured with SQLite by default, which OrmLite lets you easily change to use your preferred RDBMS. But when storing live customer data you'll want to ensure you have redundant backups to protect against data loss and why we were excited to learn about Litestream for enabling effortless replicas & restores to a number of popular storage providers.
Litestream is being developed by @benbjohnson, the creator of the popular BoltDB NoSQL embeddable DB, used in a number of critical software components like etcd to manage critical information distributed systems need, most notably, the configuration, state and metadata for Kubernetes.
Thankfully Ben saw the potential for SQLite as a better replacement of BoltDB as a dependency-free application database and went about resolving the primary issue preventing SQLite from being used in production server-side Apps.
The problem Litestream solves
I built Litestream to bring back sanity to application development. Litestream is a tool that runs in a separate process and continuously replicates a SQLite database to Amazon S3. You can get up and running with a few lines of configuration. Then you can set-it-and-forget-it and get back to writing code.
You might think this sounds expensive to continuously write to cloud storage that provides 99.99% uptime and 99.999999999% durability but it’s astoundingly cheap. Typical costs are only about $1 per month. Litestream is free and open-source too so there’s never a license to pay for.
We're excited about the inexpensive cost, minimal infrastructure dependencies and simplified hosting complexity of this new approach that we quickly set out to provide integrated support for Litestream.
Safely run DB Apps on a single server at low cost
Simple & Fast! Litestream reliably runs most Apps, fast on a single server, with continuous backups to cheap managed storage.
How it works
Litestream is run as a sidecar Docker container, activated on each deployment to handle restoring & replicating changes from its configured storage

Boringly Simple
Litestream's implementation is beautiful in its simplicity which doesn't require any libraries or custom builds of SQLite, it works as an external process transparent to your application that taps into SQLite's journaling features to handle replicating changes to its configured storage provider:
The most important thing you should understand about Litestream is that it's just SQLite. Your application uses standard SQLite, with whatever your standard SQLite libraries are. We're not parsing your queries or proxying your transactions, or even adding a new library dependency. We're just taking advantage of the journaling and concurrency features SQLite already has, in a tool that runs alongside your application. For the most part, your code can be oblivious to Litestream's existence.
Or, think of it this way: you can build a Remix application backed by Litestream-replicated SQLite, and, while it's running, crack open the database using the standard sqlite3 REPL and make some changes. It'll just work. You can read more about how this works here.
The Right Time for Server-Side SQLite
Over the years CPUs, memory, & disks have become orders of magnitude faster & cheaper which now sees NVMe SSDs being able to read an entire 1 GB database in <1 second, what's not getting faster is the speed of light and the latency it takes for data to travel between networked components that's further exacerbated by the necessary layers of network switches, firewalls, and application protocols undertaken in each HTTP Request.
Whilst modern RDBMS's are finely-tuned modern miracles, the one thing they don't have any control over is the latency between its distributed components. A latency SQLite doesn't have courtesy of being built right in to your application process which sees per-query latency's drop down to 10-20 microseconds - a 50-100x improvement over intra-region RDBMS queries.
In addition to applications benefiting from latency-free queries, they also become much simpler to manage, replacing entire infrastructure dependencies and n-tier architectures with a transparent sidecar process that continuously monitors and performs per-second backups to AWS S3, Azure Blob Storage & SFTP providing resilient, cost effective point-in-time restore functionality.
Best of all storing bytes is a boringly simple solved problem AWS guarantees with 11 9's durability, a marked improvement over the 3 9's guarantee when their first tier SLA kicks in for its managed RDS instances.
Reduce Complexity & Save Costs
Avoid expensive managed RDBMS servers, reduce deployment complexity, eliminate infrastructure dependencies & save order of magnitude costs vs production hosting

Commercially supported thanks to Fly.io
Whilst SQLite enjoys enviable reliability with one of the most thoroughly tested code-bases on earth, it's usage in server production databases is still nascent given there hasn't been a tool that works as seamlessly as Litestream to enable transparent replication & restores. On the surface Litestream appears to be great boring technology, beautiful in its simplicity but we only started seriously considering it for server production apps after it graduated from OSS project to a commercially supported product when Ben joined Fly.io to work on Litestream full-time.
Already being excited in its potential, this was enough to immediately start work on our support for Litestream, creating load tests calling ServiceStack AutoQuery APIs querying SQLite + Litestream to test the viability for ourselves which we we're pleasantly surprised to see it's performance and cost savings held up under load:
Savings at Scale
SQLite directly benefits from improving hardware's faster CPUs and SSDs with superior locality to comfortably handle most App's needs.

We share Ben's enthusiasm and thoughts on SQLite has become a viable option for Server-side production App databases that can handle most App needs. Litestream's architecture does have limitations where it's only suitable for single-node applications, its effortless replication will let you scale out your reads to read-only replicas, but your writes need to be either sharded or limited to a single Application.
In effect, instead of managing Kubernetes clusters you'll need to scale up Majestic Monolith's, a practice some high-performance sites like StackOverflow have adopted who instead of caching hot pages, have evaluated it was better to give their SQL Server 1.5TB RAM. An architectural overview of servers used to handle their impressive load:
- 2B page views /month
- 6000 req /sec
- 9 servers @ 5/10% capacity
- 1.5 TB RAM SQL Server
So whilst scaling up is an option, SQLite's no-frills core SQL featureset allows for easy migrations should you wish to migrate to micro services in future, a task effortless in OrmLite which provides an implementation agnostic abstraction for the most popular RDBMS's.
Effortless Migrations
No Lock-in. Migrate off whenever you want.
Using SQLite with OrmLite's fast, typed APIs
lets you easily migrate to any of its
supported RDBMS with just configuration, no other code changes required.

The beauty of Litestream is that it happily runs in the background transparent to your application who doesn't need to make any changes to take advantage of it, the way to enable it is by including Litestream along with your app's deployment workflow and running it as a dedicated sidecar container where it restores and watches for updates to your SQLite database, replicating those changes to your configured storage.
Create Litestream Apps
To make it easy, we've created GitHub Action Docker Compose configurations for each of Litestream's popular Storage options:
 S3 Simple Storage Service
 Azure Blob Storage
 SSH File Transfer Protocol
That you can mix with any modern C# jamstacks.net Project Templates:
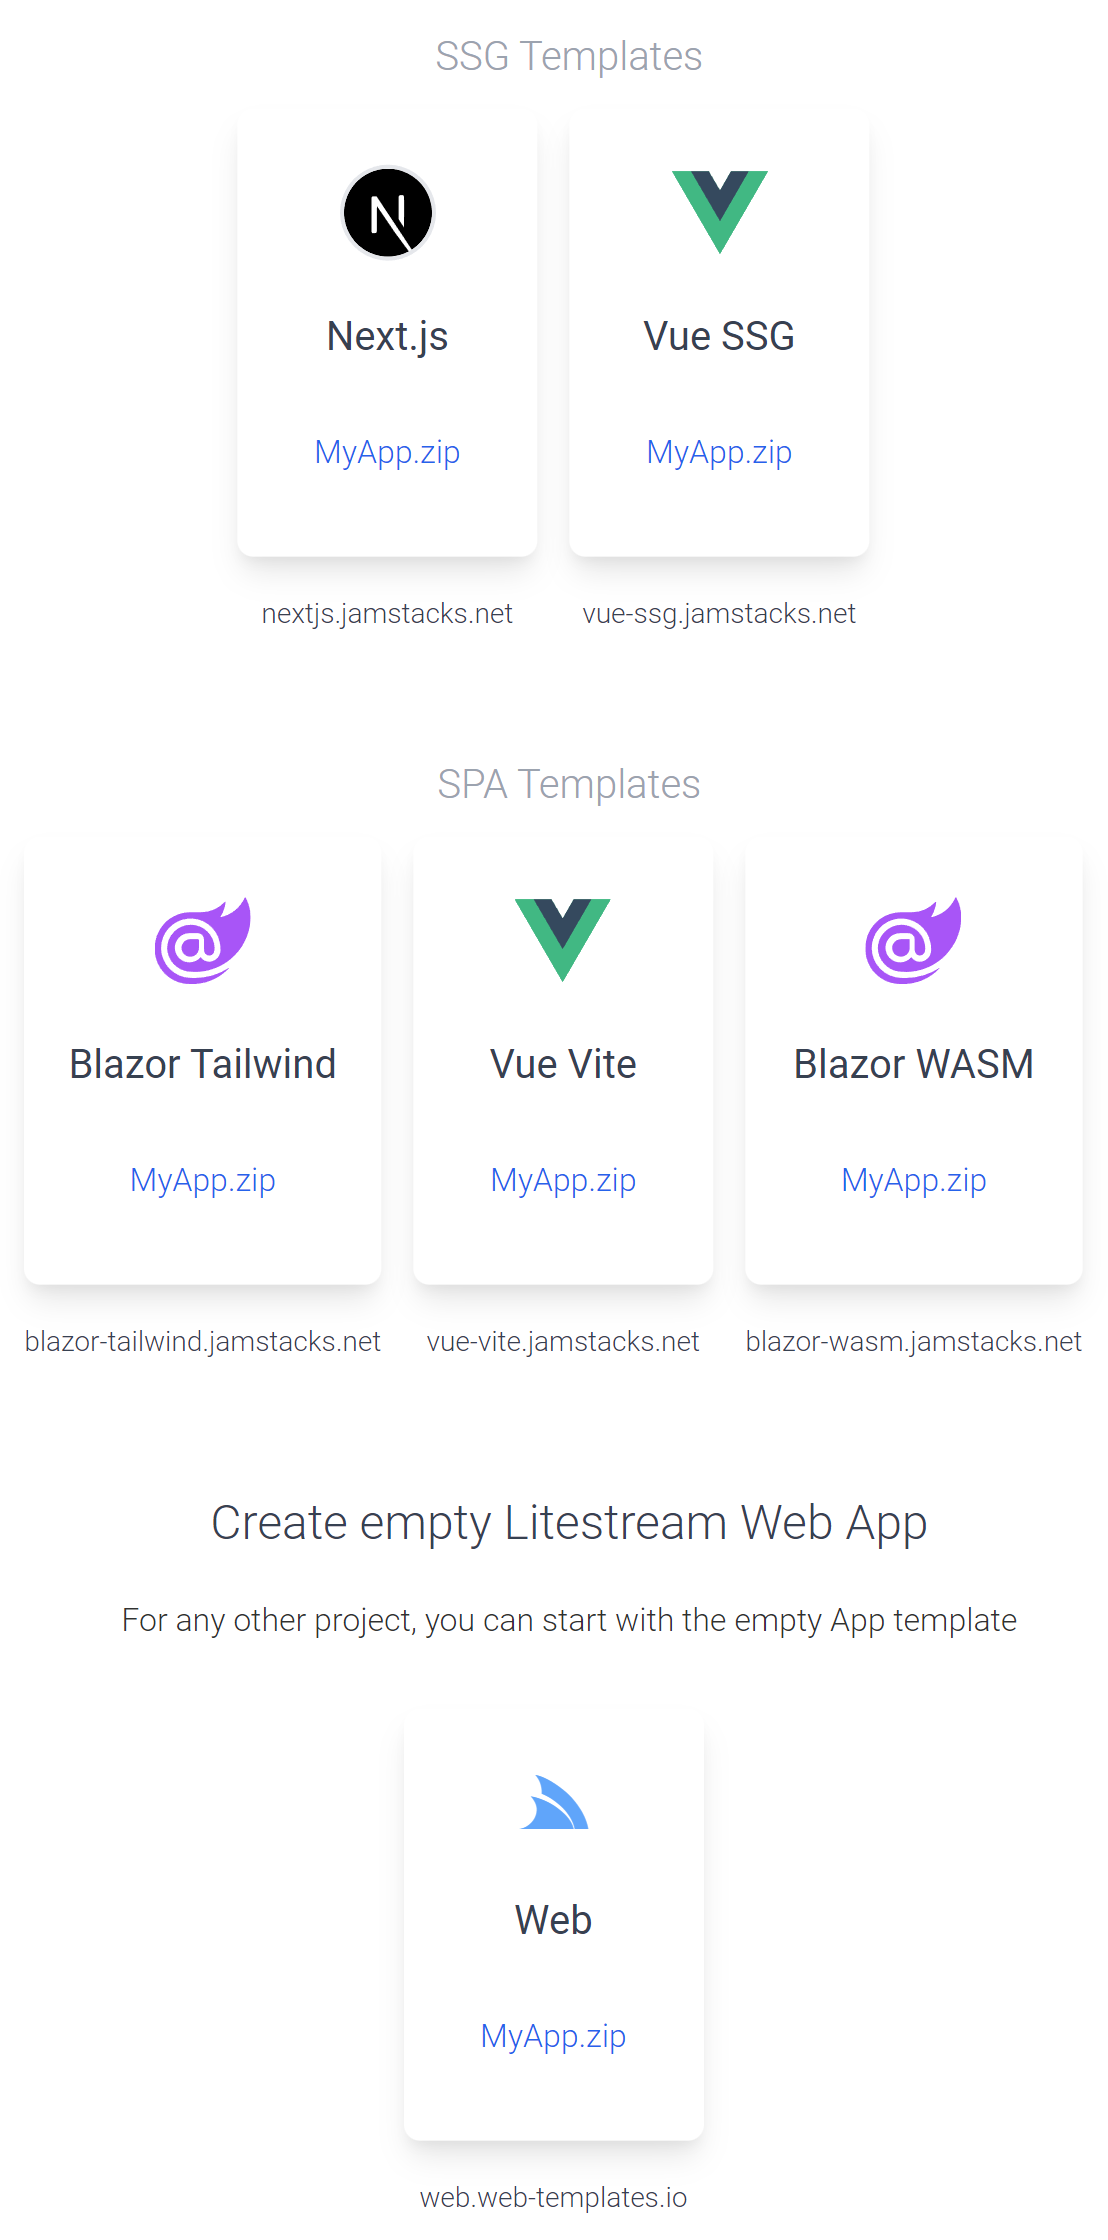
Alternatively as the Docker compose configurations are delivered as mix configurations, they can also be applied to existing projects, e.g:
x mix litestream-aws
Since Litestream is tied to deployment, hosting environment & preferred configured storage, we've created a matrix of configurations to cover each of the supported templates and storage preferences.
| Project Template | AWS S3 | Azure Blob Storage | SFTP (generic) |
|---|---|---|---|
| web | litestream-aws | litestream-azure | litestream-sftp |
| blazor | blazor-litestream-aws | blazor-litestream-azure | blazor-litestream-sftp |
| blazor-vue | blazor-litestream-aws | blazor-litestream-azure | blazor-litestream-sftp |
| blazor-wasm | blazor-litestream-aws | blazor-litestream-azure | blazor-litestream-sftp |
| vue-ssg | jamstack-litestream-aws | jamstack-litestream-azure | jamstack-litestream-sftp |
| vue-static | jamstack-litestream-aws | jamstack-litestream-azure | jamstack-litestream-sftp |
| nextjs | jamstack-litestream-aws | jamstack-litestream-azure | jamstack-litestream-sftp |
GitHub Action Workflow
These GitHub Action configurations are an effortless way to create and deploy new Applications within minutes, which only need to be filled in with your environment's access credentials configured in your projects GitHub Action Secrets.
Admin UI
Another primary focus of this release was developing a new suite of Admin UI's providing a number of productivity features to Manage Users, DB Validation Rules and gain unprecedented insights into Live running Apps with in-depth Request Logging & Profiling where you'll be able to observe your App's behavior in real-time.
The Admin UI is built into all ServiceStack Apps, accessible to Admin Users from:
/admin-ui
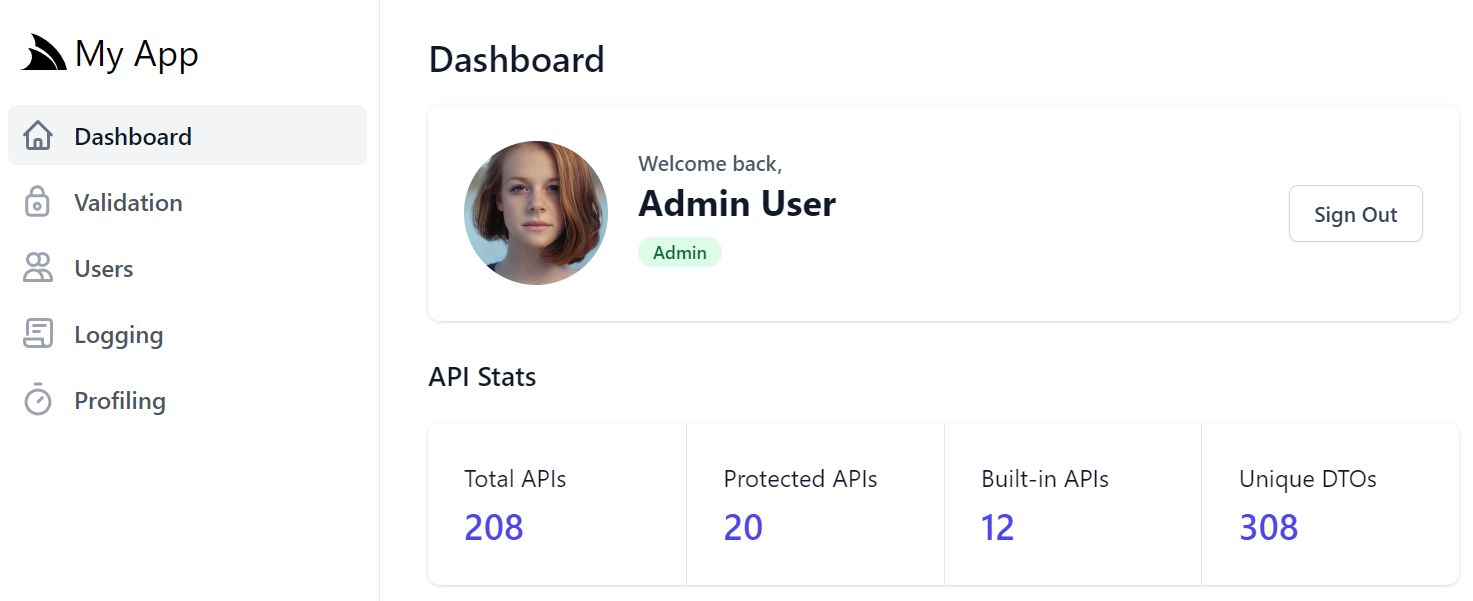
Dashboard
On first access you'll be greeted with the re-designed dashboard showing high-level overview stats on the number of APIs your App has as well as internal stats counters that were previously only accessible from code, now they're being surfaced right on your Dashboard where they can provide valuable insights into the health of different features at a glance:
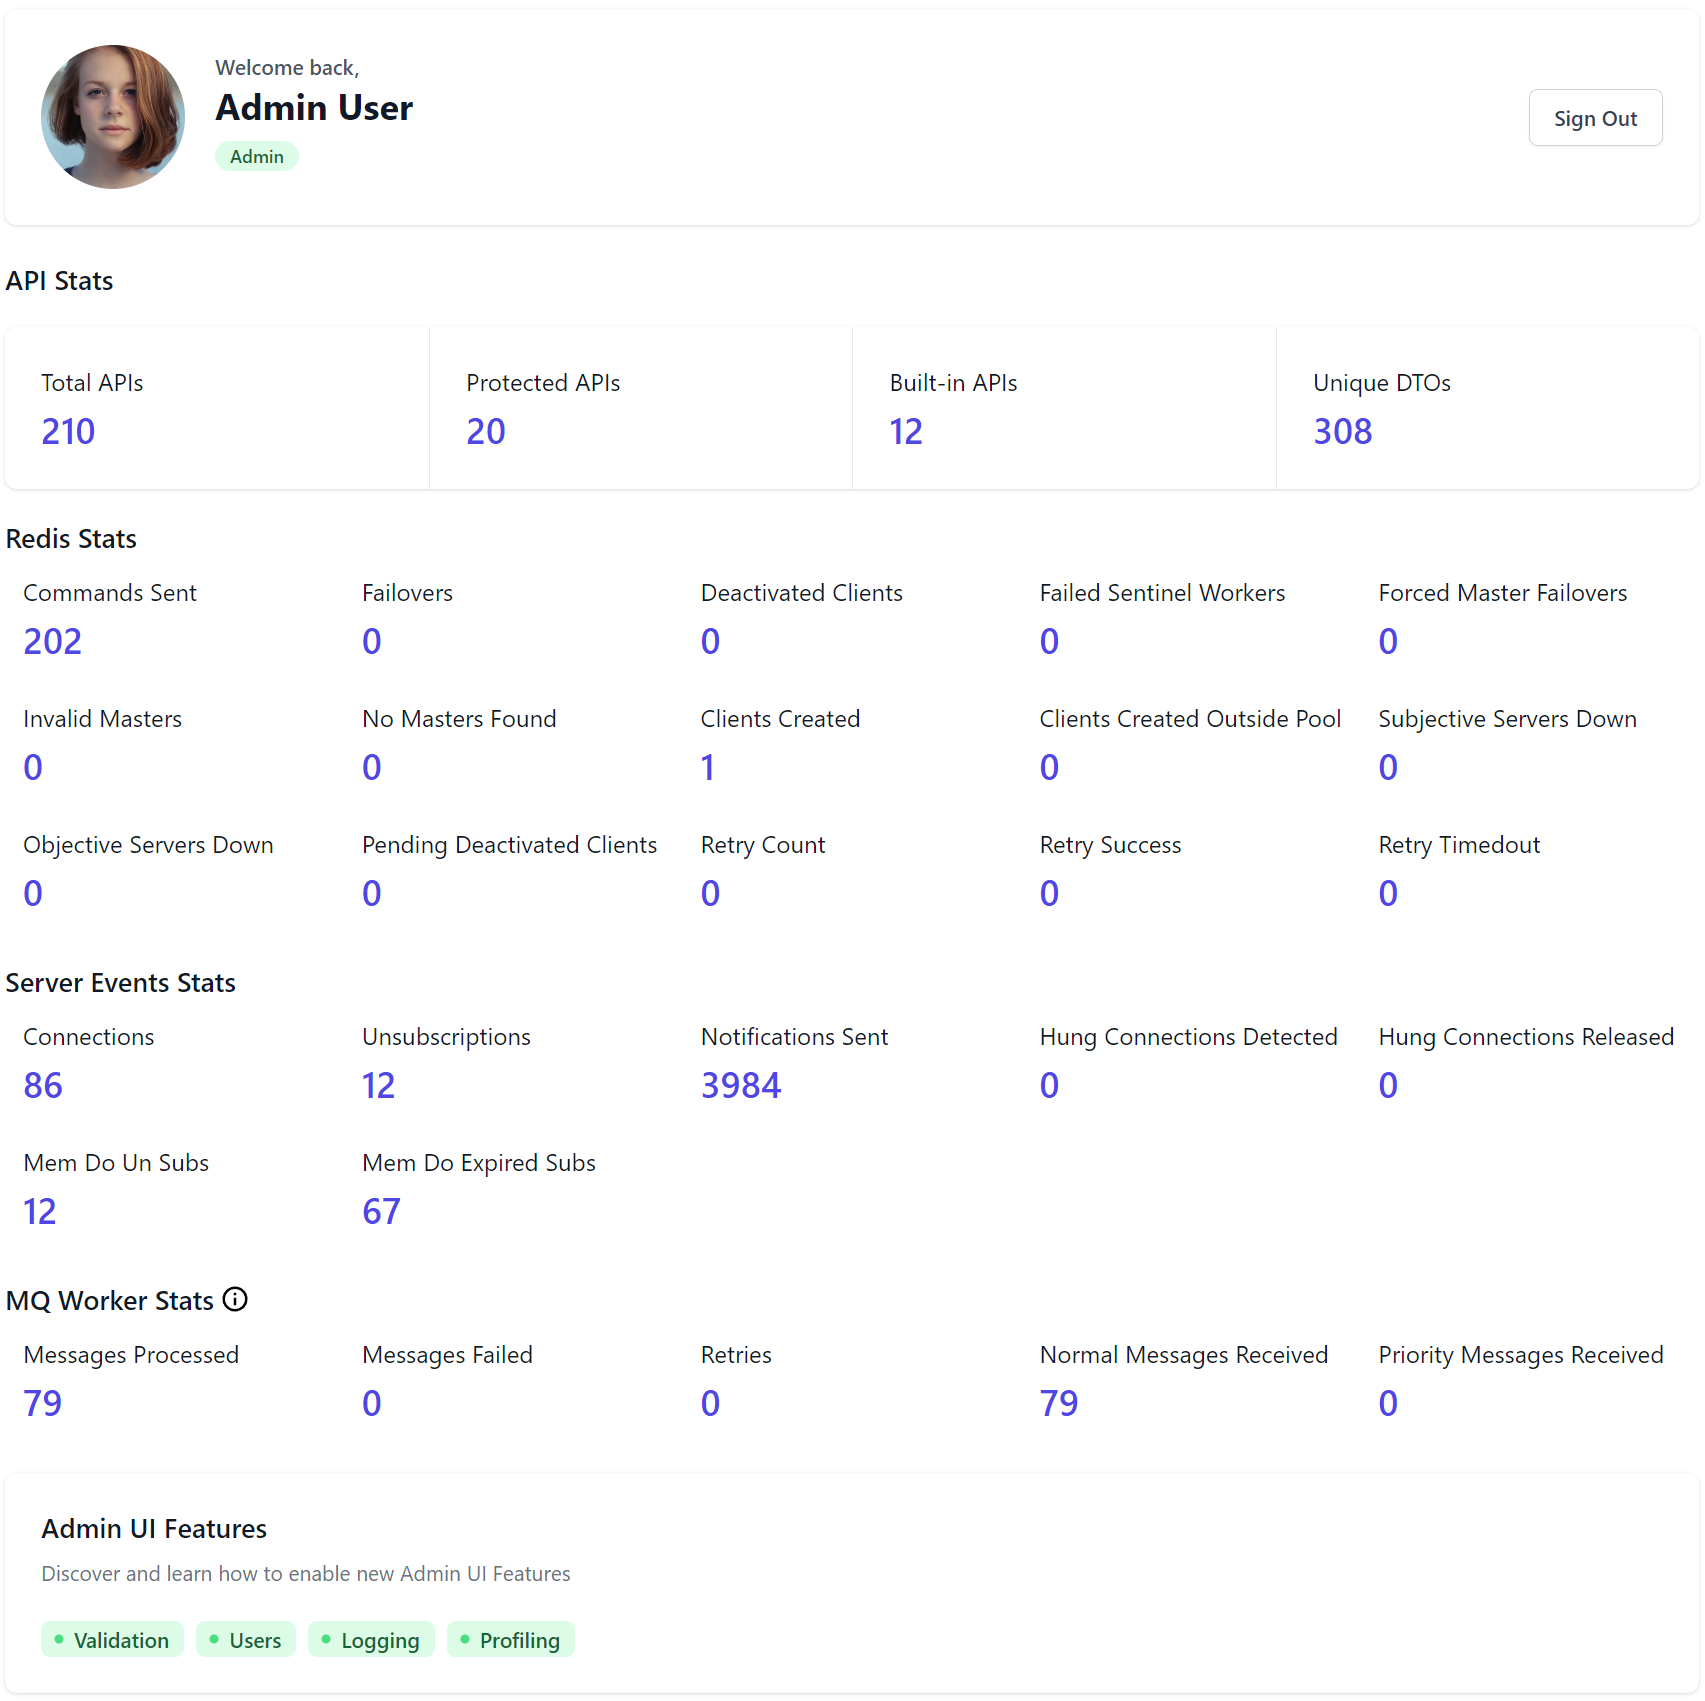
Advertized features
As Admin is a capability-based UI it only shows the stats and features your App has enabled. To aid in discovery the dashboard now includes a light switch of available Admin features with a link to Admin UI Feature Docs, providing a summary of each Admin UI component and instructions on how to enable them.
Lets explore some of the new Admin UI components added in this release:
Request Logging & Profiling
The new Request Logging & Profiling UIs bring an invaluable new level of observability into your App, from being able to quickly inspect and browse incoming requests, to tracing their behavior from their generated events in the new Diagnostic Source capabilities added all throughout ServiceStack, which both power the new UIs and enables new introspectability from code where you can now to tap in to inspect & debug when each diagnostic event occurs.
The quickest way to enable access to these new features is to mix in the profiling configuration:
x mix profiling
Which will add the Modular Startup configuration to your Host project that registers both Request Logging & Profiling features when running your App in DebugMode (i.e. Development):
public class ConfigureProfiling : IHostingStartup
{
    public void Configure(IWebHostBuilder builder)
    {
        builder.ConfigureAppHost(host => {
            host.Plugins.AddIfDebug(new RequestLogsFeature {
                EnableResponseTracking = true,
            });

            host.Plugins.AddIfDebug(new ProfilingFeature {
                IncludeStackTrace = true,
            });
        });
    }
}
The default configuration looks at providing useful information during development, where the response request bodies are captured in the Request Logger and the StackTrace is captured on the important events where they can be useful.
Configuration
Depending on your App you'll want to change these defaults, e.g. if you're persisting the request logs using the CSV Request Logger or Redis Request Logger it may not be feasible to capture all API responses if they're very large.
If enabled, StackTraces are captured in these important events:
- ServiceStack: Before a Service Gateway Request is sent
- OrmLite: Opening a connection or rolling back a transaction
- Redis: Opening a connection, auto retrying a failed command, renting & returning clients from a redis manager pool
The latter of which is useful when resolving concurrent usage issues.
As it adds overhead, profiling should only be added when used, e.g. during development or when needing to debug production issues. Although you may always want to capture request logs depending on how important it is to maintain an audit of completed API requests. Should it be needed, both Logging & Profiling plugins offer several configuration options to control the type, info & events captured.
Whichever features you have registered will dynamically appear in the Admin UI's sidebar for quick navigation:
Request Logging UI
Clicking on Logging navigates to the Request Logging UI which displays each API request processed in a grid of useful summary information showing high-level information for each HTTP API request:
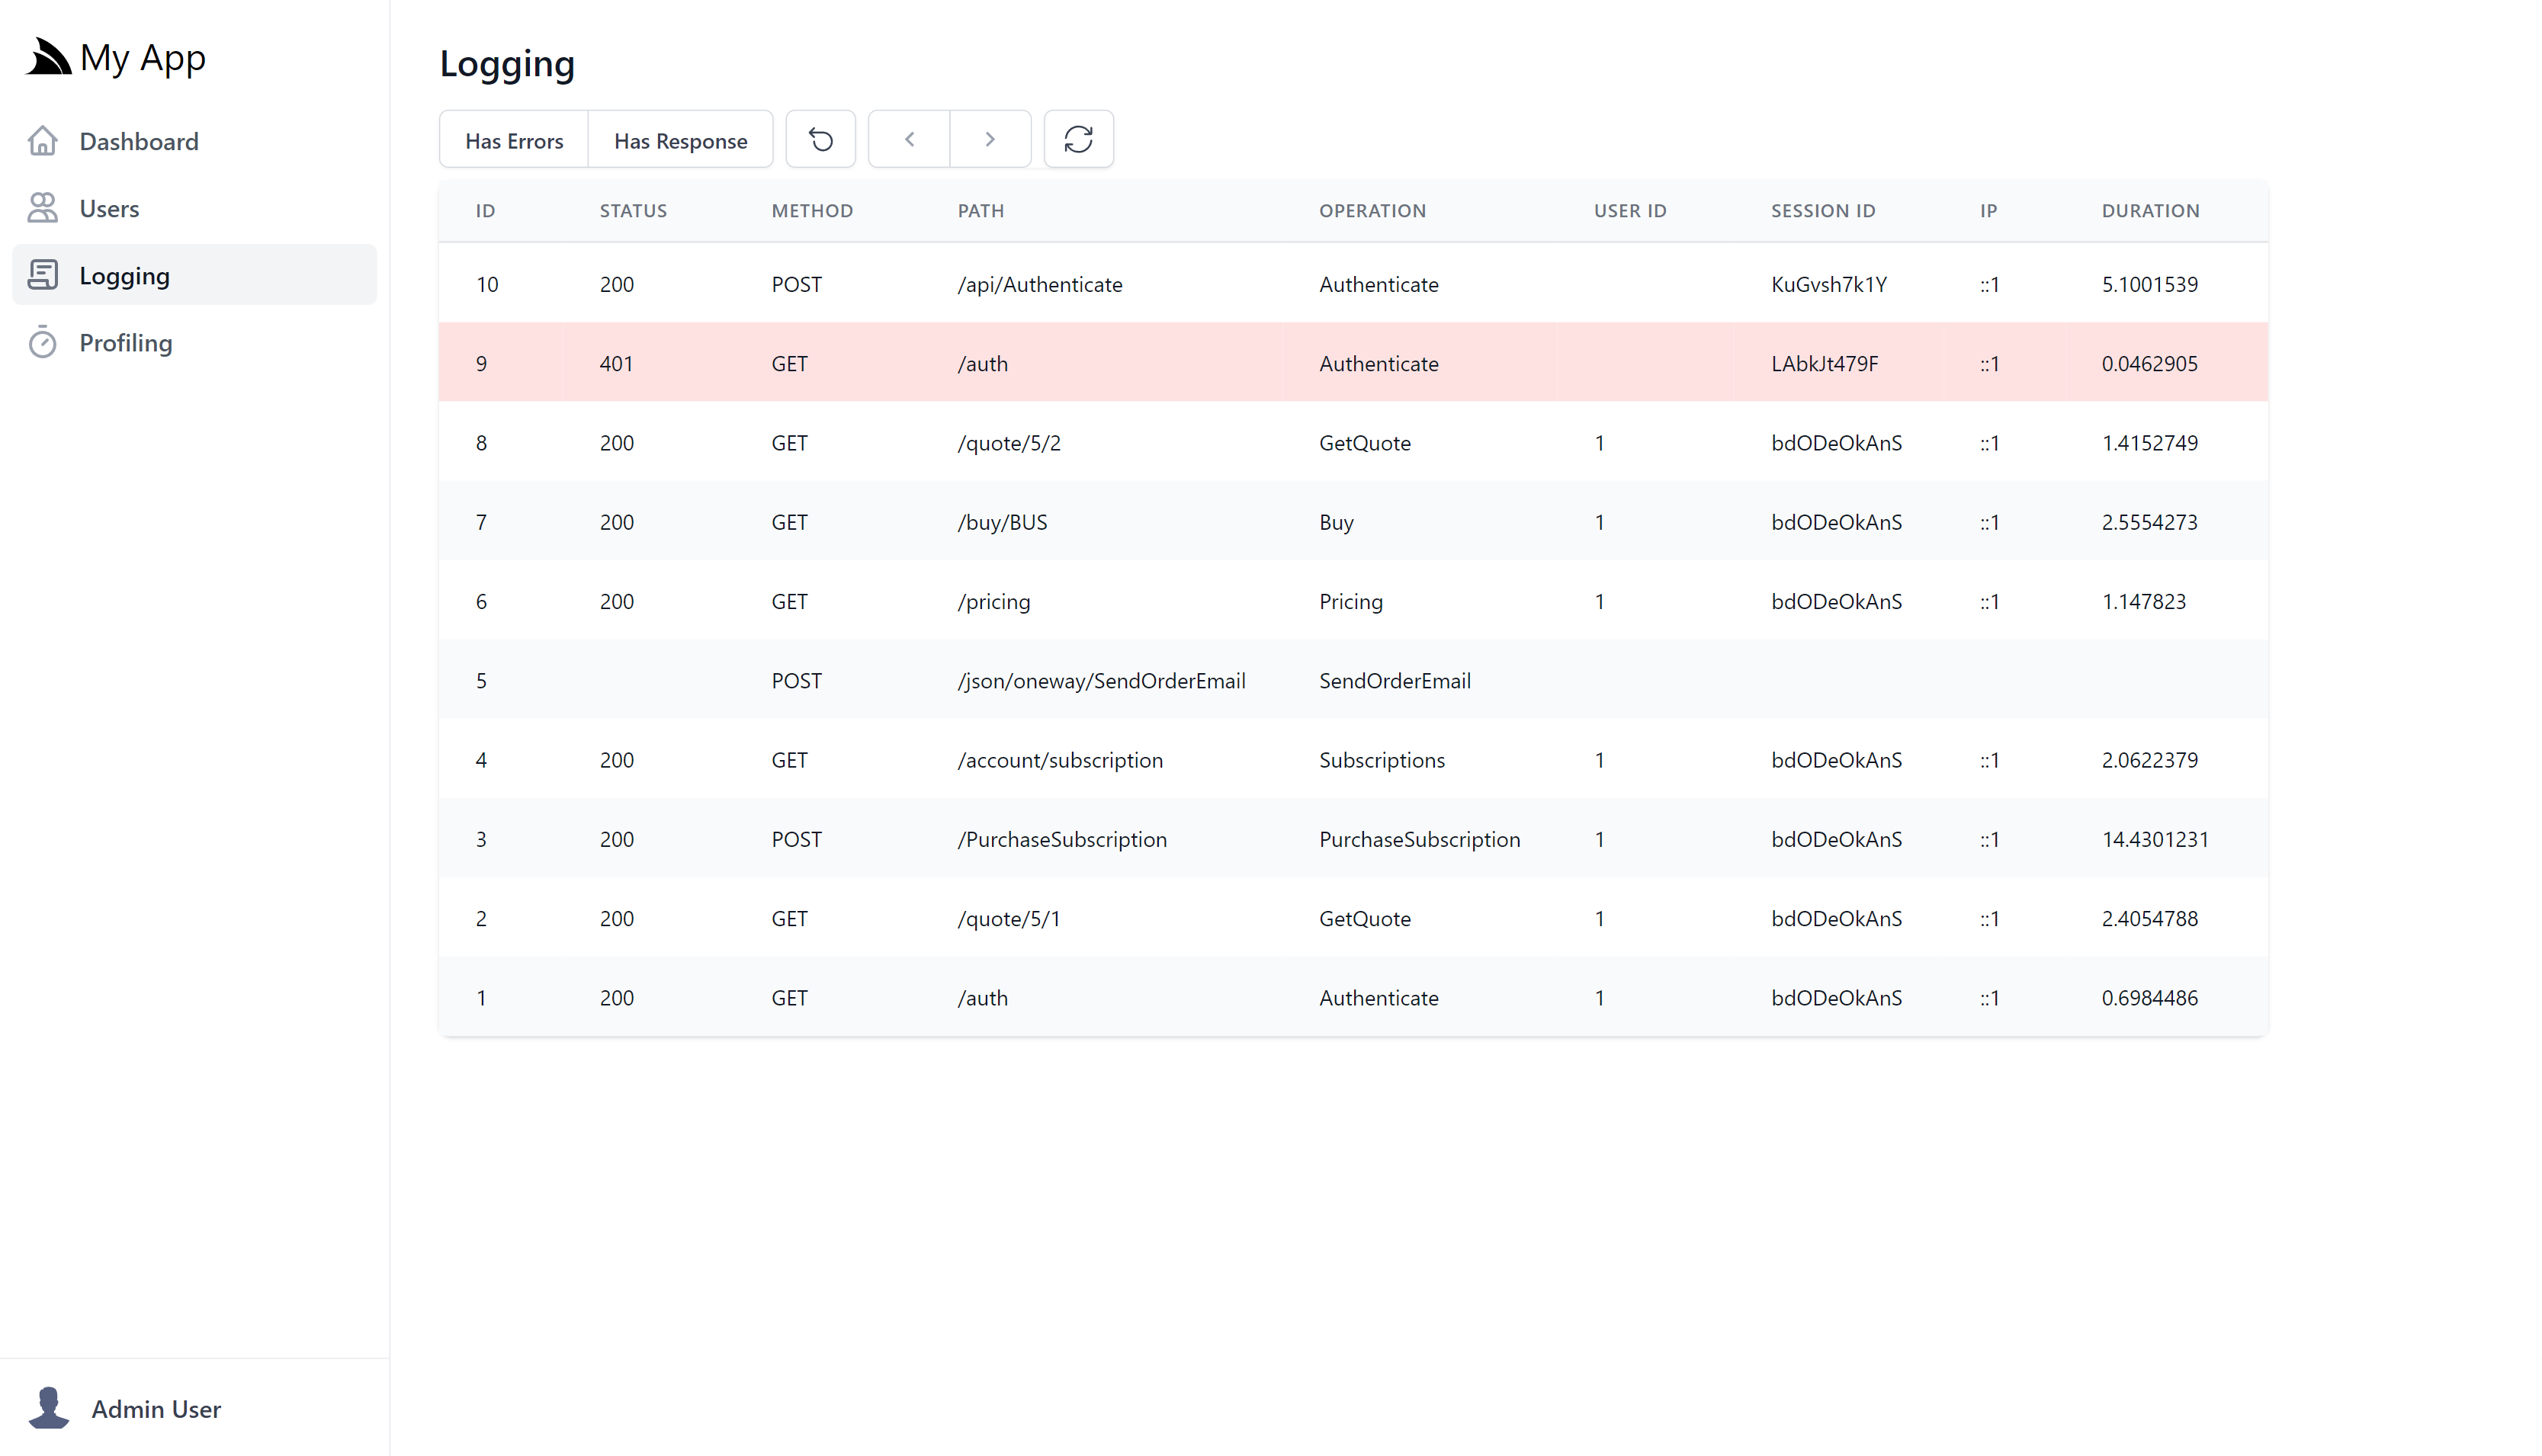
This screenshot shows an example of a non-authenticated user navigating to a protected page before signing in then querying and submitting a new Booking in the AutoQuery CRUD Bookings Demo using Locode's Auto UI, in which we can see error API Responses are highlighted in red and redirects highlighted in yellow.
The top navigation controls which results are displayed with:
- Has Errors - Show only requests with errors
- Has Response - Show only requests with response bodies
- Reset Filters Icon - Clear all filters (ESC)
- Left/Right Icons - Navigate to previous/next pages (LEFT/RIGHT)
- Refresh Icon - Reload the latest results
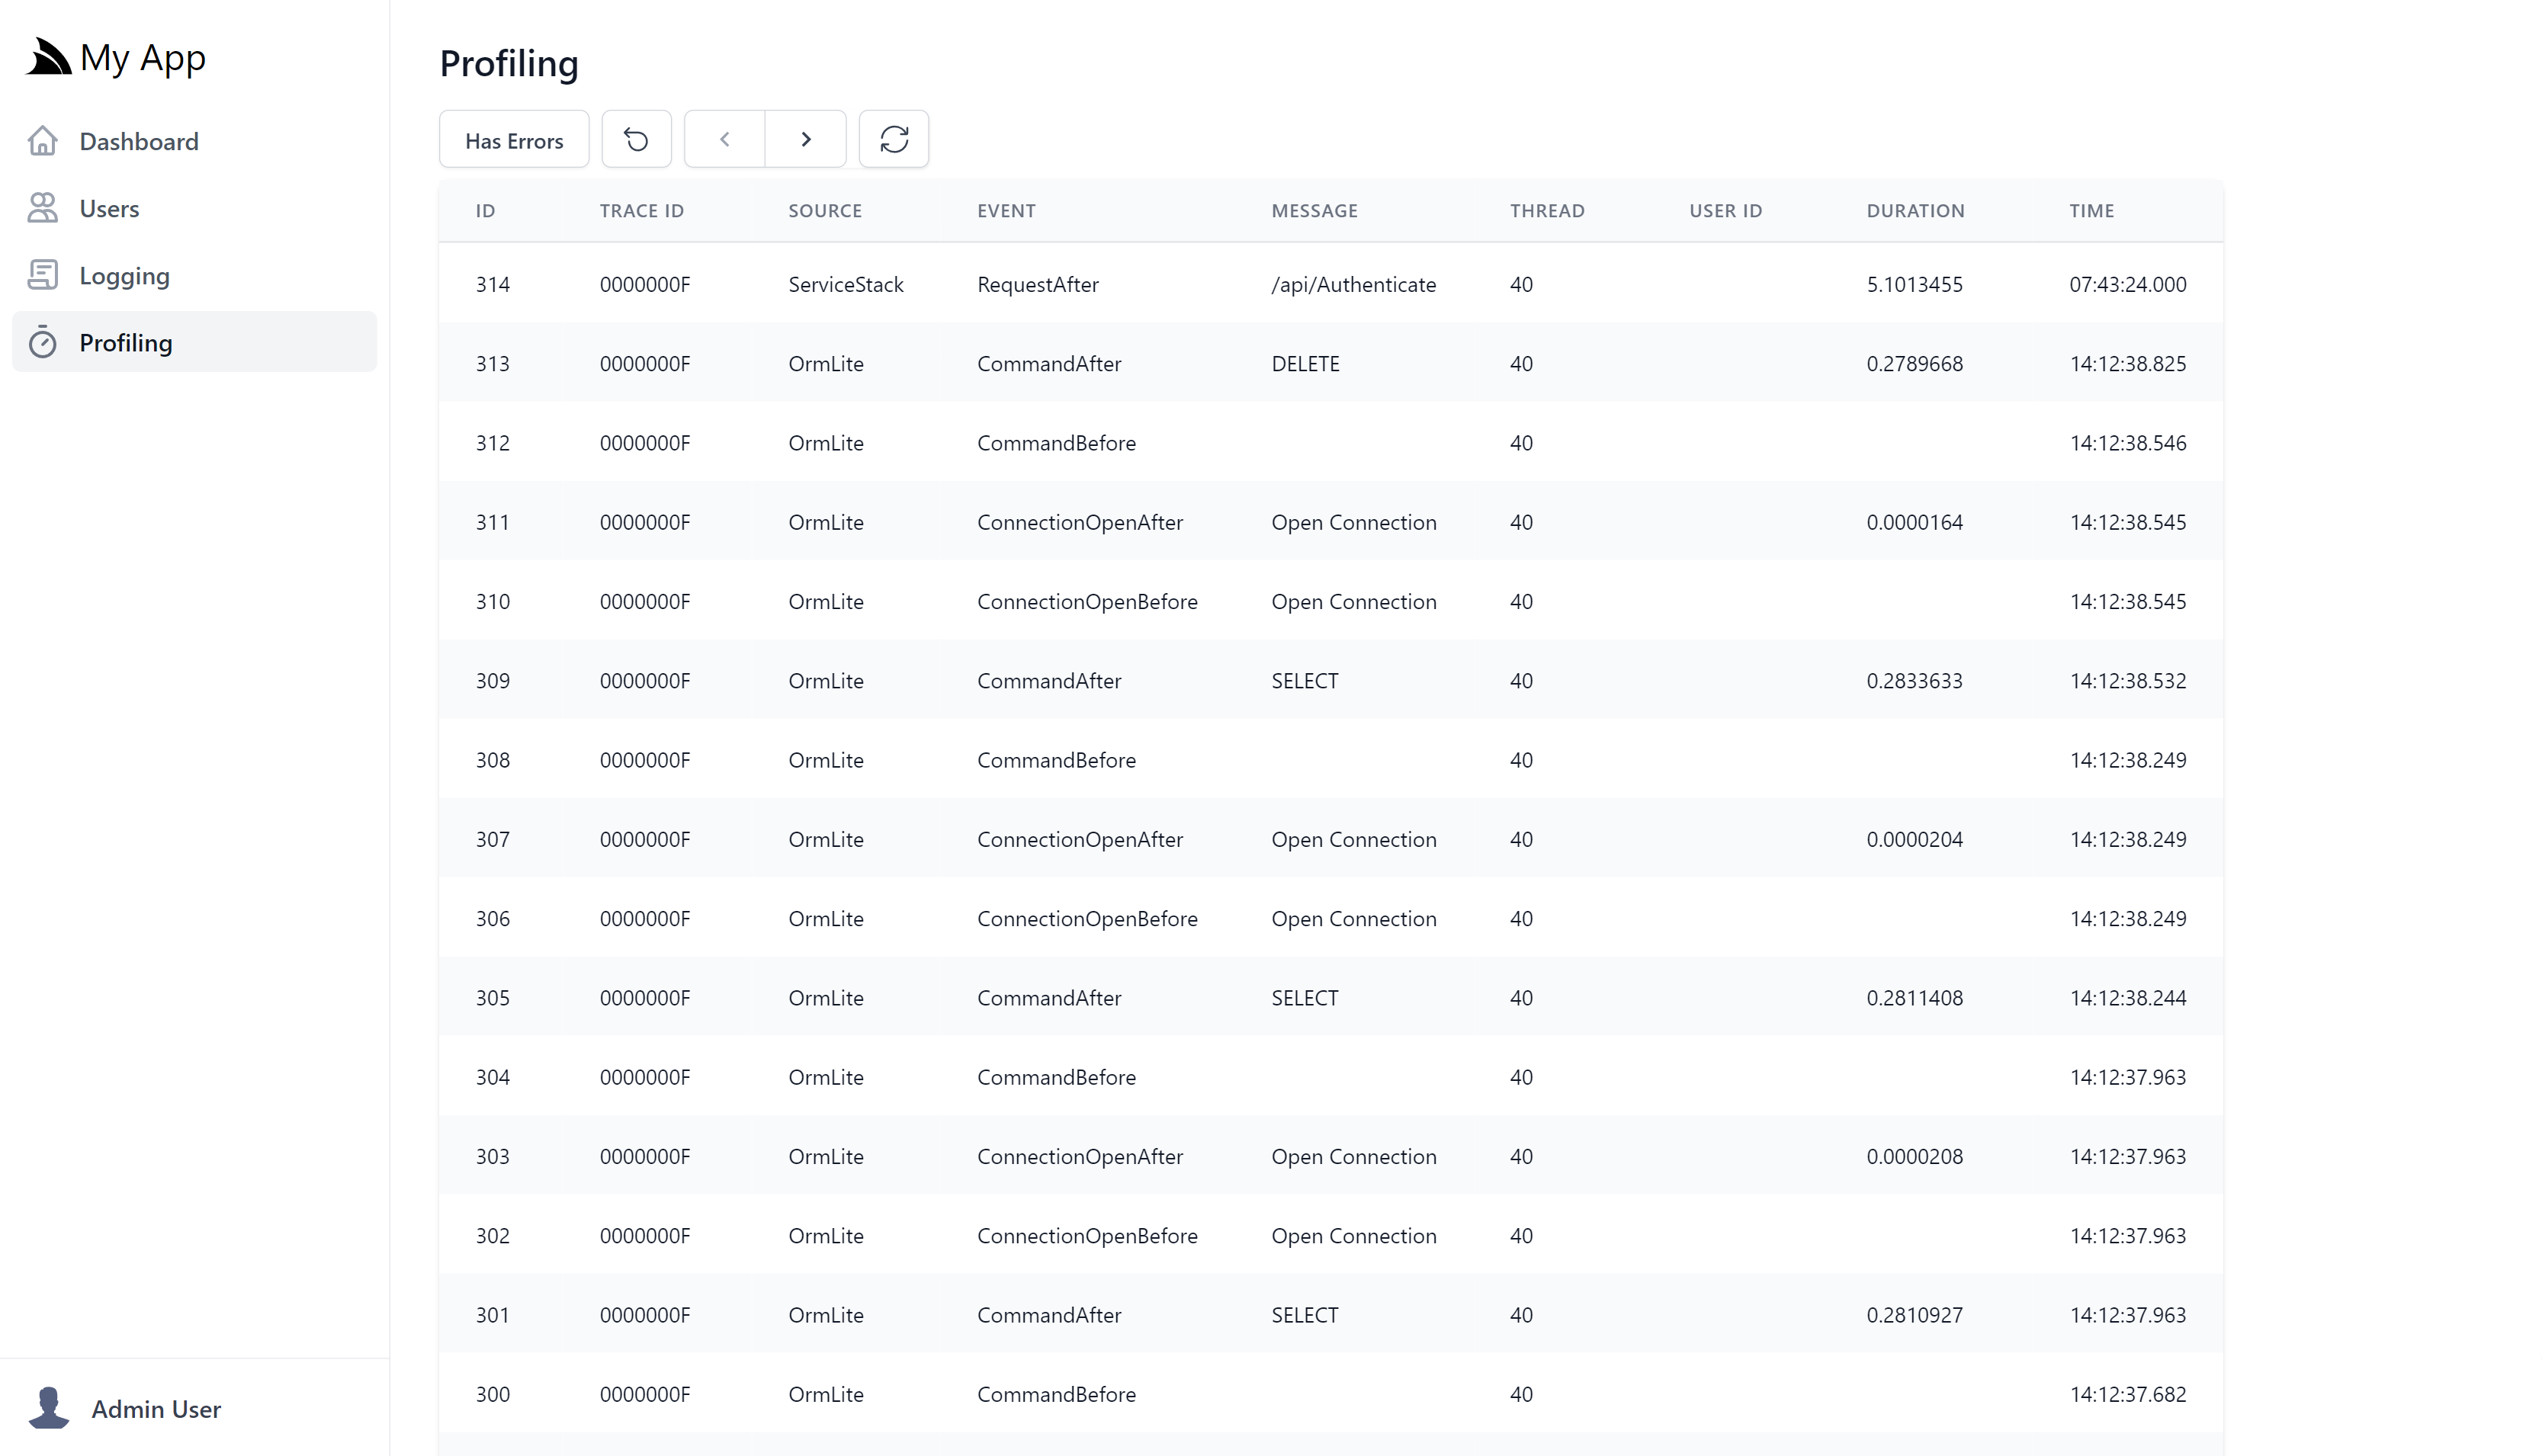
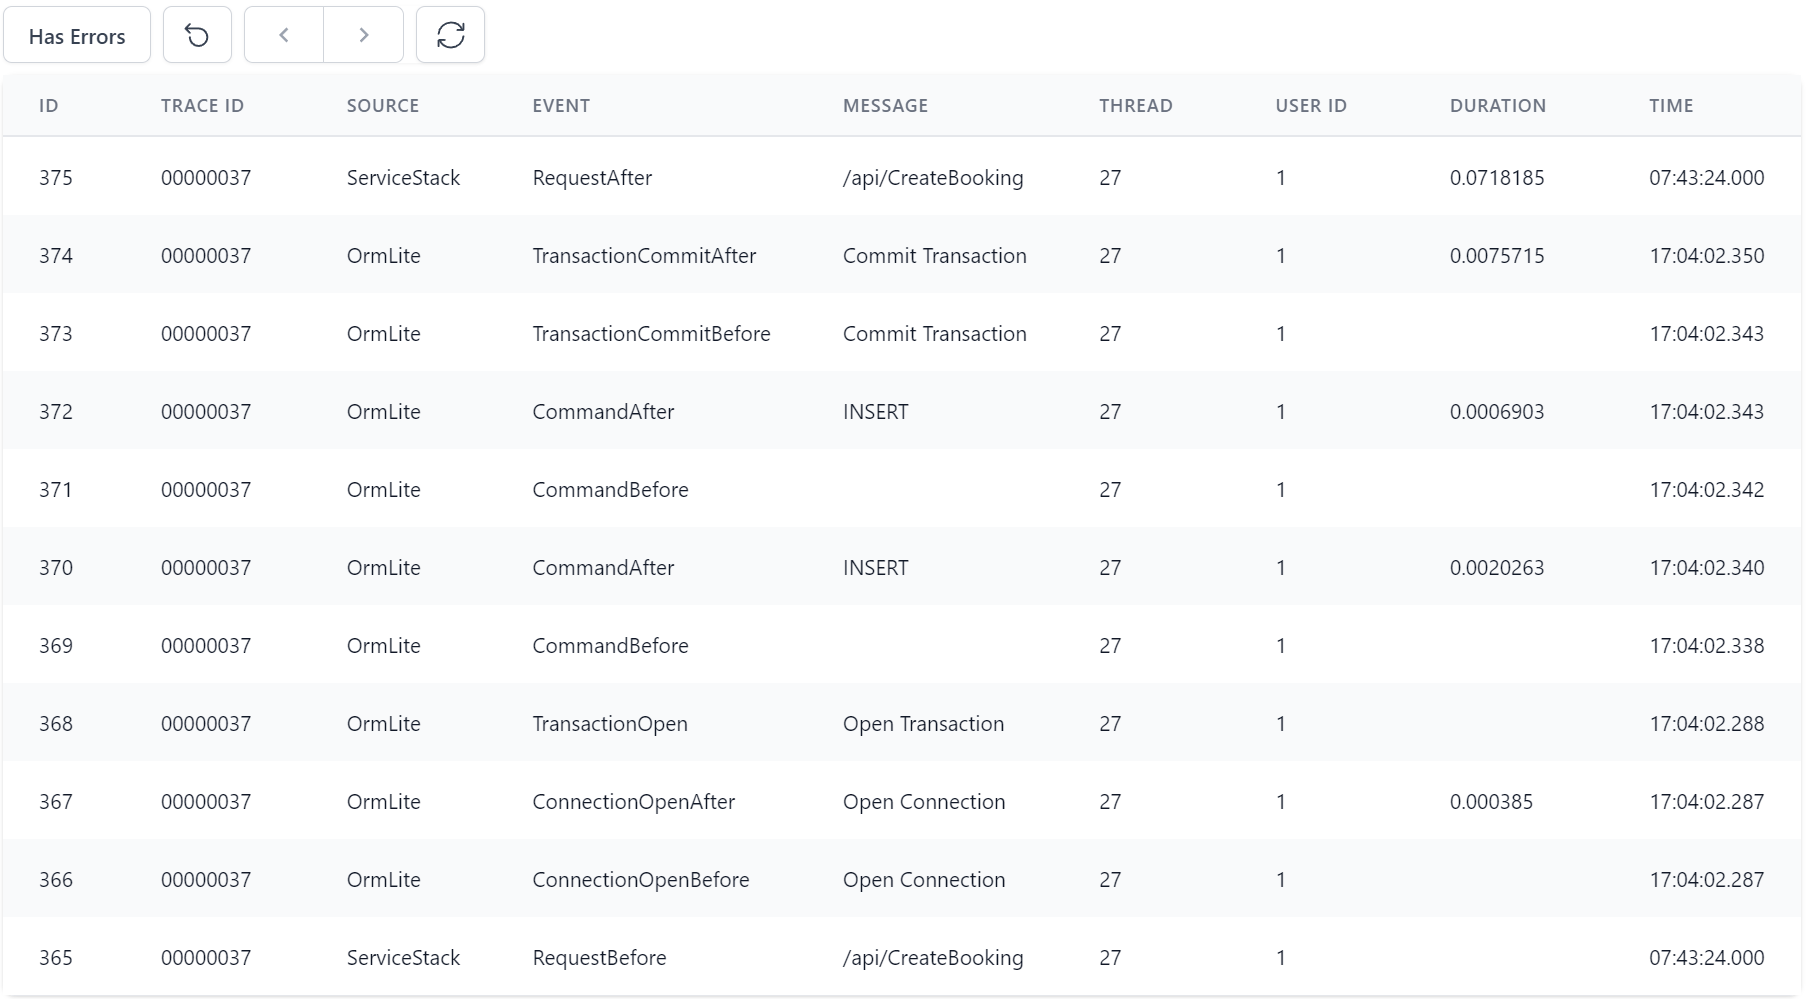
This same user workflow is also captured in the Profiling UI in much finer granularity, capturing all the events performed by APIs:
Clicking on an entry previews it in more detail, e.g. clicking on the first /api/QueryBookings will show the API Request and Response made:
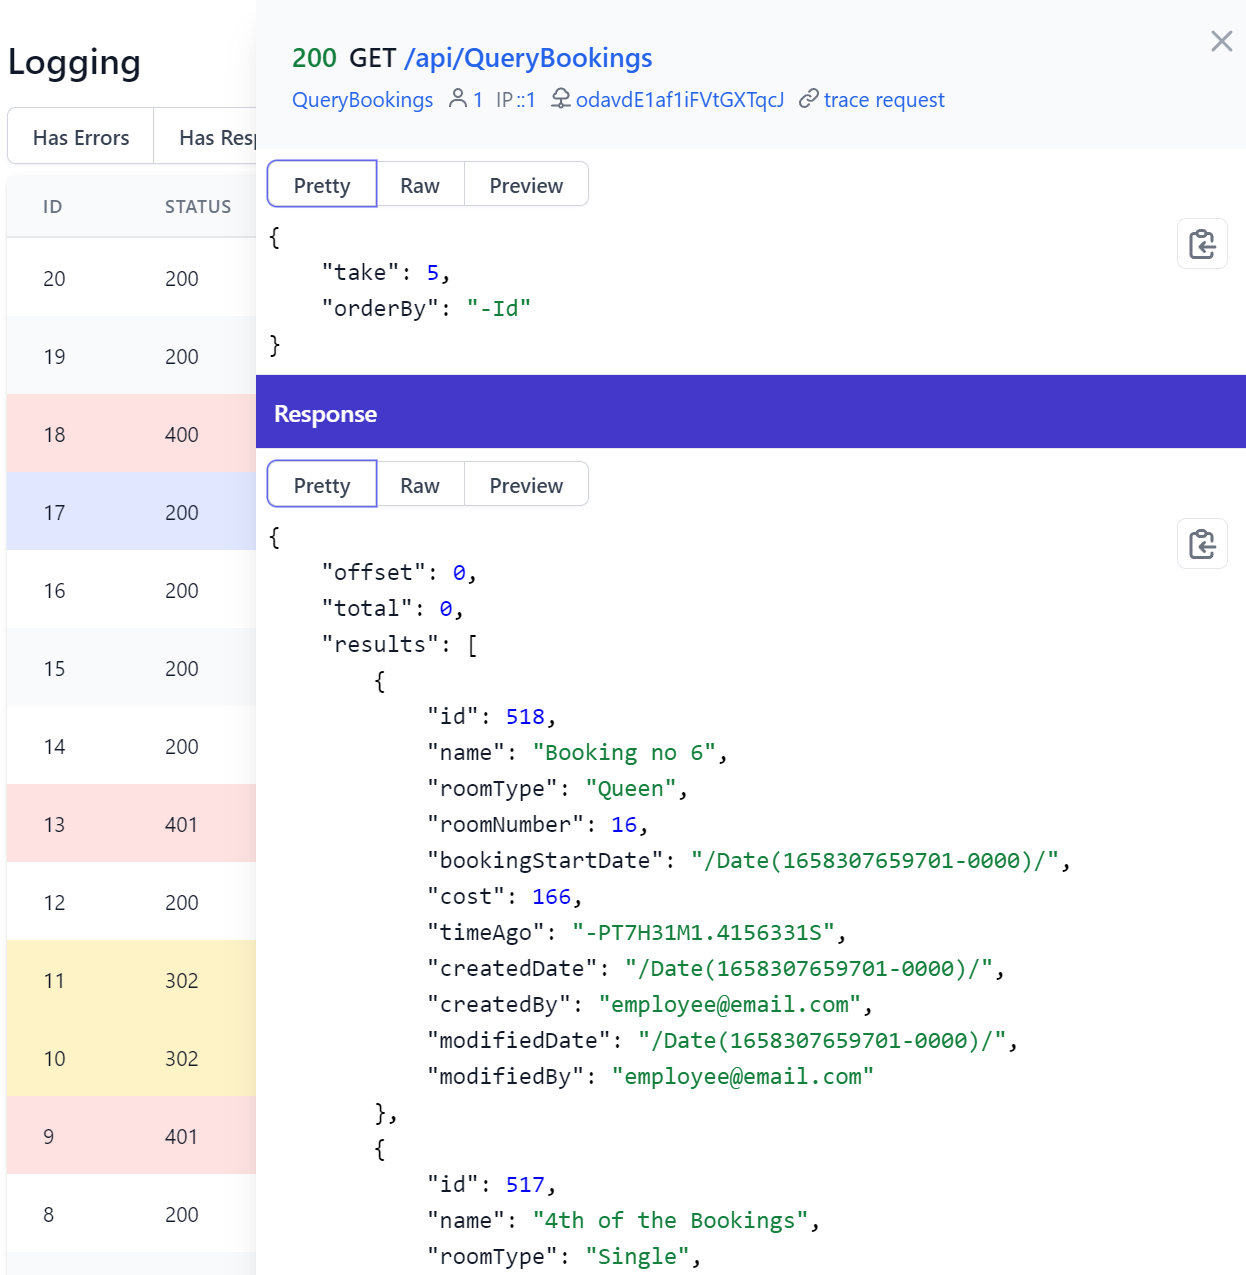
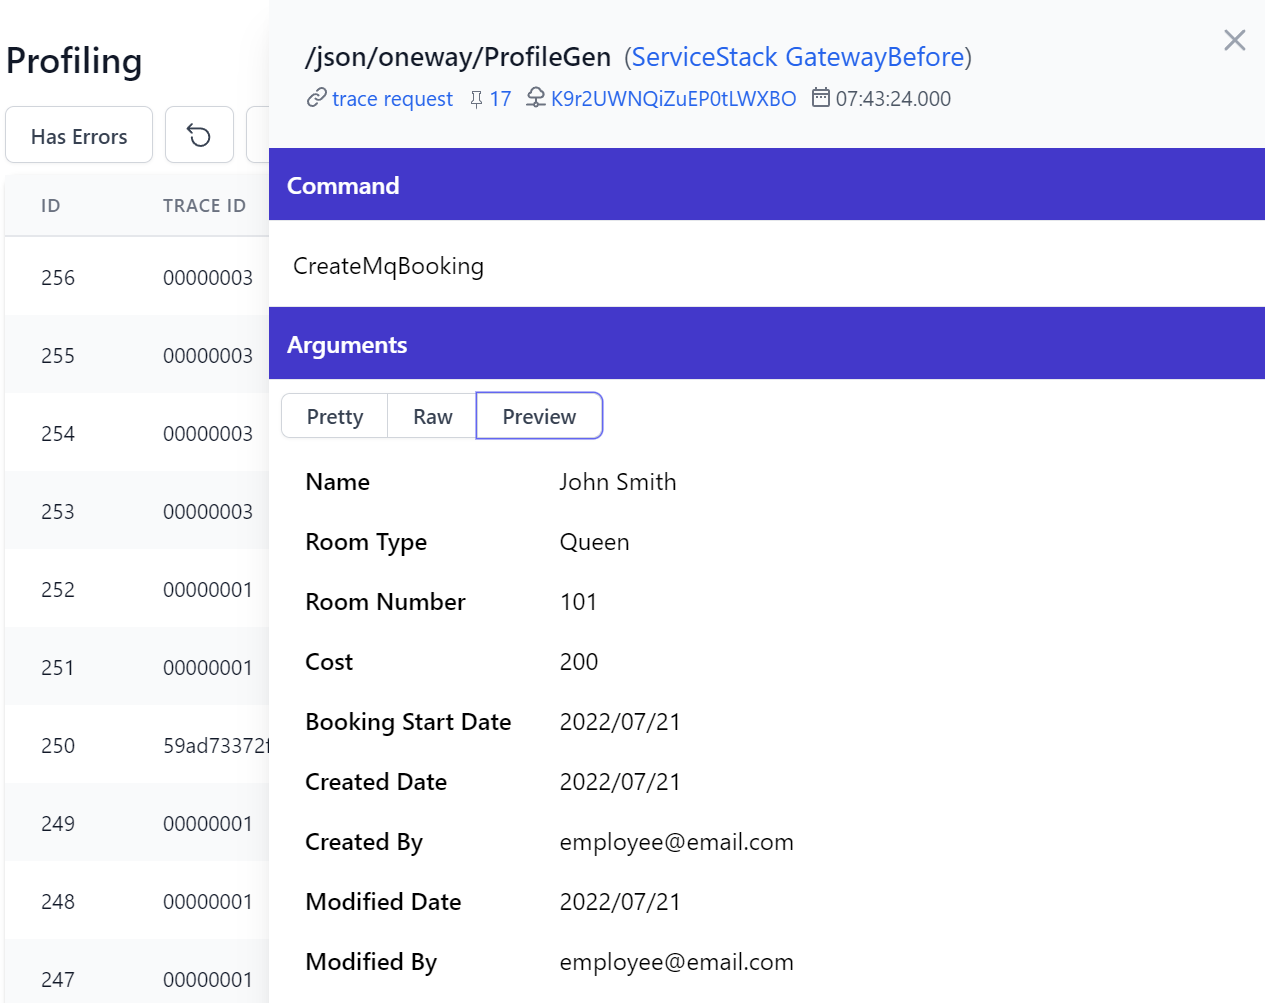
By default it shows the Request and Response DTOs in JSON, but clicking on preview often shows a more human-friendly view:
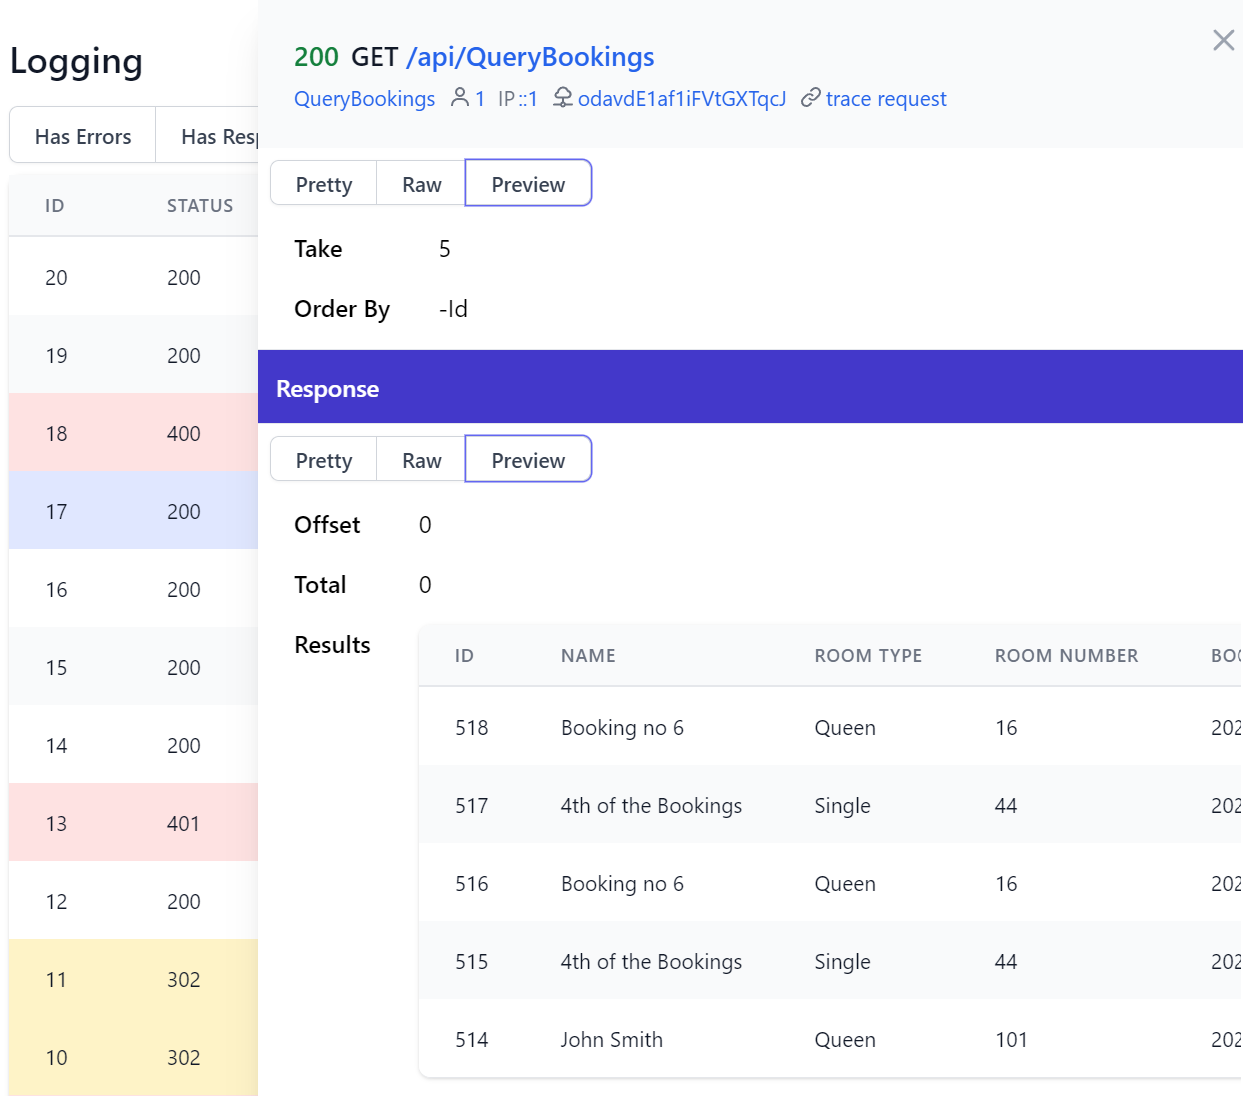
A useful feature from having a dedicated UX-friendly UI is enabling quick navigation where each blue link will display results filtered to all matching requests, whilst the trace request link will navigate to the Profiling UI showing all diagnostic events performed within that request.
In addition to Request & Response DTOs, the Logging UI also shows all captured HTTP information including HTTP Request Headers with any Cookies being extracted into its own view for better readability as well as decoded JWT payload from the ss-tok cookie when using JWT Auth with non-encrypted JWT defaults.

Lets now take a look at the failed CreateBooking request to see what went wrong:
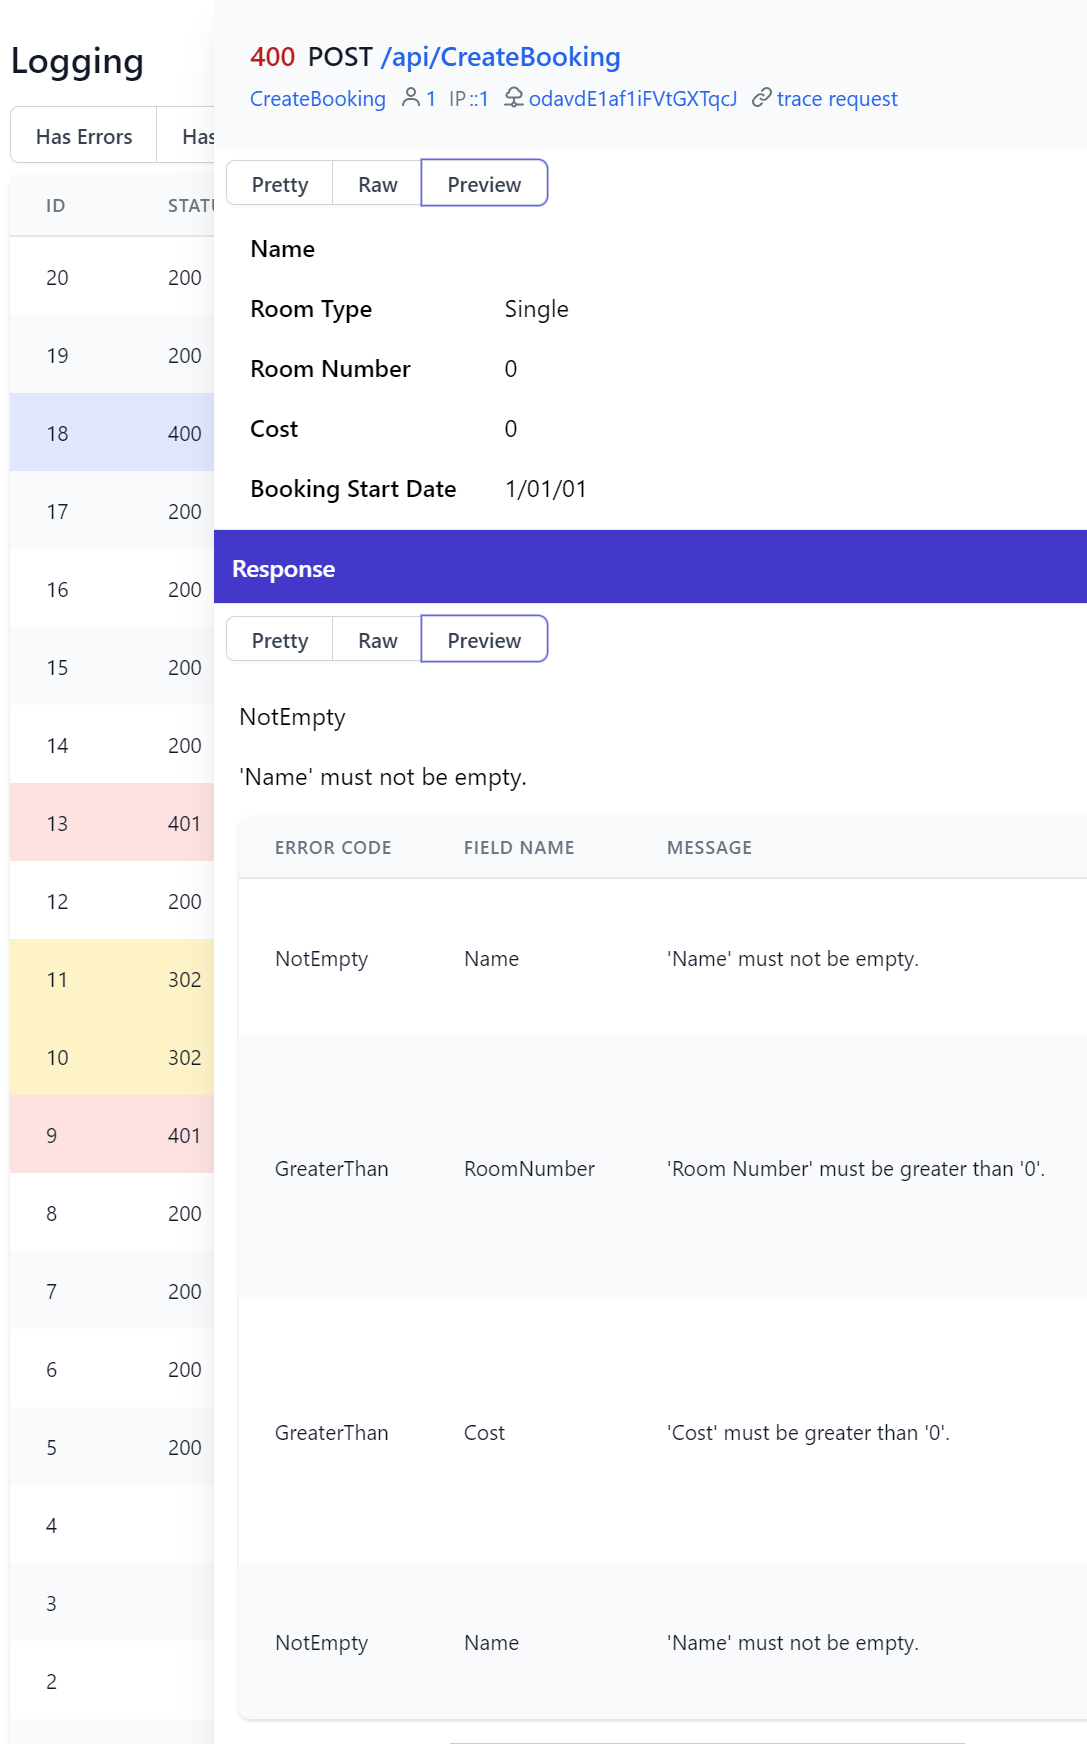
Ok, so the Admin User (identified from JWT info) tried to create an empty booking which was rejected by its server declarative validation rules which sees these context validation errors surfaced into Locode's UI:
We can then see this was quickly rectified in the next request with a successful Booking submitted:
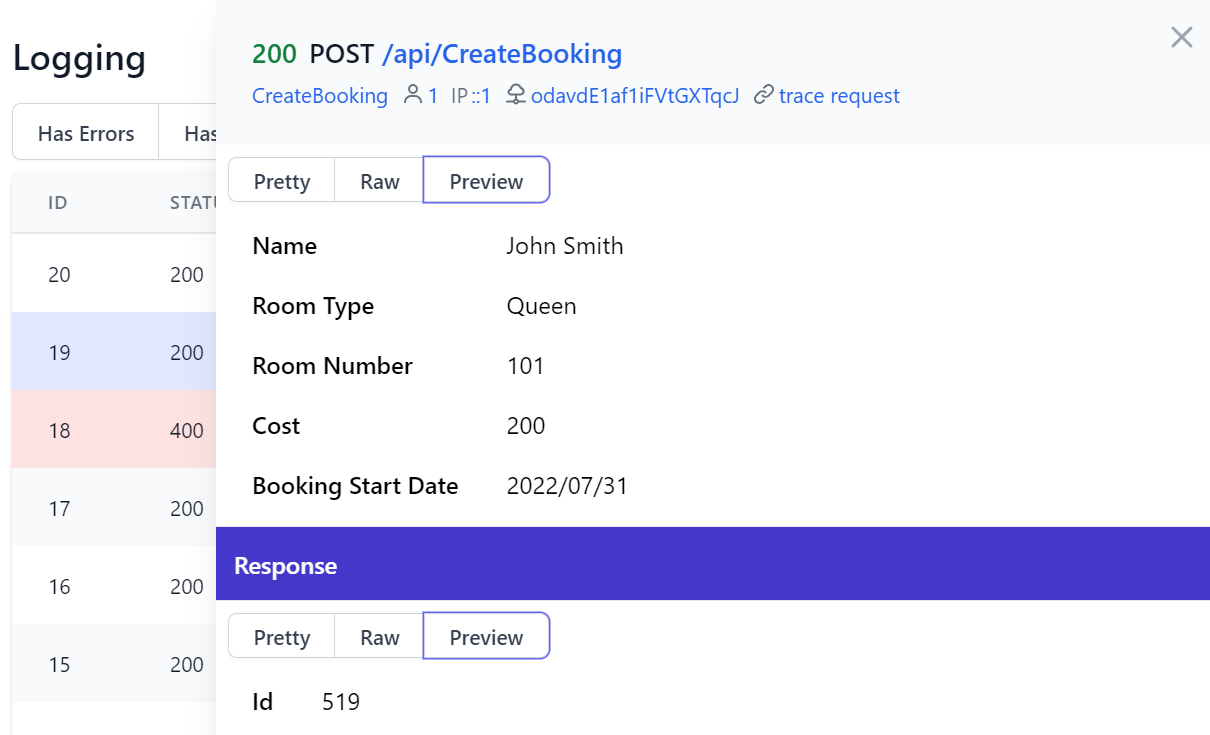
Clicking on trace request we can see all the diagnostic events performed in this API request within the RequestBefore and RequestAfter events which took 0.07s to complete.
Profiling UI
Following diagnostic conventions you'll typically see 2 entries for each event, created before and after each action, measuring the duration and capturing the last event before any error occurred.
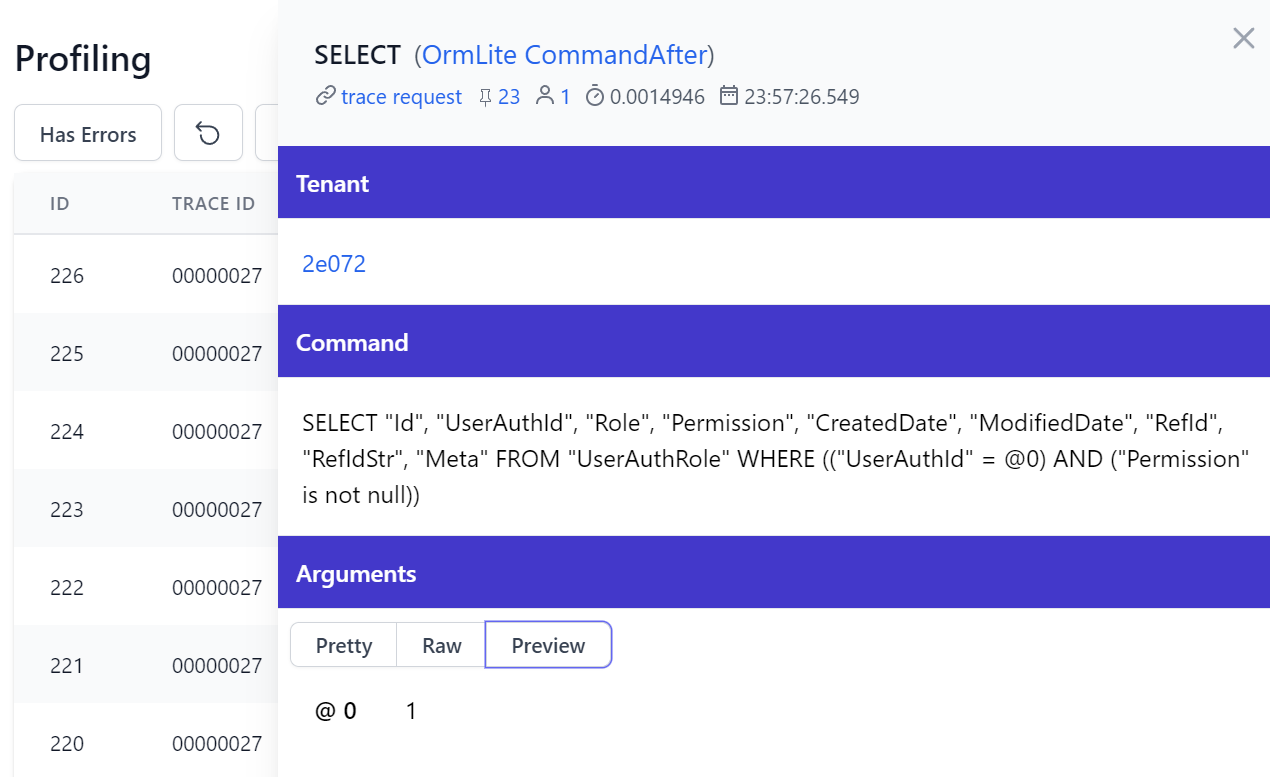
SQL Profiling
Clicking on an entry will show more useful contextual information captured for each event, e.g. if you click on OrmLite's CommandAfter event you'll be able to see the generated SQL + Params executed by OrmLite:
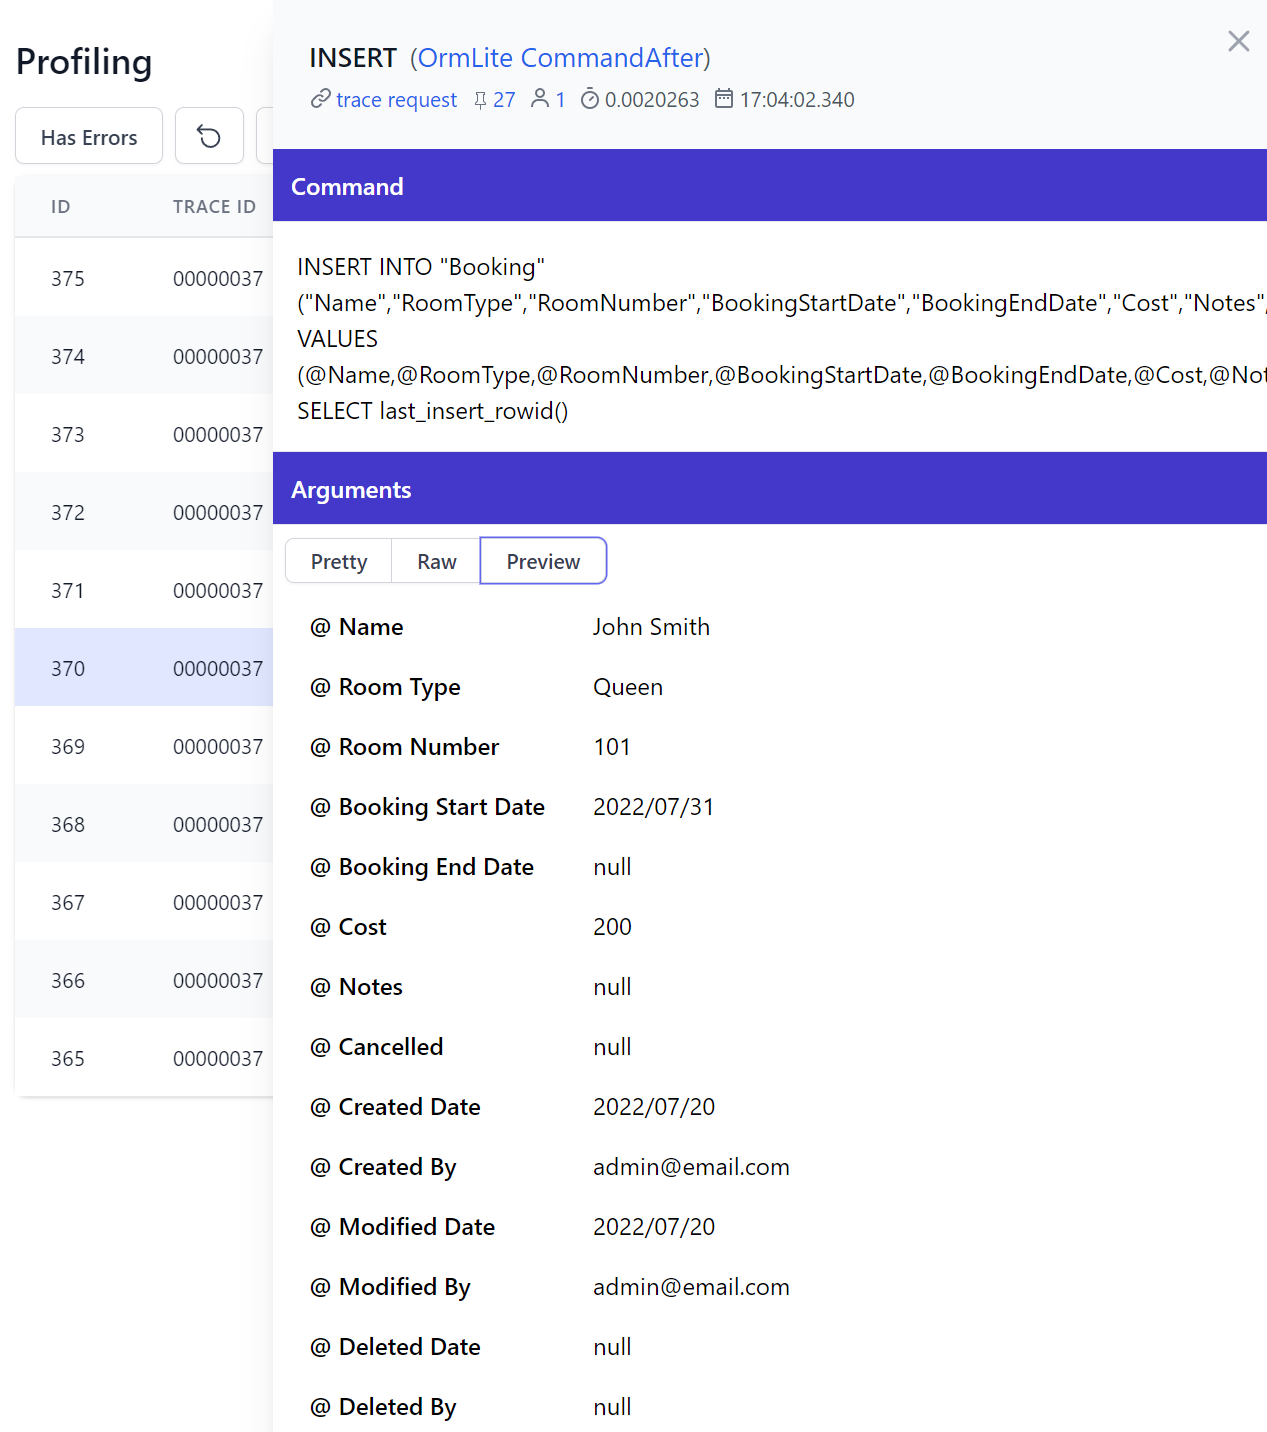
The profiling detail view also contains blue links to filter matching diagnostic events and showing useful information like the Thread, User this command was executed by as well as the duration and timestamp when it occurred.
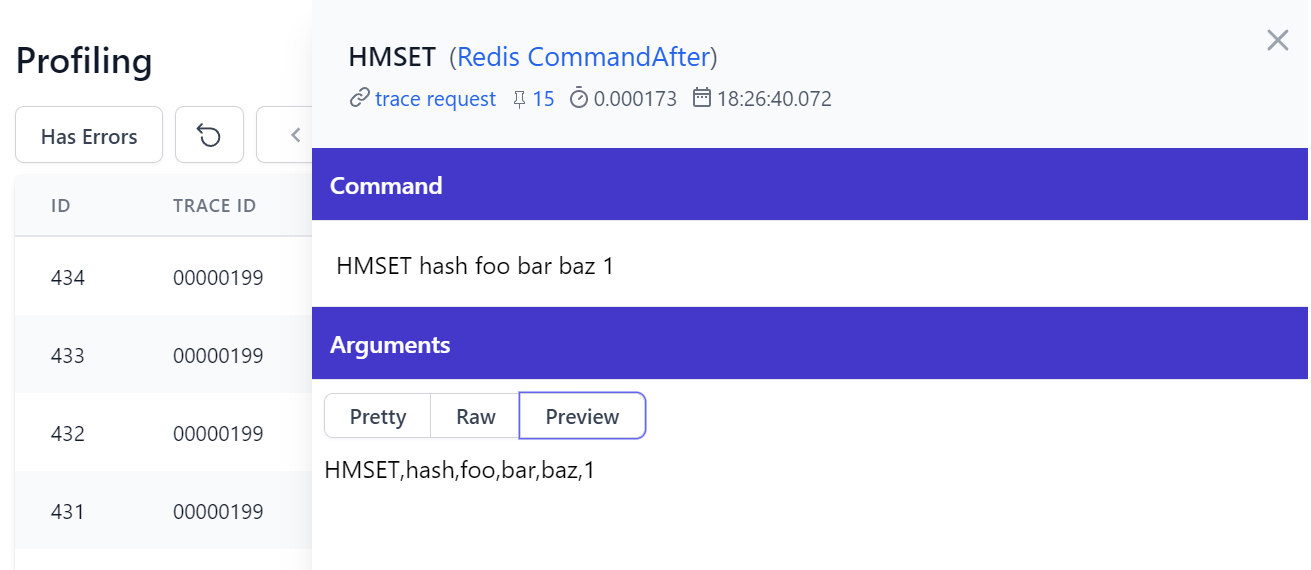
Redis Profiling
Redis simpler commands are captured in a list of arguments:
Purchase API Events Example
Surfacing the high-level events of your service implementations provides a new observability perspective that's harder to infer from trying to follow the details in the code.
For example our Order Page generated over 150+ events capturing all the SQL commands to store order, subscription, customer, payment information and generated License and Order confirmation emails, HttpClient integration requests with Stripe and MQ requests for sending emails in a Background MQ Worker thread.
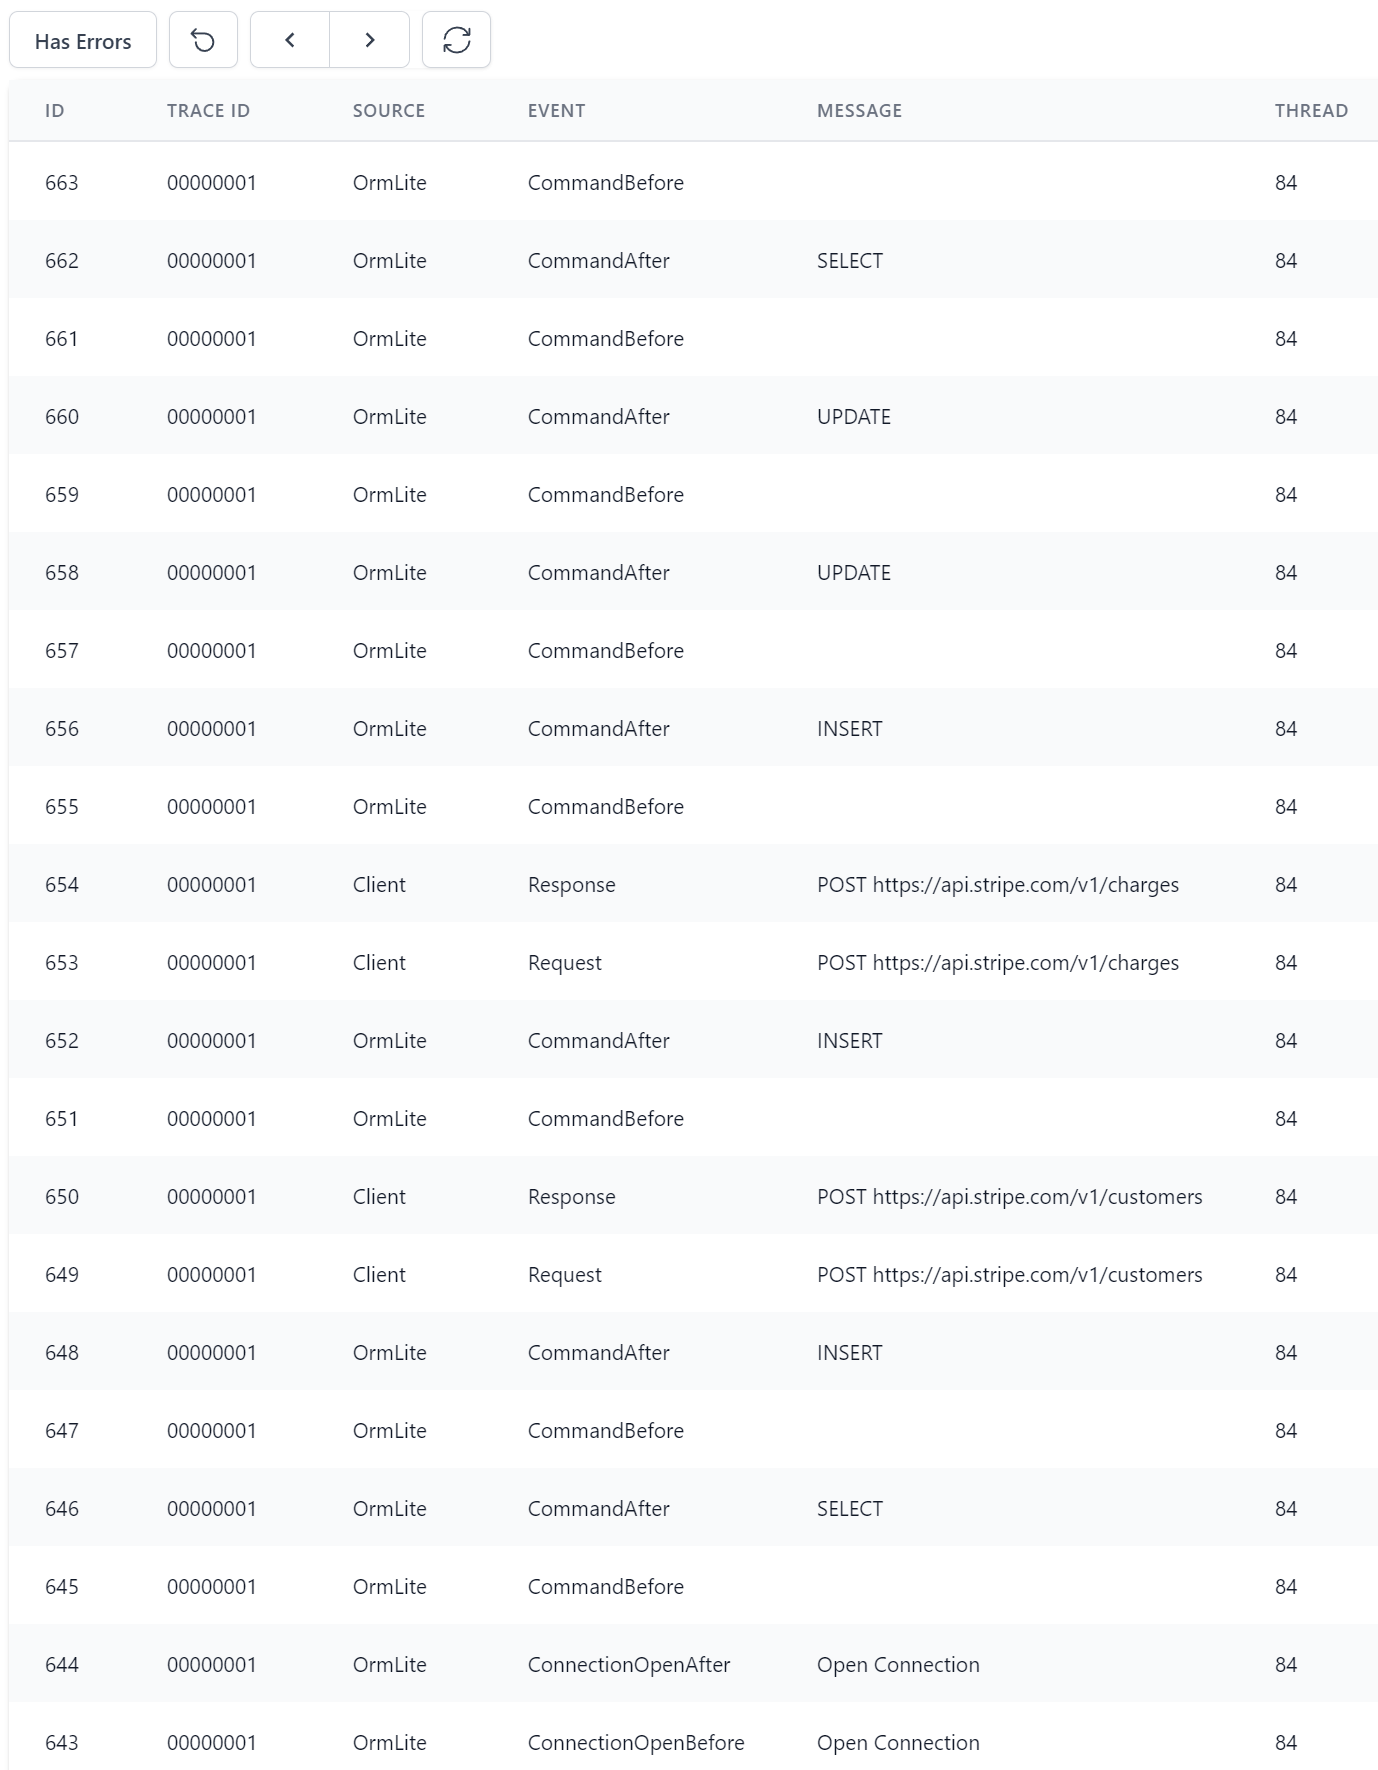
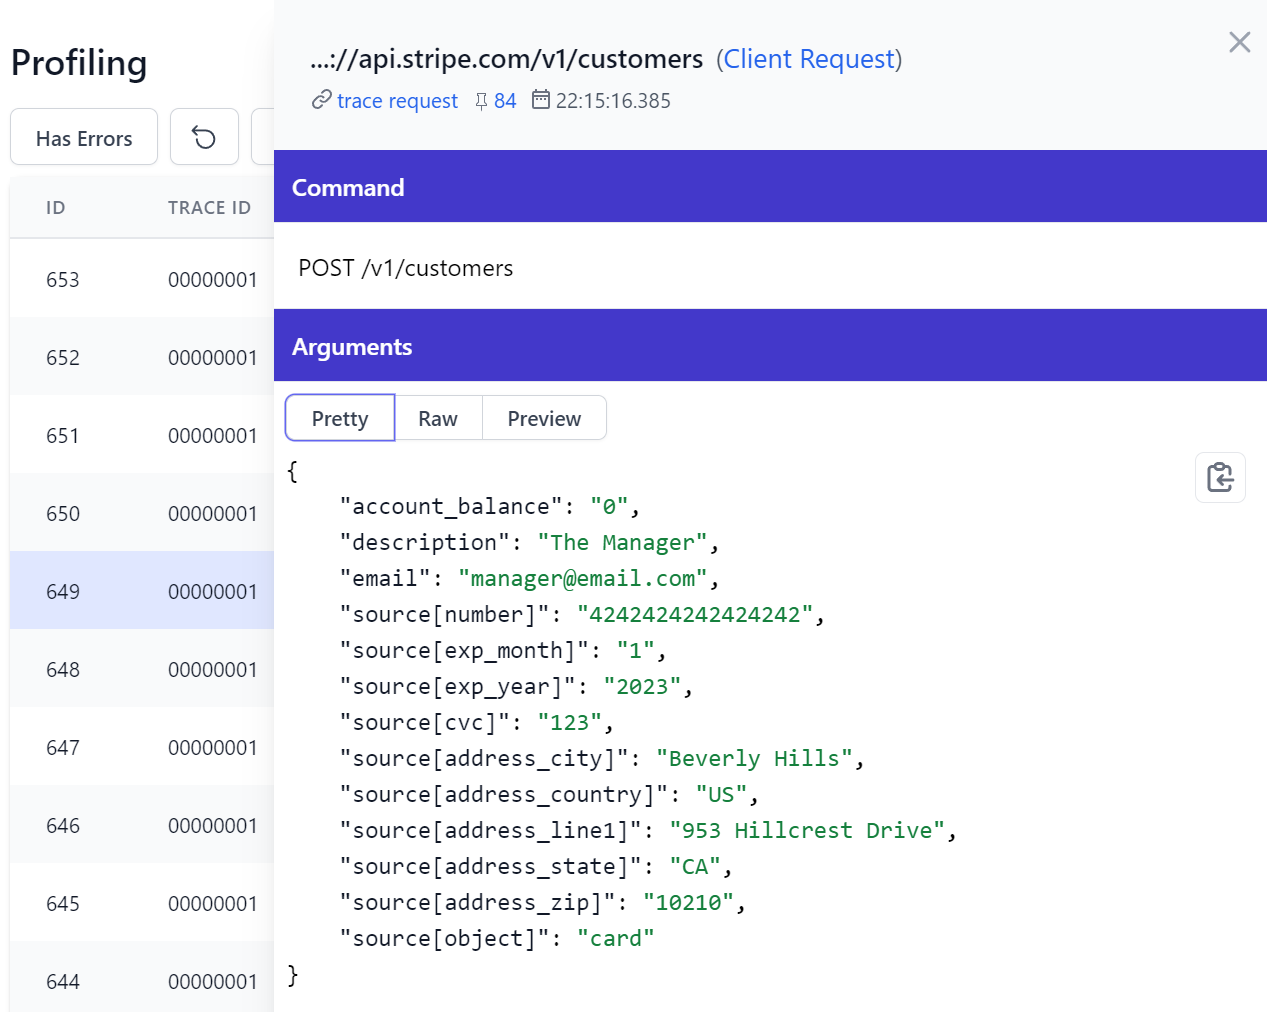
HttpClient Profiling
HttpClient profiling is implemented a little differently then other events in that it builds on the existing HttpClient diagnostic events so it's able to capture general usage of .NET's HttpClient, which is how it's able to capture our integration with Stripe:
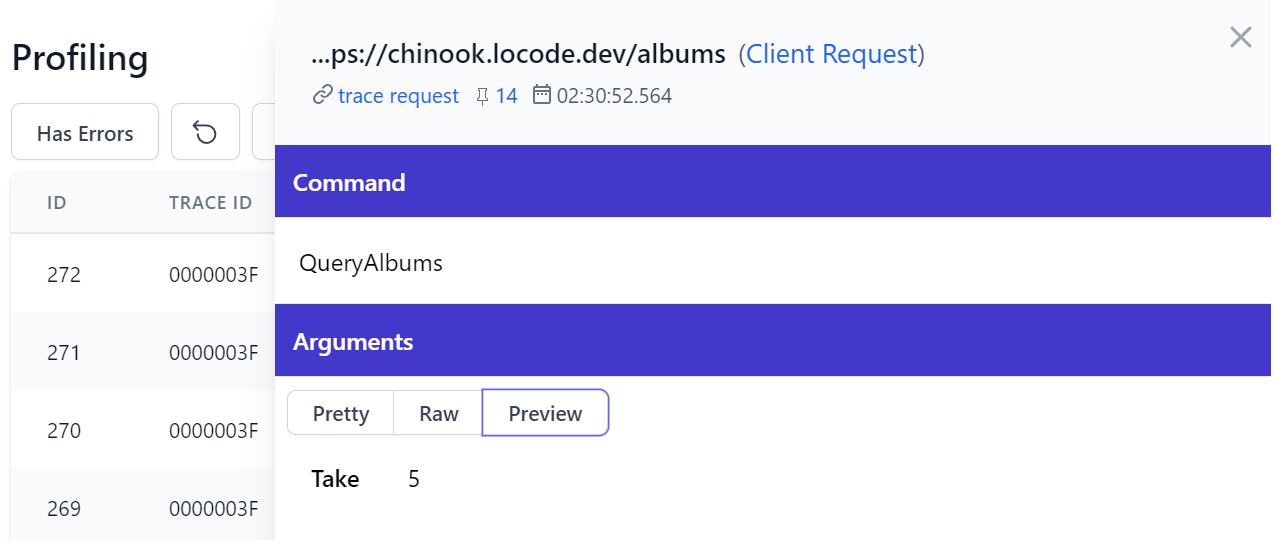
JsonApiClient Profiling
Although we're able to provide richer profiling for our .NET 6+ JsonApiClient which has access to typed Request DTOs for submitting API Requests:
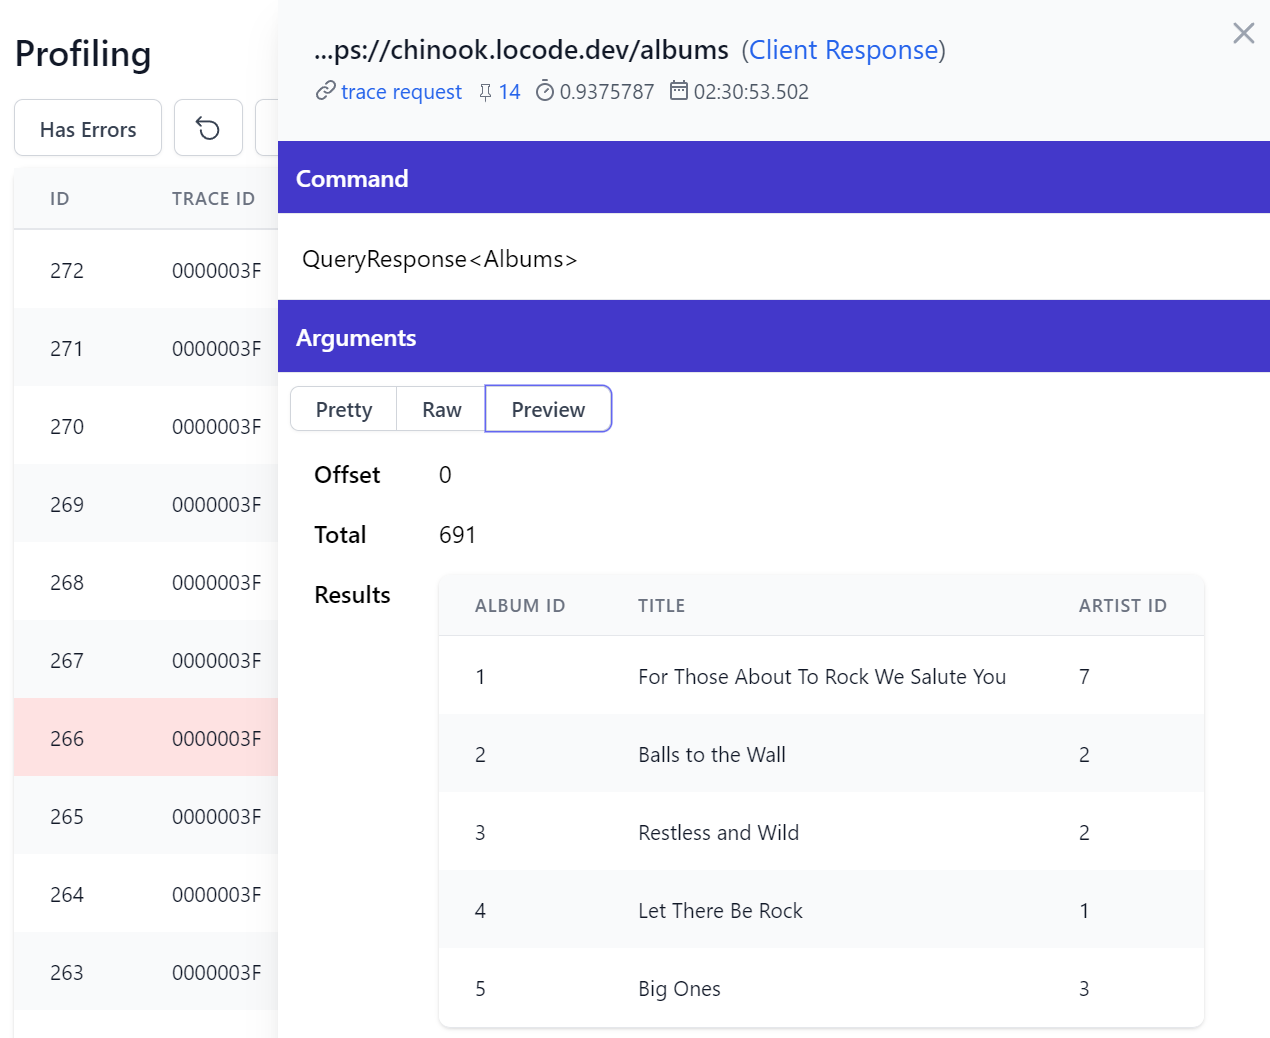
As well as Response DTOs returned in API Responses:
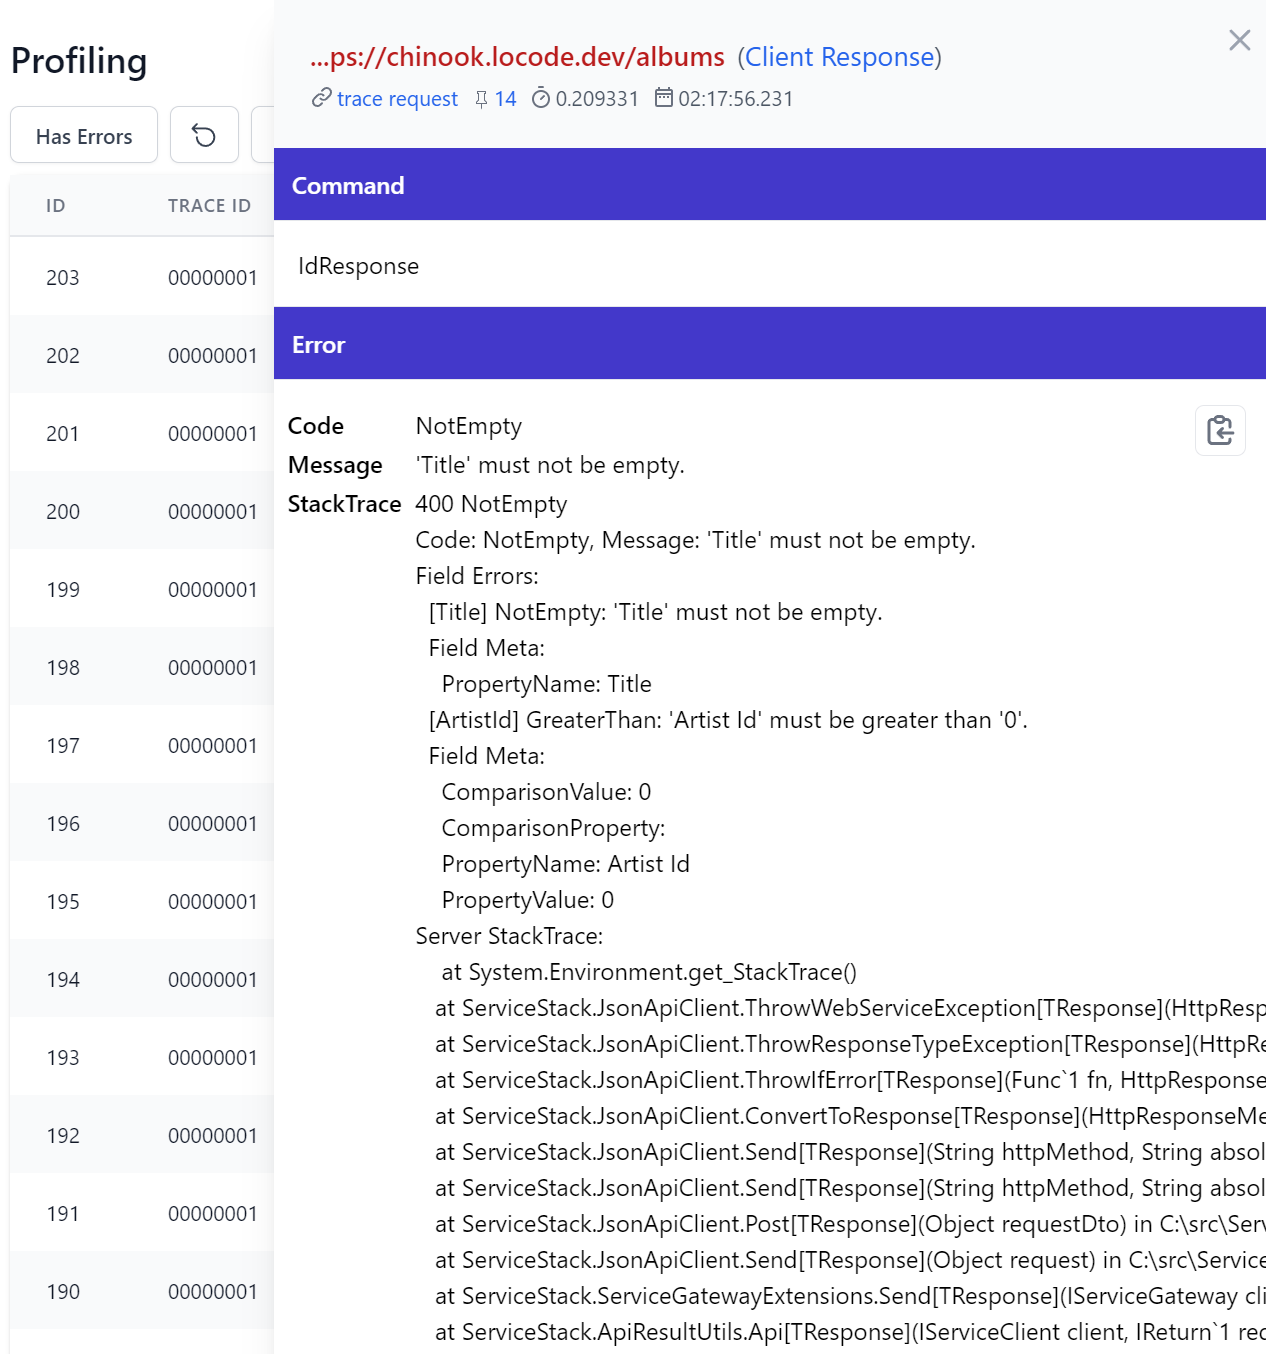
We also can examine API Error responses in richer detail, e.g:
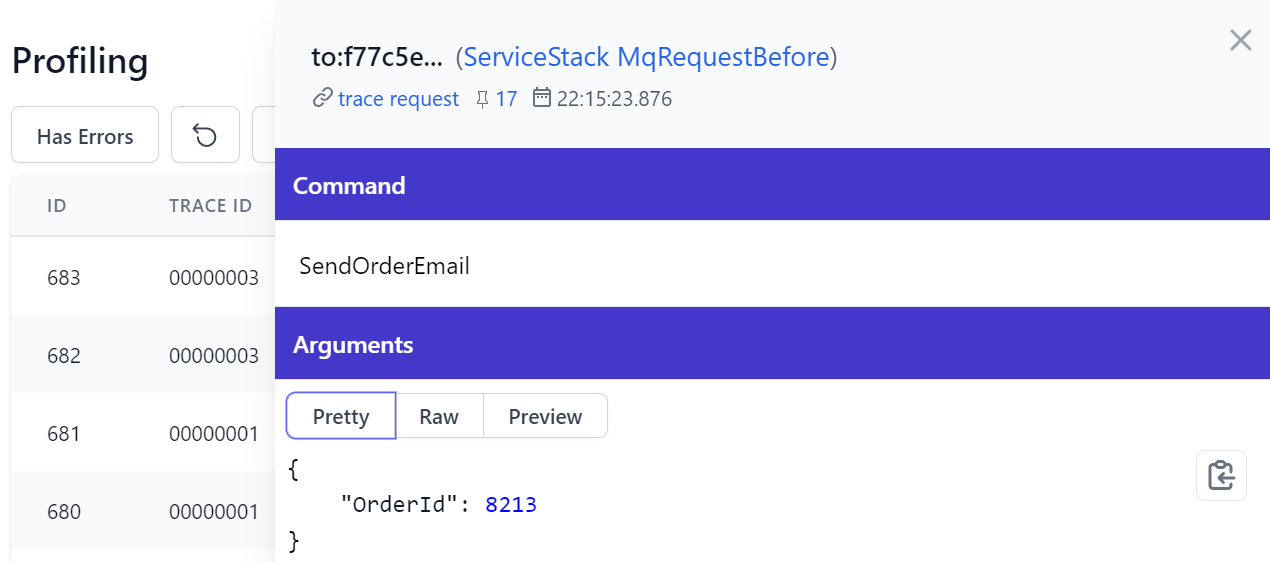
MQ Profiling
Since they execute APIs on an entirely different endpoint and worker threads, MQ Requests are tracked independently from HTTP APIs starting their own diagnostic Activity which enables being able to trace all events generated from an MQ Request. Here's an example used to handle sending customer emails:
Service Gateway Profiling
The Service Gateway leverages ServiceStack's message-based design to enable loosely-coupled service integrations enabling systems to split into Microservices without needing to change any of the internal services consuming them. As they're not RPC invocations their messages are introspectable and can be observed in the Profiling UI:
Profile Custom Info
We've made it easy to add a custom tracking field with the same functionality as the primary fields where they can be sorted and filtered. This could be used to attach a Tenant Id to the profiling information by providing a Label and Resolver function to resolve it, e.g:
new ProfilingFeature {
    TagLabel = "Tenant",
    TagResolver = req => MyResolveTenant(req),
}
Where it will be displayed in all profiling results, e.g:

TIP
The number and order of fields can be customized in SummaryFields collection in ProfilingFeature
This custom info also appears in the detail page as a link which can be used to filter events with the same tenant id:
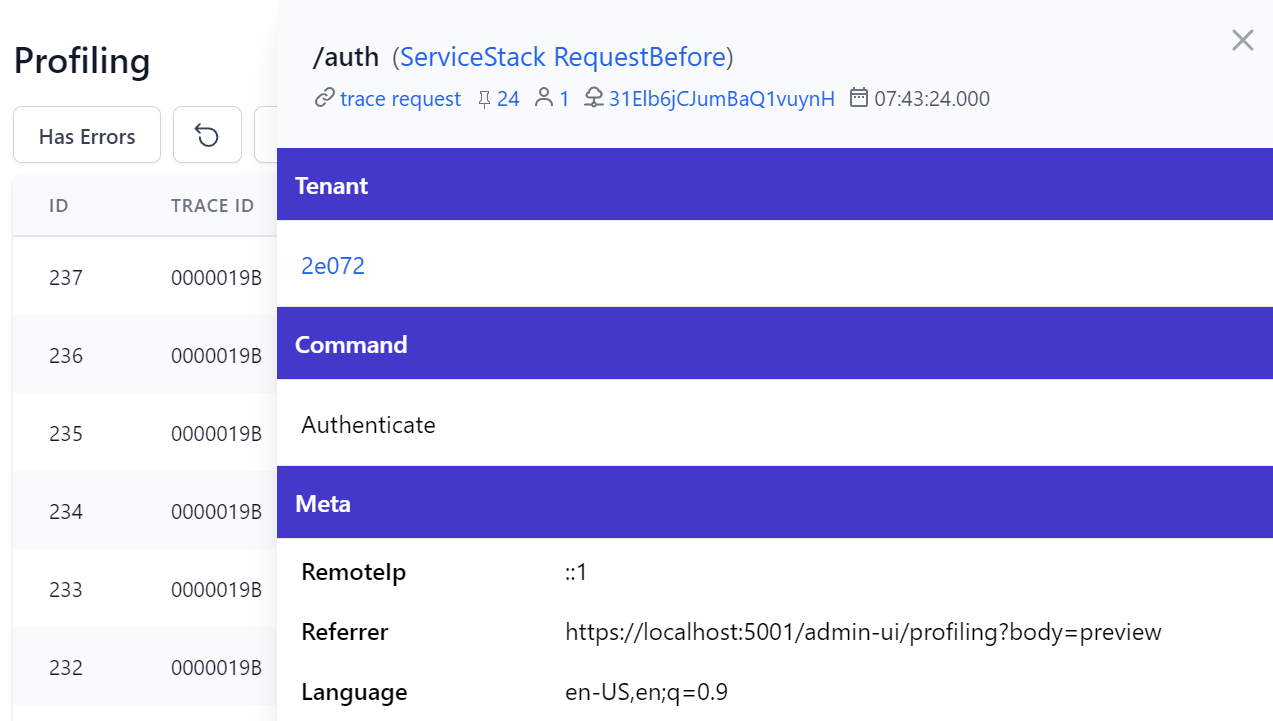
Profile Custom Metadata
You're also able to capture custom information for different events and have them appear in the detail page, e.g:
new ProfilingFeature {
    DiagnosticEntryFilter = (entry, evt) => {
        if (evt is RequestDiagnosticEvent requestEvent)
        {
            var req = requestEvent.Request;
            entry.Meta = new() {
                ["RemoteIp"] = req.RemoteIp,
                ["Referrer"] = req.UrlReferrer?.ToString(),
                ["Language"] = req.GetHeader(HttpHeaders.AcceptLanguage),
            };
        }
    },
}
Where it will be populated in the Meta section arguments:
Access Diagnostic Events in Code
In addition to powering the profiling UI, the diagnostic events added throughout ServiceStack can be observed in code to tap in and inspect when these diagnostic events occur. It follows the standard Diagnostic Source model where you specify which listeners you want observed in OnNext(DiagnosticListener) that you can then access in OnNext(KeyValuePair<string,object>).
Microsoft's Diagnostic Events like HttpClient uses anonymous classes making them unnecessarily difficult to access, which can be made easier by using our Reflection Utils ToObjectDictionary().
As they offer better utility, we've opted to use idiomatic strong types and string constants instead where they're better accessible from C#.
You can use this skeleton class for a quick way to get started showing how to subscribe to all ServiceStack Diagnostic Sources and the event names and types to handle all profiling events:
// Register your Diagnostic Observer
var observer = new MyDiagnosticObserver();
var subscription = DiagnosticListener.AllListeners.Subscribe(observer);

public sealed class MyDiagnosticObserver :
    IObserver<DiagnosticListener>,
    IObserver<KeyValuePair<string, object>>
{
    private readonly List<IDisposable> subscriptions = new();

    /* Specify which Profiling Events you want to observe */
    void IObserver<DiagnosticListener>.OnNext(DiagnosticListener diagnosticListener)
    {
        if (diagnosticListener.Name is Diagnostics.Listeners.ServiceStack
         || diagnosticListener.Name is Diagnostics.Listeners.OrmLite
         || diagnosticListener.Name is Diagnostics.Listeners.Redis
         || diagnosticListener.Name is Diagnostics.Listeners.Client
         || diagnosticListener.Name is Diagnostics.Listeners.HttpClient)
        {
            var subscription = diagnosticListener.Subscribe(this);
            subscriptions.Add(subscription);
        }
    }

    /* Handle Profiling Events */
    public void OnNext(KeyValuePair<string, object> kvp)
    {
        /** ServiceStack */
        /*** Request */
        if (kvp.Key == Diagnostics.Events.ServiceStack.WriteRequestBefore && kvp.Value is RequestDiagnosticEvent reqBefore) { /*...*/ }
        if (kvp.Key == Diagnostics.Events.ServiceStack.WriteRequestAfter && kvp.Value is RequestDiagnosticEvent reqAfter) { /*...*/ }
        if (kvp.Key == Diagnostics.Events.ServiceStack.WriteRequestError && kvp.Value is RequestDiagnosticEvent reqError) { /*...*/ }

        /*** Gateway */
        if (kvp.Key == Diagnostics.Events.ServiceStack.WriteGatewayBefore && kvp.Value is RequestDiagnosticEvent gatewayBefore) { /*...*/ }
        if (kvp.Key == Diagnostics.Events.ServiceStack.WriteGatewayAfter && kvp.Value is RequestDiagnosticEvent gatewayAfter) { /*...*/ }
        if (kvp.Key == Diagnostics.Events.ServiceStack.WriteGatewayError && kvp.Value is RequestDiagnosticEvent gatewayError) { /*...*/ }

        /*** MQ */
        if (kvp.Key == Diagnostics.Events.ServiceStack.WriteMqRequestBefore && kvp.Value is MqRequestDiagnosticEvent mqReqBefore) { /*...*/ }
        if (kvp.Key == Diagnostics.Events.ServiceStack.WriteMqRequestAfter && kvp.Value is MqRequestDiagnosticEvent mqReqAfter) { /*...*/ }
        if (kvp.Key == Diagnostics.Events.ServiceStack.WriteMqRequestError && kvp.Value is MqRequestDiagnosticEvent mqReqError) { /*...*/ }
        if (kvp.Key == Diagnostics.Events.ServiceStack.WriteMqRequestPublish && kvp.Value is MqRequestDiagnosticEvent mqReqPublish) { /*...*/ }

        /** Client */
        if (kvp.Key == Diagnostics.Events.Client.WriteRequestBefore && kvp.Value is HttpClientDiagnosticEvent clientBefore) { /*...*/ }
        if (kvp.Key == Diagnostics.Events.Client.WriteRequestAfter && kvp.Value is HttpClientDiagnosticEvent clientAfter) { /*...*/ }
        if (kvp.Key == Diagnostics.Events.Client.WriteRequestError && kvp.Value is HttpClientDiagnosticEvent clientError) { /*...*/ }

        /** HttpClient */
        if (kvp.Key == Diagnostics.Events.HttpClient.OutStart)
        {
            var obj = kvp.Value.ToObjectDictionary();
        }
        if (kvp.Key == Diagnostics.Events.HttpClient.Request)
        {
            var obj = kvp.Value.ToObjectDictionary();
        }
        if (kvp.Key == Diagnostics.Events.HttpClient.OutStop)
        {
             var obj = kvp.Value.ToObjectDictionary();
        }
        if (kvp.Key == Diagnostics.Events.HttpClient.Response)
        {
            var obj = kvp.Value.ToObjectDictionary();
        }

        /** OrmLite */
        if (kvp.Key == Diagnostics.Events.OrmLite.WriteCommandBefore && kvp.Value is OrmLiteDiagnosticEvent dbBefore) { /*...*/ }
        if (kvp.Key == Diagnostics.Events.OrmLite.WriteCommandAfter && kvp.Value is OrmLiteDiagnosticEvent dbAfter) { /*...*/ }
        if (kvp.Key == Diagnostics.Events.OrmLite.WriteCommandError && kvp.Value is OrmLiteDiagnosticEvent dbError) { /*...*/ }

        /*** OrmLite Connections */
        if (kvp.Key == Diagnostics.Events.OrmLite.WriteConnectionOpenBefore && kvp.Value is OrmLiteDiagnosticEvent dbOpenBefore) { /*...*/ }
        if (kvp.Key == Diagnostics.Events.OrmLite.WriteConnectionOpenAfter && kvp.Value is OrmLiteDiagnosticEvent dbOpenAfter) { /*...*/ }
        if (kvp.Key == Diagnostics.Events.OrmLite.WriteConnectionOpenError && kvp.Value is OrmLiteDiagnosticEvent dbOpenError) { /*...*/ }
        if (kvp.Key == Diagnostics.Events.OrmLite.WriteConnectionCloseBefore && kvp.Value is OrmLiteDiagnosticEvent dbCloseBefore) { /*...*/ }
        if (kvp.Key == Diagnostics.Events.OrmLite.WriteConnectionCloseAfter && kvp.Value is OrmLiteDiagnosticEvent dbCloseAfter) { /*...*/ }
        if (kvp.Key == Diagnostics.Events.OrmLite.WriteConnectionCloseError && kvp.Value is OrmLiteDiagnosticEvent dbCloseError) { /*...*/ }

        /*** OrmLite Transactions */
        if (kvp.Key == Diagnostics.Events.OrmLite.WriteTransactionOpen && kvp.Value is OrmLiteDiagnosticEvent commitOpen) { /*...*/ }
        if (kvp.Key == Diagnostics.Events.OrmLite.WriteTransactionCommitBefore && kvp.Value is OrmLiteDiagnosticEvent commitBefore) { /*...*/ }
        if (kvp.Key == Diagnostics.Events.OrmLite.WriteTransactionCommitAfter && kvp.Value is OrmLiteDiagnosticEvent commitAfter) { /*...*/ }
        if (kvp.Key == Diagnostics.Events.OrmLite.WriteTransactionCommitError && kvp.Value is OrmLiteDiagnosticEvent commitError) { /*...*/ }
        if (kvp.Key == Diagnostics.Events.OrmLite.WriteTransactionRollbackBefore && kvp.Value is OrmLiteDiagnosticEvent rollbackBefore) { /*...*/ }
        if (kvp.Key == Diagnostics.Events.OrmLite.WriteTransactionRollbackAfter && kvp.Value is OrmLiteDiagnosticEvent rollbackAfter) { /*...*/ }
        if (kvp.Key == Diagnostics.Events.OrmLite.WriteTransactionRollbackError && kvp.Value is OrmLiteDiagnosticEvent rollbackError) { /*...*/ }

        /** Redis */
        if (kvp.Key == Diagnostics.Events.Redis.WriteCommandBefore && kvp.Value is RedisDiagnosticEvent redisBefore) { /*...*/ }
        if (kvp.Key == Diagnostics.Events.Redis.WriteCommandRetry && kvp.Value is RedisDiagnosticEvent redisRetry) { /*...*/ }
        if (kvp.Key == Diagnostics.Events.Redis.WriteCommandAfter && kvp.Value is RedisDiagnosticEvent redisAfter) { /*...*/ }
        if (kvp.Key == Diagnostics.Events.Redis.WriteCommandError && kvp.Value is RedisDiagnosticEvent redisError) { /*...*/ }

        /*** Redis Connections */
        if (kvp.Key == Diagnostics.Events.Redis.WriteConnectionOpenBefore && kvp.Value is RedisDiagnosticEvent redisOpenBefore) { /*...*/ }
        if (kvp.Key == Diagnostics.Events.Redis.WriteConnectionOpenAfter && kvp.Value is RedisDiagnosticEvent redisOpenAfter) { /*...*/ }
        if (kvp.Key == Diagnostics.Events.Redis.WriteConnectionOpenError && kvp.Value is RedisDiagnosticEvent redisOpenError) { /*...*/ }
        if (kvp.Key == Diagnostics.Events.Redis.WriteConnectionCloseBefore && kvp.Value is RedisDiagnosticEvent redisCloseBefore) { /*...*/ }
        if (kvp.Key == Diagnostics.Events.Redis.WriteConnectionCloseAfter && kvp.Value is RedisDiagnosticEvent redisCloseAfter) { /*...*/ }
        if (kvp.Key == Diagnostics.Events.Redis.WriteConnectionCloseError && kvp.Value is RedisDiagnosticEvent redisCloseError) { /*...*/ }

        /*** Redis Pools */
        if (kvp.Key == Diagnostics.Events.Redis.WritePoolRent && kvp.Value is RedisDiagnosticEvent redisPoolBefore) { /*...*/ }
        if (kvp.Key == Diagnostics.Events.Redis.WritePoolReturn && kvp.Value is RedisDiagnosticEvent redisPoolAfter) { /*...*/ }
    }

    void IObserver<DiagnosticListener>.OnCompleted()
    {
        subscriptions.ForEach(x => x.Dispose());
        subscriptions.Clear();
    }
    public void OnCompleted() {}
    void IObserver<DiagnosticListener>.OnError(Exception error) {}
    public void OnError(Exception error) {}
}
Request Logs Configuration
The Request Logs feature has a number of configuration options controlling which requests are logged and the level of logging captured about them.
class RequestLogsFeature
{
    // Limit API access to users in role
    string AccessRole = RoleNames.Admin;

    // RequestLogs service Route, default is /requestlogs
    string AtRestPath = "/requestlogs";

    // Size of memory logger circular buffer
    int? Capacity;

    // Turn On/Off Session Tracking
    bool EnableSessionTracking;

    // Turn On/Off Logging of Raw Request Body, default is Off
    bool EnableRequestBodyTracking;

    // Turn On/Off Raw Request Body Tracking per-request
    Func<IRequest, bool> RequestBodyTrackingFilter;

    // Turn On/Off Tracking of Responses
    bool EnableResponseTracking = false;

    // Turn On/Off Tracking of Responses per-request
    Func<IRequest, bool> ResponseTrackingFilter;

    // Turn On/Off Tracking of Exceptions
    bool EnableErrorTracking = true;

    // Don't log matching requests
    Func<IRequest, bool> SkipLogging;

    // Change the RequestLogger provider. Default is InMemoryRollingRequestLogger
    IRequestLogger RequestLogger;

    // Don't log requests of these types. By default RequestLog's are excluded
    Type[] ExcludeRequestDtoTypes;

    // Don't log request body's for services with sensitive information.
    // By default Auth and Registration requests are hidden.
    Type[] HideRequestBodyForRequestDtoTypes;

    // Don't log Response DTO Types
    Type[] ExcludeResponseTypes;

    // Limit logging to only Service Requests
    bool LimitToServiceRequests = true;

    // Customize Request Log Entry
    Action<IRequest, RequestLogEntry> RequestLogFilter;

    // Ignore logging and serializing these Request DTOs
    List<Type> IgnoreTypes; = new();

    // Use custom Ignore Request DTO predicate
    Func<object,bool> IgnoreFilter = DefaultIgnoreFilter;

    // Default take, if none is specified
    int DefaultLimit = 100;

    // Change what DateTime to use for the current Date (defaults to UtcNow)
    Func<DateTime> CurrentDateFn = () => DateTime.UtcNow;
}
Profiling Configuration
The ProfilingFeature offers similar functionality in specifying which sources to observe and profiling events to capture as well as options for customizing the Profiling UI, e.g you can limit generating & capturing diagnostic events to just OrmLite and Redis with:
Plugins.Add(new ProfilingFeature {
    Profile = ProfileSource.OrmLite | ProfileSource.Redis
});
For further configuration options see the documented plugin below:
[Flags]
enum ProfileSource
{
    None         = 0,
    ServiceStack = 1 << 0,
    Client       = 1 << 1,
    Redis        = 1 << 2,
    OrmLite      = 1 << 3,
    All          = ServiceStack | Client | OrmLite | Redis,
}

class ProfilingFeature
{
    // Limit API access to users in role
    string AccessRole = RoleNames.Admin;

    // Which features to Profile, default all
    ProfileSource Profile = ProfileSource.All;

    // Size of circular buffer of profiled events
    int Capacity = 10000;

    // Don't log requests of these types. By default Profiling/Metadata requests are excluded
    List<Type> ExcludeRequestDtoTypes = new();

    // Don't log requests from these path infos prefixes
    List<string> ExcludeRequestPathInfoStartingWith = new();

    // Turn On/Off Tracking of Responses per-request
    Func<IRequest, bool>? ExcludeRequestsFilter;

    // Don't log request body's for services with sensitive information.
    // By default Auth and Registration requests are hidden.
    List<Type> HideRequestBodyForRequestDtoTypes = new();

    // Don't log Response DTO Types
    List<Type> ExcludeResponseTypes = new();

    // Turn On/Off Tracking of Responses per-request
    Func<IRequest, bool>? ResponseTrackingFilter;

    // Whether to include CallStack StackTrace
    bool? IncludeStackTrace;

    // Attach custom data to request profiling summary fields
    Func<IRequest,string?>? TagResolver;

    // Label to show for custom tag
    string? TagLabel;

    // The properties displayed in Profiling UI results grid
    List<string> SummaryFields;

    // Default take, if none is specified
    int DefaultLimit = 50;

    // Customize DiagnosticEntry that gets captured
    Action<DiagnosticEntry, DiagnosticEvent>? DiagnosticEntryFilter;

    // Maximum char/byte length of string response body
    int MaxBodyLength = 10 * 10 * 1024;
}
DB Validation
The DB Validation feature leverages the existing Declarative Validation infrastructure where it enables dynamically managing Request DTO Type and Property Validators from a RDBMS data source which immediately takes effect at runtime and can be optionally cached where they'll only need to be re-hydrated from the database after modification.
This feature can be easily added to existing host projects with the mix command:
x mix validation-source
Which will add the Modular Startup validation configuration to your project, utilizing your existing configured database:
[assembly: HostingStartup(typeof(MyApp.ConfigureValidation))]

namespace MyApp;

public class ConfigureValidation : IHostingStartup
{
    // Add support for dynamically generated db rules
    public void Configure(IWebHostBuilder builder) => builder
        .ConfigureServices(services => services.AddSingleton<IValidationSource>(c =>
            new OrmLiteValidationSource(c.Resolve<IDbConnectionFactory>(), HostContext.LocalCache)))
        .ConfigureAppHost(appHost => {
            // Create `ValidationRule` table if it doesn't exist in AppHost.Configure() or Modular Startup
            appHost.Resolve<IValidationSource>().InitSchema();
        });
}
Which the built-in Validation Feature detects before registering the GetValidationRules and ModifyValidationRules management APIs and enables the DB Validation Admin UI:
Pre-populating Validation Rules
A minimum set of validation rules can be enforced by adding them on Startup, e.g:
var validationSource = container.Resolve<IValidationSource>();
validationSource.InitSchema();
validationSource.SaveValidationRules(new List<ValidateRule> {
    new ValidateRule { Type=nameof(CreateTable), Validator = "NoRefTableReferences" },
    new ValidateRule { Type=nameof(MyRequest), Field=nameof(MyRequest.LastName), Validator = "NotNull" },
    new ValidateRule { Type=nameof(MyRequest), Field=nameof(MyRequest.Age), Validator = "InclusiveBetween(13,100)" },
});
This can also be used to support alternative data sources by pre-populating validation rules in an MemoryValidationSource, although the recommendation would be to implement IValidationSourceAdmin to get the full features of the Admin Validation UI.
Validation UI
We can start adding validation rules after selecting the API we want to add them to, tag groups provide a quick view popup allowing APIs to be selected with just a mouse, whilst groups with a large number of APIs can benefit from the Autocomplete textbox results filter.
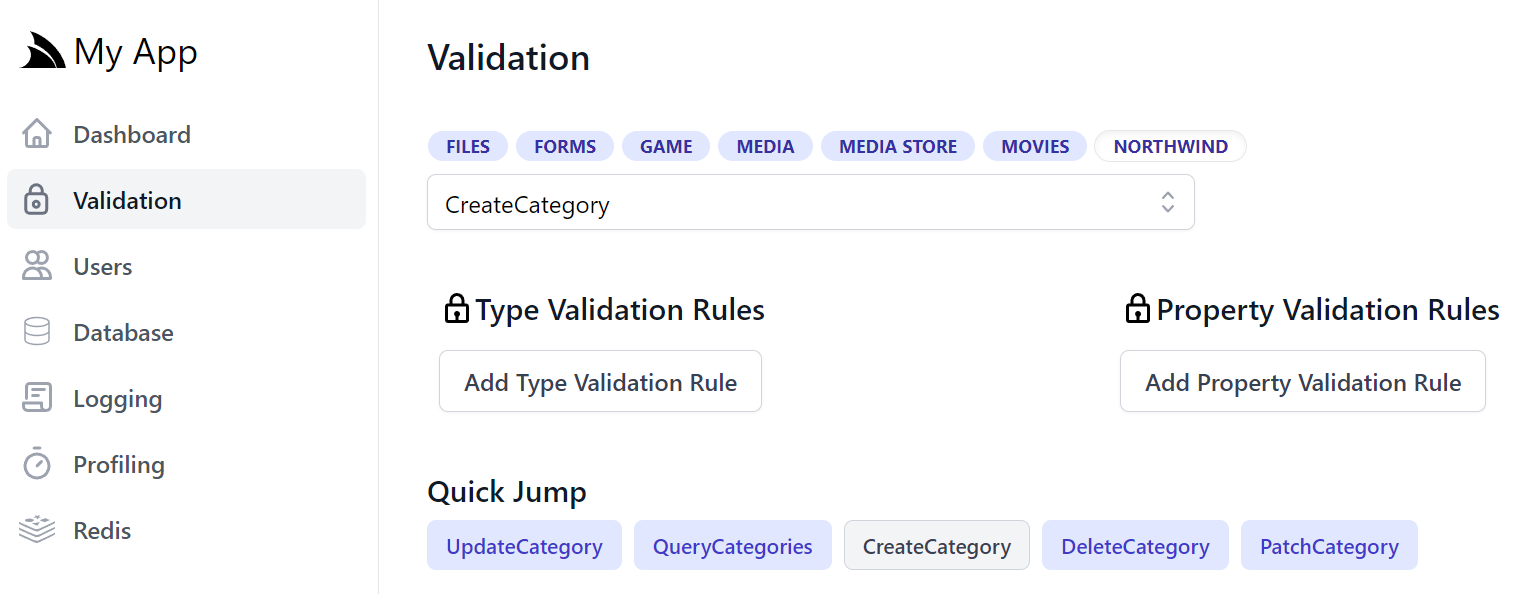
The quick links help navigating between related AutoQuery APIs that allows jumping between different APIs with the same Data Model.
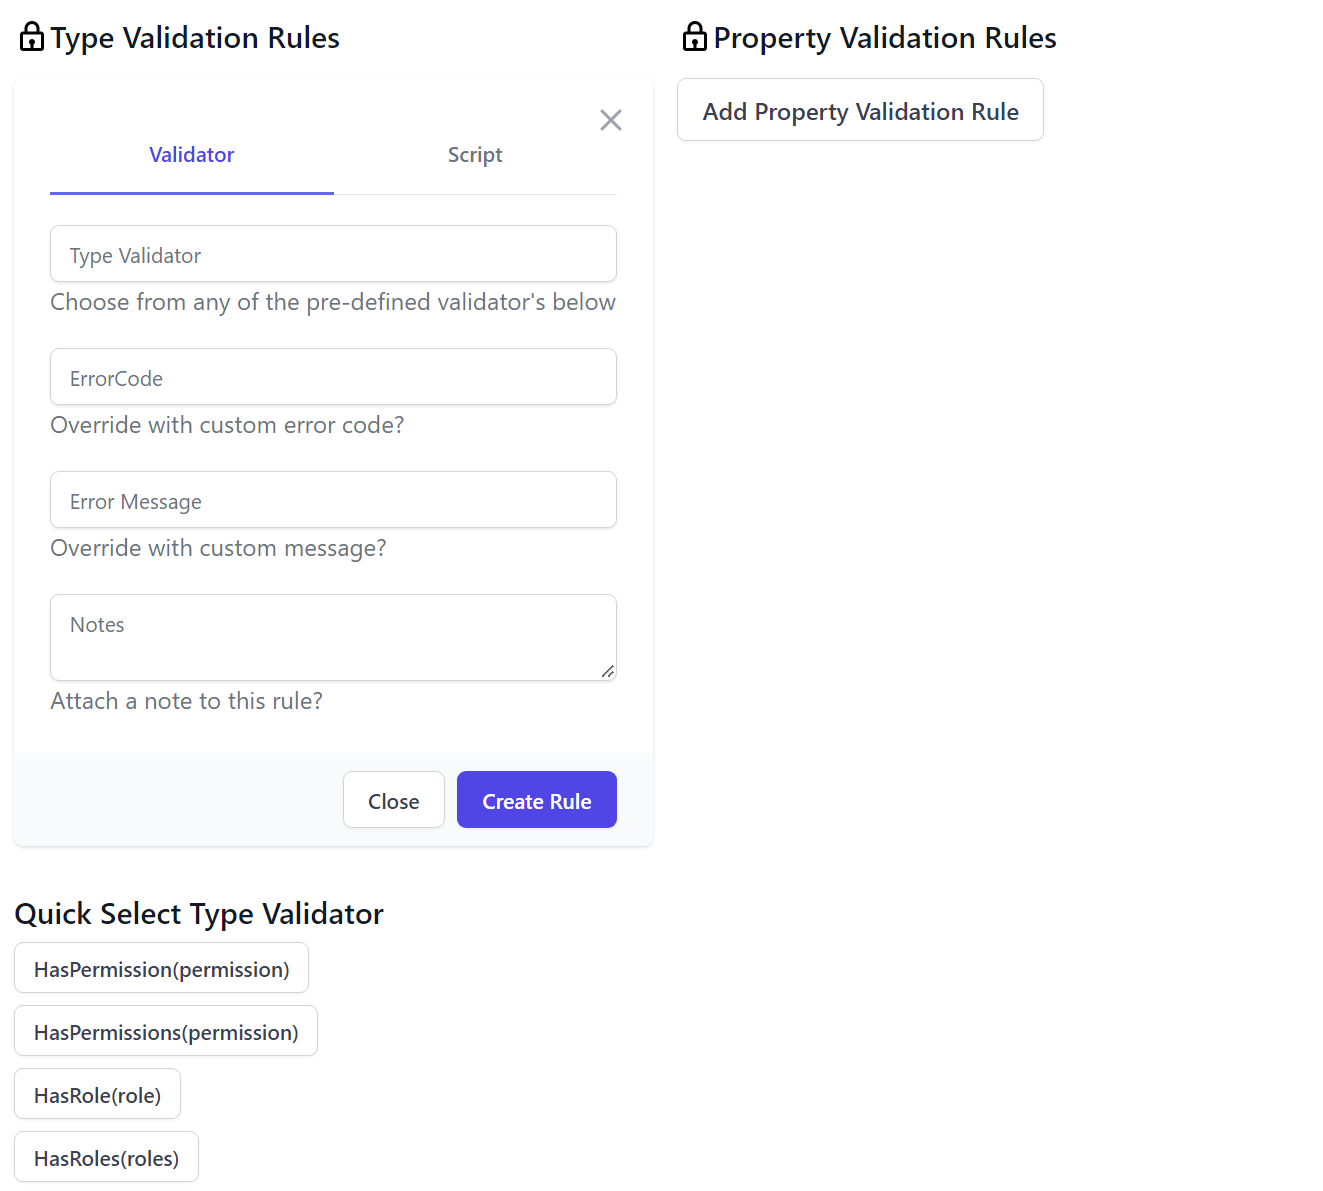
In the validation editor you'll be able to create Type and Property Validation Rules that either make use of an existing Validator or you can enter a custom #Script expression that validates to true. The DB Validationo UI is smart and will list all built-in and Custom Script Methods returning ITypeValidator or IPropertyValidator that's registered in the remote instance. The pre-defined list of validators are displayed in a list of "quick pick" buttons that enables fast adding/editing of validation rules.
Verified Rules
The ModifyValidationRules API used to save validation rules performs a number of checks to ensure any Validation rules are accurate including executing the validator to make sure it returns the appropriate validator type and checking the syntax on any Script validation rules to ensure it's valid.

The ModifyValidationRules back-end API also takes care of invalidating the validation rule cache so that any saved Validators are immediately applied.
Despite being sourced from a DB, after the first access the validation rules are cached in memory where they'd have similar performance profile to validators declaratively added on Request DTOs in code.
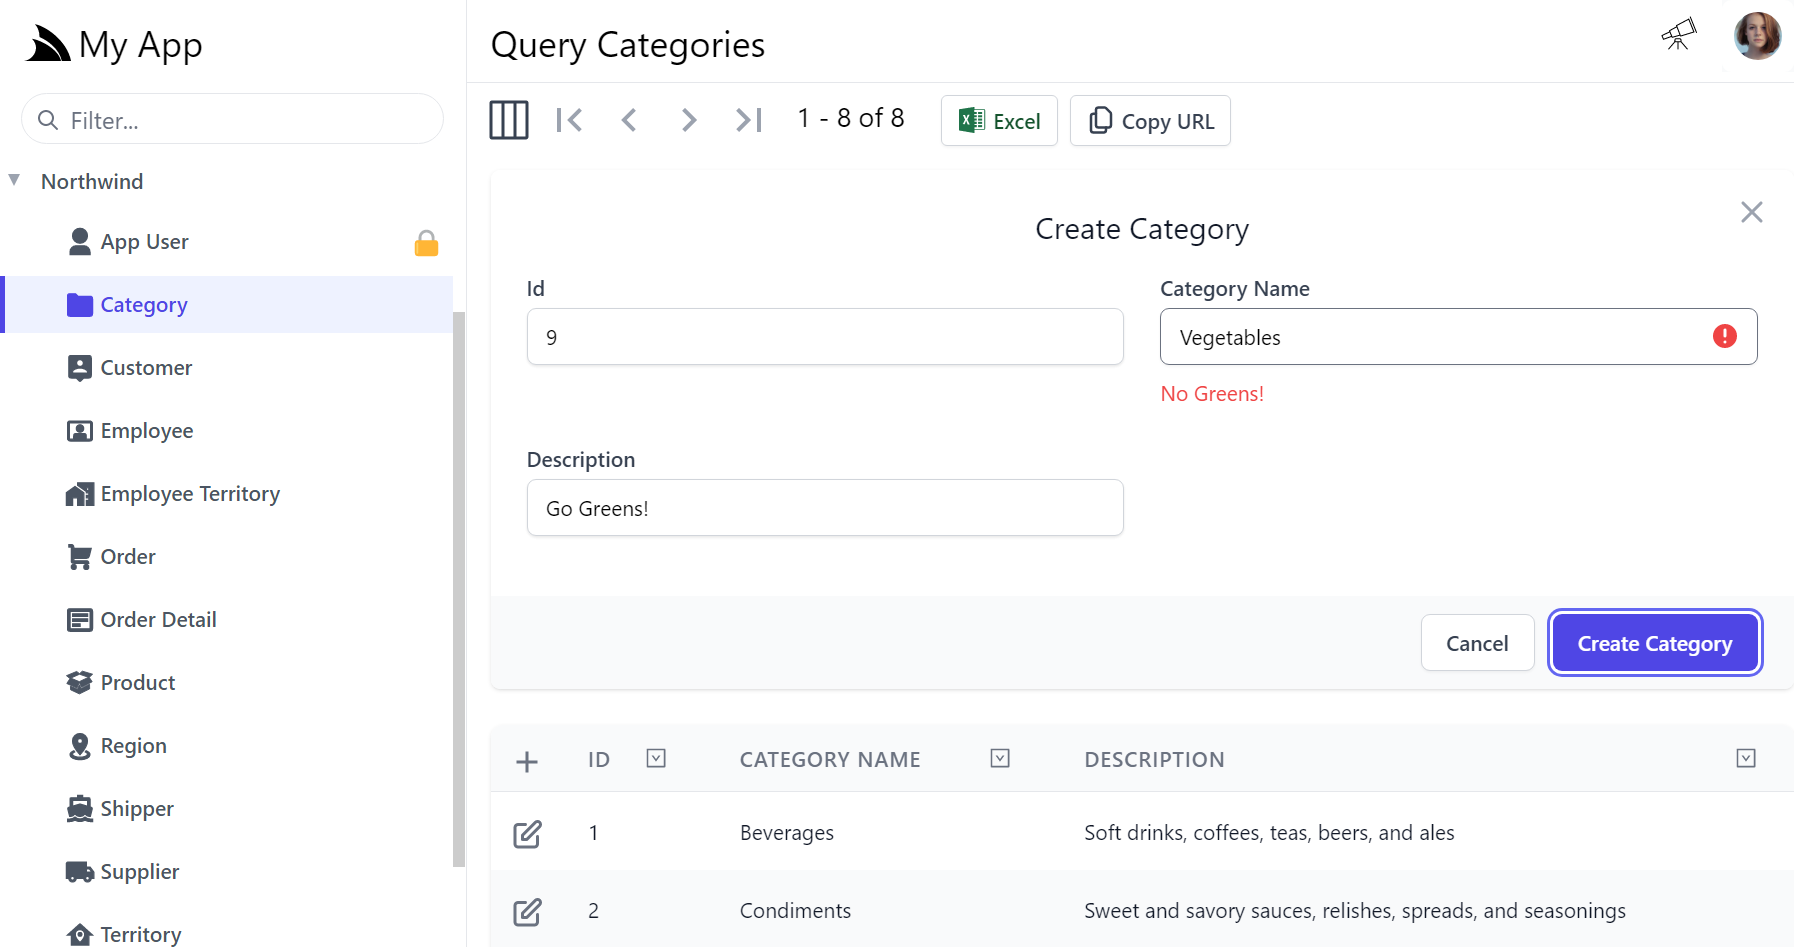
After you add your validation rules they'll be immediately enforced when calling the API, e.g. in API Explorer or Locode. Be mindful of what Validation Rule you're adding to which DTO, e.g. a validation rule added to CreateCategory API will only be applied when creating entities, e,g. not for full entity or partial field updates.
Retiring Studio
With DB Validation support now added, we've completed the reimplementation of Studio Desktop App features within the ServiceStack library itself and its built-in Locode, API Explorer and Admin UIs.
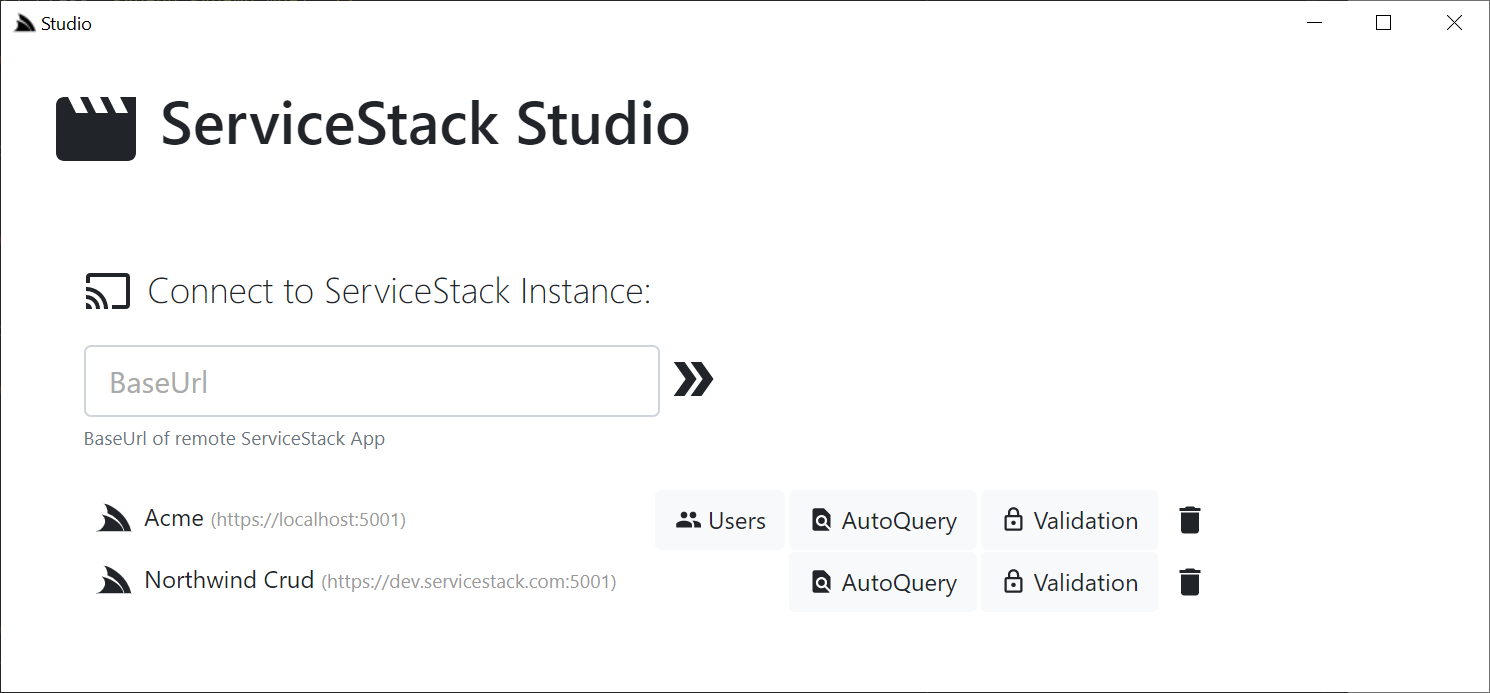
Whilst Studio enabled managing multiple instances of ServiceStack from a single Desktop App, the UI not being served from the same Web App hindered development as it couldn't use integrated browser auth and forced needing to manage multiple authentication sessions for each site and required proxying every request to attach the auth info. It's App Metadata also had to remain backwards-compatible to support multiple versions of ServiceStack which inhibited progress.
In contrast our new built-in UIs offer far superior development velocity and better utility for users which can reuse existing authenticated sessions, as a result we're retiring ServiceStack Studio and focusing development of all new UI features to the existing built-in UIs.
ServiceStack v6.1.0 will the last version of ServiceStack and app v6.0.4 will be the last app tool version that will be able to run Studio:
dotnet tool install --global app --version 6.0.4
Locode
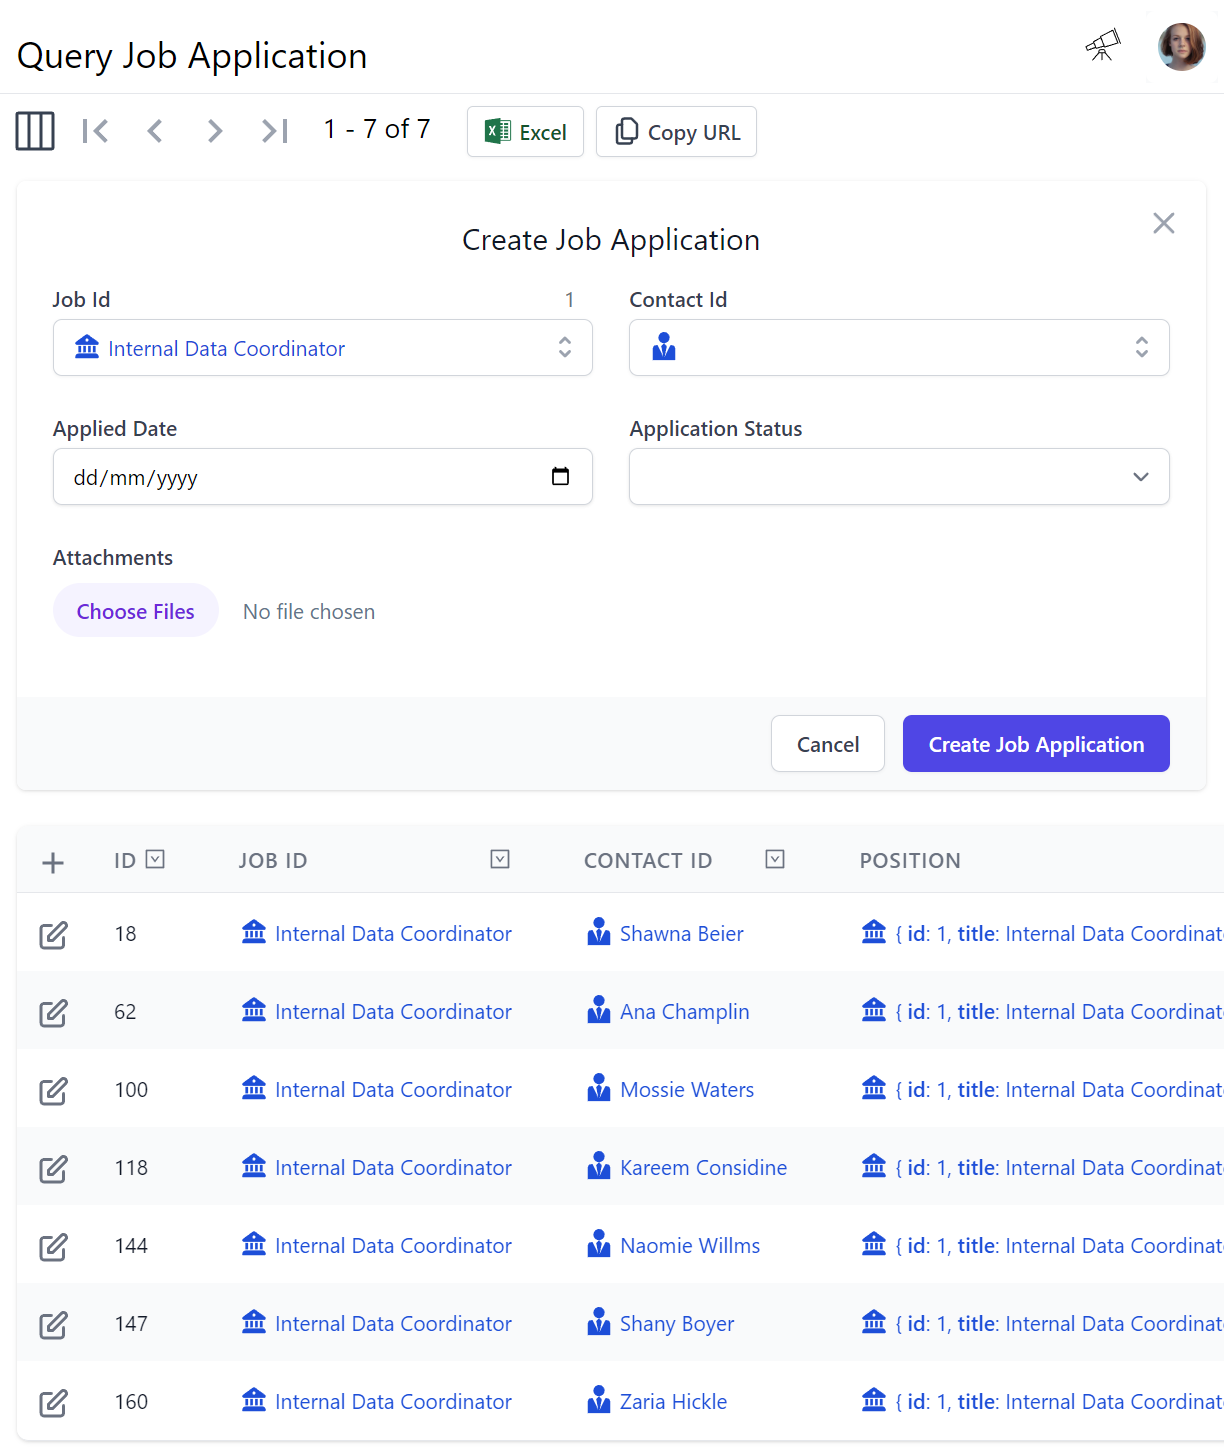
Pre-populated Reference Data
As we look for ways to improve productivity in Locode now pre-populates referential data from navigated references, e.g. when creating a new Job Application after navigating to a Job's Applications in Talent Blazor it uses this context to pre-populate the Job it's filtered by:
Support for Large Apps
The built-in capability-based UI's are powered from your APIs metadata, as more of our Customers start to make use of these new UIs in their workflow we've had reports from some customers with Large Apps (550+ APIs) that the UIs started to hang their browsers when it tried to process the 9.5MB of generated metadata.
To support Larger Apps we've added the ability to restrict the metadata and UIs to only related APIs in user-defined Tag Groups by adding ?IncludeTypes to the URL, e.g:
/ui/?IncludeTypes={tag}
This follows the Include Types pattern where you can view multiple tag groups with:
/ui/?IncludeTypes={tag1},{tag2}
This feature is supported in all built-in UIs and is now integrated on the /metadata page where if you select a tag the API Explorer link will be updated with ?IncludeTypes=:
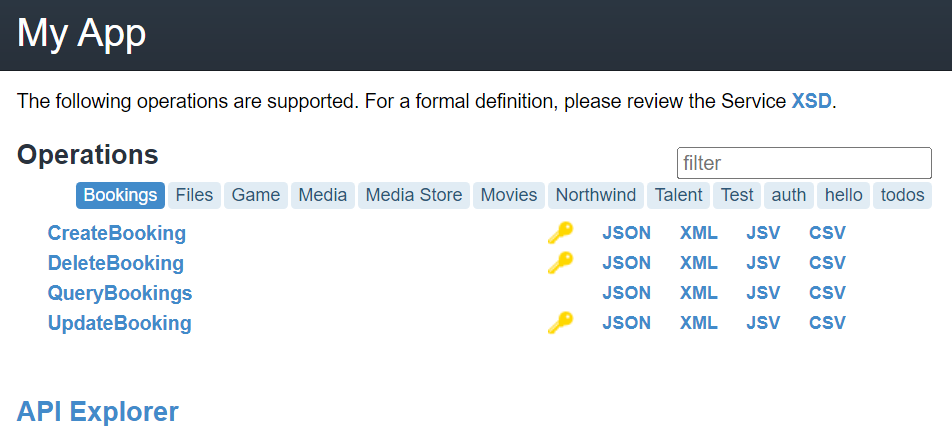
Where you'll now be able to open API Explorer restricted to APIs with that tag without needing to manually craft the URL.
Localize Metadata
To assist with with creating Localized Locode UIs, all user-defined descriptive text is now routed through to your AppHost's ResolveLocalizedString() method which you can use to return a localized string for the current request, e.g:
public override string ResolveLocalizedString(string text, IRequest request = null)
{
    return request != null
        ? MyResolveLocalizedString(text, request.Headers[HttpHeaders.AcceptLanguage])
        : text;
}
Simplified ApiForm APIs
The new ApiForm APIs have added more ergonomic overloads when submitting mixed Request DTO + Form Data requests where the API URL now able to be inferred from the Request DTO, e.g:
var client = JsonApiClient(BaseUrl);

using var content = new MultipartFormDataContent()
    .AddFile(nameof(MultipartRequest.ProfileUrl), "profile.png", imageStream)
    .AddFile(nameof(MultipartRequest.ResumeUrl),  "resume.pd",   resumeStream);

var request = new MultipartRequest {
    Id = 2,
    String = "bar",
    Contact = new Contact { Id = 1, FirstName = "First", LastName = "Last" },
};

var api = client.ApiForm(request, content);
PostFilesWithRequest uses preferred HTTP Method
The PostFilesWithRequest APIs for uploading files in addition to Request DTOs now uses your APIs preferred HTTP Method if defined, so you can now use these APIs to make PUT and PATCH File Upload + Requset DTO requests.