The FileUploadFeature plugin is a high-level ServiceStack feature that allows you to configure multiple managed
file upload locations within the same App that you can declaratively bind to different APIs to use.
Upload Locations can be configured to use any of the supported Writable Virtual File Systems including:
FileSystemVirtualFiles- Hard-disk or Network Files and Directories from a specified directoryS3VirtualFiles- Files stored on Amazon's S3 Managed File Storage in ServiceStack.AwsR2VirtualFiles- Files stored on CloudFlare's R2 Managed File Storage in ServiceStack.AwsAzureBlobVirtualFiles- Files stored on Azure's Managed Blob Storage in ServiceStack.AzureGistVirtualFiles- Files persisted to a GitHub GistMemoryVirtualFiles- Temporary Virtual Files and Folders that last for the lifetime of the AppHost
TIP
Additional support for external file storages can be added by Implementing a new Virtual File System
Managed file uploads is a generic feature any ServiceStack HTTP API can use by declaratively annotating it on Request DTOs. It's especially useful in AutoQuery CRUD APIs as it enables an easy way to populate a file path that can be stored along with a table row without the uploaded files embedded in the database itself, taking up valuable RDBMS resources and significantly impacting its performance.
Basic File Upload Example
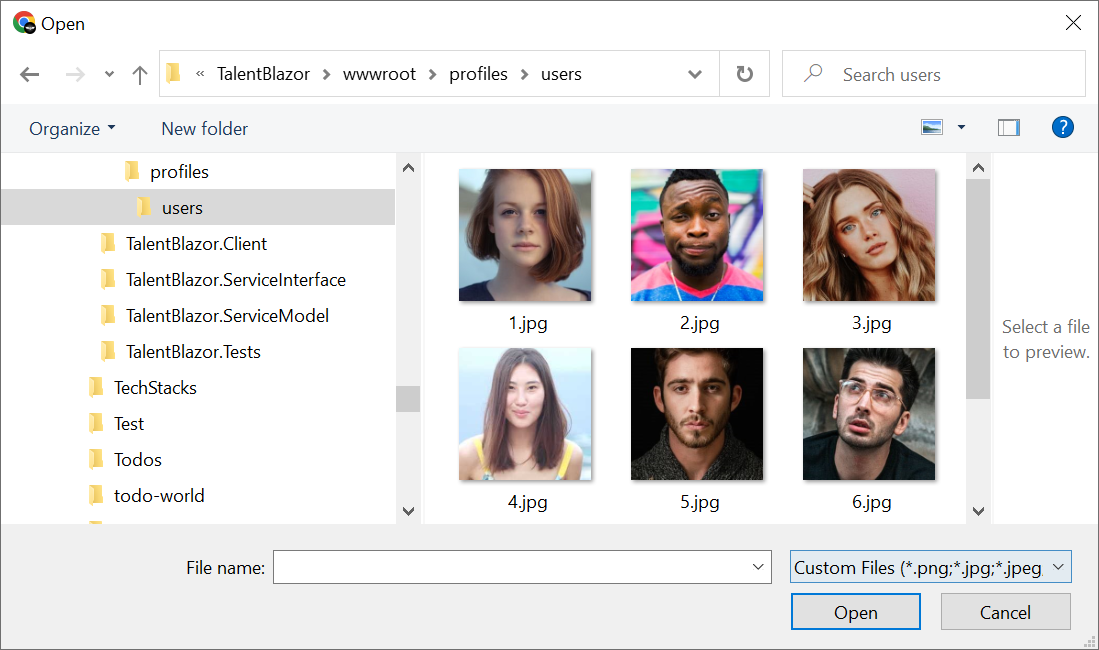
To demonstrate how to use the Managed File Uploads feature we'll look at handling the basic example of uploading files
to publicly accessible /wwwroot folder location. This is what the talent.locode.dev Demo
uses to handle profile image uploads for Contacts and Users in different locations in its
Configure.AppHost.cs:
.ConfigureServices((context, services) =>
{
    // Configure ASP.NET Core IOC Dependencies
    var wwwrootVfs = new FileSystemVirtualFiles(context.HostingEnvironment.WebRootPath);
    services.AddPlugin(new FilesUploadFeature(
        new UploadLocation("profiles", wwwrootVfs, allowExtensions:FileExt.WebImages,
            resolvePath: ctx => $"/profiles/{ctx.FileName}"),
        new UploadLocation("users", wwwrootVfs, allowExtensions:FileExt.WebImages,
            resolvePath: ctx => $"/profiles/users/{ctx.UserAuthId}.{ctx.FileExtension}"),
        //...
    ));
});
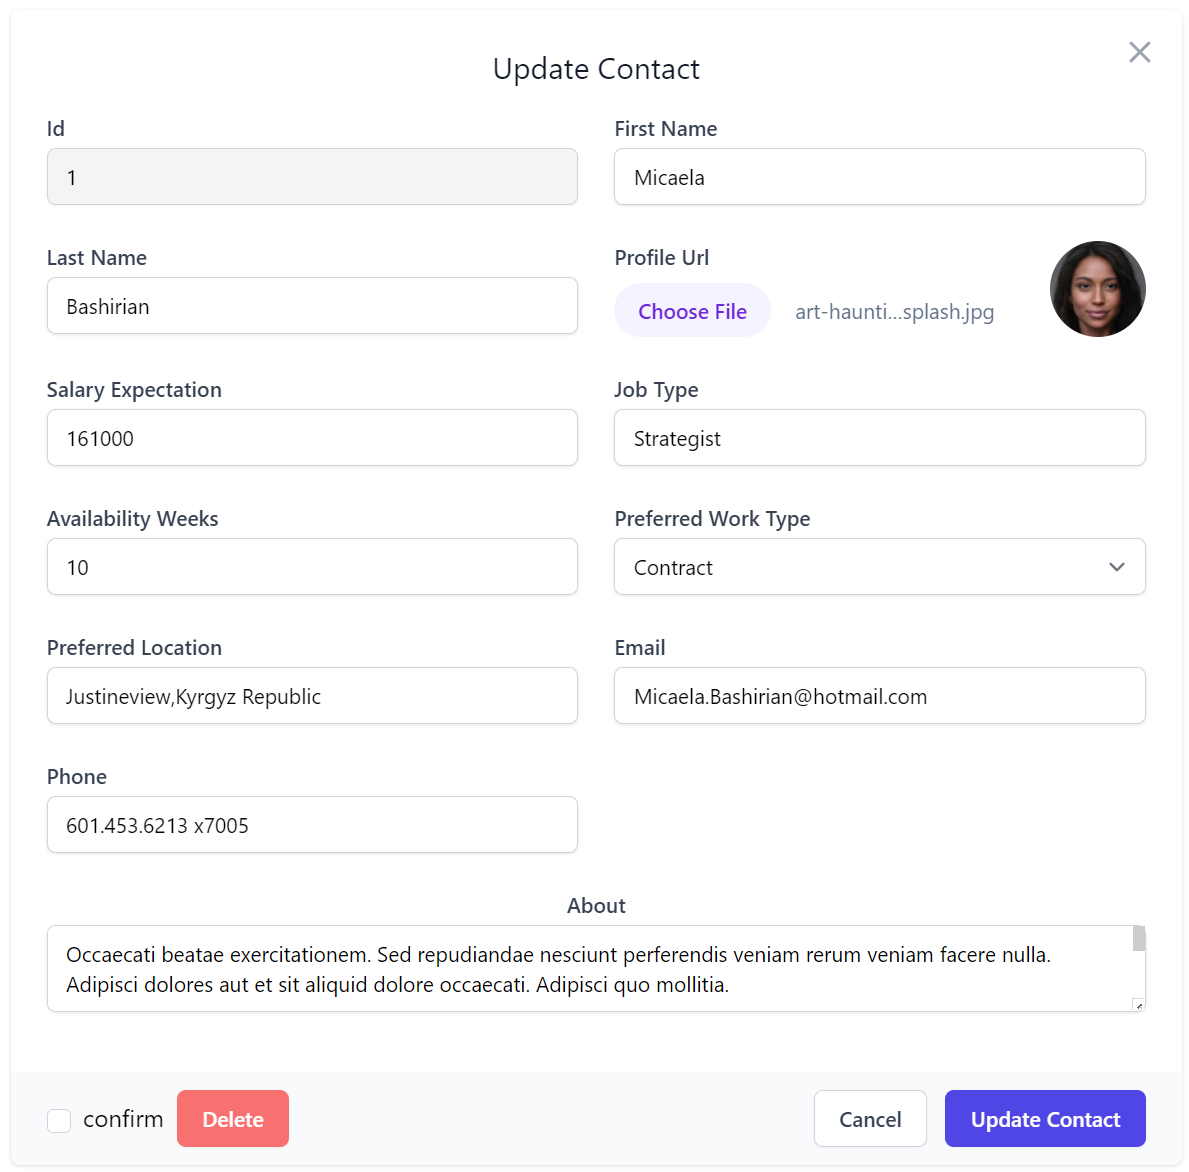
As both locations are uploaded to the App's /wwwroot folder they'll be immediately accessible after they're uploaded.
Contact profile images are saved using their uploaded FileName whilst User profiles are saved in a predictable location
against their User Id and uploaded File Extension type.
The only default restriction placed on File Uploads is that they can only be performed by Authenticated Users.
Each UploadLocation is able to use the several configuration options available to further restrict file uploads
by file type, count, size, number of uploads or a custom validation function. In this instance Talent Blazor
is restricting uploads in allowExtensions to only Images supported by Browsers, which is a server validation that
also gets propagated to the client to limit the user to only be able to select from the server-configured file extensions:
To simplify configuration we've included a number of pre-configured file extensions for different file types.
public static class FileExt
{
    string[] WebImages = { "png", "jpg", "jpeg", "gif", "svg", "webp" };
    string[] BinaryImages = {"png", "jpg", "jpeg", "gif", "bmp", "tif", "tiff", "webp", "ai", "psd","ps"};
    string[] Images = WebImages.CombineDistinct(BinaryImages);
    string[] WebVideos = { "avi", "m4v", "mov", "mp4", "mpg", "mpeg", "wmv", "webm" };
    string[] WebAudios = { "mp3", "mpa", "ogg", "wav", "wma", "mid", "webm" };
    string[] BinaryDocuments = { "doc", "docx", "pdf", "rtf" };
    string[] TextDocuments = { "tex", "txt", "md", "rst" };
    string[] Spreadsheets = { "xls", "xlsm", "xlsx", "ods", "csv", "txv" };
    string[] Presentations = { "key", "odp", "pps", "ppt", "pptx" };
    string[] AllDocuments = BinaryDocuments.CombineDistinct(TextDocuments, Presentations, Spreadsheets);
    string[] WebFormats = WebImages.CombineDistinct(WebVideos, WebAudios);
}
Using File Upload Locations in APIs
With just the above configuration we can now use them in our APIs, which Talent Blazor does in its CreateContact
and UpdateContact CRUD APIs to handle uploading a contact profiles image
when they're Created and Updated:
public class CreateContact : ICreateDb<Contact>, IReturn<Contact>
{
    [ValidateNotEmpty]
    public string FirstName { get; set; } = string.Empty;
    [ValidateNotEmpty]
    public string LastName { get; set; } = string.Empty;

    [Input(Type = "file"), UploadTo("profiles")]
    public string? ProfileUrl { get; set; }

    public int? SalaryExpectation { get; set; }
    [ValidateNotEmpty]
    public string JobType { get; set; } = string.Empty;
    public int AvailabilityWeeks { get; set; }
    public EmploymentType PreferredWorkType { get; set; }
    [ValidateNotEmpty]
    public string PreferredLocation { get; set; } = string.Empty;
    [ValidateNotEmpty]
    public string Email { get; set; } = string.Empty;
    public string? Phone { get; set; }
}

public class UpdateContact : IPatchDb<Contact>, IReturn<Contact>
{
    public int Id { get; set; }
    [ValidateNotEmpty]
    public string? FirstName { get; set; }
    [ValidateNotEmpty]
    public string? LastName { get; set; }

    [Input(Type = "file"), UploadTo("profiles")]
    public string? ProfileUrl { get; set; }

    public int? SalaryExpectation { get; set; }
    [ValidateNotEmpty]
    public string? JobType { get; set; }
    public int? AvailabilityWeeks { get; set; }
    public EmploymentType? PreferredWorkType { get; set; }
    public string? PreferredLocation { get; set; }
    [ValidateNotEmpty]
    public string? Email { get; set; }
    public string? Phone { get; set; }
    [Input(Type = "textarea"), FieldCss(Field = "col-span-12 text-center")]
    public string? About { get; set; }
}
Only the [UploadTo(location)] attribute is required to instruct the API to use the specified Upload Location to
handle the File Upload. For successful uploads the Uploaded HTTP File will be saved to the configured file path which
it populates on the ProfileUrl property which from that point is treated as a normal string property that is
validated and stored along with the rest of the DTO properties in the Contact Table.
Auto Form UIs
In API Explorer & Locode Apps you'll want to pair this together with [Input(Type="file")] to instruct the Auto Form UI
to use its File Upload control to handle updating this property, which looks like:
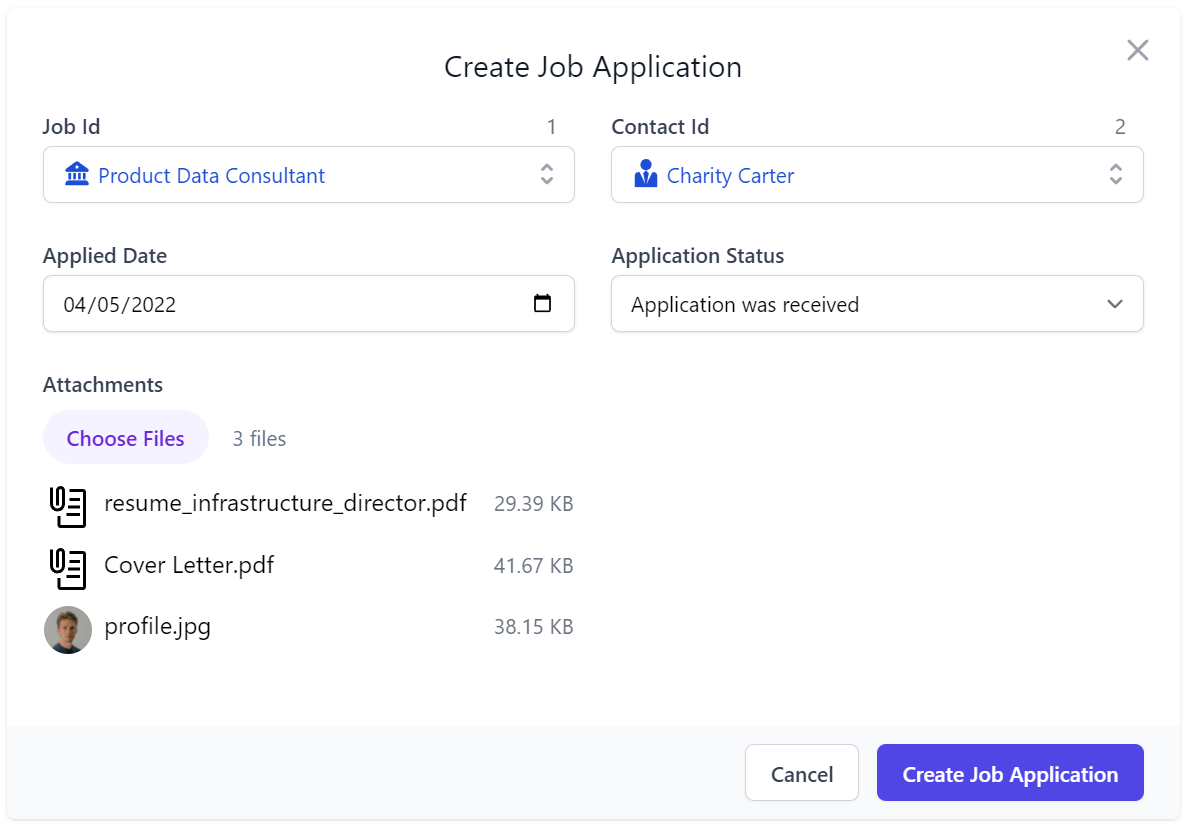
Managed Multi File Upload example
In addition to managing image profiles for its Users and Contacts, Talent Blazor also uses Managed File Uploads to handle accepting an Applicant's Job Application attachments. A more advanced configuration is needed for this use-case, that:
- Saves uploaded Applications to the non-servable ~/App_Data folder
- Limits Job Applications to a maximum of 3 attachments
- Limits Max Upload size to 10mb
- Allows non-authenticated Users to upload & download their attachments
.ConfigureServices((context, services) =>
{
    // Configure ASP.NET Core IOC Dependencies
    var appDataVfs = new FileSystemVirtualFiles(context.HostingEnvironment.ContentRootPath.CombineWith("App_Data").AssertDir());
    services.AddPlugin(new FilesUploadFeature(
        //...
        new UploadLocation("applications", appDataVfs, maxFileCount: 3, maxFileBytes: 10_000_000,
            resolvePath: ctx => ctx.GetLocationPath((ctx.Dto is CreateJobApplication create
                    ? $"jobapp/{create.JobId}/{create.ContactId}/{ctx.FileName}"
                    : $"app/{ctx.Dto.GetId()}") + $"/{ctx.DateSegment}/{ctx.FileName}"),
            readAccessRole: RoleNames.AllowAnon, writeAccessRole: RoleNames.AllowAnon)
    ));
});
In this case instead of resolving a relative path from /wwwroot it uses ctx.GetLocationPath() to resolve to a managed
file location whose access is managed by FilesUploadFeature File Management APIs:
| API | Route | Description |
|---|---|---|
StoreFileUpload |
POST /uploads/{Name} |
Upload files to the specified managed location |
GetFileUpload |
GET /uploads/{Name}/{Path} |
Download file from the specified managed location |
ReplaceFileUpload |
PUT /uploads/{Name}/{Path} |
Overwrite file at the specified managed location |
DeleteFileUpload |
DELETE /uploads/{Name}/{Path} |
Delete file at the specified managed location |
TIP
/uploads is the default overridable BasePath for FilesUploadFeature managed File APIs
We can now start accepting attachments with our Job Applications by adding [Input(Type="file"), UploadTo("applications")]
to the property where we want the Uploaded File metadata populated, when submitting and updating Job Applications:
public class CreateJobApplication : ICreateDb<JobApplication>, IReturn<JobApplication>
{
    [ValidateGreaterThan(0)]
    public int JobId { get; set; }
    [ValidateGreaterThan(0)]
    public int ContactId { get; set; }
    public DateTime AppliedDate { get; set; }
    public JobApplicationStatus ApplicationStatus { get; set; }
    [Input(Type="file"), UploadTo("applications")]
    public List<JobApplicationAttachment> Attachments { get; set; }
}

public class UpdateJobApplication : IPatchDb<JobApplication>, IReturn<JobApplication>
{
    public int Id { get; set; }
    public int? JobId { get; set; }
    public int? ContactId { get; set; }
    public DateTime? AppliedDate { get; set; }
    public JobApplicationStatus ApplicationStatus { get; set; }
    [Input(Type="file"), UploadTo("applications")]
    public List<JobApplicationAttachment>? Attachments { get; set; }
}
This is all that's needed to configure our CRUD Services to handle multiple file uploads in Locode & API Explorer:
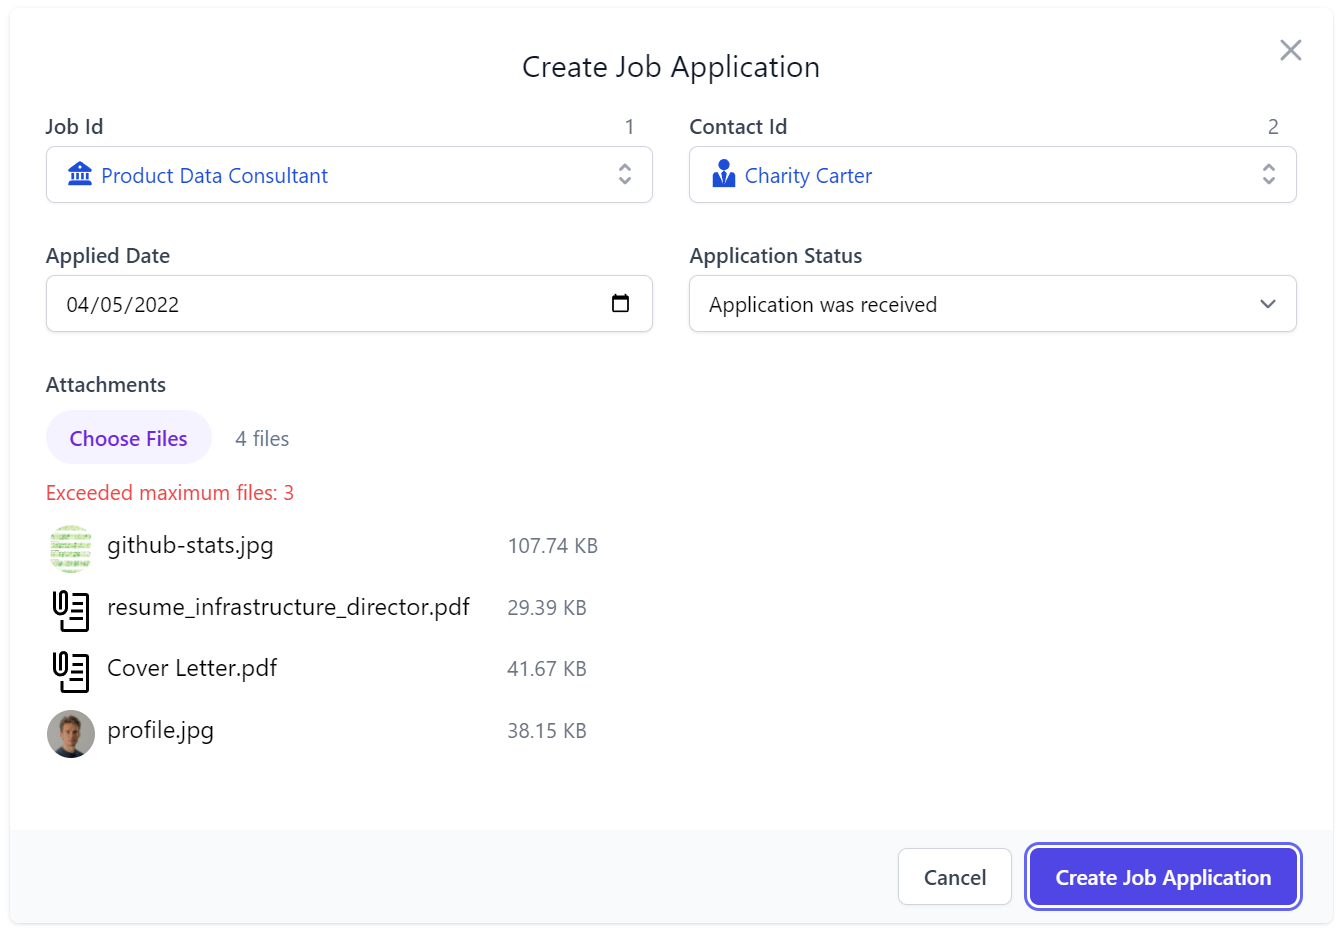
Where the File Input behaves as just another Input control with contextual validation errors displayed when it exceeds any of the configured file restrictions on its Upload Location, e.g:
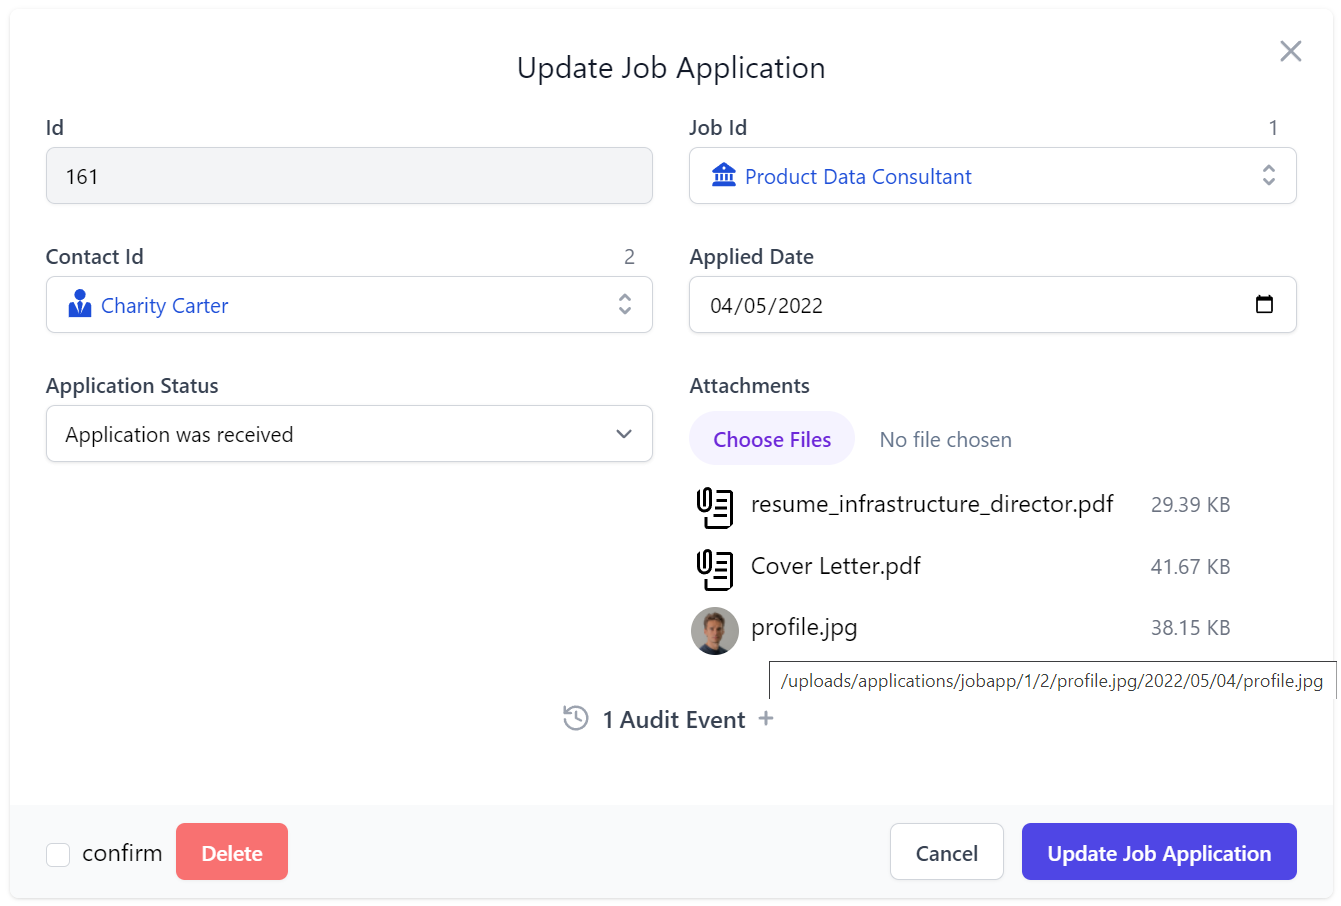
After a successful submission the attachments are uploaded to the configured managed location path which is then used to access the file in the Update Job Application Form UI:
Integrates with AutoQuery CRUD
This is another example of how well this generic feature works with the rest of ServiceStack, where without any
implementation logic the AutoQuery CRUD API is able to populate a 1 to Many table relationship to capture the metadata
of each uploaded file because the Attachments Request DTO property maps to a [Reference]
POCO Reference property which automatically populates
Foreign Key Reference properties in CRUD APIs.
public class JobApplication : AuditBase
{
    [Reference]
    public List<JobApplicationAttachment> Attachments { get; set; }
    //...
}

public class JobApplicationAttachment
{
    [AutoIncrement]
    public int Id { get; set; }

    [References(typeof(JobApplication))]
    public int JobApplicationId { get; set; }

    public string FileName { get; set; }
    [Format(FormatMethods.Attachment)]
    public string FilePath { get; set; }
    public string ContentType { get; set; }
    [Format(FormatMethods.Bytes)]
    public long ContentLength { get; set; }
}
Uploaded File Metadata populated in Complex Type properties
This also shows that [UploadTo] can either be applied to a string property where it's just populated with the
path the file is uploaded to, or it could contain a complex type where any matching properties are populated with
metadata of the uploaded file:
| Property | Description |
|---|---|
| FilePath | The UploadLocation path where the file is uploaded to |
| Name | The form field name from the Content-Disposition header |
| FileName | The file name of the uploaded file |
| ContentLength | The size in bytes of the uploaded file |
| ContentType | The Content-Type of the uploaded file |
In addition, it also supports List<string> or List<T> complex types for handling multiple file uploads, as done in this case.
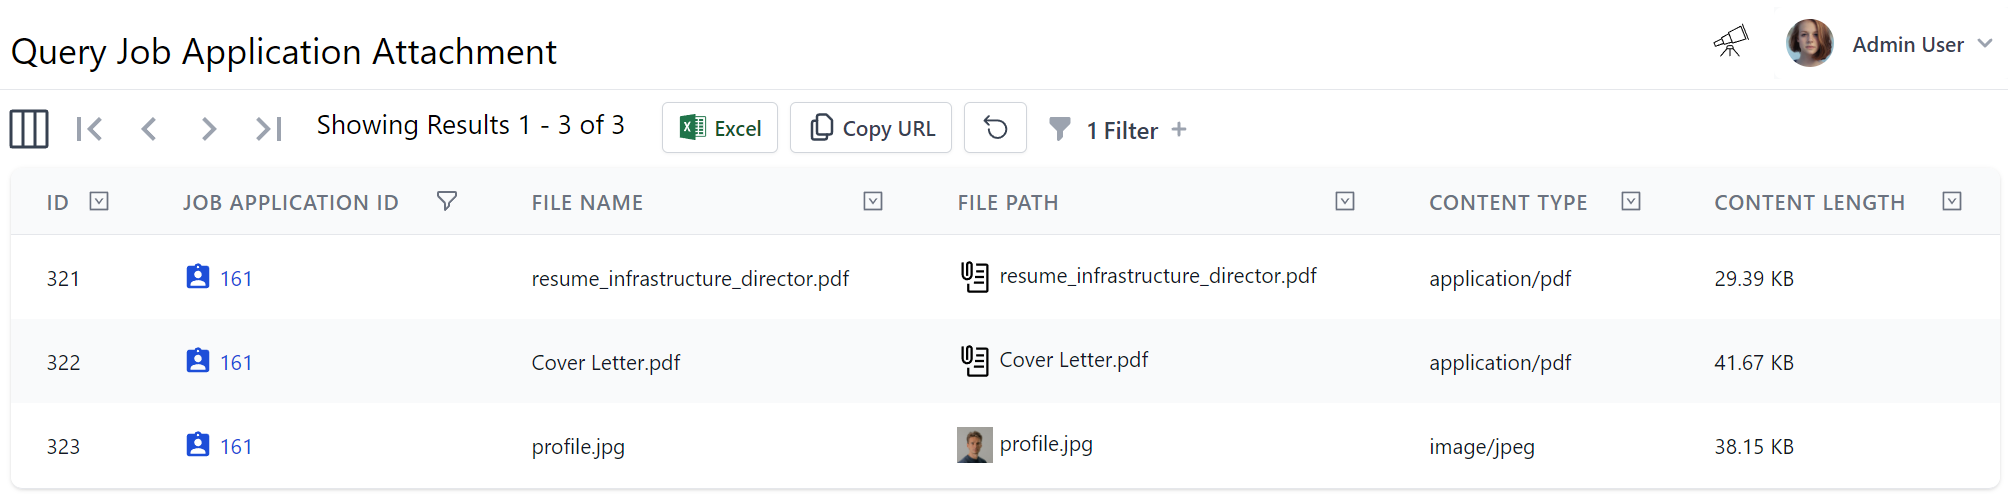
All these features work together to achieve our desired result of populating submitted applications in the
JobApplicationAttachment joined table, so their metadata can be browsed, queried and navigated like any other
related data without file system access and without their contents consuming RDBMS resources:
Uploading Files from C#
We can see how Locode gives us instant utility and lets us start submitting file attachments with any AutoQuery CRUD DTO, but as the feature just uses the standard HTTP multipart/form-data Content-Type, we can use the existing Service Client APIs for uploading files as demonstrated in Talent Blazor's FileUploadTests.cs which uploads a single attachment when creating a Contact with a Profile Image and multiple file attachments when submitting a Job Application:
var profileImg = await ProfileImageUrl.GetStreamFromUrlAsync();
var contact = await client.PostFileWithRequestAsync<Contact>(profileImg, "cody-fisher.png",
    new CreateContact
    {
        FirstName = "Cody",
        LastName = "Fisher",
        Email = "cody.fisher@gmail.com",
        JobType = "Security",
        PreferredLocation = "Remote",
        PreferredWorkType = EmploymentType.FullTime,
        AvailabilityWeeks = 1,
        SalaryExpectation = 100_000,
        About = "Lead Security Associate",
    }, fieldName:nameof(CreateContact.ProfileUrl));

// contact.ProfileUrl = /profiles/cody-fisher.png

var uploadedImage = await client.BaseUri.CombineWith(contact.ProfileUrl).GetStreamFromUrlAsync();
var coverLetter = new FileInfo($"{AppData}/sample_coverletter.pdf");
var resume = new FileInfo($"{AppData}/sample_resume.pdf");

var attachmentsField = nameof(CreateJobApplication.Attachments);
var uploadAttachments = new UploadFile[] {
    new(coverLetter.Name, coverLetter.OpenRead(), attachmentsField),
    new(resume.Name, coverLetter.OpenRead(), attachmentsField),
    new(contact.ProfileUrl.LastRightPart('/'), uploadedImage, attachmentsField),
};

var jobApp = await client.PostFilesWithRequestAsync<JobApplication>(new CreateJobApplication {
        JobId = 1,
        AppliedDate = DateTime.UtcNow,
        ContactId = contact.Id,
    }, uploadAttachments);

uploadAttachments.Each(x => x.Stream.Dispose());
This example also shows APIs are able to submit files from any Stream that can be sourced from anywhere,
including the HTTP Response stream of a Remote URI or files from a local hard drive.
Using HttpClient MultipartFormDataContent
The introduction of .NET 6+ JsonApiClient lets us provide an even more flexible approach by utilizing
MultipartFormDataContent() which we've enhanced with high-level extension methods to enable a Fluent API for constructing
custom API Requests populated from multiple sources, which can be sent using its ApiForm* methods:
var profileImg = await ProfileImageUrl.GetStreamFromUrlAsync();
using var createContact = new MultipartFormDataContent()
    .AddParams(new CreateContact
    {
        FirstName = "Cody",
        LastName = "Fisher",
        Email = "cody.fisher@gmail.com",
        JobType = "Security",
        PreferredLocation = "Remote",
        PreferredWorkType = EmploymentType.FullTime,
        AvailabilityWeeks = 1,
        SalaryExpectation = 100_000,
        About = "Lead Security Associate",
    })
    .AddFile(nameof(CreateContact.ProfileUrl), "cody-fisher.png", profileImg);

var contactApi = await client.ApiFormAsync<Contact>(typeof(CreateContact).ToApiUrl(), createContact);
// contactApi.Succeeded = true
var contact = contactApi.Response!;
// contact.ProfileUrl   = /profiles/cody-fisher.png

using var uploadedImage = await client.BaseUri.CombineWith(contact.ProfileUrl).GetStreamFromUrlAsync();
var coverLetter = new FileInfo($"{AppData}/sample_coverletter.pdf");
var resume = new FileInfo($"{AppData}/sample_resume.pdf");

var attachmentsField = nameof(CreateJobApplication.Attachments);
var createJobApp = new MultipartFormDataContent()
    .AddParams(new CreateJobApplication {
        JobId = 1,
        AppliedDate = DateTime.UtcNow,
        ContactId = contact.Id,
    })
    .AddFile(attachmentsField, coverLetter)
    .AddFile(attachmentsField, resume)
    .AddFile(attachmentsField, contact.ProfileUrl.LastRightPart('/'), uploadedImage);

var jobAppApi = await client.ApiFormAsync<JobApplication>(
    typeof(CreateJobApplication).ToApiUrl(), createJobApp);
// jobAppApi.Succeeded = true
var jobApp = jobAppApi.Response!;
TIP
All JsonApiClient Async APIs also have
safe sync equivalents when access outside an async method is needed
Versatile Multi Part Content Type APIs
AutoQueryCrudTests.References.cs
also showcases how we can take advantage of MultipartFormDataContent to construct custom requests using a combination
of different Content Type sources, including single and multiple file attachments within a single request:
public class MultipartRequest : IPost, IReturn<MultipartRequest>
{
    public int Id { get; set; }
    public string String { get; set; }

    // Complex types sent as JSV by default
    public Contact Contact { get; set; }

    [MultiPartField(MimeTypes.Json)]
    public PhoneScreen PhoneScreen { get; set; }

    [MultiPartField(MimeTypes.Csv)]
    public List<Contact> Contacts { get; set; }

    [UploadTo("profiles")]
    public string ProfileUrl { get; set; }

    [UploadTo("applications")]
    public List<UploadedFile> UploadedFiles { get; set; }
}
Complex types are sent using JSV by default which is a more human & wrist-friendly and more efficient format than JSON, however we could also take advantage of the flexibility in HTTP multipart/form-data requests to construct an HTTP API Request utilizing multiple Content-Type's optimized for the data we're sending, e.g:
- JSON/JSV more optimal for hierarchical graph data
- CSV more optimal for sending tabular data
- File Uploads are more optimal for sending large files
To facilitate this in our Server APIs we can use [MultiPartField] attribute to instruct ServiceStack which registered
serializer it should use to deserialize the form-data payload, whilst we can continue using the generic [UploadTo]
attribute in normal APIs to handle our File Uploads and populate the Request DTO with the uploaded file metadata.
Our MultipartFormDataContent extension methods simplifies our client logic by allowing us to easily populate this
custom request in a single Fluent construction expression:
using var content = new MultipartFormDataContent()
    .AddParam(nameof(MultipartRequest.Id), 1)
    .AddParam(nameof(MultipartRequest.String), "foo")
    .AddParam(nameof(MultipartRequest.Contact),
        new Contact { Id = 1, FirstName = "First", LastName = "Last" })
    .AddJsonParam(nameof(MultipartRequest.PhoneScreen),
        new PhoneScreen { Id = 3, JobApplicationId = 1, Notes = "The Notes"})
    .AddCsvParam(nameof(MultipartRequest.Contacts), new[] {
        new Contact { Id = 2, FirstName = "First2", LastName = "Last2" },
        new Contact { Id = 3, FirstName = "First3", LastName = "Last3" },
    })
    .AddFile(nameof(MultipartRequest.ProfileUrl), "profile.txt", file1Stream)
    .AddFile(nameof(MultipartRequest.UploadedFiles), "uploadedFiles1.txt", file2Stream)
    .AddFile(nameof(MultipartRequest.UploadedFiles), "uploadedFiles2.txt", file3Stream));

var api = await client.ApiFormAsync<MultipartRequest>(typeof(MultipartRequest).ToApiUrl(), content);
if (!api.Succeeded) api.Error.PrintDump();
Uploading Files from JS/TypeScript
Similarly, we can populate custom requests by either programmatically constructing the FormData object, which also benefits from native integration in browsers where it can be populated directly from an HTML Form:
let client = new JsonServiceClient(BaseUrl)
let formData = new FormData(document.forms[0])
let api = await client.apiForm(new MultipartRequest(), formData)
Where apiForm can be used to submit FormData requests for normal API Requests, or apiFormVoid for IReturnVoid API requests.
API Keys protected managed File Uploads
Managed file uploads can also be protected with Identity Auth API Keys by setting requireApiKey:, e.g:
var fileFs = new FileSystemVirtualFiles(context.HostingEnvironment.ContentRootPath);
services.AddPlugin(new FilesUploadFeature(
    new UploadLocation("pub",
        fileFs,
        readAccessRole: RoleNames.AllowAnon,
        requireApiKey: new(),
        maxFileBytes: 10 * 1024 * 1024,
        resolvePath:ctx => "pub".CombineWith(ctx.Request.GetApiKey().Key, ctx.FileName)),
    new UploadLocation("secure",
        fileFs,
        requireApiKey: new("manager"),
        maxFileBytes: 10 * 1024 * 1024,
        resolvePath:ctx => "secure".CombineWith(ctx.Request.GetApiKey().Key, ctx.FileName))
));
This configuration shows a pub upload location allowing for anonymous reads but all writes requiring an API Key.
The secure upload location requires an API key with a manager Scope which is required for both read and write access.
In both cases the upload locations will store the files in a sub-directory named after API Key used to upload it.
Substitutable Virtual File Providers
We've also created the File Blazor Demo to further demonstrate the versatility of the
FilesUploadFeature to seamlessly manage uploading files to multiple different locations using different
Virtual Files providers that's still able to utilize the same custom configuration and validation in its
Configure.AppHost.cs:
.ConfigureServices((context, services) =>
{
    // Configure ASP.NET Core IOC Dependencies
    //...
    var awsAccessKeyId = Environment.GetEnvironmentVariable("AWS_ACCESS_KEY_ID") ??
                         Environment.GetEnvironmentVariable("LOCAL_AWS_ACCESS_KEY_ID");
    var awsSecretAccessKey = Environment.GetEnvironmentVariable("AWS_SECRET_ACCESS_KEY") ??
                             Environment.GetEnvironmentVariable("LOCAL_AWS_SECRET_ACCESS_KEY");
    var azureBlobConnString = Environment.GetEnvironmentVariable("AZURE_BLOB_CONNECTION_STRING") ??
                              Environment.GetEnvironmentVariable("LOCAL_AZURE_BLOB_CONNECTION_STRING");

    var appFs = new FileSystemVirtualFiles(context.HostingEnvironment.ContentRootPath.CombineWith("App_Data").AssertDir());
    var s3Client = new AmazonS3Client(awsAccessKeyId, awsSecretAccessKey, RegionEndpoint.USEast1);
    var s3DataVfs = new S3VirtualFiles(s3Client, "file-blazor-demo");

    if(string.IsNullOrEmpty(azureBlobConnString))
        Log.Warn("Started without Azure Blob Storage configured.");

    var uploadLocations = new[] {
        new UploadLocation("s3", s3DataVfs,
            readAccessRole: RoleNames.AllowAnon, resolvePath: ResolveUploadPath,
            validateUpload: ValidateUpload, validateDownload: ValidateDownload,
            maxFileBytes: 10 * 1024 * 1024),
        new UploadLocation("fs", appFs,
            readAccessRole: RoleNames.AllowAnon, resolvePath: ResolveUploadPath,
            validateUpload: ValidateUpload, validateDownload: ValidateDownload,
            maxFileBytes: 10 * 1024 * 1024),
        // User profiles
        new UploadLocation("users", appFs, allowExtensions: FileExt.WebImages,
            resolvePath: ctx => $"/profiles/users/{ctx.UserAuthId}.{ctx.FileExtension}",
            maxFileBytes: 10 * 1024 * 1024)
    };

    if (!string.IsNullOrEmpty(azureBlobConnString))
    {
        var azureBlobVfs = new AzureBlobVirtualFiles(azureBlobConnString, "fileblazordemo");
        uploadLocations = uploadLocations.Prepend(new UploadLocation("azure", azureBlobVfs,
            readAccessRole: RoleNames.AllowAnon, resolvePath: ResolveUploadPath,
            validateUpload: ValidateUpload, validateDownload: ValidateDownload,
            maxFileBytes: 10 * 1024 * 1024)).ToArray();
    }

    var uploadPlugin = new FilesUploadFeature(uploadLocations);
    services.AddPlugin(uploadPlugin);
});
//...
private static string ResolveUploadPath(FilesUploadContext ctx)
{
    if (ctx.Dto is IFileItemRequest { FileAccessType: { } } createFile)
    {
        return createFile.FileAccessType != FileAccessType.Private
            ? ctx.GetLocationPath($"/{createFile.FileAccessType}/{ctx.FileName}")
            : ctx.GetLocationPath($"/{createFile.FileAccessType}/{ctx.UserAuthId}/{ctx.FileName}");
    }
    throw HttpError.BadRequest("Invalid file creation request.");
}

private static void ValidateUpload(IRequest request, IHttpFile file)
{
    if (request.Dto is IFileItemRequest createFile)
    {
        var accessType = createFile.FileAccessType;
        var ext = file.FileName.LastRightPart('.');
        if (accessType == FileAccessType.Team && ext != null && FileExt.WebImages.Contains(ext) == false)
            throw new ArgumentException("Supported file extensions: {0}".LocalizeFmt(request,
                string.Join(", ", FileExt.WebImages.Map(x => '.' + x).OrderBy(x => x))), file.FileName);
    }
    else
        throw new HttpError("Invalid request.");
}
//...
Memory Virtual File Sources
ServiceStack AppHost's are configured with an empty Memory VFS which can be used to transiently prepopulate App files from external sources on Startup or maintain temporary working files with the same lifetime of the App without needing to persist to disk.
They're also a great solution for Integration Testing managed file access without creating any persistent artifacts as done in AutoQueryCrudTests.References.cs
var memFs = new MemoryVirtualFiles();
services.AddPlugin(new FilesUploadFeature(
    new UploadLocation("profiles", memFs),
    new UploadLocation("applications", memFs, maxFileCount: 3, maxFileBytes: 10_000_000,
        resolvePath: ctx => ctx.GetLocationPath((ctx.Dto is CreateJobApplication create
            ? $"job/{create.JobId}"
            : $"app/{ctx.Dto.GetId()}") + $"/{ctx.DateSegment}/{ctx.FileName}"),
        readAccessRole:RoleNames.AllowAnon, writeAccessRole:RoleNames.AllowAnon)
));
Configuring Database-First Apps
As Database-First Types are only generated & exist at runtime they can't be explicitly annotated
with [UploadTo] attributes, instead they can be added dynamically at runtime by using AutoQuery's TypeFilter which
is invoked for all Types including Request and Response DTO types.
An example of this can be found in the
Northwind Locode Database-First demo which uses type.Name == "Employee" to match on the Employee Data Model and
IsCrudCreateOrUpdate("Employee") Metadata Type extension method to target its CreateEmployee and UpdateEmployee CRUD APIs:
TypeFilter = (type, req) =>
{
    if (type.Name == "Employee")
    {
        // Remove embedded Blob column from Data Model Type
        type.Properties.RemoveAll(x => x.Name == "Photo");
    }
    if (type.IsCrudCreateOrUpdate("Employee"))
    {
        // Add `[Input]` and `[UploadTo]` attributes to `PhotoPath` managed file upload property
        type.Property("PhotoPath")
            .AddAttribute(new InputAttribute { Type = Input.Types.File })
            .AddAttribute(new UploadToAttribute("employees"));
    }
    //...
}
The result of this is converting the Northwind Database from using the Photo blob column to persist image bit maps
and instead uses the PhotoPath column to maintain an external file reference to their Profile Photo which is
managed by the FilesUploadFeature to persist images to its configured FileSystemVirtualFiles virtual file source.
Files Upload Transformer
Blazor Diffusion uses the Managed Files Upload Feature configured in Configure.AppHost.cs for all its website File Uploads:
var r2Client = new AmazonS3Client(appConfig.R2AccessId, appConfig.R2AccessKey, new AmazonS3Config
{
    ServiceURL = $"https://{appConfig.R2Account}.r2.cloudflarestorage.com"
});
services.AddSingleton(r2Client);
var localFs = new FileSystemVirtualFiles(context.HostingEnvironment.ContentRootPath.CombineWith("App_Files").AssertDir());
var appFs = VirtualFiles = hasR2 ? new R2VirtualFiles(r2Client, appConfig.ArtifactBucket) : localFs;
services.AddPlugin(new FilesUploadFeature(
    new UploadLocation("artifacts", appFs,
        readAccessRole: RoleNames.AllowAnon,
        maxFileBytes: AppData.MaxArtifactSize),
    new UploadLocation("avatars", appFs, allowExtensions: FileExt.WebImages,
        // Use unique URL to invalidate CDN caches
        resolvePath: ctx => X.Map((CustomUserSession)ctx.Session,
            x => $"/avatars/{x.RefIdStr[..2]}/{x.RefIdStr}/{ctx.FileName}")!,
        maxFileBytes: AppData.MaxAvatarSize,
        transformFile: ImageUtils.TransformAvatarAsync)
));
It utilizes the new transformFile: option to transform an uploaded file and save a reference to the transformed file instead. This is used to only save a reference to the 128x128 resized avatar used by the App, whilst still persisting the original uploaded image in a Background MQ task in case a higher resolution of their avatar is needed later.
public class ImageDetails
{
    public static async Task<IHttpFile?> TransformAvatarAsync(FilesUploadContext ctx)
    {
        var originalMs = await ctx.File.InputStream.CopyToNewMemoryStreamAsync();

        // Offload persistance of original image to background task
        using var mqClient = HostContext.AppHost.GetMessageProducer(ctx.Request);
        mqClient.Publish(new DiskTasks {
            SaveFile = new() {
                FilePath = ctx.Location.ResolvePath(ctx),
                Stream = originalMs,
            }
        });

        var resizedMs = await CropAndResizeAsync(originalMs, 128, 128, PngFormat.Instance);

        return new HttpFile(ctx.File)
        {
            FileName = $"{ctx.FileName.LastLeftPart('.')}_128.{ctx.File.FileName.LastRightPart('.')}",
            ContentLength = resizedMs.Length,
            InputStream = resizedMs,
        };
    }

    public static async Task<MemoryStream> CropAndResizeAsync(Stream inStream, int width, int height, IImageFormat format)
    {
        var outStream = new MemoryStream();
        var image = await Image.LoadAsync(inStream);
        using (image)
        {
            var clone = image.Clone(context => context
                .Resize(new ResizeOptions {
                    Mode = ResizeMode.Crop,
                    Size = new Size(width, height),
                }));
            await clone.SaveAsync(outStream, format);
        }
        outStream.Position = 0;
        return outStream;
    }
}