We're excited to announce the culmination of many high-level productivity features ServiceStack gained in this release that makes it vastly more productive to rapidly develop data-driven APIs which has seen AutoQuery gain full CRUD support where it's now able to declaratively implement Create, Updates, Partial Updates and Deletes APIs.
To maximize their utility AutoQuery/CRUD Services gain additional declarative powers whereby most common operations can continue to be implemented entirely from just their declarative Request DTO definition which is able to apply mandatory filters to limit Multitenant & Soft Deleted records, populate internal data models with Audit info & Complex Expressions, Auto Mapping between different DTO & Data Model properties, support for Optimistic concurrency & the ability to easily enable high-end App-level features like full Executable Audit History for all CRUD operations enabling EventSourcing-like capabilities in being able to re-create entity state by re-running their Audit History.
Whilst all Services benefit from the new enhanced Fluent Validation capabilities where all built-in validators can now be applied declaratively, including new support for top-level "Type Validators" which can be used to enforce Type Authorization rules directly on DTOs without implementation dependencies. Declarative validation rules can also sourced from dynamic sources like an RDBMS where they're both instantly applied at runtime & cached locally for max performance.
If time constrained, skim the ToC below to get a quick overview of what's in this release and jump directly to features you're interested in:
Table of Contents
- Introducing ServiceStack Studio!
- Instantly Servicify existing Systems!
- autodto - Generate Types for RDBMS Tables
- Introducing SharpData!
- AutoQuery CRUD!
- Declarative Validation
- Executable Audit Log
- AutoGen AutoQuery & Crud Services
- AutoRegister AutoGen AutoQuery Services!
- Instantly Servicify Northwind DB with gRPC
- Create Dart gRPC Console App
- Calling gRPC SSL Services
- AutoGen's AutoRegister Implementation
- CreateCrudServices Instructions
- Customize Code Generation to include App Conventions
- Mixing generated AutoQuery Services & existing code-first Services
- Trying it out
- Open in ServiceStack Studio
- ServiceStack Studio
- Studio Desktop App vs ServiceStack.Admin
- Frequent out-of-band release cadence
- Light Footprint + Always use latest version
- Desktop Features
- ServiceStack.Desktop
- win32 demo
- Highly productive live-reloading Development experience
- Starting ServiceStack Studio
- Home Page
- AutoQuery UI
- Integrated Auth Component
- Desktop User State & Preferences
- AutoCrud Querying
- Export to Excel
- AutoCrud Partial Updates
- AutoCrud Create
- AutoCrud Update and Delete
- API Log Viewer
- Executable Audit History
- Validators UI
- Future Updates
- Metadata App Export / Discovery
- AutoQuery
- gRPC code-first Development
- Single Page App Templates
- #Script
- ServiceStack
- Embedded UMD build of @servicestack/client
- TypeScript Nullable properties
- Embedded Login Page fallback
- Lightweight Customizable HTML Templates
- Hosting ASP.NET Core Apps on Custom Path
- Pluralize and Singularize
- AuthSecret Admin Session
- Exception Handling
- GatewayExceptionHandlers
- System.Web Shims removed
- XmlSerializerFormat Plugin
- Cache Client
- Server Sent Events
- Stand-alone Razor Views
- OpenApi
- OrmLite
v5.9.2 Patch Release Notes
If you're using JWT Auth please upgrade to v5.9.2 when possible to resolve a JWT signature verification issue.
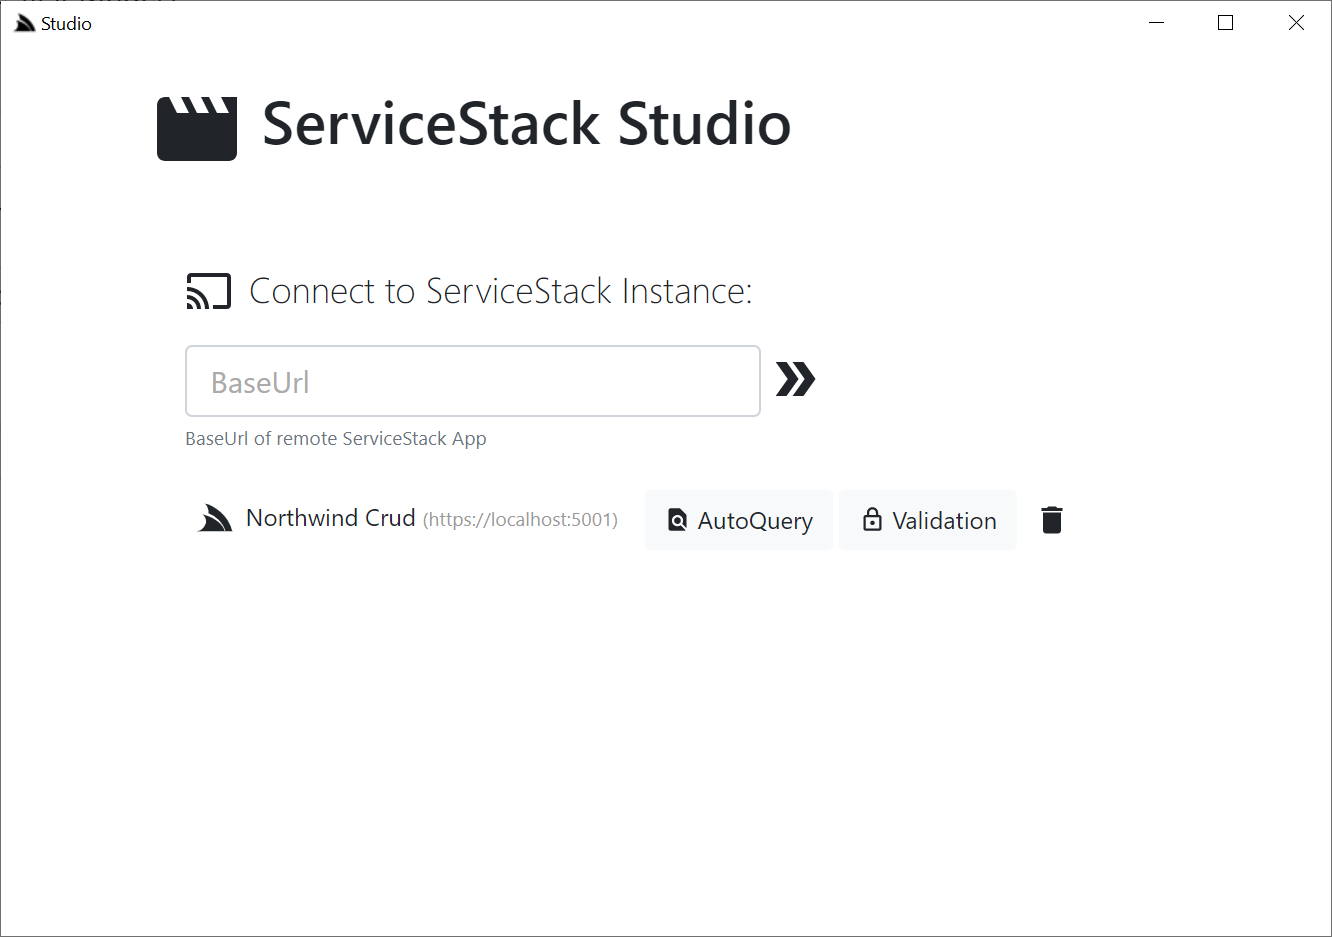
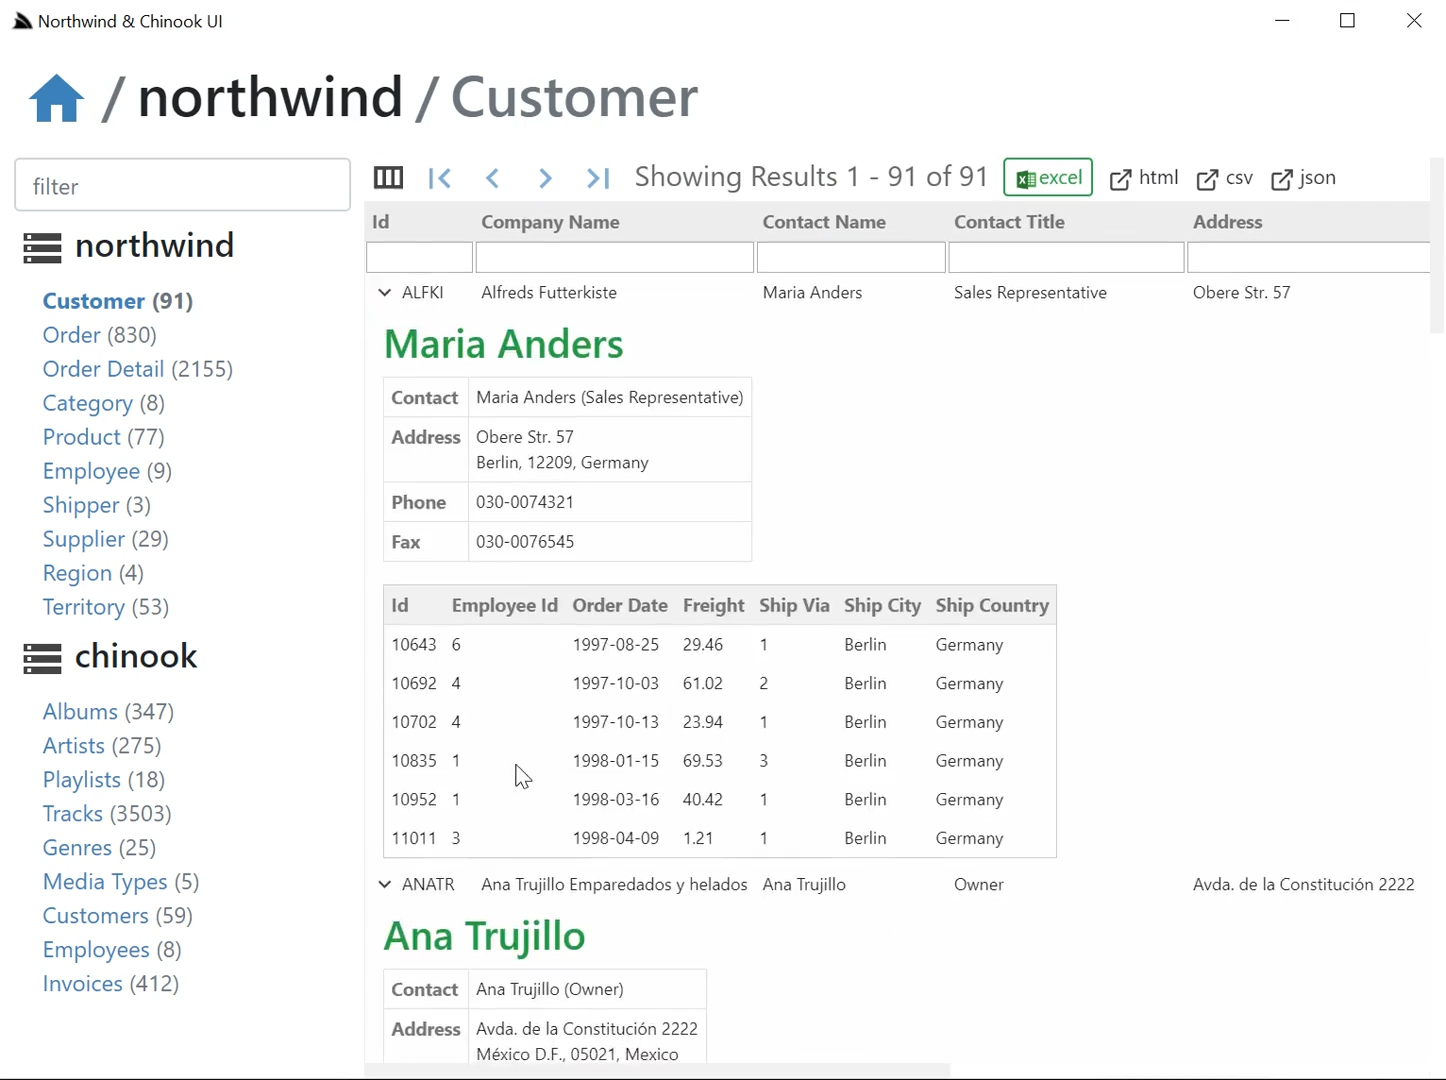
Introducing ServiceStack Studio!
Another exciting development in this release is the successor to Admin UI: ServiceStack Studio! - a capability-based UI to manage multiple remote ServiceStack instances from either a Chromium Desktop App or cross-platform .NET Core Web App.
The richer metadata in ServiceStack Services allows Studio to logically group Services around Data Models, enabling its high-level semantic features like its native data-grid like UX over all AutoQuery Services to quickly discover, search, create, update and delete entities based on the available AutoQuery APIs and whether Authenticated Users have access to them.
YouTube: youtu.be/2FFRLxs7orU
Instantly Servicify existing Systems!
ServiceStack also reached maximum autonomy for a Services framework where in addition to AutoQuery automatically providing your Services implementations, Studio providing its instant UI, ServiceStack also gained the capability to generate your entire API! Including Typed API contracts, data models, implementations & human-friendly pluralized HTTP API routes over an existing System RDBMS's tables!
ServiceStack's AutoGen enables a number of exciting possibilities, predominantly it's the fastest way to ServiceStack-ify an existing systems RDBMS where it will serve as an invaluable tool for anyone wanting to quickly migrate to ServiceStack and access its functionality ecosystem around ServiceStack Services:

AutoGen's code generation is programmatically customizable where the generated types can be easily augmented with additional declarative attributes to inject your App's conventions into the auto generated Services & Types to apply custom behavior like Authorization & additional validation rules. After codifying your system conventions the generated classes can optionally be "ejected" where code-first development can continue as normal.
This feature enables rewriting parts or modernizing legacy systems with the least amount of time & effort, once Servicified you can take advantage of declarative features like Multitenancy, Optimistic Concurrency & Validation, enable automatic features like Executable Audit History, allow business users to maintain validation rules in its RDBMS, manage them through Studio & have them applied instantly at runtime and visibly surfaced through ServiceStack's myriad of client UI auto-binding options. Studio can then enable stakeholders with an instant UI to quickly access and search through their data, import custom queries directly into Excel or access them in other registered Content Types through a custom UI where fine-grained app-level access can be applied to customize which tables & operations different users have.
gRPC's Typed protoc Universe
AutoGen also enables access to ServiceStack's ecosystem of metadata services & connectivity options where it's now become the fastest way to generate gRPC endpoints over an existing system. This is especially exciting as in addition to enabling high-performance connectivity to your Systems data, it opens it up to all languages in gRPC's protoc universe.
Whilst the Smart, Generic C# / F# / VB.NET Service Clients continue to provide the best UX for consuming gRPC Services, one of the nicest protoc generated clients languages is Dart - a modern high-level language with native class performance & script-like productivity where individual source files can be run immediately without compilation, it's quality tooling, static analysis & high-level features like async/await make it an ideal exploratory language for consuming gRPC endpoints.
Dart gRPC Script Playground
This quick demo shows an example of instantly Servicifying a database & accesses it via gRPC in minutes, starting with a new grpc project from scratch, it mixes in autocrudgen to configure AutoGen to generate AutoQuery services for the registered sqlite RDBMS that's copied into the project from the northwind.sqlite gist.
Once the servicified App is running it accesses the gRPC Services in a new Dart Console App using the UX-friendly Dart gRPC support in the x dotnet tool to call the protoc generated Services:
YouTube: youtu.be/5NNCaWMviXU
Flutter gRPC Android App
And if you can access it from Dart, you can access it from all platforms Dart runs on - the most exciting is Google's Flutter UI Kit for building beautiful, natively compiled applications for Mobile, Web, and Desktop from a single codebase:
YouTube: youtu.be/3iz9aM1AlGA

React Native Typed Client
gRPC is just one of the endpoints ServiceStack Services can be accessed from, for an even richer & more integrated development UX they're also available in all popular Mobile, Web & Desktop languages Add ServiceStack Reference supports.
Like TypeScript which can be used in Browser & Node TypeScript code-bases as well as JavaScript-only code-bases like React Native - a highly productive Reactive UI for developing iOS and Android Apps:
YouTube: youtu.be/6-SiLAbY63w
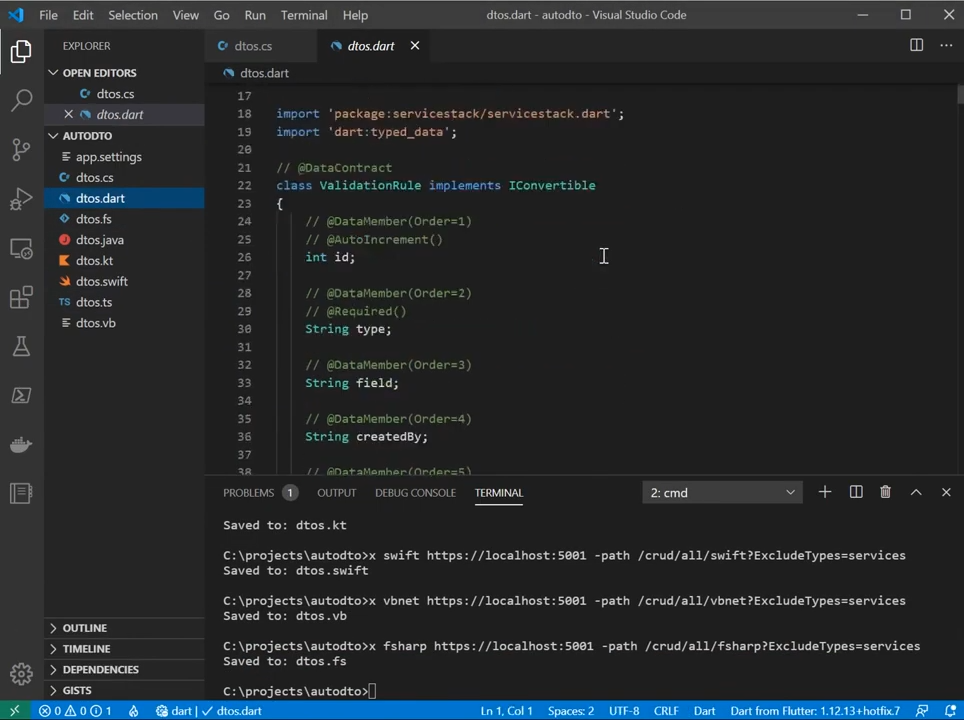
autodto - Generate Types for RDBMS Tables
An unintended consequence of AutoGen that's potentially universally appealing to even non .NET developers is that it's also a way to instantly generate Types for all RDBMS tables in all of ServiceStack supported client languages, which thanks to being configurable in a Sharp App can be executed from the command-line using the dotnet tools:
$ dotnet tool install --global x
We can then use the mix feature to download the autodto gist
containing a pre-configured app.settings, with the only configuration required is the RDBMS it should connect to, which you can
specify in a single-command when writing the gist, e.g:
$ x mix autodto -replace DIALECT=<dialect> -replace CONNECTION_STRING="<connection-string>"
Dialect: sqlite, sqlserver, postgres, mysql
Or if preferred the connection string can be referenced from an Environment variable with the $ prefix, e.g:
$ x mix autodto -replace DIALECT=postgres -replace CONNECTION_STRING=$TECHSTACKS_DB
| C# | TypeScript | Swift | Java | Kotlin | Dart | F# | VB.NET |
YouTube: youtu.be/1dFqzrF1mV8
If you don't have an RDBMS readily available to test this on, you can also mix in a copy of the northwind.sqlite database & configure it with the same command:
$ x mix autodto northwind.sqlite -replace DIALECT=sqlite -replace CONNECTION_STRING=northwind.sqlite
Alternatively you can download and update separately with:
$ x mix autodto
Then use a text editor to update app.settings with your RDBMS configuration:
debug true
name Auto DTO
defaultRedirect /metadata
features AutoQueryFeature
AutoQueryFeature { MaxLimit: 100 }
AutoQueryFeature.GenerateCrudServices { }

# Configure below. Supported dialects: sqlite, sqlserver, postgres, mysql
db sqlite
db.connection northwind.sqlite
Once configured, start this ServiceStack App with:
$ x
Then in another terminal you can download just the generated Types in each language you want, by excluding their Services:
$ x csharp https://localhost:5001 -path /crud/all/csharp?ExcludeTypes=services
$ x typescript https://localhost:5001 -path /crud/all/typescript?ExcludeTypes=services
$ x dart https://localhost:5001 -path /crud/all/dart?ExcludeTypes=services
$ x java https://localhost:5001 -path /crud/all/java?ExcludeTypes=services
$ x kotlin https://localhost:5001 -path /crud/all/kotlin?ExcludeTypes=services
$ x swift https://localhost:5001 -path /crud/all/swift?ExcludeTypes=services
$ x vbnet https://localhost:5001 -path /crud/all/vbnet?ExcludeTypes=services
$ x fsharp https://localhost:5001 -path /crud/all/fsharp?ExcludeTypes=services
Every language is customizable using their DTO Customization Options so you
could uncomment the GlobalNamespace option to generate types in your preferred namespace instead:
GlobalNamespace: TechStacks
Then regenerate it using the full language name above or their wrist-friendly 2-letter abbreviation:
x cs
x ts
x da
x ja
x kt
x sw
x vb
x fs
Or put this in a
.bator.shscript to automate re-generation for all languages in a single command.
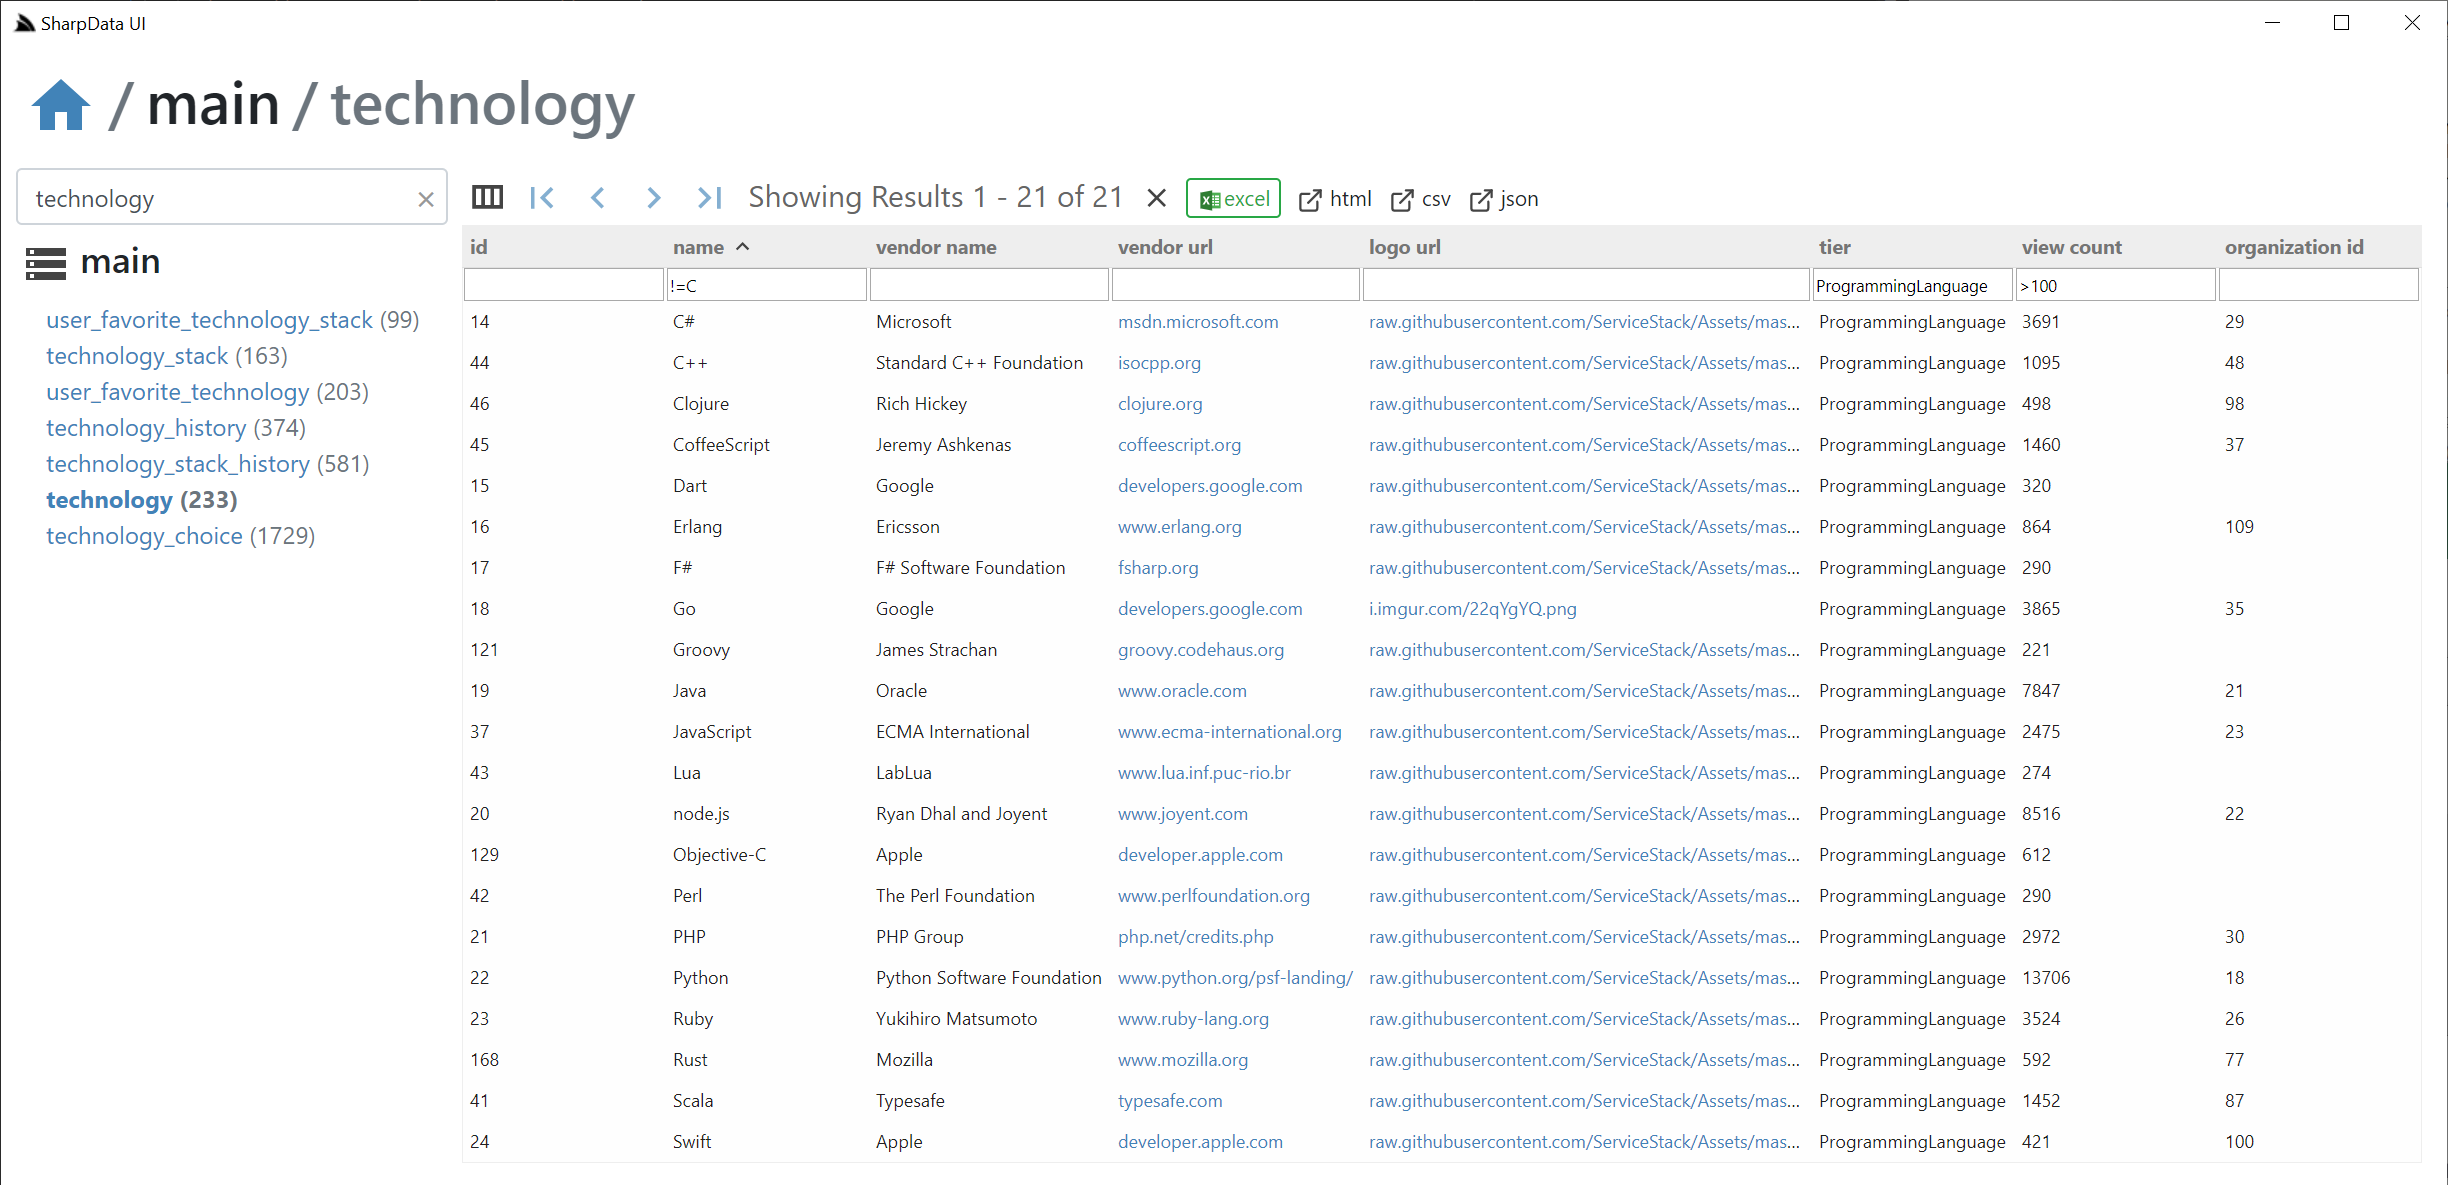
Introducing SharpData!
Before we delve into the typed world of AutoCrud, we'd like to introduce the SharpData .NET Core project - another generic tool (useful for non .NET devs) for providing an instant UI around multiple RDBMS's:
YouTube: youtu.be/GjVipOqwZMA
It makes use of the app dotnet tool for running Chromium Gist Desktop Apps on-the-fly without installation, from a single URL that can also mix in additional gists which can be used in SharpData to configure RDBMS's, copy SQLite databases and apply per-database customizations to add navigable deep links and customized UI Views to each table resultset.
Whilst SharpData supports connecting to most popular RDBMS's, it's especially useful for being able to deploy an instant stand-alone UI with an embedded SQLite databases which can be published independently in a gist and launched from a single URL.
For an example of this in action we've published customized gists for the Northwind and Chinook SQLite databases which after installing the latest app dotnet tool:
$ dotnet tool install -g app
Can be run from the link below in a Windows x64 Desktop App:
Or via command-line:
$ app open sharpdata mix northwind.sharpdata
$ app open sharpdata mix chinook.sharpdata
Cross platform using the x dotnet tool (in Default Browser):
$ x open sharpdata mix northwind.sharpdata
$ x open sharpdata mix chinook.sharpdata
Each of these options will download & run the latest version of SharpData along with a copy of the northwind.sharpdata or chinook.sharpdata gists on-the-fly containing the embedded SQLite DB along with any UI customizations.
Hosted as a .NET Core App
As NetCoreApps/SharpData is also a standard .NET Core project, it can also be deployed as a normal stand-alone .NET Core Web App:
https://sharpdata.netcore.io
Tiny footprint
An impressively capable .NET Core App that fits into a tiny 20kb .zip footprint thanks to Gist Desktop App's Architecture. It's small dynamic #Script & Vue TypeScript code-base also makes it highly customizable to tailor & further extend with
App-specific requirements - suitable for offering advanced system users a quick, capable customized read-only UI of your DBs.
SharpData started as a demonstration showing how productive #Script can be in the number of areas where dynamic languages offer far superior productivity then the typical .NET approach of using C# to type an entire code-base & models.
For example a single #Script page provides a lot of the functionality in AutoQuery where it provides an instant HTTP API
(in all registered ServiceStack formats) around all registered RDBMS tables, in all OrmLite supported RBDMS's, that includes support for custom fields,
multiple querying options, paging, multi OrderBy's in a parameterized SQL query executed with OrmLite's SQL async DB APIs:
AutoQuery Script
/db/_db/_table/index.html
{{ {namedConnection:db} |> if (db && db != 'main') |> useDb }}
```code|quiet
var ignore = ['db','fields','format','skip','take','orderBy']
var fields = qs.fields ? qs.fields.split(',').map(x => sqlQuote(x)).join(',') : '*'
var sql = `SELECT ${fields} FROM ${sqlQuote(table)}`
var filters = []
var queryMap = qs.toObjectDictionary().withoutKeys(ignore)
#each queryMap.Keys.toList()
var search = queryMap[it.sqlVerifyFragment()].sqlVerifyFragment();
#if search == '=null' || search == '!=null'
`${sqlQuote(it)} ${search=='=null' ? 'IS' : 'IS NOT'} NULL` |> addTo => filters
queryMap[it] = null
else if search.startsWith('=')
`${sqlQuote(it)} = @${it}` |> addTo => filters
queryMap[it] = search.substring(1).coerce()
else if search.startsWith('<=') || search.startsWith('>=') || search.startsWith('!=')
`${sqlQuote(it)} ${search.substring(0,2)} @${it}` |> addTo => filters
queryMap[it] = search.substring(2).coerce()
else if search.startsWith('<') || search.startsWith('>')
`${sqlQuote(it)} ${search.substring(0,1)} @${it}` |> addTo => filters
queryMap[it] = search.substring(1).coerce()
else if search.endsWith(',')
`${sqlQuote(it)} IN (${search.trimEnd(',').split(',').map(i=>i.toLong()).join(',')})` |> addTo=>filters
queryMap[it] = null
else if search.startsWith('%') || search.endsWith('%')
`${sqlQuote(it).sqlCast('varchar')} LIKE @${it}` |> addTo => filters
else
`${sqlQuote(it).sqlCast('varchar')} = @${it}` |> addTo => filters
/if
/each
#if !filters.isEmpty()
sql = `${sql} WHERE ${filters.join(' AND ')}`
/if
#if qs.orderBy
sql = `${sql} ORDER BY ${sqlOrderByFields(qs.orderBy)}`
/if
#if qs.skip || qs.take
sql = `${sql} ${sqlLimit(qs.skip,qs.take)}`
/if
sql |> dbSelect(queryMap) |> return
```
{{ ifError |> show(sql) }}
{{htmlError}}
The _ prefixes in the path utilizes Page Based Routing allowing for
CoC based
Clean URL routes without needing to define & maintain separate routes where the
same script supports querying all registered multitenancy databases.
Instant Customizable RDBMS UI
The SharpData project essentially provides a UI around this script, surfacing its features & give it instant utility which ended up being so useful that it's become the quickest way to perform fast adhoc DB queries as it's easy to configure which RDBMS's & tables to show in a simple text file, easy to customize its UI, enables 1-click export into Excel and its shortcut syntax support in column filters is a fast way to perform quick adhoc queries.
Quick Tour
We'll quickly go through some of its features to give you an idea of its capabilities, from the above screenshot we can some of its
filtering capabilities. All results displayed in the UI are queried using the above
sharpdata #Script HTTP API
which supports the following features:
Filters
All query string parameter except for db,fields,format,skip,take,orderBy are treated as filters, where you can:
- Use
=nullor!=nullto searchNULLcolumns - Use
<=,<,>,>=,<>,!=prefix to search with that operator - Use
,trailing comma to perform anIN (values)search (integer columns only) - Use
%suffix or prefix to perform aLIKEsearch - Use
=prefix to perform a coerced "JS" search, for exactnumber,boolean,nulland WCF date comparisons - Otherwise by default performs a "string equality" search where columns are casted and compared as strings
Here's the filtered list used in the above screenshot:
/db/main/Order?Id=>10200&CustomerId=V%&Freight=<=30&OrderDate=>1997-01-01
Custom Field Selection
The column selection icon on the top left of the results lets you query custom select columns which is specified using ?fields:
Multiple OrderBy's
You can use AutoQuery Syntax to specify multiple Order By's:
Paging
Use ?skip and ?take to page through a result set
Format
Use ?format to specify which Content-Type to return the results in, e.g:
Multitenancy
You can specify which registered DB to search using the path info, use main to query the default database:
/db/<named-db>/<table>
Launching SharpData
To run SharpData in a .NET Core Desktop App you'll need latest app dotnet tool:
$ dotnet tool update -g app
If on macOS/Linux you can use the x dotnet tool instead to view SharpData in your default browser
Configure RDBMS from command-line
You can override which database to connect to by specifying it on the command line, e.g. here's an example of connecting to https://techstacks.io RDBMS:
$ app open sharpdata -db postgres -db.connection $TECHSTACKS_DB
Which will open SharpData listing all of TechStack's RDBMS tables. If you have a lot of tables the Sidebar filter provides a quick way to find the table you want, e.g:
app URL Schemes
What can be done with the open command on the command-line can also be done from a custom URL Scheme, a feature that opens up a myriad of new
possibilities as app can open Gist Desktop Apps from Gists or in public & private GitHub repositories,
where it's able to download and launch Apps on the fly with custom arguments - allowing a single URL to run a never installed Desktop App stored in a
Gist & pass it custom params to enable deep linking.
With this organizations could maintain a dashboard of links to its different Desktop Apps that anyone can access, especially useful as the
only software that's needed to run any Sharp Apps is the app dotnet tool which thanks to all
ServiceStack .dll's & dependencies being bundled with the tool, (including Vue/React/Bootstrap fontawesome and Material SVG Icon assets),
the only files that need to be published are the App's specific resources, which is how Apps like SharpData can be compressed in a
20kb .zip - a tiny payload that's viable to download the latest app each on each run, removing the pain & friction to distribute updates as
everyone's already running the latest version every time it's run.
Should you need to (e.g. large Sharp App or github.com is down) you can run your previously locally cached App using run:
$ app run sharpdata
With Custom URL Schemes everyone with app installed can view any database they have network access to from specifying the db type and connection string in the URL:
app://sharpdata?db=postgres&db.connection={CONNECTION_STRING}
CONNECTION_STRING needs to be URL Encoded, e.g. with JS's
encodeURIComponent()
or by specifying an Environment variable containing the connection string:
app://sharpdata?db=postgres&db.connection=$TECHSTACKS_DB
In addition to Sharp Apps being downloaded and run on the fly, they're also able to take advantage of the dotnet tools mix support to also download another Gist's content into the Sharp App's working directory.
With this you can publish a custom dataset in an SQLite database save it as a gist and generate a single URL that everyone can use to download the database and open it in SharpData, e.g:
It's possible to use the user-friendly northwind.sqlite alias here as it's published in the global mix.md directory where it links to the northwind.sqlite gist.
For your custom databases you use the Gist Id instead or if you plan to use this feature a lot you can override which mix.md document that
app should source its links from by specifying another Gist Id in the MIX_SOURCE Environment variable (or see below - to create a local alias).
But if you're already mixing in an external gist you may as well include a custom app.settings in the Gist so it's pre-configured with custom
RDBMS registrations and table lists, e.g:
Which applies the northwind.sharpdata gist, which can also be referenced by Gist Id:
Alternatively you may instead prefer to publish it to a private GitHub repo instead of a Gist which anyone can open up with:
app://user/sharpdata-private?token={TOKEN}
The app dotnet tools will use the latest published GitHub release if there are any, otherwise will use the master.zip archive,
this feature can be used to maintain a working master repo and maintain control ver when to publish new versions of your custom SharpData App.
app local aliases
Where ever you can use a Gist Id, you can assign a local user-friendly alias to use instead. So if you had a custom sqlite database and sharpdata app.settings you could assign it to a local db alias with:
$ app alias db 0ce0d5b828303f1cb4637450b563adbd
Which you'll be able to use in place of the Gist Id, e.g. via command-line:
$ app open sharpdata mix db
or via URL Scheme:
app://sharpdata?mix=db
Likewise the gist alias can also be used for referencing Gist Desktop Apps, e.g. we can assign the redis gist app to use our preferred alias:
$ app alias local-redis 6de7993333b457445793f51f6f520ea8
That we can open via command-line:
$ app open local-redis
Or URL Scheme:
app://local-redis
Or if we want to run our own modified copy of the Redis Desktop App, we can mix the Gist files to our local directory:
$ app mix local-redis
Make the changes we want, then run our local copy by running app (or x) without arguments:
$ app
Other alias command include:
View all aliases
$ app alias
View single alias
$ app alias mydb
Remove an alias
$ app unalias mydb
Open in Excel
SharpData detects if Excel is installed and lets you open the un-paged filtered resultset directly by clicking the Excel button
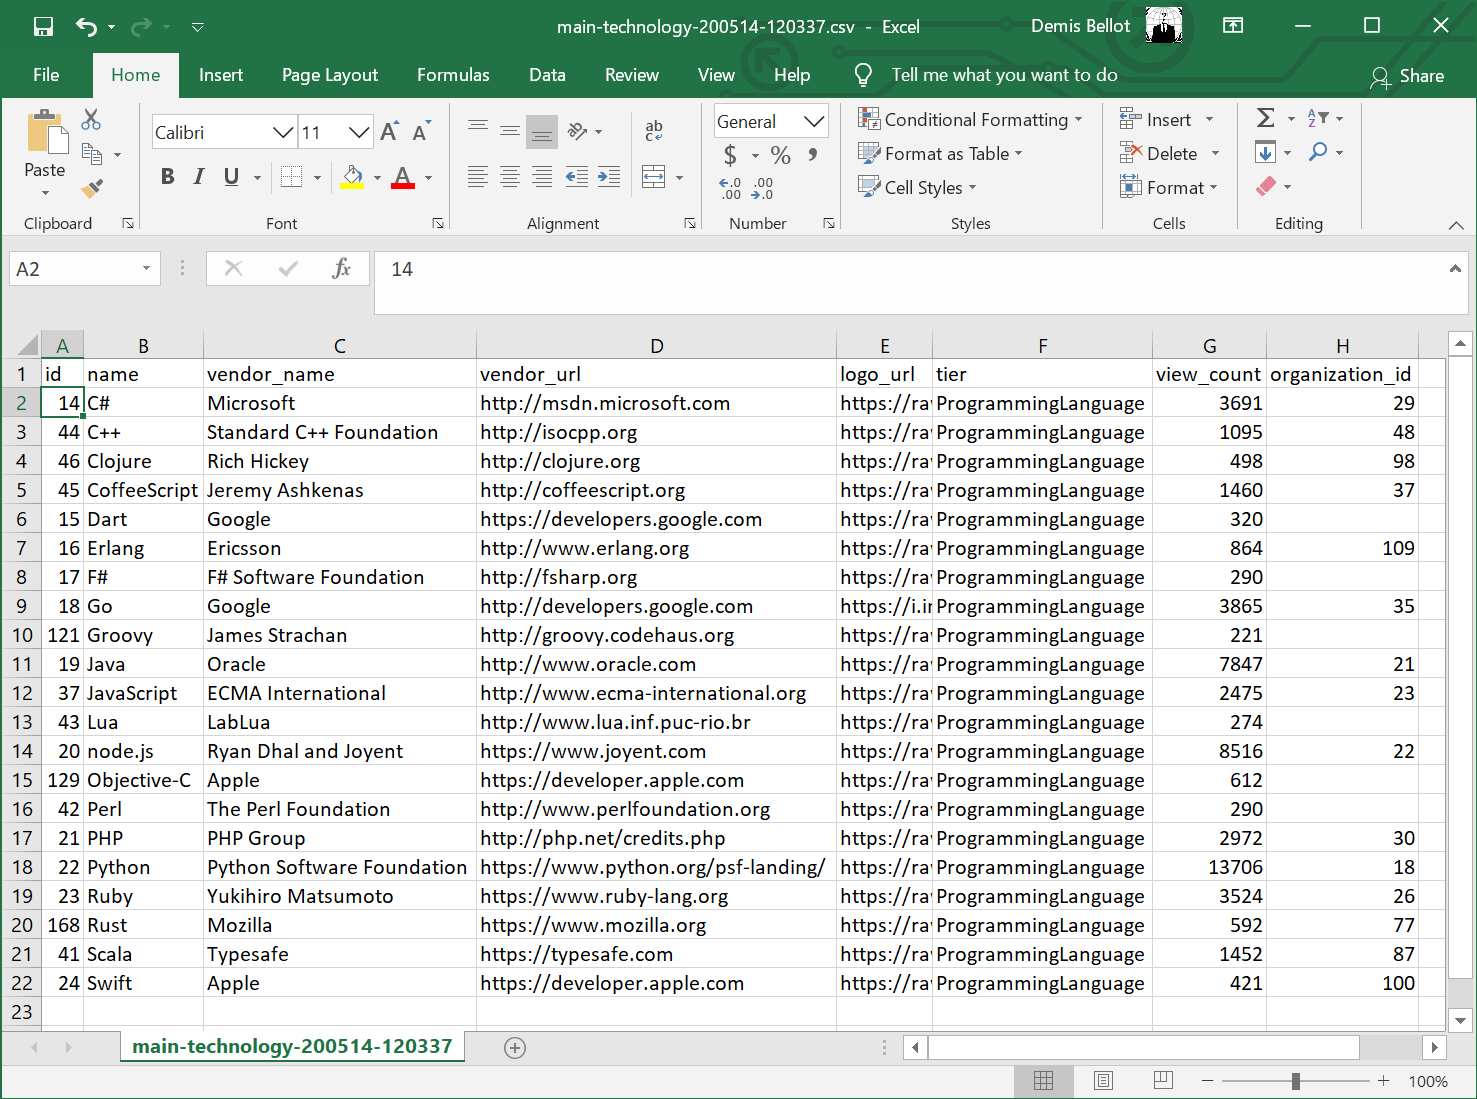
This works seamlessly as it's able to "by-pass" the browser download where the query is performed by the back-end .NET Core Server who streams the response directly to the Users Downloads folder and launches it in Excel as soon as it's finished.
Custom SharpData UI
Each time a Gist Desktop App is opened it downloads and overrides the existing Gist with the latest version which it loads in a Gist VFS where any of its files can be overridden with a local copy.
As the App's working directory is preserved between restarts you can provide a custom app.settings at:
%USERPROFILE%\.sharp-apps\sharpdata\app.settings
Custom app.settings
Where you can perform basic customizations like which RDBMS's and tables you want to be able to access, e.g:
debug false
name Northwind & TechStacks UI
appName sharpdata

db.connections[northwind]  { db:sqlite,   connection:'northwind.sqlite' }
db.connections[techstacks] { db:postgres, connection:$TECHSTACKS_DB }

args.tables Customer,Order,OrderDetail,Category,Product,Employee,EmployeeTerritory,Shipper,Supplier,Region,Territory
args.tables_techstacks technology,technology_stack,technology_choice,organization,organization_member,post,post_comment,post_vote,custom_user_auth,user_auth_details,user_activity,page_stats
Which will display both RDBMS Databases, showing only the user-specified tables in app.settings above:
Advanced Customizations
More advanced customizations can be added via dropping TypeScript/JavaScript source files in the /custom folder, e.g:
Which is how the northwind.sharpdata and chinook.sharpdata mix gists enable Customized Views for the Northwind & Chinook databases via their dbConfig registrations below:
chinook
dbConfig('chinook', {
    showTables: 'albums,artists,playlists,tracks,genres,media_types,customers,employees,invoices'.split(','),
    tableName: splitPascalCase,
    links: {
        albums: {
            ArtistId: (id:number) => `artists?filter=ArtistId:${id}`
        },
        employees: {
            ReportsTo: (id:number) => `employees?filter=EmployeeId:${id}`
        },
        invoices: {
            CustomerId: (id:number) => `customers?filter=CustomerId:${id}`
        },
        tracks: {
            AlbumId: (id:number) => `albums?filter=AlbumId:${id}`,
            MediaTypeId: (id:number) => `media_types?filter=MediaTypeId:${id}`,
            GenreId: (id:number) => `genres?filter=GenreId:${id}`,
        }
    },
    rowComponents: {
        albums: Album,
        artists: Artist,
        playlists: Playlist,
    }
});
northwind
dbConfig('northwind', {
    showTables: 'Customer,Order,OrderDetail,Category,Product,Employee,Shipper,Supplier,Region'.split(','),
    tableName: splitPascalCase,
    links: {
        Order: {
            CustomerId: (id:string) => `Customer?filter=Id:${id}`,
            EmployeeId: (id:string) => `Employee?filter=Id:${id}`,
            ShipVia: (id:number) => `Shipper?filter=Id:${id}`,
        },
        OrderDetail: {
            OrderId: (id:string) => `Order?filter=Id:${id}`,
            ProductId: (id:string) => `Product?filter=Id:${id}`,
        },
        Product: {
            SupplierId: (id:number) => `Supplier?filter=Id:${id}`,
            CategoryId: (id:number) => `Category?filter=Id:${id}`,
        },
        Territory: {
            RegionId: (id:number) => `Region?filter=Id:${id}`,
        },
    },
    rowComponents: {
        Order,
        Customer,
    }
});
These db customizations let you specify which RDBMS tables & the order that they should be displayed, the table names text casing function, which columns to linkify & any custom Row Components for different tables.
Deploying Customizations
When deploying as a .NET Core project the customizations are deployed with your /wwwroot as normal.
To make customizations available to load with the SharpData Gist Desktop App you'll need to publish the directory of customizations to a gist. Here are the customizations for the northwind.sharpdata and chinook.sharpdata gists:
/dist-mix
- /chinook
- /custom
- chinook.js - UI Customizations
- app.settings - Custom App Settings
- chinook.sqlite - Embedded SQLite database
- /custom
- /northwind
- /custom
- northwind.js - UI Customizations
- app.settings - Custom App Settings
- northwind.sqlite - Embedded SQLite database
- /custom
You can publish a directory of files to a GitHub Gist using the x publish command with the
GitHub AccessToken with gist write access you want to write to, e.g:
$ cd northwind
$ x publish -token %TOKEN%
Viewing Customizations
When published these Gist Customizations can be viewed by gist id directly or by a user friendly gist mix or local alias:
- app://sharpdata?mix=0ce0d5b828303f1cb4637450b563adbd
- app://sharpdata?mix=96b10369daf94897531810841cb097f2
Custom Row Components
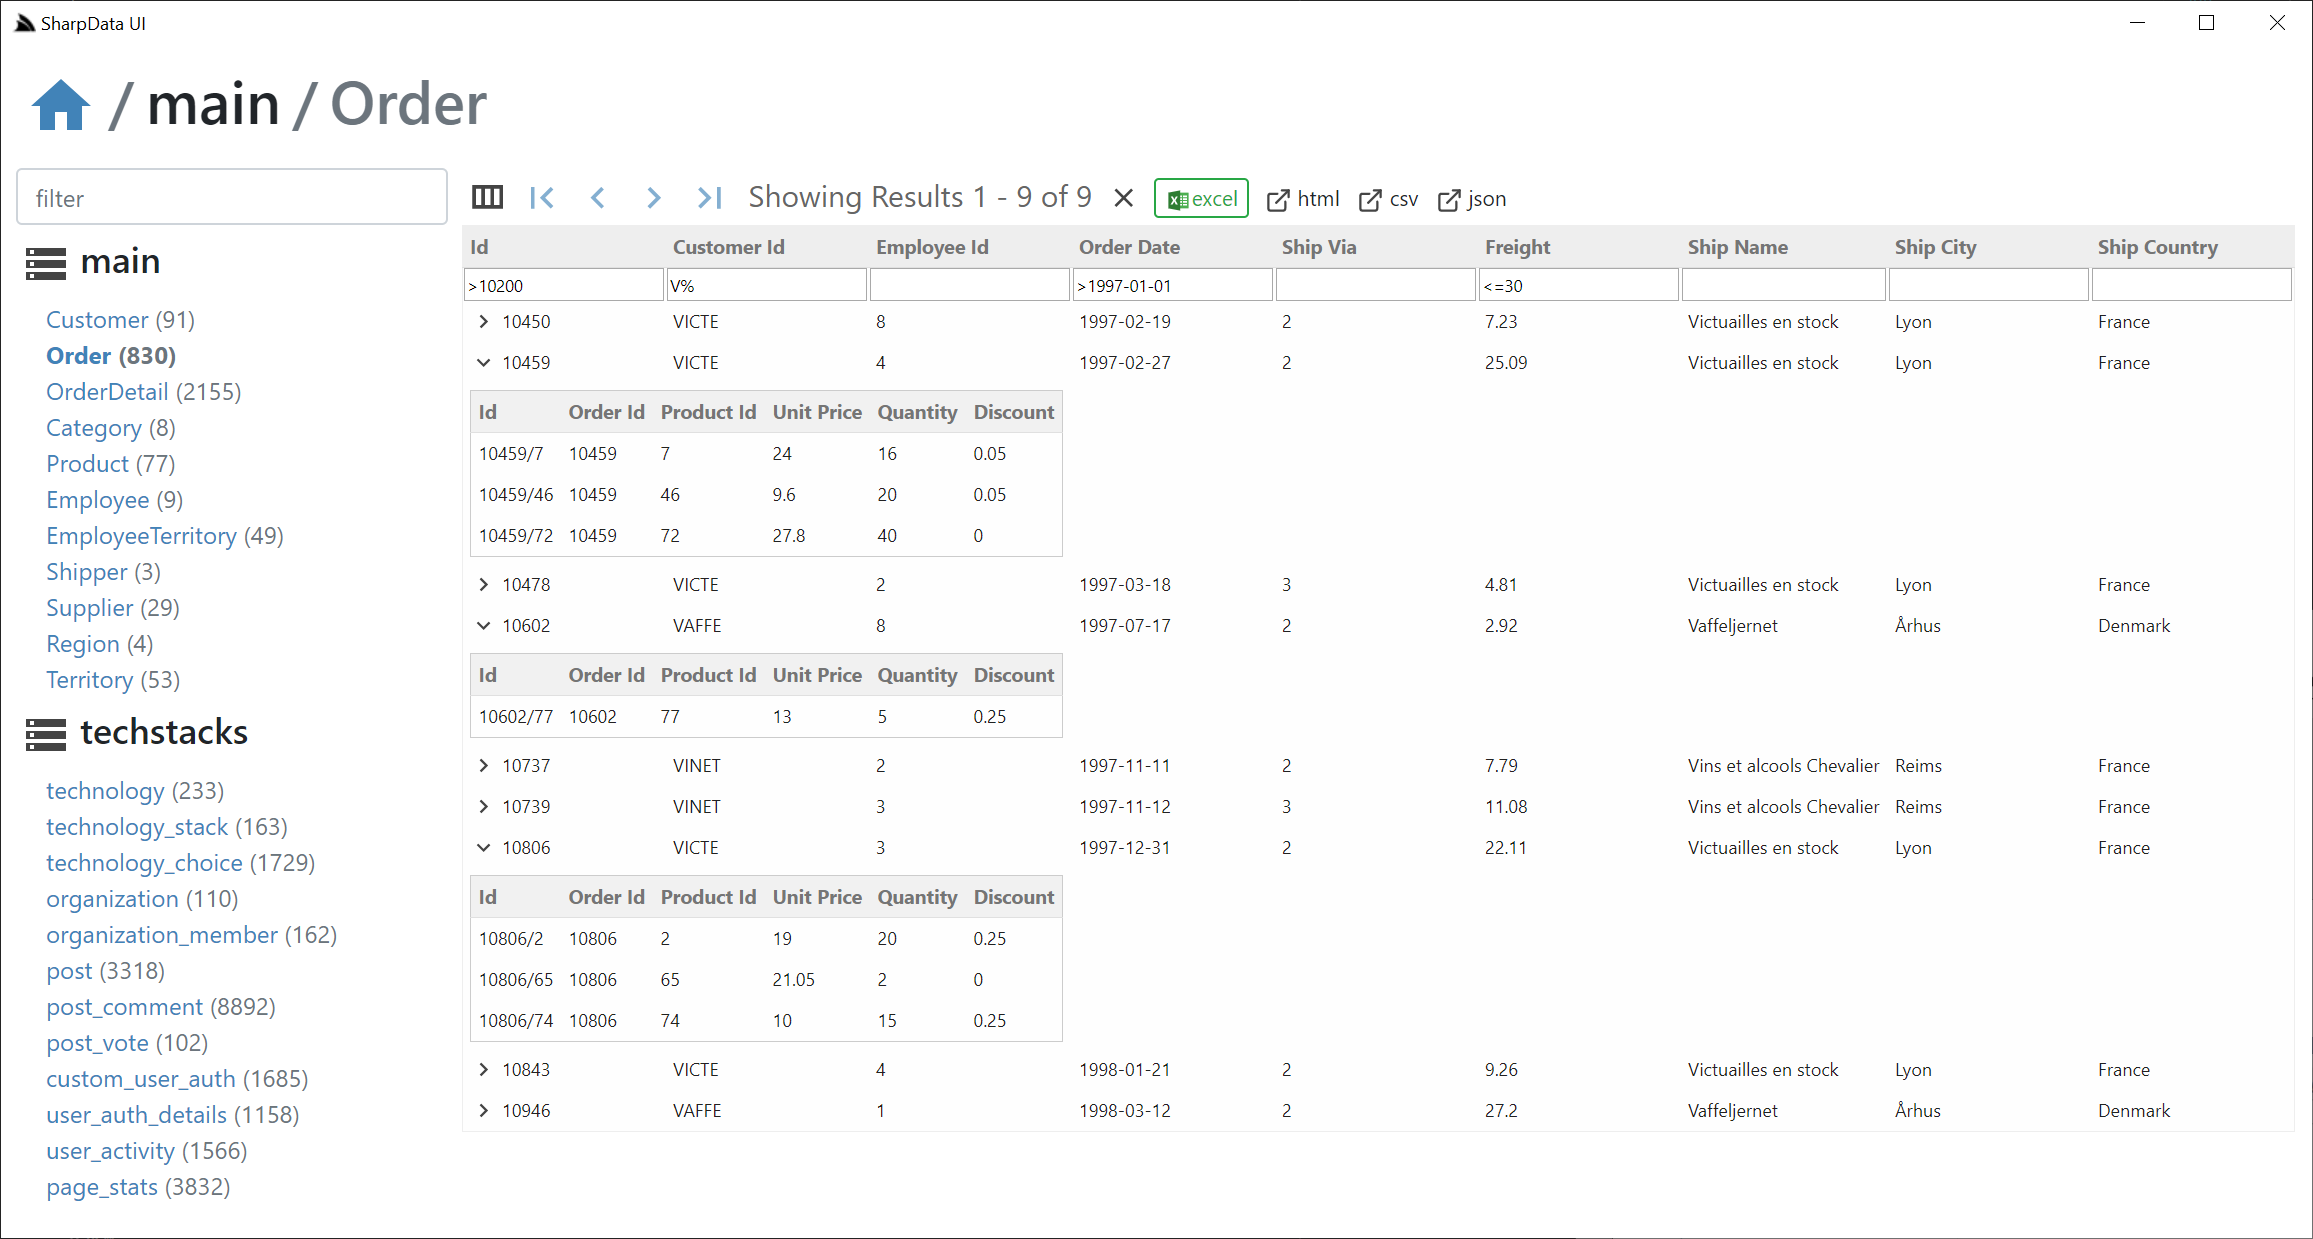
Whilst a tabular grid view might be a natural UI for browsing a database for devs, we can do better since we have the full UI source code of the Vue components. A filtered tabular view makes it fast to find the record you're interested in, but it's not ideal for quickly finding related information about an Entity.
To provide a more customized UX for different App UIs, SharpData includes support for "Row Components" (defined in /wwwroot/custom) to be able to quickly drill down & view richer info on any record.
For example when viewing an Order, it's natural to want to view the Order Details with it, enabled with the custom Vue component registration below:
@Component({ template:
`<div v-if="id">
    <jsonviewer :value="details" />
</div>
<div v-else class="alert alert-danger">Order Id needs to be selected</div>`
})
class Order extends RowComponent {
    details:any[] = [];

    get id() { return this.row.Id; }

    async mounted() {
        this.details = await sharpData(this.db,'OrderDetail',{ OrderId: this.id });
    }
}
All Row components are injected with the db, table properties, the entire row object that was selected as well as the Column Schema definition for that table. Inside the component you're free to display anything, in this case we're using the sharpData helper for calling the server #Script HTTP API to get it to fetch all OrderDetail entries for this order.
If the resultset is filtered without the Order
IdPK it can't fetch its referenced data, so displays an error instead
The jsonviewer component used is similar to ServiceStack's HTML5 auto pages to quickly view contents of any object.
The registerRowComponent(db,table,VueComponent,componentName) API is used to register this component with SharpData to make it available to render any order.
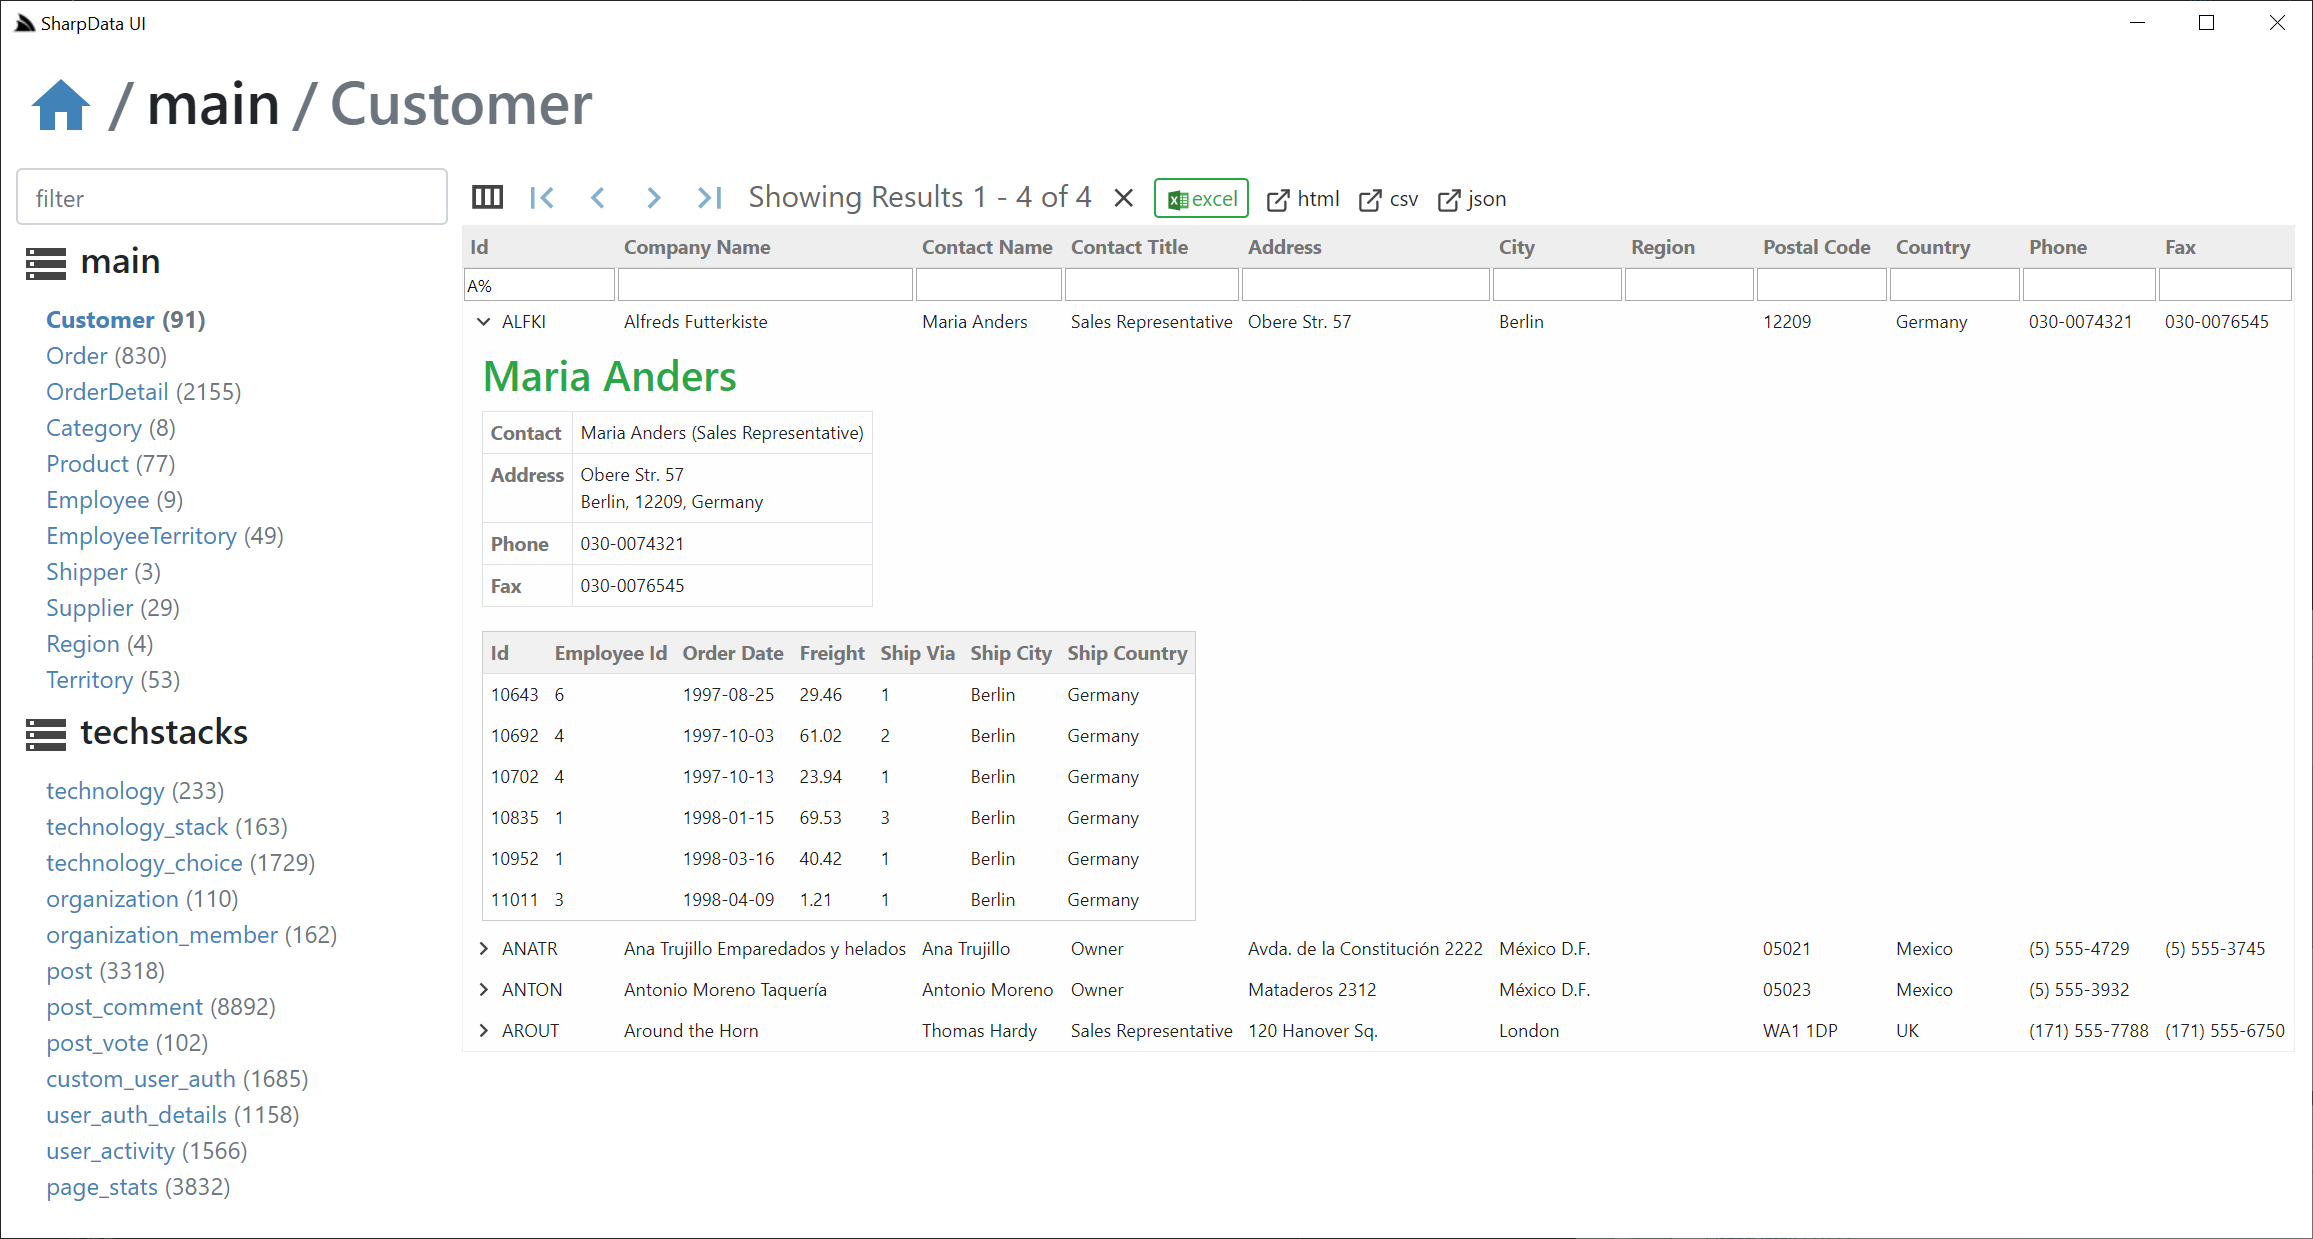
With the Order component registered we can now drill down into any Order to view its Order Details:
You're free to render any kind of UI in the row component, e.g. here's the Customer.ts row component used to render a richer view for Customers:
@Component({ template:
`<div v-if="id" class="pl-2">
<h3 class="text-success">{{customer.ContactName}}</h3>
<table class="table table-bordered" style="width:auto">
<tr>
<th>Contact</th>
<td>{{ customer.ContactName }} ({{ customer.ContactTitle }})</td>
</tr>
<tr>
<th>Address</th>
<td>
<div>{{ customer.Address }}</div>
<div>{{ customer.City }}, {{ customer.PostalCode }}, {{ customer.Country }}</div>
</td>
</tr>
<tr>
<th>Phone</th>
<td>{{ customer.Phone }}</td>
</tr>
<tr v-if="customer.Fax">
<th>Fax</th>
<td>{{ customer.Fax }}</td>
</tr>
</table>
<jsonviewer :value="orders" />
</div>
<div v-else class="alert alert-danger">Customer Id needs to be selected</div>`
})
class Customer extends RowComponent {
customer:any = null;
orders:any[] = [];
get id() { return this.row.Id; }
async mounted() {
this.customer = (await sharpData(this.db,this.table,{ Id: this.id }))[0];
const fields = 'Id,EmployeeId,OrderDate,Freight,ShipVia,ShipCity,ShipCountry';
this.orders = await sharpData(this.db,'Order',{ CustomerId: this.id, fields })
}
}
Which looks like:
SharpData .NET Core Project
Whilst NetCoreApps/SharpData can live a charmed life as a Desktop App, it's also just a regular ServiceStack .NET Core App with a Startup.cs and AppHost that can be developed, published and deployed as you're used to, here's an instance of it deployed as a .NET Core App on Linux:
sharpdata.netcore.io
For best experience we recommend running against local network databases
It's a unique ServiceStack App in that it doesn't contain any ServiceStack Services as it's only using pre-existing functionality already built into ServiceStack,
#Script for its HTTP APIs and a Vue SPA for its UI, so requires no .dll's need to be deployed with it.
It uses the same Vue SPA solution as vue-lite to avoid npm's size & complexity where you only need to run TypeScript's tsc -w to enable its live-reload dev UX which provides its instant feedback during development.
Some other of its unique traits is that instead of manually including all the Vue framework .js libraries, it instead references the new ServiceStack.Desktop.dll for its Vue framework libraries and its Material design SVG icons which are referenced as normal file references:
{{ [
`/lib/js/vue/vue.min.js`,
`/lib/js/vue-router/vue-router.min.js`,
`/lib/js/vue-class-component/vue-class-component.min.js`,
`/lib/js/vue-property-decorator/vue-property-decorator.min.js`,
`/lib/js/@servicestack/desktop/servicestack-desktop.min.js`,
`/lib/js/@servicestack/client/servicestack-client.min.js`,
`/lib/js/@servicestack/vue/servicestack-vue.min.js`,
] |> map => `<script src="${it}"></script>` |> joinln |> raw }}
But instead of needing to exist on disk & deployed with your project it's referencing the embedded resources in ServiceStack.Desktop.dll and only the bundled assets need to be deployed with your project which is using the built-in NUglify support in the dotnet tools to produce its highly optimized/minified bundle without needing to rely on any npm tooling when publishing the .NET Core App:
<Target Name="Bundle" BeforeTargets="AfterPublish">
    <Exec Command="x run _bundle.ss -to /bin/Release/netcoreapp3.1/publish/wwwroot" />
</Target>
The included /typings are just the TypeScript definitions for each library which TypeScript uses for its static analysis & its great dev UX in IDEs & VSCode, but are only needed during development and not deployed with the project.
Publish to Gist Desktop App
The primary way SharpData is distributed is as a Gist Desktop App, where it's able to provide instant utility by running on a users local machine inside a native Chromium Desktop App making it suitable for a much broader use-case as a fast, lightweight, always up-to-date Desktop App with deeper Windows integration all packaged in a tiny 20kb .zip footprint. There's no need to provision servers, setup CI, manage cloud hosting resources, you can simply run a script to update a Gist where its latest features are immediately available to your end users the next time it's run.
To run, test & publish it as a Desktop App you can use the pre-made scripts in package.json. Rider provides a nice UX here as it lets you run each individual script directly from their json editor:
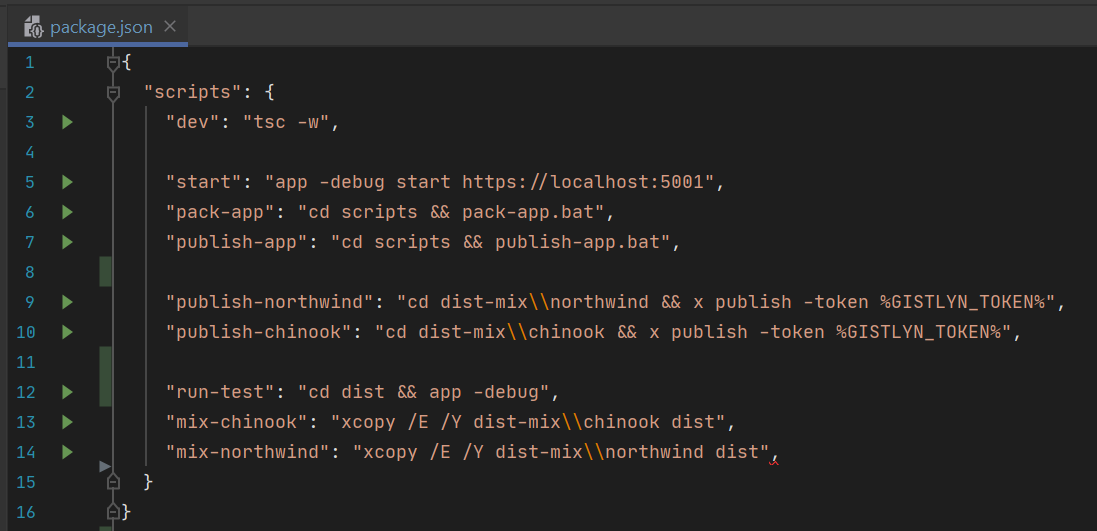
Essentially to package it into a Sharp App you just need to run the pack script which will bundle & copy all required assets into the /dist folder which you can then test locally in a .NET Core Desktop App by running app in that folder:
$ cd dist
$ app
The init-test script just copies an example northwind.sqlite database and sample app.settings so you have something to test it with if you need it.
The publish-app script is if you want to publish it to a Gist, you will need it to provide the GitHub AccessToken with write access to the Gist User Account you want to publish it to. Adding an appName and description to app.settings will publish it to the Global App Registry, make it publicly discoverable and allow anyone to open your App using your user-friendly appName alias, otherwise they can run it using the Gist Id or Gist URL.
Alternatively the contents of the dist/ folder can be published to a GitHub repo (public or private) and run with:
$ app open <user>/<repo>
Or link to it with its custom URL Scheme:
app://<user>/repo
If it's in a private repo they'll need to either provide an AccessToken in the GITHUB_TOKEN Environment variable or using the -token argument:
$ app open <user>/<repo> -token <token>
URL Scheme:
app://<user>/repo?token=<token>
RDBMS Configuration
When running as a .NET Core App you'd need to register which RDBMS's you want to use with OrmLite's configuration, e.g. the screenshot above registers an SQLite northwind.sqlite database and the https://techstacks.io PostgreSQL Database:
container.Register<IDbConnectionFactory>(c => new OrmLiteConnectionFactory(
    MapProjectPath("~/northwind.sqlite"), SqliteDialect.Provider));

var dbFactory = container.Resolve<IDbConnectionFactory>();
dbFactory.RegisterConnection("techstacks",
     Environment.GetEnvironmentVariable("TECHSTACKS_DB"),
     PostgreSqlDialect.Provider);
By default it shows all Tables in each RDBMS, but you can limit it to only show a user-defined list of tables with #Script Arguments:
Plugins.Add(new SharpPagesFeature {
    //...
    Args = {
        //Only display user-defined list of tables:
        ["tables"] = "Customer,Order,OrderDetail,Category,Product,Employee,EmployeeTerritory,Shipper,Supplier,Region,Territory",
        ["tables_techstacks"] = "technology,technology_stack,technology_choice,organization,organization_member,post,post_comment,post_vote,custom_user_auth,user_auth_details,user_activity,page_stats",
    }
});
When running as a Sharp App it's instead configured in its app.settings, here's equivalent settings for the above configuration:
# Configure below. Supported dialects: sqlite, mysql, postgres, sqlserver
db sqlite
db.connection northwind.sqlite
# db.connections[techstacks] { db:postgres, connection:$TECHSTACKS_DB }

args.tables Customer,Order,OrderDetail,Category,Product,Employee,EmployeeTerritory,Shipper,Supplier,Region,Territory
args.tables_techstacks technology,technology_stack,technology_choice,organization,organization_member,post,post_comment,post_vote,custom_user_auth,user_auth_details,user_activity,page_stats
Feedback
We hope SharpData serves useful in some capacity, whether it's being able to quickly develop and Ship a UI to stakeholders or as a template to develop .NET Core Apps that you can distribute as Sharp Apps, as an example to explore the delivery and platform potential of URL schemes and install-less Desktop Apps or just as an inspiration for areas where #Script shines & the different kind of Apps you can create with it.
Whilst app is Windows 64 only, you can use the x cross-platform tool and its xapp:// URL scheme to run Sharp Apps on macOS/Linux, it just wont have access to any of its Window Integration features.
AutoQuery CRUD!
AutoQuery Services enjoy new declarative super powers where it's able to implement much of a CRUD Services logic declaratively, including support for multi-tenancy, optimistic concurrency, declarative validation, Auto Mapping external of Request/Respond DTOs to data model properties, auto populating then using full #Script Expressions that can be used for example to populate timestamps, authenticating user information, generating new UUIDs, etc.
Just like AutoQuery, CRUD Services are ServiceStack Services where you can continue using the same functionality to specify optimal user-defined routes for HTTP APIs, same Request/Response and Attribute filters to apply custom logic and continue enjoying the entire ecosystem around ServiceStack Services including being able to invoke them via gRPC, MQ endpoints and its rich client ecosystem for enabling end-to-end Typed APIs with Add ServiceStack Reference.
AutoQuery Services are fast & emit clean optimal "pure serialized POCO" wire-format, they're built on OrmLite's high-performance
APIs where all AutoQuery APIs are async by default but also also offers native sync APIs if needing to enlist any of
AutoQuery's functionality in custom sync methods (that are unable to be converted into viral async APIs).
Importantly AutoQuery Services are "future-proofed" and can be overridden with a custom implementation that can either choose to augment the existing AutoQuery functionality and enhance it with custom behavior (e.g. if not possible to implement declaratively) or if needed its entire implementation can be replaced without breaking its design contract & existing client integrations, should it be necessary to reimplement later if the Service needs to be constructed to use alternative data sources.
Limitations of typical Auto querying Solutions
This is ultimately where many auto querying solutions fall down, they're typically executed with black-box binary implementations which only understand their opaque query languages normal Services wouldn't support, are exposed on unnatural routes you wouldn't use and return unclean verbose wire formats normal Services wouldn't return. So when it comes to needing to replace their implementation-specific APIs, it's often not feasible to reverse engineer a new implementation to match its existing Services contract and would need to resort in creating a new incompatible API, breaking existing clients and violating its Systems encapsulation which should be one of the core goals of Service design.
Creating AutoQuery CRUD Services
Just like AutoQuery, you just need to provide the typed Request DTOs definition for your DB Table APIs and AutoQuery automatically provides the implementation for the Service.
To enlist Auto CRUD behavior your Request DTOs need to implement one of the following interfaces which dictates the behavior of the Service:
ICreateDb<Table>- Create new Table EntryIUpdateDb<Table>- Update existing Table EntryIPatchDb<Table>- Partially update existing Table EntryIDeleteDb<Table>- Delete existing Table Entry
All Request DTOs also require either an IReturn<T> or IReturnVoid marker interface to specify the return type of the Service.
Can use built-in
IReturn<EmptyResponse>for an "empty" response where asIReturnVoidreturns "no" response.
Let's go through a simple example, starting with a simple POCO OrmLite data model we want to add to our RDBMS:
public class Rockstar
{
    [AutoIncrement]
    public int Id { get; set; }
    public string FirstName { get; set; }
    public string LastName { get; set; }
    public int? Age { get; set; }
    public DateTime DateOfBirth { get; set; }
    public DateTime? DateDied { get; set; }
    public LivingStatus LivingStatus { get; set; }
}
We can create a Service that inserts new Rockstar by defining all the properties we want to allow API consumers to provide when creating a new Rockstar:
public class CreateRockstar : ICreateDb<Rockstar>, IReturn<CreateRockstarResponse>
{
    public string FirstName { get; set; }
    public string LastName { get; set; }
    public int? Age { get; set; }
    public DateTime DateOfBirth { get; set; }
}

public class CreateRockstarResponse
{
    public int Id { get; set; } // Id is auto populated with RDBMS generated Id
    public ResponseStatus ResponseStatus { get; set; }
}
When ServiceStack starts it generates the implementation for this Service, which can now insert Rockstars using your populated Request DTO:
var client = new JsonServiceClient(baseUrl);

client.Post(new CreateRockstar {
    FirstName = "Kurt",
    LastName = "Cobain",
    Age = 27,
    DateOfBirth = new DateTime(20,2,1967),
});
Similarly you can define "Update" and "Delete" Services the same way, e.g:
public class UpdateRockstar : Rockstar,
    IUpdateDb<Rockstar>, IReturn<UpdateRockstarResponse> {}

public class UpdateRockstarResponse
{
    public int Id { get; set; } // Id is auto populated with RDBMS generated Id
    public Rockstar Result { get; set; } // selects & returns latest DB Rockstar
    public ResponseStatus ResponseStatus { get; set; }
}
By convention if your Response DTO contains any of these properties it will be automatically populated:
T Id- The Primary KeyT Result- The POCO you want to return (can be a subset of DB model)int Count- Return the number of rows affected (Deletes can have >1)
Delete Services need only a Primary Key, e.g:
public class DeleteRockstar : IDeleteDb<Rockstar>, IReturnVoid
{
    public int Id { get; set; }
}
and to Query the Rockstar table you have the full featureset of AutoQuery for a complete set of CRUD Services without needing to provide any implementations.
Advanced CRUD Example
Lets now explore a more advanced example that implements Audit information as well as layered support for multi-tenancy to see how you can easily compose features.
So lets say you have an interface that all tables you want to contain Audit information implements:
public interface IAudit
{
    DateTime CreatedDate { get; set; }
    string CreatedBy { get; set; }
    string CreatedInfo { get; set; }
    DateTime ModifiedDate { get; set; }
    string ModifiedBy { get; set; }
    string ModifiedInfo { get; set; }
    DateTime? SoftDeletedDate { get; set; }
    string SoftDeletedBy { get; set; }
    string SoftDeletedInfo { get; set; }
}
It's not required, but it's also useful to have a concrete base table which could be annotated like:
public abstract class AuditBase : IAudit
{
    public DateTime CreatedDate { get; set; }
    [Required]
    public string CreatedBy { get; set; }
    [Required]
    public string CreatedInfo { get; set; }

    public DateTime ModifiedDate { get; set; }
    [Required]
    public string ModifiedBy { get; set; }
    [Required]
    public string ModifiedInfo { get; set; }

    [Index] //Check if Deleted
    public DateTime? SoftDeletedDate { get; set; }
    public string SoftDeletedBy { get; set; }
    public string SoftDeletedInfo { get; set; }
}
We can then create a base Request DTO that all Audit Create Services will implement:
[ValidateIsAuthenticated]
[AutoPopulate(nameof(IAudit.CreatedDate),  Eval = "utcNow")]
[AutoPopulate(nameof(IAudit.CreatedBy),    Eval = "userAuthName")] //or userAuthId
[AutoPopulate(nameof(IAudit.CreatedInfo),  Eval = "`${userSession.DisplayName} (${userSession.City})`")]
[AutoPopulate(nameof(IAudit.ModifiedDate), Eval = "utcNow")]
[AutoPopulate(nameof(IAudit.ModifiedBy),   Eval = "userAuthName")] //or userAuthId
[AutoPopulate(nameof(IAudit.ModifiedInfo), Eval = "`${userSession.DisplayName} (${userSession.City})`")]
public abstract class CreateAuditBase<Table,TResponse> : ICreateDb<Table>, IReturn<TResponse> {}
These all call #Script Methods which you can add/extend yourself.
The *Info examples is a superfluous example showing that you can basically evaluate any #Script expression. Typically you'd only save User Id or Username
AutoPopulate
The [AutoPopulate] attribute tells AutoCrud that you want the DB Table to automatically populate these properties, which can be populated using any of its
properties below:
- Value - A constant value that can be used in C# Attributes, e.g
Value="Foo" - Expression - A Lightweight #Script Expression that results in a constant value that's only evaluated once and cached globally, e.g.
Expression = "date(2001,1,1)", useful for values that can't be defined in C# Attributes likeDateTime, can be any #Script Method. - Eval - A #Script Expression that's cached per request. E.g.
Eval="utcNow"calls theutcNowScript method which returnsDateTime.UtcNowwhich is cached for that request so all otherutcNowexpressions will return the same exact value. - NoCache - Don't cache the expression, evaluate it each time.
AutoCrud makes extensive usage of #Script expressions for much of its declarative functionality which always executes their cached ASTs so expressions are only parsed once and still fast to evaluate even when results are not cached.
Lets now layer on additional generic functionality by inheriting and extending the base class with additional functionality, e.g. if we want our table to support Multitenancy we could extend it with:
[AutoPopulate(nameof(IAuditTenant.TenantId), Eval = "Request.Items.TenantId")]
public abstract class CreateAuditTenantBase<Table,TResponse>
    : CreateAuditBase<Table,TResponse> {}
Where TenantId is added in a Global Request Filter (e.g. after inspecting the authenticated UserSession to determine the tenant they belong to), e.g:
const string TenantId = nameof(TenantId);

void SetTenant(IRequest req, IResponse res, object dto)
{
    var userSession = req.SessionAs<AuthUserSession>();
    if (userSession.IsAuthenticated)
    {
        req.SetItem(TenantId, userSession.City switch {
            "London" => 10,
            "Perth"  => 11,
            //...
            _        => 100,
        });
    }
}

GlobalRequestFilters.Add(SetTenant);        // HTTP Requests
GlobalMessageRequestFilters.Add(SetTenant); // MQ Requests
Now we easily implement custom "Audited" and "Multi Tenant" CRUD Services by inheriting these base Services.
Here's an example of our custom Table that implements our AuditBase class with a TenantId to capture the Tenant the record should be saved to:
public class RockstarAuditTenant : AuditBase
{
    [Index]
    public int TenantId { get; set; }
    [AutoIncrement]
    public int Id { get; set; }
    public string FirstName { get; set; }
    public string LastName { get; set; }
    public int? Age { get; set; }
    public DateTime DateOfBirth { get; set; }
    public DateTime? DateDied { get; set; }
    public LivingStatus LivingStatus { get; set; }
}
Our service can now implement our base Audit & Multitenant enabled service:
public class CreateRockstarAuditTenant
    : CreateAuditTenantBase<RockstarAuditTenant, CreateRockstarResponse>
{
    public string FirstName { get; set; }
    public string LastName { get; set; }
    public int? Age { get; set; }
    public DateTime DateOfBirth { get; set; }
}
And all the decorated properties will be automatically populated when creating the Rockstar with CreateRockstarAuditTenant, e.g:
client.Post(new CreateRockstarAuditTenant {
    FirstName = "Kurt",
    LastName = "Cobain",
    Age = 27,
    DateOfBirth = new DateTime(20,2,1967),
});
We can create the same base classes for Updates:
[ValidateIsAuthenticated]
[AutoPopulate(nameof(IAudit.ModifiedDate), Eval = "utcNow")]
[AutoPopulate(nameof(IAudit.ModifiedBy),   Eval = "userAuthName")] //or userAuthId
[AutoPopulate(nameof(IAudit.ModifiedInfo), Eval = "`${userSession.DisplayName} (${userSession.City})`")]
public abstract class UpdateAuditBase<Table,TResponse>
    : IUpdateDb<Table>, IReturn<TResponse> {}

[AutoFilter(nameof(IAuditTenant.TenantId), Eval="Request.Items.TenantId")]
public abstract class UpdateAuditTenantBase<Table,TResponse>
    : UpdateAuditBase<Table,TResponse> {}

public class UpdateRockstarAuditTenant
    : UpdateAuditTenantBase<RockstarAuditTenant, RockstarWithIdResponse>
{
    public int Id { get; set; }
    public string FirstName { get; set; }
    public LivingStatus? LivingStatus { get; set; }
}
Note the
[AutoPopulate]properties only appear on the Data Model, not the external Request DTO since we don't want external API consumers to populate them.
For Apps that prefer to never delete rows and instead mark records as deleted so an audit trail is retained, we can implement "Soft Deletes" using an UPDATE to populate the SoftDelete* fields behind-the-scenes:
[ValidateIsAuthenticated]
[AutoPopulate(nameof(IAudit.SoftDeletedDate), Eval = "utcNow")]
[AutoPopulate(nameof(IAudit.SoftDeletedBy),   Eval = "userAuthName")] //or userAuthId
[AutoPopulate(nameof(IAudit.SoftDeletedInfo), Eval = "`${userSession.DisplayName} (${userSession.City})`")]
public abstract class SoftDeleteAuditBase<Table,TResponse>
    : IUpdateDb<Table>, IReturn<TResponse> {}

[AutoFilter(QueryTerm.Ensure, nameof(IAuditTenant.TenantId),  Eval = "Request.Items.TenantId")]
public abstract class SoftDeleteAuditTenantBase<Table,TResponse>
    : SoftDeleteAuditBase<Table,TResponse> {}

public class SoftDeleteAuditTenant
    : SoftDeleteAuditTenantBase<RockstarAuditTenant, RockstarWithIdResponse>
{
    public int Id { get; set; }
}
To implement a "Real" permanently destructive DELETE you would instead implement IDeleteDb<T>:
[ValidateIsAuthenticated]
[AutoFilter(QueryTerm.Ensure, nameof(IAuditTenant.TenantId),  Eval = "Request.Items.TenantId")]
public class RealDeleteAuditTenant
    : IDeleteDb<RockstarAuditTenant>, IReturn<RockstarWithIdResponse>
{
    public int Id { get; set; }
    public int? Age { get; set; }
}
Multi RDBMS Services
As they're just regular ServiceStack Services everything you’re used to that works with normal services also works with new Auto Crud Services, to
recap you can annotate the DB Model with the [NamedConnection] attribute to specify which
registered named connection AutoQuery should use:
[NamedConnection("Reporting")]
public class NamedRockstar : Rockstar { } //DB Model
Where all AutoQuery Services for that data model will query the Reporting database instead:
public class CreateNamedRockstar : RockstarBase,
    ICreateDb<NamedRockstar>, IReturn<RockstarWithIdAndResultResponse>
{
    public int Id { get; set; }
}

public class UpdateNamedRockstar : RockstarBase,
    IUpdateDb<NamedRockstar>, IReturn<RockstarWithIdAndResultResponse>
{
    public int Id { get; set; }
}
Alternatively the [ConnectionInfo] can be used on Service implementations, but as AutoQuery doesn't
have them you'd need to provide custom implementations that can delegate to their respective Auto Crud API, e.g:
[ConnectionInfo(NamedConnection = MyDatabases.Reporting)]
public class MyReportingServices(IAutoQueryDb autoQuery) : Service
{
    public Task<object> Any(CreateConnectionInfoRockstar request) =>
        autoQuery.CreateAsync(request, Request);

    public Task<object> Any(UpdateConnectionInfoRockstar request) =>
        autoQuery.UpdateAsync(request, Request);
}
AutoFilter
If you're creating Soft Delete & Multi tenant services you'll want to ensure that every query only returns records in their tenant and doesn't return deleted items, which we can implement using an [AutoFilter], e.g:
[ValidateIsAuthenticated]
[AutoFilter(QueryTerm.Ensure, nameof(IAudit.SoftDeletedDate), Template = SqlTemplate.IsNull)]
[AutoFilter(QueryTerm.Ensure, nameof(IAuditTenant.TenantId),  Eval = "Request.Items.TenantId")]
public abstract class QueryDbTenant<From, Into> : QueryDb<From, Into> {}
The [AutoFilter] lets you add pre-configured filters to the query, QueryTerm.Ensure utilizes OrmLite's new Ensure() APIs which forces always applying this filter, even if the query contains other OR conditions.
This base class will then let you create concrete queries that doesn't return soft deleted rows and only returns rows from the same tenant as the authenticated user, e.g:
public class QueryRockstarAudit : QueryDbTenant<RockstarAuditTenant, Rockstar>
{
    public int? Id { get; set; }
}
To coincide with AutoCRUD there's also support for declarative validation which thanks to #Script lets you define your Fluent Validation Rules by annotating your Request DTO properties. As it's essentially a different way to define Fluent Validation Rules, it still needs Validation enabled to run:
Plugins.Add(new ValidationFeature());
AutoMap and AutoDefault
The [AutoDefault] attribute allows you to specify default values that the Data Model should be populated with using the same #Script expression support
available in [AutoPopulate] to populate constant values, cached constant expressions or results of full evaluated expressions.
The [AutoMap] attributes enables the flexibility of being able to maintain different external property names from their internal data models, but still
be able to declaratively map them.
Here's an example ICreateDb<T> AutoCrud Service that makes use of both these attributes to achieve its desired behavior:
public class CreateRockstarAutoMapDefault : ICreateDb<Rockstar>, IReturn<RockstarWithIdResponse>
{
    [AutoMap(nameof(Rockstar.FirstName))]
    public string MapFirstName { get; set; }

    [AutoMap(nameof(Rockstar.LastName))]
    public string MapLastName { get; set; }

    [AutoMap(nameof(Rockstar.Age))]
    [AutoDefault(Value = 21)]
    public int? MapAge { get; set; }

    [AutoMap(nameof(Rockstar.DateOfBirth))]
    [AutoDefault(Expression = "date(2001,1,1)")]
    public DateTime MapDateOfBirth { get; set; }

    [AutoMap(nameof(Rockstar.DateDied))]
    [AutoDefault(Eval = "utcNow")]
    public DateTime? MapDateDied { get; set; }

    [AutoMap(nameof(Rockstar.LivingStatus))]
    [AutoDefault(Value = LivingStatus.Dead)]
    public LivingStatus? MapLivingStatus { get; set; }
}
Custom Complex Mapping
Another opportunity to apply more complex custom mapping logic before resorting to creating an actual Service implementation is to make use of
ServiceStack's built-in Auto Mapping Populator API to intercept an AutoMapping conversion
between 2 types and apply custom logic after ConvertTo<T> or PopulateWith<T> APIs, e.g:
AutoMapping.RegisterPopulator((Dictionary<string,object> target, CreateRockstar source) =>
{
    if (!IsAlive(source))
    {
        target[nameof(source.LivingStatus)] = LivingStatus.Dead;
    }
});
Auto Guid's
In addition to supporting [AutoIncrement] to insert records with Auto Incrementing Ids, you can use [AutoId] to insert entities with
RDBMS generated UUIDs where they're supported otherwise
OrmLite populates them with Guid.NewGuid().
Note: usage of inheritance isn't required & has the same behavior as using explicit properties
public abstract class RockstarBase
{
    public string FirstName { get; set; }
    public string LastName { get; set; }
    public int? Age { get; set; }
    public DateTime DateOfBirth { get; set; }
}

public class Rockstar : RockstarBase
{
    [AutoId]
    public Guid Id { get; set; }
}

public class CreateRockstarWithAutoGuid : RockstarBase, ICreateDb<Rockstar>, IReturn<RockstarWithIdResponse>
{
}
Or if you prefer for Id's to always be populated with Guid.NewGuid(), remove [AutoId] and populate it with [AutoPopulate] instead:
[AutoPopulate(nameof(Rockstar.Id),  Eval = "nguid")]
public class CreateRockstarWithAutoGuid : RockstarBase, ICreateDb<Rockstar>, IReturn<RockstarWithIdResponse>
{
}
Optimistic Concurrency
We can declaratively add support for OrmLite's Optimistic Concurrency by
including ulong RowVersion property on Auto Crud Request/Response DTOs and Data Models, e.g:
// Data Model
public class RockstarVersion : RockstarBase
{
    [AutoIncrement]
    public int Id { get; set; }

    public ulong RowVersion { get; set; }
}

public class CreateRockstarVersion : RockstarBase, ICreateDb<RockstarVersion>,
    IReturn<RockstarWithIdAndRowVersionResponse> { }

public class UpdateRockstarVersion : RockstarBase, IPatchDb<RockstarVersion>,
    IReturn<RockstarWithIdAndRowVersionResponse>
{
    public int Id { get; set; }
    public ulong RowVersion { get; set; }
}

// Response DTO
public class RockstarWithIdAndRowVersionResponse
{
    public int Id { get; set; }
    public uint RowVersion { get; set; }
    public ResponseStatus ResponseStatus { get; set; }
}
AutoQuery will populate the RowVersion in Response DTOs which will need to be provided whenever making changes to that entity where it will fail to update the entity if no RowVersion was provided or has since been modified:
var createResponse = client.Post(new CreateRockstarVersion {
    FirstName = "Original",
    LastName = "Version",
    Age = 20,
    DateOfBirth = new DateTime(2001,7,1),
    LivingStatus = LivingStatus.Dead,
});

// throws OptimisticConcurrencyException: No RowVersion provided
client.Patch(new UpdateRockstarVersion {
    Id = createResponse.Id,
    LastName = "UpdatedVersion",
});

// succeeds if "Original Version" wasn't modified otherwise throws OptimisticConcurrencyException
var response = client.Patch(new UpdateRockstarVersion {
    Id = createResponse.Id,
    LastName = "UpdatedVersion",
    RowVersion = createResponse.RowVersion,
});
MQ Auto Crud Requests
As Auto Crud Services are just ServiceStack Services they can partake in its ecosystem of features like being able to
invoke Services via MQ, although there's some extra consideration needed to account for the differences between HTTP and MQ Requests.
First whatever filters you've added to populate the IRequest.Items like tenant Id you'll also need to register in GlobalMessageRequestFilters
so they're executed for MQ Requests as well:
GlobalRequestFilters.Add(SetTenant);        // HTTP Requests
GlobalMessageRequestFilters.Add(SetTenant); // MQ Requests
Secondly Auth Information is typically sent in the HTTP Request Headers, but they need to be included in the Request DTO to send Authenticated
MQ Requests, which can either implement IHasSessionId for normal Session Auth Providers, e.g:
public class CreateRockstarAuditTenant
  : CreateAuditTenantBase<RockstarAuditTenant, RockstarWithIdAndResultResponse>, IHasSessionId
{
    public string SessionId { get; set; } //Authenticate MQ Requests
    //...
}
Alternatively they can implement IHasBearerToken for stateless Bearer Token
Auth providers like JWT or API Keys.
If you're publishing an MQ Request inside a HTTP Service you can use the PopulateRequestDtoIfAuthenticated extension method which populates the Request
DTO from the Authenticated HTTP Request, e.g:
public class AutoCrudMqServices : Service
{
    public void Any(CreateRockstarAuditTenantMq request)
    {
        var mqRequest = request.ConvertTo<CreateRockstarAuditTenant>();
        Request.PopulateRequestDtoIfAuthenticated(mqRequest);
        PublishMessage(mqRequest);
    }
}
In this case if using Background MQ, it will execute the CreateRockstarAuditTenant request in a background thread, populating the MQ Request Context with the session identified by the IRequest.GetSessionId().
Publishing Requests to OneWay Endpoint
You can also send MQ requests directly by publishing to the OneWay HTTP endpoint, which if your AppHost is registered with an MQ Server, it will publish the message to the MQ and auto populate Request DTOs that implements IHasSessionId or IHasBearerToken, either if implicitly sent from an Authenticated client:
var authResponse = authClient.Post(new Authenticate {
    provider = "credentials",
    UserName = "admin@email.com",
    Password = "p@55wOrd",
    RememberMe = true,
});

authClient.SendOneWay(new CreateRockstarAuditTenant {
    FirstName = nameof(CreateRockstarAuditTenant),
    LastName = "SessionId",
    Age = 20,
    DateOfBirth = new DateTime(2002,2,2),
});
Or from an anonymous client with the explicit BearerToken or SessionId properties populated, e.g:
client.SendOneWay(new CreateRockstarAuditMqToken {
    BearerToken = JwtUserToken,
    FirstName = nameof(CreateRockstarAuditMqToken),
    LastName = "JWT",
    Age = 20,
    DateOfBirth = new DateTime(2002,2,2),
});
To save populating the BearerToken in each request, you can set it once on the Service Client which will automatically populate it on Request DTOs:
client.BearerToken = jwtUserToken;
Declarative Validation
To facilitate greater declarative functionality around ServiceStack Services, this release also introduces support for declarative validation where all existing Fluent Validation Property Validators can be annotated on Request DTOs using typed validation attributes which are decoupled from their Validator implementation so they're suitable to be annotated on impl-free Service Model DTOs and exported in Add ServiceStack Reference Types.
As they're decoupled they can eventually be used to implement instant validation feedback on clients without server round trips
The validators are incorporated into ServiceStack's existing Fluent Validation model so it works with existing UI form binding.
Property Validators
The new Property Validator attributes provide an alternative way to apply Request DTO validation rules, the best way to demonstrate them is showing the same example below implemented using Fluent Validation APIs:
public class ExampleValidatorsValidator : AbstractValidator<ExampleValidators>
{
    public ExampleValidatorsValidator()
    {
        RuleFor(x => x.CreditCard).CreditCard();
        RuleFor(x => x.Email).EmailAddress();
        RuleFor(x => x.Empty).Empty();
        RuleFor(x => x.Equal).Equal("Equal");
        RuleFor(x => x.ExclusiveBetween).ExclusiveBetween(10, 20);
        RuleFor(x => x.GreaterThanOrEqual).GreaterThanOrEqualTo(10);
        RuleFor(x => x.GreaterThan).GreaterThan(10);
        RuleFor(x => x.InclusiveBetween).InclusiveBetween(10, 20);
        RuleFor(x => x.Length).Length(10);
        RuleFor(x => x.LessThanOrEqual).LessThanOrEqualTo(10);
        RuleFor(x => x.LessThan).LessThan(10);
        RuleFor(x => x.NotEmpty).NotEmpty();
        RuleFor(x => x.NotEqual).NotEqual("NotEqual");
        RuleFor(x => x.Null).Null();
        RuleFor(x => x.ScalePrecision).ScalePrecision(1,1);
        RuleFor(x => x.RegularExpression).Matches(@"^[a-z]*$");
    }
}
For each property validator above you can use a Typed Property Validation Attribute in the format [Validate*]:
public class ExampleValidators : ICreateDb<ExampleValidator>, IReturn<EmptyResponse>
{
    [ValidateCreditCard]
    public string CreditCard { get; set; }
    [ValidateEmail]
    public string Email { get; set; }
    [ValidateEmpty]
    public string Empty { get; set; }
    [ValidateEqual("Equal")]
    public string Equal { get; set; }
    [ValidateLessThan(10)]
    public int LessThan { get; set; }
    [ValidateLessThanOrEqual(10)]
    public int LessThanOrEqual { get; set; }
    [ValidateGreaterThan(10)]
    public int GreaterThan { get; set; }
    [ValidateGreaterThanOrEqual(10)]
    public int GreaterThanOrEqual { get; set; }
    [ValidateExclusiveBetween(10, 20)]
    public int ExclusiveBetween { get; set; }
    [ValidateInclusiveBetween(10, 20)]
    public int InclusiveBetween { get; set; }
    [ValidateExactLength(10)]
    public string Length { get; set; }
    [ValidateNotEmpty]
    public string NotEmpty { get; set; }
    [ValidateNotEqual("NotEqual")]
    public string NotEqual { get; set; }
    [ValidateNull]
    public string Null { get; set; }
    [ValidateScalePrecision(1,1)]
    public decimal ScalePrecision { get; set; }
    [ValidateRegularExpression("^[a-z]*$")]
    public string RegularExpression { get; set; }
}
All Typed Validator Attributes above are just providing a typed subclass wrapper around the generic [Validate], so the implementation of
the [ValidateLessThan] is just:
public class ValidateLessThanAttribute : ValidateAttribute
{
    public ValidateLessThanAttribute(int value) : base($"LessThan({value})") { }
}
So the same Typed Validator above is equivalent to using the untyped generic [Validate] attribute below:
public class ExampleValidators : ICreateDb<ExampleValidator>, IReturn<EmptyResponse>
{
    [Validate("CreditCard")]
    public string CreditCard { get; set; }
    [Validate("Email")]
    public string Email { get; set; }
    [Validate("Empty")]
    public string Empty { get; set; }
    [Validate("Equal('Equal')")]
    public string Equal { get; set; }
    [Validate("ExclusiveBetween(10, 20)")]
    public int ExclusiveBetween { get; set; }
    [Validate("GreaterThanOrEqual(10)")]
    public int GreaterThanOrEqual { get; set; }
    [Validate("GreaterThan(10)")]
    public int GreaterThan { get; set; }
    [Validate("InclusiveBetween(10, 20)")]
    public int InclusiveBetween { get; set; }
    [Validate("ExactLength(10)")]
    public string Length { get; set; }
    [Validate("LessThanOrEqual(10)")]
    public int LessThanOrEqual { get; set; }
    [Validate("LessThan(10)")]
    public int LessThan { get; set; }
    [Validate("NotEmpty")]
    public string NotEmpty { get; set; }
    [Validate("NotEqual('NotEqual')")]
    public string NotEqual { get; set; }
    [Validate("Null")]
    public string Null { get; set; }
    [Validate("RegularExpression('^[a-z]*$')")]
    public string RegularExpression { get; set; }
    [Validate("ScalePrecision(1,1)")]
    public decimal ScalePrecision { get; set; }
}
Where the Validator Expression is a #Script Expression that returns a Fluent Validation IPropertyValidator defined
in the built-in ValidateScripts.cs:
public class ValidateScripts : ScriptMethods
{
    public IPropertyValidator Null() => new NullValidator();
    public IPropertyValidator Empty() => new EmptyValidator(null);
    public IPropertyValidator Empty(object defaultValue) => new EmptyValidator(defaultValue);
    public IPropertyValidator Equal(object value) => new EqualValidator(value);
    public IPropertyValidator NotNull() => new NotNullValidator();
    public IPropertyValidator NotEmpty() => new NotEmptyValidator(null);
    public IPropertyValidator NotEmpty(object defaultValue) => new NotEmptyValidator(defaultValue);
    public IPropertyValidator NotEqual(object value) => new NotEqualValidator(value);
    public IPropertyValidator CreditCard() => new CreditCardValidator();
    public IPropertyValidator Email() => new AspNetCoreCompatibleEmailValidator();
    public IPropertyValidator Length(int min, int max) => new LengthValidator(min, max);
    public IPropertyValidator ExactLength(int length) => new ExactLengthValidator(length);
    public IPropertyValidator MaximumLength(int max) => new MaximumLengthValidator(max);
    public IPropertyValidator MinimumLength(int min) => new MinimumLengthValidator(min);
    public IPropertyValidator InclusiveBetween(IComparable from, IComparable to) =>
        new InclusiveBetweenValidator(from, to);
    public IPropertyValidator ExclusiveBetween(IComparable from, IComparable to) =>
        new ExclusiveBetweenValidator(from, to);
    public IPropertyValidator LessThan(int value) => new LessThanValidator(value);
    public IPropertyValidator LessThanOrEqual(int value) => new LessThanOrEqualValidator(value);
    public IPropertyValidator GreaterThan(int value) => new GreaterThanValidator(value);
    public IPropertyValidator GreaterThanOrEqual(int value) => new GreaterThanOrEqualValidator(value);
    public IPropertyValidator ScalePrecision(int scale, int precision) =>
        new ScalePrecisionValidator(scale, precision);
    public IPropertyValidator RegularExpression(string regex) =>
        new RegularExpressionValidator(regex, RegexOptions.Compiled);
}
Validated Validator Expressions
Despite using untyped string Expressions, Validator expressions still provide early error detection as on Startup each #Script
expression is evaluated and verified that it resolves to a valid IPropertyValidator instance otherwise fails with a Startup Exception.
If the instance returned is valid it's merged with any other AbstractValidator<T> that may also be defined for the same Request DTO Type,
where it lets you mix n' match declarative attributes together with Fluent Validation rules.
Defining Multiple Validators
You can specify multiple Property Validators should be applied within a single Validator expression by using [] Array notation,
alternatively you can apply multiple Validate attributes and use C# syntax to combine them in a single line:
public class ExampleValidators
{
    [Validate("[NotNull,InclusiveBetween(13,100)]")]
    public int? ValidateAge { get; set; }

    [ValidateNotNull,ValidateInclusiveBetween(13,100)]
    public int? TypedAge { get; set; }
}
Registering Custom Declarative Validators
As [Validate*] attributes just execute a Script Method they're easily extensible by defining and register your own, e.g:
public class MyValidateScripts : ScriptMethods
{
    public IPropertyValidator Custom(int arg) => new MyCustomValidator(arg);
}
Which can be registered, either directly on your Script Pages plugin if your AppHost uses one:
Plugins.Add(new SharpPagesFeature {
    ScriptMethods = { new CustomScriptMethods() }
});
Otherwise you can use the AppHost's new ScriptContext which adds it to the AppHost's empty ScriptContext:
ScriptContext.ScriptMethods.Add(new CustomScriptMethods());
ScriptContextalso returnsSharpPagesFeatureif registered, in which case both registration examples are equivalent
After which you'll immediately be able to use it with the [Validate] attribute:
[Validate("Custom(1)")]
public int Test { get; set; }
Likewise you can create a typed Validate attribute around it which you can use instead:
public class ValidateCustomAttribute : ValidateAttribute
{
    public ValidateCustomAttribute(int arg) : base($"Custom({arg})") { }
}
//...

[ValidateCustom(1)]
public int Test { get; set; }
Custom Script Validation
Fluent Validation Validators are a nice model for defining reusable validation rules however they can require a bit of boilerplate
if you only need to define a one-off validation check. In these cases we can provide an even lighter weight solution by being able
to defining our validation condition inline with #Script by specifying it in the Condition attribute, e.g:
public class ExampleValidators : ICreateDb<ExampleValidator>, IReturn<EmptyResponse>
{
    [Validate(Condition = "it.isOdd()")]
    public int IsOddCondition { get; set; }

    [Validate(Condition = "it.isOdd() && it.log10() > 2")]
    public int IsOddAndOverTwoDigitsCondition { get; set; }

    [Validate(Condition = "it.isOdd() || it.log10() > 2")]
    public int IsOddOrOverTwoDigitsCondition { get; set; }
}
Script Conditions are valid if they return a truthy value and have access to the following arguments within their Expression:
Request: IRequestdto: Request DTOfield: Property Nameit: Property Value
If you're reusing the same Expression a nice solution for maintaining them is in a static class where you can use the AllConditions
and AnyConditions helper properties to compose individual checks, e.g:
public static class ValidationConditions
{
    public const string IsOdd = "it.isOdd()";
    public const string IsOver2Digits = "it.log10() > 2";
}

public class ExampleValidators : ICreateDb<ExampleValidator>, IReturn<EmptyResponse>
{
    [Validate(Condition = ValidationConditions.IsOdd)]
    public int IsOddCondition { get; set; }

    [Validate(AllConditions = new[]{ ValidationConditions.IsOdd, ValidationConditions.IsOver2Digits })]
    public int IsOddAndOverTwoDigitsCondition { get; set; }

    [Validate(AnyConditions = new[]{ ValidationConditions.IsOdd, ValidationConditions.IsOver2Digits })]
    public int IsOddOrOverTwoDigitsCondition { get; set; }
}
Despite not using a validator all #Script Conditions are executed using a custom Fluent Validation IPredicateValidator
(called ScriptConditionValidator) so it able to slot right
in with all other Property Validators.
Custom Error Codes and Messages
The other aspect of validators that can be overridden declaratively are the ErrorCode and Error Message returned in ServiceStack's
structured Error Response, specified using the ErrorCode and Message Attribute properties:
public class ExampleValidators : ICreateDb<ExampleValidator>, IReturn<EmptyResponse>
{
    [ValidateNotNull(ErrorCode = "ZError")]
    public string CustomErrorCode { get; set; }

    // Overrides both ErrorCode & Message
    [ValidateInclusiveBetween(1,2, ErrorCode = "ZError",
        Message = "{PropertyName} has to be between {From} and {To}, you: {PropertyValue}")]
    public int CustomErrorCodeAndMessage { get; set; }

    // Overrides ErrorCode & uses Message from Validators
    [ValidateNotNull(ErrorCode = "RuleMessage")]
    public string ErrorCodeRule { get; set; }

    [Validate(Condition = ValidationConditions.IsOdd)]
    public int IsOddCondition { get; set; }

    [Validate(AllConditions = new[]{ ValidationConditions.IsOdd, ValidationConditions.IsOver2Digits },
        ErrorCode = "RuleMessage")]
    public int IsOddAndOverTwoDigitsCondition { get; set; }
}
All Error Messages can reference the {PropertyName} and {PropertyValue} in their messages along with any other MessageFormatter
placeholders defined by the validator, e.g. the InclusiveBetweenValidator.cs used above also defines the {From}, {To} and {Value} placeholders.
#Script Conditions can define their Error codes in the centralized ConditionErrorCodes Dictionary in the ValidationFeature Plugin
where all IsOdd conditions will return the NotOdd custom error code.
The Error Messages can also be defined in the centralized ErrorCodeMessages Dictionary which defines the Error Messages that all failed
NotOdd or RuleMessage rules will use, e.g:
Plugins.Add(new ValidationFeature {
    ConditionErrorCodes = {
        [ValidationConditions.IsOdd] = "NotOdd",
    },
    ErrorCodeMessages = {
        ["NotOdd"] = "{PropertyName} must be odd",
        ["RuleMessage"] = "ErrorCodeMessages for RuleMessage",
    }
});
Type Validators
In addition to Property Validators there's also new support for Type Validators which can be declaratively added to perform top-level validation on Request DTOs.
They behave and function the same as Property Validators where you can use either the typed or the generic [ValidateRequest] attribute.
ServiceStack includes built-in Type Validator attributes for all Authorization Filter Attributes but as they're decoupled from any implementation they can be safely annotated on Request DTOs without requiring any implementation dependencies.
[ValidateIsAuthenticated]            // or [ValidateRequest("IsAuthenticated")]
[ValidateIsAdmin]                    // or [ValidateRequest("IsAdmin")]
[ValidateHasRole(role)]              // or [ValidateRequest($"HasRole(`{role}`)")]
[ValidateHasPermission(permission)]  // or [ValidateRequest($"HasPermission(`{permission}`)")
Just like Property Validators, the Typed Validator attributes are wrappers around the generic [ValidateRequest] attribute, e.g:
public class ValidateIsAuthenticatedAttribute : ValidateRequestAttribute
{
    public ValidateIsAuthenticatedAttribute() : base("IsAuthenticated") { }
}
Which are also defined in ValidateScripts.cs
but instead return a ITypeValidator:
public class ValidateScripts : ScriptMethods
{
    public ITypeValidator IsAuthenticated() => new IsAuthenticatedValidator();
    public ITypeValidator IsAuthenticated(string provider) => new IsAuthenticatedValidator(provider);
    public ITypeValidator HasRole(string role) => new HasRolesValidator(role);
    public ITypeValidator HasRoles(string[] roles) => new HasRolesValidator(roles);
    public ITypeValidator HasPermission(string permission) => new HasPermissionsValidator(permission);
    public ITypeValidator HasPermissions(string[] permission) => new HasPermissionsValidator(permission);
    public ITypeValidator IsAdmin() => new HasRolesValidator(RoleNames.Admin);
}
Custom Type Attributes
The easiest way to create a an ITypeValidator is to inherit from the TypeValidator base class, including both the ErrorCode
and Error Message failed requests should return.
An example where you might use one is when testing the pre-condition state of an entity which doesn't logically map to a property. In the example below we're validating to ensure that the entity doesn't have any Foreign Key References:
public class NoRockstarAlbumReferences : TypeValidator
{
    public NoRockstarAlbumReferences()
        : base("HasForeignKeyReferences", "Has RockstarAlbum References") {}

    public override async Task<bool> IsValidAsync(object dto, IRequest request)
    {
        //Example of using compiled accessor delegates to access `Id` property
        //var id = TypeProperties.Get(dto.GetType()).GetPublicGetter("Id")(dto).ConvertTo<int>();

        var id = ((IHasId<int>)dto).Id;
        using var db = HostContext.AppHost.GetDbConnection(request);
        return !await db.ExistsAsync<RockstarAlbum>(x => x.RockstarId == id);
    }
}
Then we need to register it as a custom script method to be able to reference it in [ValidateRequest]:
public class MyValidators : ScriptMethods
{
    public ITypeValidator NoRockstarAlbumReferences() => new NoRockstarAlbumReferences();
}
Which we can now declaratively reference by script method name:
[ValidateRequest(nameof(NoRockstarAlbumReferences))]
public class ExampleValidators : ICreateDb<Rockstar>, IReturn<RockstarWithIdResponse>, IHasId<int>
{
    public int Id { get; set; }

    [ValidateNotNull] //doesn't get validated if ValidateRequest is invalid
    public string NotNull { get; set; }
}
Type Validators are executed before any property validators, which if failed wont be executed.
Type Script Conditions
Type Validators can also execute #Script expressions where we could implement the above FK check inline using
a sync Database Script:
[ValidateRequest(Condition = "!dbExistsSync('SELECT * FROM RockstarAlbum WHERE RockstarId = @Id', { it.Id })",
    ErrorCode = "HasForeignKeyReferences")]
public class ExampleValidators : ICreateDb<Rockstar>, IReturn<RockstarWithIdResponse>
{
    public int Id { get; set; }

    [ValidateNotNull] //doesn't get validated if ValidateRequest is invalid
    public string NotNull { get; set; }
}
Note the condition needs to return a truthy value so you'd need to use the sync DB Script APIs to return a boolean instead of an async Task.
Type Validators can also specify custom Error Codes and Error Messages, they can also specify a custom HTTP Error StatusCode that failed requests should return.
[ValidateRequest(Condition = "it.Test.isOdd() && it.Test.log10() > 2",
    ErrorCode = "NotOddAndOver2Decimals", Message = "Pre-condition Failed", StatusCode = 401)]
public class ExampleValidators : ICreateDb<ExampleValidator>, IReturn<EmptyResponse> { }
DB Validation Rules
Both Property and Type Validators can also be sourced from a dynamic source with both Memory and RDBMS implementations included along with a Management HTTP API to be able to manage them remotely. Dynamic Validation Rules are cacheable locally giving them the same performance profile as declarative attributes in code whose caches are only invalidated once they've been updated, upon which they'll come into immediate effect.
Here's a Modular Startup class you can drop into a ServiceStack Project to enable maintaining declarative Validation Rules in your configured RDBMS:
public class ConfigureValidation : IConfigureServices, IConfigureAppHost
{
    public void Configure(IServiceCollection services)
    {
        // Add support for dynamically generated db rules
        services.AddSingleton<IValidationSource>(c =>
            new OrmLiteValidationSource(c.Resolve<IDbConnectionFactory>()));
    }

    public void Configure(IAppHost appHost)
    {
        appHost.Plugins.Add(new ValidationFeature());
        appHost.Resolve<IValidationSource>().InitSchema();
    }
}
DB Validation rules can be added programmatically, this example below adds 1x Type Validator and 2x Property Validators to the
DynamicRules Request DTO:
var validationSource = container.Resolve<IValidationSource>();
validationSource.SaveValidationRulesAsync(new List<ValidationRule> {
    new ValidationRule { Type  = nameof(DynamicRules), Validator = "IsAuthenticated" },
    new ValidationRule { Type  = nameof(DynamicRules), Validator = "NotNull",
                         Field = nameof(DynamicRules.LastName) },
    new ValidationRule { Type  = nameof(DynamicRules), Validator = "InclusiveBetween(13,100)",
                         Field = nameof(DynamicRules.Age) },
});
Admin Users can also manage these rules remotely using the ModifyValidationRules Service defined below:
public class ModifyValidationRules : IReturnVoid
{
    public string AuthSecret { get; set; }

    public List<ValidationRule> SaveRules { get; set; }

    public int[] DeleteRuleIds { get; set; }

    public int[] SuspendRuleIds { get; set; }

    public int[] UnsuspendRuleIds { get; set; }

    public bool? ClearCache { get; set; }
}
Later we'll showcase the UX-friendly UI you can also use to manage them when we introduce ServiceStack Studio.
Executable Audit Log
In addition to being able to declaratively develop AutoQuery and CRUD APIs without needing to implement them, you're also able to enable a recorded history of Executable Audit information over all AutoCrud operations in an executable audit log that in addition to maintaining an automated recorded history of every change to an entity also exhibits "EventSourcing-like capabilities" in being able to recreate the entities state using the latest Services implementation by replaying all AutoCrud operations in order, which can be applied on a granular entity, table level, or in the unlikely case that all System DB writes are performed through AutoQuery CRUD Services, it's capable of re-creating the entire DB state from just its Audit history, although is dependent on whether all changes made to AutoCrud Services are backwards compatible.
Being able to rebuild your Systems DB by replaying audit history events is a nice property that can serve as an integrity check to verify that all changes leading up to the current DB state has been recorded. As data is the most important part of most systems it can be beneficial to maintain a change history of when items were created, modified and deleted (and by whom) as we're used to when using a VCS for our source code. Typically this means also employing "non destructive" approaches to system design like "Soft Deletes" which you can declaratively implement with Auto CRUD.
Executable Crud Audit Events
This feature tries to obtain some of the nice features of Event Sourcing but without the additional complexity by allowing you to capture all CRUD operations in an executable log whilst still retaining your RDBMS as your master authority. This feature doesn’t require any additional dev overhead as your AutoCrud Request DTOs are the recorded events.
To enable this feature you just need to register an ICrudEvents provider which will let you persist your events in any data store, but typically you’d use OrmLiteCrudEvents to persist it in the same RDBMS that the AutoCrud requests are already writing to, e.g:
container.AddSingleton<ICrudEvents>(c =>
    new OrmLiteCrudEvents(c.Resolve<IDbConnectionFactory>()) {
        // NamedConnections = { SystemDatabases.Reporting }
    });
container.Resolve<ICrudEvents>().InitSchema();
If you’re using Multitenancy features or multiple RDBMS’s in your AutoCrud DTOs you can add them to NamedConnections where it will create an CrudEvent table in each of the RDBMS’s used.
and that’s all that’s required, now every AutoCrud operation will persist the Request DTO and associative metadata in the Event entry below within a DB transaction:
public class CrudEvent : IMeta
{
    [AutoIncrement]
    public long Id { get; set; }
    // AutoCrudOperation, e.g. Create, Update, Patch, Delete, Save
    public string EventType { get; set; }
    public string Model { get; set; }         // DB Model Name
    public string ModelId { get; set; }       // Primary Key of DB Model
    public DateTime EventDate { get; set; }   // UTC
    public long? RowsUpdated { get; set; }    // How many rows were affected
    public string RequestType { get; set; }   // Request DTO Type
    public string RequestBody { get; set; }   // Serialized Request Body
    public string UserAuthId { get; set; }    // UserAuthId if Authenticated
    public string UserAuthName { get; set; }  // UserName or unique User Identity
    public string RemoteIp { get; set; }      // Remote IP of the Request
    public string Urn { get; set; }           // URN format: urn:{requestType}:{ModelId}

    // Custom Reference Data with or with non-integer Primary Key
    public int? RefId { get; set; }
    public string RefIdStr { get; set; }
    public Dictionary<string, string> Meta { get; set; }
}
Full Executable Audit History
With what's captured this will serve as an Audit History of state changes for any row by querying the Model & ModelId columns, e.g:
var dbEvents = (OrmLiteCrudEvents)container.Resolve<ICrudEvents>();
var rowAuditEvents = dbEvents.GetEvents(Db, nameof(Rockstar), id);
The contents of the Request DTO stored as JSON in RequestBody. You can quickly display the contents of any JSON in human-friendly
HTML with the htmlDump script if you're using #Script, @Html.HtmlDump(obj)
if you're using Razor or just the static ViewUtils.HtmlDump(obj) method to get a raw pretty-formatted HTML String.
Replay AutoCrud Requests
If all your database was created with AutoCrud Services you could delete its rows and re-create it by just re-playing all your AutoCrud DTOs in the order they were executed, which can be done with:
var eventsPlayer = new CrudEventsExecutor(appHost);
foreach (var crudEvent in dbEvents.GetEvents(db))
{
    await eventsPlayer.ExecuteAsync(crudEvent);
}
The CrudEventsExecutor uses your AppHost's ServiceController to execute the message, e,g. same execution pipeline MQ Requests use,
so it will execute your AppHost's GlobalMessageRequestFilters/Async if you have any custom logic in Request Filters
(e.g. Multi TenantId example above). It also executes authenticated AutoCrud requests as the original AutoCrud Request Authenticated User,
which just like JWT Refresh Tokens
will require either using an AuthRepository or if you're using a Custom Auth Provider you can implement an IUserSessionSource to
load User Sessions from a custom data store.
When replaying the Audit Events it will use the original primary key, even if you're using [AutoIncrement] Primary Keys,
this will let you re-create the state of a single entry, e.g:
db.DeleteById<Rockstar>(id);
var rowAuditEvents = dbEvents.GetEvents(Db, nameof(Rockstar), id);
foreach (var crudEvent in rowAuditEvents)
{
    await eventsPlayer.ExecuteAsync(crudEvent);
}
If for instance you wanted it to execute through your latest logic with any enhancements or bug fixes, etc.
AutoGen AutoQuery & Crud Services
Long time users of ServiceStack will know it's a staunch proponent of code-first development where your C# Types retains the master authority of your App's logic, although there are a number of times where you have to work with existing databases which would require significant effort to create the initial code-first Data Models. Historically we've pointed people to use OrmLite's T4 Template Support which provides a decent initial stab, however it's limited in its capability and offers a sub par development experience.
Code Generation of AutoQuery & Crud Services
Now with AutoCrud we can add a lot more value in this area as AutoCrud's declarative nature allows us to easily generate AutoQuery & Crud Services by just emitting declarative Request DTOs.
You can then add the generated DTOs to your ServiceModel's to quickly enable AutoQuery Services for your existing databases.
To enable this feature you you just need to initialize GenerateCrudServices in your AutoQueryFeature plugin, e.g:
Plugins.Add(new AutoQueryFeature {
    MaxLimit = 1000,
    GenerateCrudServices = new GenerateCrudServices {}
});
If you don't have an existing database, you can quickly test this out with a Northwind SQLite database available from github.com/NetCoreApps/NorthwindAuto:
$ x download NetCoreApps/NorthwindAuto
As you'll need to use 2 terminal windows, I'd recommend opening the project with VS Code which has great multi-terminal support:
$ code NorthwindAuto
The important parts of this project is the registering the OrmLite DB Connection, the above configuration and the local northwind.sqlite database, i.e:
container.AddSingleton<IDbConnectionFactory>(c =>
    new OrmLiteConnectionFactory(MapProjectPath("~/northwind.sqlite"), SqliteDialect.Provider));

Plugins.Add(new AutoQueryFeature {
    MaxLimit = 1000,
    GenerateCrudServices = new GenerateCrudServices {}
});
Generating AutoQuery Types & Services
The development experience is essentially the same as Add ServiceStack Reference where you'll need to run the .NET Core App in 1 terminal:
$ dotnet run
Then use the x dotnet tool to download all the AutoQuery & Crud Services for all tables in the configured DB connection:
$ x csharp https://localhost:5001 -path /crud/all/csharp
Updating Generated Services
If your RDBMS schema changes you'd just need to restart your .NET Core App, then you can update all existing dtos.cs with:
$ x csharp
i.e. the same experience as updating normal DTOs.
You can do the same for all other ServiceStack's supported languages as shown in autodto at the start of this release.
AutoRegister AutoGen AutoQuery Services!
To recap we've now got an integrated scaffolding solution where we can quickly generate code-first AutoQuery Services and integrate them into our App to quickly build an AutoQuery Service layer around our existing database.
But we can raise the productivity level even higher by instead of manually importing the code-generated Services into our project we just tell ServiceStack to do it for us!
This is what the magical AutoRegister flag does for us:
Plugins.Add(new AutoQueryFeature {
    GenerateCrudServices = new GenerateCrudServices {
        AutoRegister = true,
        //....
    }
});
Instantly Servicify Northwind DB with gRPC
To show the exciting potential of this feature we'll demonstrate one valuable use-case of creating a grpc
project, mixing in AutoQuery configuration to instantly Servicifying the Northwind DB, browsing the generated Services from ServiceStack's
Metadata Page, explore the gRPC RPC Services .proto then create a new Dart App to consume the gRPC Services:
YouTube: youtu.be/5NNCaWMviXU
Step-by-step Guide
See the annotated guide below to follow along:
Create a new grpc .NET Core project and open it in VS Code:
$ x new grpc NorthwindApi
$ code NorthwindApi
Inside VS Code open a Terminal Window and mix in the required configuration:
$ cd NorthwindApi
$ x mix autocrudgen sqlite northwind.sqlite
Which will mix in the autocrudgen gist to enable AutoQuery and tell it to Auto Generate AutoQuery and CRUD Services for all tables in the registered RDBMS:
public class ConfigureAutoQuery : IConfigureAppHost
{
    public void Configure(IAppHost appHost)
    {
        appHost.Plugins.Add(new AutoQueryFeature {
            MaxLimit = 1000,
            GenerateCrudServices = new GenerateCrudServices {
                AutoRegister = true
            }
        });
    }
}
The sqlite gist registers an OrmLite.Sqlite RDBMS connection with our App which we want to configure to connect to a northwind.sqlite database:
public void Configure(IServiceCollection services)
{
    services.AddSingleton<IDbConnectionFactory>(new OrmLiteConnectionFactory(
        Configuration.GetConnectionString("DefaultConnection")
            ?? "northwind.sqlite",
        SqliteDialect.Provider));
}
Then we apply the northwind.sqlite gist to add the northwind.sqlite database to our new project.
Now that our App's configured we can run it with:
$ dotnet run
Where it will start the ServiceStack gRPC App on 3 ports configured in appsettings.json:
5001- Enables access from existing HTTP/1.1 clients and proxies5002- Enables a secure gRPC Channel5003- Enables an insecure gRPC Channel
{
  "Kestrel": {
    "Endpoints": {
      "Https": {
        "Url": "https://*:5001",
        "Protocols": "Http1"
      },
      "GrpcSecure": {
        "Url": "https://*:5051",
        "Protocols": "Http2"
      },
      "GrpcInsecure" : {
        "Url": "http://*:5054",
        "Protocols": "Http2"
      }
    }
  }
}
Once running you can view your Apps metadata page at https://localhost:5001 to inspect all the Services that were generated.
Create Dart gRPC Console App
It's also now accessible via ServiceStack's gRPC endpoint which opens your generated Services up to Google's high-performance gRPC ecosystem which enables typed, high-performance integrations into exciting platforms like Flutter which uses the Dart programming language to create Reactive, high-performance native Android and iOS Apps.
We can test Dart's gRPC integration and development workflow in a new Dart Console App we can create with:
$ mkdir dart-grpc && cd dart-grpc
$ pub global activate stagehand
$ stagehand console-full
We'll need to update pubspec.yaml with the required gRPC dependencies:
dependencies:
  fixnum: ^0.10.11
  async: ^2.2.0
  protobuf: ^1.0.1
  grpc: ^2.1.3
When you save pubspec.yaml Dart's VS Code extension will automatically fetch any new dependencies which can also be manually run with:
$ pub get
We can then use the protoc support in the dotnet tools to download our .proto Services descriptor
and generate Dart's gRPC classes with a single command:
$ x proto-dart https://localhost:5001 -out lib
We're now all set to consume our gRPC Services using the protoc generated gRPC proxy in our main() function in main.dart:
import 'dart:io';
import 'package:grpc/grpc.dart';
import 'package:dart_grpc/services.pb.dart';
import 'package:dart_grpc/services.pbgrpc.dart';

void main(List<String> arguments) async {
    var client = GrpcServicesClient(ClientChannel('localhost', port:5054,
      options:ChannelOptions(credentials: ChannelCredentials.insecure())));

    var response = await client.getQueryCategory(QueryCategory());
    print(response.results);
    exit(0);
}
Which can be run with:
$ dart bin\main.dart
Calling gRPC SSL Services
The Dart gRPC Docs shows how we can connect to it via our gRPC SSL endpoint by running the openssl scripts in grpc/scripts to generate our dev.crt and prod.crt SSL Certificates that you can configure in your in your GrpcSecure endpoint with:
{
  "Kestrel": {
    "Endpoints": {
      "GrpcSecure": {
        "Url": "https://*:5051",
        "Protocols": "Http2",
        "Certificate": {
          "Path": "dev.pfx",
          "Password": "grpc"
        }
      }
    }
  }
}
Where you'll then be able to access the secure gRPC SSL endpoints using the generated dev.crt certificate in your Dart App:
import 'dart:io';
import 'package:grpc/grpc.dart';
import 'package:dart_grpc/services.pb.dart';
import 'package:dart_grpc/services.pbgrpc.dart';

GrpcServicesClient createClient({CallOptions options}) {
  return GrpcServicesClient(ClientChannel('localhost', port:5051,
    options:ChannelOptions(credentials: ChannelCredentials.secure(
        certificates: File('dev.crt').readAsBytesSync(),
        authority: 'localhost'))), options:options);
}

void main(List<String> args) async {

    var client = createClient();
    var response = await client.getQueryCategory(QueryCategory());
    print(response.results);

    exit(0);
}
AutoGen's AutoRegister Implementation
Whilst the AutoRegister = true flag on its face may seem magical, it's simply an instruction that tells ServiceStack to register the
new AutoQuery Services it already knows about and register them as if they were normal code-first Services that we had written ourselves.
More accurately, behind-the-scenes it uses the Metadata Type structure it constructed in generating the Services & Types, i.e. the same Types used to project into its Add ServiceStack Reference's generated C#, TypeScript, (and other languages) which are also the same Types that are manipulated when customizing code-generation, gets used to generate .NET Types in memory on Startup with Reflection.Emit.
Barring any issues with the projection into IL, externally the end result is indistinguishable to a normal code-first ServiceStack Service manually created by a developer - An important point as to why these solutions compose well with the rest of ServiceStack, just as an AutoQuery Service is a normal ServiceStack Service, these auto generated & auto registered ServiceStack Services are regular Auto Query Services. The primary difference is that they only exist in a .NET Assembly in memory created on Startup, not in code so they're not "statically visible" to a C# compiler, IDE, tools, etc. But otherwise they're regular typed ServiceStack Services and can take advantage of the ecosystem around Services including Add ServiceStack Reference & other Metadata Pages and Services, etc.
CreateCrudServices Instructions
Peeking deeper behind the AutoRegister flag will reveal that it's a helper for adding an empty CreateCrudServices instance, i.e. it's equivalent to:
Plugins.Add(new AutoQueryFeature {
    GenerateCrudServices = new GenerateCrudServices {
        CreateServices = {
            new CreateCrudServices()
        }
        //....
    }
});
Multiple Schemas and RDBMS Connections
This instructs ServiceStack to generate Services for the default option, i.e. all tables in the Database of the default registered Database connection.
Although should you wish to, you can also generate Services for multiple Databases and RDBMS Schemas within the same App. With this you could have a single API Gateway Servicifying access to multiple System RDBMS Tables & Schemas, e.g:
Plugins.Add(new AutoQueryFeature {
    GenerateCrudServices = new GenerateCrudServices {
        CreateServices = {
            new CreateCrudServices(),
            new CreateCrudServices { Schema = "AltSchema" },
            new CreateCrudServices { NamedConnection = "Reporting" },
            new CreateCrudServices { NamedConnection = "Reporting", Schema = "AltSchema" },
        }
        //....
    }
});
These will generated Service Contracts & DTO Types with the Multitenancy NamedConnection
& OrmLite [Schema] attribute required for routing AutoQuery Services to use the appropriate RDBMS connection of Schema.
Although there are potential conflicts if there are identical table names in each RDBMS/Schema as it has to go back and rewrite the Metadata References to use a
non-ambiguous name, first tries using the NamedConnection, then the schema then a combination when both exists, if it's still ambiguous it gives up and ignores it.
If you do run into conflicts, the recommendation is to "eject" the generated .cs sources and manually update them to use your preferred unique names.
Customize Code Generation to include App Conventions
Being able to instantly generate AutoQuery Services for all your RDBMS tables is nice, but it's even nicer if you could easily customize the code-generation!
Together with the flexibility of the new declarative validation support you can compose a surprisingly large amount of your App's logic using the versatility of C# to automate embedding your App's conventions by annotating them on declarative Request DTOs.
The existing code-generation already infers a lot from your RDBMS schema which you can further augment using the available GenerateCrudServices filters:
ServiceFilter- called with every Service OperationTypeFilter- called with every DTO TypeIncludeService- a predicate to return whether the Service should be includedIncludeType- a predicate to return whether the Type should be included
For an illustration of this in action, here's a typical scenario of how the Northwind AutoQuery Services could be customized:
- Controlling which Tables not to generate Services for in
ignoreTables - Which tables not to generate Write Crud Services for in
readOnlyTables - Which tables to restrict access to in different roles in
protectTableByRole - Example of additional validation to existing tables in
tableRequiredFields- Adds the
[ValidateNotEmpty]attribute to Services accessing the table and the[Required]OrmLite attribute for the Data Model DTO Type.
- Adds the
var ignoreTables = new[] { "IgnoredTable", }; // don't generate AutoCrud APIs for these tables
var readOnlyTables = new[] { "Region" };
var protectTableByRole = new Dictionary<string,string[]> {
    ["Admin"]    = new[] { nameof(CrudEvent), nameof(ValidationRule) },
    ["Accounts"] = new[] { "Order", "Supplier", "Shipper" },
    ["Employee"] = new[] { "Customer", "Order", "OrderDetail" },
    ["Manager"]  = new[] { "Product", "Category", "Employee", "EmployeeTerritory", "UserAuth", "UserAuthDetails" },
};
var tableRequiredFields = new Dictionary<string,string[]> {
    ["Shipper"] = new[]{ "CompanyName", "Phone" },
};

Plugins.Add(new AutoQueryFeature {
    MaxLimit = 100,
    GenerateCrudServices = new GenerateCrudServices
    {
        ServiceFilter = (op,req) =>
        {
            // Require all Write Access to Tables to be limited to Authenticated Users
            if (op.IsCrudWrite())
            {
                op.Request.AddAttributeIfNotExists(new ValidateRequestAttribute("IsAuthenticated"),
                    x => x.Validator == "IsAuthenticated");
            }

            // Limit Access to specific Tables
            foreach (var tableRole in protectTableByRole)
            {
                foreach (var table in tableRole.Value)
                {
                    if (op.ReferencesAny(table))
                        op.Request.AddAttribute(new ValidateHasRoleAttribute(tableRole.Key));
                }
            }

            // Add [ValidateNotEmpty] attribute on Services operating Tables with Required Fields
            if (op.DataModel != null && tableRequiredFields.TryGetValue(op.DataModel.Name, out var requiredFields))
            {
                var props = op.Request.Properties.Where(x => requiredFields.Contains(x.Name));
                props.Each(x => x.AddAttribute(new ValidateNotEmptyAttribute()));
            }
        },
        TypeFilter = (type, req) =>
        {
            // Add OrmLite [Required] Attribute on Tables with Required Fields
            if (tableRequiredFields.TryGetValue(type.Name, out var requiredFields))
            {
                var props = type.Properties.Where(x => requiredFields.Contains(x.Name));
                props.Each(x => x.AddAttribute(new RequiredAttribute()));
            }
        },
        //Don't generate the Services or Types for Ignored Tables
        IncludeService = op => !ignoreTables.Any(table => op.ReferencesAny(table)) &&
            !(op.IsCrudWrite() && readOnlyTables.Any(table => op.ReferencesAny(table))),

        IncludeType = type => !ignoreTables.Contains(type.Name),
    }
});
To assist in code-generation a number of high-level APIs are available to help with identifying Services, e.g:
operation.IsCrud()- Is read-only AutoQuery or AutoCrud write Serviceoperation.IsCrudWrite()- Is AutoCrud write Serviceoperation.IsCrudRead()- Is AutoQuery read-only Serviceoperation.ReferencesAny()- The DTO Type is referenced anywhere in the Service (e.g. Request/Response DTOs, Inheritance, Generic Args, etc)type.InheritsAny()- The DTO inherits any of the specified type namestype.ImplementsAny()- The DTO implements any of the specified interface type names
Mixing generated AutoQuery Services & existing code-first Services
The expected use-case for these new features is that you'd create a new project that points to an existing database to bootstrap your project with code-first AutoQuery Services using the dotnet tool to download the generated types, i.e:
$ x csharp https://localhost:5001 -path /crud/all/csharp
At which point you'd "eject" from the generated AutoQuery Services (forgetting about this feature), copy the generated types into your ServiceModel project and continue on development as code-first Services just as if you'd created the Services manually.
But the GenerateCrudServices feature also supports a "hybrid" mode where you can also just generate Services for any new AutoQuery Services
that don't exist, i.e. for tables for which there are no existing services which you can access their generated Services from:
$ x csharp https://localhost:5001 -path /crud/new/csharp
The existing /crud/all/csharp Service continues to return generated Services for all Tables but will stitch together and use existing types where they exist.
Trying it out
We now have all the features we need to quickly servicify an existing database that we can easily customize to apply custom App logic to further protect & validate access.
So you can quickly explore these new features locally, you can download the enhanced Northwind example with this customization above in the new github.com/NetCoreApps/NorthwindCrud project which you can download & run with:
$ x download NetCoreApps/NorthwindCrud
$ cd NorthwindCrud
$ dotnet run
This example App is also configured with other new features in incoming release including Crud Events in Startup.cs:
// Add support for auto capturing executable audit history for AutoCrud Services
container.AddSingleton<ICrudEvents>(c => new OrmLiteCrudEvents(c.Resolve<IDbConnectionFactory>()));
container.Resolve<ICrudEvents>().InitSchema();
As well as support for dynamically generated db rules in Configure.Validation.cs:
services.AddSingleton<IValidationSource>(c =>
    new OrmLiteValidationSource(c.Resolve<IDbConnectionFactory>()));

appHost.Resolve<IValidationSource>().InitSchema();
To be able to test the custom code generation the example is pre-populated with 3 users with different roles in Configure.Auth.cs:
// Register Users that don't exist
void EnsureUser(string email, string name, string[] roles=null)
{
    if (authRepo.GetUserAuthByUserName(email) != null)
        return;

    authRepo.CreateUserAuth(new UserAuth {
        Email = email,
        DisplayName = name,
        Roles = roles?.ToList(),
    }, password:"p@ss");
}

EnsureUser("employee@gmail.com", name:"A Employee",   roles:new[]{ "Employee" });
EnsureUser("accounts@gmail.com", name:"Account Dept", roles:new[]{ "Employee", "Accounts" });
EnsureUser("manager@gmail.com",  name:"The Manager",  roles:new[]{ "Employee", "Manager" });
Of which you can also find published on NorthwindCrud's home page:
Open in ServiceStack Studio
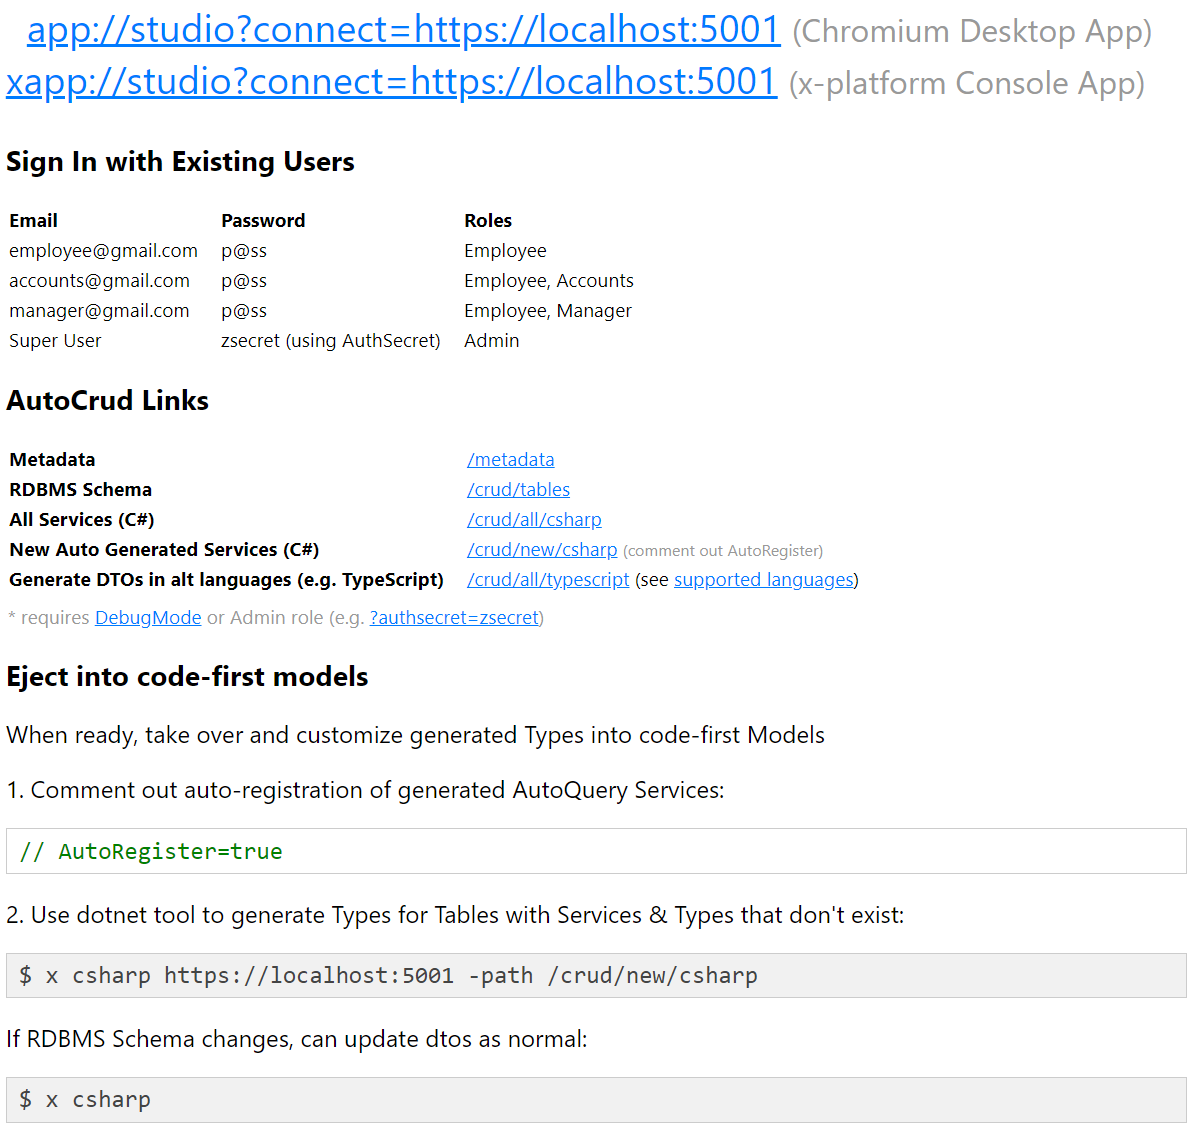
Retrying Dart gRPC Example
We can see an immediate effect of these customizations in NorthwindCrud where most APIs now require Authentication:
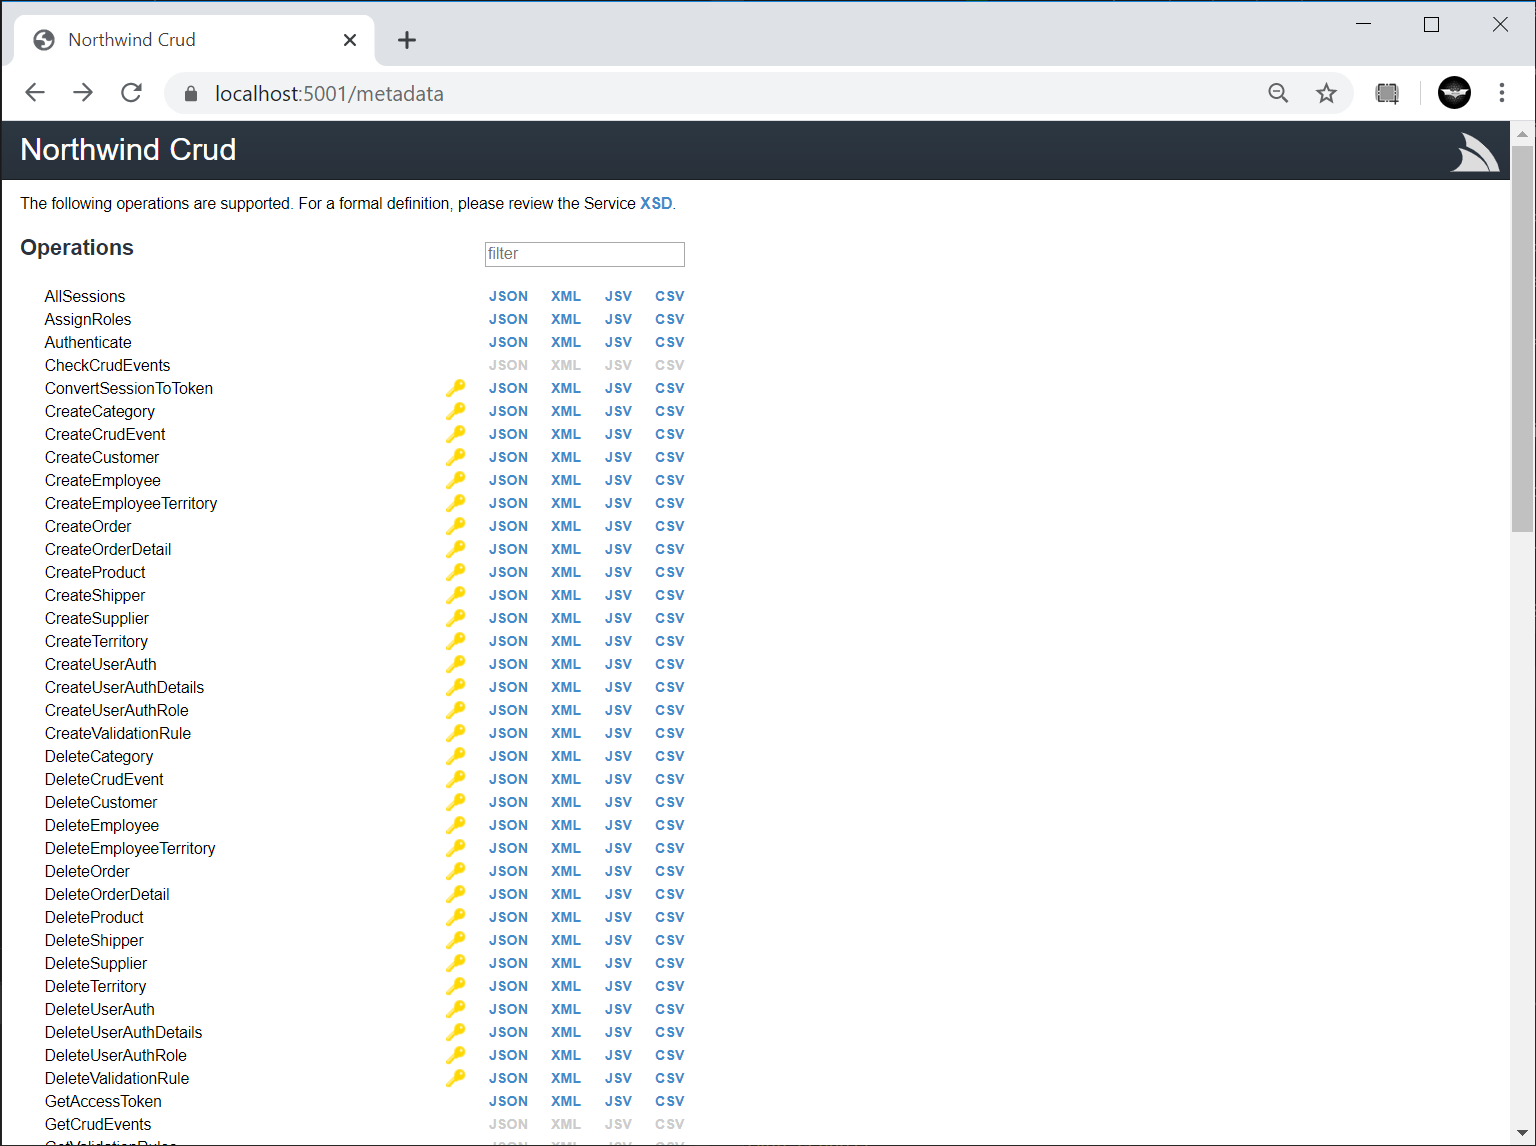
If we then try to run our Dart main.dart example against the customized NorthwindCrud APIs by first regenerating gRPC protoc Types:
$ x proto-dart https://localhost:5001 -out lib
Then try rerunning main.dart where it will now fail with an Unauthorized exception:

To now be able to access most Services we'll need to Authenticate as registered user. As NorthwindCrud is configured to use JWT we can create an Authenticated gRPC client by adding the populated JWT Token from an Authenticated Request into the Authorization gRPC metadata Header:
GrpcServicesClient createClient({CallOptions options}) {
  return GrpcServicesClient(ClientChannel('localhost', port:5054,
    options:ChannelOptions(credentials: ChannelCredentials.insecure())),
    options:options);
}

void main(List<String> arguments) async {
    var authResponse = await createClient()
        .postAuthenticate(Authenticate()..provider='credentials'
        ..userName='manager@gmail.com'..password='p@ss');

    var authClient = createClient(options:CallOptions(metadata:{
        'Authorization': 'Bearer ${authResponse.bearerToken}' }));
    var response = await authClient.getQueryCategory(QueryCategory());
    print(response.results);
    exit(0);
}
Now when we rerun main.dart we'll be able to access our Northwind categories again:
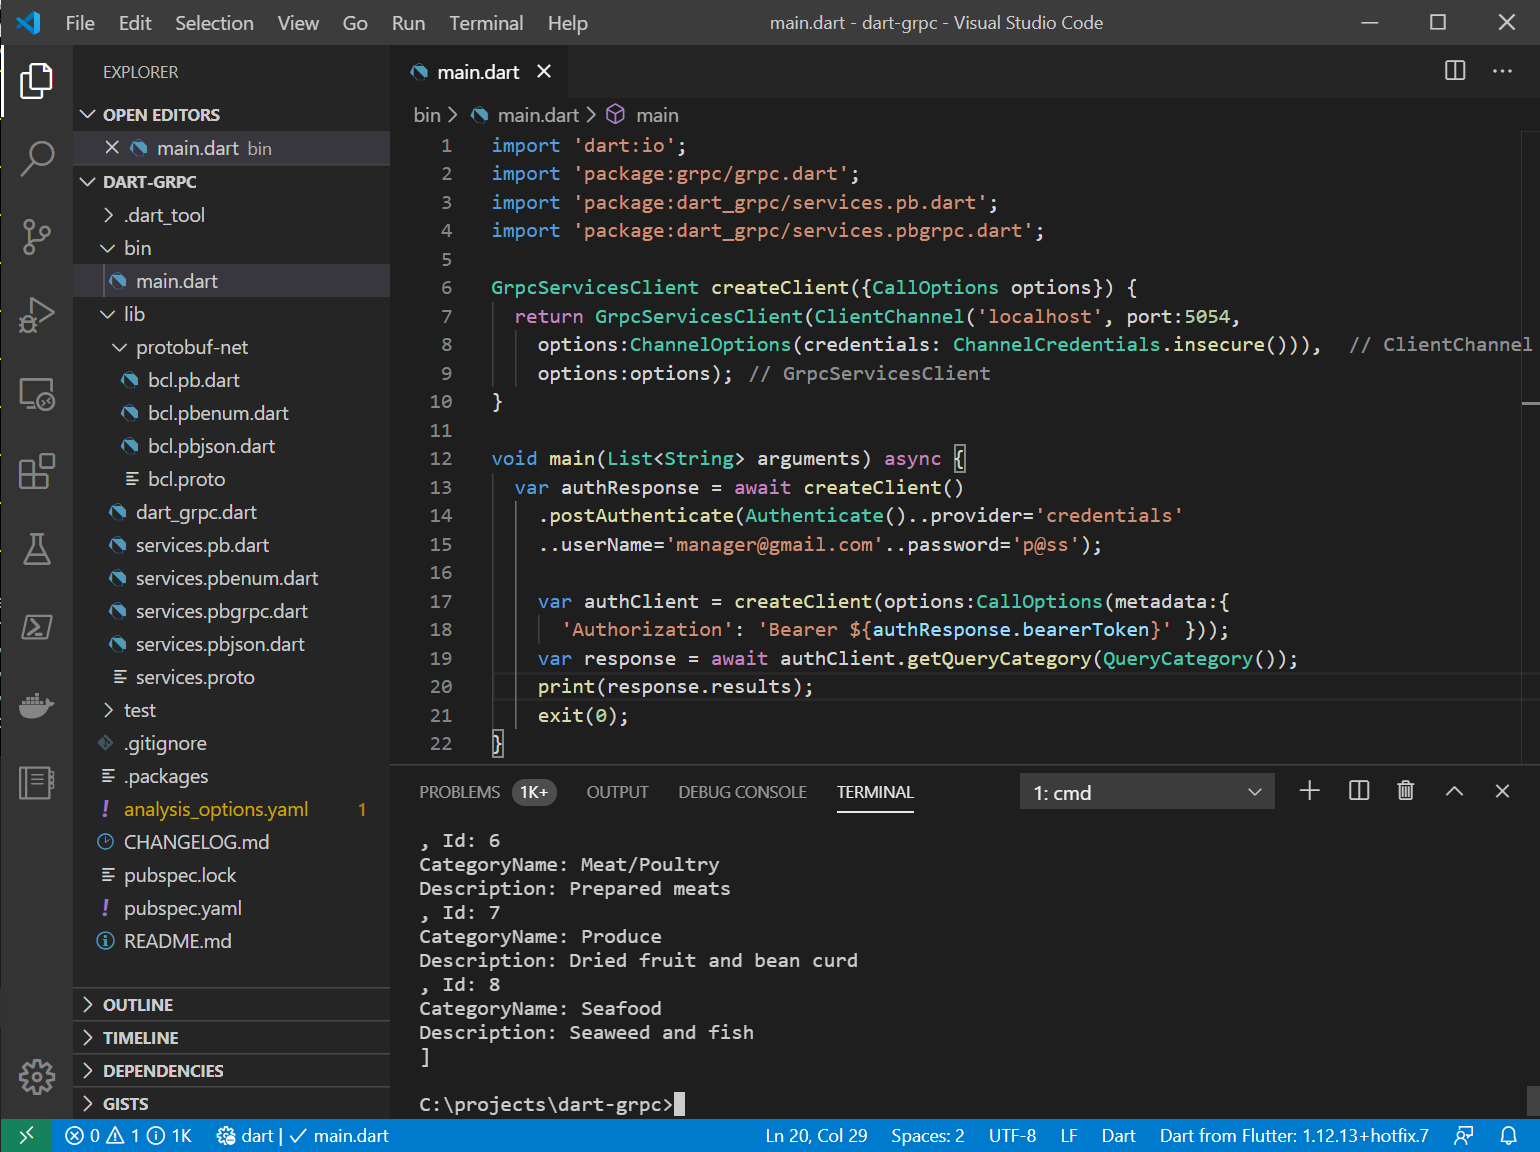
ServiceStack Studio
Thanks to the richer semantics of AutoQuery Services, it's generic interfaces, base class & declarative attributes, ServiceStack has more knowledge about your Services than what's possible from normal HTTP API endpoint metadata and is able to provide richer suite of functionality around them. An example that takes advantage of this is ServiceStack Studio - A new Desktop App for accessing your ServiceStack instances.
YouTube: youtu.be/2FFRLxs7orU
It replaces the ServiceStack Admin UI where it provides a UX-friendly UI for accessing AutoQuery & Crud Services but will also gain UI features for taking advantage of various ServiceStack Plugins & Features, e.g. in this initial release it includes UI's for Managing DB Validation Rules & for viewing the Executable Audit History of Tables updated through AutoCrud Services.
Studio is a capability-based Admin UI where it only enables its different management UI's depending on which features each remote ServiceStack Instance has enabled & whether the Signed In User has access to them.
To enable this ability a new /metadata/app endpoint returns metadata information about which plugins are enabled, what features they're configured
with and whether they're protected behind User Roles. As such it will only be able to manage ServiceStack instances running the latest v5.9 release.
You'll need the latest app dotnet tool which is bundled with the latest Chromium which provides the Desktop UI:
$ dotnet tool update -g app
Which you'll need to run once to register the app:// url scheme, e.g:
$ app -version
Studio Desktop App vs ServiceStack.Admin
The primary limitations with ServiceStack Admin was its deployment model where it had to be explicitly registered as a plugin in each ServiceStack instance, this means it could only be used on ServiceStack instances that explicitly had it registered, also it maintained the long release cadence of ServiceStack major releases which means the UI couldn't be updated frequently resulting in a stale long feedback loop.
Frequent out-of-band release cadence
To overcome this ServiceStack Studio is delivered as a Gist Desktop App which, like a website will be running the latest version each time it's run. To reduce its download footprint the app and x dotnet tools now include the new ServiceStack.Desktop project which includes the common framework libraries that most Vue & React Apps use which saves it from needing to be included in each Download. It also includes Google Material Design Icons SVGs & a copy of fontawesome free icons that all Desktop Apps will be able to use without the bandwidth cost for using them.
Light Footprint + Always use latest version
ServiceStack/Studio is a vue-lite App that only uses SVG icons as they're small, high-quality at every scale, are customizable & have built-in css classes making them easy to use declaratively where it takes advantage of ServiceStack's built-in SVG support which allows optimal css bundles containing only the SVGs your App's use. All SVG icons used in Studio are defined in its _init.ss startup script which defines which Material Design SVG to make available under which css bundle. It also registers its own custom SVG icons not contained in ServiceStack.Desktop's embedded resources and includes them as part of its /css/app.css bundle.
As a result of its architecture Studio gets bundled down to a 55kb .zip which includes its 46kb (Uncompressed) Studio.dll plugin containing all its C# back-end logic (thanks to all ServiceStack .dll's being deployed with the dotnet tools as well). As it's published as a Gist it adds a bit more overhead (and Gist APIs aren't particularly fast) so there's a slight delay in loading from a Gist but still is able to load its home page in around 2-3s, which includes the start time of the ServiceStack .NET Core App and the Chromium CEF Browser. The number of restarts should be minimal thanks to Studio being designed as a single UI to manage all your ServiceStack instances so you can reuse the same running Desktop App to manage multiple remote ServiceStack instances.
Desktop Features
Thanks to it being a Desktop App we have features that wouldn't be possible in a Web App, e.g. we can use built-in proxies to by-pass CORS & IFrame embedding limitations to be able to access ServiceStack instances that don't have CORS enabled & native Windows features like easy access to clipboard, launch external programs directly, control Desktop Windows, e.g. Launch into kiosk mode or in/out of full-screen with F11, etc.
ServiceStack.Desktop
Studio is powered by exciting new features in the latest app .NET Core Desktop App dotnet tool which in addition to its small footprint & able to run "always up-to-date", it also includes seamless integration into invoking server functions with #Script which allows you to use the same syntax to call JavaScript functions.
The integration makes it trivial to call Win32 APIs from JavaScript which are accessible behind async TypeScript APIs resulting in a much more pleasant API than calling them in C#, e.g. you can Copy + Paste to the Windows clipboard with just:
import { clipboard, setClipboard } from '@servicestack/desktop'

await setClipboard('Some Text')
await clipboard() //= Some Text
The TypeScript APIs are just typed wrappers around calling DesktopScripts Script Methods which invoke the the appropriate Win 32 API, e.g:
async function clipboard() {
    return await evaluateCode('clipboard');
}
win32 demo
The win32 Sharp App contains an examples dashboard of invoking different native Win32 functions:
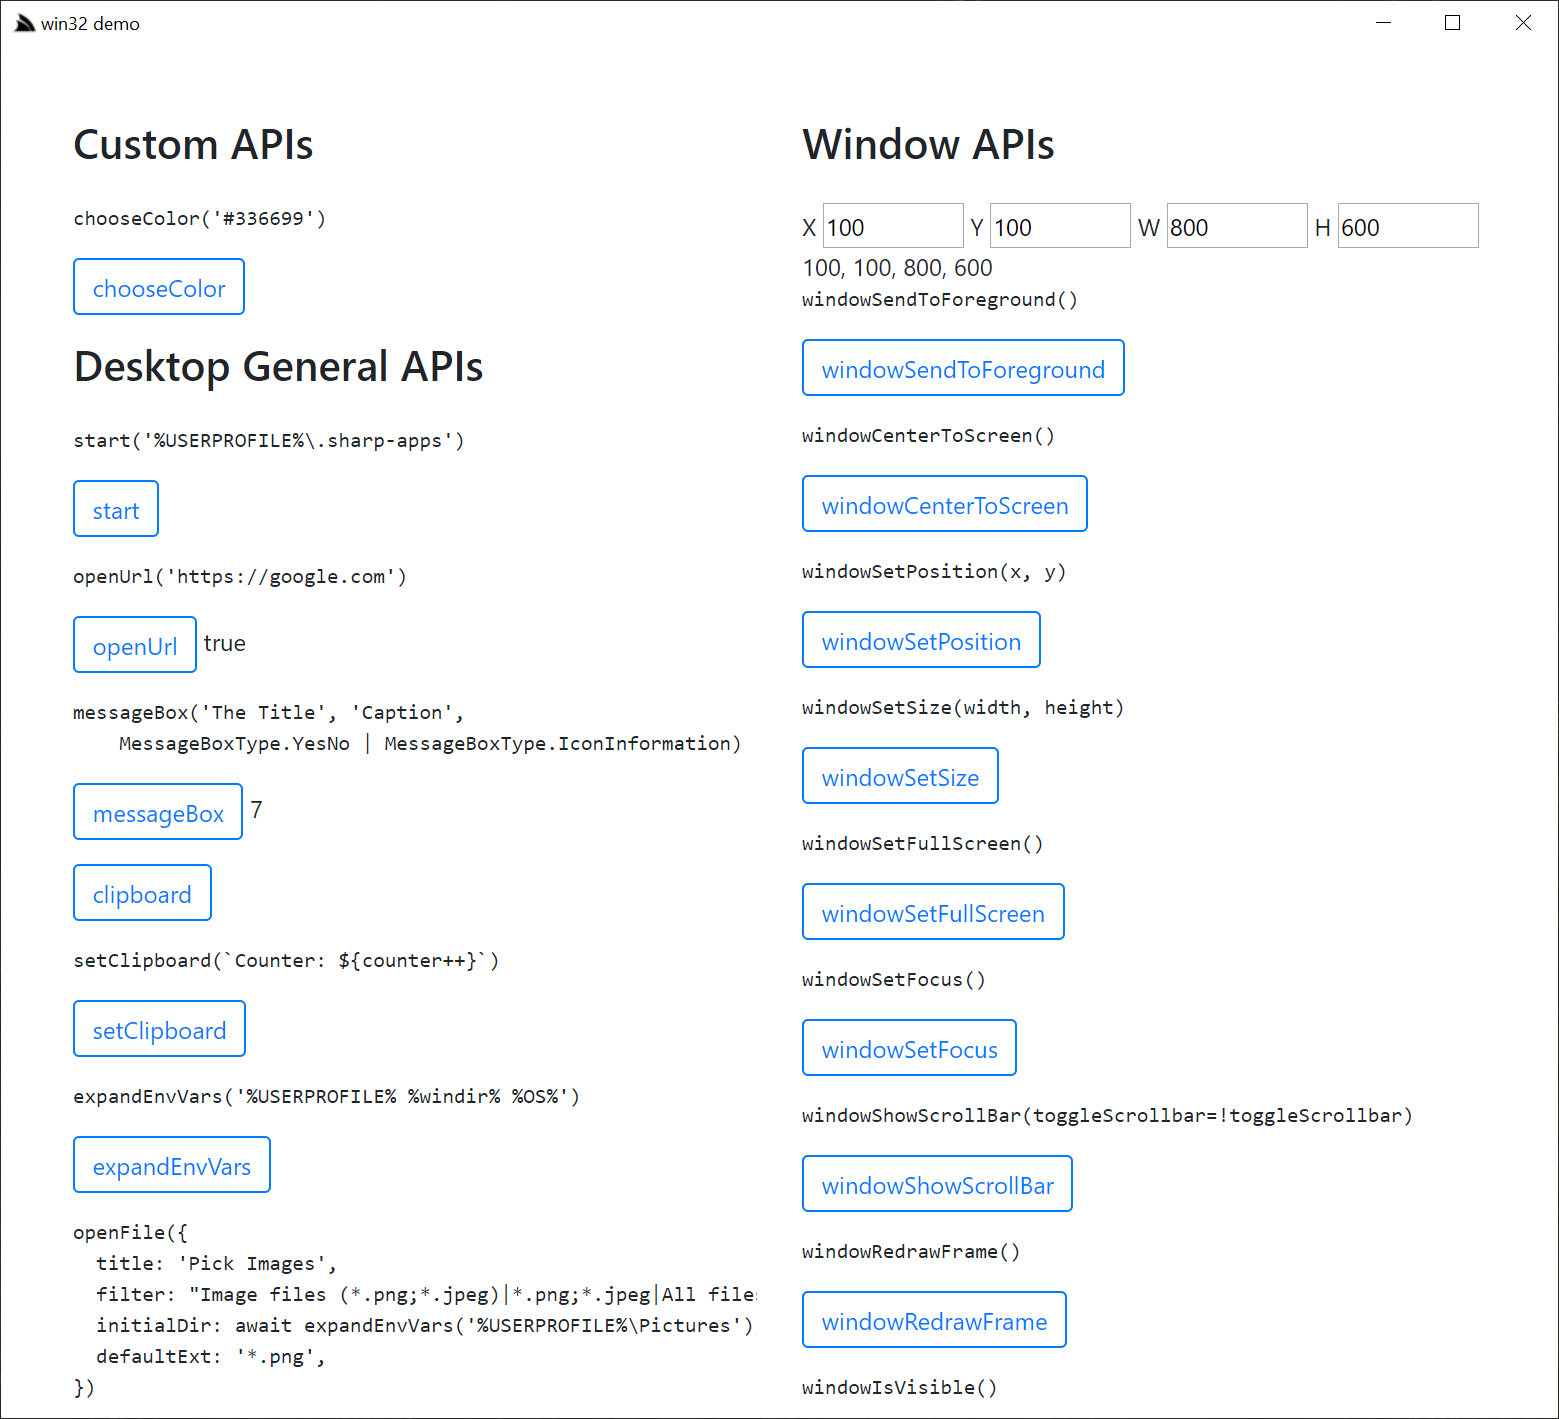
You can run this Gist Desktop App via URL Scheme from:
[app://win32](app://win32)
Or via command-line:
$ app open win32
The main source code of this component is in Win32/index.ts,
which makes use of the built in TypeScript APIs below from @servicestack/desktop:
start('%USERPROFILE%\\\\.sharp-apps')

openUrl('https://google.com')

messageBox('The Title', 'Caption', MessageBoxType.YesNo | MessageBoxType.IconInformation)

await openFile(  {
    title: 'Pick Images',
    filter: "Image files (*.png;*.jpeg)|*.png;*.jpeg|All files (*.*)|*.*",
    initialDir: await expandEnvVars('%USERPROFILE%\\\\Pictures'),
    defaultExt: '*.png',
})

openFile({ isFolderPicker: true })

deviceScreenResolution()

primaryMonitorInfo()

windowSetPosition(x, y)

windowSetSize(width, height)
Custom Win32 API
You're also not limited to calling the built-in Win32 APIs above as calling custom APIs just involves wrapping the C# inside your preferred #Script method that you would like to make it available to JS as, e.g. here's the win32 implementation for launching Win32's Color Dialog Box and returning the selected color in HTML Color format:
public class CustomMethods : ScriptMethods
{
    [DllImport("ComDlg32.dll", CharSet = CharSet.Unicode)]
    internal static extern int CommDlgExtendedError();

    [DllImport("ComDlg32.dll", CharSet = CharSet.Unicode)]
    internal static extern bool ChooseColor(ref ChooseColor cc);

    private int[] customColors = new int[16] {
        0x00FFFFFF, 0x00C0C0C0, 0x00808080, 0x00000000,
        0x00FF0000, 0x00800000, 0x00FFFF00, 0x00808000,
        0x0000FF00, 0x00008000, 0x0000FFFF, 0x00008080,
        0x000000FF, 0x00000080, 0x00FF00FF, 0x00800080,
    };

    public string chooseColor(ScriptScopeContext scope) => chooseColor(scope, "#ffffff");

    public string chooseColor(ScriptScopeContext scope, string defaultColor) => scope.DoWindow(w => {
        var cc = new ChooseColor();
        cc.lStructSize = Marshal.SizeOf(cc);
        var lpCustColors = Marshal.AllocCoTaskMem(16 * sizeof(int));
        try
        {
            Marshal.Copy(customColors, 0, lpCustColors,16);
            cc.hwndOwner = w;
            cc.lpCustColors = lpCustColors;
            cc.Flags = ChooseColorFlags.FullOpen | ChooseColorFlags.RgbInit;
            var c = ColorTranslator.FromHtml(defaultColor);
            cc.rgbResult = ColorTranslator.ToWin32(c);

            if (!ChooseColor(ref cc))
                return (string) null;

            c = ColorTranslator.FromWin32(cc.rgbResult);
            return ColorTranslator.ToHtml(c);
        }
        finally
        {
            Marshal.FreeCoTaskMem(lpCustColors);
        }
    });
}
ServiceStack.Desktop's IPC takes care of invoking the #Script JS-compatible expression
and returning the result:
var selectedColor = await evaluateCode('chooseColor(`#336699`)')
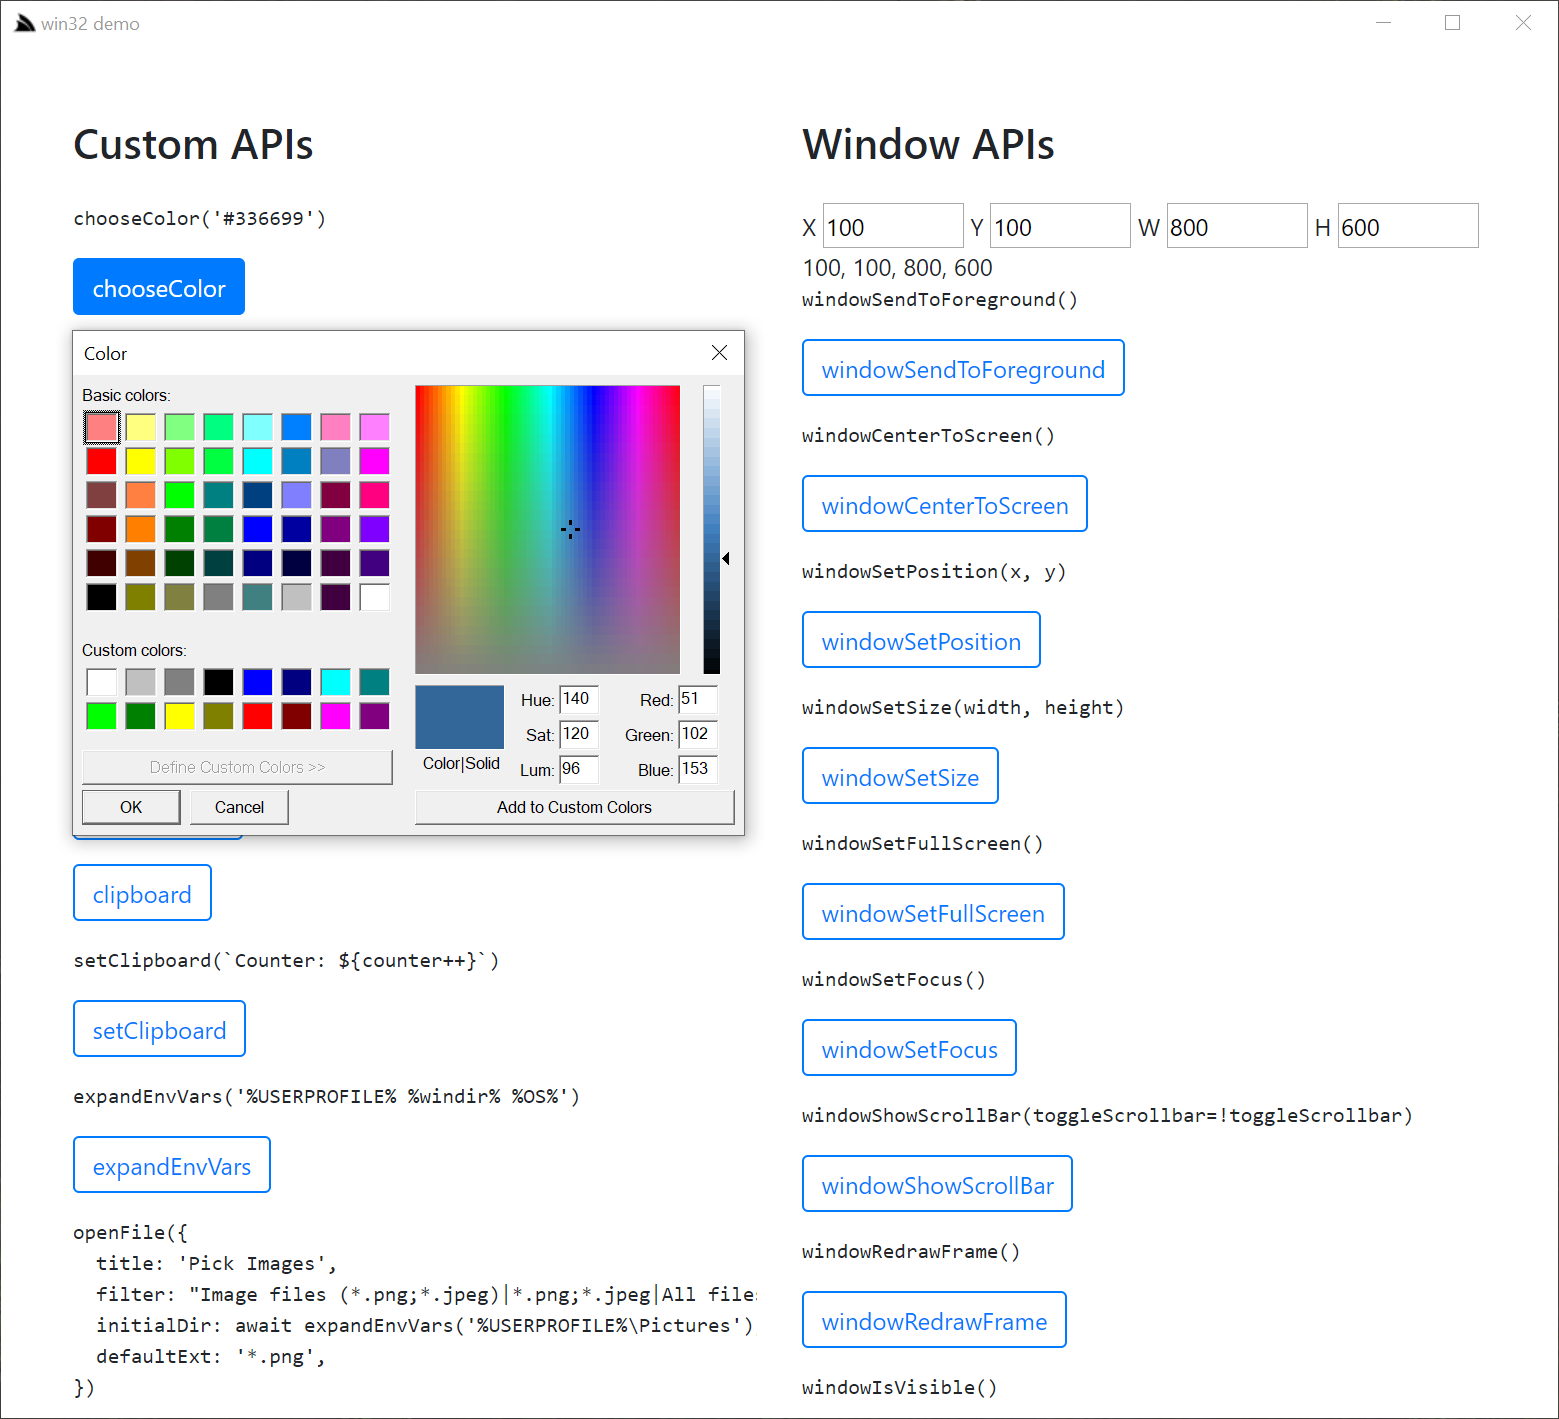
The scope.DoWindow() extension method supports expressions being invoked in-process when launched by app.exe as well as when
invoked during development in "detached mode" if electing to run the .NET Core backend as a stand-alone Web App.
If your App calls your custom APIs a lot you can wrap it in a first-class TypeScript method that mirrors the server #Script method:
function chooseColor(defaultColor?:string) {
    return defaultColor
        ? evaluateCode(`chooseColor(${quote(defaultColor)})`)
        : evaluateCode(`chooseColor()`);
}
Where it can be called using the same syntax in JS and #Script:
var selectedColor = await chooseColor(`#336699`)
Highly productive live-reloading Development experience
When running inside an app .NET Core Desktop App is uses an IPC mode similar to Unix Pipes where communication is streamed over internal processes with the Desktop Scripts invoked by app.exe. To enable an optimal development experience it also supports a decoupled mode where in Debug builds you can launch the app.exe Chromium browser to open a remote URL, e.g:
$ app start https://localhost:5002
Which allows you to develop your Desktop App as a regular .NET Core Web App whilst still being hosted inside the app CEF shell which instead of using a Chromium inter-process IPC to invoke #Script server functions, will invoke them over https where the Win 32 APIs end up being invoked by the back-end .NET Core Server instead of the app.exe Desktop App, but the end result remains the same.
If it weren't for the productivity possible for being able to only needing to develop for Chrome's state-of-the-art rendering engine where you can use advanced features like CSS grid along with the productivity of high-level productive Reactive UI frameworks like Vue, the effort into create a Desktop App like ServiceStack Studio wouldn't be justifiable. Being able to develop in a highly productive environment with hot-reloading and a fast iterative development loop makes all the difference which otherwise wouldn't be feasible if needing to use any C# & XAML UI FX or WinForms to develop Desktop Apps.
A Reactive Vue Desktop App with live-reload brings the enjoyment back to developing Desktop Apps with web development productivity, access to the latest Chrome features & native Windows features when needed.
After the next release we'll create pre-packaged project templates for vue-desktop and react-desktop Desktop Apps to make it easy develop Vue & React Desktop Apps along with scripts to bundle it & publish it to gist. If preferred app.exe also lets you deploy the published app to your own private repo & limit access to only users accessible with a GitHub token which they can open with from a URL with:
app://user/repo?token={GITHUB_TOKEN}
Or on the command line with:
$ app user/repo -token $GITHUB_TOKEN
Or without a token by setting it in the
GITHUB_TOKENEnvironment variable
For offline deployments the published /dist folder can be copied and launched with app (or x) in the app's folder:
$ app
For better Desktop integration this (or custom command-line arguments) can be wrapped in a new Windows Shortcut:
$ app shortcut
Anyone wanting an early look at an example of Desktop App projects built using this development model can checkout ServiceStack/Studio or NetCoreApps/SharpData.
Starting ServiceStack Studio
The initial release of ServiceStack Studio primarily provides a UI around AutoQuery Services and the latest features in this release like Executable Audit History and declarative RDBMS validators.
If you don't have a project using the latest v5.9 features on hand you can launch a copy of NetCoreApps/NorthwindCrud which uses the new AutoCrud features to generate AutoQuery Services around all its RDBMS tables, that can be run locally with:
$ x download NetCoreApps/NorthwindCrud
$ cd NorthwindCrud
$ dotnet run
Where you can use app URL scheme support to launch Studio & automatically register the NorthwindCrud instance with:
app://studio?connect=https://localhost:5001
This URL scheme gets translated & is equivalent to running Studio on the command-line with:
$ app open studio -connect https://localhost:5001
Which downloads the Studio Gist Desktop App, loads it as a Gist VFS whose static assets are then served by the .NET Core Server and loaded in the CEF Chromium browser.
The connect param is used by Studio to auto register the remote NorthwindCrud instance where it auto downloads its App Metadata
containing its enabled plugins & features & within a few seconds you should see it appear on the home page:
Desktop-less x-plat app
Whilst not optimized for it, Studio can also be launched headless in your default Browser using the x x-plat tool:
xapp://studio?connect=https://localhost:5001
$ x open studio -connect https://localhost:5001
Where you'll then be able to view it by going to https://localhost:5002. Note if not launched in a browser Studio will have limited
capacity and features, but will eventually be a supported mode for accessing Studio from macOS or Linux.
Home Page
From the home page you'll see all the top-level Admin Sections available that's enabled on the remote instance, in the initial release there's a UI for accessing AutoQuery Services and a UI for maintaining DB Validation Rules.
AutoQuery UI
Because of the rich declarative metadata of AutoQuery & Crud Services we can infer the data model that each AutoQuery Service operates on and the Type of Operation each Service provides. As a result can logically group each Service around the Data Model they operate on and provide a more intuitive & natural UI for each of the different AutoQuery/CRUD operation types.
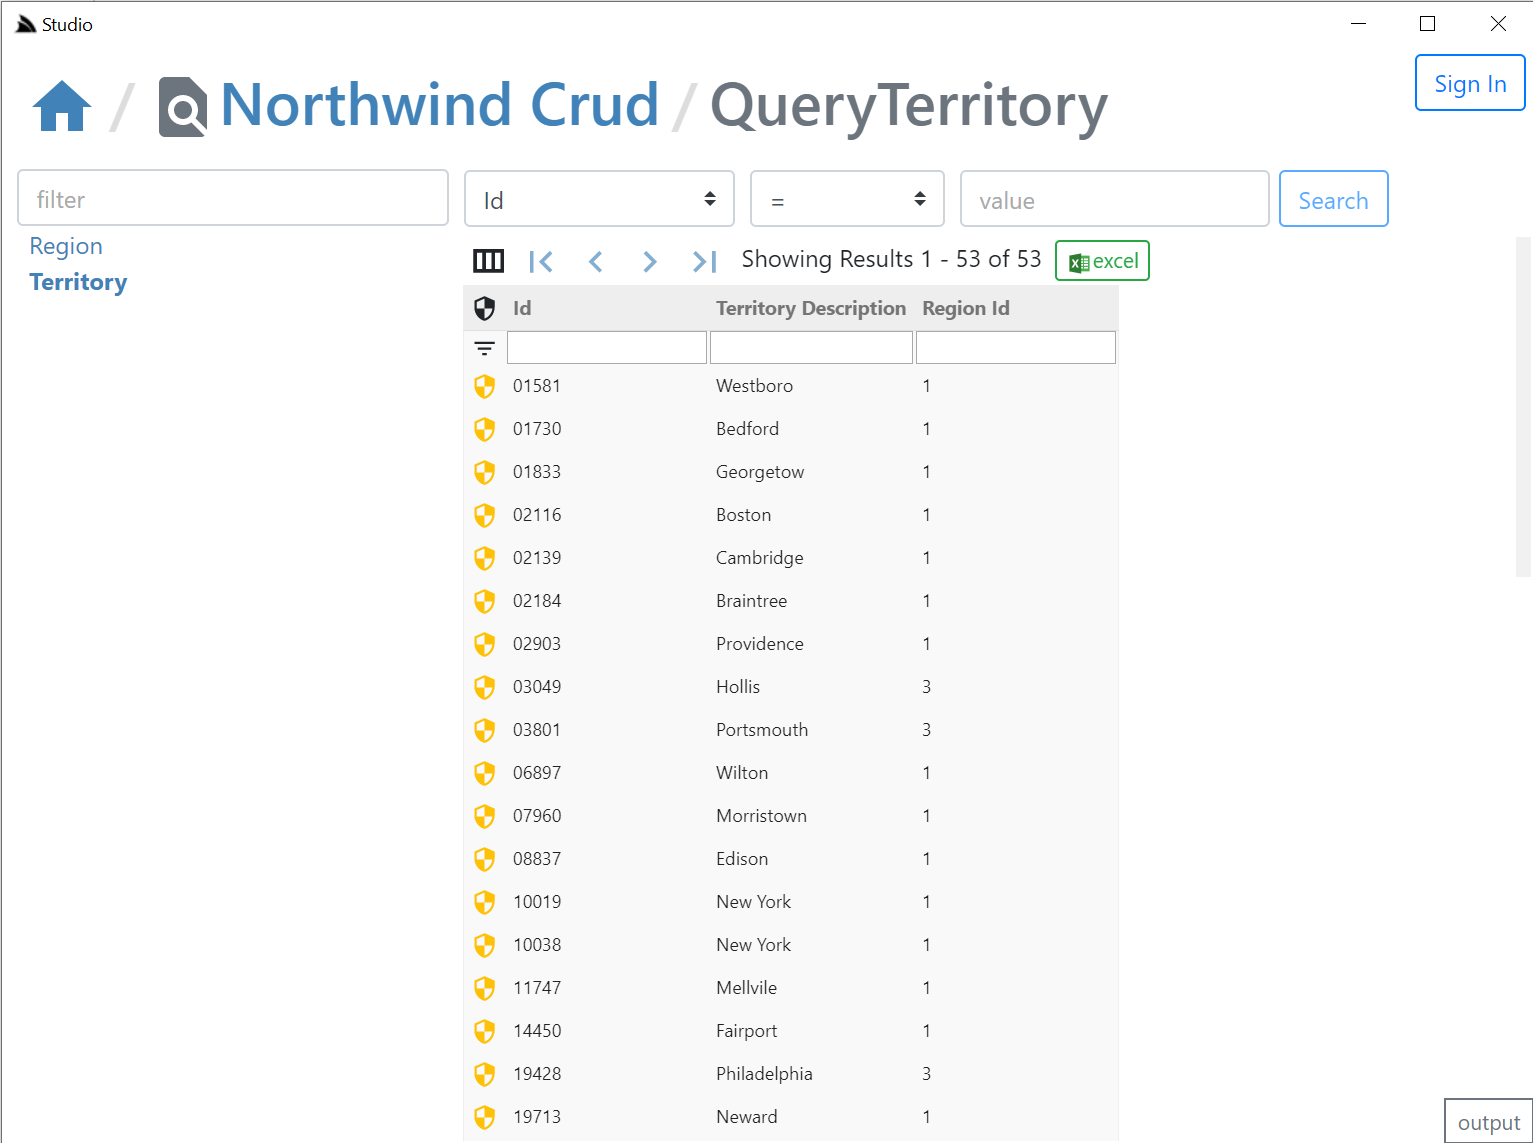
What UI features & tables are visible is reflected by whether the AutoQuery Service for that type exists and whether the currently authenticated User has access to them (i.e. Have the role required by each Service). So an unauthenticated user will see Northwind Crud's read-only Region table with no ability to update it & the Territory table, which as it isn't protected by a role will be visible to everyone, but as all CRUD Write operations require authentication, all edit controls require authentication - where we can see in the screenshot above, are replaced with Sign In buttons.
Here are the relevant NorthwindCrud auto-generation rules which defines this behavior:
var readOnlyTables = new[] { "Region" };
GenerateCrudServices = new GenerateCrudServices {
    ServiceFilter = (op,req) => {
        // Require all Write Access to Tables to be limited to Authenticated Users
        if (op.IsCrudWrite())
        {
            op.Request.AddAttributeIfNotExists(new ValidateRequestAttribute("IsAuthenticated"),
                x => x.Validator == "IsAuthenticated");
        }
    },
    //Don't generate the Services or Types for Ignored Tables
    IncludeService = op => !ignoreTables.Any(table => op.ReferencesAny(table)) &&
        !(op.IsCrudWrite() && readOnlyTables.Any(table => op.ReferencesAny(table))),
}
Clicking on any of the Auth icons or the Sign In button on the top right will open up the Sign In dialog.
Integrated Auth Component
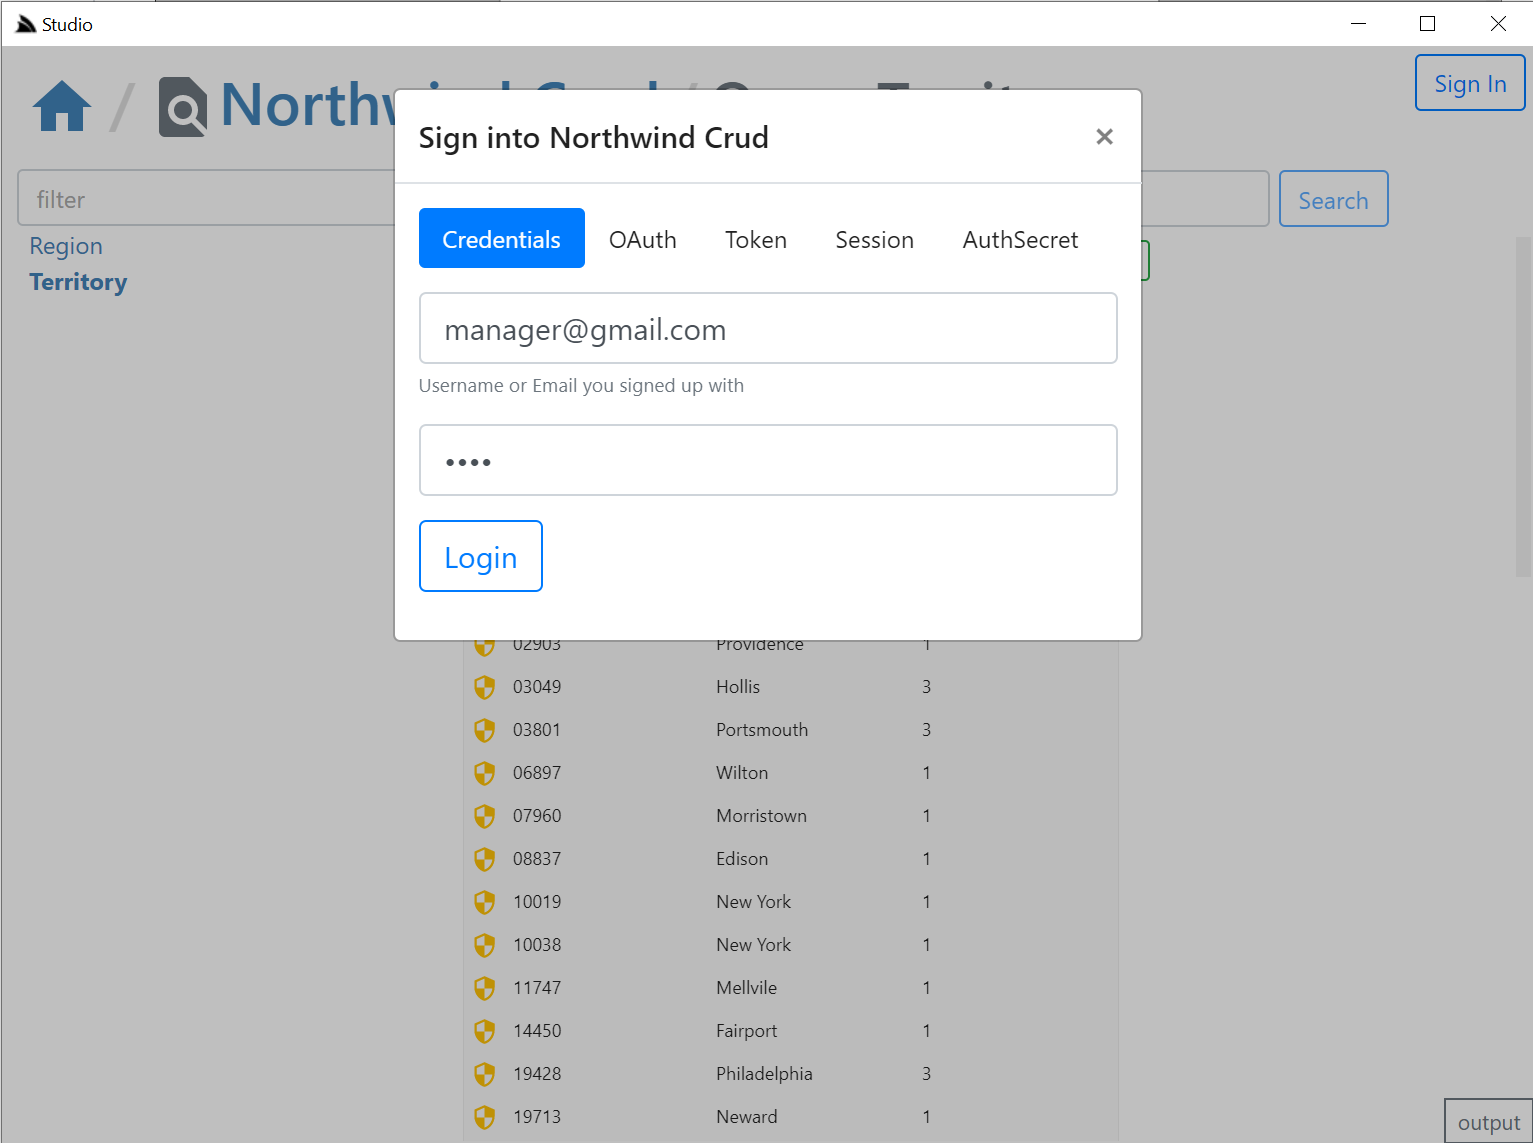
The Sign In dialog supports most of ServiceStack's built-in Auth Providers with a different Auth Dialog tab depending which Auth Providers are enabled.
It looks at "auth family type" to determine how to Authenticate with each Auth Provider so it should still support your Custom Auth Providers if they
inherit from existing Auth Providers, otherwise they can explicitly specify which Type of Auth they use by overriding the Type property getter with
one of the following:
- Bearer - Authenticate with HTTP Authentication Bearer Token (e.g. JWT or API Key)
- credentials - Authenticate with Username/Password at
/auth/credentials - oauth - Authenticate with OAuth
- session - Alternative session-based Auth Provider
The session tab is also displayed if a credentials or auth provider is enabled. It should serve as a fallback Auth option if your
Custom Auth Provider doesn't fit into the existing family types as it opens the /auth page of the remote ServiceStack instance:
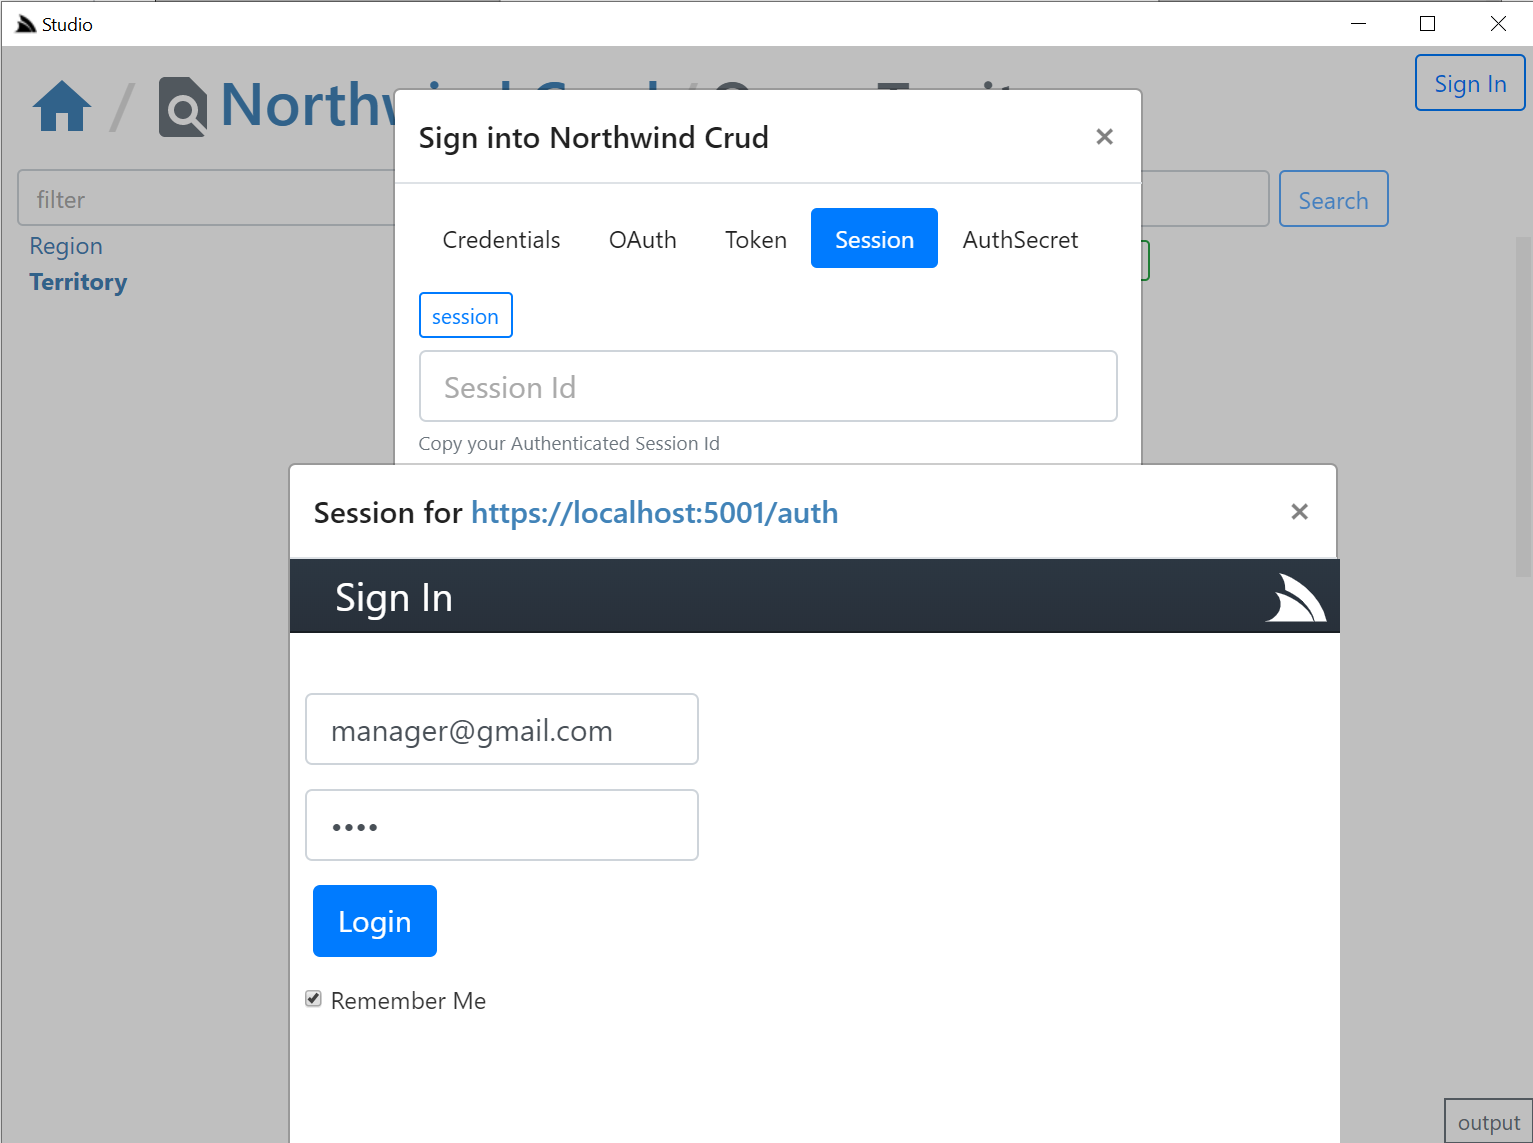
Where you can login to the remote site via the new fallback /login page or uses your custom Login Page if exists.
If your remote instance is configured to allow Studio CORS access, i.e:
appHost.Plugins.Add(new CorsFeature(allowOriginWhitelist:new[]{ "https://localhost:5002" }));
Clicking on the copy button will then be able to post the session Id back to Studio & close the auth popup otherwise you'd need to manually close the popup and paste the session in.
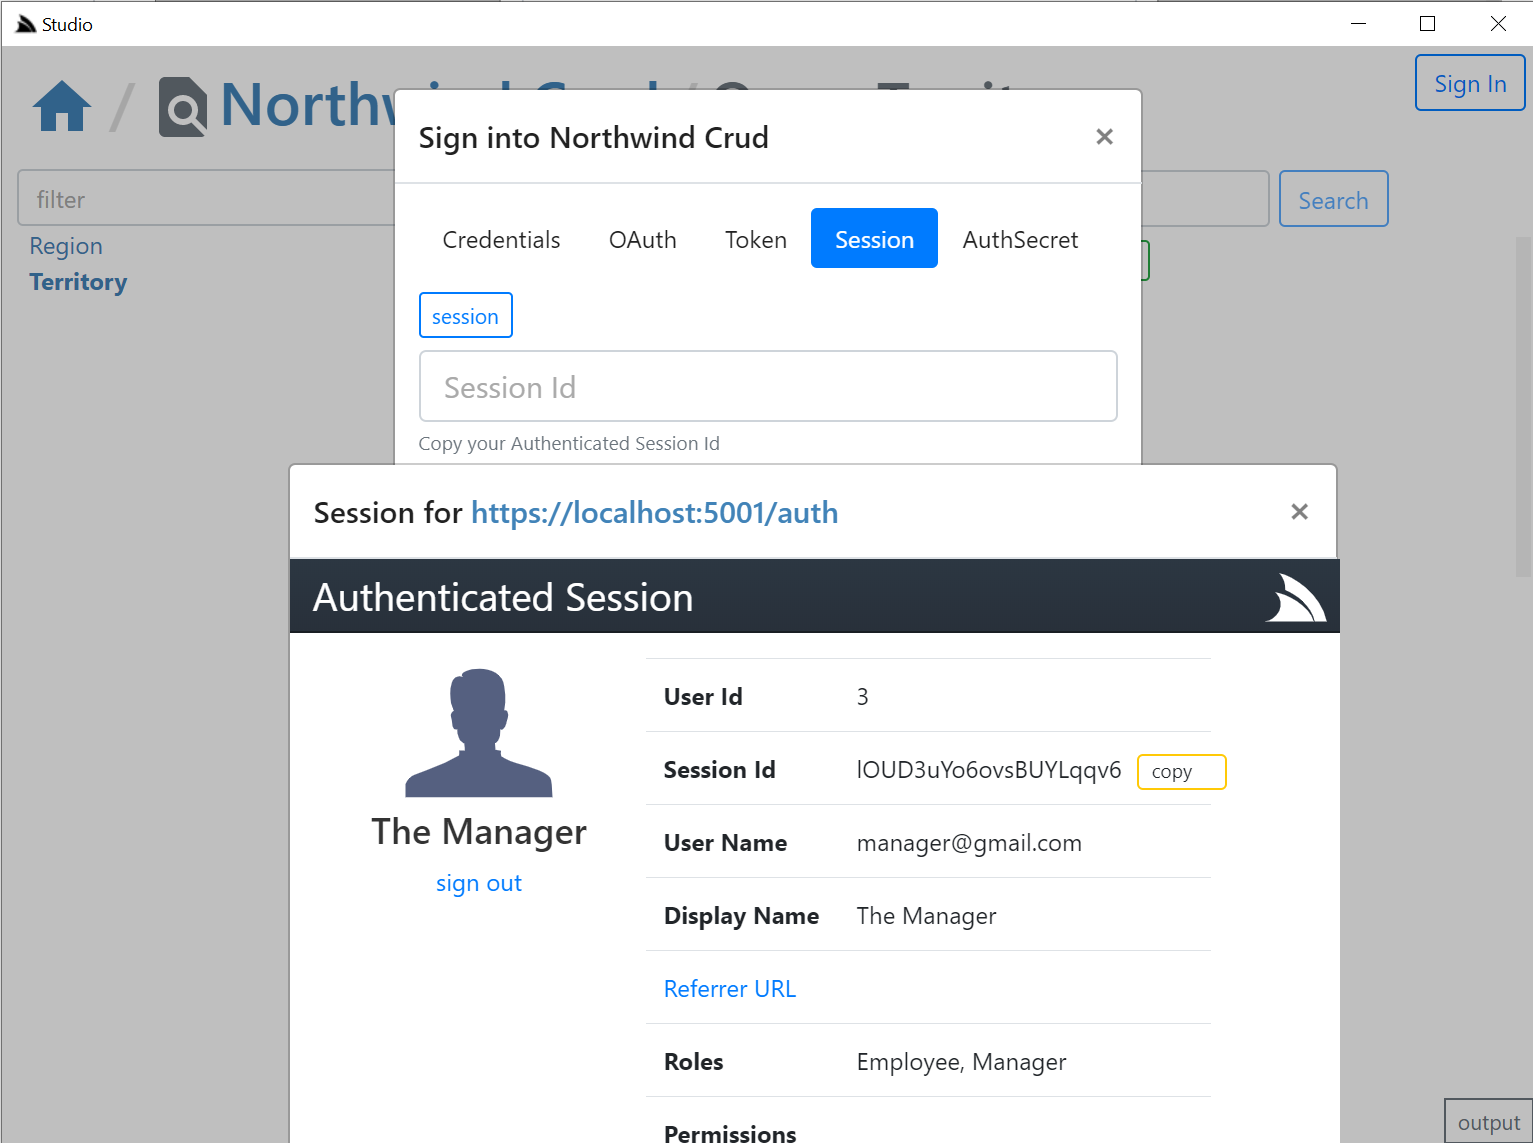
The OAuth tab is a little different since it requires an OAuth redirect and since most 3rd Party OAuth providers disallow embedding in iframes,
it needs to popup an external url in your default browser which still provides a nice auth UX as you'd typically already be Signed In with your
Default browser, where it will redirect you back to your /auth page where you can copy either the Session Id or the OAuth Access Token
if you enable including OAuth Access Tokens in your AuthenticateResponse DTO with:
appHost.Plugins.Add(new AuthFeature(...) {
    IncludeOAuthTokensInAuthenticateResponse = true, // Include OAuth Keys in authenticated /auth page
});
This allows you to Authenticate via OAuth Access Token where you can test the same Authentication that Mobile and Desktop using pre-existing Sign In Widgets who also authenticate via OAuth Access Tokens obtained by their native UI widget:
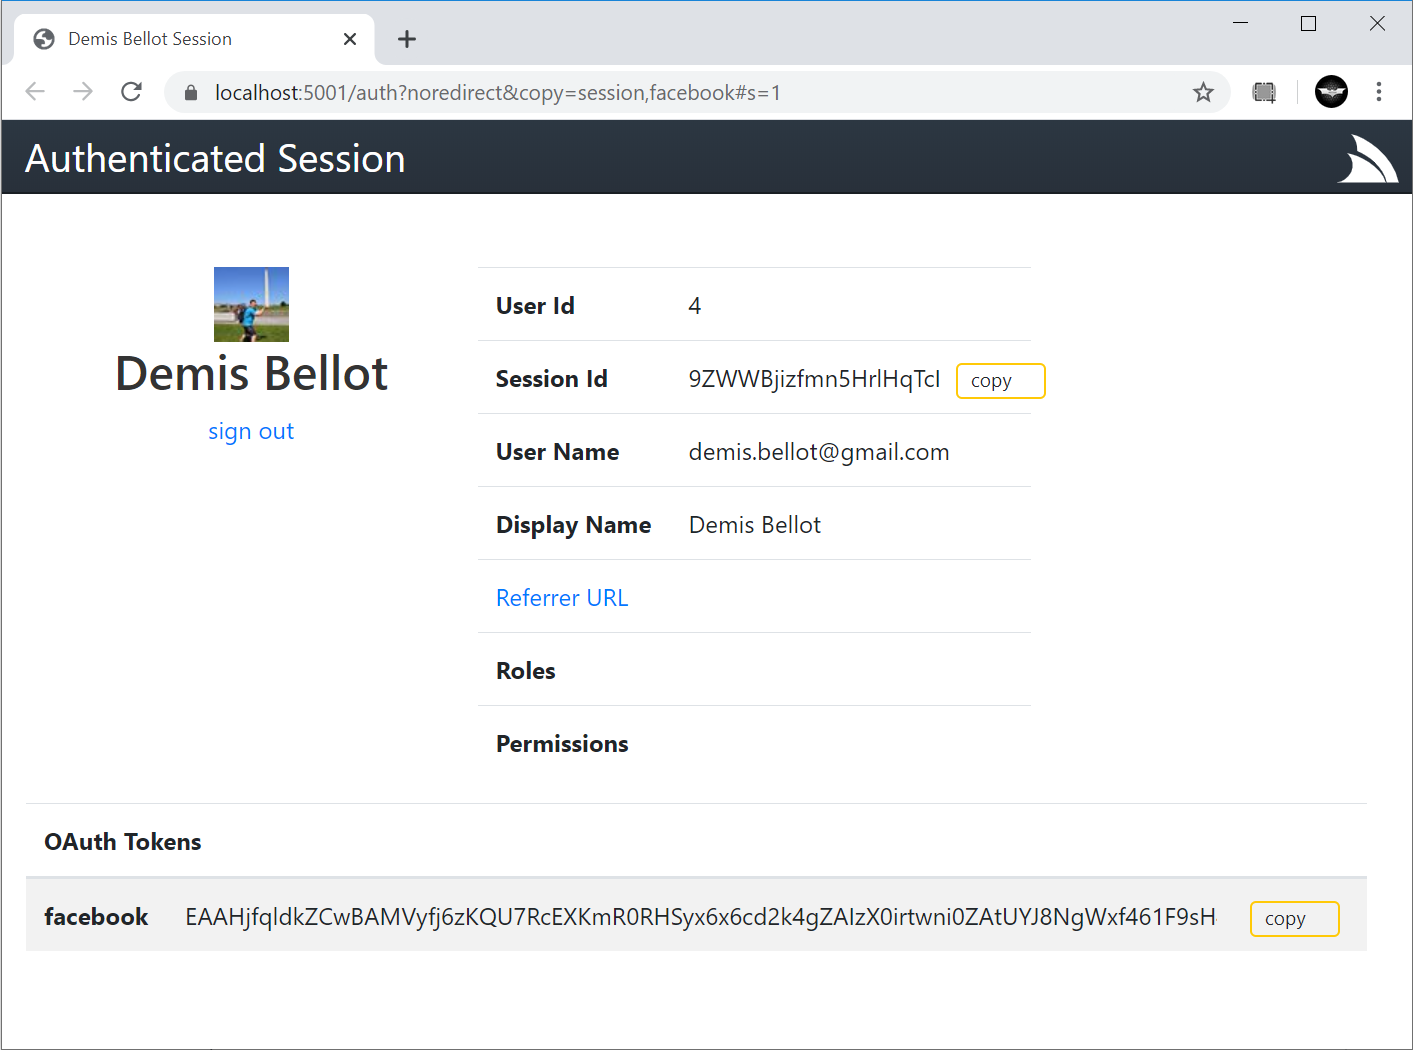
Studio is able to provide a seamless UX where it's able to monitor the Windows clipboard for changes & when detected close the window, return focus back to Studio who uses it to automatically Sign In with the copied token.
Desktop User State & Preferences
As is expected from a normal Desktop App, the User State of the App is preserved across restarts, which Studio maintains in its $HOME/.servicestack/studio/site.settings JSON file which preserves amongst other things what remote ServiceStack instances you've connected to & last queries made on each table, etc. When
not running in a Desktop App it will save it to your browsers localStorage. You can force a save with Ctrl+S or by clicking on the save icon on the top right.
AutoCrud Querying
The same querying behavior, supported filters, custom fields, paging, order by's, etc. demonstrated in SharpData above are also available in Studio, but implemented differently, where instead of calling the SharpData API directly, the filters are translated into the equivalent AutoQuery request and the remote AutoQuery Services are called instead, but as they both result in the same UX and end result, users knowledge is transferable:
Search Filters
- Use
=nullor!=nullto searchNULLcolumns - Use
<=,<,>,>=,<>,!=prefix to search with that operator - Use
,trailing comma to perform anIN (values)search (integer columns only) - Use
%suffix or prefix to perform aLIKEsearch
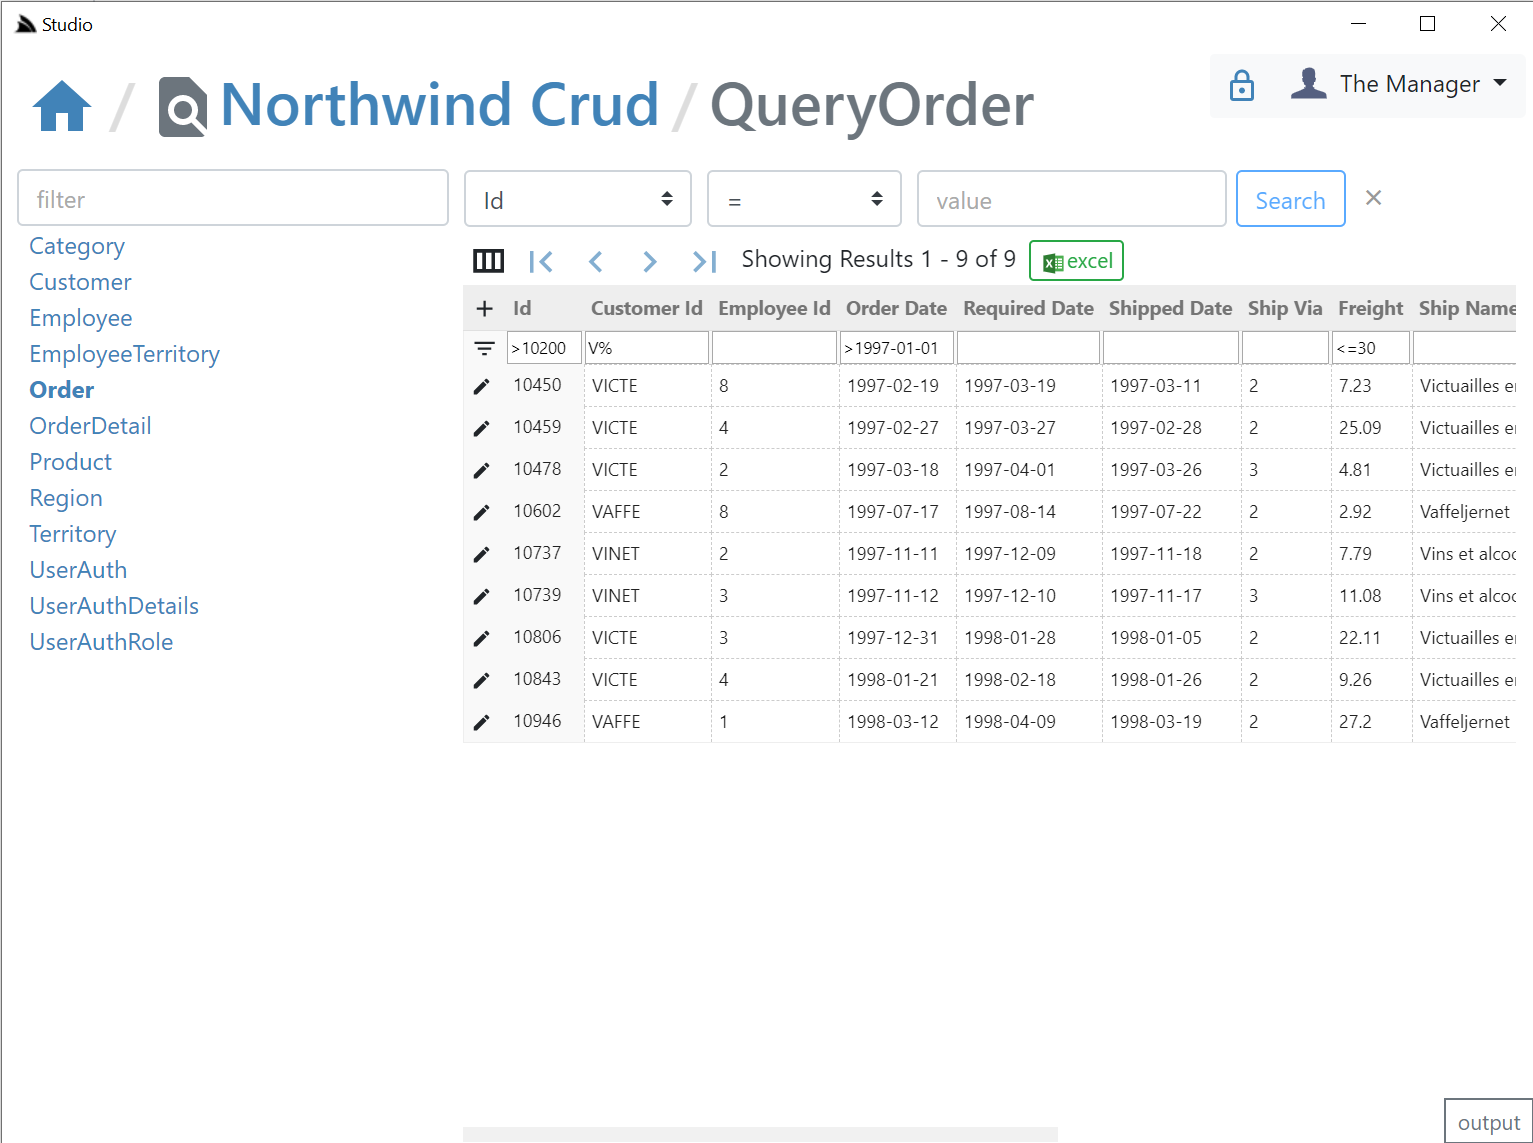
Export to Excel
Likewise the fast, direct export into Excel is also available, one difference is that the total results returned in a query is controlled by the remote ServiceStack AutoQuery plugin whereas SharpData allows for unlimited sized queries:

AutoCrud Partial Updates
The UI is designed to look similar to a generic RDBMS Admin UI Table Editor where you can edit records in a table grid. If a IPatchDb<Table>
AutoQuery Service exists for the Data Model & the Authenticated User has access to it.
If enabled all fields (excl PK) on that Request DTO will be editable in the UI, otherwise they'll appear Read-only like the Id column:
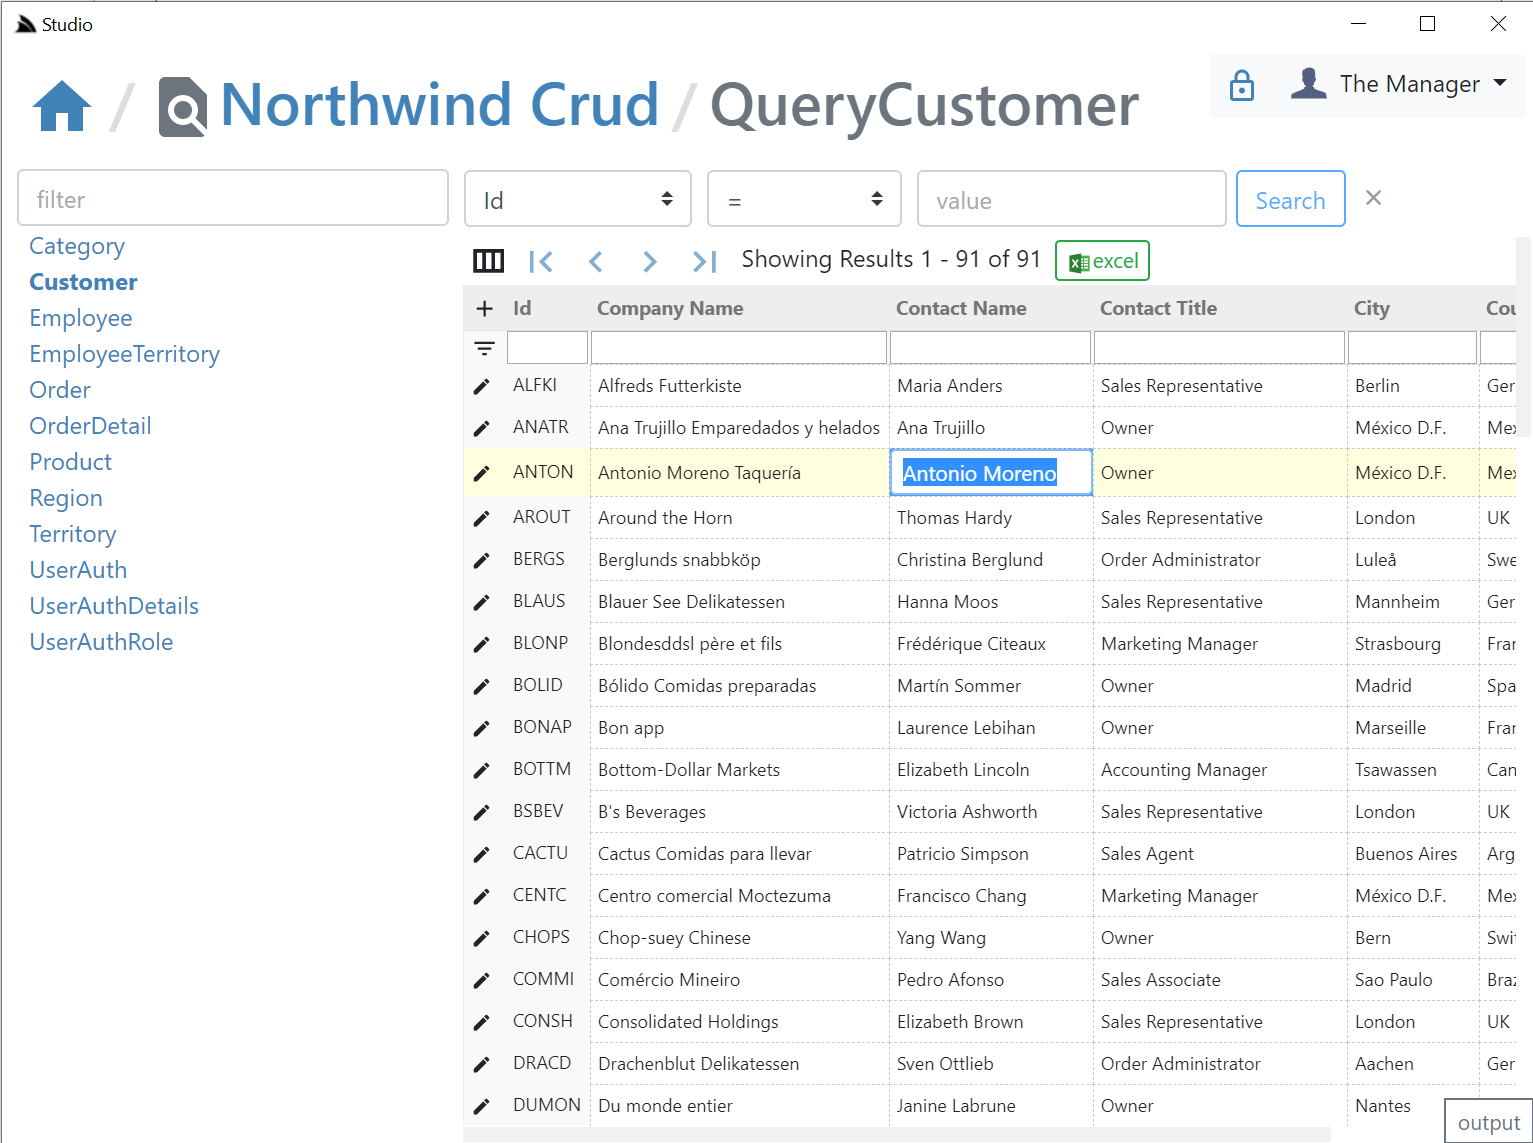
AutoCrud Create
If the user has access to the ICreateDb<Table> Service they'll be able to add records by clicking the + icon on the top-right of the resultset which brings up the Create Entity modal:
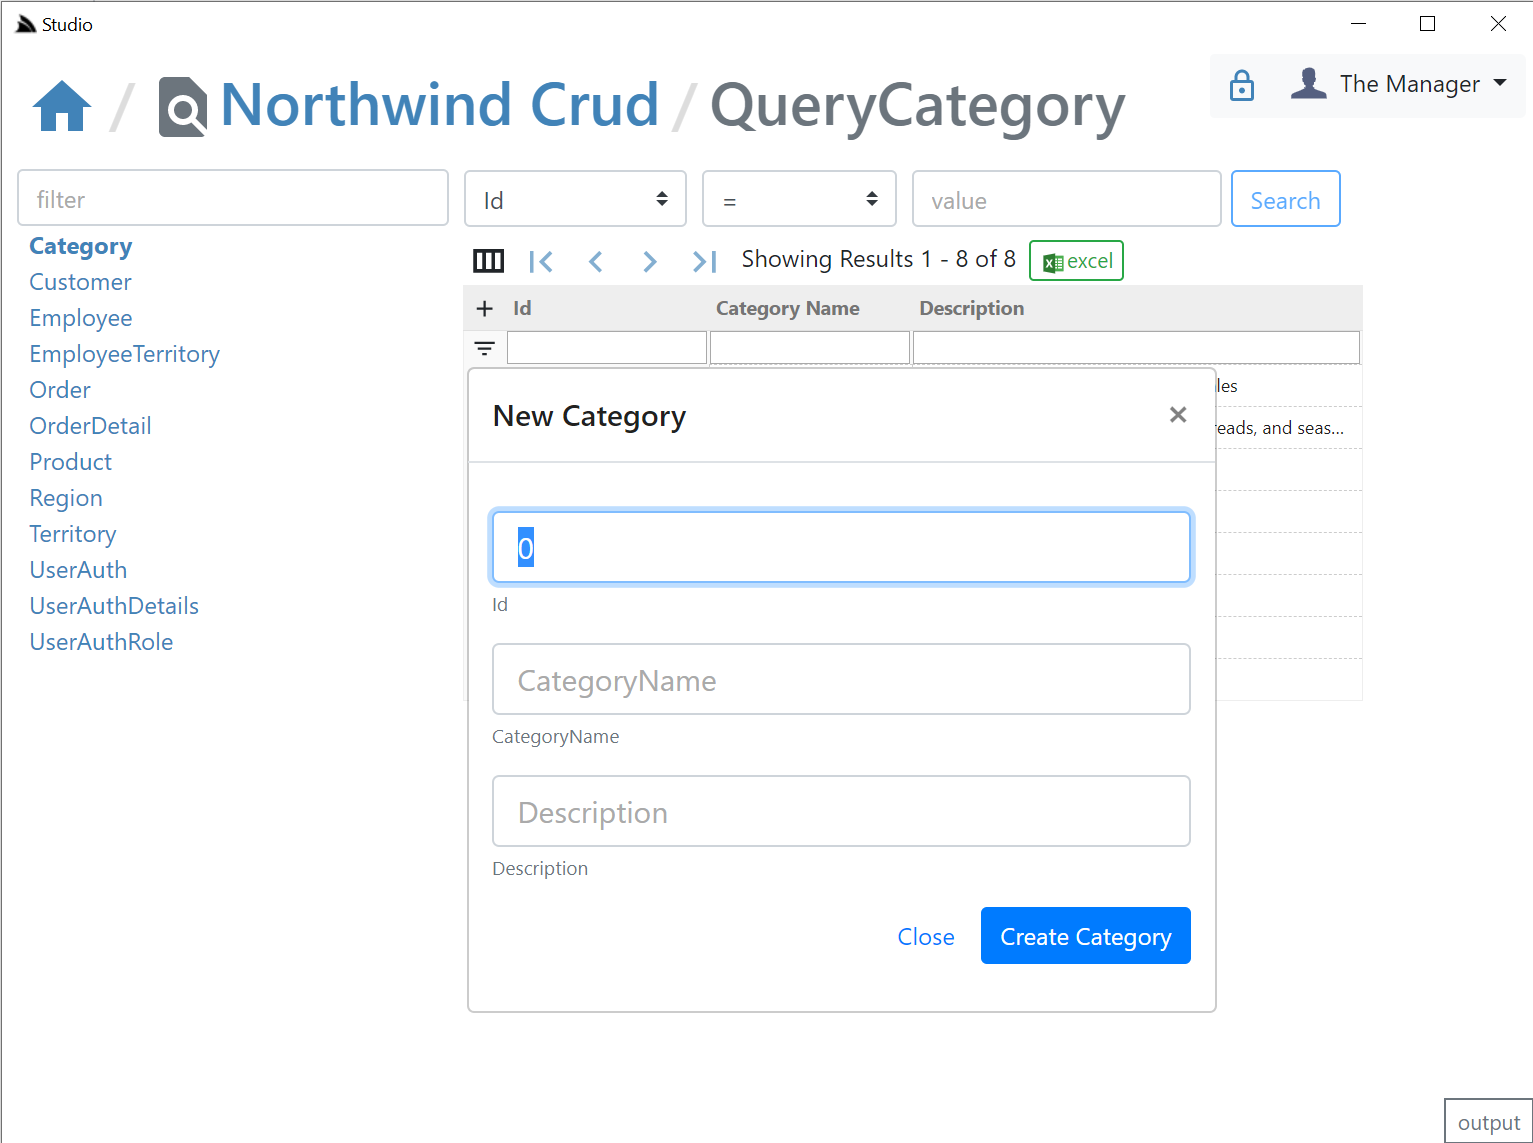
AutoCrud Update and Delete
If the user has access to the IUpdateDb<Table> Service they'll be able to update records by clicking on the edit icon which will bring up the Edit Entity dialog. If they have access to the IDeleteDb<Table> Service they'll also be able to delete the entity from the same screen:
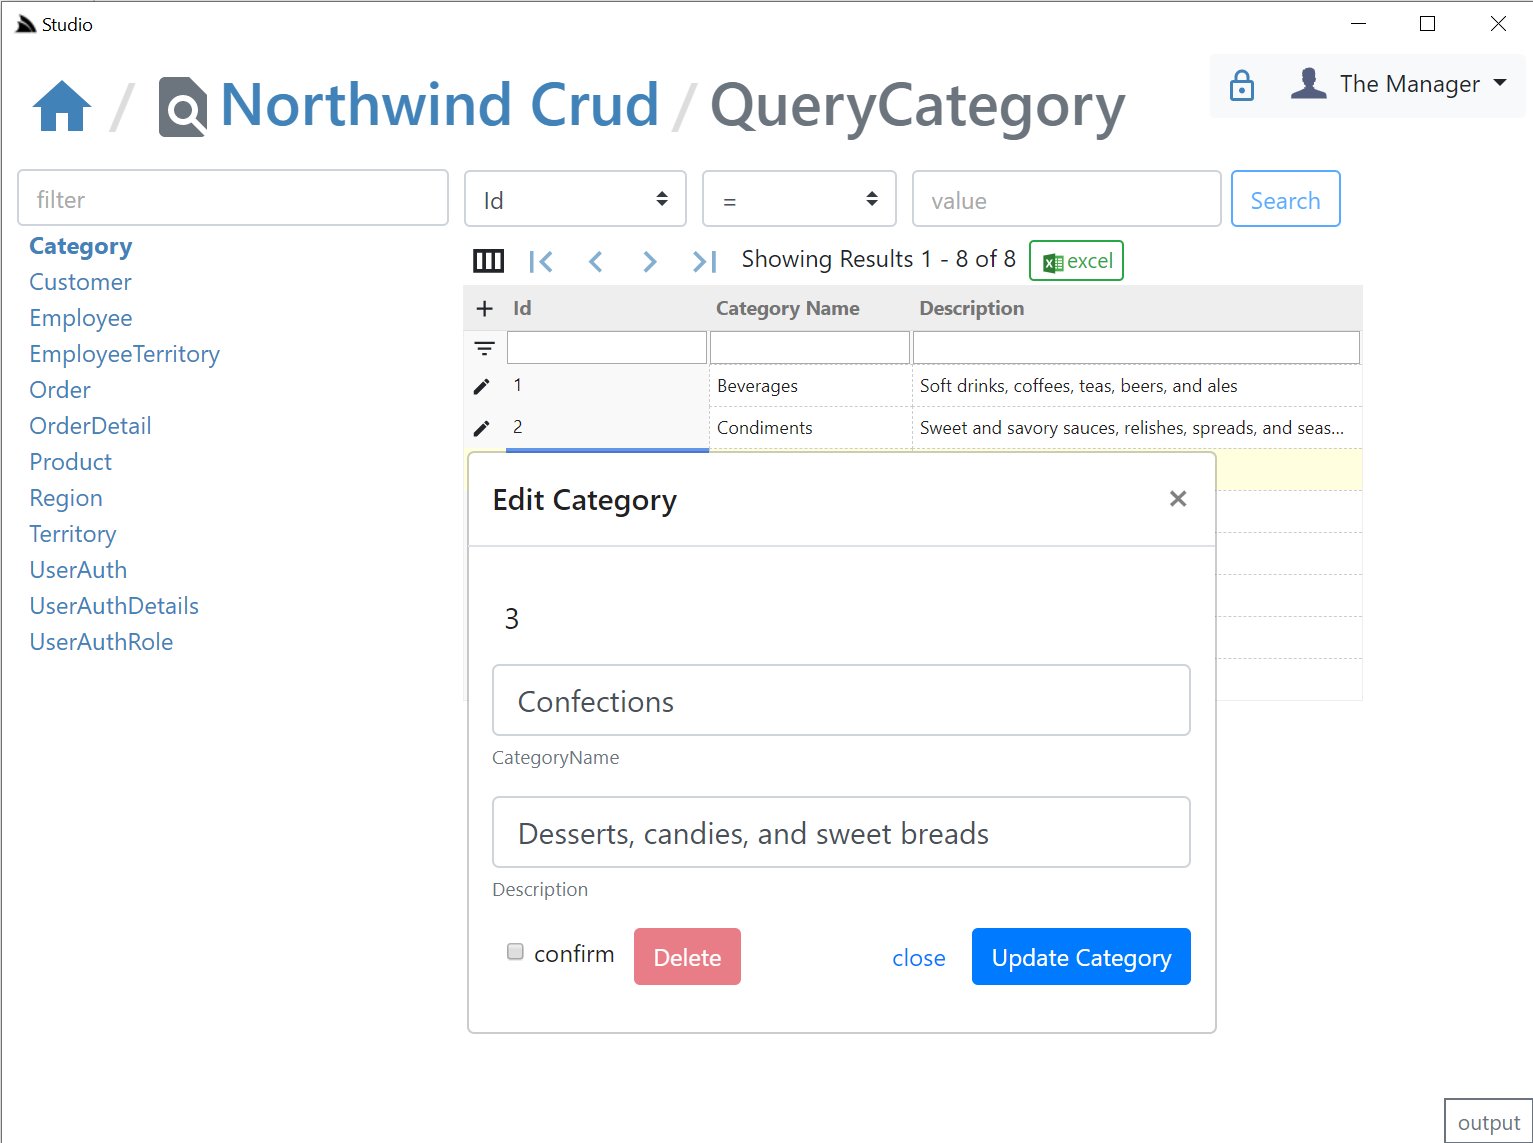
API Log Viewer
All API Requests the UI makes to remote ServiceStack instances are made via a generic .NET Core back-end Service Proxy which attaches the Signed In Authentication Info to each Request. Each API Request Studio makes is recorded in the log viewer at the bottom, showing the Verb and Parameters each API was called with:
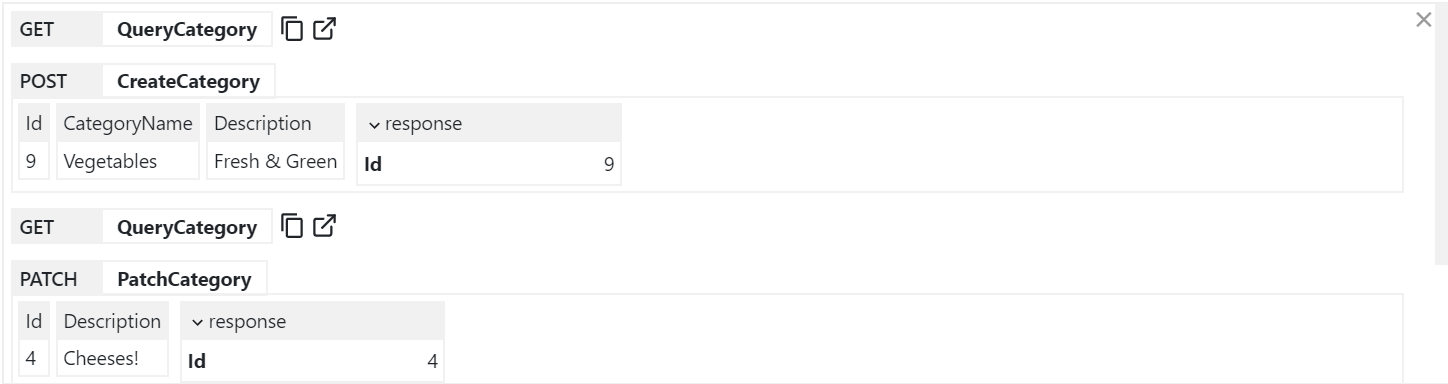
You can copy the URL from GET API Requests or open them up in a new browser to view it in isolation.
Executable Audit History
If you Sign In as the Admin User (i.e. using AuthSecret=zsecret) you'll get super user access to access the other protected features like
being able to view an Audit History of updates made to each record via AutoQuery that's enabled in NorthwindCrud with:
// Add support for auto capturing executable audit history for AutoCrud Services
container.AddSingleton<ICrudEvents>(c => new OrmLiteCrudEvents(c.Resolve<IDbConnectionFactory>()));
container.Resolve<ICrudEvents>().InitSchema();
Where users in the AutoQueryFeature.AccessRole (default: Admin) role will be able to view the Audit history of each row:
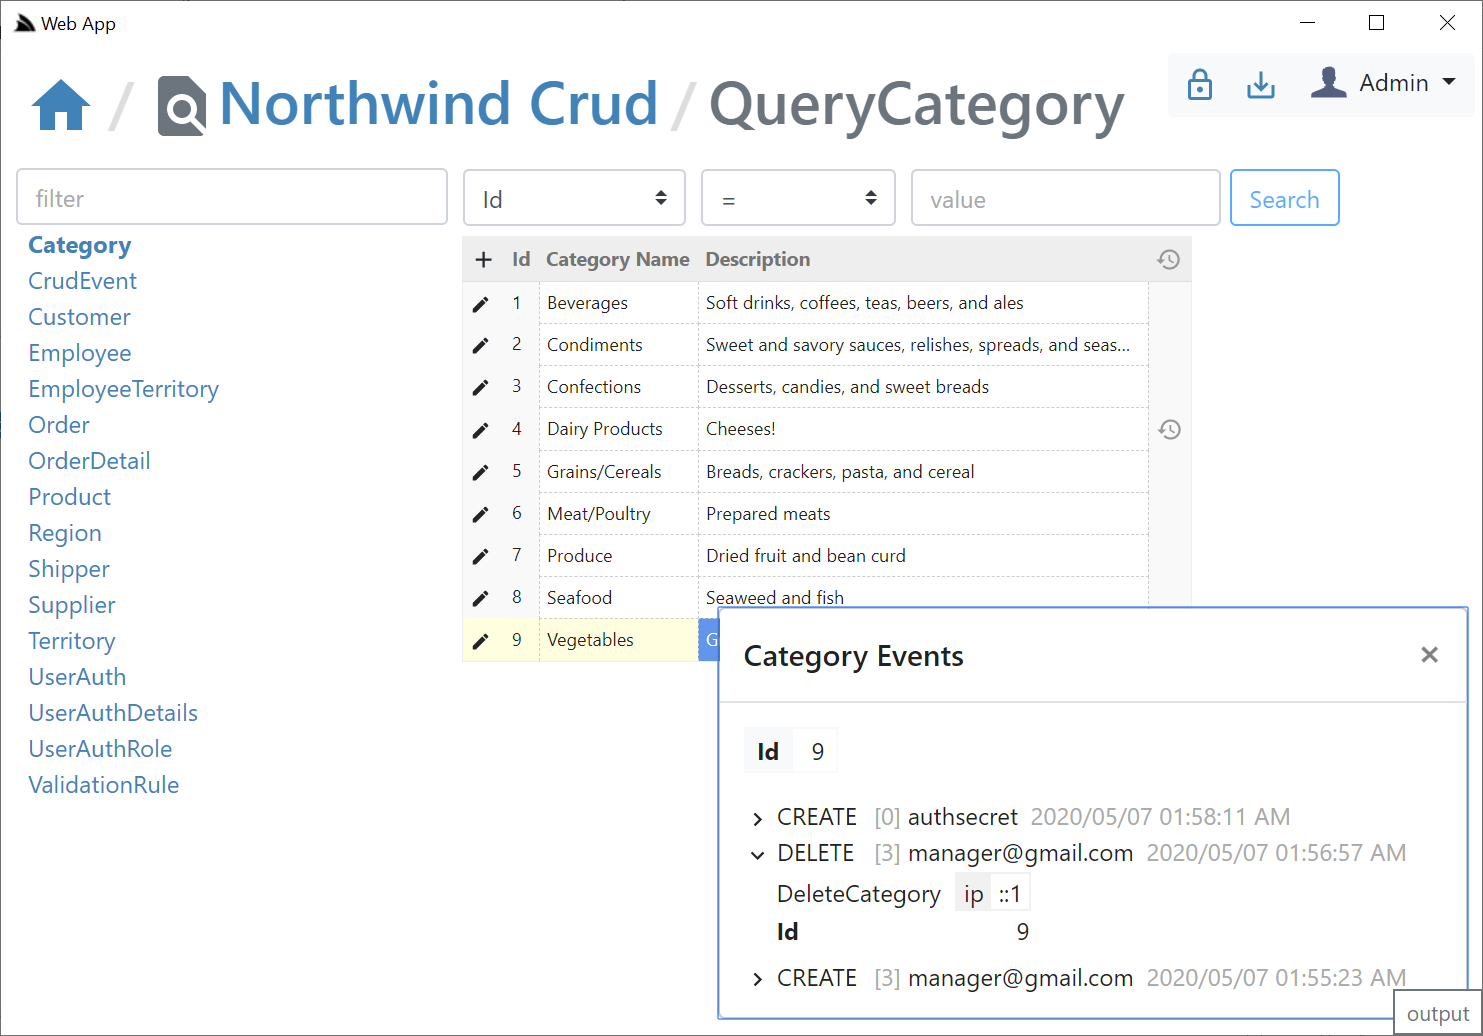
If creating & deleting an entity with the same Id, the Audit History of the previous entity will be retained & visible
Validators UI
As an Admin you'll also have access to the DB Validation Source Admin UI which will let you add declarative Type and Property Validators for each Request DTO in Studio. This is enabled in NorthwindCrud in Configure.Validation.cs:
// Add support for dynamically generated db rules
services.AddSingleton<IValidationSource>(c =>
    new OrmLiteValidationSource(c.Resolve<IDbConnectionFactory>()));

//...
appHost.Plugins.Add(new ValidationFeature());
appHost.Resolve<IValidationSource>().InitSchema();
Management of this feature is limited to users in the ValidationFeature.AccessRole (default: Admin).
Clicking on the Validation Lock Icon on the top right will take you to the Validation Editor for that AutoQuery Request DTO which will include quick links to jump to different AutoQuery/Crud Services for the same Data Model.
In the validation editor you'll be able to create Type and Property Validation Rules that either make use of an existing Validator or you can enter a custom #Script expression that must validate to true. The Validator UI is smart and will list all built-in and Custom Script Methods returning ITypeValidator or IPropertyValidator that's registered in the remote instance. The pre-defined list of validators are displayed in a list of "quick pick" buttons that enables fast adding/editing of validation rules.
Verified Rules
The ModifyValidationRules Service that Studio calls performs a lot of validation to ensure the Validation rule is accurate including executing the validator to make sure it returns the appropriate validator type and checking the syntax on any Script validation rules to ensure it's valid.
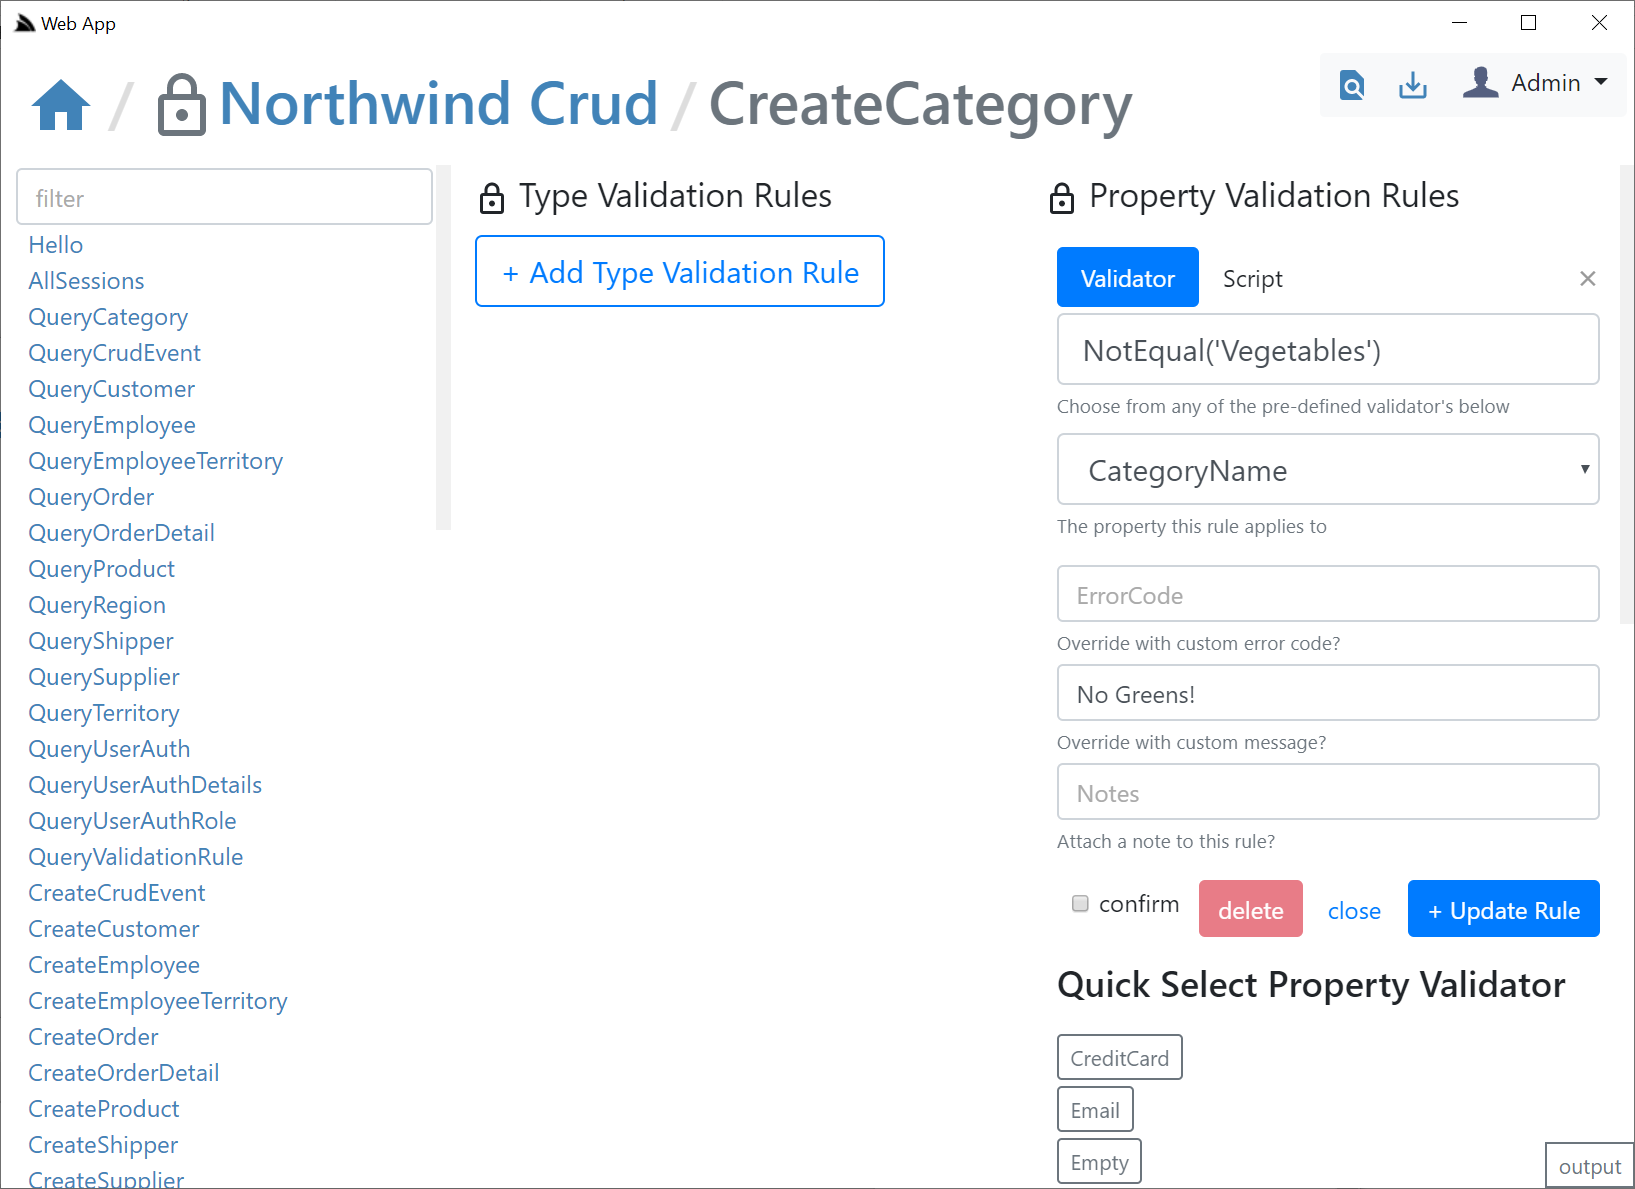
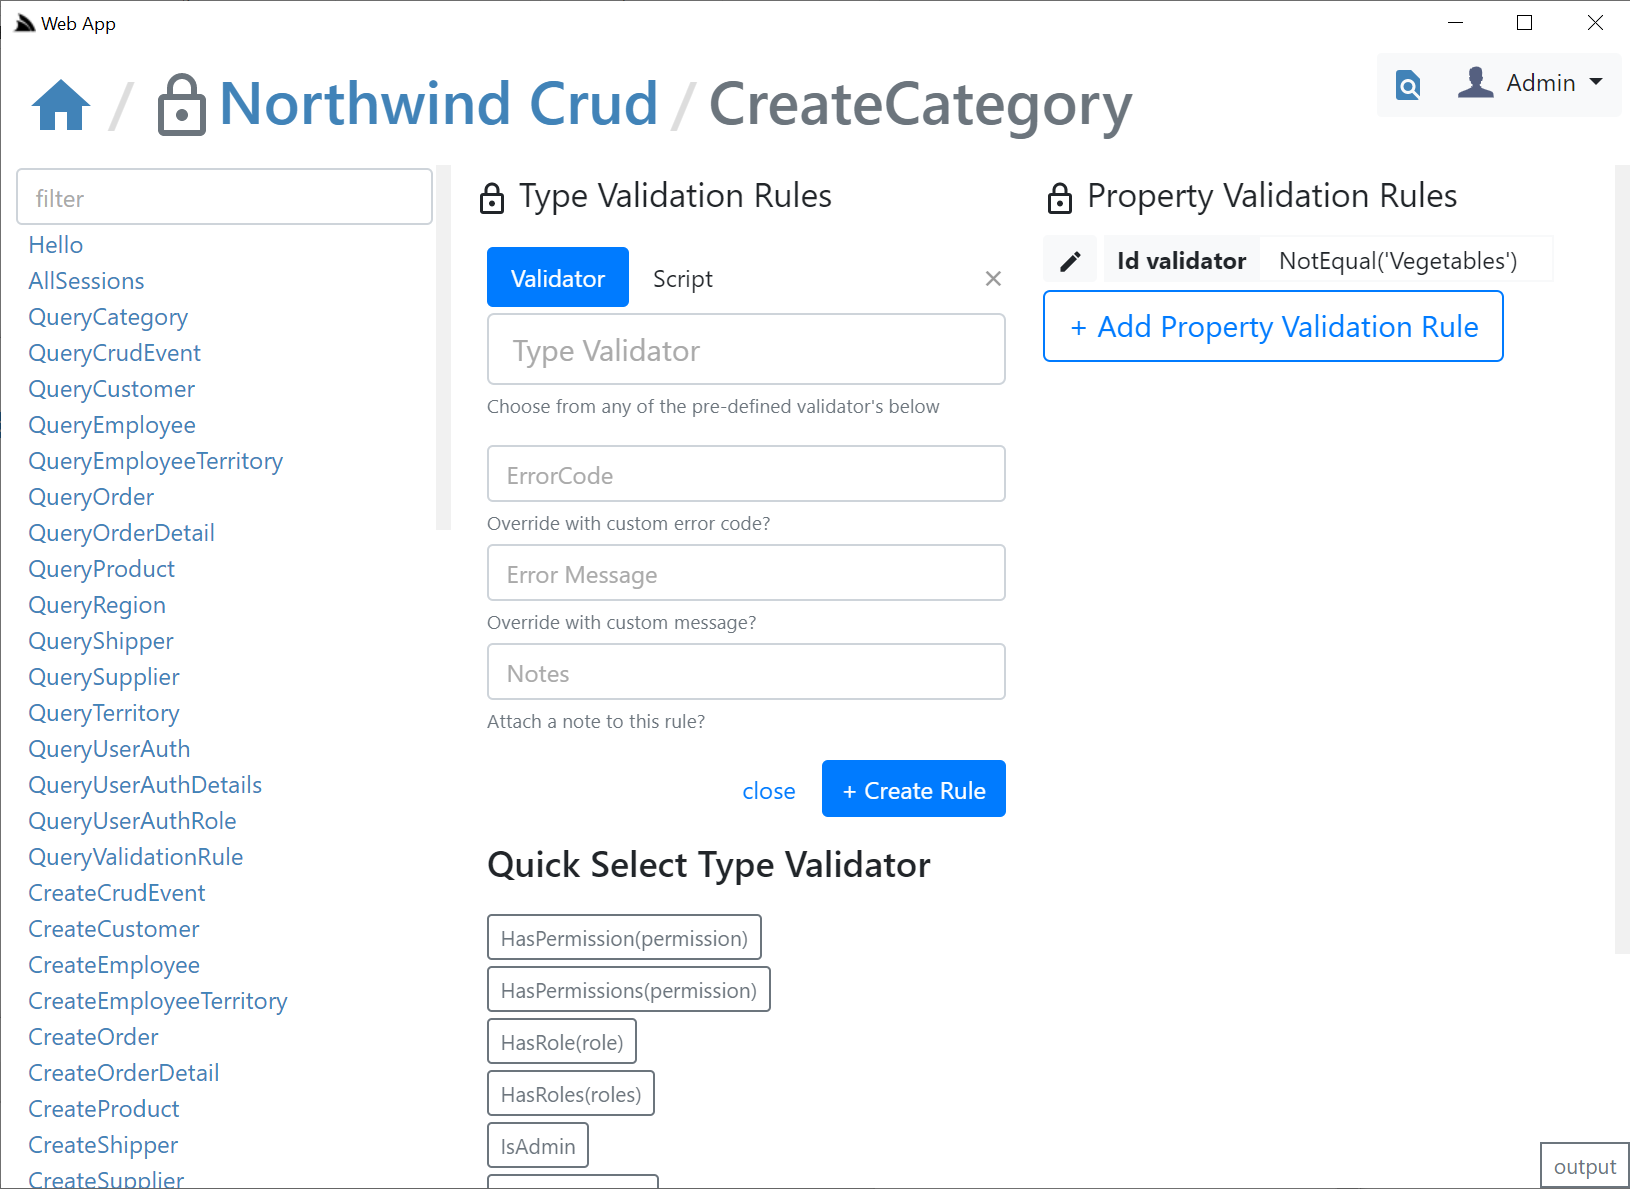
The ModifyValidationRules back-end Service also takes care of invalidating the validation rule cache so that any saved Validators are immediately applied.
Despite being sourced from a DB, after the first access the validation rules are cached in memory where they'd have similar performance to validators declaratively
added on Request DTOs in code.
After you add your validation rules you will be able to click the AutoQuery icon on the top right to return to the AutoQuery editor. Be mindful of what Validation Rule you're adding to which DTO, e.g. a validation rule added to CreateCategory Service will only be applied to that Service which is used when creating entities, e,g. not for full entity or partial field updates.
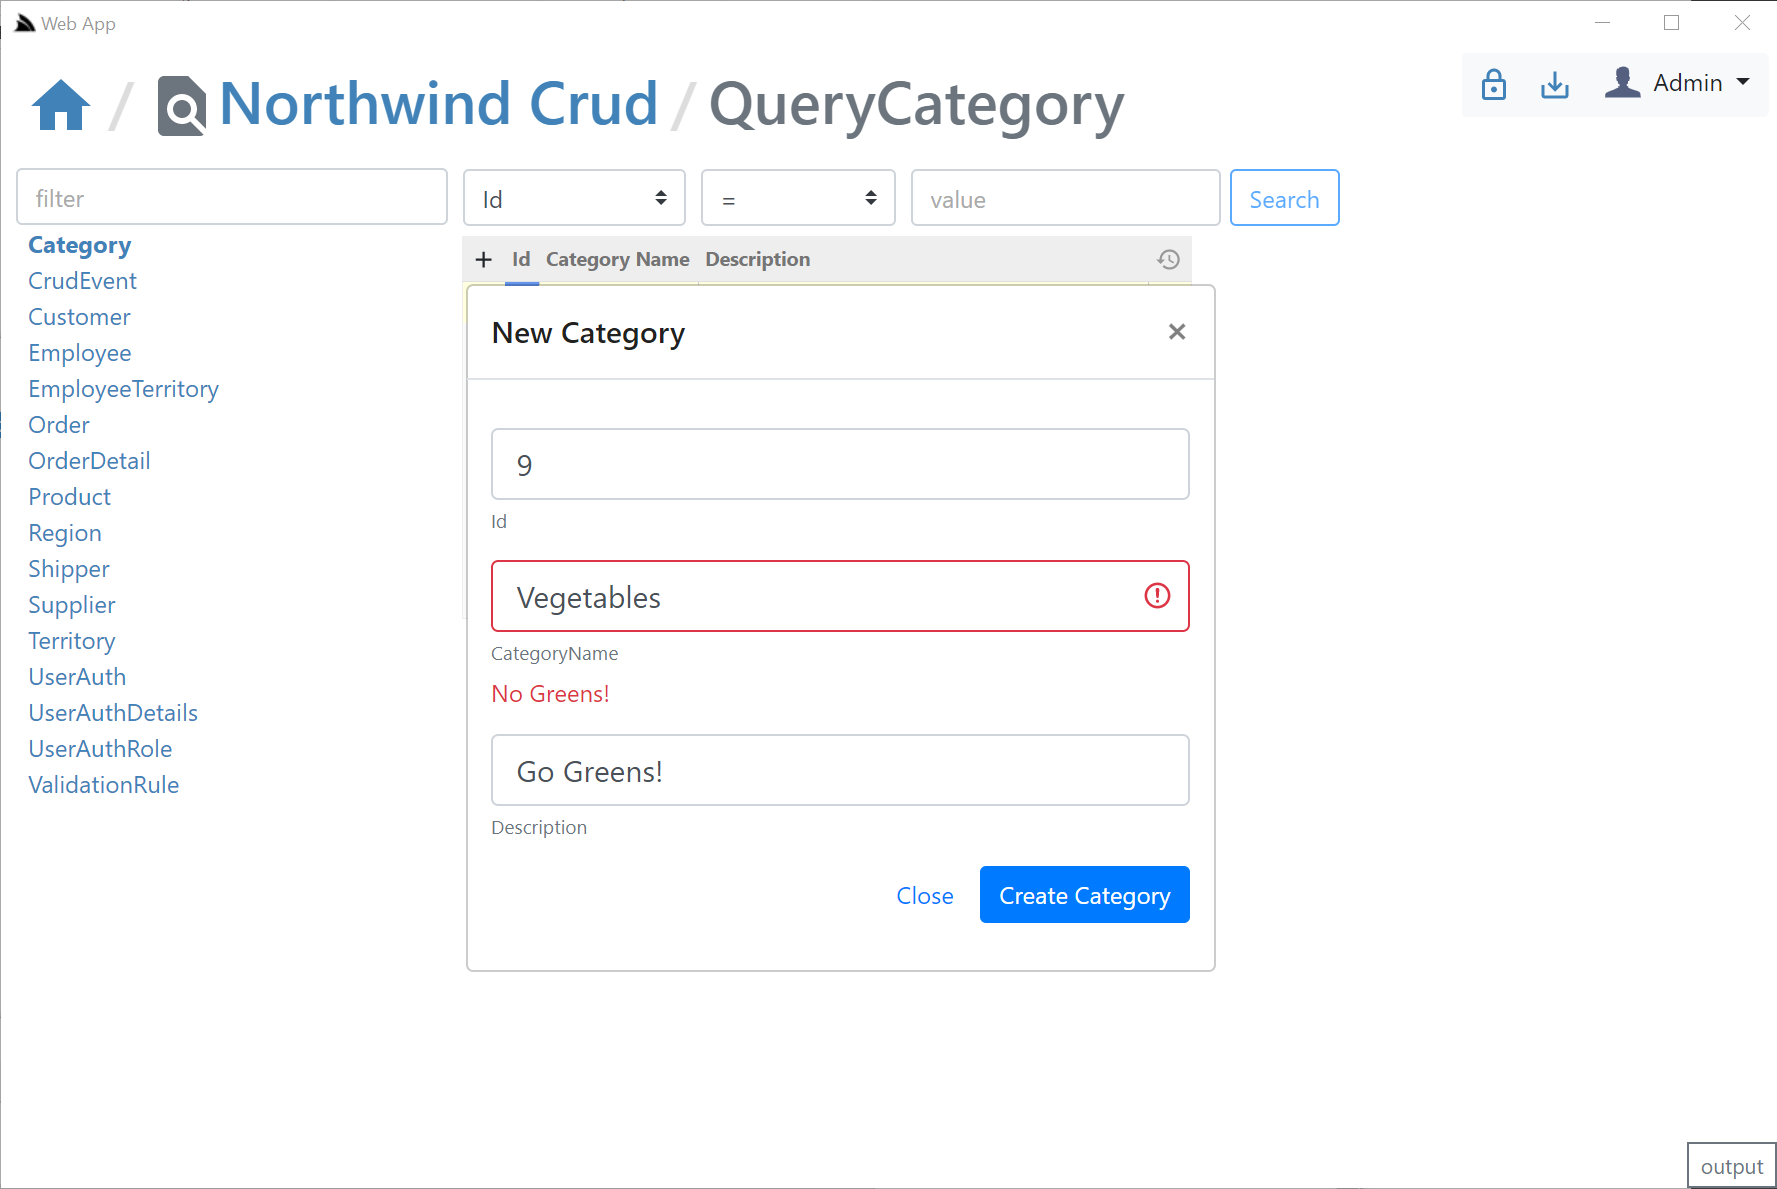
Future Updates
We hope this provides a quick glimpse into ServiceStack Studio that you'll find useful. Currently this release focused on getting the foundational architecture pieces in place that makes it possible for Studio to enable its compatibility-based UI with the metadata of the different plugins & features & their access roles.
Thanks to the productive workflow of an integrated .NET Core Chromium Desktop App updates will be able to frequently continue out-of-band of ServiceStack releases where they'll be immediately available after the next time the Studio is run. Currently on the TODO list will be to implement richer edit UIs where we should be able to use more optimal input controls as we have the type information of every field. Also planned is proving a better UI for invoking ServiceStack APIs than a generic HTTP API UI like Postman as we have richer metadata about each API and access to the richer functionality around ServiceStack Services.
Studio should be considered to be in beta at least until v5.10 where it's likely additional changes will be needed in the App Metadata as more UI features are implemented. Any feedback is welcome in the Customer Forums where they should be quickly resolved.
Metadata App Export / Discovery
The way a generic capability-based Admin UI's like Studio is possible is via the /metadata/app API descriptor which describes what
plugins and features are enabled on the remote ServiceStack instance. All built-in plugins which provide functionality that can be
remotely accessed add their info to the App's metadata.
This functionality is also available to your own plugins should you wish to attach info about your plugin where you can use the
AddToAppMetadata extension method to return a populated CustomPlugin DTO describing the features made available by your plugin:
public class MyPlugin : IPlugin
{
    public void Register(IAppHost appHost)
    {
        appHost.AddToAppMetadata(meta => {
            meta.CustomPlugins[nameof(MyPlugin)] = new CustomPlugin {
                AccessRole = RoleNames.AllowAnyUser,                   // Required Role to access Services
                ServiceRoutes = new Dictionary<string, string[]> {
                    { nameof(MyPluginService), new[] { "/myplugin/{Id}" } }, // Available Plugin Services
                },
                Enabled = new List<string> { "feature1", "feature2" }, // What plugin features are enabled
                Meta = new Dictionary<string, string> {
                    ["custom"] = "meta" // additional custom metadata you want returned for this plugin
                }
            };
        });
    }
}
AutoQuery
By default all AutoQuery Requests execute all requests using OrmLite's async DB APIs, this can be toggled at a global level to have all AutoQuery requests use sync APIs if there are any bugs or performance issues with ADO.NET's providers async implementations.
E.g. As MySql and SQLite ADO.NET providers do not yet have a "true" async implementations they'd benefit from using Sync APIs which would incur less overhead than their current "async over sync" implementations:
Plugins.Add(new AutoQueryFeature {
    EnableAsync = false
})
To increase the versatility of using AutoQuery functionality in custom Service implementations, there's now parallel Sync and Async APIs if needing to enlist AutoQuery functionality in Sync methods that are unable to be refactored to use the async APIs:
public interface IAutoQueryDb : IAutoCrudDb
{
    // Generic API to resolve the DB Connection to use for this request
    IDbConnection GetDb<From>(IRequest req = null);

    // Generate a populated and Typed OrmLite SqlExpression using the same model as the source and output target
    SqlExpression<From> CreateQuery<From>(IQueryDb<From> dto, Dictionary<string, string> dynamicParams,
        IRequest req = null, IDbConnection db = null);

    // Execute an OrmLite SqlExpression using the same model as the source and output target
    QueryResponse<From> Execute<From>(IQueryDb<From> model, SqlExpression<From> query,
        IRequest req = null, IDbConnection db = null);

    // Async Execute an OrmLite SqlExpression using the same model as the source and output target
    Task<QueryResponse<From>> ExecuteAsync<From>(IQueryDb<From> model, SqlExpression<From> query,
        IRequest req = null, IDbConnection db = null);

    // Generate a populated and Typed OrmLite SqlExpression using different models for source and output target
    SqlExpression<From> CreateQuery<From, Into>(IQueryDb<From,Into> dto, Dictionary<string,string> dynamicParams,
        IRequest req = null, IDbConnection db = null);

    // Execute an OrmLite SqlExpression using different models for source and output target
    QueryResponse<Into> Execute<From, Into>(IQueryDb<From, Into> model, SqlExpression<From> query,
        IRequest req = null, IDbConnection db = null);

    // Async Execute an OrmLite SqlExpression using different models for source and output target
    Task<QueryResponse<Into>> ExecuteAsync<From, Into>(IQueryDb<From, Into> model, SqlExpression<From> query,
        IRequest req = null, IDbConnection db = null);
}
The IAutoQueryDb inherits the new IAutoCrudDb APIs below and can access both AutoQuery and CRUD functionality.
Likewise the new AutoQuery Crud APIs also have sync & async implementations:
public interface IAutoCrudDb
{
    // Inserts new entry into Table
    object Create<Table>(ICreateDb<Table> dto, IRequest req);

    // Inserts new entry into Table Async
    Task<object> CreateAsync<Table>(ICreateDb<Table> dto, IRequest req);

    // Updates entry into Table
    object Update<Table>(IUpdateDb<Table> dto, IRequest req);

    // Updates entry into Table Async
    Task<object> UpdateAsync<Table>(IUpdateDb<Table> dto, IRequest req);

    // Partially Updates entry into Table (Uses OrmLite UpdateNonDefaults behavior)
    object Patch<Table>(IPatchDb<Table> dto, IRequest req);

    // Partially Updates entry into Table Async (Uses OrmLite UpdateNonDefaults behavior)
    Task<object> PatchAsync<Table>(IPatchDb<Table> dto, IRequest req);

    // Deletes entry from Table
    object Delete<Table>(IDeleteDb<Table> dto, IRequest req);

    // Deletes entry from Table Async
    Task<object> DeleteAsync<Table>(IDeleteDb<Table> dto, IRequest req);

    // Inserts or Updates entry into Table
    object Save<Table>(ISaveDb<Table> dto, IRequest req);

    // Inserts or Updates entry into Table Async
    Task<object> SaveAsync<Table>(ISaveDb<Table> dto, IRequest req);
}
Due to its internal pre-defined behavior, AutoQuery CRUD custom Service implementations have limited customizability over its implementation but still allows you to apply custom logic like apply Custom Filter Attributes, include additional validation, augment the Response DTO, etc.
E.g. This implementation applies the [ConnectionInfo] behavior to all its Services which will instead execute queries on the registered
Reporting named connection:
[ConnectionInfo(NamedConnection = "Reporting")]
public class MyReportingServices(IAutoQueryDb autoQuery) : Service
{
    public Task<object> Any(CreateReport request) => AutoQuery.CreateAsync(request, base.Request);
}
Resolve and Inject DB Connection
There's a minor optimization existing custom AutoQuery implementations can do by passing in the resolved IDbConnection, saving
CreateQuery and Execute* APIs from resolving it both themselves or when wanting to use a custom DB Connection resolution for a specific Service:
// Sync
public object Any(QueryRockstars query)
{
    using var db = autoQuery.GetDb(query, base.Request);
    var q = autoQuery.CreateQuery(query, base.Request, db);
    return await autoQuery.Execute(query, q, base.Request, db);
}
Another optimization if using SQL Server or PostgreSQL RDBMS's is to refactor it to use their native async implementations, e.g:
// Async
public async Task<object> Any(QueryRockstars query)
{
    using var db = autoQuery.GetDb(query, base.Request);
    var q = autoQuery.CreateQuery(query, base.Request, db);
    return await autoQuery.ExecuteAsync(query, q, base.Request, db);
}
New AutoQuery Conventions
The new implicit AutoQuery conventions below can be used in all AutoQuery Services:
%IsNull- (e.g.FieldIsNull) return results where Field is NULL%IsNotNull- (e.g.FieldIsNotNull) return results where Field is NOT NULL<>%- (e.g.<>Field=value) return results where Field does not equal value.
CsvFormat
CSV Format responses can use the same scoped custom responses as JSON to allow
Typed Results to exclude default values columns when returning limited custom fields with ?fields:
- Camel Humps Notation:
?jsconfig=edv - Full configuration:
?jsconfig=ExcludeDefaultValues
gRPC code-first Development
The development experience of gRPC Services continue to benefit from ServiceStack's code-first gRPC Services enabled by
protobuf-net.Grpc where instead of imposing the high maintenance burden of
manually authoring .proto to define gRPC Services on the developer and resulting in awkward generated classes in both
the C# Service implementation as well as the protoc generated clients.
A code-first development approach allows use of the higher-level & more expressive power of C# & its rich static analysis to intuitively declare exactly the Service you want to provide.
E.g. an AutoQuery Service uses both inheritance and generic response Types is simply declared in a single C# Request DTO with exactly what querying features you want to be discoverable for this Service:
public class QueryCategory : QueryDb<Category>
{
    public int Id { get; set; }
    public string CategoryName { get; set; }
}
Which you could call in an end-to-end API without code-gen, using the smart C# Generic gRPC Service Client which supports protobuf-net high-level retrofitted support for both inheritance and generic responses:
var response = await client.GetAsync(new QueryCategory { CategoryName = "Vegetables" });
But as .proto doesn't natively support either inheritance or generic classes the proto clients generates an unusable and awkward
has vs is a base for the retrofitted inheritance message hack requiring every base message type to define every possible subtype
message. The pursuit of a better dev UX inspired us to create the Dynamic gRPC Requests feature,
enabling the more natural and UX-friendly way to invoke Services using a flattened unstructured string Dictionary,
akin to a ?QueryString in HTTP Requests:
var response = await client.GetDynamicQueryCategoryAsync(new DynamicRequest {
    Params = {
        { "CategoryName", "Vegetables" },
        { "OrderBy", "Id" },
        { "Include", "Total" },
    }
});
This feature also allows you to construct a generic DynamicRequest Request Message that can invoke any Service making it
useful in scenarios where you want to dynamically construct & invoke different Services like in a Request Query Builder
as done in Studio and SharpData UIs, but is no longer required for invoking AutoQuery Services from protoc clients.
Flattened Request Hierarchy's
To improve support for protoc generated Service Clients Request DTOs now automatically flatten
multiple inheritance hierarchy's into a single message type in the dynamically generated .proto gRPC Services description
so now the C# QueryCategory Service above will elide the inheritance tree and expose it as a flattened Service message containing both
implicit base functionality available to all AutoQuery Services together with the explicit Querying functionality specific for each AutoQuery Service.
Now the above QueryCategory AutoQuery Service above are defined in the generated gRPC .proto as:
service GrpcServices {
    rpc GetQueryCategory(QueryCategory) returns (QueryResponse_Category) {}
}

message QueryCategory {
   int32 Skip = 1;
   int32 Take = 2;
   string OrderBy = 3;
   string OrderByDesc = 4;
   string Include = 5;
   string Fields = 6;
   map<string,string> Meta = 7;
   int64 Id = 201;
   string CategoryName = 202;
}

message QueryResponse_Category {
   int32 Offset = 1;
   int32 Total = 2;
   repeated Category Results = 3;
   map<string,string> Meta = 4;
   ResponseStatus ResponseStatus = 5;
}
This enables protoc generated clients with the more optimal generated typed API for calling ServiceStack's AutoQuery Services down to:
// Dart
var response = await client.getQueryCategory(QueryCategory()..categoryName='Vegetables');
print(response.results);
Single Page App Templates
All Single Page App Templates have been upgraded to their latest framework libraries versions:
| .NET Core C# Templates | |
|---|---|
| angular-spa | .NET Core 3.1 Angular 9 CLI Bootstrap App |
| aurelia-spa | .NET Core 3.1 Aurelia CLI Bootstrap App |
| react-lite | .NET Core 3.1 simple + lite (npm-free) React SPA using TypeScript |
| react-spa | .NET Core 3.1 React Create App CLI Bootstrap App |
| vue-lite | .NET Core 3.1 simple + lite (npm-free) Vue SPA using TypeScript |
| vue-nuxt | .NET Core 3.1 Nuxt.js SPA App with Bootstrap |
| vue-spa | .NET Core 3.1 Vue CLI Bootstrap App |
| vuetify-nuxt | .NET Core 3.1 Nuxt.js SPA App with Material Vuetify |
| vuetify-spa | .NET Core 3.1 Vue CLI App with Material Vuetify |
| angular-lite-spa | .NET Core 3.1 Angular 4 Material Design Lite Webpack App |
They've also all been converted to use the new EnableSpaFallback feature:
Plugins.Add(new SharpPagesFeature {
    EnableSpaFallback = true
})
Which replaces the previous explicit [FallbackRoute] Service with the built-in one below for returning the home page for any unknown HTML requests
to enable SPA routing on the client:
[FallbackRoute("/{PathInfo*}", Matches="AcceptsHtml"), ExcludeMetadata]
public class SpaFallback : IReturn<string>
{
    public string PathInfo { get; set; }
}

[DefaultRequest(typeof(SpaFallback))]
public class SpaFallbackService : Service
{
    //Return index.html for unmatched requests so routing is handled on client
    public object Any(SpaFallback request) => Request.GetPageResult("/");
}
Vue & React "Lite" Project Templates
The "maximum-simplified" npm-free vue-lite and react-lite
Project templates are now even lighter where instead of needing the bootstrap.css or Vue framework library *.js assets on disk we can instead
reference the official pre-minified assets embedded in ServiceStack.Desktop.dll:
{{ [
`/lib/js/vue/vue.min.js`,
`/lib/js/vue-router/vue-router.min.js`,
`/lib/js/vue-class-component/vue-class-component.min.js`,
`/lib/js/vue-property-decorator/vue-property-decorator.min.js`,
`/lib/js/@servicestack/client/servicestack-client.min.js`,
`/lib/js/@servicestack/vue/servicestack-vue.min.js`,
] |> map => `<script src="${it}"></script>` |> joinln |> raw }}
This allows faster and simplified updates and deployments which automatically takes care of updating to the latest framework library stable versions when upgrading to a newer ServiceStack release. This approach is also compatible with ServiceStack Desktop Apps and reduces the effort in wrapping your App into a Gist Desktop App should you wish to offer a Desktop version of it in future.
This greatly reduces the payload size of wwwroot assets where the only library assets
that need to exist on disk are their dev-only *.d.ts TypeScript declarations in typings
which provides the rich intelli-sense and static analysis when developing with TypeScript.
Deployments have also been simplified where now no explicit step is needed to compile your App's client assets as they're now automatically bundled, minified & hashed as part of the project's Bundle task:
<Target Name="Bundle" BeforeTargets="AfterPublish">
    <Exec Command="x run _bundle.ss -to /bin/Release/netcoreapp3.1/publish/wwwroot" />
</Target>
Where it's implicitly run when publishing the .NET Core App:
$ dotnet publish -c Release
#Script
As it's becoming an integral part of ServiceStack's newer more versatile features there's now a
ScriptContext available in all ServiceStack AppHost's which either uses your AppHost's configured SharpPagesFeature if it
has one, otherwise uses an empty fallback DefaultScriptContext.
The new APIs allows your App to easily invoke scripting functionality from a free-form string expression that has access to all built-in and registered #Script features.
So if you had your own custom rules engine with a dynamic source of user-defined business validation rules you could
easily dynamically resolve them to construct a list of Fluent Validation IPropertyValidator, e.g:
var propertyRules = new[] { "InclusiveBetween(13,100)" };
var validators = propertyRules.Map(rule =>
    (IPropertyValidator) HostContext.AppHost.EvalExpressionCached(rule));
Using the EvalExpressionCached API ensures that only the minimum number of validator instances are created & subsequently cached for fast access.
The IScriptValue Eval APIs allow you to create your own super enhanced Attributes like [AutoDefault], [AutoFilter] and [AutoPopulate]
where they're able to declaratively define any kind of value that can be statically embedded in a compile-time static C# Attribute declaration.
It also allows custom APIs to accept a single ScriptValue Type that can resolve to any kind of value, captured at their optimal performance:
HostContext.AppHost.EvalScriptValueAsync(new ScriptValue {
    Value = 10,                      // constant value
    Expression = "date(2001,01,01)", // constant expression
                                     // evaluate dynamic expression
    Eval = "dbSelect('SELECT * FROM Table WHERE Id=@Id', { Id })"
 }, new Dictionary<string,object> { ["Id"] = id })
These new #Script APIs are available in your AppHost at:
public interface IAppHost
{
    // Global #Script ScriptContext for AppHost. Returns SharpPagesFeature or DefaultScriptContext
    ScriptContext ScriptContext { get; }

    // Evaluate Expressions in ServiceStack's ScriptContext.
    // Can be overridden if you want to customize how different expressions are evaluated
    object EvalExpression(string expr);

    // Evaluate Expressions in ServiceStack's ScriptContext.
    // Can be overridden if you want to customize how different expressions are evaluated
    object EvalExpressionCached(string expr);

    // Evaluate a script value, `IScriptValue.Expression` results are cached globally.
    // If `IRequest` is provided, results from the same `IScriptValue.Eval` are cached per request
    object EvalScriptValue(IScriptValue scriptValue, IRequest req=null,
        Dictionary<string, object> args=null);

    // Evaluate a script value, `IScriptValue.Expression` results are cached globally.
    // If `IRequest` is provided, results from the same `IScriptValue.Eval` are cached per request
    Task<object> EvalScriptValueAsync(IScriptValue scriptValue, IRequest req=null,
        Dictionary<string,object> args=null);
}
Reclaiming = operator for assignment expressions
In its quest to provide a familiar and easy to use scripting language for .NET #Script added some enhancements
to JavaScript expressions such as being able to use SQL-Like Boolean Expressions
like =, and and or inside a boolean expression, e.g:
[0,1,2,3,4,5] |> where => (it = 2 or it = 3) and it.isOdd()
In modern JS (ES6+) this would be written as:
[0,1,2,3,4,5].filter(it => (it == 2 || it == 3) && isOdd(it));
Breaking Change
By default the use of the single = is now treated as an Assignment operator as it is in JS so you will need to update any of your boolean expressions
using it to use the standard == equality operator instead, e.g:
[0,1,2,3,4,5] |> where => (it == 2 or it == 3) and it.isOdd()
If you're not ready to update your scripts you can revert to the previous behavior and retain treating = as equality with:
ScriptConfig.AllowAssignmentExpressions = false;
JS familiarity over enhanced human-friendly syntax
At the time we valued human-friendly syntax over JS compatibility however over the years it's become clearer that language familiarity is more important than enhanced human-friendly syntax as it makes it much easier for devs who knows JS (i.e. most) to use #Script. Keeping compatibility with JS syntax also helps in other areas like code portability, JS tooling and syntax highlighters and linters, etc.
JS compatibility was the primary motivation for transitioning to the Pipe Forward operator whose future incorporation into JS will have a lot less friction then continuing to use the unix pipe | operator.
The Pipe Forward operator makes it more obvious that the output of the left expression is passed as the input of the right target which needs to be either a script method or a filter transformer however it could be forgiven to confuse it as an assignment expression where the output of the left expression was assigned to the sliders variable:
{{ dirFiles('img/sliders') |> sliders }}
The mistake here was that it needs to be piped to the to (or toGlobal) script method which assigns it to the sliders local scope argument:
{{ dirFiles('img/sliders') |> to => sliders }}
Local Variables
As #Script's variable declaration & assignment is the most common expression foreign to JS devs, we've decided to add support for it where you can now use JS syntax to assign a variable, e.g:
var sliders = dirFiles('img/sliders')
Like JS you can use either var, let or const but they all behave like let and assign a locally scoped variable at the time the expression is executed.
Also like JS the semicolon is optional and you can assign multiple variables in a single expression:
let a = 1 + 2, b = 3 * 4, c, d = 'D';
One semantic difference is that variable declarations are still an "Expression" in #Script, albeit one that returns a discarded result whilst they're a "Statement" in JS, although this distinction doesn't mean much in practice.
Global Variables
Global Variables in #Script are maintained in the PageResult.Args dictionary which you could previously assign to using the toGlobal script method
where it's accessible to all scripts rendered within that PageResult.
#Script now mimics JS's behavior to allow assignment expressions to assign global variables where "Assignment Expressions" on undeclared variables (i.e. where no locally scoped variable exists) will assign a global variable:
a = 1
A more descriptive syntax available to declare a global variable is to assign it to the global object (inspired by node's global) which is an alias to the PageResult.Args dictionary:
global.a = 1
Note: Like most languages assignment expressions in
#Scriptreturn the assigned value which can be discarded with|> end.
Assignment Expressions
In addition to declaring and assigning variables, there's also support for using assignment expressions to assign and mutate Collections and Type Properties using either Member Expression or Index expression syntax, e.g:
intList[1] = 10
stringArray[1] = "foo"
stringMap["foo"] = "bar"
person.Age = 27
objectMap.Person.Name = "kurt"
objectMap['Per' + 'son'].Name = "kurt"
intList[1.isOdd() ? 2 : 3] = 30
New #Script Script Methods
- new
userAuthIdanduserAuthNamescript methods (aliases foruserSession.UserAuthId&userSession.UserAuthName) - new
utcNowOffsetforDateTimeOffset.UtcNowandnguidforGuid.NewGuid() - new
envCommandLineArgsforEnvironment.GetCommandLineArgs() - new
it.ownPropsin Partials to only return user-defined arguments passed to it (e.g. not implicititbindings) - new
requestBodyAsJsonas deserialized JSON Object orrequestBodyAsStringraw string Request Body - new
toCoercedDictionaryconverts String Dictionary to Object Dictionary with values coerced following JS behavior - new
typeofProgIdon Windows forType.GetTypeFromProgID(name) - new
svgAddandsvgAddFileto register SVGs - new
resolveArg(local var resolution),resolveGlobal(PageResult.Args),resolveContextArg(Context.Args) APIs
The resolve* APIs let you resolve a variable named with the result of an expression, e.g:
var tableNames = resolveGlobal(`${db}_tables`)
Which is the same as:
var tableNames = global[`${db}_tables`]
Whereas resolveArg lets you resolve a variable using locally scope resolution hierarchy:
var tableNames = resolveArg(`${db}_tables`)
If db was northwind this would be the same as:
var tableNames = northwind_tables
Other features
- Can now use
$in variable identifiers - Can use top-level
{{ 'ex' |> catchError }}at start of Page to capture exceptions inex& continue page execution
Modified if* methods behavior
The if* APIs have changed behavior to stop execution instead of returning null which previously allowed fallback to
an otherwise script method, e.g:
'Is Authenticated' |> if(auth) |> otherwise('Not Authenticated')
This is more naturally expressed using a ternary expression:
auth ? 'Is Authenticated' : 'Not Authenticated'
Alternatively you can use the wordier *Else script methods or iif to return a default value:
'Is Authenticated' |> ifElse(auth, 'Not Authenticated')
'Is Authenticated' |> unlessElse(!auth, 'Not Authenticated')

iif(auth,'Is Authenticated','Not Authenticated')
The new behavior is changed so that useDb only gets called if db is "truthy":
{namedConnection:db} |> if(db) |> useDb
init.ss Startup Scripts
ServiceStack Apps that have SharpPagesFeature configured can also use init.ss (in addition to previous init.html) for declaring
one-time Startup logic in #Script (akin to Startup.cs for C#).
_init.ss is used in Script Pages Apps like
SharpData to construct a ServiceStack App's SVG stylesheet bundle from a user-defined
list of embedded *.svg resources and inline SVG declarations, e.g:
{{
var AppSvgs = {
'action/home.svg': 'home',
'device/storage.svg': 'db',
'action/list.svg': 'table',
'navigation/first_page.svg': 'chevron-first',
'navigation/last_page.svg': 'chevron-last',
'navigation/expand_more.svg': 'chevron-down',
'navigation/chevron_left.svg': 'chevron-left',
'navigation/chevron_right.svg': 'chevron-right',
'navigation/expand_less.svg': 'chevron-up',
'content/clear.svg': 'clear',
'content/filter_list.svg': 'filter',
}
}}
{{#each AppSvgs}}
{{`/lib/svg/material/${it.Key}` |> svgAddFile(it.Value,'app')}}
{{/each}}
{{#svg fields app}}
<svg xmlns="http://www.w3.org/2000/svg" viewBox="0 0 24 24" fill="black" width="48px" height="48px">
<path d="M0 0h24v24H0V0z" fill="none"/>
<path d="M4 5v13h17V5H4zm10 2v9h-3V7h3zM6 7h3v9H6V7zm13 9h-3V7h3v9z" fill="#ffffff"/>
</svg>
{{/svg}}
Lisp
Support for dorun was added for executing a "statement block" (sequence of expressions)
with side-effects that you want to discard the return type (akin to void return type):
context.EvaluateLisp("(dorun println (map fizzbuzz (range 1 100)))");
Or you can use do to return the last expression in the statement block:
context.EvaluateLisp("(return (do (+ 1 1) (+ 2 2)) )") //= 4
context.EvaluateLisp("(return (do (+ 1 1) (+ 2 2) nil)) )") //= null
context.EvaluateLisp("(return (do ()) )") //= null
ServiceStack
Embedded UMD build of @servicestack/client
A UMD version of the @servicestack/client JavaScript client library that contains the TypeScript Service and SSE Clients is now embedded in ServiceStack.dll. It's the modern, dependency-free replacement to ss-utils.js which requires jQuery which is used instead in all SPA Project Templates.
The embedded UMD version allows for the creation of stand-alone pages that accesses your ServiceStack JSON APIs
without any external file references with the single <script/> reference:
<script src="/js/servicestack-client.js"></script>
This is used by the updated mix init gists when generating its empty Web Apps:
$ mkdir web && cd web
$ x mix init
$ dotnet run
Where its dep-free /index.html use its
JsonServiceClient to call its /hello API:
To call APIs you'll need to include the JS transpiled DTOs of your Services TypeScript DTOs:
<script src="/js/servicestack-client.js"></script>
<script>
    Object.assign(window, window['@servicestack/client']); //import into global namespace

    // generate typed dtos with /typescript-add-servicestack-reference
    var Hello = /** @class */ (function () {
        function Hello(init) { Object.assign(this, init); }
        Hello.prototype.createResponse = function () { return new HelloResponse(); };
        Hello.prototype.getTypeName = function () { return 'Hello'; };
        return Hello;
    }());
    var HelloResponse = /** @class */ (function () {
        function HelloResponse(init) { Object.assign(this, init); }
        return HelloResponse;
    }());

    var client = new JsonServiceClient();
    client.get(new Hello({ name: val }))
        .then(function(r) {
            document.getElementById('result').innerHTML = r.result;
        });
</script>
Although modern browsers (as well as any TypeScript or Webpack project) let you use the much nicer async/await syntax:
let r = await client.get(new Hello({ name: val }))
TypeScript Nullable properties
The default TypeScript generated for a C# DTO like:
public class Data
{
    [Required]
    public int Value { get; set; }
    public int? OptionalValue { get; set; }
    public string Text { get; set; }
}
Will render the DTO with optional properties like:
export class Data
{
    // @Required()
    public value: number;

    public optionalValue?: number;
    public text?: string;

    public constructor(init?: Partial<Data>) { (Object as any).assign(this, init); }
}
You can change the behavior to emit nullable properties instead with:
TypeScriptGenerator.UseNullableProperties = true;
Where it will instead emit nullable properties:
export class Data
{
    public value: number|null;
    public optionalValue: number|null;
    public text: string|null;

    public constructor(init?: Partial<Data>) { (Object as any).assign(this, init); }
}
Should you need finer-grained customization and want to control which type and property should be nullable you can
use the new customizable filters (which UseNullableProperties defaults to):
TypeScriptGenerator.IsPropertyOptional = (generator, type, prop) => false;

TypeScriptGenerator.PropertyTypeFilter = (gen, type, prop) =>
    gen.GetPropertyType(prop, out var isNullable) + "|null";
Embedded Login Page fallback
The AuthFeature adds a fallback /login.html page if the HtmlRedirect remains the default and no /login.html exists, otherwise
if using a custom /login page in either Razor or Script Pages they'll continue to be used instead.
The default /login.html page provides an auto Login page that supports authentication via Credentials as well as a generating a dynamic
list of OAuth providers, e.g the NorthwindCrud /login page with Facebook OAuth looks like:
If however you're using an SPA App with client side routing to implement /login, the default login page can be disabled with:
new AuthFeature {
    IncludeDefaultLogin = false
}
Lightweight Customizable HTML Templates
There's a new lightweight templating solution that can be used to override ServiceStack's auto HTML Service response pages at specific routes, e.g. this is used to complete the auth/login flow in default apps which is pre-configured with:
GetPlugin<HtmlFormat>.PathTemplates["/auth"] = "/Templates/Auth.html";
Specifying the /path/info to override and the VirtualPath of the static HTML page that should be returned instead.
That instead of the JSON HTML Dump of the /auth endpoint, now returns a static .html page to display the AuthenticateResponse
DTO in a custom beautified HTML view:
The static HTML templates will replace these variable placeholders which will allow you to render a custom view of service responses:
${Dto}JSON Response DTO${BaseUrl}-IRequest.GetBaseUrl()${ServiceUrl}- Service URL
Hosting ASP.NET Core Apps on Custom Path
The new PathBase property on AppHost is now the official API for hosting a ServiceStack .NET Core App at a custom path which can be
specified at initialization:
app.UseServiceStack(new AppHost {
    PathBase = "/api",
    AppSettings = new NetCoreAppSettings(Configuration)
});
Resulting in both Config.PathBase and Config.HandlerFactoryPath getting populated with and without the / suffix:
Config.PathBase           //= /api
Config.HandlerFactoryPath //= api
When necessary the PathBase property is available in both server rendered views:
{{PathBase}}variable in #Script PagesPathBasein Razor Views
Pluralize and Singularize
In order to use optimal user-friendly routes in our AutoGenerated AutoQuery Services, an interned version of
Andrew Peters port of Rails Inflector is available under the Words static class
should you need to Pluralize or Singularize text:
var plural = Words.Pluralize("Customer");      //= Customers
var singular = Words.Singularize("Customers"); //= Customer
AuthSecret Admin Session
Super User Requests using Config.AdminAuthSecret now return an Authenticated Admin UserSession
whose default values can be modified at AuthFeature.AuthSecretSession:
DisplayName: AdminUserName: authsecretAuthProvider: authsecretRoles: AdminUserAuthId: 0
Exception Handling
Config.ReturnsInnerException now defaults to false in .NET Core. Returning the InnerException was an attempt to return
the most useful Exception but was often undesired. Instead when in DebugMode the populated StackTrace will return
the StackTraces of all Inner Exceptions, the added detail making it better to be able to identify the source of the Exception when
by inspecting the Error Response.
GatewayExceptionHandlers
The new Gateway Exception Handlers provide the same Exception Handling callbacks as ServiceExceptions which you can use to intercept Exceptions from Gateway requests:
IAppHost.GatewayExceptionHandlers
IAppHost.GatewayExceptionHandlersAsync
Gateway Exceptions can also be intercepted in your AppHost by overriding:
public override async Task OnGatewayException(IRequest httpReq, object request, Exception ex) => ...
System.Web Shims removed
To assist in being able to retain the same code-base in .NET Core and .NET Framework some core System.Web. classes
were added like IHttpHandler which have now been moved to the ServiceStack.Host namespace.
This can be a source breaking change if you have code that references these types, which can be resolved by including the namespace:
using ServiceStack.Host;
XmlSerializerFormat Plugin
The new XmlSerializerFormat plugin changes ServiceStack to serialize XML with .NET XmlSerializer instead of .NET XML
DataContractSerializer:
Plugins.Add(new XmlSerializerFormat());
The implementation provides a typical example of how to register or override different Content-Types in ServiceStack:
public class XmlSerializerFormat : IPlugin
{
    public static void Serialize(IRequest req, object response, Stream stream)
    {
        var serializer = new XmlSerializer(response.GetType());
        serializer.Serialize(stream, response);
    }

    public static object Deserialize(Type type, Stream stream)
    {
        var serializer = new XmlSerializer(type.GetType());
        var obj = (Type) serializer.Deserialize(stream);
        return obj;
    }

    public void Register(IAppHost appHost)
    {
        appHost.ContentTypes.Register(MimeTypes.Xml, Serialize, Deserialize);
    }
}
Cache Client
Most caching providers now provide an explicit API to remove expired entries:
public interface ICacheClientExtended : ICacheClient
{
    void RemoveExpiredEntries();
}
The Memory Cache client periodically calls this every MemoryCacheClient.CleaningInterval (default 1000).
Other features
- Fluent Validation upgraded to latest 9 Preview 2
- Support for returning naked
ReadOnlyMemory<char>andReadOnlyMemory<byte>raw text & binary in Service responses - Support added for non-ascii UTF-8 chares in Content-Disposition file names
- ServiceStack's interned
RecyclableMemoryStreamupdated to use latest Microsoft.IO.RecyclableMemoryStream
Server Sent Events
Server Events is more resilient and better detects and handles hung blocking async requests in ASP.NET Framework.
All Notify APIs now have overloads for being able to send raw JSON:
public interface IServerEvents : IDisposable
{
    Task NotifyAllJsonAsync(string selector, string json, CancellationToken ct);
    Task NotifyChannelJsonAsync(string channel, string selector, string json, CancellationToken ct);
    Task NotifySubscriptionJsonAsync(string subscriptionId, string selector, string json, string channel=null, CancellationToken ct);
    Task NotifyUserIdJsonAsync(string userId, string selector, string json, string channel=null, CancellationToken ct);
    Task NotifyUserNameJsonAsync(string userName, string selector, string json, string channel=null, CancellationToken ct);
    Task NotifySessionJsonAsync(string sessionId, string selector, string json, string channel=null, CancellationToken ct);
}
Update Events for when a subscription updates their registered channels are now sent to new & previously subscribed channels.
IEventSubscription captures both old & new channels in MergedChannels collection whilst the Channels return the currently
subscribed channels so the difference between MergedChannels-Channels determines which channels were unsubscribed to.
Stand-alone Razor Views
Support for rendering stand-alone HTML Views from Razor Pages has been added to .NET Core's ServiceStack.Razor implementation
which can use the GetViewPage() API for retrieving View Pages (e.g. under ~/Views) and the GetContentPage() API for retrieving
Content Pages (e.g. under /wwwroot).
You can then use RenderToHtmlAsync() API to render the HTML output in a UTF-8 ReadOnlyMemory<char> which your Services can return directly
for optimal efficiency, or if needed the rendered output can be converted to a string with .ToString():
public async Task<object> Any(MyRequest request)
{
    var razor = GetPlugin<RazorFormat>();
    var view = razor.GetViewPage("MyView");
    if (view == null)
        throw HttpError.NotFound("Razor view not found: " + "MyView");

    var ret = await razor.RenderToHtmlAsync(view, new MyModel { Name = "World" },
        layout:"_MyLayout"); //if Layout specified in `.cshtml` page it uses that
    return ret;
}
For even better efficiency the Razor View can render to the Response OutputStream directly with WriteHtmlAsync() to write the rendered UTF-8 bytes
directly to the OutputStream instead of above where it converts it into a UTF-8 string before converting it back to UTF-8 bytes when ServiceStack
writes it to the response:
public async Task Any(MyRequest request)
{
    var razor = GetPlugin<RazorFormat>();
    var view = razor.GetViewPage("MyView");
    if (view == null)
        throw HttpError.NotFound("Razor view not found: " + "MyView");

    await razor.WriteHtmlAsync(Response.OutputStream, view,
        new MyModel { Name = "World" },
        layout:"_MyLayout"); //if Layout specified in `.cshtml` page it uses that
}
If needed you can also render the view with an anonymous Model Type, e.g:
await razor.RenderToHtmlAsync(view, new { Name = "World" });
Where the Razor View would need to specify it's using a dynamic model with:
@model dynamic
OpenApi
To improve the metadata available when customizing the Open API output using Operation Filters,
non-serializable PropertyInfo and PropertyType members have been added to the OpenApiProperty DTO they represent:
public class OpenApiProperty
{
    [IgnoreDataMember]
    public PropertyInfo PropertyInfo { get; set; }
    [IgnoreDataMember]
    public Type PropertyType { get; set; }
}
OrmLite
OrmLite continues to evolve with new features gained in every release in response to Customer Feedback and when necessary to provide seamless optimal integrations into new Technologies like AutoCrud.
Ensure
The new Ensure() API on OrmLite's typed SqlExpression<T> can be used to ensure that a condition is always applied irrespective
of other conditions, e.g:
Typed API
var q = db.From<Rockstar>();
q.Ensure(x => x.Id == 1); //always applied

//...
q.Where(x => x.Age == 27);
q.Or(x => x.LivingStatus == LivingStatus.Dead);

var rows = db.Select(q);
Custom Parameterized SQL Expression
Custom SQL Ensure parameterized expressions:
q.Ensure("Id = {0}", 1);
Multiple Ensure expressions
var q = db
    .From<Rockstar>()
    .Join<RockstarAlbum>((r,a) => r.Id == a.RockstarId);

q.Ensure<Rockstar,RockstarAlbum>((r,a) => a.Name == "Nevermind" && r.Id == a.RockstarId);

q.Where(x => x.Age == 27)
 .Or(x => x.LivingStatus == LivingStatus.Dead);

q.Ensure(x => x.Id == 3);

var rows = db.Select(q);
These APIs are useful for mandatory filters like "Soft Deletes" and Multitenant records.
Dictionary APIs
The new Dictionary APIs allow you to customize which parts of a Data Model should be modified by converting it into then manipulating an Object Dictionary, e.g:
Insert by Dictionary
var row = new Person { FirstName = "John", LastName = "Smith" };
Dictionary<string,object> obj = row.ToObjectDictionary();
obj[nameof(Person.LastName)] = null;

row.Id = (int) db.Insert<Person>(obj, selectIdentity:true);
Update by Dictionary
Person row = db.SingleById<Person>(row.Id);
var obj = row.ToObjectDictionary();
obj[nameof(Person.LastName)] = "Smith";
db.Update<Person>(obj);
UpdateOnly by Dictionary
// By Primary Key Id
var fields = new Dictionary<string, object> {
    [nameof(Person.Id)] = 1,
    [nameof(Person.FirstName)] = "John",
    [nameof(Person.LastName)] = null,
};

db.UpdateOnly<Person>(fields);

// By Custom Where Expression
var fields = new Dictionary<string, object> {
    [nameof(Person.FirstName)] = "John",
    [nameof(Person.LastName)] = null,
};

db.UpdateOnly<Person>(fields, p => p.LastName == "Hendrix");
Delete by Dictionary
db.Delete<Rockstar>(new Dictionary<string, object> {
    ["Age"] = 27
});
Custom Insert and Update Expressions
The new [CustomInsert] and [CustomUpdate] attributes can be used to override what values rows are inserted
during INSERT's and UPDATE's.
We can use this to insert a salted and hashed password using PostgreSQL native functions:
public class CustomSqlUser
{
    [AutoIncrement]
    public int Id { get; set; }

    public string Email { get; set; }

    [CustomInsert("crypt({0}, gen_salt('bf'))"),
     CustomUpdate("crypt({0}, gen_salt('bf'))")]
    public string Password { get; set; }
}

var user = new CustomSqlUser {
    Email = "user@email.com",
    Password = "secret"
};
db.Insert(user);
We can then use Sql.Custom() to create a partially typed custom query to match on the hashed password, e.g:
var quotedSecret = db.Dialect().GetQuotedValue("secret");
var q = db.From<CustomSqlUser>()
    .Where(x => x.Password == Sql.Custom($"crypt({quotedSecret}, password)"));
var row = db.Single(q);
DbScripts
The New DB Scripts below surfaces existing OrmLite helpers to assist in generation of SQL queries in #Script:
sqlCast- RDBMS specific CAST expressionsqlOrderByFields- Quoted multi order by fieldssqlVerifyFragment- Verify SQL fragment
The dbCount API returns the number of rows the specified query returns whilst dbExists returns a bool
if the specified query returns any rows:
sql |> dbCount(args)

sql |> dbExists(args)
DbScriptsAsync sync APIs
In future we recommend only using DbScriptsAsync going forward as it's often useful to be explicit when using async and sync queries.
To facilitate this all DbScripts sync APIs have been merged into DbScriptsAsync and given *Sync suffixes:
Plugins.Add(new SharpPagesFeature {
    ScriptMethods = { new DbScriptsAsync() }
});
The *Sync APIs are useful when the actual resolved value is needed, like in logical binary expression or a [ValidateRequest]
Condition which expects a "truthy" result:
[ValidateRequest(Condition = "dCountSync('SELECT * FROM RockstarAlbum WHERE RockstarId = @Id', { dto.Id }) == 0",
                 ErrorCode = "HasForeignKeyReferences")]
public class MyRequest { ... }
[ValidateRequest(Condition = "!dbExistsSync('SELECT * FROM RockstarAlbum WHERE RockstarId = @Id', { dto.Id })",
                 ErrorCode = "HasForeignKeyReferences")]
public class MyRequest { ... }
Spread Util
The SqlSpread() API is useful to generate an escaped list of parameterized values for use in SQL IN() statements and SQL functions:
var dialect = db.Dialect();
dialect.SqlSpread(1, 2, 3);         //= 1,2,3
dialect.SqlSpread("A", "B", "C");   //= 'A','B','C'
dialect.SqlSpread("A'B", "C\"D");   //= 'A''B','C\"D'
PostgreSQL Array
The PgSql.Array() provides a typed API for generating PostgreSQL Array Expressions, e.g:
PgSql.Array(1,2,3)     //= ARRAY[1,2,3]
var strings = new[]{ "A","B","C" };
PgSql.Array(strings)   //= ARRAY['A','B','C']
Which you can safely use in Custom SQL Expressions that use PostgreSQL's native ARRAY support:
q.And($"{PgSql.Array(anyTechnologyIds)} && technology_ids")
q.And($"{PgSql.Array(labelSlugs)} && labels");
If you want and empty collection to return null instead of an empty ARRAY[] you can use the nullIfEmpty overload:
PgSql.Array(new string[0], nullIfEmpty:true)      //= null
PgSql.Array(new[]{"A","B","C"}, nullIfEmpty:true) //= ARRAY['A','B','C']
PostgreSQL Params
The PgSql.Param() API provides a resolve the correct populated NpgsqlParameter and NpgsqlDbType from a C# Type
which can be used to query custom PostgreSQL Data Types in APIs that accept IDbDataParameter parameters, e.g:
public class FunctionResult
{
    public int[] Val { get; set; }
}

var p = PgSql.Param("paramValue", testVal);
var sql = "SELECT * FROM my_func(@paramValue)";
var rows = db.Select<FunctionResult>(sql, new [] { p });