
We're happy to announce ServiceStack v8.7 which makes comprehensive API Analytics available to all ServiceStack Apps - designed to give complete visibility into your API operations. From high-level traffic overviews and performance trends to deep dives into individual API endpoint metrics and user-specific request patterns, these analytics provide critical data needed for effective monitoring, optimization, and troubleshooting of System APIs.
Benefits of API Analytics
They provide deep and invaluable insight into your System API Usage, device distribution, its Users, API Keys and the IPs where most traffic generates:
- Visibility: Provides a clear, visual summary of complex log data, making it easier to understand API usage and performance at a glance.
- Performance Monitoring: Helps track key metrics like request volume and response times to ensure APIs are meeting performance expectations.
- User Understanding: Offers insights into how users (and bots) are interacting with the APIs (devices, browsers).
- Troubleshooting: Aids in quickly identifying trends, anomalies, or specific endpoints related to issues.
- Resource Planning: Understanding usage patterns helps in scaling infrastructure appropriately.
- Security Insight: Identifying bot traffic and unusual request patterns can be an early indicator of security concerns.
- Interactive Analytics: Analytics are also interactive where you're able to drill down to monitor the activity of individual APIs, Users, API Keys and IPs with links back to the request logs which the summary analytics are derived from.
Getting Started
API Analytics are available to all ServiceStack Apps configured with SQLite Request Logging.
As they offer significant and valuable insights they're now built into all new ASP.NET Core IdentityAuth templates, whilst existing .NET 8 IdentityAuth templates can enable it with:
x mix sqlitelogs
Older .NET 8 Templates
.NET 8 Templates that are not configured to use Endpoint Routing
and ASP.NET Core IOC will need to explicitly register SqliteRequestLogger
as a singleton dependency in addition to configuring it on the RequestLogsFeature plugin:
public class ConfigureRequestLogs : IHostingStartup
{
    public void Configure(IWebHostBuilder builder) => builder
        .ConfigureServices((context, services) =>
        {
            var logger = new SqliteRequestLogger();
            services.AddSingleton<IRequestLogger>(logger);

            services.AddPlugin(new RequestLogsFeature {
                RequestLogger = logger,
                EnableRequestBodyTracking = true,
                EnableErrorTracking = true
            });
            services.AddHostedService<RequestLogsHostedService>();

            if (context.HostingEnvironment.IsDevelopment())
            {
                services.AddPlugin(new ProfilingFeature());
            }
        });
}
//...
Analytics Admin UI
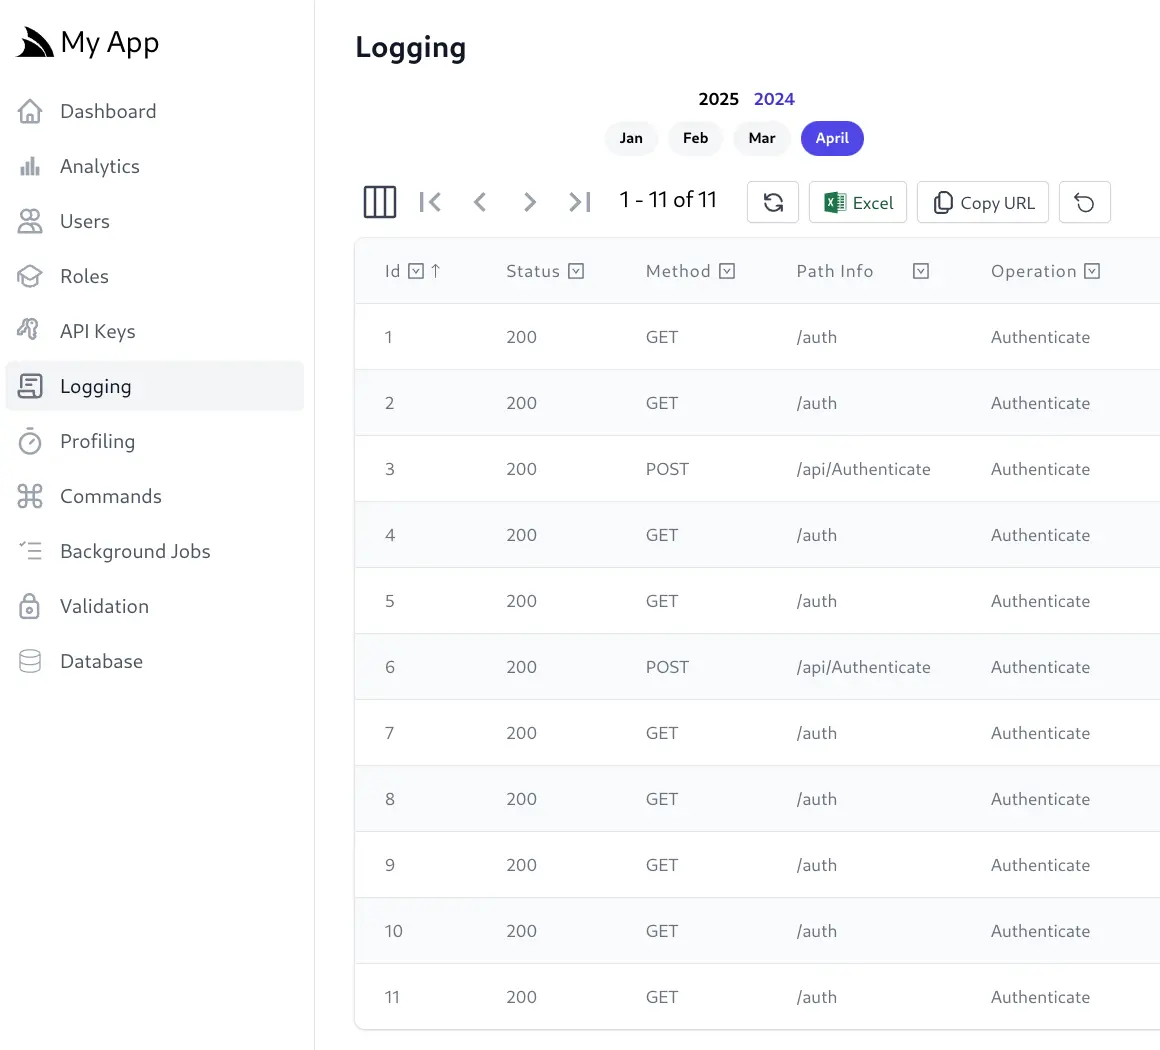
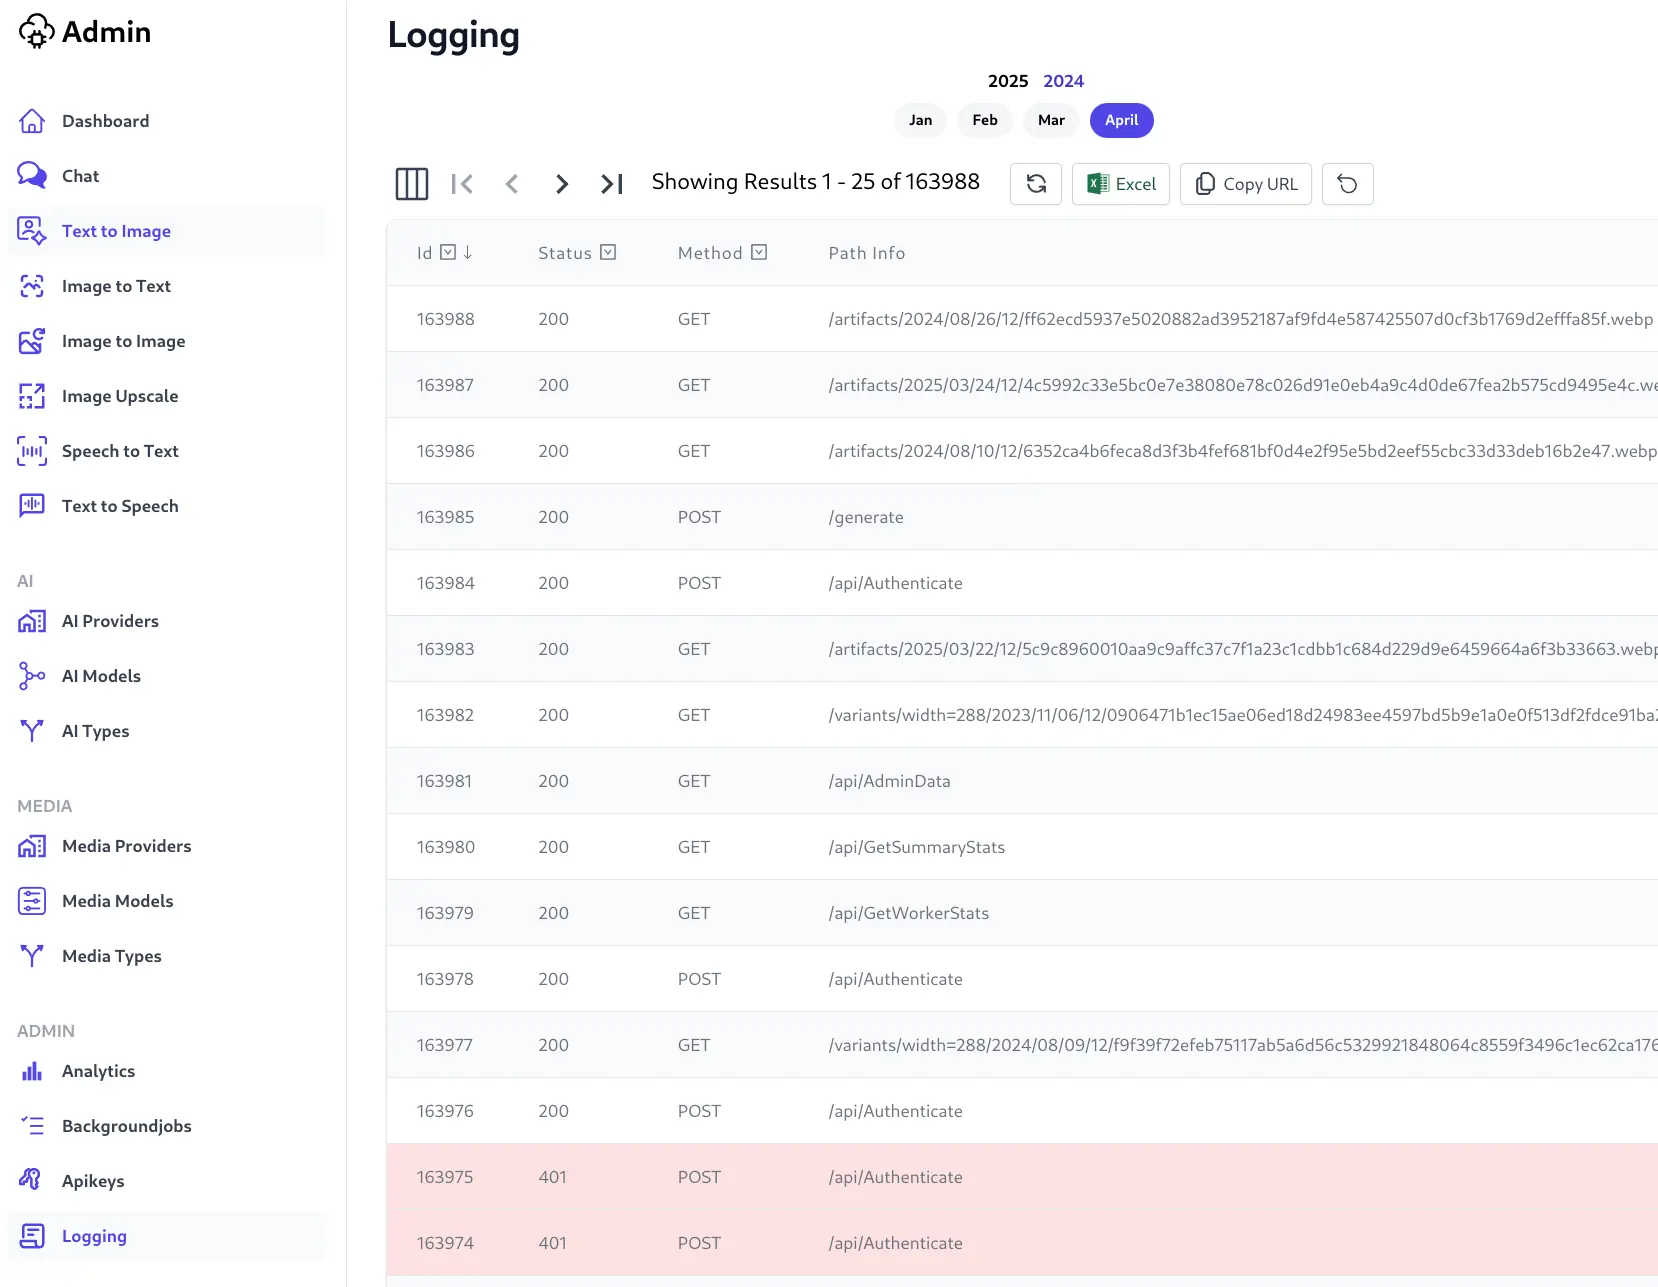
Once configured, SQLite Request Logs enable a more feature rich Request Logging Admin UI which utilizes the full queryability of an AutoQueryGrid to filter, sort and export Request Logs.
Rolling Monthly Request Logs
Benefits of using SQLite includes removing load from your App's primary database and being able to create naturally scalable and isolated Monthly databases on-the-fly which allow requests to be easily archived into managed file storage instead of a singular growing database.
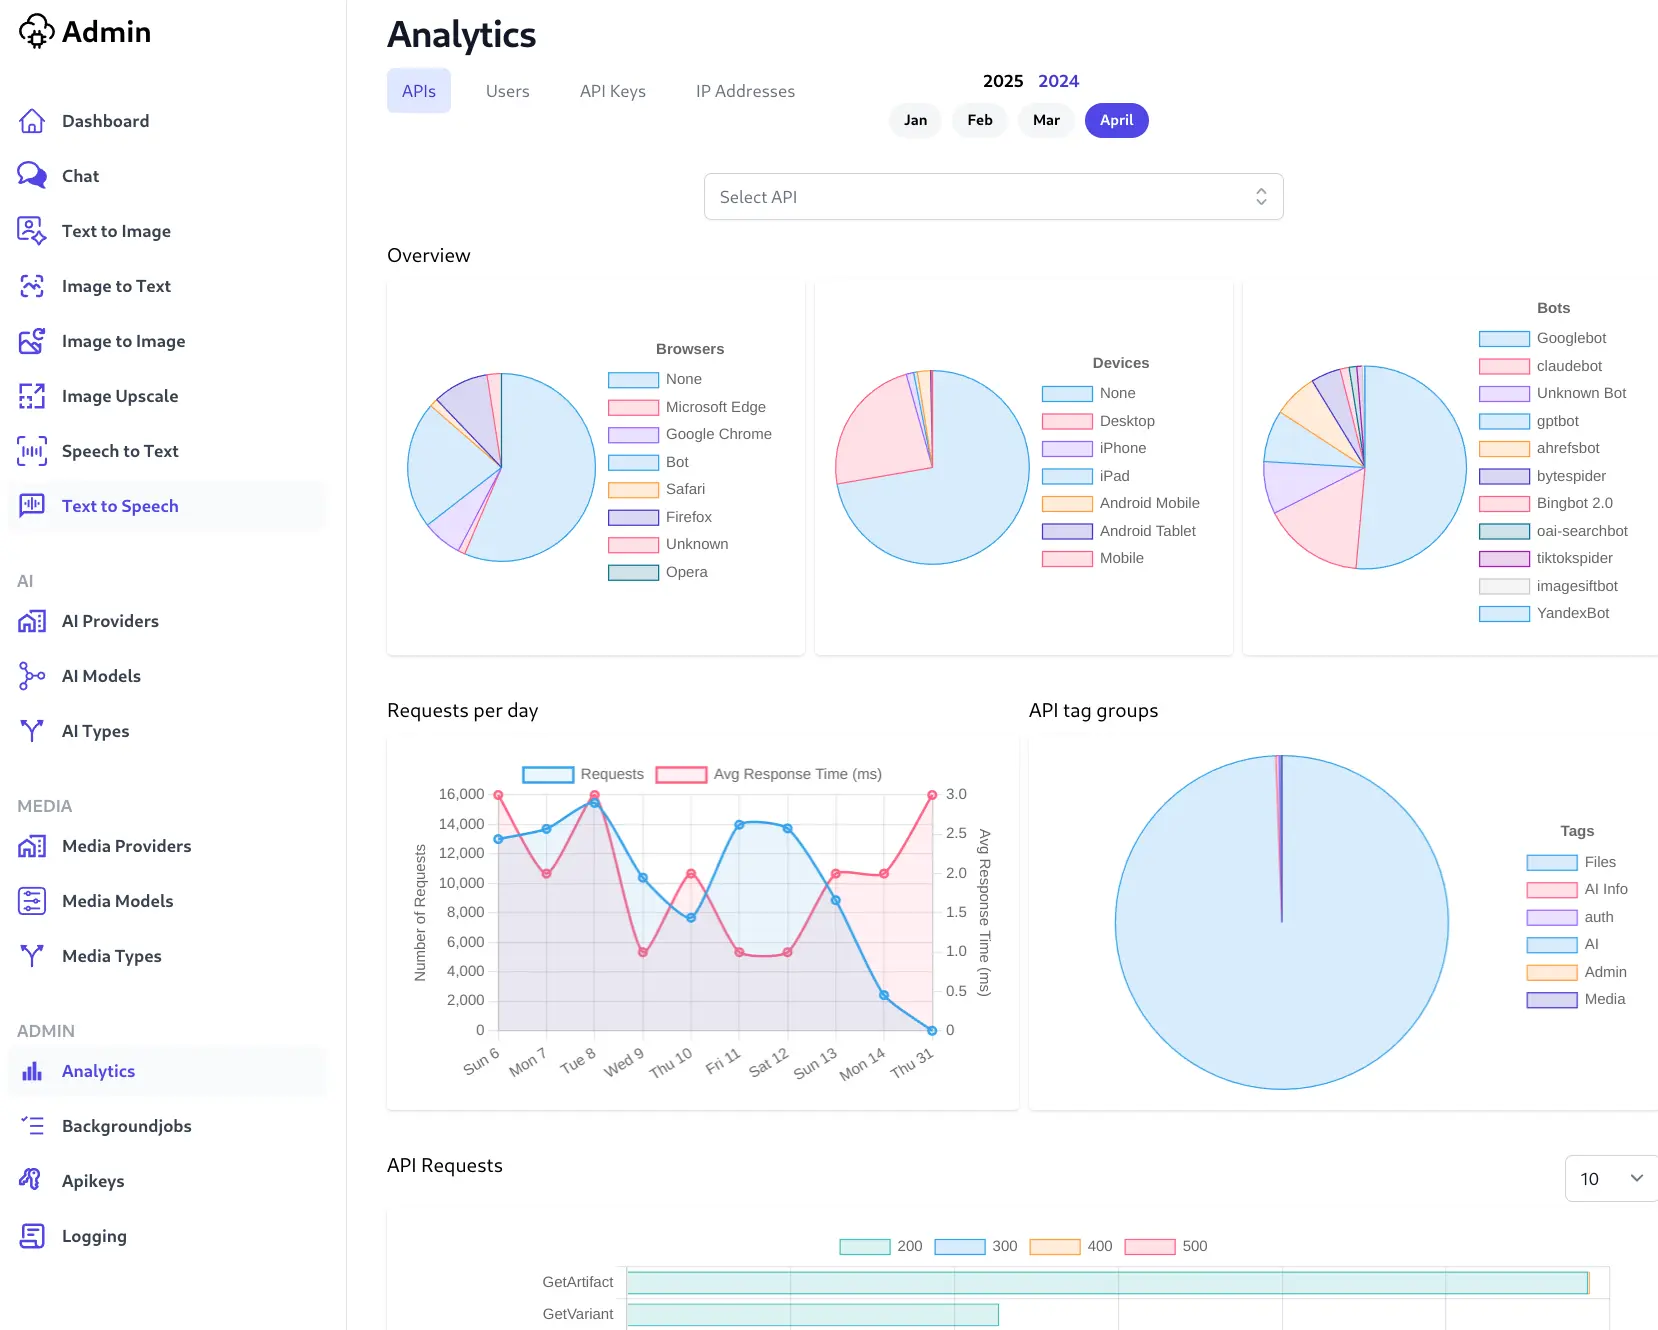
Analytics Overview
It also enables the new Analytics Admin UI in the sidebar which initially displays the API Analytics overview Dashboard:
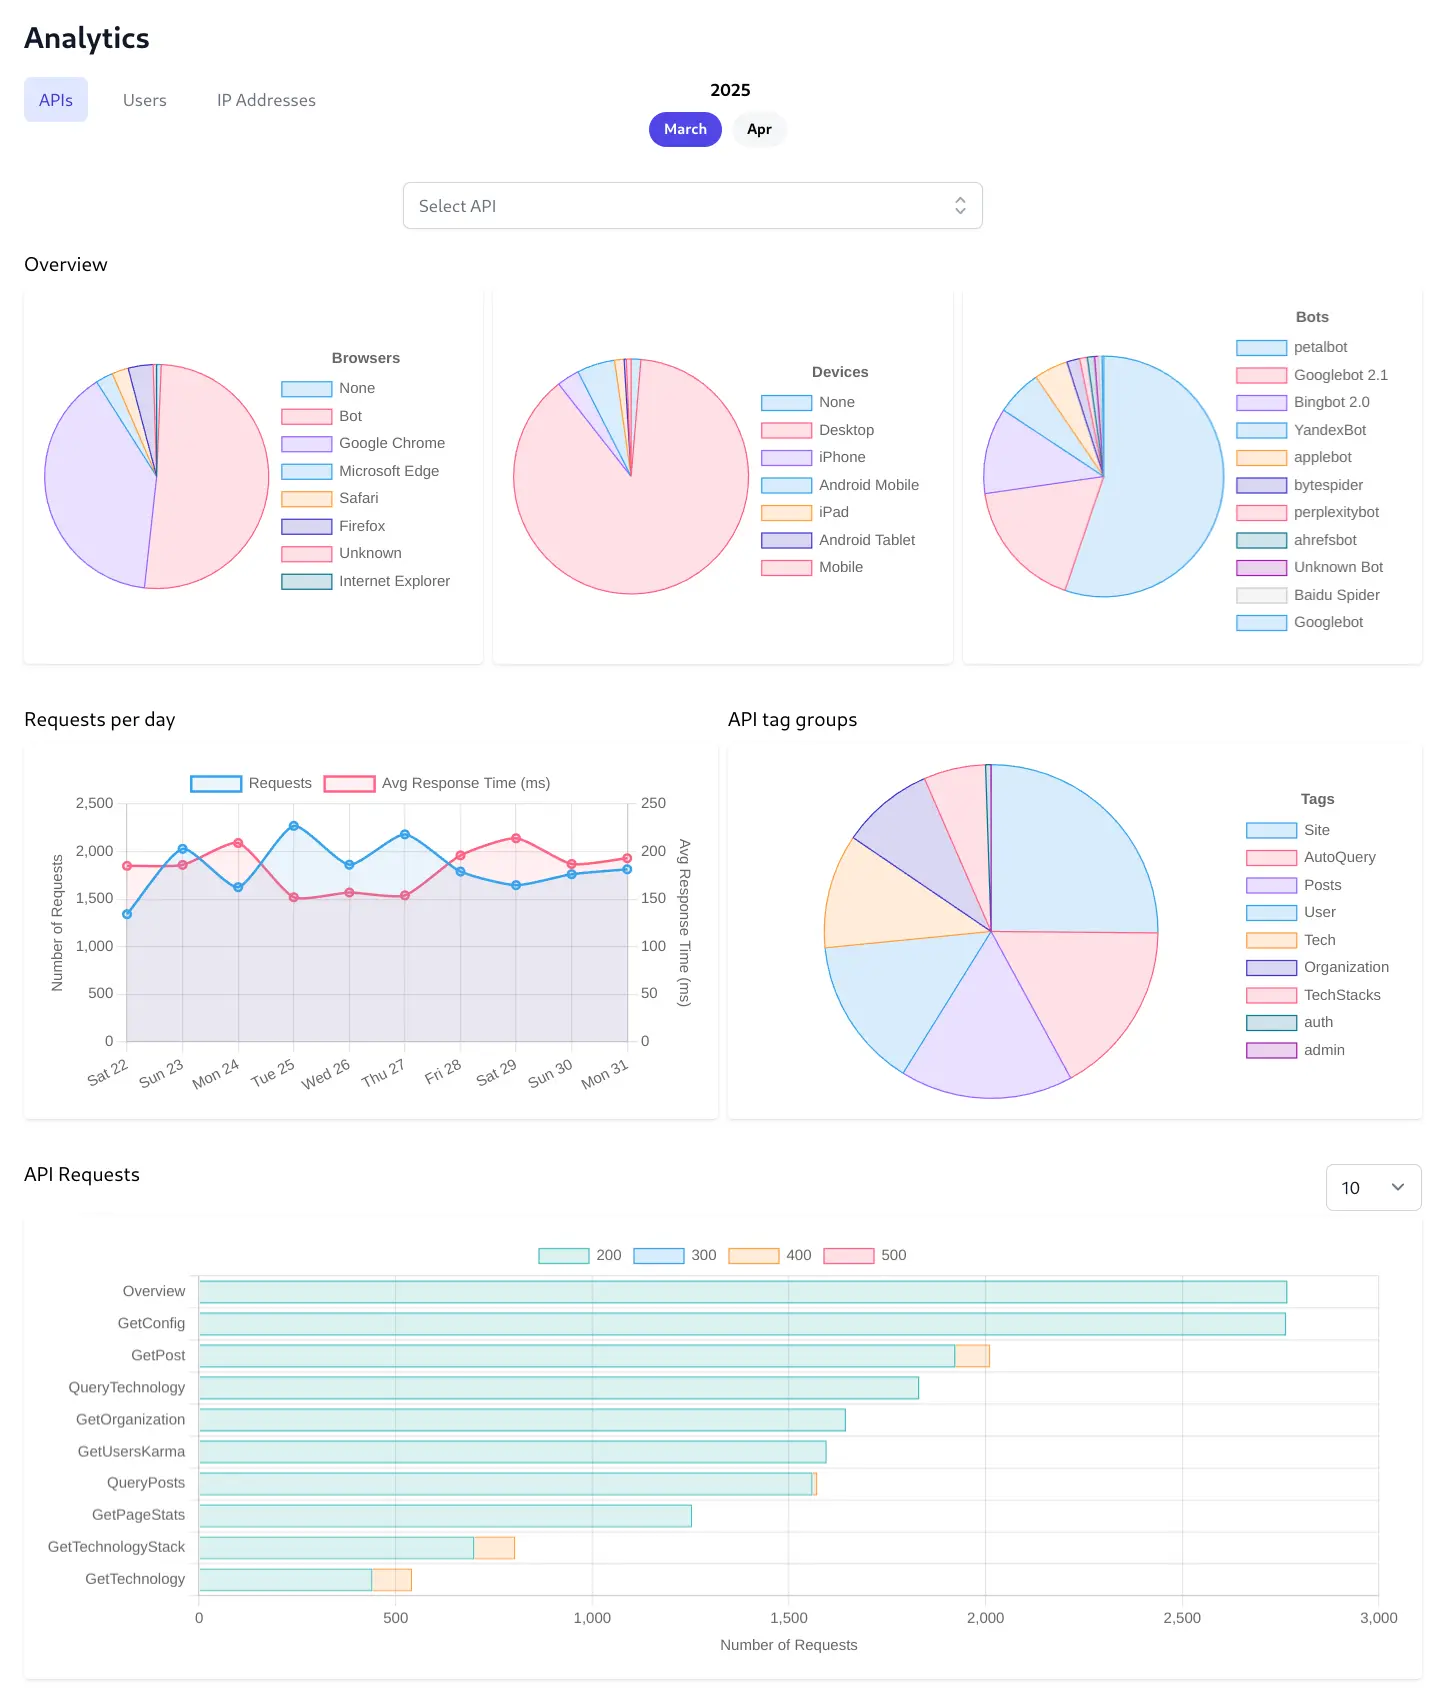
Different charts displayed on the dashboard include:
Distribution Pie Charts
Lets you quickly understand the composition of your user base and traffic sources and the distribution of users across different web browsers, device types, and to identify the proportion of traffic coming from automated bots.
Requests per day Line Chart
Lets you monitor API usage trends and performance over time. It tracks the total number of API requests and the average response time day-by-day. You can easily spot trends like peak usage hours/days, identify sudden spikes or drops in traffic, and correlate request volume with API performance which is crucial for capacity planning and performance troubleshooting.
API tag groups Pie Chart
Lets you understand the usage patterns across different functional categories of your APIs. By grouping API requests based on assigned tags (like Security, Authentication, User Management, Tech, etc.), you get a high-level view of which types of functionalities are most frequently used or are generating the most load.
API Requests Bar Chart
Lets you identify the most and least frequently used specific API endpoints which ranks individual API endpoints by the number of requests they receive. This helps pinpoint:
- Critical Endpoints: The most heavily used APIs that require robust performance and monitoring.
- Optimization Targets: High-traffic endpoints that could benefit from performance optimization.
- Underutilized Endpoints: APIs that might be candidates for deprecation or require promotion.
- Troubleshooting: If performance issues arise (seen in the line chart), this helps narrow down which specific endpoint might be responsible.
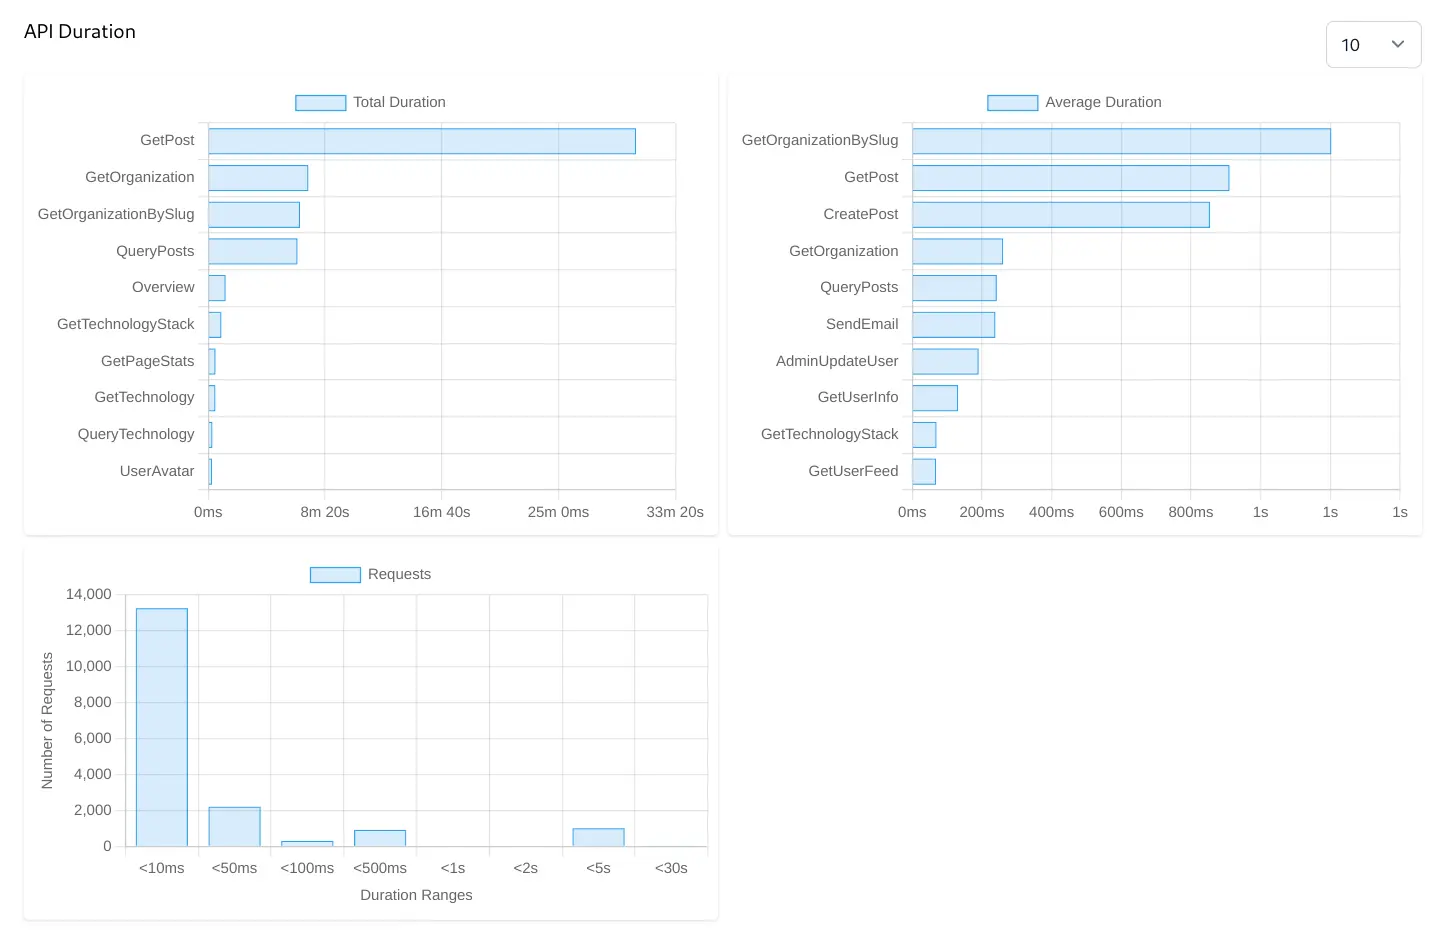
Total Duration Bar Chart
Identifies which API endpoints consume the most cumulative processing time over the selected period. Even if an API endpoint is relatively fast per call, if it's called extremely frequently, it can contribute significantly to overall server load. Optimizing these can lead to significant savings in server resources (CPU, memory).
Average Duration Bar Chart
Pinpoints which API endpoints are the slowest on a per-request basis. APIs at the top of this list are prime candidates for performance investigation and optimization, as they represent potential user-facing slowness or system bottlenecks.
Requests by Duration Ranges Histogram
Provides an overview of the performance distribution for all API requests. This chart shows how many requests fall into different speed buckets and helps you understand the overall responsiveness of your API system at a glance.
Individual API Analytics
Clicking on an API's bar chart displays a dedicated, detailed view of a single API endpoint's behavior, isolating its performance and usage patterns from the overall system metrics offering immediate insight into the endpoint's traffic volume and reliability.
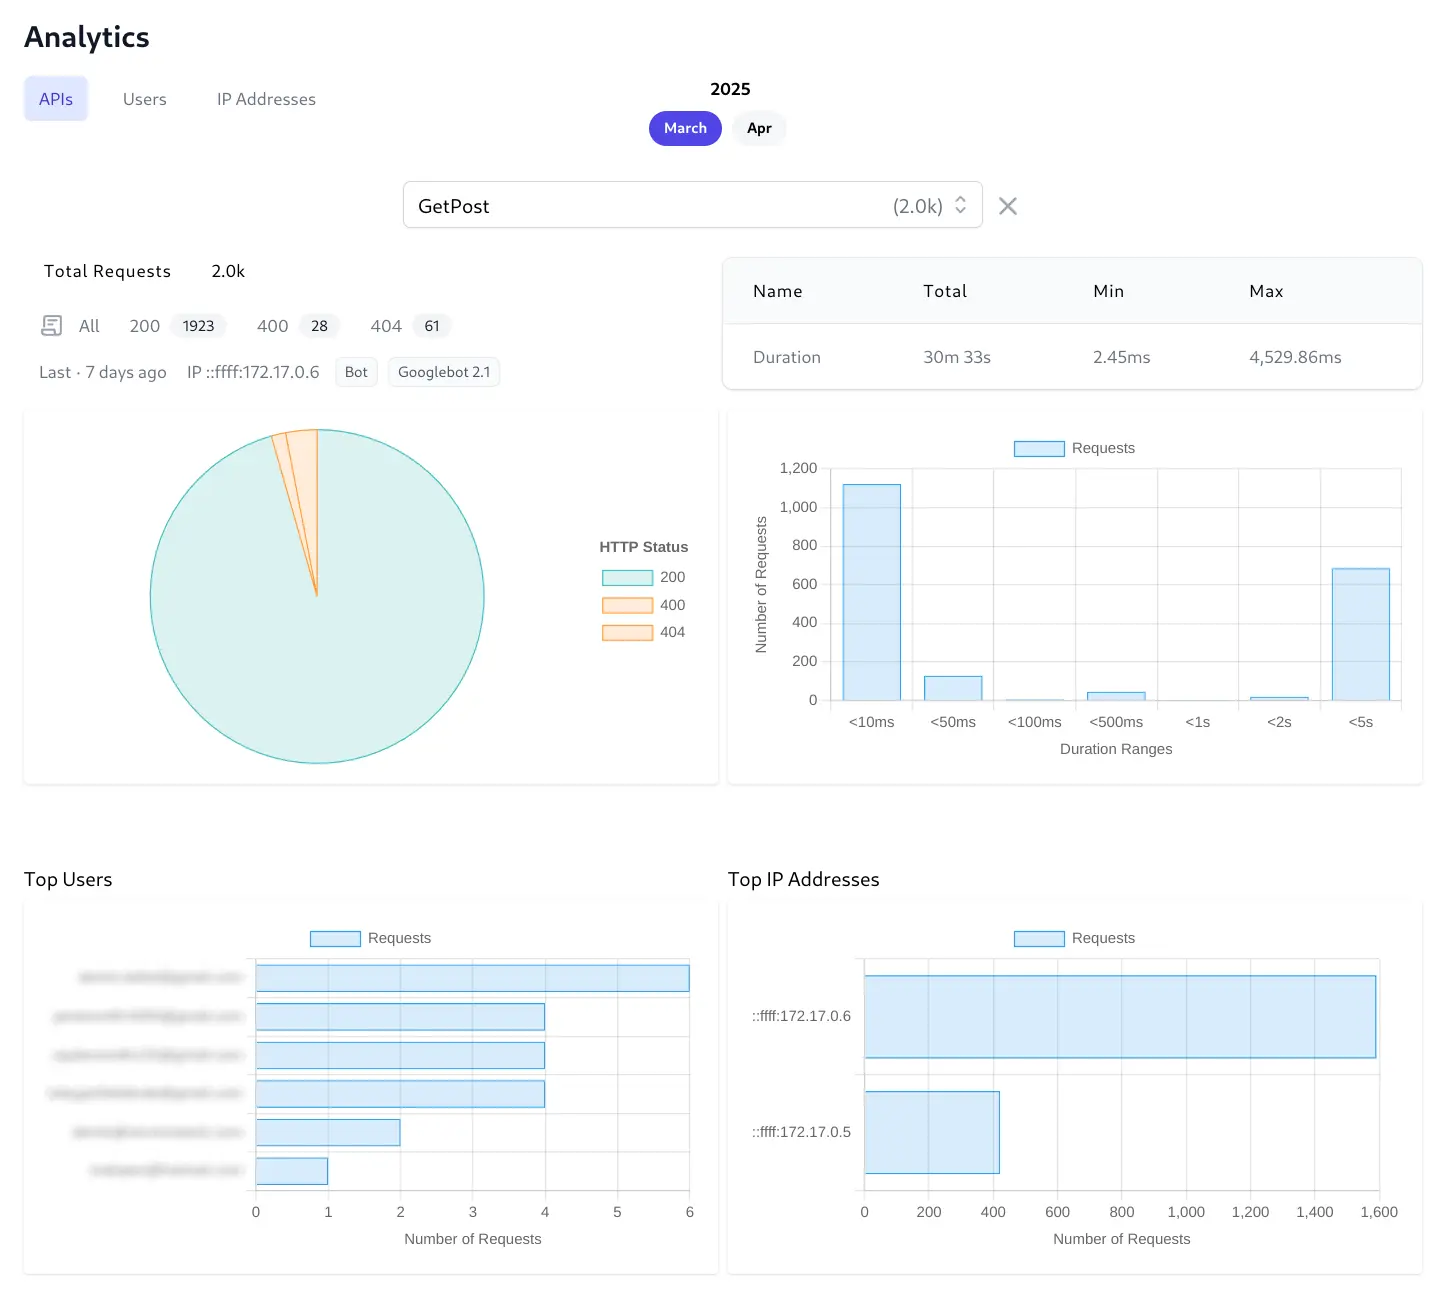
Total Requests
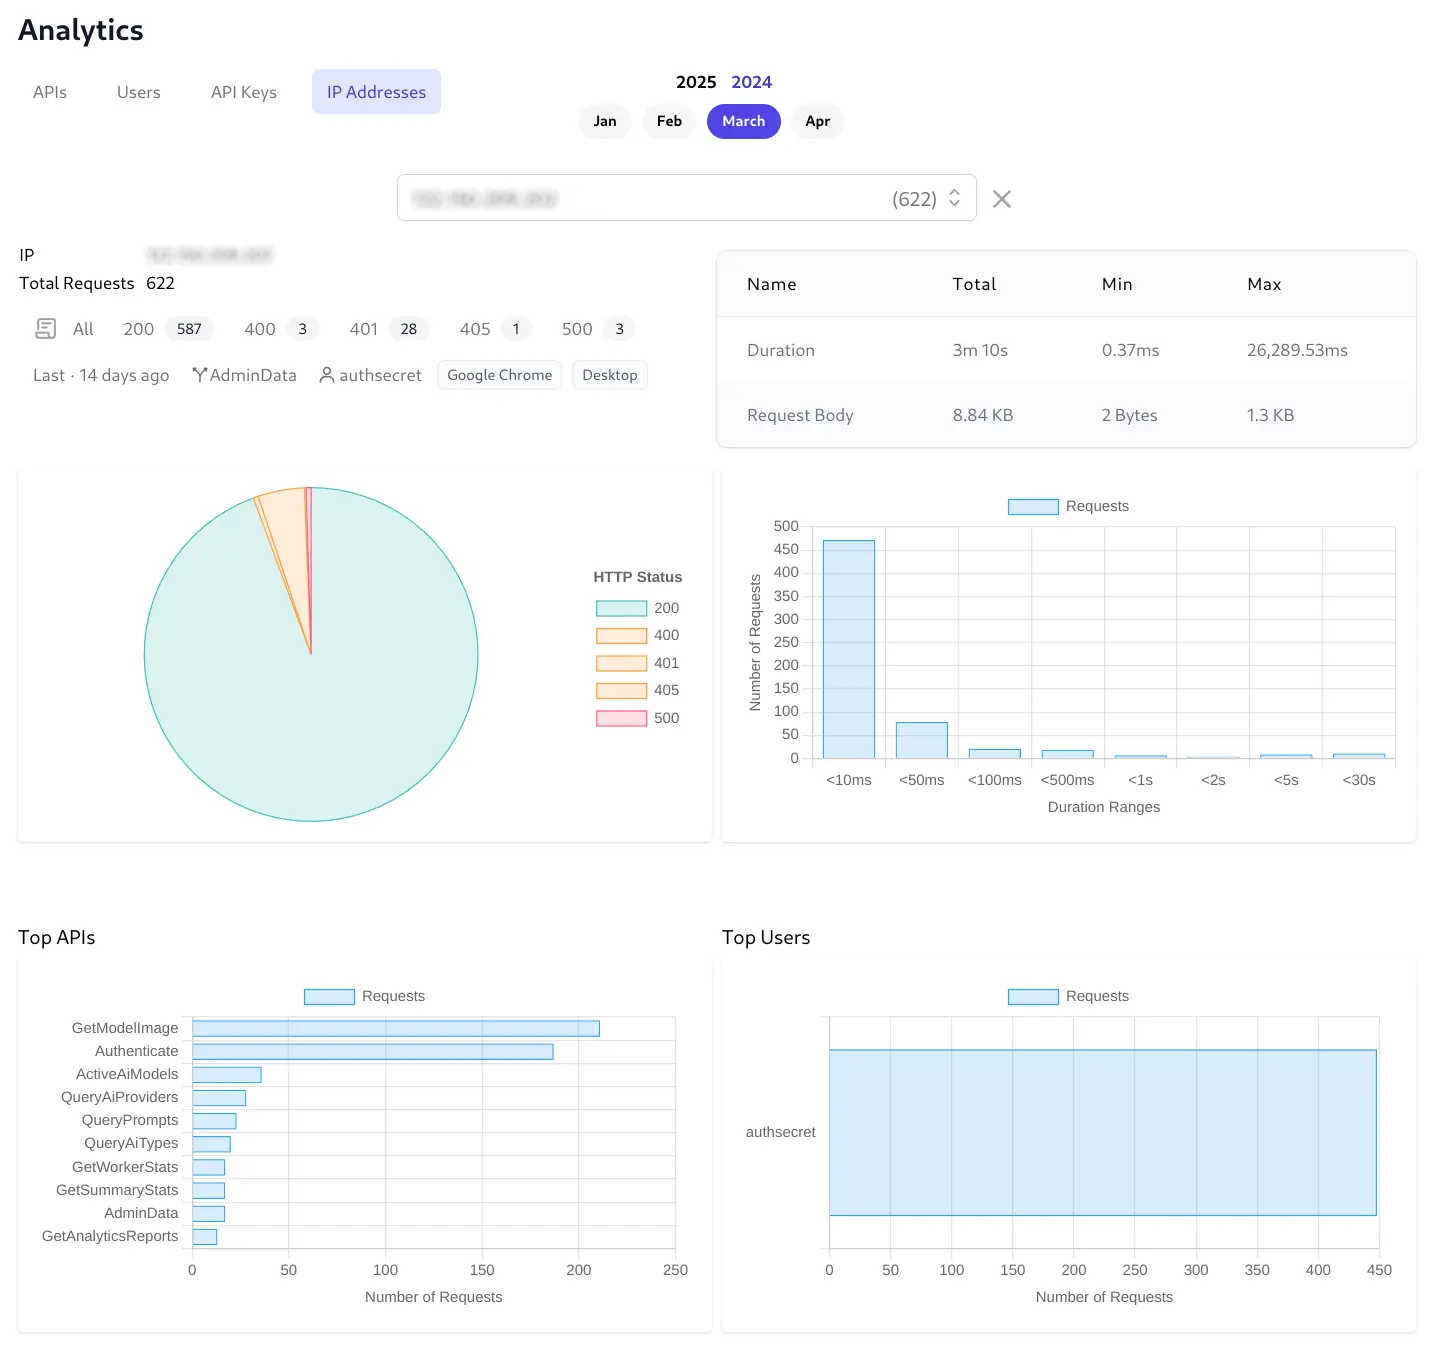
Displays the total requests for an API during the selected month. It includes HTTP Status Breakdown which provide direct access to the filtered request logs. This is a major benefit for rapid troubleshooting, allowing you to instantly view the specific log entries corresponding to successful requests or particular error codes for this API.
Last Request Information
Provides immediate context on the most recent activity for this endpoint with when the last request occurred, the source IP address and device information to help understand recent usage and check if the endpoint is still active, or quickly investigate the very last interaction if needed.
Duration Summary Table (Total, Min, Max)
Quantifies the performance characteristics specifically for this endpoint with the cumulative (Total) processing load, the best-case performance (Min), and the worst-case performance (Max) which is useful for identifying performance outliers.
Duration Requests Histogram
Visualizes the performance distribution for this API.
Top Users Bar Chart
Identifies which authenticated users are most frequently calling this API and relies on this endpoint the most. This can be useful for identifying power users, potential API abuse by a specific user account, or understanding the impact of changes to this API on key users.
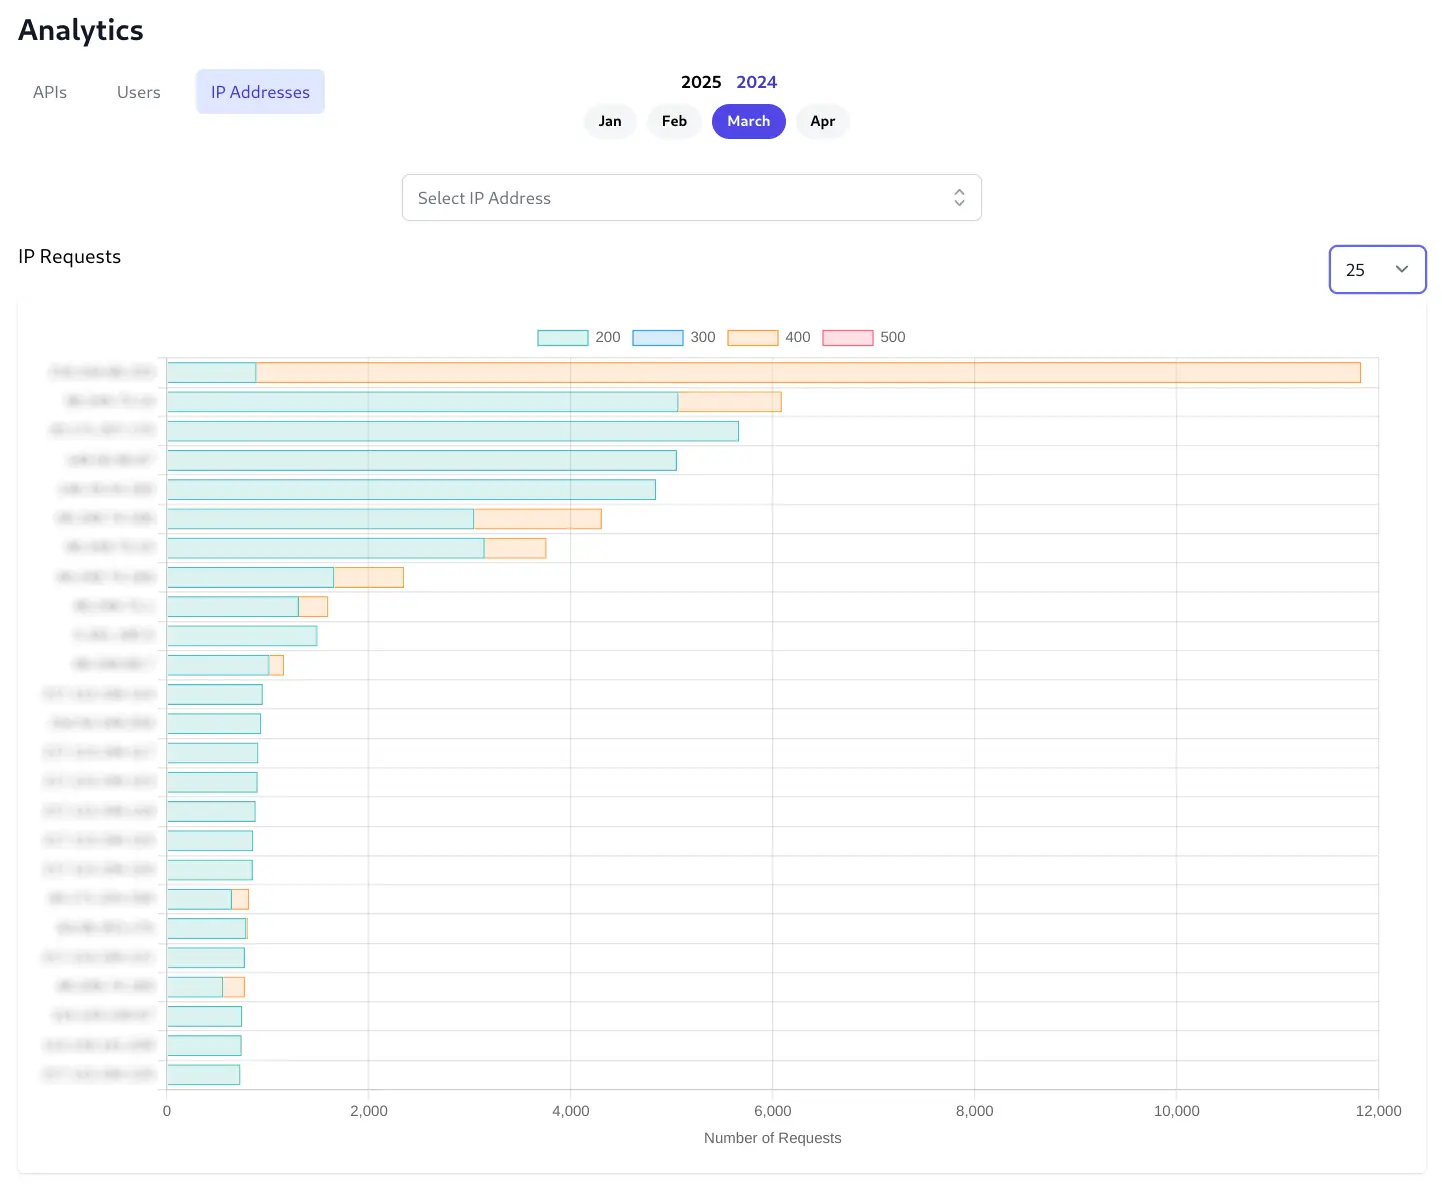
Top IP Addresses Bar Chart
Shows which source IP addresses are generating the most traffic for this API. Useful for identifying high-volume clients, specific servers interacting with this endpoint, or potentially malicious IPs.
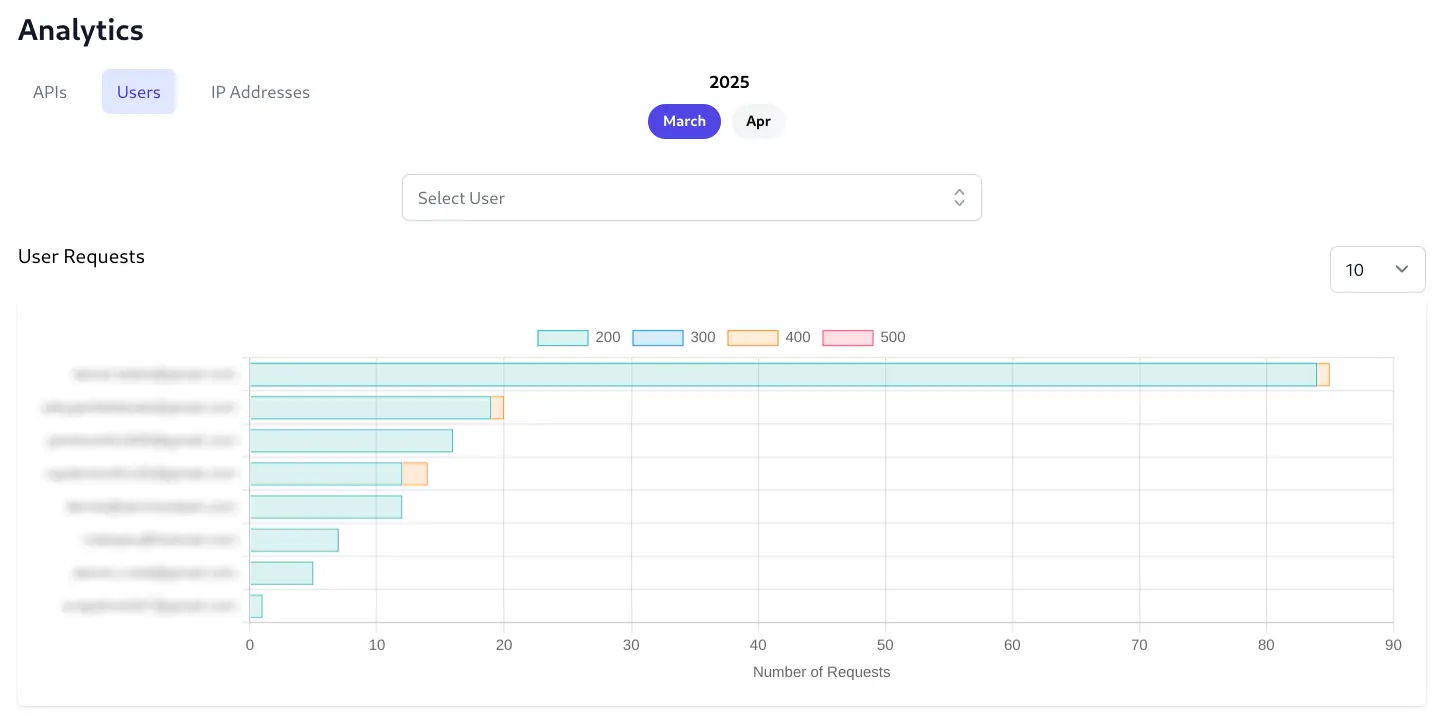
Users
The Users tab will display the top 100 Users who make the most API Requests and lets you click on a Users bar chart to view their individual User analytics.
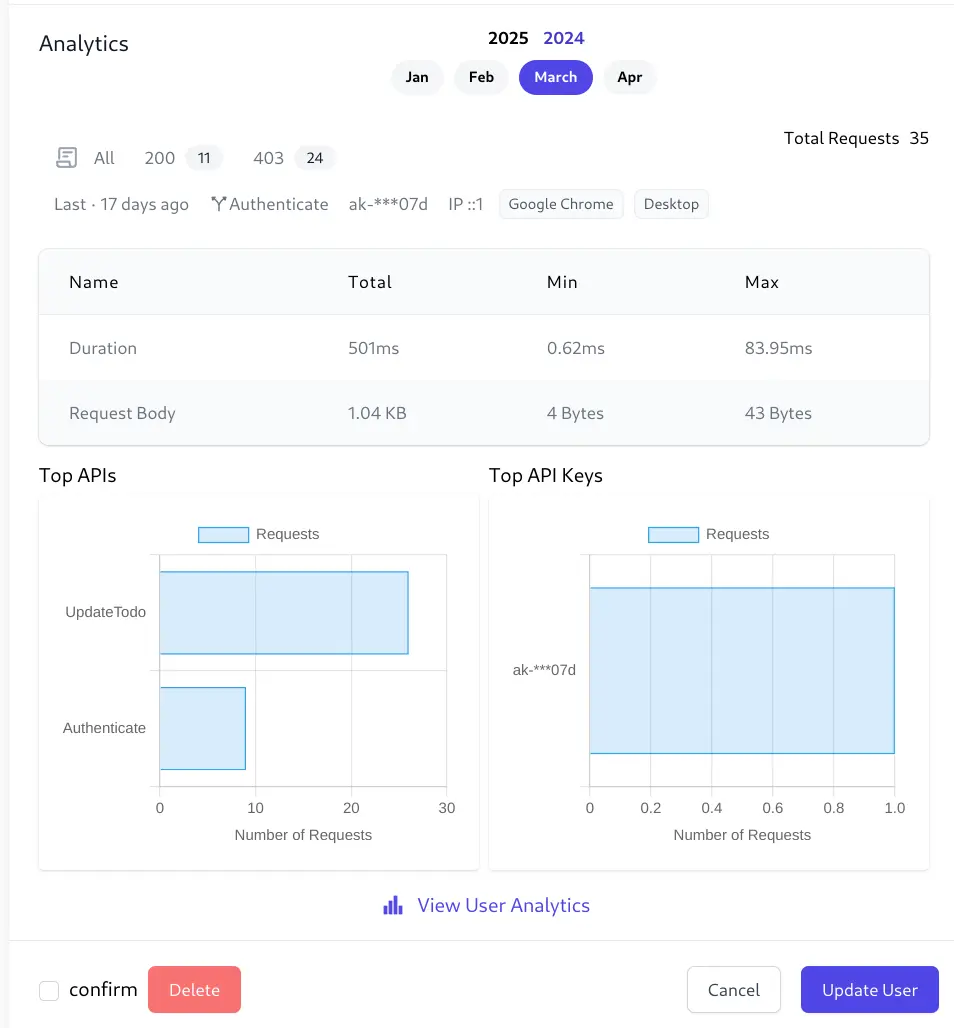
Individual User Analytics
Provides a comprehensive view of a single user's complete interaction history and behavior across all APIs they've accessed, shifting the focus from API performance to user experience and activity.

User Info & Total Requests
Identifies the user and quantifies their overall activity level. Clicking on their ID or Name will navigate to the Users Admin UI. It also shows their success/error rate via the clickable status code links. This helps gauge user engagement and baseline activity.
Last Request Information
Offers a snapshot of the user's most recent interaction for immediate context. Knowing when, what API they called, from which IP address, using which client & device is valuable for support, identifying their last action or checking recent activity.
HTTP Status Pie Chart
Visualizes the overall success and error rate specifically for this user's API requests.
Performance & Request Body Summary Table
Quantifies the performance experienced by this user and the data they typically send.
Duration Requests Histogram
Shows the distribution of response times for requests made by this user to help understand the typical performance this user experiences.
Top APIs Bar Chart
Reveals which API endpoints this user interacts with most frequently and help understanding user behavior and which features they use most.
Top IP Addresses Bar Chart
Identifies the primary network locations or devices the user connects from.
User Admin UI Analytics
To assist in discoverability a snapshot of a Users Analytics is also visible in the Users Admin UI:
Clicking on View User Analytics takes you to the Users Analytics page to access to the full Analytics features and navigation.
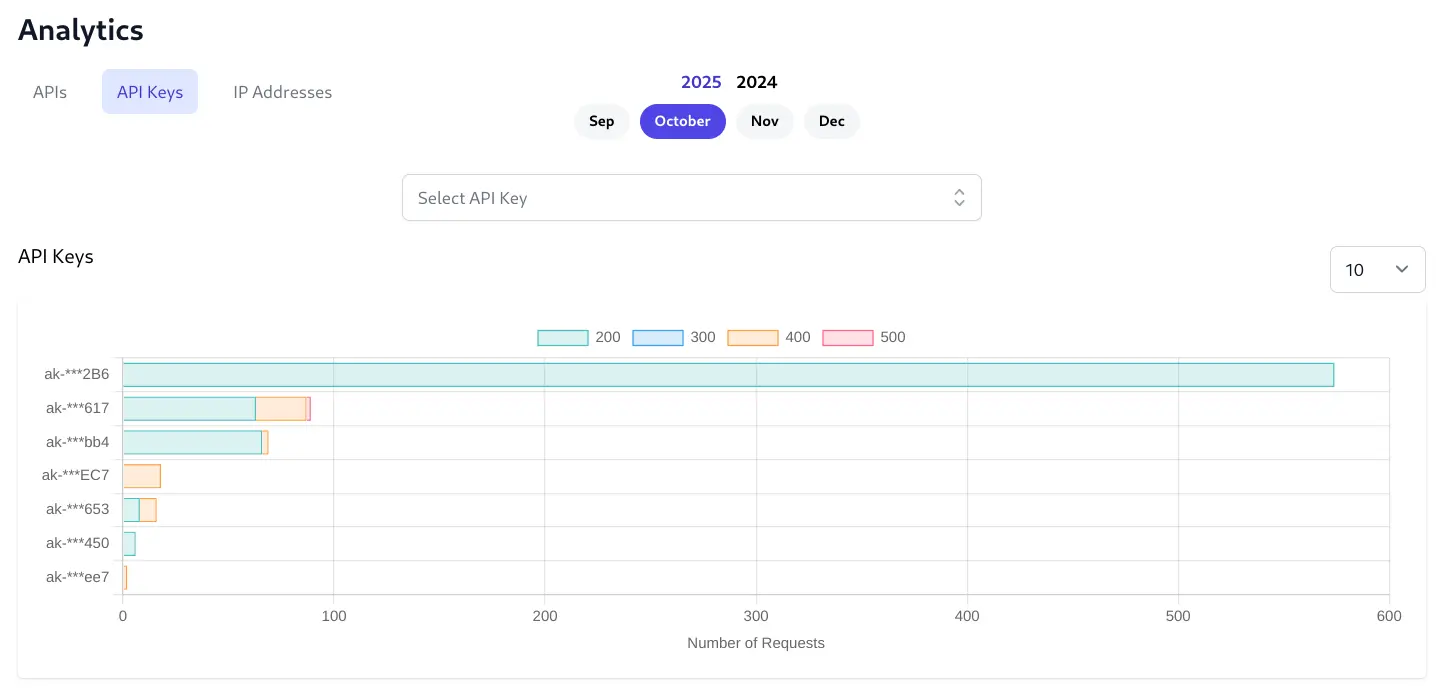
API Keys
API Key Feature Vulnerability
ServiceStack v8.7+ resolves a vulnerability we've discovered in the management APIs of ASP .NET Core API Keys, if using API Keys please upgrade as soon as possible.
The API Keys tab will display the top 100 API Keys who make the most API Requests and lets you click on an API Key bar chart to view its individual API Key analytics.
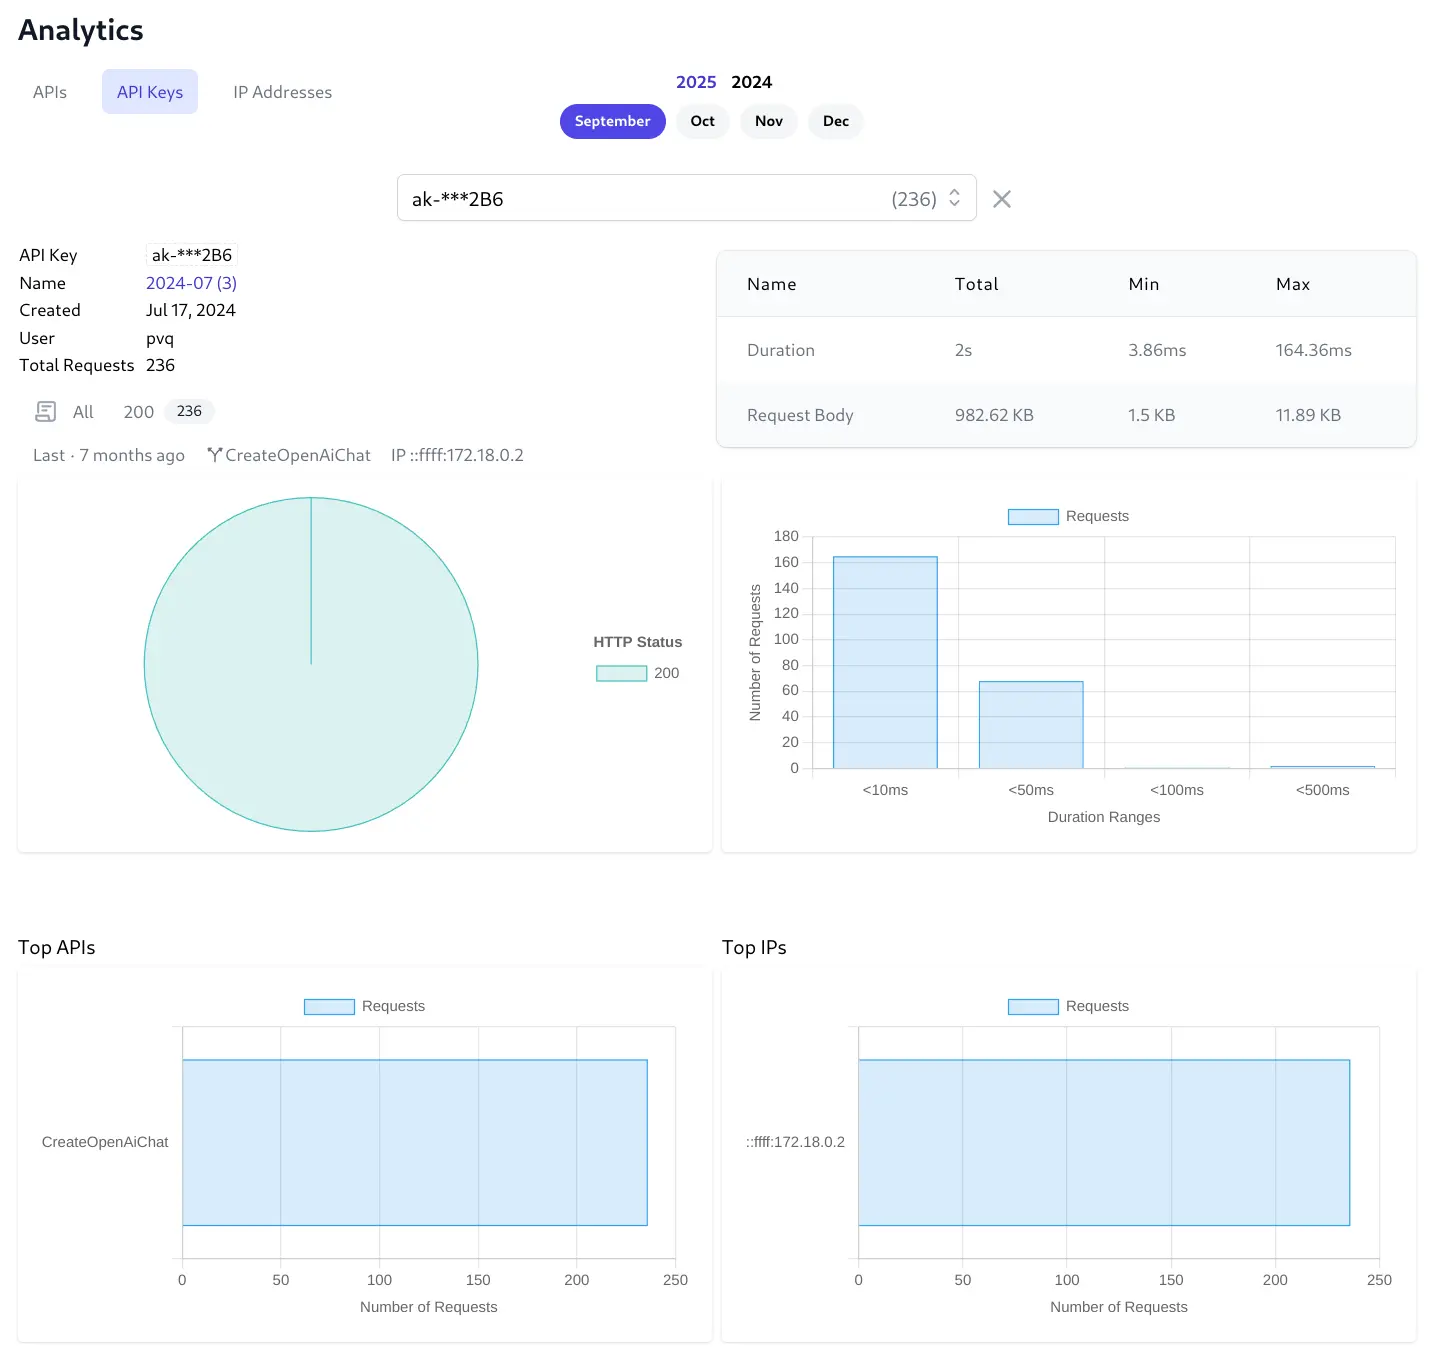
Individual API Key Analytics
Provides comprehensive API Key analytics Similar to User Analytics but limited to the API Usage of a single API Key:
IPs
The IP Addresses tab will display the top 100 IPs that make the most API Requests. Click on an IP's bar chart to view its individual analytics made from that IP Address.
Individual IP Analytics
Provides comprehensive IP Address analytics Similar to User Analytics but limited to the API Usage from a single IP Address:
Blocking User Agents
The insights from the Analytics showed us that our pvq.app was experiencing significant load from AI bots and scrapers which was the primary cause of its high resource usage and detrimental load times for normal user requests, so much so we've intervened to prevent these bots from scraping our site.
Disallowing Bots in robots.txt
In an ideal world you would just need to instruct problematic bots not to scrape your site by adding them to pvq.app/robots.txt, e.g:
User-agent: Googlebot
Allow: /
User-agent: Bingbot
Allow: /

User-agent: bytespider
Disallow: /
User-agent: gptbot
Disallow: /
User-agent: claudebot
Disallow: /
User-agent: amazonbot
Disallow: /
User-agent: mj12bot
Disallow: /
User-agent: semrushbot
Disallow: /
User-agent: dotbot
Disallow: /
User-agent: WhatsApp Bot
Disallow: /
User-agent: *
Disallow: /
Disallowing Bot Requests
As this was not having an immediate effect we took a more forceful approach to implement a middleware to reject all requests from disallowed bots from accessing our App which you can add to your own App with:
x mix useragent-blocking
This will allow you to configure which Bot User Agents you want to reject from accessing your site, e.g:
services.Configure<UserAgentBlockingOptions>(options =>
{
    // Add user agents to block
    options.BlockedUserAgents.AddRange([
        "bytespider",
        "gptbot",
        "gptbot",
        "claudebot",
        "amazonbot",
        "imagesiftbot",
        "semrushbot",
        "dotbot",
        "semrushbot",
        "dataforseobot",
        "WhatsApp Bot",
        "HeadlessChrome",
        "PetalBot",
    ]);

    // Optional: Customize the response status code
    // options.BlockedStatusCode = StatusCodes.Status429TooManyRequests;

    // Optional: Customize the blocked message
    options.BlockedMessage = "This bot is not allowed to access our website";
});
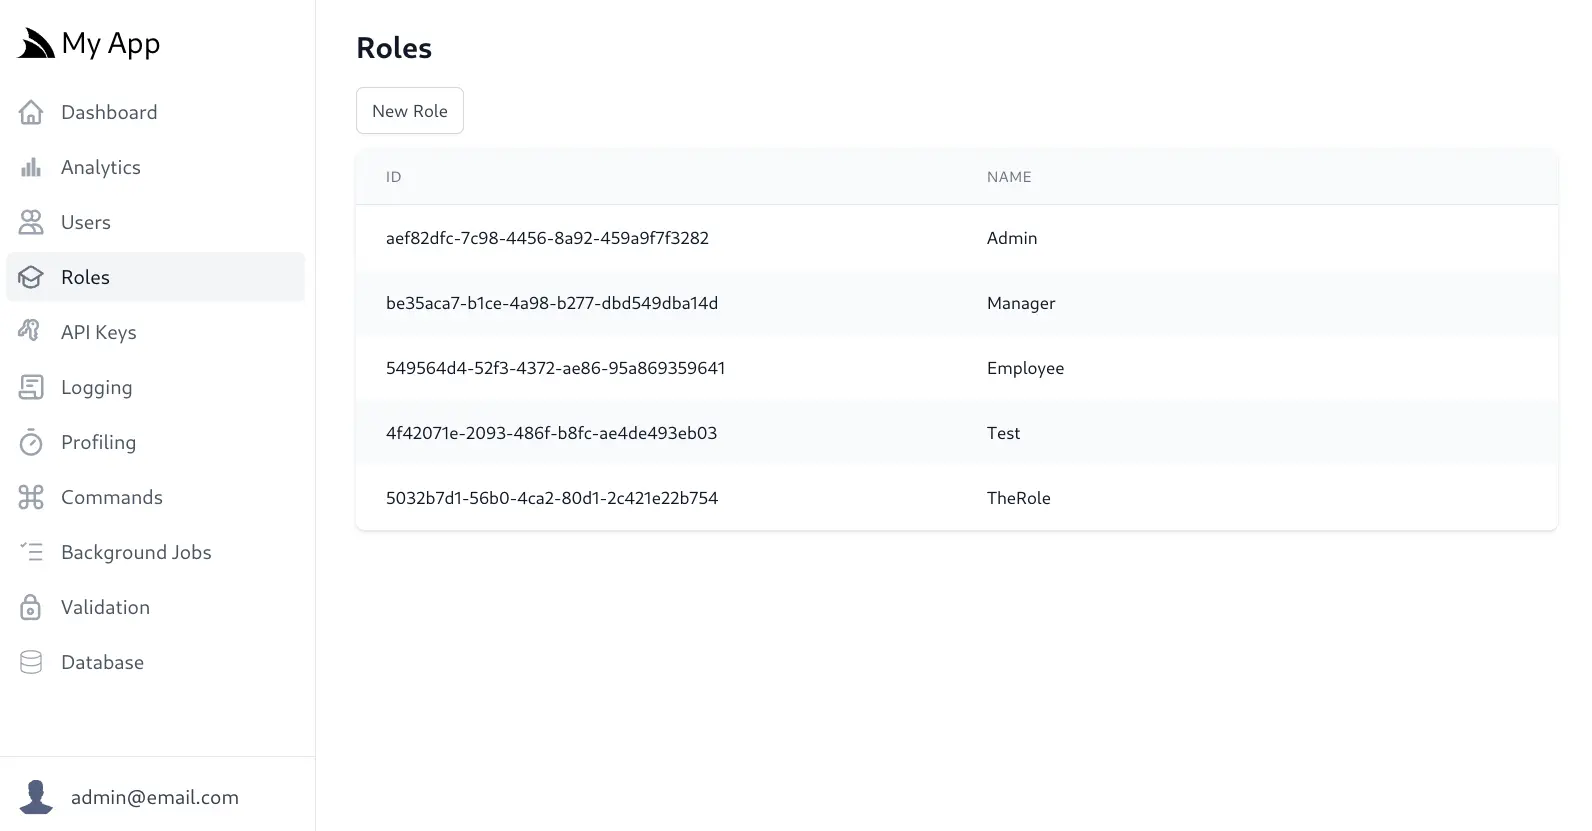
Identity Roles & Claims Admin UIs
This Release also completes our transition to ASP .NET Core Identity Auth with management APIs and Admin UIs for managing Identity Auth Roles and Claims for both Users and Roles.
The new Roles Admin UI is enabled when registering the Admin Users UI. Once registered it will be available from the Roles menu item in the Admin UI sidebar which can be used Add and Remove Application Roles:
Custom Application Roles
If your App uses an extended IdentityRole data model, it can be configured with:
services.AddPlugin(
    new AuthFeature(IdentityAuth.For<ApplicationUser,ApplicationRole>(...)));
If it's also configured to use a different PrimaryKey type, it can be configured with:
services.AddPlugin(
    new AuthFeature(IdentityAuth.For<ApplicationUser,ApplicationRole,int>(...)));
IdentityAuth Role Claims
The Edit Role Admin UI also supports Adding and Remove Claims for a Role, e.g:
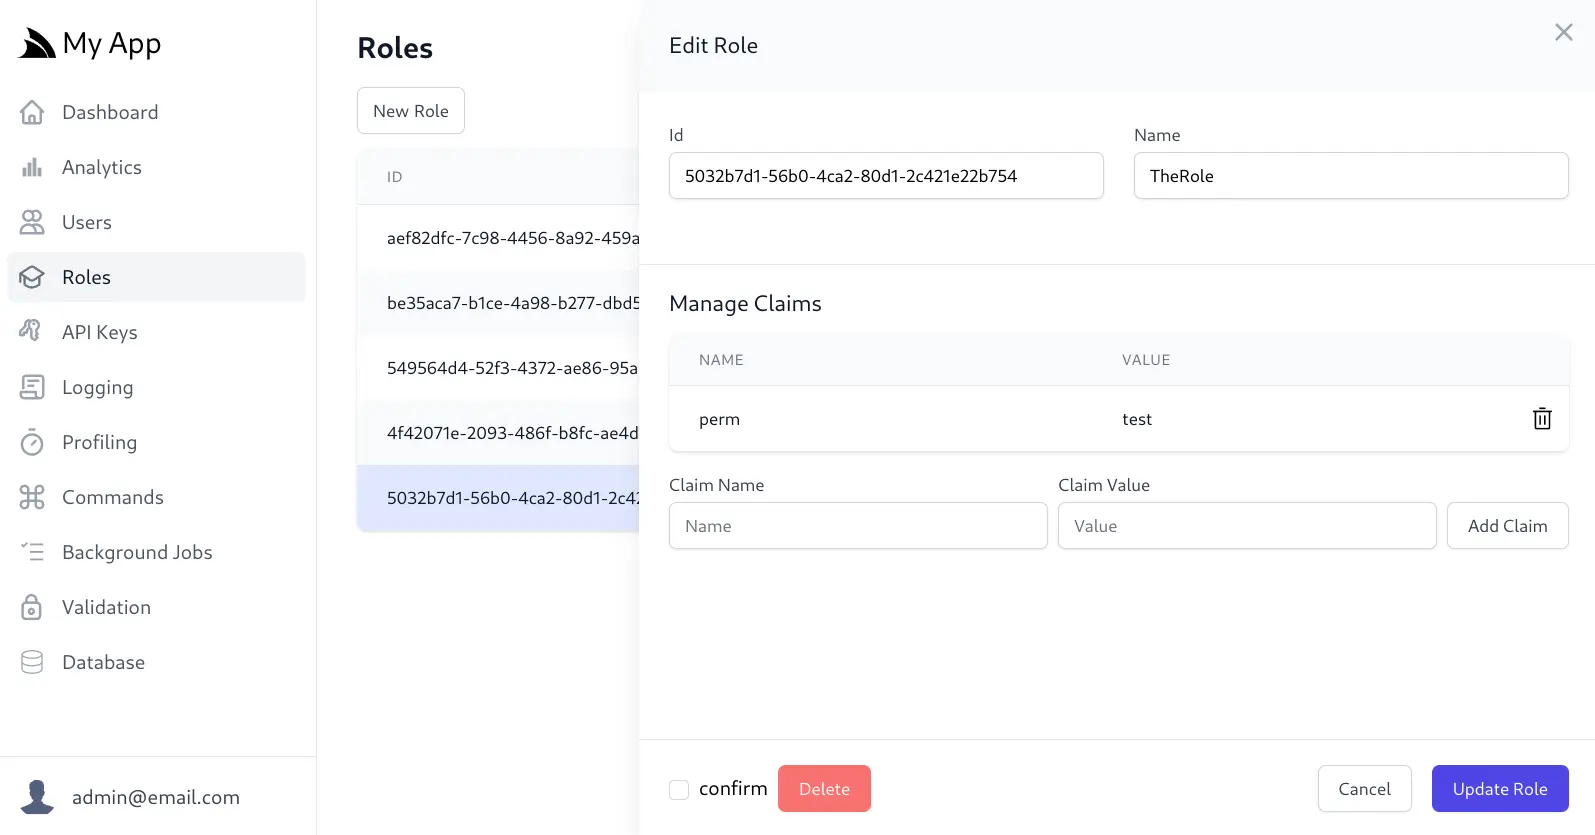
Any Added or Removed Claims are only applied after clicking Update Role, likewise you can exit the UI without applying any changes by clicking Cancel.
Behavior of Role Claims
Claims added to Roles have similar behavior to having Claims individually applied to all Users with that Role such that when a User is Authenticated they're populated with all claims assigned to their Roles and their individual User Claims.
Validating Claims
Claims are attestations or attributes about a User which we can use to restrict access to APIs to only Users who
have been assigned that claim. We could use this to implement a permission system that restricts usage with a
todos:write permission with something like:
[ValidateHasClaim("perm", "todos:write")]
class CreateTodo {}
Normally this would result in the generic missing claims error message:
But as the perm claim has a customized error message:
HasClaimValidator.ClaimErrorMessages["perm"]= "`${Value} Permission Required`";
It will generate that Error Response instead:
This is a good example for how to use HasClaimValidator.ClaimErrorMessages to add custom error messages
for your own custom claim validations.
Inspecting Claims inside Services
You can also inspect and validate a Users Claim by inspecting the Authenticated ClaimsPrincipal, e.g:
public class TodoServices : Service
{
    public object Any(CreateTodo request)
    {
        var user = Request.GetClaimsPrincipal();
        if (!user.HasClaim("perm", "todos:write"))
            throw HttpError.Forbidden("todos:write Permission Required");

        var allUserClaims = user.Claims.ToList();
        //...
    }
}
Angular SPA Template
Angular 19 SPA Template
Explore the high productivity features in the new ServiceStack Angular SPA template
We're thrilled to announce our newest Single Page Application (SPA) template which enhances the seamless integration in ASP.NET Core's Angular SPA template but upgraded from Angular 15 to the accelerated workflow in Angular 19 investment in developer experience and performance that's been rewritten to use the latest modern web technologies:
- Built-in Identity Authentication: Secured out-of-the-box, this template integrates seamlessly with ASP.NET Core Identity, providing ready-to-use registration, login, and User Admin management features.
- Tailwind v4 CSS: Rewritten to use Tailwind v4 CSS, allowing you to rapidly build beautiful, responsive designs directly in your markup.
- Dark Mode Support: Cater to user preferences with built-in, easily toggleable dark mode support, styled elegantly with Tailwind.
- Customizable DataGrid Component: Effortlessly display tabular data with the included customizable DataGrid. Easily adapt it for sorting, filtering and displaying your specific data structures.
- Reusable Input Components with Validation: The template includes reusable, pre-styled input components (e.g., text input, selects) with built-in support for validation bound forms and contextual displaying of validation errors.
- RxJS & Signals Support: Modern Angular reactivity: whether you prefer the established power of RxJS Observables or the new granular reactivity of Angular Signals, our template is structured to support both programming models.
Angular's structured approach to modern web development is ideal for large complex Applications that stitches together various technologies, handling authentication, designing responsive UIs, and managing complex state which the new Angular SPA template embraces to provide a productive starting point with a robust foundation packed with essential features right out of the box.
Getting Started
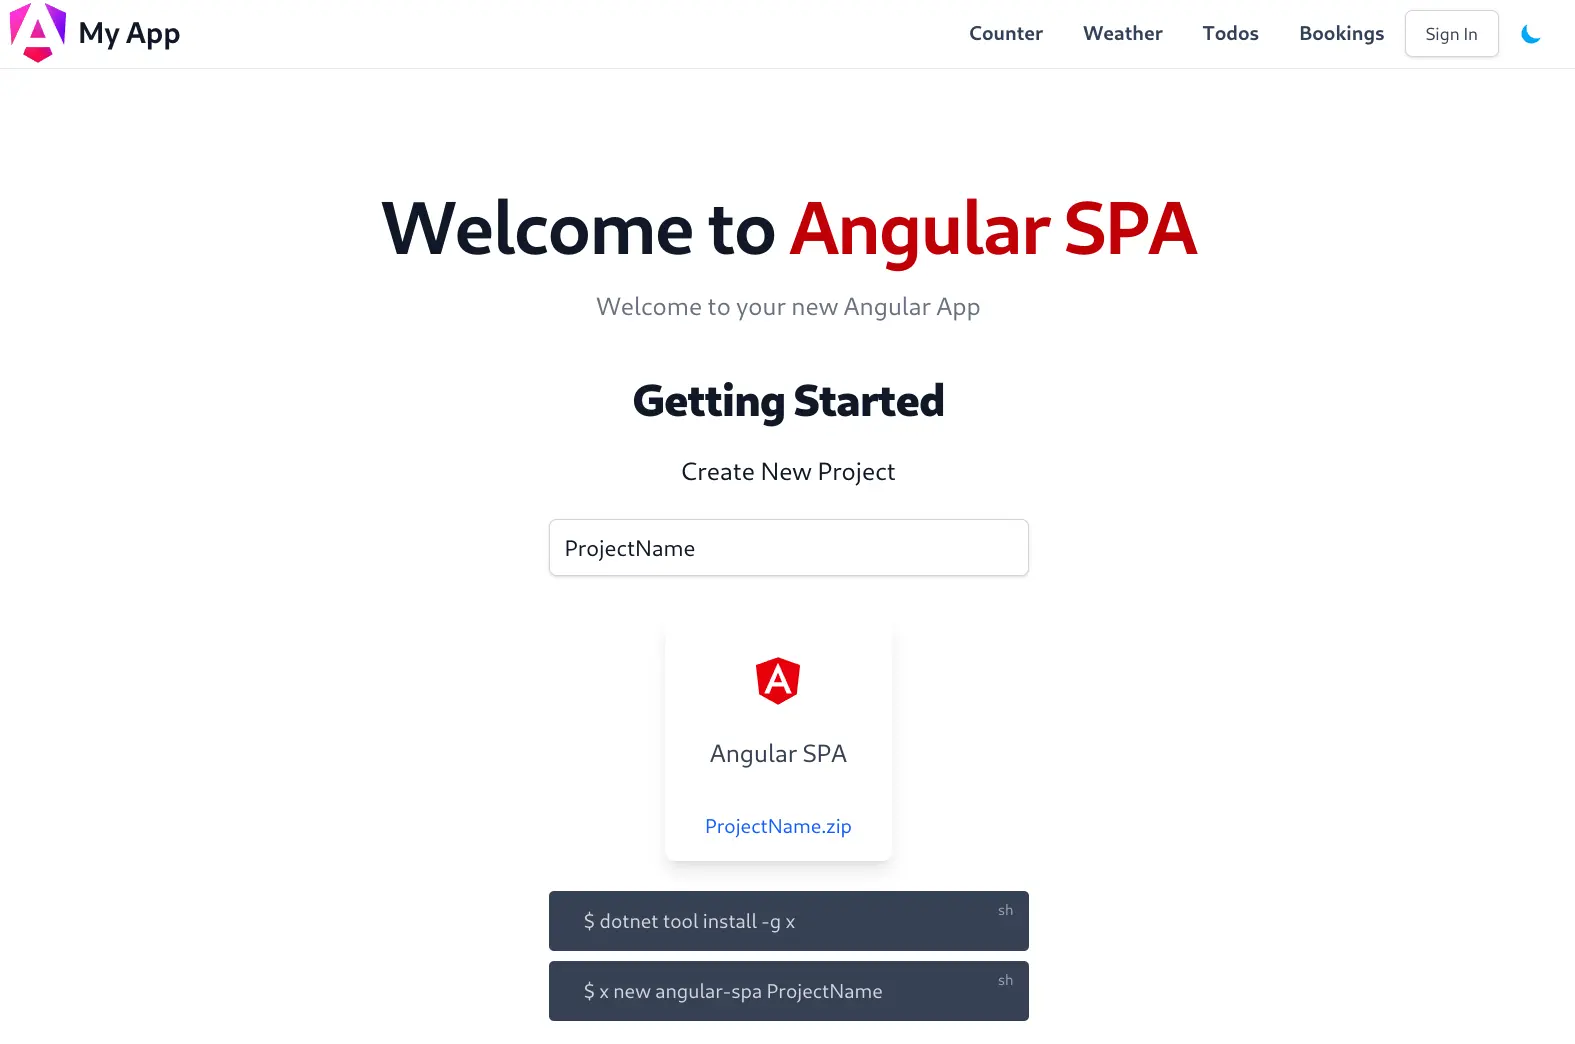
The default Angular SPA Template can be downloaded below:
Alternatively you can download a custom template from the Start Page.
The source code for the template is maintained at NetCoreTemplates/angular-spa whilst an online live-demo is available from: angular-spa.web-templates.io
Feature Tour
We'll take a quick tour to explore the templates features
Home Page
The home page sports a responsive Tailwind design with all components encapsulated within its
/src/app/home
with its logic maintained in *.ts files and its presentation UI optionally maintained in a separate *.html file:
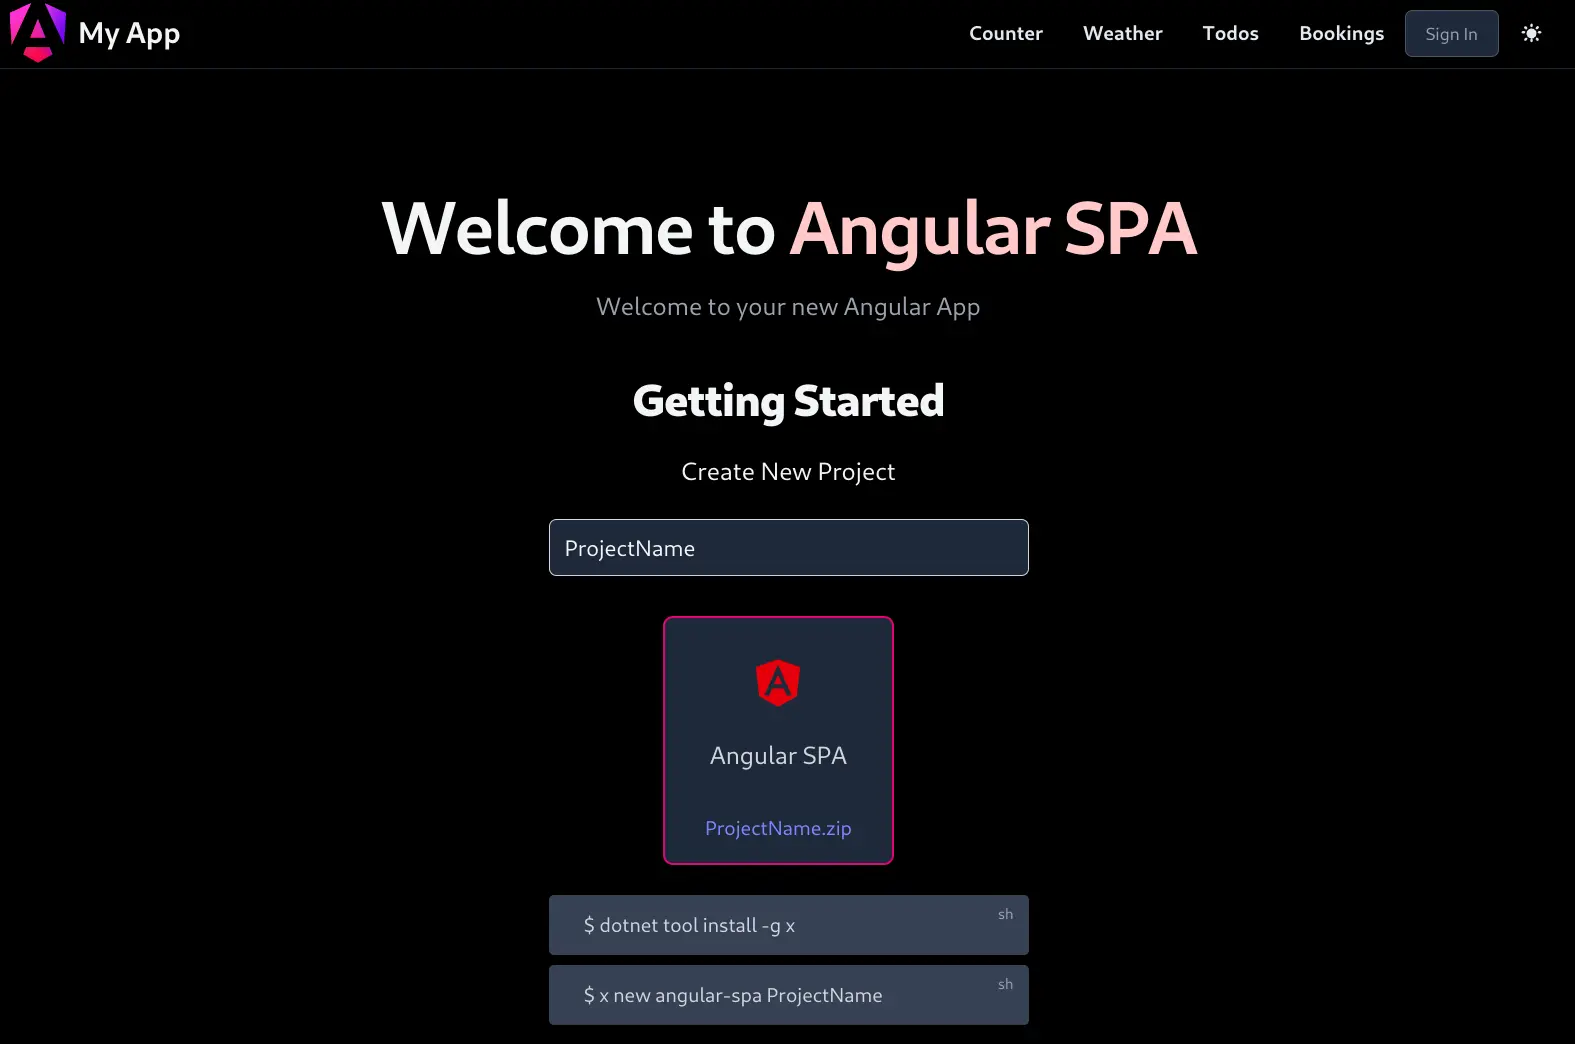
Dark Mode Support
The dark-mode-toggle.component.ts and theme.service.ts handles switching between Light and Dark Mode which is initially populated from the Users OS preference:
Weather
The Weather page maintained in /app/weather
provides a good example of utilizing an RxJS Observable programming model with the
api-http-client.service.ts
that extends Angular's Observable HttpClient with an additional api method that lets you use your APIs typed dtos.ts TypeScript DTOs to enable type-safe integrations:
import { Forecast, GetWeatherForecast, ResponseStatus } from 'src/dtos'
import { ApiHttpClient } from 'src/components/services/api-http-client.service'

export class WeatherComponent {
  http = inject(ApiHttpClient);

  public error: ResponseStatus | null = null;
  public forecasts: Forecast[] = [];

  getForecasts() {
    this.http.api(new GetWeatherForecast({ date:'2025-04-01' })).subscribe({
        next:(result) => {
            this.error = null;
            this.forecasts = result;
        },
        error:(error) => {
            this.error = error;
        }
    });
  }
}
Whilst its weather.component.html template showcases the new data-grid.component.ts to display a beautiful tailwind DataGrid with just:
<data-grid [items]="forecasts"></data-grid>
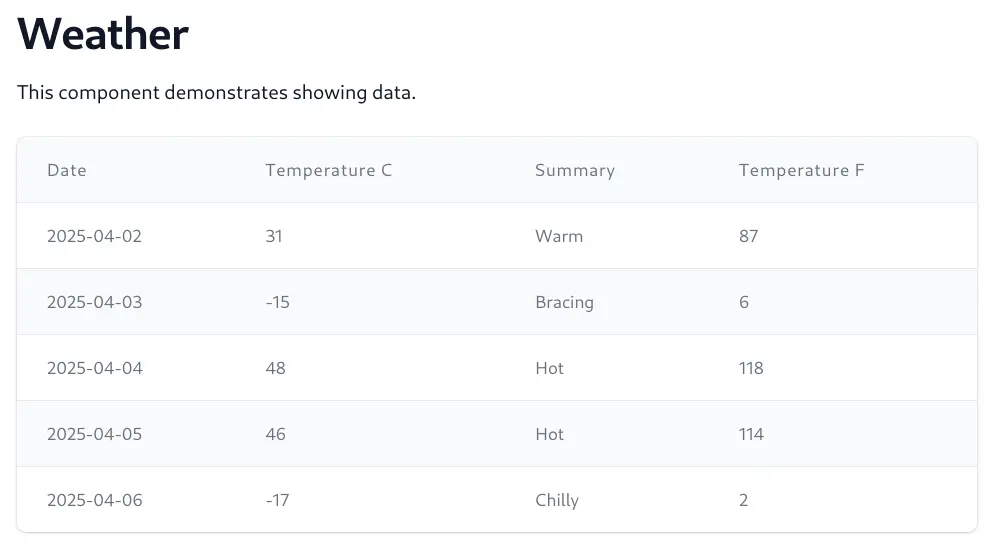
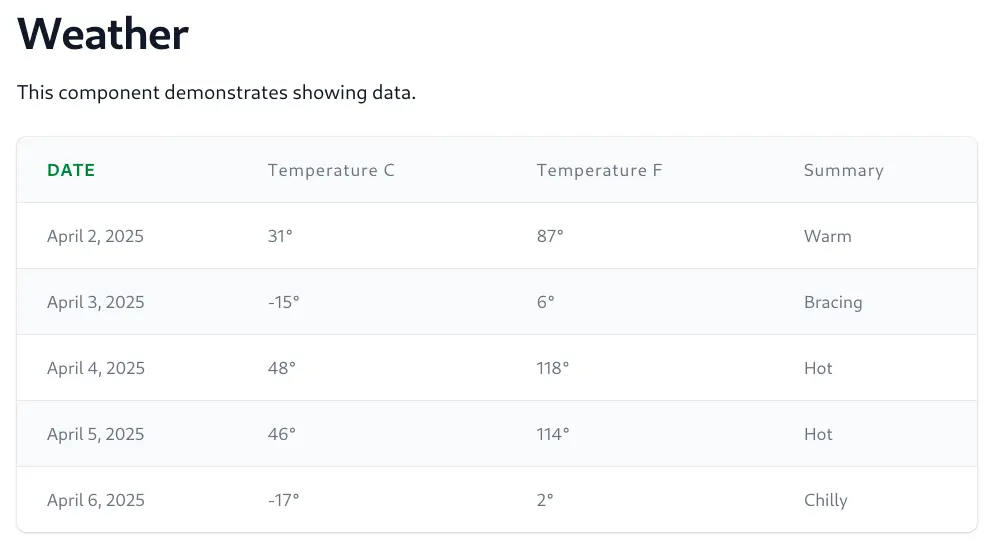
It's a direct port of our Vue DataGrid that also supports the same customizations allowing for custom Headers and Column fields, e.g:
<data-grid [items]="forecasts">
<ng-template #dateHeader>
<div class="flex items-center">
<span class="font-bold text-green-700 uppercase">Date</span>
</div>
</ng-template>
<ng-template #date let-x="date">{{ x | date:'MMMM d, yyyy' }}</ng-template>
<ng-template #temperatureC let-x="temperatureC">
{{ x }}°
</ng-template>
<ng-template #temperatureF let-x="temperatureF">
{{ x }}°
</ng-template>
<ng-template #summary let-x="summary">{{ x }}</ng-template>
</data-grid>
To render the expected:
Todos MVC
The Todos MVC App in /app/todomvc demonstrates how to create the popular todomvc.com App in Angular 19.
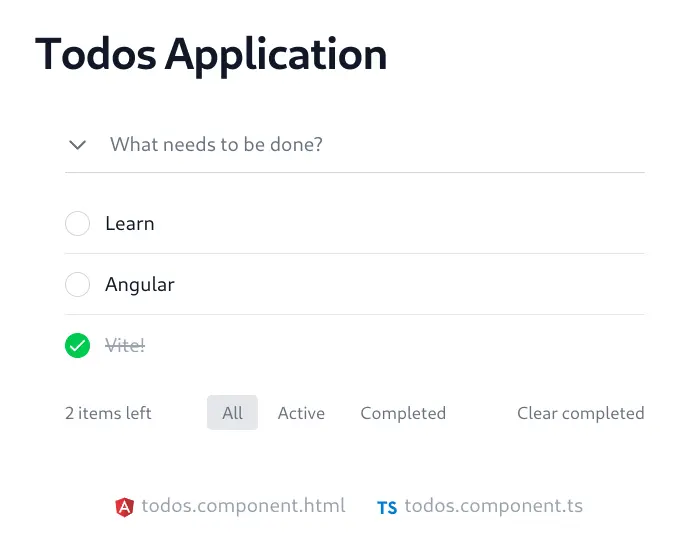
It's another example of building a simple CRUD App with Angular RxJS Observables and your APIs TypeScript DTOs.
This snippet shows how to query and create Todos with the ApiHttpClient:
import { Todo, QueryTodos, CreateTodo, ResponseStatus } from 'src/dtos'
import { ApiHttpClient } from 'src/components/services/api-http-client.service'

export class TodoMvcComponent implements OnInit {
    client = inject(ApiHttpClient);
    error: ResponseStatus | null = null;
    todos: Todo[] = [];
    newTodoText = '';

    loadTodos(): void {
        this.client.api(new QueryTodos()).subscribe({
            next: (todos) => {
                this.todos = todos.results;
            },
            error: (err) => {
                this.error = err;
            }
        });
    }

    addTodo(): void {
        if (!this.newTodoText.trim()) return;

        this.client.api(new CreateTodo({
            text: this.newTodoText.trim()
        })).subscribe({
            next: (todo) => {
                this.todos.push(todo);
                this.newTodoText = '';
            },
            error: (err) => {
                this.error = err;
                console.error('Error adding todo:', err);
            }
        });
    }
    //...
}
Bookings
All other examples in the template uses Angular's newer Signal for reactivity and the standard ServiceStack JsonServiceClient used in all other TypeScript/JS Apps.
The Bookings Pages are maintained in /app/bookings and showcases a more complete example of developing a CRUD UI in Angular starting with an example of how to encapsulate route information for a feature in an isolated booking.routes.ts:
import { Routes } from '@angular/router';
import { BookingListComponent } from './booking-list.component';
import { BookingCreateComponent } from './booking-create.component';
import { BookingEditComponent } from './booking-edit.component';
import { authGuard } from 'src/guards';

export const BOOKING_ROUTES: Routes = [
  {
    path: 'bookings',
    component: BookingListComponent,
    canActivate: [authGuard]
  },
  {
    path: 'bookings/create',
    component: BookingCreateComponent,
    canActivate: [authGuard]
  },
  {
    path: 'bookings/edit/:id',
    component: BookingEditComponent,
    canActivate: [authGuard]
  }
];
The use of the Route authGuard ensures only Authenticated Users can access these routes, as well as redirecting
non-authenticated users to the Sign In page.
Bookings List
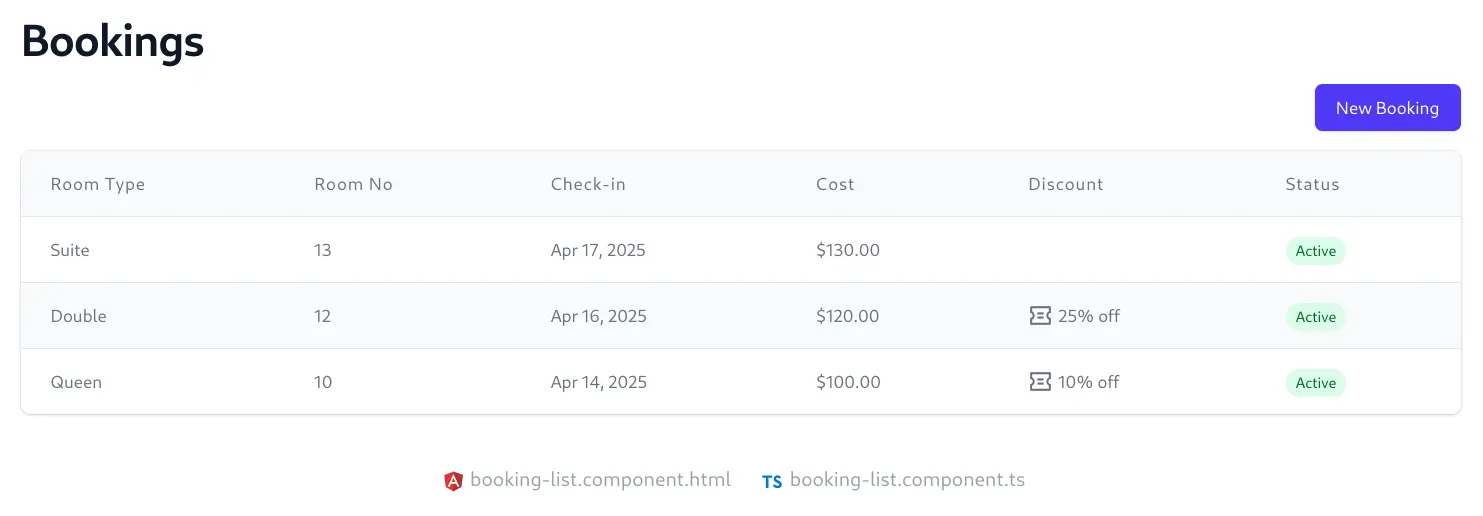
The bookings list component shows an example of using Angular's Signals with the JsonServiceClient together with
an ApiState context to enable data bound forms and validation errors:
@Component({
    templateUrl: './booking-list.component.html',
    providers: [
        ...provideApiState()
    ],
    //...
})
export class BookingListComponent implements OnInit {
    private router = inject(Router);
    private client = inject(JsonServiceClient);
    api = inject(ApiState);

    // Signals for state
    allBookings = signal<Booking[]>([]);

    ngOnInit(): void {
        this.loadBookings();
    }

    async loadBookings(): Promise<void> {
        this.api.begin();

        const api = await this.client.api(new QueryBookings({
            orderByDesc: 'BookingStartDate',
        }));
        if (api.succeeded) {
            this.allBookings.set(api.response!.results);
        }

        this.api.complete(api.error);
    }
}
Using provideApiState() implicitly injects the populated API context containing both the APIs Loading and Error state into child components saving you from having to explicitly inject it into each component.
E.g. the <form-loading> component will display when API Requests are in-flight whilst summary API Error Responses are displayed after receiving failed API Responses:
<app-page title="Bookings" class="max-w-6xl">

    <form-loading text="Loading Bookings..."></form-loading>
    <error-summary></error-summary>

    @if (allBookings().length > 0) {
    <data-grid [items]="allBookings()">...</data-grid>
    }
    @else {
    <div class="text-center py-4 bg-gray-50 rounded-md">
        <p class="text-gray-500">No bookings found</p>
    </div>
    }

</app-page>
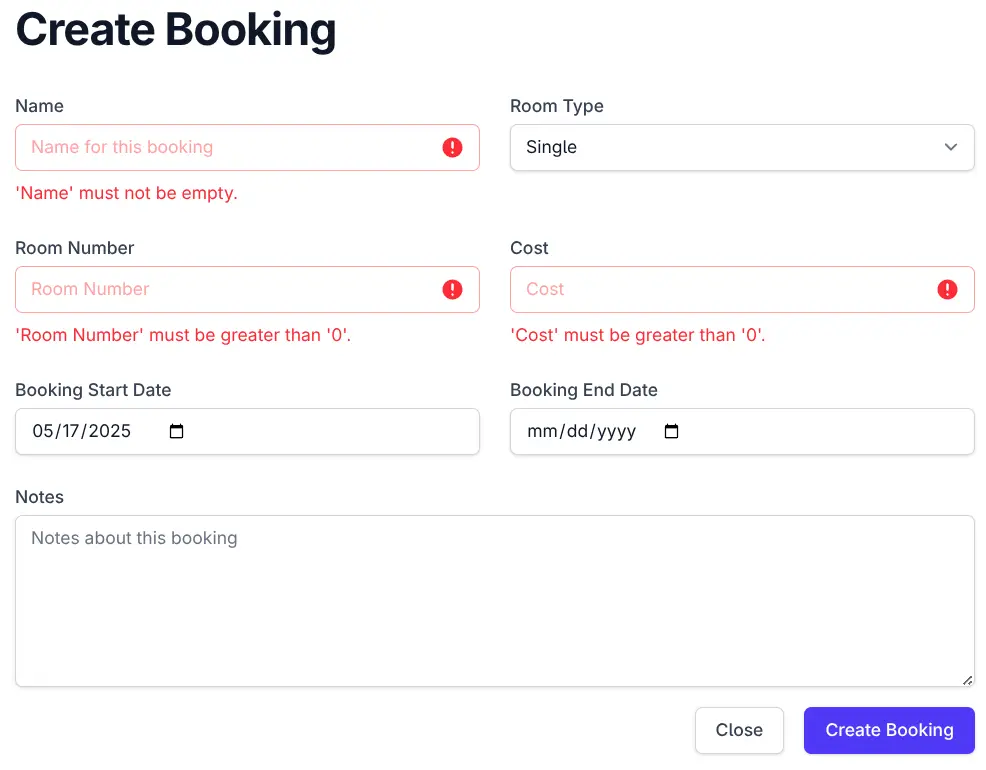
Create Booking
The booking-create.component.ts shows the standard pattern of calling ServiceStack Typed APIs to
save forms whilst saving any validation errors to the ApiState context:
async save(): Promise<void> {
    this.api.begin();

    const request = new CreateBooking(this.booking());
    const api = await this.client.api(request);
    if (api.succeeded) {
        // Navigate back to bookings list after successful save
        this.router.navigate(['/bookings']);
    }

    this.api.complete(api.error);
}
Where any contextual validation will be displayed next to the input field:
Edit Booking
The booking-edit.component.ts
shows examples of using JsonServiceClient with Signals to get and modify bookings:
export class BookingEditComponent implements OnInit {
    private route = inject(ActivatedRoute);
    private router = inject(Router);
    private client = inject(JsonServiceClient);
    meta = inject(MetadataService);
    api = inject(ApiState);

    // Signals
    booking = signal<Booking>(new Booking());

    ngOnInit(): void {
        // Get booking ID from route params
        const id = this.route.snapshot.paramMap.get('id');
        if (id) {
            this.fetchBooking(parseInt(id, 10));
        } else {
            this.api.setErrorMessage('Booking ID is required');
        }
    }

    async fetchBooking(id: number): Promise<void> {
        this.api.begin();

        const api = await this.client.api(new QueryBookings({id}));
        if (api.succeeded) {
            this.booking.set(api.response!.results[0]);
        }

        this.api.complete(api.error);
    }

    async save(): Promise<void> {
        this.api.begin();

        const api = await this.client.api(new UpdateBooking(this.booking()));
        if (api.succeeded) {
            this.router.navigate(['/bookings']);
        }

        this.api.complete(api.error);
    }
    //...
}
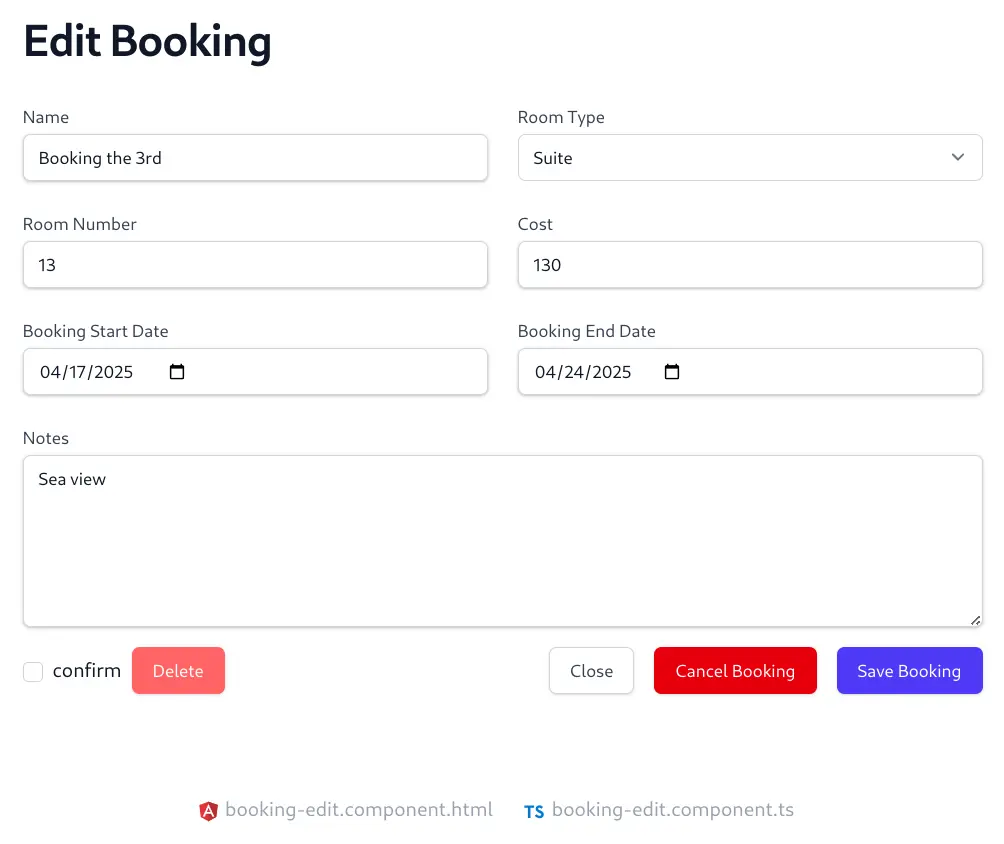
It's an example of a validation bound form bounded to a signal instance of a Booking DTO with summary and
contextual validation that also utilizes your API's metadata with meta.enumOptions('RoomType') to populate
the <select> drop down with the C# RoomType enum values:
<app-page title="Edit Booking">
<form-loading></form-loading>
@if (booking().id) {
<form class="grid gap-4 py-4" (ngSubmit)="save()">
<input class="hidden" type="submit" />
<fieldset [disabled]="api.loading()">
<error-summary except="name,roomType,roomNumber,cost,bookingStartDate,notes" class="mb-4"></error-summary>
<div class="grid grid-cols-6 gap-6">
<div class="col-span-6 sm:col-span-3">
<text-input id="name" name="name" required placeholder="Name for this booking"
[(ngModel)]="booking().name"></text-input>
</div>
<div class="col-span-6 sm:col-span-3">
<select-input id="roomType" name="roomType" [options]="meta.enumOptions('RoomType')"
[(ngModel)]="booking().roomType"></select-input>
</div>
<div class="col-span-6 sm:col-span-3">
<text-input type="number" id="roomNumber" name="roomNumber" min="0" required
[(ngModel)]="booking().roomNumber"></text-input>
</div>
<div class="col-span-6 sm:col-span-3">
<text-input type="number" id="cost" name="cost" min="0" required
[(ngModel)]="booking().cost"></text-input>
</div>
<div class="col-span-6 sm:col-span-3">
<text-input type="date" id="bookingStartDate" name="bookingStartDate" required
[(ngModel)]="booking().bookingStartDate"></text-input>
</div>
<div class="col-span-6 sm:col-span-3">
<text-input type="date" id="bookingEndDate" name="bookingEndDate"
[(ngModel)]="booking().bookingEndDate"></text-input>
</div>
<div class="col-span-6">
<textarea-input id="notes" name="notes" rows="6" placeholder="Notes about this booking"
[(ngModel)]="booking().notes"></textarea-input>
</div>
</div>
</fieldset>
<div class="flex justify-between">
<div>
<confirm-delete (delete)="delete()"></confirm-delete>
</div>
<div class="flex flex-wrap sm:flex-nowrap gap-4">
<secondary-button (click)="close()">
Close
</secondary-button>
@if (booking().cancelled) {
<primary-button type="button" color="green" [disabled]="api.loading()" (click)="cancelBooking(false)">
Restore Booking
</primary-button>
}
@else {
<primary-button type="button" color="red" [disabled]="api.loading()" (click)="cancelBooking(true)">
Cancel Booking
</primary-button>
}
<primary-button type="submit" [disabled]="api.loading()">
{{ api.loading() ? 'Saving...' : 'Save Booking' }}
</primary-button>
</div>
</div>
</form>
}
@else {
<error-summary></error-summary>
}
</app-page>
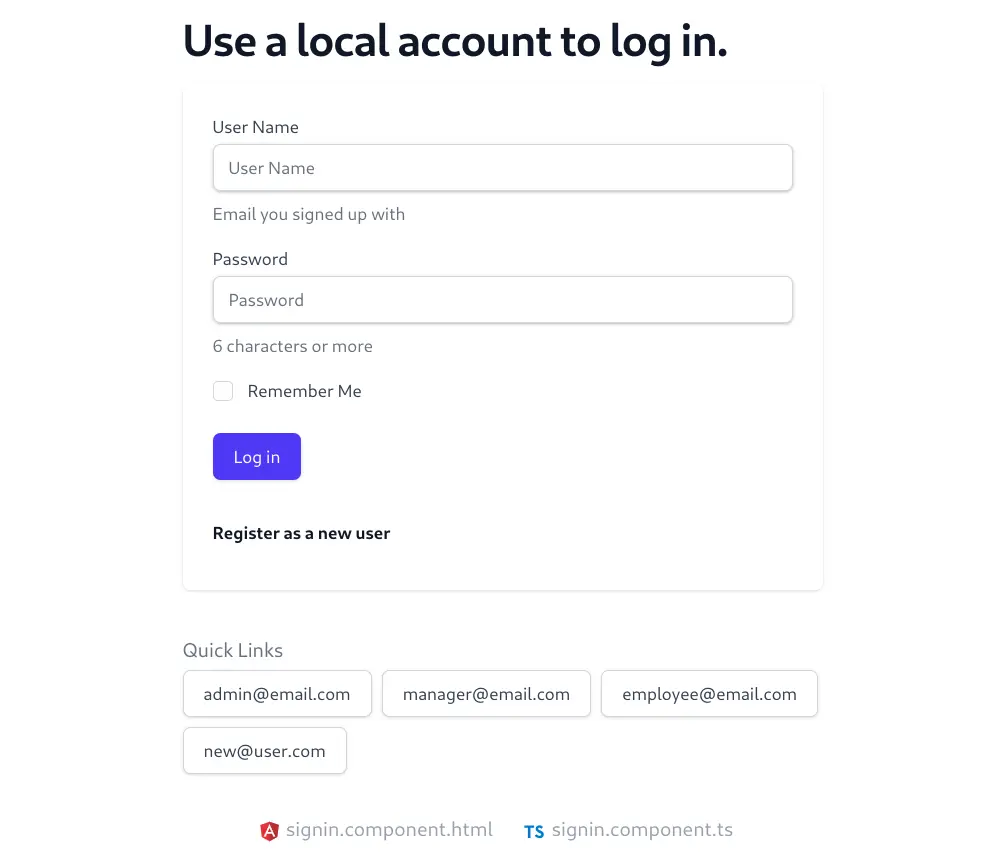
Sign In Page
The signin.component.ts is an example of integrating with auth.service.ts to Authenticate a User on the Client and Server:
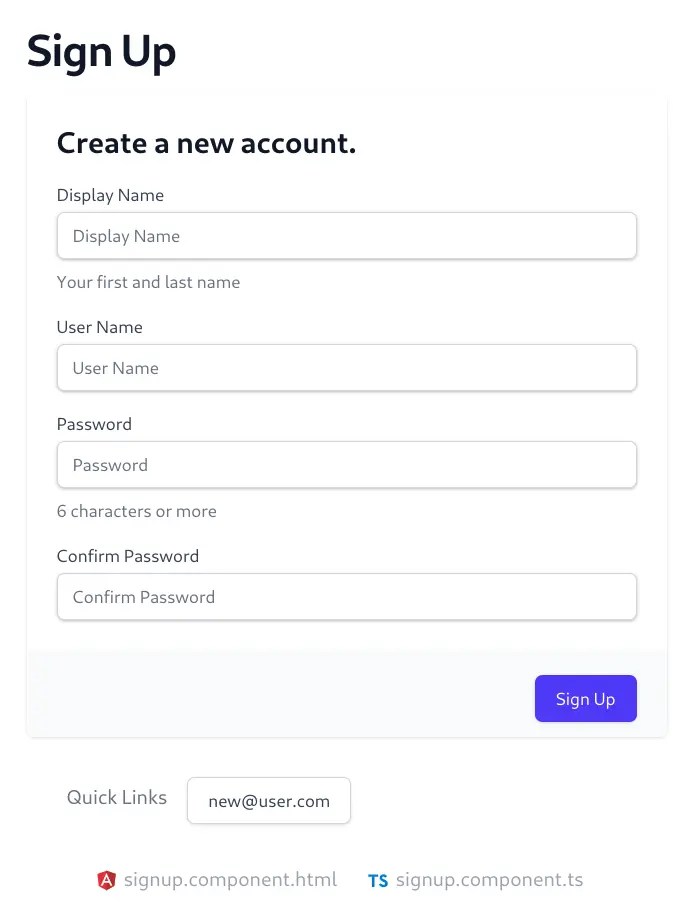
Sign Up Page
The signup.component.ts
shows an example of the Identity Auth Sign Up workflow of creating new users with the Register API and redirecting to
the signup-confirm.component.ts
for Email Confirmation.
Text to Blazor now utilizing world's best coding models
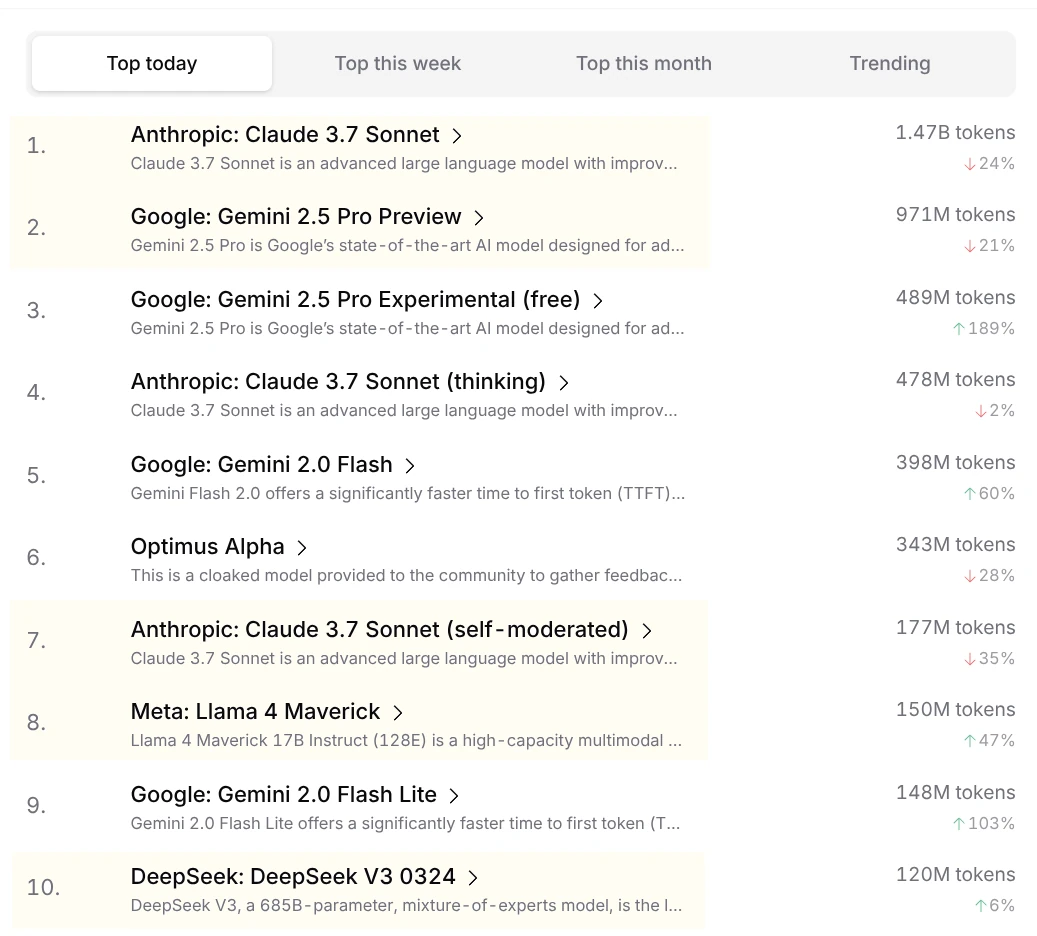
After the positive reception we've received for Text to Blazor we've now upgraded it to use the best (non-thinking) coding LLMs from the leading AI and OSS companies, inc:


These LLMs routinely top Aider's LLM Leaderboards and are also amongst the most popular LLMs used for programming on Open Router:
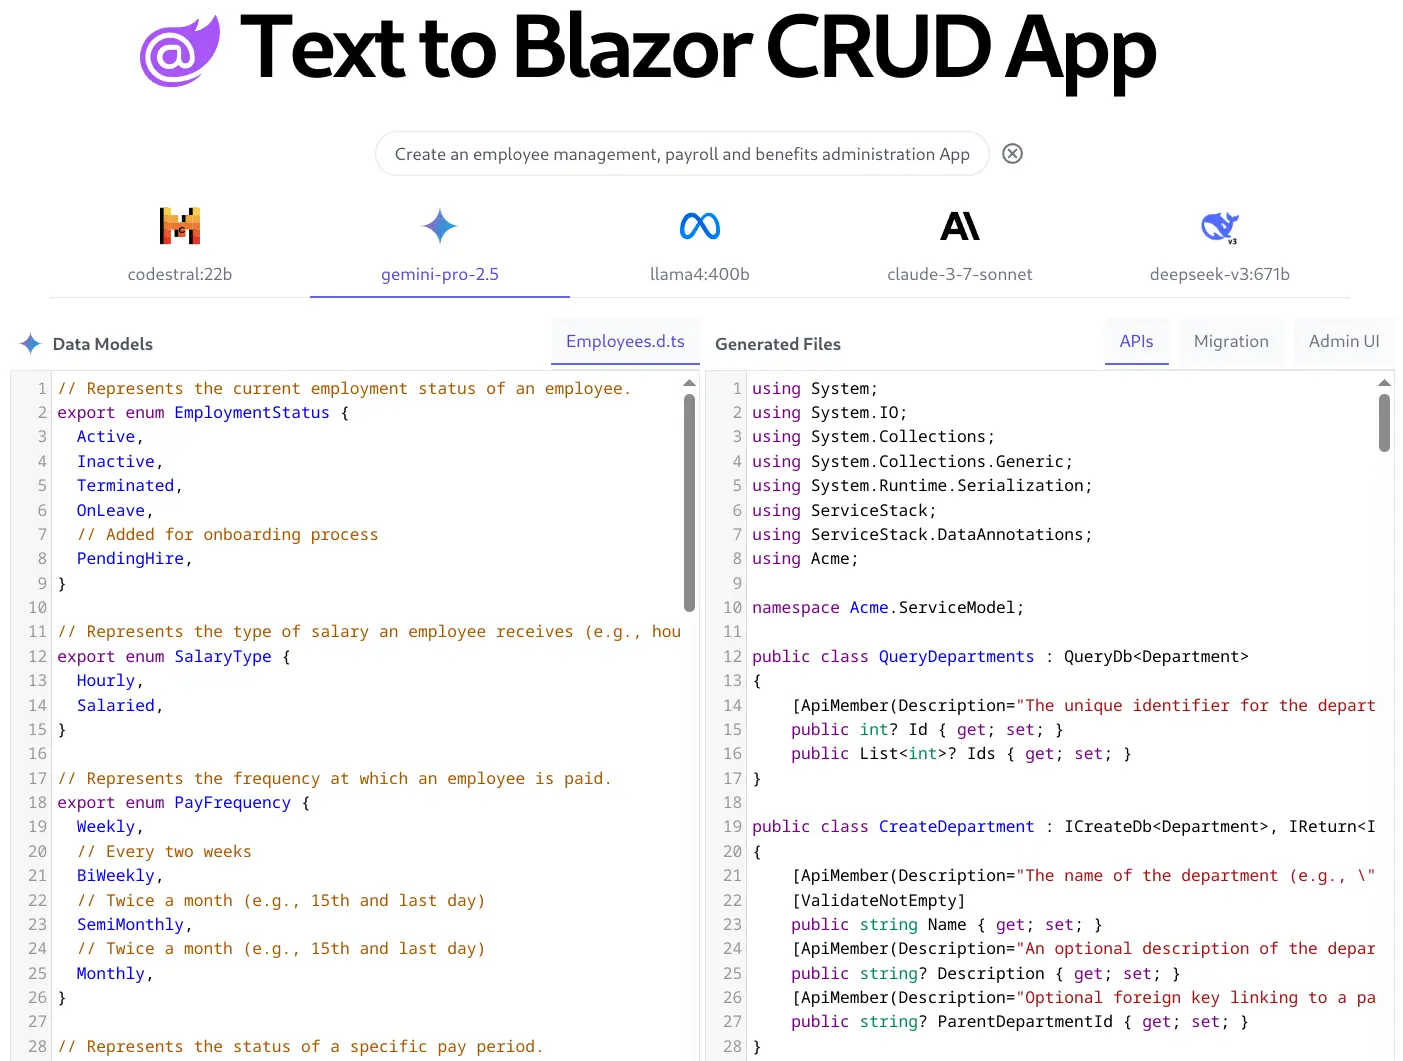
100+ Blazor CRUD Apps Created!
Since Text to Blazor's announcement in ServiceStack's last release we're happy to report that more than 100+ Blazor CRUD Apps have been created and downloaded!
Text to Blazor harnesses the power of AI to instantly generate new Blazor Admin CRUD Apps from just a text description.
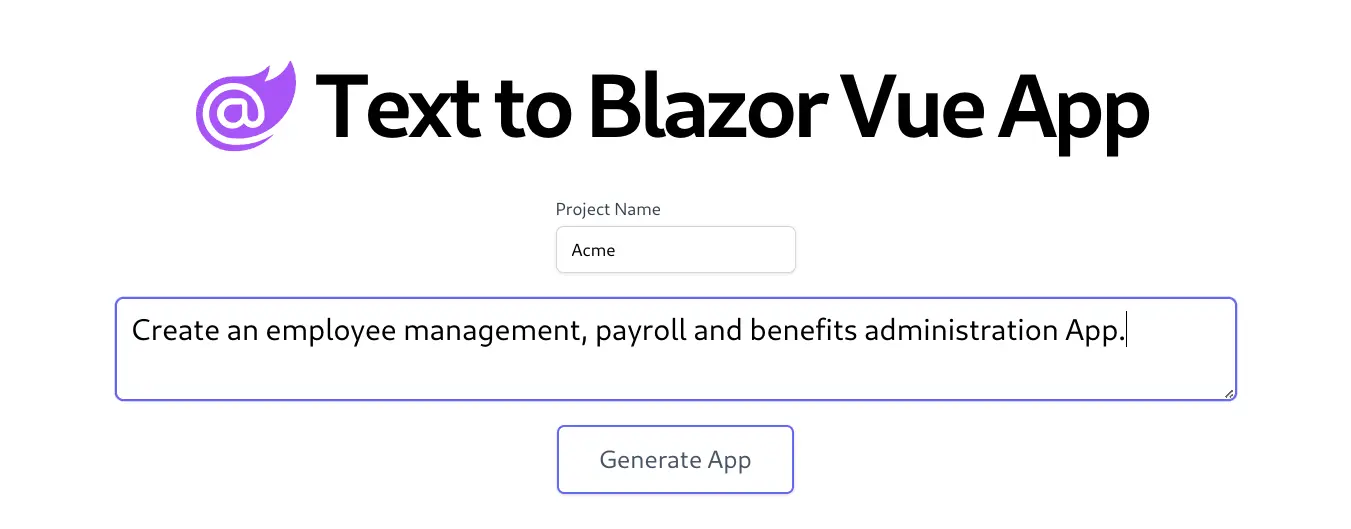
This will query 5 different leading AI coding models to generate 5x different Data Models, APIs, DB Migrations and Admin UIs which you choose amongst to pick the best one that matches your requirements for your new CRUD App:
Instant CRUD UI
After running npm run migrate to create the Database tables, you can hit the ground running and start using the Admin UI to manage the new Data Model RDBMS Tables:
AI Server improvements

We're continuing to make improvements to AI Server starting with adding support for popular LLM models added during this release including:
- Google: gemini-pro-2.5, gemini-flash-2.0, gemini-flash-lite-2.0, gemini-flash-thinking-2.0, gemma3
- OpenAI: o3, o4-mini, gpt-4.1, gpt-4.1-mini, gpt-4.1-nano
- Alibaba: qwen2.5, qwen2.5-coder, qwen-turbo, qwen-plus, qwen-max
- Meta: llama-4-scout, llama-4-maverick
- Microsoft: phi4
- Mistral: mistral-small, mistral-saba
Built in Analytics & Logging
We've brought comprehensive Analytics added in ServiceStack v5.7 into AI Server's Admin UI to provide deep and invaluable insight into your System API Usage, device distribution, API Keys and the IPs where most traffic generates.
For even finer grained detail of your AI Server's usage we've also surfaced the SQLite Request Logs functionality inside AI Server's Admin UI which lets you monitor your API System usage in real-time:
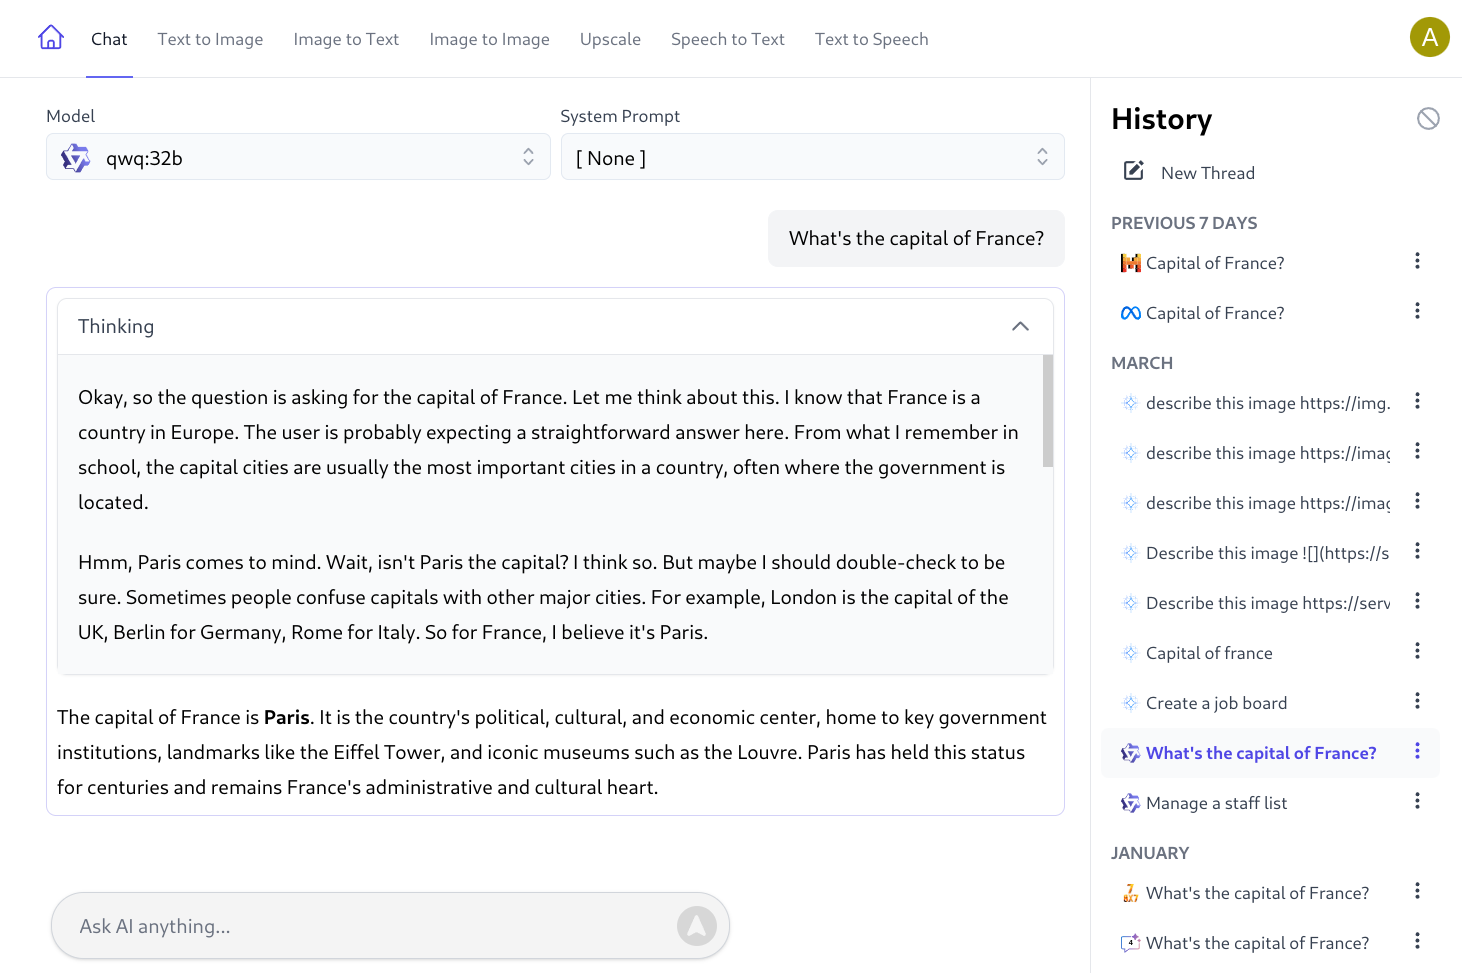
Support for Thinking Responses
With the rise and popularity of Thinking Models we've added custom rendering of thinking responses in a collapsible and scrollable container:
Support for Ollama Vision Models
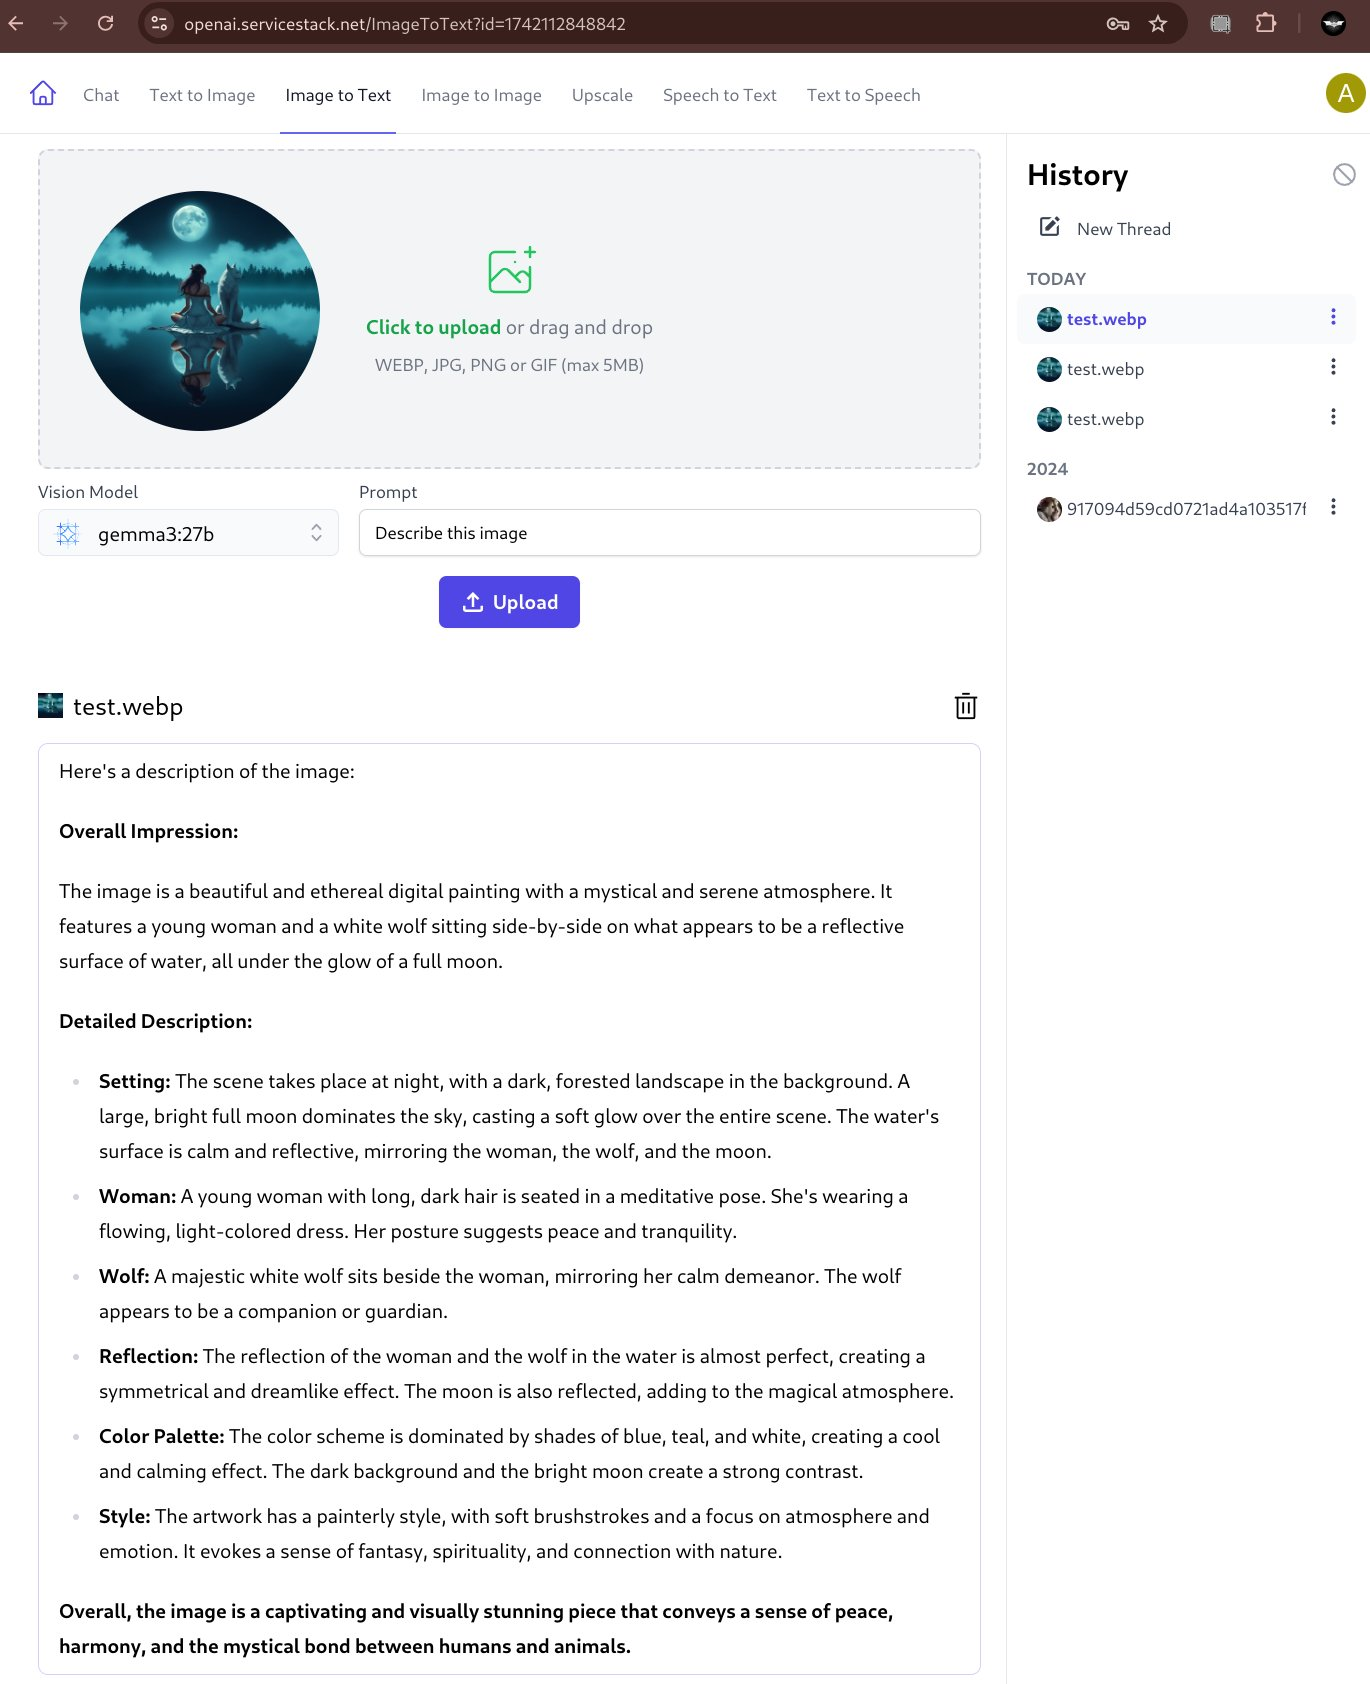
By default ImageToText uses a purpose-specific Florence 2 Vision model with ComfyUI for its functionality which is capable of generating a very short description about an image, e.g:
A woman sitting on the edge of a lake with a wolf
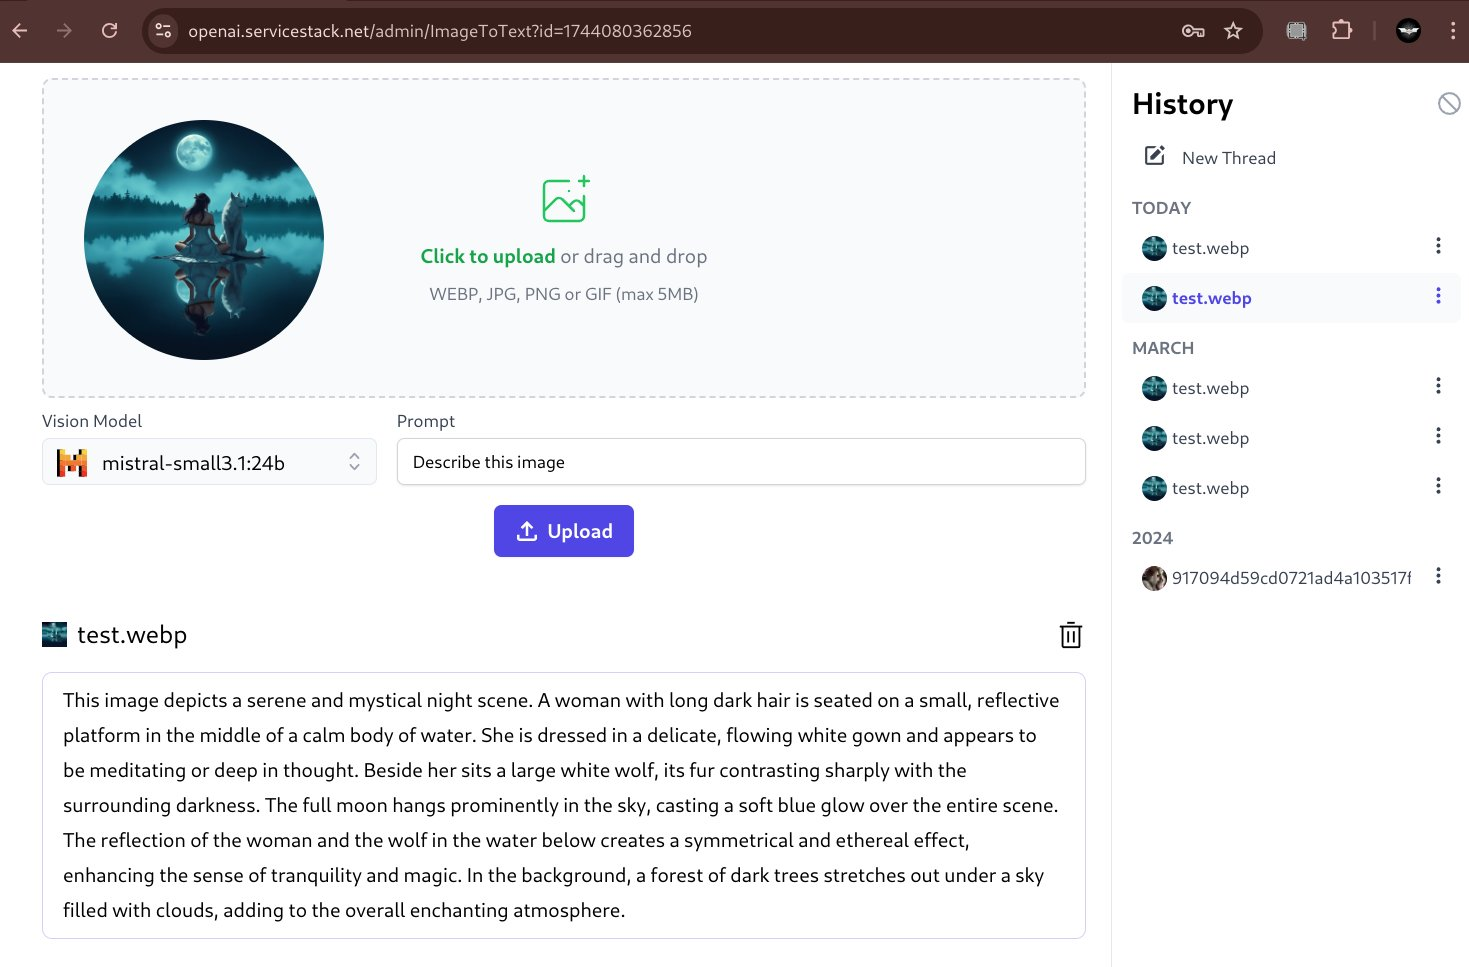
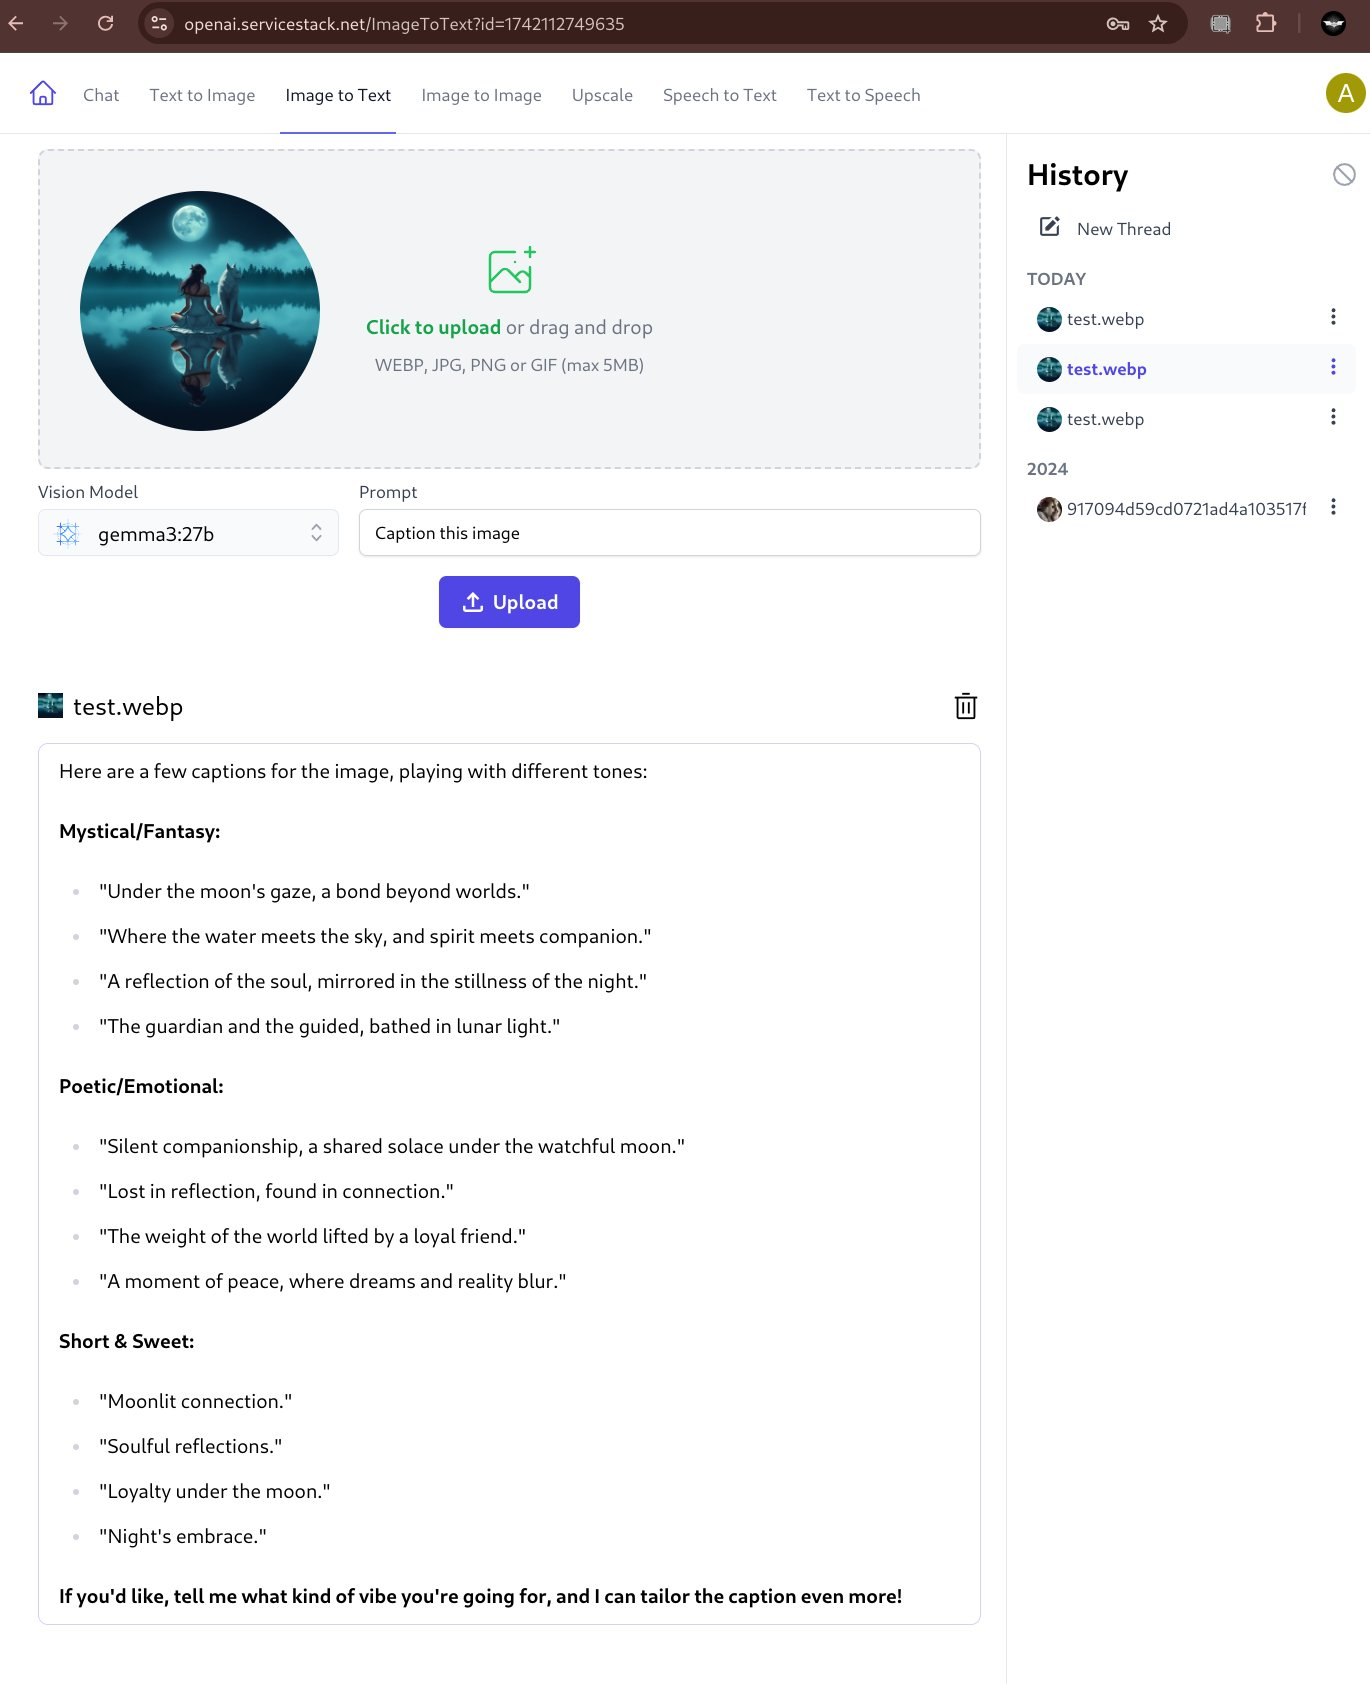
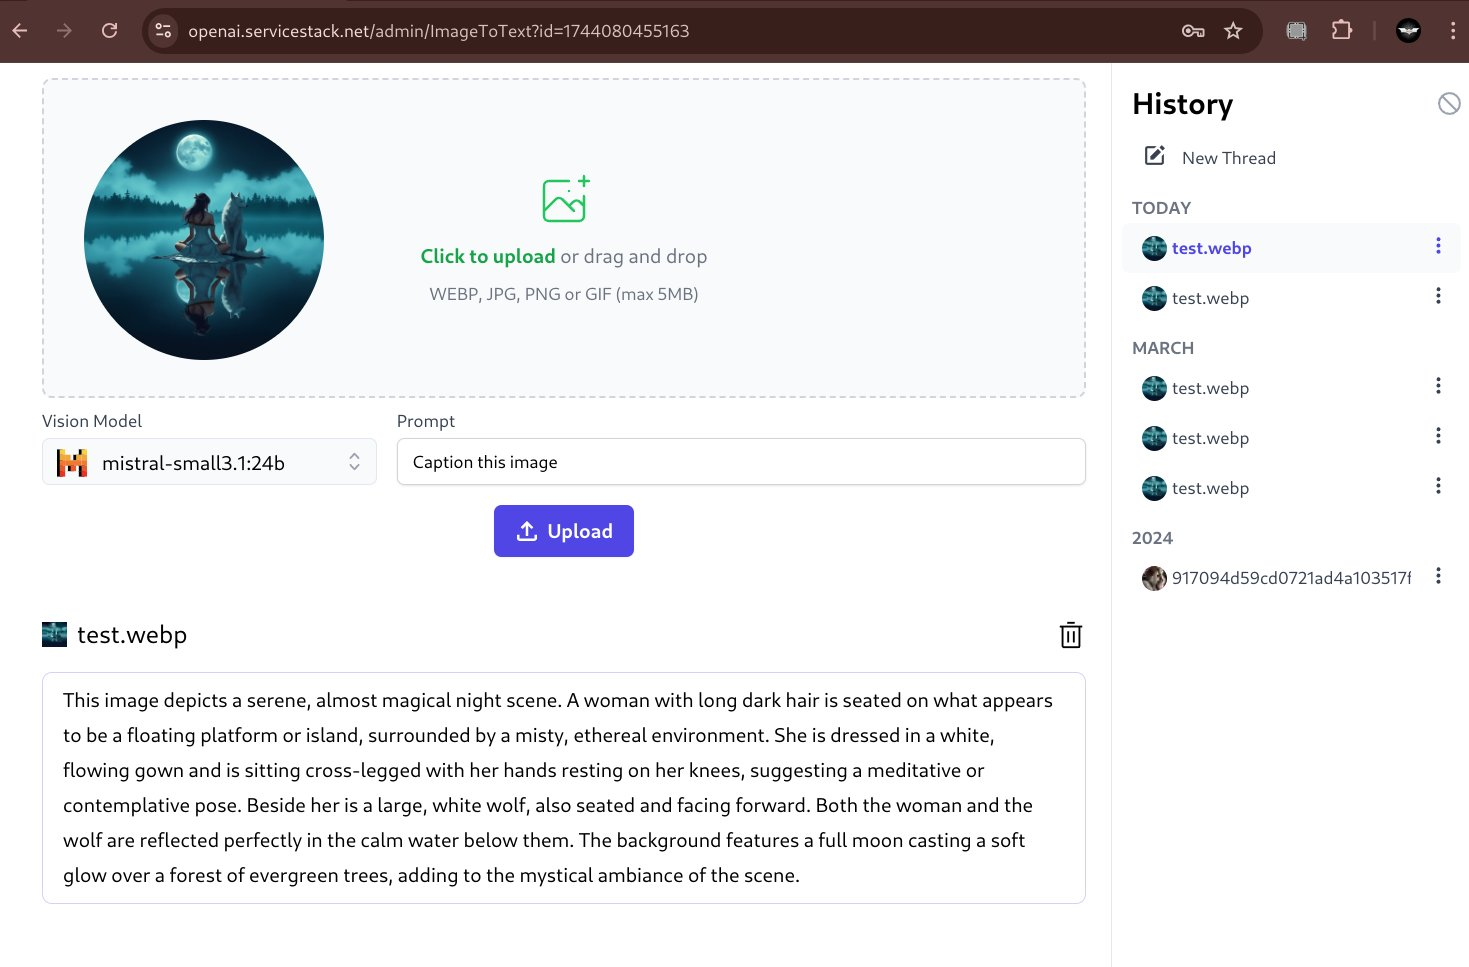
But with LLMs gaining multi modal capabilities and Ollama's recent support of Vision Models we can instead use popular Open Source models like Google's gemma3:27b or Mistral's mistral-small:24b to extract information from images.
Both models are very capable vision models that's can provide rich detail about an image:
Describe Image
Caption Image
Although our initial testing sees gemma being better at responding to a wide variety of different prompts, e.g:
New OllamaGenerate Endpoints
To support Ollama's vision models AI Server added a new feature pipeline around Ollama's generate completion API:
- ImageToText
- Model - Whether to use a Vision Model for the request
- Prompt - Prompt for the vision model
- OllamaGeneration: Synchronous invocation of Ollama's Generate API
- QueueOllamaGeneration: Asynchronous or Web Callback invocation of Ollama's Generate API
- GetOllamaGenerationStatus: Get the generation status of an Ollama Generate API
Cache Aware JsonApiClient
New Cache Client was added for JsonApiClient which works the same as the Cache Aware JsonHttpClient where you can use the WithCache() extension method to return a client that supports caching, e.g:
var client = new JsonApiClient(baseUrl).WithCache();

//equivalent to:
var client = new CachedApiClient(new JsonApiClient(baseUrl));
OrmLite and EF Integration
Added support for using an existing Entity Framework DB Connection and Transaction with OrmLite with:
var db = dbFactory.Use(connection,transaction);
Please note this shouldn’t bed used in a using statement or call Dispose() on this db instance since it doesn’t own the connection or transaction.