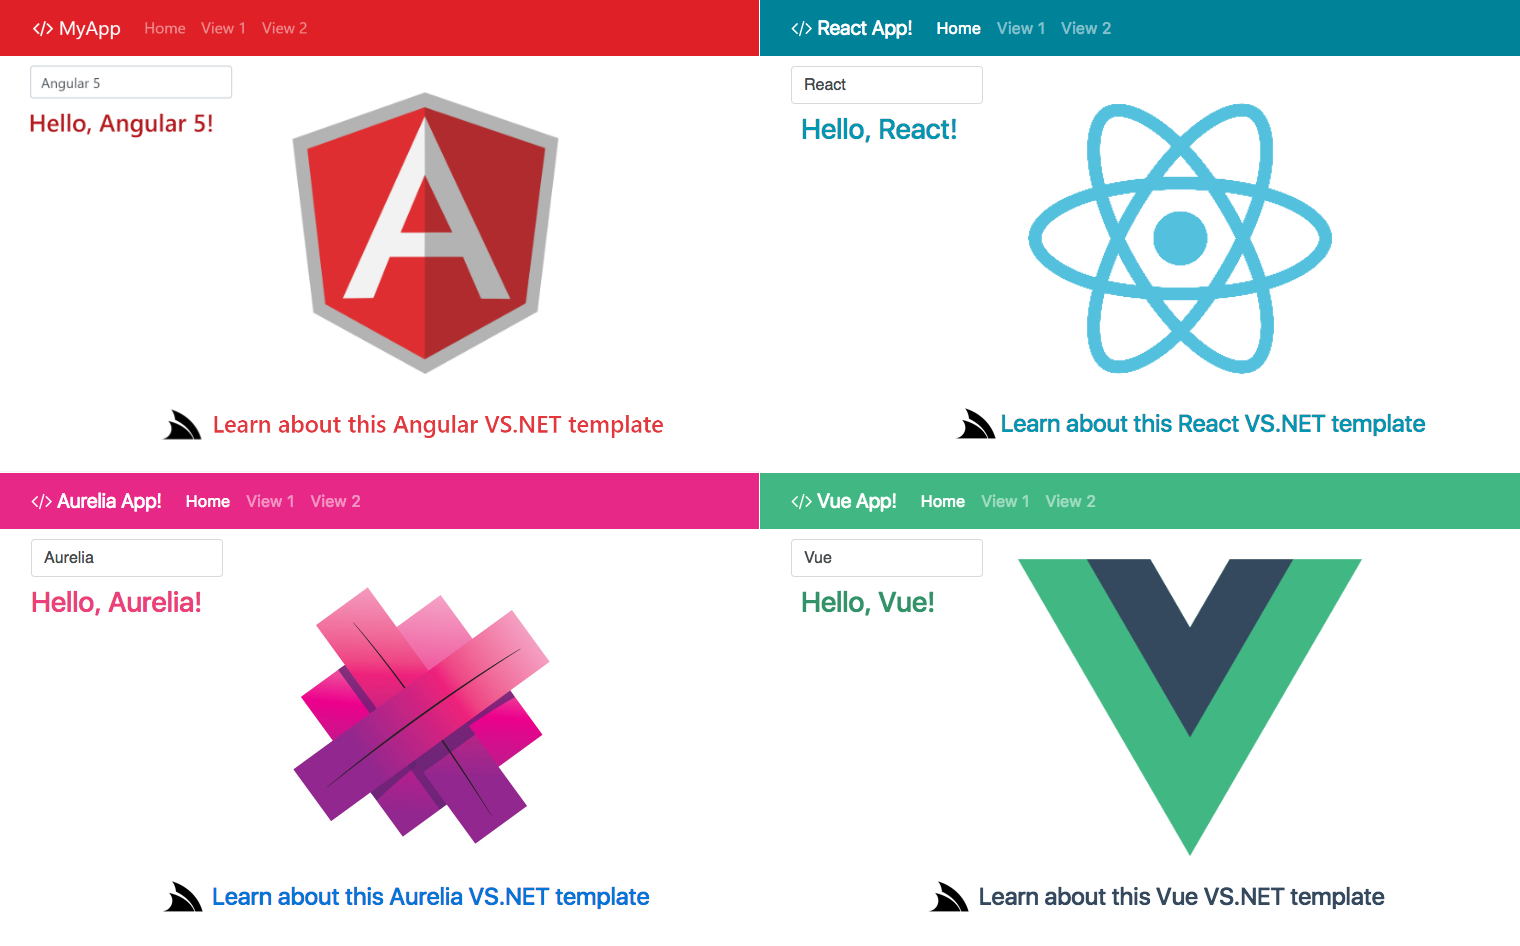
We're super excited to announce our new Angular4, React, Aurelia and Vue.js Single Page App VS.NET templates for ASP.NET which have been re-imagined to incorporate the latest gold standard in modern Single Page App development and integrated to provide the ideal development experience within VS.NET, optimal bundling and packaging for production including one-click Web App deployments using MS Web Deploy.
Ultimate Angular4, React, Aurelia and Vue.js Templates for ASP.NET!
All ServiceStack Templates are available from the ServiceStackVS VS.NET Extension:
Webpack-powered Single Page App Templates
Our existing Angular, Aurelia, React and React Desktop Single Page App templates have been rewritten to completely embrace Webpack - the most advanced module bundler for JavaScript Apps. Webpack is used to power the development, testing and production builds of your Web App.
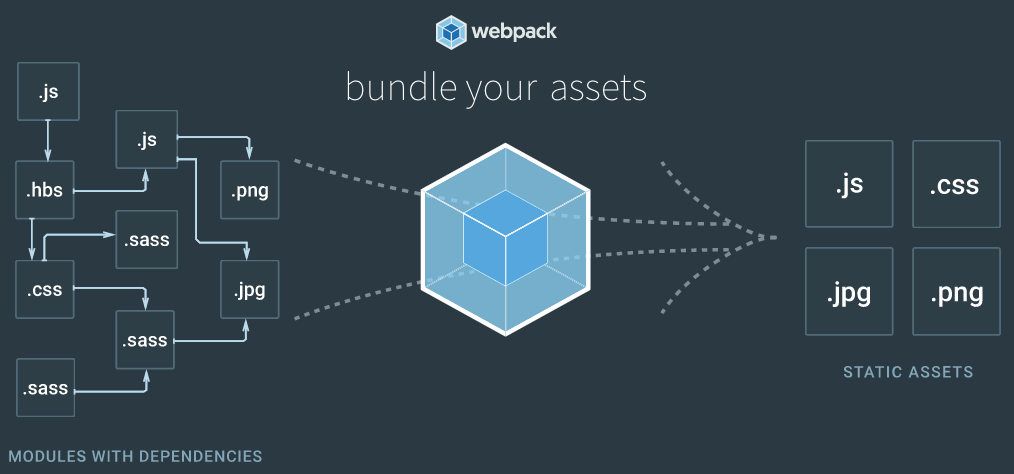
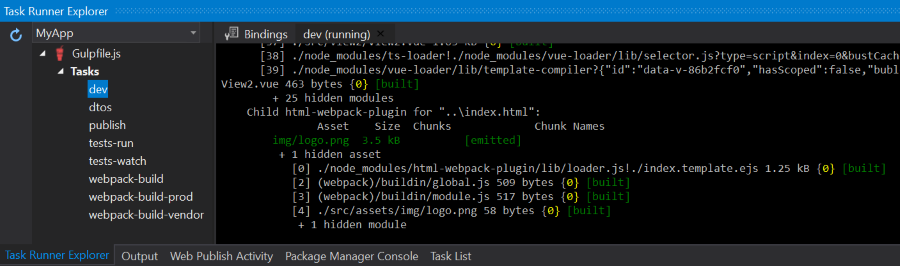
Webpack replaces JSPM and now takes care of all packaging and bundling requirements which prior templates used Gulp tasks and JSPM to accomplish. Gulp is still used, primarily to provide a GUI to run the templates npm scripts in VS.NET's Task Runner Explorer so all templates features can be accessed without leaving VS.NET, or if preferred each npm script can also be run on the command-line with:
$ npm run {script name}
Unlike our earlier use of JSPM which was its own package manager that just handled JavaScript dependencies and builds, Webpack works natively with npm packages and is used to handle all client assets which can leverage its vast ecosystem of loaders and plugins to handle every kind of web asset, performing the necessary transformations to transpile it into the native formats browsers understand, loading it in browsers and generating source maps so their original source files can be debugged. The Webpack configuration is customized per build type where the optimal configuration is used in development for faster builds and easier debuggability whilst production builds are optimized for performance, size and cacheability.
Vue.js Template!
In addition to converting all existing Single Page App templates to Webpack, we're excited to include support for the simple and elegant and Vue.js framework which is designed from the ground up to be incrementally adoptable where it scales nicely from being able to enhance a page with a splash of JavaScript to developing full-scale Single Page Apps.

If you're not familiar with Vue.js yet we highly recommend checking it out as we've found it shares a similar integrated and simplicity-focus ethos as ServiceStack, delivers a refreshing progressive approach to App development that's built on a few simple, but powerful integrated primitives enabling the creation of sophisticated Apps with minimal conceptual and cognitive overhead. Vue's docs are also beautifully written and very approachable where it's initially aimed at beginners and ramps up in storybook form to more advanced concepts where you'll become productive in no time.
Quick tour of Webpack
Webpack has been pre-configured in all Single Page App templates to enable a flexible and feature-rich development model whose defaults in webpack.config.js will be able to support a large number of Web Apps without modification, leaving you free to focus on developing your App.
Although as Webpack is the central hub powering each template you'll still want to become familiar with its four high-level concepts to understand how it's new approach to Single Page App development works and how it can handle all your App's dependencies and resources.
We'll quickly touch on each of Webpack's concepts by seeing how the React App's webpack.config.js is configured to handle its TypeScript sources, sass/css files and their references.
Entry points
Webpack builds a graph of your App's dependencies which it traverses starting from its entry points, this is the input into Webpack where its given the App's entry point, we also tell Webpack we want to create a separate vendor entry point referencing our App's 3rd party dependencies so their outputs can be configured independently:
entry: {
    app: [
        './src/app.tsx'
    ],
    vendor: [
        'es6-shim',
        'classnames',
        'react',
        'react-dom',
        'react-router-dom',
        '@servicestack/client'
    ]
},
Output
On the opposite end of Webpack's build are its outputs where we tell it where to bundle our App:
output: {
    path: isProd ? root('wwwroot/dist') : root('dist'),
    publicPath: '/dist/',
    filename: isProd ? '[name].[chunkhash].bundle.js' : '[name].bundle.js',
    chunkFilename: isProd ? '[name].[chunkhash].js' : '[name].js',
},
Here we can see that our Webpack config supports multiple isProd and isDev configurations, isDev is used for development builds where Webpack bundles our website in the /dist folder whilst isProd is used for production builds which is instead bundled in the /wwwroot/dist folder with each .js bundle including a [chunkhash] cache-breaker in its filename.
The
root()andwhen()functions used are basic helpers used to simplify webpack configuration
Loaders
Loaders are the flexible engine that sets Webpack apart where it's able to leverage its vast ecosystem where there's a loader for every kind of web asset typically used when developing Web Apps.
Loaders are configured in the rules section and invoked using node's require() statement or ES6/TypeScript's import statement. Rules use the test regex to specify which files they should apply to whilst the loader property tells Webpack which loader to load them with. Each loader is self-contained in a separate npm package that needs to be made available to your project by adding them to your package.json devDependencies.
Lets checkout React's loader configuration for a typical example:
var postcssLoader = {
    loader: 'postcss-loader',
    options: { plugins: [ require('precss'), require('autoprefixer') ] }
};

rules: [
    {
        test: /\.tsx?$/,
        loader: 'awesome-typescript-loader'
    },
    {
        test: /\.html$/,
        loader: 'html-loader'
    },
    {
        enforce: "pre",
        test: /\.js$/,
        loader: "source-map-loader"
    },
    {
        test: /\.(jpe?g|gif|png|ico|svg|wav|mp3)$/i,
        loader: 'file-loader' + (isProd
            ? '?hash=sha512&digest=hex&name=img/[name].[hash].[ext]'
            : '?name=img/[name].[ext]')
    },
    {
        test: /\.(eot|ttf|woff|woff2)(\?v=\d+\.\d+\.\d+)?$/,
        loader: isProd
            ? 'url-loader?limit=10000&name=img/[name].[hash].[ext]'
            : 'file-loader?name=img/[name].[ext]'
    },
    ...when(isDev, [
        {
            test: /\.css$/,
            use: [ 'style-loader', 'css-loader', postcssLoader ]
        },
        {
            test: /\.(sass|scss)$/,
            use: [ 'style-loader', 'css-loader', postcssLoader, 'sass-loader' ]
        },
    ]),
    ...when(isProd, [
        {
            test: /\.css$/,
            loader: ExtractTextPlugin.extract({
                fallback: 'style-loader',
                use: ['css-loader?minimize', postcssLoader],
            }),
        },
        {
            test: /\.(sass|scss)$/,
            loader: ExtractTextPlugin.extract({
                fallback: 'style-loader',
                use: ['css-loader?minimize', postcssLoader, 'sass-loader'],
            }),
        }
    ])
]
This configuration instructs Webpack to load any .ts or .tsx files using the awesome-typescript-loader which is then responsible for compiling the source files with TypeScript's compiler.
Loaders are also chainable as seen in the .css and .scss rules which starts from right-to-left where the output of the rightmost loader is passed into the next loader on its left and so on.
{
    test: /\.css$/,
    use: [ 'style-loader', 'css-loader', postcssLoader ]
},
For React App the .css contents are first processed with postcssLoader which uses precss to let you use basic sass-like features in vanilla .css files and autoprefixer which lets you write clean standard css rules like:
a {
    display: flex;
}
Which autoprefixer will expand to include vendor prefixes, maximizing support for older browser versions:
a {
    display: -webkit-box;
    display: -webkit-flex;
    display: -ms-flexbox;
    display: flex
}
The output of postcssLoader then gets passed into css-loader which processes any css @import() and @url() rules and loads them with Webpack's require() to ensure its references are also processed by Webpack.
The output of css-loader then gets passed into style-loader who injects the resulting css fragments within <style></style> tags in the browser's DOM which is how Web App styles in development builds are still visible despite their being no .css files written. Sass .scss files are handled similarly to .css files except they're initially loaded with sass-loader which converts them into .css. Both these rules together let you use your preferred choice of .scss or .css files to style your Web App.
There's a separate configuration needed for Production builds which is configured to minify the css and write their contents out into separate .css bundles as defined in the plugins section below:
Plugins
Loaders only loads and transforms files on a per-file basis, anything more advanced requires using plugins. In this template plugins are used to:
- Set type of Webpack build so other loaders/plugins can optimize accordingly
- Deletes the output folder
- Exports common dependencies into a vendor
bundle.js - Generate the WebApps
index.html, based on index.template.ejs and compiled with lodash template, which also takes care of injecting any.cssand.jsoutput bundle references
plugins: [
    new webpack.DefinePlugin({
        'process.env': {
            'NODE_ENV': JSON.stringify(isProd ? 'production' : 'development')
        }
    }),
    new Clean([isProd ? root('wwwroot/*') : root('dist')]),
    new webpack.optimize.CommonsChunkPlugin({
        name: 'vendor',
        filename: isProd ? 'vendor.[chunkhash].bundle.js' : 'vendor.bundle.js'
    }),
    new HtmlWebpackPlugin({
        template: 'index.template.ejs',
        filename: '../index.html',
        inject: true
    }),
    ...when(isProd, [
        new ExtractTextPlugin({ filename: '[name].[chunkhash].css', allChunks: true }),
        new webpack.optimize.UglifyJsPlugin({ sourceMap: true }),
        new CopyWebpackPlugin(COPY_FILES)
    ]),
]
In production builds, .css files are written using ExtractTextPlugin and the resulting .js files minified with UglifyJS. The CopyWebpackPlugin is then used to copy the .NET Web Apps Server assets and binaries, completing the full production build of the WebApp in /wwwroot that's all ready to be deployed to any MS WebDeploy enabled Server using the 03-deploy-app Gulp task.
Loading Dependencies
Now that we've covered how Webpack is configured, the next step is showing how to make use of it, by loading your App's resources using node's require() or TypeScript's import statement.
This can be seen in the App's app.tsx starting point where it imports bootstrap.css and font-awesome.css directly from the installed bootstrap and font-awesome npm packages as well as a local ./app.scss SASS file which lives side-by-side next to TypeScript source files:
import 'bootstrap/dist/css/bootstrap.css';
import "font-awesome/css/font-awesome.css";
import './app.scss';

import "es6-shim";
import * as ReactDOM from 'react-dom';
import * as React from 'react';

import Home from './home/Home';
import View1 from './view1/View';
import View2 from './view2/View';
Importing bootstrap and font-awesome also imports their references, including any images, fonts, svg and other .css files. These are all transparently added to the webpack build and bundled with the rest of your app.
In production builds the file-loader copies their references to the output folder, embedding its sha512 hash in each file name. url-loader works similarly but also has the option of embedding file contents below the configured 10000 byte limit inline inside a Data URI to reduce network requests in production builds.
{
    test: /\.(jpe?g|gif|png|ico|svg|wav|mp3)$/i,
    loader: 'file-loader' + (isProd
        ? '?hash=sha512&digest=hex&name=img/[name].[hash].[ext]'
        : '?name=img/[name].[ext]')
},
{
    test: /\.(eot|ttf|woff|woff2)(\?v=\d+\.\d+\.\d+)?$/,
    loader: isProd
        ? 'url-loader?limit=10000&name=img/[name].[hash].[ext]'
        : 'file-loader?name=img/[name].[ext]'
},
require() can also be used to load resources in other files which is how images can be imported in the index.template.ejs home page template:
<link rel="shortcut icon" href="<%=require('./src/assets/img/favicon.png')%>">
Or inside App components, both of which returns the image url after it has been processed by Webpack's loaders, e.g:
constructor() {
    this.logoUrl = require("./assets/img/logo.png");
}
In production builds this returns a relative url to the output image, e.g: img/logo.36166adfacf0c8cc11d493f2161164fd.png.
Webpack builds
By importing all your WebApp resources into Webpack it's able to maintain a knowledgeable graph of all your Web Apps dependencies where it lets you define how they're handled at a macro level making it easy to incorporate design-time features like TypeScript and Sass whilst also taking care of generating optimal builds for development, testing and production.
Development builds
You'll use development builds when developing your app locally which you can run with either the webpack-build Gulp task in VS.NET's Task Runner Explorer GUI or by running the build npm script on the command-line:
$ npm run build
This will generate your App in the /dist folder similar to:
/dist
    /img
        logo.png
        fontawesome-webfont.ttf
        ...
    app.bundle.js
    vendor.bundle.js
index.html
The lack of .css files or source-maps are due to being embedded in the .js bundles and injected in the browser's DOM within <style></style> tags.
After the Webpack development build has completed you can just run or refresh your ASP.NET Web App to view the latest changes.
Production builds
When your App is ready to deploy you can run a production build using the webpack-build-prod Gulp task or the build-prod npm script:
$ npm run build-prod
This will bundle and generate your WebApp in the /wwwroot/dist folder with css and source maps extracted and written into separate files, css and js minified and all assets emitted with cache-breaking hashes, similar to:
/wwwroot
    /dist
        /img
            logo.36166adfacf0c8cc11d493f2161164fd.png
            fontawesome-webfont.b06871f281fee6b241d60582ae9369b9.ttf
            ...
        app.0f14847405ac6f9ebc18.bundle.js
        app.0f14847405ac6f9ebc18.bundle.js.map
        app.0f14847405ac6f9ebc18.css
        app.0f14847405ac6f9ebc18.css.map
        vendor.dca56d88046f8443277c.bundle.js
        vendor.dca56d88046f8443277c.bundle.js.map
    index.html
Development workflow
Executing a development build of Webpack is all that's required to be able to see our changes but it can take a while to run a full dev build which negatively impacts our fast iterative dev workflow. It's instead recommended to leave webpack running in the background and have it watch for changes so it only needs to rebuild assets that have changed, which it's able to do very quickly.
The 00-webpack-dev and 00-webpack-watch gulp tasks facilitate the 2 popular development modes for running webpack during development:
Webpack watch
Our recommendation is to run the 00-webpack-watch Gulp task and leave it running in the background, or if preferred, run the watch npm script on the command-line with:
$ npm run watch
Webpack watch works as you'd expect where it initially generates a full development build of your Web App then stays running in the background to process files as they're changed. This enables the normal dev workflow of running your ASP.NET Web App from VS.NET, saving changes locally then hitting F5 to refresh the page and view them.
Each change updates the output dev resources so even if you stop the watch task your Web App remains in a working state that's viewable when running the ASP.NET Web App.
Live reload with Webpack Dev Server
The alternative dev workflow is to run the 00-webpack-dev Gulp task to run the Webpack dev server, or you can run it from the command-line with:
$ npm run dev
This launches the Webpack dev server listening at http://localhost:3000/ and configured to proxy all non-Webpack HTTP requests to the ASP.NET Web App where it handles all Server API requests. The benefit of viewing your App through the Webpack dev server is its built-in Live Reload feature where it will automatically reload the page as resources are updated. We've found the Webpack dev server ideal when developing UI's where your Web App is running side-by-side VS.NET, where every change saved triggers the dev server to reload the current page so changes are visible immediately.
The disadvantage of the dev server is that all transformations are kept in memory so when the dev server is stopped, the Web Apps resources are lost, so it requires a webpack-build in order to generate a current build. There's also a slight lag in API requests resulting from each server request being handled by both Webpack's Dev Server and ASP.NET's IIS Express.
Single Page App Features
Our goals with the Single Page Templates is to provide a highly productive base that's ideal for developing small to medium-sized JavaScript Web Apps including just the core essentials that pack the most productive punch whilst adding minimal complexity and required configuration, whilst still remaining open-ended to easily plug-in other tools into your Webpack configuration you believe will improve your development workflow.
With these goals in mind we've hand-picked and integrated a number of simple best-of-breed technologies so you'll be immediately productive:
Integrated UI framework and Vector Icons

React, Vue and Aurelia are pre-configured with Bootstrap v4 and font-awesome vector font icons whilst Angular 4 is preconfigured to use Material Design Lite and Material Design Icons which are the more natural choice for Angular Apps where they're all developed and maintained by Google.
TypeScript and Sass

All templates are configured with TypeScript which we believe provides the greatest value in enabling a highly-productive and maintainable code-base. TypeScript lets you utilize the latest ES6/7 features including terse ES6 modules and async/await support whilst being able to target down-level browsers. Other benefits include better documented typed APIs, instant compiler feedback, rich intellisense and refactoring support in a graceful superset of JavaScript that scales well to be able develop prototypes quickly then easily go back to harden existing code-bases with optional Type information, catching common errors at compile-time whilst annotating modules with valuable documentation other developers can benefit from.
Whilst CSS is a powerful language for styling Web Apps it lacks many of the DRY and reuse features we take for granted in a general purpose programming language. SASS is designed to close that gap with a number of useful extensions to CSS aimed at enabling a highly-maintainable, modular and configurable css code-base. If you prefer to avoid learning SASS you can continue using vanilla css which has been enhanced with autoprefixer and precss support.
End-to-end Typed APIs

ServiceStack is seamlessly integrated with TypeScript where all templates are pre-configured to use the Server's TypeScript DTOs and @servicestack/client generic JsonServiceClient to make the Typed API request below which displays a Welcome message on each key-press:
import { client } from '../shared';
import { Hello } from '../dtos';

async nameChanged(name:string) {
    if (name) {
        let request = new Hello();
        request.name = name;
        let r = await client.get(request);
        this.setState({ result: r.result });
    } else {
        this.setState({ result: '' });
    }
}
The imported client is an instance of JsonServiceClient declared in shared.ts module, configured with the BaseUrl at /:
export var client = new JsonServiceClient(global.BaseUrl || '/');
The global.BaseUrl is defined in package.json and injected by Jest in order to be able to run end-to-end Integration tests.
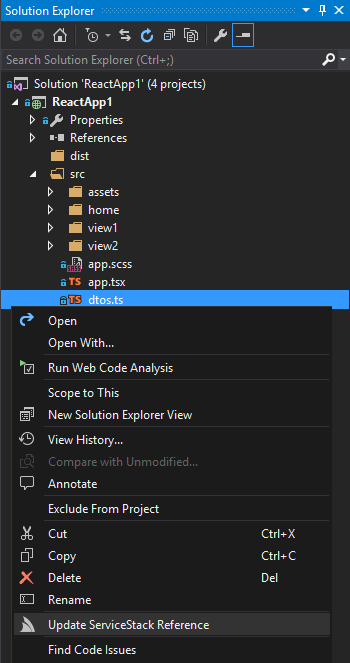
Updating Server TypeScript DTOs
To get the latest Server DTOs, build the ASP.NET Web App then either right-click on dtos.ts and select Update ServiceStack Reference from the Context Menu:
Or alternatively you can run the update-dtos Gulp task in Task Runner Explorer GUI, or if preferred, run the script on the command-line with:
$ npm run typescript-ref
Routing Enabled, Multi-page Layout
All templates have multiple views with Routing enabled so they're all setup to develop multi-page navigable Single Page Apps out-of-the-gate. All templates are designed to be functionally equivalent utilizing a 3 page tabbed layout but implemented using their own idiomatic style so you'll be able to easily inspect and compare the structure and ergonomics of each JavaScript framework to evaluate the one you like best.

Deep linkable Pretty URLs
All Single Page Apps are configured to use Pretty URLs (i.e. without #!) and are deep-linkable so they behave similarly to server-generated websites in that they support the back button and full-page reloads to refresh the current page. This works behind the scenes using a [FallbackRoute] to have all unknown routes return the home page so the route can be handled on the client to load the appropriate view.
JavaScript Unit Testing
Aurelia, React and React Desktop Apps are configured to use Facebook's Jest Testing Framework with the React Templates configured to use AirBnb's enzyme virtual React DOM to enable fast, browser-less tests and includes a few different examples of client/server integration tests.
Angular4 and Vue are configured to use the Karma test runner with the headless phantomjs WebKit browser so the behavior of Components are tested in a real browser.
Tests can be run with the tests-run gulp task, or on the command-line using any of npm's testing conventions:
$ npm test
$ npm t
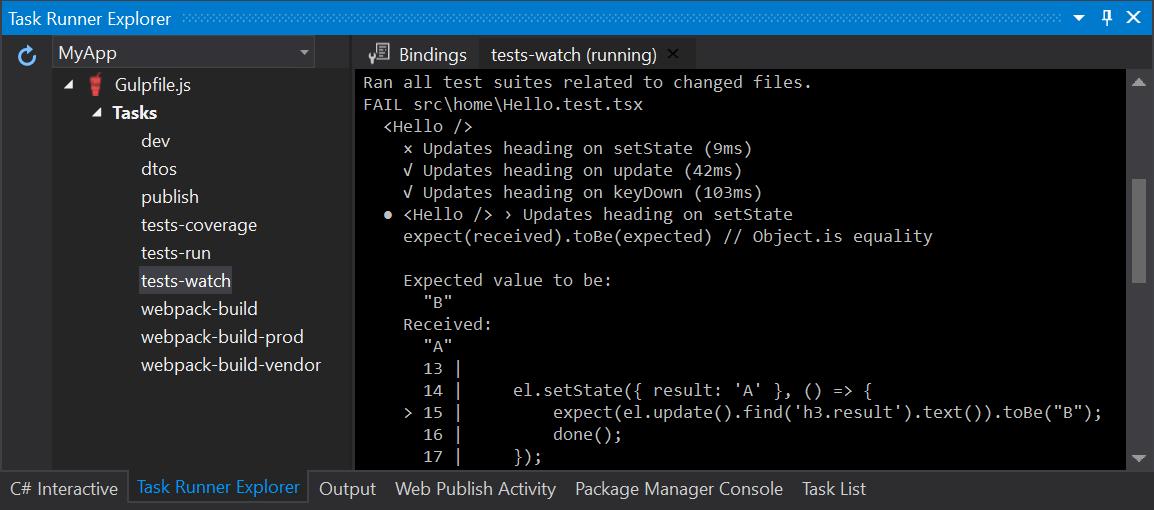
Live Testing
Each template also includes support for Live Testing which can be run in the background by clicking the tests-watch Gulp task or on the command-line with:
$ npm run test-watch
Live testing automatically re-runs JavaScript tests after each change to provide instant feedback to detect when changes causes existing tests to fail.
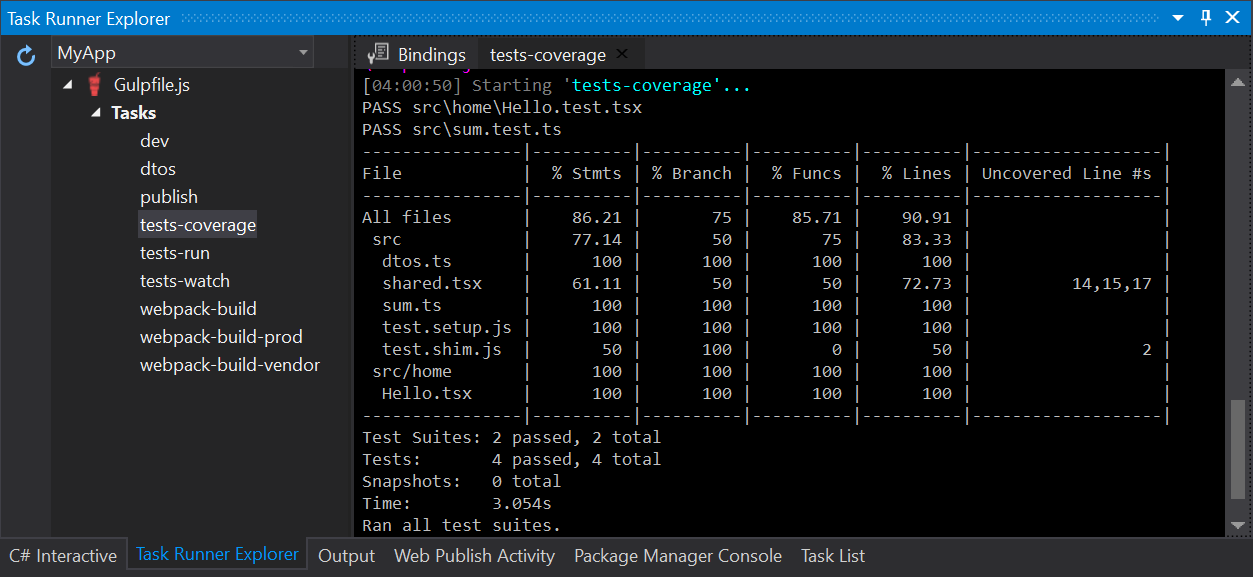
Test Coverage
Angular4, Aurelia and React are also pre-configured to be able to show test coverage, viewable by running the tests-coverage Gulp task or on the command-line with:
$ npm run test-coverage
Single Click Deployments
All templates continue to include our one-click deploy functionality by running the package-and-deploy Gulp task which will perform a full ASP.NET server release build and Webpack client production build then runs MS WebDeploy to package and deploy the bundled App to the remote server configured in wwwroot_build/publish/config.json. If you already have a production build you wish to deploy you can run 03-deploy-app Gulp task instead to just perform the MS WebDeploy step.
publish/config.json
{
    "iisApp": "SiteName",
    "serverAddress": "remote.server.org",
    "userName": "{WebDeployUserName}",
    "password" : "{WebDeployPassword}"
}
Multi-Project Solution Layout
All templates follow our Recommended Physical Project Structure ensuring ServiceStack projects starts off from an optimal logical project layout, laying the foundation for growing into a more maintainable, cohesive and reusable code-base.
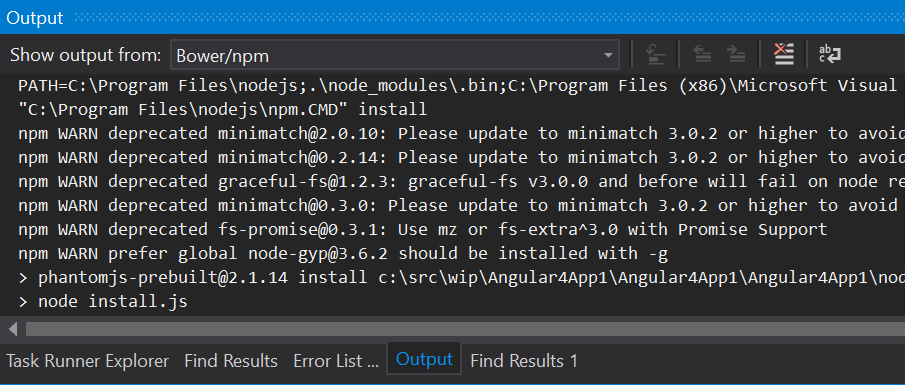
Track progress whilst templates are being created
The Single Page App templates sources their client dependencies from npm which can take up to few minutes to finish downloading and installing. You'll be able to see its progress by looking at the Bower/npm Output Window in VS.NET:
You'll be able to detect when it's finished by waiting for the original contents of index.html:
<!-- auto-generated by webpack -->
to be replaced with a Webpack generated html template.
Keep Desktop node and VS.NET in sync
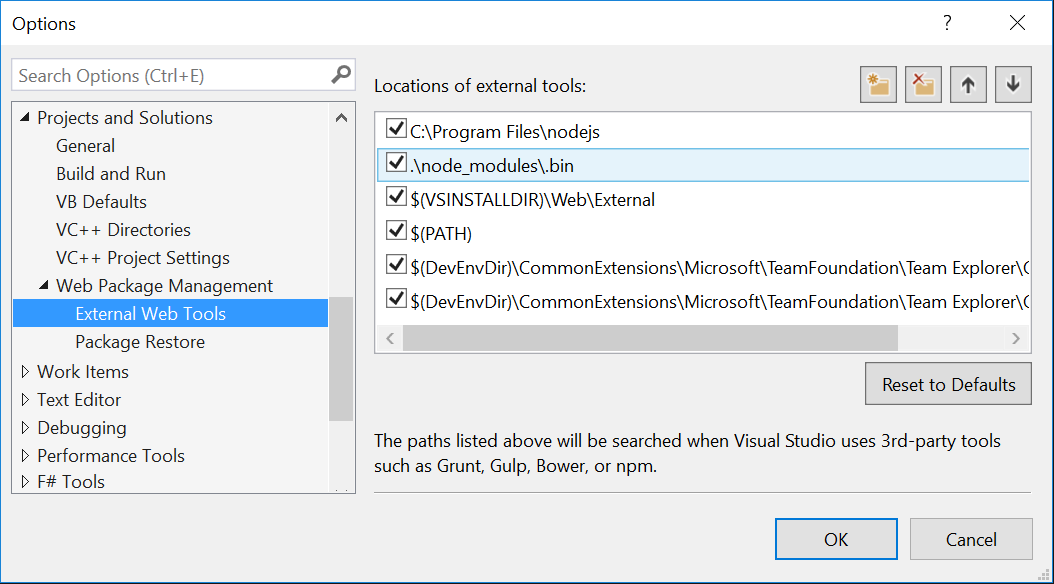
Unfortunately VS.NET 2017 ships with an outdated version of node.exe which can be problematic when trying to run scripts from the command-line with a locally installed version of node as native module packages like node-sass are coupled to the specific node version and platform they were installed with. This can easily be resolved by configuring VS.NET to use your Desktop version of node instead by adding its the C:\Program Files\nodejs folder as the first path in:
Tools > Options > Projects and Solutions > External Web Tools
Gistlyn updated
We've upgraded Gistlyn to use the new Webpack-powered React Desktop Apps template which was fairly easy to migrate as it just needed copying the new template assets across and removing the JSPM and typings dependencies. The only TypeScript source code that needed updating was importing Gistlyn's css assets in main.tsx and change its JSX views to reference images using Webpack's require().
A nice benefit from migrating to the new templates is that our source folders remain clean and are no longer populated with generated .js and source maps that were previously generated next to their original .ts, the interim individual files are no longer necessary as they're instead just bundled in Webpack's output folder.
The React Desktop Templates aren't configured to use cache-breaker hashes in their production output file names so the Embedded Resources project used by the different Desktop App projects retain predictable names for each asset.
Full support for VS 2017
We've added complete support for VS.NET 2017 with the ServiceStackVS VS.NET Extension and have migrated all ServiceStack code-bases for all of ServiceStack's NuGet packages to VS2017's new MSBuild format which is now being used to generate the different .NET 4.5 and .NET Standard platform builds used in all .NET Core packages including our multi-target Test projects.
Breaking Change
The only package we couldn't bring across into VS2017's new MSBuild format was ServiceStack.OrmLite.Sqlite.Mono which referenced the native sqlite3.dll directly. This has been replaced with the new ServiceStack.OrmLite.Sqlite NuGet package which replaces both Sqlite.Mono and Sqlite.Windows packages and can be installed with:
PM> Install-Package ServiceStack.OrmLite.Sqlite
Or if using .NET Core / .NET Standard:
PM> Install-Package ServiceStack.OrmLite.Sqlite.Core
Simple command-line utilities for ServiceStack
The new servicestack-cli npm package replaces our existing ss-util.exe and OSX swiftref command-line programs to provide simple command-line utilities to easily Add and Update ServiceStack References for all of ServiceStack's 7 supported languages.
Installation
Prerequisites: Node.js (>=4.x, 6.x preferred), npm version 3+.
$ npm install -g servicestack-cli
This will make the following utilities available from your command-line which will let you download the Server DTO classes for a remote ServiceStack endpoint in your chosen language which you can use with ServiceStack's generic Service clients to facilitate end-to-end API requests.
| Script | Alias | Language |
|---|---|---|
| csharp-ref | cs-ref | C# |
| typescript-ref | ts-ref | TypeScript |
| typescriptd-ref | tsd-ref | TypeScript Declarations |
| swift-ref | Swift | |
| java-ref | Java | |
| kotlin-ref | kt-ref | Kotlin |
| vbnet-ref | vb-ref | VB.NET |
| fsharp-ref | fs-ref | F# |
Usage
Once installed you can easily download a Server's Typed DTOs by using the script for the language you want with the BaseUrl of the remote ServiceStack Instance, e.g. These commands below downloads TechStacks Typed Server DTOs in each available language:
$ csharp-ref http://techstacks.io
$ typescript-ref http://techstacks.io
$ tsd-ref http://techstacks.io
$ swift-ref http://techstacks.io
$ java-ref http://techstacks.io
$ kotlin-ref http://techstacks.io
$ vbnet-ref http://techstacks.io
$ fsharp-ref http://techstacks.io
We'll continue using TypeScript below to inspect the other cli features:
Adding a ServiceStack Reference
To Add a TypeScript ServiceStack Reference just call typescript-ref with the URL of a remote ServiceStack instance:
$ typescript-ref http://techstacks.io
Result:
Saved to: techstacks.dtos.ts
Calling typescript-ref with just a URL will save the DTOs using the Hostname, you can override this by specifying a FileName as the 2nd argument:
$ typescript-ref http://techstacks.io Tech
Result:
Saved to: Tech.dtos.ts
Updating a ServiceStack Reference
To Update an existing ServiceStack Reference, call typescript-ref with the Filename:
$ typescript-ref techstacks.dtos.ts
Result:
Updated: techstacks.dtos.ts
Which will update the File with the latest TypeScript Server DTOs from techstacks.io. You can also customize how DTOs are generated by uncommenting the TypeScript DTO Customization Options and updating them again.
Updating all TypeScript DTOs
Calling typescript-ref without any arguments will update all TypeScript DTOs in the current directory:
$ typescript-ref
Result:
Updated: Tech.dtos.ts
Updated: techstacks.dtos.ts
To make it more wrist-friendly you can also use the shorter ts-ref alias instead of typescript-ref.
Installing Generic Service Client
Now we have our TechStacks Server DTOs we can use them with the generic JsonServiceClient in the @servicestack/client npm package to make Typed API Calls.
Install @servicestack/client
$ npm install @servicestack/client
TechStacks Example
Once installed create a demo.ts file with the example below using both the JsonServiceClient from the @servicestack/client npm package and the Server DTOs we
want to use from our local techstacks.dtos.ts above:
import { JsonServiceClient } from '@servicestack/client';
import { GetTechnology, GetTechnologyResponse } from './techstacks.dtos';

var client = new JsonServiceClient("https://techstacks.io")

let request = new GetTechnology()
request.Slug = "ServiceStack"

client.get(request)
    .then(r => console.log(r.Technology.VendorUrl))
The JsonServiceClient is populated with the BaseUrl of the remote ServiceStack instance we wish to call. Once initialized we can send populated Request DTOs and handle
the Typed Response DTOs in Promise callbacks.
To run our TypeScript example we just need to compile it with TypeScript:
$ tsc demo.ts
Which will generate the compiled demo.js (and typescript.dtos.js) which we can then run with node:
$ node demo.js
Result:
https://servicestack.net
Enabling TypeScript async/await
To make API requests using TypeScript's async/await feature we'll need to create a TypeScript tsconfig.json config file that imports ES6 promises and W3C fetch definitions with:
{
  "compilerOptions": {
    "target": "es5",
    "module": "commonjs",
    "lib": [ "es2015", "dom" ]
  }
}
Now we can create a new await-demo.ts file and start using TypeScript's async/await feature which as it can only be called within an async function, we'll need to wrap in an async function:
import { JsonServiceClient } from '@servicestack/client';
import { GetTechnology, GetTechnologyResponse } from './techstacks.dtos';

var client = new JsonServiceClient("https://techstacks.io")

async function main() {
    let request = new GetTechnology()
    request.Slug = "ServiceStack"

    const response = await client.get(request)
    console.log(response.Technology.VendorUrl)
}

main()
Now that we have a tsconfig.json we can just call tsc to compile all our TypeScript source files in our folder:
$ tsc
And then run the compiled await-demo.js with node:
$ node await-demo.js
Result:
https://servicestack.net
ServiceStack.Text
Major Memory and Performance Improvements
We've replaced our internal string parsing in ServiceStack.Text's serializers to use .NET Core's new StringSegment class (polyfilled in .NET 4.5) which dramatically reduces the memory allocations needed and execution time for deserialization. These improvements are best seen in large complex types with nested arrays like MiniProfiler's DTO where memory allocations were reduced by 5.3x and performance improved by 33%:
v4.5.8
| Method | Mean | StdErr | StdDev | Gen 0 | Allocated |
|---|---|---|---|---|---|
| Deserialize: Complex MiniProfiler | 19,134,639.0083 ns | 190,778.9031 ns | 1,176,040.1418 ns | 1062.5 | 9.09 MB |
v4.5.10
| Method | Mean | StdErr | StdDev | Gen 0 | Allocated |
|---|---|---|---|---|---|
| Deserialize: Complex MiniProfiler | 12,754,285.9029 ns | 60,934.7823 ns | 235,999.3970 ns | 22.9167 | 1.7 MB |
The parsing implementations of primitive .NET Types like integers, decimal and Guid types were replaced with custom implementations utilizing StringSegment which sees their performance improved by 2.5-4x. We've added several tests to ensure consistent behavior, but if needed they can revert to using .NET BCL parsing methods by setting: JsConfig.UseSystemParseMethods = true. If this is needed for whatever reason please let us know at https://github.com/ServiceStack/Issues
Vulnerability with object Properties
Jonathan Birch from Microsoft Vulnerability Research Team (MSVR) notified us of a potential vulnerability when using object properties on DTOs as it allows crafting a JSON payload that can create instances of arbitrary Types and setting their public properties and there exists Types in the .NET Base Class library where this feature can have unwanted consequences.
We've strongly recommended against usage of object and interface properties on DTOS which is contra to the goals of designing self-describing APIs where they expose an unknown hole in Service contracts that's a potential source of runtime serialization issues, requires proprietary extensions to serialization formats, embeds brittle .NET namespaces in DTOs and adds coupling to serializer-specific implementations that will fail to deserialize in many standards based serializers which as a result won't work in some alternative languages.
Despite its shortcomings it's still a used feature that we still need to support but in order to close this vulnerability we had to switch to use a whitelist to limit which Types are allowed to deserialize in late-bound object properties.
To minimize the runtime Exceptions resulting from adopting a whitelist we've pre-populated it with a safe-list of popular Data Types, DTOs and Request DTOs with the default configuration below:
// Allow deserializing types with [DataContract] or [RuntimeSerializable] attributes
JsConfig.AllowRuntimeTypeWithAttributesNamed = new HashSet<string>
{
    nameof(DataContractAttribute),
    nameof(RuntimeSerializableAttribute), // new in ServiceStack.Text
};

// Allow deserializing types implementing any of the interfaces below
JsConfig.AllowRuntimeTypeWithInterfacesNamed = new HashSet<string>
{
    "IConvertible",
    "ISerializable",
    "IRuntimeSerializable", // new in ServiceStack.Text
    "IMeta",
    "IReturn`1",
    "IReturnVoid",
};

// Allow object property in ServiceStack.Messaging MQ classes
JsConfig.AllowRuntimeTypeInTypesWithNamespaces = new HashSet<string>
{
    "ServiceStack.Messaging",
};
The above rules can be extended to allow your own conventions. If you just need to allow a specific Type you can instead just implement:
JsConfig.AllowRuntimeType = type => type == typeof(MyType);
If you're in a trusted intranet environment this can also be used to disable the whitelist completely by allowing all Types to be deserialized into object properties with:
JsConfig.AllowRuntimeType = _ => true;
Note: This vulnerability also applies if you've manually implemented a similar feature that uses a string or Type property to specify which instance to create, in which case you'll want to implement a similar solution. Although the recommendation to avoid this vulnerability would be to not use late-bound object properties and to revert to using Typed properties instead.
Fast Reflection APIs
Most of ServiceStack's libraries relies on the high-performance reusable utilities in ServiceStack.Text to power many of its features. Previously many of our compiled delegates were maintained across multiple different classes, often with duplicated functionality. In this release we've consolidated this functionality behind a formal API which includes multiple cascading implementations so it's able to use the fastest implementation available in each supported platform, i.e. for most .NET platforms we use the Reflection.Emit implementations when possible, when not available it falls back to using Compiled Expression trees, then finally falling back to using a Reflection-based implementation.
This functionality is available using the CreateGetter() and CreateSetter() extension methods on both PropertyInfo or FieldInfo which you may find useful if you'd like to get better performance when populating runtime types dynamically.
The API examples below showcases the different APIs available:
var runtimeType = typeof(MyType);

object instance = runtimeType.CreateInstance();
PropertyInfo pi = runtimeType.GetProperty("Id");
var idSetter = pi.CreateSetter();
var idGetter = pi.CreateGetter();

idSetter(instance, 1);
var idValue = idGetter(instance);
To squeeze out a bit more performance you can create a generic delegate to avoid some boxing/casting with:
MyType instance = runtimeType.CreateInstance<MyType>();
var idSetter = pi.CreateSetter<MyType>();
var idGetter = pi.CreateGetter<MyType>();
All APIs also have field equivalents:
FieldInfo fi = runtimeType.GetField("Id");
var idSetter = fi.CreateSetter();
var idGetter = fi.CreateGetter();
The Create* APIs above creates the compiled delegates which need to be cached to avoid the compilation penalty on subsequent usages. The TypeProperties<T> and TypeFields<T> classes offers fast cached access to these setters/getters which compiles all the public properties or fields on a per Type basis.
Some examples of using these classes:
var runtimeType = typeof(MyType);
var instance = runtimeType.CreateInstance();

var typeProps = TypeProperties.Get(runtimeType); //Equivalent to:
//  typeProps = TypeProperties<MyType>.Instance;

var idAccessor = typeProps.GetAccessor("Id");
propAccessor.PublicSetter(instance, 1);
var idValue = propAccessor.PublicGetter(instance);
Alternatively you can access property getters / setters individually:
typeProps.GetPublicSetter("Id")(instance, 1);
var idValue = typeProps.GetPublicGetter("Id")(instance);
Whilst TypeFields<T> does the same for a Types public fields which is also able to work around the copy semantics of ValueTypes (typically lost when boxing) by utilizing the ref APIs below where we can use this to populate C# 7's new Value Tuples with:
var typeFields = TypeFields.Get(typeof((string s, int i)));

var oTuple = (object)("foo", 1);

var item1Accessor = typeFields.GetAccessor("Item1");
var item2Accessor = typeFields.GetAccessor("Item2");

item1Accessor.PublicSetterRef(ref oTuple, "bar");
item2Accessor.PublicSetterRef(ref oTuple, 2);

var tuple = ((string s, int i))oTuple;
tuple.s //= bar
tuple.i //= 2
OrmLite
Support for C# 7 Value Tuples
The ref API above was used to implement the new fast C# 7 Value Tuple support in OrmLite which enables an alternative terse, clean and typed API for accessing the Dynamic Result Sets returned when using a custom Select expression:
var query = db.From<Employee>()
    .Join<Department>()
    .OrderBy(e => e.Id)
    .Select<Employee, Department>(
        (e, d) => new { e.Id, e.LastName, d.Name });

var results = db.Select<(int id, string lastName, string deptName)>(query);

var row = results[i];
$"row: ${row.id}, ${row.lastName}, ${row.deptName}".Print();
Full Custom SQL Example:
var results = db.SqlList<(int count, string min, string max, int sum)>(
    "SELECT COUNT(*), MIN(Word), MAX(Word), Sum(Total) FROM Table");
Partial Custom SQL Select Example:
var query = db.From<Table>()
    .Select("COUNT(*), MIN(Word), MAX(Word), Sum(Total)");

var result = db.Single<(int count, string min, string max, int sum)>(query);
Same as above, but using Typed APIs:
var result = db.Single<(int count, string min, string max, int sum)>(
    db.From<Table>()
        .Select(x => new {
            Count = Sql.Count("*"),
            Min = Sql.Min(x.Word),
            Max = Sql.Max(x.Word),
            Sum = Sql.Sum(x.Total)
        }));
Expanded Typed SqlExpresion Surface Area
Due to SqlExpression being used to construct more and more complex queries we've been requested to expand the Surface Area of OrmLite's Typed SqlExpression to handle up to 15 tables in its Where, And and Or APIs, e.g:
db.From<Table1>()
    .Join<Table2>((t1, t2) => t1.Id == t2.Id)
    .Join<Table3>((t1, t3) => t1.Id == t3.Id)
    .Join<Table4>((t1, t4) => t1.Id == t4.Id)
    ...
    .Where<Table1,Table2,Table3,Table4>((t1,t2,t3,t4) => ... ) //..., Table15
    .And<Table1,Table2,Table3,Table4>((t1,t2,t3,t4) => ... )   //..., Table15
    .Or<Table1,Table2,Table3,Table4>((t1,t2,t3,t4) => ... )    //..., Table15
Which now supports up to 15 tables in a single SQL Condition.
The benefits for using OrmLite's Typed API for executing large, complex SQL queries are its typing benefits whilst being able to generate cross-platform SQL that can be executed on multiple RDBMS's, however if you don't have these requirements it can often be easier to execute Custom SQL Statements using db.SqlList<T>() instead - especially useful when needing to utilize RDBMS-specific features.
Expanded Join Conditions
In a similar way Join and LeftJoin statements can now have up to 4 tables with the first 2 tables used for the table join and the remaining tables can be used to add additional filters to the JOIN expression, e.g:
var q = db.From<Table1>()
    .Join<Table2>((t1, t2) => t1.Id == t2.Id)
    .Join<Table1, Table3, Table2>((t1, t3, t2) =>
        t1.Id == t3.Id && t3.Id == t2.Id)
    .LeftJoin<Table1, Table4, Table2, Table3>((t1, t4, t2, t3) =>
        t1.Id == t4.Id && t4.Id == t2.Id && t4.Id == t3.Id);
Fail fast
OrmLite is designed to populate as much matching data as it's able to, if you'd instead prefer to fail fast you can tell OrmLite to throw instead of suppressing common mapping exceptions with:
OrmLiteConfig.ThrowOnError = true;
Proxy Feature
The new ProxyFeature plugin is an application-level proxy that can be used to transparently proxy HTTP Requests through to
downstream servers whose behavior can be customized with custom C# hooks to control how requests are proxied.
ProxyFeature registers an async/non-blocking RawHttpHandler which bypasses ServiceStack's Request Pipeline that in ASP.NET is executed as an ASP.NET IHttpAsyncHandler so it should be flexible and performant enough to handle many demanding workloads.
The example configuration below registers multiple proxies which proxies all requests to /techstacks, /marketing or /finance endpoints to their configured downstream servers:
Plugins.Add(new ProxyFeature(
    matchingRequests: req => req.PathInfo.StartsWith("/techstacks"),
    resolveUrl:req => $"http://${resolve(req)}.techstacks.io" + req.RawUrl.Replace("/techstacks","/")))

Plugins.Add(new ProxyFeature(
    matchingRequests: req => req.PathInfo.StartsWith("/marketing"),
    resolveUrl:req => "http://marketing.domain.com" + req.RawUrl.Replace("/marketing", "/")))

Plugins.Add(new ProxyFeature(
    matchingRequests: req => req.PathInfo.StartsWith("/finance"),
    resolveUrl:req => "http://finance.domain.com" + req.RawUrl.Replace("/finance", "/")))
Just like a normal HTTP Proxy, ProxyFeature forwards all the HTTP Request Headers and returns all the HTTP Response Headers and body of the downstream server inc. HTTP Error Responses. This works especially well with ServiceStack's message-based design as the proxied endpoint e.g /techstacks can be treated as if it were the BaseUrl for the downstream server which allows external clients to treat it like they're communicating with the downstream server directly despite every request being transparently proxied behind a central external ServiceStack instance.
One potential use-case is to enable smart load balancing which lets you use C# to dynamically control which external downstream server requests are proxied to.
Thanks to ServiceStack's clean Service Gateway design you can use the clean POCO DTOs from any server instance, which you can get using the new servicestack-cli utils from either the public url or proxy endpoint url, e.g:
$ csharp-ref https://techstacks.io
$ csharp-ref https://external.domain.com/techstacks
The resulting DTOs can be used with any .NET Service Client, configured with the proxy endpoint as the BaseUrl:
var client = new JsonServiceClient("https://external.domain.com/techstacks");

var request = new GetTechnology { Slug = "ServiceStack" };
var response = client.Get(request);
response.PrintDump();
Another potential use-case is to have the proxy act like a facade to access multiple internal microservices that can be made available behind a single external URL, e.g:
var authRequest = new Authenticate { ... };

var marketingClient = new JsonServiceClient("https://external.domain.com/marketing");
var authResponse = marketingClient.Post(authRequest);

var financeClient = new JsonHttpClient("https://external.domain.com/finance");
var authResponse = await financeClient.PostAsync(authRequest);
When needed, there's a number of customization options available which enables complete control in how the request is proxied and ultimately what response is returned to clients:
class ProxyFeature
{
    // Required filters to specify which requests to proxy and which url to use
    ProxyFeature(
        Func<IHttpRequest, bool> matchingRequests, // Which requests should be proxied
        Func<IHttpRequest, string> resolveUrl);    // Which downstream url to use

    // Customize the HTTP Request Headers that are sent to downstream server
    Action<IHttpRequest, HttpWebRequest> ProxyRequestFilter

    // Customize the downstream HTTP Response Headers that are returned to client
    Action<IHttpResponse, HttpWebResponse> ProxyResponseFilter

    // Inspect or Transform the HTTP Request Body that's sent downstream
    Func<IHttpRequest, Stream, Task<Stream>> TransformRequest

    // Inspect or Transform the downstream HTTP Response Body that's returned
    Func<IHttpResponse, Stream, Task<Stream>> TransformResponse
}
So you could use the TransformResponse delegate for instance to rewrite any internal urls to use external urls with something like:
Plugins.Add(new ProxyFeature(
    matchingRequests: req => req.PathInfo.StartsWith("/techstacks"),
    resolveUrl: req => $"http://${resolve(req)}.techstacks.io" + req.RawUrl.Replace("/techstacks","/"))
    {
        TransformResponse = async (res, responseStream) =>
        {
            using (var reader = new StreamReader(responseStream, Encoding.UTF8))
            {
                var responseBody = await reader.ReadToEndAsync();
                var replacedBody = responseBody.Replace(
                    "https://techstacks.io",
                    "https://external.domain.com/techstacks");
                return MemoryStreamFactory.GetStream(replacedBody.ToUtf8Bytes());
            }
        }
    });
Open API
We've had a lot of interest and usage with our recent support for Open API added in the last release and have continued to add refinements based on Customer feedback:
The new [Tag] attribute can be used to visually group operations by Tag in Swagger UI:
[Tag("Greet")]
public class Hello : IReturn<HelloResponse>
{
    public string Name { get; set; }
}
Arrays annotated with the [ApiAllowableValues] will show the list of values when clicking Try Out button in Swagger UI:
[Route("/movie/{Id}")]
public class GetMovie : IReturn<MovieResponse>
{
    [ApiMember(IsRequired = true, Description = "Required ID of Movie.", DataType = "integer", ParameterType = "path")]
    public int Id { get; set; }

    [ApiMember(IsRequired = false, AllowMultiple = true, Description = "List of additional objects to include in the movie response.")]
    [ApiAllowableValues("Includes", Values = new string[] { "Genres", "Releases", "Contributors" })]
    public string[] Includes { get; set; }
}
Support for application\x-www-form-urlencoded ContentType params in POST and PUT requests can be enabled in Swagger UI by disabling DTO bodies with:
Plugins.Add(new OpenApiFeature {
    DisableAutoDtoInBodyParam = true
});
Server Events
EventSubscription
The new ServerArgs string Dictionary on IEventSubscription and SubscriptionInfo is for storing metadata on a SSE subscription that you only want visible on the Server (e.g. Service implementations). The existing ConnectArgs Dictionary is for info you want the subscribed client to have access to from its OnConnect event whilst the Meta dictionary is for public info you'd like other channel subscribers to have access to from their OnJoin, OnLeave and OnUpdate on subscriber events.
Here's an example of using the server OnCreated callback to populate all 3 collections:
new ServerEventsFeature {
    OnCreated = (sub,req) => {
        var session = req.GetSession();
        if (!session.IsAuthenticated) return;
        sub.Meta["Nickname"] = session.Nickname;           // channel subscribers
        sub.ConnectArgs["Email"] = session.Email;          // client subscriber
        sub.ServerArgs["PostalCode"] = session.PostalCode; // server
    }
}
Other additions include:
- The new
IServerEvents.GetAllSubscriptionInfos()API lets you access all active subscriptions CreatedAtnow available in client channel subscriber events- The
LastMessageId,Request,Responseproperties now accessible onEventSubscription
Autowired Typed Request Filters
Josh Engler contributed support for Autowired Request and Response Filters which lets you handle Request DTOs in a Typed Filter similar to how Autowired Services handles Typed Request DTOs with access to IOC injected dependencies.
Autowired Typed Filters just needs to implement ITypedFilter<TRequest> and can be registered in the IOC like a regular dependency, e.g:
container.RegisterAutoWiredAs<Dependency, IDependency>();
container.RegisterAutoWired<TypedRequestFilter>();
Then can be registered using the new RegisterTypedRequestFilter overload:
this.RegisterTypedRequestFilter(c => c.Resolve<TypedRequestFilter>());
Which invokes the Typed Request Filter on each MyRequest where it's able to access any IOC injected dependencies, e.g:
class TypedRequestFilter : ITypedFilter<MyRequest>
{
    public IDependency Dependency { get; set; } // injected by IOC

    public void Invoke(IRequest req, IResponse res, MyRequest dto)
    {
        // Handle MyRequest using a Request Filter
        if (!Dependency.GrantAccess(dto, req))
        {
            res.StatusCode = (int)HttpStatusCode.Forbidden;
            res.StatusDescription = "Thou shall not pass";
            res.EndRequest();
        }
    }
}
HTTP Caching
Returning a static Virtual File or FileInfo in a HttpResult now sets the Last-Modified HTTP Response Header whose behavior instructs the pre-configured HttpCacheFeature to generate the necessary HTTP Headers so HTTP Clients are able to validate subsequent requests using the If-Modified-Since HTTP Request Header, allowing them to skip redownloading files they've already cached locally.
This feature is leveraged in all Single Page App templates in its [FallbackRoute] implementation that's used to enable full page reloads by returning the Home index.html page for any unknown Requests, allowing routing to be handled on the client:
[FallbackRoute("/{PathInfo*}")]
public class FallbackForClientRoutes
{
    public string PathInfo { get; set; }
}

public class MyServices : Service
{
    //Return default.html for unmatched requests so routing is handled on client
    public object Any(FallbackForClientRoutes request) =>
        new HttpResult(VirtualFileSources.GetFile("index.html"));
}
Authentication
Re-Authentication
We routinely preemptively seek out optimizations and try to avoid executing unnecessary logic when possible. One such optimization was skipping Authentication if the User was already Authenticated. However in this case we picked the wrong default as skipping Re-Authentication wasn't completely harmless, e.g. you weren't able to tell if your Password was still valid, it didn't reset the UserSession expiry and more recently it prevented accessing new JWT Refresh Tokens which are only issued upon Authentication.
So we've removed this optimization and are allowing Re-Authentication by default which is more in-line with the expected behavior. If needed, the previous behavior can be reverted with:
Plugins.Add(new AuthFeature(...) {
    SkipAuthenticationIfAlreadyAuthenticated = true
});
However we're deprecating and will eventully remove this option as we can't think of a valid use-case where it's preferred, so if you're somehow relying on the previous behavior we recommend changing it to work with current behavior when possible.
API Key Auth Provider
You can opt-in to allow API Keys to be passed on the QueryString (e.g. ?apikey={APIKEY}) or HTTP POST Form Data with:
Plugins.Add(new ApiKeyAuthProvider {
    AllowInHttpParams = true
});
JWT Tokens
You can retrieve the JWT Token string from the current IRequest with:
string jwt = req.GetJwtToken();
There's also a new API to simplify converting JWT Tokens into User Sessions:
var userSession = JwtAuthProviderReader.CreateSessionFromJwt(base.Request);
Which is essentially a shorthand for:
var jwtProvider = (JwtAuthProviderReader)AuthenticateService.GetAuthProvider("jwt");
var userSession = jwtProvider.ConvertJwtToSession(base.Request, req.GetJwtToken());
Minor Changes
DebugMode
The home page and directories are no longer cached in DebugMode to better be able to reflect changes during development.
WebServiceException
The WebServiceException Message returns the the more appropriate ResponseStatus.ErrorMessage if available. The previous StatusDescription text can be retrieved from the WebServiceException.StatusDescription property.
BasicAppHost
The BasicAppHost is no longer pre-registered with default plugins, so any tests or external code that uses ServiceStack APIs outside of ServiceStack will need to import any plugins they make use of, e.g:
using (var appHost = new BasicAppHost {
        Plugins = { new MarkdownFormat() }
    }.Init())
{
    //..
}
Other Changes
- The
RemoveHeader()API has been added toIResponseand all implementations - The HTTP Request/Response Preview in Metadata pages uses the Verb, URL and Request Body of the preferred HTTP Method for each Service
- The Basic Auth Credentials are auto-sent in
JsonHttpClient401 Challenged Responses - Empty Collections are now ignored AutoQuery Filters