
Text to Blazor is our first initiative for harnessing AI to help to rapidly generate new Blazor Admin CRUD Apps from just a text description.
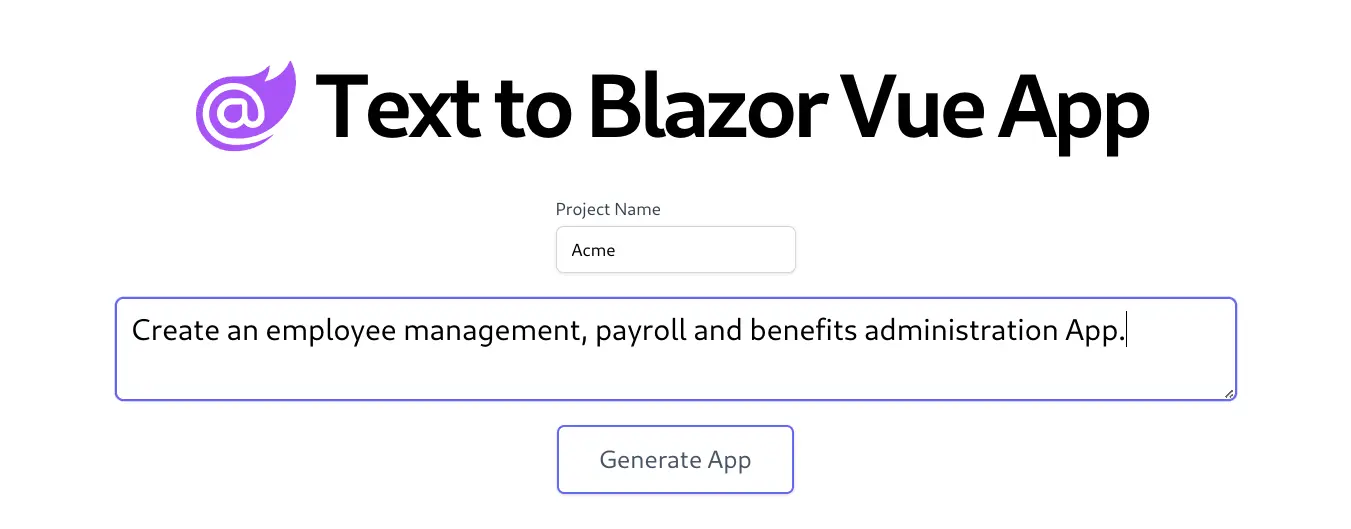
This will query 5 different high quality AI models to generate 5 different Data Models, APIs, DB Migrations and Admin UIs which you can browse to find the one that best matches your requirements.
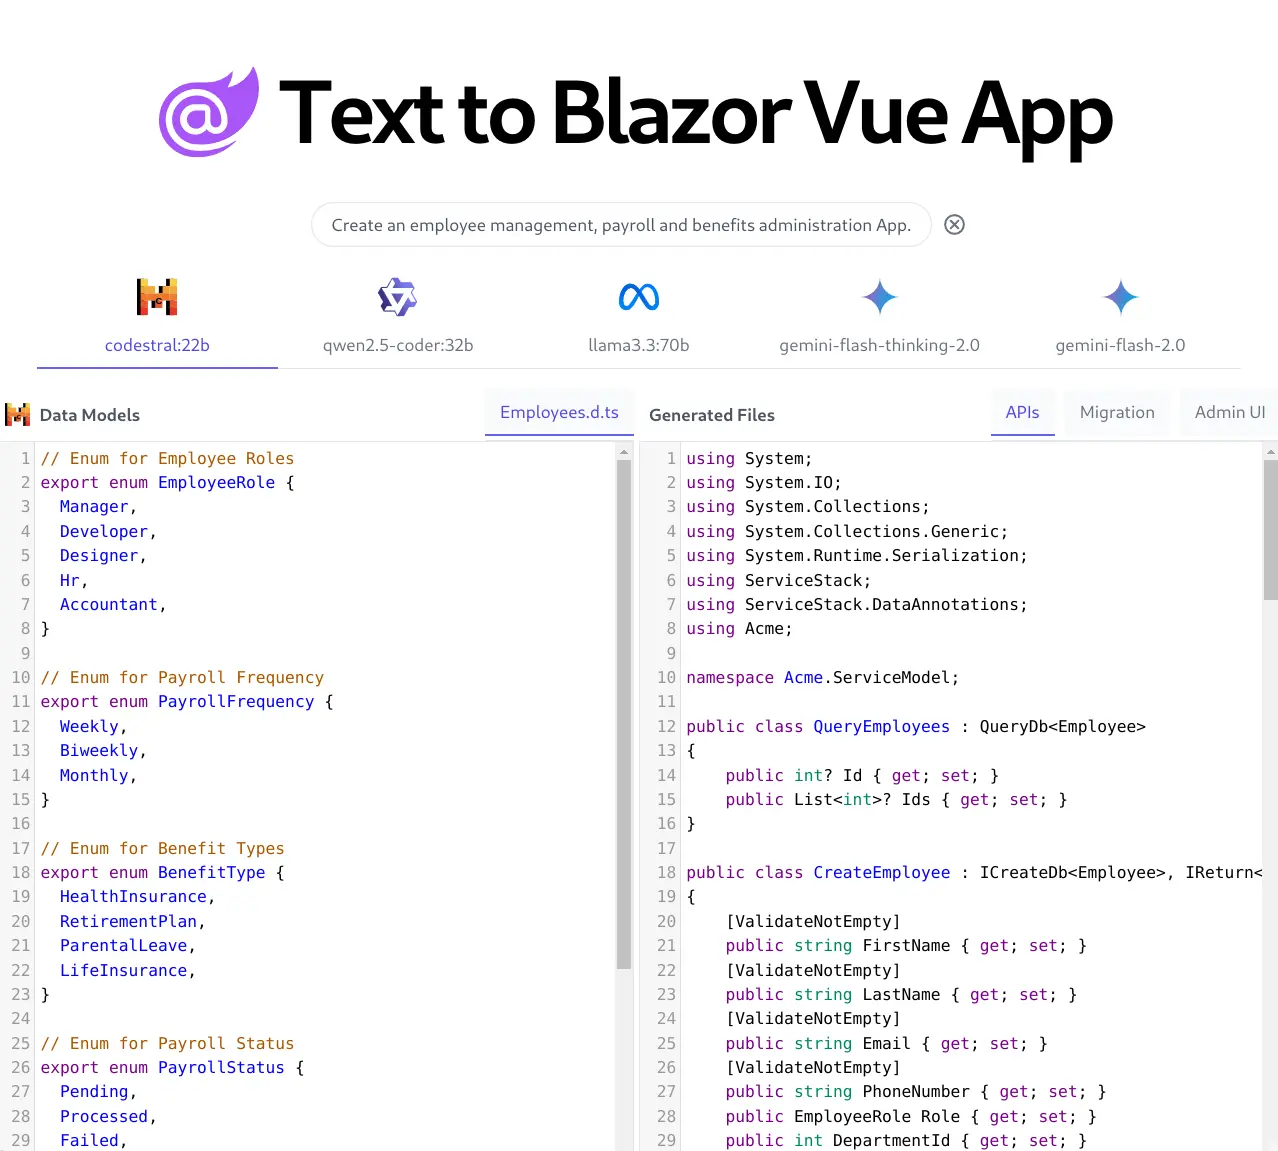
Using AI to generate Data Models for Inspiration
Whilst the result is a working CRUD App, the approach taken is very different from most AI tools which uses AI to generate the entire App that ends up with a whole new code-base developers didn't write which they'd now need to maintain.
Instead AI is only used to generate the initial Data Models within a TypeScript Declaration file which we've found is the best format supported by AI models that's also the best typed DSL for defining data models with minimal syntax that's easy for humans to read and write.
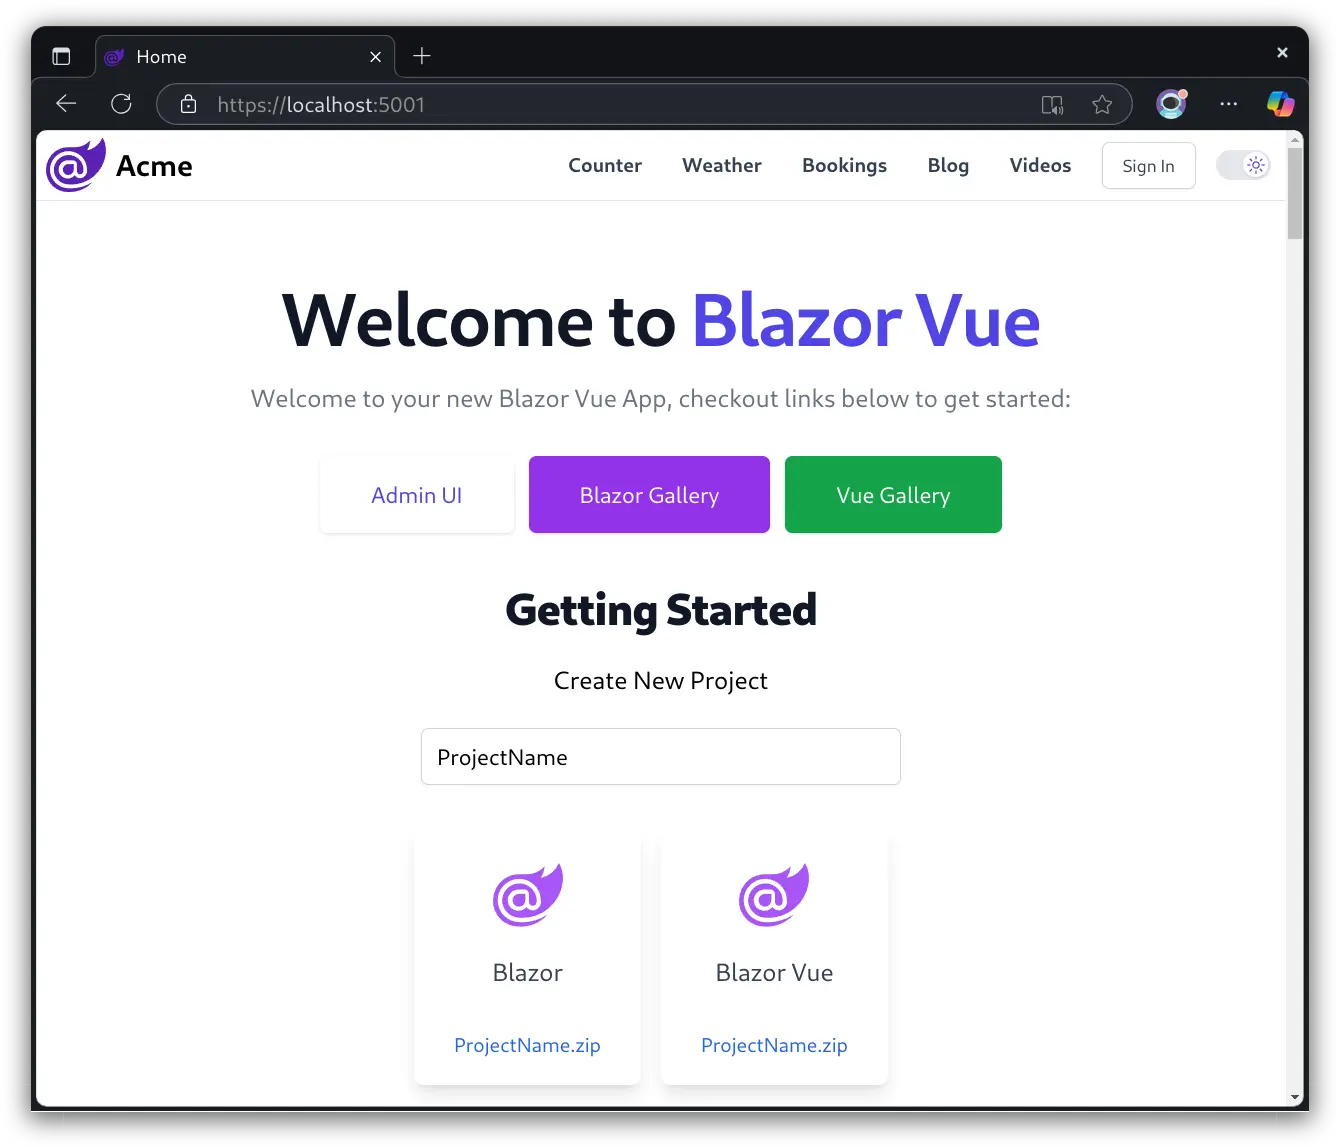
Download preferred Blazor Vue CRUD App
Once you've decided on the Data Models that best matches your requirements, you can download your preferred generated Blazor Vue CRUD App:
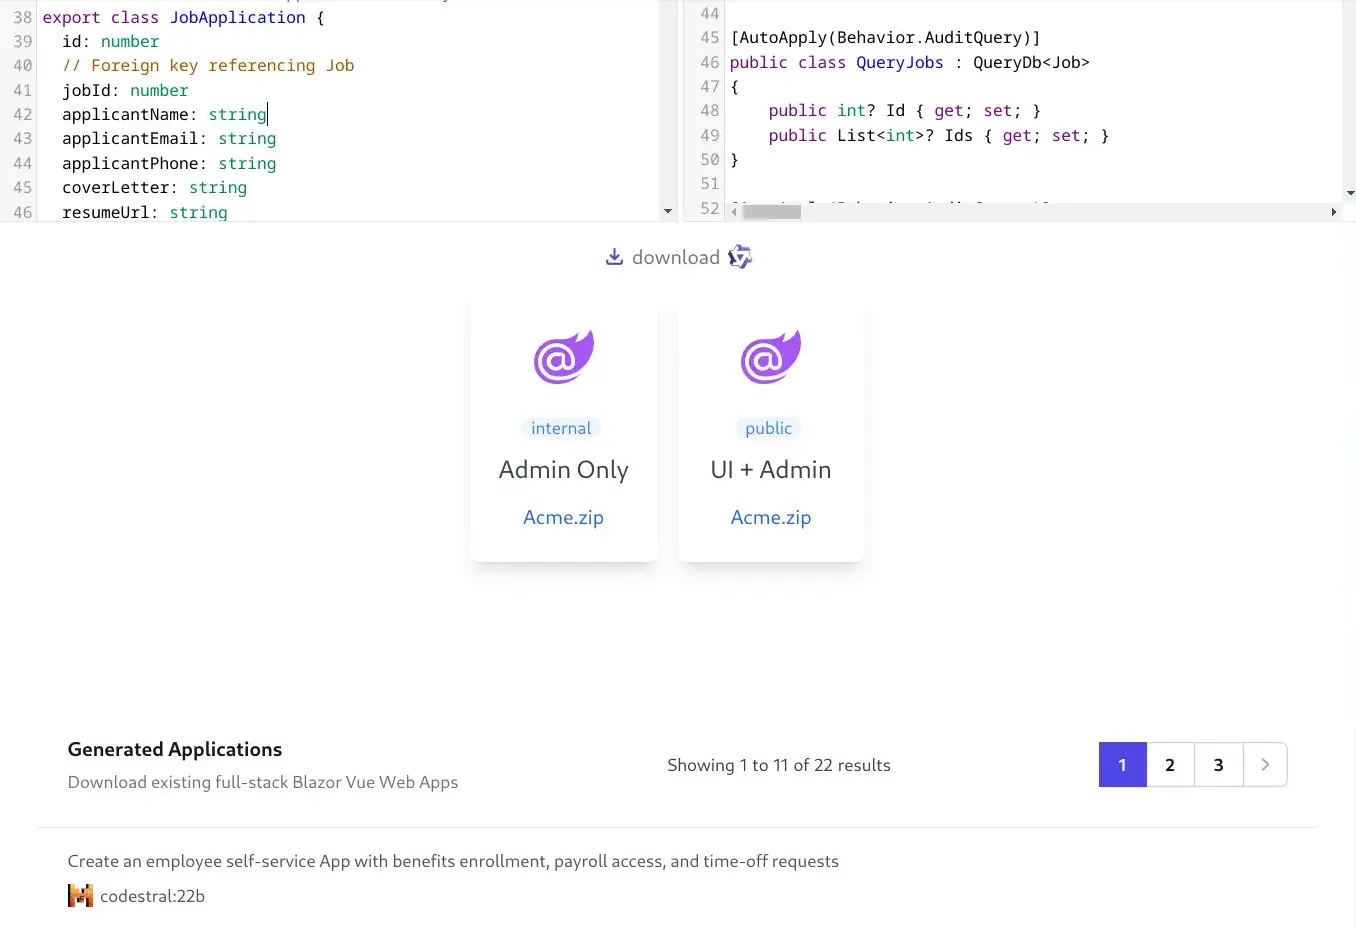
Blazor Admin App
Admin Only - is ideal for internal Admin Apps where the Admin UI is the Primary UI
Blazor Vue App
UI + Admin - Creates a new blazor-vue template, ideal for Internet or public facing Apps which sports a full-featured content rich UI for a Web App's users whilst providing a back-office Admin UI for Admin Users to manage the App's data.
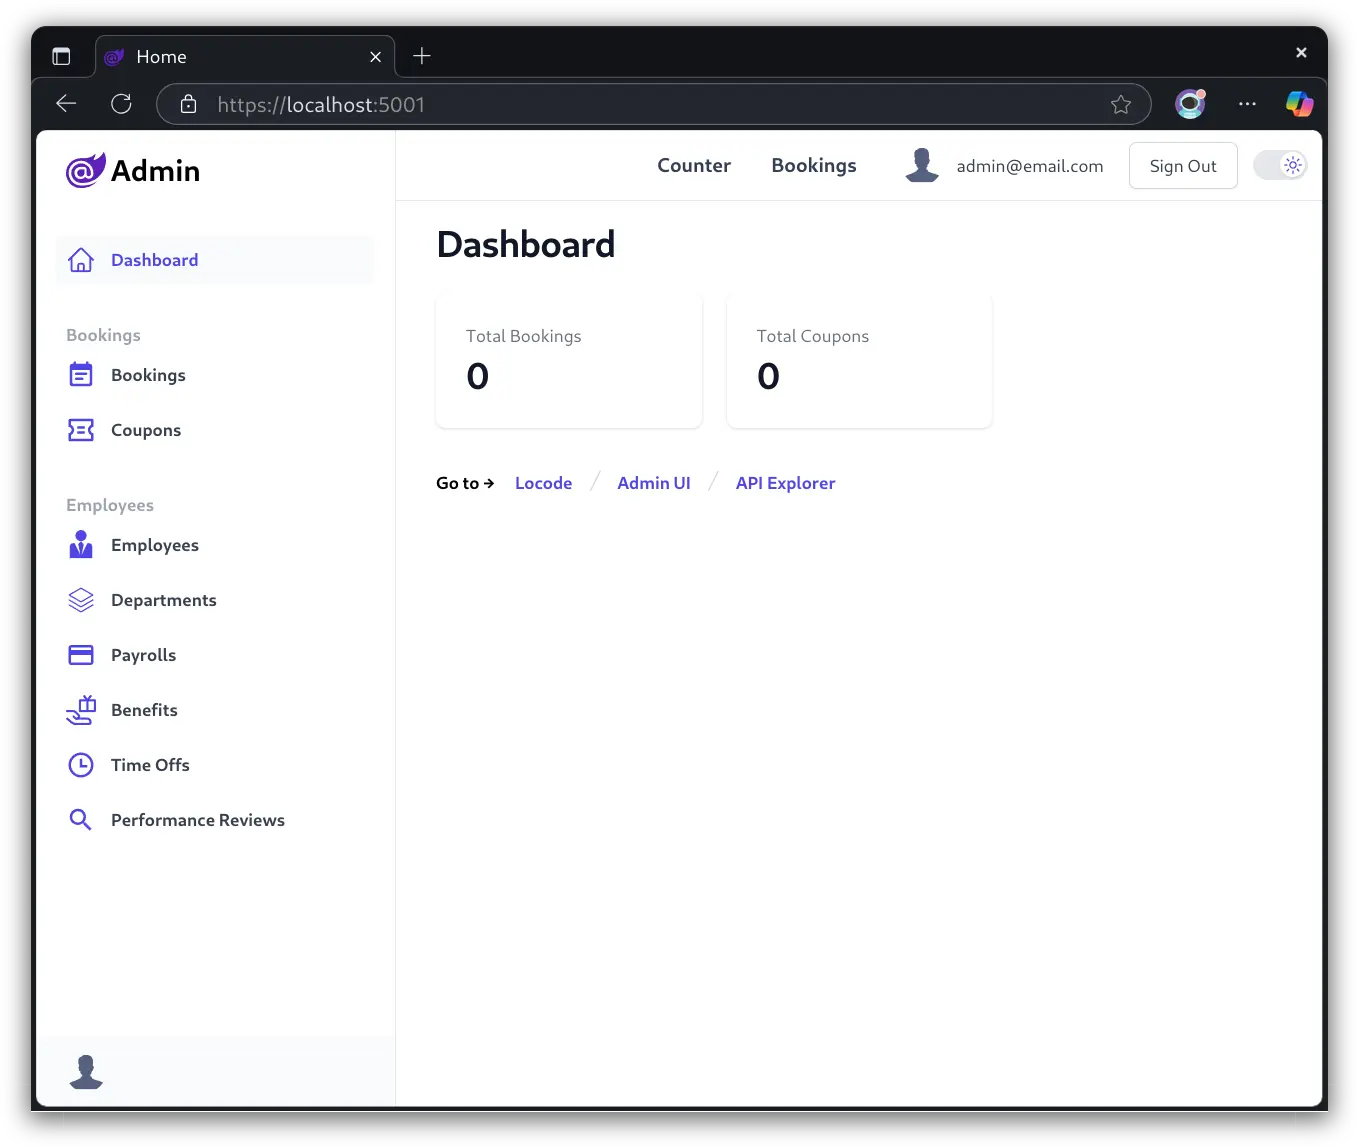
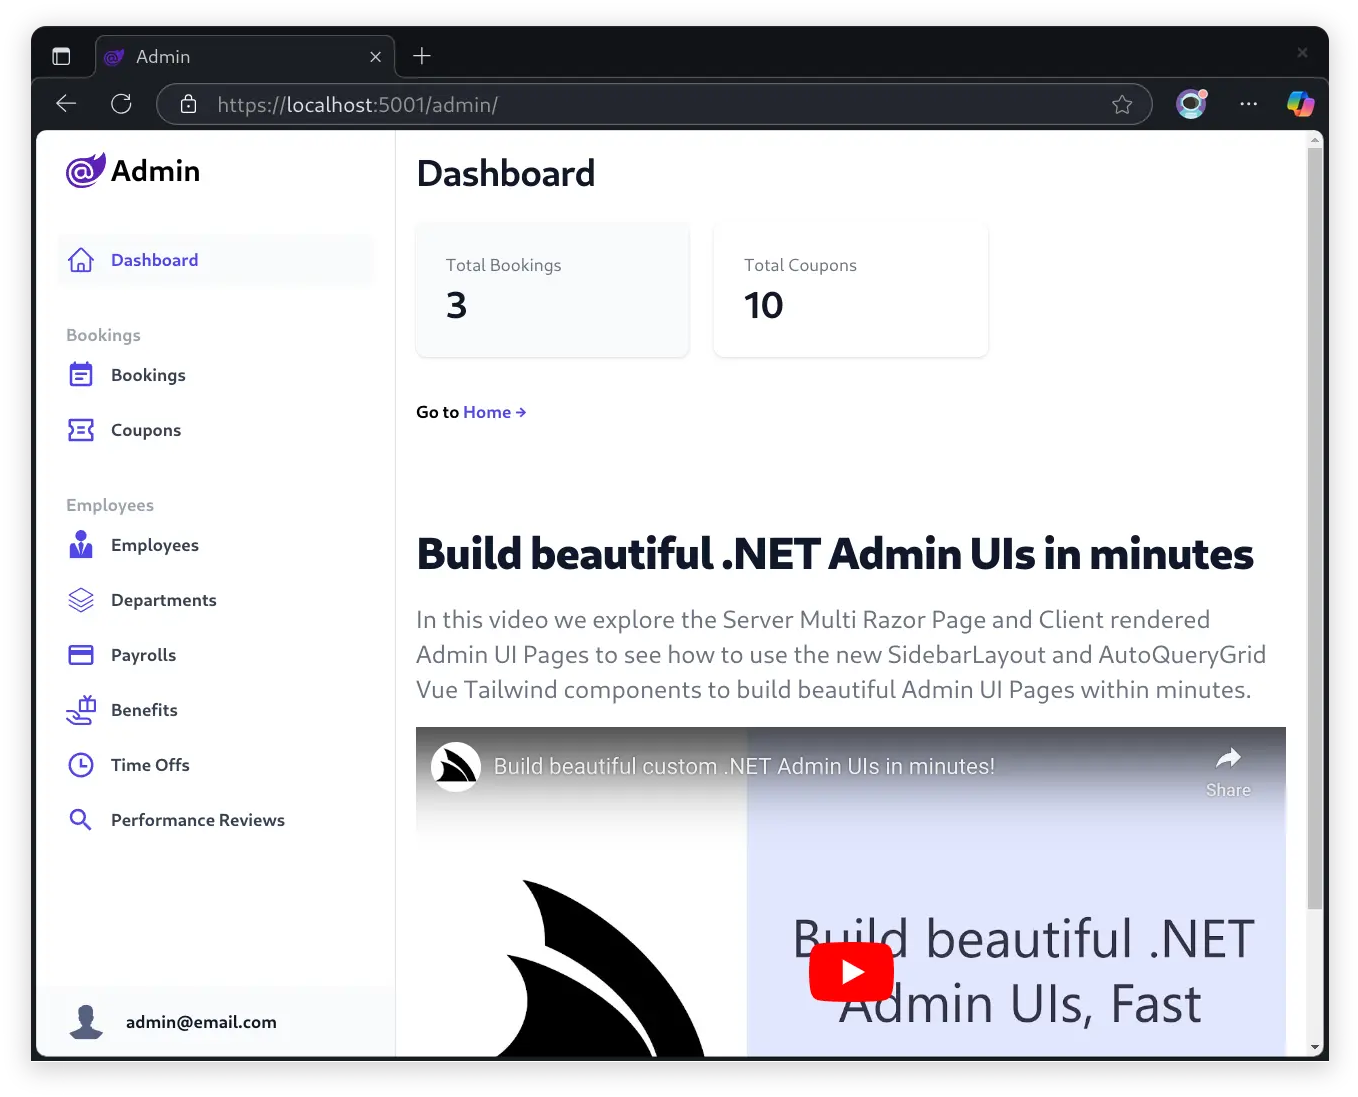
Clicking on the Admin UI button will take you to the Admin UI at /admin:
Run Migrations
After downloading you'll then need to run the DB Migrations to create the App's Identity Auth and DB Tables:
npm run migrate
Instant CRUD UI
Upon which you can hit the ground running and start using the Admin UI to manage the new Data Model RDBMS Tables!
Create new Records from Search Dialog
We're continually improving the UX of the AutoQueryGrid Component used in generating CRUD UIs to enable a more productive and seamless workflow. A change added to that end that you can see in the above video is the ability to add new Records from a Search dialog:
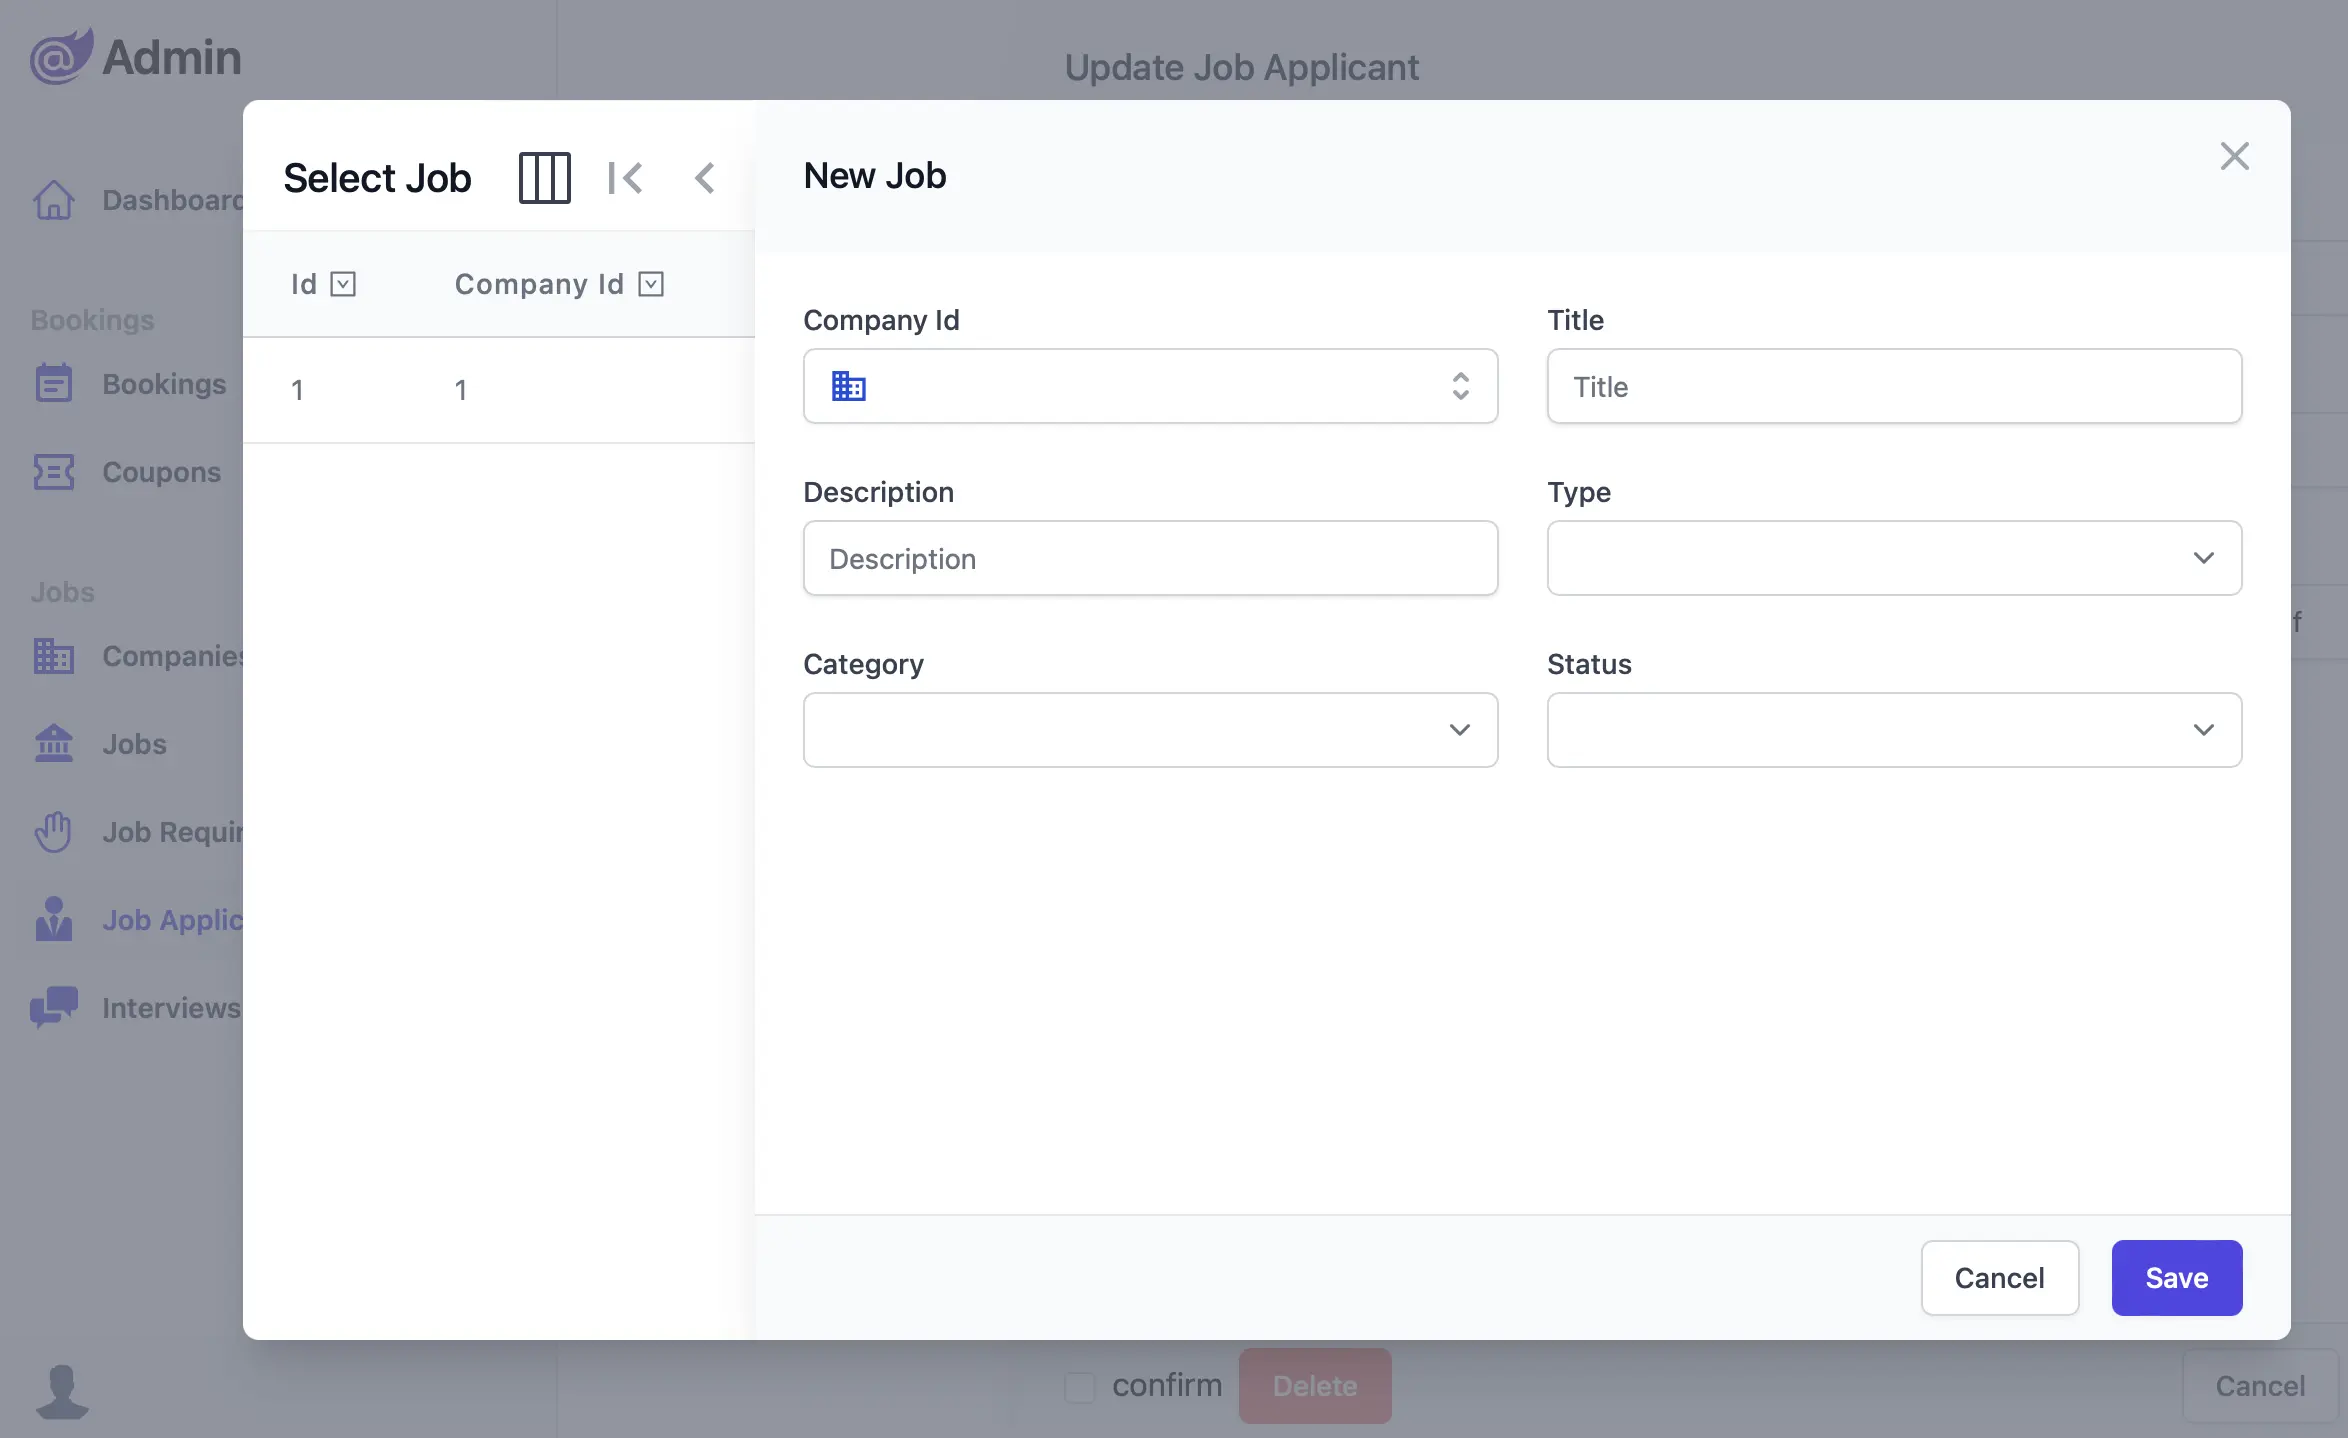
This now lets you start immediately creating new records without needing to create any lookup entries beforehand.
References using non Foreign Key Properties
Another declarative feature added is being able to define Foreign Key References in Data Models using non-Primary Keys. A good use-case for this is returning User Info for tables that store a Username instead of a User Id, e.g:
public class Booking : AuditBase
{
    //..
    [Reference(SelfId=nameof(CreatedBy), RefId=nameof(User.UserName), RefLabel=nameof(User.Name))]
    public User Employee { get; set; }
}
Which works the same as a Foreign Key Primary Key Reference in returning the Referenced Data in API Responses, e.g:
{
    "id": 1,
    "name": "First Booking!",
    "roomType": "Queen",
    "roomNumber": 10,
    "bookingStartDate": "2024-12-01T00:45:50.9098005Z",
    "bookingEndDate": "2024-12-08T00:45:50.9098123Z",
    "cost": 100,
    "couponId": "BOOK10",
    "employee": {
        "id": "684201c8-733a-453c-9f91-2004ccf23366",
        "userName": "employee@email.com",
        "firstName": "Test",
        "lastName": "Employee",
        "displayName": "Test Employee",
        "profileUrl": "/img/profiles/user2.svg"
    },
    "createdDate": "2024-11-21T00:45:50.9098513Z",
    "createdBy": "employee@email.com",
    "modifiedDate": "2024-11-21T00:45:50.9098722Z",
    "modifiedBy": "employee@email.com"
}
Lookup Input Component
Lookup Input fields are implicitly assigned to Foreign Key properties by AutoQuery which is customizable using
Reference Fields. They can also now be assigned to other properties like
Custom Input Component with [Input(Type="lookup")]
public class UpdateBooking : IPatchDb<Booking>, IReturn<IdResponse>
{
    [Input(Type="lookup")]
    public int Id { get; set; }
}
This could be assigned to Primary Key properties to replace its Text field with a modal lookup dialog for providing a GUI to search for a specified record's Primary Key.

Input Options can be used to customize the RefInfo property of a Lookup Input, e.g: refLabel can be used to show a different label for the selected record:
[Input(Type="lookup", Options="{refLabel:'RoomNumber'}")]
public int Id { get; set; }
Or you could choose to lookup a different Table by changing the model:
[Input(Type="lookup", Options = "{refId:'id',model:'Coupon',refLabel:'RoomNumber'}")]
public int Id { get; set; }
This can also be applied in TypeScript Definitions with the @input() attribute, which by default is applied to all
AutoQuery APIs:
export class Booking extends AuditBase {
  @input({type:"lookup",options:"{refLabel:'RoomNumber'}"})
  id: number
}
Alternatively targeted attributes can be used to apply them to a single API, e.g:
export class Booking extends AuditBase {
  @Update.input({type:"lookup",options:"{refLabel:'RoomNumber'}"})
  id: number
}
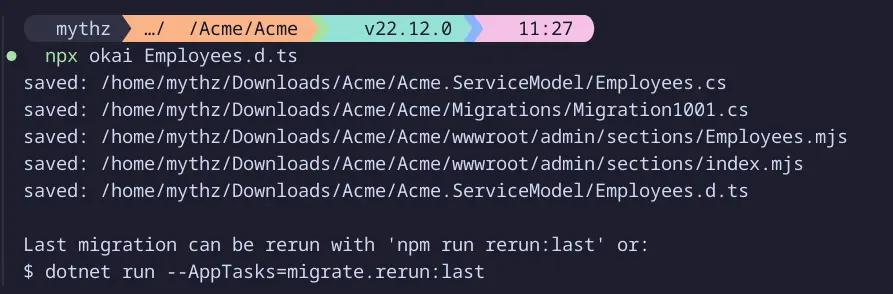
Audited Data Models
The TypeScript Data Models enable a rapid development experience for defining an App's Data Models which are used to generate the necessary AutoQuery CRUD APIs to support an Admin UI.
An example of the productivity of this approach is the effortless support for maintaining a detailed audit history for changes to select tables by inheriting from the AuditBase base class, e.g:
export class Job extends AuditBase {
    ...
}
Which can then be regenerated using the name of the TypeScript Model definitions:
npx okai Jobs.d.ts
This will include additional CreatedBy, CreatedDate, ModifiedBy, ModifiedDate, DeletedBy and DeletedDate
properties to the specified Table and also generates the necessary
Audit Behaviors
on the AutoQuery APIs to maintain the audit history for each CRUD operation.
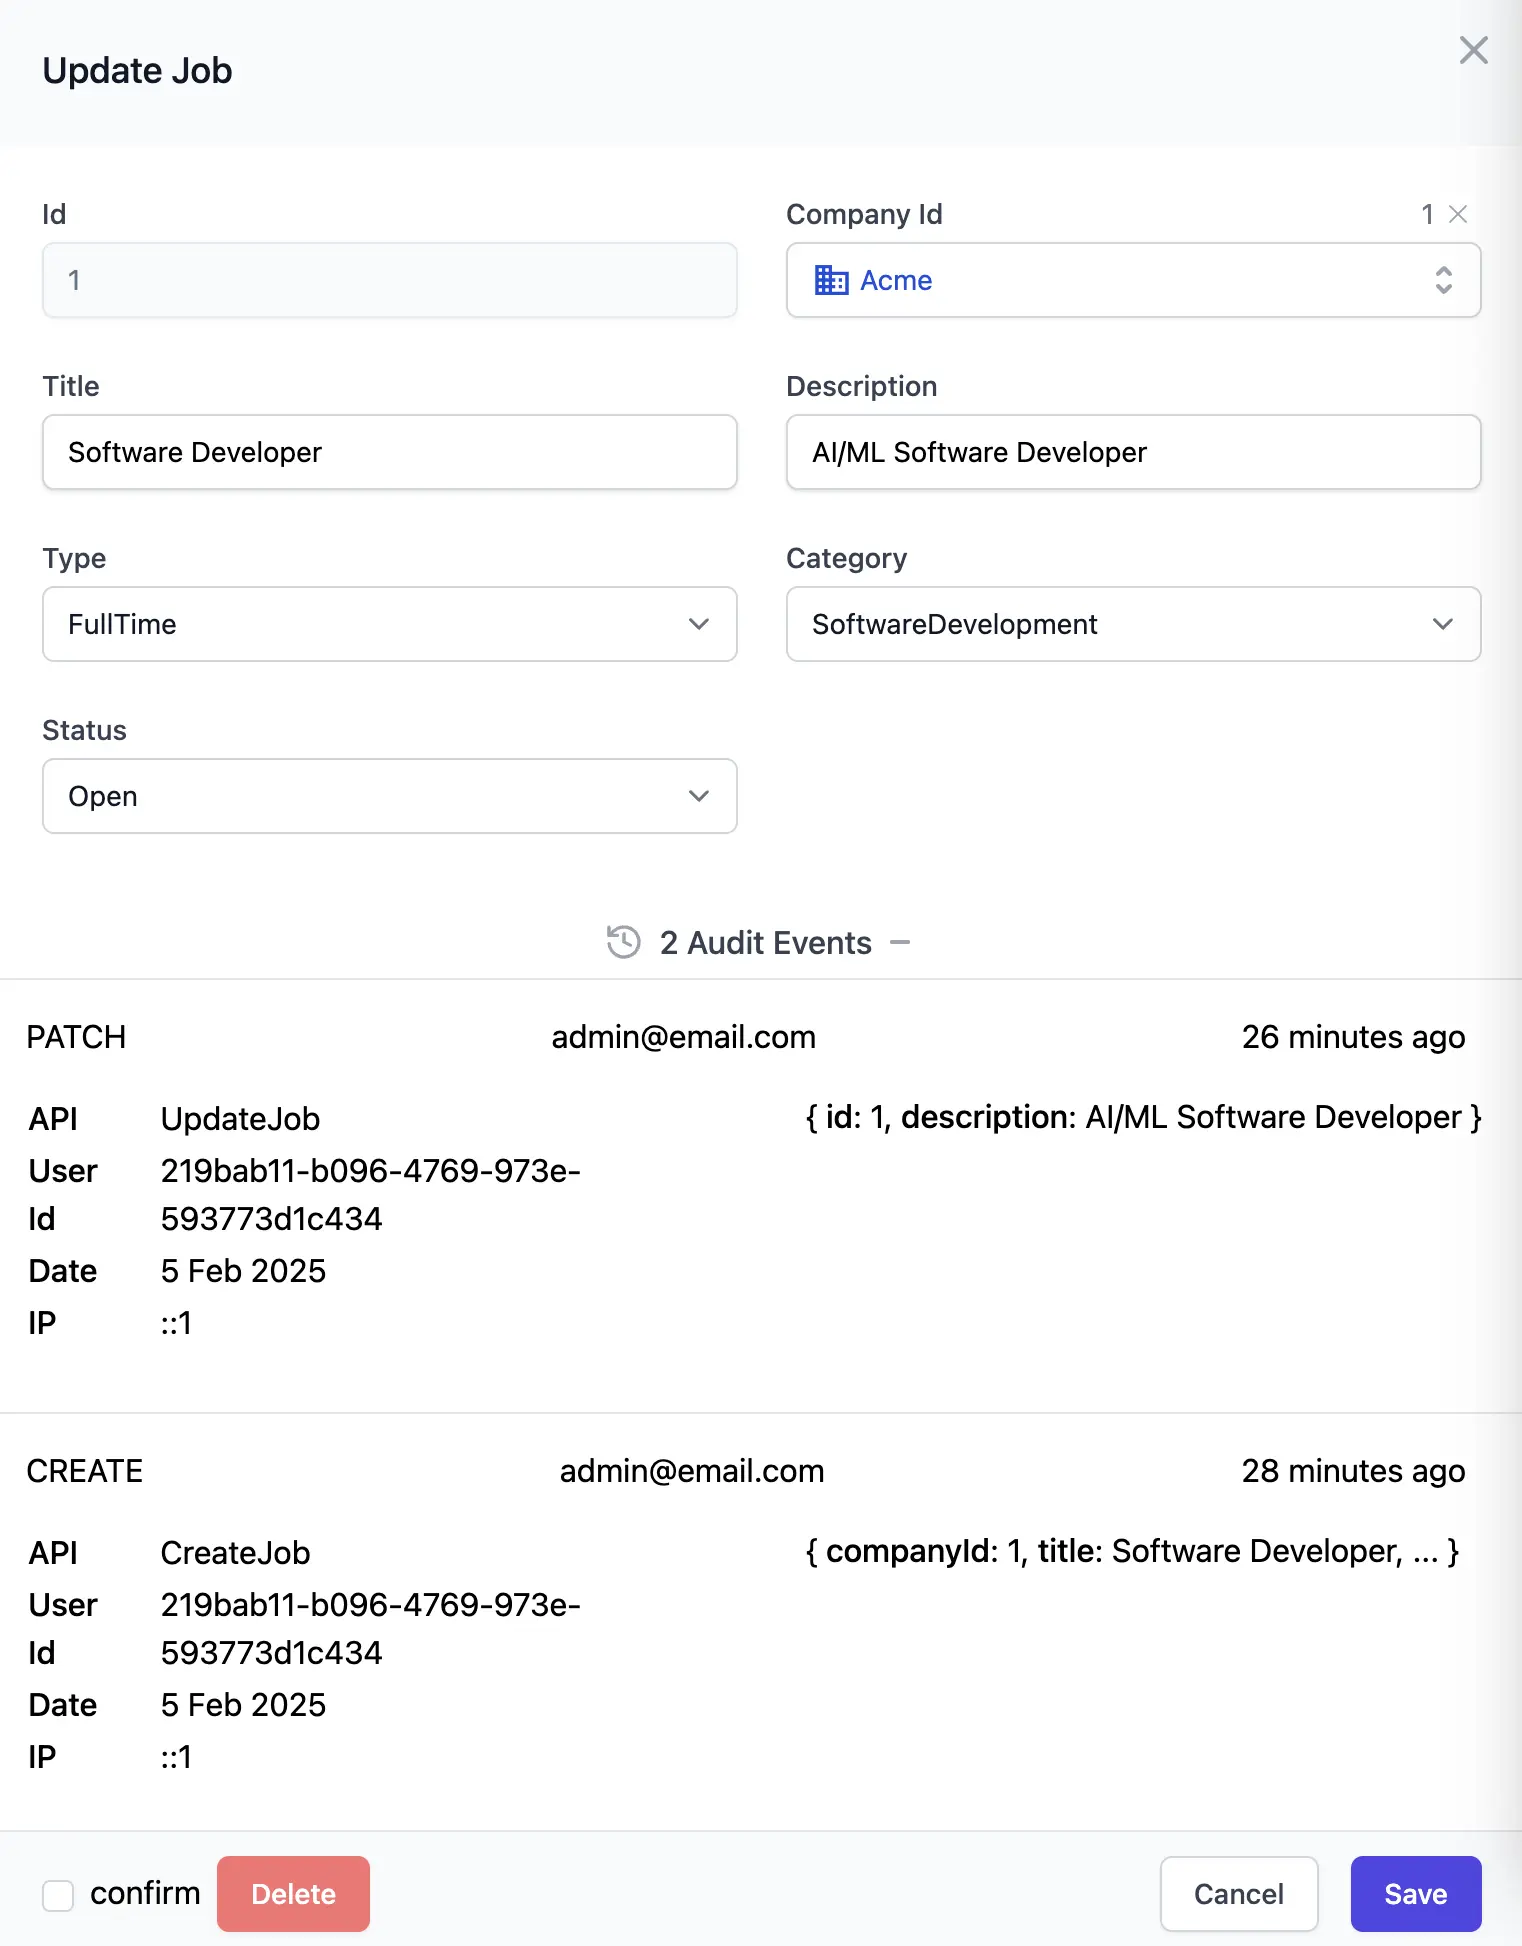
AutoQuery CRUD Audit Log
As the blazor-admin and blazor-vue templates are configured to use AutoQuery's Audit Log in its Configure.AutoQuery.cs the Audit Behaviors also maintains an Audit Trail of all CRUD operations, viewable in the Admin UI:
AI powered Rapid App Development Workflow
The okai npm tool works similar to the online Text to Blazor App creator
except it's a local tool that can add additional functionality to an existing project:
The syntax for adding a new feature to your ServiceStack App is simply calling it with a text prompt: npx okai <prompt>
npx okai "The kind of Feature you would like to add"
Where it will generate the Data Models, AutoQuery CRUD APIs, DB Migrations and Admin UI for the selected feature which you'll see after selecting the LLM Data Models you want to use, e.g:
Selected 'deepseek-r1:70b' data models

Saved: /projects/MyApp/MyApp.ServiceModel/Jobs.d.ts
Saved: /projects/MyApp/MyApp.ServiceModel/Jobs.cs
Saved: /projects/MyApp/wwwroot/admin/sections/Jobs.mjs
Saved: /projects/MyApp/wwwroot/admin/sections/index.mjs
Saved: /projects/MyApp/Migrations/Migration1001.cs

Run 'dotnet run --AppTasks=migrate' to apply new migration and create tables

To regenerate classes, update 'Jobs.d.ts' then run:
$ okai Jobs.d.ts
Where okai will generate everything needed to support the feature in your App, including:
MyApp.ServiceModel/Jobs.d.ts- TypeScript Data ModelsMyApp.ServiceModel/Jobs.cs- AutoQuery CRUD APIs and Data Modelswwwroot/admin/sections/Jobs.mjs- Admin UI Section- requires
blazor-adminorblazor-vuetemplate
- requires
MyApp/Migrations/Migration1001.cs- DB Migrations- requires project with OrmLite DB Migrations
Creating Data Models from Scratch
You can also choose to create your TypeScript Data Models from scratch if you prefer not to start with generated AI Models, by running:
npx okai init Todos.d.ts
This will create a basic Data Model and run the code generation to generate the necessary files for it:
Saved: /projects/Acme/Acme.ServiceModel/api.d.ts
Saved: /projects/Acme/Acme.ServiceModel/Todos.cs
Saved: /projects/Acme/Acme/Migrations/Migration1002.cs
Saved: /projects/Acme/Acme/wwwroot/admin/sections/Todos.mjs
Saved: /projects/Acme/Acme/wwwroot/admin/sections/index.mjs
Saved: /projects/Acme/Acme.ServiceModel/Todos.d.ts

Run 'npm run migrate' to apply the new migration and create the new tables or:
$ dotnet run --AppTasks=migrate
With Todos.d.ts include the a reference to the api.d.ts schema
and the necessary header config specifying which files it should generate along with an empty class where
you can start adding your Data Models for this feature:
/// <reference path="./api.d.ts" />
export type Config = {
  prompt:    "New Todo"
  api:       "~/Acme.ServiceModel/Todos.cs"
  migration: "~/Acme/Migrations/Migration1002.cs"
  uiMjs:     "~/Acme/wwwroot/admin/sections/Todos.mjs"
}

@tag("Todos")
export class Todo {
  id: number
  name: string
}
Removing Data Models
If for whatever reason don't want the generated Data Models anymore, you can remove them from your code-base with:
npx okai rm Todos.d.ts
Which will remove the *.d.ts Data Models and all its associated generated files.
Run Migrations
In order to create the necessary tables for any new functionality, you'll need to run the DB Migrations.
If migrations have never been run before, you can run the migrate npm script to create the initial database:
npm run migrate
This also lets you recreate it from scratch by running it after deleting the App's database (e.g. App_Data/app.db)
Rerun Last Migration
If migrations have already been run, run the rerun:last npm script instead to drop and re-run the last migration:
npm run rerun:last
Customize Data Models
The data models defined in the TypeScript Declaration file e.g. Jobs.d.ts is what drives the
generation of the Data Models, APIs, DB Migrations and Admin UIs.
This can be further customized by editing the TypeScript Declaration file and re-running the okai tool
with the name of the TypeScript Declaration file, e.g. Jobs.d.ts:
npx okai Jobs.d.ts
Which will re-generate the Data Models, APIs, DB Migrations and Admin UIs based on the updated Data Models.
TIP
You only need to specify the Jobs.d.ts TypeScript filename (i.e. not the filepath) from
anywhere within your .NET solution
Live Code Generation
If you'd prefer to see the generated code in real-time you can add the --watch flag to watch the
TypeScript Declaration file for changes and automatically re-generate the generated files on Save:
npx okai Jobs.d.ts --watch
Declarative AI powered Features
The approach okai uses is very different from most AI tools in which okai only uses AI to generate the initial Data Models within
a TypeScript Declaration *.d.ts file.
This is possible in ServiceStack since a significant portion of an App's functionality can be declaratively applied inc. AutoQuery CRUD APIs which only requires a typed Request DTOs to define the shape of the API to be implemented.
From the Data Models, the rest of the feature is generated using declarative classes depending on the template used.
Generated Admin CRUD UI
To generate a CRUD Admin UI you'll need to use okai within a new Blazor Admin project or Blazor Vue (blazor-vue) project:
x new blazor-admin Acme
Which support a "Modular no-touch" Admin UI that will appear under a new group in the Admin Sidebar:
Modular Code Generation
Instead of unleashing AI on your code-base unabated, okai only uses AI to generate isolated functionality into grouped "no touch" source files that can be easily maintained and extended.
Creating a new Project with a similar prompt above would create a new project with the new source files
(marked *) added to the existing project:
APIs
Migration
UI
TypeScript Schema
In addition to being a great DSL for defining Data Models, using TypeScript also lets us define a schema containing all the C# Types, interfaces, and attributes used in defining APIs, DTOs and Data Models in the accompanying api.d.ts file.
This now lets us use TypeScript to define the Bookings.cs AutoQuery APIs and Data Models which blazor-admin uses instead in its Bookings.d.ts:
/// <reference path="./api.d.ts" />
export type Config = {
    prompt:    "New Booking"
    api:       "~/MyApp.ServiceModel/Bookings.cs"
    migration: "~/MyApp/Migrations/Migration1001.cs"
    uiMjs:     "~/MyApp/wwwroot/admin/sections/Bookings.mjs"
}

export enum RoomType {
  Single,
  Double,
  Queen,
  Twin,
  Suite,
}

@Read.route("/bookings","GET")
@Read.route("/bookings/{Id}","GET")
@Read.description("Find Bookings")
@Create.route("/bookings","POST")
@Create.description("Create a new Booking")
@Update.notes("Find out how to quickly create a <a href='https://youtu.be/nhc4MZufkcM'>C# Bookings App from Scratch</a>")
@Update.route("/booking/{Id}","PATCH")
@Update.description("Update an existing Booking")
@Delete.route("/booking/{Id}","DELETE")
@Delete.description("Delete a Booking")
@tag("Bookings")
@icon({svg:"<svg>...</svg>"})
@notes("Captures a Persons Name & Room Booking information")
@description("Booking Details")
@validateHasRole("Employee")
export class Booking extends AuditBase {
  @autoIncrement()
  id: number
  @Create.description("Name this Booking is for")
  @validateNotEmpty()
  name: string
  roomType: RoomType
  @validateGreaterThan(0)
  roomNumber: number
  @intlDateTime(DateStyle.Long)
  bookingStartDate: Date
  @intlRelativeTime()
  bookingEndDate?: Date
  @intlNumber({currency:"USD"})
  @validateGreaterThan(0)
  cost: decimal
  @ref({model:"nameof(Coupon)",refId:"nameof(Coupon.Id)",refLabel:"nameof(Coupon.Description)"})
  @references("typeof(Coupon)")
  couponId?: string
  @reference()
  discount?: Coupon
  @input({type:"textarea"})
  notes?: string
  cancelled?: boolean
  @reference({selfId:"nameof(CreatedBy)",refId:"nameof(User.UserName)",refLabel:"nameof(User.DisplayName)"})
  employee: User
}

@tag("Bookings")
@icon({svg:"<svg>...</svg>"})
export class Coupon extends AuditBase {
  id: string
  description: string
  discount: number
  expiryDate: Date
}
The benefit of this approach being that you can make a change to the Data Models and rerun the okai tool to regenerate the AutoQuery APIs, DB Migrations and Admin UIs.
npx okai Bookings.d.ts
Which will regenerate its:
- APIs: MyApp.ServiceModel/Bookings.cs
- DB Migration: MyApp/Migrations/Migration1000.cs
- Admin UI: /wwwroot/admin/sections/Bookings.mjs
What files will be generated is controlled by its Config section:
export type Config = {
    prompt:    "New Booking"
    api:       "~/MyApp.ServiceModel/Bookings.cs"
    migration: "~/MyApp/Migrations/Migration1001.cs"
    uiMjs:     "~/MyApp/wwwroot/admin/sections/Bookings.mjs"
}
So if no longer want the code regeneration to update the DB Migration for it, you can just remove it from the Config.
Rerunning Code Generation
The data models defined in the TypeScript Declaration file e.g. Bookings.d.ts is what drives the
generation of the Data Models, APIs, DB Migrations and Admin UIs.
This can be further customized by editing the TypeScript Declaration file and re-running the okai tool
with the name of the TypeScript Declaration file, e.g. Bookings.d.ts:
npx okai Bookings.d.ts
Which will re-generate the Data Models, APIs, DB Migrations and Admin UIs based on the updated Data Models.
Or add --watch to watch the TypeScript *.d.ts file for changes and automatically run code generation on Save:
npx okai Bookings.d.ts --watch
TIP
You only need to specify the Bookings.d.ts TypeScript filename (i.e. not the filepath) from
anywhere within your .NET solution
Single Data Model
One challenge with this approach is that there's only a single class used to define attributes for the Data Model, Request and Response DTOs for all AutoQuery CRUD APIs.
Smart API and Data Model attributes
The okai tool resolves some issues with smart generation of attributes where any "Data Model Attributes"
like [Icon] class and [AutoIncrement] property attributes are only generated on the Data Model:
@icon({svg:"<svg>...</svg>"})
export class Booking {
    @autoIncrement()
    id: number
    @intlNumber({currency:"USD"})
    cost: decimal
}
Whilst "API Attributes" like [Tag] and [ValidateHasRole] class attribute and [ValidateGreaterThan]
property attributes and are only generated on the APIs Request DTOs:
@tag("Bookings")
@validateHasRole("Employee")
export class Booking {
    @validateGreaterThan(0)
    cost: decimal
}
Using C# Types in TypeScript Models
As JavaScript only has a limited set of types, the TypeScript api.d.ts schema also includes the built-in C# Types used when defining APIs, DTOs and Data Models which you'll be able to use when your APIs need to use a specific .NET type, e.g:
export class Booking extends AuditBase {
  id: number
  name: string
  roomNumber: number
  bookingStartDate: Date
  bookingEndDate?: DateOnly
  cost: decimal
  cancelled?: boolean
}
Which uses the DateOnly and decimal .NET Types in its code generation:
public class Booking : AuditBase
{
    [AutoIncrement]
    public int Id { get; set; }
    public string Name { get; set; }
    public int RoomNumber { get; set; }
    public DateTime BookingStartDate { get; set; }
    public DateOnly? BookingEndDate { get; set; }
    public decimal Cost { get; set; }
    public bool? Cancelled { get; set; }
}
API Targeted Attributes
When you need to add attributes to a specific API Request DTO you can use a CRUD prefix to have it only applied to that specific AutoQuery API, e.g:
@Read.route("/bookings","GET")
@Read.route("/bookings/{Id}","GET")
@Create.route("/bookings","POST")
Where it would only the generated on the AutoQuery API that it targets, e.g:
[Route("/bookings", "GET")]
[Route("/bookings/{Id}", "GET")]
public class QueryBookings : QueryDb<Booking> { ... }

[Route("/bookings", "POST")]
public class CreateBooking : ICreateDb<Booking>, IReturn<IdResponse> { ... }
In addition to Create.*, Read.*, Update.*, Delete.* attributes to target specific AutoQuery CRUD APIs,
you can also use Write.* to target all Create, Update, Delete write APIs.
Ambiguous Attributes
Attributes that can be annotated on both the Data Model and API Request DTOs like [Notes] and [Description]
are only generated on the Data Model and require using targeted attributes to apply to them to
API Request DTOs, e.g:
@Read.description("Find Bookings")
@Create.description("Create a new Booking")
@Update.notes("Find out how to quickly create a <a href='https://youtu.be/nhc4MZufkcM'>C# Bookings App from Scratch</a>")
@Update.description("Update an existing Booking")
@Delete.description("Delete a Booking")
@notes("Captures a Persons Name & Room Booking information")
@description("Booking Details")
export class Booking extends AuditBase { ... }
Where the non-prefixed @notes and @description attributes are only generated on the Data Model whilst the
targeted attributes are generated on their respective DTOs, e.g:
[Description("Find Bookings")]
public class QueryBookings : QueryDb<Booking> { ... }

[Description("Create a new Booking")]
public class CreateBooking : ICreateDb<Booking>, IReturn<IdResponse> { ... }

[Notes("Find out how to quickly create a <a href='https://youtu.be/nhc4MZufkcM'>C# Bookings App from Scratch</a>")]
[Description("Update an existing Booking")]
public class UpdateBooking : IPatchDb<Booking>, IReturn<IdResponse> { ... }

[Description("Delete a Booking")]
public class DeleteBooking : IDeleteDb<Booking>, IReturnVoid { ... }

[Description("Booking Details")]
[Notes("Captures a Persons Name & Room Booking information")]
public class Booking : AuditBase { ... }
Special Attribute Values
There's special behavior for "nameof(...)" and "typeof(...)" string attribute values where:
export class Booking extends AuditBase {
    @ref({model: "nameof(Coupon)", refId: "nameof(Coupon.Id)", refLabel: "nameof(Coupon.Description)"})
    @references("typeof(Coupon)")
    couponId?: string
}
Will be generated with native C# syntax, i.e. instead of as strings:
public class Booking : AuditBase
{
    [Ref(Model=nameof(Coupon),RefId=nameof(Coupon.Id),RefLabel=nameof(Coupon.Description))]
    [References(typeof(Coupon))]
    public string? CouponId { get; set; }
}
Changing Default Attributes
To improve the default out-of-the-box experience some attributes are included by default, including:
[Icon]attribute on Data Models based on the Data Model name- prevent by adding empty
@icon()attribute
- prevent by adding empty
[AutoIncrement]onidnumber properties if no other[PrimaryKey]attribute is defined- prevent by adding
@primaryKey()or@autoId()
- prevent by adding
[Validate*]attributes added to Create/Update APIs on non-nullable properties- prevent by adding empty
@validate()attribute
- prevent by adding empty
Here's an example which changes the default behavior for the default attributes above:
@icon()
export class Todo {
    @primaryKey()
    id: number
    @validate()
    name: string
}
Which will generate the C# APIs without the [Icon] and [Validate] attributes and replace [AutoIncrement]
with [PrimaryKey], e.g:
public class CreateTodo : ICreateDb<Todo>, IReturn<IdResponse>
{
    [ValidateGreaterThan(0)]
    public int Id { get; set; }
    public string Name { get; set; }
}

public class Todo
{
    [PrimaryKey]
    public int Id { get; set; }
    public string Name { get; set; }
}
Modifying ApplicationUser
In many cases the AI Models will want to generate a User class for their AI models. But as Blazor Apps
are already configured to use an ApplicationUser Identity Auth User class, the C# code generation only generates
the User class in a block comment with an instruction to merge it with your existing User class if you want to, e.g:
/* merge with User DTO
/// <summary>
/// Interface defining the structure for a JobApplication.
/// Represents a user's application to a specific job.
/// </summary>
public class User
{
    [AutoIncrement]
    public int Id { get; set; }
    public string FirstName { get; set; }
    public string LastName { get; set; }
    public string Email { get; set; }
    /// <summary>
    /// Optional URL to the user's resume
    /// </summary>
    public string? ResumeUrl { get; set; }
}
*/
If you wish to add additional properties, you'll first need to add it your ApplicationUser class, e.g:
public class ApplicationUser : IdentityUser
{
    public string? FirstName { get; set; }
    public string? LastName { get; set; }
    public string? DisplayName { get; set; }
    public string? ProfileUrl { get; set; }
    /// <summary>
    /// Optional URL to the user's resume
    /// </summary>
    public string? ResumeUrl { get; set; }
}
Regenerating Identity Auth EF Migrations
You'll then need to regenerate the EF Migration to update the AspNetUsers table with the new columns by
running the init-ef npm script:
npm run init-ef
Which will delete the existing Migrations and create a new Migration to update the Identity Auth tables:
{
    "scripts": {
        "init-ef": "node -e 'fs.readdirSync(`Migrations`).filter(x => !x.startsWith(`Migration`)).forEach(x => fs.rmSync(`Migrations/${x}`))' && dotnet ef migrations add CreateIdentitySchema",
    }
}
You can then delete your Primary Database (e.g. App_Data/app.db) and re-run the migrate npm script to recreate it:
npm run migrate
If you want the additional property to also be included in API Responses you'll also need to add it to your User DTO, e.g:
/// <summary>
/// Public User DTO
/// </summary>
[Alias("AspNetUsers")]
public class User
{
    public string Id { get; set; }
    public string UserName { get; set; }
    public string? FirstName { get; set; }
    public string? LastName { get; set; }
    public string? DisplayName { get; set; }
    public string? ProfileUrl { get; set; }

    public string? ResumeUrl { get; set; }
}
Which OrmLite and AutoQuery will use to query Identity Auth's AspNetUsers table.
Custom APIs
When you need more fine-grained control over the generated APIs, you can "takeover" the generation of an AutoQuery API by explicitly defining it yourself.
So if you prefer to use explicit API Request DTOs or need to control the exact properties generated in each API, you can define the API Request DTOs yourself where when exists will skip generation for that API, e.g:
@tag("Bookings")
@notes("Captures a Persons Name & Room Booking information")
@route("/bookings","GET")
@route("/bookings/{Id}","GET")
@autoApply(Behavior.AuditQuery)
@description("Find Bookings")
export class QueryBookings extends QueryDb<Booking> {
  id?: number
}
See Custom APIs docs for the full example.
Generate CRUD APIs and UIs for existing DBs
A core piece of functionality in the Text to Blazor CRUD App feature is distilling an AI Prompt into TypeScript classes that can be further customized to generate AutoQuery CRUD APIs and Admin UIs for managing the underlying RDBMS tables.
Blueprint for Code Generation
The TypeScript Data Models serve as the blueprint for generating everything needed to support the feature in your App, including the AutoQuery CRUD APIs, Admin UIs and DB Migrations that can re-create the necessary tables from scratch.
1. Generate RDBMS Metadata
The first step in generating TypeScript Data Models is to capture the metadata from the existing RDBMS tables which
we can do with the App.json AppTask below which uses your App's configured
RDBMS connection to generate the Table Definitions for all tables in the specified RDBMS connection and schema
to the file of your choice (e.g App_Data/App.json):
AppTasks.Register("App.json", args =>
  appHost.VirtualFiles.WriteFile("App_Data/App.json",ClientConfig.ToSystemJson(
      migrator.DbFactory.GetTables(namedConnection:null, schema:null))));
This task can then be run from the command line with:
dotnet run --AppTasks=App.json
Which generates App_Data/App.json containing the table definition metadata for all tables in
the specified RDBMS, e.g:
[
  {
    "name": "AspNetUserClaims",
    "columns": [
      {
        "columnName": "Id",
        "columnOrdinal": 0,
        "columnSize": -1,
        "numericPrecision": 0,
        "numericScale": 0,
        "isUnique": true,
        "isKey": true,
        "baseCatalogName": "techstacks",
        "baseColumnName": "Id",
        "baseSchemaName": "public",
        "baseTableName": "AspNetUserClaims",
        "dataType": "System.Int32",
        "allowDBNull": false,
        "providerType": 9,
        "isAliased": false,
        "isExpression": false,
        "isAutoIncrement": true,
        "isRowVersion": false,
        "isHidden": false,
        "isLong": false,
        "isReadOnly": false,
        "dataTypeName": "integer",
        "columnDefinition": "INTEGER PRIMARY KEY AUTOINCREMENT"
      },
    ],
  ...
]
Different Connection or DB Schema
If you prefer to generate the metadata for a different connection or schema, you can create a new AppTask
with your preferred namedConnection and/or schema, e.g:
AppTasks.Register("Sales.json", args =>
  appHost.VirtualFiles.WriteFile("Sales.json", ClientConfig.ToSystemJson(
    migrator.DbFactory.GetTables(namedConnection:"reports",schema:"sales"))));
That you could then generate with:
dotnet run --AppTasks=Sales.json
2. Generate TypeScript Data Models
The next step is to generate TypeScript Data Models from the captured metadata which can be done with the okai tool
by running the convert command with the path to the App.json JSON table definitions which will generate the
TypeScript Data Models to stdout which can be redirected to a file in your ServiceModel project, e.g:
npx okai convert App_Data/App.json > ../MyApp.ServiceModel/App.d.ts
3. Generate CRUD APIs and Admin UIs
The data models defined in the App.d.ts TypeScript Declaration file is what drives the generation of the Data Models, APIs, DB Migrations and Admin UIs. This can be further customized by editing the TypeScript Declaration file and re-running the okai tool with just the filename, e.g:
npx okai App.d.ts
Which will re-generate the Data Models, APIs, DB Migrations and Admin UIs based on the updated Data Models.
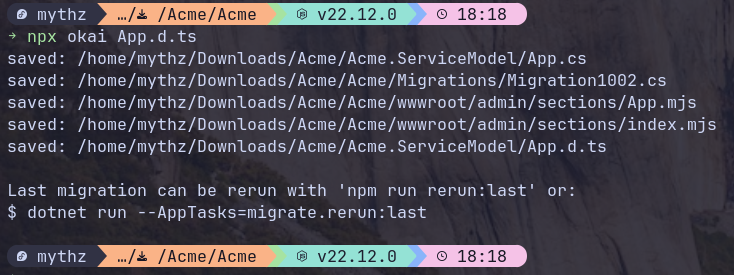
TIP
You only need to specify the App.d.ts TypeScript filename (i.e. not the filepath) from
anywhere within your .NET solution
Free LLM Chat Prompts
As part of the development of okai, we've also made available a generic chat prompt that can be used as a convenient way to conduct personal research against many of the worlds most popular Large Language Models - for Free!

You can just start immediately using the npx okai chat script to ask LLMs for assistance:
npx okai chat "command to copy a folder with rsync?"
This will use the default model (currently codestral:22b) to answer your question.
Select Preferred Model
You can also use your preferred model with the -m <model> flag with either the model name or its alias, e.g you can use
Microsoft's PHI-4 14B
model with:
npx okai -m phi chat "command to copy folder with rsync?"
List Available Models
We're actively adding more great performing and leading experimental models as they're released.
You can view the list of available models with ls models:
npx okai ls models
Which at this time will return the following list of available models along with instructions for how to use them:
USAGE (5 models max):
a) OKAI_MODELS=codestral,llama3.3,flash
b) okai -models codestral,llama3.3,flash <prompt>
c) okai -m flash chat <prompt>

FREE MODELS:
claude-3-haiku            (alias haiku)
codestral:22b             (alias codestral)
deepseek-r1:32b
deepseek-r1:671b          (alias deepseek-r1)
deepseek-r1:70b
deepseek-r2:32b
deepseek-v3:671b          (alias deepseek)
gemini-flash-1.5
gemini-flash-1.5-8b       (alias flash-8b)
gemini-flash-2.0          (alias flash)
gemini-flash-lite-2.0     (alias flash-lite)
gemini-flash-thinking-2.0 (alias flash-thinking)
gemini-pro-2.0            (alias gemini-pro)
gemma2:9b                 (alias gemma)
gpt-3.5-turbo             (alias gpt-3.5)
gpt-4o-mini
llama3.1:70b              (alias llama3.1)
llama3.3:70b              (alias llama3.3)
llama3:8b                 (alias llama3)
mistral-nemo:12b          (alias mistral-nemo)
mistral-small:24b         (alias mistral-small)
mistral:7b                (alias mistral)
mixtral:8x22b
mixtral:8x7b              (alias mixtral)
nova-lite
nova-micro
phi-4:14b                 (alias phi,phi-4)
qwen-plus
qwen-turbo
qwen2.5-coder:32b         (alias qwen2.5-coder)
qwen2.5:32b
qwen2.5:72b               (alias qwen2.5)
qwq:32b                   (alias qwq)
qwq:72b

PREMIUM MODELS: *
claude-3-5-haiku
claude-3-5-sonnet
claude-3-7-sonnet         (alias sonnet)
claude-3-sonnet
gemini-pro-1.5
gpt-4
gpt-4-turbo
gpt-4o
mistral-large:123b
nova-pro
o1-mini
o1-preview
o3-mini
qwen-max

 * requires valid license:
a) SERVICESTACK_LICENSE=<key>
b) SERVICESTACK_CERTIFICATE=<LC-XXX>
c) okai -models <premium,models> -license <license> <prompt>
Where you'll be able to use any of the great performing inexpensive models listed under FREE MODELS for Free.
Whilst ServiceStack customers with an active commercial license can also use any of the more expensive
and better performing models listed under PREMIUM MODELS by either:
- Setting the
SERVICESTACK_LICENSEEnvironment Variable with your License Key - Setting the
SERVICESTACK_CERTIFICATEVariable with your License Certificate - Inline using the
-licenseflag with either the License Key or Certificate
FREE for Personal Usage
To be able to maintain this as a free service we're limiting usage as a tool that developers can use for personal assistance and research by limiting usage to 60 requests /hour which should be more than enough for most personal usage and research whilst deterring usage in automated tools.
info
Rate limiting is implemented with a sliding Token Bucket algorithm that replenishes 1 additional request every 60s
AI Server Improvements
We've continued making improvements to AI Server with fixes to Background Jobs filtering and also including support for these newer models:
| Provider | Models |
|---|---|
| OpenAI | o3-mini |
| Qwen | qwq qwen-turbo qwen-plus qwen-max qwen-vl-plus |
| DeepSeek | deepseek-v3 deepseek-r1 |
gemini-flash-2.0 gemini-flash-lite-2.0 gemini-flash-thinking-2.0 gemini-pro-2.0 |
|
| Amazon | nova-micro nova-lite nova-pro |
| Others | llama3.3 phi4 mistral-small |
We've also published a new Video with configuring AI Server to use Ollama endpoints:
Reported Vulnerabilities
We've received and resolved 2 Vulnerability Reports during this release.
ZDI-CAN-25837
The report for this vulnerability reads:
This advisory presents a Remote Code Execution vulnerability in ServiceStack JSON/JSV deserialization. Attack complexity was evaluated as High in case of a remote exploitation, because the attacker needs a possibility to drop the DLL or EXE file to the filesystem. Typically, this can be achieved in two different ways:
- Using a different vulnerability in targeted application, which allows to drop a file to the filesystem, or
- Using a legitimate functionality that an application may expose, which allows to upload a file to the filesystem (upload location does not matter).
The root-cause for this vulnerability exists in the type resolving mechanism implemented in the
ServiceStack.NetFxPclExport.FindType(string, string)method.
Resolution
This vulnerability was resolved in this commit where it's no longer possible to reference a Type on the local filesystem to instantiate.
This validation can be overridden with:
AssemblyUtils.ValidateTypeName = typeName => ...
ZDI-CAN-25834
The report for this vulnerability reads:
This advisory presents an NTLM Relaying vulnerability in ServiceStack
HttpUtils.GetErrorResponsemethod. Attack Complexity for this vulnerability was assessed as High, because I think that usage of theGetErrorResponsemethod with the attacker-controlled input is rather rare.
With the issue being some of our HTTP Utils convenience wrappers over .NET APIs not casting to HttpWebRequest to prevent File URLs:
At
[1], theWebRequestis created with theWebRequest.Createmethod. This is a root-cause for this vulnerability. This operation is missing a cast to theHttpWebRequest. According to this, the attacker can e.g. provide a URL withfile://protocol, and theFileWebRequestobject will be created.
Proof of concept:
This code implements a minimal example, where we can pass the malicious URL to the Main method:
static void Main(string[] args)
{
    HttpWebResponse resp = HttpUtils.GetErrorResponse(args[0]);
}
Resolution
As our HTTP Utils are just convenience wrapper over .NET APIs we don't believe this is a real vulnerability since the Proof of Concept could just as easily call the WebRequest.Create(url) .NET API directly instead of our wrapper.
But in the interest of marking it as resolved we've replaced our usages of WebRequest.Create(url) with WebRequest.CreateHttp(url) which now prevents our convenience APIs for being used to access files in this commit.