
We've got a couple of exciting features in this release opening ServiceStack up to new use-cases with the potential of changing the internal code-architecture of ServiceStack Apps, especially those benefiting from the value and simplicity of running SQLite on the Server.
Commands Feature
Much of ServiceStack has been focused on providing a productive API First Development experience and adding value-added features around your System's external APIs, including:
- Native end-to-end typed API integrations to 11 popular languages
- Built-in API Explorer to discover, browse and invoke APIs
- Instant CRUD UIs with Auto Query and Locode
- Custom CRUD UIs with Blazor components and Vue Components
As well as Declarative Validation, multiple Auth Integrations and other extensive Declarative Features to enhance your external facing APIs.
Internal API Implementation
Thus far little attention has been given to internal implementations of APIs since it can use anything that fulfils its service contract by returning the APIs populated Response DTO.
How code-bases are structured is largely a matter of developer preference, however we believe we've also been able to add value in this area with the new appealing managed Commands Feature.
Code Architecture
Ultimately nothing beats the simplicity of "No Architecture" by maintaining all logic within a Service Implementation which just needs to call a few App dependencies to implement its functionality and return a populated Response DTO:
public object Any(MyRequest request) => new MyResponse { ... };
This is still the best option for small implementations where the Service is the only consumer of the logic that should be run on the HTTP Worker Request Thread.
When to restructure
Times when you may want to consider moving logic out of your Service into separate classes include:
- Code Reuse: Make it easier to reuse your Service logic in other Services
- Complexity: Break down complex logic into smaller more manageable pieces
- Testability: Make it easier to test your Logic in isolation
- Observability: Make it easier to log and monitor
- Robustness: Make it easier to handle, retry and recover from errors
- Flexibility: Make it easier to run in parallel or in a different managed thread
We'll look at how the new Commands Feature can help in these areas.
Code Reuse
Following principles of YAGNI in doing the simplest thing that could possibly work, whenever we want to reuse logic across Services we'd first start by moving it to an extension method on the dependency that it uses, e.g.
public static async Task<List<Contact>> GetActiveSubscribersAsync(
    this IDbConnection db, MailingList mailingList)
{
    return await db.SelectAsync(db.From<Contact>(db.TableAlias("c"))
        .Where(x => x.DeletedDate == null && x.UnsubscribedDate == null &&
            x.VerifiedDate != null && (mailingList & x.MailingLists) == mailingList)
        .WhereNotExists(db.From<InvalidEmail>()
            .Where<Contact,InvalidEmail>((c,e) =>
                e.EmailLower == Sql.TableAlias(c.EmailLower, "c"))
            .Select(x => x.Id))
    );
}
Which does a great job at encapsulating logic and making it reusable and readable:
foreach (var sub in await Db.GetActiveSubscribersAsync(MailingList.Newsletter)) {
    //...
}
Where it can be reused without referencing any external classes whilst also being easily discoverable via intelli-sense.
This works great for 1 or 2 dependencies, but becomes more cumbersome as the number of dependencies grows, e.g:
public static async Task<List<Contact>> GetActiveSubscribersAsync(
    this IDbConnection db, ILogger log, ICacheClient cache, MailingList mailingList)
In which the complexity of the extension method dependencies leaks and impacts all calling classes that need to include them and also starts to impact its readability, e.g:
public class MyService(ILogger<MyService> log, ICacheClient cache, IDbConnection db)
    : Service
{
    public object Any(MyRequest request)
    {
        var subs = await Db.GetActiveSubscribersAsync(log, cache, request.MailList);
    }
}
Refactoring Logic into separate classes
The solution to this is to refactor the logic into a separate class and leverage the IOC to inject the dependencies it needs, fortunately with Primary Constructors this now requires minimal boilerplate code, e.g:
class MyLogic(ILogger<MyService> log, ICacheClient cache, IDbConnection db)
{
    //...
}
But it still requires manual registration adding additional complexity to
your Host project Program.cs or Modular Configurations which needs to
manage registration for all these new logic classes, e.g:
builder.Services.AddTransient<MyLogic>();
Async Commands
Which touches on the first benefit of the Commands Feature which like ServiceStack Services auto registers
all classes implementing the intentionally simple and impl-free IAsyncCommand interface, e.g:
public interface IAsyncCommand<in T>
{
    Task ExecuteAsync(T request);
}
Allowing for maximum flexibility in how to implement your logic classes, which are essentially encapsulated units of logic with a single method to execute it, e.g:
public class AddTodoCommand(ILogger<AddTodoCommand> log, IDbConnection db)
    : IAsyncCommand<CreateTodo>
{
    public async Task ExecuteAsync(CreateTodo request)
    {
        var newTodo = request.ConvertTo<Todo>();
        newTodo.Id = await db.InsertAsync(newTodo, selectIdentity:true);
        log.LogDebug("Created Todo {Id}: {Text}", newTodo.Id, newTodo.Text);
    }
}
Where we immediately get the benefits of code reuse, encapsulation, and readability without needing to manually register and pollute your App's configuration with them.
By default Commands are registered as transient dependencies, but you can also register them with a different lifetime
scope using the [Lifetime] attribute, e.g:
[Lifetime(Lifetime.Scoped)]
public class AddTodoCommand(ILogger<AddTodoCommand> log, IDbConnection db)
    : IAsyncCommand<CreateTodo> {}
Or by manually registering them, if you need a custom registration:
services.AddTransient<AddTodoCommand>(c => CreateAddTodoCommand(c));
Commands with Results
For maximum flexibility, we want to encourage temporal decoupling by separating initiating a command from its execution,
so instead of adding a different method to execute commands with results, we're instead recommending the convention of
storing the result of a command in a Result property, e.g:
public interface IAsyncCommand<in TRequest, out TResult>
    : IAsyncCommand<TRequest>, IHasResult<TResult> { }

public interface IHasResult<out T>
{
    T Result { get; }
}
So we could implement a command with a result like:
public class AddTodoCommand(ILogger<AddTodoCommand> log, IDbConnection db)
    : IAsyncCommand<CreateTodo, Todo>
{
    public Todo Result { get; private set; }

    public async Task ExecuteAsync(CreateTodo request)
    {
        Result = request.ConvertTo<Todo>();
        Result.Id = await db.InsertAsync(newTodo, selectIdentity:true);
        log.LogDebug("Created Todo {Id}: {Text}", Result.Id, Result.Text);
    }
}
Messaging
Although for better resilience and scalability we recommend utilizing a messaging pattern to notify the outputs of a command by publishing messages to invoke dependent logic instead of returning a result, e.g:
public class AddTodoCommand(IDbConnection db, IMessageProducer mq)
    : IAsyncCommand<CreateTodo>
{
    public async Task ExecuteAsync(CreateTodo request)
    {
        var newTodo = request.ConvertTo<Todo>();
        newTodo.Id = await db.InsertAsync(newTodo, selectIdentity:true);
        mq.Publish(new SendNotification { TodoCreated = newTodo });
    }
}
Which decouples the sender and receiver of the message, allowing it to finish without needing to wait and concern itself on how subsequent logic is processed, e.g. how to handle errors, whether to execute it in a different managed thread, in parallel, etc.
Messaging encourages adopting a more reliable asynchronous one-way workflow instead of implementing logic serially where the sender is timely coupled to the successful execution of all subsequent logic before being able to complete, e.g:
await cmd.ExecuteAsync(createTodo);
var newTodo = cmd.Result;
await SendNewTodoNotificationAsync(newTodo);
It allows for more reliable and observable workflows that removes the temporal coupling between components where each execution step can be executed on different threads, independently monitored and retried if needed.
[A] -> [B] -> [C]
Commands as Application Building Blocks
As they're not dependent on any framework and can support multiple execution patterns, we believe Commands make great building blocks for insulating units of logic as they're simple and testable and allow for managed execution which can easily add logging, monitoring, and resilience around your logic.
Background MQ
It should be noted adopting a messaging pattern doesn't require additional infrastructure complexity of an external MQ Server as you can use the Background MQ to execute messages in configurable managed background threads.
Executing Commands
Commands are effectively a pattern to structure your logic that doesn't depend on any implementation assembly or framework, so they can just be executed directly, e.g:
using var db = dbFactory.Open();
var cmd = new AddTodoCommand(new NullLogger<AddTodoCommand>(), db);
await cmd.ExecuteAsync(new CreateTodo { Text = "New Todo" });
Command Executor
They also allow for a managed execution which the CommandsFeature provides with its ICommandExecutor which
can be executed like:
public class MyService(ICommandExecutor executor) : Service
{
    public object Any(MyRequest request)
    {
        var cmd = executor.Command<AddTodoCommand>();
        await cmd.ExecuteAsync(new AddTodoCommand { Text = "New Todo" });
    }
}
This still results in the same behavior where exceptions are bubbled but also adds observability and resilience and other niceties like executing any Fluent or Declarative Validation on Command Requests.
Retry Failed Commands
We can make commands more resilient by adding the [Retry] attribute to opt into auto retrying failed commands:
[Retry]
public class AddTodoCommand() : IAsyncCommand<CreateTodo> {}
Which will automatically retry the command as per the default Retry Policy:
services.AddPlugin(new CommandsFeature
{
    DefaultRetryPolicy = new(
        Times: 3,
        Behavior: RetryBehavior.FullJitterBackoff,
        DelayMs: 100,
        MaxDelayMs: 60_000,
        DelayFirst: false
    )
});
That can be overridden on a per-command basis with the [Retry] attribute, e.g:
[Retry(Times=4, MaxDelayMs=300_000, Behavior=RetryBehavior.LinearBackoff)]
public class AddTodoCommand() : IAsyncCommand<CreateTodo> {}
The different Retry Behaviors available include:
public enum RetryBehavior
{
    // Use the default retry behavior
    Default,

    // Always retry the operation after the same delay
    Standard,

    // Should be retried with a linear backoff delay strategy
    LinearBackoff,

    // Should be retried with an exponential backoff strategy
    ExponentialBackoff,

    // Should be retried with a full jittered exponential backoff strategy
    FullJitterBackoff,
}
Command Admin UI
Which can be inspected in the new Command Admin UI where you can view summary stats of all executed Commands and APIs in the Summary tab, e.g:

Latest Command Executions
It also maintains a rolling log of the latest executed commands in the Latest tab:
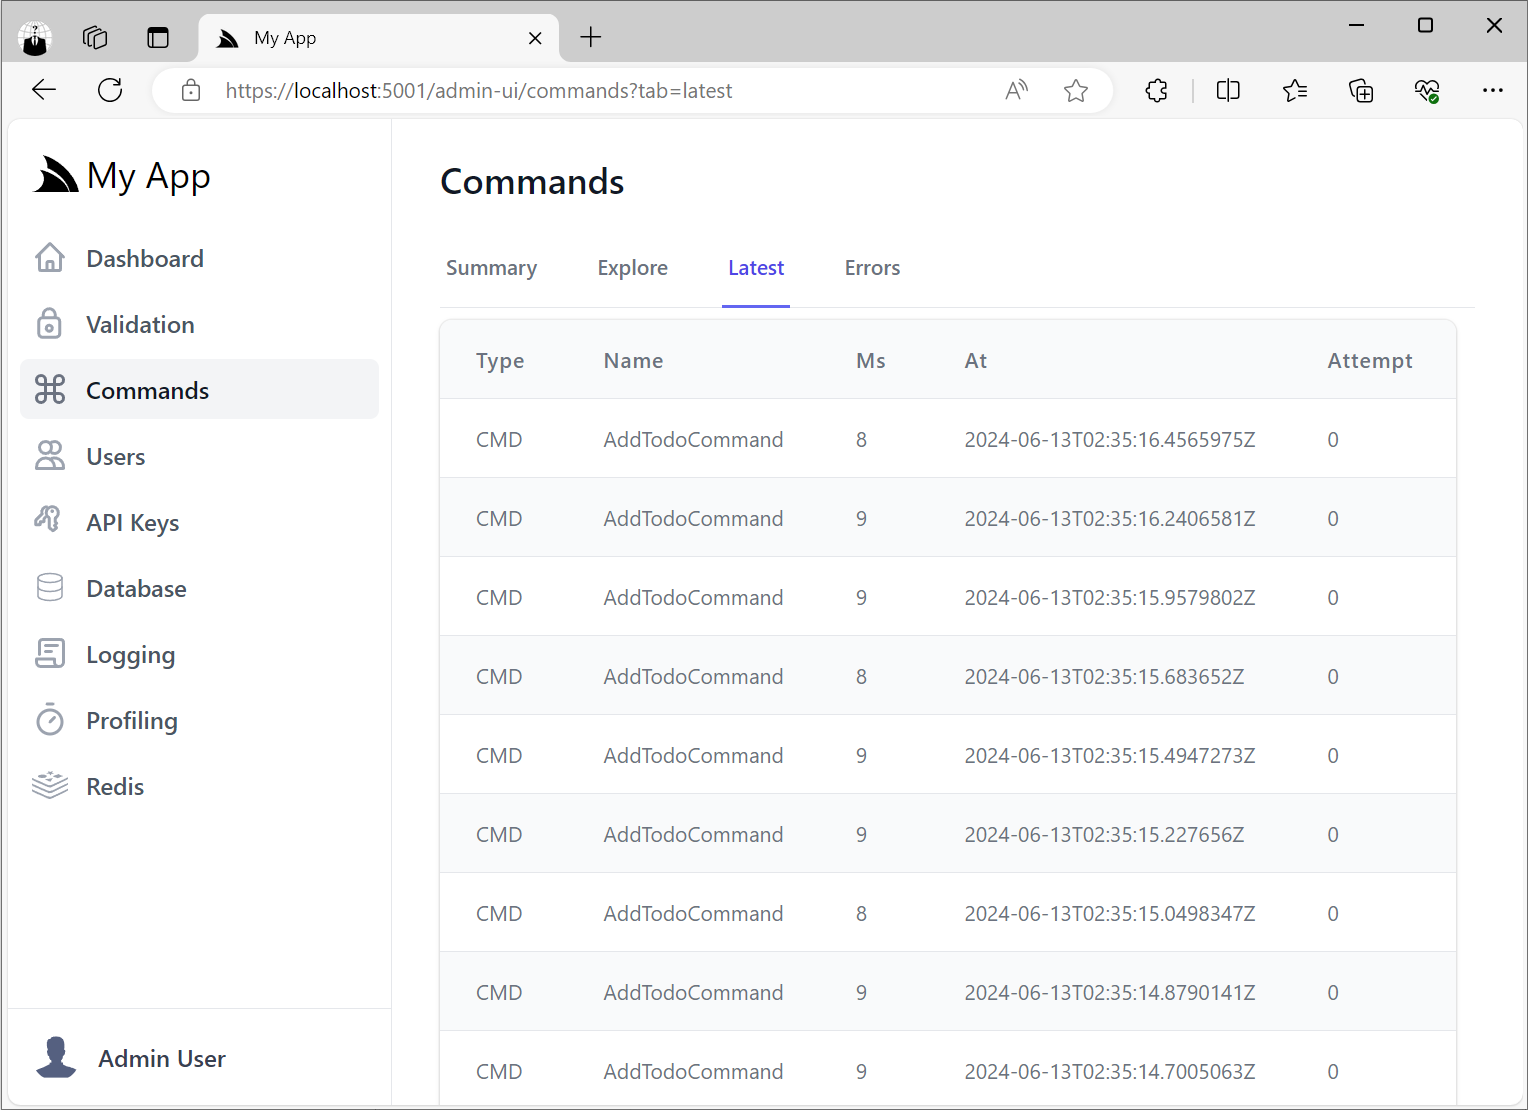
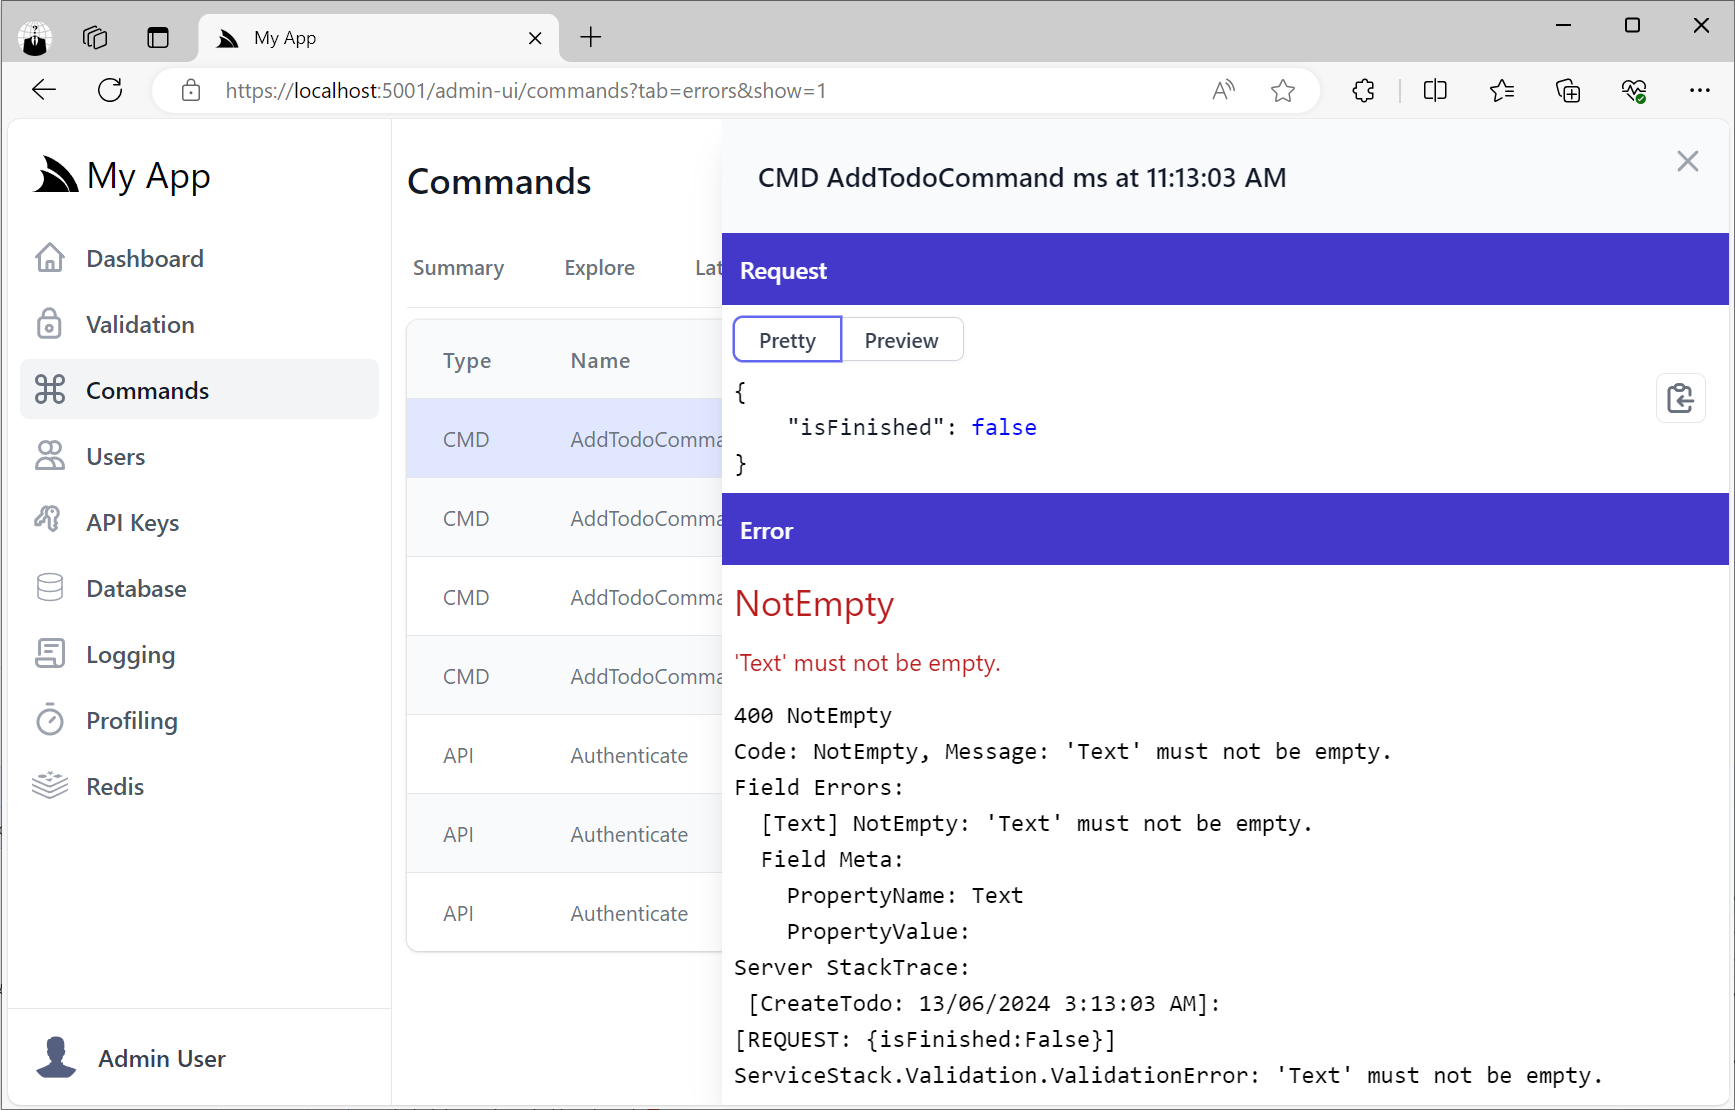
Failed Command Executions
Whilst the Errors tab shows a list of all failed Command and API executions:
Execute Internal Commands
A benefit of using Commands as the building block for your internal logic is that they enjoy many of the same benefits of ServiceStack's message-based Services where they can be invoked using just the Command Name and a Request Body which allows them to be discovered and executed from the Explore Tab:
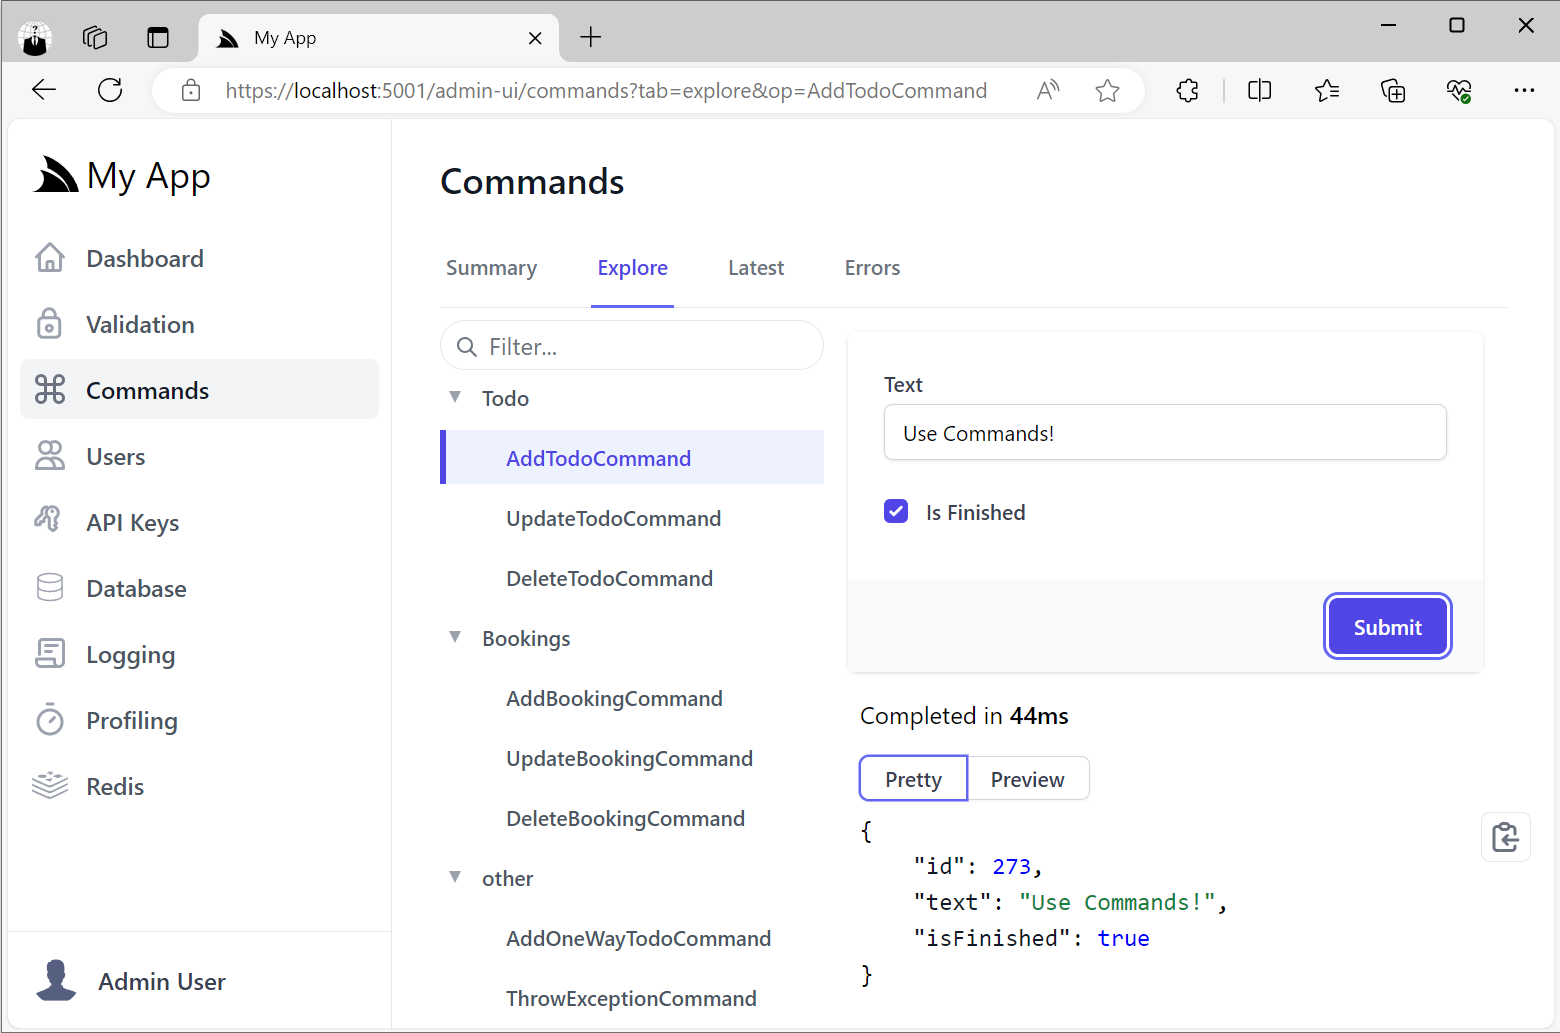
In this way they can be treated like Internal APIs for being able to invoke internal functionality that's only accessible by Admin Users.
Group Commands by Tag
Just like ServiceStack Services they can be grouped by Tag which can be used to group related commands:
[Tag("Todos")]
public class AddTodoCommand() : IAsyncCommand<CreateTodo> {}
MQ Integration
Although CommandsFeature is a standalone feature we're registering it in the new Identity Auth Templates Configure.Mq.cs
which already uses the Background MQ to execute messages in managed background threads where it's used to send Identity Auth emails:
public class ConfigureMq : IHostingStartup
{
    public void Configure(IWebHostBuilder builder) => builder
        .ConfigureServices((context, services) => {
            services.AddSingleton<IMessageService>(c => new BackgroundMqService());
            services.AddPlugin(new CommandsFeature());
        })
        .ConfigureAppHost(afterAppHostInit: appHost => {
            var mqService = appHost.Resolve<IMessageService>();

            //Register ServiceStack APIs you want to be able to invoke via MQ
            mqService.RegisterHandler<SendEmail>(appHost.ExecuteMessage);
            mqService.Start();
        });
}
Despite being 2 independent features, they work well together as the Background MQ can be used to execute Commands in managed background threads of which a single thread is used to execute each Request Type by default (configurable per request).
You'd typically want to use queues to improve scalability by reducing locking and concurrency contention of heavy resources by having requests queued and executed in a managed background thread where it's able to execute requests as fast as it can without contention. Queues are also a great solution for working around single thread limitations of resources like writes to SQLite databases.
Use Case - SQLite Writes
As we've started to use server-side SQLite databases for our new Apps given its many benefits we needed a solution to workaround its limitation of not being able to handle multiple writes concurrently.
One of the benefits of using SQLite is creating and managing multiple databases is relatively cheap, so we can mitigate this limitation somewhat by maintaining different subsystems in separate databases, e.g:
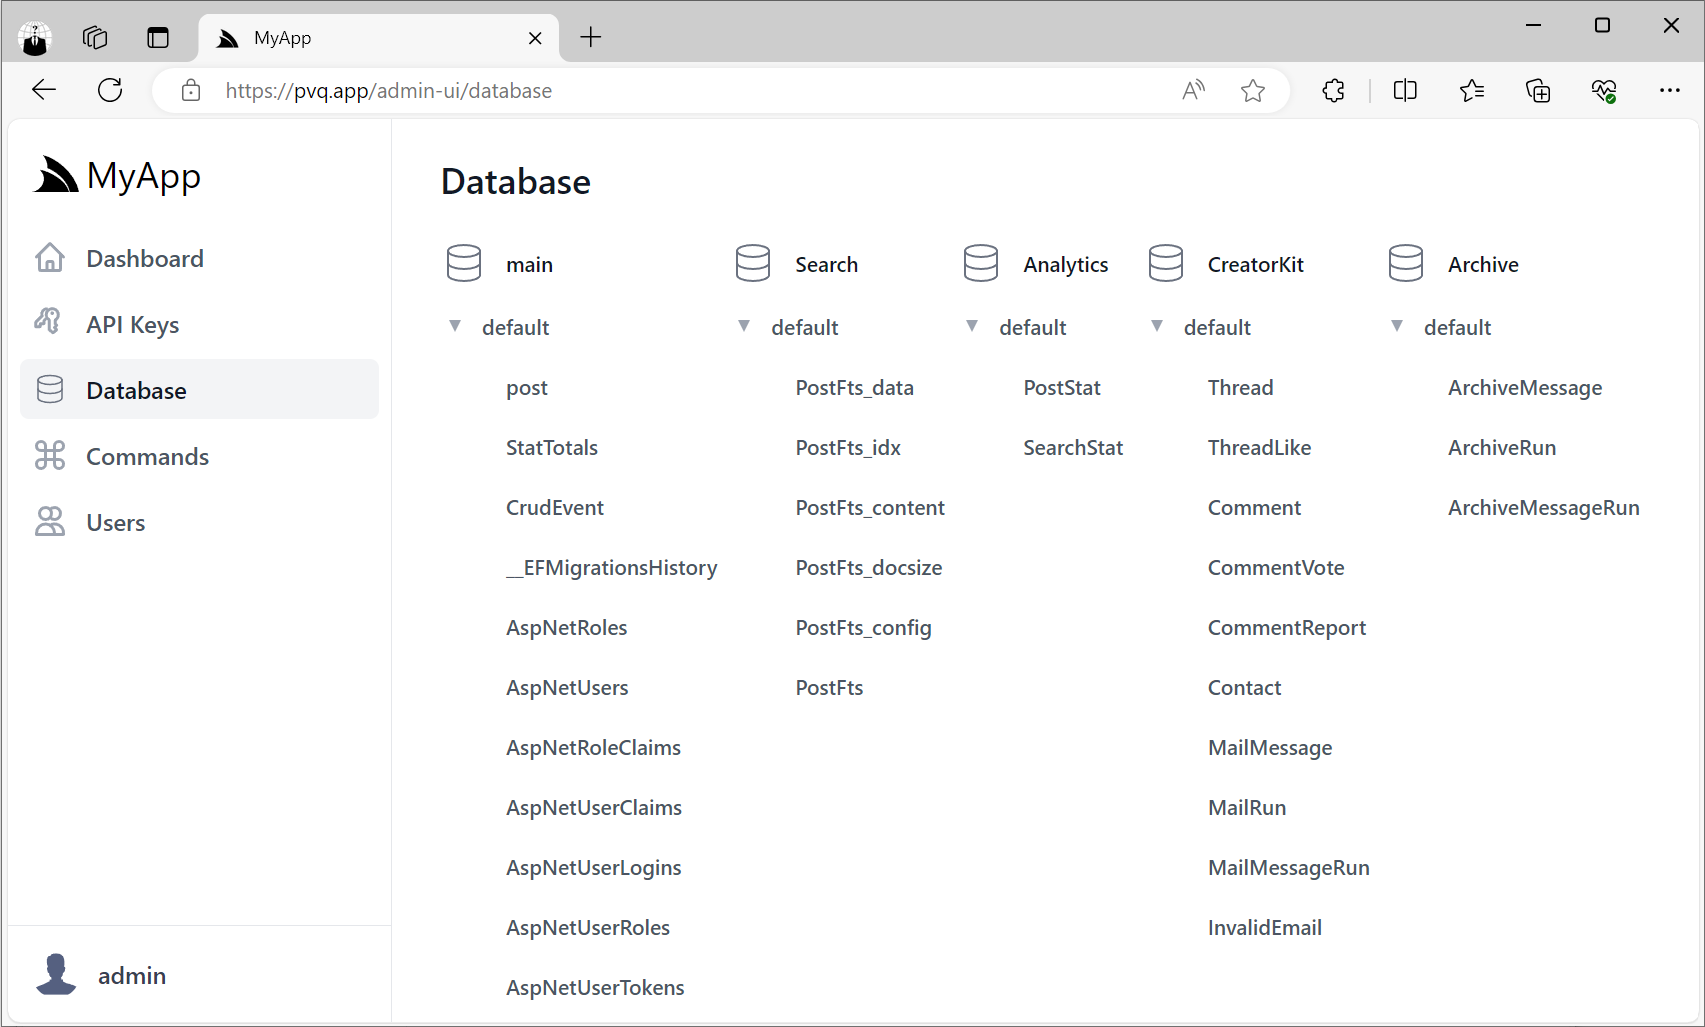
But each database can only be written to by a single thread at a time, which we can now easily facilitate with Background MQ and MQ Command DTOs.
MQ Command DTOs
We can use the new [Command] attribute to be able to execute multiple commands on a single Request DTO Properties:
[Tag(Tag.Tasks)]
[Restrict(RequestAttributes.MessageQueue), ExcludeMetadata]
public class DbWrites : IGet, IReturn<EmptyResponse>
{
    [Command<CreatePostVoteCommand>]
    public Vote? CreatePostVote { get; set; }

    [Command<CreateCommentVoteCommand>]
    public Vote? CreateCommentVote { get; set; }

    [Command<CreatePostCommand>]
    public Post? CreatePost { get; set; }

    [Command<UpdatePostCommand>]
    public Post? UpdatePost { get; set; }

    [Command<DeletePostsCommand>]
    public DeletePosts? DeletePosts { get; set; }

    [Command<DeleteAnswersCommand>]
    public DeleteAnswers? DeleteAnswers { get; set; }

    [Command<CreateAnswerCommand>]
    public Post? CreateAnswer { get; set; }

    [Command<PostSubscriptionsCommand>]
    public PostSubscriptions? PostSubscriptions { get; set; }

    [Command<TagSubscriptionsCommand>]
    public TagSubscriptions? TagSubscriptions { get; set; }
    //...
}
Then to execute the commands we can use the Request.ExecuteCommandsAsync extension method for its
Background MQ API implementation:
public class BackgroundMqServices : Service
{
    public Task Any(DbWrites request) => Request.ExecuteCommandsAsync(request);
}
Which goes through all Request DTO properties to execute all populated properties with their associated command, using it as the request for the command.
So after registering the DbWrites Command DTO with the MQ Service:
mqService.RegisterHandler<DbWrites>(appHost.ExecuteMessage);
We can now publish a single DbWrites message to execute multiple commands in a single managed background thread:
public class NotificationServices(MessageProducer mq) : Service
{
    public object Any(Watch request)
    {
        var userName = Request.GetClaimsPrincipal().GetUserName();

        mq.Publish(new DbWrites
        {
            PostSubscriptions = request.PostId == null ? null : new()
            {
                UserName = userName,
                Subscriptions = [request.PostId.Value],
            },
            TagSubscriptions = request.Tag == null ? null : new()
            {
                UserName = userName,
                Subscriptions = [request.Tag],
            },
        });

        mq.Publish(new AnalyticsTasks {
            WatchRequest = request,
        });
    }
}
We also benefit from its natural parallelism where write requests to different Databases are executed in parallel.
API Keys
As we continue to embrace and natively integrate with ASP.NET Core's .NET 8 platform, we've reimplemented the last major feature missing from ServiceStack Auth - support for API Keys!
What are API Keys?
API Keys are a simple and effective way to authorize access to your APIs, which are typically used for machine-to-machine communication, where a client application needs to access an API without user intervention. API Keys are often used to control access to specific resources or features in your API, providing a simple way to manage access control.
Redesigning API Keys
Building on our experience with API Keys in previous versions of ServiceStack, we've taken the opportunity to redesign how API Keys work to provide a more flexible and powerful way to manage access control for your APIs.
The existing API Key Auth Provider was implemented as another Auth Provider that provided another way to authenticate a single user. The consequences of this was:
- Initial API Request was slow as it required going through the Authentication workflow to authenticate the user and setup authentication for that request
- No support for fine-grained access control as API Keys had same access as the authenticated user
- API Keys had to be associated with a User which was unnecessary for machine-to-machine communication
Given the primary use-case for API Keys is for machine-to-machine communication where the client isn't a User, nor do they want systems using their API Keys to have access to their User Account, we've changed how API Keys work in .NET 8.
.NET 8 API Keys Feature
The first design decision to overcome the above issues was to separate API Keys from Users and Authentication itself,
where the new ApiKeysFeature is now just a plugin instead of an Auth Provider, which can be added to existing Identity
Auth Apps with:
x mix apikeys
Which will add the API Keys Modular Startup to your Host project, a minimal example of which looks like:
public class ConfigureApiKeys : IHostingStartup
{
    public void Configure(IWebHostBuilder builder) => builder
        .ConfigureServices(services => {
            services.AddPlugin(new ApiKeysFeature());
        })
        .ConfigureAppHost(appHost => {
            using var db = appHost.Resolve<IDbConnectionFactory>().Open();
            var feature = appHost.GetPlugin<ApiKeysFeature>();
            feature.InitSchema(db);
        });
}
Where it registers the ApiKeysFeature plugin and creates the ApiKey table in the App's configured database if it
doesn't already exist.
Creating Seed API Keys
The plugin can also be used to programmatically generate API Keys for specified Users:
if (feature.ApiKeyCount(db) == 0)
{
    var createApiKeysFor = new [] { "admin@email.com", "manager@email.com" };
    var users = IdentityUsers.GetByUserNames(db, createApiKeysFor);
    foreach (var user in users)
    {
        // Create a super API Key for the admin user
        List<string> scopes = user.UserName == "admin@email.com"
            ? [RoleNames.Admin]
            : [];
        var apiKey = feature.Insert(db, new() {
            Name="Seed Key", UserId=user.Id, UserName=user.UserName, Scopes=scopes });

        var generatedApiKey = apiKey.Key;
    }
}
Basic Usage
With the plugin registered, you can now use the ValidateApiKey attribute to limit APIs to only be accessible with a
valid API Key, e.g:
[ValidateApiKey]
public class MyRequest {}
Use API Keys with our without Users and Authentication
API Keys can optionally be associated with a User, but they don't have to be, nor do they run in the context of a User or are able to invoke any Authenticated APIs on their own. Users who create them can also limit their scope to only call APIs they have access to, which can be done with user-defined scopes:
Scopes
Scopes are user-defined strings that can be used to limit APIs from only being accessible with API Keys that have the required scope. For example, we could create generate API Keys that have read only, write only or read/write access to APIs by assigning them different scopes, e.g:
public static class Scopes
{
    public const string TodoRead = "todo:read";
    public const string TodoWrite = "todo:write";
}

[ValidateApiKey(Scopes.TodoRead)]
public class QueryTodos : QueryDb<Todo> {}

[ValidateApiKey(Scopes.TodoWrite)]
public class CreateTodo : ICreateDb<Todo>, IReturn<Todo> {}

[ValidateApiKey(Scopes.TodoWrite)]
public class UpdateTodo : IUpdateDb<Todo>, IReturn<Todo> {}

[ValidateApiKey(Scopes.TodoWrite)]
public class DeleteTodos : IDeleteDb<Todo>, IReturnVoid {}
Where only API Keys with the todo:read scope can access the QueryTodos API, and only API Keys with the todo:write
scope can access the CreateTodo, UpdateTodo and DeleteTodos APIs.
APIs that aren't assigned a scope can be accessed by any valid API Key.
The only built-in Scope is Admin which like the Admin role enables full access to all [ValidateApiKeys] APIs.
Fine-grained Access Control
Alternatively API Keys can be restricted to only be able to access specific APIs.
Features
In addition to scopes, API Keys can also be tagged with user-defined Features which APIs can inspect to enable different behavior, e.g. a Paid feature could be used to increase rate limits or return premium content whilst a Tracking feature could be used to keep a record of API requests, etc.
These can be accessed in your Services with:
public object Any(QueryTodos request)
{
    if (Request.GetApiKey().HasFeature(Features.Paid))
    {
        // return premium content
    }
}
Integrated UIs
Like many of ServiceStack's other premium features, API Keys are fully integrated into ServiceStack's built-in UIs including API Explorer and the Admin UI.
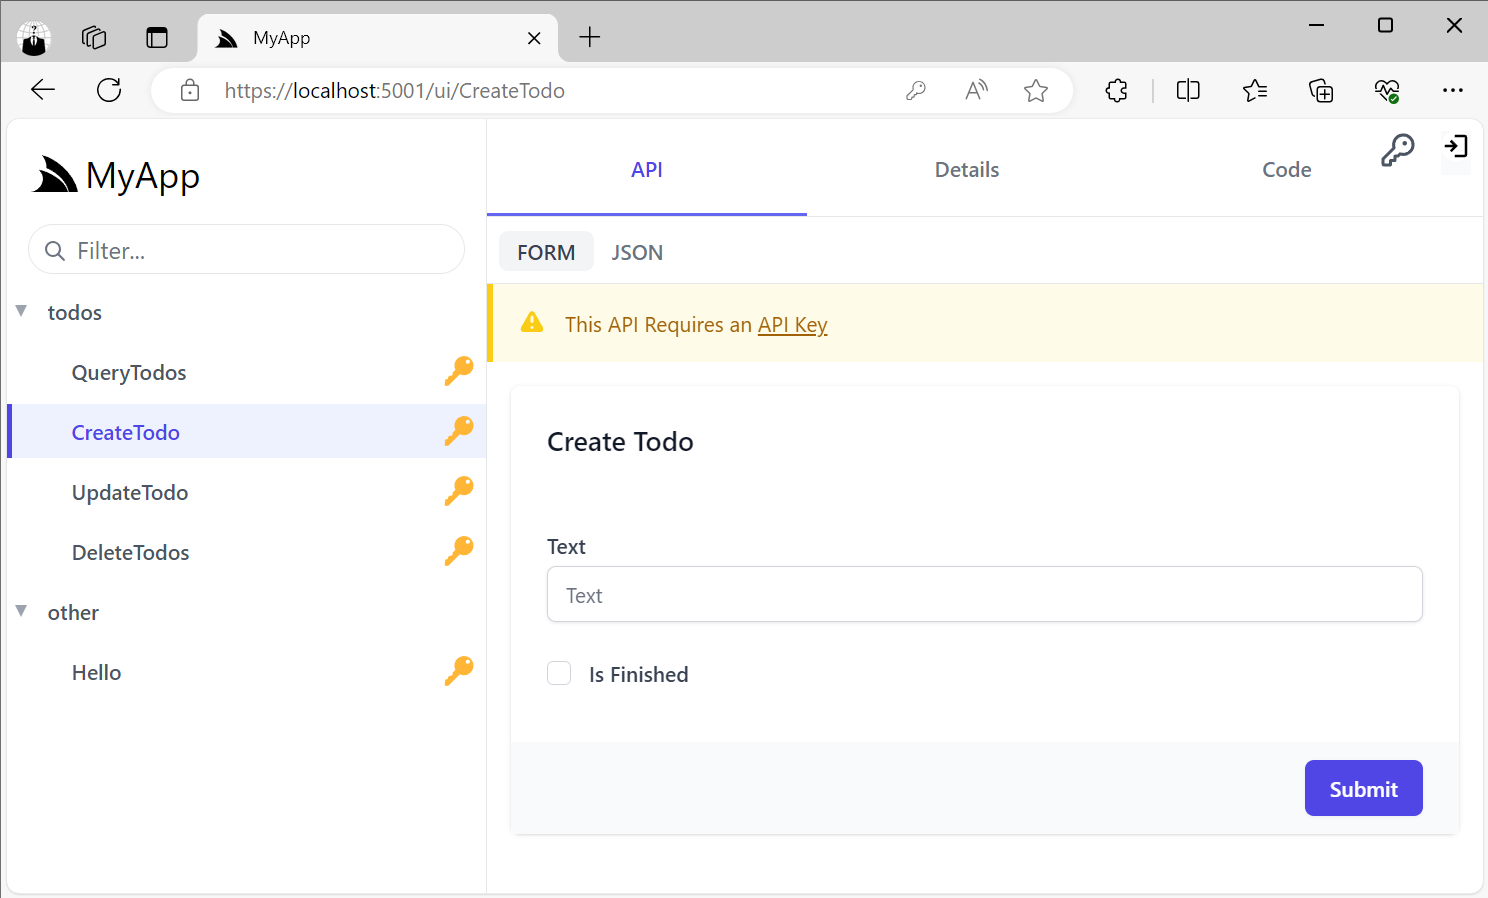
API Explorer
Your Users and API Consumers can use API Explorer to invoke protected APIs with their API Key. API Key protected APIs will display a key icon next to the API instead of the padlock which is used to distinguish APIs that require Authentication.
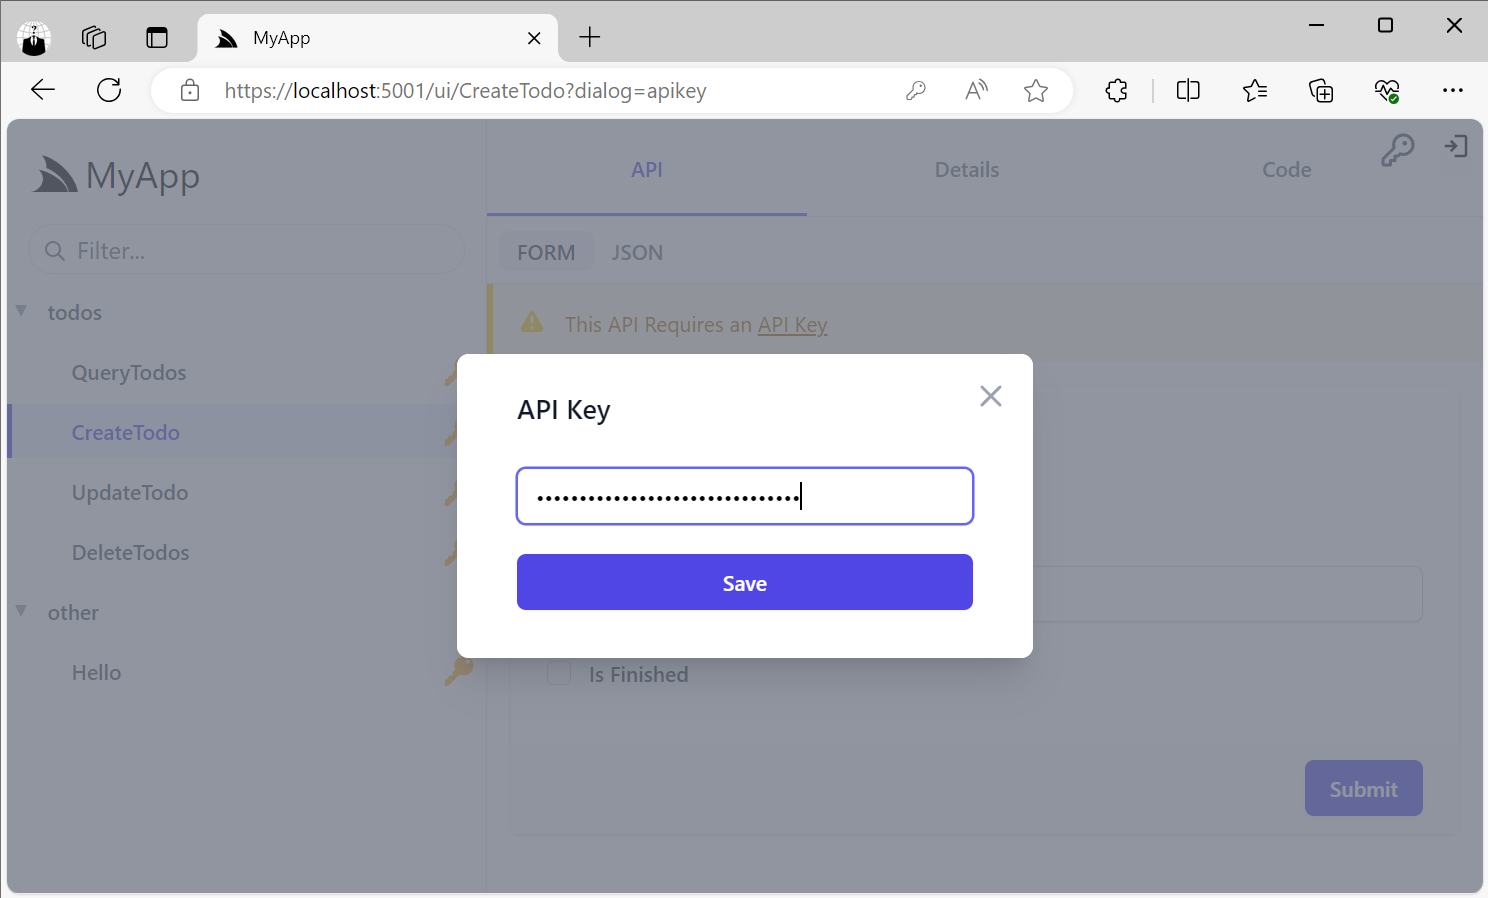
Users can configure API Explorer with their API Key by either clicking the key icon on the top right or by clicking the API Key link on the alert message that appears when trying to access an API requiring an API Key:

Both of these will open the API Key dialog where they can paste their API Key:
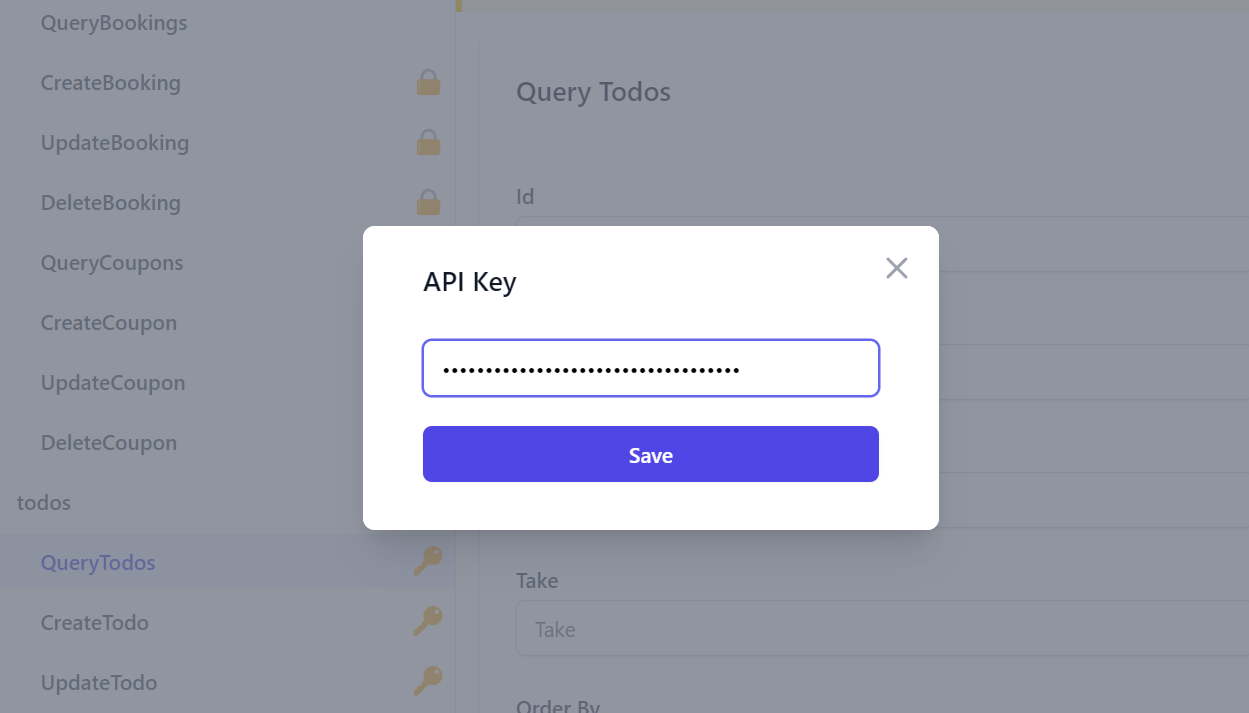
NOTE
API Keys are not stored in localStorage and only available in the current session
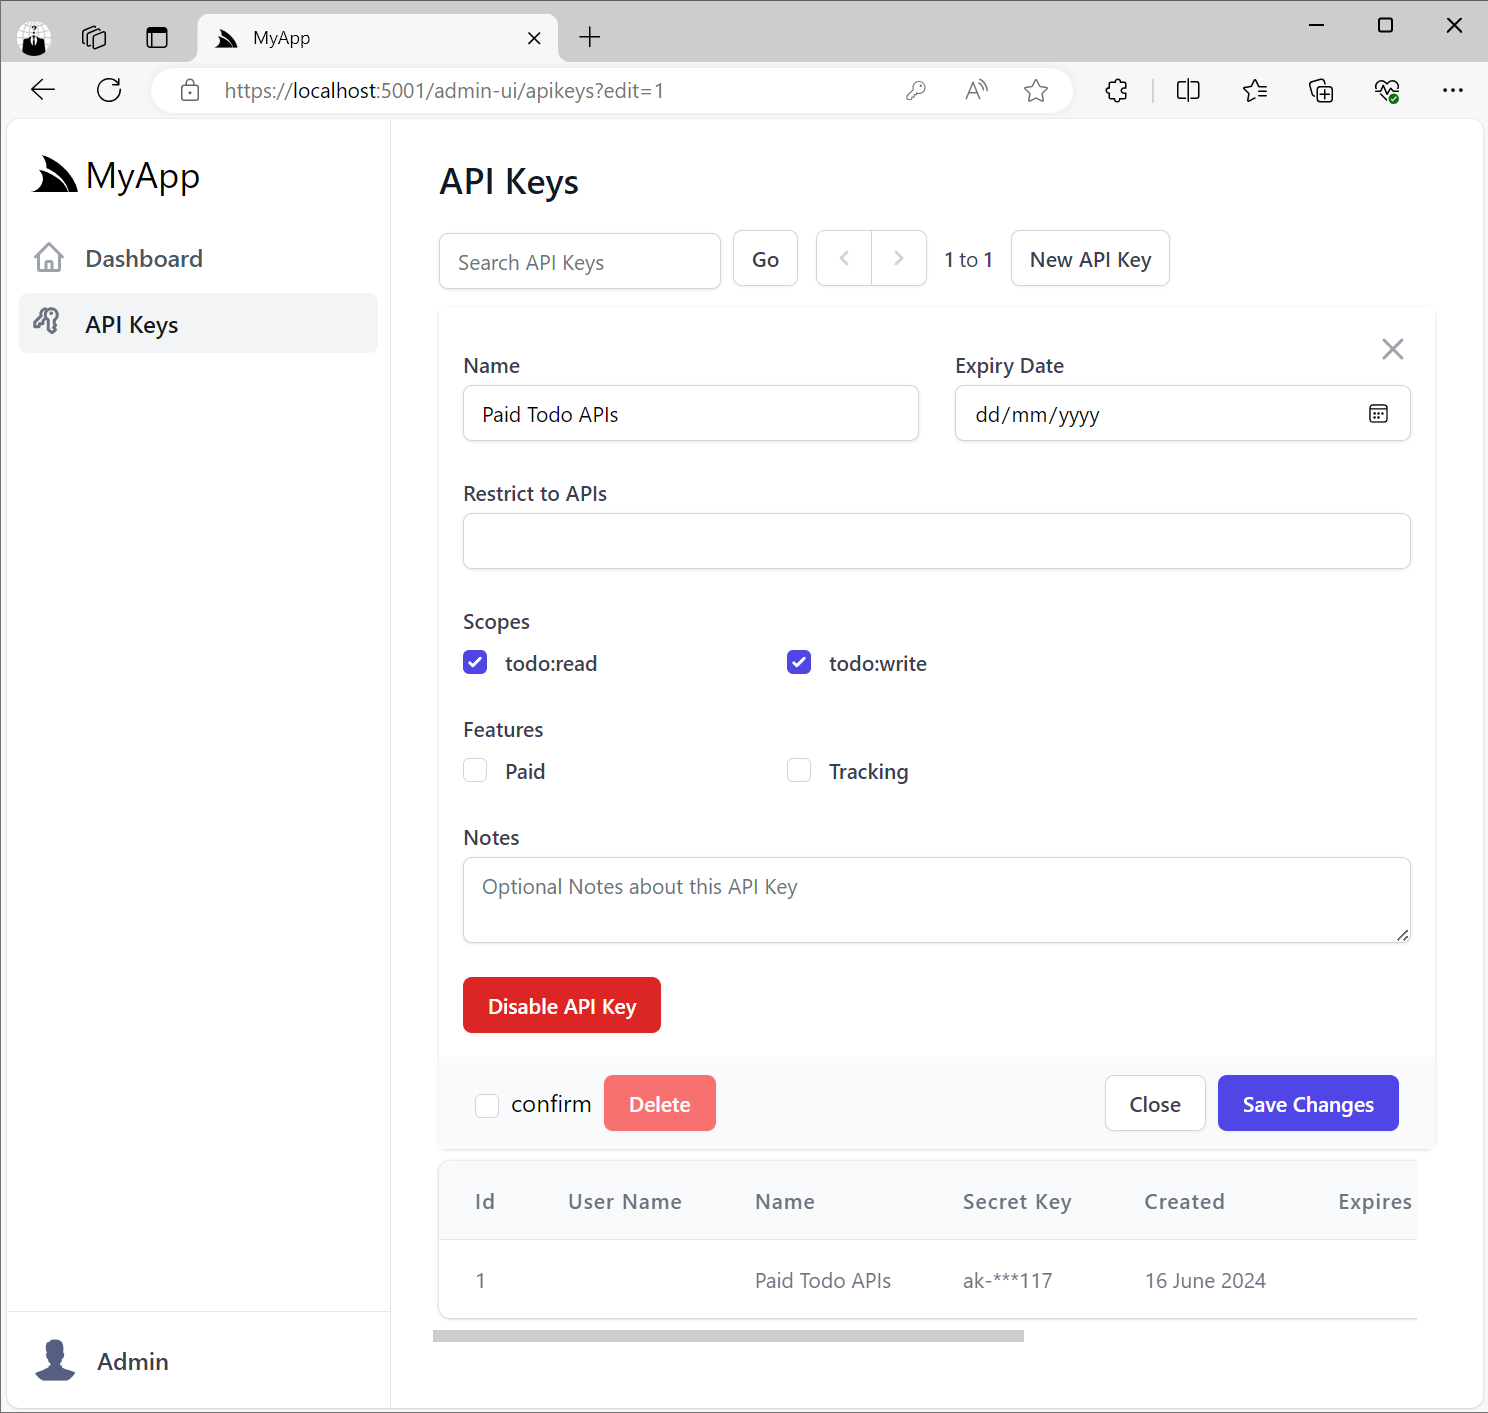
Admin UI
Whilst Admin users can view and manage API Keys in the API Key Admin UI at:
/admin-ui/apikeys
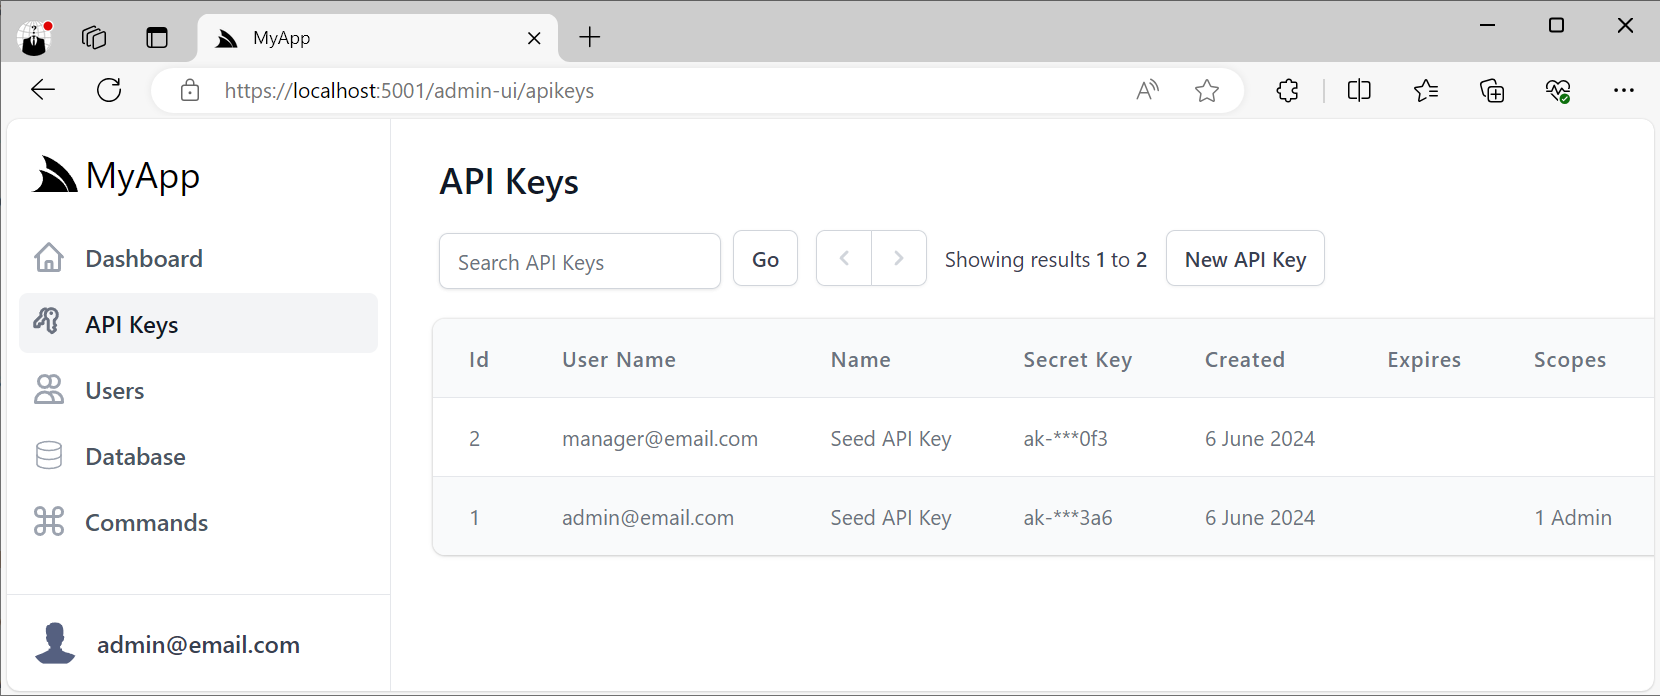
This will let you view and manage all API Keys in your App, including the ability to revoke API Keys, extend their Expiration date as well as manage any Scopes and Features assigned to API Keys.
Customizing API Key UIs
The ApiKeysFeature plugin can be configured to specify which Scopes and Features can be assigned to API Keys
as well as the different Expiration Options you want available in the API Key management UIs, e.g:
services.AddPlugin(new ApiKeysFeature {
    // Optional: Available Scopes Admin Users can assign to any API Key
    Features = [
        Features.Paid,
        Features.Tracking,
    ],
    // Optional: Available Features Admin Users can assign to any API Key
    Scopes = [
        Scopes.TodoRead,
        Scopes.TodoWrite,
    ],
    // Optional: Limit available Expiry options that can be assigned to API Keys
    // ExpiresIn =[
    //     new("", "Never"),
    //     new("30", "30 days"),
    //     new("365", "365 days"),
    // ],
    // Hide Optional Fields
    // Hide = ["RestrictTo","Notes"],
});
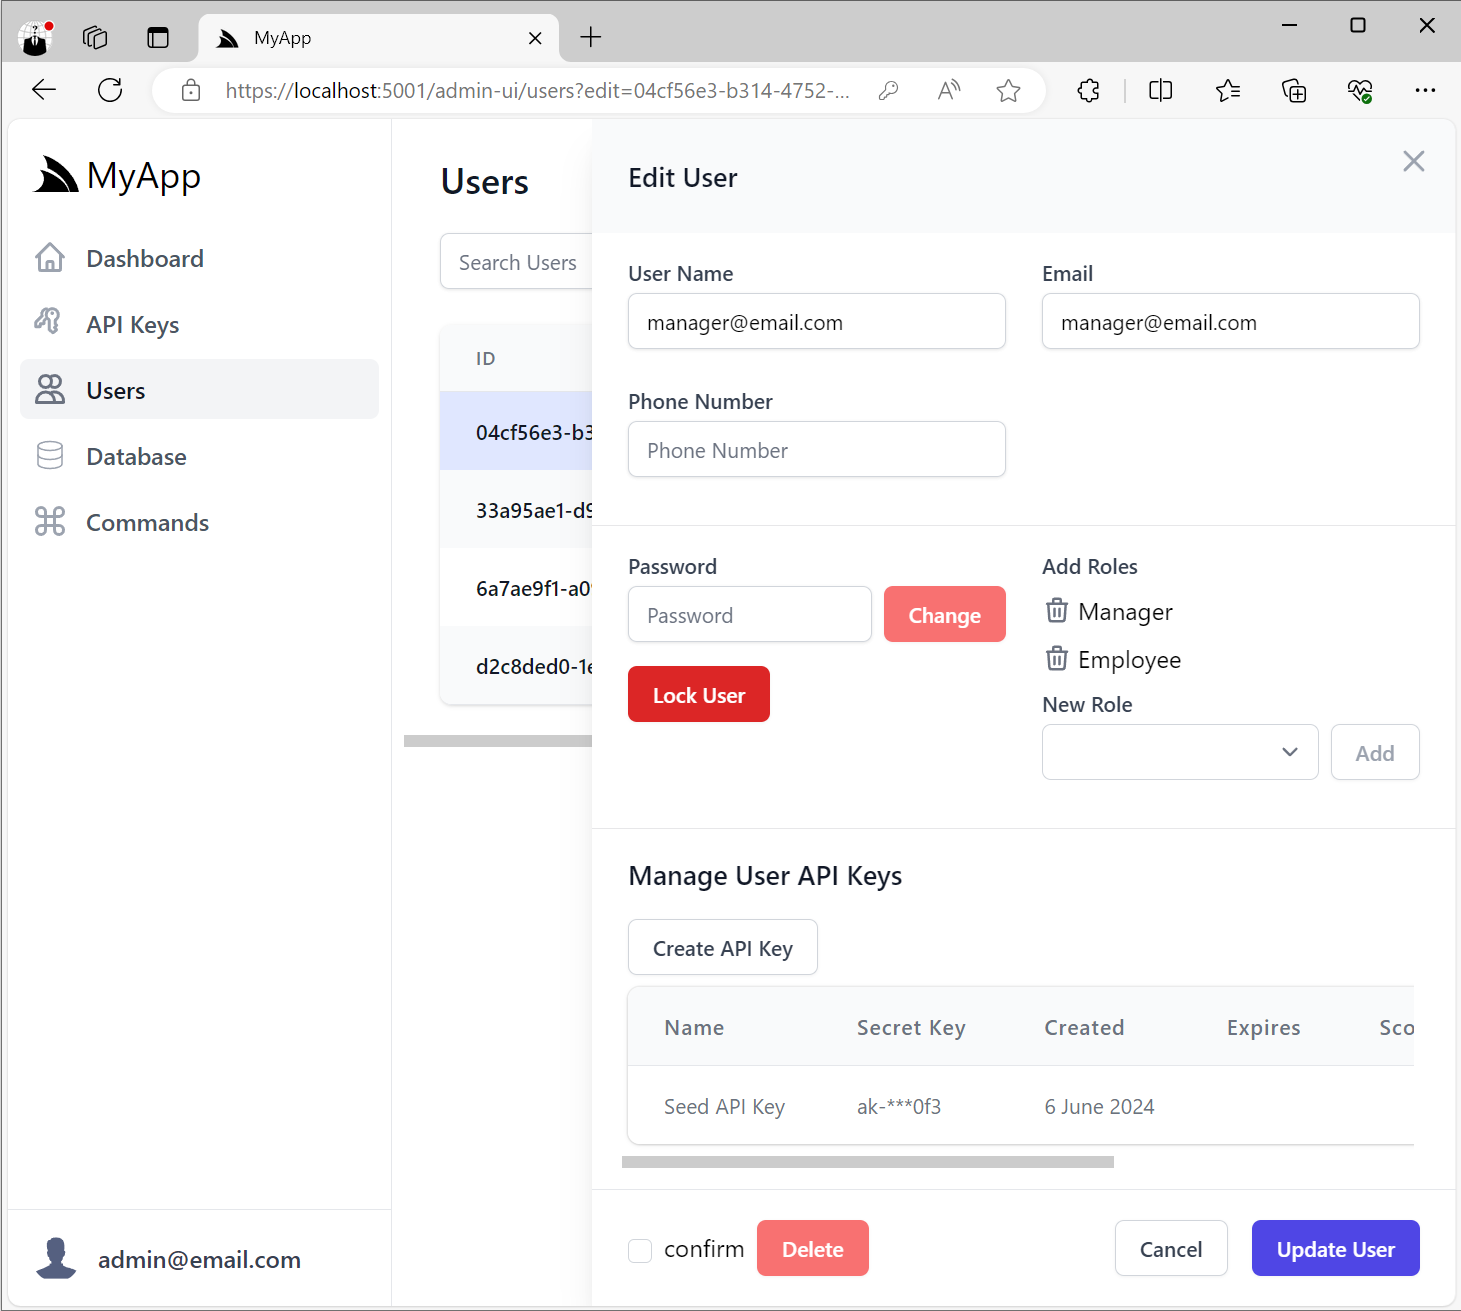
Admin User API Keys
When the ApiKeysFeature plugin is registered, the User Admin UI
will be enhanced to include the ability to create and manage API Keys for the user at the bottom of the Edit User form:
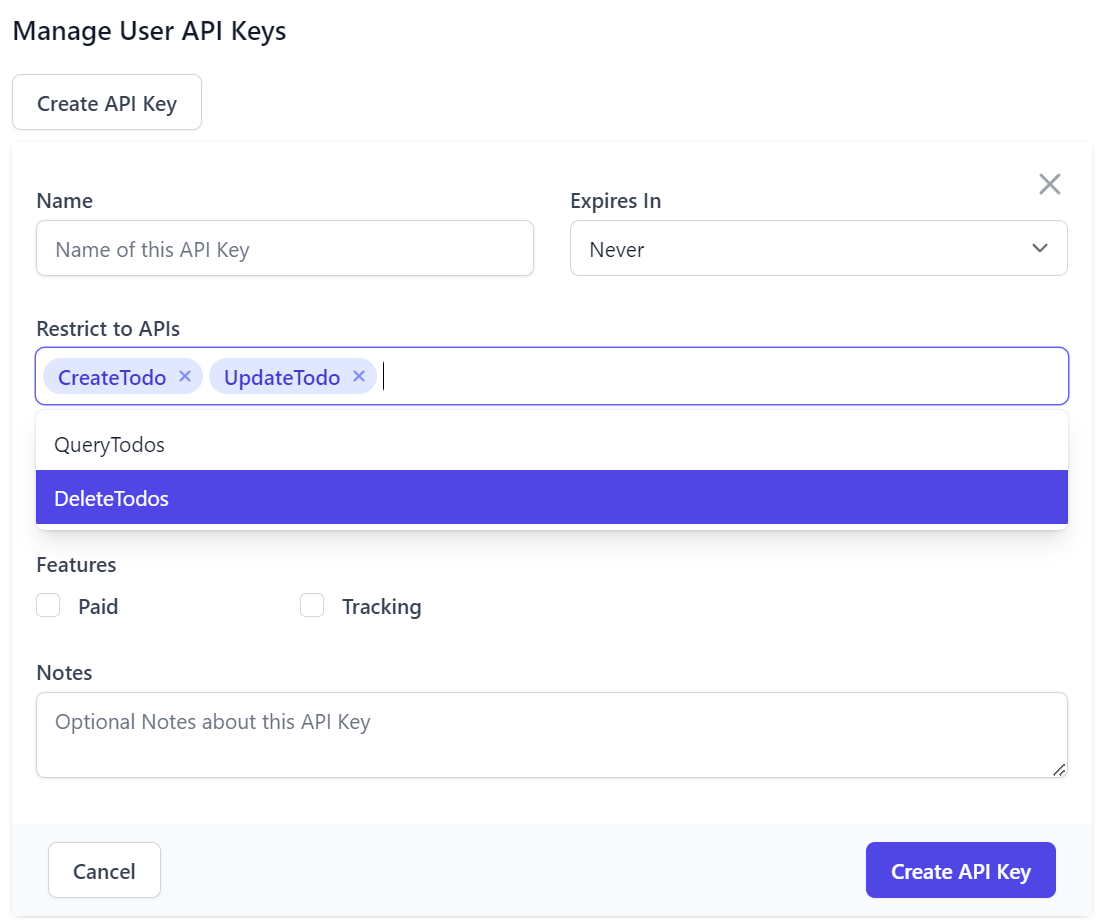
Creating User API Keys
When creating API Keys, you can assign them a Name, its Expiration date and any Scopes, Features and Notes.
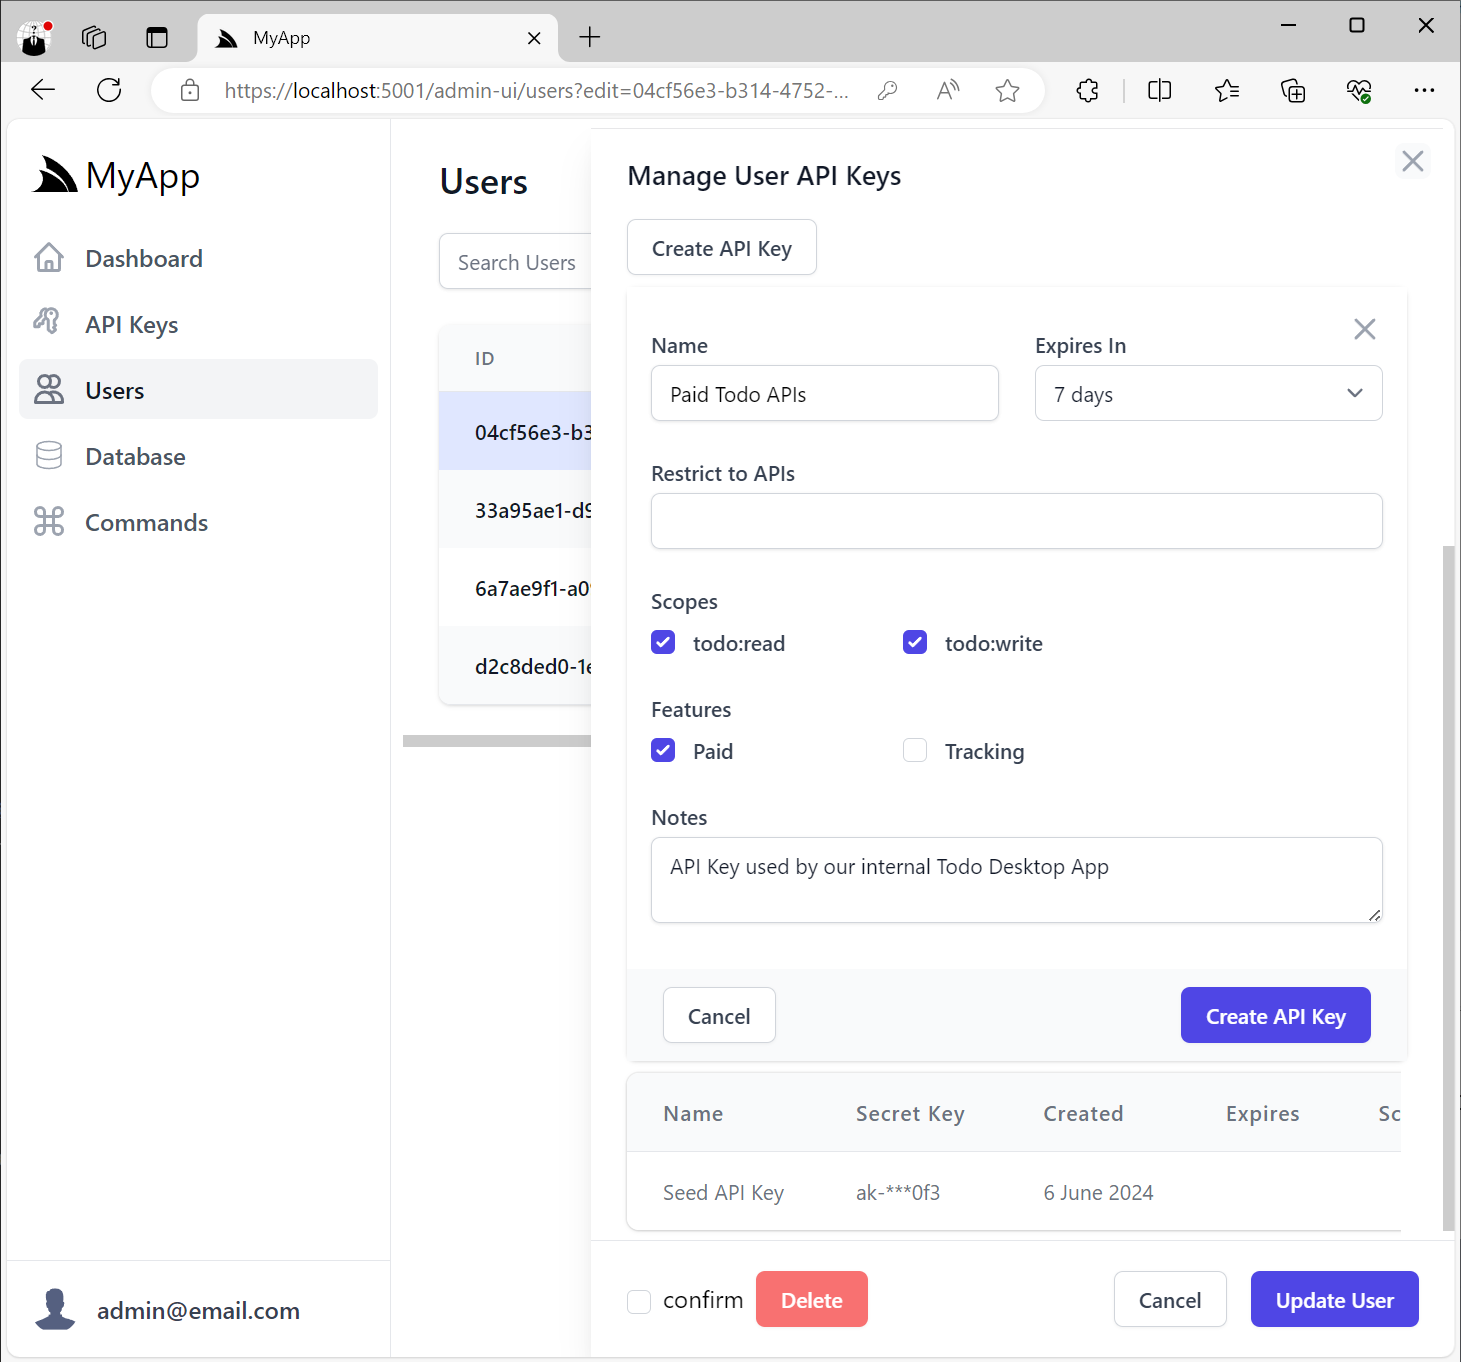
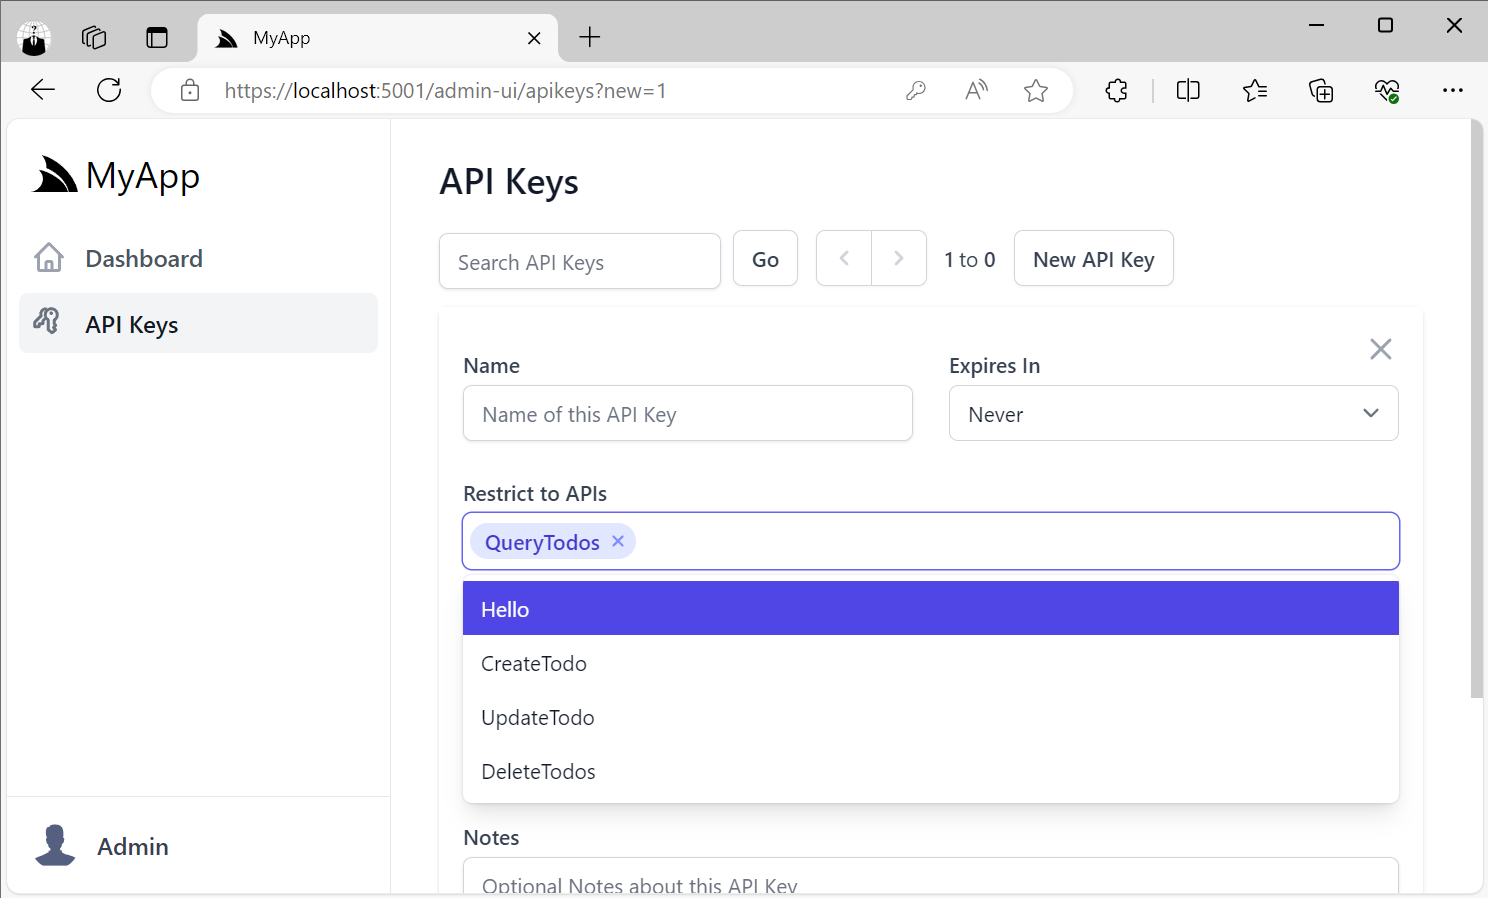
Restrict to APIs
Scopes provide a simple way to logically group a collection of related APIs behind UX-friendly names without Users
needing to know the behavior of each individual API.
In addition, Users who want fine-grained control can also restrict API Keys to only be able to access specific APIs that their systems make use of by selecting them from the Restrict to APIs option:
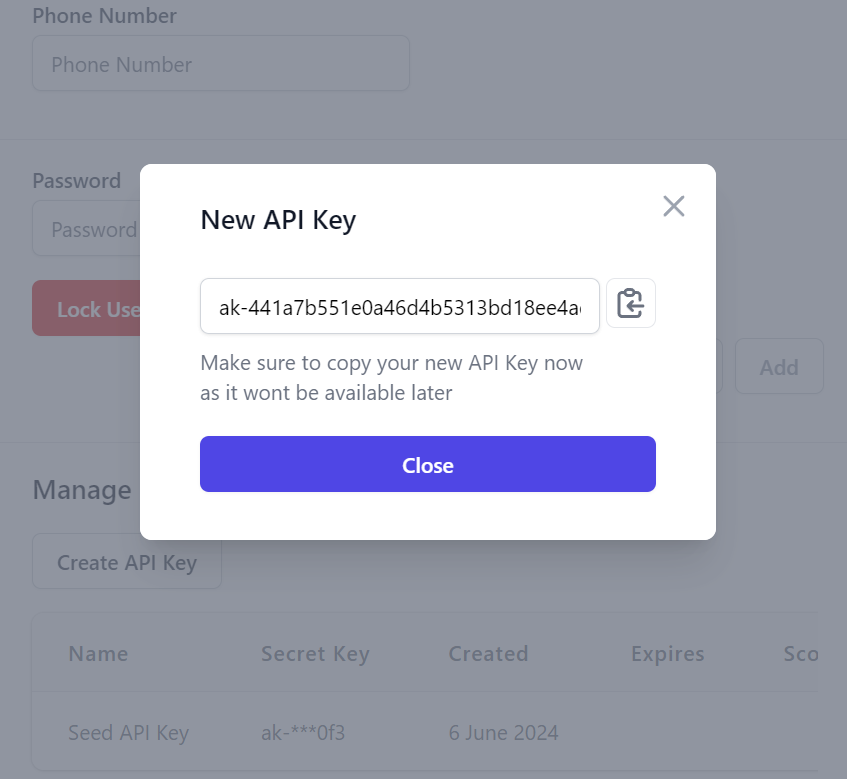
One Time only access of generated API Key
All UIs limit access to the generated API Key token so that it's only accessible at the time of creation:
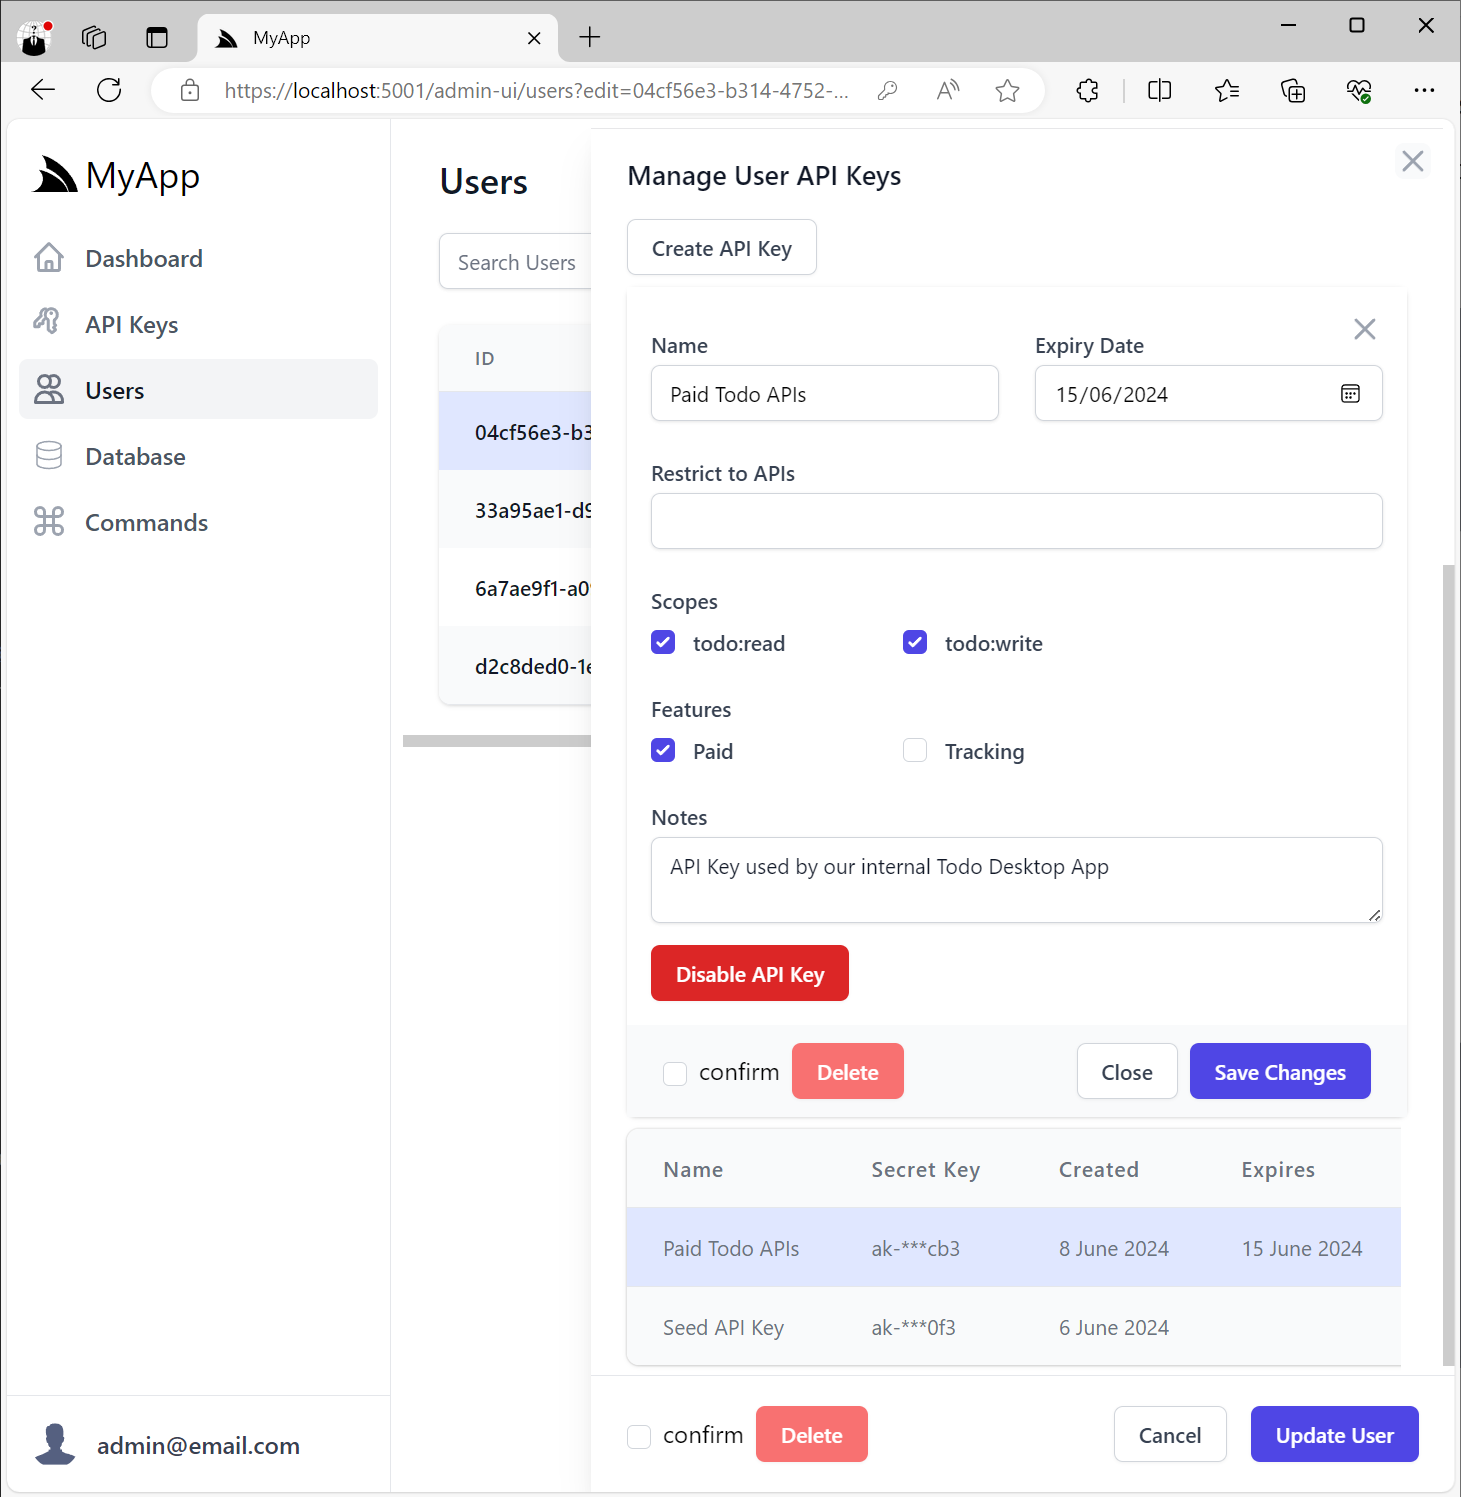
Editing User API Keys
Everything about the API Key can be edited after it's created except for the generated API Key token itself, in addition to be able to cancel and revoke the API Key:
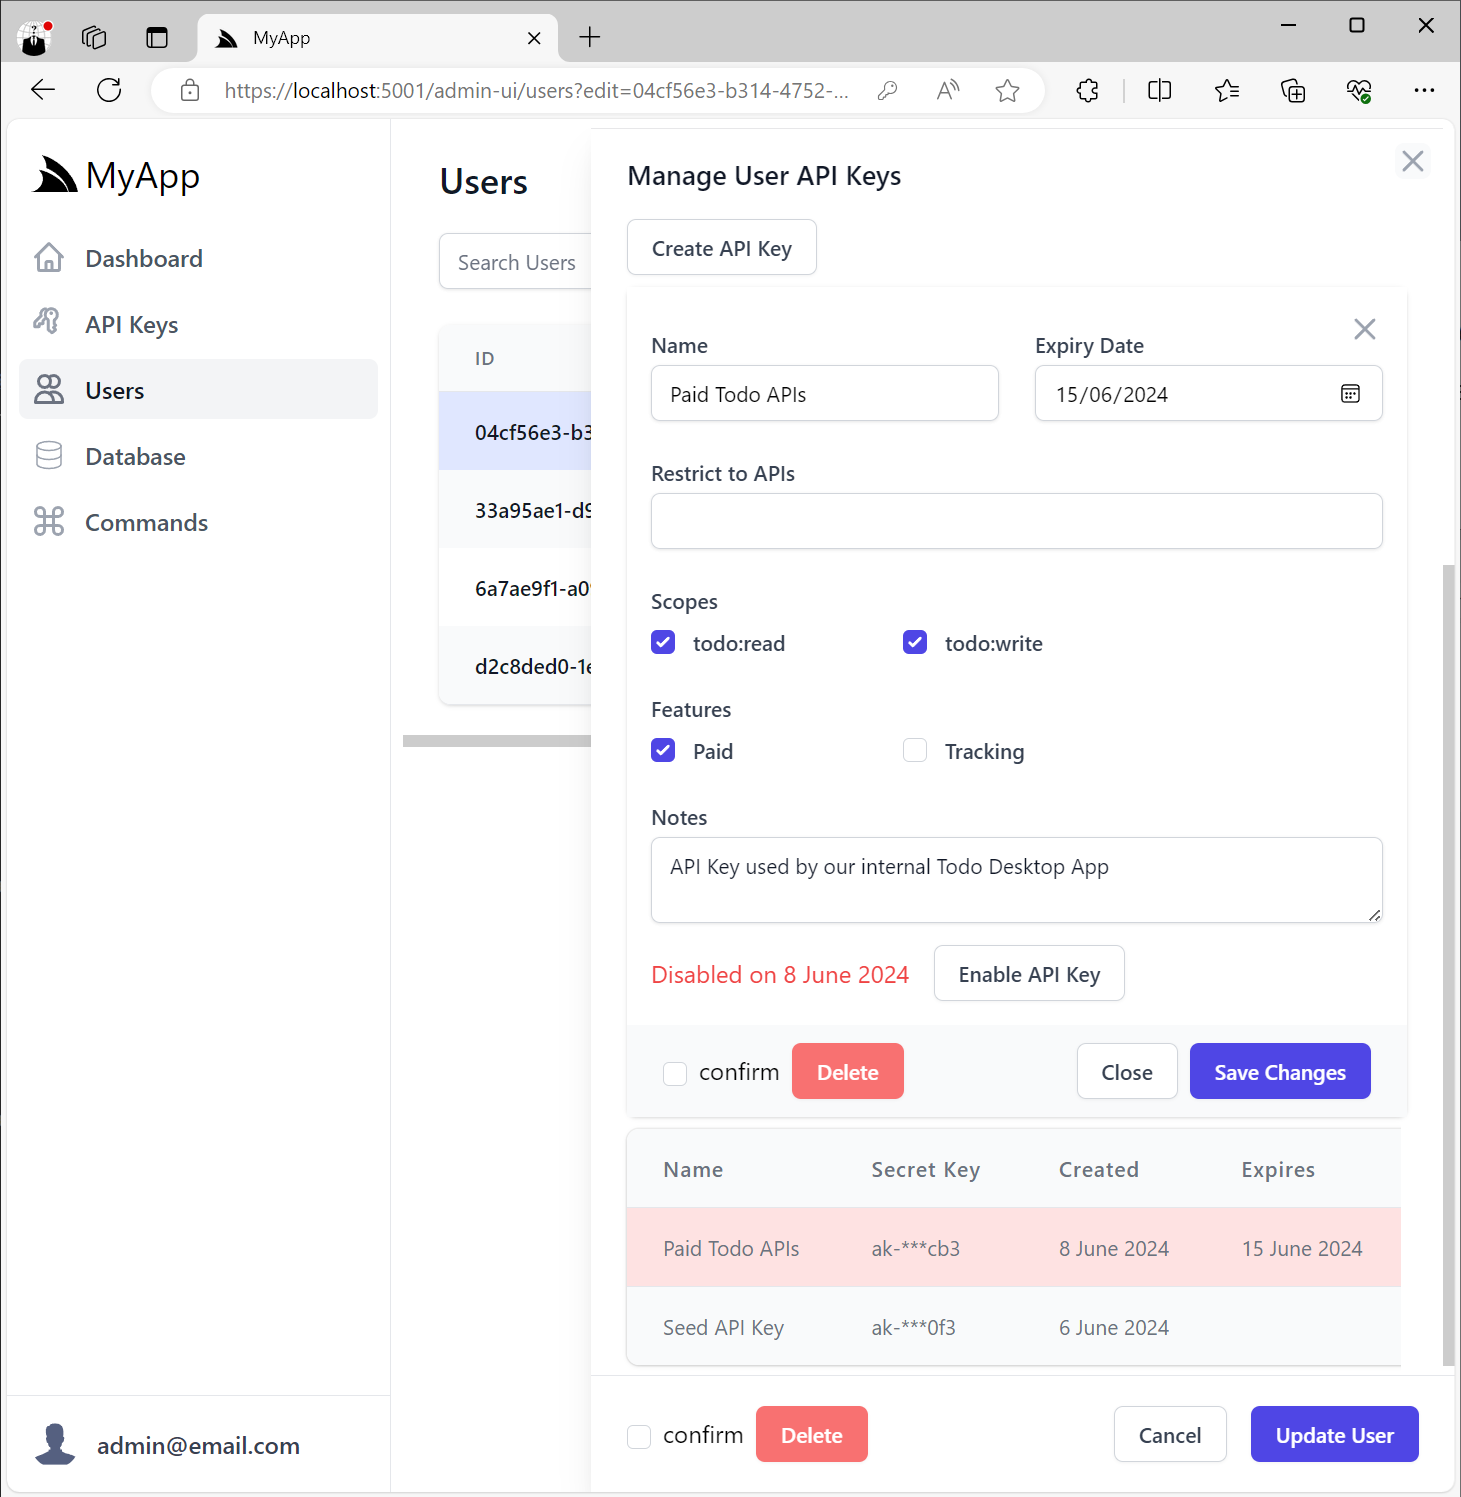
Invalid API Keys that have expired or have been disabled will appear disabled in the UI:
User Management API Keys
In addition to the built-in Admin UIs to manage API Keys, all Identity Auth Tailwind templates have also been updated to include support for managing API Keys in their User Account pages:
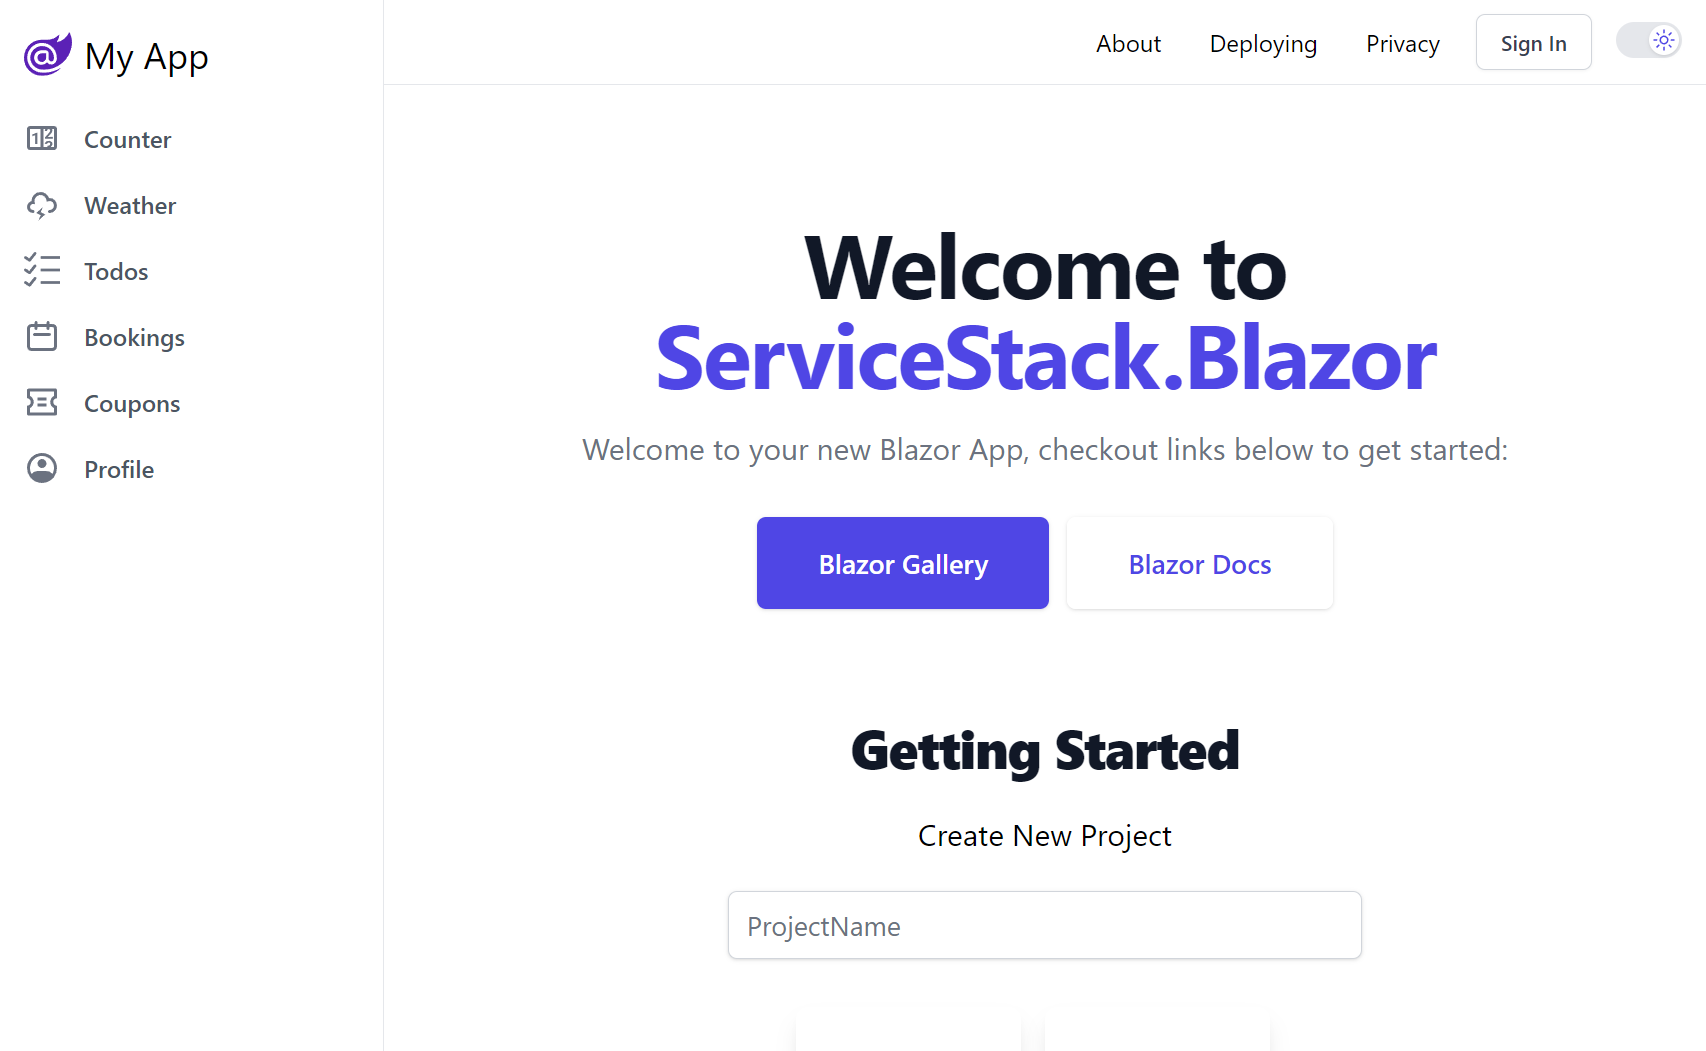


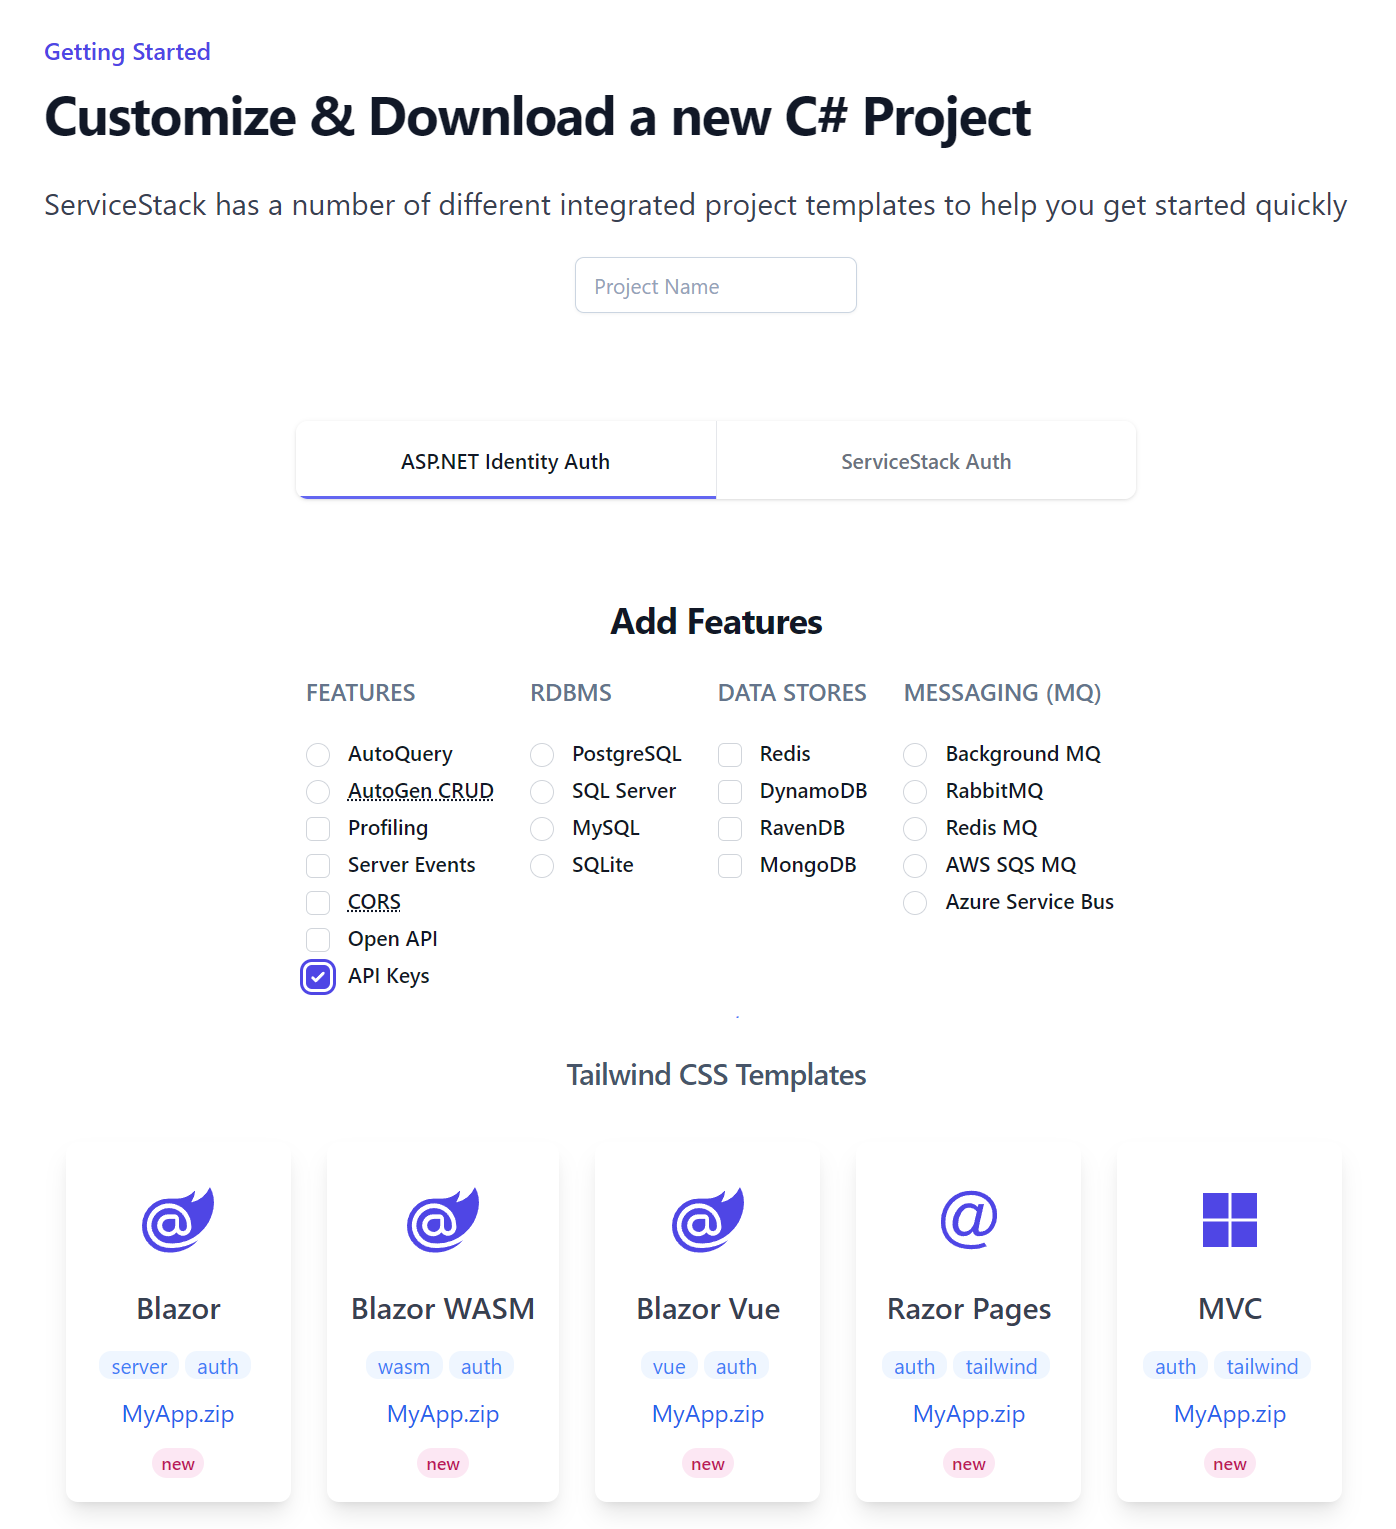
The templates aren't configured to use API Keys by default, but new projects can be configured to use API Keys by selecting the API Keys feature on the Start Page:
Or by mixing the apikeys project in your host project:
x mix apikeys
Which add the Configure.ApiKeys.cs modular startup to your Host project, which registers the ApiKeysFeature plugin
where you'd use the UserScopes and UserFeatures collections instead to control which scopes and features Users
can assign to their own API Keys, e.g:
services.AddPlugin(new ApiKeysFeature {
    // Optional: Available Scopes Admin Users can assign to any API Key
    Features = [
        Features.Paid,
        Features.Tracking,
    ],
    // Optional: Available Features Admin Users can assign to any API Key
    Scopes = [
        Scopes.TodoRead,
        Scopes.TodoWrite,
    ],

    // Optional: Limit available Scopes Users can assign to their own API Keys
    UserScopes = [
        Scopes.TodoRead,
    ],
    // Optional: Limit available Features Users can assign to their own API Keys
    UserFeatures = [
        Features.Tracking,
    ],
});
Identity Auth API Keys
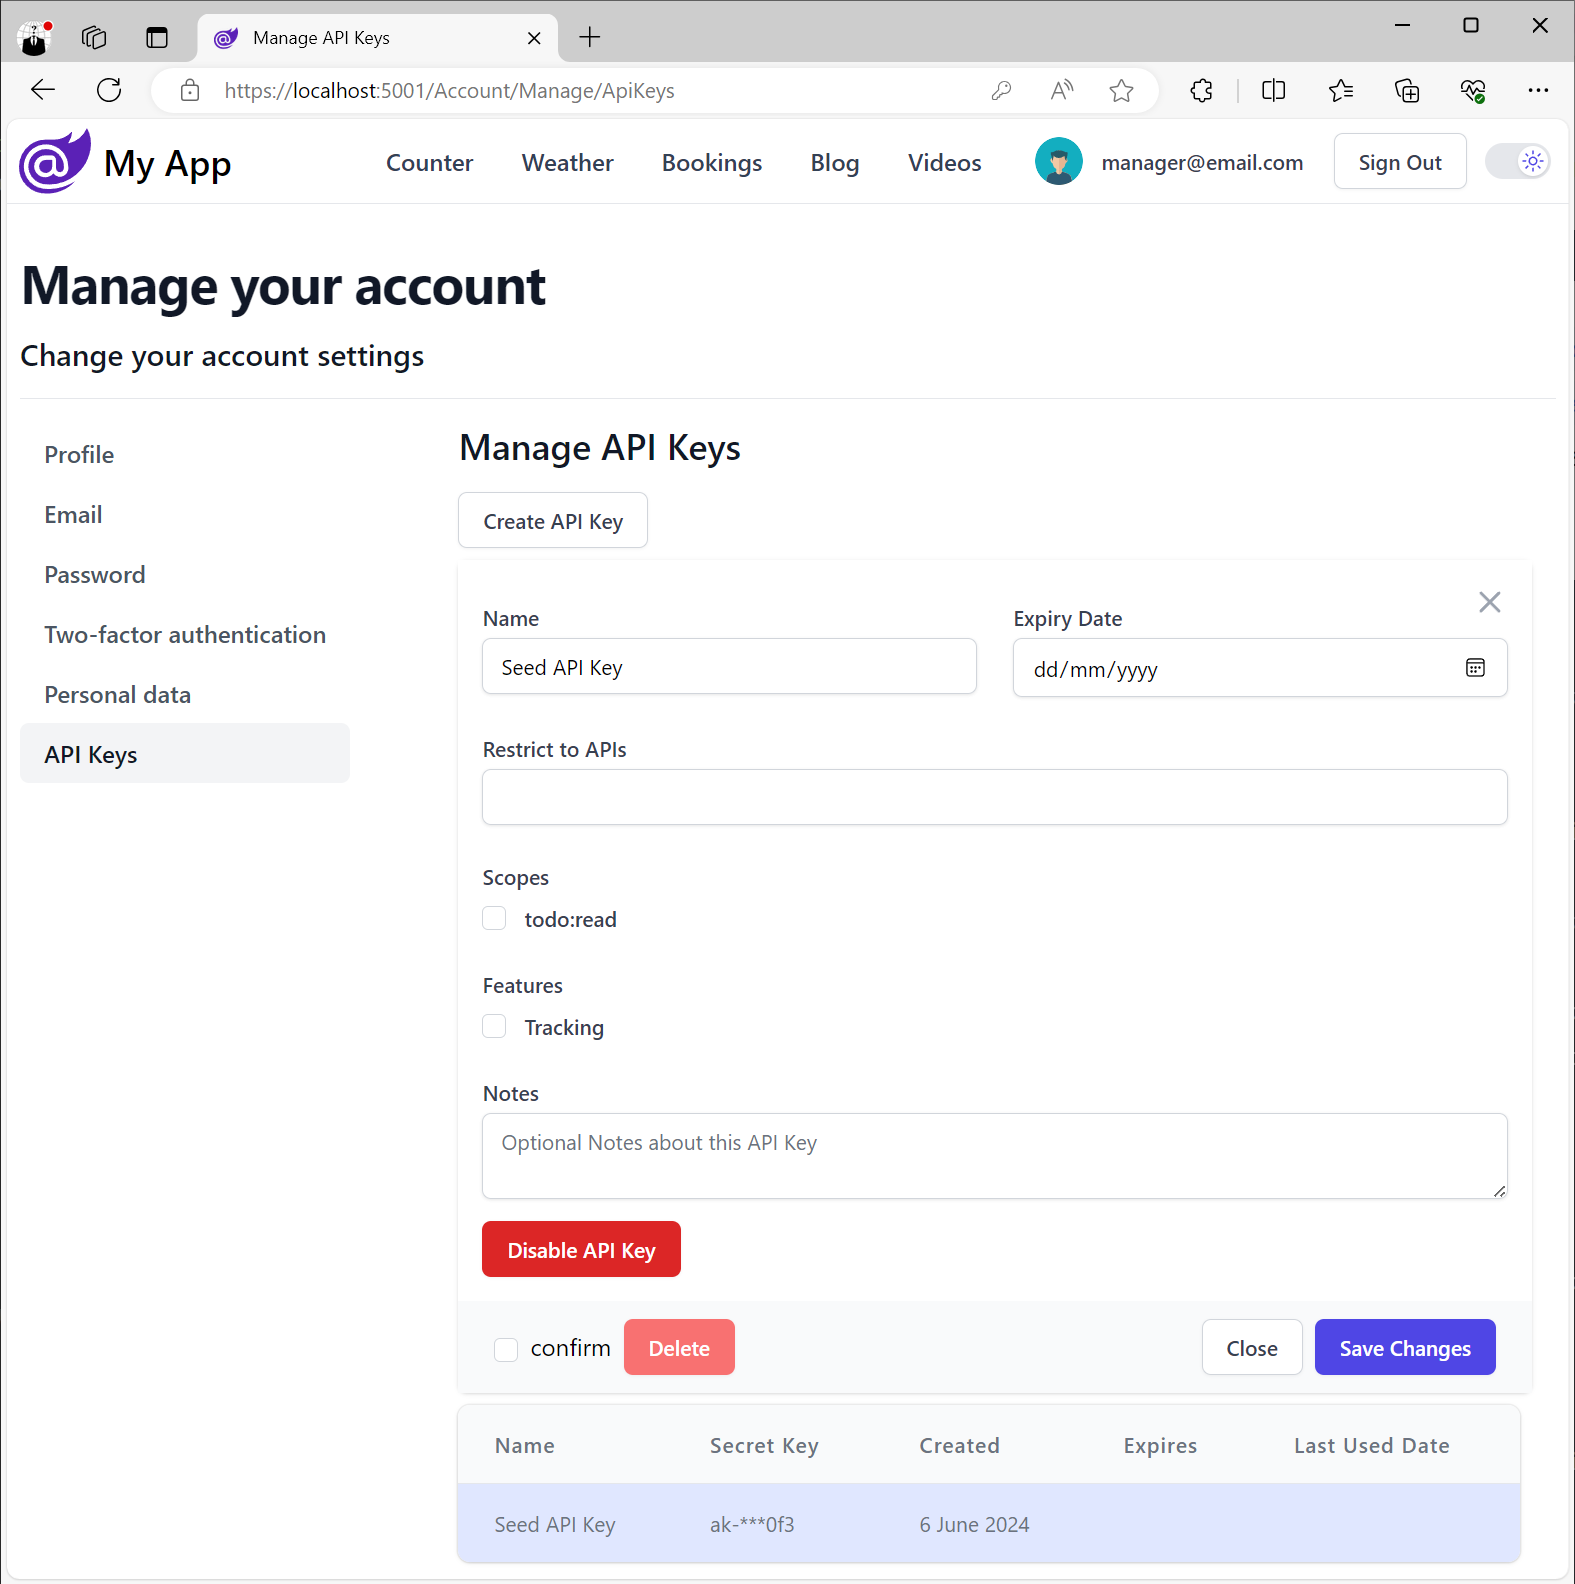
When enabled users will be able to create and manage their own API Keys from their Identity UI pages
which will use any configured UserScopes and UserFeatures:
Client Usage
Like most API Key implementations, API Keys can be passed in a HTTP Authorization Bearer Token that can be configured in ServiceStack Service Clients with:
C#
var client = new JsonApiClient(BaseUrl) {
    BearerToken = apiKey
};
TypeScript
const client = new JsonServiceClient(BaseUrl)
client.bearerToken = apiKey
API Key HTTP Header
Alternatively, API Keys can also be passed in the X-Api-Key HTTP Header which allows clients to be configured
with an alternative Bearer Token allowing the same client to call both Authenticated and API Key protected APIs, e.g:
C#
var client = new JsonApiClient(BaseUrl) {
    BearerToken = jwt,
    Headers = {
        [HttpHeaders.XApiKey] = apiKey
    }
};
TypeScript
const client = new JsonServiceClient(BaseUrl)
client.bearerToken = apiKey
client.headers.set('X-Api-Key', apiKey)
Or use a different HTTP Header by configuring ApiKeysFeature.HttpHeader, e.g:
services.AddPlugin(new ApiKeysFeature {
    HttpHeader = "X-Alt-Key"
});
Simple Auth Story
With ServiceStack now fully integrated with ASP.NET Identity Auth, our latest .NET 8 Tailwind Templates offer a full-featured Auth Configuration complete with User Registration, Login, Password Recovery, Two Factory Auth, and more.
Whilst great for Web Applications that need it, it neglects the class of Apps which don't need User Auth and the additional complexity it brings inc. Identity and Password Management, EF Migrations, Token Expirations, OAuth Integrations, etc.
For these stand-alone Apps, Microservices and Docker Appliances that would still like to restrict Access to their APIs but don't need the complexity of ASP .NET Core's Authentication machinery, a simpler Auth Story would be preferred.
With the introduction of API Keys in this release we're able to provide a simpler Auth Story for .NET 8 Microservices that's easy for Admin Users to manage and control which trusted clients and B2B Integrations can access their functionality.
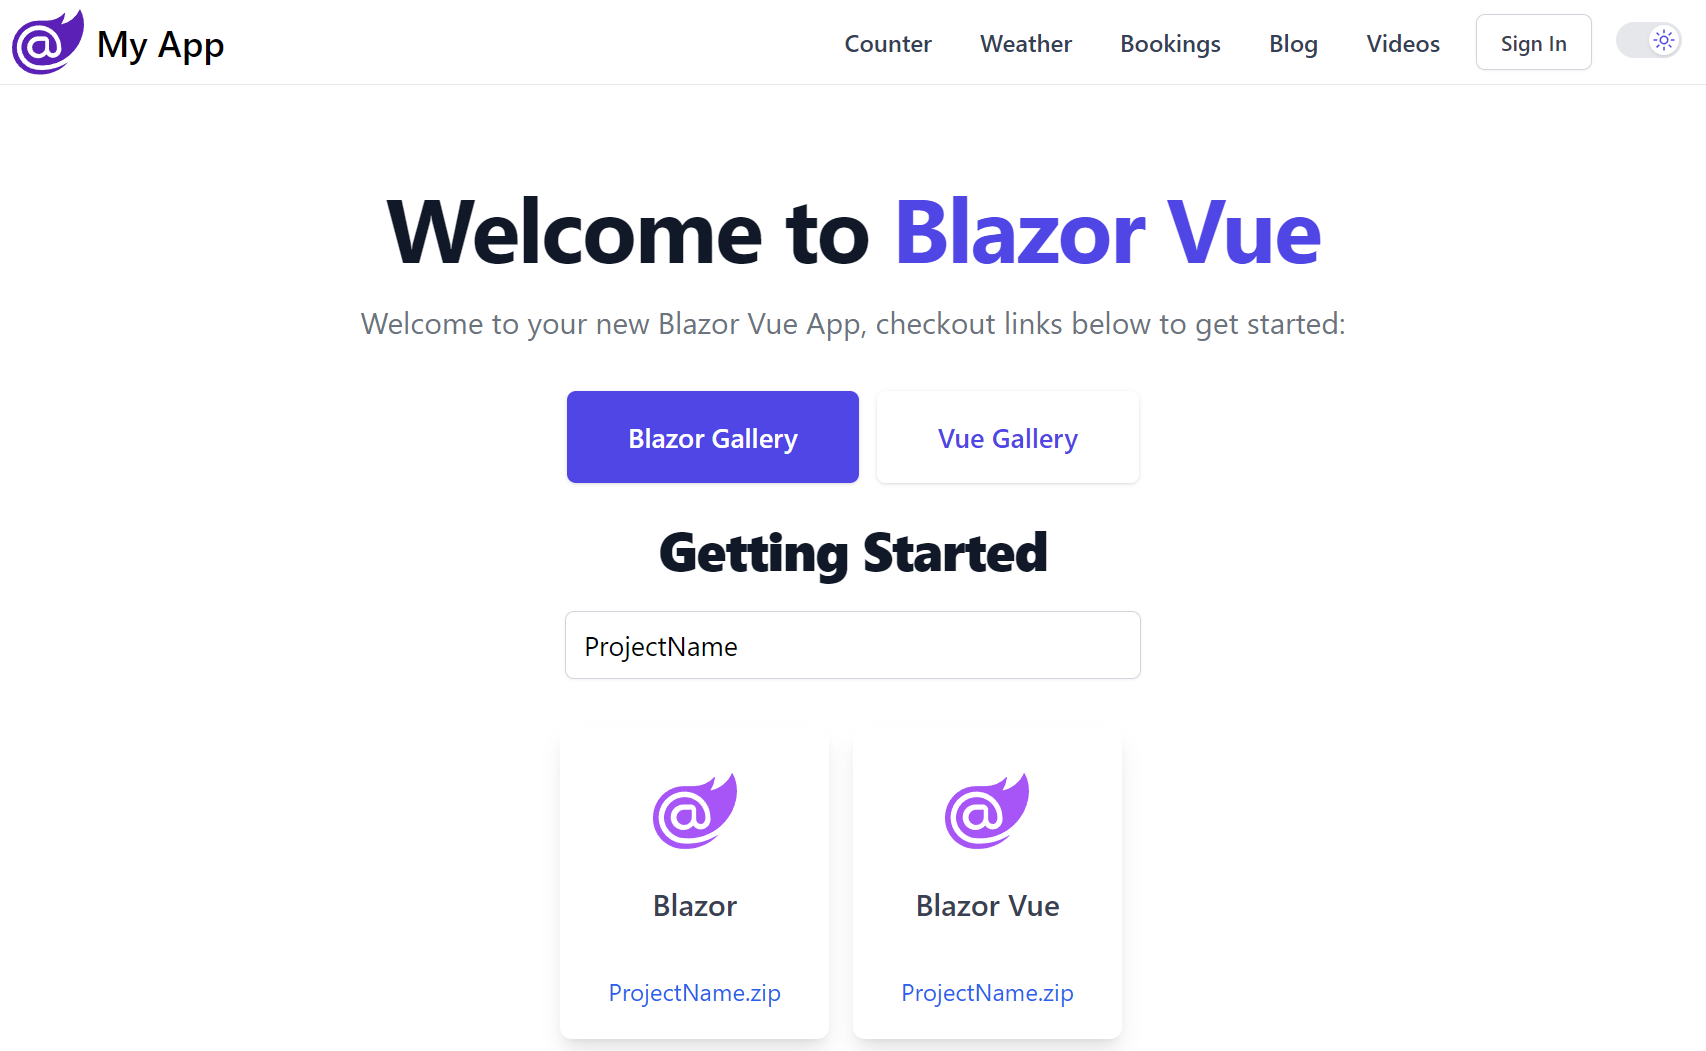
The easiest way to get started is by creating a new Empty project with API Keys enabled with your preferred database to store the API Keys in. SQLite is a good choice for stand-alone Apps as it doesn't require any infrastructure dependencies.
Create a new Empty project with API Keys
Existing Projects
Existing projects not configured with Authentication can enable this simple Auth configuration by running:
x mix apikeys-auth
Which will add the ServiceStack.Server dependency and the Modular Startup configuration below:
public class ConfigureApiKeys : IHostingStartup
{
    public void Configure(IWebHostBuilder builder) => builder
    .ConfigureServices(services =>
    {
        services.AddPlugin(new AuthFeature(new AuthSecretAuthProvider("p@55wOrd")));
        services.AddPlugin(new ApiKeysFeature
        {
            // Optional: Available Scopes Admin Users can assign to any API Key
            // Features = [
            //     "Paid",
            //     "Tracking",
            // ],
            // Optional: Available Features Admin Users can assign to any API Key
            // Scopes = [
            //     "todo:read",
            //     "todo:write",
            // ],
        });
    })
    .ConfigureAppHost(appHost =>
    {
        using var db = appHost.Resolve<IDbConnectionFactory>().Open();
        var feature = appHost.GetPlugin<ApiKeysFeature>();
        feature.InitSchema(db);
    });
}
Which configures the AuthSecretAuthProvider with the Admin password and ApiKeysFeature to enable API Keys support.
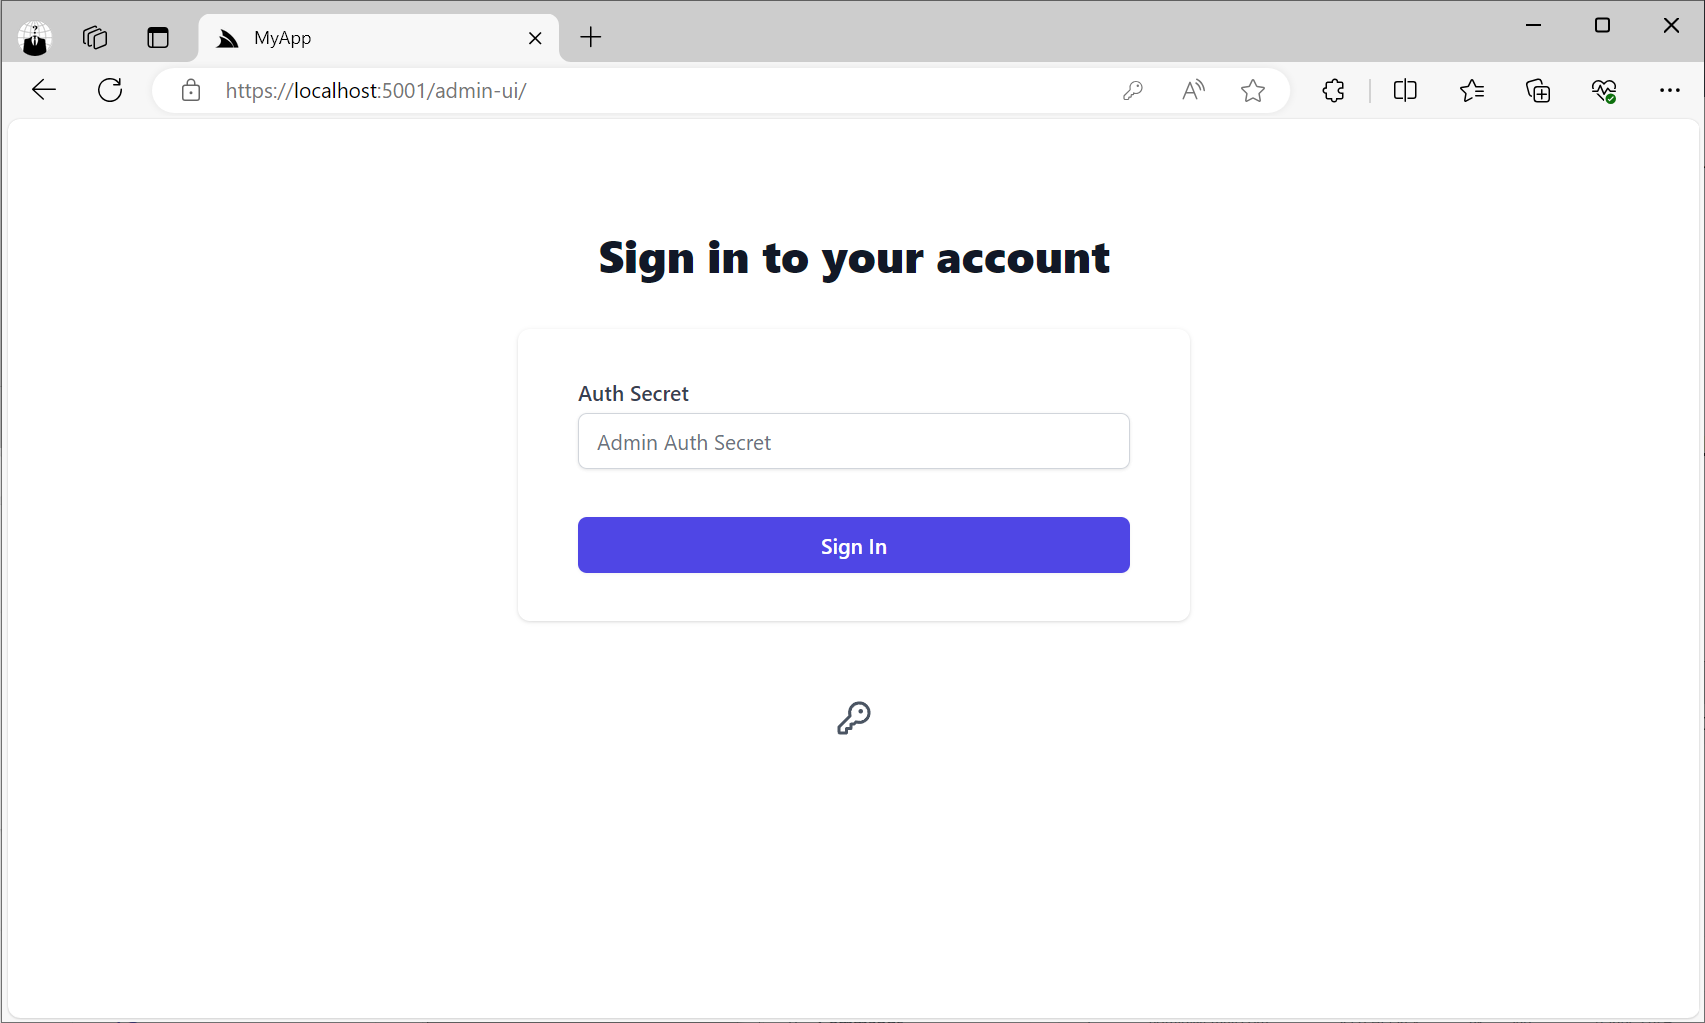
Admin UI
The Admin password will give you access to the Admin UI at:
/admin-ui
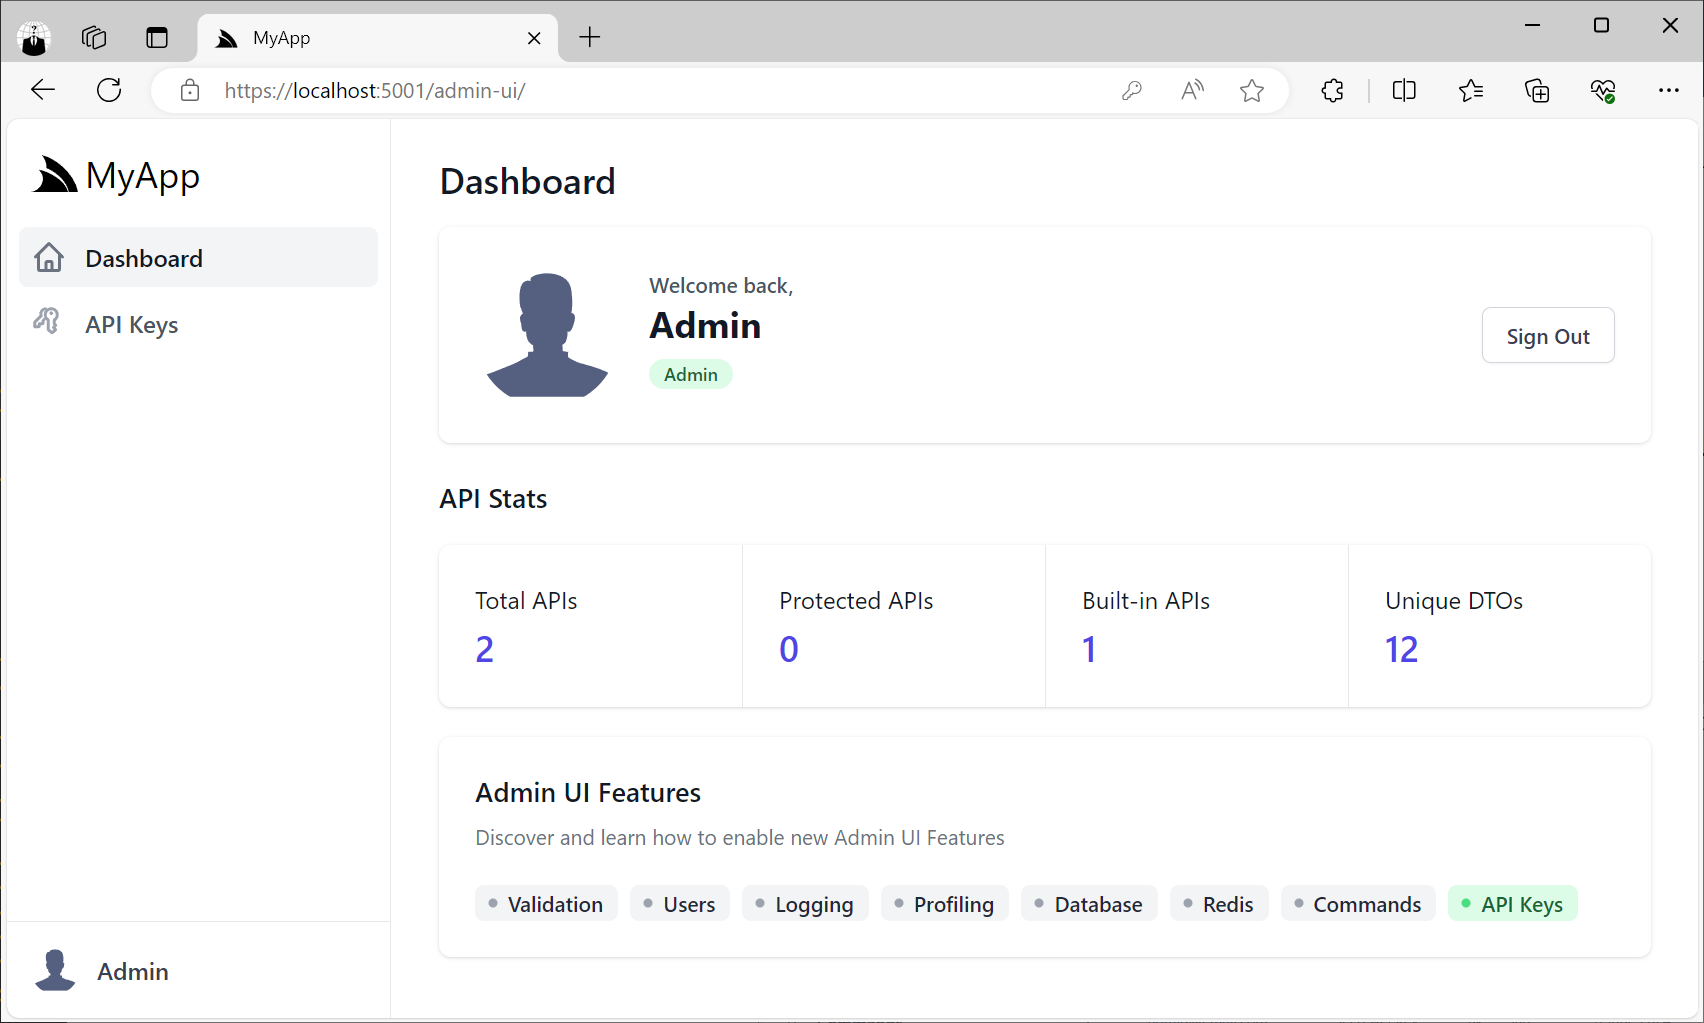
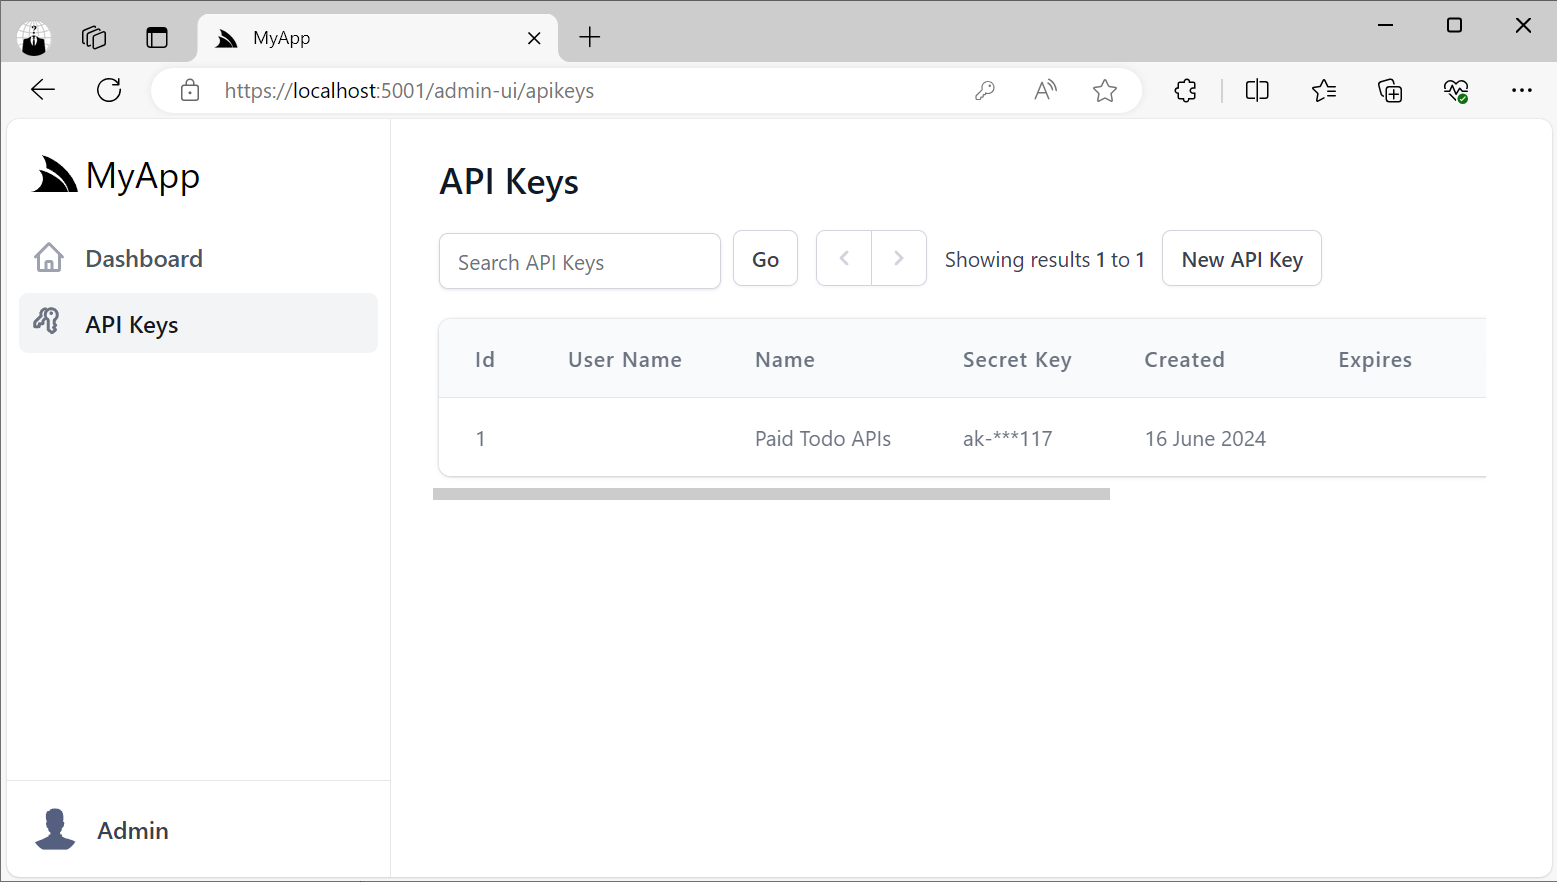
API Keys Admin UI
Clicking on API Keys menu item will take you to the API Keys Admin UI where you'll be able to create new API Keys that you can distribute to different API consumers you want to be able to access your APIs:
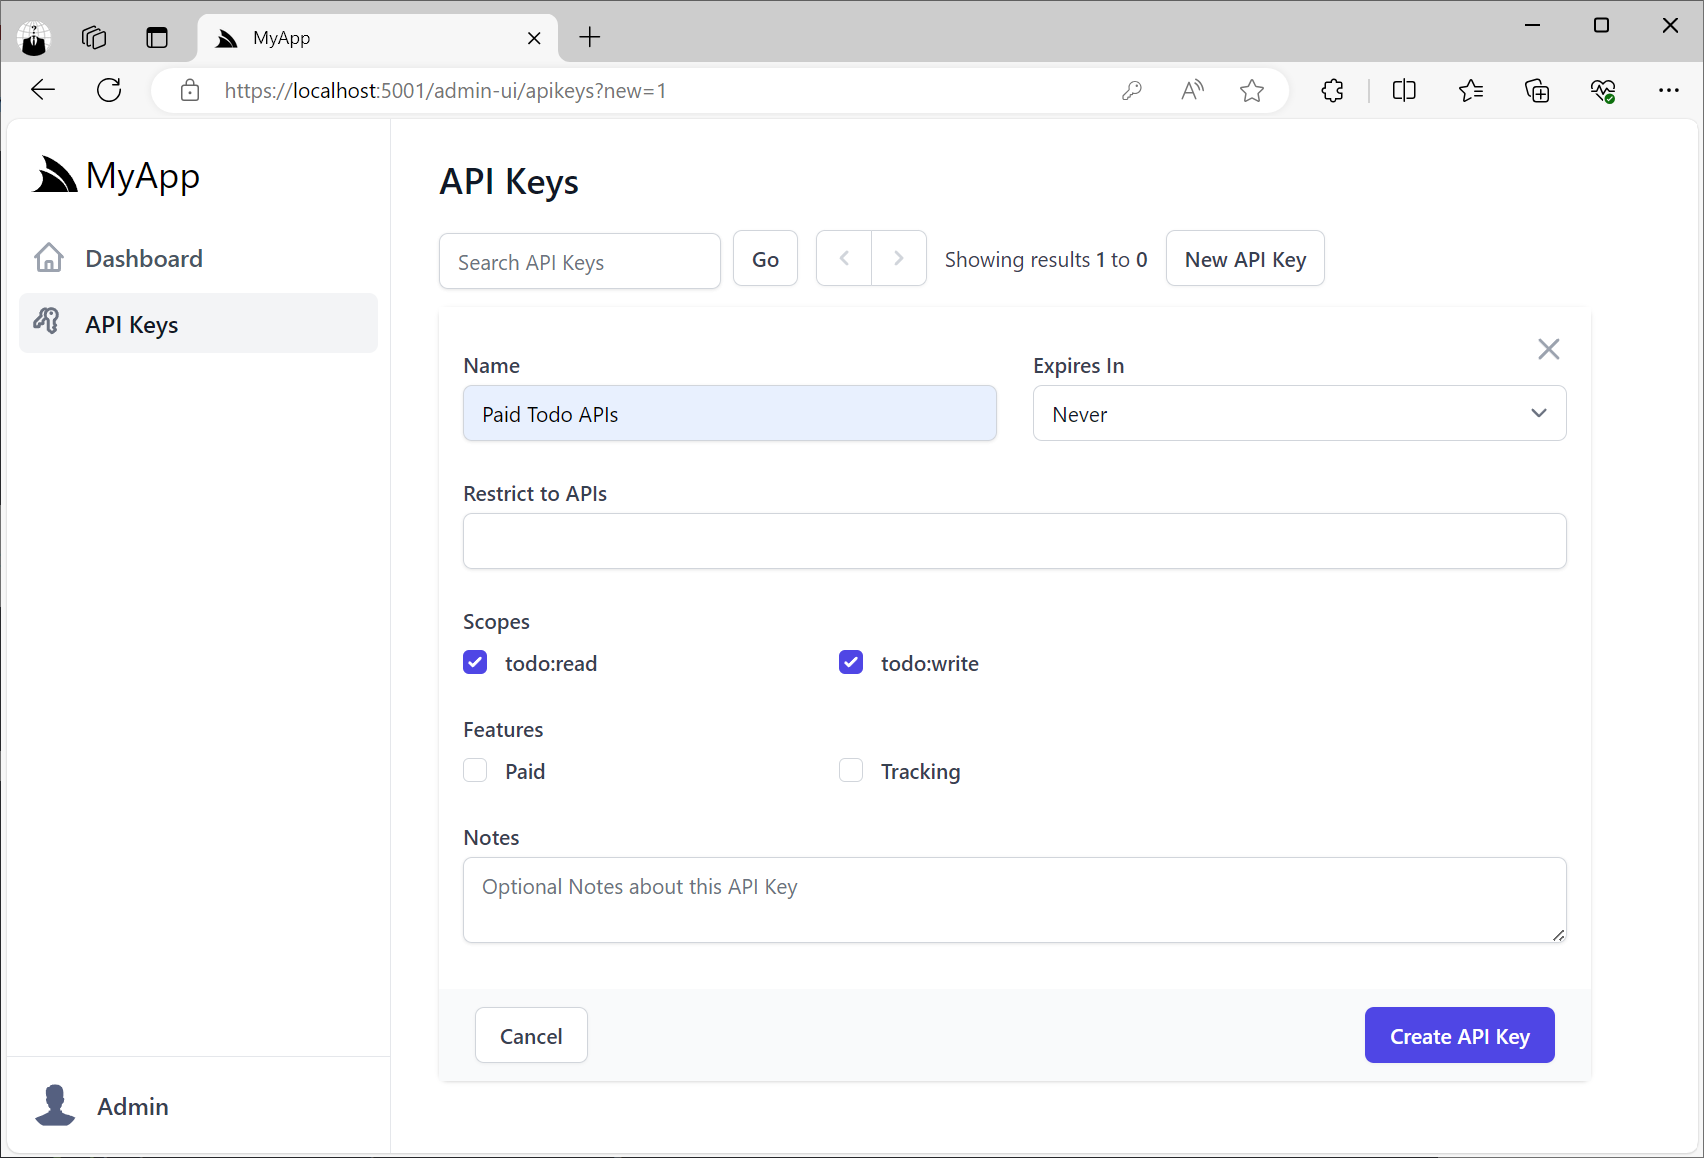
The ApiKeysFeature plugin will let you control different parts of the UI, including what Features you want to assign to API Keys and what Scopes you want individual API Keys to be able to have access to.
services.AddPlugin(new ApiKeysFeature
{
    Features = [
        "Paid",
        "Tracking",
    ],
    Scopes = [
        "todo:read",
        "todo:write",
    ],
    // ExpiresIn =[
    //     new("", "Never"),
    //     new("30", "30 days"),
    //     new("365", "365 days"),
    // ],
    // Hide = ["RestrictTo","Notes"],
});
Any configuration on the plugin will be reflected in the UI:
The API Keys Admin UI also lets you view and manage all API Keys in your App, including the ability to revoke API Keys, extend their Expiration date as well as manage any Scopes and Features assigned to API Keys.
Protect APIs with API Keys
You'll now be able to protect APIs by annotating Request DTOs with the [ValidateApiKey] attribute:
[ValidateApiKey]
public class Hello : IGet, IReturn<HelloResponse>
{
    public required string Name { get; set; }
}
Which only allows requests with a valid API Key to access the Service.
Scopes
We can further restrict API access by assigning them a scope which will only allow access to Valid API Keys configured with that scope, e.g:
[ValidateApiKey("todo:read")]
public class QueryTodos : QueryDb<Todo>
{
    public long? Id { get; set; }
    public List<long>? Ids { get; set; }
    public string? TextContains { get; set; }
}

[ValidateApiKey("todo:write")]
public class CreateTodo : ICreateDb<Todo>, IReturn<Todo>
{
    [ValidateNotEmpty]
    public required string Text { get; set; }
    public bool IsFinished { get; set; }
}

[ValidateApiKey("todo:write")]
public class UpdateTodo : IUpdateDb<Todo>, IReturn<Todo>
{
    public long Id { get; set; }
    [ValidateNotEmpty]
    public required string Text { get; set; }
    public bool IsFinished { get; set; }
}

[ValidateApiKey("todo:write")]
public class DeleteTodos : IDeleteDb<Todo>, IReturnVoid
{
    public long? Id { get; set; }
    public List<long>? Ids { get; set; }
}
Restrict To APIs
Scopes allow for coarse-grained access control allowing a single scope to access a logical group of APIs. For more fine-grained control you can use Restrict To APIs to specify just the APIs an API Key can access:
Unlike scopes which can access APIs with the same scope or without a scope, Valid API Keys configured with Restrict To APIs can only access those specific APIs.
Features
Features are user-defined strings accessible within your Service implementation to provide different behavior based on Features assigned to the API Key, e.g:
public object Any(QueryTodos request)
{
    if (Request.GetApiKey().HasFeature("Paid"))
    {
        //...
    }
}
API Explorer
Support for API Keys is also integrated into the API Explorer allowing users to use their API Keys to access API Key protected Services which are highlighted with a Key Icon:
Users can enter their API Key by clicking on the Key Icon in the top right, or the link in the Warning alert when trying to access an API Key protected Service:
Summary
We hope this shows how stand-alone .NET 8 Microservices and self-contained Docker Apps can use the simple Admin and API Keys configuration to easily secure their APIs, complete with Management UI and typed Service Client integrations.
RHEL 9 Default Cryptographic Policy

A consequence of RedHat Enterprise Linux 9's hardened system-wide cryptographic policies is that it's incompatible with ServiceStack's current licensing mechanism which uses RSA encryption and SHA1 hashing algorithm to protect and validate license keys.
Unfortunately this means it's not possible to use License Keys to run unrestricted ServiceStack Apps on default installs of RHEL 9. The difficulty being we can't both support RHEL 9's hardened cryptography policy and maintain compatibility of using newer License Keys in all previous versions of ServiceStack - vital for enabling frictionless rotation of Keys.
As a system-wide policy we're unable to work around this restriction in the library to allow usage of RSA+SHA1 to just validate License Keys (i.e. the only place it's used). As it only affected a small number of users, we initially recommend that users just switch to use RHEL's Legacy Cryptography Policy to allow for maximum compatibility with existing software.
Road to Solution
But as more customers upgraded to RHEL 9 and started experiencing the same issue, we've decided to invest time to try and address this issue starting with adding support for a configurable Hashing algorithm when creating and validating License Keys. We still have the issue of not being able to generate a new License Key that would be compatible with both default RHEL 9 and all previous versions of ServiceStack.
The solutions under consideration were:
- Generate a new License Key that's compatible with RHEL 9's hardened cryptography policy, but inform customers that they'll be unable to use the new License Key on their existing versions of ServiceStack and to continue to use their existing License Key for existing versions
- Generate 2 License Keys, and explain to Customers which key to use for previous versions of ServiceStack and which key to use for RHEL 9
- Provide a way for customers to regenerate their License Key to support RHEL 9's hardened cryptography policy
Since this issue only affected a minority of our Customers we decided to go with the last option to avoid inflicting any additional complexity on the majority of our Customers who are unaffected by this issue.
Generate License Key for RHEL 9+
Starting from this release Customers can regenerate a new License Key with a stronger SHA512 Hash Algorithm that's compatible with RHEL 9's default hardened cryptography policy by visiting:
Future
We'll need to wait at least 1-2 years before we can make the stronger Hash Algorithm the default in order to reduce the impact of not being able to use new License Keys on versions of ServiceStack prior to v8.2.
After the switch is made regenerating license keys will no longer be necessary.
XSS Vulnerability
This release also fixes a DOM XSS vulnerability reported by René de Sain @renniepak in ServiceStack's built-in Login page in which already authenticated users can be redirected to a page that could invoke a JavaScript function that could trigger an XSS vulnerability, e.g:
/login?redirect=javascript:alert(1)