This release continues to bring improvements across the board with a major async focus on most of ServiceStack's existing sync APIs gaining pure async implementations allowing your App's logic to use their preferred sync or async APIs.
Improvements to AutoQuery CRUD, ServiceStack Studio and new User Admin Module allows you to develop new systems from scratch at an unprecedented pace using only declarative code-first C# POCOs to define both system Data Models and their Typed API-first System inputs/outputs. Their enhanced declarative featureset lets you easily compose additional functionality from fine-grain Validation Rules & Authorization Access permissions to common CRUD logic made possible by AutoQuery CRUD Attributes.
ServiceStack Studio can then be used to give Authorized Users an Instant UI to access AutoQuery Services resulting in an immediate fully queryable (inc. export to Excel) & management UI over system tables within minutes. By virtue of being normal ServiceStack Services, AutoQuery APIs also inherit ServiceStack's ecosystem of features like Add ServiceStack Reference enabling high-performance end-to-end typed API access in all popular Web, Mobile & Desktop platforms.
Table of Contents
- Creating a multi-user .NET Core Booking system in minutes!
- User Admin Feature
- Advanced Native Type Code gen
- Async Upgrade
- Async Auth Providers
- Group Services by Tag
- Configure localhost development dev certificate
- Sign In with Apple
- Enhanced Dart support
- Blazor Web Assembly Template
- Blazor Service Client
- Vue .NET Core Windows Desktop App Template
- Fluent Validation
- OrmLite
- ServiceStack.Text
Creating a multi-user .NET Core Booking system in minutes!
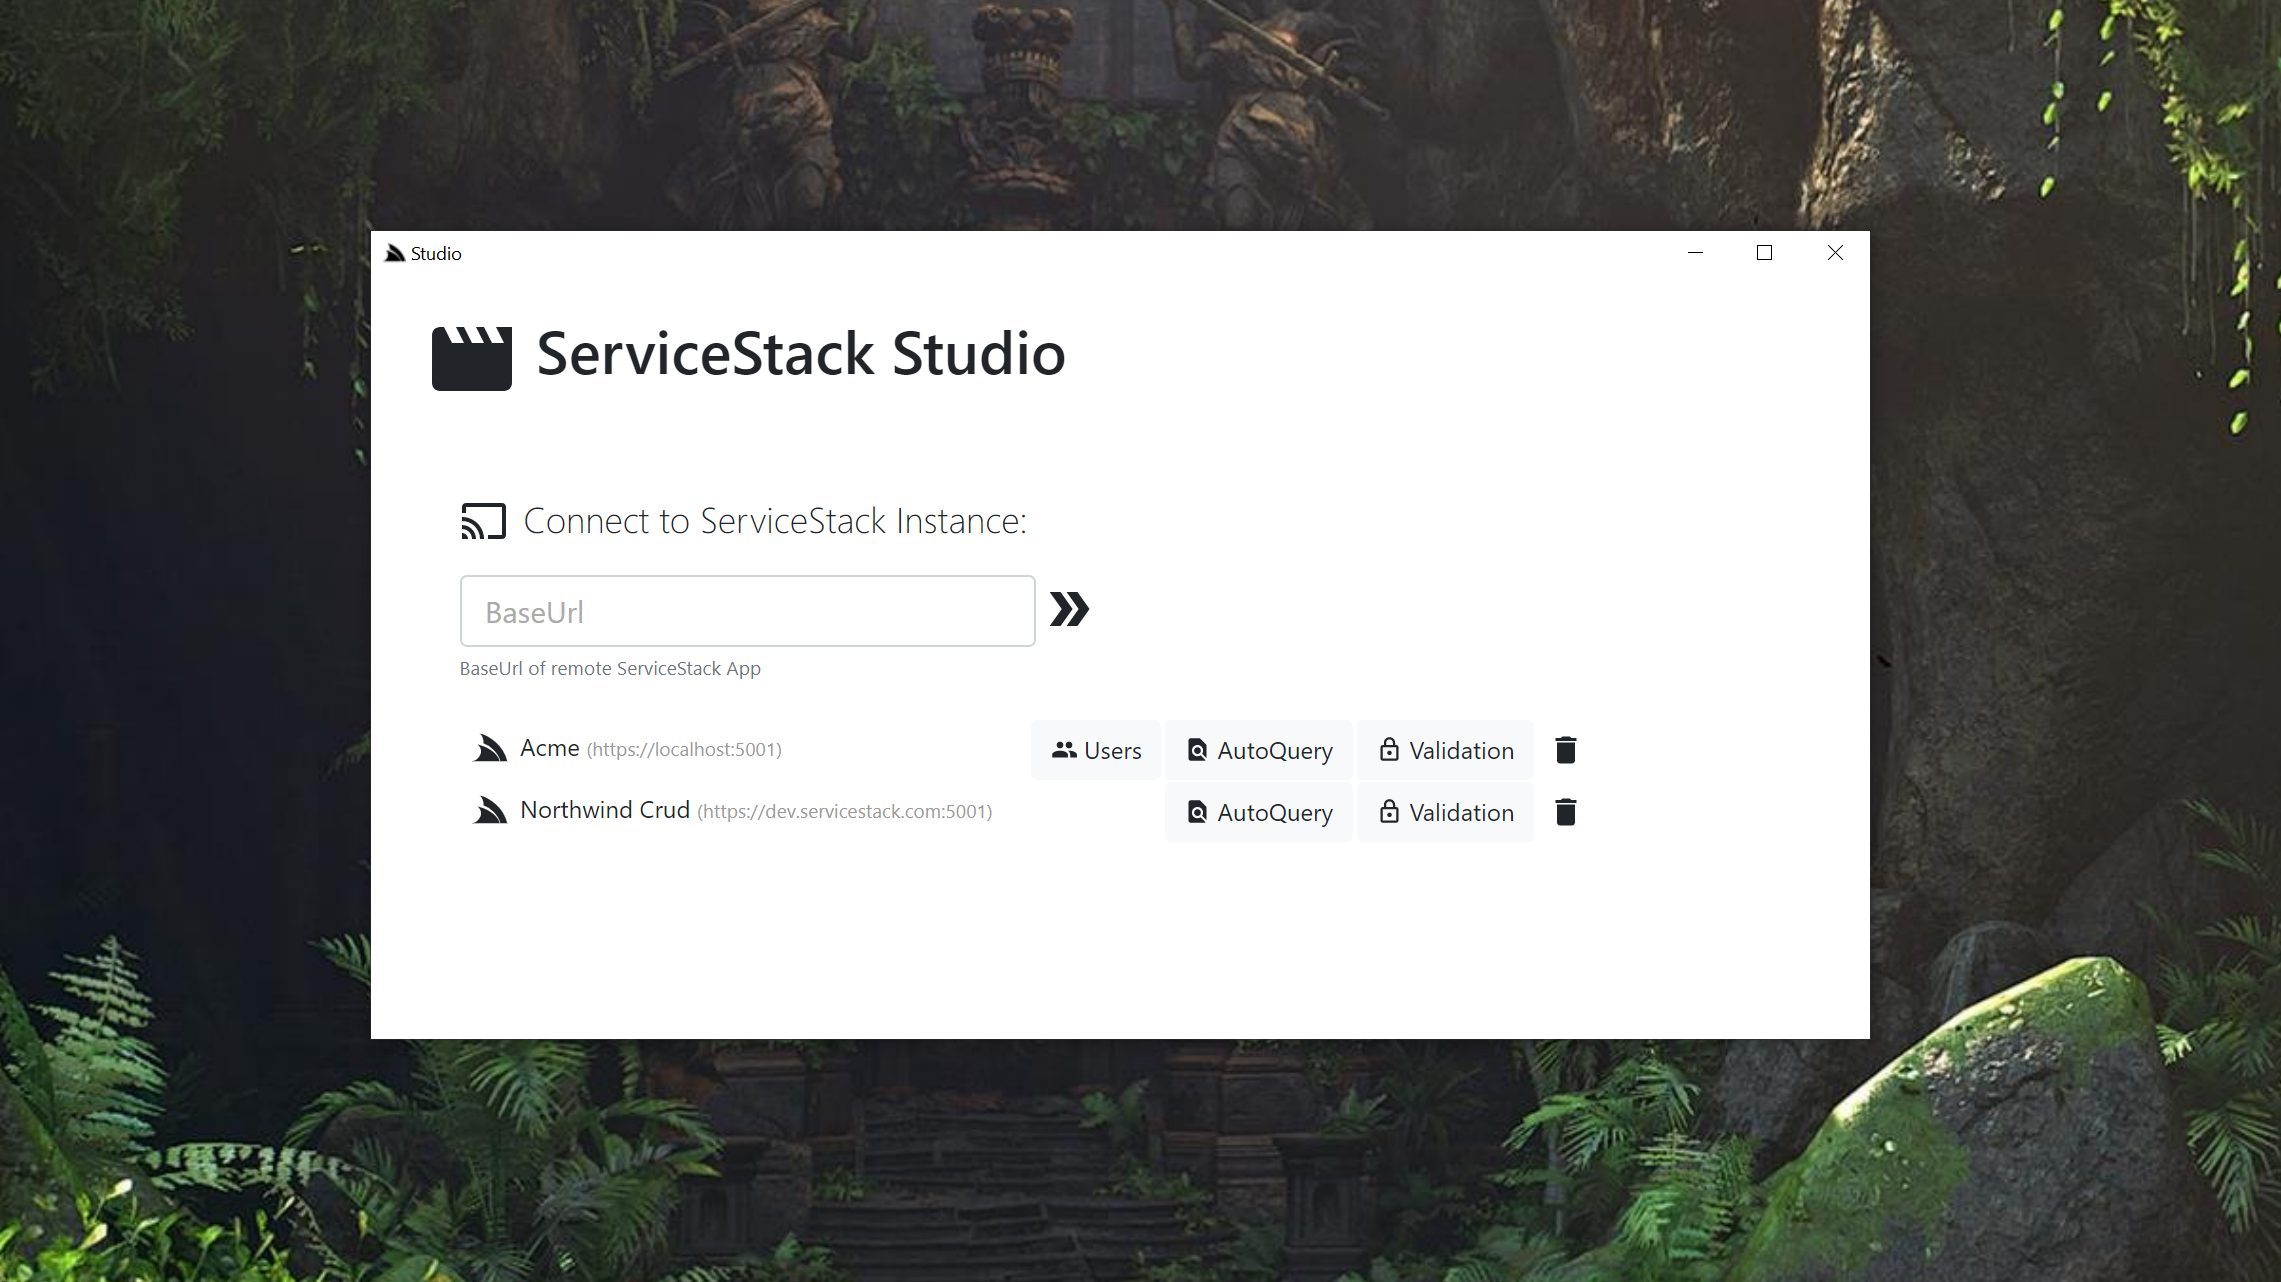
To see the rapid development of AutoQuery in action we've created a quick demo showing how to create a simple multi-user Booking System from an empty web project, mixed in with the preferred RDBMS & Auth layered functionality, before enabling Validation, AutoQuery, Admin Users & CRUD Event Log plugins - to lay the foundational features before building our App by first defining its Booking data model & its surrounding Query, Create, Update and Soft Delete Typed CRUD APIs with rich validation enforced by declarative Validation attributes and multi-layer authorization rules & access permissions protected using Authorization attributes.
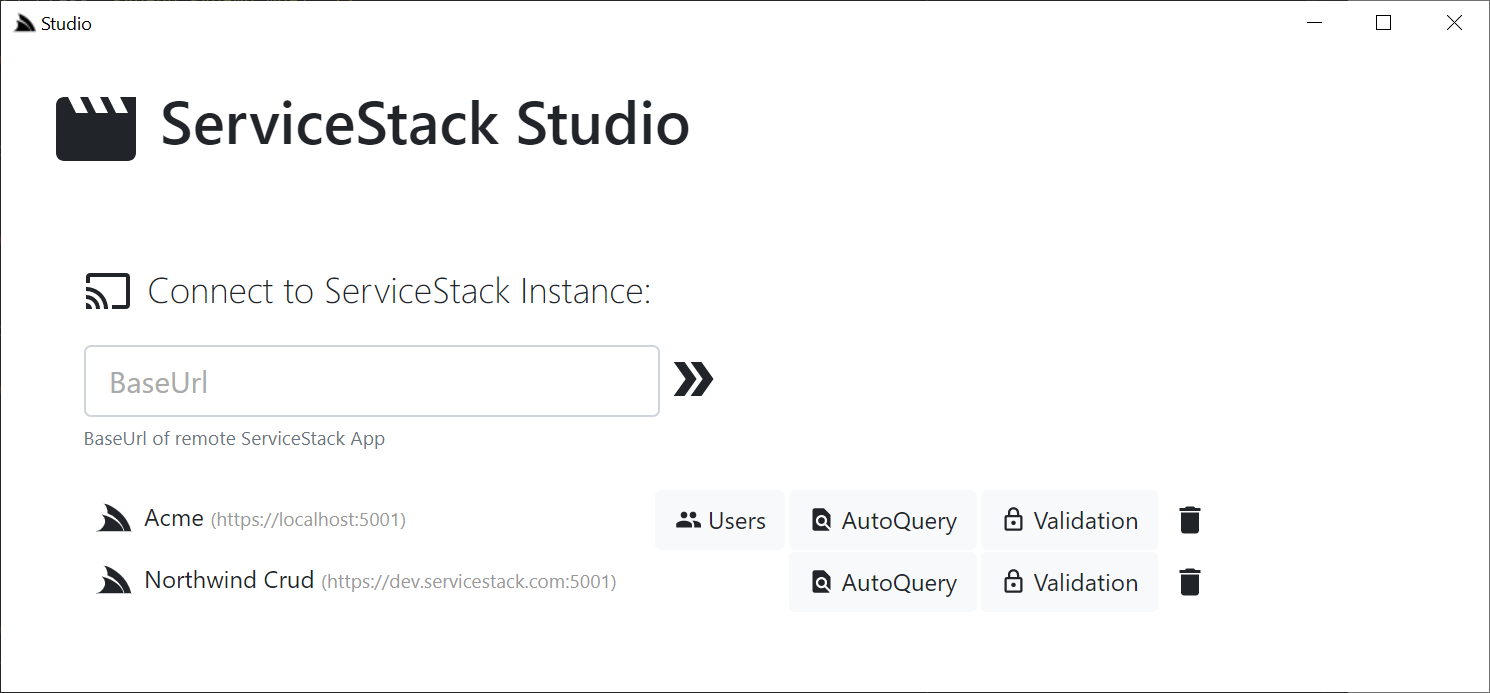
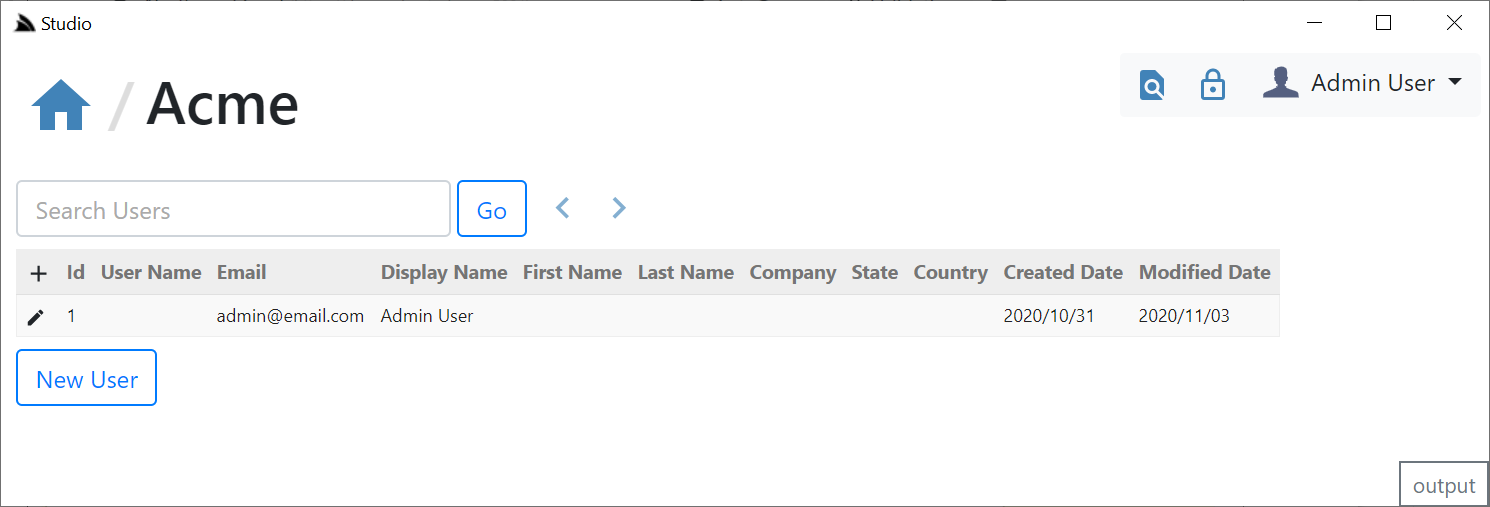
All declarative functionality is accessible in ServiceStack Studio which is used to create new Employee & Manager Users, before signing in with each to hit the ground running and start entering new bookings using Studio's capability-based UI, with each change visible in its full Audit History.
YouTube: youtu.be/XpHAaCTV7jE
New features in Studio
New features in Studio in this release which made this a more seamless experience include:
- New User Admin module for ServiceStack Apps with the
UserAdminFeatureplugin enabled - Create & Edit UIs now use optimal Text, Number, Date/Time, Checkbox UI Controls for relevant C# Data Types, inc.
drop-down select box for
Enumvalues - The
IPatchDb<T>API can be used for both inline spreadsheet edits as well as updates made by Edit UI
Single Patch Partial Update API
Previously the Edit UI required the full update IUpdateDb<T> API, but now supports falling back to using a partial IPatchDb<T> API (if exists) where it will instead only update the modified fields that have changed.
Ultimately this means for most cases you'll only need to provide a single IPatchDb<T> API to update your data model as it allows for the most flexible functionality of only updating any non-null values provided. This does mean that every property other than the primary key should either be a nullable reference or Value Type (i.e. using Nullable).
Using IPatchDb<T> Partial Updates are also beneficial in crud audit logs as they only capture the fields that have changed instead of full record IUpdateDb<T> updates.
IPatchDb<T> APIs can also be used to reset fields to null by specifying them in a Reset DTO string collection Property or Request Param, e.g. ?reset=Field1,Field2.
Download and Run
The quickest way to run the Bookings AutoQuery Example is to install the app tool, download & run the repo:
$ app download NetCoreApps/BookingsCrud
$ cd BookingsCrud\Acme
$ dotnet run
Custom project from Scratch
If you have different App requirements you can instead create a project from scratch that integrates with your existing preferred infrastructure - the mix tool and ServiceStack's layered Modular Startup configurations makes this a cinch, start with an empty web project:
$ app new web ProjectName
Then mix in your desired features. E.g. In order for this project to be self-hosting it utilizes the embedded SQLite database, which we can configure along with configuration to enable popular Authentication providers and an RDBMS SQLite Auth Repository with:
$ app mix auth auth-db sqlite
But if you also wanted to enable the new Sign in with Apple and use SQL Server you'll instead run:
$ app mix auth-ext auth-db sqlserver
You can view all DB and Auth options available by searching for available layered gist configurations by tag:
$ app mix [db]
$ app mix [auth]
Typically the only configuration that needs updating is your DB connection string in Configure.Db.cs, in this case it's changed to use a persistent SQLite DB:
services.AddSingleton<IDbConnectionFactory>(new OrmLiteConnectionFactory(
    Configuration.GetConnectionString("DefaultConnection")
        ?? "bookings.sqlite",
    SqliteDialect.Provider));
You'll also want to create RDBMS tables for any that doesn't exist:
using var db = appHost.Resolve<IDbConnectionFactory>().Open();
db.CreateTableIfNotExists<Booking>();
Create Booking CRUD Services
The beauty of AutoQuery is that we only need to focus on the definition of our C# POCO Data Models which OrmLite uses to create the RDBMS tables and AutoQuery reuses to generates the Typed API implementations enabling us to build full functional high-performance systems with rich querying capabilities that we can further enhance with declarative validation & authorization permissions and rich integrations with the most popular platforms without needing to write any logic.
The Booking class defines the Data Model whilst the remaining AutoQuery & CRUD Services define the typed inputs, outputs and behavior of each API available that Queries and Modifies the Booking table.
An added utilized feature are the [AutoApply] attributes which applies generic behavior to AutoQuery Services.
The Behavior.Audit* behaviors below depend on the same property names used in the
AuditBase.cs
class where:
Behavior.AuditQuery- adds an Ensure AutoFilter to filter out any deleted recordsBehavior.AuditCreate- populates theCreated*andModified*properties with the Authenticated user infoBehavior.AuditModify- populates theModified*properties with the Authenticated user infoBehavior.AuditSoftDelete- changes the behavior of the default Real Delete to a Soft Delete by
populating theDeleted*properties
public class Booking : AuditBase
{
    [AutoIncrement]
    public int Id { get; set; }
    public string Name { get; set; }
    public RoomType RoomType { get; set; }
    public int RoomNumber { get; set; }
    public DateTime BookingStartDate { get; set; }
    public DateTime? BookingEndDate { get; set; }
    public decimal Cost { get; set; }
    public string Notes { get; set; }
    public bool? Cancelled { get; set; }
}

public enum RoomType
{
    Single,
    Double,
    Queen,
    Twin,
    Suite,
}

[AutoApply(Behavior.AuditQuery)]
public class QueryBookings : QueryDb<Booking>
{
    public int[] Ids { get; set; }
}

[ValidateHasRole("Employee")]
[AutoApply(Behavior.AuditCreate)]
public class CreateBooking
    : ICreateDb<Booking>, IReturn<IdResponse>
{
    public string Name { get; set; }
    [ApiAllowableValues(typeof(RoomType))]
    public RoomType RoomType { get; set; }
    [ValidateGreaterThan(0)]
    public int RoomNumber { get; set; }
    public DateTime BookingStartDate { get; set; }
    public DateTime? BookingEndDate { get; set; }
    [ValidateGreaterThan(0)]
    public decimal Cost { get; set; }
    public string Notes { get; set; }
}

[ValidateHasRole("Employee")]
[AutoApply(Behavior.AuditModify)]
public class UpdateBooking
    : IPatchDb<Booking>, IReturn<IdResponse>
{
    public int Id { get; set; }
    public string Name { get; set; }
    [ApiAllowableValues(typeof(RoomType))]
    public RoomType? RoomType { get; set; }
    [ValidateGreaterThan(0)]
    public int? RoomNumber { get; set; }
    public DateTime? BookingStartDate { get; set; }
    public DateTime? BookingEndDate { get; set; }
    [ValidateGreaterThan(0)]
    public decimal? Cost { get; set; }
    public bool? Cancelled { get; set; }
    public string Notes { get; set; }
}

[ValidateHasRole("Manager")]
[AutoApply(Behavior.AuditSoftDelete)]
public class DeleteBooking : IDeleteDb<Booking>, IReturnVoid
{
    public int Id { get; set; }
}
Run in ServiceStack Studio
After defining your AutoQuery APIs, start your App then you can use ServiceStack Studio UI to manage Bookings and Users which can be launched from a URL:
app://studio
If your browser is open, the quickest way to launch it is just to type
app://studioin your URL bar
User Admin Feature
We've caught a glimpse of the new User Admin Feature in the Bookings CRUD demo who utilizes it to create Employee and Manager users. The AdminUsersFeature provides Admin User Management APIs enabling remote programmatic access to your registered User Auth Repository, featuring:
- Works with existing
IUserAuthRepositorysync or async providers - Utilizes Progressive enhancement, e.g. search functionality utilizes
IQueryUserAuth(if exists) performing a wildcard search over multiple fields, otherwise falls back to exact match onUserNameorEmail - Supports managing Auth Repositories utilizing custom
UserAuthdata models - Flexible UI options for customizing which fields to include in Search Results and Create/Edit UIs
- Rich Metadata aggregating only App-specific Roles & Permissions defined in your App
- User Events allow you to execute custom logic before & after each Created/Updated/Deleted User
User Admin Plugin is a lightweight API around Auth Repository APIs with no additional dependencies that can be registered as normal:
Plugins.Add(new AdminUsersFeature());
Studio User Management UI
Where Studio's compatibility-based API will only enable it for remote ServiceStack instances with the plugin enabled:
In the Users Module you'll need to Sign In as an Admin User to gain access which for new Apps created with auth-db mix script will only have the admin user:
That was created in the Configure.AuthRepository.cs Modular Startup script:
public void Configure(IAppHost appHost)
{
    var authRepo = appHost.Resolve<IAuthRepository>();
    authRepo.InitSchema();
    CreateUser(authRepo, "admin@email.com", "Admin User", "p@55wOrd", roles:new[]{ RoleNames.Admin });
}

public void CreateUser(IAuthRepository authRepo, string email, string name, string pass, string[] roles)
{
    if (authRepo.GetUserAuthByUserName(email) != null) return;
    var user = authRepo.CreateUserAuth(new AppUser { Email = email, DisplayName = name }, pass);
    authRepo.AssignRoles(user, roles);
}
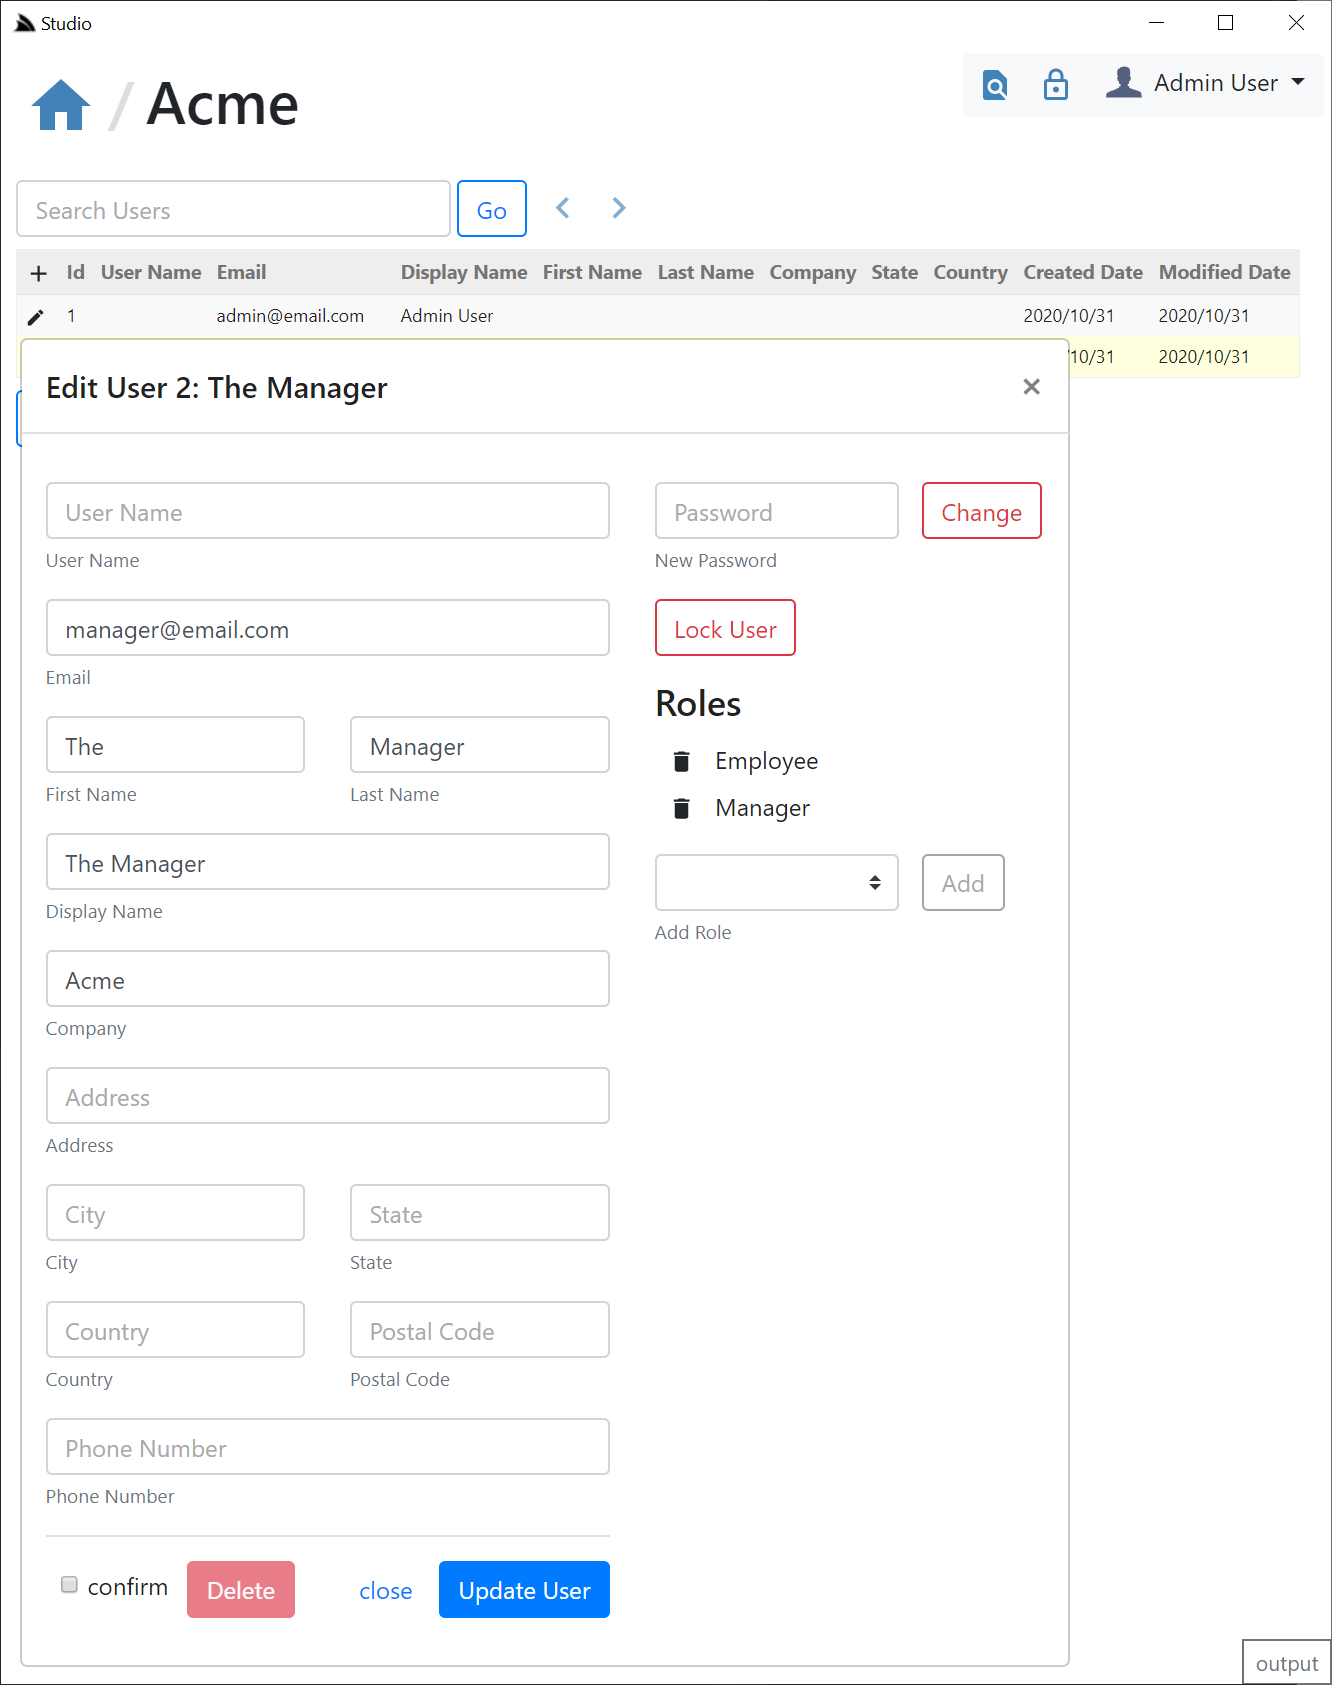
This screen allows you Search for & edit existing users or create new Users. Both Create & Edit forms will default to only showing the most common User Info fields for creating a new User:
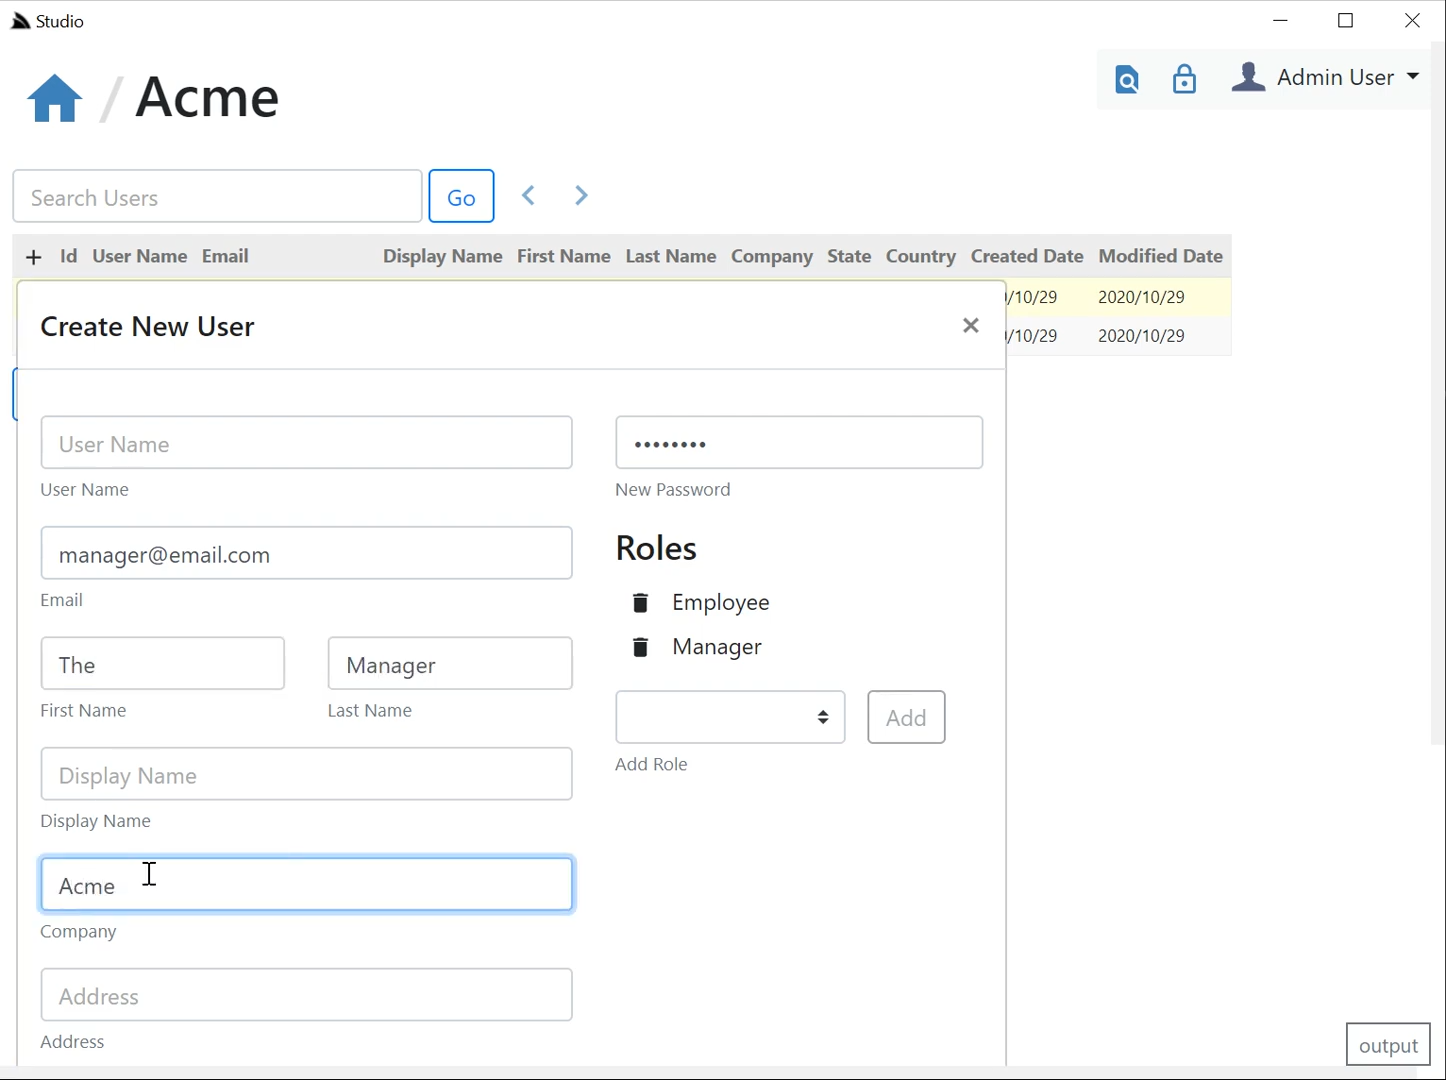
Whilst the Edit UI also lets you perform common actions like changing a Users Password, Locking Users and Assigning Roles & Permissions which are auto populated from the Required & Validation Roles/Permission Attributes used in your App:
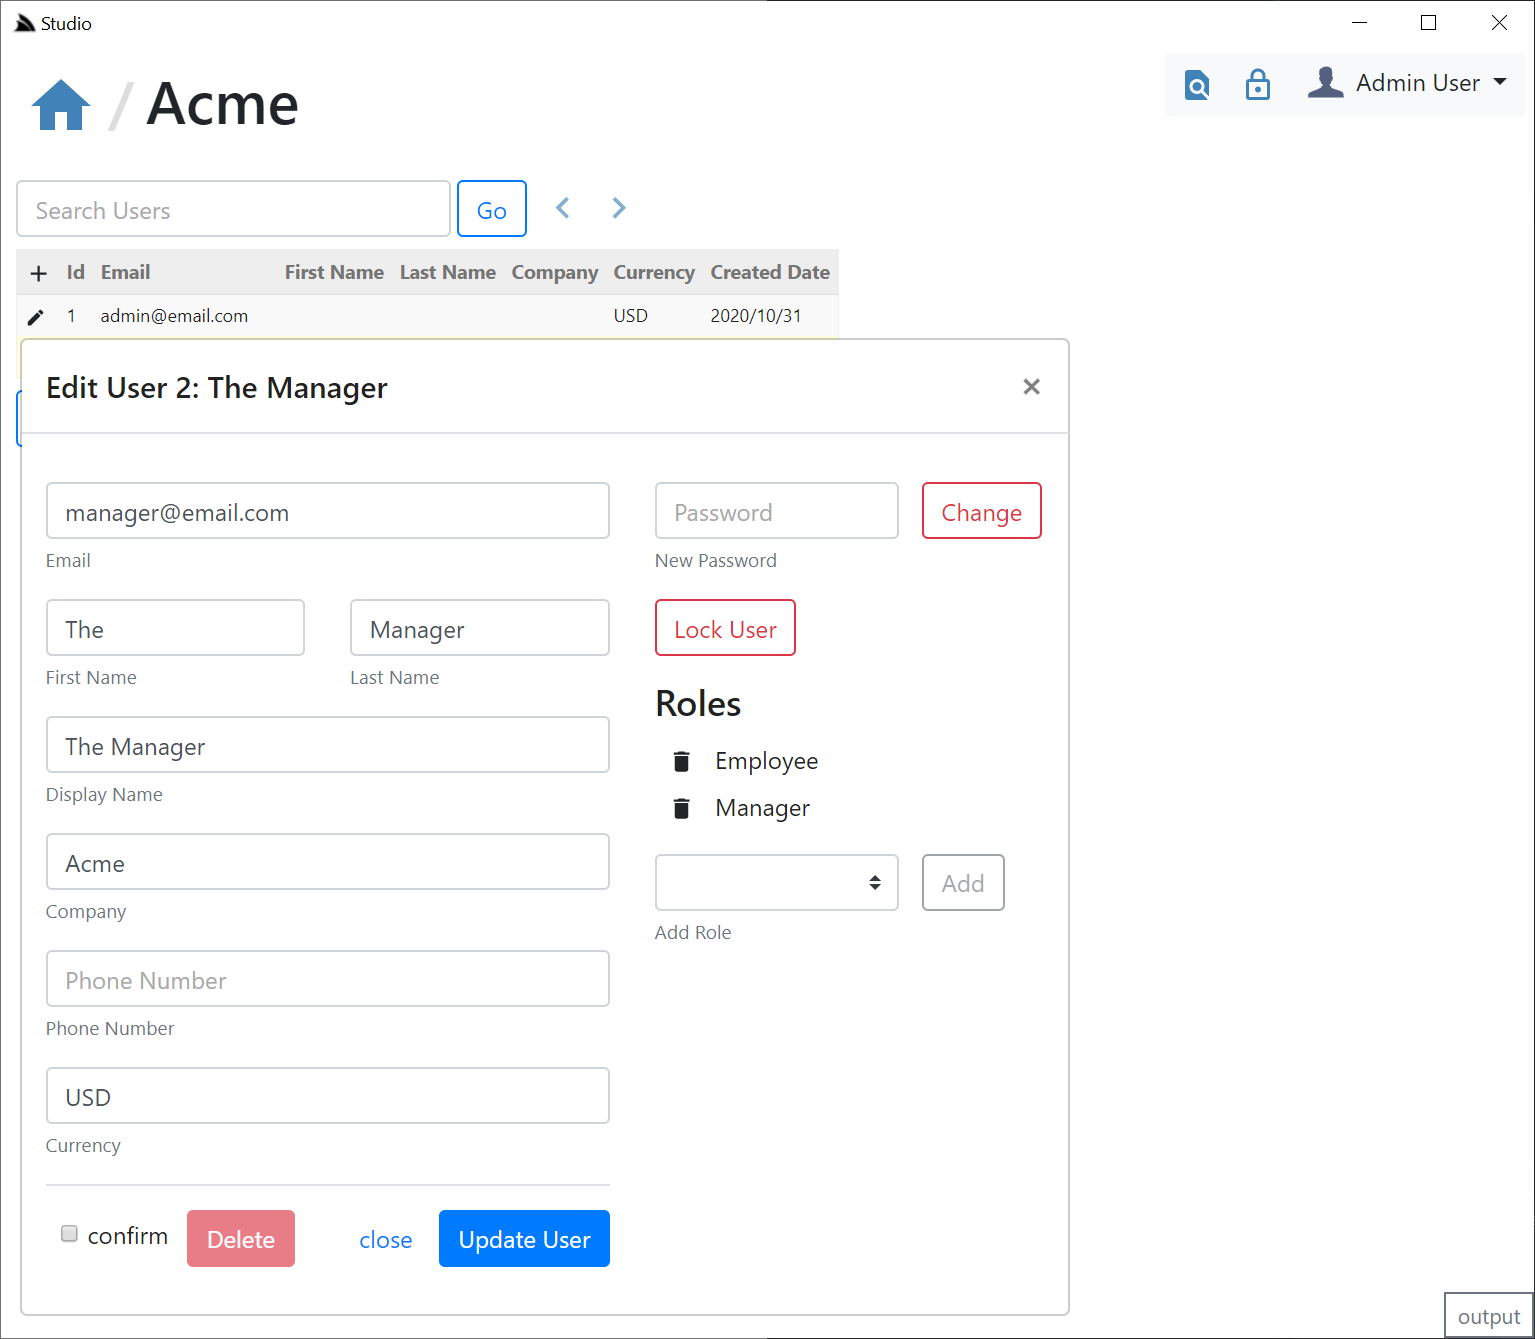
The fields in the Search Results and User forms can also be customized to suit your App. Lets say we want to use a custom
AppUser class with a few additional fields, the LastLoginIp and LastLoginDate we'll want automatically populated
using the OnAuthenticated AuthEvent whilst we want to add the users Currency to both the IncludeUserAuthProperties to include them in the Management forms and the QueryUserAuthProperties so they're returned in Search Results.
public class AppUser : UserAuth
{
    public string LastLoginIp { get; set; }
    public DateTime? LastLoginDate { get; set; }
    public string Currency { get; set; }
}

services.AddSingleton<IAuthRepository>(c =>
    new OrmLiteAuthRepository<AppUser, UserAuthDetails>(c.Resolve<IDbConnectionFactory>()) {
        UseDistinctRoleTables = true
    });

Plugins.Add(new AdminUsersFeature {
    // Defaults to only allow 'Admin' users to manage users
    // AdminRole = RoleNames.Admin,
    IncludeUserAuthProperties = new List<string> {
        nameof(AppUser.Id),
        nameof(AppUser.Email),
        nameof(AppUser.DisplayName),
        nameof(AppUser.FirstName),
        nameof(AppUser.LastName),
        nameof(AppUser.Company),
        nameof(AppUser.PhoneNumber),
        nameof(AppUser.LockedDate),
        nameof(AppUser.Currency),
    },
    QueryUserAuthProperties = new List<string> {
        nameof(AppUser.Id),
        nameof(AppUser.Email),
        nameof(AppUser.FirstName),
        nameof(AppUser.LastName),
        nameof(AppUser.Company),
        nameof(AppUser.Currency),
        nameof(AppUser.CreatedDate),
    },
    // Update denormalized data
    OnAfterUpdateUser = async (newUser, oldUser, service) => {
        if (newUser.Email != oldUser.Email)
        {
            await service.Db.UpdateOnlyAsync(() => new Customer { Email = newUser.Email },
                where: q => q.Id == oldUser.Id);
            await service.Db.UpdateOnlyAsync(() => new Subscription { Email = newUser.Email },
                where: q => q.CustomerId == oldUser.Id);
        }
    }
});
We also don't want to store any Address info on our Users so we've excluded them in our field lists which will result in our Custom UI:
Our Custom Configuration makes use of custom event hooks for performing Custom App logic, in this case it uses the OnAfterUpdateUser event to update denormalized data when it detects a Users email has changed.
Alternatively you can prevent emails from being changed whilst still displaying them in the UI forms with an OnBeforeUpdateUser event:
Plugins.Add(new AdminUsersFeature {
    // Disable Changing Email
    OnBeforeUpdateUser = async (newUser, oldUser, service) => {
        if (newUser.Email != oldUser.Email)
            throw new ArgumentException("Cannot change Email", nameof(IUserAuth.Email));
    },
});
There are OnBefore/OnAfter hooks for Create/Update/Delete User Events.
Admin User Services
Of course user management isn't limited to Studio's UI as you can use the back-end APIs integrated within your own Apps. Here are all Admin Users DTOs containing everything needed to call its APIs from .NET Service Clients. These are contained within ServiceStack.Client so no additional dependencies are needed.
The APIs are fairly straight-forward with each DTO containing on the bare minimum Typed properties with all other UserAuth fields you want updated in the UserAuthProperties Dictionary. Whilst all User result-sets are returned in an unstructured Object Dictionary.
public abstract class AdminUserBase : IMeta
{
    public string UserName { get; set; }
    public string FirstName { get; set; }
    public string LastName { get; set; }
    public string DisplayName { get; set; }
    public string Email { get; set; }
    public string Password { get; set; }
    public string ProfileUrl { get; set; }
    public Dictionary<string, string> UserAuthProperties { get; set; }
    public Dictionary<string, string> Meta { get; set; }
}

public partial class AdminCreateUser : AdminUserBase, IPost, IReturn<AdminUserResponse>
{
    public List<string> Roles { get; set; }
    public List<string> Permissions { get; set; }
}

public partial class AdminUpdateUser : AdminUserBase, IPut, IReturn<AdminUserResponse>
{
    public string Id { get; set; }
    public bool? LockUser { get; set; }
    public bool? UnlockUser { get; set; }
    public List<string> AddRoles { get; set; }
    public List<string> RemoveRoles { get; set; }
    public List<string> AddPermissions { get; set; }
    public List<string> RemovePermissions { get; set; }
}

public partial class AdminGetUser : IGet, IReturn<AdminUserResponse>
{
    public string Id { get; set; }
}

public partial class AdminDeleteUser : IDelete, IReturn<AdminDeleteUserResponse>
{
    public string Id { get; set; }
}

public class AdminDeleteUserResponse : IHasResponseStatus
{
    public string Id { get; set; }
    public ResponseStatus ResponseStatus { get; set; }
}

public partial class AdminUserResponse : IHasResponseStatus
{
    public string Id { get; set; }
    public Dictionary<string,object> Result { get; set; }
    public ResponseStatus ResponseStatus { get; set; }
}

public partial class AdminQueryUsers : IGet, IReturn<AdminUsersResponse>
{
    public string Query { get; set; }
    public string OrderBy { get; set; }
    public int? Skip { get; set; }
    public int? Take { get; set; }
}

public class AdminUsersResponse : IHasResponseStatus
{
    public List<Dictionary<string,object>> Results { get; set; }
    public ResponseStatus ResponseStatus { get; set; }
}
AutoQuery CRUD Behaviors
One of the features the Bookings demo takes advantage of are the new [AutoApply] attributes for applying generic behavior to AutoQuery CRUD Services:
public static class Behavior
{
    // Auto Filter SoftDeleted Results
    public const string AuditQuery = nameof(AuditQuery);

    // Auto Populate CreatedDate, CreatedBy, ModifiedDate & ModifiedBy fields
    public const string AuditCreate = nameof(AuditCreate);

    // Auto Populate ModifiedDate & ModifiedBy fields
    public const string AuditModify = nameof(AuditModify);

    // Auto Populate DeletedDate & DeletedBy fields
    public const string AuditDelete = nameof(AuditDelete);

    // Auto Populate DeletedDate & DeletedBy fields and changes IDeleteDb operation to Update
    public const string AuditSoftDelete = nameof(AuditSoftDelete);
}
This functionality is implemented by extending the metadata for AutoQuery CRUD Services with additional attributes in a AutoCrudMetadataFilters where they result in the same behavior as if the Request DTOs were annotated with attributes directly. E.g. Here's the built-in filter for implementing the above behaviors:
public static void AuditAutoCrudMetadataFilter(AutoCrudMetadata meta)
{
    foreach (var applyAttr in meta.AutoApplyAttrs)
    {
        switch (applyAttr.Name)
        {
            case Behavior.AuditQuery:
                meta.Add(new AutoFilterAttribute(
                    QueryTerm.Ensure, nameof(AuditBase.DeletedDate), SqlTemplate.IsNull));
                break;
            case Behavior.AuditCreate:
            case Behavior.AuditModify:
                if (applyAttr.Name == Behavior.AuditCreate)
                {
                    meta.Add(new AutoPopulateAttribute(nameof(AuditBase.CreatedDate)) {
                        Eval = "utcNow"
                    });
                    meta.Add(new AutoPopulateAttribute(nameof(AuditBase.CreatedBy)) {
                        Eval = "userAuthName"
                    });
                }
                meta.Add(new AutoPopulateAttribute(nameof(AuditBase.ModifiedDate)) {
                    Eval = "utcNow"
                });
                meta.Add(new AutoPopulateAttribute(nameof(AuditBase.ModifiedBy)) {
                    Eval = "userAuthName"
                });
                break;
            case Behavior.AuditDelete:
            case Behavior.AuditSoftDelete:
                if (applyAttr.Name == Behavior.AuditSoftDelete)
                    meta.SoftDelete = true;

                meta.Add(new AutoPopulateAttribute(nameof(AuditBase.DeletedDate)) {
                    Eval = "utcNow"
                });
                meta.Add(new AutoPopulateAttribute(nameof(AuditBase.DeletedBy)) {
                    Eval = "userAuthName"
                });
                break;
        }
    }
}
Which results in the behavior had the AutoQuery Request been annotated with the attributes directly:
[AutoApply(Behavior.AuditQuery)]
public class QueryBookings { ... } // Equivalent to:

[AutoFilter(QueryTerm.Ensure, nameof(AuditBase.DeletedDate), Template = SqlTemplate.IsNull)]
public class QueryBookings { ... }


[AutoApply(Behavior.AuditCreate)]
public class CreateBooking { ... } // Equivalent to:

[AutoPopulate(nameof(AuditBase.CreatedDate),  Eval = "utcNow")]
[AutoPopulate(nameof(AuditBase.CreatedBy),    Eval = "userAuthName")]
[AutoPopulate(nameof(AuditBase.ModifiedDate), Eval = "utcNow")]
[AutoPopulate(nameof(AuditBase.ModifiedBy),   Eval = "userAuthName")]
public class CreateBooking { ... }
You can use this same functionality to describe your own custom generic functionality, e.g. Lets say you wanted to instead populate your base class with Audit Info containing different named properties with local DateTime and UserAuth Id. You can define your own Behavior name for this functionality:
[AutoApply("MyUpdate")]
public class UpdateBooking { ... }
and implement it with a custom AutoCrudMetadataFilters that populates the Audit [AutoPopulate] attributes on all Request DTOs marked with your Behavior name, e.g:
void MyAuditFilter(AutoCrudMetadata meta)
{
    if (meta.HasAutoApply("MyUpdate"))
    {
        meta.Add(new AutoPopulateAttribute(nameof(MyBase.MyModifiedDate)) {
            Eval = "now"
        });
        meta.Add(new AutoPopulateAttribute(nameof(MyBase.MyModifiedBy)) {
            Eval = "userAuthId"
        });
    }
}

Plugins.Add(new AutoQueryFeature {
    AutoCrudMetadataFilters = { MyAuditFilter },
});
AutoQuery CRUD Events
AutoQuery now includes OnBefore* and OnAfter* (sync & async) events for Create, Update, Patch & Delete you can use to execute custom logic before or after each AutoQuery CRUD operation. E.g. if your system implements their own Audit history via RDBMS triggers, you can use the OnBefore Delete event to update the record with deleted info before the AutoQuery CRUD operation deletes it:
Plugins.Add(new AutoQueryFeature {
    OnBeforeDeleteAsync = async ctx => {
        if (ctx.Dto is DeleteBooking deleteBooking)
        {
            var session = await ctx.Request.GetSessionAsync();
            await ctx.Db.UpdateOnlyAsync(() => new Booking {
                DeletedBy = session.UserAuthName,
                DeletedDate = DateTime.UtcNow,
            }, where: x => x.Id == deleteBooking.Id);
        }
    },
});
Note: AutoQuery generates async Services by default which will invoke the *Async events, but if you implement a sync Custom AutoQuery CRUD Service it executes the sync events instead so you'd need to implement the OnBeforeDelete custom hook instead.
AutoQuery AutoGen Customizations
AutoGen's Instantly Servicify existing Systems feature works by automatically generating the AutoQuery & Crud APIs and Data Models for all tables in the configured RDBMS's. The existing Customizable Code Generation filters have been extended to allow customization of the DataModel Names, the user-defined Route Path they're hosted at & the name of individual AutoQuery APIs for each operation.
So if you had an existing table name called applications the default convention based names would be:
- Data Model:
Applications - APIs:
CreateApplications,PatchApplications,QueryApplications, etc - Route:
/applications,/applications/{Id}
You can change each of these default conventions with the new GenerateOperationsFilter, e.g:
Plugins.Add(new AutoQueryFeature {
    MaxLimit = 1000,
    GenerateCrudServices = new GenerateCrudServices {
        AutoRegister = true,
        GenerateOperationsFilter = ctx => {
            if (ctx.TableName == "applications")
            {
                ctx.DataModelName = "Application";
                ctx.PluralDataModelName = "Apps";
                ctx.RoutePathBase = "/apps";
                ctx.OperationNames = new Dictionary<string, string> {
                    [AutoCrudOperation.Create] = "CreateApp",
                    [AutoCrudOperation.Patch] = "ModifyApp",
                };
            }
        }
    }
});
Would result in:
- Data Model:
Application - APIs:
QueryApps,CreateApp,ModifyApp - Route:
/apps,/apps/{Id}
Ignore AutoCrud Properties
If you're creating Custom AutoQuery CRUD Services you can ignore & skip the validation of properties that don't map to the Request's Data Model individually annotating properties with the [AutoIgnore] Attribute, e.g:
public class CustomRockstarService
    : ICreateDb<Rockstar>, IReturn<RockstarWithIdResponse>
{
    public int Id { get; set; }
    public int? Age { get; set; }
    [AutoIgnore]
    public CustomInfo CustomInfo { get;set; }
}
Or you can ignore validation for all properties with the same name by registering it on AutoQuery.IncludeCrudProperties , e.g:
AutoQuery.IncludeCrudProperties.Add(nameof(CustomInfo));
OrderBy Random
AutoQuery OrderBy includes special support for returning results in Random order using Random, e.g:
/rockstars?OrderBy=Random
Using Service Client:
client.Get(new QueryRockstars { OrderBy = "Random" });
Advanced Native Type Code gen
To provide even greater flexibility when generating complex Typed DTOs for Add ServiceStack Reference languages, you can use [Emit{Language}] attributes to generate code before each type or property.
You could use these attributes to generate different attributes or annotations to enable client validation for different validation libraries in different languages, e.g:
[EmitCSharp("[Validate]")]
[EmitTypeScript("@Validate()")]
[EmitCode(Lang.Swift | Lang.Dart, "@validate()")]
public class User : IReturn<User>
{
    [EmitCSharp("[IsNotEmpty]","[IsEmail]")]
    [EmitTypeScript("@IsNotEmpty()", "@IsEmail()")]
    [EmitCode(Lang.Swift | Lang.Dart, new[]{ "@isNotEmpty()", "@isEmail()" })]
    public string Email { get; set; }
}
Which will generate [EmitCsharp] code in C# DTOs:
[Validate]
public partial class User
    : IReturn<User>
{
    [IsNotEmpty]
    [IsEmail]
    public virtual string Email { get; set; }
}
[EmitTypeScript] annotations in TypeScript DTOs:
@Validate()
export class User implements IReturn<User>
{
    @IsNotEmpty()
    @IsEmail()
    public email: string;

    public constructor(init?: Partial<User>) { (Object as any).assign(this, init); }
    public createResponse() { return new User(); }
    public getTypeName() { return 'User'; }
}
Whilst the generic [EmitCode] attribute lets you emit the same code in multiple languages with the same syntax.
Type Generation Filters
In addition you can use the PreTypeFilter, InnerTypeFilter & PostTypeFilter to generate source code before and after a Type definition, e.g. this will append the @validate() annotation on non enum types:
TypeScriptGenerator.PreTypeFilter = (sb, type) => {
    if (!type.IsEnum.GetValueOrDefault())
    {
        sb.AppendLine("@Validate()");
    }
};
The InnerTypeFilter gets invoked just after the Type Definition which can be used to generate common members for all Types and interfaces, e.g:
TypeScriptGenerator.InnerTypeFilter = (sb, type) => {
    sb.AppendLine("id:string = `${Math.random()}`.substring(2);");
};
There's also PrePropertyFilter & PostPropertyFilter for generating source before and after properties, e.g:
TypeScriptGenerator.PrePropertyFilter = (sb , prop, type) => {
    if (prop.Name == "Id")
    {
        sb.AppendLine("@IsInt()");
    }
};
Async Upgrade
Another large focus area for this release was to add Async APIs to most of ServiceStack's existing sync providers. The new APIs are additive "pure" async APIs which async methods & Services can benefit from whilst sync business logic can continue utilizing existing sync implementations. In addition to new the async APIs, existing async implementations like JsonHttpClient had their manual continuations rewritten to use async/await to resolve issues in Xamarin platforms.
Redis Async
The most requested async library support has now been implemented in ServiceStack.Redis available in .NET Core (.NET Standard 2.0) or .NET Framework v4.7.2+ projects where there's now async API equivalents for most APIs that can be explored in the Redis Async interfaces below:
- IRedisClientsManagerAsync.cs
- IRedisClientAsync.cs
- IRedisNativeClientAsync.cs
- IRedisSubscriptionAsync.cs
- IRedisTransactionAsync.cs
Generic Client APIs
- IRedisTypedClientAsync.cs
- IRedisTypedQueueableOperationAsync.cs
- IRedisTypedTransactionAsync.cs
- IRedisTypedPipelineAsync.cs
- IRedisHash.Generic.Async.cs
- IRedisList.Generic.Async.cs
- IRedisSet.Generic.Async.cs
- IRedisSortedSet.Generic.Async.cs
Server Collection APIs
Pipeline APIs
- IRedisPipelineSharedAsync.cs
- IRedisQueueCompletableOperationAsync.cs
- IRedisQueueableOperationAsync.cs
Redis Async Usage
All Redis Client Managers implement both IRedisClientsManager and IRedisClientsManagerAsync so no changes are needed for existing registrations which can continue to register against the existing IRedisClientsManager interface, e.g:
container.Register<IRedisClientsManager>(c =>
    new RedisManagerPool(redisConnectionString));
Where it can be used to resolve both sync IRedisClient and async IRedisClientAsync clients, e.g:
using var syncRedis = container.Resolve<IRedisClientsManager>().GetClient();
await using var asyncRedis = await container.Resolve<IRedisClientsManager>().GetClientAsync();
Whilst inside ServiceStack Services & Controllers we recommend using GetRedisAsync() to resolve an IRedisClientAsync, e.g:
public class MyService : Service
{
    public async Task<object> Any(MyRequest request)
    {
        await using var redis = await GetRedisAsync();
        await redis.IncrementAsync(nameof(MyRequest), 1);
    }
}

public class HomeController : ServiceStackController
{
    public async Task<ActionResult> Index()
    {
        await using var redis = await GetRedisAsync();
        await redis.IncrementAsync(nameof(HomeController), 1);
    }
}
The async support in ServiceStack.Redis differs from other async APIs in that it aimed for maximum efficiency so uses ValueTask & other modern Async APIs so it requires a minimum of .NET Standard 2.0 (i.e. .NET Core) or .NET Framework v4.7.2+ project. All other Async APIs return the more interoperable Task responses for their async APIs.
If you’re using ServiceStack.Redis in your own (i.e. non ServiceStack) projects you could just register IRedisClientsManagerAsync to force usage of async APIs as it only lets you resolve async only IRedisClientAsync and ICacheClientAsync clients, e.g:
public void ConfigureServices(IServiceCollection services)
{
    services.AddSingleton<IRedisClientsManagerAsync>(c => new RedisManagerPool());
}

//...

public class MyDep
{
    private IRedisClientsManagerAsync manager;
    public MyDep(IRedisClientsManagerAsync manager) => this.manager = manager;

    public async Task<long> Incr(string key, uint value)
    {
        await using var redis = await manager.GetClientAsync();
        return await redis.IncrementAsync(key, value);
    }
}
Async DynamoDB PocoDynamo
The other major client to add async support is DynamoDB PocoDynamo with the PocoDynamo client implementing both IPocoDynamo and IPocoDynamoAsync interfaces which allows calling both sync & async APIs with the same client instance, e.g:
var awsDb = new AmazonDynamoDBClient("keyId","key",
    new AmazonDynamoDBConfig { ServiceURL="http://localhost:8000"});

var db = new PocoDynamo(awsDb);

var newTodo = new Todo {
    Content = "Learn PocoDynamo",
    Order = 1
};
db.PutItem(newTodo);

var savedTodo = await db.GetItemAsync<Todo>(newTodo.Id);
Async Providers
With all major ServiceStack client libraries gaining async support, ServiceStack's other providers and abstractions have also gained pure async implementations which ServiceStack now utilizes internally where they would yield for optimal performance.
Async Cache Clients
All ServiceStack's remote Caching Providers now implement the ICacheClientAsync async APIs whilst any other ICacheClient
only providers like the local in-memory MemoryCacheClient are still able to use the ICacheClientAsync interface as they'll return an Async Wrapper over the underlying sync APIs.
So even if you're currently only using MemoryCacheClient or your own ICacheClient sync implementation, you can still use the async Caching Provider API now and easily switch to an async caching provider in future without code changes.
The Async Caching Provider APIs are accessible via the CacheAsync property in ServiceStack Service or ServiceStackController classes, e.g:
public async Task<object> Any(MyRequest request)
{
    var item = await CacheAsync.GetAsync<Item>("key");
    //....
}

public class HomeController : ServiceStackController
{
    public async Task<ActionResult> Index()
    {
        var item = await CacheAsync.GetAsync<Item>("key");
    }
}
Whilst outside of ServiceStack you can AppHost.GetCacheClientAsync(), e.g:
var cache = HostContext.AppHost.GetCacheClientAsync();
var item = await cache.GetAsync<Item>("key");
Async Auth Repositories
All built-in ServiceStack Auth Repositories now also implement IUserAuthRepositoryAsync which you can use inside ServiceStack Services with the AuthRepositoryAsync property, e.g:
public async Task<object> Post(GetUserAuth request)
{
    var userAuth = await AuthRepositoryAsync.GetUserAuthByUserNameAsync(request.UserName);
    if (userAuth == null)
        throw HttpError.NotFound(request.UserName);
    return userAuth;
}
Outside of ServiceStack you can access it from the AppHost.GetAuthRepositoryAsync() API, e.g:
var authRepo = HostContext.AppHost.GetAuthRepositoryAsync();
await using (authRepo as IAsyncDisposable)
{
    //...
}
Like the caching providers the async Auth Repositories makes use of the existing IAuthRepository registration so no additional configuration is needed and your Services can use the IAuthRepositoryAsync APIs above even for your own sync IAuthRepository providers as it will return a IAuthRepositoryAsync wrapper API in its place.
Async Auth Providers
To make usage of the new async API functionality all of ServiceStack’s built-in Auth Providers were rewritten to use the new Async APIs. If you’re only using ServiceStack's existing Auth Providers this will be a transparent detail, however your own Custom Auth Providers will need to change as all existing Sync I/O base class APIs have been refactored into Async APIs.
Breaking Changes
The recommendation would be change your existing custom Auth Providers to use the new Async APIs which all follow the same async method convention, i.e:
- Has an
*Asyncsuffix - Takes an optional
CancellationTokenas its last parameter - Returns a
Task
Here's an example of all these changes to convert a sync into an async method:
int Add(int value);

Task<int> AddAsync(int value, CancellationToken token = default);
So if your custom Auth Provider inherits from CredentialsAuthProvider it would now need to be changed to override Async APIs, e.g:
//Async
public class CustomCredentialsAuthProvider : CredentialsAuthProvider
{
    public virtual async Task<bool> TryAuthenticateAsync(IServiceBase authService,
        string userName, string password, CancellationToken token=default)
    {
        //Add here your custom auth logic (database calls etc)
        //Return true if credentials are valid, otherwise false
    }

    public override async Task<object> AuthenticateAsync(IServiceBase authService,
        IAuthSession session, Authenticate request, CancellationToken token = default)
    {
        //Fill IAuthSession with data you want to retrieve in the app eg:
        session.FirstName = "some_firstname_from_db";

        //Call base method to Save Session and fire Auth/Session callbacks:
        return await base.AuthenticateAsync(authService, session, tokens, authInfo, token);
    }
}
Alternatively to simplify migration of existing Auth Providers when upgrading ServiceStack, the popular Auth Providers below used to implement Custom Auth Providers now have a Sync suffix:
CredentialsAuthProviderSyncBasicAuthProviderSyncAuthProviderSyncOAuthProviderSyncOAuth2ProviderSync
So the easiest way to migrate would be to just add a *Sync suffix to your base class, e.g:
//Sync
public class CustomCredentialsAuthProvider : CredentialsAuthProviderSync
{
    public override bool TryAuthenticate(IServiceBase authService,
        string userName, string password)
    {
    }

    public override IHttpResult OnAuthenticated(IServiceBase authService,
        IAuthSession session, IAuthTokens tokens,
        Dictionary<string, string> authInfo)
    {
        return base.OnAuthenticated(authService, session, tokens, authInfo);
    }
}
Auth Response & URL Redirect Filters
If your AuthProvider implements IAuthResponseFilter to implement for intercepting successful Authenticate Request DTO requests, the interface gains an additional ResultFilterAsync method for intercepting successful OAuth redirect responses:
public interface IAuthResponseFilter
{
    // Intercept successful Authenticate Request DTO requests
    void Execute(AuthFilterContext authContext);

    // Intercept successful OAuth redirect requests
    Task ResultFilterAsync(AuthResultContext context, CancellationToken token);
}
Which you can provide an empty implementation by returning a completed task, e.g:
public Task ResultFilterAsync(AuthResultContext context, CancellationToken token)
     => Task.CompletedTask;
The OAuth URL Filters have changed from being passed an AuthProvider to an AuthContext, if your URL filter made use of the AuthProvider it can be accessed from AuthContext.AuthProvider, e.g:
SuccessRedirectUrlFilter = (authProvider,url) => ...;

SuccessRedirectUrlFilter = (authContext,url) => authContext.AuthProvider ...;
Together these features is used to implement the new JwtAuthProvider.UseTokenCookie feature below:
Cookie Config Changes
Config.UseSameSiteCookieschanged to a use a tri-statebool?wherenulldefaults tosamesite=laxConfig.UseHttpOnlyCookiesrenamed fromAllowNonHttpOnlyCookies, default totrue
The default Cookie behavior from this release is:
SetConfig(new HostConfig
{
    UseHttpOnlyCookies = true,  //default ;HttpOnly
    UseSecureCookies = true,    //default ;Secure (https)
    UseSameSiteCookies = false, //default ;SameSite=Lax
});
JWT Server Cookie Config
When JWT is enabled if you wanted to return your Authenticated UserSession into a stateless JWT Token Cookie your clients would've needed to request it with UseTokenCookie on the Authenticate Request or in a hidden FORM Input. This capability was only available for Authenticate requests as OAuth requests would've needed a separate call to Convert their Server Session into a JWT Cookie.
Now you can configure this behavior to return Authenticated Sessions in a stateless JWT Token on the server with the new UseTokenCookie on the JWT Auth Provider:
new JwtAuthProvider(appSettings) {
    UseTokenCookie = true
}
Which now works for both successful Authenticate Requests & OAuth Web Flow Sign Ins.
Session Save APIs
Whilst ServiceStack has been changed to use async APIs it will only fire OnSaveSessionAsync() AppHost callback to save the session. So if you previously have overridden OnSaveSession in your AppHost to intercept when sessions are saved you'll need to change it to override OnSaveSessionAsync instead, e.g:
[Obsolete("Use OnSaveSessionAsync")]
public override void OnSaveSession(IRequest httpReq, IAuthSession session, TimeSpan? expiresIn = null)
{
}

public override Task OnSaveSessionAsync(
    IRequest httpReq, IAuthSession session, TimeSpan? expiresIn = null, CancellationToken token=default)
{
}
Note that if you have code that calls the sync SaveSession() to save a Users Session you would either need to change it to use SaveSessionAsync() or override both APIs above if you're intercepting session saves.
Authenticate & Register Services
If you're using HostContext.ResolveService<T> to call either the AuthenticateService or RegisterService APIs, e.g. to Authenticate or impersonate a user:
using var authService = HostContext.ResolveService<AuthenticateService>(req);
var response = authService.Post(new Authenticate
{
    provider = Name,
    UserName = userName,
    Password = password
});
The Post() API implementation is now a deprecated "sync over async" implementation which although will continue to work, you're encouraged to change it to use the async version, e.g:
var response = await authService.PostAsync(new Authenticate { ... });
These are the main gotchas from the refactor to use async APIs internally, most of the time the Async APIs are just additive so
Optional *Async Suffixes
In addition to the expanded support for Async, your Services can now optionally have the *Async suffix which by .NET Standard (and ServiceStack) guidelines is preferred for Async methods to telegraph to client call sites that its response should be awaited.
If both exists (e.g. Post() and PostAsync()) the *Async method will take precedence and be invoked instead.
Allowing both is useful if you have internal services directly invoking other Services using HostContext.ResolveService<T>() where you can upgrade your Service to use an Async implementation without breaking existing clients, e.g. this is used in RegisterService.cs:
[Obsolete("Use PostAsync")]
public object Post(Register request)
{
    try
    {
        var task = PostAsync(request);
        return task.GetResult();
    }
    catch (Exception e)
    {
        throw e.UnwrapIfSingleException();
    }
}

/// <summary>
/// Create new Registration
/// </summary>
public async Task<object> PostAsync(Register request)
{
    //... async impl
}
To change to use an async implementation whilst retaining backwards compatibility with existing call sites, e.g:
using var service = HostContext.ResolveService<RegisterService>(Request);
var response = service.Post(new Register { ... });
This is important if the response is ignored as the C# compiler wont give you any hints to await the response which can lead to timing issues where the Services is invoked but User Registration hasn't completed as-is often assumed.
Alternatively you can rename your method to use *Async suffix so the C# compiler will fail on call sites so you can replace the call-sites to await the async Task response, e.g:
using var service = HostContext.ResolveService<RegisterService>(Request);
var response = await service.PostAsync(new Register { ... });
Support for ValueTask
ServiceStack Services now also supports returning ValueTask<object> responses.
Group Services by Tag
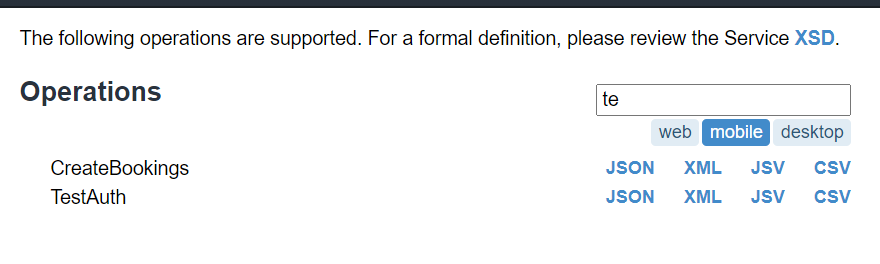
We've extended the Tag support in Open API to group related Services by annotating Request DTOs with the [Tag] attribute, e.g. you can use this to tag which Services are used by different platforms:
[Tag("web")]
public class WebApi : IReturn<MyResponse> {}

[Tag("mobile")]
public class MobileApi : IReturn<MyResponse> {}

[Tag("web"),Tag("mobile")]
public class WebAndMobileApi : IReturn<MyResponse> {}
Where they'll now appear as a tab to additionally filter APIs in metadata pages:
Support for tags was also added to Add ServiceStack Reference where it can be used in the IncludeTypes DTO customization option where tags can be specified using braces in the format {tag} or {tag1,tag2,tag3}, e.g:
/* Options:
IncludeTypes: {web,mobile}
Or individually:
/* Options:
IncludeTypes: {web},{mobile}
It works similar to Dependent Type References wildcard syntax where it expands all Request DTOs with the tag to include all its reference types so including a {web} tag would be equivalent to including all Request DTOs & reference types with that reference, e.g:
/* Options:
IncludeTypes: WebApi.*,WebAndMobileApi.*
Configure localhost development dev certificate
As it's common to use the same ServiceStack Instance to support both Web & Mobile Apps, it can be tricky to configure your local development environment to support all target platforms. Due to the pressure to use HTTPS everywhere with Browsers marking HTTP as not secure and operating systems and mobile platforms requiring all connections to be secure by default, it's become the defacto standard to both host production sites with HTTPS as well as developing locally under HTTPS with a Self-Signed Certificate.
In most cases it's sufficient to run .NET Core Apps on https://localhost:5001 for normal browser development and if you receive an invalid certificate error you can run:
$ dotnet dev-certs https --trust
To trust the local development certificate and remove the SSL Certificate error in your browser.
When localhost is not allowed
However for Apps needing to support OAuth providers that don't allow localhost domains like Sign In with Apple you would need to use a different domain. A popular workaround is to use a DNS name that resolves to 127.0.0.1 in which case you can use our:
local.servicestack.com
Which you can use to view your local Web App typically on https://localhost:5001 at https://local.servicestack.com:5001 which
will allow you to register as valid domains & callback URLs in OAuth Apps you want to support. As this is a real DNS A record
it will also work in emulators & different environments like WSL.
When developing for Android
But to be able to access your local dev server from an Android Emulator you'd instead need to use the special 10.0.2.2 loopback
IP, which you could support by updating your Android Emulator /system/etc/hosts file mapping to include:
10.0.2.2 local.servicestack.com
Which can be quite cumbersome to change, alternatively an easier solution is to use a DNS record that resolves to 10.0.2.2:
dev.servicestack.com
and instead update your OS hosts file (e.g. %SystemRoot%\System32\drivers\etc\hosts for Windows or /etc/hosts on macOS/Linux) to include:
127.0.0.1 dev.servicestack.com
Which will let you use the same dev.servicestack.com to access your local dev server in both Android Emulators and your Host OS so you can have a single domain & callback URL you can use in your OAuth Apps configuration.
When developing for iOS
As iOS is a heavily locked down OS you wont have the same opportunity to modify iOS's hosts file, instead the easiest way to configure a custom address for a given domain is to configure it on the DNS Server. Fortunately this easy to setup in macOS with a lightweight, easy to configure DNS Server like Dnsmasq which lets you easily add custom DNS rules whilst falling back to use its default DNS resolution for non-configured addresses.
For a step-by-step guide, see our docs for enabling Dnsmasq in iOS.
Generating self-signed SSL Certificates for Custom Domains
Whether you use local.servicestack.com or dev.servicestack.com or your own hostname, you'll need to create and trust
a self-signed certificate to be able to view it in a browser without certificate errors.
To simplify creation of self-signed certificate for *.servicestack.com you can use the dotnet mix tool
to download the openssl script and running it:
$ x mix gen-dev-crt.sh
$ bash gen-dev-crt.sh
Which will write this script below to your projects HOST project:
PASSWORD=dev
if [ $# -ge 1 ]
  then
    PASSWORD=$1
fi

openssl req -x509 -out dev.crt -keyout dev.key -days 825 \
  -newkey rsa:2048 -nodes -sha256 \
  -subj '/CN=*.servicestack.com' -extensions EXT -config <( \
   printf "[dn]\nCN=*.servicestack.com\n[req]\ndistinguished_name = dn\n[EXT]\nsubjectAltName=DNS:*.servicestack.com\nkeyUsage=digitalSignature\nextendedKeyUsage=serverAuth")

openssl pkcs12 -export -out dev.pfx -inkey dev.key -in dev.crt -password pass:$PASSWORD
Which uses OpenSSL to generate a self-signed certificate dev.crt, private key dev.key and a PKCS #12 dev.pfx certificate in macOS, Linux & Windows using WSL.
Trust self-signed certificate
After generating a new self-signed certificate you'll need to trust it in your OS's certificate store so it's recognized & treated as a valid certificate.
Windows
On Windows you can trust certificates by running the powershell command below in Administrator mode:
Import-Certificate -FilePath dev.crt -CertStoreLocation Cert:\CurrentUser\Root
Where it will import the Certificate into the Current User Certificate Store which you can view/remove in regedit.msc at:
Computer\HKEY_CURRENT_USER\SOFTWARE\Microsoft\SystemCertificates\Root\Certificates\
macOS
In macOS you can add a trusted root certificate to your System.keychain with:
$ sudo security add-trusted-cert -d -r trustRoot -k "/Library/Keychains/System.keychain" dev.crt
Linux
Unfortunately it's not as cohesive in Linux where different Distro's & Apps handle it differently, however this existing answer covers installation in Debian/Ubuntu distributions.
Configure in .NET Core
You can configure the .NET Core to use this self-signed certificate during development by specifying the path to dev.pfx and the password used
in your appsettings.Development.json:
{
  "Kestrel": {
    "Endpoints": {
      "Http": {
        "Url": "https://*:5001",
        "Protocols": "Http1",
        "Certificate": {
          "Path": "dev.pfx",
          "Password": "dev"
        }
      }
  }
}
Accessing from Browsers
Now after restarting your browser to reset its SSL caches you'll be able to use either *.servicestack.com domains to view your local development without SSL Errors:

Accessing from C# Clients
As .NET has access your OS's trusted certificates you'll be able to access the custom domains without additional configuration:
var client = new JsonServiceClient("https://dev.servicestack.com:5001"); //.NET HttpWebRequest
var response = await client.GetAsync(new Hello { Name = "World" });

var client = new JsonHttpClient("https://dev.servicestack.com:5001");    //.NET HttpClient
var response = await client.GetAsync(new Hello { Name = "World" });
Accessing from Native Applications
Something you want to avoid is including your certificate & private key with your Native application which is considered a compromise of your private key that attackers can use to implement a successful MitM attack.
Flutter Android
Instead you'll want to either install the self-signed certificate on your local device/emulator where it wont be trusted by anyone else.
Otherwise a far easier solution is to ignore SSL certificates when accessing your local dev server which you can do with Dart/Flutter using the HttpClient badCertificateCallback property:
var httpClient = new HttpClient()
    ..badCertificateCallback =
        ((X509Certificate cert, String host, int port) => host == 'dev.servicestack.com' && port == 5001);
Although ideally you'd use a constant value like kDebugMode so that the badCertificateCallback pass-through doesn't make it into production builds. Here's an example configuring a ServiceStack Dart Service Client
to use development or production APIs:
var client = kDebugMode
    ? ClientFactory.createWith(ClientOptions(baseUrl:'https://dev.servicestack.com:5001', ignoreCert:true))
    : ClientFactory.create('https://prod.app');

var response = await client.get(Hello()..name=='World');
Removing Certificate Artifacts
If you're only using Windows you'll typically only end up using the PKCS #12 dev.pfx certificate combining both certificate & private key which can be safely removed to clear unnecessary generated artifacts & clear-text copy of the private key:
$ del dev.key
$ del dev.crt
Where as other OS's predominantly use Certificates & Private Keys, which if needed can be later extracted from the dev.pfx:
Extract Certificate
$ openssl pkcs12 -in dev.pfx -clcerts -nokeys -out dev.crt
Extract Private Key
$ openssl pkcs12 -in dev.pfx -nocerts -nodes | openssl rsa -out dev.key
Sign In with Apple
As mobile Apps is a target use-case for ServiceStack, this release also includes 1st class integration with Sign In with Apple OAuth provider. To assist with adoption we've also developed Sign In with Apple Integration Examples for iOS, Android & Web with working implementations for Flutter iOS/Android & SwiftUI Apps at:
github.com/NetCoreApps/AppleSignIn
Sign In with Apple Requirements
Whilst configuring AppleAuthProvider is as straightforward as ServiceStack's other OAuth providers, it requires more initial setup effort to enable Sign in with your App & gather the required information which can be summarized by these high-level steps:
- Membership Team ID from https://developer.apple.com/account/#/membership/
- Create & configure App ID from https://developer.apple.com/account/resources/identifiers/list
- Use App ID to create & configure Service ID from https://developer.apple.com/account/resources/identifiers/list/serviceId
- Use App ID to create & configure Private Key from https://developer.apple.com/account/resources/authkeys/list
App Requirements Walkthrough
Okta has a good walkthrough explaining Sign In with Apple and steps required to create the above resources.
Note: Service ID must be configured with non-localhost trusted domain and HTTPS callback URL, for development you can use:
- Domain:
dev.servicestack.com - Callback URL:
https://dev.servicestack.com:5001/auth/apple
See docs on Configure localhost development dev certificate for instructions & info for being able to use a single local.servicestack.com or dev.servicestack.com local DNS names to support local development of all platforms.
Apple Services ID configuration
If you also need to support Android you'll also need to register the https://dev.servicestack.com:5001/auth/apple?ReturnUrl=android:com.servicestack.auth URL will as a valid Callback URL in your Apple Services ID configuration.
Create project with preferred Auth Configuration
As the crypto algorithms required to integrate with Sign In with Apple requires .NET Core 3 APIs, the AppleAuthProvider is implemented in the ServiceStack.Extensions NuGet Package.
A quick way to can create a working project from scratch with your preferred configuration using the mix tool, e.g:
$ mkdir web && cd web
$ x mix init auth-ext auth-db sqlite
This creates an empty project, with Auth Enabled, adds the ServiceStack.Extensions NuGet package, registers OrmLite, SQLite and the OrmLiteAuthRepository.
Copy your Apple Private Key to your Apps Content Folder then configure your OAuth providers in appsettings.json:
{
  "oauth.apple.RedirectUrl": "https://dev.servicestack.com:5001/",
  "oauth.apple.CallbackUrl": "https://dev.servicestack.com:5001/auth/apple",
  "oauth.apple.TeamId": "{Team ID}",
  "oauth.apple.ClientId": "{Service ID}",
  "oauth.apple.BundleId": "{Bundle ID}",
  "oauth.apple.KeyId": "{Private KeyId}",
  "oauth.apple.KeyPath": "AuthKey_{Private KeyId}.p8",
  "jwt.AuthKeyBase64": "{Base64 JWT Auth Key}"
}
See JWT docs for how to Generate a new Auth Key
When needing to support Mobile or Desktop Apps using OAuth Providers like Sign In with Apple, we recommend using it in combination with the JWT Auth Provider with UseTokenCookie feature enabled so the Authorization is returned in a stateless JWT Token that can be persisted for optimal Authentication across App restarts, e.g:
Plugins.Add(new AuthFeature(() => new CustomUserSession(),
    new IAuthProvider[] {
        new JwtAuthProvider(AppSettings) {
            UseTokenCookie = true,
        },
        new AppleAuthProvider(AppSettings)
            .Use(AppleAuthFeature.FlutterSignInWithApple),
    }));
Clone working Client & Server Project
For a working example you can clone or fork this repo or alternatively download the latest master .zip with:
$ x download NetCoreApps/AppleSignIn
Then after updating appsettings.json with your iOS App's configuration, copying your Private Key into the web Content Folder you're all set to run your App:
$ dotnet run
Android Support
To support Android we recommend using dev.servicestack.com which resolves to the 10.0.2.2 special IP in the Android Emulator that maps to 127.0.0.1 on your Host OS. To also be able to use it during development you'll need to add an entry in your OS's hosts file
(e.g. %SystemRoot%\System32\drivers\etc\hosts for Windows or /system/etc/hosts on macOS/Linux):
127.0.0.1 dev.servicestack.com
If you don't need to support android you can use local.servicestack.com instead which resolves to 127.0.0.1, please see configuring localhost development dev certificate for more info.
Then you can view your App using the non-localhost domain name:
https://dev.servicestack.com:5001/
You can then use the Embedded Login Page which renders the Sign In button for each of the registered OAuth providers in your AuthFeature:
https://dev.servicestack.com:5001/login
Clicking on Sign in with Apple button should let you Sign In with Apple. After successfully signing in you can view the AllUsersInfo Service to view a dump of all User Sessions & User Auth Info stored in the registered RDBMS:
https://dev.servicestack.com:5001/users
Flutter iOS & Android App
A reference client Flutter iOS & Android App showcasing integration with Sign In with Apple is available at /flutter/auth.
The first task the App does is to create an instance of the IServiceClient it should use using the recommended ClientFactory API which in combination with the conditional import below returns the appropriate configured Service Client implementation for the platform it's running on, for iOS & Android it uses the native JsonServiceClient:
import 'package:servicestack/web_client.dart' if (dart.library.io) 'package:servicestack/client.dart';
//...

AppState(client: kDebugMode
  ? ClientFactory.createWith(ClientOptions(baseUrl:'https://dev.servicestack.com:5001', ignoreCert:true))
  : ClientFactory.create("https://prod.app"))
Using a constant like kDebugMode ensures that create Service Clients that ignore SSL Certificate errors are stripped from production builds.
sign_in_with_apple package
To support both iOS and Android we're utilizing the sign_in_with_apple SignInWithAppleButton which takes care of invoking iOS's native Sign In with Apple behavior as well as enabling support for Android by wrapping an OAuth Web Flow in a WebView. Both approaches, if successful will result in an Authenticated IdentityToken which you can use to Authenticate with your ServiceStack instance to establish an Authenticated session.
The SignInWithAppleButton functions as a normal button which is placed in your Widgets build() method where you want the UI Button to appear, in this case it'll render the Sign in with Apple button if the user is not Authenticated otherwise it renders a Sign Out FlatButton:
state.isAuthenticated
  ? FlatButton(onPressed: state.signOut, child: Text('Sign Out'))
  : SignInWithAppleButton(onPressed: () async { await handleSignIn(state); })
When either is pressed it invokes its onPressed event where the Apple Sign in functionality is initiated,
within the handleSignIn implementation which reflects the behavior of the different platforms with Android
using the OAuth Web Flow to authenticate with its ReturnUrl needing the Android's App Id that it should redirect to.
The native integration in iOS is more streamlined with iOS handling the Auth flow with Apple's servers:
var clientID = "net.servicestack.myappid";
var redirect = "https://dev.servicestack.com:5001/auth/apple?ReturnUrl=android:com.servicestack.auth";
var scopes = [ AppleIDAuthorizationScopes.email, AppleIDAuthorizationScopes.fullName ];
final credentials = Platform.isAndroid
  ? await SignInWithApple.getAppleIDCredential(scopes:scopes,
      webAuthenticationOptions:WebAuthenticationOptions(clientId:clientID,redirectUri:Uri.parse(redirect)))
  : await SignInWithApple.getAppleIDCredential(scopes:scopes);
New User Registration
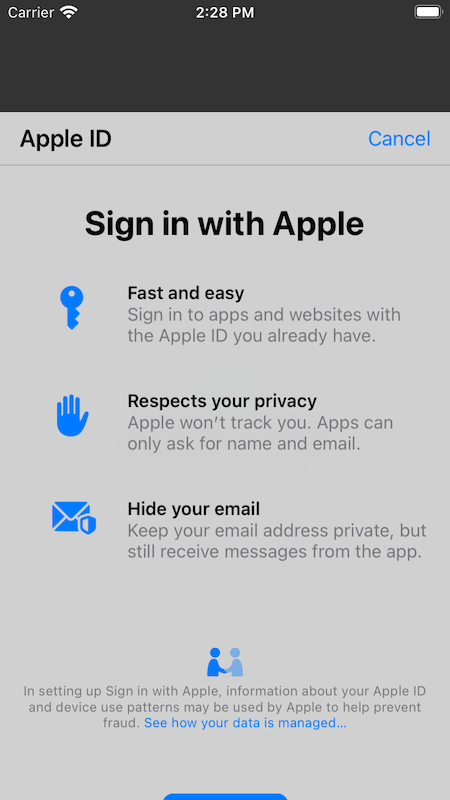
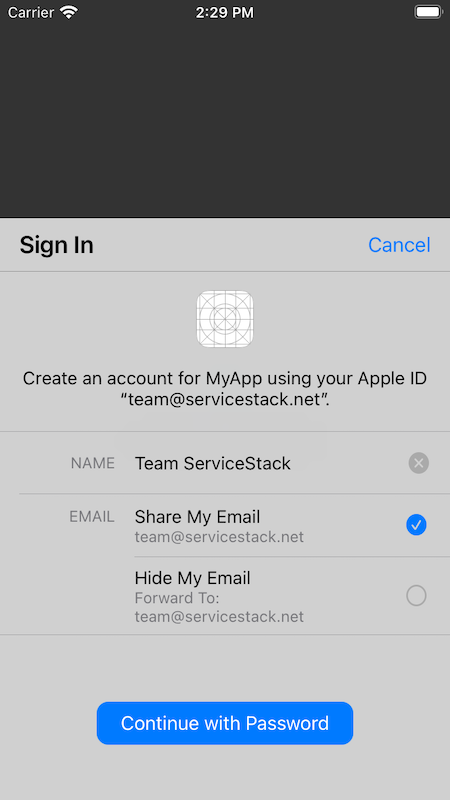
When a user signs into your App the first time they'll be presented with the option on what name they want to use and whether or not they want to provide their own email or use Apple's hidden email forwarding service:
Subsequent re-authentication attempts in iOS are more seamless & effortless for users whilst Android users will still need to go through the OAuth web flow:
If Sign in is successful it will return the identity token which we can use to Authenticate against our remote ServiceStack instance. Importantly Apple only returns the Users name on its initial sign in which we'll
need to include in our Authenticate request in order for it to be used when creating the new user account.
The same code can also be used to re-authenticate existing users:
// Sign in with Apple success!
var idToken = credentials.identityToken;

// Authenticate with server using idToken & convert into stateless JWT Cookie + persistent auth token
var response = await state.client.post(Authenticate()
    ..provider = 'apple'
    ..accessToken = idToken, args: {
        'authorizationCode': credentials.authorizationCode,
        'givenName': credentials.givenName,
        'familyName': credentials.familyName,
    }); // JwtAuthProvider.UseTokenCookie returns session as JWT

state.saveAuth(response);
Persistent Authenticated Sessions
We recommend using JWT to store authenticated sessions as it allows using a single approach to support multiple OAuth providers, inc. Username/Password Credentials Auth if you want your App to support it, it's also the fastest & most resilient Auth Provider which requires no I/O to validate & no server state as it's all encapsulated within the stateless client JWT token.
As all DTOs are JSON Serializable, the easiest way to persist Authentication is to save the AuthenticateResponse
(which contains both JWT Bearer & Refresh Tokens) in Flutter's SharedPreferences abstraction which has implementations
available in all its supported platforms.
Populating a Service Client with bearerToken and refreshToken enables it to make authenticated requests which is
done on successful Sign in requests and when the App is initialized which is also what allows for persistent authentication across App restarts.
class AppState extends ChangeNotifier {
  SharedPreferences prefs;
  IServiceClient client;
  AuthenticateResponse auth;
  bool hasInit = false;

  bool get isAuthenticated => auth != null;

  AppState({this.client});

  Future<AppState> init() async {
    prefs = await SharedPreferences.getInstance();
    var json = prefs.getString('auth');
    auth = json != null ? AuthenticateResponse.fromJson(jsonDecode(json)) : null;

    initClientAuth(client, auth);

    if (auth != null && !await checkIsAuthenticated(client)) {
      auth = client.bearerToken = client.refreshToken = null;
      prefs.remove('auth');
    }
    hasInit = true;
    return this;
  }

  void signOut() => saveAuth(null);

  void saveAuth(AuthenticateResponse response) {
    auth = response;
    if (auth != null) {
      var json = jsonEncode(auth.toJson());
      prefs.setString('auth', json);
    } else {
      prefs.remove('auth');
    }
    initClientAuth(client, auth);
    notifyListeners();
  }
}

void initClientAuth(IServiceClient client, AuthenticateResponse auth) {
  client.bearerToken = auth?.bearerToken;
  client.refreshToken = auth?.refreshToken;
  if (auth == null) {
    client.clearCookies();
  }
}

Future<bool> checkIsAuthenticated(IServiceClient client) async {
  try {
    await client.post(Authenticate());
    return true;
  } catch (e) {
    return false;
  }
}
When signing out we also want to remove its cookies to clear its ss-tok authenticated JWT Cookie inc. any other user identifying cookies.
The call to notifyListeners() is part of Flutter's ChangeNotifier
Simple app state management solution which notifies widgets using it of state changes, triggering re-rendering of its UI.
Authenticated API Requests
To test Authentication the App makes a call to HelloSecure Secured C# ServiceStack Service that validates Auth only
access using the [ValidateIsAuthenticated] declarative validation attribute:
[ValidateIsAuthenticated]
[Route("/hello/secure")]
[Route("/hello/secure/{Name}")]
public class HelloSecure : IReturn<HelloResponse>
{
    public string Name { get; set; }
}

public class HelloResponse
{
    public string Result { get; set; }
}

public class MyServices : Service
{
    public object Any(HelloSecure request) =>
        new HelloResponse { Result = $"Secure {request.Name}!" };
}
Which uses the Dart client DTOs generated using the Dart ServiceStack Reference feature to perform its Typed API Request:
  floatingActionButton: FloatingActionButton(
    onPressed: _callService,
    tooltip: 'HTTP API Example',
    child: Icon(Icons.play_arrow),
  ), // This trailing comma makes auto-formatting nicer for build methods.

//...

  Future<void> _callService() async {
    try {
      var client = Provider.of<AppState>(context, listen: false).client;
      var response = await client.get(HelloSecure()..name = "Flutter");
      setState(() {
        result = response.result;
      });
    } on WebServiceException catch (e) {
      setState(() {
        result = "${e.statusCode}: ${e.message}";
      });
    }
  }
Which if authenticated will update the UI with API Response for both iOS:
and Android:
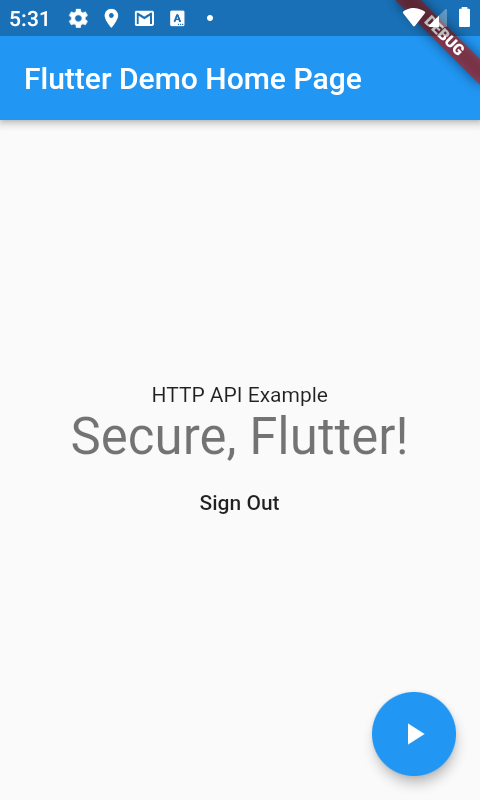
Or fail with an Unauthorized: Not Authenticated error if the user is not Signed in.
Resetting App Sign in
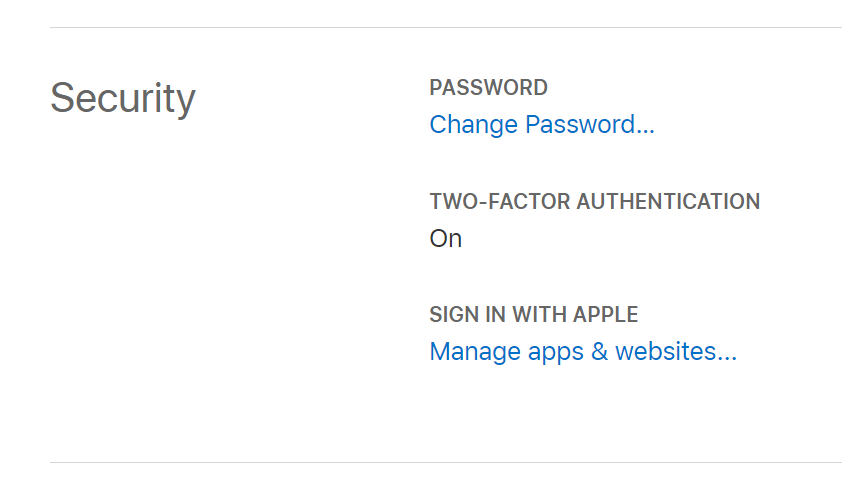
As the Sign in behavior is different for new & existing users you may need to find yourself needing to retest the new user workflow which you can do by removing your existing relationship to your App by signing into your Apple Id:
Then under Security click on Manage apps & websites...
Which will let you delete your existing user id and relationship with existing Apps you've signed into:
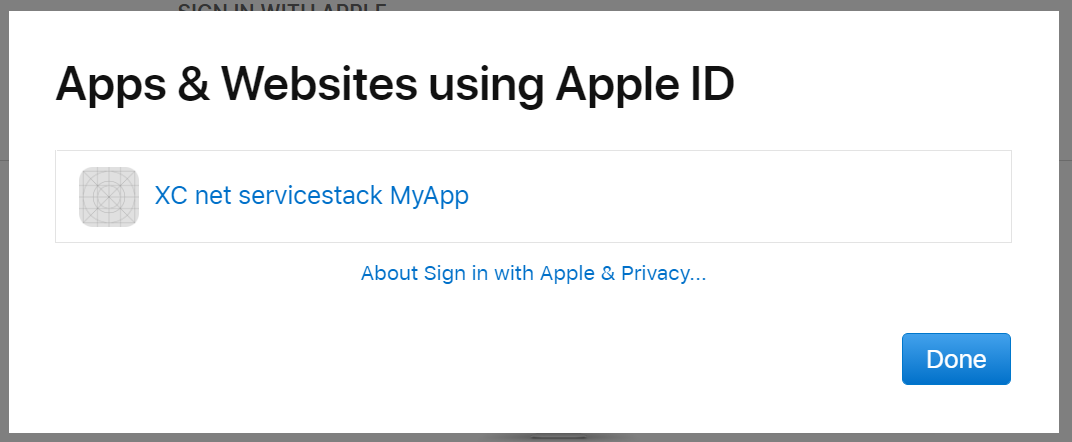
Now next time you Sign in to your App it will behave as an initial new User request complete with a new unique user id.
Flutter Android sign_in_with_apple requirements
It's already configured in this project, but to be able to use sign_in_with_apple in your own Flutter Android Apps you'll need to register this Android intent in your AndroidManifest.xml:
<application ...>

    <!-- Set up the Sign in with Apple activity, such that it's callable from the browser-redirect -->
    <activity
        android:name="com.aboutyou.dart_packages.sign_in_with_apple.SignInWithAppleCallback"
        android:exported="true"
        >
        <intent-filter>
            <action android:name="android.intent.action.VIEW" />
            <category android:name="android.intent.category.DEFAULT" />
            <category android:name="android.intent.category.BROWSABLE" />

            <data android:scheme="signinwithapple" />
            <data android:path="callback" />
        </intent-filter>
    </activity>

    <!-- Don't delete the meta-data below.
            This is used by the Flutter tool to generate GeneratedPluginRegistrant.java -->
    <meta-data
        android:name="flutterEmbedding"
        android:value="2" />

</application>
ServiceStack AppleAuthProvider configuration
This client App configuration works in combination with the Server's AppleAuthProvider to redirect to your Android's App intent which needs to be configured with:
new AppleAuthProvider(AppSettings)
    .Use(AppleAuthFeature.FlutterSignInWithApple),
Where it adds support for ?ReturnUrl=android:<android-package-id> Callback URLs that your Flutter Android App needs to use.
SwiftUI App
There's also a SwiftUI iOS Example App available at /swift/MyApp as it'll likely end up being another popular platform that will utilize Sign in with Apple.
It's a good idea to checkout Apple's official docs for their recommended approach for Implementing User Authentication with Sign in with Apple in Swift Apps which includes a sample iOS Storyboard Swift App which enlists the built-in Authentication Services Framework for iOS's native Sign in feature.
For simplicity & comparison purposes we've developed an App similar to the Flutter example using Apple's new declarative state-of-the-art SwiftUI Framework, which like Flutter is a declarative Reactive UI Framework allowing you to construct your App's UI & logic in code - most of which is contained within ContentView.swift.
Real device needed to test Sign in with Apple
Whilst the iOS Simulator can run the rest of the App, a real device was needed to test the actual Sign in functionality which otherwise hangs in the simulator which has been reported is due to 2FA which is required to use Sign in with Apple.
Add ServiceStack.Swift package
From Xcode 12 the Swift Package Manager is built into Xcode.
Go to File > Swift Packages > Add Package Dependency:
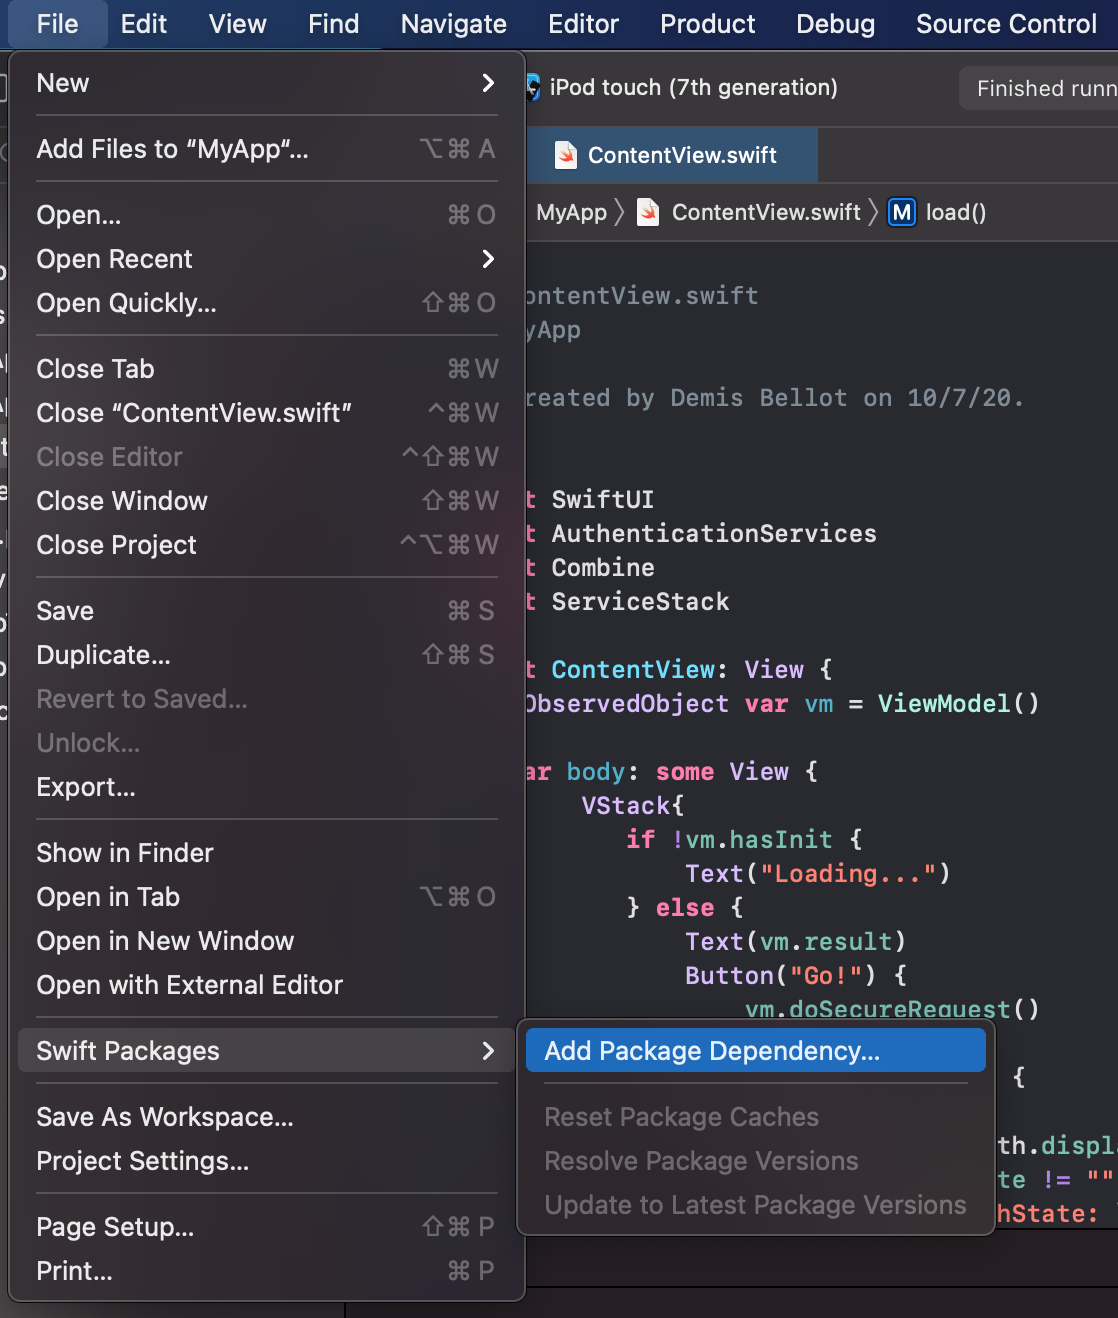
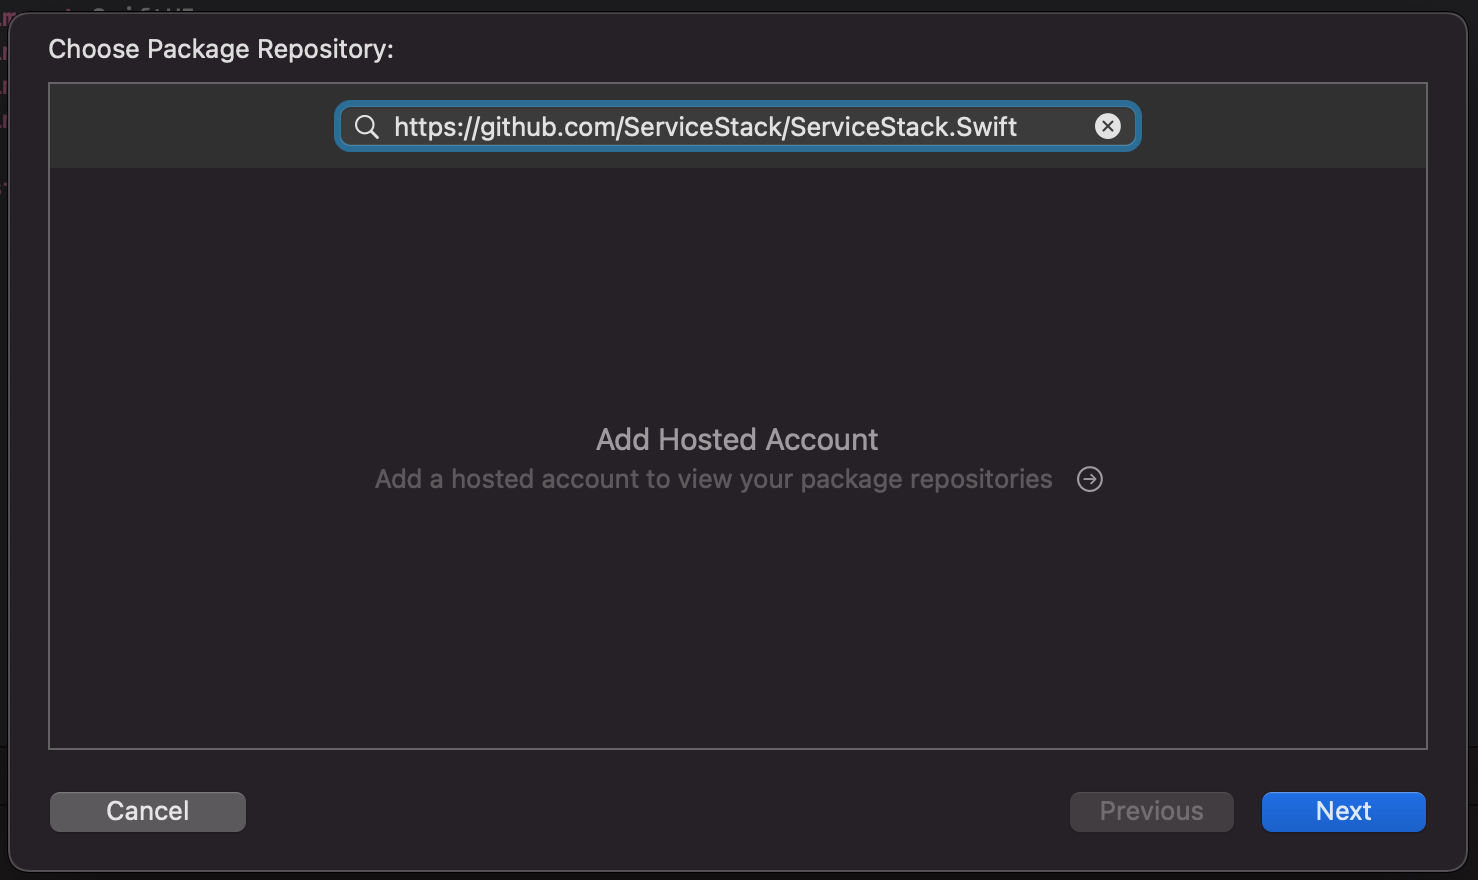
Add a reference to the ServiceStack.Swift GitHub repo:
https://github.com/ServiceStack/ServiceStack.Swift
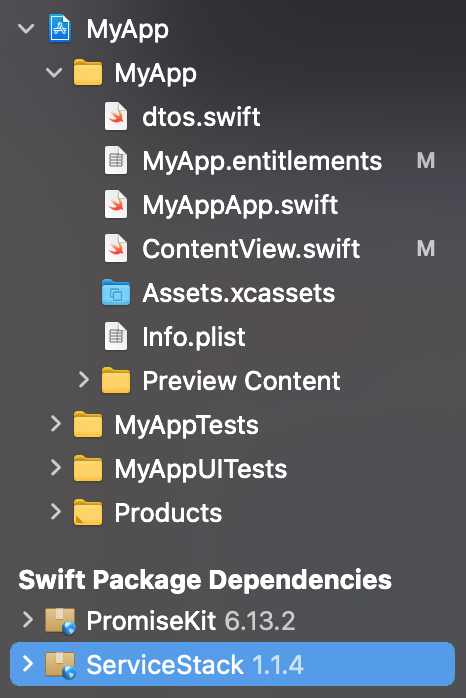
After adding the dependency both ServiceStack.Swift and its PromiseKit dependency will be added to your project:
Enabling Sign In With Apple Capability
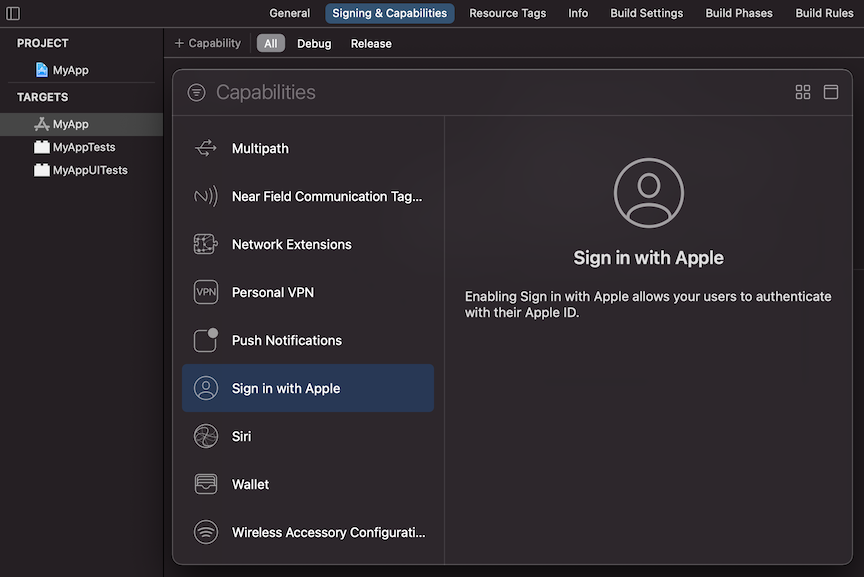
To enable Sign In functionality in your iOS App you'll need to add the Sign in with Apple capability in your App's Target > Signing & Capabilities window:
SwiftUI Layout
SwiftUI's declarative API is able to expressively capture our UI in its different states within this code fragment below:
struct ContentView: View {
    @ObservedObject var vm = ViewModel()

    var body: some View {
         VStack {
            if !vm.hasInit {
                Text("Loading...")
            } else {
                Text(vm.result)
                Button("Go!") {
                    vm.doSecureRequest()
                }
                if let auth = vm.auth {
                    VStack {
                        Text("Hi \(auth.displayName ?? "")")
                        if vm.authState != "" {
                            Text("authState: \(vm.authState)")
                                .foregroundColor(vm.authState == "authorized" ? .green : .primary)
                        }
                        Button("Sign Out") { vm.signOut() }
                    }
                } else {
                    AppleSignInButton()
                        .frame(width: 200, height: 50)
                        .onTapGesture {
                            self.vm.getRequest()
                        }
                }
            }
        }
    }
}

struct AppleSignInButton: UIViewRepresentable {
 func makeUIView(context: Context) -> ASAuthorizationAppleIDButton {
  return ASAuthorizationAppleIDButton(
    authorizationButtonType: .signUp,
    authorizationButtonStyle: .white)
 }
 func updateUIView(_ uiView: ASAuthorizationAppleIDButton, context:Context) {}
}
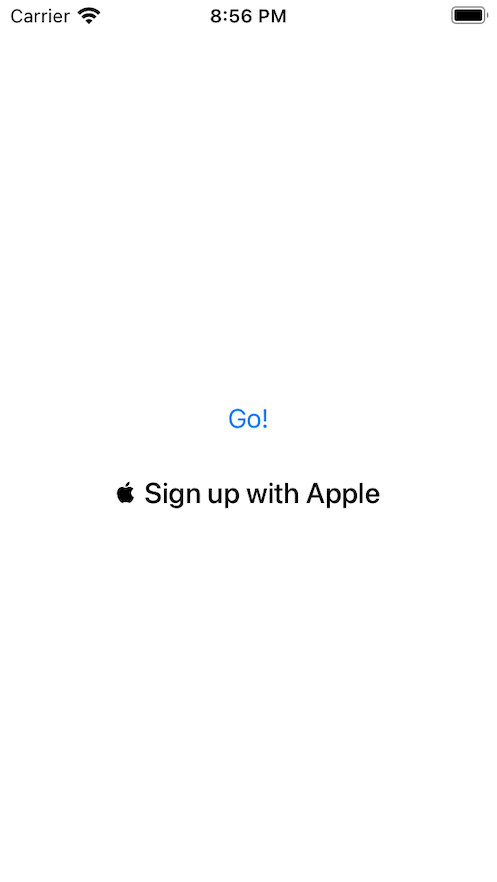
Which for an initialized unauthenticated user will render the Go! button with a Sign in button:
The Sign in buttons UI is defined by AppleSignInButton() which is our wrapper around Apple's ASAuthorizationAppleIDButton() that allows for several customizations to change its appearance.
When the button is pressed it calls our ViewModel getRequest() method to initiate the Sign in request.
@ObservedObject is one of SwiftUI's constructs for managing state, effectively it's the mechanism by which your App modifies to re-render its UI. A good article explaining the features and differences of each construct can be found in
SwiftUI: @State vs @StateObject vs @ObservedObject vs @EnvironmentObject.
Inside getRequest() we can see it's just calling signInWithApple.getAppleRequest() which is our custom controller
used to manage the Sign in request.
class ViewModel: ObservableObject {
    private lazy var signInWithApple = SignInWithAppleCoordinator(vm:self)
    private lazy var client = createClient()

    func createClient() -> JsonServiceClient {
        let client = JsonServiceClient(baseUrl: "https://dev.servicestack.com:5001")
        client.ignoreCert = true
        return client
    }

    @Published var auth: AuthenticateResponse?
    var isAuthenticated:Bool { auth != nil }
    @Published var hasInit:Bool = false
    @Published var result:String = ""
    @Published var authState:String = ""

    func getRequest() {
        signInWithApple.getAppleRequest()
    }
    //....
}
The SignInWithAppleCoordinator uses the ASAuthorizationController to initiate the request and assigns itself as the ASAuthorizationControllerDelegate used to handle its success & error callbacks:
final class SignInWithAppleCoordinator : NSObject {
    let vm: ViewModel
    init(vm:ViewModel) {
        self.vm = vm
    }

    func getAppleRequest() {
        let appleIdProvider = ASAuthorizationAppleIDProvider()
        let request = appleIdProvider.createRequest()
        request.requestedScopes = [.fullName, .email]
        let authController = ASAuthorizationController(authorizationRequests: [request])
        authController.delegate = self
        authController.performRequests()
    }

    private func setUserInfo(for credential: ASAuthorizationAppleIDCredential) {
        ASAuthorizationAppleIDProvider().getCredentialState(forUserID: credential.user, completion: {
          credentialState, error in
            var authState: String?
            switch credentialState {
            case .authorized: authState = "authorized"
            case .notFound: authState = "notFound"
            case .revoked: authState = "revoked"
            case .transferred: authState = "transferred"
            @unknown default: fatalError()
            }
            self.vm.setUser(credential:credential, authState:authState!)
        })
    }
}

extension SignInWithAppleCoordinator : ASAuthorizationControllerDelegate
{
    func authorizationController(controller: ASAuthorizationController,
      didCompleteWithAuthorization authorization: ASAuthorization) {
        if let credential = authorization.credential as? ASAuthorizationAppleIDCredential {
            setUserInfo(for: credential)
        }
    }

    func authorizationController(controller: ASAuthorizationController, didCompleteWithError error: Error) {
        print("Sign In with Apple Error: \(error.localizedDescription)")
    }
}
The Sign in request is initiated with authController.performRequests() which on first usage launches a splash screen
explaining the benefits of Sign in with Apple:
Then new users will be able to customize the name & email they'll share with your App:
Upon successful authentication the authorizationController callback gets invoked with the users credentials captured
in the ASAuthorizationAppleIDCredential struct that eventually calls setUser() with both the authenticated credential and its authState.
setUser() then uses the authorized credential to authenticate with our remote ServiceStack instance, passing
through the givenName and familyName that are only populated on a new Users initial Sign in request with the App.
func setUser(credential: ASAuthorizationAppleIDCredential, authState: String) {

    DispatchQueue.main.async {
        self.authState = authState

        if authState == "authorized" {
            let request = Authenticate()
            request.provider = "apple"
            request.accessToken = String(decoding:credential.identityToken!, as: UTF8.self)
            request.meta = [
                "authorizationCode": String(decoding:credential.authorizationCode!, as: UTF8.self),
                "givenName": credential.fullName?.givenName ?? "",
                "familyName": credential.fullName?.familyName ?? "",
            ]
            _ = self.client.postAsync(request)
                .done { r in
                    self.auth = r
                    UserDefaults.standard.set(r.toJson(), forKey: "auth")
                    self.client.bearerToken = r.bearerToken
                    self.client.refreshToken = r.refreshToken
                }
                .catch { error in
                    let status:ResponseStatus = error.convertUserInfo()!
                    self.result = "\(status.errorCode ?? ""): \(status.message ?? "")"
                }
        }
    }
}
Like the Flutter example, we save the JSON serialized AuthenticateResponse DTO to enable persistent Authentication
across App restarts and populate the JsonServiceClient with the JWT bearerToken and refreshToken to configure
the authenticated Service Client.
To Sign out the user we can use a new fresh client instance and remove any shared cookies that were created by the previous client.
func signOut() {
    DispatchQueue.main.async {
        self.auth = nil
        HTTPCookieStorage.shared.cookies?.forEach(HTTPCookieStorage.shared.deleteCookie)
        self.client = self.createClient()
    }
    UserDefaults.standard.removeObject(forKey: "auth")
}
Loading persistent JWT Auth Tokens
Which is restored on App start and verified the JWT Token is still valid by calling the Authenticate Service
with an empty DTO which returns if Authenticated otherwise throws a 401 Unauthorized Error if they're not.
class ViewModel: ObservableObject {
  init() { load() }
  //...

  func load() {
      if let authJson = UserDefaults.standard.string(forKey: "auth"),
          let auth = AuthenticateResponse.fromJson(authJson) {
          client.bearerToken = auth.bearerToken
          client.refreshToken = auth.refreshToken
          client.postAsync(Authenticate())
              .done { r in
                  self.auth = auth
              }
              .catch { error in
                  self.client.bearerToken = nil
                  self.client.refreshToken = nil
                  UserDefaults.standard.removeObject(forKey: "auth")
              }
              .finally {
                  self.hasInit = true
              }
      } else {
          self.hasInit = true
      }
  }
}
Apple recommends maintaining Auth tokens in Keychain
Whilst this example uses UserDefaults, Apple's recommendation is to instead save auth tokens in the User's Keychain.
Authenticated Requests
With our Service Client configured with our JWT Auth Tokens it can now be used to perform authenticated requests using
the generic JsonServiceClient to send typed Swift DTOs generated from the
Swift ServiceStack Reference feature:
func doSecureRequest() {
    self.result = ""
    DispatchQueue.main.async {
        let request = HelloSecure()
        request.name = "SwiftUI"
        _ = self.client.getAsync(request)
            .done { r in
                self.result = r.result ?? ""
            }
            .catch { error in
                let status:ResponseStatus = error.convertUserInfo()!
                self.result = "\(status.errorCode ?? ""): \(status.message ?? "")"
            }
    }
}
Which when sent from an authenticated Service Client will result in the expected:

Advanced Configuration
As with ServiceStack's other OAuth Providers, the behavior of the AppleAuthProvider can be further customized with the below configuration, when registering the AppleAuthProvider or in your App's configured
App Settings:
public class AppleAuthProvider
{
    // Apple Developer Membership Team ID
    // appsettings: oauth.apple.TeamId
    public string TeamId

    // Service ID
    // appsettings: oauth.apple.ClientId
    public string ClientId

    // Bundle ID
    // appsettings: oauth.apple.BundleId
    public string BundleId

    // The Private Key ID
    // appsettings: oauth.apple.KeyId
    public string KeyId

    // Path to .p8 Private Key
    // appsettings: oauth.apple.KeyPath
    public string KeyPath

    // Base64 of .p8 Private Key bytes
    // appsettings: oauth.apple.KeyBase64
    public string KeyBase64

    // .p8 Private Key bytes
    public byte[] KeyBytes

    // Customize ClientSecret JWT
    public Func<AppleAuthProvider, string> ClientSecretFactory

    // When JWT Client Secret expires, defaults to Apple Max 6 Month Expiry
    // default: 6 months in secs
    // appsettings: oauth.apple.ClientSecretExpiry
    public TimeSpan ClientSecretExpiry

    // JSON list of Apple's public keys, defaults to fetching from https://appleid.apple.com/auth/keys
    // appsettings: oauth.apple.IssuerSigningKeysJson
    public string IssuerSigningKeysJson

    // Whether to cache private Key if loading from KeyPath,
    // default: true
    // appsettings: oauth.apple.CacheKey
    public bool CacheKey

    // Whether to cache Apple's public keys
    // default: true
    // appsettings: oauth.apple.CacheKey
    public bool CacheIssuerSigningKeys

    // How long before re-validating Sign in RefreshToken, default: 1 day.
    // Set to null to disable RefreshToken validation.
    public TimeSpan? ValidateRefreshTokenExpiry

    // Custom DisplayName resolver function when not sent by Apple
    public Func<IAuthSession,IAuthTokens, string> ResolveUnknownDisplayName
}
Enhanced Dart support
The recommended way to create Dart Service Client instances is now to use the new ClientFactory which enables source-compatible Service Client instance creation in both Dart VM / Flutter JsonServiceClient and Dart Web JsonWebClient IServiceClient's that can be created with:
import 'package:servicestack/web_client.dart' if (dart.library.io) 'package:servicestack/client.dart';
//...

var client = ClientFactory.create(baseUrl);
Or using ClientOptions for more advanced configuration, e.g:
var client = ClientFactory.createWith(
    ClientOptions(baseUrl:'https://dev.servicestack.com:5001', ignoreCert:true));
All instances created with ClientFactory can be further customized by the initClient lambda to configure all ServiceClients instances, e.g. you could configure them to use the same JWT Token with:
ClientConfig.initClient = (client) => client.bearerToken = jwtToken;
New Dart Client APIs
All Service Client implementations now implement clearCookies() to remove traces of previously assigned cookies:
void clearCookies();
Support for Naked Lists
Resolved a Dart VM on Device issue reporting different types in its Type introspection APIs where JsonConverters.TypeFactories are now populated with additional concrete Type mappings for all generic types to add support for returning naked lists, e.g:
class GetFoo : OrderedRequest, IReturn<List<FooDto>>
Blazor Web Assembly Template
Sebastian Faltoni from the ServiceStack community continues to improve Blazor WASM Template, now with new support for .NET 5.0!
A New ServiceStack + Blazor WASM templates can be created with:
$ x new nukedbit/blazor-wasm-servicestack ProjectName
Executing in a Standalone Desktop app
For an even better integrated Desktop App Experience you can also use ServiceStack's app dotnet tool to run your Blazor Desktop Apps as a Chromium Desktop App:
$ dotnet tool update -g app
$ x new nukedbit/blazor-wasm-servicestack Acme
$ cd Acme\Acme
$ dotnet public -c Release
$ cd bin\Release\net5.0\publish
$ app Acme.dll
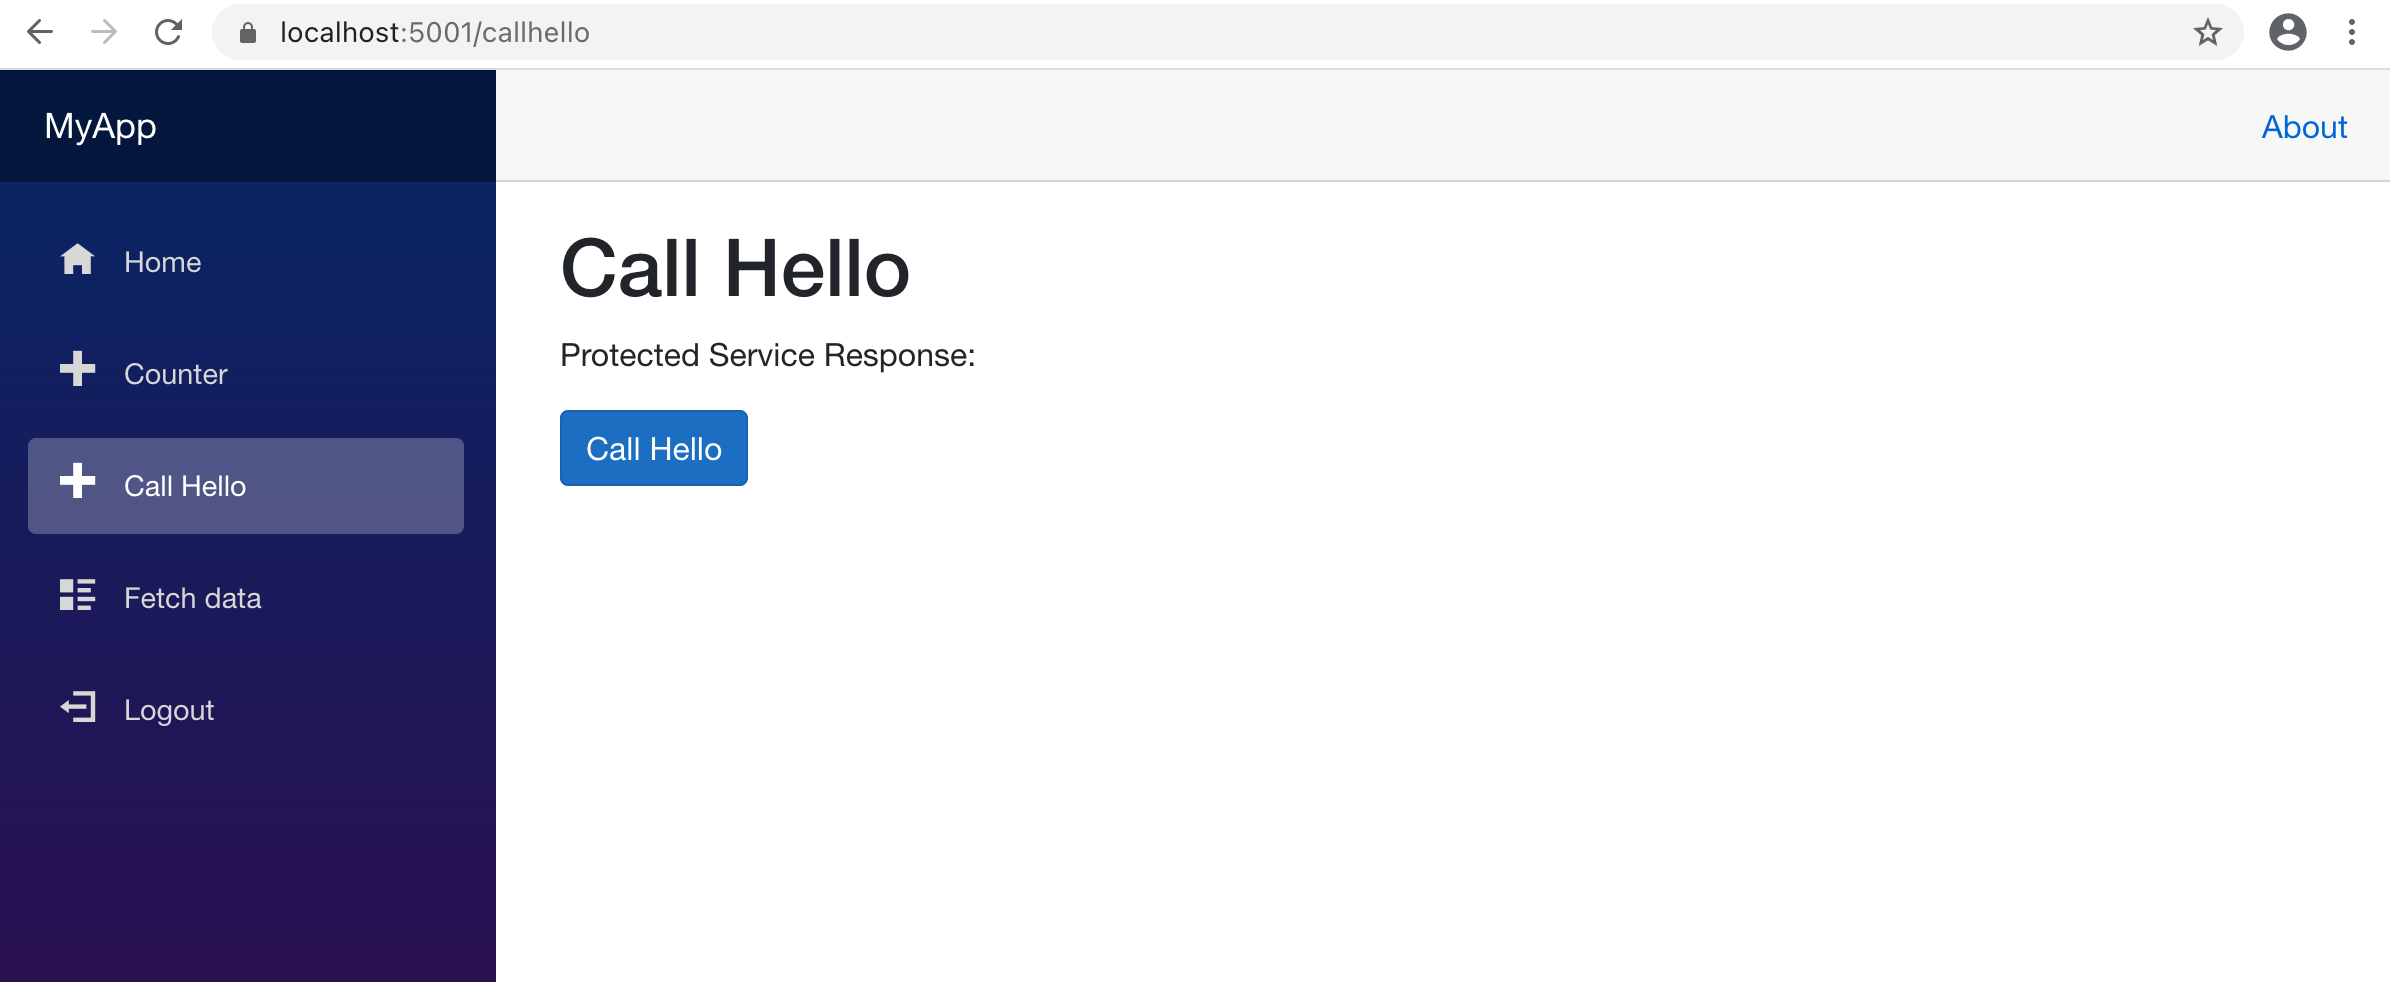
Blazor Service Client
As we track Blazor's progress we've created an official API for creating C#/.NET Service Client instances with:
var client = BlazorClient.Create(baseUrl);
Which returns a JsonHttpClient stripped of features that are known not to work in Blazor, we'll keep it updated as Blazor gains support for additional features.
This API also lets you modify the MessageHandler all Blazor client instances are configured with:
BlazorClient.MessageHandler = new HttpClientHandler { ... };
Vue .NET Core Windows Desktop App Template
During this Release we also released the vue-desktop Project Template which lets you create .NET Core Vue Single Page Apps that can also be packaged & deployed as Gist Desktop Apps which is ideal for quickly & effortlessly creating & deploying small to medium .NET Core Windows Desktop Apps packaged within a Chromium Web Vue UI within minutes!
Create new project with app dotnet tool:
$ dotnet tool install -g app
$ app new vue-desktop ProjectName
YouTube: youtu.be/kRnQSWdqH6U
Why Chromium Desktop Apps?
With the investment into advancing Web Browsers & Web technologies, many new modern Desktop Apps developed today like: Spotify, VS Code, GitHub Desktop, Skype, Slack, Discord, Whats App, Microsoft Teams, etc. are being built using Web Technologies and rendered with a Chromium webview, using either the popular Electron Framework or the Chromium Embedded Framework (CEF) directly.
Following VS Code frequent releases makes it clear why they've decided on developing it with Web Technologies using Electron where they've been able to iterate faster and ship new features at an unprecedented pace. In addition to its superior productivity, they're able to effortlessly support multiple Operating Systems as well as enable reuse for running on the Web as done with its Monaco Editor powering VS Code as well as innovative online solutions like GitHub Code Spaces.
These attributes in addition to the amount of investment that major technology companies like Google, Apple, Microsoft & Firefox invest each year in improving Web & browser technologies will ensure the platform will be continually supported & improved unlike most Desktop UI Technologies.
Blazor WASM Starting Project Template
But as it's the latest technology developed & promoted by .NET PR it's going to be the Web UI technology compared to most, so this project template is based on the UI of an empty Blazor WASM project, rewritten to use Vue SPA UI & a back-end .NET Core App. It's an enhanced version that also includes examples of commonly useful features:
- Home page includes example of using TypeScript Service Reference to consume typed APIs
- Fetch data page sources it's data from an embedded SQLite database querying an AutoQuery Service
- Utilizes built-in SVG support for using Material Design & Custom SVG Icons
- Utilizes Win 32 Integration showcasing how to call Win32 APIs from the UI
Distributed App Size
The first comparison is a direct result of the approaches used in each technology, where in addition to all your App's
assets Blazor WASM has to also bundle a dotnet WASM runtime & linked/tree-shaken .dll's. Whilst app Desktop Apps
is on opposite side of the spectrum where it only requires distribution of App-specific functionality as all popular
Vue JS libraries, Bootstrap CSS, Material Design SVG icons or ServiceStack .dll's used are pre-bundled with the global app dotnet tool.
For the comparison we ran the publish-app script & Blazor's Publish to Folder tool & compared the .zip of each folder which resulted in:
15kb Vue Desktop App vs 6207kb Blazor WASM (413x smaller)
The end result that even our enhanced Blazor WASM starting project template is 413.8x or 2.6x orders of magnitude smaller than Blazor WASM. A more apt comparison of its tiny footprint, is the enhanced Vue Desktop App is roughly equivalent to Blazor WASM's 12kb partial screenshot of its App:
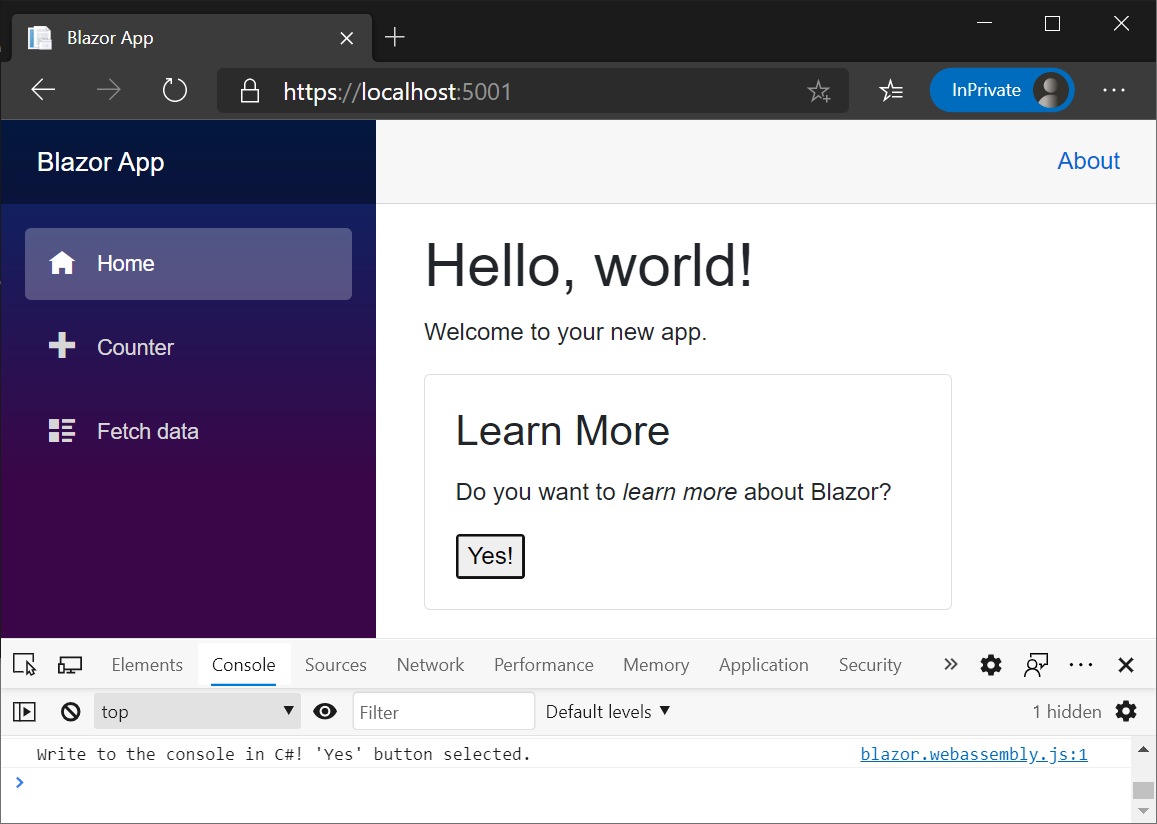
In addition, the app tool also bundles a Chromium Desktop App shell in order for your Vue Desktop Apps to appear like Native Desktop Apps,
to get the same experience with Blazor WASM App you would also need to manage the installation of a Chromium wrapper like
Chromely.
When App sizes are this small you have a lot more flexibility in how to distribute & manage the App, which is how Vue Desktop Apps can be published to Gists and always download & open the latest released version - enabling transparent updates by default.
Live Reload
A notable omission from a modern UI FX is there doesn't to be any kind of Live Reload capability for any page, including static .html or .css resources.
Vue Desktop Apps naive live reload feature works as you'd expect where the UI automatically refreshes on each file change, e.g:
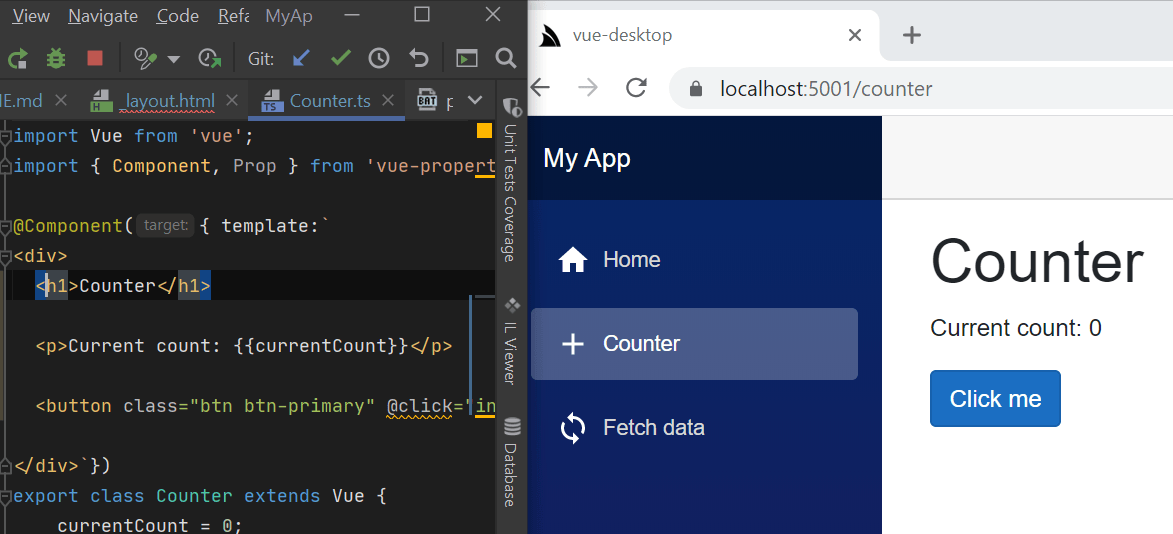
This is a good example of why we prefer to avoid complex tooling as what's normally a trivially implementable feature requires much more effort & time to implement when you're reliant on a complex architecture & heavy tooling.
The only build tool required to enable Live Reload in Vue Desktop Apps is TypeScript's watch feature which monitors and automatically
transpiles all *.ts file changes:
$ tsc -w
Reload Time
The lack of a live reload feature is exacerbated when having to manually reload your App to view every change which has noticeable delay in Blazor WASM which is otherwise instant in a normal .NET Core Web App:
Blazor WASM

Vue Desktop
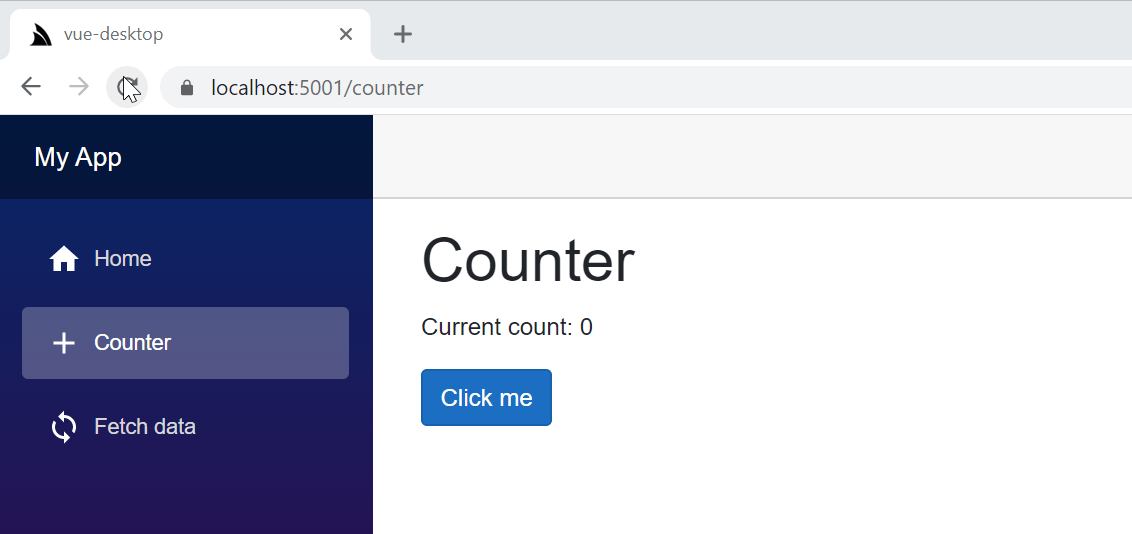
Opinionated App Launcher
The app dotnet tool is essentially just a .NET Core Desktop App launcher hosted within a Chromium Desktop Shell,
whether it's launching our app Desktop Apps or existing
.NET Core Web App .dll or .exe's.
It's opinionated in the shared libraries it includes, namely:
- Vue, React & jQuery
- Bootstrap CSS
- Material Design & Fontawesome SVG icons
- ServiceStack .NET Packages & Dependencies
You can use your own client/server libraries but they'd need to be distributed with the App
Intended for developing small/medium Desktop Apps that can be published to a GitHub Gist (or repo) & opened over a URL, e,g: Redis Admin UI, generic DB Viewer or our ServiceStack Studio API Management tool which all package down to small footprints.
Given you can build & distribute an App within minutes, it's suitable for quick UI's around a single purpose Task you may want to distribute internally, e.g. a dynamic reporting viewer, edit forms, surveys, email composer, or see the Desktop App Index for other examples.
Native Win32 API Interop
As #Script is a scripting language utilizing JS syntax to invoke .NET APIs, the Win 32 support ends up being both simple & intuitive.
Where it calls the CustomMethods.cs .NET Win 32 APIs (wrapped in a #Script method) directly from JS as done in App.ts which can be invoked using JS syntax using the evaluateCode TypeScript API, e.g:
import { evaluateCode } from '@servicestack/desktop';

await evaluateCode(`chooseColor()`);
await evaluateCode(`chooseColor('#336699')`);
The app dotnet tool already includes these dotnet/pinvoke .NET Wrapper API NuGet packages
below so they can be used within your App without needing to distribute them with your App:
<PackageReference Include="PInvoke.AdvApi32" Version="0.6.49" />
<PackageReference Include="PInvoke.BCrypt" Version="0.6.49" />
<PackageReference Include="PInvoke.Crypt32" Version="0.6.49" />
<PackageReference Include="PInvoke.DwmApi" Version="0.6.49" />
<PackageReference Include="PInvoke.Gdi32" Version="0.6.49" />
<PackageReference Include="PInvoke.Hid" Version="0.6.49" />
<PackageReference Include="PInvoke.Kernel32" Version="0.6.49" />
<PackageReference Include="PInvoke.Magnification" Version="0.6.49" />
<PackageReference Include="PInvoke.MSCorEE" Version="0.6.49" />
<PackageReference Include="PInvoke.Msi" Version="0.6.49" />
<PackageReference Include="PInvoke.Fusion" Version="0.6.49" />
<PackageReference Include="PInvoke.NCrypt" Version="0.6.49" />
<PackageReference Include="PInvoke.NetApi32" Version="0.6.49" />
<PackageReference Include="PInvoke.NTDll" Version="0.6.49" />
<PackageReference Include="PInvoke.Psapi" Version="0.6.49" />
<PackageReference Include="PInvoke.SetupApi" Version="0.6.49" />
<PackageReference Include="PInvoke.Shell32" Version="0.6.49" />
<PackageReference Include="PInvoke.SHCore" Version="0.6.49" />
<PackageReference Include="PInvoke.User32" Version="0.6.49" />
<PackageReference Include="PInvoke.Userenv" Version="0.6.49" />
<PackageReference Include="PInvoke.UxTheme" Version="0.6.49" />
<PackageReference Include="PInvoke.WtsApi32" Version="0.6.49" />
See Win32 App for more info & examples on Win32 integration.
For more info checkout the github.com/LegacyTemplates/vue-desktop project template docs.
Fluent Validation
ServiceStack's interned version of fluentvalidation.net was upgraded to their latest v9.3 preview release. Please refer to their 9.0 Upgrade Guide for changes.
OrmLite
SqlExpression's new ComputeHash() can be used to generate a unique SHA1 hash should you want to maintain your own local results cache for popular queries, e.g:
var q = Db.From<Table>.Where(...);
var cacheKey = q.ComputeHash();
var results = LocalCache.GetOrCreate(cacheKey, TimeSpan.FromMinutes(10), () => Db.Select(q));
Whilst the new SqlExpression.Dump() API lets you capture an SQL Expression's state and parameter values which you can quickly view an SQL Expressions content, e.g:
q.Dump(includeParams:true).Print();
New Async APIs available for RDBMS inspection:
DoesTableExistAsync()DoesColumnExistAsync()DoesSchemaExistAsync()DoesSequenceExistAsync()
ServiceStack.Text
New APIs for downloading asynchronously from a Stream:
Stream.ReadFullyAsync()Stream.ReadFullyAsMemoryAsync()
Uploading Files from configured WebRequest or URL:
WebRequest.UploadFile()WebRequest.UploadFileAsync()string.PostFileToUrl()string.PostFileToUrlAsync()string.PutFileToUrl()string.PutFileToUrlAsync()
Fast ToHex encoding API:
byte[].ToHex()
HttpError
New static Type helpers for returning other remaining HTTP Errors:
throw HttpError.PreconditionFailed(message);
throw HttpError.ExpectationFailed(message);
throw HttpError.NotImplemented(message);
throw HttpError.ServiceUnavailable(message);
Feedback Welcome!
We hope you enjoy the new capabilities in this release, as always if you have any questions or feedback in this release please let us know in the Customer Forums.