We're excited to announce the release of our new Angular 21 SPA Template - a modern, full-stack template combining the latest Angular 21 frontend with a powerful .NET 10 backend powered by ServiceStack.
What's New
Angular with Modern Features
- Standalone Components - No NgModules, cleaner component architecture
- Signal-based State Management - Reactive state with Angular's new signals API
- TypeScript 5.9 - Latest TypeScript features and improved type safety
- Tailwind CSS 4 - Utility-first styling with dark mode support
.NET 10 Backend
- ServiceStack v10 - High-performance .NET APIs with AutoQuery CRUD
- Entity Framework Core 10 - For ASP.NET Core Identity
- OrmLite - Fast, typed POCO ORM for application data
- SQLite - Zero-configuration database (easily swap for PostgreSQL, SQL Server, etc.)
Upgrading to an production RDBMS
To switch from SQLite to PostgreSQL/SQL Server/MySQL:
- Install preferred RDBMS (
ef-postgres,ef-mysql,ef-sqlserver), e.g:
npx add-in ef-postgres
- Install
db-identityto also switch to use this RDBMS for Background Jobs and Request Logs Analytics:
npx add-in db-identity
Simplified .NET + Angular Development Workflow
- Single endpoint
https://localhost:5001for both .NET and Angular UI (no dev certs required) - ASP.NET Core proxies requests to Angular dev server (port 4200)
- Hot Module Replacement (HMR) support for instant UI updates
- WebSocket proxying for Angular HMR functionality

.NET Angular App with Static Export
Angular SPA uses static export, where a production build of the Angular App is generated at deployment and published together with the .NET App in its /wwwroot folder, utilizing static file serving to render its UI.
This minimal angular-spa starting template is perfect for your next AI Assisted project, offering a streamlined foundation for building modern web applications with Angular 21 and .NET 10:

Key Features
🔐 ASP.NET Core Identity Authentication
Full authentication system with beautifully styled Tailwind CSS pages:
- User registration and login
- Email confirmation
- Password reset
- Profile management
- Role-based authorization
⚡ Rapid AutoQuery CRUD dev workflow
Quickly generate complete C# CRUD APIs and DB Migrations from simple TypeScript data models:
- Create a new feature
npx okai init MyFeature
- Define your TypeScript data models in
MyFeature.d.ts, e.g:
code MyApp.ServiceModel/MyFeature.d.ts
- When ready, generate C# APIs and migrations
npx okai MyFeature.d.ts
- Apply database migrations
npm run migrate
Use AI for quick scaffolding
To help quickly scaffold your data models and features, use ServiceStack's AI assistant. Example of creating AutoQuery CRUD APIs for managing products:
npx okai "Manage products price and inventory"
📊 Background Jobs
Durable background job processing with:
- Command-based job execution
- Recurring job scheduling
- SMTP email sending via background workers
📝 Request Logging
SQLite-backed request logging for:
- API request tracking
- Error monitoring
- Performance analysis
🔍 Built-in Admin UIs
- /ui - ServiceStack API Explorer
- /admin-ui - Database management, user administration
- /swagger - OpenAPI documentation (development mode)
Architecture Highlights
Hybrid Development Model
During development, dotnet watch starts both the .NET backend and Angular dev server with Hot Module Replacement. In production, Angular builds to static files served directly by ASP.NET Core.
Modular Configuration
Clean separation of concerns with IHostingStartup pattern:
- Configure.AppHost.cs - Main ServiceStack AppHost registration
- Configure.Auth.cs - ServiceStack AuthFeature with ASP.NET Core Identity integration
- Configure.AutoQuery.cs - AutoQuery features and audit events
- Configure.Db.cs - Database setup (OrmLite for app data, EF Core for Identity)
- Configure.Db.Migrations.cs - Runs OrmLite and EF DB Migrations and creates initial users
- Configure.BackgroundJobs.cs - Background job processing
- Configure.HealthChecks.cs - Health monitoring endpoint
This pattern keeps Program.cs clean and separates concerns.
Type-Safe API Client
Auto-generated TypeScript DTOs ensure type safety across the stack:
import { QueryBookings } from '@/dtos'

const response = await client.api(new QueryBookings({ minCost: 100 }))
if (response.succeeded) {
    console.log(response.response!.results)
}
Deployment Ready
GitHub Actions workflows included for:
- CI/CD - Automated build and test
- Container Builds - Docker image creation
- Kamal Deployment - One-command production deployment with SSL
Kamal Deployments
All deployments include the GitHub Action workflows to deploy your App to any Linux Server with Kamal using Docker, SSH and GitHub Container Registry (ghcr).
Where you can host it on a Hetzner US Cloud VM for as low as $5 per month or if you have multiple Apps you can delpoy them all to a single VM which we're doing for our .NET Template Live Demos which runs 30 Docker Apps on a 8GB RAM/80GB SSD dedicated VM for $15 /month.
AI-Assisted Development with CLAUDE.md
As part of our objectives of improving developer experience and embracing modern AI-assisted development workflows - all new .NET React templates include a comprehensive AGENTS.md file designed to optimize AI-assisted development workflows.
What is CLAUDE.md?
CLAUDE.md and AGENTS.md onboards Claude (and other AI assistants) to your codebase by using a structured documentation file that provides it with complete context about your project's architecture, conventions, and technology choices. This enables more accurate code generation, better suggestions, and faster problem-solving.
What's Included
Each template's AGENTS.md contains:
- Project Architecture Overview - Technology stack, design patterns, and key architectural decisions
- Project Structure - Gives Claude a map of the codebase
- ServiceStack Conventions - DTO patterns, Service implementation, AutoQuery, Authentication, and Validation
- React Integration - TypeScript DTO generation, API client usage, component patterns, and form handling
- Database Patterns - OrmLite setup, migrations, and data access patterns
- Common Development Tasks - Step-by-step guides for adding APIs, implementing features, and extending functionality
- Testing & Deployment - Test patterns and deployment workflows
Extending with Project-Specific Details
The existing CLAUDE.md serves as a solid foundation, but for best results, you should extend it with project-specific details like the purpose of the project, key parts and features of the project and any unique conventions you've adopted.
Benefits
- Faster Onboarding - New developers (and AI assistants) understand project conventions immediately
- Consistent Code Generation - AI tools generate code following your project's patterns
- Better Context - AI assistants can reference specific ServiceStack patterns and conventions
- Reduced Errors - Clear documentation of framework-specific conventions
- Living Documentation - Keep it updated as your project evolves
How to Use
Claude Code and most AI Assistants already support automatically referencing CLAUDE.md and AGENTS.md files, for others you can just include it in your prompt context when asking for help, e.g:
Using my project's AGENTS.md, can you help me add a new AutoQuery API for managing Products?
The AI will understand your App's ServiceStack conventions, React setup, and project structure, providing more accurate and contextual assistance.
Getting Started
All new angular-spa.web-templates.io include AGENTS.md by default. For existing projects, you can adapt the template to document your App's conventions, patterns and technology choices.
Feature Tour
Angular's structured approach to modern web development is ideal for large complex Applications that stitches together various technologies, handling authentication, designing responsive UIs, and managing complex state which the new Angular SPA template embraces to provide a productive starting point with a robust foundation packed with essential features right out of the box.
- Built-in Identity Authentication: Secured out-of-the-box, this template integrates seamlessly with ASP.NET Core Identity, providing ready-to-use registration, login, and User Admin management features.
- Tailwind v4 CSS: Rewritten to use Tailwind v4 CSS, allowing you to rapidly build beautiful, responsive designs directly in your markup.
- Dark Mode Support: Cater to user preferences with built-in, easily toggleable dark mode support, styled elegantly with Tailwind.
- Customizable DataGrid Component: Effortlessly display tabular data with the included customizable DataGrid. Easily adapt it for sorting, filtering and displaying your specific data structures.
- Reusable Input Components with Validation: The template includes reusable, pre-styled input components (e.g., text input, selects) with built-in support for validation bound forms and contextual displaying of validation errors.
- RxJS & Signals Support: Modern Angular reactivity: whether you prefer the established power of RxJS Observables or the new granular reactivity of Angular Signals, our template is structured to support both programming models.
We'll take a quick tour to explore the templates features:
Home Page
The home page sports a responsive Tailwind design where all its components are encapsulated within its
/app/home
with its logic maintained in *.ts files and its presentation UI optionally maintained in a separate *.html file.
Dark Mode
The dark-mode-toggle.component.ts and theme.service.ts handles switching between Light and Dark Mode which is initially populated from the Users OS preference.
Weather
The Weather page maintained in /app/weather
provides a good example of utilizing an RxJS Observable programming model with the
api-http-client.service.ts
that extends Angular's Observable HttpClient with an additional api method that lets you use your Services typed dtos.ts
TypeScript DTOs to enable type-safe integration with your back-end services:
import { Forecast, GetWeatherForecast, ResponseStatus } from 'src/dtos'
import { ApiHttpClient } from 'src/components/services/api-http-client.service'

export class WeatherComponent {
  http = inject(ApiHttpClient);

  public error: ResponseStatus | null = null;
  public forecasts: Forecast[] = [];

  getForecasts() {
    this.http.api(new GetWeatherForecast({ date:'2025-04-01' })).subscribe({
        next:(result) => {
            this.error = null;
            this.forecasts = result;
        },
        error:(error) => {
            this.error = error;
        }
    });
  }
}
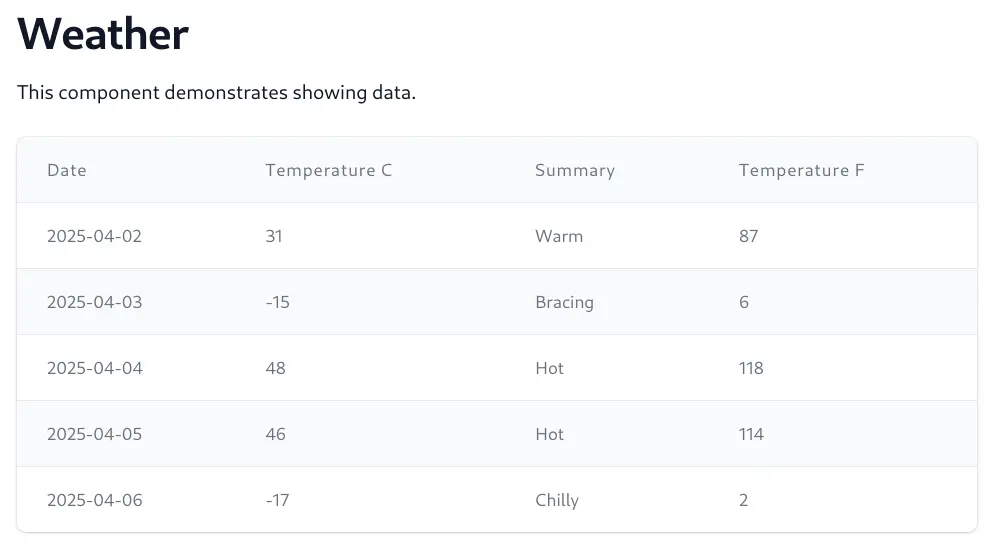
Whilst its weather.component.html template showcases the new data-grid.component.ts to display a beautiful tailwind DataGrid with just:
<data-grid [items]="forecasts"></data-grid>
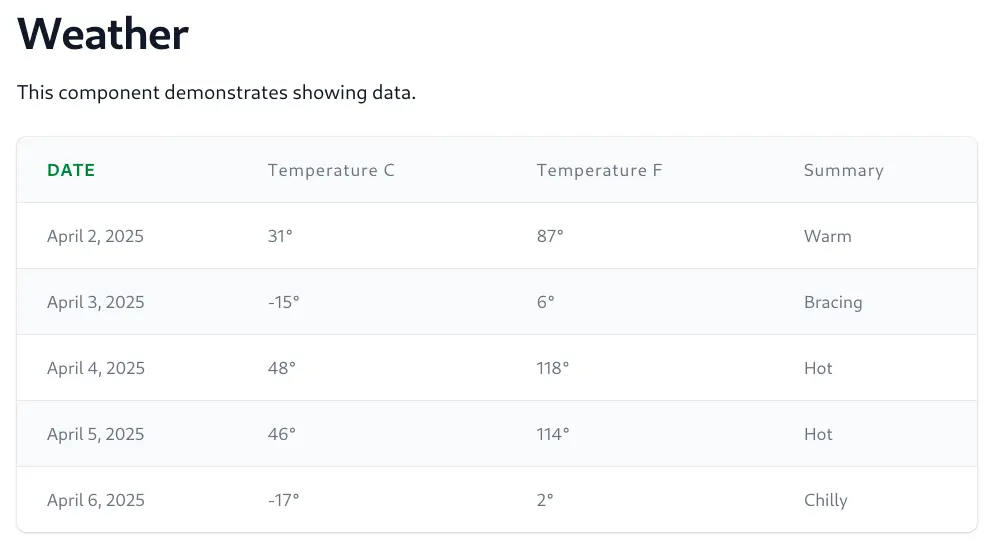
It's a direct port of our Vue DataGrid that also supports the same customizations allowing for custom Headers and Column fields, e.g:
<data-grid [items]="forecasts">
<ng-template #dateHeader>
<div class="flex items-center">
<span class="font-bold text-green-700 uppercase">Date</span>
</div>
</ng-template>
<ng-template #date let-x="date">{{ x | date:'MMMM d, yyyy' }}</ng-template>
<ng-template #temperatureC let-x="temperatureC">
{{ x }}°
</ng-template>
<ng-template #temperatureF let-x="temperatureF">
{{ x }}°
</ng-template>
<ng-template #summary let-x="summary">{{ x }}</ng-template>
</data-grid>
Which renders the expected:
Todos MVC
The Todos MVC App maintained in /app/todomvc demonstrates how to create the popular todomvc.com App in Angular 19.
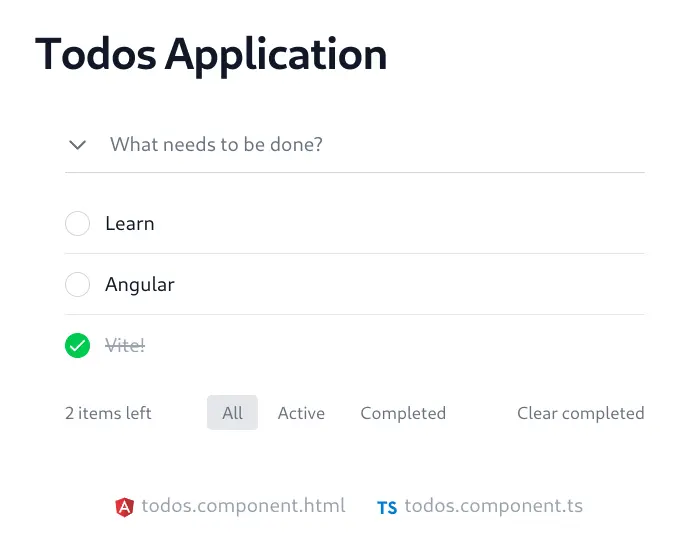
It's another example of building a simple CRUD Application with Angular RxJS Observables and your APIs TypeScript DTOs.
This snippet shows how to query and create Todos with the ApiHttpClient:
import { Todo, QueryTodos, CreateTodo, ResponseStatus } from 'src/dtos'
import { ApiHttpClient } from 'src/components/services/api-http-client.service'

export class TodoMvcComponent implements OnInit {
    client = inject(ApiHttpClient);
    error: ResponseStatus | null = null;
    todos: Todo[] = [];
    newTodoText = '';

    loadTodos(): void {
        this.client.api(new QueryTodos()).subscribe({
            next: (todos) => {
                this.todos = todos.results;
            },
            error: (err) => {
                this.error = err;
            }
        });
    }

    addTodo(): void {
        if (!this.newTodoText.trim()) return;

        this.client.api(new CreateTodo({
            text: this.newTodoText.trim()
        })).subscribe({
            next: (todo) => {
                this.todos.push(todo);
                this.newTodoText = '';
            },
            error: (err) => {
                this.error = err;
                console.error('Error adding todo:', err);
            }
        });
    }
    //...
}
Bookings
All other examples in the template uses Angular's newer Signal for reactivity and the standard ServiceStack JsonServiceClient
used in all other TypeScript/JS Apps.
The Bookings Pages are maintained in /app/bookings and showcases a more complete example of developing a CRUD UI in Angular starting with an example of how to encapsulate route information for a feature in an isolated booking.routes.ts:
import { Routes } from '@angular/router';
import { BookingListComponent } from './booking-list.component';
import { BookingCreateComponent } from './booking-create.component';
import { BookingEditComponent } from './booking-edit.component';
import { authGuard } from 'src/guards';

export const BOOKING_ROUTES: Routes = [
  {
    path: 'bookings',
    component: BookingListComponent,
    canActivate: [authGuard]
  },
  {
    path: 'bookings/create',
    component: BookingCreateComponent,
    canActivate: [authGuard]
  },
  {
    path: 'bookings/edit/:id',
    component: BookingEditComponent,
    canActivate: [authGuard]
  }
];
The use of the Route authGuard ensures only Authenticated Users can access these routes, as well as redirecting
non-authenticated users to the Sign In page.
Bookings List
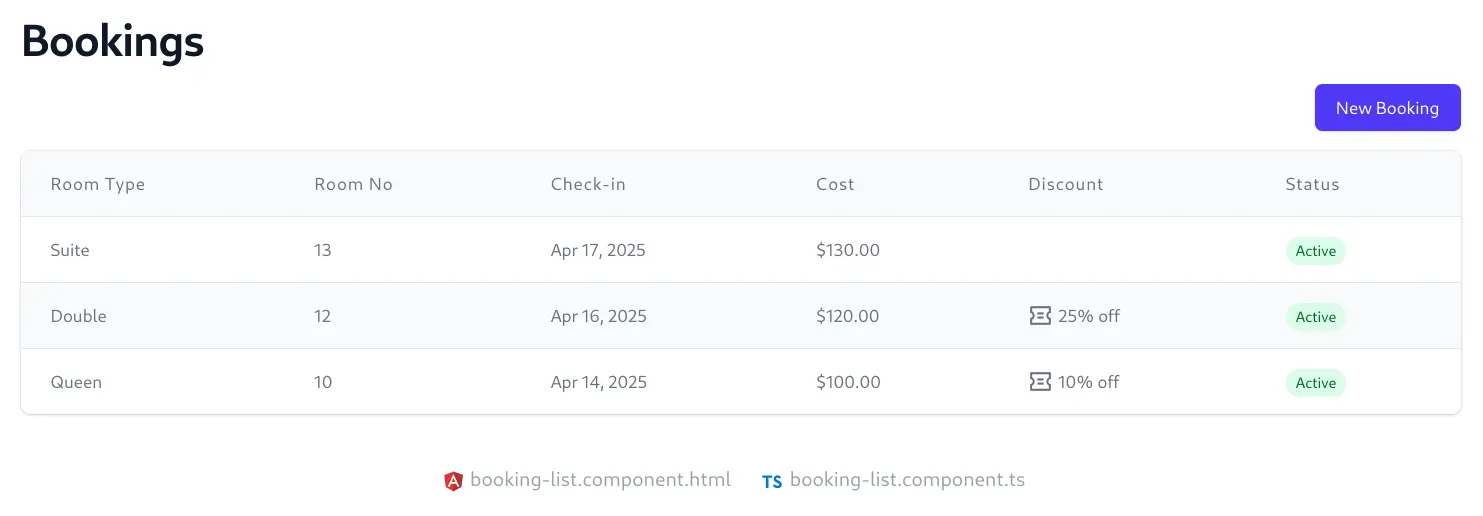
The bookings list component shows an example of using Angular's Signals with the JsonServiceClient together with
an ApiState context to enable data bound forms and validation errors:
@Component({
    templateUrl: './booking-list.component.html',
    providers: [
        ...provideApiState()
    ],
    //...
})
export class BookingListComponent implements OnInit {
    private router = inject(Router);
    private client = inject(JsonServiceClient);
    api = inject(ApiState);

    // Signals for state
    allBookings = signal<Booking[]>([]);

    ngOnInit(): void {
        this.loadBookings();
    }

    async loadBookings(): Promise<void> {
        this.api.begin();

        const api = await this.client.api(new QueryBookings({
            orderByDesc: 'BookingStartDate',
        }));
        if (api.succeeded) {
            this.allBookings.set(api.response!.results);
        }

        this.api.complete(api.error);
    }
}
Using provideApiState() implicitly injects the populated API context containing both the APIs Loading and Error state into child components saving you from having to explicitly inject it into each component.
E.g. the <form-loading> component will display when API Requests are in-flight whilst API Error Responses are displayed
after receiving failed API Responses:
<app-page title="Bookings" class="max-w-6xl">

    <form-loading text="Loading Bookings..."></form-loading>
    <error-summary></error-summary>

    @if (allBookings().length > 0) {
    <data-grid [items]="allBookings()">...</data-grid>
    }
    @else {
    <div class="text-center py-4 bg-gray-50 rounded-md">
        <p class="text-gray-500">No bookings found</p>
    </div>
    }

</app-page>
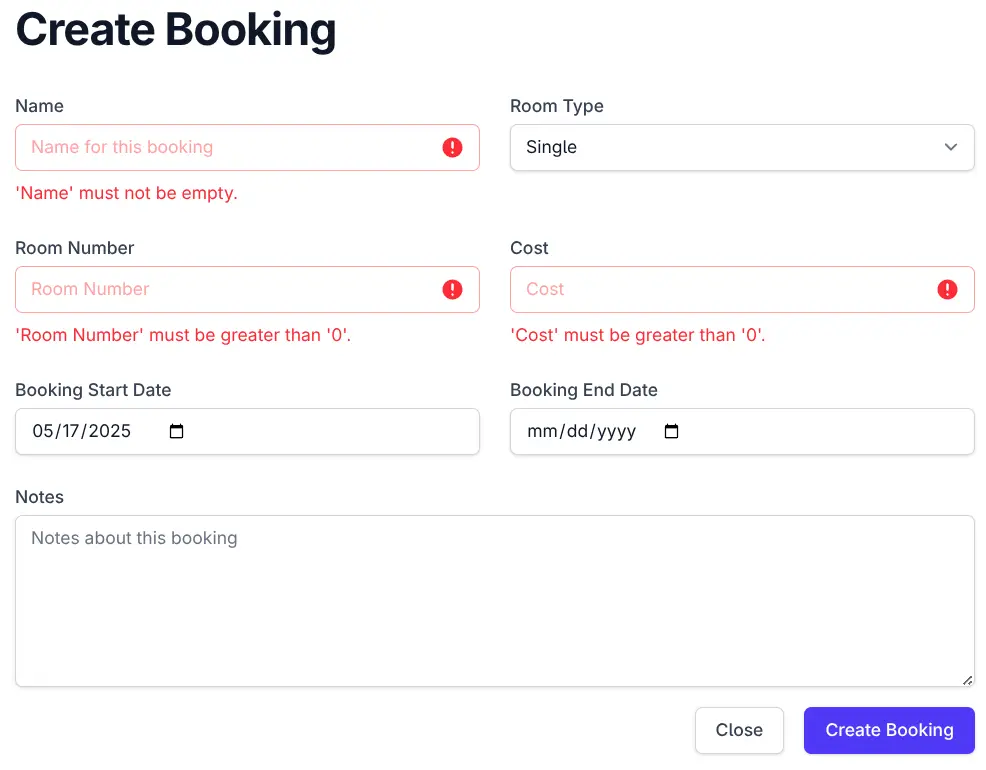
Create Booking
The booking-create.component.ts shows the standard pattern of calling ServiceStack Typed APIs to
save forms whilst saving any validation errors to the ApiState context:
async save(): Promise<void> {
    this.api.begin();

    const request = new CreateBooking(this.booking());
    const api = await this.client.api(request);
    if (api.succeeded) {
        // Navigate back to bookings list after successful save
        this.router.navigate(['/bookings']);
    }

    this.api.complete(api.error);
}
Where any contextual validation will be displayed next to the input field:
Edit Booking
The booking-edit.component.ts
shows an example of using the JsonServiceClient with Signals to get and modify bookings:
export class BookingEditComponent implements OnInit {
    private route = inject(ActivatedRoute);
    private router = inject(Router);
    private client = inject(JsonServiceClient);
    meta = inject(MetadataService);
    api = inject(ApiState);

    // Signals
    booking = signal<Booking>(new Booking());

    ngOnInit(): void {
        // Get booking ID from route params
        const id = this.route.snapshot.paramMap.get('id');
        if (id) {
            this.fetchBooking(parseInt(id, 10));
        } else {
            this.api.setErrorMessage('Booking ID is required');
        }
    }

    async fetchBooking(id: number): Promise<void> {
        this.api.begin();

        const api = await this.client.api(new QueryBookings({id}));
        if (api.succeeded) {
            this.booking.set(api.response!.results[0]);
        }

        this.api.complete(api.error);
    }

    async save(): Promise<void> {
        this.api.begin();

        const api = await this.client.api(new UpdateBooking(this.booking()));
        if (api.succeeded) {
            this.router.navigate(['/bookings']);
        }

        this.api.complete(api.error);
    }
}
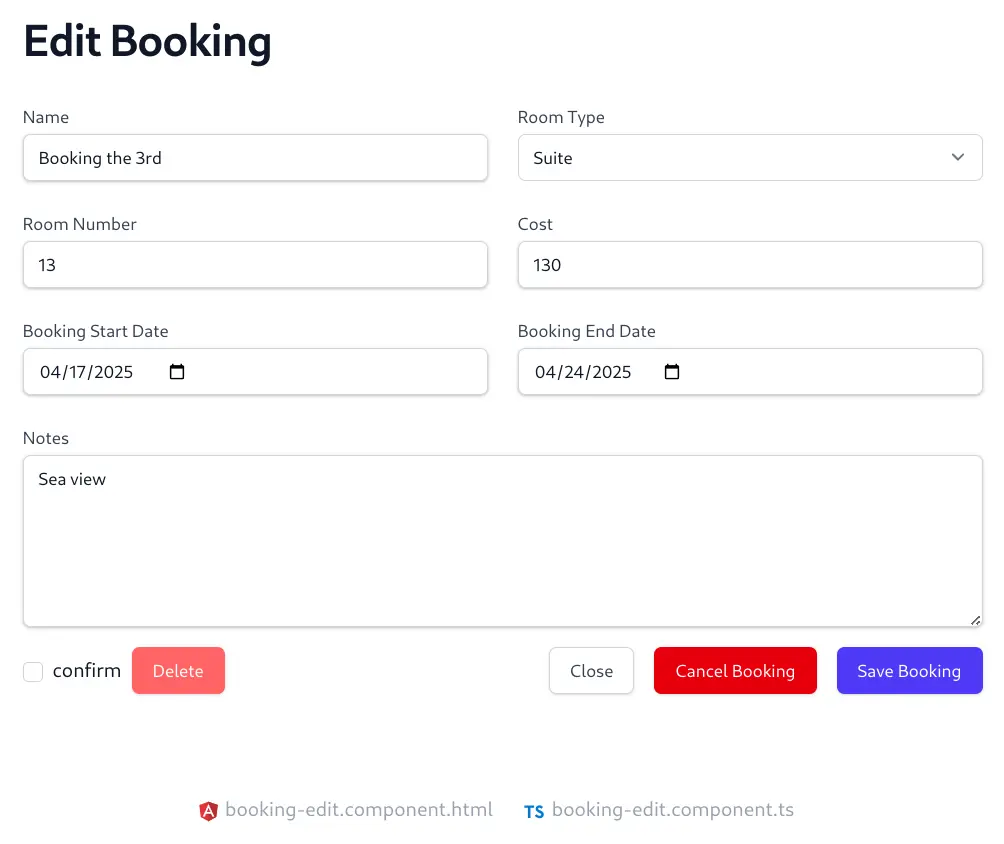
It shows an example of a validation bound form bounded to a signal instance of a Booking DTO with summary and
contextual validation and utilization of your API's metadata with meta.enumOptions('RoomType') which populates
the <select> drop down with the C# RoomType enum values:
<app-page title="Edit Booking">
<form-loading></form-loading>
@if (booking().id) {
<form class="grid gap-4 py-4" (ngSubmit)="save()">
<input class="hidden" type="submit" />
<fieldset [disabled]="api.loading()">
<error-summary except="name,roomType,roomNumber,cost,bookingStartDate,notes" class="mb-4"></error-summary>
<div class="grid grid-cols-6 gap-6">
<div class="col-span-6 sm:col-span-3">
<text-input id="name" name="name" required placeholder="Name for this booking"
[(ngModel)]="booking().name"></text-input>
</div>
<div class="col-span-6 sm:col-span-3">
<select-input id="roomType" name="roomType" [options]="meta.enumOptions('RoomType')"
[(ngModel)]="booking().roomType"></select-input>
</div>
<div class="col-span-6 sm:col-span-3">
<text-input type="number" id="roomNumber" name="roomNumber" min="0" required
[(ngModel)]="booking().roomNumber"></text-input>
</div>
<div class="col-span-6 sm:col-span-3">
<text-input type="number" id="cost" name="cost" min="0" required
[(ngModel)]="booking().cost"></text-input>
</div>
<div class="col-span-6 sm:col-span-3">
<text-input type="date" id="bookingStartDate" name="bookingStartDate" required
[(ngModel)]="booking().bookingStartDate"></text-input>
</div>
<div class="col-span-6 sm:col-span-3">
<text-input type="date" id="bookingEndDate" name="bookingEndDate"
[(ngModel)]="booking().bookingEndDate"></text-input>
</div>
<div class="col-span-6">
<textarea-input id="notes" name="notes" rows="6" placeholder="Notes about this booking"
[(ngModel)]="booking().notes"></textarea-input>
</div>
</div>
</fieldset>
<div class="flex justify-between">
<div>
<confirm-delete (delete)="delete()"></confirm-delete>
</div>
<div class="flex flex-wrap sm:flex-nowrap gap-4">
<secondary-button (click)="close()">
Close
</secondary-button>
@if (booking().cancelled) {
<primary-button type="button" color="green" [disabled]="api.loading()" (click)="cancelBooking(false)">
Restore Booking
</primary-button>
}
@else {
<primary-button type="button" color="red" [disabled]="api.loading()" (click)="cancelBooking(true)">
Cancel Booking
</primary-button>
}
<primary-button type="submit" [disabled]="api.loading()">
{{ api.loading() ? 'Saving...' : 'Save Booking' }}
</primary-button>
</div>
</div>
</form>
}
@else {
<error-summary></error-summary>
}
</app-page>