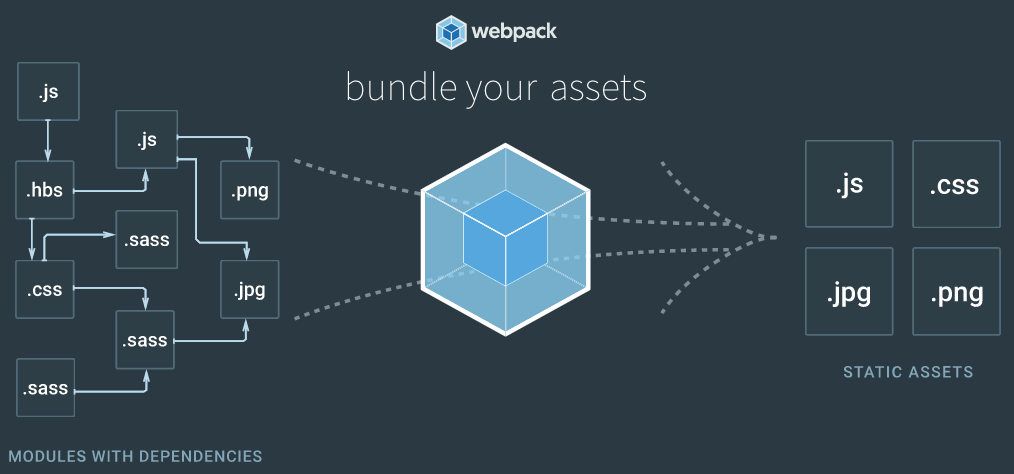
Webpack powers many npm-based Single Page App templates to enable a flexible and feature-rich development model whose defaults in webpack.config.js will be able to support a large number of Web Apps without modification, leaving you free to focus on developing your App.
Webpack works natively with npm packages and is used to handle all client assets which can leverage its vast ecosystem of loaders and plugins to handle every kind of web asset, performing the necessary transformations to transpile it into the native formats browsers understand, loading it in browsers and generating source maps so their original source files can be debugged. The Webpack configuration is customized per build type where the optimal configuration is used in development for faster builds and easier debuggability whilst production builds are optimized for performance, size and cacheability.
Although as Webpack is the central hub powering each template you'll still want to become familiar with its four high-level concepts to understand how it's new approach to Single Page App development works and how it can handle all your App's dependencies and resources.
We'll quickly touch on each of Webpack's concepts by seeing how the React App's webpack.config.js is configured to handle its TypeScript sources, sass/css files and their references.
Entry points
Webpack builds a graph of your App's dependencies which it traverses starting from its entry points, this is the input into Webpack where its given the App's entry point.
webpack.config.js
entry: isTest ? NONE : {
    app: [
        './src/main.ts'
    ]
},
webpack.config.vendor.js
A separate vendor Webpack configuration is maintained for 3rd party Vendor dependencies independent from your App's code-base so they only need to be compiled once when adding a new dependency instead of each time your App changes. To include another vendor library in the vendor build, add the module name or the resource your App uses in the VENDOR collection, e.g:
const VENDOR = [
    'bootstrap/dist/css/bootstrap.css',
    'font-awesome/css/font-awesome.css',
    'es6-shim',
    '@servicestack/client',
    'vue',
    'vue-router'
];

entry: { vendor: VENDOR },
Output
On the opposite end of Webpack's build are its outputs where we tell it where to bundle our App:
output: {
    path: root('wwwroot/dist'),
    publicPath: '/dist/',
    filename: isProd ? '[name].[chunkhash].bundle.js' : '[name].bundle.js',
    chunkFilename: isProd ? '[name].[chunkhash].js' : '[name].js',
},
Here we can see that our Webpack config supports multiple isProd and isDev configurations, isDev is used for development builds where Webpack bundles our website in the /dist folder whilst isProd is used for production builds which is instead bundled in the /wwwroot/dist folder with each .js bundle including a [chunkhash] cache-breaker in its filename.
The
root()andwhen()functions used are basic helpers used to simplify webpack configuration
Vendor Output
The Vendor Webpack configuration utilizes Webpack's DllPlugin to generate a vendor.dll.css and a vendor.dll.js containing the Vendor's compiled .css and .js bundles:
const extractCSS = new ExtractTextPlugin('vendor.dll.css');

output: {
    path: root('wwwroot/dist'),
    publicPath: 'dist/',
    filename: '[name].dll.js',
    library: '[name]_[hash]',
},
plugins: [
    extractCSS,
    new webpack.DllPlugin({
        path: path.join(__dirname, 'wwwroot', 'dist', '[name]-manifest.json'),
        name: '[name]_[hash]'
    })
]
It also generates vendor-manifest.json which is referenced in the App's webpack.config.js to tell it which dependencies are included in the vendor bundles so they don't need to be compiled with the App:
plugins: [
    ...when(!isTest, [
        new webpack.DllReferencePlugin({
            context: __dirname,
            manifest: require('./wwwroot/dist/vendor-manifest.json')
        }),
    ]),
]
Utilizing Webpack .dll's plugin for your vendor dependencies allows for faster compilation times as they don't need to be recompiled when your App changes.
Loaders
Loaders are the flexible engine that sets Webpack apart where it's able to leverage its vast ecosystem where there's a loader for every kind of web asset typically used when developing Web Apps.
Loaders are configured in the rules section and invoked using node's require() statement or ES6/TypeScript's import statement. Rules use the test regex to specify which files they should apply to whilst the loader property tells Webpack which loader to load them with. Each loader is self-contained in a separate npm package that needs to be made available to your project by adding them to your package.json devDependencies.
Lets checkout Vue's loader configuration for a typical example:
const postcssLoader = {
    loader: 'postcss-loader',
    options: { plugins: [require('precss'), require('autoprefixer')] }
};

module: {
    rules: [
        {
            test: /\.vue$/,
            loader: 'vue-loader',
            options: {
                loaders: {
                    scss: 'vue-style-loader!css-loader!sass-loader',
                    sass: 'vue-style-loader!css-loader!sass-loader?indentedSyntax'
                }
            }
        },
        {
            test: /\.tsx?$/,
            loader: 'ts-loader',
            options: {
                appendTsSuffixTo: [/\.vue$/],
                transpileOnly: isTest
            },
            exclude: [isTest ? /\.(e2e)\.ts$/ : /\.(spec|e2e)\.ts$/, /node_modules/]
        },
        {
            test: /\.html$/,
            loader: 'html-loader'
        },
        {
            enforce: "pre",
            test: /\.js$/,
            loader: "source-map-loader"
        },
        {
            test: /\.(jpe?g|gif|png|ico|svg|wav|mp3)$/i,
            loader: 'file-loader' + (isProd
                ? '?hash=sha512&digest=hex&name=img/[name].[hash].[ext]'
                : '?name=img/[name].[ext]')
        },
        {
            test: /\.(eot|ttf|woff|woff2)(\?v=\d+\.\d+\.\d+)?$/,
            loader: isProd
                ? 'url-loader?limit=10000&name=img/[name].[hash].[ext]'
                : 'file-loader?name=img/[name].[ext]'
        },
        ...when(isDev || isTest, [
            {
                test: /\.css$/,
                use: [ 'style-loader', 'css-loader', postcssLoader ]
            },
            {
                test: /\.(sass|scss)$/,
                use: [ 'style-loader', 'css-loader', postcssLoader, 'sass-loader' ]
            },
        ]),
        ...when(isProd, [
            {
                test: /\.css$/,
                loader: ExtractTextPlugin.extract({
                    fallback: 'style-loader',
                    use: ['css-loader?minimize', postcssLoader],
                }),
            },
            {
                test: /\.(sass|scss)$/,
                loader: ExtractTextPlugin.extract({
                    fallback: 'style-loader',
                    use: ['css-loader?minimize', postcssLoader, 'sass-loader'],
                }),
            }
        ])
    ]
},
This configuration instructs Webpack to load any .ts or .tsx files using the TypeScript loader for webpack which is then responsible for compiling the source files with TypeScript's compiler.
Loaders are also chainable as seen in the .css and .scss rules which starts from right-to-left where the output of the rightmost loader is passed into the next loader on its left and so on.
{
    test: /\.css$/,
    use: [ 'style-loader', 'css-loader', postcssLoader ]
},
Here the .css contents are first processed with postcssLoader which uses precss to let you use basic sass-like features in vanilla .css files and autoprefixer which lets you write clean standard css rules like:
a {
    display: flex;
}
Which autoprefixer will expand to include vendor prefixes, maximizing support for older browser versions:
a {
    display: -webkit-box;
    display: -webkit-flex;
    display: -ms-flexbox;
    display: flex
}
The output of postcssLoader then gets passed into css-loader which processes any css @import() and @url() rules and loads them with Webpack's require() to ensure its references are also processed by Webpack.
The output of css-loader then gets passed into style-loader who injects the resulting css fragments within <style></style> tags in the browser's DOM which is how Web App styles in development builds are still visible despite their being no .css files written. Sass .scss files are handled similarly to .css files except they're initially loaded with sass-loader which converts them into .css. Both these rules together let you use your preferred choice of .scss or .css files to style your Web App.
There's a separate configuration needed for Production builds which is configured to minify the css and write their contents out into separate .css bundles as defined in the plugins section below:
Plugins
Loaders only loads and transforms files on a per-file basis, anything more advanced requires using plugins. In this template plugins are used to:
- Set type of Webpack build so other loaders/plugins can optimize accordingly
- Ignores watching the
/wwwrootfolder for any changes during watched builds - References the vendor
.jsand.cssbundles in the App's Webpack build - Generate the WebApps
index.html, based on index.template.ejs and compiled with lodash template, which also takes care of injecting any.cssand.jsoutput bundle references - Injects the vendor
.jsand.cssbundles in the generatedwwwroot/index.html
plugins: [
    new webpack.DefinePlugin({ '_process.env.NODE_ENV': isDev ? '"development"' : '"production"' }),
    new webpack.WatchIgnorePlugin([root("wwwroot")]),
    ...when(!isTest, [
        new webpack.DllReferencePlugin({
            context: __dirname,
            manifest: require('./wwwroot/dist/vendor-manifest.json')
        }),
        new HtmlWebpackPlugin({
            template: 'index.template.ejs',
            filename: '../index.html',
            inject: true
        }),
        new AddAssetHtmlPlugin({ filepath: root('wwwroot/dist/*.dll.js') }),
        new AddAssetHtmlPlugin({ filepath: root('wwwroot/dist/*.dll.css'), typeOfAsset: 'css' })
    ]),
    ...when(isProd, [
        new webpack.LoaderOptionsPlugin({ minimize: true }),
        new ExtractTextPlugin({ filename: '[name].[chunkhash].css', allChunks: true }),
        new webpack.optimize.UglifyJsPlugin({ sourceMap: true, compress: { warnings: false } })
    ]),
]
/wwwroot WebRoot Path for .NET Framework Templates
To simplify migration efforts of ServiceStack projects between .NET Core and .NET Framework, all SPA and Website Templates are configured to use .NET Core's convention of /wwwroot for its public WebRoot Path. The 2 adjustments needed to support this was configuring ServiceStack to use the /wwwroot path in AppHost:
SetConfig(new HostConfig {
    WebHostPhysicalPath = MapProjectPath("~/wwwroot"),
});
Deployments
When your App is ready to deploy, run the publish npm (or Gulp) script to package your App for deployment:
npm run publish
Which creates a production build of your App where the .css files are written using ExtractTextPlugin and the resulting .js files minified with UglifyJS. The full production build is generated in in /wwwroot/dist folder where it's ready for an XCOPY, rsync or MSDeploy deployment.
In the .NET Framework templates you can deploy to any MS WebDeploy enabled Server by clicking Publish... in the ASP.NET's project Context Menu item which makes use of the existing /PublishProfiles/PublishToIIS.pubxml which includes an instruction to include the /wwwroot folder in deployments.
In .NET 8.0 projects the publish npm script runs dotnet publish -c Release to Publish a Release build of your App in the /bin/netcoreapp3.1/publish folder which can then copied to remote server or an included in a Docker container to deploy your App.
Loading Dependencies
Now that we've covered how Webpack is configured, the next step is showing how to make use of it, by loading your App's resources using node's require() or TypeScript's import statement.
This can be seen in the App's main.ts starting point where it imports bootstrap.css and font-awesome.css directly from the installed bootstrap and font-awesome npm packages as well as a local ./app.scss SASS file which lives side-by-side next to TypeScript source files:
import 'bootstrap/dist/css/bootstrap.css';
import "font-awesome/css/font-awesome.css";
import './app.scss';
import 'es6-shim';

import Vue from 'vue';
import Router from 'vue-router';
import App from './App.vue';
import Home from './home/Home.vue';
import View1 from './view1/View1.vue';
import View2 from './view2/View2.vue';
Importing bootstrap and font-awesome also imports their references, including any images, fonts, svg and other .css files. These are all transparently added to the webpack build and bundled with the rest of your app.
In production builds the file-loader copies their references to the output folder, embedding its sha512 hash in each file name. url-loader works similarly but also has the option of embedding file contents below the configured 10000 byte limit inline inside a Data URI to reduce network requests in production builds.
{
    test: /\.(jpe?g|gif|png|ico|svg|wav|mp3)$/i,
    loader: 'file-loader' + (isProd
        ? '?hash=sha512&digest=hex&name=img/[name].[hash].[ext]'
        : '?name=img/[name].[ext]')
},
{
    test: /\.(eot|ttf|woff|woff2)(\?v=\d+\.\d+\.\d+)?$/,
    loader: isProd
        ? 'url-loader?limit=10000&name=img/[name].[hash].[ext]'
        : 'file-loader?name=img/[name].[ext]'
},
require() can also be used to load resources in other files which is how images can be imported in the index.template.ejs home page template:
<img src="<%=require('./src/assets/img/logo.png')%>" />
Or inside App components, both of which returns the image url after it has been processed by Webpack's loaders, e.g:
constructor() {
    this.logoUrl = require("./assets/img/logo.png");
}
In production builds this returns a relative url to the output image, e.g: img/logo.36166adfacf0c8cc11d493f2161164fd.png.
Webpack builds
By importing all your WebApp resources into Webpack it's able to maintain a knowledgeable graph of all your Web Apps dependencies where it lets you define how they're handled at a macro level making it easy to incorporate design-time features like TypeScript and Sass whilst also taking care of generating optimal builds for development, testing and production.
Development builds
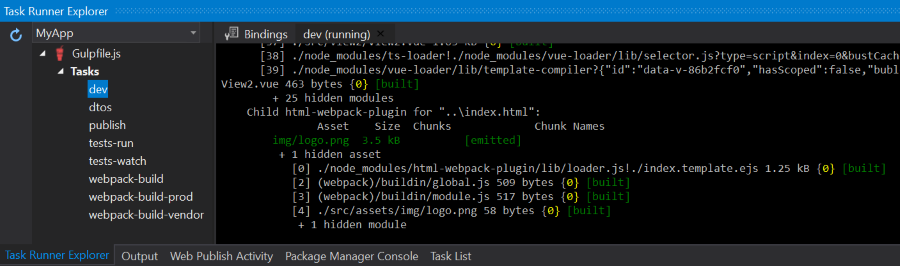
You'll use development builds when developing your app locally which you can run with either the webpack-build Gulp task in VS.NET's Task Runner Explorer GUI or by running the build npm script on the command-line:
$ npm run build
This will generate your App in the /wwwroot/dist folder similar to:
/wwwroot
   /dist
       /img
           logo.png
           ...
       app.bundle.js
       vendor.dll.css
       vendor.dll.js
       vendor-manifest.json
index.html
The lack of .css files or source-maps are due to being embedded in the .js bundles and injected in the browser's DOM within <style></style> tags.
After the Webpack development build has completed you can just run or refresh your ASP.NET Web App to view the latest changes.
Production builds
When your App is ready to deploy you can run a production build using the webpack-build-prod Gulp task or the build-prod npm script:
$ npm run build-prod
This will bundle and generate your WebApp in the /wwwroot/dist folder with css and source maps extracted and written into separate files, css and js minified and all assets emitted with cache-breaking hashes, similar to:
/wwwroot
   /dist
       /img
           logo.36166adfacf0c8cc11d493f2161164fd.png
       674f50d287a8c48dc19ba404d20fe713.eot
       912ec66d7572ff821749319396470bde.svg
       b06871f281fee6b241d60582ae9369b9.ttf
       app.3728b4547755ace1f489.bundle.js
       app.3728b4547755ace1f489.bundle.js.map
       app.3728b4547755ace1f489.css
       app.3728b4547755ace1f489.css.map
       vendor.dll.css
       vendor.dll.css.map
       vendor.dll.js
       vendor.dll.js.map
       vendor-manifest.json
   index.html
Development workflow
Executing a development build of Webpack is all that's required to be able to see our changes but it can take a while to run a full dev build which negatively impacts our fast iterative dev workflow. It's instead recommended to leave webpack running in the background and have it watch for changes so it only needs to rebuild assets that have changed, which it's able to do very quickly.
Gulp Tasks
- dev - Run Webpack watch to automatically build, watch and process changed files
- dtos - Run typescript-ref npm script to import latest TypeScript Server DTOs
- webpack-build - Run a Webpack development build to bundle and output your app to
/dist - webpack-build-prod - Run a Webpack production build to bundle and output your app to
/wwwroot/dist - webpack-build-vendor - Run a Webpack production build to bundle the Vendor libraries to
/wwwroot/dist - package - Perform all tasks to build the client so your App is ready for deployment
- tests-run - Run all TypeScript/JS unit and integration tests
- tests-watch - Rerun all TypeScript/JS tests as source code changes are made
- tests-coverage - View test coverage of your existing TypeScript/JS tests
Whilst we recommend running the dev Gulp or npm script during development to run a live watched development, you can instead run the npm run dev-server npm script to run a development build of your app through Webpack's dev-server which has it's own built-in hot reloading for when your Client Apps source code changes.
Webpack watch
Our recommendation during development is to run the dev Gulp task and leave it running in the background, or if preferred, run the dev npm script on the command-line with:
$ npm run dev
Webpack dev initially generates a full development build of your Web App then stays running in the background to process files as they're changed. This enables the normal dev workflow of running your ASP.NET Web App from VS.NET, saving changes locally which are then reloaded using ServiceStack's built-in hot reloading. Alternatively hitting F5 will refresh the page and view the latest changes.
Each change updates the output dev resources so even if you stop the dev task your Web App remains in a working state that's viewable when running the ASP.NET Web App.
Live reload with Webpack Dev Server
The alternative dev workflow is to run the dev-server npm script to run the Webpack dev server:
$ npm run dev-server
This launches the Webpack dev server listening at http://localhost:3000/ and configured to proxy all non-Webpack HTTP requests to the ASP.NET Web App where it handles all Server API requests. The benefit of viewing your App through the Webpack dev server is its built-in Live Reload feature where it will automatically reload the page as resources are updated. We've found the Webpack dev server ideal when developing UI's where your Web App is running side-by-side VS.NET, where every change saved triggers the dev server to reload the current page so changes are visible immediately.
The disadvantage of the dev server is that all transformations are kept in memory so when the dev server is stopped, the Web Apps resources are lost, so it requires a webpack-build in order to generate a current build. There's also a slight lag in API requests resulting from each server request being handled by both Webpack's Dev Server and ASP.NET's IIS Express.