One of the primary benefits of .NET Core's first-class support for Linux is being able to leverage the thriving ecosystem that's formed around automating, deploying and hosting Server Apps on Linux. Whilst there have been a number of deployment strategies that have been adopted over the years, the current state-of-the-art is the standardization around the Docker container format which hits the sweet spot of providing isolation within a minimal footprint over encapsulating your App and its dependencies which is contrast to including an entire Operating System when using VM's. In addition to being lightweight and efficient to run, Docker also enables fast, reproducible builds where your entire App's Image can be rebuilt by your CI Server on each check-in - bringing the same benefits of version control and continuous integration on your code to your Server infrastructure - which can now be easily be versioned, replicated, scaled and automated.
Once built, your Docker App is treated like an opaque Image where the fact it's running .NET Core instead of a pure LAMP stack becomes a transparent implementation detail that doesn't impact the utility of your App, who are both able to equally benefit from Docker's rich ecosystem. E.g. your Docker App can be uploaded to any public Docker repository where it can be easily shared and run on any supported Linux Distrobution. In addition to being able to run any published Docker image on any Docker-enabled OS, you're also able to use it as a the source image for your own custom Docker Image, a feature that you'll take advantage of when building your own .NET Core Docker App which is based on Microsoft's microsoft/dotnet Docker Image that's published on Docker's public repository.
Native Docker Integration in the Cloud
As the premier Container format for packaging Server Apps, all major cloud providers include native support for Docker that goes beyond the basic hosting of Docker Images to also include repository management, monitoring, inspection and orchestration which lets you easily (or automatically) scale your Docker App on a managed cluster of VMs. You can learn more about the Docker integration offerings of the major Cloud providers in the links below:
- AWS - Amazon EC2 Container Service
- Azure - Azure Container Service
- Google Cloud - Google Container Engine
Whilst other popular Cloud providers like Digital Ocean make it trivial to setup a Docker Server in seconds.
AWS EC2 Container Service
For this guide we'll walk through how we've deployed our .NET Core Live Demos using the popular power combo of:
- Using travis-ci.org (free for OSS projects) for running CI scripts to rebuild Docker App Images on every check-in
- Using AWS EC2 Container Service for managing Docker images and instance deployments
- Using nginx-proxy setting up an nginx reverse proxy and automatically bind virtual hosts to Docker Instances
We'll also look at covering Azure Container Service in future as it's another popular option for deploying and hosting .NET Core Docker Apps.
Deploying to AWS Container Service Overview
In this guide we'll go through setting up your AWS Account to enable Docker deployments using AWS EC2 Container Service and have them deploy to a single EC2 Instance for optimal value and minimal cost. There's no additional cost for using AWS's EC2 Container Service beyond the cost of the EBS and EC2 resources for storing and running your Docker Containers. Thanks to the small footprint of Docker Containers and .NET Core's lean profile you'll be able to host a few small Docker Apps on a T2 Micro instance costing less than <$10 per month or if you haven't created an account with AWS before, you can run it free for 12 months courtesy of AWS Free Tier.
Deploying fork of redis-geo .NET Core App
We'll be deploying a fork of the .NET Core Redis GEO Live Demo as it's a good representative of a small multi-project .NET Core solution that requires an external Redis Server infrastructure dependency which we'll deploy alongside our App in a separate Docker container.
We'll use Travis CI to do the actual build and deployments by running the plain bash scripts that lives alongside your code in the same Github Repo which builds and deploys your Docker App. Most of the bash scripts are generic and can be reused for deploying different projects with only minor config changes to specify the solution to build and the AWS Account to deploy to, with any sensitive information maintained in Travis-CI private Environment Variables so they're kept out of the public Github repositories.
Running build scripts locally
A nice property of using plain Bash scripts to build Docker images is being able to run them locally where you can run the resulting Docker Image natively on your Linux Dev or OSX workstation with Docker for Mac which is nicely integrated courtesy of OS X's built-in Bash support. Whilst less integrated, there's also support for building and running Docker Images with Docker for Windows.
Walkthrough Overview
The basic steps for deploy your .NET Core App with Docker that's covered in this guide include:
- Creating a
ecsInstanceRoleRole that your EC2 Instance will run as - Creating a
ecsDemoUserUser for remotely running AWS CLI utils to deploy to your AWS Account - Launching a new EC2 Instance with the
ecsInstanceRoleRole to use as your Docker Server - Configuring DNS and associating an Elastic IP to the new EC2 Instance
- SSH into the EC2 Instance to run the
nginx-proxyDocker Container - Forking the
redis-geoGithub project - Configure Travis CI to deploy your
redis-geofork to your AWS ECS Service - Playing with your deployed .NET Core Docker App!
Whilst this may seem like a lot of effort to deploy a Docker App, most of the above steps only need to be done once - only steps 6-8 are repeatable for each new project that you want to deploy to your ECS Container EC2 Instance.
At the end of the rainbow an instance of your redis-geo fork .NET Core App will be running on your AWS EC2 Instance, re-deployed on every check-in by triggering Travis CI into action to rebuild and package the latest version of your App in a new Docker App Image that it also publishes to your ECS Service.
ECS also maintains a complete history of every Docker App Image and related task definition deployed in its private Docker Repository. ECS also lets you inspect your running EC2 Instance to see how much CPU and memory is used - providing valuable insight in how many more Docker Apps you'll be able to pack into your EC2 Instance.
Now we know what we're getting, let's jump in!
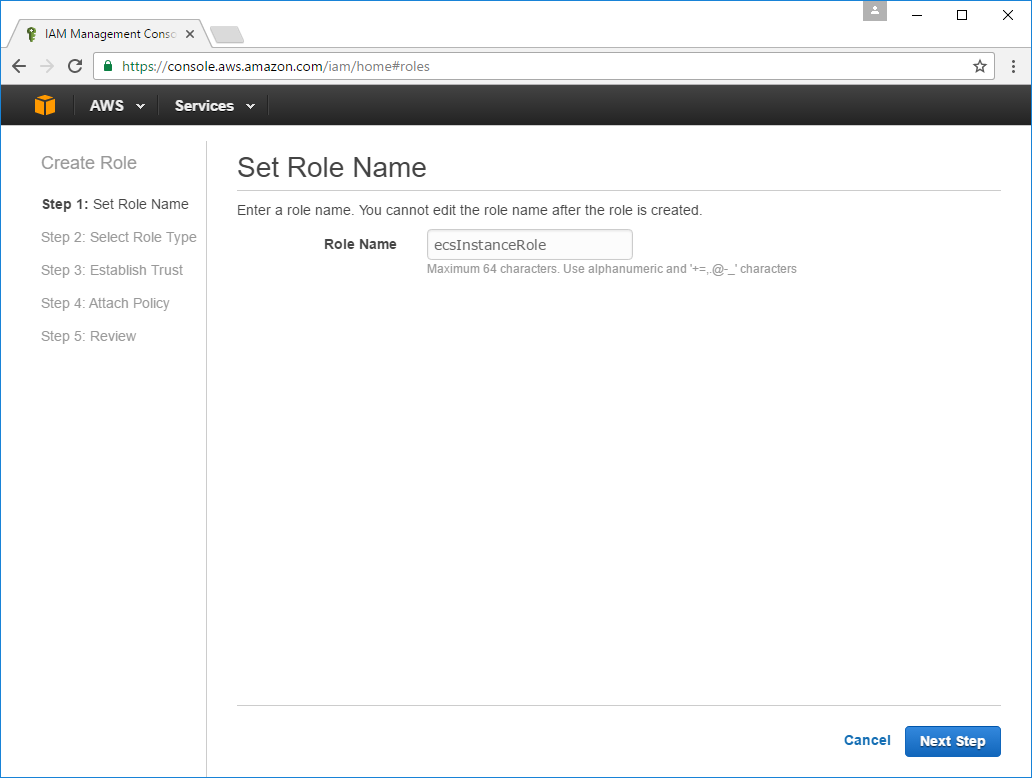
1. Create the ecsInstanceRole Role
Our first port of call is to create a new ecsInstanceRole in IAM, this is a
special Role for EC2 Container Instances
that contains the necessary permissions for your EC2 Instance to communicate with the ECS API.
When launching a new EC2 Instance with the ecsInstanceRole, it will automatically create the
default cluster in ECS and registers itself to the set of EC2 instances that are available to run
Docker Apps deployed to that cluster.
Creating new Roles are done within Identity & Access Management (IAM) in your AWS dashboard under the Roles tab which you can jump directly to using the deep link: https://console.aws.amazon.com/iam/home#roles. Then click on Create New Role button to start the Create Role Wizard:
Type ecsInstanceRole for the Role Name then click Next Step:
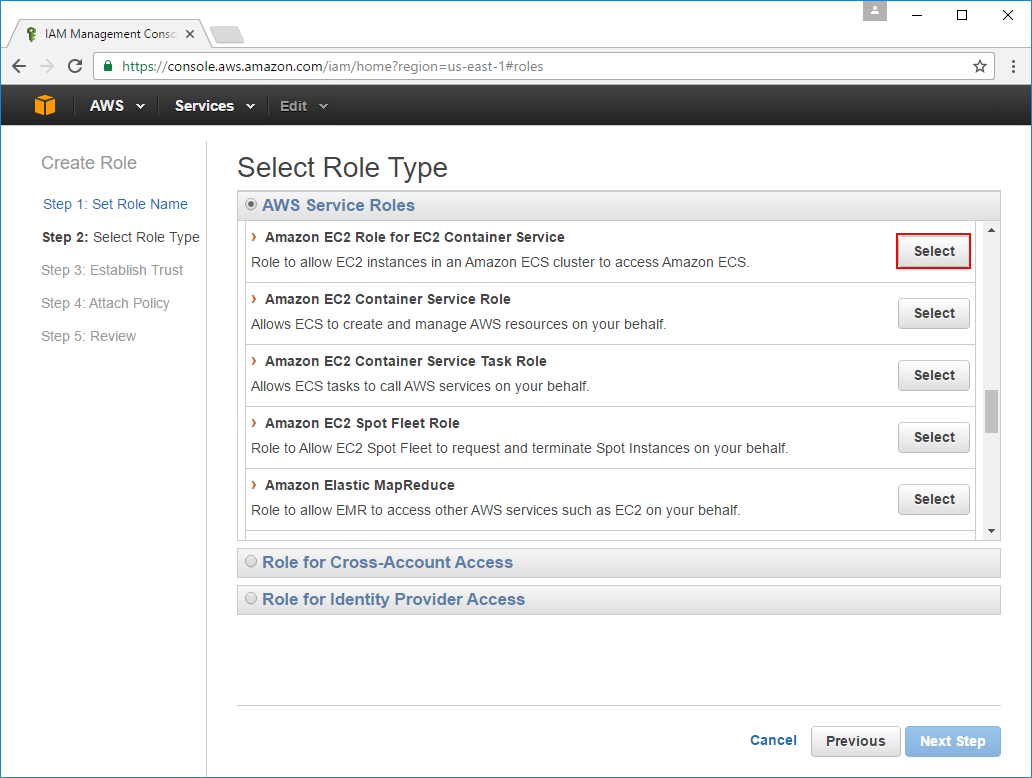
Select the Amazon EC2 Role for EC2 Container Service Role Type:
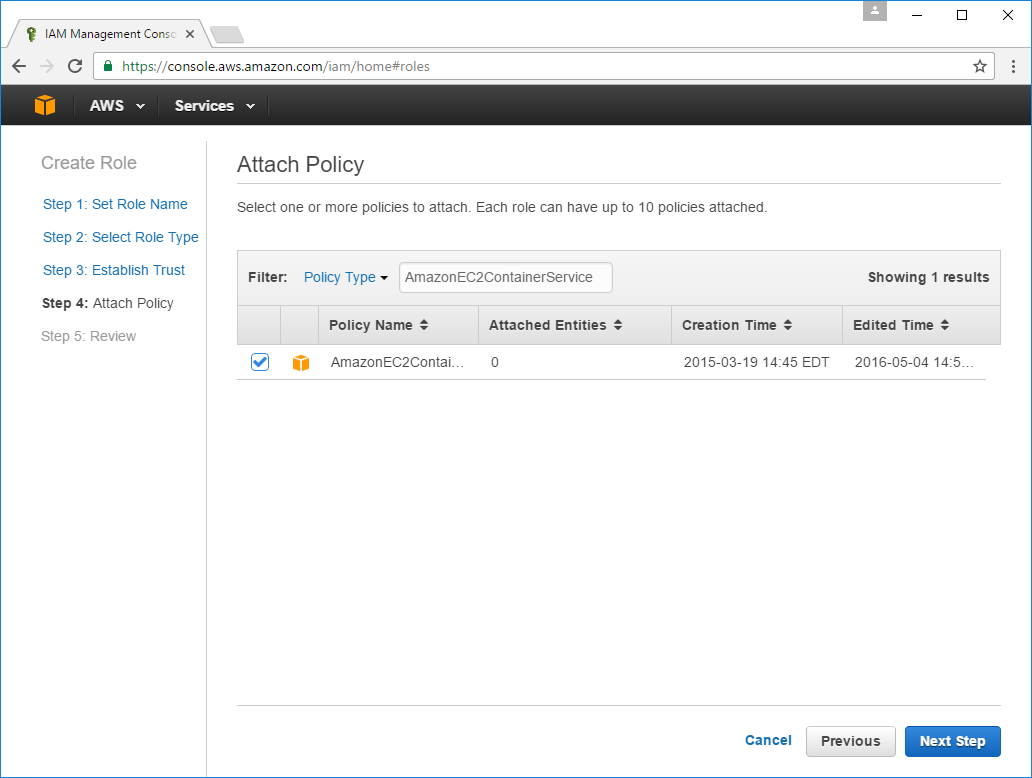
You'll also need to attach the AmazonEC2ContainerServiceforEC2Role policy which you can quickly find by
pasting it in the Policy Type filter and selecting the only result and proceeding to the Next Step:
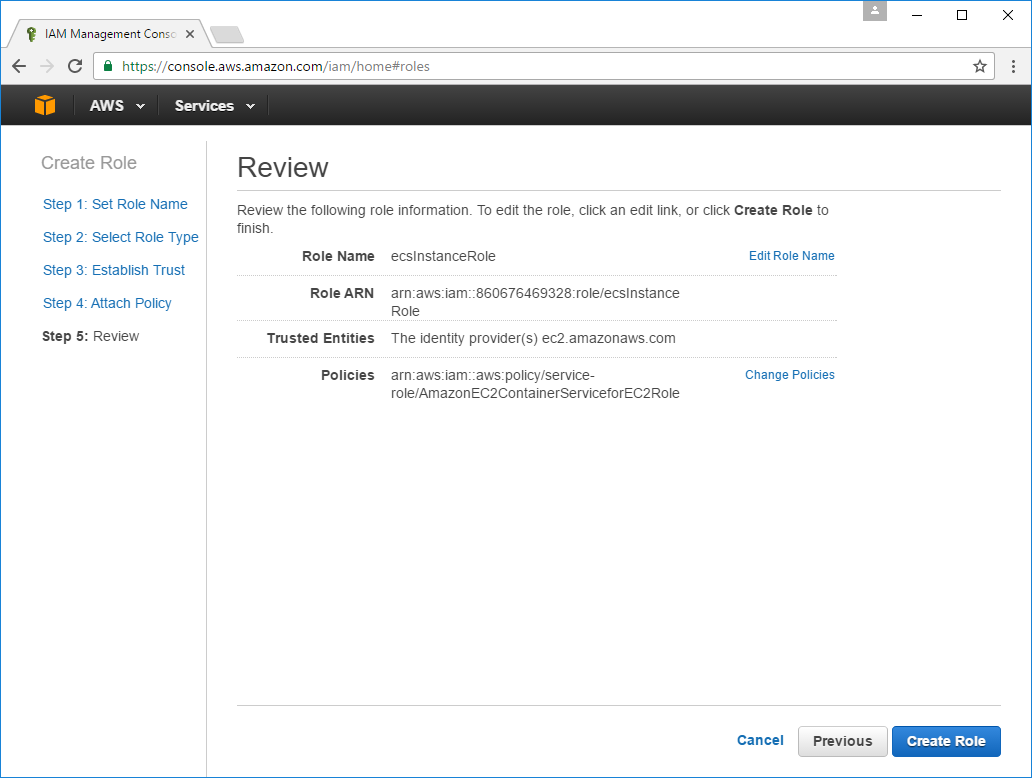
The last page in the Wizard lets you review details of the Role you'll creating after clicking Create Role:
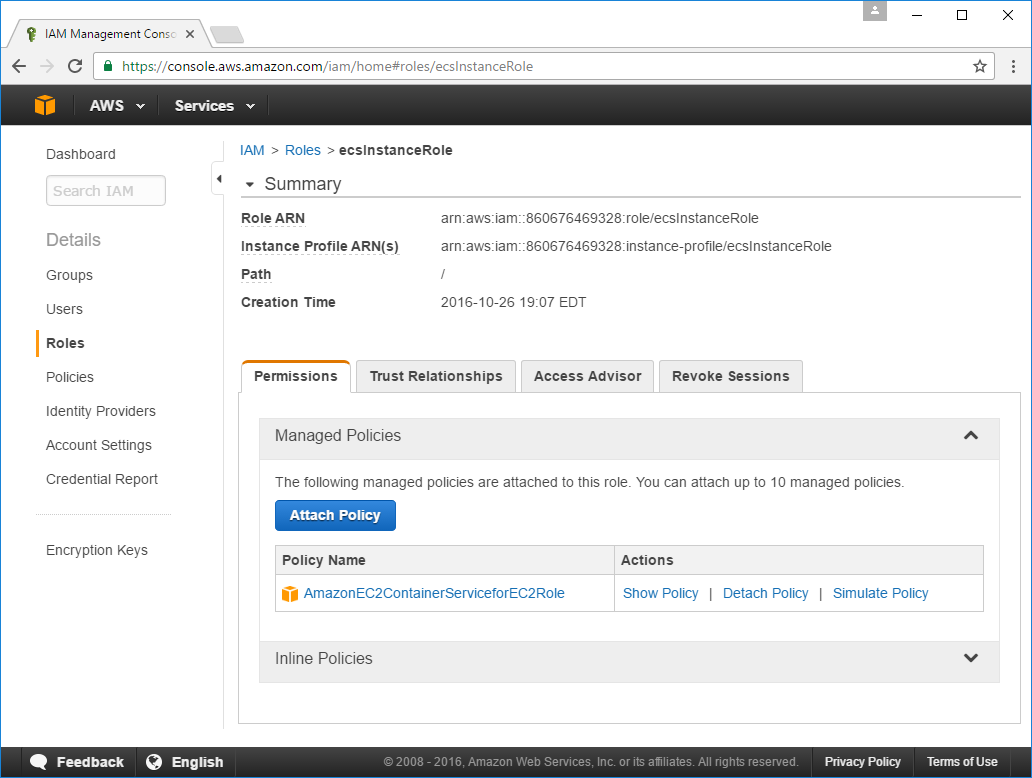
The new ecsInstanceRole will be available in the Roles tab which you can click on to open its Detail View:
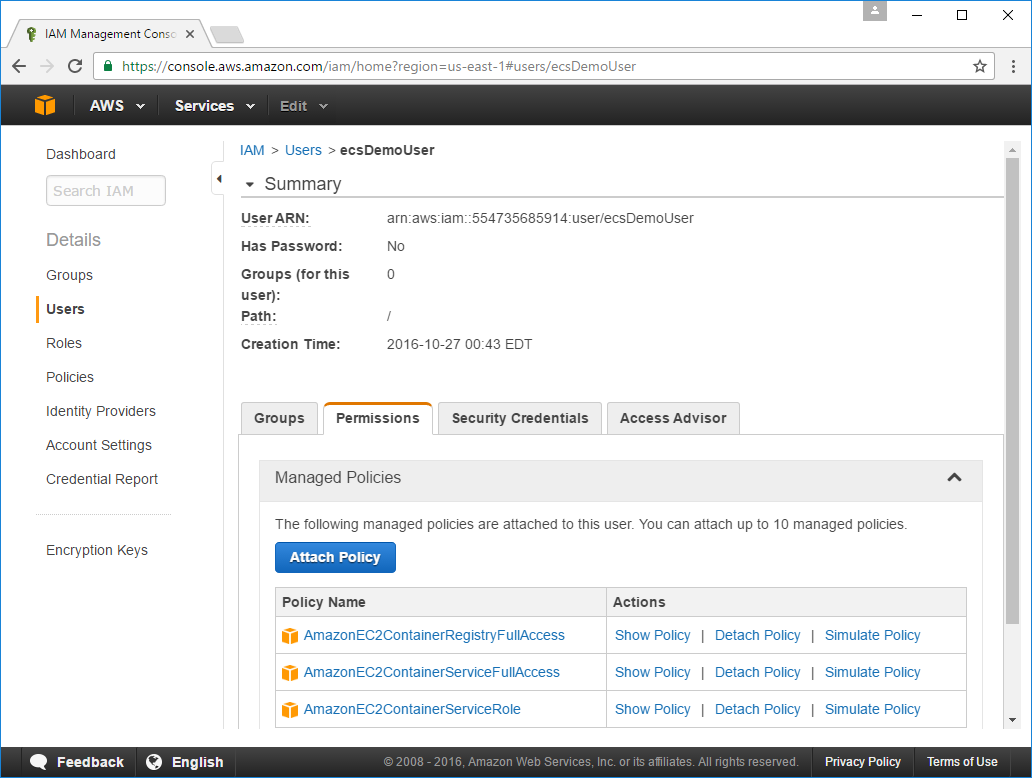
2. Create a new IAM User
We now need to create a new User in IAM to allow remote Servers we want to access our ECS Container Service. Travis CI needs to authenticate as this User in order to use the AWS CLI utils so it can deploy our Docker App to our ECS default Cluster.
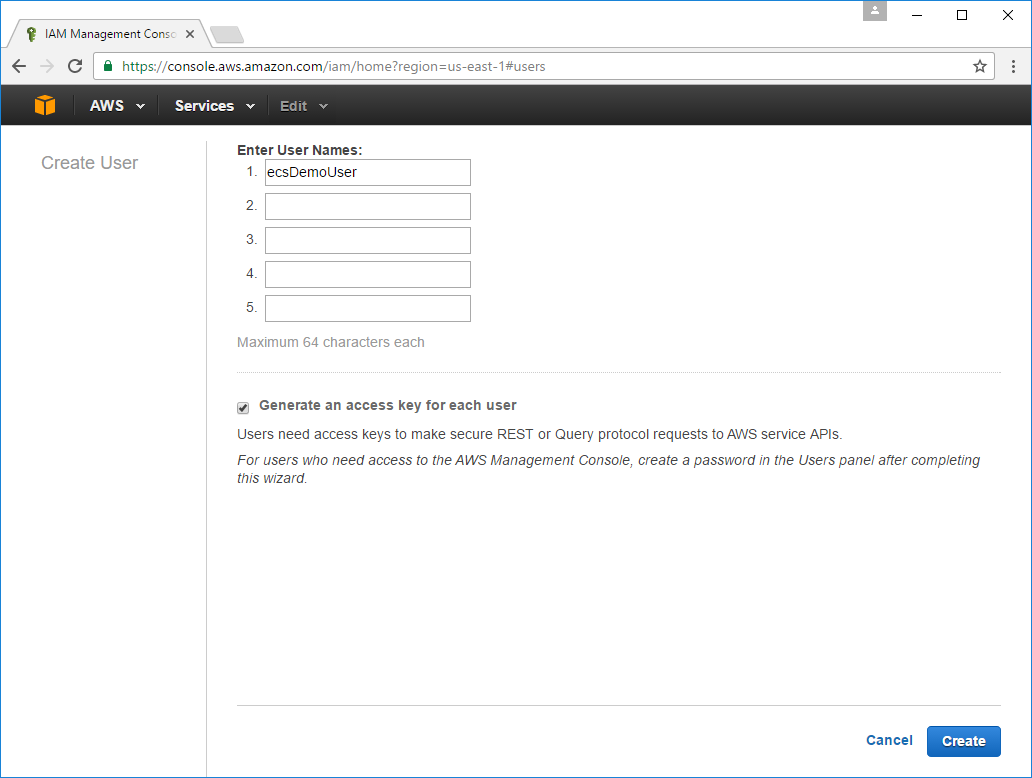
Similar to creating a role, to create a new User select the Users tab then click Create New Users. On the next screen add your preferred Username for this new User in the first textbox then click Create:
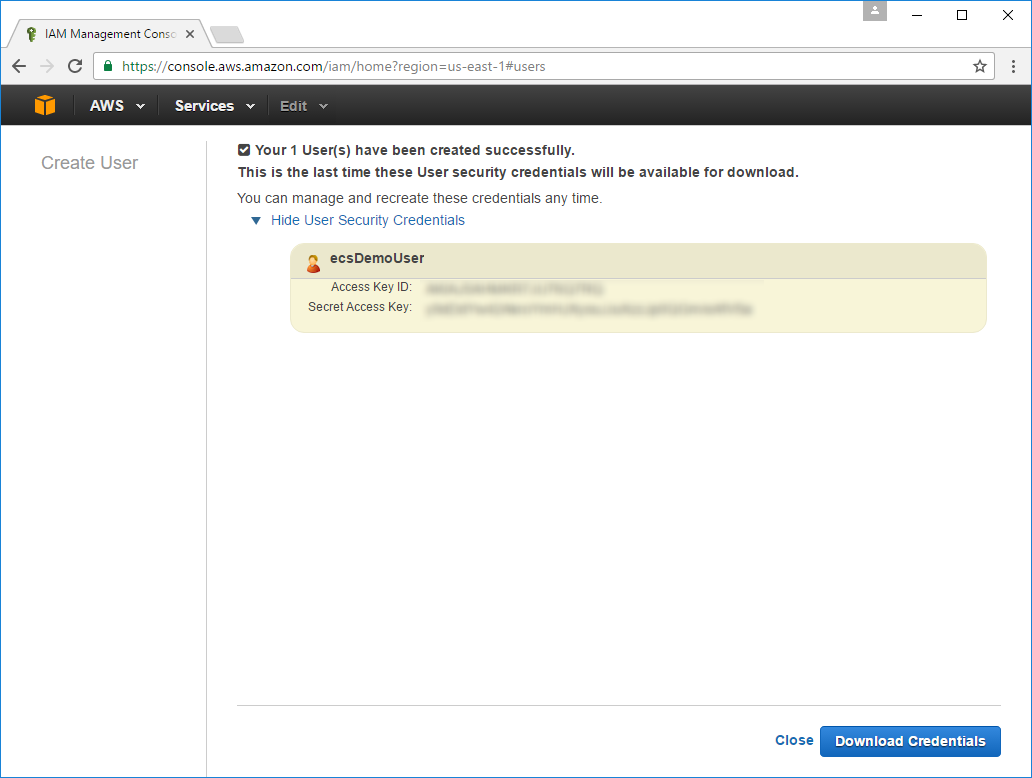
You'll need to copy both the Access Key ID and Secret Access Key which is only available from the next screen. These credentials need to be saved as you'll need to configure it with Travis CI later so it can authenticate as this new User.
We also need to assign the following permissions to the new User to give it access to our ECS Service. The easiest way to select these policies is to copy each into the Policy Type Filter then select the filtered result, you'll need to do this for each of the policies below:
AmazonEC2ContainerRegistryFullAccessAmazonEC2ContainerServiceFullAccessAmazonEC2ContainerServiceRole
After clearing the filter you should see 3 Policies selected, then click Attach Policy to add them to the User.
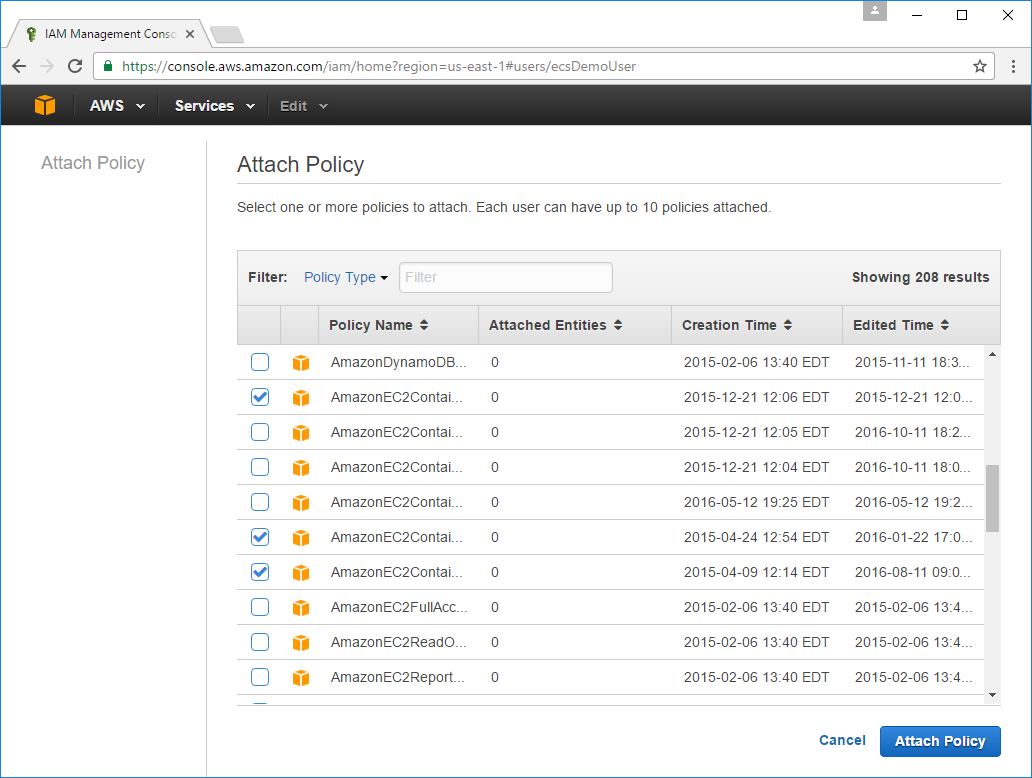
As the names were cropped in the previous screen, double-check that you have the same policy names selected below:
Checkout AWS Container Service
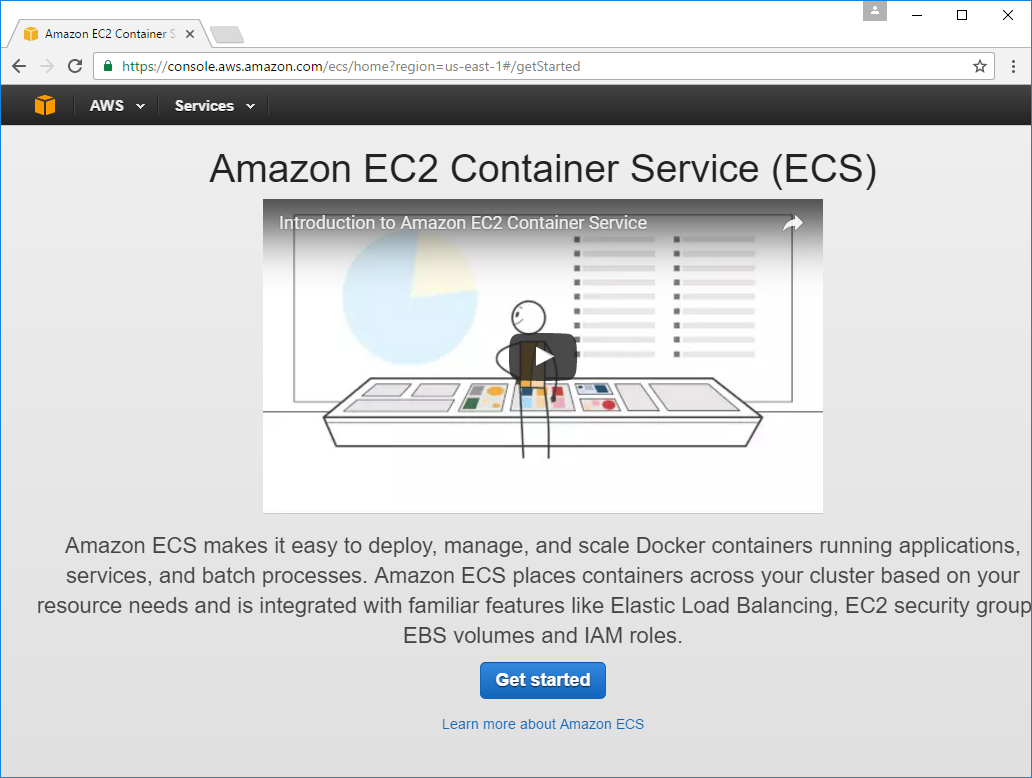
This point is a good time to check out the EC2 Container Service by clicking on it in the AWS dashboard or following the direct link: https://console.aws.amazon.com/ecs/home
We're not going to do anything within ECS just yet other than observe its emptiness :) The first time you go there you'll be presented with the splash page below which you can skip on through by clicking Get Started:
In the next screen AWS will try to guide you into populating your ECS Service with something, but as we're after a blank slate, you'll want to click Cancel:

Which will arrive us to our destination - the empty state:
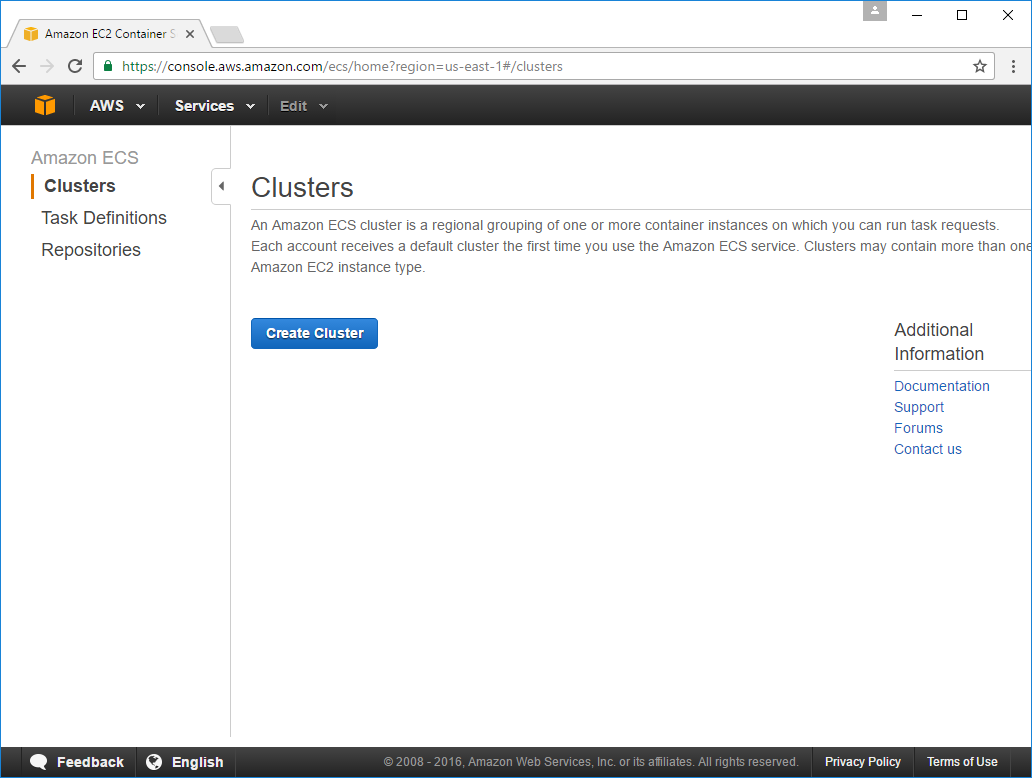
But we needn't worry, everything in our ECS Service will be created outside ECS by our new EC2 Instance and Travis CI builds.
3. Launch new EC2 Docker Server Instance
At this point we now have everything we need to light up the bits where our Docker Apps will run on.
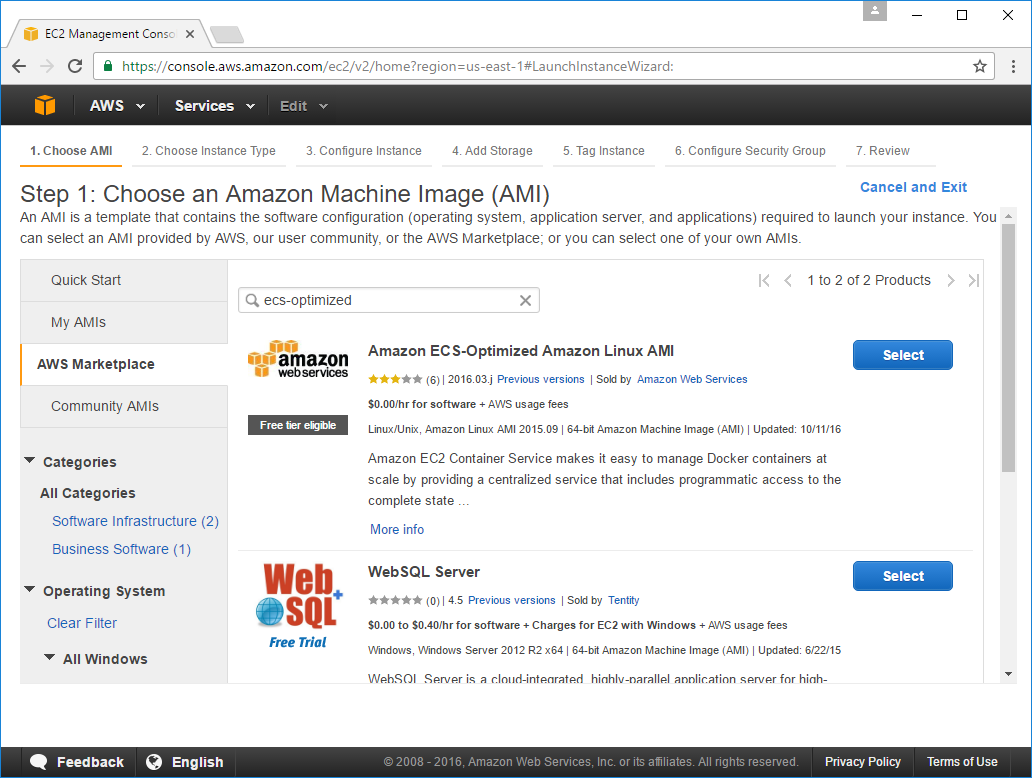
We want any EC2 Instances in the Container Service to use the purpose-specific
Amazon ECS-Optimized Amazon Linux AMI which you can quickly find by selecting the AWS Marketplace tab
and adding ecs-optimized in the filter then click Select on the first Amazon AMI result:
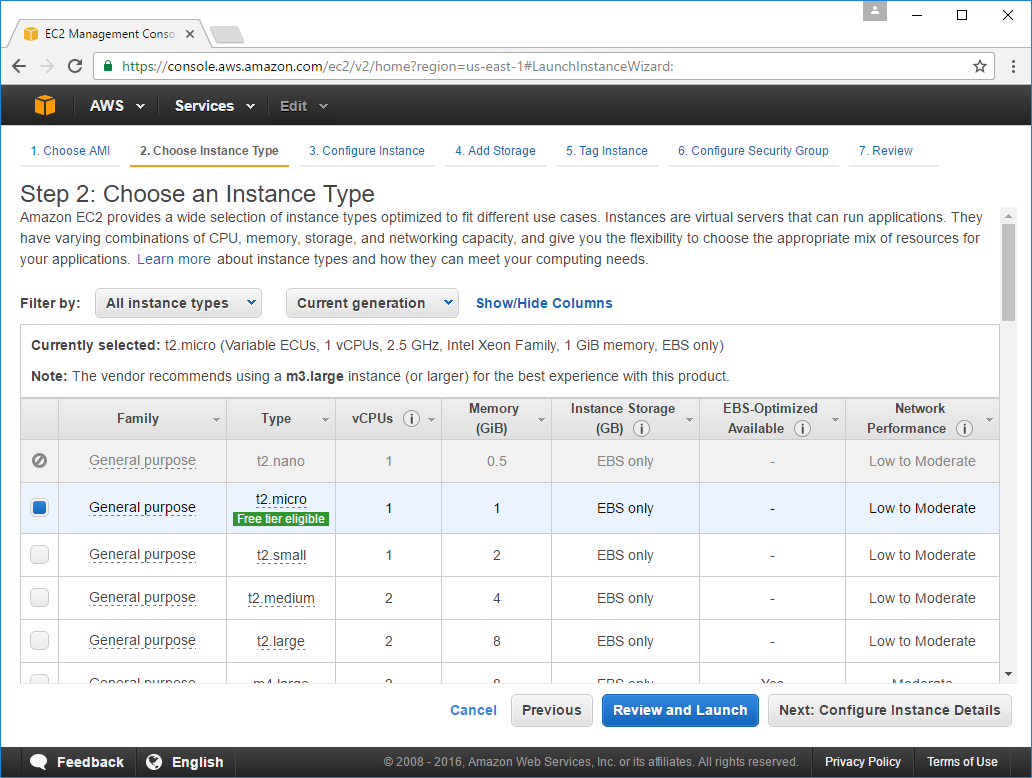
Which will start the Launch Instance Wizard where you can select the Instance Type you want to run. The t2.micro is more than enough for what we need but you can select any preferred Instance Type then click Next: Configure instance Details:
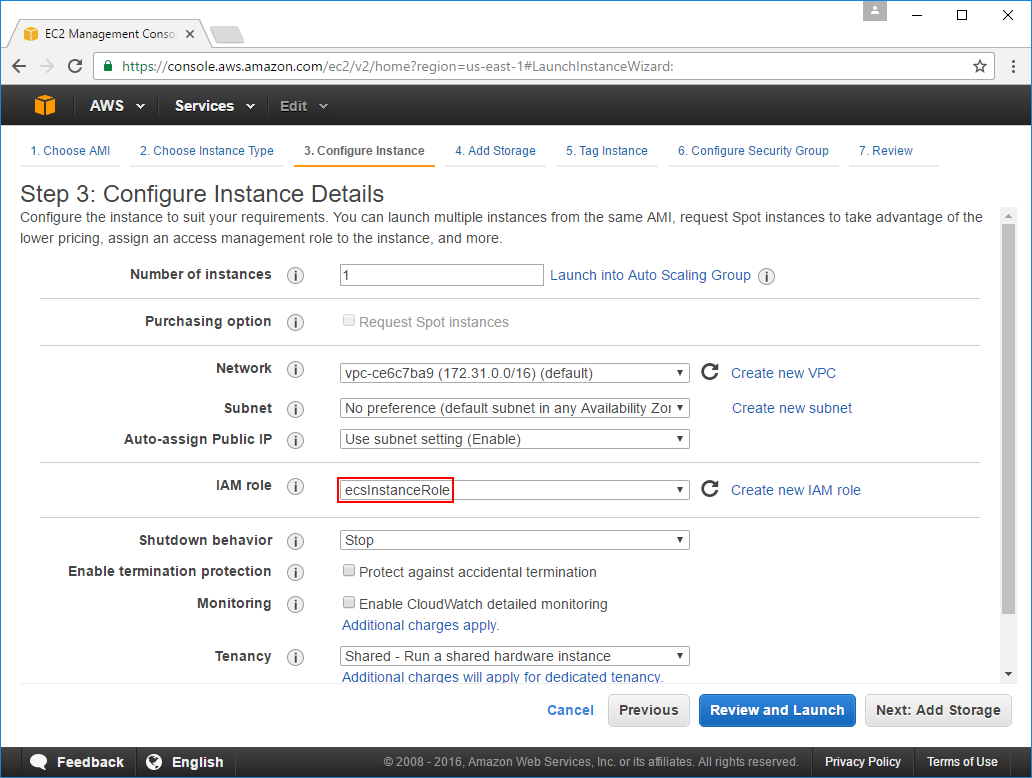
The important option in the Configure Instance Details screen is to select the ecsInstanceRole for the
EC2 Instance's IAM Role, you'll also want to choose Enable for the Auto-assign Public IP option
(if it's not already the default):
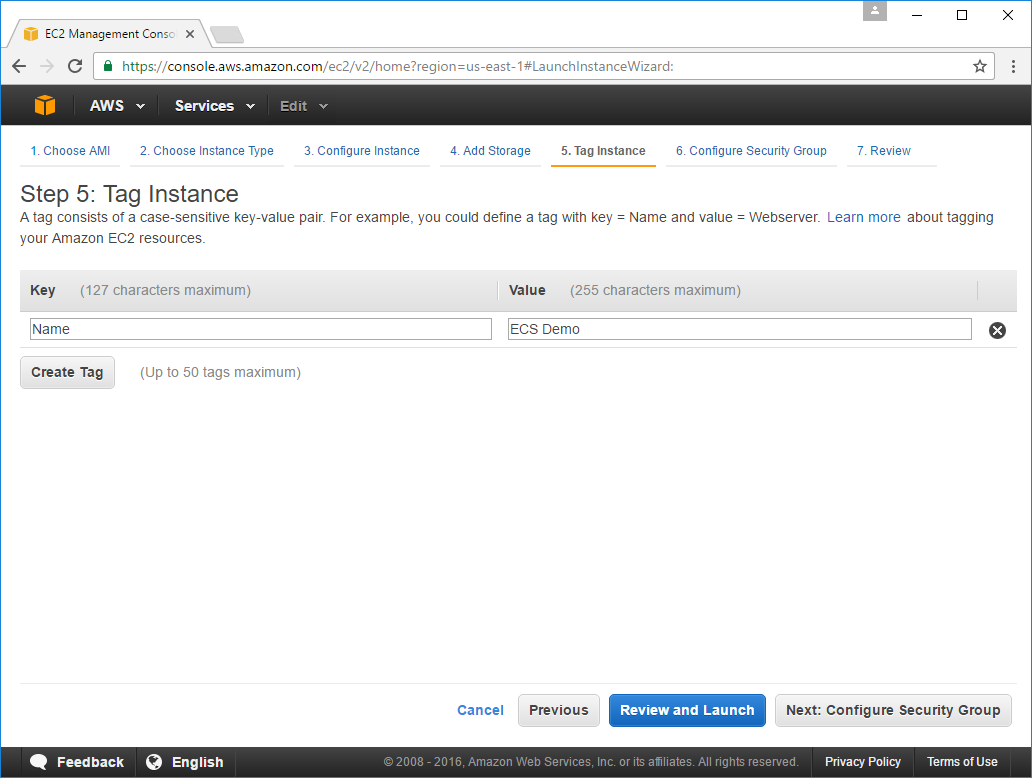
You can skip past the defaults on the Add Storage screen, in the Tag Instance screen you'll be able to assign a human-friendly label to identify this instance, e.g:
The Configure Security Group page is where you specify the ports you want open. You'll want SSH open
so you can login to your instance and for Web Apps you'll also typically want HTTP and HTTPS open
as well. With the warning message AWS is encouraging you to limit your SSH access to a limited IP Range
which if you have a static IP from your ISP is a good idea to lock down the Source to My IP,
otherwise leaving it open to any IP is ok as we'll be using a Private Key to login to our Instance.

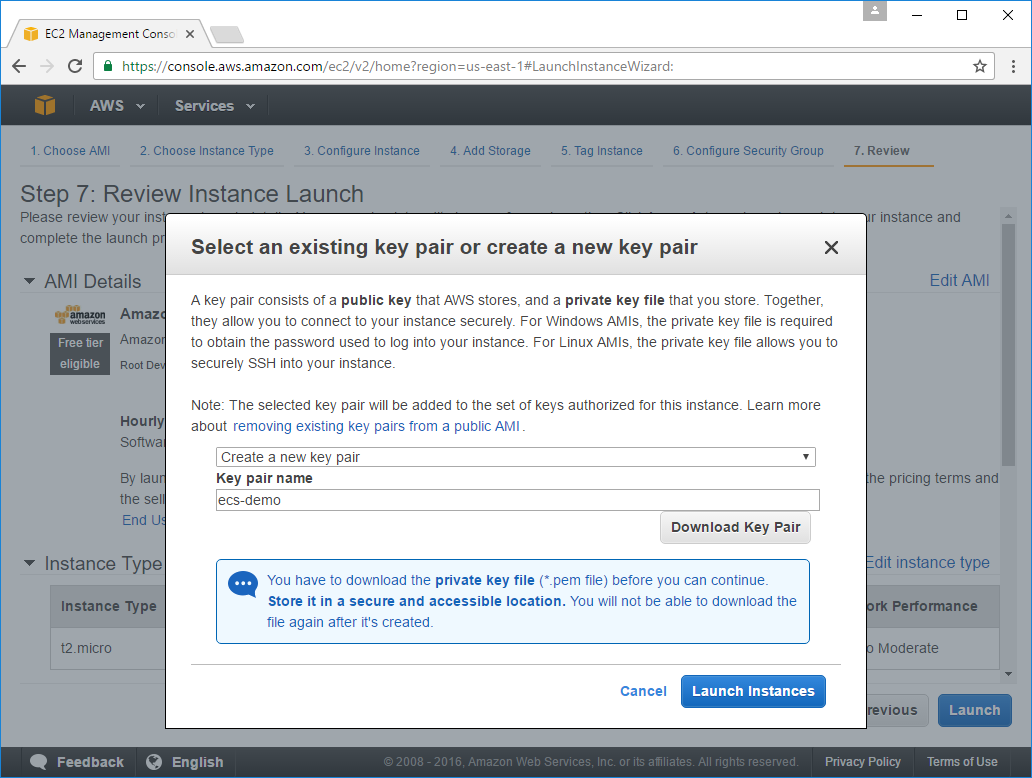
On the next page you want to either create a new Public/Private Key Pair or use an existing one. If creating a new Pair you need to click Download Key Pair as you'll need it to SSH into your instance.
After clicking Launch Instances you'll be redirected to your EC2 Instances tab where you can watch your new Instance start up:

Revisit AWS Container Service
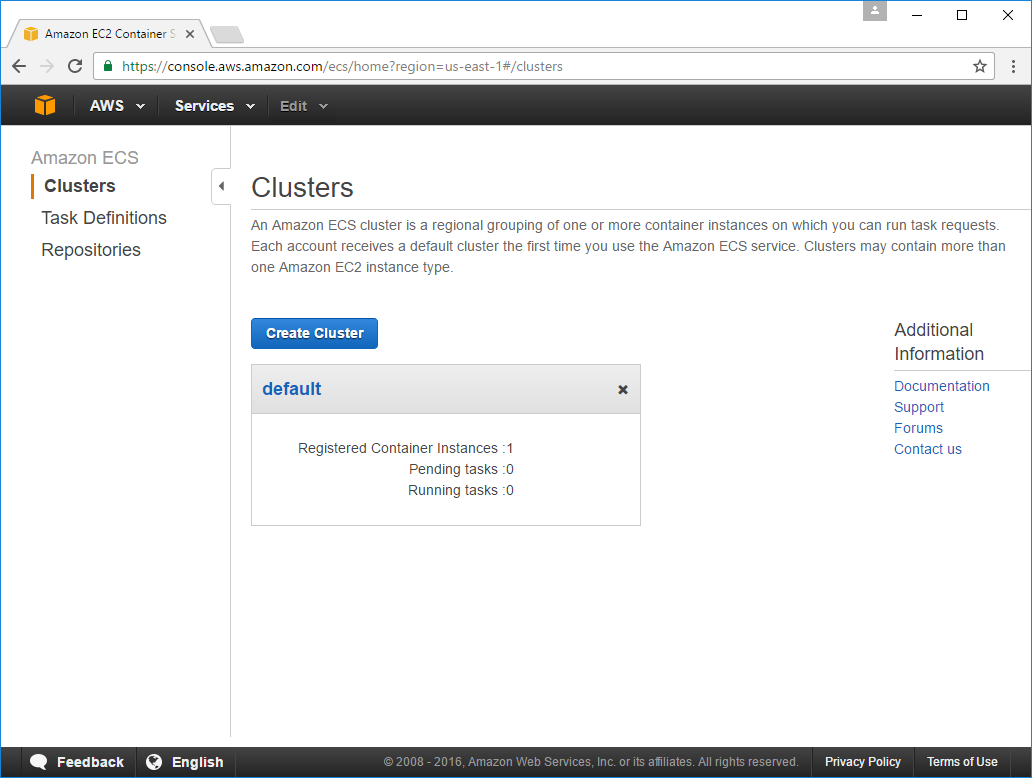
Once running go back and refresh your EC2 Container Service page where you should now see a default cluster that was created:
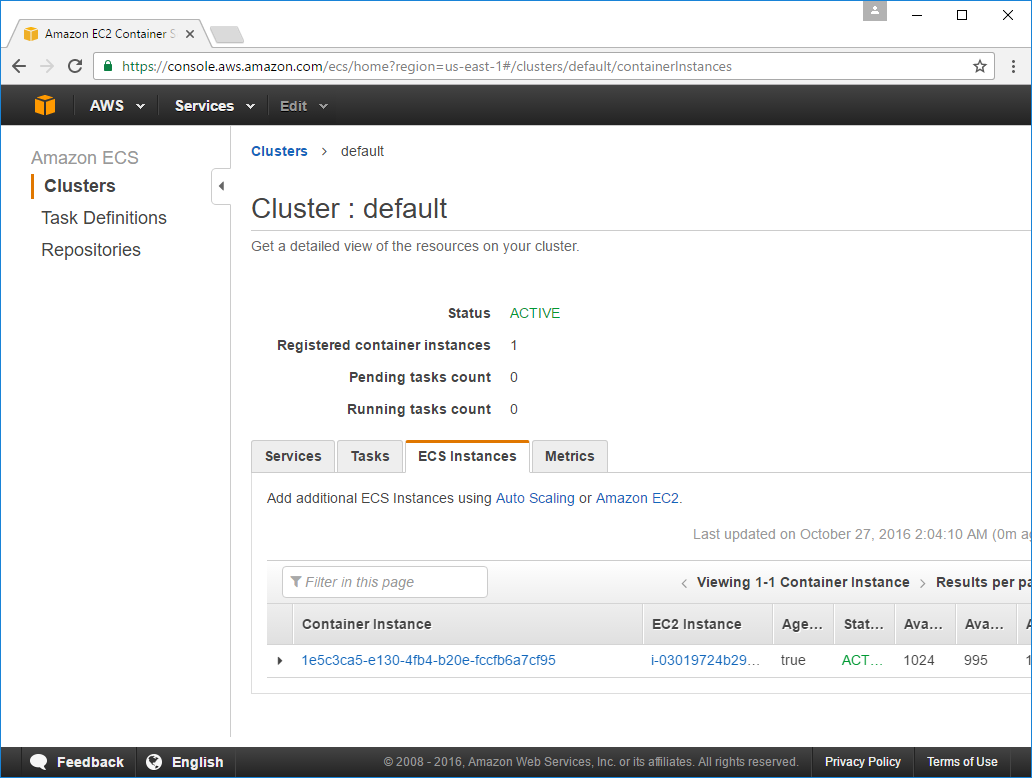
Clicking on ECS Instances tab will show your new Instance with an ACTIVE state:
If you don't see a default cluster created with your new Instance attached, terminate your Instance
then go back and create it again, triple-checking it has the ecsInstanceRole IAM Role when Configuring
the Instance. If that fails, try re-creating the ecsInstanceRole ROLE making sure it has the
AmazonEC2ContainerServiceforEC2Role Policy.
4. Associating Elastic IP to new EC2 Instance
Before connecting to the Instance lets assign it a domain name so it has a canonical reference to make it easier to remember and refer to later. Before doing this you should assign your instance an Elastic IP so it has a persistent Public IP within your control that you can assign a domain name to.
To do this, click on the Elastic IPs tab then click on Allocate New Address, this will issue you a new Elastic IP that you can assign to your new instance, e.g:

After clicking Associate it will show up in the Elastic IPs tab:

Assign a Domain Name to your Elastic IP
This is going to different for each Domain Registrar but you'll want to assign a new A Record to point to your new Elastic IP. If you're using Google Domains you can refer to their Google Domains Help Documentation.
For the purposes of this tutorial we've used the ecsdemo.netcore.io domain name which resolves to our
Elastic IP Address.
5. Log into the new EC2 Instance
With the new Instance up and running we can login to it, but you'll need access to a ssh client to make
that happen. If you're fortunate to have a Unix-based OS at your disposal you're already set, if you're
on Windows 10 you can enable Bash on Ubuntu on Windows
otherwise you'll need to install a SSH Client for Windows.
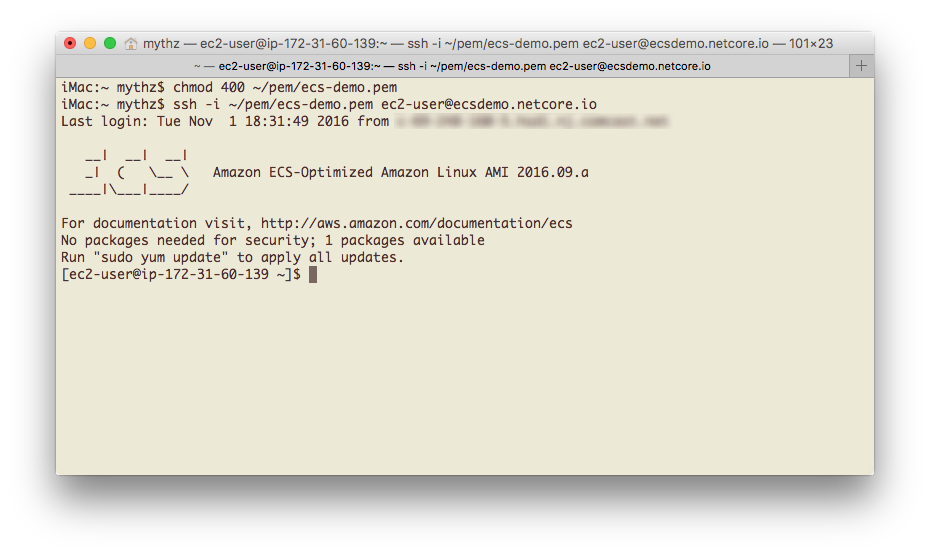
When you're ready open a Terminal and copy the EC2 Instance Key Pair that you downloaded previously and
copy it into a permanent location, e.g ~/pem/ecs-demo.pem.
Before we can SSH with the Private Key we need to lock down the permissions so only we can read it which you can do with:
chmod 400 ~/pem/ecs-demo.pem
Once locked down you can use it to SSH into your instance using the -i flag, logging in as the ec2-user:
ssh -i ~/pem/ecs-demo.pem ec2-user@ecsdemo.netcore.io
Replace ecsdemo.netcore.io with your domain name or Elastic IP. If everything went to plan you should now
be logged into your EC2 Instance:
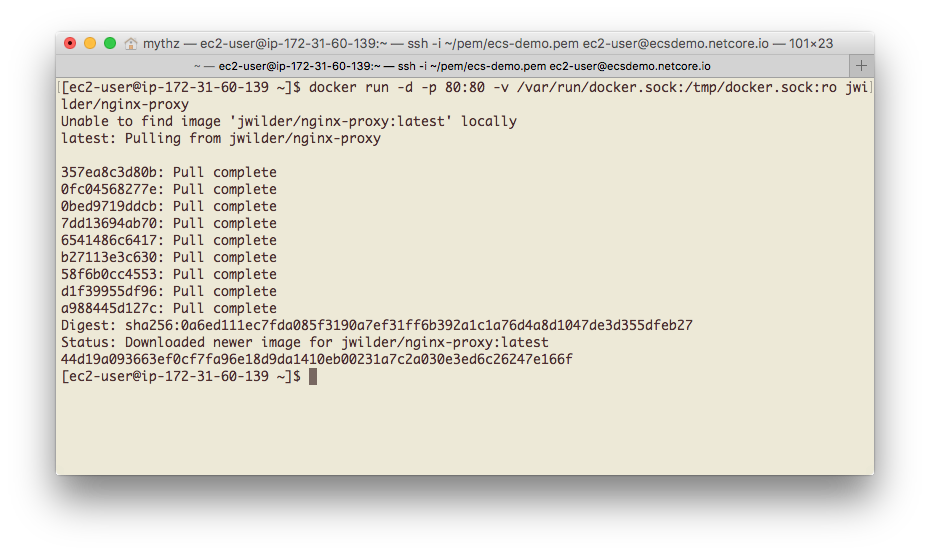
We're only assigned one task while we're here which is to run an instance of the jwilder/nginx-proxy
Docker App copying the command below:
docker run -d -p 80:80 -v /var/run/docker.sock:/tmp/docker.sock:ro jwilder/nginx-proxy
This will pull the jwilder/nginx-proxy Docker Image from
Dockers public repository which sets up
a new Docker container running nginx and
docker-gen which is what will enable our no-touch deployments where
it will generate the reverse proxy configs for nginx each time a new Docker App is deployed where it will
use its VIRTUAL_HOST Environment Variable that it was created with.
It's not important to
know exactly how it works
only that it's responsible for setting up nginx to reverse proxy requests from our App's custom
VIRTUAL_HOST (e.g. ecsdemo.netcore.io) to our .NET Core Kestrel HTTP Server that's listening on port 5000.
If successful you'll get an output similar to:
For the curious you can run docker ps at this point to see the running Docker Containers which should
include this nginx-proxy and AWS's ECS agent.
Enable support for SSL
If you wanted to host any of your Apps under SSL you'll instead need to run your jwilder/nginx-proxy container with:
docker run --detach --name nginx-proxy --publish 80:80 --publish 443:443

--volume /etc/nginx/certs --volume /etc/nginx/vhost.d --volume /usr/share/nginx/html

--volume /var/run/docker.sock:/tmp/docker.sock:ro jwilder/nginx-proxy
You'll also need to run the letsencrypt-nginx-proxy-companion
companion Docker container for nginx-proxy with:
docker run --detach --name nginx-proxy-letsencrypt --volumes-from nginx-proxy

--volume /var/run/docker.sock:/var/run/docker.sock:ro jrcs/letsencrypt-nginx-proxy-companion
SSL Requires additional info added via environment variables included your .NET Core Docker App's deployment script which are documented in Configure support for SSL.
6. Fork redis-geo Demo
With all the prep work for setting up our Docker Server out of the way, we can now get to the fun part of deploying Docker Apps to it. Let's get started by forking the existing https://github.com/NetCoreApps/redis-geo project:
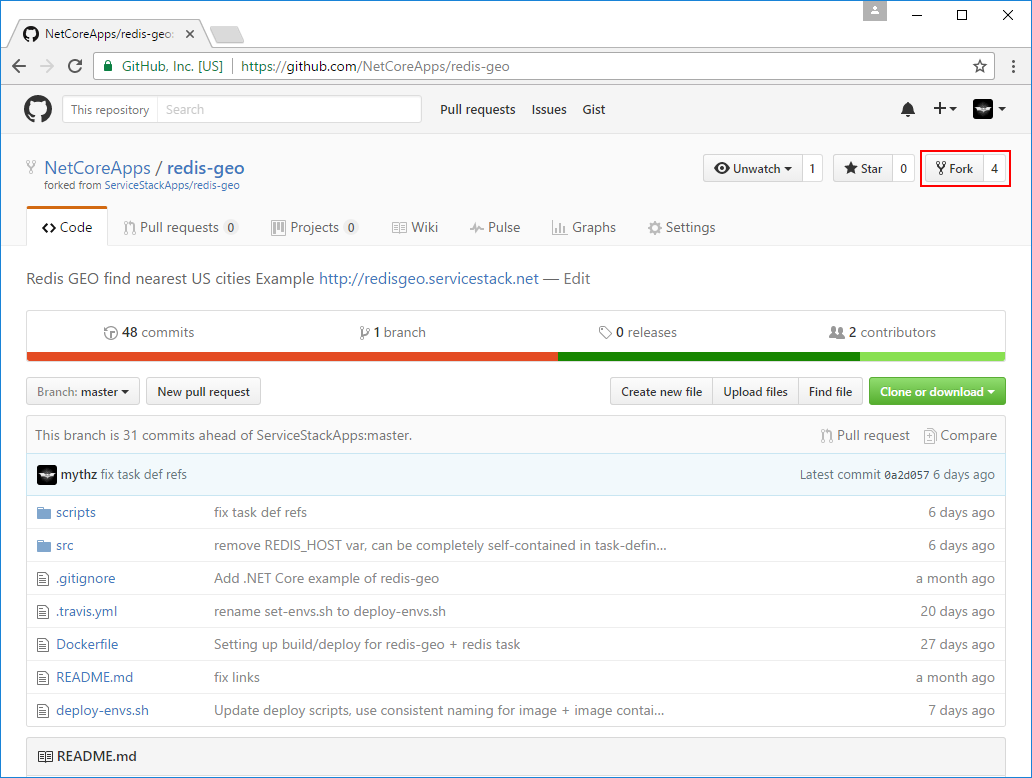
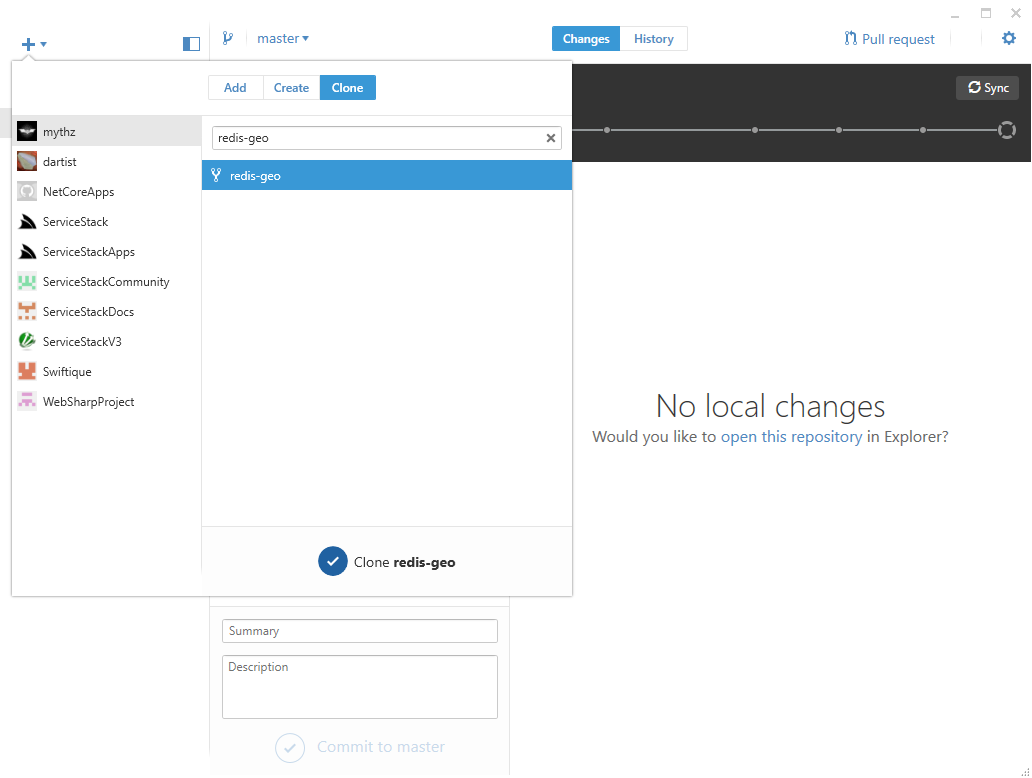
This will create our own fork of the redis-geo Github project into our own Github User Account. We then
need to Clone our local fork which we can do from the Github Desktop App
to a local folder:
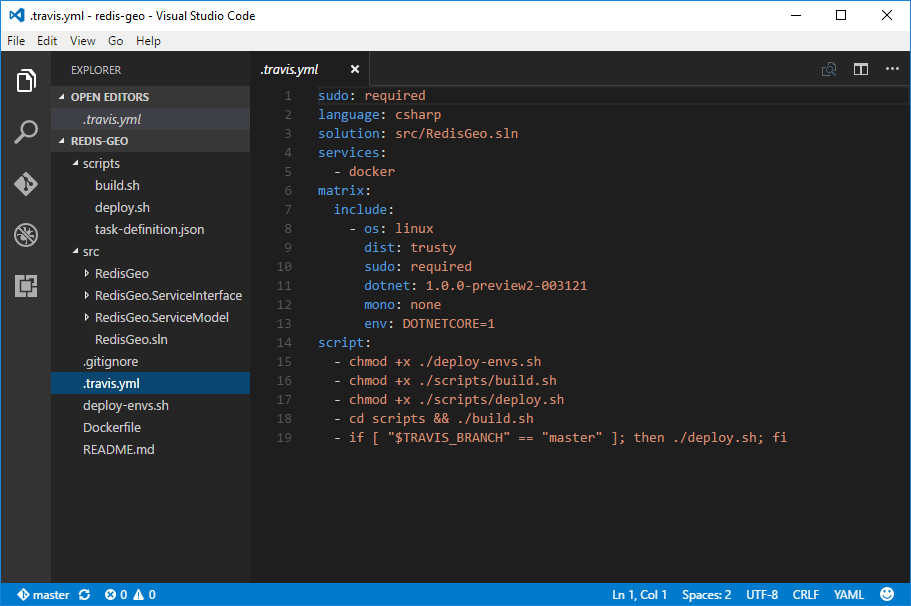
Inspect the Build Scripts
Lets open the folder in VS code to inspect what deployment scripts we have:
C:\src\redis-geo>code .
The .travis.yml is used to configure the environment which Travis CI will execute your build under.
Here we're telling Travis we want a csharp environment for our solution located at src/RedisGeo.sln
using an Ubuntu 14.04 Linux distribution with .NET Core installed. The script section tells Travis how
it should build our project, which is to just run the build scripts in the repo:
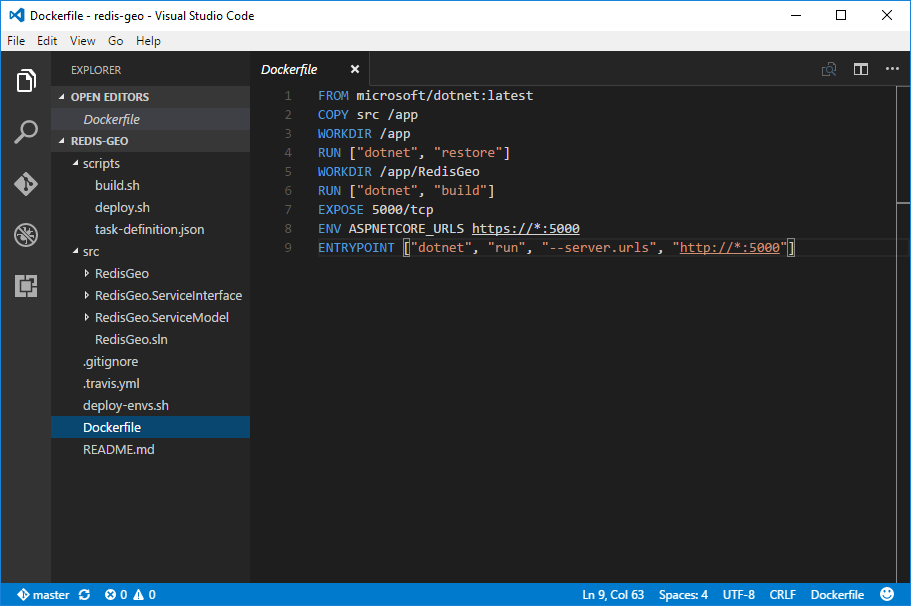
The DockerFile tells Docker how to build our Docker App Image:
- that's based on the microsoft/dotnet:latest Docker Image from Docker's public Repository
- includes a copy of our .NET Core solution files
- runs
dotnet restoreon to pull down all NuGet dependencies - builds the .NET Core Solutions Host Project using
dotnet build - notifies Docker our App will run a TCP Service listening on port
5000that it should expose - sets the
ASPNETCORE_URLSEnvironment Variable - tells Docker what to execute when our App is run
This is a fairly generic template for building a .NET Core multi-project App which typically only requires changing the WORKDIR to point to your Solutions Host Project:
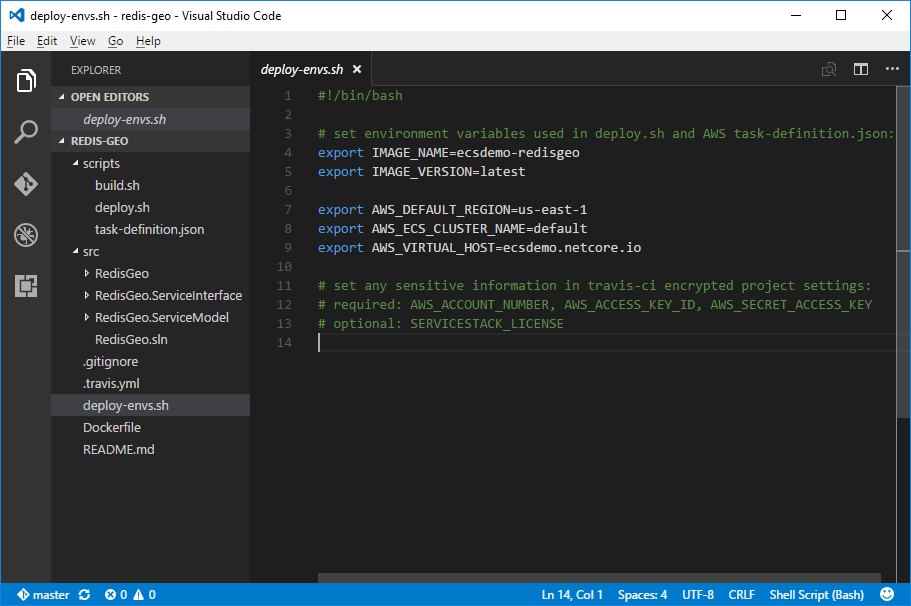
The primary config changes you'll need to make are in /deploy-env.sh which contains public deployment and
project-specific info. Here you'll want to change AWS_DEFAULT_REGION with the AWS region where your
ECS Service is located. You'll also need to change AWS_VIRTUAL_HOST with your VIRTUAL_HOST:
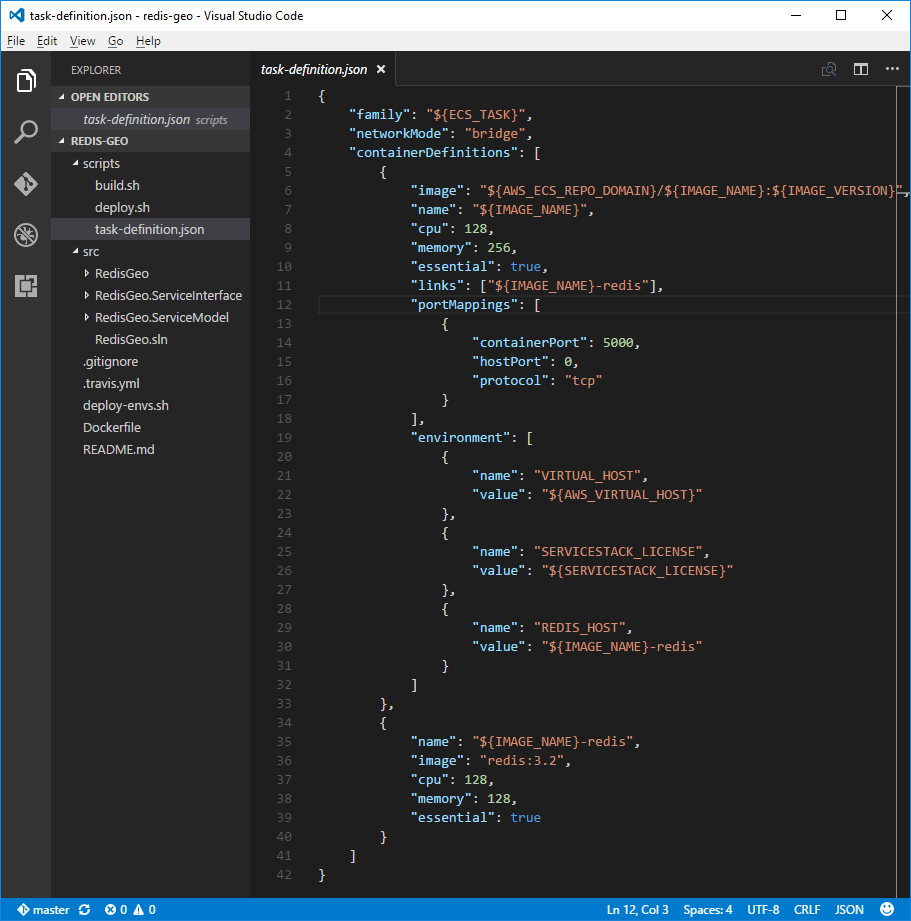
ECS task-definition.json
The task-definition.json is specific to AWS ECS which lets you declaratively define an atomic collection
of Docker Containers ECS should run when it deploys this "Task". It's essentially a thin wrapper around
docker run where most features can be easily mapped
to its command-line switches.
The task-definition.json is where we tell ECS what Docker Containers our App needs. Here in addition to
our Docker App we also need an instance of redis:3.2 that's made available to our App via Docker's
--link feature which lets us connect to the redis-server instance using the ecsdemo-redisgeo-redis
Hostname that we make available to our App via the REDIS_HOST Environment variable:
Configure support for SSL
If you want to host your .NET Core Apps under SSL you'll need to include some additional information in your deployment scripts that will be passed to the docker-letsencrypt-nginx-proxy-companion container which is a run as a companion Docker container to nginx-proxy which will automate the creation/renewal of Lets Encrypt SSL Certificates and the necessary nginx configuration to redirect HTTP Requests to SSL Requests which are "SSL terminated" at the nginx reverse proxy and proxied as HTTP to your downstream .NET Core App.
Instead of starting with redis-geo you'll want to start with the deployment scripts in /ServiceStack/sharpscript
which contain a working example of a .NET Core App hosted under SSL at https://sharpscript.net.
Essentially your deploy-envs.sh deployment configuration
script needs to include LETSENCRYPT_HOST and LETSENCRYPT_EMAIL variables:
#!/bin/bash

# set environment variables used in deploy.sh and AWS task-definition.json:
export IMAGE_NAME=netcoreapps-sharpscript
export IMAGE_VERSION=latest

export AWS_DEFAULT_REGION=us-east-1
export AWS_ECS_CLUSTER_NAME=default
export AWS_VIRTUAL_HOST=sharpscript.net
export LETSENCRYPT_HOST=$AWS_VIRTUAL_HOST
export LETSENCRYPT_EMAIL=team@servicestack.net
The only other change required is to pass these environment variables to your App's Docker container defined in task-definition.json:
{
    "family": "${ECS_TASK}",
    "networkMode": "bridge",
    "containerDefinitions": [
        {
            "image": "${AWS_ECS_REPO_DOMAIN}/${IMAGE_NAME}:${IMAGE_VERSION}",
            "name": "${IMAGE_NAME}",
            "cpu": 128,
            "memory": 256,
            "essential": true,
            "portMappings": [
                {
                    "containerPort": 5000,
                    "hostPort": 0,
                    "protocol": "tcp"
                }
            ],
            "environment": [
                {
                    "name": "VIRTUAL_HOST",
                    "value": "${AWS_VIRTUAL_HOST}"
                },
                {
                    "name": "LETSENCRYPT_HOST",
                    "value": "${LETSENCRYPT_HOST}"
                },
                {
                    "name": "LETSENCRYPT_EMAIL",
                    "value": "${LETSENCRYPT_EMAIL}"
                }
            ]
        }
    ]
}
Otherwise all other deployment scripts remain the same as a normal ECS .NET Core Docker App, the primary difference being
that after it's deployed by AWS ECS, it triggers the nginx-proxy-companion to retrieve and auto-configure
an SSL Certificate from Lets Encrypt for the App's external domain defined in LETSENCRYPT_HOST
which it registers with nginx to enable its SSL-terminated https support for that domain.
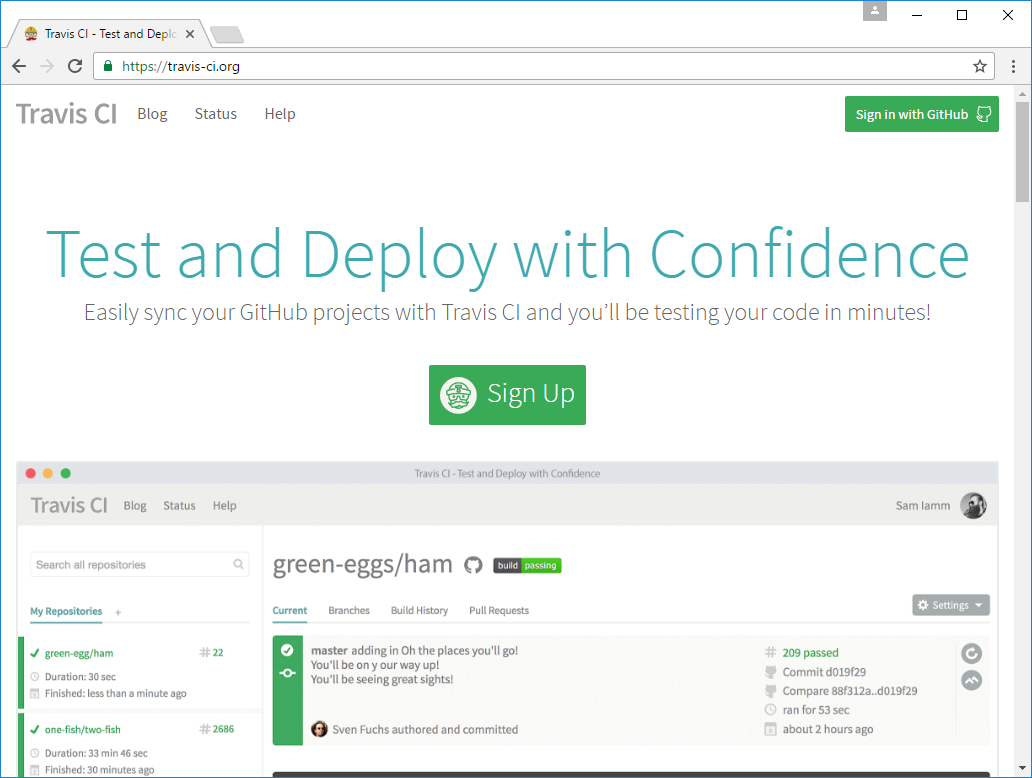
Create project in Travis-CI
After making the necessary changes in /deploy-env.sh we can register our project in Travis CI,
fortunately for us Travis's UX is streamlined making this effortless. Start by clicking on Sign Up
button on Travis's home page https://travis-ci.org:
Then click on the + link next to My Repositories:
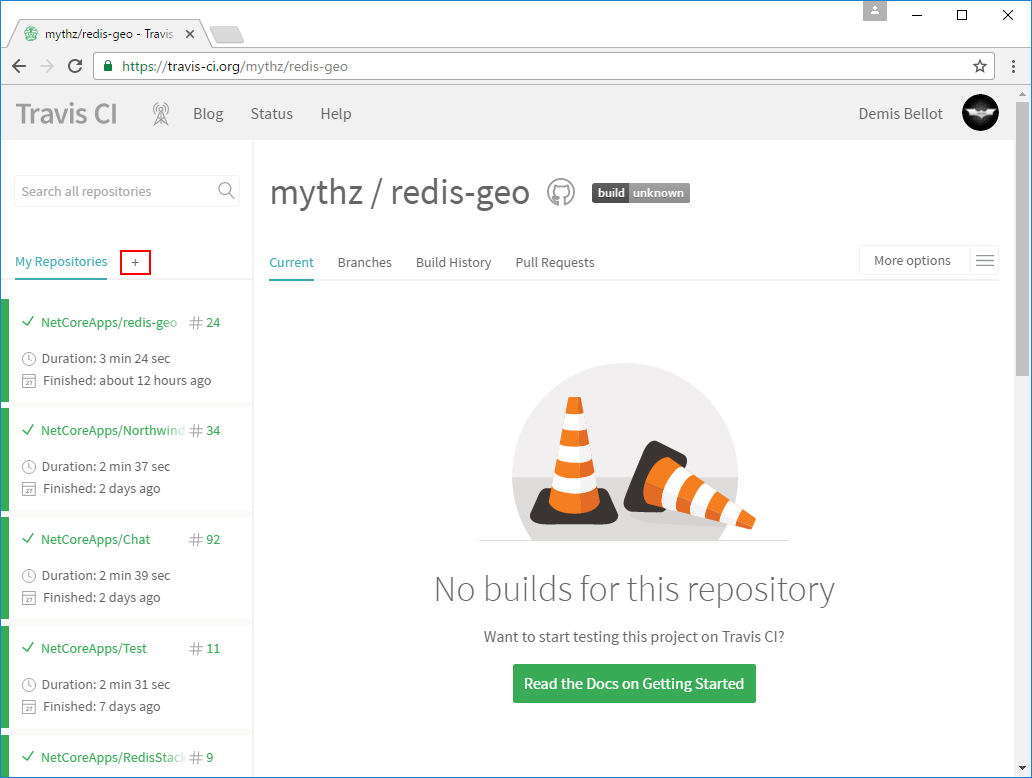
This takes you to your Github Profile view where you just need to click on the the switch icon next to your redis-geo fork, e.g:

CI Environment Variables
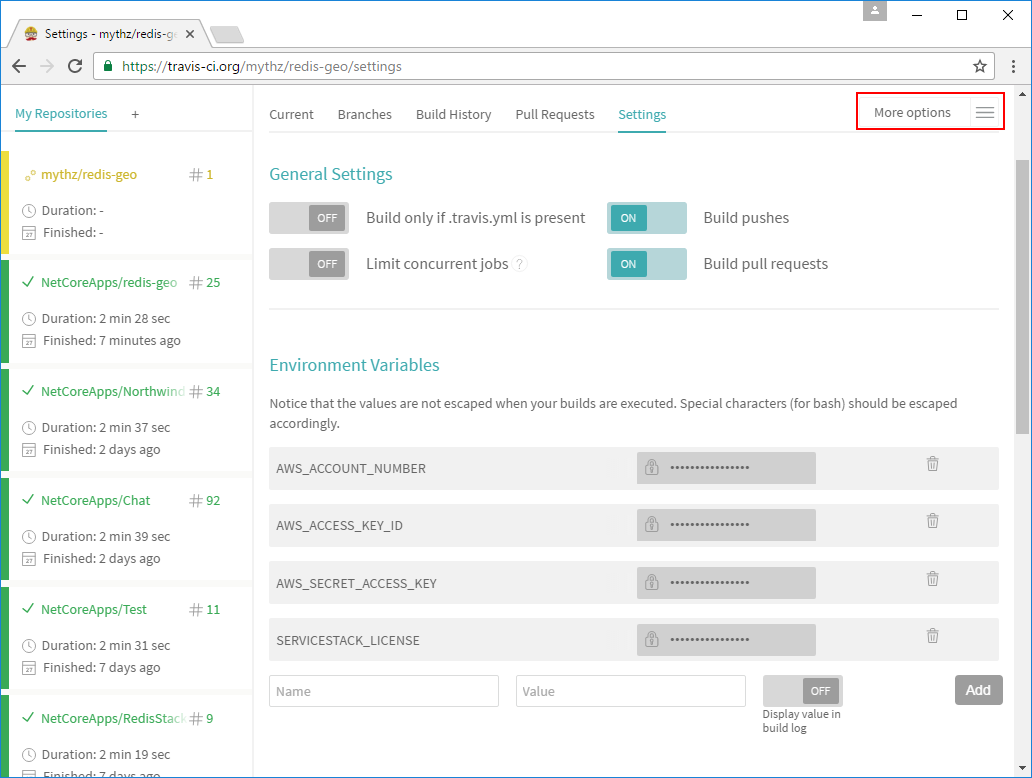
After enabling your project it will appear in your repositories list. Here we need to click on
the Settings Menu Item in the More Options drop down menu in order to provide Travis the
sensitive ecsDemoUser credentials that we don't want to include in a public Github Repository.
At a minimum you'll need to add Environment variables for the ecsDemoUser IAM User you copied above:
AWS_ACCOUNT_NUMBERAWS_ACCESS_KEY_IDAWS_SECRET_ACCESS_KEY
The Settings page is where you can define any sensitive information you want your Docker App to have
access to. E.g. although it's not needed for this Demo you can specify your SERVICESTACK_LICENSE here
where its inject into your Docker App with the "environment" Key/Value list in your projects
task-definition.json. If your App requires a lot of confidential information it can be easier to instead
register a connection string to a Remote AppSettings data source,
that way you can have a centralized location for managing the keys and connection strings for all your Apps.
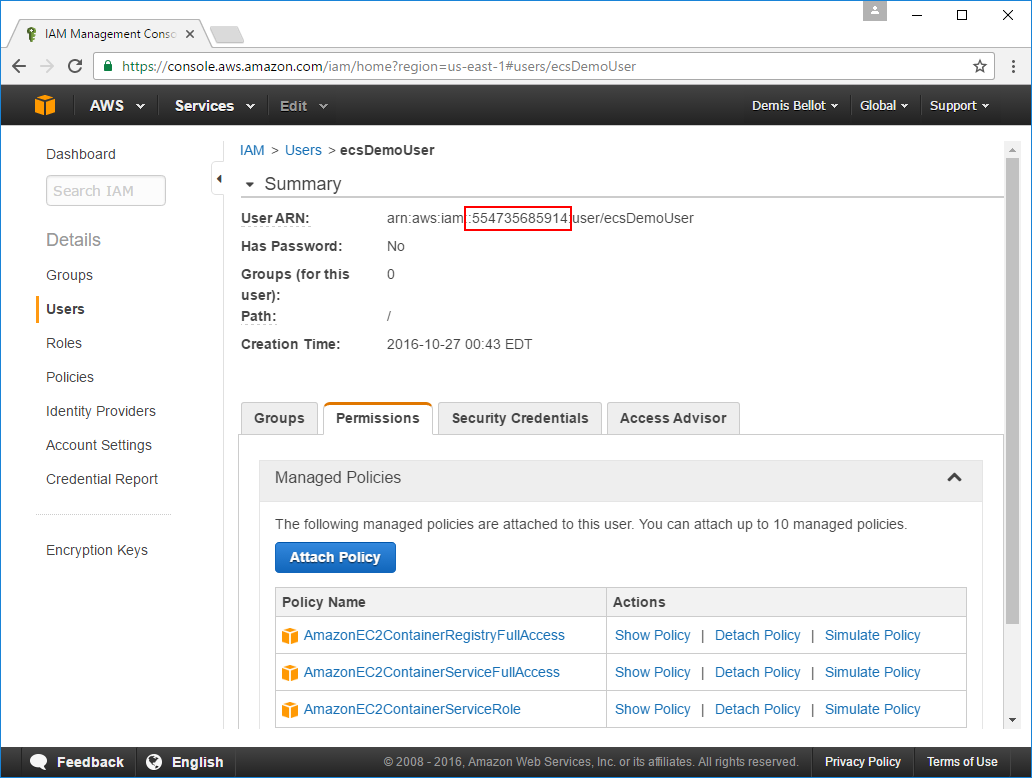
If it's not on hand, you can get the AWS_ACCOUNT_NUMBER for your ecsDemoUser from the number embedded
in its User ARN:
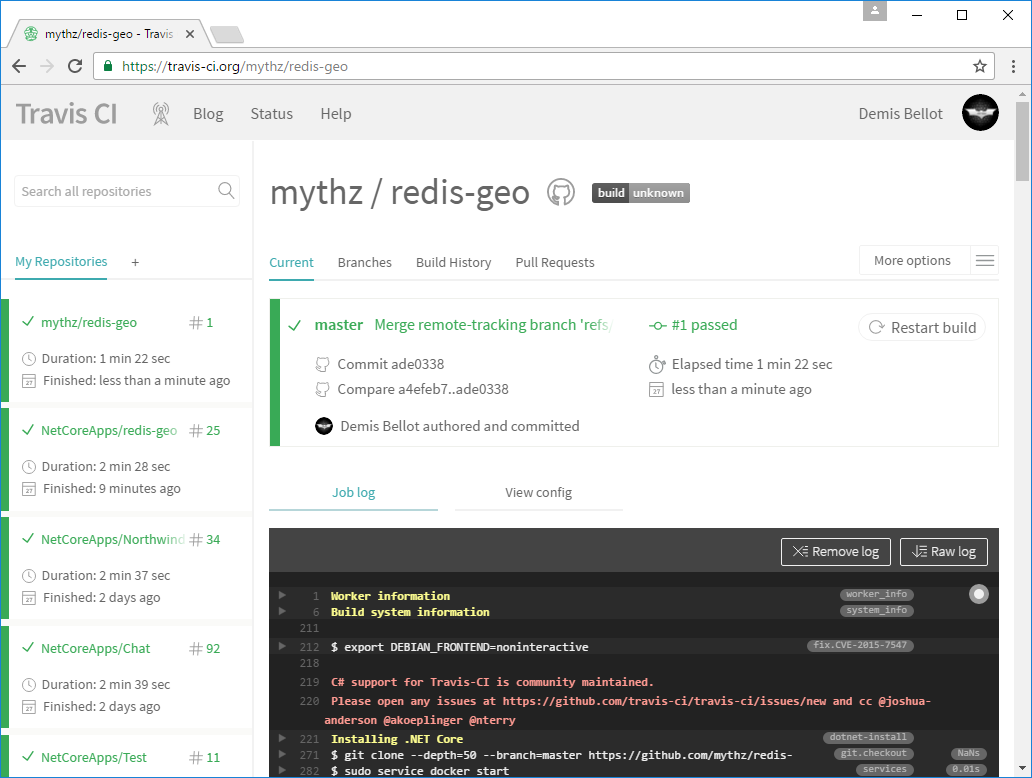
After adding your ecsDemoUser credentials above, commit and push your changes to deploy-env.sh in order
to trigger a new Travis CI build. If you've previously committed the changes you can click
Restart build to rerun the build using your latest Environment Variables. This will trigger a new build
which if everything is in place should result in a successful green build:
Inspect AWS Container Service
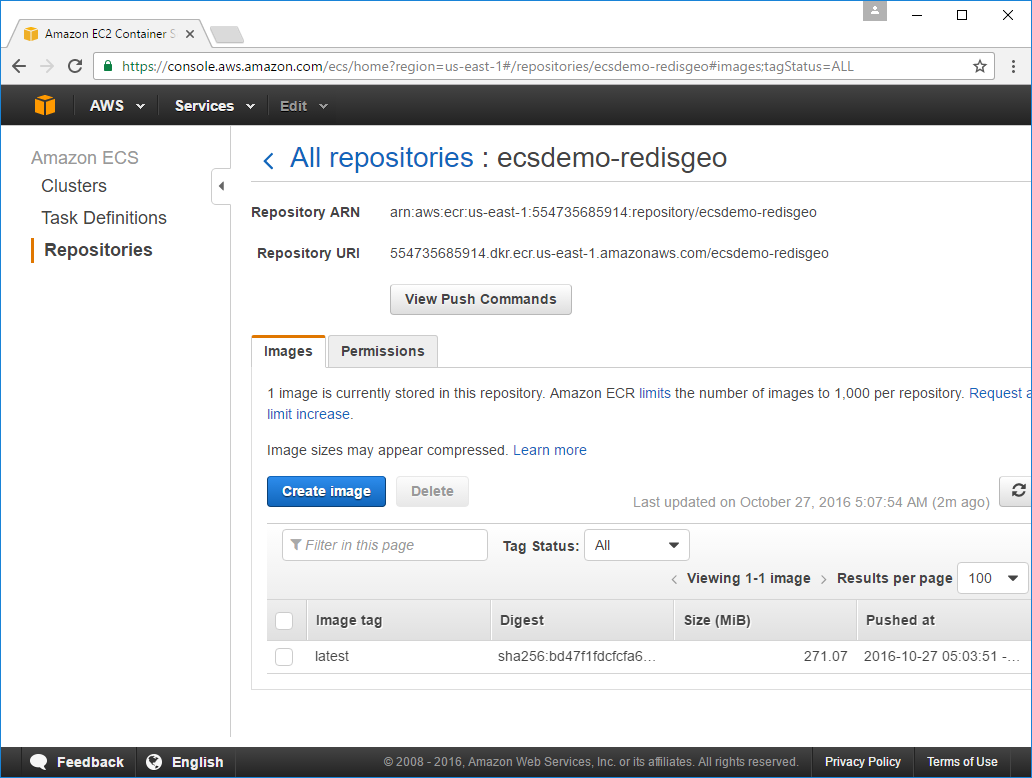
Now we can go back into EC2 Container Service and have a look at what the generic deploy.sh script
created for us. Clicking the Repositories tab will display your Apps
private ECR Repository
which contains a list of all Docker Images that were deployed to ECS with the one that's currently used by
the running Docker Container, tagged with the latest Image tag:
In the Clusters tab you'll see that your default Cluster contains an
ECS Service
aptly named ecsdemo-redisgeo-service:
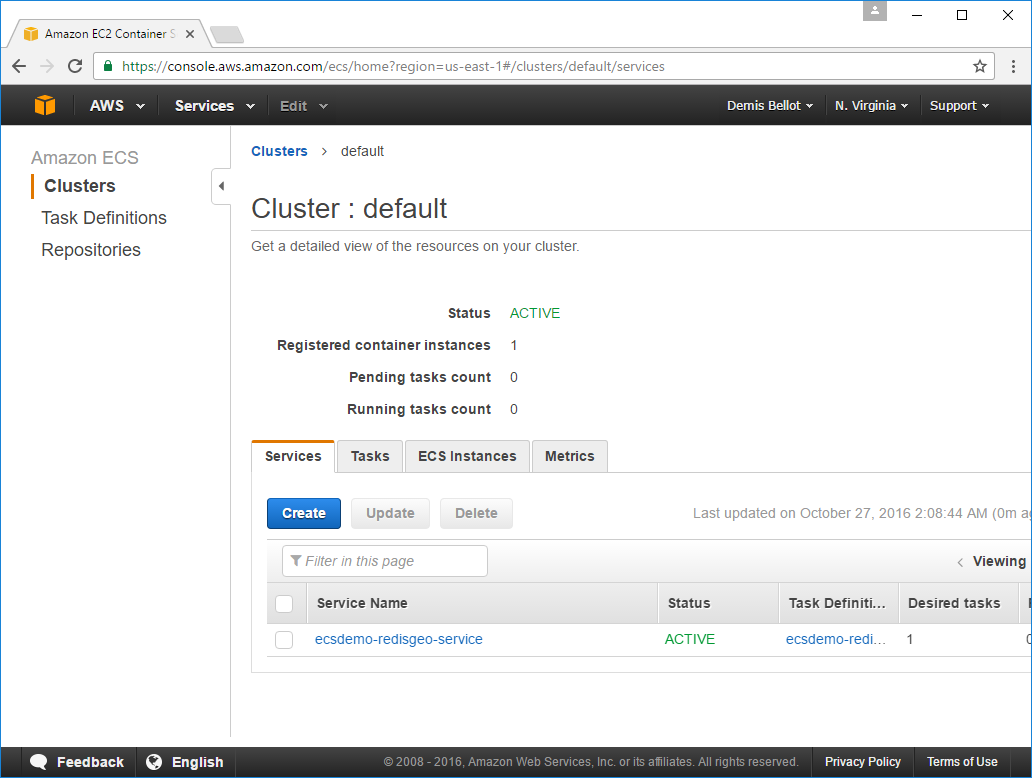
The ECS Service is what manages your running Tasks where if your Docker App goes down for whatever reason, the Service will restart new Task Instances based on its Task Definition until the Desired count of instances is reached.

View list of running Docker Containers
If your Service contains a RUNNING Task that means your time here was a success. We can further verify
that's everything's in order by SSH'ing back into our EC2 Instance and running docker ps to see our
running Docker Containers:
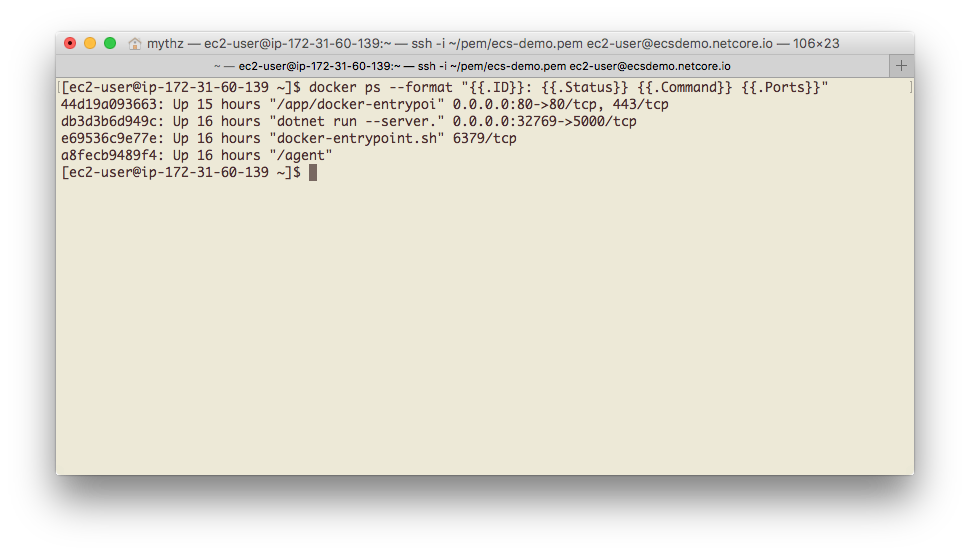
Where we should see 4 running Docker Containers:
- nginx-proxy
- Our .NET Core Docker App
- redis-server
- AWS ECS agent
Problems with the task not running
If you don't have a RUNNING Task then you might need to restart the ECS container agent by SSH'ing into the EC2 Instance and running the commands below:
[ec2-user ~]$ sudo stop ecs
ecs stop/waiting
[ec2-user ~]$ sudo start ecs
ecs start/running, process 26119
If that still doesn't work you should see if any of the containers are stopping shortly after they have started. A good way of doing this is to run docker ps -a which will show you all the containers that have started (without the -a, it only shows the currently running ones). If you see that some are exiting with a code that is not 0, then you may have a problem with that container. Run that container using docker run using its image name and omitting the -d flag. For example:
docker run 473481601643.dkr.ecr.ap-southeast-2.amazonaws.com/netcoreapps-redisgeo:latest
That will run the container and show its output, which might give you some indication of the problem.
Things to try
1. Make a change to your App
With your .NET Core Docker mission officially a success the first thing you're going to want to do is to commit a change to your fork whilst watching your Travis CI bot working away so you can see your Continuous Docker deployments in action :)
2. Go through this tutorial again
If you've stuttered hazily through parts of this tutorial we recommend going through it again from scratch as things should become a lot clearer and faster the next time around. After doing this a few times everything will appear intuitive and you won't need to refer to this tutorial again.
3. Copy the build scripts to Dockerize own .NET Core Apps
Customizing the deploy scripts to your own Apps will help familiarize yourself with Docker and identify the areas which are customizable.
4. Exec build scripts to Create and Run your Docker App locally
Install Docker for Mac or
Docker for Windows and try building and running the
Docker Images locally. Since you're running locally you'll need to set any required Travis CI Environment
Variables then have a look at translating what ECS does with its task-definition.json into docker commands.
This example is a little tricky due to the use of Docker's --link feature but with some trial and error and
the Docker run reference to guide you, you'll have your
Docker App running locally - acquainting you with one of Docker's killer features!