Ollama, LM Studio and Jan have become popular choices for AI enthusiasts looking to run large language models (LLMs) locally which provide a UX-friendly intuitive interfaces for downloading, installing and running a variety of open-source models on personal workstations, acceleratable with GPUs.
However, when scaling beyond personal use, these tools reveal their limitations which weren't designed with production deployment in mind, often lacking flexible and robust resource management, fine-grained authorized usage and optimizations necessary for sustained, high-demand environments.
Enter llama-server: The Production workhorse
The technology underpinning these applications is llama.cpp, a groundbreaking C/C++ implementation that enables running sophisticated language models on consumer hardware. This remarkable project, created by Georgi Gerganov, revolutionized the LLM landscape by making previously cloud-only models accessible to everyday users through clever quantization techniques and memory-efficient operations.
While Ollama and LM Studio provide user-friendly wrappers around this technology, llama.cpp's llama-server leverages the same core but strips away the overhead to focus exclusively on performance and stability. By directly utilizing the llama.cpp library and its server component, organizations can bypass the abstractions introduced by desktop applications and tap into the raw power of the underlying engine whose highly configurable runtime allows for optimized self-hosting of authorized models.
This direct approach eliminates unnecessary layers that might introduce latency or unexpected behaviors, providing a more consistent and predictable experience necessary for production environments. For DevOps teams and system administrators, this translates to fewer surprises during deployment and operation — a crucial factor when incorporating self-hosting AI solutions into critical business applications.
Hosting llama-server with Docker
Organizations that have incorporated container based deployment solutions will most likely prefer a docker solution of which is available in a number of different hardware optimized configurations including CPU, CUDA for NVIDIA GPUs, ROCm for AMD GPUs and MUSA for Moore Threads GPUs.
Docker containers requiring NVIDIA GPU accelearation will require installing the
NVidia Container Toolkit which allows you to run the llama.cpp:server-cuda CUDA optimized image with the --gpus flag to utilize your hardwares NVIDIA GPUs, e.g:
docker run -p 8080:8080 -v /path/to/models:/models --gpus all \
    ghcr.io/ggml-org/llama.cpp:server-cuda -m models/phi-4.Q4_K_M.gguf \
    -c 512 --host 0.0.0.0 --port 8080 --n-gpu-layers 999
llama.cpp can run models in the GGUF File format that are commonly hosted on hugging face. As of this writing Microsoft, Google and Mistral AI have released some of the best quantized LLMs you can run on consumer GPUs:
- Phi-4 14B by Microsoft
- Gemma3 27B by Google
- Mistral Small 3.1 24B by Mistral AI
Docker compose
Docker compose is a great solution for hosting llama-server in production environments which simplifies managing multiple services within declarative configurations, making deployments more repeatable and scalable.
version: '3'

services:
  phi:
    image: ghcr.io/ggml-org/llama.cpp:server-cuda
    environment:
      - LLAMA_ARG_N_GPU_LAYERS=999
      - LLAMA_ARG_MODEL=/models/phi-4.Q4_K_M.gguf
    ports:
      - "8000:8080"
    volumes:
      - ./models:/models
    deploy:
      resources:
        reservations:
          devices:
            - driver: nvidia
              count: all
              capabilities: [gpu]
  gemma:
    image: ghcr.io/ggml-org/llama.cpp:server-cuda
    environment:
      - LLAMA_ARG_N_GPU_LAYERS=999
      - LLAMA_ARG_MODEL=/models/gemma-3-27b-it-qat-q4_0-gguf
    ports:
      - "8001:8080"
    volumes:
      - ./models:/models
    deploy:
      resources:
        reservations:
          devices:
            - driver: nvidia
              count: all
              capabilities: [gpu]
  mistral:
    image: ghcr.io/ggml-org/llama.cpp:server-cuda
    environment:
      - LLAMA_ARG_N_GPU_LAYERS=999
      - LLAMA_ARG_MODEL=/models/mistral-small-3.1-24b-instruct-2503-q8_0.gguf
    ports:
      - "8002:8080"
    volumes:
      - ./models:/models
    deploy:
      resources:
        reservations:
          devices:
            - driver: nvidia
              count: all
              capabilities: [gpu]
After saving this to docker-compose.yml along with the models:
You'll be able to run and test them with:
docker compose up
This will launch 3 container instances of llama-server configured to run different models accessible via an OpenAI compatible API on ports 8000, 8001 and 8002 which you can test using llama-server's Chat Web UI.
Dedicated GPUs
Docker containers can also be configured to run llama-server on different dedicated GPUs, identified by their GPU index:
- driver: nvidia
  device_ids: ['0'] # Assign to GPU 0
  capabilities: [gpu]
Systemd Services
You can trade hosting flexibility to squeeze an extra ounce of performance and run without the overhead of a container by running a compiled llama-server natively by cloning llama.cpp repo:
git clone https://github.com/ggml-org/llama.cpp
For NVIDIA GPUs you'll need to install NVIDIA CUDA Toolkit before running a CUDA optimized llama.cpp build with:
cmake -B build -DGGML_CUDA=ON
cmake --build build --config Release
If all goes well after a long while you'll get a freshly minted llama-server executable at
/build/bin/llama-server which you can create a managed Systemd service with:
sudo vi /etc/systemd/system/llama-server-gemma3.service
With the configuration of your llama-server service using your preferred model and configuration options, e.g:
[Unit]
Description=Llama Server: Gemma3 27B
After=network.target

[Service]
Type=simple
User=root
WorkingDirectory=/home/deploy/llama.cpp
Environment="CUDA_VISIBLE_DEVICES=0"
ExecStart=/home/deploy/llama.cpp/build/bin/llama-server \
  --model /home/deploy/llama.cpp/models/gemma-3-27b-it-qat-q4_0-gguf \
  -ngl 999 --host 0.0.0.0 --port 8080
Restart=on-failure
RestartSec=5s
StandardOutput=file:/home/deploy/llama.cpp/logs/llama-server-gemma3.stdout.log
StandardError=file:/home/deploy/llama.cpp/logs/llama-server-gemma3.stderr.log

[Install]
WantedBy=multi-user.target
To enable your new systemd service, reload systemd's configuration with:
systemctl daemon-reload
Where you'll now be able to use systemd to start/stop/restart your llama-service with:
systemctl start llama-server-gemma3
Typed Open AI Chat APIs in 11 Languages
Since AI Server is written in ServiceStack we're able to use its OpenAI Compatible Chat API DTOs to enable typed integrations in its 11 supported languages.
Access llama-server from C#
- Create an empty console application:
dotnet new console
- Add the ServiceStack.Client NuGet package:
dotnet add package ServiceStack.Client
- Download AI Server's Typed C# DTOs:
npx get-dtos csharp https://openai.servicestack.net
- Call llama-server's OpenAI Chat API from C#:
// Program.cs
using ServiceStack;
using ServiceStack.Text;
using AiServer.ServiceModel;

var client = new JsonApiClient("https://localhost:8000");
var result = await client.PostAsync<OpenAiChatResponse>("/v1/chat/completions",
    new OpenAiChatCompletion {
        Messages = [
            new () { Role = "user", Content = "What's the capital of France?" }
        ],
        MaxTokens = 50
    });

result.PrintDump();
Run the program:
dotnet run
Access llama-server from Node or Bun with TypeScript
- Add the
@servicestack/clientclient library:
npm install @servicestack/client
- Download AI Server's TypeScript DTOs:
npx get-dtos typescript https://openai.servicestack.net
Call llama-server with TypeScript DTOs and the generic JsonServiceClient
import { JsonServiceClient, Inspect } from "@servicestack/client"
import { OpenAiChatCompletion } from "./dtos"

const client = new JsonServiceClient("https://localhost:8000")

const result = await client.postToUrl("/v1/chat/completions",
    new OpenAiChatCompletion({
        messages: [
            { role: "user", content: "What's the capital of France?" }
        ],
        max_tokens: 50
    })
)

Inspect.printDump(result)
Managed AI Server Gateway
If your organization needs to maintain a number of AI integrations you may want to consider running them behind a Managed AI Gateway so that your App's only need to be configured to use a single endpoint, abstracting away all the complexity of managing multiple AI Providers, API Key managment and monitoring behind a single location.
Open Source AI Server
To support this use-case we're developing AI Server - an OSS self-hosted managed gateway that our production AI Applications utilize for all their AI requirements.
AI Server allows you to orchestrate your systems AI requests through a single self-hosted application to control what AI Providers App's should use without impacting their client integrations. It serves as a private gateway to process LLM, AI, and Media Transformations, dynamically delegating tasks across multiple providers.

Benefits include:
- Unified AI Gateway - Centralized management, load balance and monitor AI usage
- Multi Providers - Manage multiple self-hosted llama-server/Ollama instances or API Hosted LLMs (e.g. OpenAI, Anthropic, Mistral AI, Google, OpenRouter, Groq)
- Load Balancing - Delegate requests across multiple providers hosting same model
- Developer UX - Simple Typed AI access to developer friendly APIs in 11 different languages supporting Synchronous, Queued and Web Callback integrations
- Secure access - Only allow access from Auhtorized Apps using simple API keys
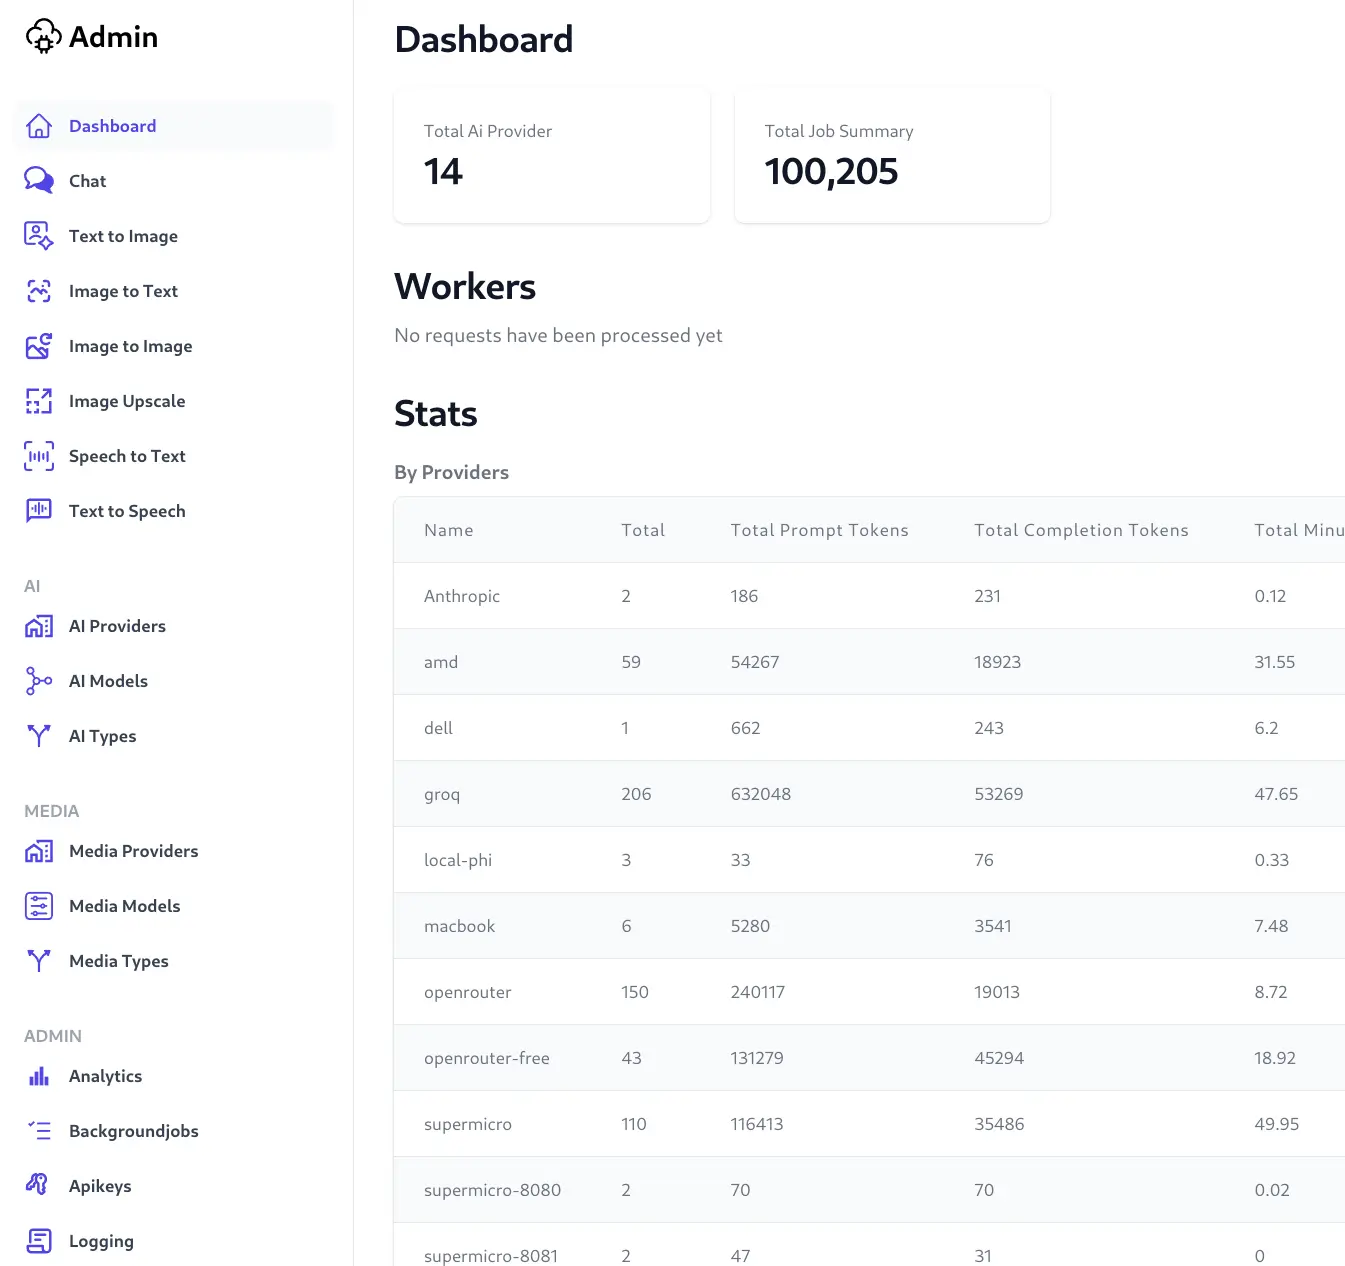
- Analytics - Observe and monitor your Organizations AI Usage
- Background Jobs - Monitor executing AI requests in real-time
- Audit History - Access previous AI Request/Responses in monthly archivable DBs
Install
AI Server can be installed on Linux, macOS or WSL/Windows with Docker
- Clone the Repository
- Run the Installer
cd ai-server && cat install.sh | bash
This will launch a self-hosted instance of AI Server at: https://localhost:5006 where you'll be able to Sign In with your chosen Admin password at installation and access AI Server's Admin UI at:
https://localhost:5006/admin
Registering llama-server endpoints
To let AI Server know about your new llama-server instances create a new AI Provider with the Custom AI Provider type to register an OpenAI Chat compatible endpoint, e.g:
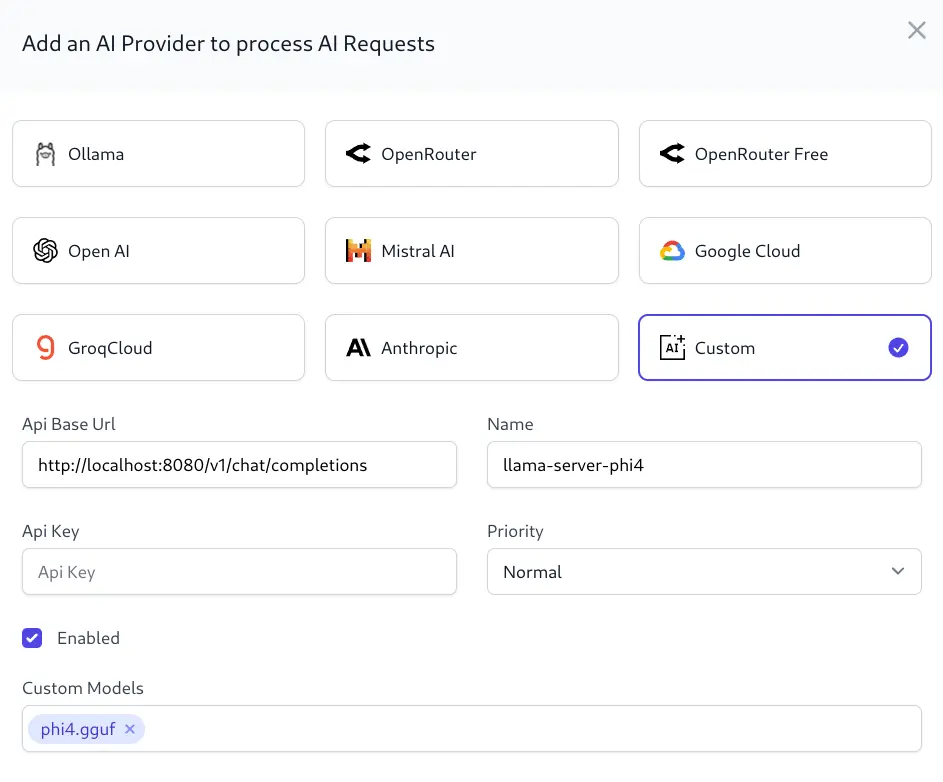
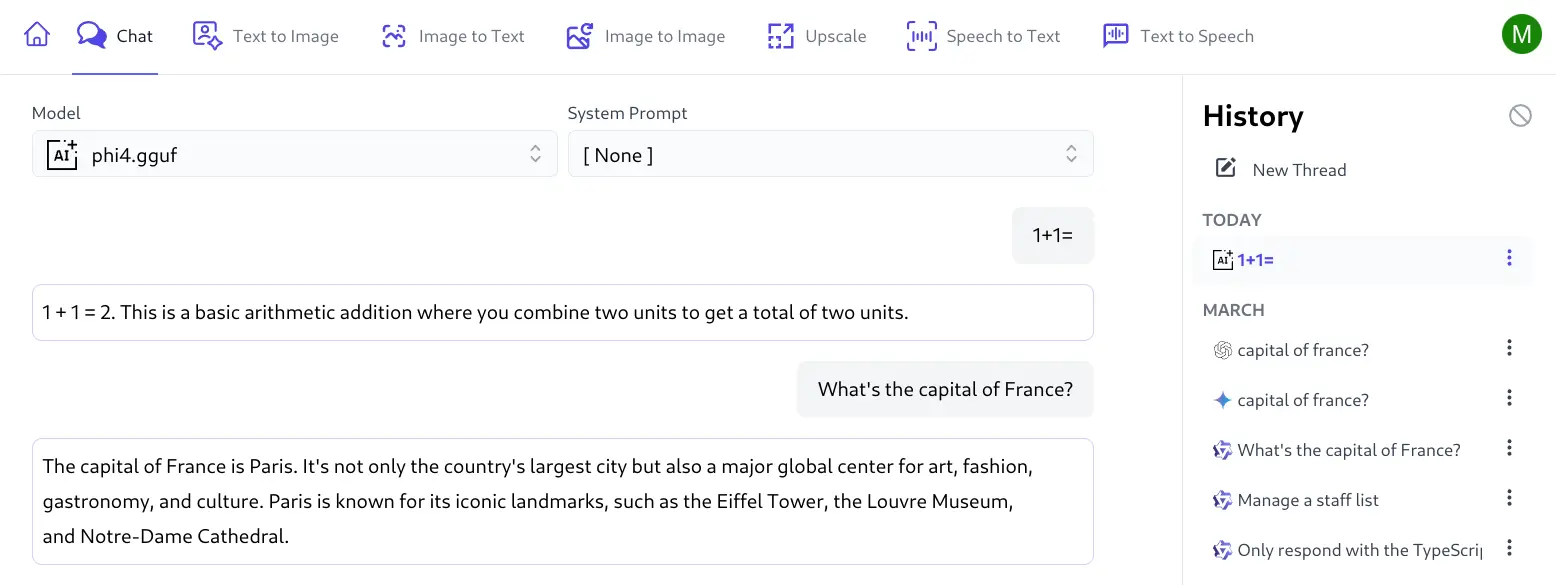
As llama-server is only configured to serve a single model it can configured with any model name as it's ignored by llama-server but used by AI Server to route AI requests for that model to the custom AI Provider instance which you can try in the Chat UI:
Create API Keys for your Apps
After testing the llama-server instance is working with the Chat UI it's time to create API Keys for all your Apps so they can access AI Servers APIs with the API Keys UI:
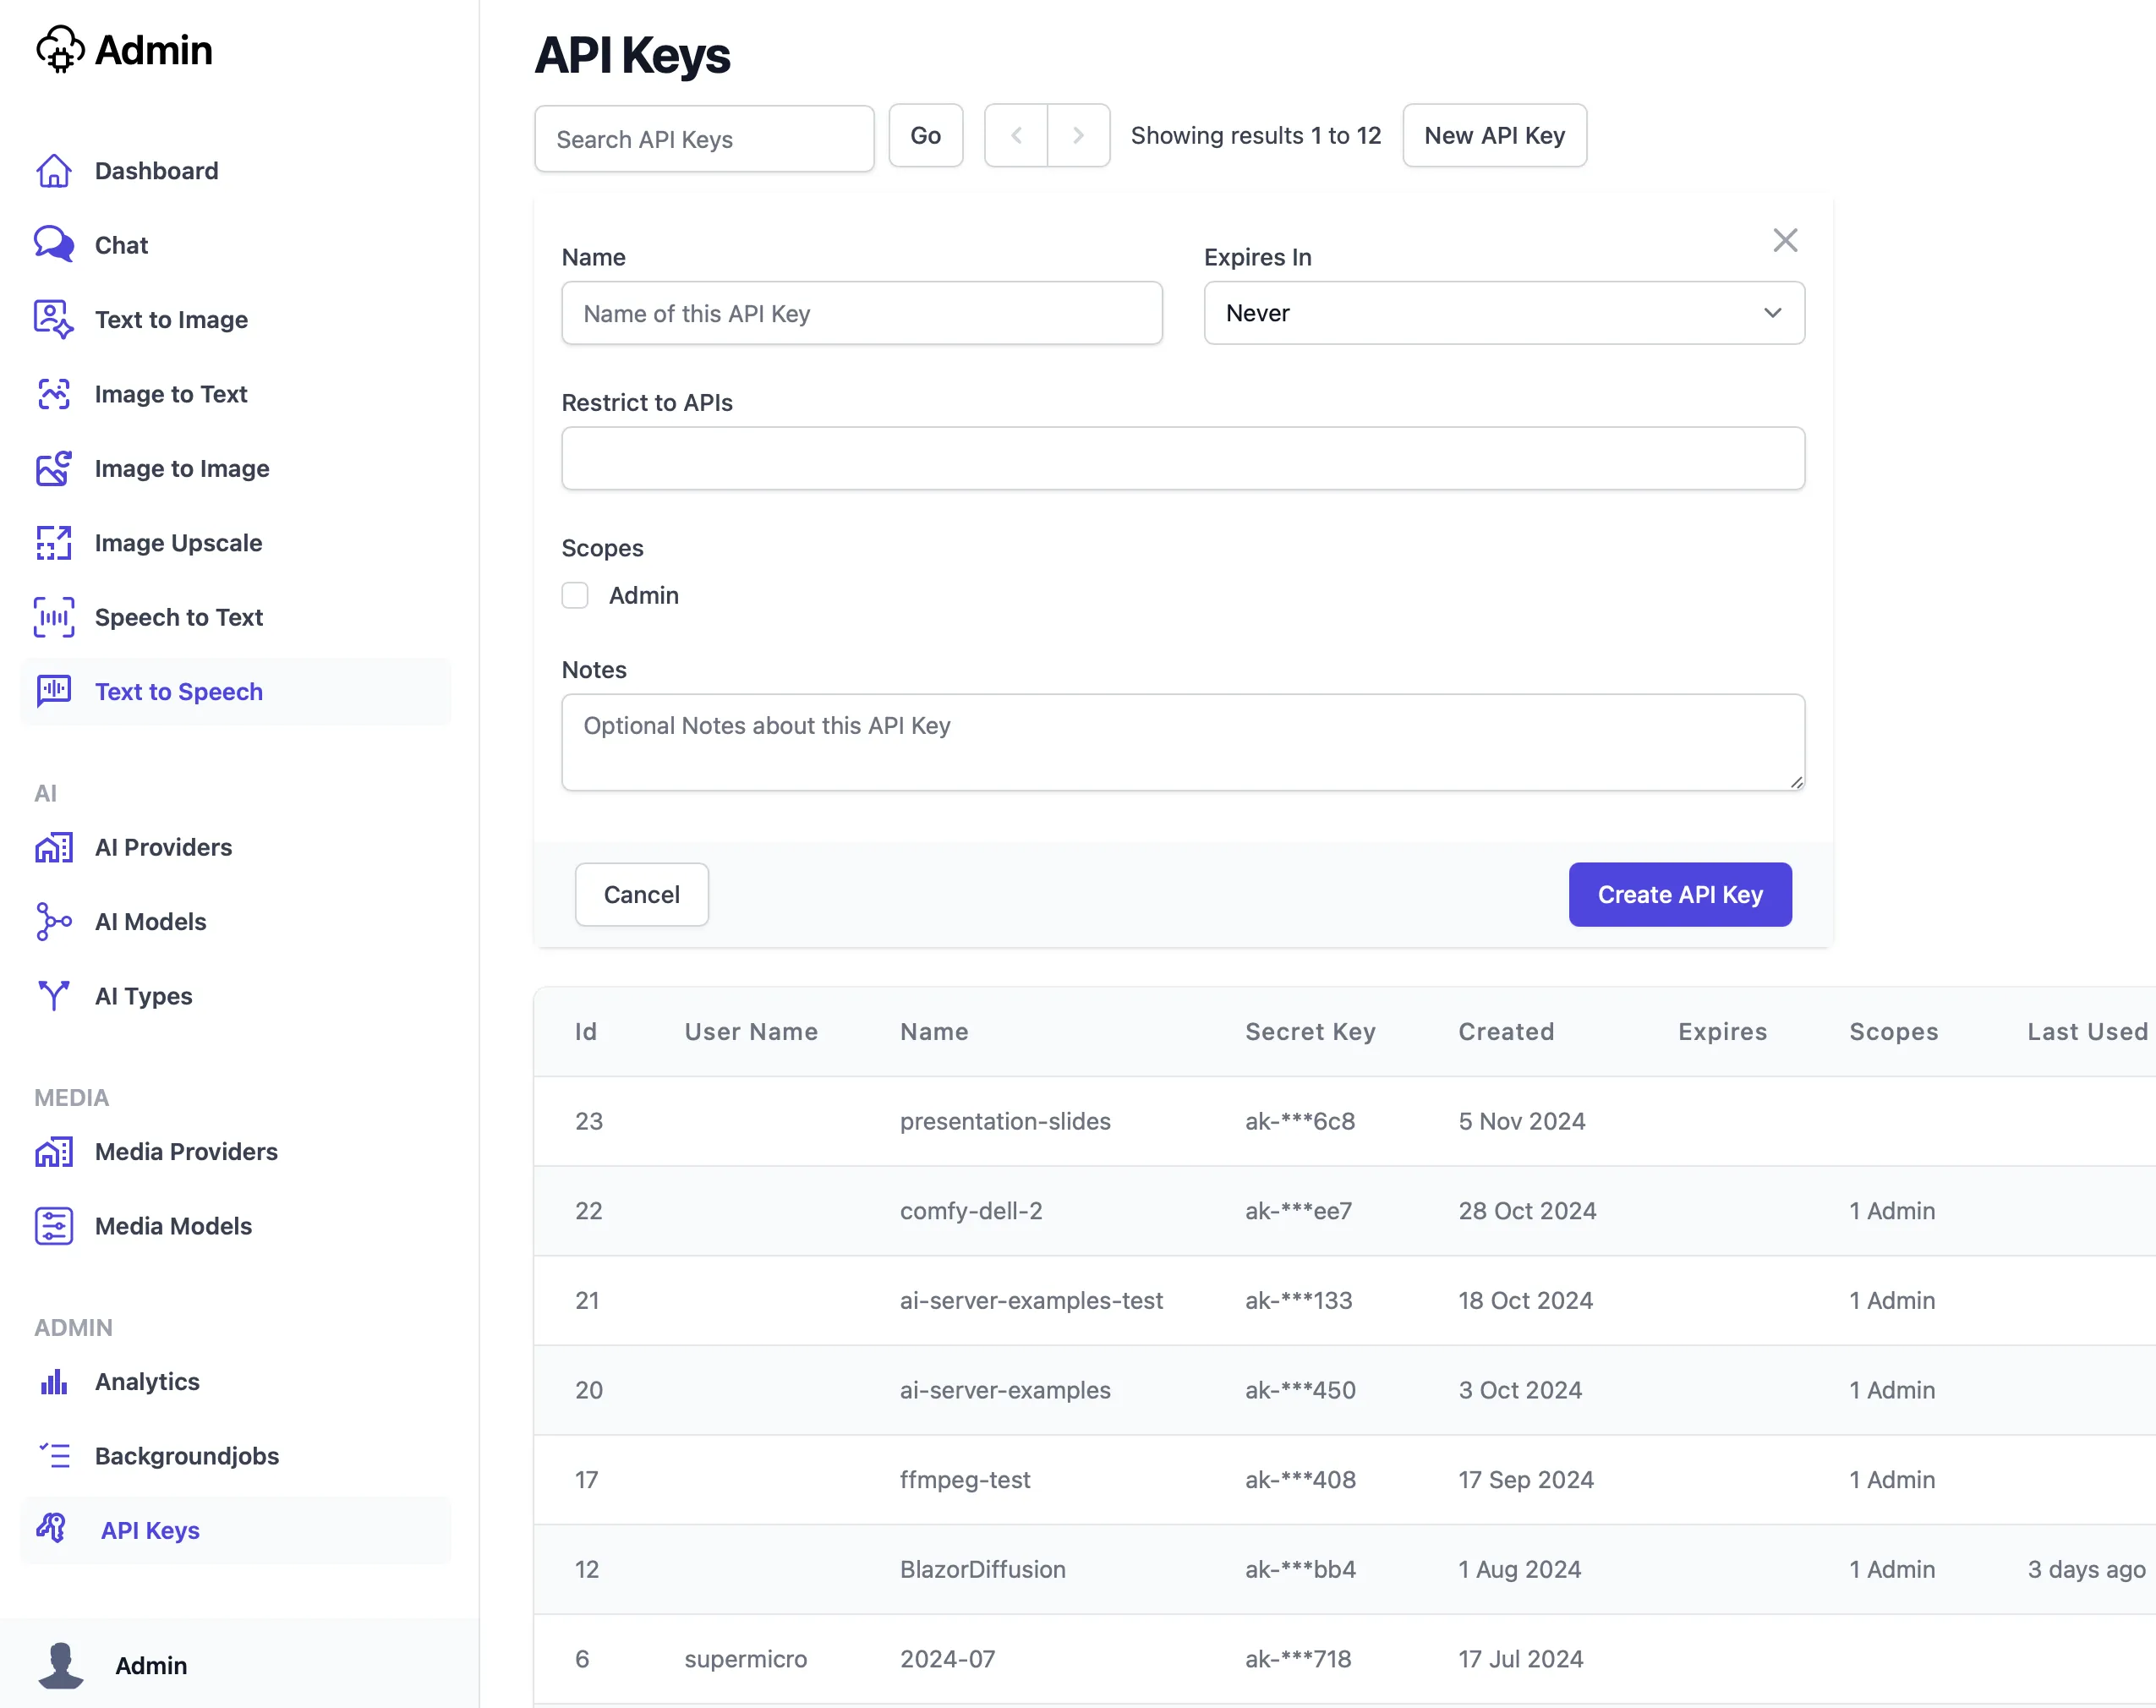
It's recommended to use a different API Key per App so they can be monitored and analyzed separately.
With a valid API Key in hand your App's can use AI Server's DTOs with ServiceStack generic service clients to enable typed integrations in 11 different languages.
Synchronous Usage Example
Here's an example of Synchronous Usage in C#:
var client = new JsonApiClient("https://localhost:5006") {
  BearerToken = Environment.GetEnvironmentVariable("AI_SERVER_API_KEY")
};

var response = await client.PostAsync(new OpenAiChatCompletion {
    Model = "phi4.gguf",
    Messages =
    [
      new() { Role = "system", Content = "You are a helpful AI assistant" },
      new() { Role = "user", Content = "How do LLMs work?" }
    ],
    MaxTokens = 50
});
var answer = response.Choices[0].Message.Content;
Queued Open AI Chat Completion
Alternatively, you can call the same endpoint asynchronously which will queue the request for processing then check the status of the request and download the response when it's ready.
var response = await client.PostAsync(new QueueOpenAiChatCompletion {
  Request = new() {
    Model = "phi4.gguf",
      Messages =
      [
        new() { Role = "system", Content = "You are a helpful AI assistant" },
        new() { Role = "user", Content = "How do LLMs work?" }
      ],
      MaxTokens = 50
    },
});

// Poll for Job Completion Status
GetOpenAiChatStatusResponse status = new();
while (status.JobState is
  BackgroundJobState.Started or BackgroundJobState.Queued)
{
    status = await client.GetAsync(new GetOpenAiChatStatus {
      RefId = response.RefId
    });
    await Task.Delay(1000);
}

var answer = status.Result.Choices[0].Message.Content;
ReplyTo Callback Chat Completion
A more reliable Application integration pattern is to provide a ReplyTo callback URL to get notified of the response when it's completed, e.g:
var response = await client.PostAsync(new QueueOpenAiChatCompletion {
  Request = new() {
    Model = "phi4.gguf",
      Messages =
      [
        new() { Role = "system", Content = "You are a helpful AI assistant" },
        new() { Role = "user", Content = "How do LLMs work?" }
      ],
      MaxTokens = 50
    },
    ReplyTo = "https://localhost:5001/api/QueueOpenAiChatResponse"
});
This enables a push notification integration where your response is not coupled to the client making the request and polling for the response. It's a more robust solution as the notification is handled by a managed background job with retries so that App's are still able to get notified of responses after deployments.