ServiceStack Sign In with Apple Auth Provider docs & Integration docs from github.com/NetCoreApps/AppleSignIn.
Sign In with Apple Requirements
- Membership Team ID from developer.apple.com/account/#/membership/
- Create & configure App ID from developer.apple.com/account/resources/identifiers/list
- Use App ID to create & configure Service ID from developer.apple.com/account/resources/identifiers/list/serviceId
- Use App ID to create & configure Private Key from developer.apple.com/account/resources/authkeys/list
App Requirements Walkthrough
Okta has a good walkthrough explaining Sign In with Apple and steps required to create the above resources.
Note: Service ID must be configured with non-localhost trusted domain and HTTPS callback URL, for development you can use:
- Domain:
dev.servicestack.com - Callback URL:
https://dev.servicestack.com:5001/auth/apple
See docs on Configure localhost development dev certificate for instructions & info for being able to use a single local.servicestack.com or dev.servicestack.com local DNS names to support local development of all platforms.
Apple Services ID configuration
If you also need to support Android you'll also need to register the https://dev.servicestack.com:5001/auth/apple?ReturnUrl=android:com.servicestack.auth URL will as a valid Callback URL in your Apple Services ID configuration.
Getting Started
As the elliptic curve algorithms required to integrate with Sign In with Apple requires .NET Core 3 APIs the AppleAuthProvider is implemented in the ServiceStack.Extensions NuGet Package.
Create project with preferred Auth Configuration
A quick way to can create a working project from scratch with your preferred configuration using the mix tool, e.g:
mkdir web && cd web
x mix init auth-ext auth-db sqlite
This creates an empty project, with Auth Enabled, adds the ServiceStack.Extensions NuGet package, registers OrmLite, SQLite and the OrmLiteAuthRepository.
Copy your Apple Private Key to your Apps Content Folder then configure your OAuth providers in appsettings.json:
{
  "oauth.apple.RedirectUrl": "https://dev.servicestack.com:5001/",
  "oauth.apple.CallbackUrl": "https://dev.servicestack.com:5001/auth/apple",
  "oauth.apple.TeamId": "{Team ID}",
  "oauth.apple.ClientId": "{Service ID}",
  "oauth.apple.BundleId": "{Bundle ID}",
  "oauth.apple.KeyId": "{Private KeyId}",
  "oauth.apple.KeyPath": "AuthKey_{Private KeyId}.p8",
  "jwt.AuthKeyBase64": "{Base64 JWT Auth Key}"
}
INFO
See JWT docs for how to Generate a new Auth Key
When needing to support Mobile or Desktop Apps using OAuth Providers like Sign In with Apple, we recommend using it in combination with the JWT Auth Provider with UseTokenCookie enabled so the Authorization is returned in a stateless JWT Token that can be persisted for optimal Authentication across App restarts, e.g:
Plugins.Add(new AuthFeature(() => new CustomUserSession(),
    new IAuthProvider[] {
        new JwtAuthProvider(AppSettings) {
            UseTokenCookie = true,
        },
        new AppleAuthProvider(AppSettings)
            .Use(AppleAuthFeature.FlutterSignInWithApple),
    }));
Clone working Client & Server Project
For a working example you can clone or fork the /NetCoreApps/AppleSignIn repo or alternatively download the latest master .zip with:
x download NetCoreApps/AppleSignIn
Then after updating appsettings.json with your iOS App's configuration, copying your Private Key into the web Content Folder you're all set to run your App:
dotnet run
Android Support
To support Android we recommend using dev.servicestack.com which resolves to the 10.0.2.2 special IP in the Android Emulator that maps to 127.0.0.1 on your Host OS. To also be able to use it during development you'll need to add an entry in your OS's hosts file
(e.g. %SystemRoot%\System32\drivers\etc\hosts for Windows or /system/etc/hosts on macOS/Linux):
127.0.0.1 dev.servicestack.com
If you don't need to support android you can use local.servicestack.com instead which resolves to 127.0.0.1, please see configuring localhost development dev certificate for more info.
Then you can view your App using the non-localhost domain name:
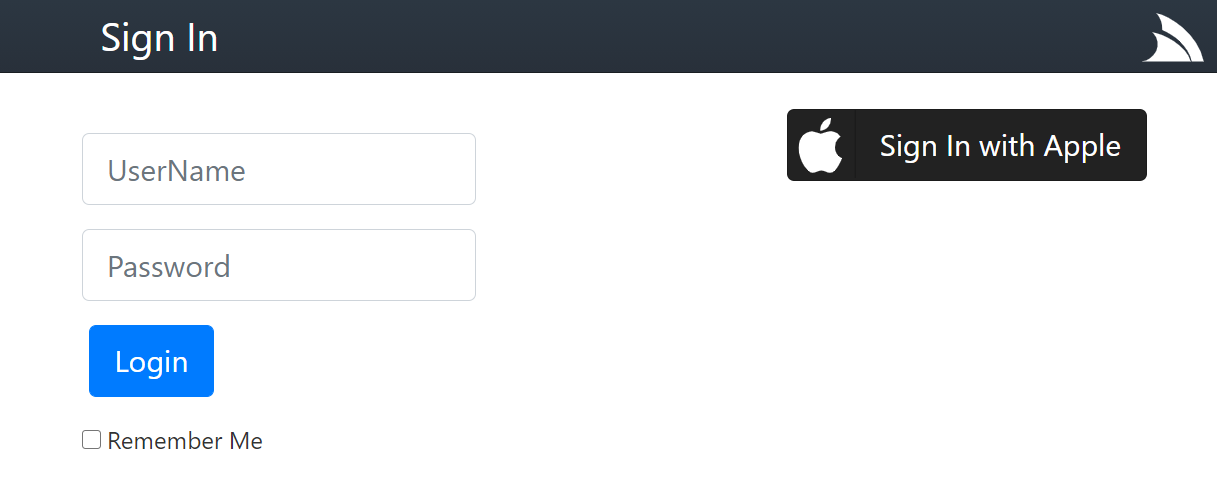
You can then use the Embedded Login Page which renders the Sign In button for each of the registered OAuth providers in your AuthFeature:
Clicking on Sign in with Apple button should let you Sign In with Apple. After successfully signing in you can view the AllUsersInfo Service to view a dump of all User Sessions & User Auth Info stored in the registered RDBMS:
Flutter iOS & Android App
A reference client Flutter iOS & Android App showcasing integration with Sign In with Apple is available at /flutter/auth.
The first task the App does is to create an instance of the IServiceClient it should use using the recommended ClientFactory API which in combination with the conditional import below returns the appropriate configured Service Client implementation for the platform it's running on, for iOS & Android it uses the native JsonServiceClient:
import 'package:servicestack/web_client.dart' if (dart.library.io) 'package:servicestack/client.dart';
//...

AppState(client: kDebugMode
  ? ClientFactory.createWith(ClientOptions(baseUrl:'https://dev.servicestack.com:5001', ignoreCert:true))
  : ClientFactory.create("https://prod.app"))
Using a constant like kDebugMode ensures that create Service Clients that ignore SSL Certificate errors are stripped from production builds.
sign_in_with_apple package
To support both iOS and Android we're utilizing the sign_in_with_apple SignInWithAppleButton which takes care of invoking iOS's native Sign In with Apple behavior as well as enabling support for Android by wrapping an OAuth Web Flow in a WebView. Both approaches, if successful will result in an Authenticated IdentityToken which you can use to Authenticate with your ServiceStack instance to establish an Authenticated session.
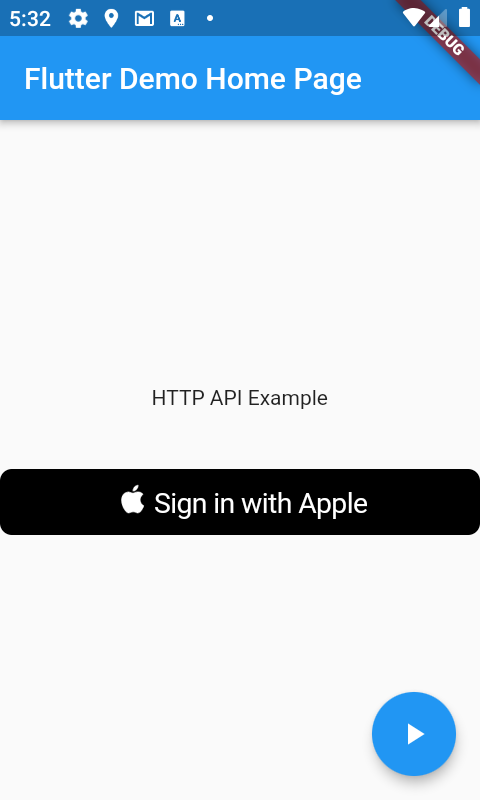
The SignInWithAppleButton functions as a normal button which is placed in your Widgets build() method where you want the UI Button to appear, in this case it'll render the Sign in with Apple button if the user is not Authenticated otherwise it renders a Sign Out FlatButton:
state.isAuthenticated
  ? FlatButton(onPressed: state.signOut, child: Text('Sign Out'))
  : SignInWithAppleButton(onPressed: () async { await handleSignIn(state); })
When either is pressed it invokes its onPressed event where the Apple Sign in functionality is initiated,
within the handleSignIn implementation which reflects the behavior of the different platforms with Android
using the OAuth Web Flow to authenticate with its ReturnUrl needing the Android's App Id that it should redirect to.
The native integration in iOS is more streamlined with iOS handling the Auth flow with Apple's servers:
var clientID = "net.servicestack.myappid";
var redirect = "https://dev.servicestack.com:5001/auth/apple?ReturnUrl=android:com.servicestack.auth";
var scopes = [ AppleIDAuthorizationScopes.email, AppleIDAuthorizationScopes.fullName ];
final credentials = Platform.isAndroid
  ? await SignInWithApple.getAppleIDCredential(scopes:scopes,
      webAuthenticationOptions:WebAuthenticationOptions(clientId:clientID,redirectUri:Uri.parse(redirect)))
  : await SignInWithApple.getAppleIDCredential(scopes:scopes);
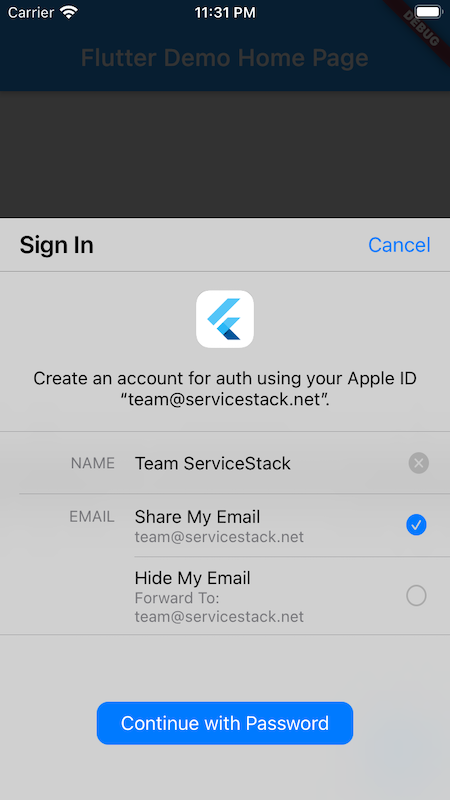
New User Registration
When a user signs into your App the first time they'll be presented with the option on what name they want to use and whether or not they want to provide their own email or use Apple's hidden email forwarding service:
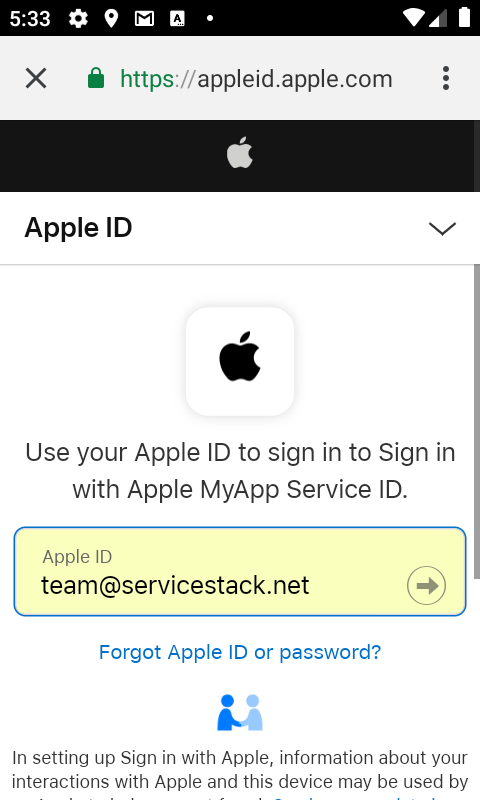
Subsequent re-authentication attempts in iOS are more seamless & effortless for users whilst Android users will still need to go through the OAuth web flow:
If Sign in is successful it will return the identity token which we can use to Authenticate against our remote ServiceStack instance. Importantly Apple only returns the Users name on its initial sign in which we'll
need to include in our Authenticate request in order for it to be used when creating the new user account.
The same code can also be used to re-authenticate existing users:
// Sign in with Apple success!
var idToken = credentials.identityToken;

// Authenticate with server using idToken & convert into stateless JWT Cookie + persistent auth token
var response = await state.client.post(Authenticate()
    ..provider = 'apple'
    ..accessToken = idToken, args: {
        'authorizationCode': credentials.authorizationCode,
        'givenName': credentials.givenName,
        'familyName': credentials.familyName,
    }); // JwtAuthProvider.UseTokenCookie returns session as JWT

state.saveAuth(response);
Persistent Authenticated Sessions
We recommend using JWT to store authenticated sessions as it allows using a single approach to support multiple OAuth providers, inc. Username/Password Credentials Auth if you want your App to support it, it's also the fastest & most resilient Auth Provider which requires no I/O to validate & no server state as it's all encapsulated within the stateless client JWT token.
As all DTOs are JSON Serializable, the easiest way to persist Authentication is to save the AuthenticateResponse
(which contains both JWT Bearer & Refresh Tokens) in Flutter's SharedPreferences abstraction which has implementations
available in all its supported platforms.
Populating a Service Client with bearerToken and refreshToken enables it to make authenticated requests which is
done on successful Sign in requests and when the App is initialized which is also what allows for persistent authentication across App restarts.
class AppState extends ChangeNotifier {
  SharedPreferences prefs;
  IServiceClient client;
  AuthenticateResponse auth;
  bool hasInit = false;

  bool get isAuthenticated => auth != null;

  AppState({this.client});

  Future<AppState> init() async {
    prefs = await SharedPreferences.getInstance();
    var json = prefs.getString('auth');
    auth = json != null ? AuthenticateResponse.fromJson(jsonDecode(json)) : null;

    initClientAuth(client, auth);

    if (auth != null && !await checkIsAuthenticated(client)) {
      auth = client.bearerToken = client.refreshToken = null;
      prefs.remove('auth');
    }
    hasInit = true;
    return this;
  }

  void signOut() => saveAuth(null);

  void saveAuth(AuthenticateResponse response) {
    auth = response;
    if (auth != null) {
      var json = jsonEncode(auth.toJson());
      prefs.setString('auth', json);
    } else {
      prefs.remove('auth');
    }
    initClientAuth(client, auth);
    notifyListeners();
  }
}

void initClientAuth(IServiceClient client, AuthenticateResponse auth) {
  client.bearerToken = auth?.bearerToken;
  client.refreshToken = auth?.refreshToken;
  if (auth == null) {
    client.clearCookies();
  }
}

Future<bool> checkIsAuthenticated(IServiceClient client) async {
  try {
    await client.post(Authenticate());
    return true;
  } catch (e) {
    return false;
  }
}
When signing out we also want to remove its cookies to clear its ss-tok authenticated JWT Cookie inc. any other user identifying cookies.
The call to notifyListeners() is part of Flutter's ChangeNotifier
Simple app state management solution which notifies widgets using it of state changes, triggering re-rendering of its UI.
Authenticated API Requests
To test Authentication the App makes a call to HelloSecure Secured C# ServiceStack Service that validates Auth only
access using the [ValidateIsAuthenticated] declarative validation attribute:
[ValidateIsAuthenticated]
[Route("/hello/secure")]
[Route("/hello/secure/{Name}")]
public class HelloSecure : IReturn<HelloResponse>
{
    public string Name { get; set; }
}

public class HelloResponse
{
    public string Result { get; set; }
}

public class MyServices : Service
{
    public object Any(HelloSecure request) =>
        new HelloResponse { Result = $"Secure {request.Name}!" };
}
Which uses the Dart client DTOs generated using the Dart ServiceStack Reference feature to perform its Typed API Request:
  floatingActionButton: FloatingActionButton(
    onPressed: _callService,
    tooltip: 'HTTP API Example',
    child: Icon(Icons.play_arrow),
  ), // This trailing comma makes auto-formatting nicer for build methods.

//...

  Future<void> _callService() async {
    try {
      var client = Provider.of<AppState>(context, listen: false).client;
      var response = await client.get(HelloSecure()..name = "Flutter");
      setState(() {
        result = response.result;
      });
    } on WebServiceException catch (e) {
      setState(() {
        result = "${e.statusCode}: ${e.message}";
      });
    }
  }
Which if authenticated will update the UI with API Response for both iOS:
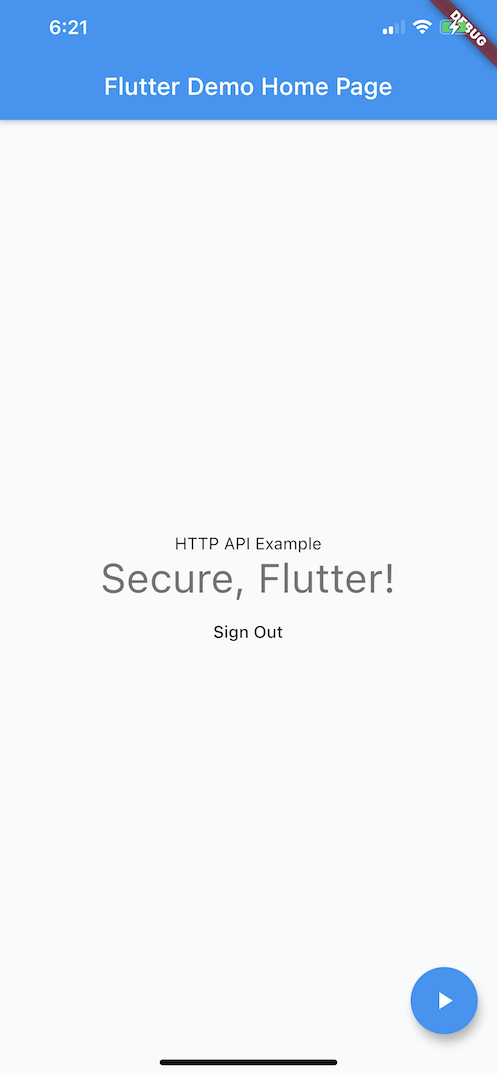
and Android:
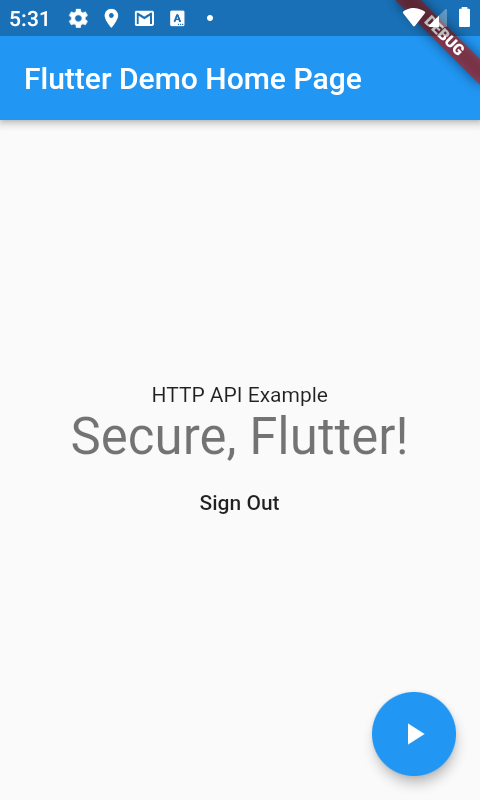
Or fail with an Unauthorized: Not Authenticated error if the user is not Signed in.
Resetting App Sign in
As the Sign in behavior is different for new & existing users you may need to find yourself needing to retest the new user workflow which you can do by removing your existing relationship to your App by signing into your Apple Id:
Then under Security click on Manage apps & websites...
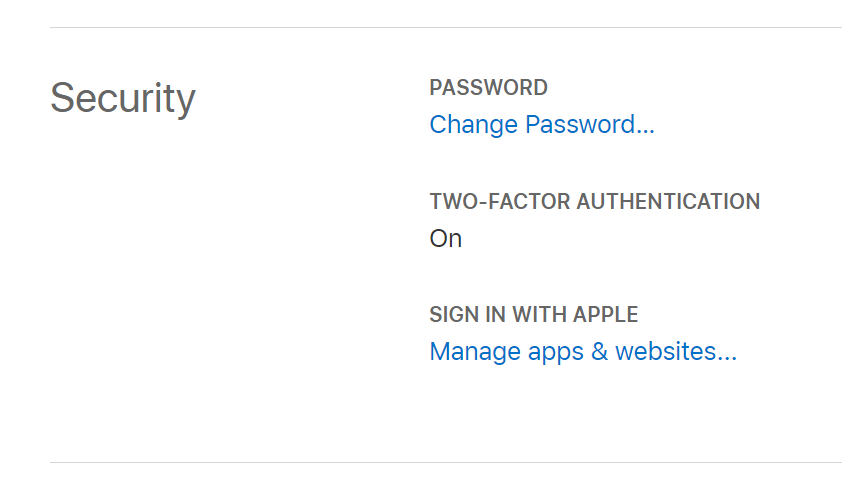
Which will let you delete your existing user id and relationship with existing Apps you've signed into:
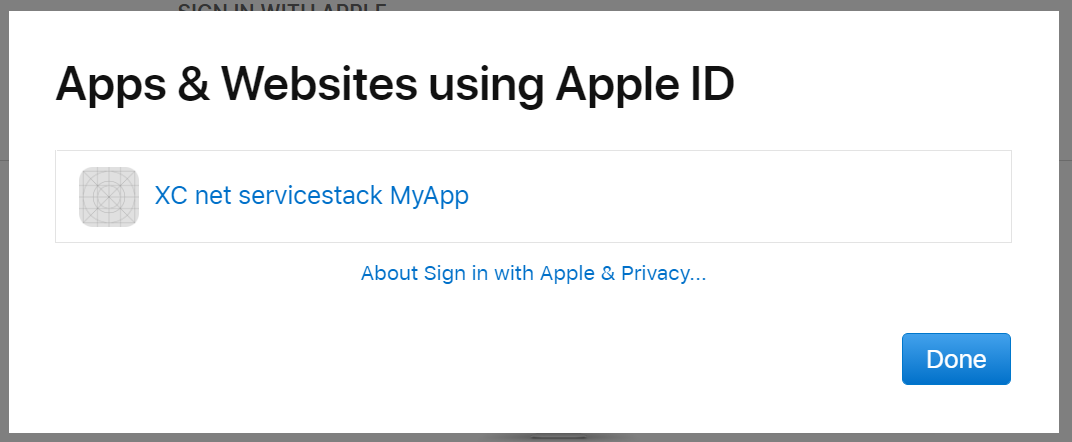
Now next time you Sign in to your App it will behave as an initial new User request complete with a new unique user id.
Flutter Android sign_in_with_apple requirements
It's already configured in this project, but to be able to use sign_in_with_apple in your own Flutter Android Apps you'll need to register this Android intent in your AndroidManifest.xml:
<application ...>

    <!-- Set up the Sign in with Apple activity, such that it's callable from the browser-redirect -->
    <activity
        android:name="com.aboutyou.dart_packages.sign_in_with_apple.SignInWithAppleCallback"
        android:exported="true"
        >
        <intent-filter>
            <action android:name="android.intent.action.VIEW" />
            <category android:name="android.intent.category.DEFAULT" />
            <category android:name="android.intent.category.BROWSABLE" />

            <data android:scheme="signinwithapple" />
            <data android:path="callback" />
        </intent-filter>
    </activity>

    <!-- Don't delete the meta-data below.
            This is used by the Flutter tool to generate GeneratedPluginRegistrant.java -->
    <meta-data
        android:name="flutterEmbedding"
        android:value="2" />

</application>
ServiceStack AppleAuthProvider configuration
This client App configuration works in combination with the Server's AppleAuthProvider to redirect to your Android's App intent which needs to be configured with:
new AppleAuthProvider(AppSettings)
    .Use(AppleAuthFeature.FlutterSignInWithApple),
Where it adds support for ?ReturnUrl=android:<android-package-id> Callback URLs that your Flutter Android App needs to use.
SwiftUI App
The /NetCoreApps/AppleSignIn repo also includes a SwiftUI iOS Example App available at /swift/MyApp as it'll likely end up being another popular platform that will utilize Sign in with Apple.
It's a good idea to checkout Apple's official docs for their recommended approach for Implementing User Authentication with Sign in with Apple in Swift Apps which includes a sample iOS Storyboard Swift App which enlists the built-in Authentication Services Framework for iOS's native Sign in feature.
For simplicity & comparison purposes we've developed an App similar to the Flutter example using Apple's new declarative state-of-the-art SwiftUI Framework, which like Flutter is a declarative Reactive UI Framework allowing you to construct your App's UI & logic in code - most of which is contained within ContentView.swift.
Real device needed to test Sign in with Apple
Whilst the iOS Simulator can run the rest of the App, a real device was needed to test the actual Sign in functionality which otherwise hangs in the simulator which has been reported is due to 2FA which is required to use Sign in with Apple.
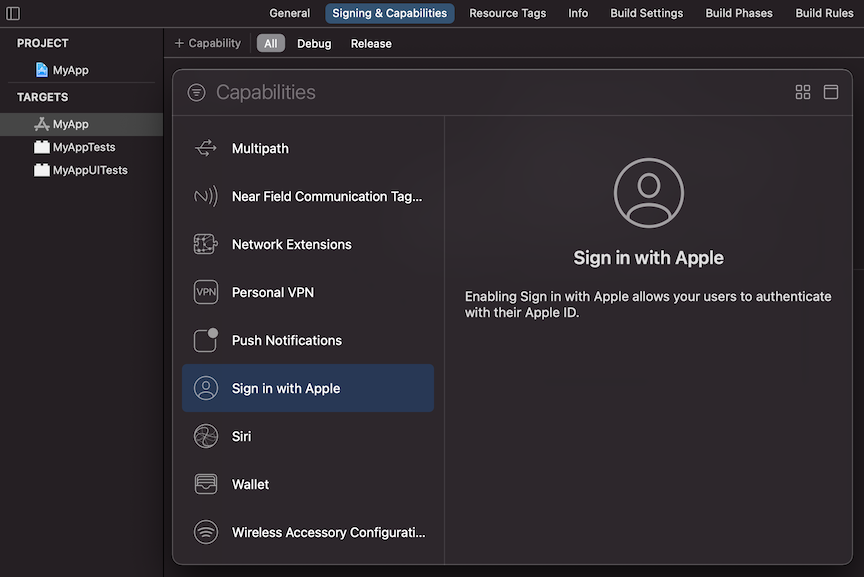
Enabling Sign In With Apple Capability
To enable Sign In functionality in your iOS App you'll need to add the Sign in with Apple capability in your App's Target > Signing & Capabilities window:
SwiftUI Layout
SwiftUI's declarative API is able to expressively capture our UI in its different states within this code fragment below:
struct ContentView: View {
    @ObservedObject var vm = ViewModel()

    var body: some View {
         VStack {
            if !vm.hasInit {
                Text("Loading...")
            } else {
                Text(vm.result)
                Button("Go!") {
                    vm.doSecureRequest()
                }
                if let auth = vm.auth {
                    VStack {
                        Text("Hi \(auth.displayName ?? "")")
                        if vm.authState != "" {
                            Text("authState: \(vm.authState)")
                                .foregroundColor(vm.authState == "authorized" ? .green : .primary)
                        }
                        Button("Sign Out") { vm.signOut() }
                    }
                } else {
                    AppleSignInButton()
                        .frame(width: 200, height: 50)
                        .onTapGesture {
                            self.vm.getRequest()
                        }
                }
            }
        }
    }
}

struct AppleSignInButton: UIViewRepresentable {
 func makeUIView(context: Context) -> ASAuthorizationAppleIDButton {
  return ASAuthorizationAppleIDButton(
    authorizationButtonType: .signUp,
    authorizationButtonStyle: .white)
 }
 func updateUIView(_ uiView: ASAuthorizationAppleIDButton, context:Context) {}
}
Which for an initialized unauthenticated user will render the Go! button with a Sign in button:
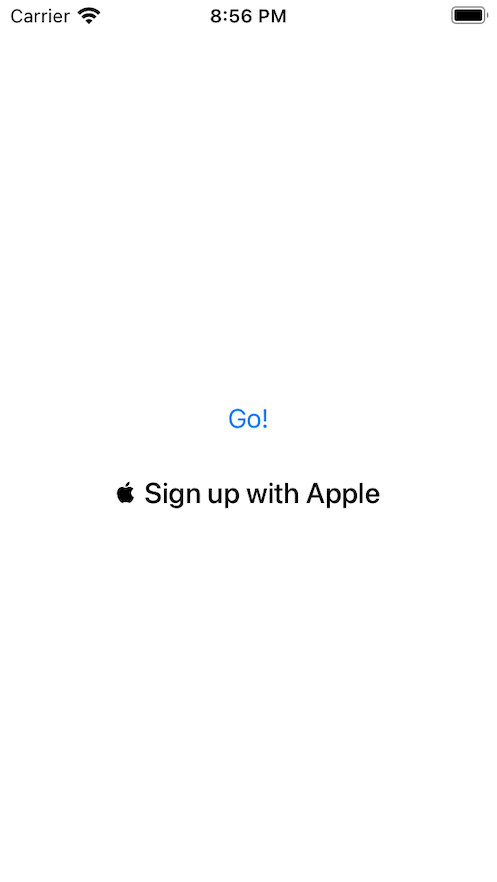
The Sign in buttons UI is defined by AppleSignInButton() which is our wrapper around Apple's ASAuthorizationAppleIDButton() that allows for several customizations to change its appearance.
When the button is pressed it calls our ViewModel getRequest() method to initiate the Sign in request.
@ObservedObject is one of SwiftUI's constructs for managing state, effectively it's the mechanism by which your App modifies to re-render its UI. A good article explaining the features and differences of each construct can be found in
SwiftUI: @State vs @StateObject vs @ObservedObject vs @EnvironmentObject.
Inside getRequest() we can see it's just calling signInWithApple.getAppleRequest() which is our custom controller
used to manage the Sign in request.
class ViewModel: ObservableObject {
    private lazy var signInWithApple = SignInWithAppleCoordinator(vm:self)
    private lazy var client = createClient()

    func createClient() -> JsonServiceClient {
        let client = JsonServiceClient(baseUrl: "https://dev.servicestack.com:5001")
        client.ignoreCert = true
        return client
    }

    @Published var auth: AuthenticateResponse?
    var isAuthenticated:Bool { auth != nil }
    @Published var hasInit:Bool = false
    @Published var result:String = ""
    @Published var authState:String = ""

    func getRequest() {
        signInWithApple.getAppleRequest()
    }
    //....
}
The SignInWithAppleCoordinator uses the ASAuthorizationController to initiate the request and assigns itself as the ASAuthorizationControllerDelegate used to handle its success & error callbacks:
final class SignInWithAppleCoordinator : NSObject {
    let vm: ViewModel
    init(vm:ViewModel) {
        self.vm = vm
    }

    func getAppleRequest() {
        let appleIdProvider = ASAuthorizationAppleIDProvider()
        let request = appleIdProvider.createRequest()
        request.requestedScopes = [.fullName, .email]
        let authController = ASAuthorizationController(authorizationRequests: [request])
        authController.delegate = self
        authController.performRequests()
    }

    private func setUserInfo(for credential: ASAuthorizationAppleIDCredential) {
        ASAuthorizationAppleIDProvider().getCredentialState(forUserID: credential.user, completion: {
          credentialState, error in
            var authState: String?
            switch credentialState {
            case .authorized: authState = "authorized"
            case .notFound: authState = "notFound"
            case .revoked: authState = "revoked"
            case .transferred: authState = "transferred"
            @unknown default: fatalError()
            }
            self.vm.setUser(credential:credential, authState:authState!)
        })
    }
}

extension SignInWithAppleCoordinator : ASAuthorizationControllerDelegate
{
    func authorizationController(controller: ASAuthorizationController,
      didCompleteWithAuthorization authorization: ASAuthorization) {
        if let credential = authorization.credential as? ASAuthorizationAppleIDCredential {
            setUserInfo(for: credential)
        }
    }

    func authorizationController(controller: ASAuthorizationController, didCompleteWithError error: Error) {
        print("Sign In with Apple Error: \(error.localizedDescription)")
    }
}
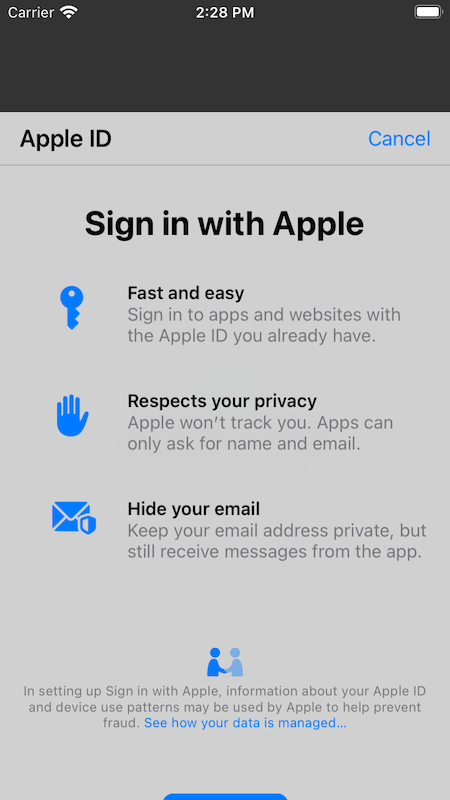
The Sign in request is initiated with authController.performRequests() which on first usage launches a splash screen
explaining the benefits of Sign in with Apple:
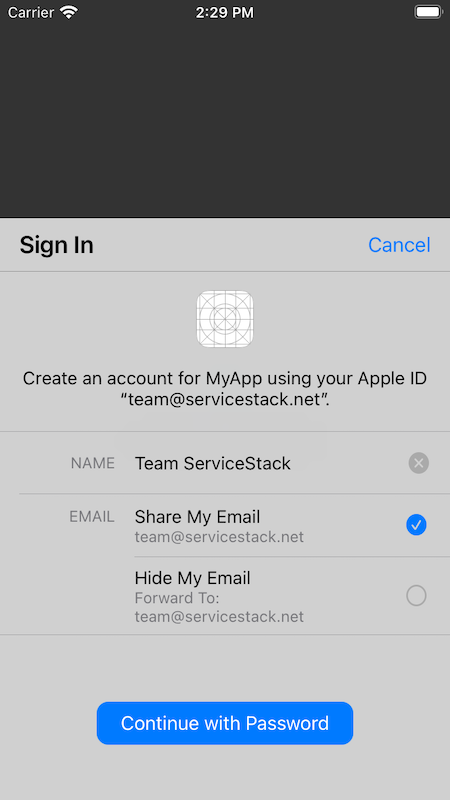
Then new users will be able to customize the name & email they'll share with your App:
Upon successful authentication the authorizationController callback gets invoked with the users credentials captured
in the ASAuthorizationAppleIDCredential struct that eventually calls setUser() with both the authenticated credential and its authState.
setUser() then uses the authorized credential to authenticate with our remote ServiceStack instance, passing
through the givenName and familyName that are only populated on a new Users initial Sign in request with the App.
func setUser(credential: ASAuthorizationAppleIDCredential, authState: String) {

    DispatchQueue.main.async {
        self.authState = authState

        if authState == "authorized" {
            let request = Authenticate()
            request.provider = "apple"
            request.accessToken = String(decoding:credential.identityToken!, as: UTF8.self)
            request.meta = [
                "authorizationCode": String(decoding:credential.authorizationCode!, as: UTF8.self),
                "givenName": credential.fullName?.givenName ?? "",
                "familyName": credential.fullName?.familyName ?? "",
            ]
            _ = self.client.postAsync(request)
                .done { r in
                    self.auth = r
                    UserDefaults.standard.set(r.toJson(), forKey: "auth")
                    self.client.bearerToken = r.bearerToken
                    self.client.refreshToken = r.refreshToken
                }
                .catch { error in
                    let status:ResponseStatus = error.convertUserInfo()!
                    self.result = "\(status.errorCode ?? ""): \(status.message ?? "")"
                }
        }
    }
}
Like the Flutter example, we save the JSON serialized AuthenticateResponse DTO to enable persistent Authentication
across App restarts and populate the JsonServiceClient with the JWT bearerToken and refreshToken to configure
the authenticated Service Client.
To Sign out the user we can use a new fresh client instance and remove any shared cookies that were created by the previous client.
func signOut() {
    DispatchQueue.main.async {
        self.auth = nil
        HTTPCookieStorage.shared.cookies?.forEach(HTTPCookieStorage.shared.deleteCookie)
        self.client = self.createClient()
    }
    UserDefaults.standard.removeObject(forKey: "auth")
}
Loading persistent JWT Auth Tokens
Which is restored on App start and verified the JWT Token is still valid by calling the Authenticate Service
with an empty DTO which returns if Authenticated otherwise throws a 401 Unauthorized Error if they're not.
class ViewModel: ObservableObject {
  init() { load() }
  //...

  func load() {
      if let authJson = UserDefaults.standard.string(forKey: "auth"),
          let auth = AuthenticateResponse.fromJson(authJson) {
          client.bearerToken = auth.bearerToken
          client.refreshToken = auth.refreshToken
          client.postAsync(Authenticate())
              .done { r in
                  self.auth = auth
              }
              .catch { error in
                  self.client.bearerToken = nil
                  self.client.refreshToken = nil
                  UserDefaults.standard.removeObject(forKey: "auth")
              }
              .finally {
                  self.hasInit = true
              }
      } else {
          self.hasInit = true
      }
  }
}
Apple recommends maintaining Auth tokens in Keychain
Whilst this example uses UserDefaults, Apple's recommendation is to instead save auth tokens in the User's Keychain.
Authenticated Requests
With our Service Client configured with our JWT Auth Tokens it can now be used to perform authenticated requests using
the generic JsonServiceClient to send typed Swift DTOs generated from the
Swift ServiceStack Reference feature:
func doSecureRequest() {
    self.result = ""
    DispatchQueue.main.async {
        let request = HelloSecure()
        request.name = "SwiftUI"
        _ = self.client.getAsync(request)
            .done { r in
                self.result = r.result ?? ""
            }
            .catch { error in
                let status:ResponseStatus = error.convertUserInfo()!
                self.result = "\(status.errorCode ?? ""): \(status.message ?? "")"
            }
    }
}
Which when sent from an authenticated Service Client will result in the expected:

Advanced Configuration
As with ServiceStack's other OAuth Providers, the behavior of the AppleAuthProvider can be further customized with the below configuration, when registering the AppleAuthProvider or in your App's configured
App Settings:
public class AppleAuthProvider
{
    // Apple Developer Membership Team ID
    // appsettings: oauth.apple.TeamId
    public string TeamId

    // Service ID
    // appsettings: oauth.apple.ClientId
    public string ClientId

    // Bundle ID
    // appsettings: oauth.apple.BundleId
    public string BundleId

    // The Private Key ID
    // appsettings: oauth.apple.KeyId
    public string KeyId

    // Path to .p8 Private Key
    // appsettings: oauth.apple.KeyPath
    public string KeyPath

    // Base64 of .p8 Private Key bytes
    // appsettings: oauth.apple.KeyBase64
    public string KeyBase64

    // .p8 Private Key bytes
    public byte[] KeyBytes

    // Customize ClientSecret JWT
    public Func<AppleAuthProvider, string> ClientSecretFactory

    // When JWT Client Secret expires, defaults to Apple Max 6 Month Expiry
    // default: 6 months in secs
    // appsettings: oauth.apple.ClientSecretExpiry
    public TimeSpan ClientSecretExpiry

    // JSON list of Apple's public keys, defaults to fetching from https://appleid.apple.com/auth/keys
    // appsettings: oauth.apple.IssuerSigningKeysJson
    public string IssuerSigningKeysJson

    // Whether to cache private Key if loading from KeyPath,
    // default: true
    // appsettings: oauth.apple.CacheKey
    public bool CacheKey

    // Whether to cache Apple's public keys
    // default: true
    // appsettings: oauth.apple.CacheKey
    public bool CacheIssuerSigningKeys

    // How long before re-validating Sign in RefreshToken, default: 1 day.
    // Set to null to disable RefreshToken validation.
    public TimeSpan? ValidateRefreshTokenExpiry

    // Custom DisplayName resolver function when not sent by Apple
    public Func<IAuthSession,IAuthTokens, string> ResolveUnknownDisplayName
}