We're excited to announce locode.dev, our Rapid Application Development solution to quickly develop beautiful Full Stack CRUD Apps around AutoQuery APIs, suitable for a wide number of use-cases including:
- Rapid prototyping by creating an instant UI around existing Database-First RDBMS tables
- Declarative Code-First development model with unprecedented customizability (exportable from Database-First)
- Hybrid Apps with a custom UI to optimize common workflows whilst using Locode's Auto UI to manage Back office tables
As Locode's UI is built on top of ServiceStack's industrial strength AutoQuery APIs, Hybrid Apps can benefit from its superior end-to-end typed development model for creating Web, Mobile & Desktop Apps.
We've created Live Demos with full source, Docs & Videos covering all these popular use-cases, starting with Locode's Introductory video:
Creating Beautiful CRUD Apps with Locode
Develop faster
Everything you need to develop RDBMS Web Apps
Locode enables creation of intelligent, highly customizable, beautiful UX Friendly UIs, powered by rich metadata & capabilities of typed AutoQuery APIs
Powerful Filtering
Multiple flexible query filters can be applied to any searchable column
Custom Views
Users can maintain their own persistent query preferences for each table & lookup view
Export to Excel
Users can export their current filtered table view to CSV and open in Excel
Managed File Uploads
Support for single & multi file uploads with built-in integration in AutoQuery CRUD APIs
Declarative Auth & Validation
Flexible declarative Auth & Validation Rules inc. model binding in a capability driven UI
Highly Extensible
Unprecedented flexible declarative dev model, support for custom APIs, UI Forms, formatters...
Our last v6 release saw the introduction of API Explorer, a built-in UI optimized for developers to discover, learn & quickly try out all accessible APIs in a ServiceStack App. Locode is a new built-in UI created using the same technology but is instead optimized for users.
Locode vs Low Code RAD tools
RAD code-gen tools typically generates tightly-coupled & purpose-specific UIs and Server Controllers, whereas we've instead made AutoQuery APIs more sophisticated and expanded its dev model to encompass customizing UI functionality & behavior. A high-level view of these approaches can be broadly summarized as:
| Locode | Low-Code Development Platforms |
|---|---|
| Model & Contract First | Visual Editor First |
| Less code to maintain | Large code generation |
| Override only what you need | Split responsibility between visual editor & custom code |
Radzen is a popular Low-code RAD tool for .NET who also have a Northwind Sample Demo with full source code so we can see what this looks like in practice vs Locode Northwind Demo:
Northwind Auto Locode
Northwind Auto is a customized database-first Northwind App using AutoGen to generate AutoQuery & CRUD APIs in less than 120 Lines of Code in Configure.AppHost.cs

A high-level overview of their respective code bases highlights the differences of both approaches:
| Locode Northwind | Radzen Northwind |
|---|---|
| ~120 lines of C# | ~4500 lines of C# (generated) |
| 29 lines for custom Home Page | 10k+ lines of Angular HTML/TS (generated) |
| Custom UI with HTML Components | Custom UI with Angular or Blazor Components |
Essentially Locode provides a highly functional UI out-of-the-box that doesn't rely on code-gen that allows you to only override the Custom UI or Custom API implementation when needed. RAD tools are still a better choice for developers preferring the assistance of a Visual Designer, whereas Locode's declarative dev model is optimal for devs preferring a Code-First dev model.
Built on AutoQuery
Locode reduces the development to effort of creating Full Stack Apps down to declaring your Data Models and APIs with simple POCOs to define the precise schema of the underlying RDBMS tables and its API DTO contracts, that can then benefit from ServiceStack's:
- Productive end-to-end typed Development Model in 11 languages
- Declarative Dev Model for defining Authentication, Validation, Documentation & UI Customizations
- Beautiful, UX-Friendly, capability-based Customizable UI in Locode
- Rich analysis, API discoverability & simplified client integrations in API Explorer
- Powerful querying capabilities in AutoQuery
- Full executable Audit History Tracking
- Access to ServiceStack's rich ecosystem of typed clients, versatile formats & endpoints
- Seamless integrations with Open API, interactive Jupyter Notebooks & Instant Client Apps
And access to ServiceStack's rich ecosystem of features, most centered around your typed API contracts making them easy to apply to your existing Services.
All benefits attainable without needing to write a single line of implementation logic thanks to the default implementations in AutoQuery Services & Auto UIs in Locode, API Explorer & Swagger UI. At the same time when needed the default behavior can be overridden at multiple levels, from custom AutoQuery implementations on the server to custom UIs on the client.
Getting started with Locode
Locode is a feature built into ServiceStack that provides a user-friendly interface to manage data using AutoQuery CRUD services, supporting 4 major RDBMS providers including PostgreSQL, SQL Server, MySQL and SQLite.
AutoQuery services can be generated directly from your database schema or use Plain Old C# Objects (POCOs) to define its CRUD behaviour that can be further customized & extended and customized using C# attributes.
Database-First
Using AutoQuery's AutoGen enables the quickest way to modernize an existing database by generating Data Models & AutoQuery CRUD APIs from RDBMS table schemas. From Locode's point of view, the result is indistinguishable to Code-First where instead of developers defining Data Models & API Contracts in code they're dynamically generated by AutoGen at runtime, on Startup.
The difference is how APIs & Types are customized, with Code-First Types able to naturally access the Declarative Dev Model using C# Attributes, Database-First Models instead need to dynamically add attributes at runtime using AutoGen's Type & Service filters.
Exporting to Code-First Types
Database-First is a great way to rapidly build a CRUD App of an existing database, when we need even greater flexibility beyond what's possible from dynamically modifying Types at runtime, whether a custom AutoQuery implementation is needed, you want to override built-in AutoGen conventions or prefer the conventional development model of using C# and take advantage of the static analysis benefits in C# IDEs.
Exporting to code-first types retains attributes dynamically added at runtime, so all the conventions and customizations used to customize our Database-First Locode App gets codified when exporting into Code-First models with:
x csharp https://localhost:5001 -path /crud/all/csharp
Code-First
An example where we've taken this approach is with the SQLite's Chinook sample database which initially started out as a Database-First Locode App, before exporting into Code-First types, disabling AutoGen then using refactoring tools in C# IDEs to organize the code-gen types into logical files:
- Media APIs in Media.cs
- Chinook Store APIs in Store.cs
- Data Models in Types/Models.cs
Where it was developed going forward as a code-first project using Declarative Attributes to create its customized UI:
Code-first Example Locode App
The end result after applying the UI Customizations is the customized Chinook Locode App:
Chinook Locode
Chinook is a customized Code-First App using AutoGen to export Chinook's RDBMS Tables into Models.cs generating code-first AutoQuery APIs & Data Models that's further annotated to create a customized Locode App

Declarative Dev Model
Code-First is the natural development model of AutoQuery Services which facilitates the majority of a System and its UI can be developed from simple, declarative C# POCOs to define the underlying RDBMS Schema Data Models and the precise typed API DTO Contracts of their surrounding AutoQuery & CRUD APIs. The Data and Service models can be further enhanced by ServiceStack's vast declarative attributes where a significant amount of behavior, functionality and customization can be defined, ranging from:
- Customizing how Data Models map to RDBMS tables and enlist RDBMS features
- Customize Serialization & API behavior
- Define AutoQuery & CRUD API behavior
- Define Validation Rules and Authorization restrictions
- Annotate & Document APIs
- Customize UI Behavior & Appearance
Custom Forms
The Chinook Locode App also showcases of how to implement an enhanced UX beyond Locode's default UI to create Custom Forms for its Albums table by creating custom HTML & JS Components which is loaded directly in Locode.
To override Locode's built-in Form UI you can add custom PetiteVue HTML components
to your Host Project /wwwroot folder at /modules/locode/custom.html using the naming conventions below:
| Component Name | Description |
|---|---|
New{Table} |
Custom Create Form UI |
Edit{Table} |
Custom Update Form UI |
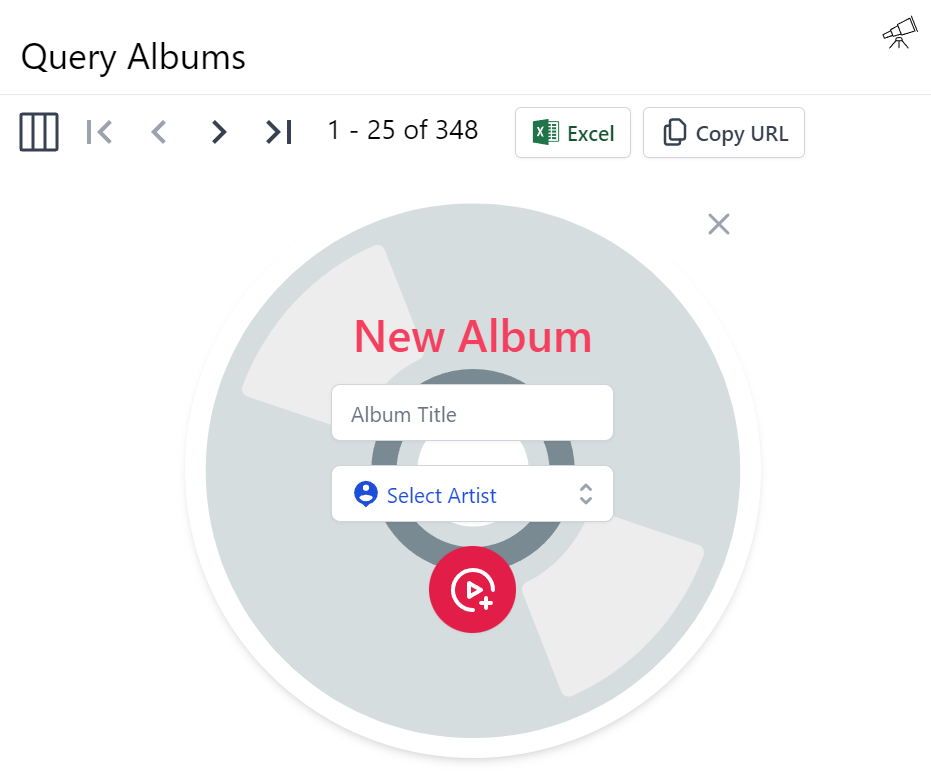
Chinook does this to create its custom Form UI for creating and editing Albums by registering NewAlbums and EditAlbums components in its
/modules/locode/custom.html to render its custom Create Album form to update its Albums table:
The custom forms also implements error handling where submitting an empty form will trigger the contextual validation errors to appear:
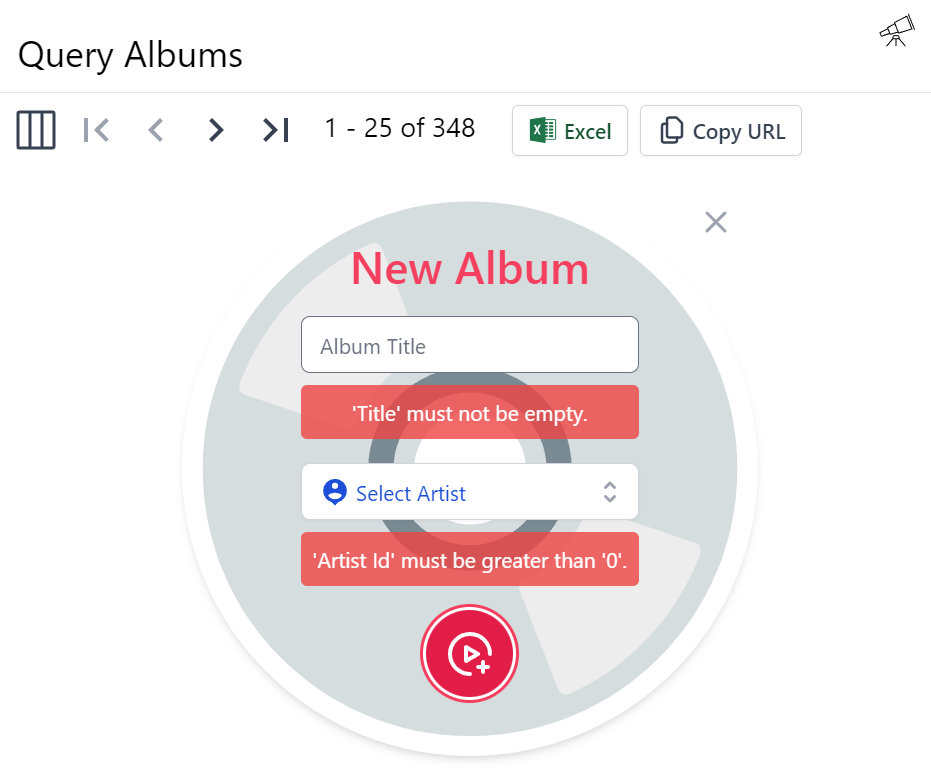
As enforced by the Declarative Validation rules on the CreateAlbums AutoQuery CRUD DTO Locode invokes when creating Albums:
[Route("/albums", "POST"), Tag(Tags.Media)]
public class CreateAlbums
    : IReturn<IdResponse>, IPost, ICreateDb<Albums>
{
    [ValidateNotEmpty]
    public string Title { get; set; }
    [ValidateGreaterThan(0)]
    public long ArtistId { get; set; }
}
For more information & a detailed walkthrough see the Custom Forms Docs.
Custom Fields and Inputs
These attributes can be used to customize how fields and HTML Input controls in the Auto Form UIs in Locode and API Explorer
| Attribute | Description |
|---|---|
[Input] |
Customize the HTML Input control for a Property in Auto Form UIs |
[Field] |
Customize the HTML Input control and Form Field CSS for a Type's Property |
[FieldCss] |
Customize a Property Form Field CSS |
[ExplorerCss] |
Customize the Form and Field CSS in API Explorer |
[LocodeCss] |
Customize the Form and Field CSS in Locode |
We'll go through some examples to explore how they can be used to customize Locode and API Explorer UIs.
From the CreateJob Request DTO below we can see that Locode uses the most appropriate HTML Input for the specific
data type, e.g. <input type=number> for numbers, <input type=date> for Date Types and <select> dropdown
for finite values like Enums.
We can also further customize each field with the [Input] attribute where we can change to use a <textarea> for
large text fields which we can pair with the [FieldCss] attribute to change the width of its encapsulating field
using TailwindCss Grid classes to change its grid width
and center its label:
public class CreateJob : ICreateDb<Job>, IReturn<Job>
{
    public string Title { get; set; }

    [ValidateGreaterThan(0)]
    public int SalaryRangeLower { get; set; }
    [ValidateGreaterThan(0)]
    public int SalaryRangeUpper { get; set; }
    [Input(Type = "textarea"), FieldCss(Field = "col-span-12 text-center")]
    public string Description { get; set; }

    public EmploymentType EmploymentType { get; set; }
    public string Company { get; set; }
    public string Location { get; set; }

    public DateTime Closing { get; set; }
}
Which renders our preferred responsive form layout:

Field
The [Field] attribute is an alternative way to define both [Input] and [FieldCss] attributes on Types which
is especially useful when you don't have the property on the Request DTO you want to define because it's in a base class,
in which case you can use [Field] on the Request DTO:
[Field(nameof(Description), Type = "textarea", FieldCss="col-span-12 text-center")]
public class CreateJob : JobBase, ICreateDb<Job>, IReturn<Job> {}
Custom Form CSS
The high-level [LocodeCss] attribute can be used to change the entire Form layout instead where you'll be able to
change the default Form, FieldSet and Field CSS classes, e.g:
[LocodeCss(Field="col-span-12 sm:col-span-6", Fieldset = "grid grid-cols-6 gap-8",
           Form = "border border-indigo-500 overflow-hidden max-w-screen-lg")]
[Field(nameof(BookingEndDate), LabelCss = "text-gray-800", InputCss = "bg-gray-100")]
[Field(nameof(Notes), Type = "textarea", FieldCss="col-span-12 text-center", InputCss = "bg-gray-100")]
public class UpdateBooking : IPatchDb<Booking>, IReturn<IdResponse>
{
    public int Id { get; set; }
    [ValidateNotNull]
    public string? Name { get; set; }
    public RoomType? RoomType { get; set; }
    [ValidateGreaterThan(0)]
    public int? RoomNumber { get; set; }
    [ValidateGreaterThan(0), AllowReset]
    public decimal? Cost { get; set; }
    public DateTime? BookingStartDate { get; set; }
    public DateTime? BookingEndDate { get; set; }
    public string? Notes { get; set; }
    public bool? Cancelled { get; set; }
}
Renders our custom Form layout:

These changes only applies to the Form when viewed in Locode, to change the Form in API Explorer use [ExplorerCss] instead:
[ExplorerCss(Field="col-span-12 sm:col-span-6", Fieldset = "grid grid-cols-6 gap-8",
             Form = "border border-indigo-500 overflow-hidden max-w-screen-lg")]
Custom HTML Components
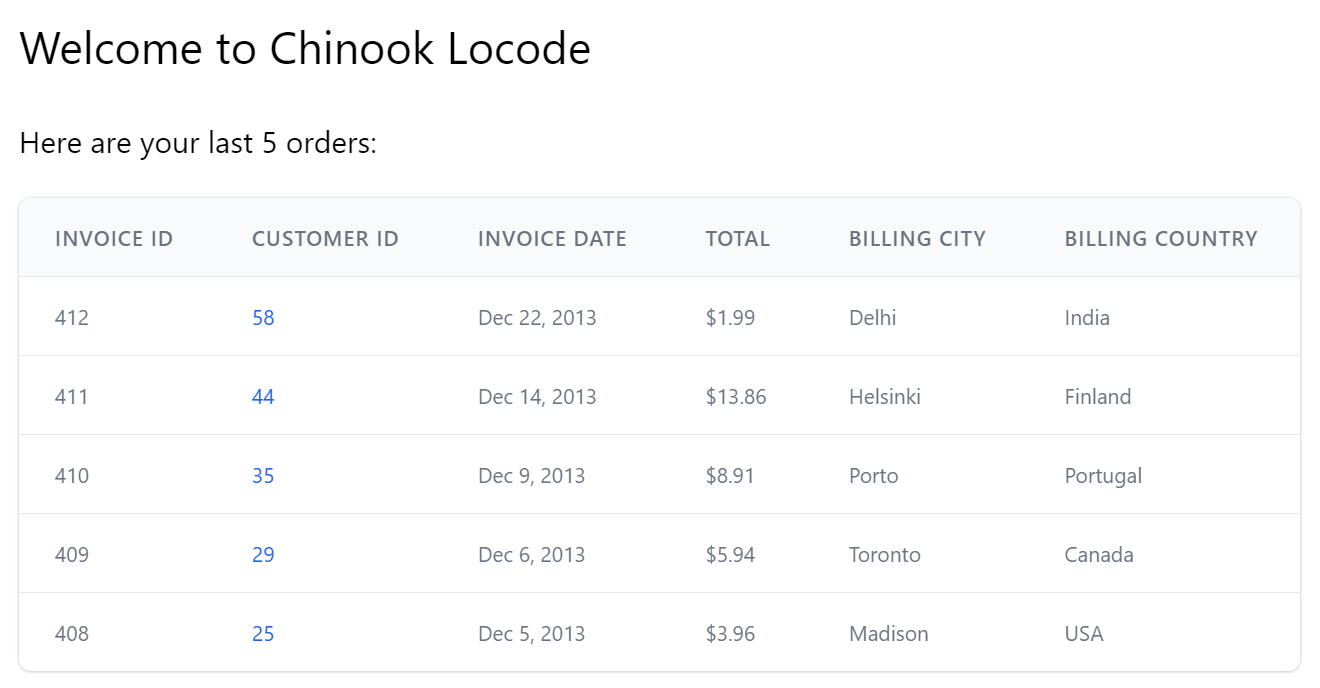
Just like the built-in API Explorer and Admin UI, each of their components can be overridden by locally adding a file at the same path. The Chinook Demo shows an example of overriding its existing /modules/locode/components/Welcome.html component in order to render its custom Home page.
In addition to using built-in Locode functionality, it also makes use of the TypeScript DTOs to call Chinooks typed APIs, by running:
$ npm run dtos
This provides the type definitions for all its APIs DTOs which makes use of the JavaScript Add ServiceStack Reference feature to preload the client DTO implementations, ready for usage in Locode Apps.
This results in providing an end-to-end typed dev UX for creating custom components to call App's APIs as done in:
<script>
import { App, client } from "@servicestack/ui/locode"
import { QueryInvoices } from "dtos"
App.components({
Welcome() {
return {
$template: '#welcome-template',
lastOrders: [],
mounted() {
client.api(new QueryInvoices({ orderBy:'-InvoiceId',
take:5,
fields:'InvoiceId,CustomerId,InvoiceDate,Total,BillingCountry,BillingCity'
}), { jsconfig: 'edv' })
.then(api => {
if (api.succeeded) {
this.lastOrders = api.response.results
}
})
}
}
}
})
</script>
<template id="welcome-template">
<div class="pl-4" @vue:mounted="mounted">
<h1 class="text-3xl">
Welcome to Chinook Locode
</h1>
<div v-if="lastOrders.length" class="mt-8">
<h3 class="text-xl mb-4">Here are your last {{lastOrders.length}} orders:</h3>
<div class="max-w-screen-md" v-scope="PreviewObject({ val:() => lastOrders })"></div>
</div>
</div>
</template>
Used to render its custom Home page:
@servicestack/ui TypeScript Definitions
Locode App development are also able to benefit from static analysis and intelli-sense by installing @servicestack/ui and importing
static types using standard ES6 import syntax which it can reference using standard JSDoc annotations
or TypeScript's JSDoc support as an alternative
to maintaining a separate custom.ts file. By using JSDoc comments directly in custom.js we can avoid the
additional build-step and get instant feedback on each save when we run our App with:
dotnet watch
To facilitate custom HTML/JS UI development we've packaged type definitions for all Locode's functionality by installing the npm package:
npm install @servicestack/ui
To enable its productive typed development UX whose changes load instantly without App restarts:
API Reference
Type definitions for all functionality available in ServiceStack UI's are published at api.locode.dev:

Library Reference
| Namespace | Description |
|---|---|
| shared | Type Definitions for all Types and shared functionality used in all UI's |
| client | Type Definitions for the @servicestack/client library |
UIs
| UI | Description |
|---|---|
| locode | Global App and Type instances available in Locode Apps |
| explorer | Global App and Type instances available in API Explorer |
| admin | Global App and Type instances available in ServiceStack's Admin UI |
Format Functions
Chinook also makes usage of Format functions to customize how its fields are displayed in its tabular result pages, e.g:

Where columns are customized using a built-in formatting function referenced by the [Format] attributes:
public class Contact : AuditBase
{
    [Format(FormatMethods.IconRounded)]
    public string ProfileUrl { get; set; }

    [Format(FormatMethods.Currency)]
    public int? SalaryExpectation { get; set; }

    [Format(FormatMethods.LinkEmail, Options =
        @"{target:'_self',subject:'New Job Opportunity',
           body:'We have an exciting new opportunity...', cls:'text-green-600'}")]
    public string Email { get; set; }

    [Format(FormatMethods.LinkPhone)]
    public string Phone { get; set; }
    //....
}
Whilst the [Intl*] attributes provide a typed API to utilize JavaScript's rich
Intl object containing the
namespace for the ECMAScript Internationalization API, which provides number formatting, and date & time formatting, e.g:

Which was rendered using the [Format] ant [Intl*] attributes below:
public class Tracks
{
    [Format(Method = "stylize", Options = "{cls:'text-rose-500'}")]
    public string Name { get; set; }

    [IntlDateTime(Minute = DatePart.Digits2, Second = DatePart.Digits2, FractionalSecondDigits = 3)]
    public long Milliseconds { get; set; }

    [Format(FormatMethods.Bytes)]
    public long? Bytes { get; set; }

    [IntlNumber(Currency = NumberCurrency.USD)]
    public decimal UnitPrice { get; set; }
    //....
}
Custom Format Function
The Name column shows an example of calling a custom stylize JavaScript function defined in
/modules/locode/custom.js:
/**: Extend locode App with custom JS **/
/** Custom [Format] method to style text with custom class
* @param {*} val
* @param {{cls:string}} [options] */
function stylize(val, options) {
let cls = options && options.cls || 'text-green-600'
return `<span class="${cls}">${val}</span>`
}
Which makes use of JSDoc and TypeScript's JSDoc support to enable rich static analysis.
Hybrid Locode Apps
Locode's declarative dev model lets you focus on your new App's business requirements where its data model, API capabilities, input validation & multi-user Auth restrictions can be defined simply using annotated C# POCOs. This provides immense value at the start of the development cycle where functional prototypes can be quickly iterated to gather business requirements
Once requirements have solidified, its typed AutoQuery APIs can easily be reused to develop custom UIs to optimize important workflows.
Talent Blazor is a new App showcasing an example of this where its entire back-office functionality can be managed through Locode whilst an optimized Blazor WASM App is created to optimize its unique workflow requirements which also benefits from the superior productive dev model of its Typed APIs
Talent Blazor Locode
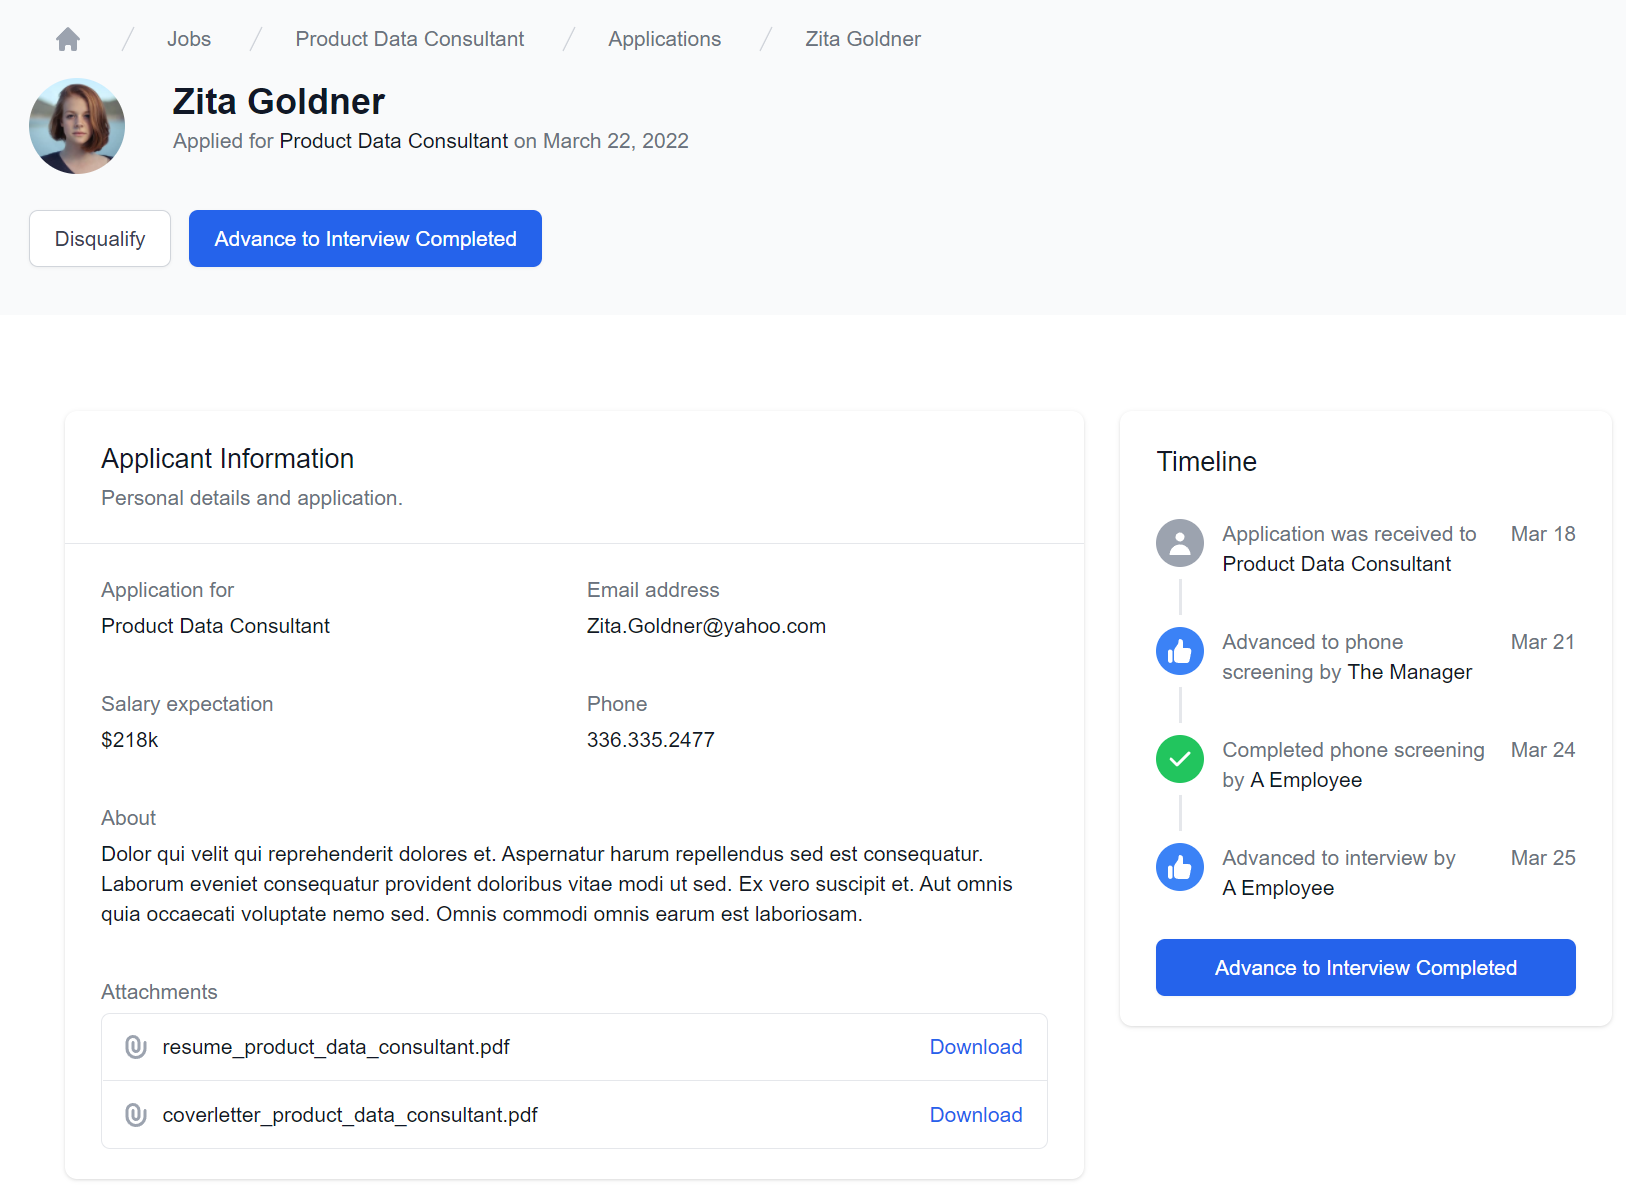
Talent Blazor is a Blazor WASM App built around a HR's unique workflow for processing Job Applications
from initial Application, through to Phone Screening and Interviews by multiple employees, capturing
relevant feedback at each application event, with successful Applicants awarded the Job
It's co-developed & deployed with a customized Locode App that manages all other CRUD Database Access
Explore Features
Blazor Dev Model Preview
In addition to enabling a Rapid Development Platform the resulting typed AutoQuery APIs also offer a superior end-to-end typed development model for all ServiceStack's 9 supported popular programming languages used in developing Web, Mobile & Desktop Apps.
The benefits are further exemplified in C# Client Apps like Blazor WASM as ServiceStack's API First Development Model and decoupled project structure is able to achieve complete reuse of your APIs DTOs on the client as-is, to enable its end-to-end Typed API free from any additional tooling or code-gen complexity.
Talent Blazor's ContactApplicationView.razor page contains a good preview of the typical effort required to call AutoQuery APIs using the generic service clients "Exception-less" Api and ApiAsync methods to perform AutoQuery search requests to check if a Job Offer exists for the current Job Application:
async Task RefreshJobOffer()
{
    var api = await ApiAsync(new QueryJobOffer {
        JobApplicationId = JobAppId
    });
    if (api.Succeeded)
    {
        var hasOffer = api.Response!.Results.Count > 0;
        jobOffer = hasOffer ? api.Response!.Results[0] : new();
    }
    else
    {
        errorStatus = api.Error;
    }
}
As well as invoking AutoQuery CRUD APIs to put forward a Job Offer to an Applicant:
async Task CreateJobOffer()
{
    offerResult = await ApiAsync(new CreateJobOffer {
        JobApplicationId = JobAppId,
        SalaryOffer = offerSalary,
        Notes = offerNotes,
        ApplicationStatus = JobApplicationStatus.Offer
    });
    if (offerResult.Succeeded)
    {
        ResetOffer();
        await RefreshData();
        showMakeOffer = false;
    }
    else
    {
        errorStatus = offerResult.Error;
    }
}
With both examples also including error handling logic with all ServiceStack APIs returning errors in a structured ResponseStatus DTO which can be generically handled.
Managed File Uploads
Talent Blazor also makes use of an exciting new feature in this release which dramatically reduces the effort to handle File Uploads which can be declaratively applied to APIs that also seamlessly integrates with Locode's built-in File Upload HTML Components.
The server functionality for this a high-level ServiceStack feature is encapsulated in the FileUploadFeature plugin which allows you to
configure multiple managed file upload locations that can be declaratively bound to different APIs to make use of.
Upload Locations can be configured to use any of the supported Writable Virtual File Systems including:
FileSystemVirtualFiles- Hard-disk or Network Files and Directories from a specified directoryS3VirtualFiles- Files stored on Amazon's S3 Managed File Storage in ServiceStack.AwsAzureBlobVirtualFiles- Files stored on Azure's Managed Blob Storage in ServiceStack.AzureGistVirtualFiles- Files persisted to a GitHub GistMemoryVirtualFiles- Temporary Virtual Files and Folders that last for the lifetime of the AppHost
TIP
Additional support for external file storages can be added by Implementing a new Virtual File System
Managed file uploads is a generic feature any ServiceStack HTTP API can use by declaratively annotating it on Request DTOs. It's especially useful in AutoQuery CRUD APIs as it enables an easy way to populate a file path that can be stored along with a table row without the uploaded files embedded in the database itself, taking up valuable RDBMS resources and significantly impacting its performance.
Basic File Upload Example
To demonstrate how to use the Managed File Uploads feature we'll look at handling the basic example of uploading files
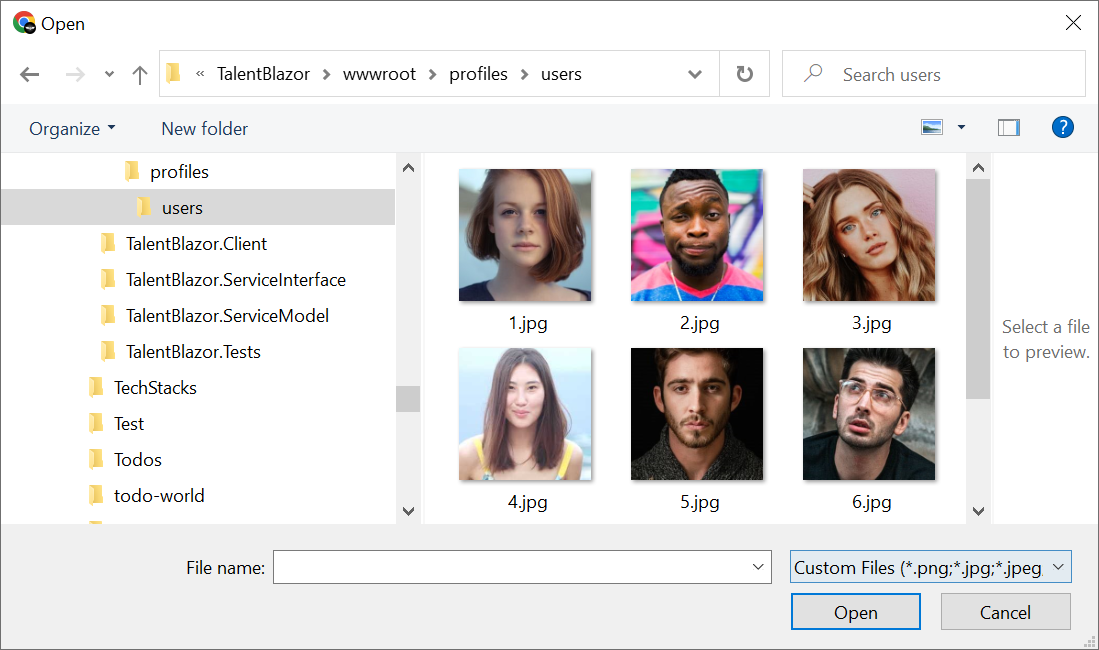
to publicly accessible /wwwroot folder location. The talent.locode.dev demo uses this to handle profile image uploads
for Contacts and Users in different locations in its
Configure.AppHost.cs:
var wwwrootVfs = GetVirtualFileSource<FileSystemVirtualFiles>();
Plugins.Add(new FilesUploadFeature(
    new UploadLocation("profiles", wwwrootVfs, allowExtensions:FileExt.WebImages,
        resolvePath: ctx => $"/profiles/{ctx.FileName}"),

    new UploadLocation("users", wwwrootVfs, allowExtensions:FileExt.WebImages,
        resolvePath: ctx => $"/profiles/users/{ctx.UserAuthId}.{ctx.FileExtension}")
    //...
);
As both locations are uploaded to the App's /wwwroot folder they'll be immediately accessible after they're uploaded.
Contact profile images are saved using their uploaded FileName whilst User profiles are saved in a predictable location
against their User Id and uploaded File Extension type.
The only default restriction placed on File Uploads is that they can only be performed by Authenticated Users.
Each UploadLocation is able to use the several configuration options available to further restrict file uploads
by file type, count, size, number of uploads or a custom validation function.
In this instance Talent Blazor restricts uploads in its allowExtensions to only images supported by Browsers - a server validation rule that
also gets propagated to the client, limiting the user to only be able to select from its server-configured file extensions:
To simplify common configuration, we've included a number of pre-configured file extensions for different file types:
public static class FileExt
{
    string[] WebImages = { "png", "jpg", "jpeg", "gif", "svg", "webp" };
    string[] BinaryImages = {"png", "jpg", "jpeg", "gif", "bmp", "tif", "tiff", "webp", "ai", "psd","ps"};
    string[] Images = WebImages.CombineDistinct(BinaryImages);
    string[] WebVideos = { "avi", "m4v", "mov", "mp4", "mpg", "mpeg", "wmv", "webm" };
    string[] WebAudios = { "mp3", "mpa", "ogg", "wav", "wma", "mid", "webm" };
    string[] BinaryDocuments = { "doc", "docx", "pdf", "rtf" };
    string[] TextDocuments = { "tex", "txt", "md", "rst" };
    string[] Spreadsheets = { "xls", "xlsm", "xlsx", "ods", "csv", "txv" };
    string[] Presentations = { "key", "odp", "pps", "ppt", "pptx" };
    string[] AllDocuments = BinaryDocuments.CombineDistinct(TextDocuments, Presentations, Spreadsheets);
    string[] WebFormats = WebImages.CombineDistinct(WebVideos, WebAudios);
}
Using File Upload Locations in APIs
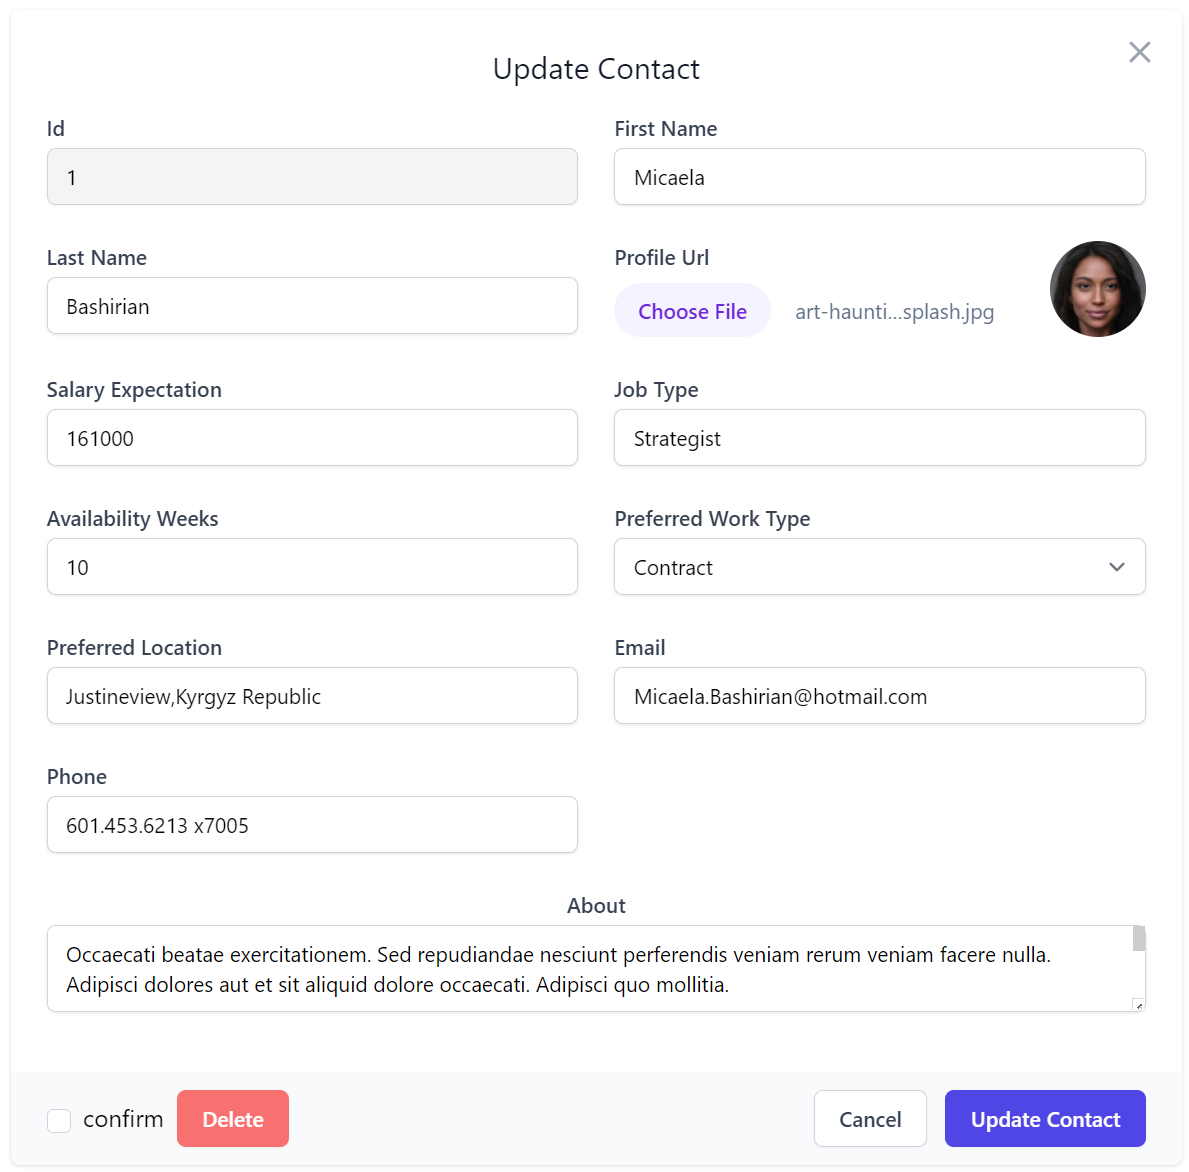
With just the above configuration we can now use them in our APIs, which Talent Blazor uses in its CreateContact
and UpdateContact CRUD APIs to handle uploading a contact profiles image
when they're Created and Updated with the [UploadTo] attribute:
public class CreateContact : ICreateDb<Contact>, IReturn<Contact>
{
    [ValidateNotEmpty]
    public string FirstName { get; set; } = string.Empty;
    [ValidateNotEmpty]
    public string LastName { get; set; } = string.Empty;

    [Input(Type = "file"), UploadTo("profiles")]
    public string? ProfileUrl { get; set; }

    public int? SalaryExpectation { get; set; }
    [ValidateNotEmpty]
    public string JobType { get; set; } = string.Empty;
    public int AvailabilityWeeks { get; set; }
    public EmploymentType PreferredWorkType { get; set; }
    [ValidateNotEmpty]
    public string PreferredLocation { get; set; } = string.Empty;
    [ValidateNotEmpty]
    public string Email { get; set; } = string.Empty;
    public string? Phone { get; set; }
}

public class UpdateContact : IPatchDb<Contact>, IReturn<Contact>
{
    public int Id { get; set; }
    [ValidateNotEmpty]
    public string? FirstName { get; set; }
    [ValidateNotEmpty]
    public string? LastName { get; set; }

    [Input(Type = "file"), UploadTo("profiles")]
    public string? ProfileUrl { get; set; }

    public int? SalaryExpectation { get; set; }
    [ValidateNotEmpty]
    public string? JobType { get; set; }
    public int? AvailabilityWeeks { get; set; }
    public EmploymentType? PreferredWorkType { get; set; }
    public string? PreferredLocation { get; set; }
    [ValidateNotEmpty]
    public string? Email { get; set; }
    public string? Phone { get; set; }
    [Input(Type = "textarea"), FieldCss(Field = "col-span-12 text-center")]
    public string? About { get; set; }
}
Only the [UploadTo(location)] attribute is required to instruct the API to use the specified Upload Location to
handle the File Upload.
For successful uploads the Uploaded HTTP File will be saved to the configured file path which it populates on the ProfileUrl property,
after which it's treated as a normal property, e.g. validated and saved along with the rest of the DTO properties in the Contact Table.
Auto Form UIs
In API Explorer & Locode Apps you'll want to pair this together with [Input(Type="file")] to instruct the Auto Form UI
to use its built-in File Upload Input control to handle updating this property, which looks like:
Managed Multi File Upload example
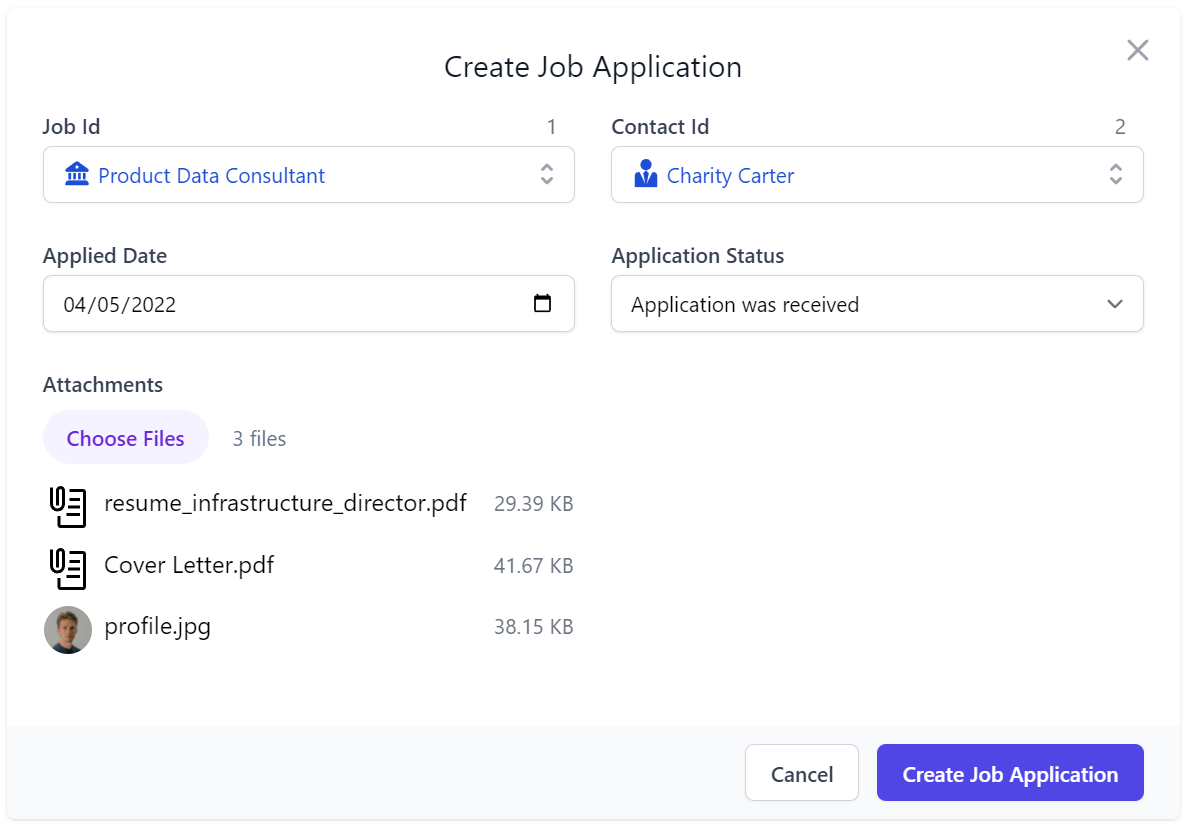
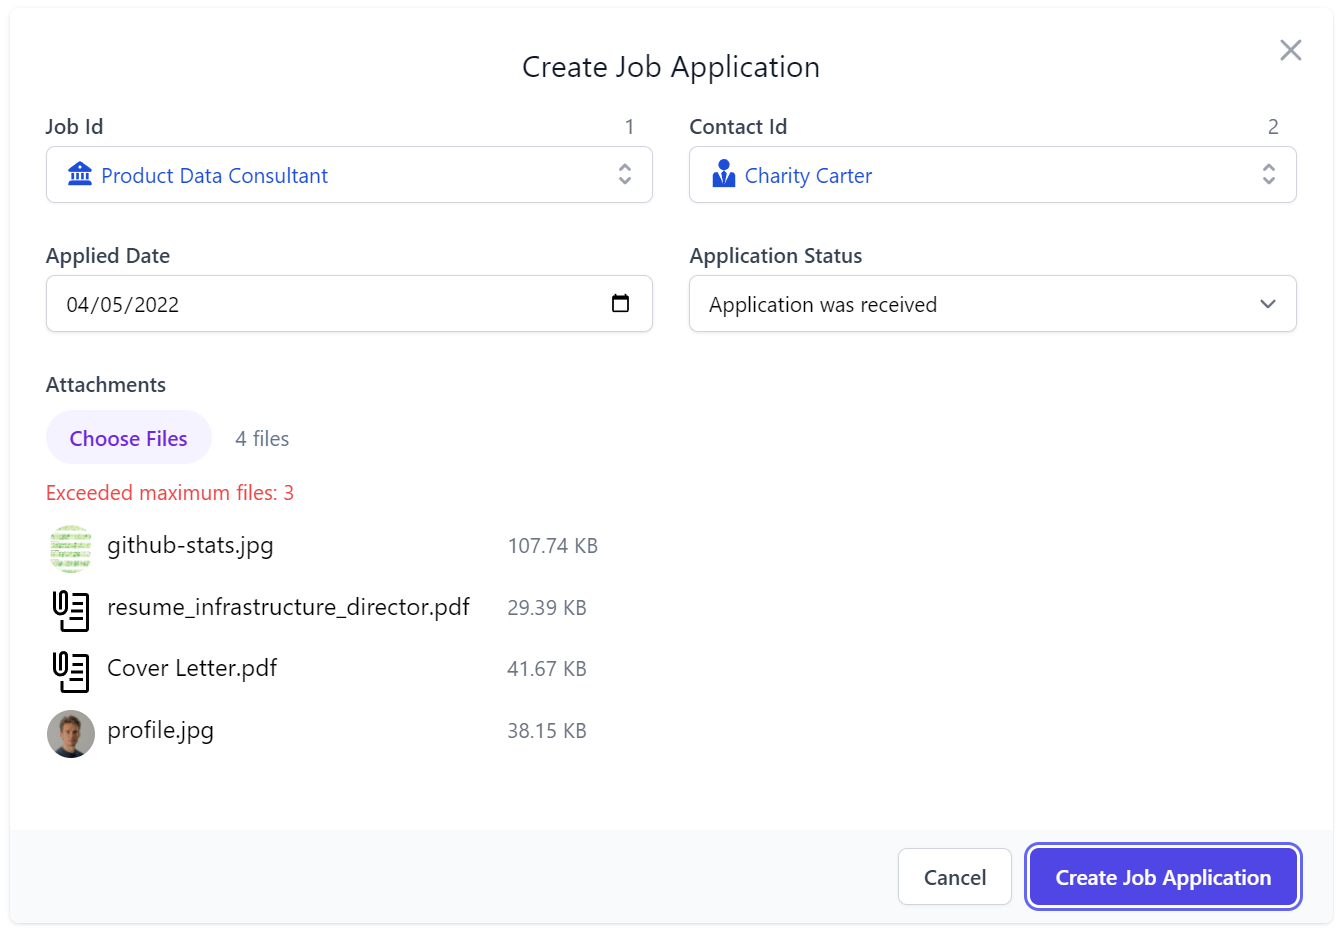
In addition to managing image profiles for its Users and Contacts, Talent Blazor also uses Managed File Uploads to handle accepting an Applicant's Job Application attachments. A more advanced configuration is needed for this use-case, that:
- Saves uploaded Applications to the non-servable ~/App_Data folder
- Limits Job Applications to a maximum of 3 attachments
- Limits Max Upload size to 10mb
- Allows non-authenticated Users to upload & download their attachments
var appDataVfs = new FileSystemVirtualFiles(ContentRootDirectory.RealPath.CombineWith("App_Data"));
Plugins.Add(new FilesUploadFeature(
    //...
    new UploadLocation("applications", appDataVfs, maxFileCount: 3, maxFileBytes: 10_000_000,
        resolvePath: ctx => ctx.GetLocationPath((ctx.Dto is CreateJobApplication create
            ? $"jobapp/{create.JobId}/{create.ContactId}/{ctx.FileName}"
            : $"app/{ctx.Dto.GetId()}") + $"/{ctx.DateSegment}/{ctx.FileName}"),
        readAccessRole: RoleNames.AllowAnon, writeAccessRole: RoleNames.AllowAnon)
));
In this case instead of resolving a relative path from /wwwroot it uses ctx.GetLocationPath() to resolve to a
managed file location whose access is managed by FilesUploadFeature File Management APIs:
| API | Route | Description |
|---|---|---|
StoreFileUpload |
POST /uploads/{Name} |
Upload files to the specified managed location |
GetFileUpload |
GET /uploads/{Name}/{Path} |
Download file from the specified managed location |
ReplaceFileUpload |
PUT /uploads/{Name}/{Path} |
Overwrite file at the specified managed location |
DeleteFileUpload |
DELETE /uploads/{Name}/{Path} |
Delete file at the specified managed location |
TIP
/uploads is the default overridable BasePath for FilesUploadFeature managed File APIs
We can now start accepting attachments with our Job Applications by adding [Input(Type="file"), UploadTo("applications")]
to the property where we want the Uploaded File metadata populated, when submitting and updating Job Applications:
public class CreateJobApplication : ICreateDb<JobApplication>, IReturn<JobApplication>
{
    [ValidateGreaterThan(0)]
    public int JobId { get; set; }
    [ValidateGreaterThan(0)]
    public int ContactId { get; set; }
    public DateTime AppliedDate { get; set; }
    public JobApplicationStatus ApplicationStatus { get; set; }
    [Input(Type="file"), UploadTo("applications")]
    public List<JobApplicationAttachment> Attachments { get; set; }
}

public class UpdateJobApplication : IPatchDb<JobApplication>, IReturn<JobApplication>
{
    public int Id { get; set; }
    public int? JobId { get; set; }
    public int? ContactId { get; set; }
    public DateTime? AppliedDate { get; set; }
    public JobApplicationStatus ApplicationStatus { get; set; }
    [Input(Type="file"), UploadTo("applications")]
    public List<JobApplicationAttachment>? Attachments { get; set; }
}
This is all that's needed to configure our CRUD Services to handle multiple file uploads in Locode & API Explorer:
Where the File Input behaves as just another Input control with contextual validation errors displayed when it exceeds any of the configured file restrictions on its Upload Location, e.g:
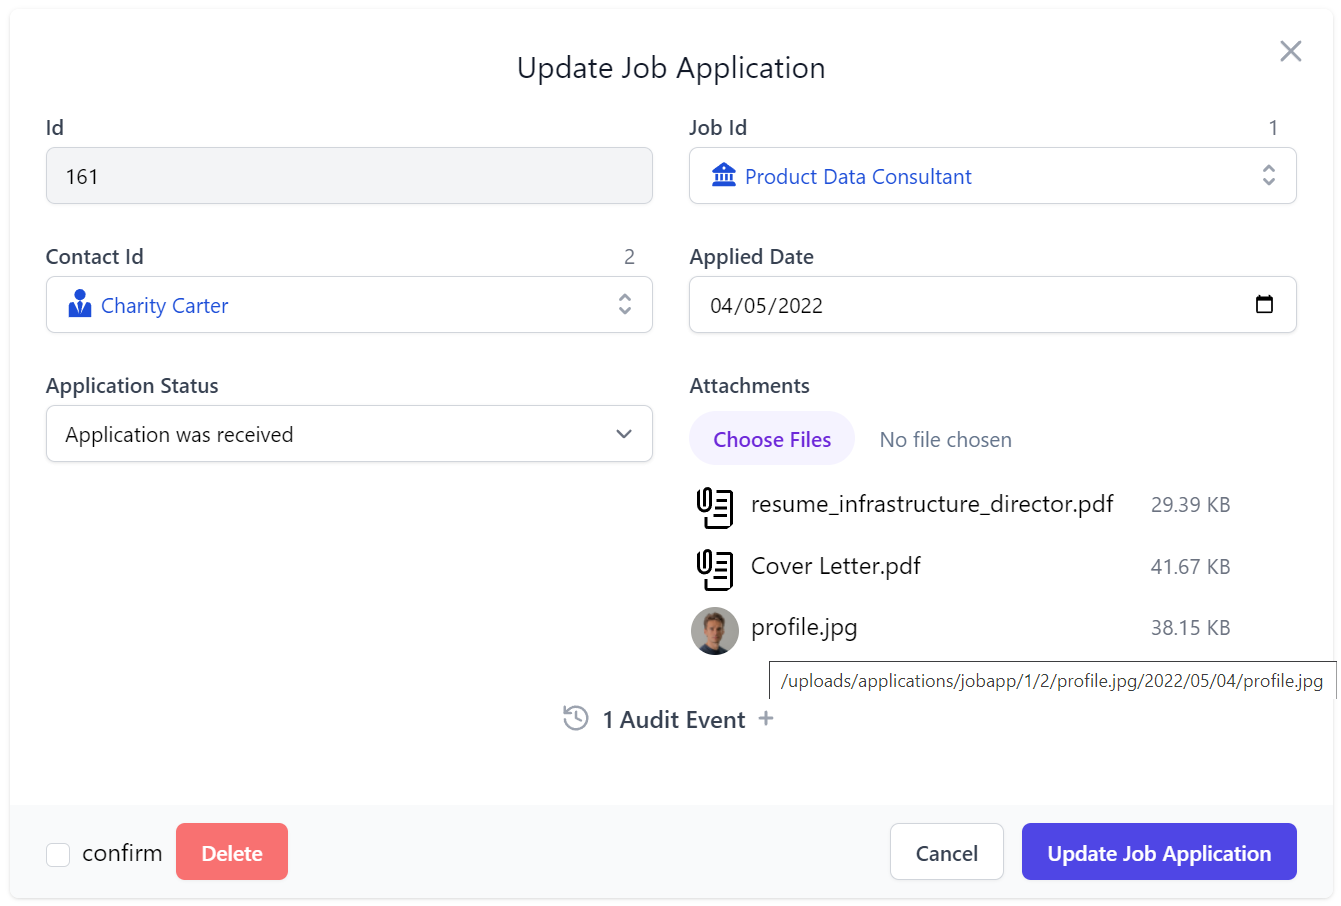
After a successful submission the attachments are uploaded to the configured managed location path which is then used to access the file in the Update Job Application Form UI:
Integrates with AutoQuery CRUD
This is another example of how well this generic feature works with the rest of ServiceStack, where without any
implementation logic the AutoQuery CRUD API is able to populate a 1 to Many table relationship to capture the metadata
of each uploaded file because the Attachments Request DTO property maps to a [Reference]
POCO Reference property which automatically populates
Foreign Key Reference properties in CRUD APIs.
public class JobApplication : AuditBase
{
    [Reference]
    public List<JobApplicationAttachment> Attachments { get; set; }
    //...
}

public class JobApplicationAttachment
{
    [AutoIncrement]
    public int Id { get; set; }

    [References(typeof(JobApplication))]
    public int JobApplicationId { get; set; }

    public string FileName { get; set; }
    [Format(FormatMethods.Attachment)]
    public string FilePath { get; set; }
    public string ContentType { get; set; }
    [Format(FormatMethods.Bytes)]
    public long ContentLength { get; set; }
}
Uploaded File Metadata populated in Complex Type properties
This also shows that [UploadTo] can either be applied to a string property where it's just populated with the
path the file is uploaded to, or it could contain a complex type where any matching properties are populated with
metadata of the uploaded file:
| Property | Description |
|---|---|
| FilePath | The UploadLocation path where the file is uploaded to |
| Name | The form field name from the Content-Disposition header |
| FileName | The file name of the uploaded file |
| ContentLength | The size in bytes of the uploaded file |
| ContentType | The Content-Type of the uploaded file |
In addition, it also supports List<string> or List<T> complex types for handling multiple file uploads, as done in this case.
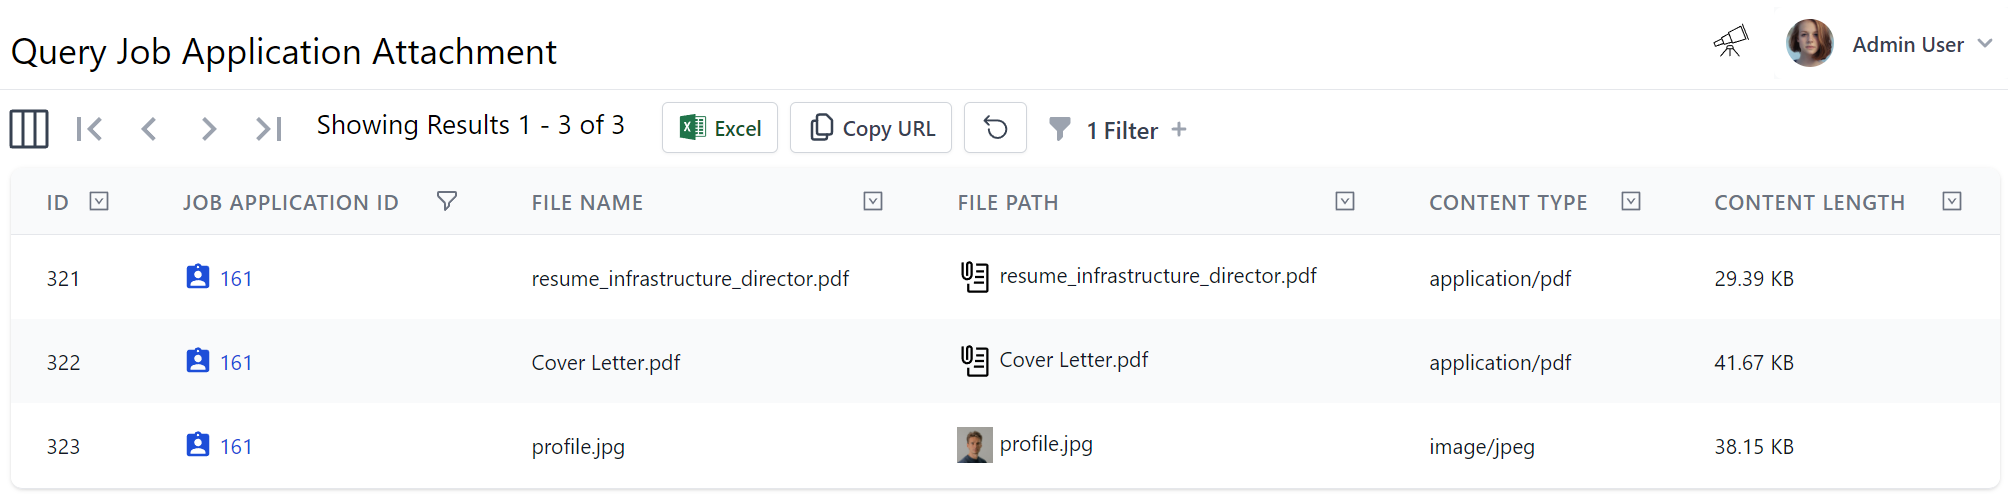
All these features work together to achieve our desired result of populating submitted applications in the
JobApplicationAttachment joined table, so their metadata can be browsed, queried and navigated like any other
related data without file system access and without their contents consuming RDBMS resources:
Uploading Files from C#
We can see how Locode gives us instant utility and lets us start submitting file attachments with any AutoQuery CRUD DTO, but as the feature just uses the standard HTTP multipart/form-data Content-Type, we can use the existing Service Client APIs for uploading files as demonstrated in Talent Blazor's FileUploadTests.cs which uploads a single attachment when creating a Contact with a Profile Image and multiple file attachments when submitting a Job Application:
var profileImg = await ProfileImageUrl.GetStreamFromUrlAsync();
var contact = await client.PostFileWithRequestAsync<Contact>(profileImg, "cody-fisher.png",
    new CreateContact
    {
        FirstName = "Cody",
        LastName = "Fisher",
        Email = "cody.fisher@gmail.com",
        JobType = "Security",
        PreferredLocation = "Remote",
        PreferredWorkType = EmploymentType.FullTime,
        AvailabilityWeeks = 1,
        SalaryExpectation = 100_000,
        About = "Lead Security Associate",
    }, fieldName:nameof(CreateContact.ProfileUrl));

// contact.ProfileUrl = /profiles/cody-fisher.png

var uploadedImage = await client.BaseUri.CombineWith(contact.ProfileUrl).GetStreamFromUrlAsync();
var coverLetter = new FileInfo($"{AppData}/sample_coverletter.pdf");
var resume = new FileInfo($"{AppData}/sample_resume.pdf");

var attachmentsField = nameof(CreateJobApplication.Attachments);
var uploadAttachments = new UploadFile[] {
    new(coverLetter.Name, coverLetter.OpenRead(), attachmentsField),
    new(resume.Name, coverLetter.OpenRead(), attachmentsField),
    new(contact.ProfileUrl.LastRightPart('/'), uploadedImage, attachmentsField),
};

var jobApp = await client.PostFilesWithRequestAsync<JobApplication>(new CreateJobApplication {
        JobId = 1,
        AppliedDate = DateTime.UtcNow,
        ContactId = contact.Id,
    }, uploadAttachments);

uploadAttachments.Each(x => x.Stream.Dispose());
This example also shows APIs are able to submit files from any Stream that can be sourced from anywhere,
including the HTTP Response stream of a Remote URI or files from a local hard drive.
Using HttpClient MultipartFormDataContent
The introduction of .NET 6+ JsonApiClient lets us provide an even more flexible approach by utilizing
MultipartFormDataContent() which we've enhanced with high-level extension methods to enable a Fluent API for constructing
custom API Requests populated from multiple sources, which can be sent using its ApiForm* methods:
var profileImg = await ProfileImageUrl.GetStreamFromUrlAsync();
using var createContact = new MultipartFormDataContent()
    .AddParams(new CreateContact
    {
        FirstName = "Cody",
        LastName = "Fisher",
        Email = "cody.fisher@gmail.com",
        JobType = "Security",
        PreferredLocation = "Remote",
        PreferredWorkType = EmploymentType.FullTime,
        AvailabilityWeeks = 1,
        SalaryExpectation = 100_000,
        About = "Lead Security Associate",
    })
    .AddFile(nameof(CreateContact.ProfileUrl), "cody-fisher.png", profileImg);

var contactApi = await client.ApiFormAsync<Contact>(typeof(CreateContact).ToApiUrl(), createContact);
// contactApi.Succeeded = true
var contact = contactApi.Response!;
// contact.ProfileUrl   = /profiles/cody-fisher.png

using var uploadedImage = await client.BaseUri.CombineWith(contact.ProfileUrl).GetStreamFromUrlAsync();
var coverLetter = new FileInfo($"{AppData}/sample_coverletter.pdf");
var resume = new FileInfo($"{AppData}/sample_resume.pdf");

var attachmentsField = nameof(CreateJobApplication.Attachments);
var createJobApp = new MultipartFormDataContent()
    .AddParams(new CreateJobApplication {
        JobId = 1,
        AppliedDate = DateTime.UtcNow,
        ContactId = contact.Id,
    })
    .AddFile(attachmentsField, coverLetter)
    .AddFile(attachmentsField, resume)
    .AddFile(attachmentsField, contact.ProfileUrl.LastRightPart('/'), uploadedImage);

var jobAppApi = await client.ApiFormAsync<JobApplication>(
    typeof(CreateJobApplication).ToApiUrl(), createJobApp);
// jobAppApi.Succeeded = true
var jobApp = jobAppApi.Response!;
TIP
All JsonApiClient Async APIs also have
safe sync equivalents when access outside an async method is needed
Versatile Multi Part Content Type APIs
AutoQueryCrudTests.References.cs
also showcases how we can take advantage of MultipartFormDataContent to construct custom requests using a combination
of different Content Type sources, including single and multiple file attachments within a single request:
public class MultipartRequest : IPost, IReturn<MultipartRequest>
{
    public int Id { get; set; }
    public string String { get; set; }

    // Complex types sent as JSV by default
    public Contact Contact { get; set; }

    [MultiPartField(MimeTypes.Json)]
    public PhoneScreen PhoneScreen { get; set; }

    [MultiPartField(MimeTypes.Csv)]
    public List<Contact> Contacts { get; set; }

    [UploadTo("profiles")]
    public string ProfileUrl { get; set; }

    [UploadTo("applications")]
    public List<UploadedFile> UploadedFiles { get; set; }
}
Complex types are sent using JSV by default which is a more human & wrist-friendly and more efficient format than JSON, however we could also take advantage of the flexibility in HTTP multipart/form-data requests to construct an HTTP API Request utilizing multiple Content-Type's optimized for the data we're sending, e.g:
- JSON/JSV more optimal for hierarchical graph data
- CSV more optimal for sending tabular data
- File Uploads are more optimal for sending large files
To facilitate this in our Server APIs we can use [MultiPartField] attribute to instruct ServiceStack which registered
serializer it should use to deserialize the form-data payload, whilst we can continue using the generic [UploadTo]
attribute in normal APIs to handle our File Uploads and populate the Request DTO with the uploaded file metadata.
Our MultipartFormDataContent extension methods simplifies our client logic by allowing us to easily populate this
custom request in a single Fluent construction expression:
using var content = new MultipartFormDataContent()
    .AddParam(nameof(MultipartRequest.Id), 1)
    .AddParam(nameof(MultipartRequest.String), "foo")
    .AddParam(nameof(MultipartRequest.Contact),
        new Contact { Id = 1, FirstName = "First", LastName = "Last" })
    .AddJsonParam(nameof(MultipartRequest.PhoneScreen),
        new PhoneScreen { Id = 3, JobApplicationId = 1, Notes = "The Notes"})
    .AddCsvParam(nameof(MultipartRequest.Contacts), new[] {
        new Contact { Id = 2, FirstName = "First2", LastName = "Last2" },
        new Contact { Id = 3, FirstName = "First3", LastName = "Last3" },
    })
    .AddFile(nameof(MultipartRequest.ProfileUrl), "profile.txt", file1Stream)
    .AddFile(nameof(MultipartRequest.UploadedFiles), "uploadedFiles1.txt", file2Stream)
    .AddFile(nameof(MultipartRequest.UploadedFiles), "uploadedFiles2.txt", file3Stream));

var api = await client.ApiFormAsync<MultipartRequest>(typeof(MultipartRequest).ToApiUrl(), content);
if (!api.Succeeded) api.Error.PrintDump();
Uploading Files from JS/TypeScript
Similarly, we can populate custom requests by either programmatically constructing the FormData object, which also benefits from native integration in browsers where it can be populated directly from an HTML Form:
let client = new JsonServiceClient(BaseUrl)
let formData = new FormData(document.forms[0])
let api = await client.apiForm(new MultipartRequest(), formData)
Where apiForm can be used to submit FormData requests for normal API Requests, or apiFormVoid for IReturnVoid API requests.
Substitutable Virtual File Providers
We've also created the File Blazor Demo to further demonstrate the versatility of the
FilesUploadFeature to seamlessly manage uploading files to multiple different locations using different
Virtual Files providers that's still able to utilize the same custom configuration and validation in its
Configure.AppHost.cs:
var appFs = new FileSystemVirtualFiles(ContentRootDirectory.RealPath.CombineWith("App_Data").AssertDir());
var s3Client = new AmazonS3Client(awsAccessKeyId, awsSecretAccessKey, RegionEndpoint.USEast1);
var s3DataVfs = new S3VirtualFiles(s3Client, "file-blazor-demo");
var azureBlobVfs = new AzureBlobVirtualFiles(azureBlobConnString, "file-blazor-demo");

Plugins.Add(new FilesUploadFeature(
    new UploadLocation("azure", azureBlobVfs,
        readAccessRole: RoleNames.AllowAnon, resolvePath: ResolveUploadPath,
        validateUpload: ValidateUpload, validateDownload: ValidateDownload),
    new UploadLocation("s3", s3DataVfs,
        readAccessRole: RoleNames.AllowAnon, resolvePath: ResolveUploadPath,
        validateUpload: ValidateUpload, validateDownload: ValidateDownload),
    new UploadLocation("fs", appFs,
        readAccessRole: RoleNames.AllowAnon, resolvePath: ResolveUploadPath,
        validateUpload: ValidateUpload, validateDownload: ValidateDownload)
));

static string ResolveUploadPath(FilesUploadContext ctx) =>
    ctx.Dto is IAppFile { FileAccessType: { } } createFile
        ? createFile.FileAccessType != FileAccessType.Private
            ? ctx.GetLocationPath($"/{createFile.FileAccessType}/{ctx.FileName}")
            : ctx.GetLocationPath($"/{createFile.FileAccessType}/{ctx.UserAuthId}/{ctx.FileName}")
        : throw HttpError.BadRequest("Invalid file creation request.");

static void ValidateUpload(IRequest request, IHttpFile file)
{
    if (request.Dto is IAppFile createFile)
    {
        var accessType = createFile.FileAccessType;
        var ext = file.FileName.LastRightPart('.');
        if (accessType == FileAccessType.Gallery && ext != null && FileExt.Images.Contains(ext) == false)
            throw new ArgumentException("Supported file extensions: {0}".LocalizeFmt(request,
                string.Join(", ", FileExt.Images.Map(x => '.' + x).OrderBy(x => x))), file.FileName);
    }
    else
        throw new HttpError("Invalid request.");
}
//...
Memory Virtual File Sources
ServiceStack AppHost's are configured with an empty Memory VFS which can be used to transiently prepopulate App files from external sources on Startup or maintain temporary working files with the same lifetime of the App without needing to persist to disk.
They're also a great solution for Integration Testing managed file access without creating any persistent artifacts as done in AutoQueryCrudTests.References.cs
var memFs = GetVirtualFileSource<MemoryVirtualFiles>();
Plugins.Add(new FilesUploadFeature(
    new UploadLocation("profiles", memFs),
    new UploadLocation("applications", memFs, maxFileCount: 3, maxFileBytes: 10_000_000,
        resolvePath: ctx => ctx.GetLocationPath((ctx.Dto is CreateJobApplication create
            ? $"job/{create.JobId}"
            : $"app/{ctx.Dto.GetId()}") + $"/{ctx.DateSegment}/{ctx.FileName}"),
        readAccessRole:RoleNames.AllowAnon, writeAccessRole:RoleNames.AllowAnon)
));
Configuring Database-First Apps
As Database-First Types are only generated & exist at runtime they can't be explicitly annotated
with [UploadTo] attributes, instead they can be added dynamically at runtime by using AutoQuery's TypeFilter which
is invoked for all Types including Request and Response DTO types.
An example of this can be found in the
Northwind Locode Database-First demo which uses type.Name == "Employee" to match on the Employee Data Model and
IsCrudCreateOrUpdate("Employee") Metadata Type extension method to target its CreateEmployee and UpdateEmployee CRUD APIs:
TypeFilter = (type, req) =>
{
    if (type.Name == "Employee")
    {
        // Remove embedded Blob column from Data Model Type
        type.Properties.RemoveAll(x => x.Name == "Photo");
    }
    if (type.IsCrudCreateOrUpdate("Employee"))
    {
        // Add `[Input]` and `[UploadTo]` attributes to `PhotoPath` managed file upload property
        type.Property("PhotoPath")
            .AddAttribute(new InputAttribute { Type = Input.Types.File })
            .AddAttribute(new UploadToAttribute("employees"));
    }
    //...
}
The result of this is converting the Northwind Database from using the Photo blob column to persist image bit maps
and instead uses the PhotoPath column to maintain an external file reference to their Profile Photo which is
managed by the FilesUploadFeature to persist images to its configured FileSystemVirtualFiles virtual file source.
HTTP Range Streaming support for large S3 downloads
A new WritePartialToAsync API was added to IVirtualFile
public interface IVirtualFile : IVirtualNode
{
    //...
    Task WritePartialToAsync(Stream toStream, long start, long end, CancellationToken token=default);
}
To support HTTP Range Streaming for Large S3 Files, which required
a custom implementation in order to construct chunked S3 ByteRange requests.
AutoQuery CRUD POCO References
Previously AutoQuery APIs only supported POCO References for Querying, providing an efficient way to return related data in a single AutoQuery Response.
This release sees POCO reference support expanded to also support Create & Update CRUD APIs which can map complex type properties:
// AutQuery CRUD API
public class CreateJobApplication : ICreateDb<JobApplication>, IReturn<JobApplication>
{
    //...
    public List<JobApplicationAttachment> Attachments { get; set; }
}
To POCO Reference properties on the JobApplication target model:
// Data Model
public class JobApplication : AuditBase
{
    [Reference]
    public List<JobApplicationAttachment> Attachments { get; set; }
    //...
}

// 1:M Related Data Model
public class JobApplicationAttachment
{
    [AutoIncrement]
    public int Id { get; set; }               // PK populated by RDBMS

    [References(typeof(JobApplication))]
    public int JobApplicationId { get; set; } // FK populated by OrmLite

    public string FileName { get; set; }
    public string FilePath { get; set; }
    public string ContentType { get; set; }
    public long ContentLength { get; set; }
}
Which now has the same behavior as OrmLite's Save() API in saving an entity and all its references:
db.Save(jobApp, references:true);
Which works as we expect in saving the parent entity and populating any Foreign Key properties in its related 1:1 or 1:M related Tables:
Audit History Tracking
A benefit to AutoQuery's structured declarative approach to its CRUD APIs is that it's better able to enable high-level generic functionality that can benefit all CRUD APIs. AutoQuery CRUD's Executable Audit Log is an example of this which makes use of AutoQuery CRUD Attributes to capture every CRUD operation responsible for any modifications to its underlying RDBMS tables.
We'll explore an overview of this feature by applying it to our simple Bookings table from the
AutoQuery CRUD Bookings Demo included in all
jamstacks.net project templates there by adding the ability to track all CRUD API operations
and with it all modifications made to our Booking RDBMS table.
Enabling Crud Events
First thing we need to do is register the ICrudEvents dependency in our App's IOC, in this case uses OrmLiteCrudEvents
to store all Audit Information in the CrudEvent table of our configured database:
public class ConfigureAutoQuery : IHostingStartup
{
    public void Configure(IWebHostBuilder builder) => builder
        .ConfigureServices(services => {
            // Enable Audit History
            services.AddSingleton<ICrudEvents>(c =>
                new OrmLiteCrudEvents(c.Resolve<IDbConnectionFactory>()));
        })
        .ConfigureAppHost(appHost => {
            appHost.Plugins.Add(new AutoQueryFeature {
                MaxLimit = 1000,
                //IncludeTotal = true,
            });

            // Create CrudEvent if it doesn't exist
            appHost.Resolve<ICrudEvents>().InitSchema();
        });
}
As ICrudEvents stores all events in a separate table, we also need to use InitSchema above to create the CrudEvent
table if it doesn't already exist.
Enabling Audit History Tracking on Data Models and APIs
With ICrudEvents registered, we can now choose which Data Models we want to enable Audit Tracking on by having them
inherit from the built-in AuditBase class:
public class Booking : AuditBase
{
    [AutoIncrement]
    public int Id { get; set; }
    public string Name { get; set; }
    public RoomType RoomType { get; set; }
    public int RoomNumber { get; set; }
    public DateTime BookingStartDate { get; set; }
    public DateTime? BookingEndDate { get; set; }
    public decimal Cost { get; set; }
    public string Notes { get; set; }
    public bool? Cancelled { get; set; }
}
This will extend our RDBMS tables with additional Audit Info to capture who and when bookings were Created, Last Modified and Deleted (when using Soft Deletes):
public abstract class AuditBase
{
    public DateTime CreatedDate { get; set; }
    public string CreatedBy { get; set; }
    public DateTime ModifiedDate { get; set; }
    public string ModifiedBy { get; set; }
    public DateTime? DeletedDate { get; set; }
    public string DeletedBy { get; set; }
}
Even without needing to inspect the audit history table, capturing this info on its own provides valuable insight into the provenance of each booking.
Configuring CRUD APIs
The appropriate [AutoApply] behavior then needs to be added on all the CRUD APIs for the data models we want Audit History
tracking enabled on, e.g:
[AutoApply(Behavior.AuditQuery)]
public class QueryBookings : QueryDb<Booking>
{
    //...
}

[AutoApply(Behavior.AuditCreate)]
public class CreateBooking
    : ICreateDb<Booking>, IReturn<IdResponse>
{
    //...
}

[AutoApply(Behavior.AuditModify)]
public class UpdateBooking
    : IPatchDb<Booking>, IReturn<IdResponse>
{
    //...
}

[AutoApply(Behavior.AuditSoftDelete)]
public class DeleteBooking : IDeleteDb<Booking>, IReturnVoid
{
    //...
}
TIP
Use Behavior.AuditDelete instead if you prefer your delete operations resulted in permanent hard deletes
Audit Info in Locode
The AutoQueryFeature.AccessRole determines the accessibility of the CRUD Event APIs that Locode uses to display the
Audit History logs for each entity, which by default is restricted to Admin users who can view the
Audit History of each record at the bottom of its Edit Form.
With our Bookings CRUD APIs now configured with Audit behavior we can see an example of what this looks like in Locode after the Employee User account records a Booking from John Smith for a Single room:

With the left section displaying audit information about the CRUD operation and the User making it including their
UserName, Id and IP. The right section contains the info sent in the Request DTO, in this case the CreateBooking API.
If John Smith later contacts the manager to upgrade his booking to a Suite, the Audit information will be updated
with the UpdateBooking Audit entry which as it is a IPatchDb<Table> operation, only contains information that's changed:

This is typically why the behavior of IPatchDb<Table> is preferable over IUpdateDb<Table> APIs when Audit Tracking
is enabled as otherwise each Update operation would instead contain the entire entry on each update.
For more info, see the Locode Auditing and AutoQuery CRUD Executable Audit Log docs.
ServiceStack.Redis
Support for ACL Usernames
Support for authenticating with ACL Usernames was added to ServiceStack.Redis, configurable via the connection string:
using var redisManager1 = new RedisManagerPool(
    "localhost:6379?username=" + username.UrlEncode() + "&password=" + password.UrlEncode());
Using the Username property on RedisClient:
using var redisManager = new RedisManagerPool("localhost:6379");
using var client = redisManager.GetClient();
client2.Username = username;
client2.Password = password;
Using a custom AUTH command:
using var redisManager = new RedisManagerPool("localhost:6379");
using var client = redisManager.GetClient();
client.Custom("AUTH", username, password);
New RedisClient APIs
UTF-8 string APIs for GETRANGE and SETRANGE have now been added to IRedisClient:
public interface IRedisClient
{
    string Slice(string key, int fromIndex, int toIndex);
    long InsertAt(string key, int offset, string value);
    //...
}
and Async versions to:
public interface IRedisClientAsync
{
    ValueTask<string> SliceAsync(string key, int fromIndex, int toIndex, CancellationToken token = default);
    ValueTask<long> InsertAtAsync(string key, int offset, string value, CancellationToken token = default);
    //...
}
Breaking Changes
Customizing Inputs and Fields in Code
Previously to define custom form layouts for the User Form in Admin UI, e.g:
Plugins.Add(new ServiceStack.Admin.AdminUsersFeature {
    UserFormLayout = new() {
        new()
        {
            Input.For<AppUser>(x => x.Email),
        },
        new()
        {
            Input.For<AppUser>(x => x.DisplayName),
        },
        new()
        {
            Input.For<AppUser>(x => x.Company),
            Input.For<AppUser>(x => x.Department),
        },
        new() {
            Input.For<AppUser>(x => x.PhoneNumber, c => c.Type = Input.Types.Tel)
        },
        new() {
            Input.For<AppUser>(x => x.Nickname, c => {
                c.Help = "Public alias (3-12 lower alpha numeric chars)";
                c.Pattern = "^[a-z][a-z0-9_.-]{3,12}$";
                //c.Required = true;
            })
        },
        new() {
            Input.For<AppUser>(x => x.ProfileUrl, c => c.Type = Input.Types.Url)
        },
        new() {
            Input.For<AppUser>(x => x.IsArchived), Input.For<AppUser>(x => x.ArchivedDate),
        },
    }
});
Or API Forms in API Explorer's Auto Form UI would require defining its grid layout using a List of Lists, e.g:
appHost.ConfigureOperation<Register>(op => op.FormLayout = new()
{
    new(){ Input.For<Register>(x => x.DisplayName,     x => x.Help = "Your first and last name") },
    new(){ Input.For<Register>(x => x.Email,           x => x.Type = Input.Types.Email) },
    new(){ Input.For<Register>(x => x.Password,        x => x.Type = Input.Types.Password) },
    new(){ Input.For<Register>(x => x.ConfirmPassword, x => x.Type = Input.Types.Password) },
});
But as this was insufficient for being able to define responsive grid layouts at different breakpoints, the FormLayout was flattened into a single list of inputs, e.g:
appHost.ConfigureOperation<Register>(op => op.FormLayout = new()
{
    Input.For<Register>(x => x.DisplayName,     x => x.Help = "Your first and last name"),
    Input.For<Register>(x => x.Email,           x => x.Type = Input.Types.Email),
    Input.For<Register>(x => x.Password,        x => x.Type = Input.Types.Password),
    Input.For<Register>(x => x.ConfirmPassword, x => x.Type = Input.Types.Password),
});
Although despite being a flattened list we're still able to customize the form layout by using the Typed FieldsPerRow() helper method:
Plugins.Add(new AdminUsersFeature {
    // Add Custom Fields to Create/Edit User Forms
    FormLayout = new() {
        Input.For<AppUser>(x => x.Email, x => x.Type = Input.Types.Email),
        Input.For<AppUser>(x => x.DisplayName),
        Input.For<AppUser>(x => x.UserName),
        Input.For<AppUser>(x => x.Company,      c => c.FieldsPerRow(2)),
        Input.For<AppUser>(x => x.Department,   c => c.FieldsPerRow(2)),
        Input.For<AppUser>(x => x.PhoneNumber,  c => c.Type = Input.Types.Tel),
        Input.For<AppUser>(x => x.Nickname,     c => {
            c.Help = "Public alias (3-12 lower alpha numeric chars)";
            c.Pattern = "^[a-z][a-z0-9_.-]{3,12}$";
        }),
        Input.For<AppUser>(x => x.ProfileUrl,   c => c.Type = Input.Types.Url),
        Input.For<AppUser>(x => x.IsArchived,   c => c.FieldsPerRow(2)),
        Input.For<AppUser>(x => x.ArchivedDate, c => c.FieldsPerRow(2)),
    }
});
Which is able to specify the grid layout it should use from different responsive breakpoints:
public static InputInfo FieldsPerRow(this InputInfo input,
    int sm, int? md = null, int? lg = null, int? xl = null, int? xl2 = null)
This just simplifies choosing the responsive TailwindCss grid classes
we want, in this case renders 2 fields per row from the sm responsive Tailwind breakpoint
by expanding to:
Input.For<UserAuth>(x => x.FirstName, c => c.Input.Css.Field = "col-span-12 sm:col-span-6")
Which continues to render our preferred form layout:
Input.FromGridLayout
Developers who prefer the former visual grid layout can use the Input.FromGridLayout() helper to convert to the new flattened layout.
This lets us maintain backwards compatibility with the former nested list layout when configuring AdminUsersFeature
public List<List<InputInfo>> UserFormLayout
{
    set => FormLayout = Input.FromGridLayout(value);
}
But developers who've specified custom API Forms will need to transition to the new flattened layout or use Input.FromGridLayout()
appHost.ConfigureOperation<Register>(op => op.FormLayout = Input.FromGridLayout(...));
@servicestack/client upgraded to ES2015
The target for @servicestack/client has been upgraded to ES2015 which results in cleaner & leaner code generation with fewer polyfills to workaround missing JavaScript features.
This does mean that it no longer supports Internet Explorer 11 which was released in 2013. The last version supporting ES5 and Internet Explorer is 1.1.21:
"dependencies": {
    "@servicestack/client": "~1.1.21"
},