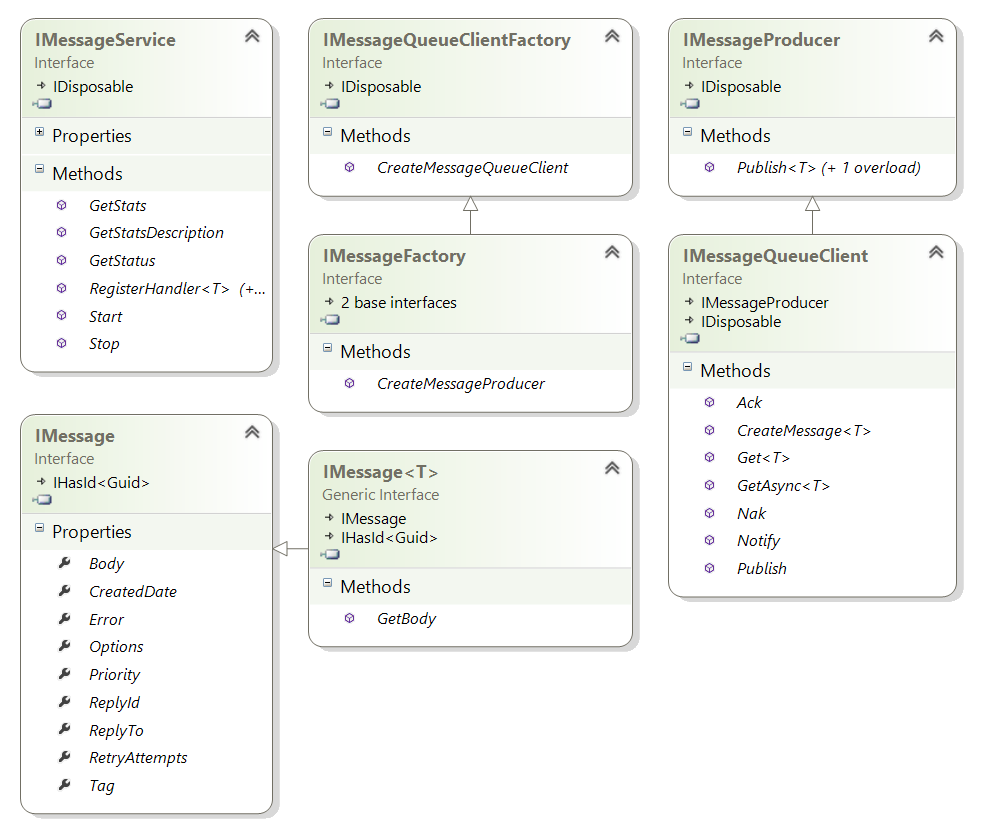
ServiceStack provides a high-level Messaging API exposing a number of essential messaging features in order to publish and receive messages as well as registering and processing handlers for different message types. A class diagram of the core interfaces is below:
There are currently 5 supported MQ Server options:
Like other ServiceStack providers, all MQ Servers are interchangeable, visible in the shared MQ Server tests below:
Mix in MQ Server
In ASP.NET Core Apps we recommend using mix to configure your preferred MQ Service, other than being quicker to add,
it proposes adopting a naming convention in app settings and file names that other mix features can also make use of:
x mix [mq]
Currently available list of MQ Services:
Results matching tag [mq]:

   1. backgroundmq  Use Memory Background MQ                    to: $HOST  by @ServiceStack  [mq]
   2. rabbitmq      Use RabbitMQ                                to: $HOST  by @ServiceStack  [mq]
   3. sqs           Use AWS SQS MQ                              to: $HOST  by @ServiceStack  [mq]
   4. servicebus    Use Azure Service Bus MQ                    to: $HOST  by @ServiceStack  [mq]
   5. redismq       Use Redis MQ                                to: $HOST  by @ServiceStack  [mq]
   6. feature-mq    Simple MQ Feature to test sending Messages  to: $HOST  by @ServiceStack  [feature,mq,sharp]
Worker Service Templates
If you'd instead prefer to develop stand-alone MQ Servers (i.e. without HTTP access) then it can be beneficial to run the MQ Server in an ASP.NET Core Worker Service by starting from a pre-configured project template:
| .NET Core C# Worker Service Templates | |
|---|---|
| worker-rabbitmq | .NET 6.0 Rabbit MQ Worker Service |
| worker-redismq | .NET 6.0 Redis MQ Worker Service |
| worker-servicebus | .NET 6.0 Azure Service Bus MQ Worker Service |
| worker-sqs | .NET 6.0 AWS SQS MQ Worker Service |
MQ Stats on Admin UI Dashboard
The health and activity of your MQ Services can be monitored from the Admin UI Dashboard which maintains aggregate stats for how many messages have been received, processed or failed as well as detailed stats on each MQ Worker:

Benefits of Message Queues
One of the benefits of using ServiceStack is its integrated support for hosting MQ Servers allowing your Services to be invoked via a MQ Broker. There are a number of reasons why you'd want to use a MQ as an alternative to HTTP including:
- Sender is decoupled from Receiver, eliminating point-to-point coupling and configuration
- Allows no-touch deploy of new clients and servers without updating any configuration
- Removes time-coupling allowing clients and servers to be deployed independently without downtime
- Better reliability, consumers can still send messages when servers are down and vice-versa
- Durable, messages can be persisted and survive application or server reboots
- Allows for CPU Intensive or long operations without disrupting message workflow
- Instant response times by queuing slow operations and executing them in the background
- Allows for natural load-balancing where throughput can be increased by simply adding more processors or servers
- Message-based design allows for easier parallelization and introspection of computations
- Greater throttling and control of message throughput, message execution can be determined by server
- Reduces request contention and can defer execution of high load spikes over time
- Better recovery, messages generating server exceptions can be retried and maintained in a dead-letter-queue
- DLQ messages can be introspected, fixed and later replayed after server updates and rejoin normal message workflow
More details of these and other advantages can be found in the definitive Enterprise Integration Patterns.
Likewise the HTTP Service Clients implement the Messaging API IMessageProducer:
void Publish<T>(T requestDto);
void Publish<T>(IMessage<T> message);
When publishing a IMessage<T> the message metadata are sent as HTTP Headers with an X- prefix.
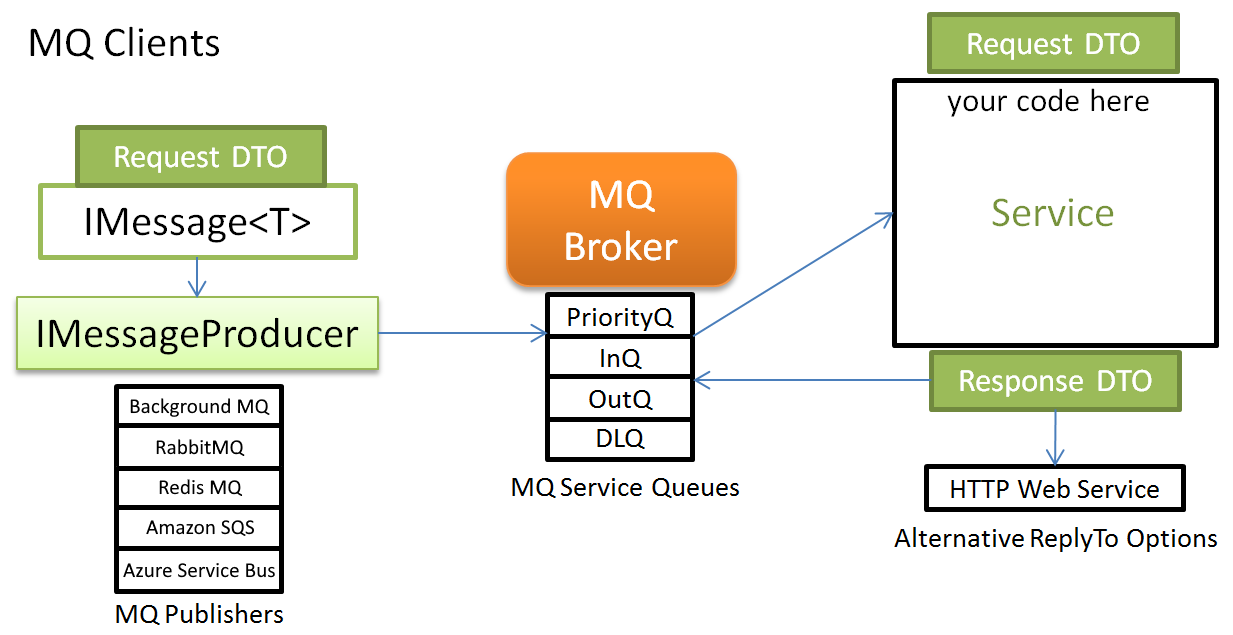
MQ Client Architecture
By promoting clean (endpoint-ignorant and dependency-free) Service and DTO classes, your web services are instantly re-usable from non-http contexts like MQ Services.
Within MQ Services, Request DTO's get wrapped and sent within the IMessage body, which looks like:
MQ Server Architecture
The Server Architecture shows where MQ Hosts (in green) fits within the context of ServiceStack's Request Pipeline. Effectively MQ Services are treated as "internal Services" bypassing HTTP Web Services Content Negotiation and Global Request/Response Filters:
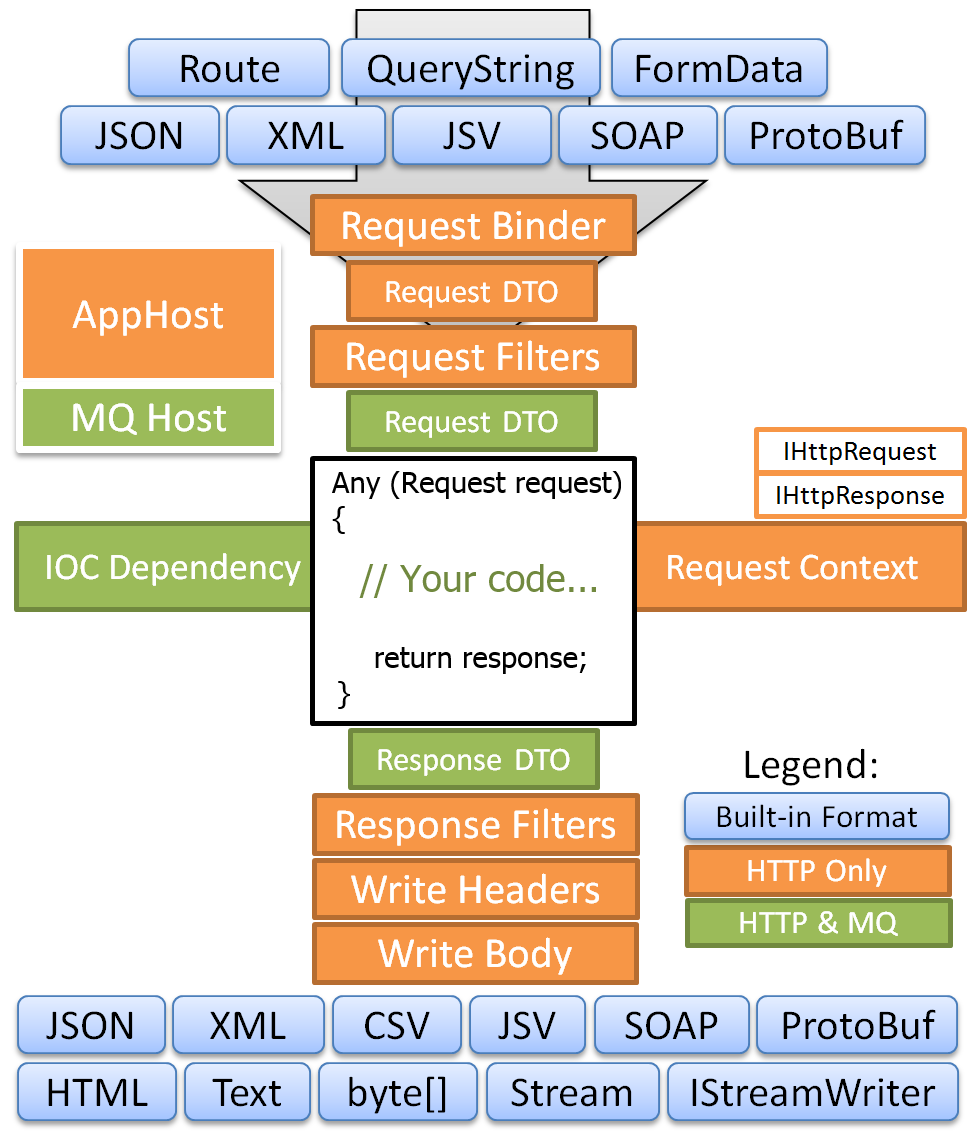
MQ Services also have their own distinct GlobalMessageRequestFilters and GlobalMessageResponseFilters for registering custom logic that only applies to MQ Requests. Plugins like Validation Feature can execute custom behavior for both HTTP and MQ Services by registering it in both HTTP GlobalRequestFilters and MQ GlobalMessageRequestFilters, e.g:
appHost.GlobalRequestFilters.Add(ValidationFilters.RequestFilter);
appHost.GlobalMessageRequestFilters.Add(ValidationFilters.RequestFilter);
Message Workflow
By default, MQ Servers will send a response message after it's processed each message, what the response is and which Queue (or HTTP url) the response is published to is dependent on the outcome of the message handler, i.e:
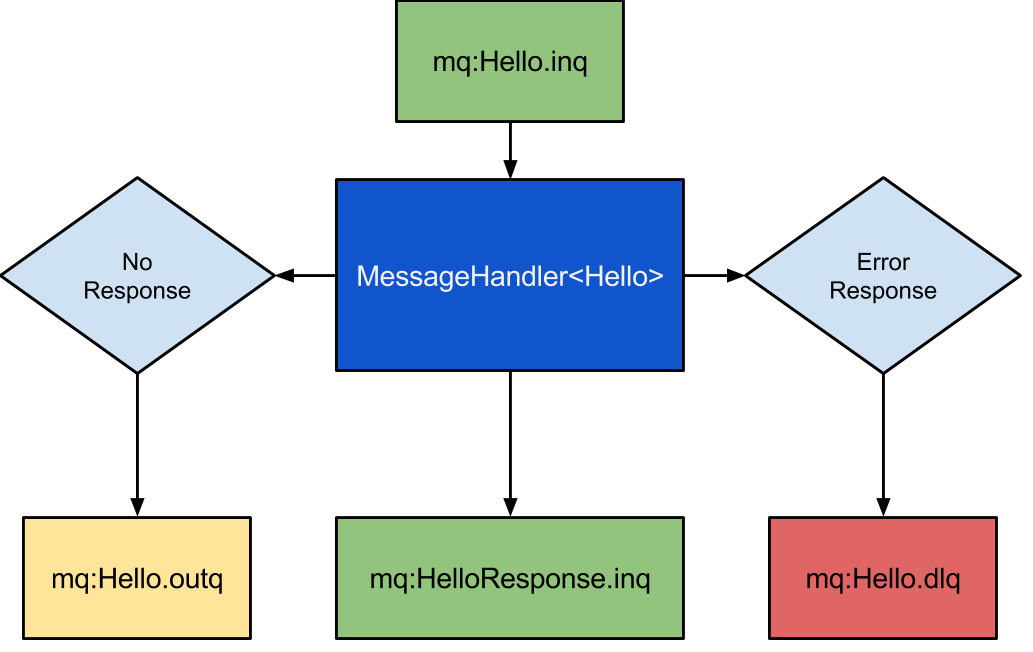
Messages with no responses are sent to '.outq' Topic
When a handler returns a null response, the incoming message is re-published as a
"transient" message to the out queue, e.g: mq:Hello.outq having the effect of notifying
any subscribers to mq:Hello.outq each time a message is processed.
We can use this behavior to block until a message gets processed with:
IMessage<Hello> msgCopy = mqClient.Get<Hello>(QueueNames<Hello>.Out);
mqClient.Ack(msgCopy);
msgCopy.GetBody().Name //= World
Also shown in this example is an explicit Ack (which should be done for each message you receive) to tell the MQ Broker that you've taken responsibility of the message so it can safely remove it off the queue.
Messages with Responses are published to the Response .inq
Often message handlers will just return a POCO response after it processes a message, e.g:
mqServer.RegisterHandler<Hello>(m =>
    new HelloResponse { Result = $"Hello, {m.GetBody().Name}!" });
Whenever there's a response, then instead of the .outq the response message is sent to
the .inq of the response message type, which for a HelloResponse type is just
mq:HelloResponse.inq, e.g:
mqClient.Publish(new Hello { Name = "World" });

var responseMsg = mqClient.Get<HelloResponse>(QueueNames<HelloResponse>.In);
mqClient.Ack(responseMsg);
responseMsg.GetBody().Result //= Hello, World!
INFO
this behavior can be limited to only publish responses for types in the
mqServer.PublishResponsesWhitelist, otherwise all response messages can be disabled
entirely by setting mqServer.DisablePublishingResponses = true.
Responses from Messages with ReplyTo are published to that address
Whilst for the most part you'll only need to publish POCO messages, you can also alter the
default behavior by providing a customized IMessage<T> wrapper which ServiceStack will
send instead, e.g. you can specify your own ReplyTo address to change the queue where
the response gets published, e.g:
const string replyToMq = mqClient.GetTempQueueName();
mqClient.Publish(new Message<Hello>(new Hello { Name = "World" }) {
    ReplyTo = replyToMq
});

IMessage<HelloResponse> responseMsg = mqClient.Get<HelloResponse>(replyToMq);
mqClient.Ack(responseMsg);
responseMsg.GetBody().Result //= Hello, World!
ReplyTo addresses can be URLs
A nice feature unique in ServiceStack is that the ReplyTo address can even be a HTTP Uri, in which case ServiceStack will attempt to POST the raw response at that address. This works nicely with ServiceStack Services which excel at accepting serialized DTO's.
mqClient.Publish(new Message<Hello>(new Hello { Name = "World" }) {
    ReplyTo = "http://example.org/hello/callback"
});
Messages with exceptions are re-tried then published to the dead-letter-queue (.dlq)
By default Mq Servers lets you specify whether or not you want messages that cause an exception to be retried by specifying a RetryCount of 1 (default), or if you don't want any messages re-tried, specify a value of 0, e.g:
var mqServer = new RabbitMqServer { RetryCount = 1 };
To illustrate how this works we'll keep a counter of how many times a message handler is invoked, then throw an exception to force an error condition, e.g:
var called = 0;
mqServer.RegisterHandler<Hello>(m => {
    called++;
    throw new ArgumentException("Name");
});
Now when we publish a message the response instead gets published to the messages .dlq,
after it's first transparently retried. We can verify this behavior by checking called=2:
mqClient.Publish(new Hello { Name = "World" });

IMessage<Hello> dlqMsg = mqClient.Get<Hello>(QueueNames<Hello>.Dlq);
mqClient.Ack(dlqMsg);

Assert.That(called, Is.EqualTo(2));
DLQ Messages retains the original message in their body as well as the last exception
serialized in the IMessage.Error ResponseStatus metadata property, e.g:
dlqMsg.GetBody().Name   //= World
dlqMsg.Error.ErrorCode  //= typeof(ArgumentException).Name
dlqMsg.Error.Message    //= Name
Since the body of the original message is left in-tact, you're able to retry failed messages by removing them from the dead-letter-queue then re-publishing the original message, e.g:
IMessage<Hello> dlqMsg = mqClient.Get<Hello>(QueueNames<Hello>.Dlq);

mqClient.Publish(dlqMsg.GetBody());

mqClient.Ack(dlqMsg);
This is useful for recovering failed messages after identifying and fixing bugs that were previously causing exceptions, where you can replay and re-process DLQ messages and continue processing them as normal.
Priority Queues
MQ Servers spawns 2 threads for each handler, one to listen to the Message Inbox mq:<Message>.inq and another to listen on the Priority Queue located at mq:<Message>.priorityq.
You can white-list which messages to enable Priority Queue's for with mqServer.PriorityQueuesWhitelist or disable them all by setting:
mqServer.DisablePriorityQueues = true;
OneWay HTTP Requests are published to MQ then executed
Using the SendOneWay() Service Client APIs will publish DTO's to the /oneway Pre-defined Route:
var client = new JsonServiceClient(BaseUrl);
client.SendOneWay(new RequestDto { ... }); //POST's to /json/oneway/RequestDto
Where if there is an MQ Server is registered in the AppHost it will instead publish the Request DTO to the registered MQ Server who then pulls it from the MQ Broker and executes the message in a background thread like a normal MQ Message. If no MQ Server is registered then the Request is executed in the HTTP Handler like a normal HTTP Request.
OneWay MQ and HTTP Service Clients are Substitutable
Service Clients and MQ Clients are also interoperable where all MQ Clients implement the Service Clients IOneWayClient API which enables writing code that works with both HTTP and MQ Clients:
IOneWayClient client = GetClient();
client.SendOneWay(new RequestDto { ... });
Disable 'outq' notification messages
All MQ Servers support the ability to specify a whitelist of Requests you only want to publish .outq for:
PublishToOutqWhitelist = new[]{ nameof(MyRequest) }
Alternatively all .outq messages can be disabled with:
DisablePublishingToOutq = true
Flexible Queue Name strategies
There are more flexible options for specifying the Queue Names where you can categorize queue names or avoid conflicts with other MQ services by specifying a global prefix to be used for all Queue Names, e.g:
QueueNames.SetQueuePrefix("site1.");

QueueNames<Hello>.In //= site1.mq:Hello.inq
Or to gain complete control of each queue name used, provide a custom QueueName strategy, e.g:
QueueNames.ResolveQueueNameFn = (typeName, suffix) =>
    $"SITE.{typeName.ToLower()}{suffix.ToUpper()}";

QueueNames<Hello>.In  //= SITE.hello.INQ
Note: Custom QueueNames need to be declared on both MQ Client in addition to ServiceStack Hosts.
Authenticated Requests via MQ
As MQ Requests aren't executed within the Context of a HTTP Request they don't have access to any HTTP Info like HTTP Cookies, Headers, FormData, etc. This also means the Users Session isn't typically available as it's based on the ss-id Session Ids in Cookies.
Embedding Auth Info in MQ Request DTO
The easiest way to publish Authenticated MQ Requests is using the same approach as Encrypted Messaging by embedding the Auth Info in the Request DTO by implementing IHasSessionId if using
session-based Authentication or IHasBearerToken if using token-based Auth, e.g:
public class AuthSessionMq : IHasSessionId
{
    public string SessionId { get; set; }
    //...
}

public class AuthTokenMq : IHasBearerToken
{
    public string BearerToken { get; set; }
    //...
}

public class MqServices : Service
{
    public void Any(PublishSessionMq request)
    {
        var mqRequest = request.ConvertTo<AuthSessionMq>();
        mqRequest.SessionId = Request.GetSessionId();
        PublishMessage(mqRequest);
    }

    public void Any(PublishTokenMq request)
    {
        var mqRequest = request.ConvertTo<AuthTokenMq>();
        mqRequest.BearerToken = Request.GetJwtToken();
        PublishMessage(mqRequest);
    }
}
Overriding MQ Request Headers
Alternatively as ServiceStack also lets you specify a Users Session ids using HTTP Headers (with X- prefix), we can instead specify Session Ids using
Request Headers. To do this we can create a custom Request Context that the MQ Service is executed within and set the SessionId in the Headers:
var req = new BasicRequest { Verb = HttpMethods.Post };
req.Headers["X-ss-id"] = sessionId;
Alternatively we can inject the Session itself. As a Users Session is just a AuthUserSession POCO persisted against the SessionId, we can access the
Users Session from the CacheClient directly ourselves, e.g:
//i.e. urn:iauthsession:{sessionId}
var sessionKey = SessionFeature.GetSessionKey(sessionId);
var usersSession  = HostContext.TryResolve<ICacheClient>()
    .Get<IAuthUserSession>(sessionKey);
And inject to use this Session with:
req.Items[Keywords.Session] = usersSession;
We can then Execute the MQ Service with this custom Request Context with:
return this.ExecuteMessage(m, req);
See the Session docs for more info about Sessions in ServiceStack
We'll walk-through a minimal example using this approach to make authenticated Requests and access the Users Session in a Service that's accessible via both HTTP and MQ transports.
To start we'll configure an Authentication-enabled ServiceStack MQ and HTTP Self-Hosted Application:
public class AppHost : AppSelfHostBase
{
    public override void Configure(Container container)
    {
        //Enable Authentication
        Plugins.Add(new AuthFeature(() => new AuthUserSession(),
            new IAuthProvider[] {
                // Enable Username/Password Authentication
                new CredentialsAuthProvider(AppSettings),
            }));

        //Use an InMemory Repository to persist User Authenticaiton Info
        container.Register<IUserAuthRepository>(c => new InMemoryAuthRepository());

        //Create a new User on Startup
        var authRepo = container.Resolve<IUserAuthRepository>();
        authRepo.CreateUserAuth(new UserAuth {
            Id = 1,
            UserName = "mythz",
            FirstName = "John",
            LastName = "Doe",
            DisplayName = "John Doe",
        }, "p@55word");

        //Register to use a Rabbit MQ Server
        container.Register<IMessageService>(c => new RabbitMqServer());

        var mqServer = container.Resolve<IMessageService>();

        mqServer.RegisterHandler<AuthOnly>(m => {
            var req = new BasicRequest { Verb = HttpMethods.Post };
            req.Headers["X-ss-id"] = m.GetBody().SessionId;
            var response = ExecuteMessage(m, req);
            return response;
        });

        //Start the Rabbit MQ Server listening for incoming MQ Requests
        AfterInitCallbacks.Add(appHost => mqServer.Start());
    }
}
and now add the Service Implementation:
public class AuthOnly : IReturn<AuthOnlyResponse>
{
    public string Name { get; set; }
    public string SessionId { get; set; }
}

public class AuthOnlyResponse
{
    public string Result { get; set; }
}

public class AuthOnlyService : Service
{
    [Authenticate] //Only allow Authenticated Requests
    public object Any(AuthOnly request)
    {
        // Get the User Session for this Request
        var session = base.SessionAs<AuthUserSession>();

        return new AuthOnlyResponse {
            Result = $"Hello, {request.Name}! Your UserName is {session.UserAuthName}";
        };
    }
}
With the ServiceStack Host and Service implemented, we can start listening to both HTTP and Rabbit MQ Requests by starting the AppHost:
new AppHost().Start("http://localhost:1337/");
Then on the Client we can authenticate using UserName/Password credentials using the HTTP Service Client, e.g:
var client = new JsonServiceClient("http://localhost:1337/");

var response = client.Post(new Authenticate {
    UserName = "mythz",
    Password = "p@55word",
    RememberMe = true,
});

var sessionId = response.SessionId;
The above Request establishes an authenticated Session with the JsonServiceClient instance which has its Cookies populated with the Users SessionIds - allowing it to make subsequent authenticated requests as that User.
To make Authenticated Requests via MQ we can pass the returned sessionId into the MQ Request:
var mqFactory = RabbitMqMessageFactory();
using (var mqClient = mqFactory.CreateMessageQueueClient())
{
    mqClient.Publish(new AuthOnly {
        Name = "RabbitMQ Request",
        SessionId = sessionId,
    });

    //Block until the Response is Received:
    var responseMsg = mqClient.Get<AuthOnlyResponse>(QueueNames<AuthOnlyResponse>.In);
    mqClient.Ack(responseMsg); //Acknowledge the message was received

    //"Hello, RabbitMQ Request! Your UserName is mythz"
    Console.WriteLine(responseMsg.GetBody().Result);
}
This works since we're extracting the SessionId and injecting into a Custom Request Context used by the MQ Service:
mqServer.RegisterHandler<AuthOnly>(m => {
    var req = new BasicRequest { Verb = HttpMethods.Post };
    req.Headers["X-ss-id"] = m.GetBody().SessionId;
    var response = ExecuteMessage(m, req);
    return response;
});
Global Filters vs Action Filters
One important difference worth re-iterating is that Filter Attribute declared on the Service class are top-level filters executed during Global Request filters which are only executed for HTTP Requests:
[Authenticate] //Top-level Filter Attribute - only executed for HTTP Requests
public class MqAuthOnlyService : Service
{
    public object Any(AuthOnly request)
    {
        var session = base.SessionAs<AuthUserSession>();
        return new AuthOnlyResponse {
            Result = $"Hello, {request.Name}! Your UserName is {session.UserAuthName}";
        };
    }
}
This will allow you to separate behavior for external HTTP Requests from internal MQ Requests.
To validate both HTTP and MQ Requests, place the [Authenticate] attribute on the method itself, e.g:
public class AuthOnlyService : Service
{
    [Authenticate] //Authenticate both HTTP and MQ Requests
    public object Any(AuthOnly request)
    {
        var session = base.SessionAs<AuthUserSession>();
        return new AuthOnlyResponse {
            Result = $"Hello, {request.Name}! Your UserName is {session.UserAuthName}";
        };
    }
}
feature-mq
The feature-mq adds MQ support to your App, complete with UI and includes 2 different ways of calling MQ Services in ServiceStack, just like
example-validation UI, feature-mq is another complete working example with both UI and Service implementation in the following files:
- Configure.Mq.cs?
- Feature.Mq.cs
- ServiceInterface\MqServices.cs
- ServiceModel\Mq.cs
- wwwroot\messaging.html
As Configure.Mq.cs? is optional it will only add it if doesn't already exist, so it will either use your existing MQ configuration
or configure your App to use the In Memory BackgroundMqService implementation.
Add feature-mq to your project with:
x mix feature-mq
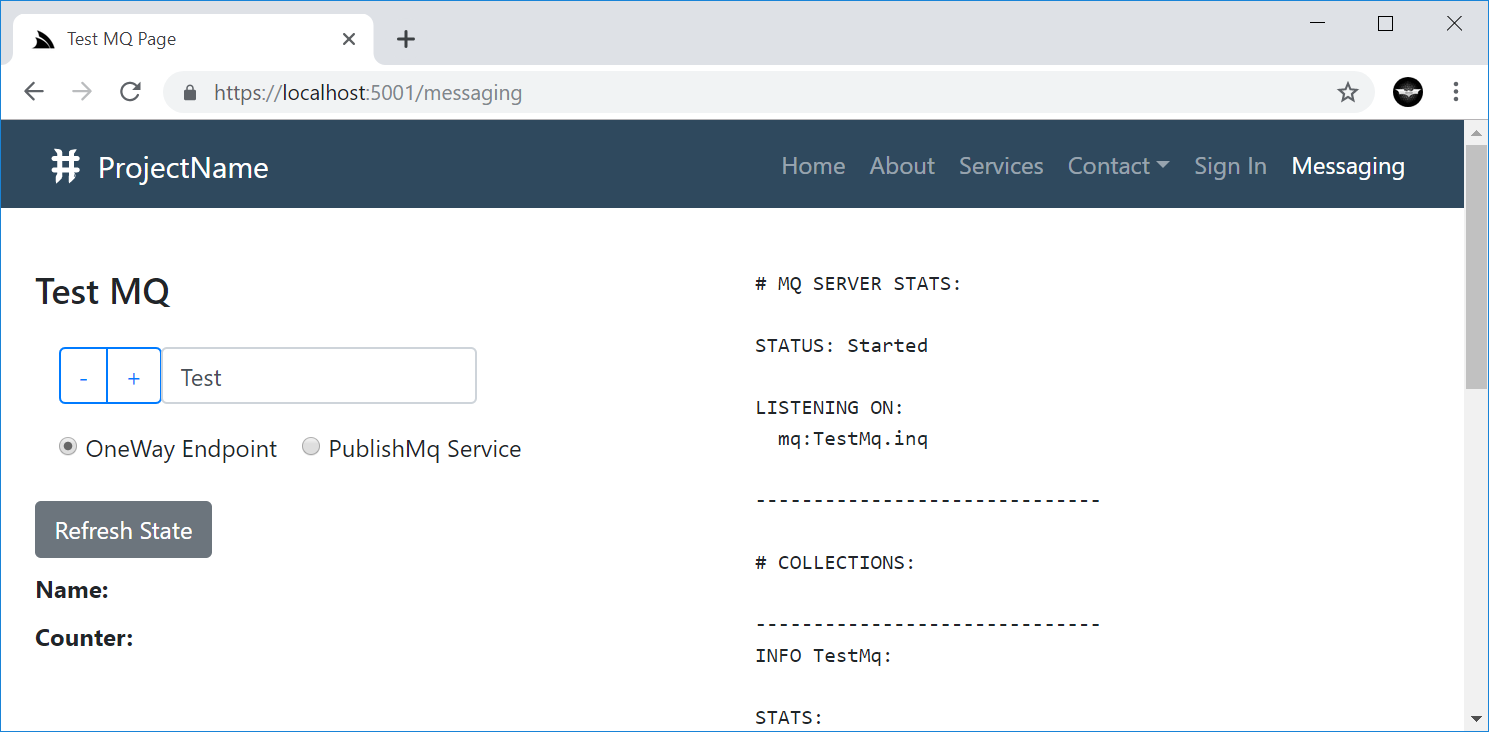
This will add the TestMq Service and make it available to your MQ endpoint. TestMq is a regular service that updates values in the
App's registered ICacheClient and returns the Cache's current values as well as the internal Stats of the MQ:
public class MqServices : Service
{
    public IMessageService MqService { get; set; }

    public void Any(PublishMq request)
    {
        PublishMessage(request.ConvertTo<TestMq>());
    }

    public object Any(TestMq request)
    {
        if (!string.IsNullOrEmpty(request.Name))
            Cache.Set("mq.name", request.Name);

        if (request.Add > 0)
            Cache.Increment("mq.counter", (uint)request.Add);
        else if (request.Add < 0)
            Cache.Decrement("mq.counter", (uint)(request.Add * -1));

        return new TestMqResponse {
            Name = Cache.Get<string>("mq.name"),
            Counter = Cache.Get<long>("mq.counter"),
            StatsDescription = MqService.GetStatsDescription(),
        };
    }
}
The 2 ways to call a MQ Service is directly using the publish or sendOneWay APIs (available in all ServiceStack Service Clients) where
it send the request to the Service's /oneway endpoint which will automatically publish it to the registered MQ.
Alternatively you can publish the Request DTO yourself from a different Service Implementation as done in PublishMq, as-is typical for
Services that queues sending emails without blocking Service Execution.
The feature's UI allows you to publish TestMq messages using either approach:
client = new JsonServiceClient('/');

var oneway = document.querySelector('input[name=mq-publish]:checked').value === "OneWay";
if (oneway) {
    client.publish(new TestMq({ name: $txtName.value, add: parseInt(add) }))
} else {
    client.post(new PublishMq({ name: $txtName.value, add: parseInt(add) }))
}
Both approaches end with the same result with the TestMq Request DTO published and executed by the registered MQ Service as shown in the
UI which is periodically updated with the current state in the Cache and the internal stats of the MQ Service showing how many messages it processed.